

Page 1
TUMBLE DRYER
SECHE -LINGE
WÄSCHETROCKNER
ASCIUGABIANCHERIA
INSTRUCTION BOOKLET
MODE DEMPLOI
GEBRAUCHSANWEISUNG
LIBRETTO ISTRUZIONI
EDE 5361
F
GB
D
I
125981281
Page 2
2
Dear customer,
Please read these operating instructions carefully and pay particular attention to the safety notes indicated in
the first pages.
We recommend that you keep this instruction booklet for future reference and pass it on to any future owners.
Transport damages
After unpacking the machine please check it is not damaged. If in doubt, do not start it but contact your local
Service Centre.
The symbols you will see on some paragraphs of this booklet have the following meaning:
The warning triangle emphasize information that is particularly important for your safety or correct
functioning of the appliance.
The information marked with this symbol provides additional instructions and practical tips on the use of
the appliance.
Tips and information about economical and ecological use of the machine are marked with this symbol.
Our contribution to the protection of the
environment: we use recycled paper.
Page 3

ENGLISH
Contents
Important safety information ............4
Disposal............................................................5
Tips for environmental protection 5
Description of the appliance..............6
Installation ......................................................7
Unpacking ............................................................7
Positioning ............................................................7
Fitting the vent hose ..........................................7-8
Electrical connection ............................................8
Stacking kit............................................................8
Door reversal ........................................................8
Use........................................................................9
The control panel ..................................................9
Programme chart ................................................10
Operating sequence............................................11
Useful hints ........................................................12
Maintenance and Cleaning................13
External cleaning ................................................13
Cleaning the door................................................13
Cleaning the filters ..............................................13
Something not working?....................14
Technical specifications
DIMENSIONS: Height 85 cm
Width 60 cm
Depth 58 cm
ELECTRICAL CONNECTION: 220-230 V/50 Hz
MAX. POWER ABSORBED: 2200 W
MIN. FUSE RATING: 10 A
MAX. DRYING CAPACITY: Cotton, linen 5 kg
Synthetics 2.5 kg
CONSUMPTION: Cotton, linen 2,7 kWh (5.5 kg store dry)
Cotton, linen 2.24 kWh (5.5 kg iron dry)
This appliance complies with the following E.E.C. Directives:
- 73/23 EEC of 19.2.73 (Low Voltage Directive) and subsequent modifications;
- 89/336 EEC of 3.5.89 (Electromagnetic Compatibility Directive) and subsequent modifications.
3
Page 4

4
Important safety information
Installation
• Any electrical work required to install this appliance
should be carried out by a qualified electrician or
competent person.
• Care must be taken to ensure that the appliance
does not stand on the electrical supply cable.
• If the machine is situated on a carpeted floor,
please adjust the feet in order to allow air to
circulate freely.
• This tumble dryer is designed to be vented through
to the open air. It should have its own ventilation
system which should not be joined with any other
ventilation system connected to any other
appliance.
Use
• This appliance is designed for domestic use only. If
the machine is used for any other purposes or is
not used correctly, the manufacturer accepts no
responsibility for any damage that might occur.
• Always unplug the appliance after use.
• Clothes which are dripping wet should not be
placed in the dryer.
• Danger of explosion: Never tumble dry items that
have been in contact with inflammable solvents
(petrol, methylated spirits, dry cleaning fluid and
the like). As these substances are volatile, they
could cause an explosion. Tumble dry only items
washed with water.
• Risk of fire: items that have been spotted or
soaked with vegetable or cooking oil constitute a
fire hazard and should not be placed in the tumble
dryer.
• If you have washed your laundry with stain
remover you must execute an extra rinse cycle
before loading your tumble dryer.
• Please make sure that no gas lighters have
accidentally been left in pockets of garments to be
loaded into appliance.
• Do not dry canvas shoes or sports shoes, as they
could get stuck between the door and the drum,
thus blocking this latter.
• Leave the door slightly ajar when the appliance is
not being used. This will allow the seal to be
preserved.
• Clean fluff filters after using the tumble dryer. To
prevent fire risks, do not use the appliance if the
fluff filters are damaged or without filters.
• Do not allow fluff to accumulate around the dryer.
General safety
• It is dangerous to alter the specifications or attempt
to modify this product in any way.
• Under no circumstances should you attempt to
repair the machine yourself. Repairs carried out by
inexperienced persons may cause injury or serious
malfunctioning. Contact your local Zanussi Service
Centre. Always insist on genuine Zanussi spare
parts.
Child safety
• Children are often not aware of how dangerous
electrical appliances can be. When the machine is
working, children should be carefully supervised
and not be allowed to play with the appliance.
• The packaging components (e.g. plastic film,
polystyrene) can be dangerous to children - danger
of suffocation! Keep them out of children’s reach.
• Make sure that children or pets do not climb into
the drum.
• When the appliance is to be scrapped, cut off the
electrical supply cable and destroy the plug with
the remaining cable. Disable the door catch in
order to prevent children from becoming trapped
inside while playing.
These warnings have been provided in the interest of safety. You MUST read them carefully before installing or
using the appliance.
Page 5

5
ENGLISH
To save energy and to help protect the environment,
we recommend that you follow these hints:
• Try to load the maximum capacity of the machine
as small loads are uneconomical.
• Always load well spun laundry. The higher the spin
speed, the lower the electricity consumption and
the shorter the drying times.
• Do not over-dry laundry, this avoids creasing and
saves energy.
Select the drying programme according to the type
of laundry and the required degree of dryness.
• To utilize the maximum load, laundry which is to be
dried ready to put away (store dry) can be dried
together with items to be ironed. To do this, select
the programme for iron-dry, remove the iron-dry
items at the end of the programme and then finishdry the rest of the load.
• Clean the filters regularly to avoid excessive drying
times and high electricity consumption.
• Ventilate the room well. The room temperature
should not exceed +35°C during drying.
Tips for environmental protection
• Packaging materials
The materials marked with the symbol are
recyclable.
This means that they can be recycled by disposing of
them properly in appropriate collection containers.
• Machine
Use authorised disposal sites for your old appliance.
Help to keep your country tidy!
• Old appliance
The symbol on the product or on its packaging
indicates that this product may not be treated as
household waste. Instead it shall be handed over to
the applicable collection point for the recycling of
electrical and electronic equipment. By ensuring this
product is disposed of correctly, you will help
prevent potential negative consequences for the
environment and human health, which could
otherwise be caused by inappropriate waste
handling of this product. For more detailed
information about recycling of this product, please
contact your local city office, your household waste
disposal service or the shop where you purchased
the product.
Disposal
Page 6
6
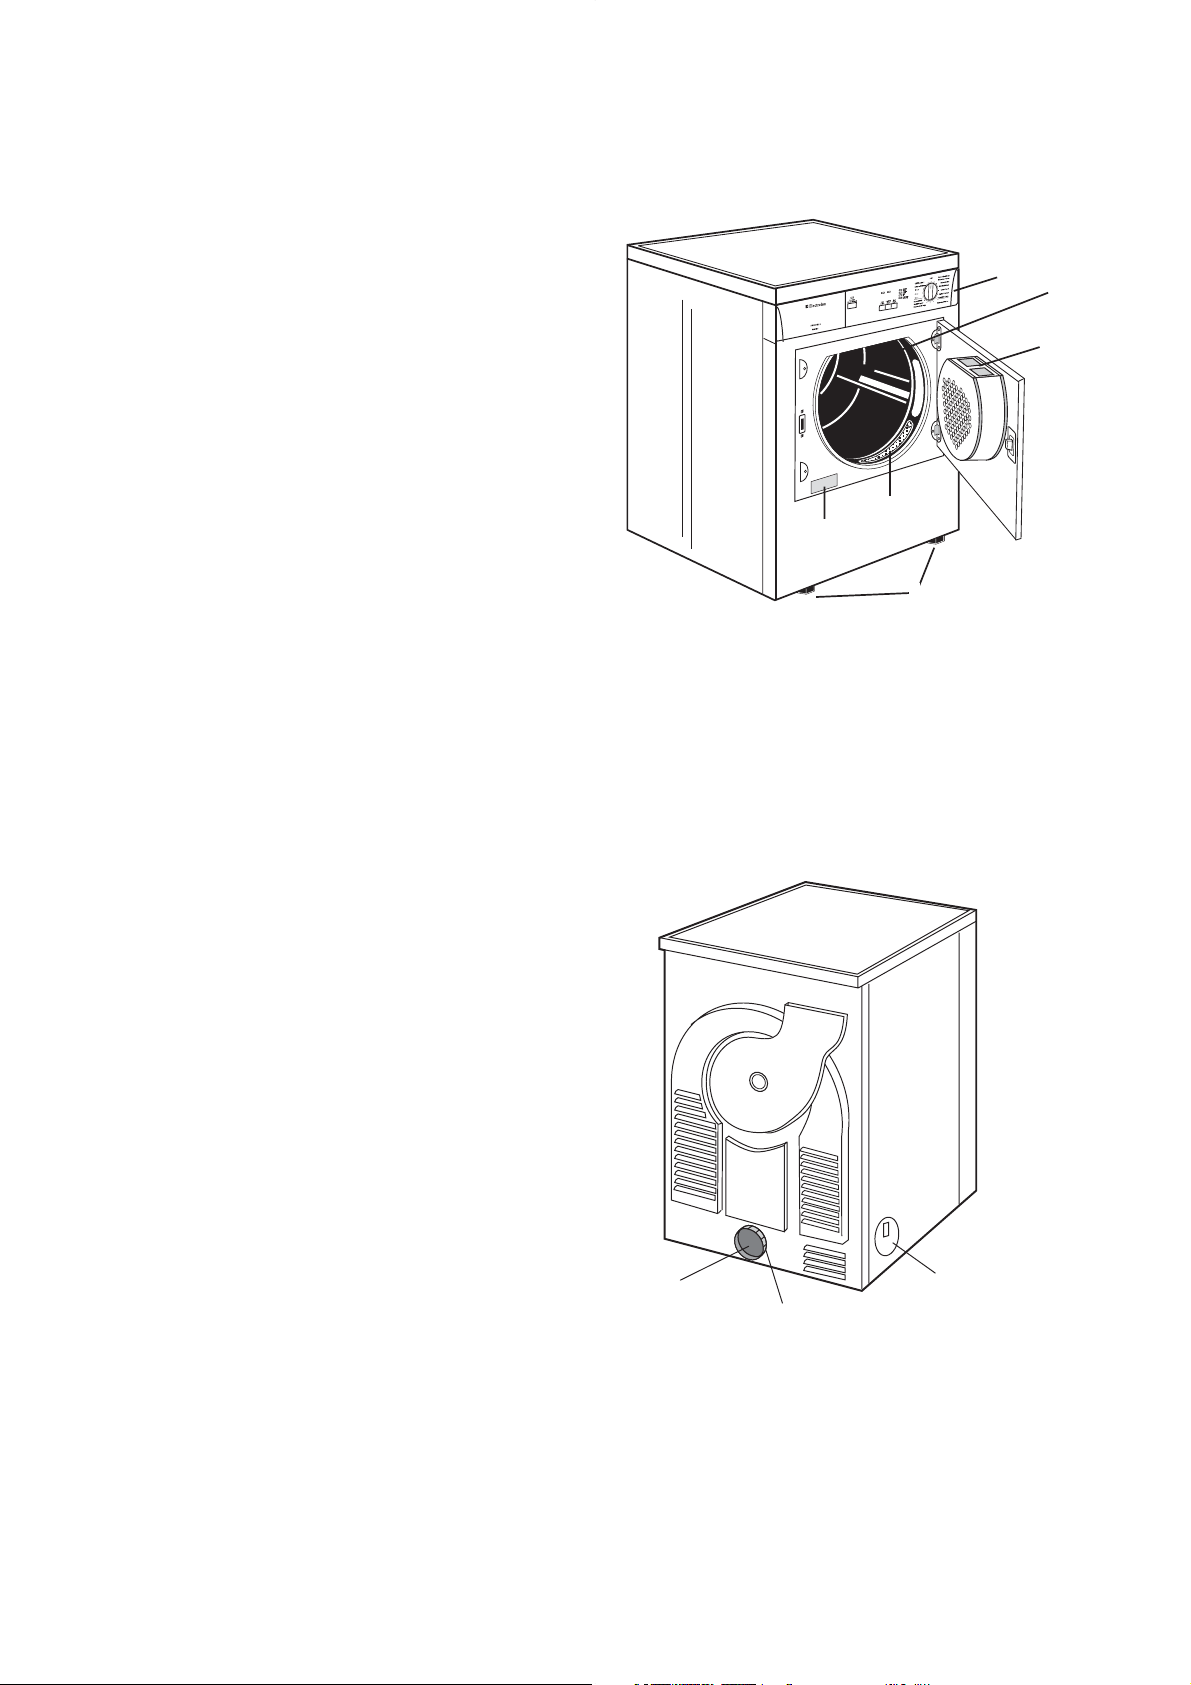
Description of the appliance
01 Control panel
02 Fluff filters
03 Rating Plate
04 Adjustable feet
05 Drum light
06 Side vent outlets
07 Ring nut
08 Rear vent outlet
1
2
2
3
4
5
6
7
8
Page 7
7
ENGLISH
Installation
Warning!
Unpacking
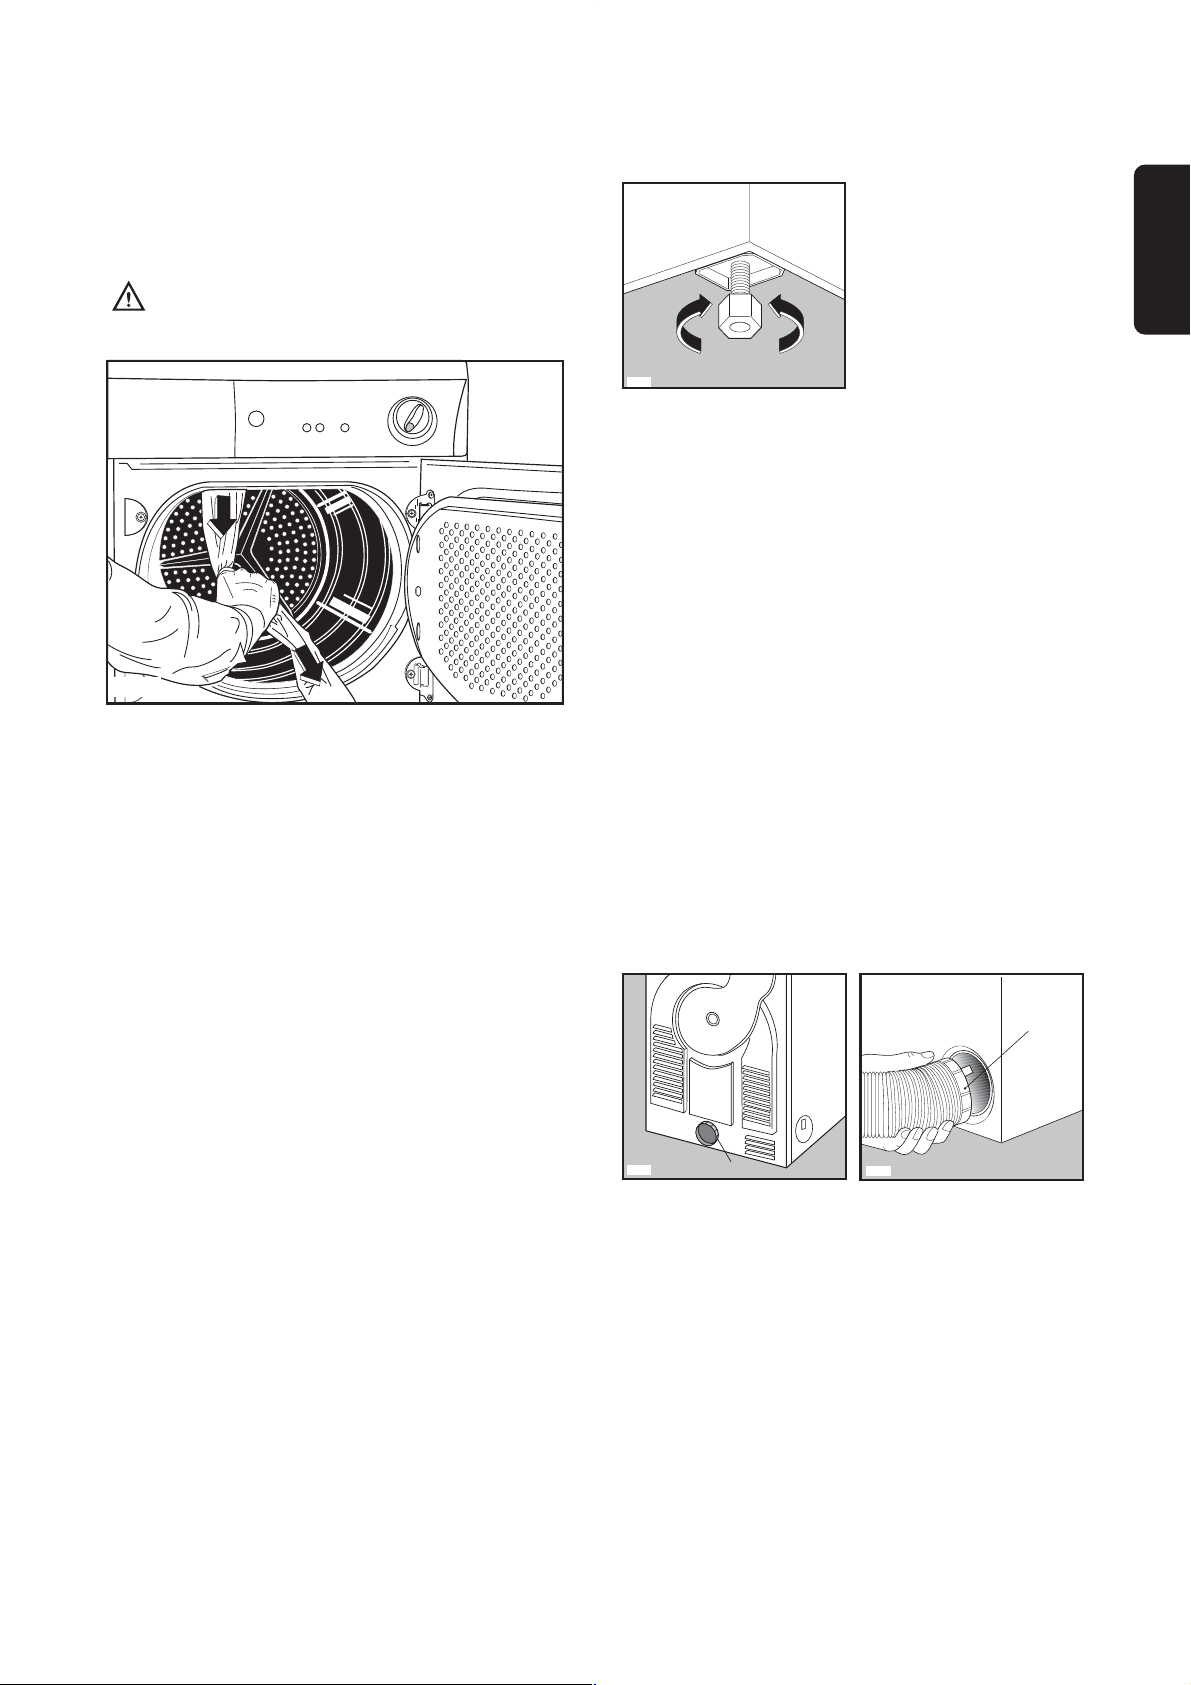
Slide out the polythene bag with the
polystyrene stuffing before using the appliance
Pull off adhesive strips from inside machine on
top of drum
.
Positioning
It is recommended that, for your convenience, the
machine is positioned close to your washing machine.
Whilst drying, the tumble dryer will expel a certain
amount of warm, very moist air, and this should be
removed from the room as quickly as possible to
prevent condensation. In an extremely well ventilated
room or close to an open window, this may occur
naturally.
However, in general, it is better to carry the dryer's
exhaust outside via the 100 mm diameter flexible
hose supplied with the appliance; ending either
temporarily at an open window, or permanently at a
fixed ventilation grille, fitted to an exterior wall or
window.
The tumble dryer must be installed in a clean place,
where dirt does not build up.
Make sure there are no obstructing items or material
near the air-intake louvres provided at
the back (e.g. paper, rags etc.).
To keep vibration and noise to a minimum when the
dryer is in use, it should be placed on a firm, level
surface.
Once in its permanent operating position, check that
the dryer is absolutely level with the aid of a spirit
level. If it is not, raise or lower the feet until it is.
P1106
The feet must never be removed.
Do not restrict the floor clearance through deep-
pile carpets, strips of wood or similar. This might
cause heat build-up which would interfere with
the operation of the appliance.
Important
When operating the tumble dryer, the room
temperature must not exceed 35°C, as it may affect
the performance of the appliance.
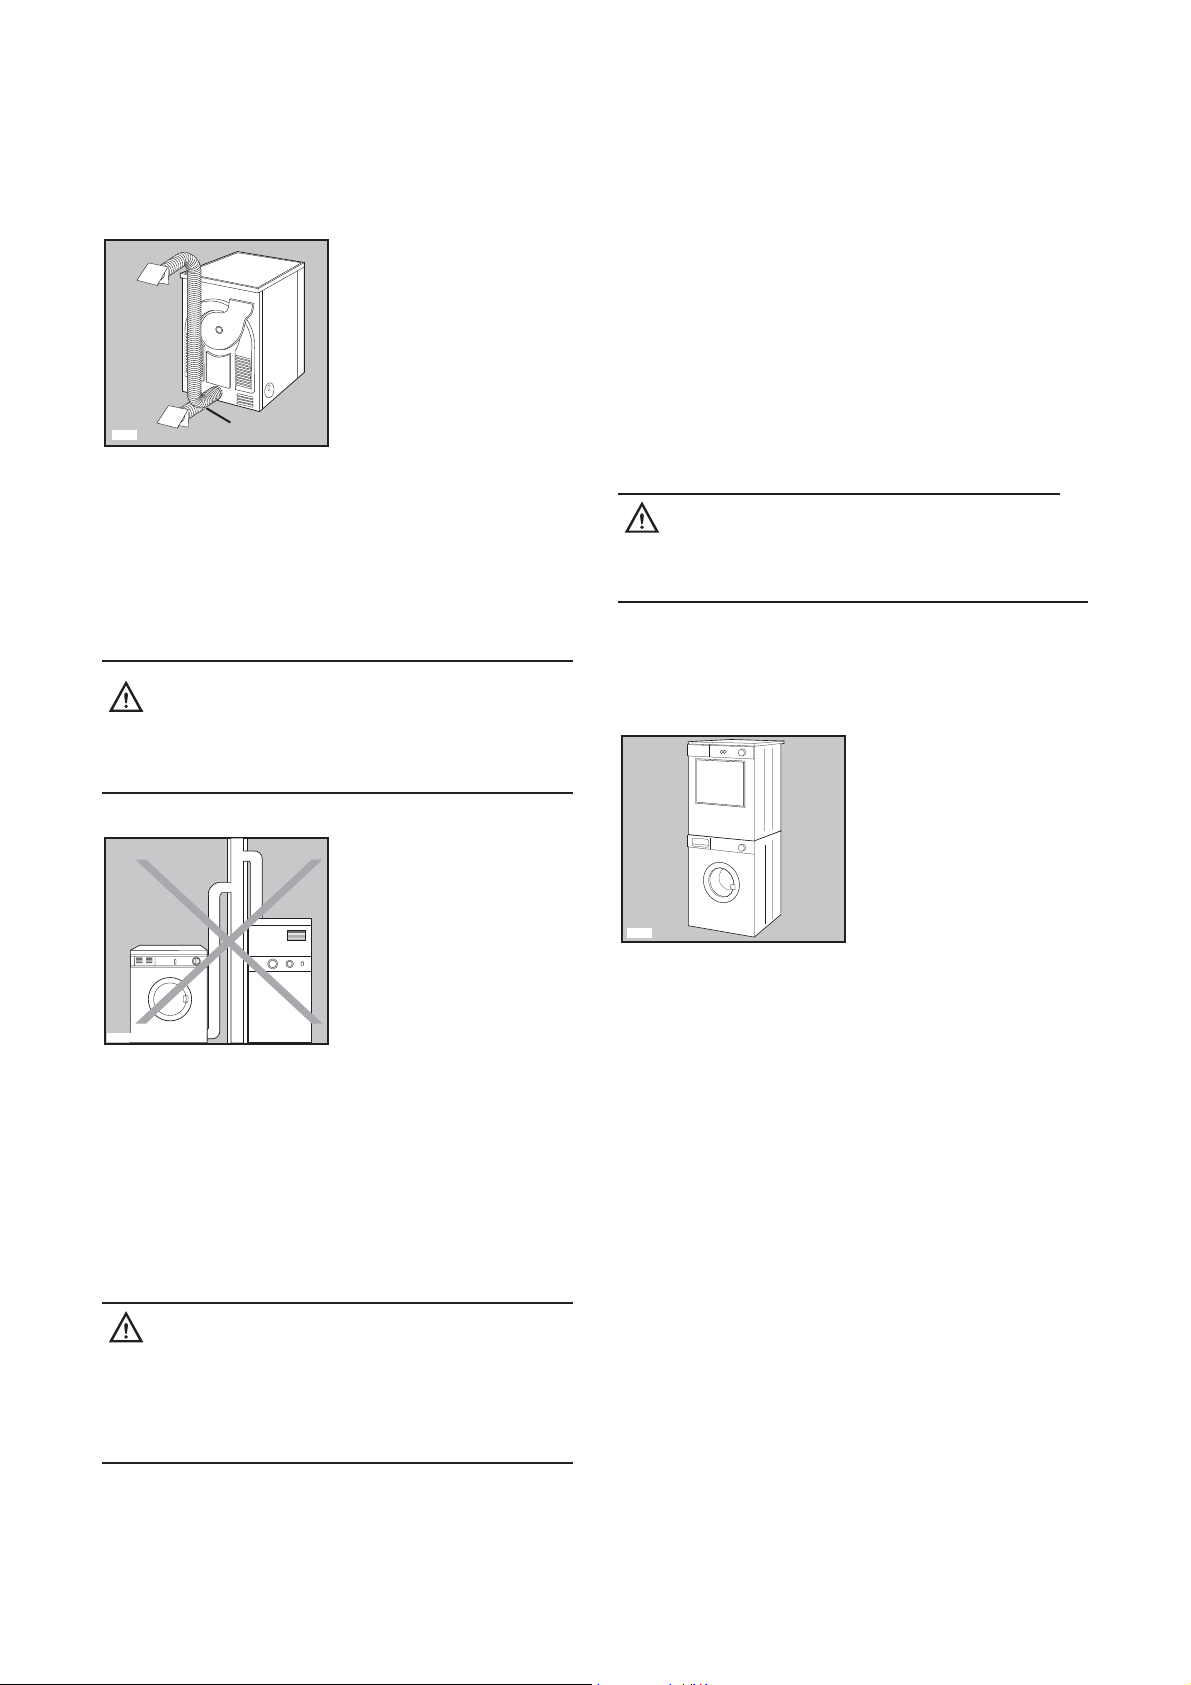
Fitting the vent hose
To simplify the installation, there is a choice of vent
outlets: one at the back, the others in the left and
right-hand side.
Connect the hose to whichever is the more
convenient by pulling the ring nut (A) from the vent
outlet at the back, screwing it on to the hose and
pushing it firmly back into place.
The unused vents should now be sealed with the
special snap covers provided.
Advice: If the hose is long and the room
temperature low, the moisture might condense to
water inside the hose. This is an unavoidable
natural phenomenon. To prevent this water from
Iying in the hose or flowing back into the tumble
dryer, it is advisable to drill a small hole (dia.
3 mm) in the lowest point of the hose and to place a
small container below it.(See picture, point B).
P1027
A
A
P1028
P0046
Page 8
8
Once connected to the dryer, run the vent hose to
the desired outlet point, ensuring that the run’s
overall length is less than 2.5 m, and that it contains
no more than two bends. As to the outlet itself, if you
have decided on a fixed wall/window grille, a good
local builder’s merchant should be able to supply you
with the necessary fittings and installation advice.
It is important not to connect the vent hose
to, for example, a cooker hood, or a
chimney or flue pipe designed to carry the
exhaust from a fuel burning appliance.
Note that to avoid condensation problems, it is
essential that the dryer be fitted with the flexible hose
to carry its “exhaust” at least beyond the kitchen
units; preferable outside the kitchen.
In order to prevent the appliance from overheating, it
is important that the steam exhaust is unobstructed.
Therefore, in case of a permanent hose fitted to an
exterior wall or ceiling, it must be ensured an
exhaust capacity of at least 150 m
3
/h.
If the dryer is fitted next to kitchen units,
make sure that the vent hose is not
squashed. If the hose is partially squashed,
drying efficiency will be reduced, resulting
in longer drying times and higher energy
consumption.
If the hose is completely squashed, the safety
cut-outs with which the machine is fitted may
operate.
P0055
P1056
B
Electrical connection
This machine is designed to operate on a 220-230 V,
single-phase, 50 Hz supply.
Check that your domestic electrical installation can
take the maximum load required (2.2 kW), also
taking into account any other appliances in use.
Connect the machine to an earthed socket, in
accordance with current wiring regulations.
The manufacturer declines any
responsibility for damage or injury
through failure to comply with the above
safety precaution.
Stacking kit
A special stacking kit is available through your
dealer, to enable the mounting of the dryer on top of
your washing machine.
Door reversal
To make it easier to load or unload the laundry the
door can be reversed.
This operation must be carried out by qualified
personnel.
Please contact the nearest Electrolux Service Centre.
P1107
Warning!
The power supply cable must be accessible
after installing the machine.
Page 9
9
ENGLISH
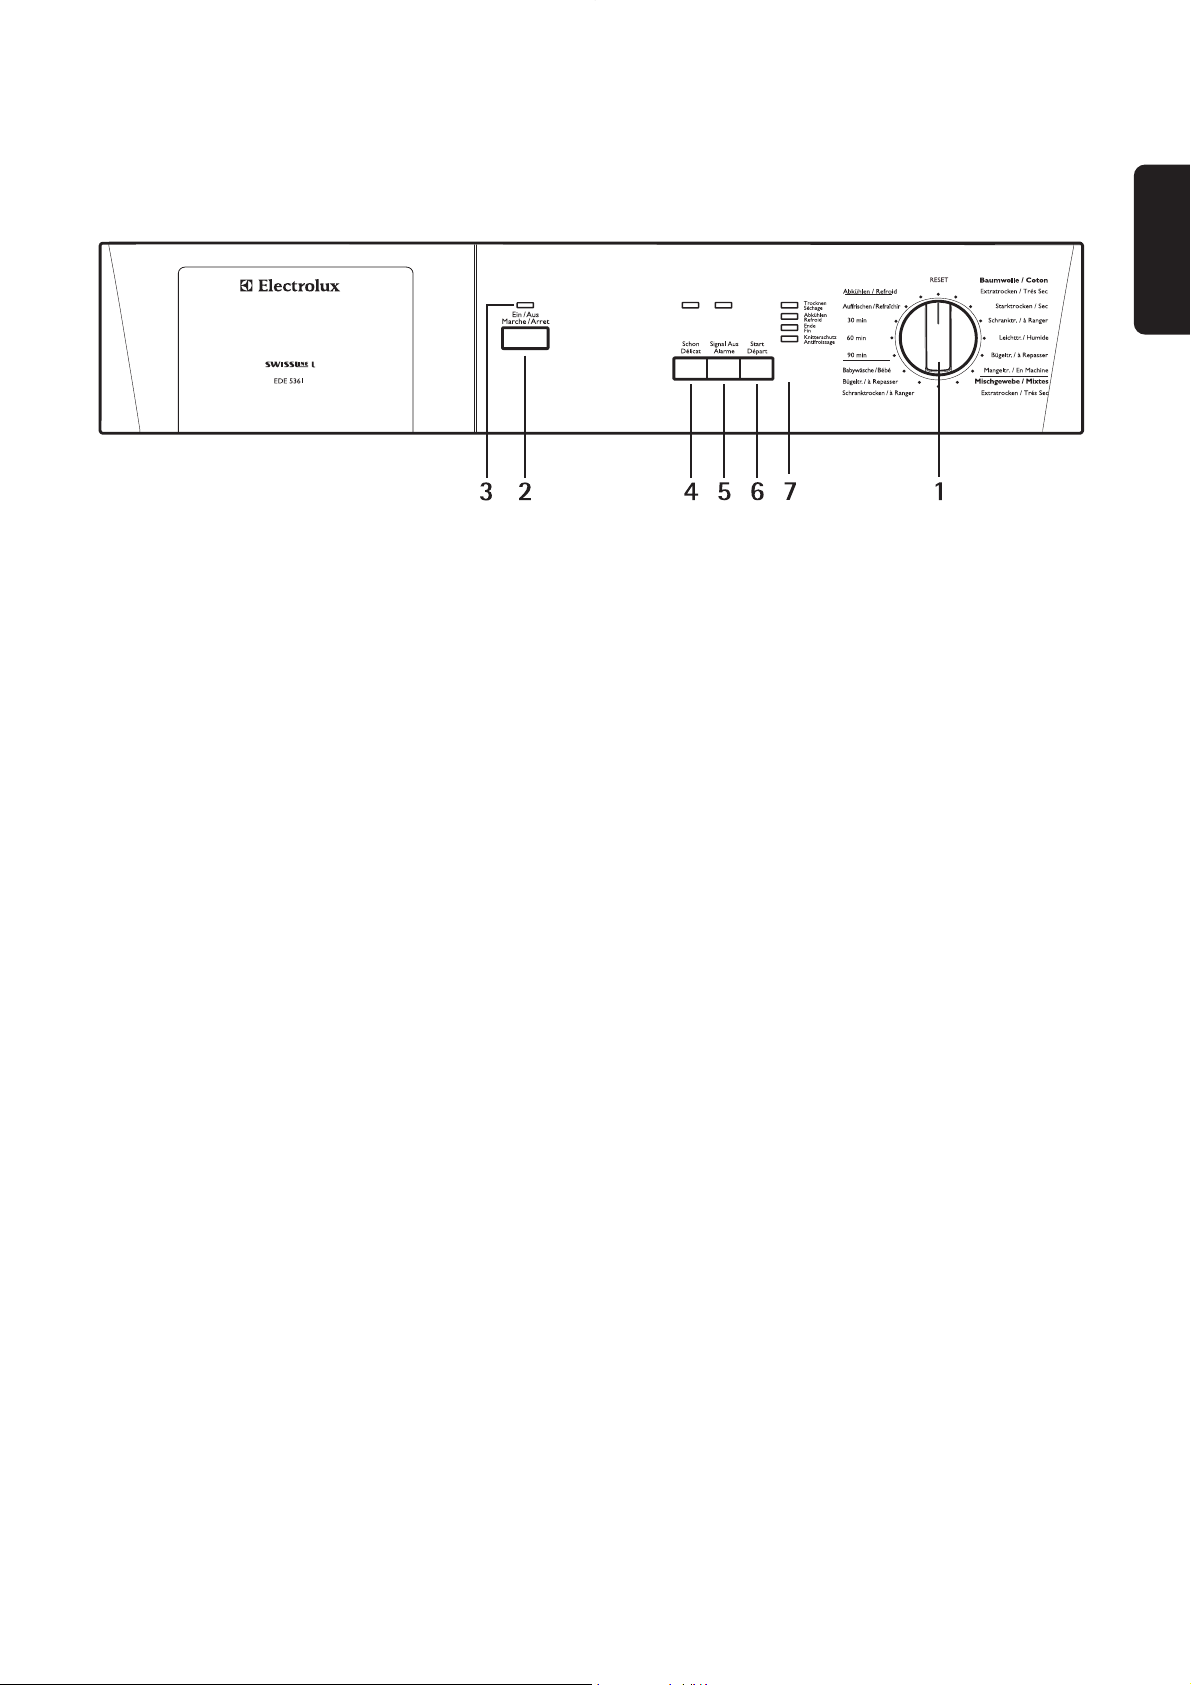
Use
The control panel
1 Programme/Time selector dial
Allows you to select electronically controlled or time
controlled drying.
Turn the dial to the required programme or time.
Electronically controlled drying
(automatic)
The appliance runs these programmes with the help
of probes which detect the degree of dampness of
the laundry.
Simply select the programme according to the type
of laundry and degree of drying required.
Time controlled drying
Can be used to finish off drying if necessary.
Select the 60 minute programme for cottons or the
30 minute programme for synthetics .
To cancel a programme which is running, turn the
programme selector dial to “RESET”.
At the end of drying, turn the selector dial to
“RESET” before removing the laundry
2 ON/OFF button “EIN/AUS“
This button is used to switch the dryer on. At the end
of the programme, release this button by pressing it
again to switch the dryer off.
3 Mains-ON light
Comes on when the appliance is switched on
(EIN/AUS button pressed down) and goes out when
this button is released.
4 Low temperature button “SCHON”
Pressing this button allows drying to be performed at
a lower temperature, for delicate items.
The corresponding pilot light comes on.
5 Buzzer OFF button
“SIGNAL AUS
”
A buzzer sounds during the anti-creasing phase.
Press this button when selecting the programme if
you wish to switch the buzzer off. The corresponding
light illuminates.
6 Start button “START”
Press this button for about 2 seconds to start the
dryer after having selected the programme.
If the door is opened while the programme is
running, this button must be pressed again after
closing the door in order to restart the programme
from the point at which it was interrupted.
This button must also be pressed after a power cut.
In both cases light “TROCKNEN” or “ABKÜHLEN”
(depending on the phase in progress) flashes to remind
you that the start button needs to be pressed again.
7 Programme phase indicator lights
These lights indicate the various phases of the
programme as they are being performed.
“Drying” light “TROCKNEN”
This light indicates that the appliance is in the drying phase.
“Cooling” light “ABKÜHLEN”
This light indicates that the appliance is in the
cooling phase. At the end of drying, there is a 10
minute cooling phase to cool the laundry.
If light “TROCKNEN” or “ABKÜHLEN” is flashing,
this means that the Start button needs to be pressed
again for the programme to resume.
“End of programme” light “ENDE”
This light flashes at the end of the cooling phase and
during the anti-creasing phase.
“Anti-creasing phase” light “KNITTERSCHUTZ”
This light flashes alternately with the light “ENDE” at
the end of the drying phase (after cooling) and during
the anti-creasing phase.
If only light “ENDE” flashes, this means that the anticreasing phase has finished.
.
Page 10
10
Programme chart
Automatic drying (electronic programmes)
Time controlled drying
(1) Never overfill the drum (do not load large quilts, for example).
Drying times vary according to:
• The type of laundry
• The size of the load
• The degree of spinning prior to drying
• The degree of dryiness required.
Cooling - “ABKÜHLEN”
This position on programme selector dial can be used to freshen the laundry (e.g. to remove a persistent
odour of moth-balls).
Load
It is often difficult to estimate the weight of items to be dried. We therefore recommend that you adopt the
following guidelines:
• cotton, linen: drum full but not too tightly packed;
• synthetics: drum no more than half full;
• delicate fabrics: drum no more than one third full.
Type of laundry Drying time
Max-load
(1)
kg
Programme
selector dial position
Cotton
Cotton
Synthetics
90 min
60 min
30 min
5
5
2.5
90
60
30
Extratrocken
Schranktrocken (*)
Bügeltrocken
(*) According to IEC 61121 Standards.
Type of laundry
Degree of drying
required
Max-load
(1)
Programme
COTTON
Extra dry
Ready to wear
Store dry
Slightly damp
Iron dry
Machine Iron Dry
5 kg
5 kg
5 kg
5 kg
5 kg
5 kg
SYNTHETIC
Extra dry
Store dry
Iron dry
2.5 kg
2.5 kg
2.5 kg
JUMPERS
Baby dry
1 kg
(10 jumpers)
Babywäsche
Extratrocken
Starktrocken
Schranktrocken (*)
Leichttrocken
Bügeltrocken (*)
Mangeltrocken
Jackets, trousers,
dresses, skirts.
Dry fresh
1 - 4 garments
Auffrischen
• Baby cycle “Baby” is a special programme for jumpers to be dried “ready to wear”.
• Dry fresh “Auffrischen” is designed to clean and freshen garments labelled “dry clean only” at home, in your
tumble dryer, using the special product available on the market.
Page 11
ENGLISH
11
Operating sequence
Before using your tumble dryer for the first time, we
recommend to place a few damp cloths inside the
appliance and dry for 30 minutes.
There may be dust inside a brand new tumble dryer.
Drying
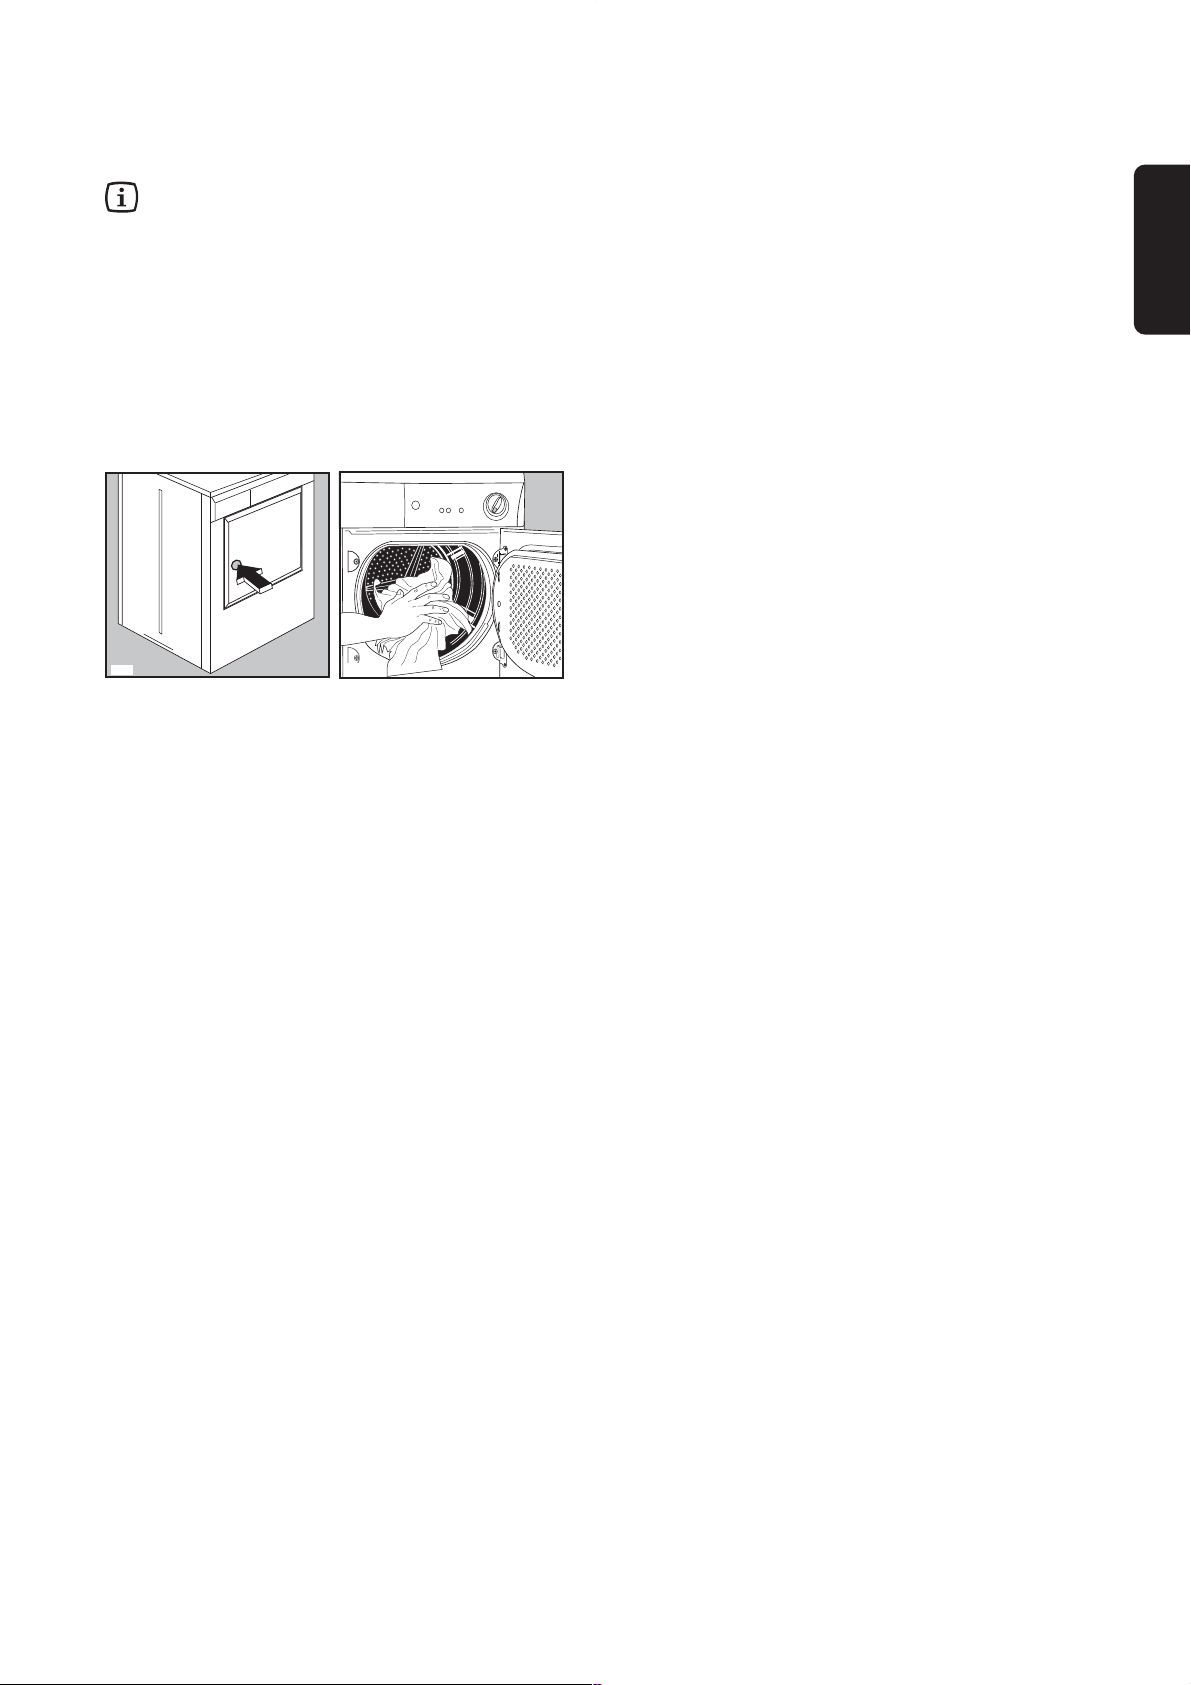
1. Connect the appliance.
2. Open the door.
3. Load the items one at a time, shaking them out
loosely.
4. Close the door. Please check the laundry does
not get caught between the door and filter.
5. Press the ON/OFF button “EIN/AUS”: the mains-
ON light comes on.
6. Select the drying programme or time.
7. If required, press the low temperature button
“SCHON” and/or the buzzer OFF button
“SIGNAL AUS” .
8. Press the Start button START for 2 seconds: light
“TROCKNEN” comes on and drying starts.
The drum turns alternately in both directions
during drying.
All drying programmes end with a 10 minute
cooling phase (light “ABKÜHLEN” is on).
You may remove the laundry after this phase.
9. If the laundry is not removed at the end of the
cycle, the dryer performs an anti-creasing phase
(duration: 30 minutes maximum).
The buzzer sounds every 10 seconds (if the
“SIGNAL AUS” button has not been pressed).
Lights “ENDE” and “KNITTERSCHUTZ” flash
alternately.
If you do not remove the laundry, the dryer will
stop automatically at the end of the anti-creasing
phase.
Light “ENDE” flashes and the mains-ON light
stays on.
Turn the programme selector dial to “RESET”;
P1108
P1104
light “ENDE” goes out.
Release the ON/OFF button (the mains-ON light
goes out) and immediately remove the laundry.
After each use
• Turn the programme selector dial to “RESET”.
• Switch the appliance off by releasing the ON/OFF
button “EIN/AUS . The mains-ON light goes out.
• Clean the filters (see page 13).
Important!
If the drying programme has to be stopped before it
reaches the end, we recommend that you turn the
programme selector dial to position “ABKÜHLEN”
(cooling) and wait until the end of this phase before
removing the laundry. This will avoid a build-up of
heat inside the appliance.
Modifying the programme
To change a programme which is running, first
cancel it by turning the programme selector dial to
“RESET”. Select the new programme and press the
Start button “START” .
Page 12
12
Useful hints
• Try to load to the maximum capacity of the
machine as small loads are uneconomical.
For information, here is a list of the average
weights of some common laundry items.
Sheet 700 - 1000 g
Tablecloth 400 - 500 g
Kitchen towel 70 - 120 g
Table napkin 50 - 100 g
Towelling hand towel 150 - 250 g
Bathrobe 1000 - 1500 g
Man’s shirt 200 - 300 g
Pillowcase 100 - 200 g
Man’s pyjamas 400 - 500 g
Ladies’ nightdress 200 - 250 g
• Never tumble dry the following:
Particularly delicate items such as net curtains,
woollen, silk, fabrics with metal trim, nylon tights,
bulky materials such as anoraks, blankets,
eiderdowns, sleeping bags, feather quilts and any
items containing rubber foam or materials similar
to rubber foam.
• Always follow the instructions on garment labels:
may be tumble dried
normal drying (high temperature)
delicate drying (low temperature)
do not tumble dry
• Close pillowcases and covers with fasteners to
prevent small laundry items getting tangled inside
them. Close press studs, zips and hooks and tie
belts and apron strings.
• Sort laundry according to type and degree of
drying required.
• Do not over-dry laundry, this avoids creasing and
saves energy.
• Avoid drying dark clothes with light coloured fluffy
items such as towels as they could attract the fluff.
• The laundry must be thoroughly spun before
tumble drying.
• Easy-care items, too, e.g. shirts, should be briefly
pre-spun before drying (depending on crease
resistance approx. 30 seconds or using the special
brief spin programme of your washing machine).
• Knitted textiles (knitted underwear) may shrink a
little during drying. Please do not overdry items of
this type. It is advisable to allow for shrinkage
when choosing the size of new purchases.
• You can also put starched items into your dryer.
However, to achieve the desired starched effect,
choose the programme “iron dry”. To remove any
starch residues, wipe out the internal drum after
drying with a moist cloth and then rub it dry.
• To avoid a static charge when drying is completed,
use either a fabric softener when you are washing
the laundry or a fabric conditioner specifically for
tumble dryers.
• Remove the laundry when the dryer has finished
drying.
• If individual items are still damp after drying, set a
brief post-drying time, but at least 30 minutes.
This will be necessary particularly for multilayered
items (e.g. collars, pockets, etc.).
Page 13
ENGLISH
13
Maintenance and Cleaning
You must disconnect the appliance from the
electricity supply, before you can carry out any
cleaning or maintenance work.
External cleaning
Use only soap and water and then dry thoroughly.
Important: do not use methylated spirit, diluents or
similar products.
Cleaning the door
Clean periodically the interior part of the door to
remove any fluff from the seals around the filter.
Accurate cleaning ensures correct drying.
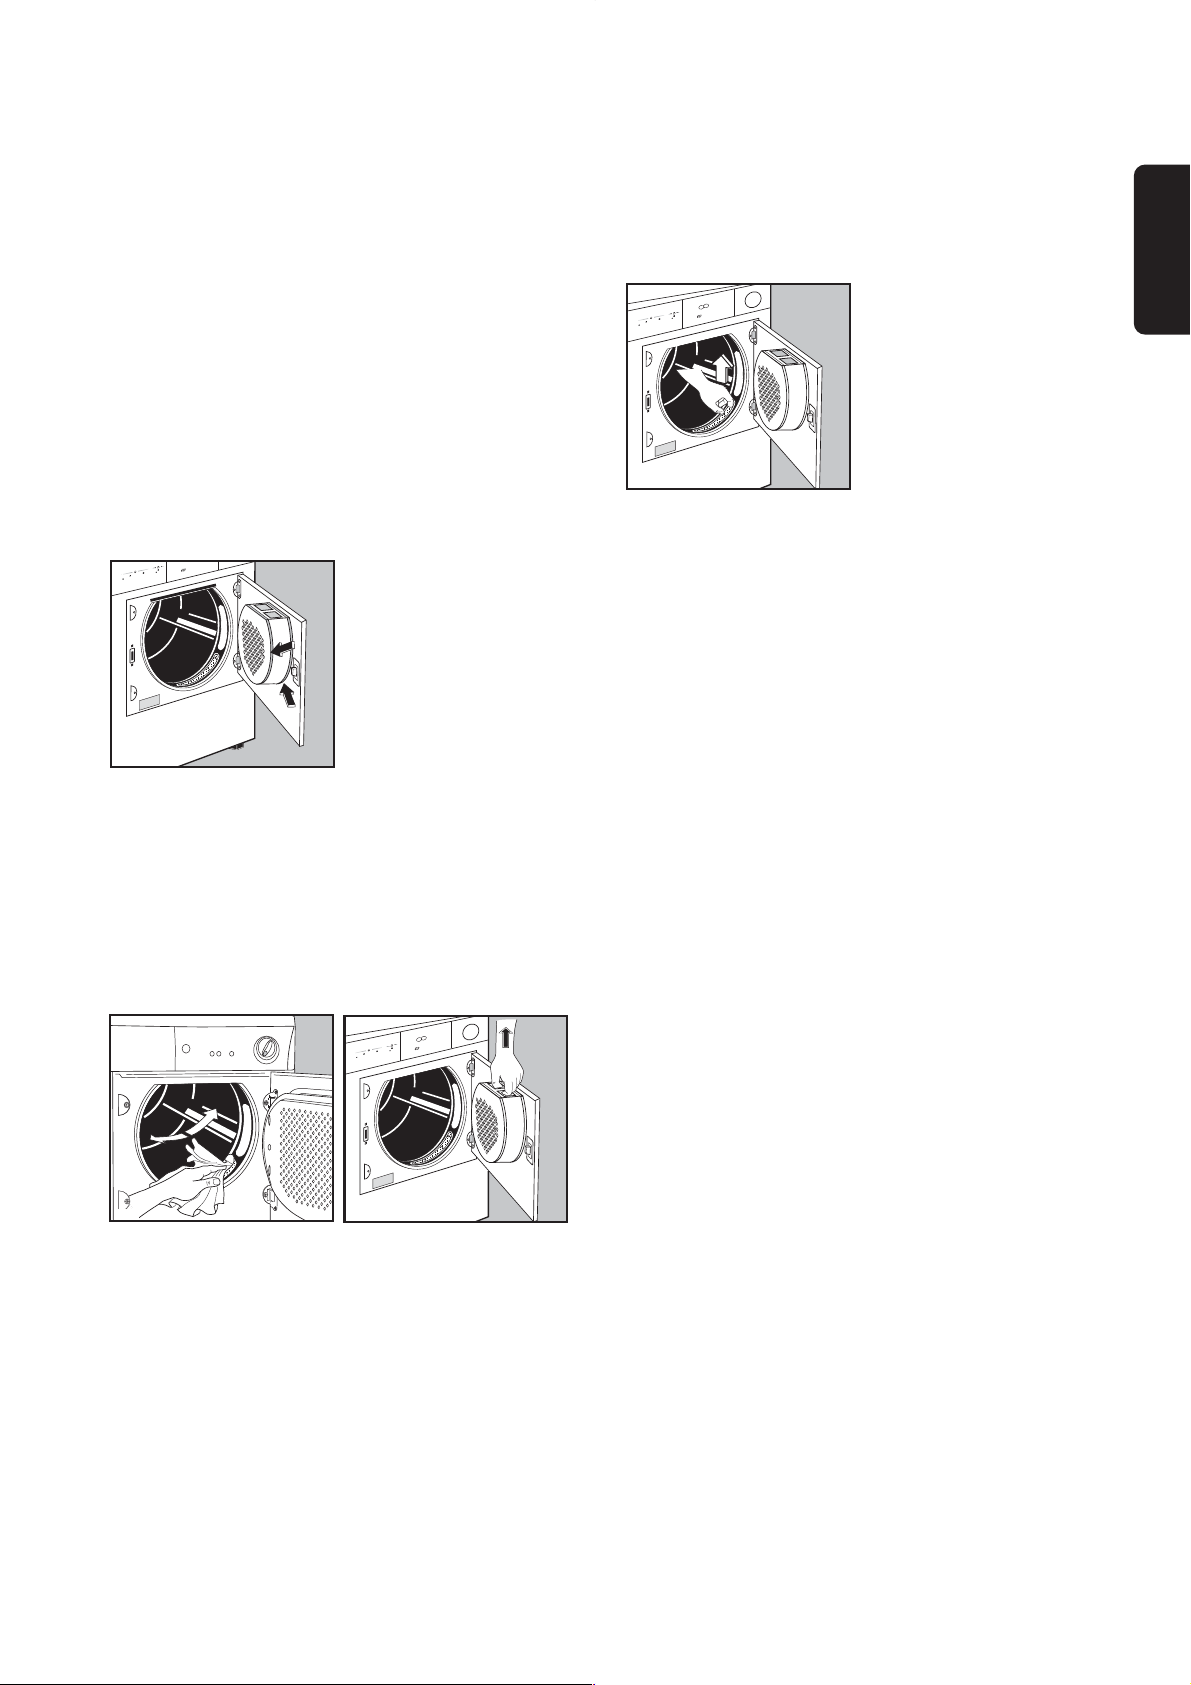
Cleaning the filters
Your dryer will only function well if the filters are
clean.
The filters collect all the fluff which accumulates
during drying and they must therefore be cleaned at
the end of each programme, before removing the
laundry, with a damp cloth.
The filter in the inner door must be removed for
cleaning.
Do not be alarmed by the amount of fluff. It is not
due to excessive wear caused by the dryer. All fabric
loses fluff when drying but it goes un-noticed in the
air. In a tumble dryer it simply collects in the filter.
AU
TO
REVE
RSE
k
g
5
k
g
2
,
5
8
00 / 90
0
7
0
'
-
9
0
'
3
5
'
-
5
0
'
10
00 / 12
00
6
5
'
-
8
5
'
3
0
'
-
4
5
'
8
00 / 90
0
8
0
'
-
1
0
0
'
5
5
'
-
7
0
'
1000 / 12
00
7
5
'
-
9
5
'
5
0
'
-
6
5
'
650
5
0
'
-
6
0
'
3
0
'
-
3
5
'
k
g
2
,
5
k
g
1
P1111
P1110
A
U
TO
R
E
V
E
RS
E
k
g
5
k
g
2
,
5
80
0 /
9
0
0
7
0
'
-
9
0
'
3
5
'
-
5
0
'
1
0
00
/
120
0
6
5
'
-
8
5
'
3
0
'
-
4
5
'
8
00
/
90
0
8
0
'
-
1
0
0
'
5
5
'
-
7
0
'
1
000
/
12
0
0
7
5
'
-
9
5
'
5
0
'
-
6
5
'
65
0
5
0
'
-
6
0
'
3
0
'
-
3
5
'
k
g
2
,
5
k
g
1
P1109
If necessary the filters can be cleaned under running
water using a brush. In this case remove the filter in
the door opening as per picture (it can be positioned
with the tooth facing to the left or to the right).
A
UTO
RE
V
E
R
S
E
k
g
5
k
g
2
,
5
8
00
/
90
0
7
0
'
-
9
0
'
3
5
'
-
5
0
'
1
00
0 /
1
2
00
6
5
'
-
8
5
'
3
0
'
-
4
5
'
8
00
/
90
0
8
0
'
-
1
0
0
'
5
5
'
-
7
0
'
1
0
00
/
120
0
7
5
'
-
9
5
'
5
0
'
-
6
5
'
650
5
0
'
-
6
0
'
3
0
'
-
3
5
'
k
g
2
,
5
k
g
1
P1112
Page 14

14
Something not working?
If, after the above checks, there is still a fault, call
your local Service Centre.
Please make sure you give the model and serial
number of the appliance.
This information can be found on the rating plate
(see picture on page 6).
Before contacting your local Fors Service Centre, please make the following checks:
Problem Possible cause
• The dryer does not work:
• The door is open.
• The plug is not fitted into the wall socket.
• There is no electricity supply from the wall socket.
• The selector dial is not set correctly.
• The start button “
START” has not been depressed.
• The dryer does not dry properly:
• The filters are clogged.
• The selected cycle is not suitable for the laundry.
• The laundry has not been spun properly.
• The low temperature function “SCHON” has been
selected.
• Excessive laundry load.
• The dryer is not correctly installed.
Page 15
FRANÇAIS
15
Chère cliente, Cher client,
veuillez lire attentivement cette notice d’utilisation.
Tenez compte surtout des avertissements importants donnés dans les premières pages de cette notice.
Gardez cette notice d’utilisation pour toute consultation future. Remettez-la à l’acheteur éventuel de votre
appareil.
Dégâts de transport
A la réception de l'appareil, nous vous prions de faire les «réserves d'usage» en présence du livreur (dégâts
esthétiques par exemple).
Comment lire votre notice d’utilisation?
Les symboles suivants vous guideront tout au long de la lecture de votre notice d’utilisation:
Instructions de sécurité
Conseils et recommandations
Informations liées à la protection de l’environnement
Notre contribution à la protection de l’environnement:
nous utilisons du papier recyclé.
Page 16

Sommaire
Avertissements et conseils
importants
. . . . . . . . . . . . . . . . . . . . . . . . . . .17
Recyclage . . . . . . . . . . . . . . . . . . . . . . . . . . .18
Conseils écologiques . . . . . . . . . . . . . .18
Description de l’appareil . . . . . . . . . . .19
Installation . . . . . . . . . . . . . . . . . . . . . . . . . . .20
●
Débridage . . . . . . . . . . . . . . . . . . . . . . . . . . . . .20
●
Emplacement . . . . . . . . . . . . . . . . . . . . . . . . . .20
●
Evacuation de l’air humide . . . . . . . . . . . . . . . .20
●
Raccordement électrique . . . . . . . . . . . . . . . . .21
●
Installation en colonne . . . . . . . . . . . . . . . . . . .21
●
Réversibilité de la porte . . . . . . . . . . . . . . . . . .21
Utilisation . . . . . . . . . . . . . . . . . . . . . . . . . . . .22
●
Bandeau de commandes . . . . . . . . . . . . . . . . .22
●
Guide des programmes . . . . . . . . . . . . . . . . . .23
●
Comment faire un séchage? . . . . . . . . . . . . . . .24
●
Guide de séchage . . . . . . . . . . . . . . . . . . . . . . .25
Entretien . . . . . . . . . . . . . . . . . . . . . . . . . . . . .26
●
Nettoyage extérieur . . . . . . . . . . . . . . . . . . . . .26
●
Nettoyage de la porte . . . . . . . . . . . . . . . . . . . .26
●
Nettoyage des filtres . . . . . . . . . . . . . . . . . . . . .26
En cas d'anomalie de
fonctionnement
. . . . . . . . . . . . . . . . . . . . .27
Caractéristiques Techniques
DIMENSIONS: hauteur 85 cm
largeur 60 cm
profondeur 58 cm
PUISSANCE DE BRANCHEMENT: 220/230 V/50 Hz
PUISSANCE TOTALE ABSORBEE: 2200 W
FUSIBLE: 10 A
CAPACITE DE SECHAGE: coton, lin 5,0 kg
synthétiques 2,5 kg
CONSOMMATIONS: coton, lin 2,7 kWh (5 kg prêt à ranger)
coton, lin 2,2 kWh (5 kg prêt à repasser)
Cet appareil est conforme aux Directives Communautaires suivantes:
- 73/23 CEE 19/02/73 (Basse tension) et modifications successives;
- 89/336 CEE 03/05/89 (Compatibilité Electromagnétique) et modifications successives.
16
Page 17

FRANÇAIS
17
Avertissements et conseils importants
Installation
●
Si l'installation électrique de votre habitation
nécessite une modification pour le branchement
de votre appareil faites appel à un électricien
qualifié.
●
Assurez-vous, après avoir installé l'appareil, que
celui-ci ne repose pas sur le câble d'alimentation.
●
Si le sèche-linge est installé sur un sol recouvert
de moquette, réglez les pieds de façon à ce que
l’air puisse circuler librement autour de l’appareil.
●
Votre sèche-linge a été conçu pour évacuer la
vapeur à l’air libre. L’appareil a son propre
système d’aération qui ne doit être relié à aucun
autre système d’aération servant à d’autres
appareils.
Utilisation
●
Votre appareil est destiné à un usage domestique.
Ne l’utilisez pas à des fins commerciales ou
industrielles ou pour d’autres buts que celui pour
lequel il a été conçu.
●
Débranchez toujours l'appareil après son
utilisation.
●
N'introduisez jamais dans l'appareil du linge
simplement égoutté.
●
Ne séchez pas d'articles ayant été traités avec
des produits chimiques, tels que les produits
utilisés pour le nettoyage à sec, car ils pourraient
provoquer une explosion.
●
Risque d'incendie : ne faites pas sécher dans
votre appareil du linge qui a été taché ou imbibé
d'huile végétale ou d'huile de cuisson.
●
Risque d'incendie : si vous avez prétraité votre linge
avec du détachant (spray ou liquide) avant lavage,
effectuez un cycle de rinçage supplémentaire avant
de le charger dans votre seche linge.
●
Contrôlez qu'un briquet n'est pas resté dans une
poche.
●
Ne séchez en aucun cas des chaussures
(tennis,etc.), car elles pourraient s’encastrer entre
le hublot et le tambour, bloquant ce dernier.
●
Laissez la porte entrouverte lorsque le sèchelinge n'est pas utilisé, mais veillez à ce que les
enfants ne s'enferment pas dans l'appareil.
●
Les filtres doivent être nettoyés après chaque
utilisation. N'utilisez jamais l'appareil avec des
filtres endommagés ou sans filtres. Cela pourrait
provoquer un incendie.
●
Evitez l’accumulation de poussière autour de
l’appareil pour permettre à l’air de circuler
librement.
Sécurité
●
Il est dangereux de modifier ou d'essayer de
modifier les caractéristiques techniques de cet
appareil.
●
N'essayez jamais de réparer l'appareil vousmême. Les réparations effectuées par du
personnel non qualifié peuvent provoquer des
dommages importants.
Seul un Service Après-Vente recommandé est
habilité à intervenir. En cas d'intervention, exigez
des pièces de rechange certifiées constructeur.
Sécurité des enfants
●
Les enfants ne sont souvent pas en mesure de
reconnaître les risques émanant des appareils
ménagers. Il est donc indispensable de les
garder sous surveillance lorsque l'appareil
fonctionne. Ne les laissez pas jouer avec le
sèche-linge!
●
Les éléments constituant l'emballage (les films en
plastique, les morceaux de styropor par ex.)
peuvent présenter un danger pour les enfants.
Risque d'asphyxie! Gardez les éléments
d'emballage hors de la portée des enfants.
●
Assurez-vous que les enfants ou vos animaux
domestiques ne puissent pas pénétrer dans le
tambour du sèche-linge.
●
Si vous procédez à la mise à la casse de votre
appareil, veillez à mettre hors d'usage ce qui
pourrait représenter un danger: coupez le câble
d'alimentation au ras de l'appareil et détériorez le
dispositif de fermeture de la porte.
Vous éviterez ainsi que les enfants s’y enferment
en se mettant ainsi en danger de mort.
Les avertissements suivants sont donnés pour votre sécurité. Nous vous prions de bien vouloir les lire
attentivement avant d'installer et d'utiliser l'appareil.
Page 18

18
Recyclage
●
Recyclage de l’emballage
Tous les matériaux marqués par le symbole
sont recyclables. Pour qu’ils puissent être récupérés
(recyclés), il est nécessaire de les déposer dans les
déchetteries prévues à cet effet (renseignez-vous
auprès des autorités locales).
●
Mise à la casse de l’ancien
appareil
Informez-vous auprès de la municipalité au sujet de
l’endroit où déposer l’ancien appareil pour qu’il
puisse être ensuite recyclé ou détruit.
•
Appareiles usagés
Le symbole sur le produit ou son emballage
indique que ce produit ne peut etre traité comme
déchet ménager. Il doit plutôt etre remis au point de
ramassage concerné, se chargeant du recyclage du
matériel électrique et électronique. En vous assurant
que ce produit est éliminé correctement, vous favorisez la
prévention des conséquences négatives pour
l’environnement et la santé humaine qui, sinon, seraient le
résultat d’un traitement inapproprié des déchets de ce
produit. Pour obtenir plus de détails sur le recyclage de ce
produit, veuillez prendre contact avec le bureau municipal
de votre région, votre service d’élimination des déchets
ménagers ou le magasin ou vous avez acheté le produit. .
Conseils écologiques
Afin de réaliser des économies d’énergie, nous vous
conseillons de respecter les instructions suivantes:
●
Utilisez si possible l’appareil à pleine capacité;
des charges partielles sont peu économiques.
●
Tout le linge à sécher doit être essoré avant d'être
introduit dans le tambour. Plus la vitesse
d'essorage sera importante, plus courte sera la
durée du séchage d'où économie d'énergie.
●
Evitez de sécher le linge trop longtemps:
choisissez le programme de séchage en fonction
de la nature des textiles et du degré de séchage
désiré.
●
Pour utiliser l'appareil à pleine capacité vous
pouvez sécher en une fois du linge “prêt à
ranger” avec du linge “prêt à repasser”.
Sélectionnez le programme de séchage pour
“prêt à repasser” et à la fin du programme retirez
ce linge. Complétez le programme en
sélectionnant un séchage chronométrique pour
le linge “prêt à ranger”.
●
Nettoyez régulièrement les filtres pour éviter des
temps de séchage trop longs: vous
économiserez de l’énergie.
●
Pendant le fonctionnement de l’appareil, la
température ambiante ne doit pas dépasser
+ 35°C.
Page 19

FRANÇAIS
19
Description de l’appareil
1 Bandeau de commandes
2 Filtres
3 Plaque signalétique
4 Pieds réglables
5 Eclairage intérieur
1
2
2
3
4
5
6 Sorties latérales
7 Raccord
8 Sortie air humide à l’arrière
6
7
8
Page 20

20
Remarque:
La chaleur dégagée par le sèche-linge peut atteindre
jusqu’à 60°C. Tenez compte de ce facteur lors de
l’installation de l’appareil sur des revêtements de sol
sensibles.
Pendant le fonctionnement du sèche-linge, la
température ambiante ne doit pas dépasser +35°C;
sinon, il faut ouvrir une porte ou une fenêtre.
L’air doit pouvoir circuler librement tout autour de
l’appareil. Les grilles d’aspiration ne doivent pas être
obstruées.
Evacuation de l'air humide
L'évacuation de l'air humide peut s'effectuer par
l'arrière ou par les côtés de l'appareil.
Les orifices d'évacuation non utilisés doivent être
obstrués à l'aide des caches fournis avec l'appareil.
Le raccordement sur l'extérieur
Ce mode d'évacuation de l'air humide est possible
en raccordant le tuyau flexible de 100 mm de
diamètre, livré avec l’appareil, sur la sortie choisie.
Pour relier le tuyau à l'appareil il faut appliquer
d'abord à une extrémité du tuyau le raccord en
plastique «A» se trouvant sur l'orifice arrière et
ensuite introduire le tuyau dans l'orifice d'évacuation
choisi. Bouchez les autres orifices à l’aide des
caches.
Si votre appareil est placé dans un local très froid,
percez un trou au point B de 3 mm et déposez un
récipient plat dessous pour y récupérer l'eau de
condens
ation.
Le tuyau ne devra pas présenter plus de deux
coudes.
attention: ce sèche-linge ne doit pas
être raccordé sur un conduit de fumées.
Installation
Attention!
Débridage
Enlevez le sachet en polyéthylène avec le
rembourrage en polystyrène avant d’utiliser
l’appareil pour la première fois.
Enlevez le ruban adhésif da la partie
supérieure á l’intérieur da tambour.
Emplacement
Votre appareil doit être installé dans un local aéré
afin de permettre l'évacuation de l'air humide
dégagé de l'appareil pendant son fonctionnement.
Un excès de condensation dans la pièce prolonge le
temps de séchage et, par conséquent, la
consommation d'énergie. L'aération de la pièce peut
être obtenue par l'ouverture d'une fenêtre ou par
l'adaptation d'un raccordement sur l'extérieur.
Pour que l’appareil fonctionne dans les meilleures
conditions, il est indispensable de le mettre
parfaitement de niveau (emploi d’un niveau à bulle)
en agissant sur les quatre pieds réglables.
Un fonctionnement correct exige une arrivée d’air
exempte de poussière.
Ne démontez pas les pieds, ne limitez pas la
circulation de l’air au sol par de tapis à longs
poils, des moulures, etc. Il pourrait se produire une
accumulation de chaleur qui nuirait au bon
fonctionnement du moteur ou risquerait de
l’endommager.
P1106
A
P0046
P1028
P1056
A
P1027
B
Page 21

FRANÇAIS
21
Utilisez un socle de prise de courant comportant
une borne de mise à la terre qui doit être
obligatoirement raccordée conformément aux
normes en vigueur.
Notre responsabilité ne saurait être
engagée en cas d'incident ou
d'accident provoqué par une mise à la
terre défectueuse ou inexistante.
Installation en colonne
Ce sèche-linge peut être installé en colonne sur
certains lave-linge de notre marque à chargement
frontal. La fixation de ces deux appareils s'effectue à
l'aide du kit vendu sur demande. Ce kit est à
commander auprès de votre revendeur. Les
instructions de montage se trouvent dans
l'emballage.
Réversibilité de la porte
Si nécessaire, le sens d’ouverture de la porte peut
être changé de droite à gauche.
Cette opération ne doit être effectuée que par un
technicien qualifié.
Pour ce faire adressez-vous au service après-vente
le plus proche de votre domicile.
P1107
attention: ce sèche-linge ne doit pas
être raccordé sur un conduit de fumées.
Remarqe:
Si vous avez équipé l'extrémité du tuyau de
raccordement sur l'extérieur d'un clapet
anti-retour ou d'une grille, ils devront être
régulièrement entretenus pour ne pas être obstrués
par des peluches.
Un débit maximum d'évacuation d'au moins
150 m
3
/h doit être assuré.
Notre responsabilité ne saurait être
engagée en cas de surchauffe
provoquée par une obstruction due
à un corps étranger.
Vous avez également la possibilité d'orienter
l'extrémité du tuyau vers le bas afin d'empêcher
l'eau et le vent d'entrer.
Important: Il est possible que vous constatiez des
anomalies de fonctionnement si le local est équipé
d'une V.M.C. (ventilation mécanique centralisée).
Si le temps de séchage est anormalement long,
débranchez la VMC ou fermez l'orifice d'aspiration.
Si le sèche-linge est installé à côté de meubles de
cuisine, vérifiez que le tuyau d'évacuation n'est pas
écrasé. Si le tuyau est partiellement écrasé,
l'efficacité de séchage sera réduite, avec une
augmentation conséquente des temps de séchage
et de consommation d’électricité.
Si le tuyau est complètement écrasé, les dispositifs
de sécurité dont la machine est dotée pourraient se
déclencher. Dans ce cas, appelez le Service AprèsVente.
Raccordement électrique
Ce sèche-linge ne peut être branché qu'en
220-230V/ 50 Hz, 10 A.
Vérifiez que le compteur et les fusibles peuvent
supporter l'intensité absorbée par l'appareil (2.2 kW),
en tenant compte des autres appareils électriques
branchés.
P0055
Attention!
Le câble d’alimentation doit être
facilement accessible après l’installation
de l’appareil.
Page 22

22
Utilisation
Le bandeau de commandes
1 Programmateur/Minuteur
Il vous permet de sélectionner un séchage
électronique ou chronométrique.
Tournez la manette sur le programme ou le temps désiré.
Le séchage à contrôle électronique
(automatique)
L’appareil fonctionne avec ces programmes à l’aide
de sondes qui testent le degré d’humidité du linge.
Il vous suffit d’afficher le programme en fonction de
la catégorie de linge et du degré de séchage désiré.
Le séchage chronométrique
A utiliser pour parfaire le séchage si nécessaire.
Sélectionnez le programme 60 minutes pour le linge
en coton ou 30 minutes pour les synthétiques.
Pour annuler un programme en cours tournez le
programmateur sur “RESET”.A la fin du séchage
tournez-le sur “RESET” avant de sortir le linge.
2 Touche “MARCHE/ ARRET”
Cette touche permet de mettre le sèche-linge sous
tension. A la fin du programme, faites ressortir cette
touche pour mettre le sèche-linge hors tension.
3 Voyant de mise sous tension
Il s'allume lorsque l'appareil est sous tension
(touche marche/arrêt enclenchée) et s’éteint en
faisant ressortir la même touche.
4 Touche séchage délicat”DELICAT”
L’enclenchement de cette touche permet d’effectuer
un séchage à une température inférieure pour du
linge délicat. Le voyant correspondant s’allume.
5 Touche “ ALARME”
Des signaux sonores retentissent durant la phase
anti-froissage. Enclenchez cette touche lors de la
programmation si vous souhaitez supprimer l’alarme
sonore. Le voyant correspondant s’allume.
6 Touche départ “DEPART”
Appuyez sur cette touche pendant 2 secondes environ
pour mettre le sèche-linge en fonctionnement après
avoir sélectionné le programme.
Si la porte est ouverte en cours de programme,
cette touche doit être enclenchée à nouveau
après fermeture de la porte pour que le
programme démarre là où il a été interrompu.
Cette touche doit être enclenchée aussi après une
coupure de courant.
Dans les deux cas le voyant “SÈCHAGE” ou
“REFROID” (suivant la phase en cours) clignote pour
vous rappeler que la touche départ doit être
enclenchée à nouveau.
7 Voyants déroulement programme
Ces voyants vous indiquent les différentes phases
du programme que l’appareil est en train d’effectuer:
Voyant de séchage “SÈCHAGE”
Ce voyant indique que l’appareil est en phase de séchage.
Voyant phase de “REFROID”
Ce voyant indique que l’appareil est en phase de
refroidissement. En fin de séchage, une phase de
refroidissement de 10 minutes est prévue pour éviter
le froissement du linge.
Si le voyant “SÈCHAGE” ou “REFROID” clignote
cela signifie que la touche départ doit être enclenchée à
nouveau pour que le programme redémarre.
Voyant “FIN” de programme
Ce voyant clignote à la fin de la phase de
refroidissement et pendant la phase anti-froissage.
Voyant “ANTIFROISSAGE”
Les voyants “FIN” et “ANTIFROISSAGE” clignotent
alternativement à la fin du programme (après la phase
de refroidissement) et pendant la phase “antifroissage” pour vous rappeler que le programme est
terminé et que le linge peut être retiré.
Si seul le voyant “FIN” clignote cela signifie que la
phase anti-froissage est terminée: l’appareil s’arrête.
Page 23

23
Guide des programmes
Séchage életronique
Type de linge
Très sec
Sec
Coton et lin
Mixtes
Grenouillères
Vestons, pantalon,
vêtements, jupes.
(*) Suivant normes IEC 61121.
• Le programme “Bébé” est un programme à utiliser pour le séchage des grenouillères.
• Le programme “Rafraîchir” a été conçu pour nettoyer et rafraîchir à la maison, dans votre sèche-linge, les
articles portant le label “nettoyer à sec”. Utilisez à cet effet le produit spécial vendu dans le commerce.
à Ranger
Humide
Prêt à repasser
En machine
Très sec
à Ranger
à Repasser
Bébé
Rafraîchir
Degré de
séchage souhaité
Charge maxi
5 kg
5 kg
5 kg (*)
5 kg
5 kg (*)
5 kg
2.5 kg
2.5 kg (*)
2.5 kg
1 kg
(10 grenouillères)
1 - 4 vêtements
(1)
FRANÇAIS
Séchage chronométrique
Type de linge Durée de séchage Charge maxi
Coton
Coton
Synthétiques
(1) En aucun cas, le tambour ne doit être rempli en totalité (exclure par exemple les grandes couettes).
La durée du séchage est variable selon:
- la nature du linge
- l’importance de la charge
- l’intensité de l’essorage
- la degré de séchage souhaité
90 min
60 min
30 min
5 kg
5 kg
2.5 kg
(1)
Position du
programmateur
90’
60’
30’
Refroid
Ce programme peut être utilisé à toutes autres fins que le séchage du linge: pour éliminer une odeur trop
prononcée, antimites par exemple, ou par rafraîchir le linge.
Charge
Il est souvent difficile d’estimer le poids des articles à sécher. C’est pourquoi nous vous conseillons de remplir
le tambour:
• en totalité mais sans pression excessive, pour le linge en coton, lin, métis;
• à moitié de son volume pour les cotons traités et les fibres synthétiques;
• au tiers environ de son volume pour les articles très fragiles.
Page 24

24
Avant la première utilisation de votre sèche-linge,
faites-le fonctionner pendant 30 minutes environ, en
chargeant le tambour de quelques chiffons humides
(essorés), ceci afin d’éliminer d’éventuelles traces de
poussières ou de graisses.
Pour sécher votre linge:
1. Branchez l’appareil.
2. Ouvrez la porte en appuyant sur le point de
pression marqué sur la porte (voir croquis).
3. Dépliez les pièces de linge une à une et
introduisez-les dans le tambour.
4. Fermez la porte. Assurez-vous que le linge ne
reste pas coincé entre la porte et le filtre.
5. Enfoncez la touche “MARCHE/ARRET” : le
voyant de fonctionnement s’allume.
6. Sélectionnez le programme ou le temps de
séchage.
7. Enclenchez éventuellement la touche «séchage
délicat» et/ou la touche “A. Alarme”
8. Appuyez sur la touche «DÉPART» pendant 2
secondes: le séchage commence et le
voyant”DÉLICAT” s’allume. Durant le séchage le
tambour tourne alternativement dans les deux
directions.
Tous les programmes de séchage se terminent par
une phase de refroidissement de 10 minutes (le
voyant “REFROID” est allumé).
Le linge peut être retiré.
9. Si le linge n’est pas retiré en fin de cycle, le
sèche-linge effectue la phase anti-froissage
(durée: 30 minutes maximum).
Un signal sonore se fait entendre toutes les 10
secondes (si la touche A.ALARME n’a pas été
enclenchée
)
.
Les voyants”FIN” et”ANTIFROISSAGE”
clignotent alternativement.
Si vous n’intervenez pas durant cette phase, le
sèche-linge s’arrête automatiquement à la fin de
la phase anti-froissage.
P1108
P1104
Le voyant “FIN” clignote et celui de
fonctionnement reste allumé.
Tournez le programmateur sur “RESET”, le voyant
“FIN” s’éteint.
Faites ressortir la touche marche/arrêt (le voyant de
fonctionnement s’éteint) et sortez le linge
immédiatement.
Après chaque utilisation
• Tournez le programmateur sur “RESET”.
• Mettez l’appareil hors tension en faisant ressortir la
touche marche/arrêt. Le voyant de fonctionnement
s’éteint.
• Nettoyez les filtres (voir page 26)
Important!
Si le programme de séchage doit être arrêté avant
qu’il soit terminé, nous vous conseillons de tourner
la manette du programmateur sur la position
“REFROIDISSEMENT” (refroidissement) et
d’attendre la fin de cette phase pour retirer le linge.
Cela évitera une accumulation de chaleur à l’intérieur
de l’appareil. A cet effet tournez d’abord le
programmateur sur “RESET”, après sur
“REFROIDISSEMENT” et donnez le départ.
Modification du programme
Pour changer un programme en cours il faut d’abord
annuler celui-ci en tournant le programmateur sur
“RESET”. Sélectionnez le nouveau programme et
pressez la touche «départ» “START”.
.
Comment faire un séchage?
Page 25

FRANÇAIS
25
Guide de séchage
●
Ne surchargez pas le tambour de votre sèchelinge (5 kg de linge de coton sec ou 2,5 kg de
linge synthétique sec max.). Pour les articles
particulièrement fragiles, il est recommandé de
réduire encore la charge. Une surcharge du
tambour prolongerait anormalement le temps de
séchage et pourrait être cause du froissement du
linge.
Nous vous donnons à titre indicatif les poids
moyens des pièces les plus communes:
Drap 700-1000 g
Nappe 400-500 g
Torchon 70-120 g
Serviette 50-100 g
Serviette-éponge 150-250 g
Peignoir 1000-1500 g
Chemise d'homme 200-300 g
Taie d'oreiller 100-200 g
Pyjama 400-500 g
Chemise de nuit 200-250 g
Important:
●
Ne faites jamais sécher en machine:
- les lainages, les soieries et les voilages, les
articles en chlorofibres (Thermolactyl etc....).
- les matières caoutchoutées, les tissus plastifiés
et les articles ouatinés (anoraks, couettes etc...)
- les articles ayant été précédemment nettoyés
avec des produits inflammables
- les tissus ayant tendance à s'effilocher.
●
Conformez-vous scrupuleusement aux étiquettes
d'entretien de votre linge et assurez-vous que
l'article peut être séché en machine.
Séchage en tambour permis
Séchage en tambour à haute température
Séchage en tambour à température
modérée
Séchage en tambour interdit
●
Fermez les boutons pression et les fermetures à
glissière et recousez les boutons si nécessaire.
●
Veillez à nouer les ceintures et les rubans des
vêtements avant de les introduire dans le
tambour.
●
Vous obtiendrez un séchage homogène si vous
prenez la précaution de trier chaque catégorie de
linge selon son épaisseur, par exemple séchez
séparément les tissus-éponges.
●
Séchez un par un les articles tels que housses de
couette, draps, draps housse afin d'éviter qu'ils ne
s'enroulent et forment des noeuds.
●
Retournez sur l'envers les articles molletonnés et
pelucheux, ainsi que les poches de pantalon afin
d'éviter les épaisseurs longues à sécher.
●
Tout le linge à sécher doit être essoré avant de
procéder au séchage.
●
Evitez de sécher le linge trop longtemps: vous
économiserez de l'énergie et éviterez également la
formation de faux plis dans le linge.
●
L'adjonction d'assouplissant au dernier rinçage
(en lave-linge) permet de réduire l'électricité
statique sur le linge.
●
Choisissez, pour les tissus en coton épais, un
temps de séchage qui rend le linge prêt au
repassage (c'est-à-dire imprégné de l'humidité
que requiert un repassage immédiat). Si le
repassage ne peut pas se faire immédiatement,
enroulez le linge pour obtenir un degré
d'humidité uniforme.
●
Les articles tissés ont tendance à rétrécir. Un
séchage excessif renforce cet effet. Il faut, par
conséquent, sélectionner une durée de séchage
très courte pour ces textiles. Nous vous
recommandons de tenir compte des possibilités
de rétrécissement de ces textiles lors de
nouvelles acquisitions.
●
Si le linge devait être encore humide à la fin du
séchage, affichez un temps d’au moins 30
minutes pour parfaire le séchage.
Page 26

26
Entretien
Débranchez l'appareil avant toute opération
d'entretien.
Nettoyage extérieur
Utilisez de l'eau savonneuse. Rincez et séchez
soigneusement.
Important: N’utilisez jamais de produits abrasifs ou
caustiques.
Nettoyage de la porte
Nettoyez périodiquement l’intérieur de la porte pour
enlever d’éventuelles peluches des joints autour du
filtre. Un nettoyage soigneux est indispensable pour
un séchage correct.
Nettoyage des filtres
Situés à l’intérieur de la porte et dans l’ouverture du
hublot, les filtres doivent être nettoyés après chaque
utilisation à l’aide d’un chiffon humide avant de
sortir le linge.
Le filtre à l’intérieur de la porte doit être enlevé pour
pouvoir le nettoyer. A cet effet, tirez sur la poignée
vers le haut.
La quantité de peluches recueillies ne doit pas vous
inquiéter, elle est due à une usure normale du linge
et non à un mauvais fonctionnement de l’appareil.
Un frottement des fibres et du tissu se produit
pendant l’utilisation et le lavage du linge provoquant
une formation de peluches. Si le séchage du linge
est effectué sur un séchoir ou un fil ces peluches
s’envolent, tandis qu’à l’intérieur du sèche-linge
elles s’accumulent et se gonflent fortement sous
l’action du séchage.
Si nécessaire, les deux filtres peuvent être nettoyés
sous l’eau courante à l’aide d’une brosse. En ce cas,
enlevez aussi le filtre situé dans l’ouverture du
hublot comme indiqué dans le croquis. Il peut être
remis en place la languette tournée à gauche ou à
droite.
N’utilisez jamais votre sèche-linge sans filtres.
A
U
T
O
R
E
V
E
R
S
E
k
g
5
k
g
2
,
5
8
0
0
/
9
0
0
7
0
'
-
9
0
'
3
5
'
-
5
0
'
1
0
0
0
/
1
2
0
0
6
5
'
-
8
5
'
3
0
'
-
4
5
'
8
0
0
/
9
0
0
8
0
'
-
10
0
'
5
5
'
-
7
0
'
1
0
0
0
/
1
2
0
0
7
5
'
-
9
5
'
5
0
'
-
6
5
'
6
5
0
5
0
'
-
6
0
'
3
0
'
-
3
5
'
kg
2
,5
k
g
1
P1112
SE
R
50
6
EVE
R
'
0
6
'
TO
0
5
U
5
,
2
A
g
0
k
'
20
5
1
3
0 /
-
'
100
0
3
1
00
9
g
'
k
5
0 /
9
80
-
'
5
7
'
00
0
0
12
1
'
/
5
'
6
00
0
-
10
'
8
0
5
00
9
'
'
/
5
0
8
7
00
-
8
-
'
'
5
5
6
5
'
0
9
'
5
'
4
0
-
7
'
0
3
5
g
k
'
0
5
'
5
3
5
,
2
g
k
P1109
E
S
0
R
5
6
E
V
E
'
R
0
6
O
-
'
T
0
5
U
,5
A
0
kg 2
0
'
2
1
5
/
3
0
-
0
'
0
1
0
3
0
0
9
'
/
kg 1
5
0
9
0
8
'
5
7
'
0
0
0
2
0
1
1
'
/
5
0
'
6
0
0
0
-
1
8
'
0
5
0
0
9
'
'
/
5
0
0
8
7
0
-
8
-
'
'
5
5
6
5
'
0
9
'
5
'
4
0
-
7
'
0
3
kg 5
'
0
5
'
5
3
kg 2,5
P1110
P1111
Page 27

27
FRANÇAIS
En cas d’anomalie de fonctionnement
Si vous appelez un service après-vente, indiquez-lui
le modèle, le numéro de produit et le numéro de
série de l’appareil. Ces indications figurent sur la
plaque signalétique (voir page 19).
En cas d'anomalie ou de panne, nous vous conseillons de lire attentivement ce qui suit avant d'appeler votre
service après-vente.
●
Anomalie
●
Causes possibles
●
Le sèche-linge ne démarre pas:
●
Porte mal fermée
●
Appareil non branché
●
Mauvais état du fusible au compteur
●
Coupure de courant
●
Touche départ non enclenchée START
●
Le résultat de séchage n'est pas
satisfaisant
●
Le programme choisi ne convient pas au linge
●
Le linge n’a pas été suffisamment essoré après le
lavage
●
Les filtres sont obstrués
●
Le tambour est surchargé
●
Vous avez enclenché la touche de séchage
délicat “DÉLICAT”
●
Le sèche-linge n’a pas été installé correctement
Page 28

28
Sehr geehrte Kundin, sehr geehrter Kunde,
lesen Sie bitte diese Gebrauchsanweisung sorgfältig durch.
Beachten Sie vor allem die Sicherheitshinweise auf den ersten Seiten dieser Gebrauchsanweisung! Bewahren
Sie bitte die Gebrauchsanweisung zum späteren Nachschlagen auf. Geben Sie sie an eventuelle Nachbesitzer
des Geräts weiter.
Transportschaden
Vergewissern Sie sich nach dem Auspacken zunächst, dass das Gerät nicht beschädigt wurde. Nehmen Sie
das Gerät im Zweifelsfall nicht in Betrieb, sondern wenden Sie sich bitte an den Kundendienst.
Einige Passagen in der Gebrauchsanweisung sind besonders gekennzeichnet. Diese Kennzeichnungen haben
folgende Bedeutung:
Hier finden Sie wichtige Informationen über ungeeignete Handhabungen lhres Wäschetrockners, die
technische Schäden verursachen können.
Hier finden Sie Informationen, die für die einwandfreie Funktion des Geräts besonders wichtig sind.
Hier finden Sie wichtige Umweltschutzhinweise.
Unser Beitrag zum Umweltschutz:
Wir verwenden Recycling-Papier.
Page 29

29
DEUTSCH
Inhalt
Wichtige Sicherheitshinweise........30
Entsorgung ..................................................31
Umwelttipps ................................................31
Gerätebeschreibung..............................32
Installation....................................................33
● Entfernen der Transportsicherung....................33
● Aufstellung........................................................33
● Anschluss eines Abluftschlauchs ....................33
● Elektrischer Anschluss ....................................34
● Wasch-/Trockensäule ......................................34
● Türanschlagwechsel ........................................34
Gebrauch ......................................................35
● Bedienblende ..................................................35
● Trockenprogramme ..........................................36
● Reihenfolge der Arbeitsschritte........................37
● Praktische Tipps ................................................38
Wartung ..........................................................39
● Reinigung des Trocknergehäuses....................39
● Reinigung des Siebbereichs ............................39
● Reinigung der Flusensiebe ..............................39
Betriebsstörungen..................................40
Technische Daten
ABMESSUNGEN: Höhe 85 cm
Breite 60 cm
Tiefe 58 cm
NETZSPANNUNG/FREQUENZ: 220/230 V/50 Hz
GESAMTANSCHLUSSWERT: 2200 W
ABSICHERUNG: 10 A
FASSUNGSVERMÖGEN: Baumwolle, Leinen 5,0 kg
Pflegeleichte Gewebe 2,5 kg
Dieses Gerät entspricht den folgenden EG-Richtlinien:
- 73/23 EWG vom 19.2.73 - Niederspannungsrichtlinie
- 89/336 EWG vom 3.5.89 (einschließlich Änderungsrichtlinie 92/31/EWG) - EMV-Richtlinie.
VERBRAUCHSWERTE: Baumwolle, Leinen 2,7 kWh (5 kg schranktrocken)
Baumwolle, Leinen 2,2 kWh (5 kg bügelfeucht)
Page 30

30
Wichtige Sicherheitshinweise
Installation
●
Lassen Sie die beim Elektroanschluss des Geräts
entstehenden Arbeiten von einem fachkundigen
und zugelassenen Installateur ausführen.
●
Stellen Sie sicher, dass das Gerät nicht auf dem
Netzkabel steht.
●
Der Aufstellplatz darf nicht mit textiler
Auslegware, hochflorigem Teppichboden usw.
belegt sein, damit die Belüftung des Motors
gewährleistet ist.
●
Bei diesem Gerät muss die feuchte Luft ins Freie
abgelassen werden. Es sollte daher ein eigenes
Entlüftungssystem haben und nicht an andere
Systeme anderer Geräte angeschlossen werden.
Gebrauch
●
Gerät nur im Haushalt und für den angegebenen
Zweck benutzen.
●
Ziehen Sie nach Gebrauch des Geräts immer den
Netzstecker aus der Steckdose.
●
Nicht geschleuderte Wäsche darf nie im
Wäschetrockner getrocknet werden.
●
Mit feuergefährlichen Reinigungs- und
Lösungsmitteln (Waschbenzin, Alkohol,
Fleckentferner etc.) behandelte Wäschestücke
dürfen nie in diesem Wäschetrockner getrocknet
werden. Es besteht Brandgefahr.
Also nur in Wasser gewaschene Textilien
trocknen!
●
Mit Öl getränkte oder befleckte Wäschestücke
dürfennicht in dem Trockner getrocknet werden.
Brandgefahr!
●
Falls Sie Ihre Wäsche mit einem Fleckentferner
behandelt haben, führen Sie in Ihrem
Waschprogramm einen extra Spülgang durch.
●
Die Benützer sollten sich immer davon
überzeugen, dass keine Gasfeuerzeuge (auch
nichtfunktionierende) in den Kleidungsstücken
vergessen wurden.
●
Trocknen Sie nie Sportschuhe (z.B.
Tennisschuhe) in diesem Trockner. Diese könnten
zwischen Trommel und Einfülltür rutschen und
dadurch die Trommel blockieren.
●
Lassen Sie die Einfülltür zwischen einem
Trockenvorgang und dem folgenden angelehnt,
damit die Türdichtung auf Dauer wirksam bleibt.
●
Benützen Sie das Gerät nie ohne Flusensiebe
oder mit beschädigten Flusensieben. Es besteht
Brandgefahr.
●
Der Raum um den Trockner muss von Flusen
freigehalten werden.
Allgemeine Sicherheitsvorschriften
●
Es ist gefährlich, Veränderungen am Gerät oder
seinen Eigenschaften vorzunehmen.
●
Versuchen Sie keinesfalls, das Gerät selbst zu
reparieren. Reparaturen, die nicht von Fachleuten
ausgeführt werden, können zu schweren Unfällen
oder Betriebsstörungen führen.
●
Das technische Service sollte nur von
autorisierten Kundendienststellen ausgeführt
werden; verlangen Sie nur Original-Ersatzteile.
Sicherheit von Kindern
●
Kinder können Gefahren, die im Umgang mit
Elektrogeräten liegen, oft nicht erkennen. Sorgen
Sie deshalb für die notwendige Aufsicht während
des Betriebs und lassen Sie Kinder nicht mit dem
Wäschetrockner spielen.
●
Verpackungsteile (z.B. Folien, Styropor) können
für Kinder gefährlich sein. Erstickungsgefahr!
Verpackungsteile von Kindern fernhalten
●
Stellen Sie sicher, dass Kinder oder Kleintiere
nicht in die Trommel des Wäschetrockners
klettern.
●
Bei der Entsorgung des Wäschetrockners: Ziehen
Sie den Netzstecker, schneiden Sie die
elektrische Zuleitung ab und beseitigen Sie den
Stecker mit der Restleitung. Zerstören Sie das
Türschloss: so können spielende Kinder sich
nicht einsperren und nicht in Lebensgefahr
geraten..
Die folgenden Warnhinweise werden im Interesse der allgemeinen Sicherheit gegeben. Lesen Sie diese vor der
Installation oder der Verwendung dieses Gerätes aufmerksam durch!
Page 31

31
DEUTSCH
Ihr Wäschetrockner arbeitet besonders
wirtschaftlich, wenn Sie folgendes beachten:
●
Die maximale Füllmenge nutzen -entsprechend
der Programmübersicht auf Seite 25. Kleine
Wäschefüllungen sind unwirtschaftlich.
●
Die Wäsche gründlich entwässern. Je höher die
Schleuderdrehzahl, umso kürzer ist die
Trockenzeit und umso geringer ist der
Stromverbrauch.
●
Übertrocknen vermeiden durch sorgfältige
Programmwahl entsprechend des gewünschten
Trockengrades. Übertrocknete Wäsche lässt sich
zudem schlecht bügeln.
●
Um die maximale Füllmenge auszunutzen, kann
Wäsche, die schranktrocken werden soll, ohne
weiteres mit Bügelwäsche getrocknet werden.
Dazu das Programm für Bügelwäsche einstellen,
nach Programmende die Bügelwäsche
entnehmen und die restliche Wäsche
anschließend zu Ende trocknen.
●
Wenn Sie die Flusensiebe regelmäßig reinigen,
vermeiden Sie längere Trockenzeiten und
höheren Stromverbrauch.
●
Den Raum gut belüften. Die Raumtemperatur
sollte während des Trocknens + 35°C nicht
übersteigen.
Umwelttipps
●
Verpackungsentsorgung
Die recyclingfähigen Materialien der Verpackung
sind mit dem Symbol gekennzeichnet und
sollten grundsätzlich der Wiederverwertung
zugeführt werden.
>PE< steht für Polyethylen
>PS< steht für Polystyrol
>PP< steht für Polypropylen
●
Entsorgung des Altgeräts
Wenn Sie Ihr Gerät eines Tages endgültig außer
Betrieb nehmen, bringen Sie es bitte zum
nächsten Recyclingcenter oder zu Ihrem
Fachhändler, der es gegen einen geringen
Unkostenbeitrag zurücknimmt.
• Altgerät
Das Symbol auf dem Produkt oder seiner
Verpackung weist darauf hin, dass dieses Produkt
nicht als normaler Haushaltsabfall zu behandeln ist,
sondern an einem Sammelpunkt für das Recycling
von elektrischen und elektronischen Geräten
abgegeben werden muss. Durch Ihren Beitrag zum
korrekten Entsorgen dieses Produkts schützen Sie
die Umwelt und die Gesundheit Ihrer Mitmenschen.
Umwelt und Gesundheit werden durch falsches
Entsorgen gefährdet. Weitere Informationen über
das Recycling dieses Produkts erhalten Sie von
Ihrem Rathaus, Ihrer Müllabfuhr oder dem Geschäft,
in dem Sie das Produkt gekauft haben.
Entsorgung
Page 32

32
Gerätebeschreibung
01 Bedienblende
02 Flusensiebe
03 Typenschild
04 Schraubfüße
05 Glühlampe für Innenbeleuchtung
06 Abluftöffnung seitlich
07 Anschlussring
08 Abluftöffnung hinten
0
1
2
2
3
4
5
6
7
8
Page 33

33
DEUTSCH
Installation
Achtung!
Entfernen der Transportsicherung
Ziehen Sie den Folienschlauch mit dem
Polystyrolpolster heraus, bevor Sie das Gerät
zum ersten Mal in Betrieb nehmen.
Klebestreifen innen an der Trommeloberseite
abziehen.
Aufstellung
Das Gerät soll in einem genügend belüfteten Raum,
wenn möglich in der Nähe eines Fensters aufgestellt
werden, da sich während der Trocknung eine
gewisse Menge feuchte Luft bildet.
Noch günstiger ist die Abführung der feuchten Luft.
Der Raum um den Trockner muss von Flusen
freigehalten werden.
Der Trockner kann auf jedem ebenen Fußboden
aufgestellt werden. Er muss waagerecht stehen,
also eventuell mit einer Wasserwaage
ausgerichtet werden. Durch Verstellen der
Schraubfüße lassen sich Bodenunebenheiten
bzw.-schräglagen ausgleichen.
Schraubfüße nicht entfernen.
Für eine einwandfreie Funktion ist eine gute und
stauungsfreie Luftzufuhr sicherzustellen.
Die Bodenfreiheit nicht durch hochflorige
Teppichböden, Leisten u.ä. einschränken.
Es könnte ein Wärmestau eintreten, der das
Gerät in seiner Funktion beeinträchtigt.
P0046
P1106
Hinweis:
Die vom Trockner abgegebene Warmluft kann
bis zu 60°C betragen - Aufstellung nicht auf
empfindlichen Teppichböden.
Die Raumtemperatur sollte auch während des
Betriebs +35° nicht übersteigen (Raum lüften!)
Ableitung der feuchten Luft
Die feuchte Luft kann aus der Rückseite oder aus
der linken bzw. rechten Seite abgeleitet werden. Die
unbenutzten Öffnungen sind durch die mitgelieferten
Deckel zu verschließen.
Anschluss eines Abluftschlauchs
Kann der Wäschetrockner nicht in einem lüftbaren
Raum aufgestellt werden, ist eine Abführung der
feuchten Luft durch eine flexible Abluftleitung
unerlässlich.
Verwenden Sie dazu den mitgelieferten 100 mm
breiten Schlauch, der in eine der Abluftöffnungen am
Gerät durch den mitgelieferten Ring “A” zu stecken
ist. Dieser befindet sich in der Abluftöffnung auf der
Rückseite des Geräts.
Achten Sie darauf, dass die beiden nicht
verwendeten Öffnungen durch die mitgelieferten
Deckel verschlossen werden.
Sollte der Aufstellungsraum sehr kalt sein,
empfehlen wir, ein Loch (3 mm) an der untersten
Stelle des Schlauchs zu bohren (siehe Abb., Punkt
“B”) und ein Gefäß darunter zu stellen, um das
Kondenswasser aufzufangen.
A
P1028
A
P1027
P1056
B
Page 34

34
Wichtig ist, dass die Abluftleitung immer auf dem
kürzesten Wege -ohne viele Bögen - verlegt wird,
damit das Gerät so wirtschaftlich wie möglich
arbeitet.
Der Schlauch darf im montierten Zustand nicht
mehr als zwei Knie aufweisen.
Keinesfalls darf der Abluftschlauch an
Kamine von Heizanlagen oder
ähnlichem angeschlossen werden.
Eine Abluftabgabe von mindestens 150 m
3
/h muss
auf jeden Fall gewährleistet werden.
Wird am anderen Schlauchende eine
Rückschlagklappe bzw. ein Gitter angebracht,
sorgen Sie dafür, dass diese durch Rost oder
Schmutz nicht verstopft wird. Reinigen Sie sie
regelmäßig.
Selbstverständlich können Sie das Schlauchende
nach unten richten, damit Regenwasser und Wind
nicht eindringen können.
Wenn der Aufstellungsraum an einen zentralen, sehr
leistungsstarken Entlüfter angeschlossen ist, können
Probleme auftreten. Wenn Sie feststellen, dass die
Trocknungszeit zu lange dauert, schalten Sie den
Entlüfter aus oder schließen Sie, während der
Trockner in Betrieb ist, das Gitter des Entlüfters.
Falls der Wäschetrockner neben anderen
Küchenmöbeln aufgestellt wird, vergewissern Sie
sich, dass der Abluftschlauch nicht geknickt ist.
Sollte der Schlauch teilweise geknickt sein, müssen
Sie mit einer Verminderung des Trockenresultates
und folglich mit längeren Trockenzeiten und
höherem Verbrauch rechnen.
Sollte der Schlauch total geknickt sein, schalten sich
die Sicherheitsvorrichtungen ein, mit denen die
Maschine ausgestattet ist. In diesem Falle muss der
Kundendienst verständigt werden.
P0055
Elektrischer Anschluss
Der Anschluss darf nur über eine vorschriftsmäßig
installierte Schutzkontakt-Steckdose an 220-230 V
(50 Hz) erfolgen.
Der Anschlusswert beträgt ca. 2,2 kW. Erforderliche
Absicherung: 10A - LS-L-Schalter.
Die Erzeugerfirma lehnt jegliche
Verantwortung für eventuelle Unfälle
ab, die durch Nichtbeachtung dieser
Sicherheitsvorschriften entstehen.
Wasch-/Trockensäule
Der Aufbau zur platzsparenden Wasch-/
Trockensäule ist mit allen Waschvollautomaten von
60 cm Breite und Frontbeschickung möglich. Hierzu
benötigen Sie einen Bausatz, der bei Ihrem Händler
erhältlich ist. Eine ausführliche Montageanweisung
liegt dem Bausatz bei.
Türanschlagwechsel
Falls erwünscht ist es möglich, die Tür auf
Linksanschlag zu ändern.
Zu diesem Zweck wenden Sie sich bitte an die
nächste Kundendienststelle.
P1107
Achtung!
Das Netzkabel muss nach Aufstellung des
Geräts leicht zugänglich sein.
Page 35

35
DEUTSCH
Gebrauch
Bedienblende
1 Programmwähler
Mit dem Programmwähler stellen Sie die
automatische und zeiteingestellte Trocknung ein.
Trocknung durch elektronische
Programme
Diese arbeiten mit Feuchtigkeitssensoren.
Sie müssen einfach den Programmwähler auf das
gewünschte Programm einstellen und die Wäsche
wird solange getrocknet, bis sie den gewünschten
Feuchtigkeitsgrad erreicht hat.
Zeiteingestellte Trocknung
Zeitliches Trocknen für individuelles Trocknen oder
Nachtrocknen von Wäschestücken.
Drehen Sie den Programmwähler auf 60 Minuten für
Baumwolle u. Leinen oder auf 30 Minuten für
pflegeleichte Wäsche.
Zur Annullierung eines bereits laufenden Programms
drehen Sie den Programmwähler auf “RESET”.
Am Ende des Trocknens muss der Programmwähler
wieder auf “RESET” gedreht werden
2 Ein/Aus-Taste
Durch Drücken der Taste wird das Gerät
eingeschaltet. Die Betiebskontrollampe leuchtet.
Nach Beedigung des Trocknungsprogramms, Taste
emeut drücken. Das Gerät schaltet sämtliche
Funktionen ab.
3 Betriebskontrolle
Die Betriebskontrolllampe leuchtet, wenn das Gerät
eingeschaltet ist.
4 SCHON-Taste
Durch Drücken der Taste wird in allen
Trocknungsprogrammen, auch bei zeitlicher
Trocknung, mit reduzierter Heizleistung getrocknet.
Zu benutzen, wenn empfindliche Gewebe getrocknet
wird.
Die darüberliegende Lampe leuchtet.
5
SIGNAL AUS-Taste
Drücken Sie diese Taste, falls Sie das akustische
Signal während der Knitterschutzphase abschalten wollen.
6 START-Taste
Durch Drücken der Taste (ca. 2 Sek.), starten Sie
das gewählte Trocknungsprogramm.
Hinweis! Wird das laufende Trocknungsprogramm
durch Öffnen der Tür unterbrochen, muss, nachdem
die Tür wieder geschlossen wurde, das Programm
neu gestartet werden.
Diese Taste soll auch nach einem Stromausfall
wieder gedrückt werden.
In beiden Fällen blinkt die entsprechende Lampe
( “TROCKNEN” oder “ABKÜHLEN )im Informator.
7 Kontrolllampen
Der Informator informiert Sie über den momentanen
Programmstand und zeigt an, wenn das Gerät neu
gestartet werden muss.
Die Kontrolllampen zeigen folgende Funktionen an:
• Kontrolllampe “TROCKNEN” leuchtet.
Die Trocknungsphase mit Heizung wird
durchgeführt.
• Eine der Kontrolllampen TROCKNEN und
ABKÜHLEN blinkt.
Das Programm muss neu gestartet werden.
• Kontrolllampe ABKÜHLEN leuchtet.
Die Abkühlphase von ca. 10 Minuten läuft ab.
• Kontrolllampen ENDE und KNITTERSCHUTZ
blinken wechselweise.
Das Programm ist beendet, die Wäsche kann
entnommen werden.
Wird die Wäsche nicht entnommen, läuft automatisch die
Knitterschutzphase von 30 Minuten ab.
• Kontrolllampe ENDE blinkt.
Die Knitterschutzphase von 30 Minuten ist
abgelaufen, es erfolgt keine Trommelbewegung
mehr.
Page 36

36
(1) Die Trockendauer ist von der Füllmenge, der Gewebeart und der Restfeuchte der zu trocknenden Wäsche
abhängig.
Programm ABKÜHLEN
Diese Programmstellung kann zum Auslüften von Pullis, Kleidern usw. verwendet werden.
Füllmenge
Sie brauchen die Wäsche nicht abzuwiegen, wenn Sie sich an folgende Faustregeln halten:
●
Baumwolle, Leinen: volle Trommel, aber nicht überladen.
●
Pflegeleichte Gewebe: Trommel bis zur Hälfte füllen.
●
Besonders empfindliche Gewebe: Trommel nicht mehr als 1/3 füllen..
(*) Vergleichsprogramme nach CEI 1121.
Art der Wäsche
Gewünschter
Trockengrad
Füllmenge
Baumwolle und Leinen
Extratrocken
Starktrocken
Schranktrocken (*)
Leichttrocken
Bügeltrocken (*)
Mangeltrocken
Zeiteingestellte Trocknung
Mischgewebe
Extratrocken
Schranktrocken (*)
Bügeltrocken
2.5 kg
2.5 kg
2.5 kg
Strampelanzüge
bis 1 kg
(10 Strampelanzüge)
Jacken, Kleider, Hosen,
Röcke, Blusen
Auffrischen-Programm
1 - 4 Textilien
Trockenprogramme
Elektronische Trocknung
Wäscheart Trockenzeiten
Wäschemenge
(1)
Programm-
Wahlschalter Stellung
Baumwolle
Baumwolle
Mischgewebe
90 min
60 min
30 min
90 min
60 min
30 min
• Babywäsche ist ein spezielles Trockenprogramm für Strampelanzüge, die durchgetrocknet werden sollen.
• Auffrischen ist besonders geeignet zum Auffrischen und sanften Reinigen von Textilien mit Hilfe von
handelsüblichen Trockenreinigungs-Sets (Herstellerangaben zur Anwendung beachten).
Babywäsche-Programm
5 kg
5 kg
5 kg
5 kg
5 kg
5 kg
5 kg
5 kg
2.5 kg
Page 37

37
DEUTSCH
Reihenfolge der Arbeitsschritte
Vor der ersten Inbetriebnahme empfiehlt es sich,
den Trockner mit einigen feuchten Tüchern zu
beschicken und ca. 30 Minuten laufen zu lassen.
Dadurch wird sichergestellt, dass sich kein Staub
und Schmutz mehr in der Trommel befindet.
1. Gerät anschliessen.
2. Tür durch leichten Druck auf die markierte Stelle
öffnen.
3. Waschgut in die Trommel legen.
4. Tür schließen. Achten Sie darauf, dass keine
Wäschestücke eingeklemmt werden.
5. EIN/AUS-Taste drücken, die
Betriebskontrolllampe leuchtet auf.
6. Trockenprogramm oder Trockenzeit wählen.
7. Taste SCHON under/oder SIGNAL AUS
eventuell drücken.
8. Start-TasteSTART drücken: das
Trocknungsprogramm beginnt, die Kontrolllampe
TROCKNEN leuchtet auf.
9. Damit die Wäsche abkühlen kann, wird 10
Minuten vor Programmende automatisch die
Abkühlphase eingeschaltet. Die Kontrolllampe
ABKÜHLEN leuchtet auf.
Wird die Wäsche am Ende des Programms nicht
entnommen, schaltet sich automatisch das
Knitterschutzprogramm, das ca. 30 Minuten
dauert, ein.
Am Programmende und während der
Knitterschutzphase ertönt alle 10 Sekunden ein
kurzer Signalton ( falls Sie die TasteSIGNAL AUS
nicht gedrückt haben).
Die Lampen ENDE und Knitterschutz des
Informators blinken wechselweise.
Während der Knitterschutzphase können Sie
jederzeit die Wäschestücke entnehmen.
Wird dies nicht gemacht, bleibt die Maschine am
Ende des Programms automatisch stehen, die
Lampe ENDE blinkt und die Betriebskontrollleuchte
bleibt eingeschaltet.
P1108
P1104
Nach dem Trocknen
●
Programmwähler auf “RESET” drehen.
●
Gerät ausschalten durch Drücken der EIN/AUSTaste, die Betriebskontrollleuchte erlischt.
●
Flusensiebe reinigen (siehe Seite 39)
Hinweis!
Soll das Trocknungsprogramm vorzeitig beendet
werden, empfehlen wir, um Stauwärme im Gerät zu
vermeiden, grundsätzlich vorher das Programm
ABKÜHLEN einzuschalten. Dazu ProgrammWahlschalter auf “RESET” drehen, Programm
wählen und Start-Taste drücken.
Programmänderung
Bevor eine Programmänderung
durchgeführt werden
kann, muss erst das laufende Programm gelöscht
werden.
Drehen Sie den Programm-Wahlschalter auf die
Position «RESET», das vorherige Programm ist nun
gelöscht. Die Neueinstellung kann erfolgen.
Page 38

38
Praktische Tipps
● Überladen Sie das Gerät nicht.
Beachten Sie die maximalen Füllmengen.
Eine Überfüllung beeinträchtigt das
Trockenergebnis und führt zu starker
Knitterbildung. Eine zu geringe Wäschefüllung ist
unwirtschaftlich.
Folgende Gewichtsangaben können als
Richtwerte dienen:
Bettbezug 700-1000 g
Tischtuch 400-500 g
Geschirrtuch 70-120 g
Serviett 50-100 g
Frottiertuch 150-250 g
Bademantel 1000-1500 g
Herrenhemd 200-300 g
Kissenbezug 100-200 g
Herrenschlafanzug 400-500 g
Damennachthemd 200-250 g
Wichtig:
● Besonders empfindliche Gewebe, z.B. Gardinen
aus synthetischen Fasern, Wollsachen, Seide,
Textilien mit Metalleinlagen, Nylonstrümpfe,
großvolumige Textilien, z.B. Anoraks,
Tagesdecken, Steppdecken, Schlafsäcke und
Federbetten, sowie Wäschestücke, die
überwiegend Schaumgummi oder gummiähnliches
Material enthalten, dürfen nicht getrocknet werden.
● Bitte prüfen Sie, ob die Wäsche zum Trocknen im
Wäschetrockner geeignet ist. Einen
Pflegehinweis mit dem entsprechenden Symbol
finden Sie im Wäsche-Etikett.
Die Symbole für das Trocknen und ihre
Bedeutung:
Trocknergeeignet
Normales Trocknen (volle Heizleistung)
z.B. für Baumwollwäsche
Schonendes Trocknen (reduzierte
Heizleistung) - für pflegeleichte Wäsche,
z.B. Acryl
Trocknen im Wäschetrockner nicht
möglich - z.B. Wolle und Textilien mit
Wollanteil, Seide
● Bettbezüge und Kissen sollten zugeknöpft
werden, damit Kleinteile sich darin nicht
“sammeln” können.
Reißverschlüsse, Haken und Ösen schließen Sie,
lose Gürtel, Schürzenbänder etc. binden Sie
zusammen.
● Sortieren Sie die Wäsche nach Textilarten und
gewünschtem Trockengrad.
● Die Wäsche muß vor dem Trocknen gut
ausgeschleudert sein.
● Ein Übertrocknen der Wäsche sollte vermieden
werden, um Knitter bzw. unnötigen
Energieverbrauch zu vermeiden.
● Verwenden Sie zum Waschen einen Weichspüler,
um am Ende des Trockenvorganges statische
Aufladungen zu vermeiden und auch um die
Trockenzeiten zu reduzieren.
● Gewirkte Textilien (Trikotwäsche) können beim
Trocknen etwas einlaufen. Wäsche dieser Art
bitte nicht übertrocknen.
Es ist empfehlenswert, bei Neuanschaffung die
Einlaufeigenschaften bei der Größenwahl zu
berücksichtigen.
● Sind nach dem Trocknen einzelne Wäschestücke
noch zu feucht, dann stellen Sie eine kurze
Nachtrockenzeit ein, jedoch mindestens 30
Minuten. Das wird vor allem bei mehrlagigen
Wäschestücken (z.B. Kragen, Taschen usw.)
erforderlich sein.
Page 39

39
DEUTSCH
Wartung
Ziehen Sie vor jeder Reinigungs- oder
Wartungsarbeit den Netzstecker des Gerätes aus
der Steckdose.
Reinigung des Trocknergehäuses
Verwenden Sie nur Seifenwasser und trocknen Sie
das Gerät danach sorgfältig.
Wichtig: Alkohol, Lösungsmittel und dgl. dürfen
nicht verwendet werden.
Reinigung des Siebbereichs in der
Innentür
Ein minimaler Anteil der Flusen gelangt trotz des
Flusensiebs in den umgebenden Siebbereich.
Reinigen Sie deshalb von Zeit zu Zeit den gesamten
Siebbereich mit einem feuchten Tuch.
Reinigung der Flusensiebe
Der Wäschetrockner funktioniert nur bei gereinigten
Flusensieben einwandfrei. Deshalb müssen sie nach
jedem Trocknungsprogramm vor der
Wäscheentnahme kontrolliert und ggf. gereinigt
werden. Verwenden Sie dazu ein feuchtes Tuch.
Das Sieb in der Innentür an seinem Griff nach oben
herausziehen, Flusen abstreifen und Sieb wieder
einsetzen.
Die angesammelte Flusenmenge ist nicht etwa auf
die Wäschebeanspruchung im Trockner
zurückzuführen; vielmehr handelt es sich um
abgetragene Fasern vom Tragen und Waschen.
Beim Trocknen auf der Leine werden die Flusen vom
Wind fortgetragen, während sie beim
Wäschetrockner im Sieb gesammelt werden. Am
Gewicht der Flusen können Sie feststellen, wie
gering der Anteil im Verhältnis zur getrockneten
Wäschemenge ist.
Falls nötig können beide Siebe unter laufendem
Wasser mit einer Bürste gereinigt werden. Das Sieb
in der Einfüllöffnung kann auch herausgenommen
werden (siehe Abb.). Beim Wiedereinsetzen kann der
Zapfen nach rechts oder links zeigen.
Benützen Sie das Gerät nie ohne Flusensiebe.
A
U
T
O
R
E
V
E
R
S
E
k
g
5
k
g
2
,5
8
0
0
/
9
0
0
7
0
'
-
9
0
'
3
5
'
-
5
0
'
1
0
0
0
/
1
2
0
0
6
5
'
-
8
5
'
3
0
'
-
4
5
'
8
0
0
/
9
0
0
8
0
'
-
1
0
0
'
5
5
'
-
7
0
'
1
0
0
0
/
1
2
0
0
7
5
'
-
9
5
'
5
0
'
-
6
5
'
6
5
0
5
0
'
-
6
0
'
3
0
'
-
3
5
'
k
g
2
,
5
k
g
1
P1112
E
S
0
R
5
6
E
V
E
R
'
0
6
O
-
'
T
0
5
U
5
,
2
A
g
0
k
0
'
2
1
5
/
3
0
0
' -
0
1
0
3
0
0
1
9
g
'
/
k
5
0
9
0
8
' 5
7
'
0
0
0
2
0
1
'
1
/
5
0
'
6
0
0
0
1
'
8
0
5
0
0
9
'
'
/
5
0
0
8
0
7
-
8
-
'
'
5
5
6
5
'
0
9
'
5
'
4
0
7
'
0
3
5
g
k
'
0
5
-
'
5
3
5
,
2
g
k
P1110
P1111
Page 40

40
Betriebsstörungen
Sollten Sie mit Ihren Prüfungen zu keinem Resultat und
Erfolg kommen, steht Ihnen für die Betreuung Ihres
Geräts ein gut ausgerüsteter, technischer Kundendienst
zur Verfügung.
Die Anschriften sind im beigepackten Verzeichnis zu
finden.
Bitte geben Sie bei einer Meldung immer an:
vollständige Anschrift, Telefon-Nr. mit Vorwahl, sowie
das Modell und die Produkt- bzw. Serien-Nr. Ihres
Geräts.
Diese Daten sind dem Typschild zu entnehmen (s.S. 32).
Einige Hinweise zur Behebung kleiner Störungen, bevor Sie einen Fachmann zu Rate ziehen.
●
Störungen
●
Mögliche Ursachen
●
Trockner läuft nicht an:
●
Ist die Tür geschlossen?
●
Ist die Stromzufuhr unterbrochen?
●
Ist die Sicherung in Ordnung?
●
Ist der Programmwähler richtig eingestellt?
●
Ist die Start-Taste gedrückt?
●
Das Trocknungsergebnis ist
nicht zufriedenstellend:
●
Sind die Flusensiebe verstopft?
●
Haben Sie das richtige Programm gewählt?
●
Haben Sie die Schon-Taste gedrückt?
●
Wurde der Wäschetrockner übermäßig gefüllt?
●
Wurde die Wäsche vorher gut ausgeschleudert?
●
Sind alle Aufstellungshinweise beachtet?
Page 41

41
ITALIANO
Gentile cliente,
La preghiamo di leggere attentamente questo libretto istruzioni e di prestare particolare attenzione alle norme
di sicurezza riportate nelle prime pagine. Le consigliamo di conservare questo libretto per future consultazioni
e di cederlo eventualmente al nuovo proprietario in caso di vendita della macchina.
Danni di trasporto
Controllare, all’atto del disimballo, che la macchina non sia danneggiata. In caso di dubbio, non metterla in
funzione, ma rivolgersi all’assistenza tecnica.
I seguenti simboli La guideranno nella lettura del libretto:
Informazioni legate alla sicurezza nell’uso della macchina.
Consigli e raccomandazioni per l’uso corretto della macchina e per ottenerne le migliori prestazioni.
Informazioni legate alla protezione dell’ambiente..
Il nostro contributo per la protezione
dell’ambiente: noi utilizziamo carta ecologica.
Page 42

Indice
Avvertenze ....................................................43
Smaltimento …………………………………44
Consigli per la protezione
dell'ambiente
………. ..................................44
Descrizione della macchina ………..45
Installazione ................................................46
Disimballo ..........................................................46
Posizionamento ..................................................46
Collegamento tubo di scarico ………………….. 46
Collegamento elettrico ..................................46-47
Kit colonna..........................................................47
Reversibilità porta ..............................................47
Uso......................................................................48
Pannello comandi ..................................................48
Tabella programmi ............................................49
Sequenza operazioni ..........................................50
Consigli utili ........................................................51
Manutenzione e Pulizia ......................52
Pulizia mobile......................................................52
Pulizia porta ........................................................52
Pulizia filtri ..........................................................52
Anomalie di funzionamento..............53
Caratteristiche tecniche
DIMENSIONI: Altezza 85 cm
Larghezza 60 cm
Profondità 58 cm
TENSIONE/FREQUENZA: 220-230 V/ 50 Hz
POTENZA TOTALE ASSORBITA: 2200 W (10 A)
CARICO MASSIMO: Cotone, lino 5 kg
Sintetici 2,5 kg
CONSUMI: Cotone, lino 2,7 kWh (5 kg asciutto armadio)
Cotone, lino 2,2 kWh (5 kg pronto stiro)
Questa apparecchiatura è conforme alle seguenti direttive CEE:
- 73/23/CEE del 19/02/73 relativa alla bassa tensione;
- 89/336/CEE del 03/05/89 relativa alla compatibilità elettromagnetica.
42
Page 43

43
ITALIANO
Installazione
• Se l’impianto elettrico domestico necessita di
essere modificato per poter installare la macchina,
chiamare un tecnico specializzato.
• Una volta installata la macchina accertarsi che non
appoggi sul cavo di alimentazione.
• Se la macchina è posta su pavimento di moquette,
regolare i piedini in modo tale da permettere la
circolazione dell'aria tra la macchina ed il
pavimento
• Quest’ asciugabiancheria è stata concepita per
scaricare umidità all’esterno. Deve avere un
proprio sistema di scarico, non collegato con
quello di altri apparecchi.
Uso
• La macchina è prevista per un uso domestico. Se
viene utilizzata per scopi diversi da quelli per i
quali è stata progettata oppure se non viene usata
correttamente, il produttore non si assume alcuna
responsabilità per i danni che ne potrebbero
derivare.
• Dopo l'uso, staccare sempre la spina.
• •Non introdurre in macchina biancheria
semplicemente sgocciolata.
• Pericolo di esplosione: non asciugare in
macchina biancheria smacchiata con prodotti
chimici (come quelli utilizzati per la pulitura a
secco), perchè potrebbero causare un’esplosione.
Asciugare solo capi lavati in acqua.
• Pericolo di incendio: tessuti che sono stati
macchiati od inzuppati con olio vegetale o da
cucina sono a rischio di incendio e non
dovrebbero essere inseriti nell'asciugabiancheria.
• Se hai lavato la tua biancheria con prodotti
smacchianti, e' necessario eseguire un risciacquo
aggiuntivo prima di iniziare la fase di asciugatura.
• Accertarsi che non ci siano degli accendini nelle
tasche dei capi da asciugare.
• Non introdurre in macchina scarpe da tennis,
perchè potrebbero incastrarsi tra oblò e cesto,
bloccando quest’ultimo.
• Lasciare la porta socchiusa a fine programma per
aerare la macchina.
• I filtri devono essere puliti dopo ogni utilizzo. Per
prevenire rischi di incendio, non utilizzare la
macchina con i filtri danneggiati oppure senza
filtri.
• Non lasciare che si accumuli lanugine attorno alla
macchina.
Sicurezza in generale
• È pericoloso modificare o tentare di modificare le
caratteristiche tecniche dell’apparecchiatura.
• Non tentare di riparare l’apparecchiatura da soli.
Riparazioni eseguite da persone inesperte
possono causare danni. Rivolgersi sempre ad un
centro di assistenza tecnica autorizzato,
richiedendo sempre ricambi originali.
Sicurezza per i bambini
• I bambini spesso non riconoscono i pericoli legati
alle apparecchiature elettriche. Durante il
funzionamento della macchina è necessario
sorvegliarli adeguatamente e non lasciarli giocare
con l’apparecchiatura - c’è il pericolo che i
bambini si chiudano dentro.
• I componenti dell’imballaggio (es. pellicole,
polistirolo) possono essere pericolosi per i
bambini. Pericolo di soffocamento! Tenerli fuori
dalla portata dei bambini.
• Accertarsi che gli animali domestici non entrino
nel cestello dell’asciugabiancheria.
• In caso di smaltimento dell’apparecchiatura,
tagliare il cavo di alimentazione ed eliminare la
spina con il cavo restante. Rendere inutilizzabile la
serratura dell’oblò: in questo modo i bambini,
giocando, non riusciranno a chiudersi dentro
l’apparecchiatura, rischiando di rimanere
intrappolati.
Avvertenze
Queste avvertenze sono state previste per la Sua sicurezza e quella degli altri. La preghiamo quindi di leggerle
attentamente prima di installare ed utilizzare la macchina.
Page 44

44
Smaltimento
Consigli per la protezione dell’ambiente
Materiali di imballaggio
• I materiali recanti il simbolo sono riciclabili.
Perchè possano essere recuperati devono essere
deposti negli appositi spazi (o contenitori). \
Macchina
Per un corretto smaltimento della Sua vecchia
macchina, La invitiamo ad utilizzare le discariche
autorizzate. Ci aiuti a mantenere pulita la Sua città!
• Veccchio elettrodomestico
Il simbolo sul prodotto o sulla confezione indica
che il prodotto non deve essere considerato come
un normale rifiuto domestico, ma deve essere
portato nel punto di raccolta appropriato per il
riciclaggio di apparecchiature elettriche ed
elettroniche. Provvedendo a smaltire questo
prodotto in modo appropriato, si contribuisce a
evitare potenziali conseguenze negative per
l’ambiente e per la salute, che potrebbero derivare
da uno smaltimento inadeguato del prodotto. Per
informazioni piu dettagliate sul riciclaggio di questo
prodotto, contattare l’ufficio comunale, il servizio
locale di smaltimento rifiuti o il negozio in cui e stato
acquistato il prodotto.
Per ottenere delle economie di energia elettrica e
per salvaguardare l'ambiente consigliamo
di attenersi a quanto segue:
• Utilizzare il cesto a pieno carico. I piccoli carichi
sono anti-economici.
• Centrifugare bene la biancheria prima
dell’asciugatura. Quanto maggiore sarà la velocità
di centrifuga tanto minori saranno il consumo
elettrico ed i tempi di asciugatura.
• Si consiglia di non asciugare troppo la biancheria
per evitare pieghe e risparmiare energia. Scegliere
il programma e il tempo di asciugatura in funzione
del tipo di biancheria e del grado di asciugatura
richiesto.
• Per sfruttare la capacità massima di carico, si
possono asciugare assieme capi “asciutto
armadio” e “pronto stiro”. Scegliere il tempo di
asciugatura per “pronto stiro” e una volta finito il
programma, togliere la biancheria. Completare poi
il programma scegliendo un tempo supplementare
per la biancheria che deve essere asciugata fino a
“asciutto armadio”.
• Pulire accuratamente i filtri dopo ogni ciclo di
asciugatura. In questo modo l’asciugabiancheria
consumerà meno energia elettrica.
• Aerare bene il locale. La temperatura ambiente
non deve superare +35°C mentre
l’apparecchiatura è in funzione.
Page 45

45
ITALIANO
Descrizione della macchina
01 Pannello comandi
02 Filtri
03 Targa matricola
04 Piedini regolabili
05 Luce cesto
06 Scarichi aria laterali
07 Ghiera
08 Scarico aria posteriore
1
2
2
3
4
5
6
7
8
Page 46

46
Installazione
Avvertenza!
Disimballo
Prima di utilizzare la macchina, sfilare il
sacchetto di polietilene contenente il tassello
di polistirolo.
Staccate le strisce adesive all’interno nel lato
superiore del cestello.
Posizionamento
Per comodità, si raccomanda di posizionare la
macchina vicino alla lavatrice. Durante il
funzionamento l'asciugabiancheria emette una certa
quantità di aria calda umida, che deve essere
eliminata dall’ambiente, per evitare formazione di
condensa. In un locale ben aerato oppure vicino ad
una finestra aperta questo avviene naturalmente.
Generalmente è consigliabile evacuare l'aria calda
mediante il tubo flessibile di 100 mm di diametro in
dotazione con la macchina, la cui estremità può
essere temporaneamente collegata ad una finestra
aperta o permanentemente fissata ad una griglia di
ventilazione collocata in una finestra o in un muro
esterno.
L'asciugabiancheria deve essere posizionata in un
luogo pulito dove non si accumuli polvere.
Assicurarsi che vicino alle griglie di aspirazione
posteriori non ci siano oggetti o materiali che
possano ostruirle ( ad esempio carta, stracci, ecc.)
Per ridurre le vibrazioni ed il rumore al minimo
durante il funzionamento, la macchina deve essere
collocata su una superficie piana e dura.
P1106
Una volta installato l'asciugabiancheria nella sua
collocazione permanente, controllare tramite una
livella ad acqua che sia perfettamente orizzontale,
agendo sui piedini regolabili.
I piedini non devono essere mai tolti.
Non diminuire la distanza dal pavimento con
tappeti a pelo alto, pezzetti di legno o materiali
simili. Ciò potrebbe creare accumuli di calore
che potrebbe pregiudicare il funzionamento della
macchina.
Importante
Quando la macchina è in funzione, la temperatura
del locale non deve superare 35°C, perchè potrebbe
pregiudicare la prestazione della stessa.
Collegamento del tubo di scarico
Per semplificare l'installazione l’asciugabiancheria
dispone di tre fori di scarico: uno sul retro, e gli altri
sul lato destro e sinistro.
Per collegare il tubo con il foro desiderato, togliere
la ghiera (A) inserita nel foro posteriore, applicarla al
tubo e rimettere il tutto a posto esercitando una
leggera pressione. I fori inutilizzati devono essere
tappati con i coperchietti in dotazione.
P1027
A
A
P1028
P0046
Page 47

47
ITALIANO
Nota:
Se il tubo è troppo lungo e la temperatura del locale
è bassa, l'umidità può creare condensa all'interno
del tubo. E' un fenomeno naturale inevitabile. Per
evitare che l' acqua di condensa rimanga dentro il
tubo oppure rifluisca all'interno
dell'asciugabiancheria, si consiglia di praticare un
piccolo foro (del diametro di 3 mm) nel punto più
basso del tubo e posizionarvi sotto un piccolo
contenitore (vedi disegno, punto B).
Dopo aver collegato il tubo all'asciugabiancheria,
collegarlo ad un'apertura esterna assicurandosi che
non abbia più di due curve e che la lunghezza totale
non superi i due metri.
Non collegare mai il tubo ad una cappa
aspirante, una canna fumaria o ad un
condotto per lo scarico di gas di una
caldaia.
Per evitare problemi di condensa nel locale è
essenziale che il tubo flessibile
dell'asciugabiancheria abbia la possibilità di
scaricare almeno sopra i mobili della cucina;
sarebbe comunque preferibile all'esterno della
stessa.
Per evitare che la macchina si surriscaldi è
importante che il tubo di scarico non sia ostruito.
Comunque, nel caso in cui il tubo sia fissato
permanentemente ad un foro nel muro o al soffitto,
deve essere garantita una capacità di scarico di
almeno 150 m
3
/ h.
P0055
P1056
B
Se l'asciugabiancheria viene collocata vicino ai
mobili della cucina assicurarsi che il tubo non sia
schiacciato. Se il tubo venisse parzialmente
schiacciato, si ridurrebbe l'efficienza
dell'asciugatura e di conseguenza si
allungherebbero i tempi di asciugatura con
spreco di energia elettrica.
Se il tubo viene completamente schiacciato i
sistemi di sicurezza della macchina potrebbero
entrare in funzione.
Collegamento elettrico
La macchina è prevista per funzionare a 220-230 V
monofase, 50 Hz.
Controllare che l’impianto elettrico domestico sia
adatto a sopportare il carico massimo richiesto
(2,2 kW) considerando gli altri elettrodomestici in
uso.
Collegare la macchina ad una presa di corrente con
messa a terra in conformità con le norme vigenti.
Il costruttore declina qualsiasi responsabilltà
per i danni o le lesioni causate dal nonrispetto delle norme di sicurezza.
Kit colonna
Presso i rivenditori autorizzati è disponibile uno
speciale kit che permette di installare
l’asciugabiancheria sopra la lavatrice.
Reversibilità della porta
Qualora fosse necessario cambiare il senso di
apertura della porta, rivolgersi al centro di
assistenza tecnica di zona.
P1107
Avvertenza!
Il cavo dell’apparecchiatura deve essere
facilmente accessibile dopo aver installato la
macchina.
Page 48

48
Uso
Pannello comandi
1 Selettore programmi/tempi di
asciugatura
Permette di selezionare un'asciugatura elettronica
oppure un'asciugatura a tempo.
Ruotare la manopola fino al programma o al tempo
desiderato.
Asciugatura elettronica (automatica)
La macchina funziona in questi programmi tramite
sonde che rilevano il livello di umidità della
biancheria.
Selezionare il programma secondo il tipo di
biancheria ed il grado di asciugatura desiderato.
Asciugatura a tempo
Può essere utilizzata per finire di asciugare la
biancheria se è necessario.
Selezionare il programma di 60 minuti per il cotone
oppure il programma di 30 minuti per i sintetici.
Per cancellare un programma avviato, ruotare la
manopola fino allo "RESET".
Alla fine dell'asciugatura, ruotare la manopola fino
allo "RESET" e rilasciare il tasto EIN/AUS prima di
estrarre la biancheria.
2 Tasto “EIN/AUS”
Premerlo per accendere l'asciugabiancheria. A fine
programma ripremerlo per spegnere la macchina..
3 Spia di funzionamento
Questa spia si illumina quando viene accesa la
macchina (tasto ON/OFF premuto) e si spegne
quando il tasto viene ripremuto.
4 Tasto "asciugatura delicata"-SCHON
Questo tasto permette di asciugare i capi delicati a
bassa temperatura. Premuto questo tasto si
accenderà la relativa spia.
5 Tasto "cicalino escluso" SIGNAL AUS
Durante la fase anti-piega si sentiranno dei segnali
acustici. Se si desidera escluderli, premere questo
tasto quando si seleziona il programma; si
accenderà la relativa spia.
6 Tasto "avvio"-START
Scelto il programma, premere questo tasto per circa
due secondi per avviare l’asciugabiancheria.
Se viene aperta la porta mentre il programma è
in funzione, una volta chiusa la porta, questo
tasto deve essere ripremuto per riavviare il
programma dal punto in cui era stato interrotto.
É necessario ripremere questo tasto anche dopo
un'interruzione di corrente. In entrambi i casi la spia
“TROCKNEN” o la spia “ABKÜHLEN’ (a seconda
della fase in corso) lampeggeranno per ricordare
che il tasto avvio deve essere ripremuto.
7 Spie "fasi programma"
Queste spie indicano le varie fasi del programma in
svolgimento.
Spia “ TROCKNEN” - asciugatura
Questa spia indica che la macchina è in fase di
asciugatura
Spia “ABKÜHLEN” - raffreddamento
Questa spia indica che la macchina è in fase di
raffreddamento. Alla fine dell'asciugatura sono
previsti 10 minuti di raffreddamento per raffreddare
la biancheria.
Se le spie TROCKNEN o ABKÜHLEN lampeggiano,
significa che il tasto "avvio" deve essere ripremuto
per riprendere il programma.
Spia "ENDE" - fine ciclo
Questa spia lampeggia alla fine della fase di
raffreddamento e durante la fase anti-piega.
Spia "KNITTERSCHUTZ"- fase-antipiega
Questa spia lampeggia alternativamente alla spia
ENDE alla fine della fase di asciugatura (dopo il
raffreddamento) e durante la fase anti-piega.
Se lampeggia solamente la spia ENDE significa che
la fase anti-piega è terminata.
Page 49

49
ITALIANO
Tabella programmi
Asciugatura automatica (programmi elettronici)
(1) Non sovraccaricare il cesto (non caricare grandi trapunte ad esempio).
I tempi di asciugatura variano secondo il :
● Tipo di biancheria
● Quantità di carico
● Grado di centrifugazione prima dell'asciugatura
Arieggio “Abkühlen”
Questa posizione della manopola programmi può essere utilizzata per rinfrescare la biancheria (ad esempio
per togliere un odore persistente di naftalina).
Carichi di biancheria
Senza bisogno di pesare la biancheria, attenersi a quanto segue per la quantità da introdurre in macchina:
● Cotone, lino: riempire il cesto, ma non sovraccaricarlo.
● Sintetici: non più di metà del cesto.
Tipo di biancheria
Grado di asciugatura
desiderata
Carico max.
(1)
kg
Programma
Extratrocken
Schranktrocken (*)
Bügeltrocken
Cotone e lino
extra asciutto
molto asciutto
asciutto armadio
umido
pronto stiro
stiro maccchina
5 kg
5 kg
5 kg
5 kg
5 kg
5 kg
Sintetici
extra asciutto
asciutto armadio
pronto stiro
2.5 kg
2.5 kg
2.5 kg
TUTINE DA
NEONATI
Tessuti pregiati
1 kg
(10 tutine)
Babywäsche
Extratrocken
Starktrocken
Schranktrocken (*)
Leichttrocken
Bügeltrocken (*)
Mangeltrocken
Jacket, panataloni,
vestiti, gonne
Fresco
1 - 4 capo
Auffrischen
(*) Secondo le norme CEI 1121.
Asciugatura a tempo
Tipo di biancheria
Tempo di
asciugatura
Carico massimo
Posizione del
selettore
Cotone
Cotone
Sintetici
90 min
60 min
30 min
5 kg
5 kg
2.5 kg
90’
60’
30’
Opzioni possibili
• Il programma “
Tessuti pregiati” è un programma speciale, adatto per asciugare le tutine da neonato.
• Il programma “Fresco” è adatto per asciugare tessuti sintetici particolarmente delicati (camicette ad
esempio) fino al grado di asciugatura “asciutto armadio”.
90 min
60 min
30 min
Page 50

50
Sequenza delle
operazioni
Prima di usare l’asciugabiancheria per la prima
volta, consigliamo di introdurre nel cesto alcuni
stracci puliti, umidi, e di far funzionare
l’apparecchiatura per almeno 30 minuti. Questo per
togliere le eventuali tracce di polvere o grasso
presenti nel cesto.
Come asciugare
1. Collegare l’apparecchiatura alla rete elettrica.
2. Aprire la porta.
3. Caricare i capi uno alla volta dispiegandoli il più
possibile.
4. Chiudere la porta assicurandosi che la
biancheria non rimanga incastrata tra la porta ed
il filtro.
5. Premere il tasto "ON/OFF" EIN/AUS . La spia di
funzionamento si accende.
6. Selezionare il tempo o il programma di
asciugatura.
7. Se necessario, premere il tasto "asciugatura
delicata" SCHON e/o il tasto "esclusione
cicalino" SIGNAL AUS.
8. Premere il tasto "Avvio" START per due secondi:
la spia TROCKNEN si accende ed inizia
l'asciugatura.
Durante l'asciugatura il cesto ruota
alternativamente in entrambe le direzioni.
Tutti i programmi di asciugatura terminano con
una fase di raffreddamento di 10 minuti (la spia
ABKÜHLEN si accende).
Dopo questa fase è possibile estrarre la
biancheria.
9. Se la biancheria non viene tolta alla fine del ciclo,
l’asciugabiancheria effettua una fase anti-piega
(durata massima 30 minuti).
Il cicalino suona ogni 10 secondi (a meno che
non sia stato premuto il tasto "esclusione
cicalino" SIGNAL AUS).
P1108
P1104
Le spie ENDE e KNITTERSCHUTZ lampeggiano
alternativamente. Se la biancheria non viene
tolta, l'asciugabiancheria si fermerà
automaticamente alla fine della fase anti-piega.
La spia ENDE lampeggia e la spia di
funzionamento rimane accesa .
Ruotare il selettore programmi sullo "RESET"; la
spia ENDE si spegne.
Ripremere il tasto "ON/OFF" - EIN/AUS( la spia
di funzionamento si spegne) ed estrarre subito la
biancheria.
Dopo ogni uso
● Ruotare il selettore programmi sullo "RESET".
● Spegnere la macchina ripremendo il tasto
"ON/OFF"EIN/AUS . La spia di funzionamento si
spegne.
● Pulire I filtri. (vedi pag.52).
Importante!
Se si deve interrompere il programma di asciugatura
prima che raggiunga la fine, si raccomanda di
ruotare il selettore fino alla posizione ABKÜHLEN e
di attendere la fine di questa fase prima di estrarre
la biancheria. In questo modo si eviterà un
accumulo di calore nella macchina.
Modifica del programma
Se si vuole modificare un programma avviato,
ruotare innanzitutto il selettore fino alla posizione
"RESET". Selezionare il nuovo programma e
premere il tasto "Avvio" - START
.
Page 51

51
ITALIANO
Consigli utili per
l’asciugatura
● Cercare di utilizzare la macchina apieno carico.
I piccoli carichi sono anti-economici.
Indicativamente, elenchiamo i pesi medi dei capi
più comuni:
Lenzuolo 700-1000 g
Tovaglia 400-500 g
Asciugapiatti 70-120 g
Tovagliolo 50-100 g
Asciugamano spugna 150-250 g
Accappatoio 1000-1500 g
Camicia uomo 200-300 g
Federa 100-200 g
Pigiama uomo 400-500 g
Camicia da notte donna 200-250 g
● Non asciugare mai in macchina i seguenti capi:
i tessuti particolarmente delicati come tende in
fibre sintetiche, i capi in lana e seta, biancheria
con inserti metallici, le calze di nylon, i capi in
tessuto molto voluminoso come le giacche a
vento, le coperte, le trapunte, i sacchi a pelo,
piumini e qualsiasi capo che contenga
gommapiuma o materiali simili alla gommapiuma,
capi in fibra di vetro.
● Controllare le etichette applicate sui capi:
Asciugatura a macchina consentita.
Non è però specificato se a temperatura
normale o ridotta.
Asciugatura a temperatura normale.
Asciugatura a temperatura ridotta.
Non asciugare in macchina.
● Abbottonare le federe e i copripiumini per evitare
che piccoli capi di biancheria finiscano al loro
interno. Chiudere i bottoni automatici, le cerniere
lampo e i gancetti, lacci di grembiuli, ecc.
● Dividere la biancheria secondo il tipo ed il grado
di asciugatura desiderati.
● Un'eccessiva asciugatura crea pieghe nei tessuti
e consuma energia.
● Evitare di asciugare capi scuri assieme a capi
chiari colorati, come gli asciugamani di spugna,
perchè possono attrarre i peluzzi.
● La biancheria deve essere ben centrifugata prima
di essere asciugata.
● Anche i capi sintetici devono essere
brevemente centrifugati utilizzando lo speciale
programma di centrifuga delicata della vostra
lavatrice.
● I tessuti di maglia (biancheria intima di maglia)
possono restringersi durante l'asciugatura. Non
asciugare eccessivamente biancheria di questo
tipo. È consigliabile tener conto di questo
restringimento quando si acquista un nuovo
capo.
● È possibile introdurre nell’asciugabiancheria
anche dei capi inamidati. Comunque, per
ottenere l'effetto inamidato desiderato, scegliere
il programma "pronto stiro". Per eliminare
qualsiasi residuo di appretto, dopo l'asciugatura,
pulire il cesto con uno straccio umido ed infine
asciugarlo.
● Per eliminare la carica elettrostatica alla fine
dell'asciugatura, utilizzare un ammorbidente nel
lavaggio della biancheria oppure un prodotto
adatto per asciugabiancheria.
● Estrarre la biancheria subito dopo la fine
asciugatura.
● Se al termine dell'asciugatura qualche capo
dovesse risultare ancora umido, impostare un
breve ciclo di asciugatura di almeno 30 minuti.
Ciò si renderà particolarmente necessario per
capi multistrato (ad esempio tasche, colletti etc.).
Page 52

52
Manutenzione e pulizia
Disinserire elettricamente la macchina prima di
qualsiasi operazione di pulizia o manutenzione.
Pulizia mobile
Pulirlo con acqua saponosa e asciugarlo
accuratamente.
Importante: Non usare alcool, diluenti o prodotti
similari.
Pulizia porta
Pulire periodicamente la parte interna della porta
per rimuovere qualsiasi peluzzo dalle guarnizioni
attorno al filtro.
Un'accurata pulizia assicura una corretta
asciugatura.
Pulizia filtri
Un'accurata pulizia dei filtri è indispensabile per un
corretto funzionamento della macchina.
I filtri trattengono tutti i peluzzi che si accumulano
durante l'asciugatura e di conseguenza devono
essere puliti con uno straccio umido alla fine di ogni
programma, prima di estrarre la biancheria.
Il filtro sulla controporta deve essere estratto per
essere pulito.
La quantità di peluzzi non deve sorprendere: non è
dovuta ad un'eccessiva azione meccanica
dell'asciugabiancheria.
Tutti i tessuti perdono peluzzi mentre si asciugano
ma quando l’asciugatura avviene all'aria aperta,
questi vengono portati via dal vento. In
un’asciugabiancheria, invece, si raccolgono
semplicemente nel filtro.
AU
T
OREVE
R
SE
k
g
5
k
g
2
,
5
8
00 / 90
0
7
0
'
-
9
0
'
3
5
'
-
5
0
'
10
00 / 1200
6
5
'
-
8
5
'
3
0
'
-
4
5
'
8
00 / 900
8
0
'
-
1
0
0
'
5
5
'
-
7
0
'
10
00 / 1200
7
5
'
-
9
5
'
5
0
'
-
6
5
'
650
5
0
'
-
6
0
'
3
0
'
-
3
5
'
k
g
2
,
5
k
g
1
P1111
P1110
A
U
TO
REV
E
RS
E
k
g
5
k
g
2
,
5
80
0 /
9
0
0
7
0
'
-
9
0
'
3
5
'
-
5
0
'
10
00
/
120
0
6
5
'
-
8
5
'
3
0
'
-
4
5
'
8
00
/
90
0
8
0
'
-
1
0
0
'
5
5
'
-
7
0
'
1
000
/
12
00
7
5
'
-
9
5
'
5
0
'
-
6
5
'
65
0
5
0
'
-
6
0
'
3
0
'
-
3
5
'
k
g
2
,
5
k
g
1
P1109
All'occorrenza i filtri possono essere puliti sotto
acqua corrente utilizzando una spazzola. Per
estrarre il filtro dall’oblò sollevarlo come da figura. Il
filtro può essere posizionato con la linguetta rivolta
verso sinistra oppure verso destra.
A
U
TO
R
E
VE
R
SE
k
g
5
k
g
2
,
5
80
0 /
9
00
7
0
'
-
9
0
'
3
5
'
-
5
0
'
10
00
/
120
0
6
5
'
-
8
5
'
3
0
'
-
4
5
'
8
00
/
90
0
8
0
'
-
1
0
0
'
5
5
'
-
7
0
'
1
000
/ 12
00
7
5
'
-
9
5
'
5
0
'
-
6
5
'
65
0
5
0
'
-
6
0
'
3
0
'
-
3
5
'
k
g
2
,
5
k
g
1
P1112
Page 53

53
ITALIANO
Anomalie di funzionamento
Prima di interpellare il servizio di assistenza tecnica consigliamo di effettuare i controlli di seguito descritti.
Problema Cause possibili
Se dopo queste verifiche la disfunzione rimane,
rivolgersi al più vicino centro di Assistenza Tecnica
autorizzato, indicando il modello della macchina
(Mod.), il numero di prodotto (Prod. No.) e il numero
di serie (Ser. No.) che si trovano stampigliati sulla
targhetta di identificazione della macchina (vedi
disegno a pag. 45).
• La macchina non funziona:
• La porta non è chiusa.
• La spina non è ben inserita nella presa
• Non arriva corrente alla presa.
• Il selettore programmi non è posizionato
correttamente.
• Il tasto “Avvio” non è stato premuto dopo aver
acceso la macchina con il tasto ON/OFF .
• Asciugatura insoddisfacente:
• I filtri sono intasati.
• Il programma selezionato non corrisponde al tipo
di biancheria.
• La biancheria non è stata dovutamente
centrifugata.
• È stato premuto il tasto “asciugatura delicata”.
• Il cesto è sovraccarico.
• L’asciugabiancheria non è stata installata
correttamente.
Page 54

MADE IN EEC
 Loading...