

Page 1

user manual
manual de instruções
Tumble Dryer
Máquina de secar roupa
EDC78550W
Page 2

2 electrolux
Electrolux. Thinking of you.
Share more of our thinking at www.electrolux.com
CONTENTS
Important safety information 2
Environment 4
Product description 4
Control panel 5
Before first use 5
Programme chart 6
Daily use 7
Cleaning and maintenance 10
What to do if ... 13
Technical data 14
Machine settings 15
Hints for test institutes 15
Installation 16
Service 17
IMPORTANT SAFETY INFORMATION
Important! In the interest of your safety
and to ensure the correct use, before
installing and first using the appliance,
read this user manual carefully,
including its hints and warnings. To
avoid unnecessary mistakes and
accidents, it is important to ensure that
all people using the appliance are
thoroughly familiar with its operation
and safety features. Save these
instructions and make sure that they
remain with the appliance if it is moved
or sold, so that everyone using it
through its life will be properly
informed on appliance use and safety.
General safety
• It is dangerous to alter the specifications
or attempt to modify this product in any
way.
• This appliance is not intended for use by
persons (including children) with reduced
physical, sensory or lack of experience
and knowledge, unless they have been
given supervision or instruction concerning use of the appliance by a person responsible for their safety.
• Make sure that small pets do not climb into the drum. To avoid this, please check
into the drum before using.
• Any objects such as coins, safety pins,
nails, screws, stones or any other hard,
sharp material can cause extensive damage and must not be placed into the machine.
• In order to avoid danger of fires caused
by excessive drying, do not use appliance to dry the following items: Cush-
• Items such as foam rubber (latex foam),
• Always unplug the appliance after use,
• Under no circumstances should you at-
• Items that have been soiled with substan-
• Danger of explosion: Never tumble dry
• Risk of fire: items that have been spot-
• If you have washed your laundry with
Subject to change without notice
ions, quilts and the like (these items accumulate heat).
shower caps, waterproof textiles, rubber
backed articles and clothes or pillows fitted with foam rubber pads should not be
dried in the tumble dryer.
clean and maintenance.
tempt to repair the machine yourself. Repairs carried out by inexperienced persons may cause injury or serious malfunctioning. Contact your local Service Centre. Always insist on genuine spare parts.
ces such as cooking oil acetone, petrol,
kerosene, spot removers, turpentine, waxes and wax removers should be washed
in hot water with an extra amount of detergent before being dried in the tumble
dryer.
items that have been in contact with inflammable solvents (petrol, methylated
spirits, dry cleaning fluid and the like). As
these substance are volatile, they could
cause an explosion. Only tumble dry
items washed with water.
ted or soaked with vegetable or cooking
oil constitute a fire hazard and should not
be placed in the tumble dryer.
stain remover you must execute an extra
rinse cycle before loading your tumble dryer.
Page 3

electrolux 3
• Please make sure that no gas lighters or
matches have accidentally been left in
pockets of garments to be loaded into appliance
Warning! Never stop a tumble dry
before the end of the drying cycle
unless all items are quickly removed and spread out so that the
heat is dissipated. Risk of fire!
• Risk of electric shock! Do not spray
down the appliance with jets of water.
Installation
• This appliance is heavy. Care should be
taken when moving it.
• When unpacking the appliance, check
that it is not damaged. If in doubt, do not
use it and contact the Service Centre.
• All packaging must be removed before
use. Serious damage can occur to the
product and to property if this is not adhered to. See relevant section in the user
manual.
• The final part of a tumble dryer cycle occurs without heat ( cool down cycle ) to
ensure that the items are left at a temperature that ensures that items will not be
damaged.
• Any electrical work required to install this
appliance should be carried out by a qualified electrician or competent person.
• Care must be taken to ensure that the appliance does not stand on the electrical
supply cable.
• If the machine is situated on a carpeted
floor, please adjust the feet in order to allow air to circulate freely under the appliance.
• After having installed the appliance,
check that it is not pressing or standing
on its electrical supply cable.
• If the tumble dryer is placed on top of a
washing machine, it is compulsory to use
the stacking kit (optional accessory).
Use
• This appliance is designed for domestic
use. It must not be used for purposes other than those for which it was designed.
• Only dry fabrics which are designed to be
machine dried. Follow the instructions on
each garment label.
• Do not dry unwashed items in the tumble
dryer.
• Do not overload the appliance. See the
relevant section in the user manual.
• Clothes which are dripping wet should
not be placed in the dryer.
• Garments which have been in contact
with volatile petroleum products should
not be machine dried. If volatile cleaning
fluids are used, care should be taken to
ensure that the fluid is removed from the
garment before placing in the machine.
• Never pull the power supply cable to remove the plug from the socket; always
take hold of the plug itself.
• Never use the tumble dryer if the power
supply cable, the control panel, the working surface or the base are damaged so
that the inside of the tumble dryer is accessible.
• Fabric softeners, or similar products
should be used as specified by the fabric
softener instructions.
• Caution - hot surface : Do not touch
the door light cover surface when the
light is switched on (only dryers equipped
with internal drum light).
Child safety
• This machine is not intended for use by
young children or infirm persons without
supervision.
• Children should be supervised to ensure
that they do not play with the appliance.
• The packaging components (e.g. plastic
film, polystyrene) can be dangerous to children - danger of suffocation! Keep them
out of children’s reach.
• Keep all detergents in a safe place out of
children’s reach.
• Make sure that children or pets do not
climb into the drum.
Page 4

4 electrolux
ENVIRONMENT
The symbol on the product or on its
packaging indicates that this product may
not be treated as household waste. Instead
it should be taken to the appropriate
collection point for the recycling of electrical
and electronic equipment. By ensuring this
product is disposed of correctly, you will
help prevent potential negative
consequences for the environment and
human health, which could otherwise be
caused by inappropriate waste handling of
this product. For more detailed information
about recycling of this product, please
contact your local council, your household
waste disposal service or the shop where
you purchased the product.
Old appliance
Warning!
Remove mains plug from socket when you
have no further use for the machine. Cut off
mains cable and dispose of together with
plug. Destroy loading door hook. Children
cannot then lock themselves in the machine
and put their lives at risk.
Packaging material
The packaging materials are environmentally friendly and can be recycled. The plastic
components are identified by markings, e.g.
>PE<, >PS<, etc. Please dispose of the
packaging materials in the appropriate container at the community waste disposal facilities.
Environmental tips
• In the dryer, laundry becomes fluffy and
soft. Fabric softeners are not therefore
needed when washing.
• Your dryer will function most economically if you:
– always keep the ventilation slots on the
base of the dryer unobstructed;
– use the loading volumes specified in
the programme overview;
– ensure you have good ventilation in the
installation room;
– clean the micro-fine filter and fine strain-
er after each drying cycle;
– spin the laundry well before drying.
Energy consumption depends on spinning speed set in washing machine.
Higher spinning speed - lower energy
consumption.
PRODUCT DESCRIPTION
6
7
8
9
10
11
1 Control panel
2 Fluff filters
3 Loading door (reversible)
4 Ventilation grille
5 Adjustable feet
1
2
3
4
5
6 Drawer with condensed water container
7 Drum light
8 Push button for base door opening
9 Rating Plate
10 Heat exchanger
Page 5
11 Heat exchanger door
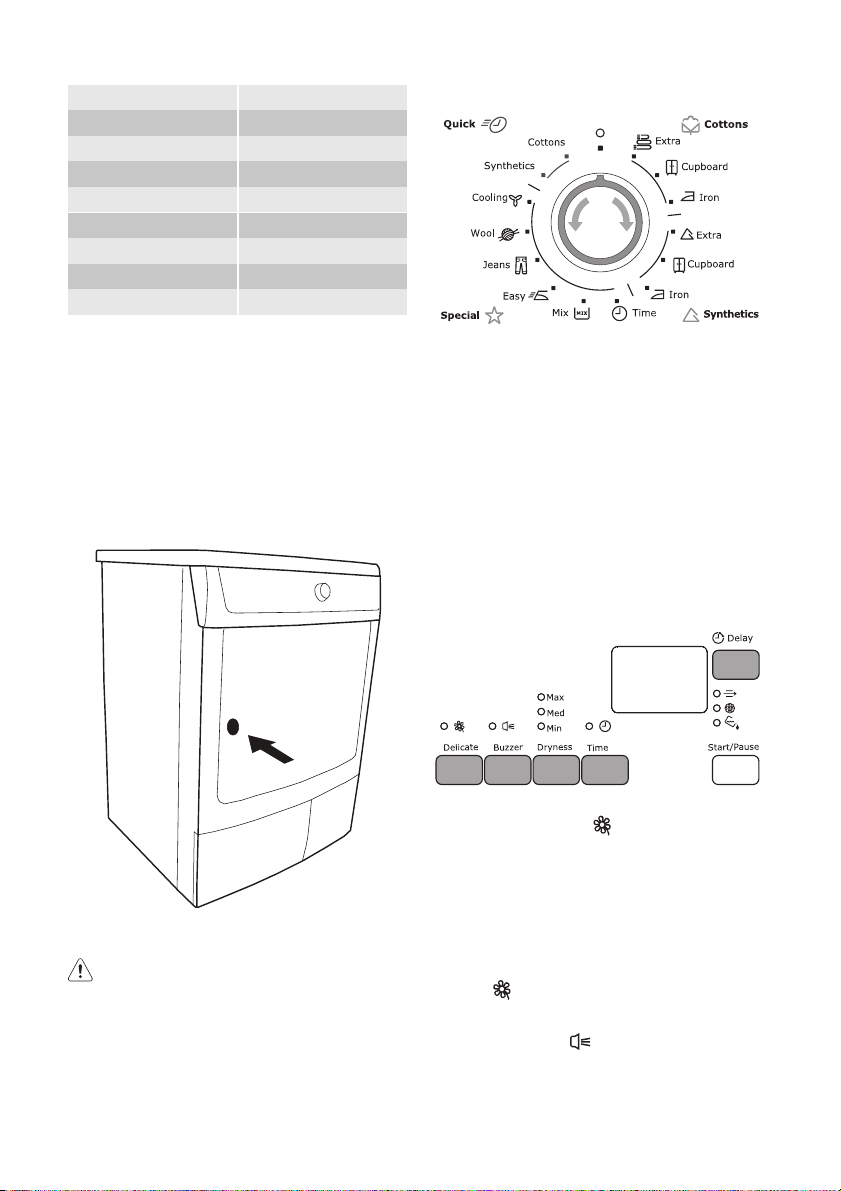
CONTROL PANEL
Control panel
1 2 3 4 5 6 7 8 9
1
Programme selector and
2
Delicate button
3 Buzzer button
4 Dryness button
5 Time button
6 Display
7 Start/Pause button
8
Warning lights:
ters , Full tank
9 Delay button
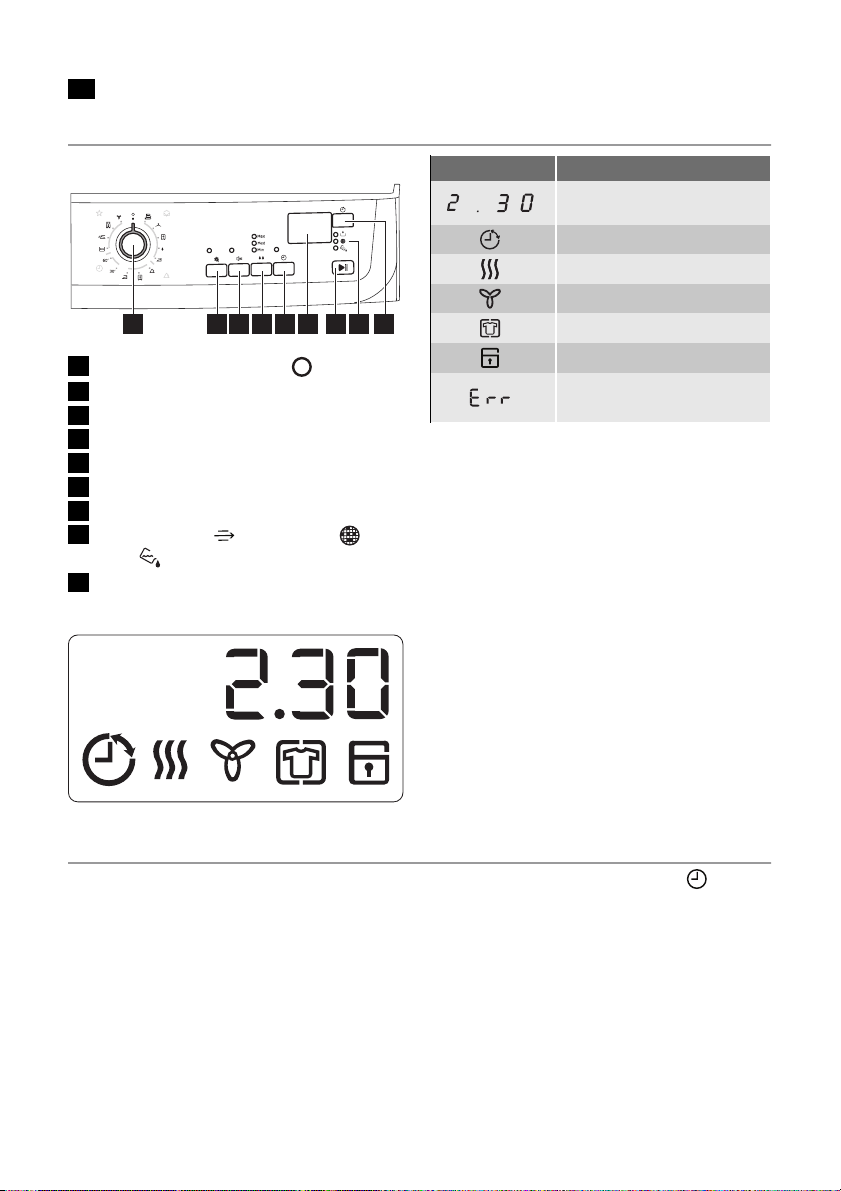
Display
Condenser , Fil-
off switch
electrolux 5
SYMBOL DESCRIPTION
Time to end (time of time programm, time of start delay)
Delay start
Drying phase
Cooling phase
Anti-crease guard phase
Child lock
Error, incorrect selection
BEFORE FIRST USE
In order to remove any residues which may
have been produced during production,
wipe the dryer drum with a damp cloth or
carry out a brief drying cycle (30 MIN) with
damp cloths in the machine.
1.
Turn the programme knob to
TIME .
2. Press the TIME button repeatedly until
0.30 appears in the display.
3. Press the START/PAUSE button.
Page 6
6 electrolux
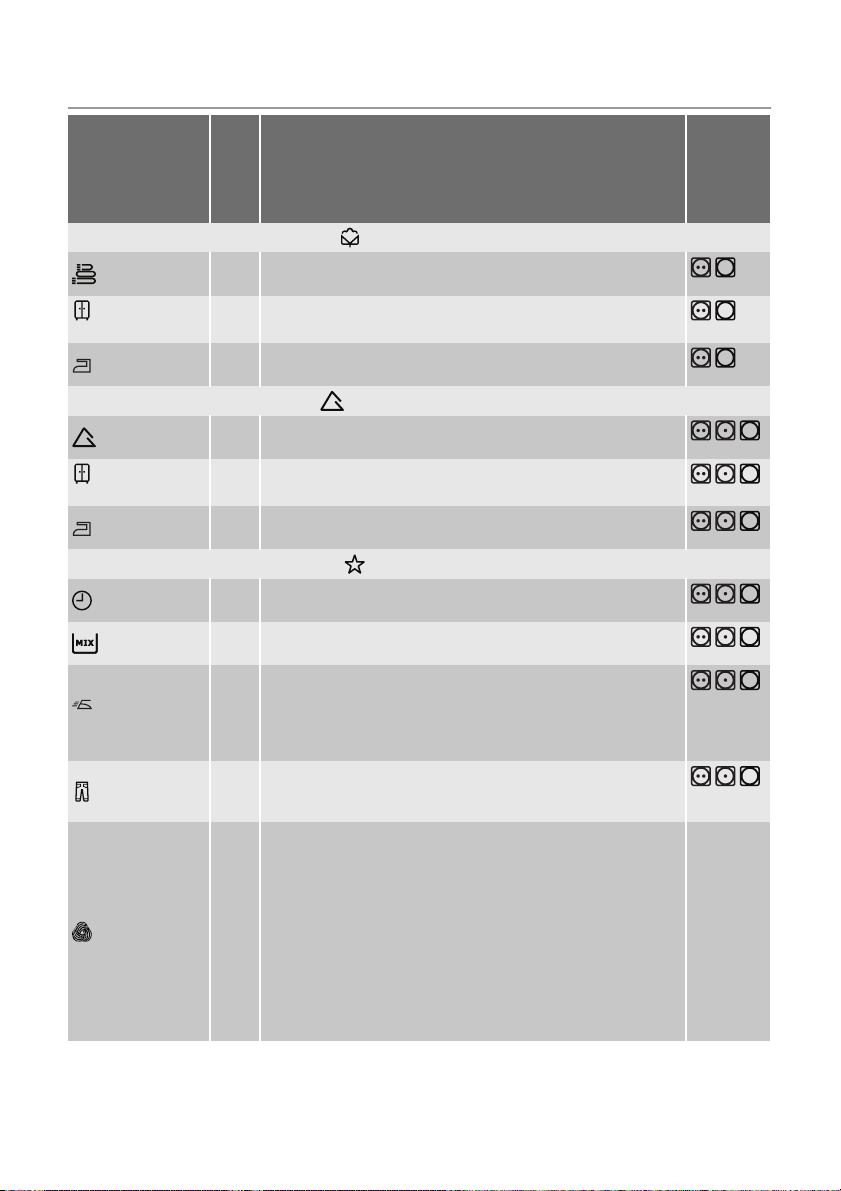
PROGRAMME CHART
Programme
Extra (Extra )
Cupboard
(Cupboard)
Iron (Iron)
Extra (Extra)
Cupboard
(Cupboard)
Iron (Iron)
Time (Time)
Mix (Mix)
Easy Iron
(Easy Iron)
Jeans (Jeans)
Wool (Wool)
Application/properties
max. load
(dry clothes)
Cottons (Cottons)
Thorough drying of thick or multi- layered fabrics, e.g. terry
8 kg
towelling items, bathrobes.
Thorough drying of fabrics of even thicknesses, e.g. terry
8 kg
towelling items, knitwear, towels.
For thin fabrics which are also to be ironed, e.g. knitwear,
8kg
cotton shirts.
Synthetics (Synthetics)
Thorough drying of thick or multi-layered fabrics, e.g. pull-
3 kg
overs, bedding, table linen.
For thin fabrics which are not ironed, e.g. easy care shirts,
3 kg
table linen, baby clothes, socks, lingerie with bones or wires.
For thin fabrics which are also to be ironed, e.g. knitwear,
3 kg
cotton shirts.
Special (Special)
For further drying of individual items of laundry. ( Dryness
8 kg
(Dryness) function not available)
For drying cotton and synthetic fabrics, uses low tempera-
3 kg
ture.
Special program with anti-crease mechanism for easy care
1 kg
fabrics such shirts and blouses; for minimum ironing effort.
(or 5
The results depends on the type of fabric and its finish.
shirt
Place fabrics in the dryer straight after spinning; once dried,
s)
immediately remove fabrics and place on a clothes hanger.
For leisure clothing, such as jeans, sweat-shirts, etc., of dif-
8 kg
ferent material thicknesses (e.g. at the neck, cuffs and
seams).
For drying woollen fabrics after they have been washed, using warm air at minimum mechanical load (Follow section
“Sorting and preparing washing”). Recommendation: Remove fabrics immediately after drying, as no anti-crease programme follows.
The wool drying cycle of this tumble drying machine has
1 kg
been tested and approved by The Woolmark Company.
The cycle is suitable to dry knitted wool garments which are
labelled "hand wash" provided that the garments are washed in a Woolmark endorsed hand washing cycle and tumble dried according to the instructions issued by the manufacturer. (M1022)
Care label
Page 7
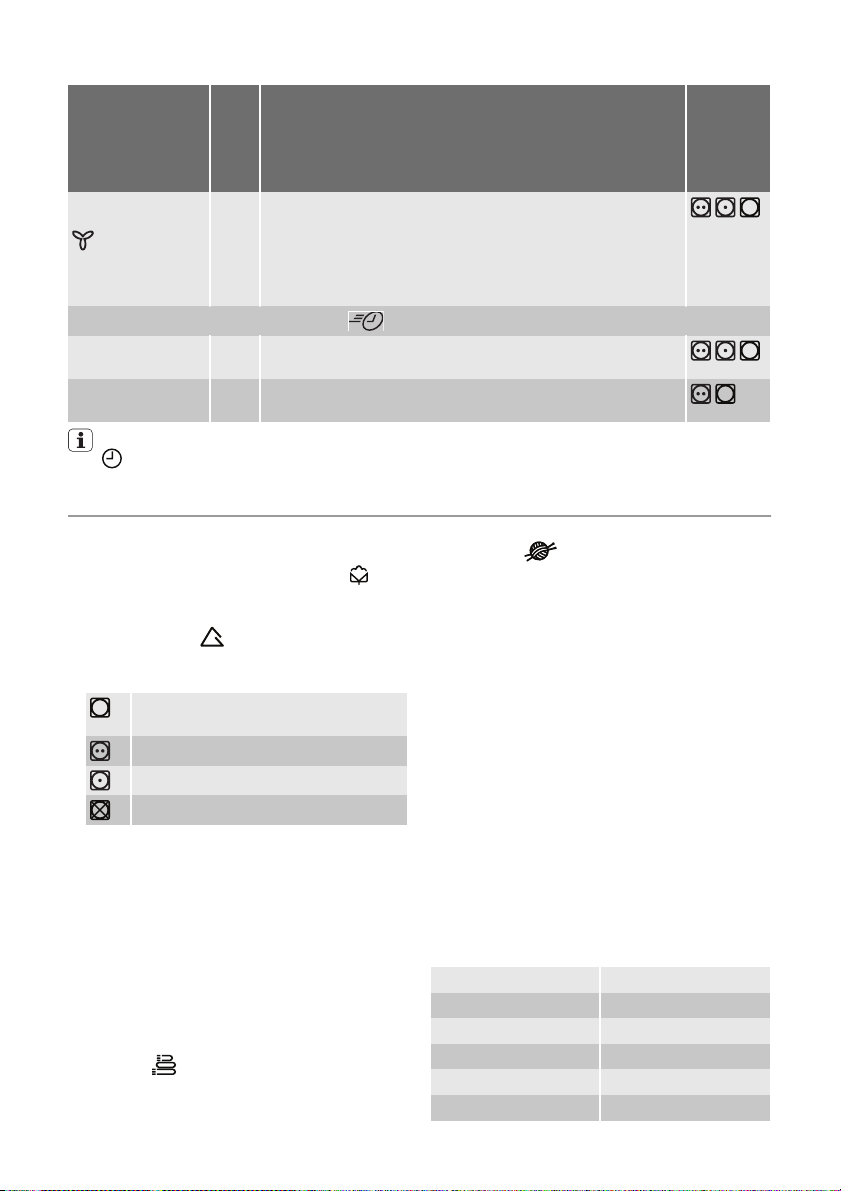
electrolux 7
Programme
Cooling
(Cooling)
Synthetics quick
(Synthetics quick)
Cottons quick
(Cottons quick)
max. load
(dry clothes)
Special programme, lasting around 10 minutes, for refreshing or gently cleaning textiles with commercially available
dry cleaning sets. (Only use those products which are de-
8 kg
clared as suitable for the drier by the manufacturer; please
observe the manufacturer’s instructions for use.)(Buzzer
(Buzzer) function available)
For quick drying synthetics fabrics with minimum creasing.
2 kg
Drying result: ready to store.
For quick drying cotton fabrics with minimum creasing. Dry-
3 kg
ing result: ready to store.
Application/properties
Quick (Quick)
Time (Time) function available only with
Time (Time) programme.
DAILY USE
Sorting laundry
• Sort by fabric type:
–
Cotton/linen for programmes in
tons (Cottons) programme group.
– Mixtures and synthetics for pro-
grammes in
Synthetics (Synthet-
ics ) programme group.
• Sort by care label: The care labels mean:
Drying in the tumble dryer possible in
principle
Drying at normal temperature
Drying at reduced temperature
Drying in the tumble dryer not possible
Important! Do not place in the appliance
any wet laundry which is not specified on
the care label as being suitable for tumbledrying.
This appliance can be used for all wet laundry items which are labelled as suitable for
tumble-drying.
• Do not dry new, coloured textiles together with light-coloured laundry items. Textile colours may bleed.
• Do not dry cotton jersey and knitwear
with the
Extra (Extra) programme.
Items may shrink!
Cot-
Care label
• Wool and wool-like textiles can be dried
using the
Wool (Wool) programme.
Before the drying cycle spin the woollen
textiles as well as possible (max. 1200
rpm). Only dry woollen textiles together of
similar or the same material, colour and
weight. Please dry heavy laundry items
made of wool separately.
Preparing laundry
• To avoid laundry becoming tangled:
close zips, button up duvet covers and
tie loose ties or ribbons (e.g. of aprons).
• Empty pockets. Remove metal items (paper clips, safety pins, etc).
• Turn items with double-layered fabrics inside out (e.g. with cotton-lined anoraks,
the cotton layer should be outermost).
These fabrics will then dry better.
Important! Do not overload the appliance.
Observe max. loading volume of 8 kg.
Average laundry weights
bathrobe 1200 g
quilt cover 700 g
man’s work shirt 600 g
man’s pyjamas 500 g
sheet 500 g
tablecloth 250 g
Page 8
8 electrolux
man’s shirt 200 g
night dress 200 g
pillow case 200 g
towelling towel 200 g
blouse 100 g
ladies’ briefs 100 g
men’s underpants 100 g
napkin 100 g
tea cloth 100 g
Switching machine on
Turn the programme selector to any programme. The machine switches on. When
the loading door is open, the internal lamp
illuminates the drum.
Door opening and laundry loading
1. Open loading door:
Push against the loading door (push
point)
Selecting the programme
Use the programme selector to set the programme you require. The estimated time to
end of the programme appears in the LCD
in h:mm format (hours:minutes).
During the cycle time elapses by steps of
one minute; less than 1 hour the leading
zero is not shown (e.g. “59”, “5”, “0”).
Selecting additional functions
You can choose from the additional functions Delicate (Delicate), Buzer (Buzer ), Dryness (Dryness), Time (Time) (if a Time programme has been selected), and Delay (Delay).
2. Load your laundry (do not force it in).
Caution! Do not jam laundry in between the loading door and rubber seal.
3. Close loading door securely. Lock must
audibly lock.
Delicate (Delicate)
For especially gentle drying of sensitive fabrics with the care label and for temperaturesensitive textiles (e.g. acrylic, viscose). Programme is executed with reduced heat.
DELICATE is only suitable for use with
loads of up to 3kg.
1. Press the DELICATE (Delicate) button.
The
DELICATE (Delicate) symbol ap-
pears in the display.
Buzzer (Buzzer)
When the drying cycle has finished, an intermittent audible signal will sound.
By depressing button Buzzer (Buzzer) the
acoustic signal is switched off in the following cases:
Page 9
electrolux 9
• when selecting the programme
• when depressing the buttons
• when the programme selector dial is
turned to another position during the programme or when you depress an option
button during the cycle
• at the end of the programme.
The corresponding light comes on
Dryness (Dryness)
Press the DRYNESS (Dryness) button repeatedly, to select the desired option. The
relevant light will light up. Laundry becomes
dryer from MIN to MAX. Press the DRYNESS (Dryness) button as many times as
necessary until the small light at the level of
residual dampness required is illuminated.
When the programme has finished the pilot
lights End is on.
Time (Time)
Use the Time (Time) button to select the programme duration after setting the Time
programme. You can select a programme
duration from 20 min. to 3 hours in 10-mi-
nute steps.
1. Turn the programme selector to the
Time
programme.
2. Press the Time (Time) button repeatedly
until the desired programme duration is
shown in the display, e.g.
for a programme of 20 minutes.
If the programme duration is not selected,
the duration is automatically set to 10 mins.
Delay (Delay)
With the Delay (Delay) button, you can
delay the start of a programme by between 30 minutes (30') and a maximum of 20 hours (20h).
1. Select the programme and additional
functions.
2. Press the Delay (Delay) button as many
times as necessary until the required
time of the delay appears on the dis-
play, e.g.
H if the programme is
to be started in 12 hours.
If the display is showing H and
you press the button again, the time delay will be cancelled. The display will
show 0 and then the duration of the selected programme.
3. To activate the delay timer, press the
Start/Pause (Start/Pause) button. The
amount of time remaining until the programme is set to start is continuously displayed (e.g. 15h, 14h, 13h, … 30' etc).
Setting child lock
The child lock can be set to prevent a programme being accidentally started or a programme in operation being accidentally
changed. The child lock function locks all
buttons and the programme selector. The
child lock can be activated or deactivated
by holding down the Buzzer (Buzzer) and
Time (Time) buttons simultaneously for 5
seconds.
– Before programme is started: Appli-
ance cannot be used
– After programme is started: Pro-
gramme in operation cannot be
changed
The icon
appears in the display to indicate that the child safety device is activated.
The child safety device is not deactivated
once the programme comes to an end.
If you want to set a new programme, you
must first deactivate the child safety device.
Starting the programme
Press the Start/Pause Start/Pause button.
The programme is started. The programme
progress display shows drying progress.
The symbols for
Drying and Coling appear in the display one after the other. The
number of droplets in the dryness indicator
gradually goes down as the drying process
progresses.
Changing programme
To change a programme which has been selected by mistake once the programme has
started, first turn the programme selector to
O off and then reset the programme.
Page 10
10 electrolux
The programme can no longer be
changed directly once the programme
has started. If nevertheless there is an
attempt to change the programme on
the programme knob, the programme
progress display and the maintenance
indicators flash. If an option button (excluding the Buzzer (Buzzer) button) is
pressed,
The drying programme is not however
affected by this (laundry protection).
Putting in extra items or taking items
out before end of programme
1. Open loading door.
Warning! Laundry and drum can
become hot. Risk of burns!
2. Load or remove laundry items.
3. Close loading securely. Lock must audi-
bly lock.
4. Press the Start/Pause button to contin-
ue the drying cycle.
Drying cycle complete / removing
laundry
Once the drying cycle is complete, the display shows the anti-crease icon and flash-
ing
as well as warning lamps:
filter and full tank . If the Buzzer (Buz-
zer) button has been pressed, an acoustic
appears on the display.
signal sounds intermittently for about one minute.
The drying cycles (except from the
Wool programme) are automatically followed by an anti-crease phase which
lasts around 30 minutes. The drum rotates at intervals during this phase. This
keeps the laundry loose and free of creases. The laundry can be removed at
any time during the anti-crease phase.
(The laundry should be taken out towards the end of the anti-crease phase
at the latest to prevent creases from
forming.)
1. Open door.
2. Before removing the laundry, remove
fluff from the micro-fine filter. It is best to
use a damp hand for this purpose. (See
“Maintenance and cleaning” chapter.)
3. Remove laundry.
4.
Turn the programme selector to
Important! After each drying cycle:
- Clean the micro-fine filter and fine filter
- Drain the condensed water container
(See chapter “Maintenance and cleaning ”.)
5. Close the door.
off .
CLEANING AND MAINTENANCE
Cleaning lint filters
To ensure that the appliance works perfectly, the lint filters in the door and in front of
the drum must be cleaned after every drying cycle.
Caution! Important. Never operate the
dryer without the lint filter or with a
damaged or blocked lint filter.
1. Open loading door
2. Use a damp hand to clean the microfine filter, which is built into the lower
part of the loading aperture.
3. After a period of time, a patina due to detergent residue on laundry forms on the
filters. When this occurs, clean the filters
with warm water using a brush. Remove
the filter from the door pulling it out. It
can be positioned with the tooth facing
Page 11
to the left or to the right). After cleaning
do not forget to put it back.
4. Remove fluff from lint filter, preferably using a damp hand for this purpose.
5. Replace the filter.
Clean the door seal
Wipe the door seal with a damp cloth immediately after the drying cycle has finished.
Emptying the water reservoir
Empty the water reservoir after every drying
cycle.
If the water reservoir is full, an active programme will break off automatically and the
empty container
icon on the display will
light up. In order to continue the programme, the water reservoir must first be
emptied.
Warning! The condensed water is not
suitable for drinking or for preparing
foodstuffs.
1. Take out water reservoir completely.
electrolux 11
2. Pour condensed water out into a basin
or similar receptacle.
3. Refit water reservoir.
If the programme has been interrupted
as a result of the water reservoir being
full: Press the START/PAUSE button to
continue the drying cycle.
The water reservoir has a volume of approx. 4.5 litres. This is sufficient for
around 8 kg of laundry which has previously been spun at 1000 revolutions/
minute.
The condensate can be used as distilled water, e.g. for steam ironing. However first filter the condensate (e.g. with
a coffee filter) to remove any residue
and small pieces of fluff.
Cleaning heat exchanger
If the
HEAT EXCHANGER is displayed,
the heat exchanger needs to be cleaned.
Caution! Operating when the heat
exchanger is blocked with fluff can
damage the dryer. This also increases
energy consumption.
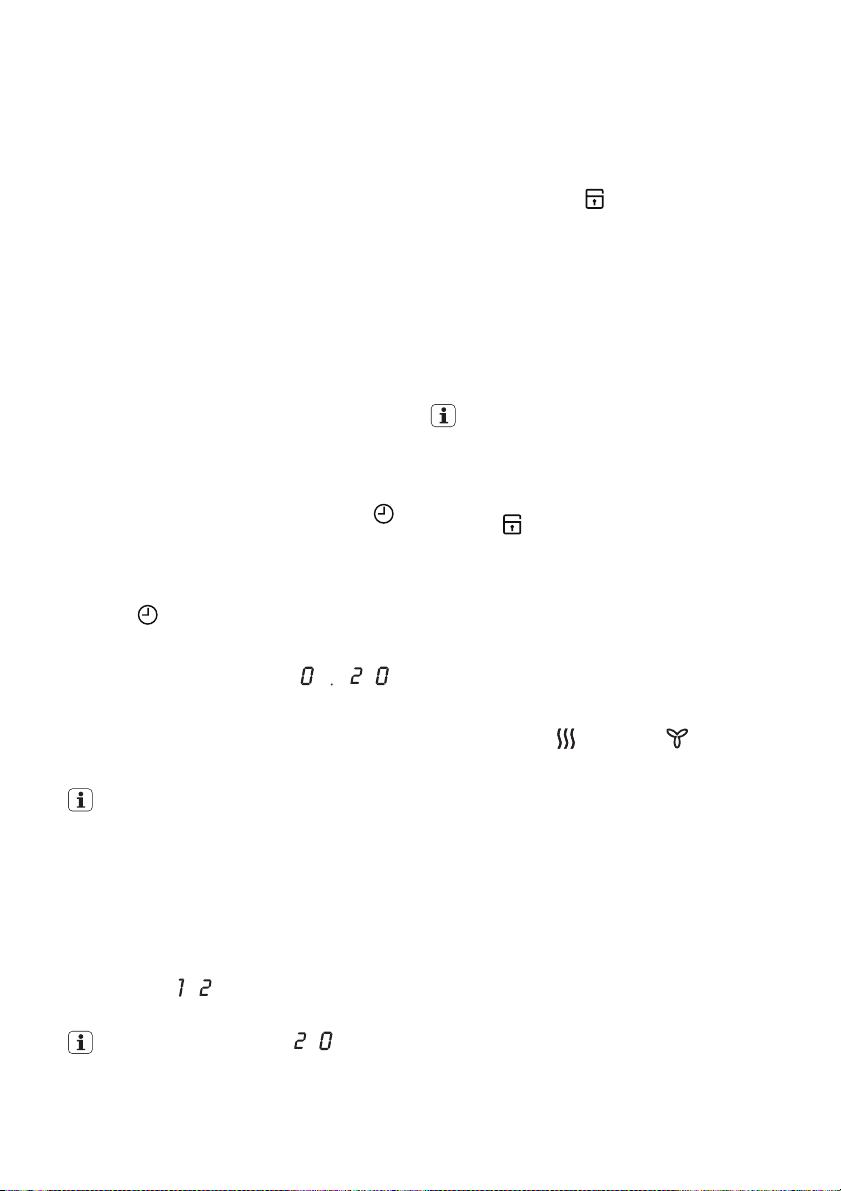
1. Open door.
Page 12

12 electrolux
2. Open door in plinth. To do this, press
the release button on the bottom of the
door aperture and open the door in the
plinth to the left.
3. Clean fluff from the inside of the door
and the heat exchanger front chamber.
Wipe the door seal with a damp cloth.
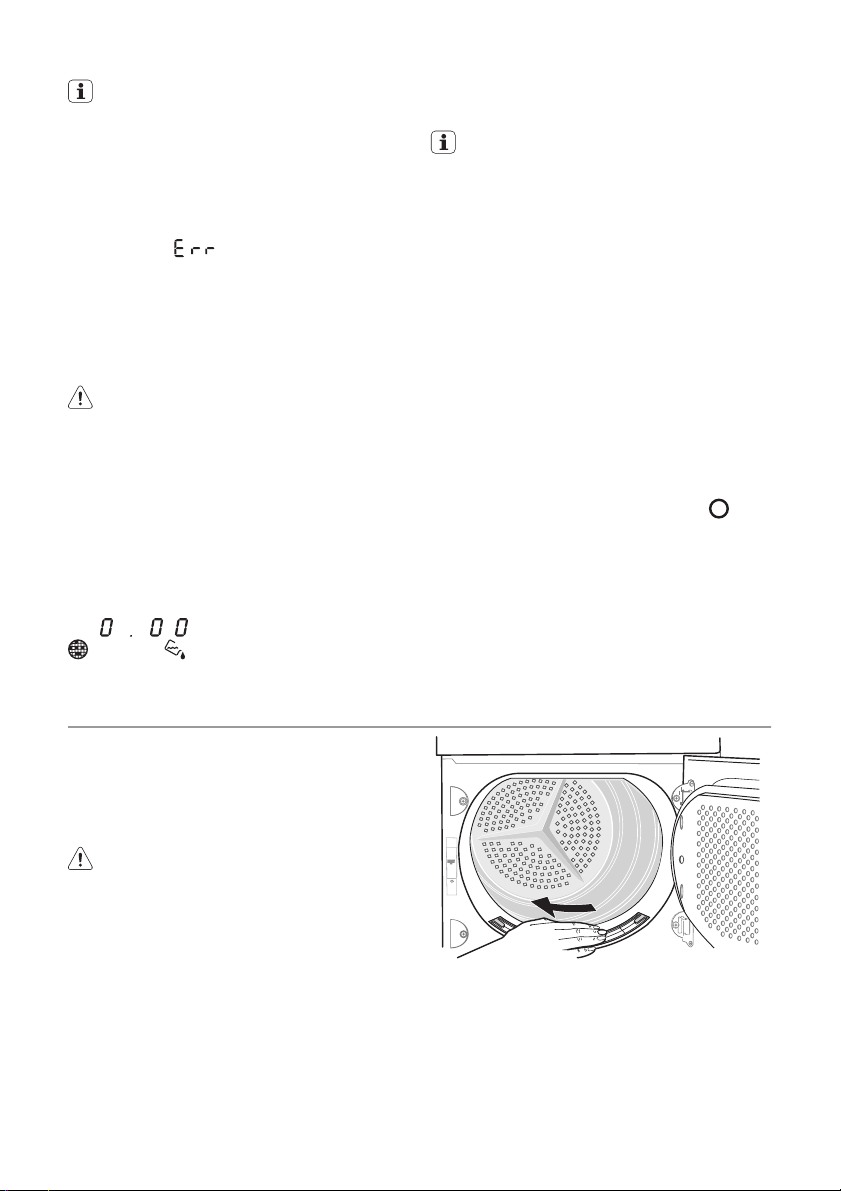
4. Turn both lock washers inwards.
5. Use the handle to pull the heat exchanger out of the base and carry it horizontally to prevent any remaining water from
spilling.
6. To empty the heat exchanger, hold vertically over a washing-up bowl.
Caution! Do not use sharp objects to
clean. The heat exchanger could
develop leaks.
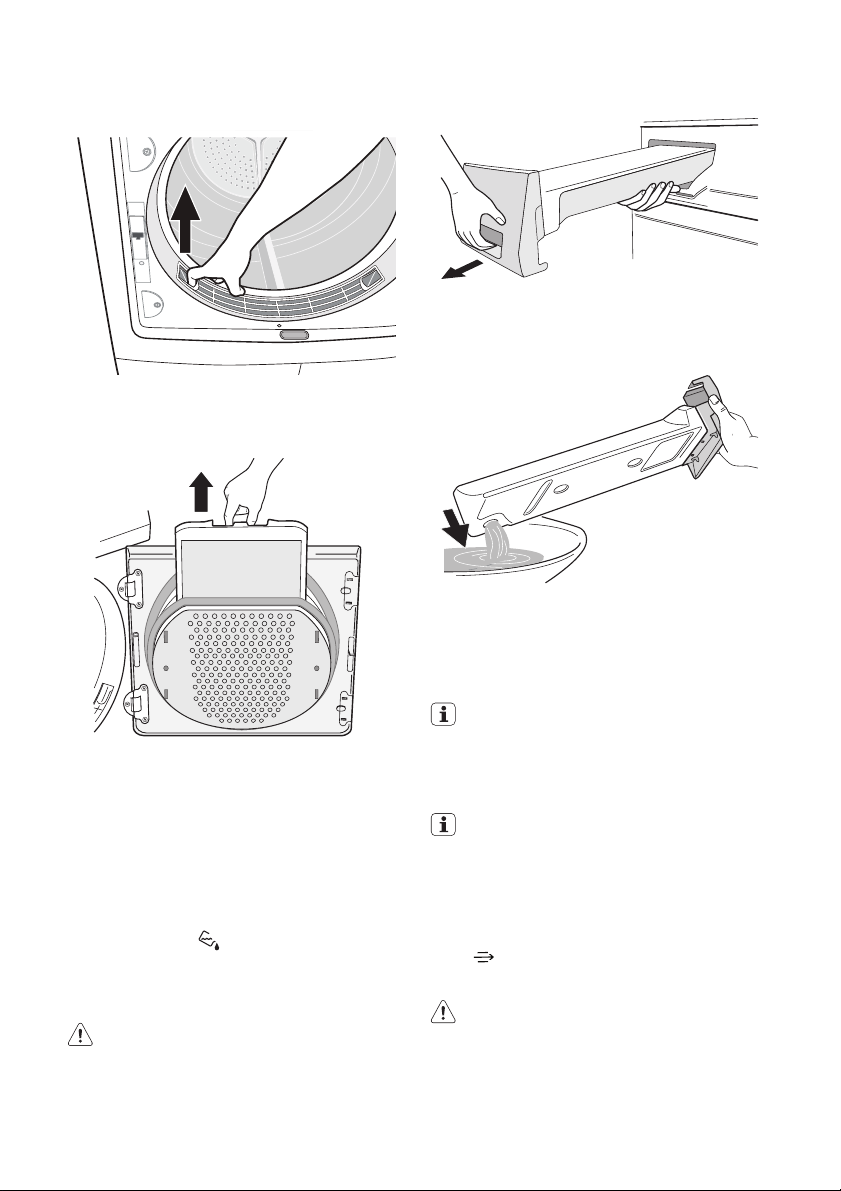
7. Clean heat exchanger.
It is best to use a brush or to rinse thoroughly with a hand-held shower.
8. Replace heat exchanger and lock into
place (turn both lock washers outwards
until they snap into place).
9. Close door in plinth.
The appliance will not operate if the
HEAT EXCHANGER indicator is still lit.
Caution! Never operate the dryer
without the heat exchanger.
Cleaning the drum
Caution! Do not use abrasives or steel
wool to clean the drum.
Lime in the water or cleaning agents
may form a barely visible lining on the inside of the drum. The degree to which
the laundry has been dried is then no
longer detected reliably. The laundry is
damper than expected when removed
from the appliance.
Use a standard domestic cleaner (e.g. vinegar-based cleaner) to wipe down the inside
of the drum and drum ribs.
Clean control panel and housing
Caution! Do not use furniture cleaners
or aggressive cleaning agents to clean
the machine.
Use a damp cloth to wipe down the control
panel and housing.
Page 13

WHAT TO DO IF ...
Troubleshooting by yourself
If, during operation, the error code E... plus
number or letter) appears on the multi-display: Switch the appliance off and on again.
Problem Possible cause Remedy
Dryer does not work.
Loading door is open. Close loading door.
Drying results unsatisfactory.
Lint filters clogged. Clean lint filters.
Fluff filter clogged. Clean fluff filter.
Heat exchanger clogged with lint. Clean heat exchanger.
Ventilation slots in base area cov-
Residue on inside surface of drum
Conductance of water at installa-
When a button is pressed
- no reaction of the machine.
Drum light does not work.
Displayed programme
time changes erratically
or stays unchanged for a
long time.
Programme inactive,
CONTAINER display illuminated.
Drying cycle ends shortly
after programme starts.
ANTICREASE (ANTICREASE) light is on.
Mains plug is not plugged in or
fuse is not working correctly.
Have you pressed the START/
PAUSE (START/PAUSE) button?
Wrong programme selected.
Overloading of laundry.
ered up.
or drum ribs.
tion site differs from standard setting of machine.
Drying protection. After the start of
the programme, the option can no
longer be set.
Programme selector in O off posi-
tion.
Defective light bulb.
Programme time is corrected automatically depending on type and
volume of laundry and level of
dampness.
Condensate tank is full.
Not enough washing loaded or
washing loaded is too dry for selected programme.
Reset programme. Press the START/
PAUSE (START/PAUSE) button. If the error
appears again, please contact the Customer Care Department, stating the error code
Plug in at mains socket. Check
fuse in fuse box (domestic installation).
Press the START/PAUSE (START/
PAUSE) button again.
Select a different programme the
next time you dry (see “Programme overview” chapter).
Observe recommended loading
volumes.
Uncover ventilation slots in base
area.
Clean inside surface of drum and
drum ribs.
Re-programme standard setting
for degree of drying (see ‘Programming options’ chapter).
Turn the programme knob to O
off . Set the programme again.
Turn programme selector to any
programme.
Replace light bulb (see next section).
Automatic process; this is not a
machine fault.
Empty condensate tank, then start
programme with START/PAUSE
(START/PAUSE) button.
Select time programme or higher
drying level (e.g.
TRA) instead of
(CUPBOARD).
CUPBOARD
electrolux 13
EXTRA (EX-
Page 14

14 electrolux
Drying cycle lasts an unusually long time. Note:
After up to 5 hours the
drying cycle ends automatically (see ‘End of drying cycle’).
Fluff filter clogged. Clean fluff filter.
Load volume too big. Reduce load volume.
Laundry insufficiently spun. Laundry must be adequately spun.
Particularly high room tempera-
Discoloration Colour fastness of textiles.
Changing the bulb for interior lighting
Only use a special bulb which is designed
specially for dryers. The special bulb can be
obtained from your local Service Force centre.
Warning! When the appliance is
switched on, the interior lighting
switches itself off after 4 minutes when
the door is open.
Warning! Do not use standard bulbs!
These develop too much heat and may
damage the machine!
Warning! Before replacing the bulb,
Lint filter clogged. Clean lint filter.
ture. Temporary switching off of
the compressor to avoid overload.
Automatic process, there is no
fault with the appliance. If possible, lower the room temperature.
Check colour fastness of textiles.
Only treat textiles together if they
are a similar colour.
1. Unscrew cover above the bulb (this can
be found directly behind the loading aperture, at the top; refer to “Description of
machine” section.)
2. Replace defective bulb.
3. Screw cover back down.
Check the correct positioning of o-ring gasket before screwing back the door light cover. Do not operate the dryer when missing oring gasket on door light cover.
Warning! For safety reasons, the cover
must be screwed down tightly. If this is
not done, the dryer must not be
operated.
disconnect the mains plug.
TECHNICAL DATA
This appliance conforms with the following EU Directives:
– 2006/95/EC dated 12.12.2006 Low Voltage Directive
– 89/336/EEC dated 03.05.1989 EMC Directive inclusive of Amending Directive
92/31/EEC
– 93/68/EEC dated 22.07.1993 CE Marking Directive
Height x width x depth 85 x 60 x 58 cm
Drum volume 108 l
Depth with loading door open 109 cm
Height can be adjusted by 1.5 cm
Weight when empty approx. 40,5 kg
Loading volume (depends on programme)
Voltage 230 V
Required fuse 10 A
Total power 2350 W
Energy efficiency class
1)
max. 8 kg
B
Page 15

electrolux 15
Energy consumption (8 kg of cotton, predrained at 1000 rpm)
Average annual energy consumption 282 kWh
Use Domestic
Permissible ambient temperature + 5°C to + 35°C
The consumption values have been established under standard conditions. They may de-
COTTON CUPBOARD (COTTON CUP-
2) 3)
BOARD)
COTTON IRON (COTTON IRON)
SYNTHETICS CUPBOARD (SYNTHETICS
CUPBOARD)
1) Different loading volume data may be needed in some countries as a result of different measuring methods.
2) in accordance with EN 61121
2)
Consumption values
viate when the machine is operated in domestic circumstances.
Programme
2)
2)
4.48 kWh
Energy consumption in kWh / average
drying time in min.
4.48 / 135 (8 kg load pre-drained at 1000
rpm)
4,30 (8 kg load pre-drained at 1400 rpm)
3.8 / 108 (8 kg load pre-drained at 1000 rpm)
1.30 / 45 (3 kg load pre-drained at 1200 rpm)
MACHINE SETTINGS
Setting Implementation
Buzzer permanent
on/off
Water hardness
1) Water contains, a variable quantity of limestone and mineral salts of which quantities vary according to
geographical locations thus varying its conductivity values. Relevant variations of the conductivity of the water
compared to those prefixed by the factory could slightly influence the residual humidity of the laundry at the end of
the cycle. Your dryer allows you to regulate the sensitivity of the drying sensor based on conductivity values of the
water.
The alarm is by default always off. To set permanent alarm on (off):
1. Turn the programme selector to any programme.
2. Press simultaneously the Buzzer and Dryness buttons and hold down
for approx. 5 seconds.
1)
1. Turn the programme selector to any programme.
2. Press simultaneously the Dryness and Start/Pause buttons and hold
down for approx. 5 seconds.
3. Press the Start/Pause button until you set desired level:
- low conductivity <300 μS/cm
- medium conductivity 300-600 μS/cm
4. To memorize setting press simultaneously the Dryness and Start/Pause
buttons or turn knob to
- high conductivity >600 μS/cm
off position
HINTS FOR TEST INSTITUTES
Parameters possible to checked by the
Test Institutes:
• Energy consumption (corrected with final
humidity) during the cupboard dry cotton
cycle with nominal load.
• Energy consumption (corrected with final
humidity) during the cupboard dry cotton
cycle with half load.
• Final humidity (during cupboard dry cotton, iron dry cotton and cupboard dry
easy care)
• Condensation efficiency (corrected with final humidity) during cupboard dry cotton
cycle with nominal and half load
All the cycles have to be checked in accordance with EN 61121 (Tumble dryers for
Page 16

16 electrolux
household use – Methods for measuring
the performance).
INSTALLATION
Appliance positioning
• It is recommended that, for your convenience, the machine is positioned close to
your washing machine.
• The tumble dryer must be installed in a
clean place, where dirt does not build up.
• Air must be able to circulate freely all
round the appliance. Do not obstruct the
front ventilation grille or the air intake
grilles at the back of the machine.
• To keep vibration and noise to a minimum when the dryer is in use, it should
be placed on a firm, level surface.
• Once in its permanent operating position,
check that the dryer is absolutely level
with the aid of a spirit level. If it is not,
raise or lower the feet until it is.
• The feet must never be removed. Do not
restrict the floor clearance through deeppile carpets, strips of wood or similar.
This might cause heat built-up which
would interfere with the operation of the
appliance.
Important!
• The hot air emitted by the tumble dryer
can reach temperatures of up to 60°C.
The appliance must therefore not be installed on floors which are not resistant to
high temperatures.
• When operating the tumble dryer, the
room temperature must not be lower
than +5°C and higher than +35°C, as it
may affect the performance of the appliance.
• Should the appliance be moved, it must
be transported vertically.
• The appliance must not be installed behind the lockable door, a sliding door a
door with a hinge on the opposite side to
that of the appliance in such a way that a
full opening of the dryer is restricted.
Removing transport safety packaging
Caution!
Before use all parts of the transport packaging must be removed.
1. Open loading door
2. Pull off adhesive strips from inside machine on top of drum.
3. Remove foil hose and polystyrene padding from the machine.
Electrical connection
Details on mains voltage, type of current
and the fuses required should be taken
from the type plate. The type plate is fitted
near the loading aperture (see “Product description” chapter).
Connect the machine to an earthed
socket, in accordance with current wiring regulations.
Warning! The manufacturer
declines any responsibility for
damage or injury through failure to
comply with the above safety
precautions.
Should the appliance power supply
cable need to be replaced, this
must be carried out by our Service
Center.
Warning! The plug must be
accessible after installing the
machine.
Door reversal
To make it easier to load or unload the laundry, the door can be reversed.
Warning! The door must only be
reversed by an authorised service
engineer.
Page 17

electrolux 17
Please contact your local Service Force Centre. The engineer will carry out the door reversal at your cost.
Special accessories
•
Stacking kit
These intermediate installation kits can
be used to arrange the dryer and a washing machine (60 cm wide, front loaded)
as a space-saving washer/dryer stack.
The washing machine is at the bottom
and the dryer is at the top.
Read carefully the instructions supplied
with the kit.
Available from your Service Force Centre or your specialist dealer
• Draining kit
Installation kit for direct draining of the condensed water into a basin, siphon, gully,
etc. The water reservoir then no longer
has to be drained, it must however re-
SERVICE
If there are technical faults, first check if you
can remedy the problem yourself with the
help of the operating instructions - see chapter What to do if….
If you cannot remedy the problem on your
own, get in touch with the Customer Care
Department or one of our service partners.
To assist you quickly, these data are necessary:
– Model description
– Product number (PNC)
– Serial number (S No. is on rating plate
stuck to the product - to find it see chapter
Product description ))
main in its intended position in the machine.
Fixed hose has to be on the suitable
height from minimum of 50 cm to maximum of 1 m from floor level and cannot
be looped. If possible shorten the draining hose.
Read carefully the instructions supplied
with the kit.
Available from your Service Force Centre or your specialist dealer
• Pedestal with the drawer
To situate the dryer at the optimal height
and have some additional space to store
(e.g. laundry).
Read carefully the instructions supplied
with the kit.
Available from your Service Force Centre or your specialist dealer
– Type of failure
– Any error messages shown by the display.
So that you have the necessary reference
numbers from your appliance at hand, we
recommend that you write them in here:
Model description: ........................................
PNC: ........................................
S No: ........................................
Page 18

18 electrolux
Electrolux. Thinking of you.
Saiba mais sobre a nossa filosofia em www.electrolux.com
ÍNDICE
Informações de segurança importantes
Ambiente 20
Descrição do aparelho 21
Painel de comando 21
O que mostra o visor 22
Antes da primeira utilização 22
Tabela de programas 22
Utilização diária 24
Limpeza e manutenção 27
18
O que fazer se ... 29
Dados técnicos 31
Definições da máquina 32
Sugestões para os institutos de teste 32
Instalação 33
Assistência 34
Sujeito a alterações sem aviso prévio
INFORMAÇÕES DE SEGURANÇA IMPORTANTES
Importante Para a sua própria
segurança e para garantir uma
utilização correcta, antes de instalar e
usar o aparelho pela primeira vez, leia
atentamente este manual do utilizador,
incluindo as suas sugestões e
advertências. Para evitar erros e
acidentes desnecessários, é
importante que todas as pessoas que
utilizam o aparelho conheçam o seu
funcionamento e as características de
segurança. Guarde estas instruções e
certifique-se de que elas acompanham
o aparelho em caso de transferência
ou venda, para que todos os que
venham a usá-lo estejam devidamente
informados quanto à sua utilização e
segurança.
Segurança geral
• É perigoso alterar as especificações ou
tentar modificar o produto de qualquer forma.
• Este aparelho não deve ser utilizado por
pessoas (incluindo crianças) com deficiências físicas, sensoriais ou sem experiência e conhecimentos, salvo se tiverem recebido supervisão ou instruções relativas
à utilização do aparelho por uma pessoa
responsável pela sua segurança.
• Certifique-se de que os animais domésticos não entram no tambor. Para o evitar,
verifique sempre o tambor antes de utilizar a máquina.
• Objectos como moedas, alfinetes, pregos, parafusos, pedras ou quaisquer objectos duros e afiados podem provocar
danos graves e não devem ser colocados na máquina.
• Para evitar o perigo de incêndios provocados por uma secagem excessiva, não
utilize o aparelho para secar os artigos seguintes: Almofadas, colchas e afins (estas peças acumulam calor).
• Peças, como sejam a espuma de borracha (espuma de látex), toucas de banho,
tecidos impermeáveis, artigos e roupa
com o avesso em borracha ou almofadas
cheias com espuma de borracha não devem ser secas na máquina de secar roupa.
• Após a utilização, limpeza e manutenção,
desligue sempre a máquina.
• Em nenhuma circunstância deve tentar reparar a máquina. As reparações efectuadas por pessoas sem a formação adequada podem causar ferimentos ou avarias
graves. Contacte o seu Centro de Assistência local. Insista sempre para que sejam utilizadas peças sobresselentes originais.
• Peças que tenham sido sujas com substâncias, como sejam óleo para culinária,
acetona, gasolina, querosene, tira-nódoas, aguarrás, ceras e removedores de
cera devem ser lavadas em água quente
com uma quantidade extra de detergente
antes de serem secas na máquina de secar roupa.
•
Perigo de explosão: Nunca seque peças que tenham estado em contacto
com solventes inflamáveis (gasolina, bebidas alcoólicas, líquido para limpeza a seco e afins). Como estas substâncias são
Page 19

electrolux 19
voláteis, podem provocar explosões. Seque apenas peças lavadas em água.
• Perigo de incêndio: as peças mancha-
das ou impregnadas com óleo ou azeite
constituem um perigo de incêndio e não
devem ser colocadas na máquina de secar.
• Se tiver lavado a roupa com produto tira-
-nódoas, efectue um ciclo de enxaguamento extra antes de a colocar na máquina de secar roupa.
• Certifique-se de que não foram deixados
acidentalmente isqueiros ou fósforos nos
bolsos da roupa que vai colocar na máquina
Advertência Nunca pare a máquina
de secar roupa antes do fim do ciclo de secagem, a não ser que todas as peças sejam rapidamente retiradas e estendidas para dissipar
o calor. Perigo de incêndio!
• Perigo de choque eléctrico! Não direccione jactos de água para a máquina.
Instalação
• Este aparelho é pesado. Tenha cuidado
quando o deslocar.
• Quando retirar a máquina da embalagem, certifique-se de que não está danificada. Se tiver dúvidas, não a utilize e contacte o Centro de Assistência.
• Retire todas as embalagens antes de a
utilizar. Podem ocorrer sérios danos materiais ou na máquina se não cumprir estas indicações. Consulte a secção específica no manual do utilizador.
• A parte final do ciclo da máquina de secar é feita sem calor (ciclo de arrefecimento) para assegurar que as peças ficam a
uma temperatura em que não serão danificadas.
• Quaisquer trabalhos eléctricos necessários para a instalação da máquina devem
ser efectuados por um electricista qualificado.
• Deve ter cuidado para que o aparelho
não fique em cima do cabo de alimentação eléctrica.
• Se a máquina estiver instalada sobre
uma alcatifa, ajuste os pés de forma que
o ar circule livremente.
• Depois de instalar a máquina, certifique-
-se de que não está apoiada sobre o cabo de alimentação.
• Se colocar a máquina de secar por cima
da máquina de lavar, é obrigatório utilizar
o kit de montagem em coluna (acessório
opcional).
Utilização
• Esta máquina destina-se a uso doméstico. Não deve ser utilizada para fins diferentes daqueles para os quais foi concebida.
• Seque apenas peças de roupa concebidas para secar na máquina. Siga as instruções nas etiquetas da roupa.
• Não utilize a máquina para secar peças
por lavar.
• Não carregue demasiado a máquina. Consulte a secção específica no manual do
utilizador.
• A roupa a escorrer água não deve ser colocada na máquina de secar.
• As peças de roupa que tiverem estado
em contacto com produtos petrolíferos
voláteis não devem ser secas na máquina. Se forem utilizados líquidos de limpeza voláteis, tenha o cuidado de retirar o
produto da peça de roupa antes de a colocar na máquina.
• Nunca puxe pelo cabo eléctrico para retirar a ficha da tomada; puxe sempre pela
própria ficha.
• Não utilize a máquina de secar se o cabo
de alimentação, o painel de comando, a
superfície de trabalho ou a base estiverem danificados de forma que o interior
da máquina de secar esteja acessível.
• Os amaciadores ou produtos semelhantes devem ser usados de acordo com as
instruções do amaciador.
•
Cuidado - superfície quente : Não toque na superfície de cobertura da luz da
porta enquanto a luz estiver acesa (só
em secadores equipados com luz interior
no tambor).
Segurança para crianças
• Esta máquina não deve ser utilizada por
crianças ou pessoas portadoras de deficiência sem vigilância.
• As crianças devem ser vigiadas para assegurar que não brincam com o aparelho.
Page 20

20 electrolux
• Os componentes da embalagem (por ex.
película de plástico, poliestireno) podem
ser perigosos para as crianças - perigo
de asfixia! Mantenha-os fora do alcance
das crianças.
AMBIENTE
O símbolo no produto ou na
embalagem indica que este produto não
pode ser tratado como lixo doméstico. Em
vez disso, deve ser entregue ao centro de
recolha selectiva para a reciclagem de
equipamento eléctrico e electrónico. Ao
garantir uma eliminação adequada deste
produto, irá ajudar a evitar eventuais
consequências negativas para o meio
ambiente e para a saúde pública, que, de
outra forma, poderiam ser provocadas por
um tratamento incorrecto do produto. Para
obter informações mais pormenorizadas
sobre a reciclagem deste produto, contacte
os serviços municipalizados locais, o centro
de recolha selectiva da sua área de
residência ou o estabelecimento onde
adquiriu o produto.
Aparelho velho
Advertência
Retire a ficha da tomada quando não utilizar mais a máquina. Corte o cabo principal
e elimine-o juntamente com a ficha. Destrua o fecho da porta de carregamento. As
crianças não podem fechar-se na máquina
e colocar a sua vida em perigo.
Materiais da embalagem
Os materiais da embalagem são ecológicos
e podem ser reciclados. Os componentes
• Mantenha todos os detergentes num local seguro e fora do alcance das crianças.
• Certifique-se de que as crianças ou animais domésticos não entram no tambor.
de plástico estão identificados por marcas,
por ex. >PE<, >PS<, etc. Elimine os materiais da embalagem no contentor adequado
nas instalações de eliminação de resíduos
da sua zona.
Sugestões ambientais
• Na máquina de secar, a roupa fica fofa e
macia. Os amaciadores não são, por isso, necessários durante a lavagem.
• A sua máquina funcionará mais economicamente se:
– mantiver sempre as aberturas de venti-
lação na base da máquina de secar desobstruídas;
– utilizar os volumes de carga especifica-
dos na vista geral dos programas;
– garantir uma boa ventilação no compar-
timento de instalação;
– limpar o filtro micro-fino e o filtro fino
após cada ciclo de secagem;
– centrifugar bem a roupa antes da seca-
gem.
O consumo de energia depende da ve-
locidade de centrifugação definida na
máquina de lavar. Velocidade de centrifugação mais alta - consumo de energia mais baixa.
Page 21

DESCRIÇÃO DO APARELHO
electrolux 21
6
7
8
9
10
11
1 Painel de comando
2 Filtros de cotão
3 Porta de carregamento (reversível)
4 Grelha de ventilação
5 Pés ajustáveis
6 Gaveta com recipiente da água de con-
densação
PAINEL DE COMANDO
1 2 43
1
2
3
4
5
7 Lâmpada do tambor
8 Botão de pressão para abrir a porta da
base
9 Placa de características
10 Trocador de calor
11 Porta do trocador de calor
1 Botão de programas e interruptor On/Off
2 Visor
3 Botão Início Diferido
4 Indicadores de manutenção
– TROCADOR DE CALOR
5 6
–FILTRO
– RESERVATÓRIO
5 Botões das funções
6 Botão INÍCIO/PAUSA
Page 22

22 electrolux
O QUE MOSTRA O VISOR
SÍMBOLO DESCRIÇÃO
Tempo para fim (tempo para
programa de tempo, tempo
de início diferido)
ANTES DA PRIMEIRA UTILIZAÇÃO
Para eliminar eventuais resíduos produzidos
durante o fabrico, limpe o tambor da máquina de secar com um pano húmido ou efectue um ciclo de secagem curto (30 MIN)
com panos húmidos na máquina.
1.
Rode o selector de programas para
TIME (TEMPO).
SÍMBOLO DESCRIÇÃO
Segurança para crianças
Início diferido
Fase de secagem
Fase de arrefecimento
Fase de protecção anti-rugas
Erro, selecção errada
2. Prima repetidamente o botão TIME
(TEMPO) até aparecer 0.30 no visor.
3. Prima o botão START/PAUSE (INÍCIO/
PAUSA).
TABELA DE PROGRAMAS
Programa
Carga máx.
(roupa seca)
Secagem intensiva de tecidos espessos ou de multi-cama-
Extra (Extra )
Cupboard
(Armário)
Iron (Ferro)
Extra (Extra)
Cupboard (Ar-
mário)
8 kg
das, por ex. atoalhados, roupões de banho.
Secagem intensiva de tecidos bastante espessos, por ex.
8 kg
atoalhados, malhas, toalhas.
Para tecidos finos que também são passados a ferro, por
8 kg
ex. malhas, camisas de algodão.
Secagem de tecidos espessos ou de multi-camadas, por
3 kg
ex. camisolas, roupa de cama, toalhas de mesa.
Para tecidos finos que não são passados a ferro, por ex. ca-
3 kg
misolas de tratamento fácil, toalhas de mesa, roupa de bebé, meias, lingerie com armação.
Aplicação/Propriedades
Etiqueta de cuidado
Cottons (Algodão)
Synthetics (Sintéticos)
Page 23

electrolux 23
Programa
Carga máx.
(roupa seca)
Para tecidos finos que também são passados a ferro, por
Iron (Ferro)
Time (Tempo)
Mix (Mix)
Easy (Fácil)
Jeans (Ganga)
Wool (Lã)
Cooling (Re-
frescar)
Synthetics quick
(Sintéticos breve)
Cottons quick
(Algodão breve)
3 kg
ex. malhas, camisas de algodão.
Para a secagem adicional de peças individuais. ( Dryness
8 kg
(Secagem) função indisponível)
Para secar tecidos de algodão e sintéticos, a baixas tempe-
3 kg
raturas.
Programa especial com mecanismo anti-rugas para peças
1 kg
de tratamento fácil, como camisas e blusas; para um esfor-
(ou
ço de engomagem mínimo. Os resultados dependem do ti-
5
po de tecido e do seu acabamento. Coloque as peças na
ca-
máquina de secar logo após a centrifugação; depois de se-
mi-
cas, retire imediatamente as peças e coloque-as num cabi-
sas)
de.
Para roupa desportiva, como calças de ganga, sweat-
8 kg
-shirts, etc., de tecidos de várias espessuras (por ex. no colarinho, nos punhos e nas costuras).
Para secar peças de lã depois de lavadas, com ar quente
na carga mecânica mínima (Consulte a secção "Separar a
roupa e preparar a lavagem"). Recomendação: Retire as peças de roupa imediatamente após a secagem, pois não existe a seguir um programa anti-rugas.
1 kg
O ciclo de secagem de lãs desta máquina de secar foi testado e aprovado pela Woolmark Company. O ciclo é adequado para secar peças de malha com a indicação "lavagem à mão", desde que as peças sejam lavadas com um
ciclo de lavagem à mão, aprovado pela Woolmark, e secas
de acordo com as instruções do fabricante. (M1022)
Programa especial, com a duração de aprox. 10 minutos,
para refrescar ou limpar suavemente tecidos com produtos
para limpeza a seco disponíveis no mercado. (Utilize ape-
1 kg
nas produtos declarados pelo fabricante como adequados
para máquinas de secar roupa; respeite as instruções de utilização do fabricante.)(função Buzzer (Alarme sonoro) disponível)
Para a secagem rápida de tecidos sintéticos com poucas
2 kg
rugas. Resultado de secagem: pronto para guardar.
Para a secagem rápida de tecidos de algodão com poucas
3 kg
rugas. Resultado de secagem: pronto para guardar.
Time (Tempo) disponível apenas com o
programa
Time (Tempo).
Aplicação/Propriedades
Etiqueta de cuidado
Special
Quick (Breve)
Page 24

24 electrolux
UTILIZAÇÃO DIÁRIA
Separar a roupa
• Separar por tipo de tecido:
– Algodão/linho para programas do gru-
po
– Misturas e sintéticos para programas
• Separar por etiquetas da roupa: As etiquetas da roupa significam:
Importante Não coloque no aparelho nenhuma roupa molhada cuja etiqueta não especifique que ela é adequada para a secagem na máquina.
Este aparelho pode ser utilizado para toda
a roupa molhada marcada como sendo adequada para a secagem na máquina.
• Não seque tecidos novos e de cor juntamente com peças de cores claras. As cores dos tecidos poderão desbotar.
• Não seque jersey de algodão e malhas
com o programa
pa poderá encolher!
• É possível secar lãs e tecidos de lã com
o programa
clo de secagem, centrifugue os tecidos
de lã o melhor possível (máx. 1200 rpm).
Seque apenas tecidos de lã do mesmo
material ou semelhante, cor e peso. Seque peças pesadas de lã separadamente.
Preparar a roupa
• Para evitar que a roupa fique emaranhada: feche os fechos, abotoe as capas de
edredão e ate fios e fitas soltas (p. ex. de
aventais).
• Esvazie os bolsos. Retire os objectos metálicos (clipes, alfinetes, etc.).
• Vire as peças com duas camadas do
avesso (p. ex. anoraques com forro de algodão, a camada algodão deve ficar para fora). Desta forma, estes tecidos irão
secar melhor.
Importante Não carregue demasiado a
máquina. Respeite a carga máx. de 8 kg.
Cottons (Algodão).
do grupo
Em princípio, é possível secar na máquina de secar roupa
Secar à temperatura normal
Secagem a baixa temperatura
Não é possível secar na máquina de
secar
Synthetics (Sintéticos).
Extra (Extra). A rou-
Wool (Lã). Antes do ci-
Pesos médios da roupa
roupão 1200 g
colcha 700 g
t-shirt de homem 600 g
pijama de homem 500 g
lençol 500 g
toalha de mesa 250 g
camisa de homem 200 g
camisa de noite 200 g
fronha 200 g
toalha de banho 200 g
blusa 100 g
cuecas de senhora 100 g
cuecas de homem 100 g
guardanapo 100 g
pano de chá 100 g
Ligar a máquina
Rode o selector de programas para qualquer programa. A máquina liga-se. Quando
a porta de carregamento está aberta, a lâmpada interna ilumina o tambor.
Abrir a porta e introduzir a roupa
1. Abra a porta de carregamento:
Pressione a porta de carregamento (ponto de pressão)
2. Carregue a roupa (sem forçar).
Page 25

electrolux 25
Cuidado Não deixe a roupa presa entre a porta de carregamento e a junta
de borracha.
3. Feche bem a porta de carregamento. O
trinco deve fazer um barulho ao fechar.
Seleccionar o programa
Use o selector de programas para definir o
programa que pretende. O tempo previsto
para terminar o programa aparece no LCD
no formato h:mm (horas:minutos).
Durante o ciclo, o tempo passa minuto a minuto; em períodos inferiores a 1 hora, os primeiros zeros não aparecem (ex. "59", "5",
"0").
Seleccionar funções adicionais
Pode seleccionar a partir das funções adicionais Delicate (Delicados), Buzer (Alarme
sonoro ), Dryness (Secagem), Time (Tempo)
(se tiver sido seleccionado um programa de
tempo) e Delay (Atraso).
Delicate (Delicados)
Para uma secagem especialmente suave
de tecidos sensíveis detentores da etiqueta
e para tecidos sensíveis à temperatura (ex.:
acrílico, viscose). O programa é executado
com um calor reduzido. DELICATE só deve
ser usado para cargas até 3 kg.
1. Prima o botão DELICATE (Delicados). O
símbolo
DELICATE (Delicados) apare-
ce no visor.
Buzzer (Alarme sonoro)
No fim do ciclo de secagem ouve-se um sinal sonoro.
Ao premir o botão Buzzer (Alarme sonoro)
o sinal acústico é desligado nos seguintes
casos:
• ao seleccionar um programa
• ao premir as teclas
• quando o selector de programas é roda-
do para outra posição durante o programa ou quando prime uma tecla de opções durante o ciclo
• no final do programa.
O indicador luminoso correspondente acende-se
Dryness (Secagem)
Prima repetidamente o botão SECAGEM
(Secagem) para seleccionar a opção desejada. O respectivo indicador luminoso acende-se. De MIN para MAX a roupa fica mais
seca. Prima o botão SECAGEM (Secagem)
as vezes necessárias até se acender a luz
pequena do nível de de secagem resídual
necessário.
Quando o programa termina, a luz piloto de
Fim acende-se.
Time (Tempo)
Use o botão Time (Tempo) para seleccionar
a duração do programa depois de regular o
programa Time
. Pode seleccionar a duração do programa de 20 min. a 3 horas
em períodos de 10 minutos.
1. Rode o selector de programas para o
programa Time
.
2. Prima o botão Time (Tempo) repetida-
mente até a duração pretendida do programa apareça no visor, p. ex.
para um programa de 20 minutos.
Se não for seleccionada a duração do programa, esta é automaticamente definida para 10 minutos.
Delay (Início diferido)
Com o botão Delay (Início diferido), pode retardar o início de um programa entre 30 minutos (30') e um máximo de
20 horas (20h).
Page 26

26 electrolux
1. Seleccionar o programa e as funções adicionais.
2. Prima o botão Delay (Início diferido) as
vezes necessárias até o atraso pretendi-
do aparecer no visor, por ex.
H
se o programa começar dentro de 12 horas.
Se o visor mostrar H e premir novamente o botão, o atraso será cancelado. O visor mostra 0 e, em seguida, a
duração do programa seleccionado.
3. Para activar o temporizador, prima o botão Start/Pause Início/Pausa. O tempo
que falta para o programa ter início é permanentemente mostrado (por ex. 15h,
14h, 13h, … 30', etc.).
Definir o bloqueio para crianças
O bloqueio para crianças pode ser programado para evitar o início acidental de um
programa ou a alteração de um programa
em funcionamento. Esta função de bloqueio para crianças bloqueia todos os botões e o botão de programas. A segurança
para crianças pode ser activada ou desactivada premindo simultaneamente os botões
Buzzer (Alarme sonoro) e Time (Tempo) durante 5 segundos.
– Antes de iniciar o programa: O apa-
relho não pode ser utilizado
– Depois do programa começar: O pro-
grama em funcionamento não pode
ser alterado
O ícone
aparece no visor para indicar
que o dispositivo de segurança para crianças está activado.
O dispositivo de segurança para crianças
não é desactivado assim que o programa
termina.
Se quiser definir um novo programa, deve
primeiro desactivar o dispositivo de segurança para crianças.
Iniciar o programa
Prima o botão Start/Pause (Início/Pausa). O
programa tem início. O indicador de progresso de programa mostra o progresso da se-
cagem. Os símbolos para
Secagem e
Arrefecimento aparecem no visor um a
seguir ao outro. O número de gotas no indicador de secagem vai diminuindo gradua-
lmente à medida que o processo de secagem vai progredindo.
Alterar o programa
Para alterar um programa seleccionado por
engano após o seu início, rode primeiro o
selector de programas para a posição O off
e, em seguida, reinicie o programa.
O programa não pode ser alterado directamente depois de começar. Se, ainda assim, tentar alterar o programa
com o botão, o visor do decorrer do
programa e os indicadores de manutenção começam a piscar. Se for premido
um botão de opções (excepto o botão
Buzzer (Alarme sonoro)),
aparece
no visor. Contudo, o programa de secagem não é afectado (protecção da
roupa).
Colocar mais peças ou retirar peças
antes do final do programa
1. Abra a porta de carregamento.
Advertência A roupa e o tambor
podem estar muito quentes. Perigo
de queimaduras!
2. Coloque ou retire as peças de roupa.
3. Feche bem a porta. O trinco deve fazer
um barulho ao fechar.
4. Prima o botão Início/Pausa para continu-
ar o ciclo de secagem.
Fim do ciclo de secagem / retirar a roupa
Depois do ciclo de secagem terminar, o visor mostra o ícone anti-rugas e
a piscar, bem como lâmpadas de aviso:
filtro e depósito cheio . Se premir o
botão Buzzer(Alarme sonoro), ouve-se um
sinal sonoro intermitente durante um minuto.
Os ciclos de secagem (excepto do programa Wool ) são seguidos automaticamente por uma fase anti-rugas que dura aprox. 30 minutos. Nesta fase, o tambor roda em intervalos regulares. Isto
mantém a roupa solta e sem rugas. Durante a fase anti-rugas, a roupa pode
ser retirada a qualquer altura. (A roupa
só deve ser retirada no final da fase anti-
-rugas, para evitar a formação de rugas.)
1. Abra a porta.
2. Antes de retirar a roupa, retire o cotão
do filtro micro-fino. É aconselhável utili-
Page 27

electrolux 27
zar uma toalha húmida. (Consulte o capítulo "Manutenção e limpeza".)
3. Retire a roupa.
4.
Rode o selector de programas para
desligado .
Importante Após cada ciclo de secagem:
LIMPEZA E MANUTENÇÃO
Limpeza dos filtros de cotão
Para garantir o funcionamento perfeito do
aparelho, os filtros de cotão na porta e à
frente do tambor têm de ser limpos após cada ciclo de secagem.
Cuidado Importante. Não deixe a
máquina funcionar sem o filtro de
cotão ou com o filtro de cotão
danificado ou obstruído.
1. Abra a porta de carregamento
- Limpe o filtro micro-fino e o filtro fino
- Drene o depósito de água de condensação
(Consulte o capítulo "Manutenção e limpeza".)
5. Feche a porta.
4. Retire o cotão do filtro, de preferência
usando a mão molhada.
5. Substitua o filtro.
2. Use uma toalha húmida para limpar o filtro micro-fino, que está instalado na parte inferior da abertura de carregamento.
3. Após algum tempo, forma-se verdete
nos filtros devido aos resíduos de detergente. Quando isto acontecer, limpe os
filtros com água quente e uma escova.
Retire o filtro da porta puxando-o para
fora. Pode estar posicionado com o dente virado para a esquerda ou para a direita). Após a limpeza, não se esqueça
de colocá-lo de novo.
Limpeza da junta da porta
Limpe a junta da porta com um pano húmido no final do ciclo de secagem.
Limpar o reservatório de água
Esvazie o depósito de água após cada ciclo de secagem.
Se o depósito de água estiver cheio, o programa activo pára automaticamente e o íco-
ne esvaziar depósito
acende-se no vi-
Page 28

28 electrolux
sor. Para continuar o programa, deve esvaziar primeiro o depósito de água.
Advertência A água de condensação
não é própria para beber nem para
cozinhar.
1. Retire o depósito de água totalmente.
2. Deite a água de condensação para uma
bacia ou para um recipiente adequado.
Limpe o permutador de calor
Se aparecer
PERMUTADOR DE CALOR, é necessário limpar o permutador de
calor.
Cuidado O funcionamento com o
permutador de calor entupido com
cotão pode danificar a máquina de
secar. Aumenta também o consumo
de energia.
1. Abra a porta.
2. Abra a porta do rodapé. Para isso, pri-
ma o botão de desengate na parte inferior da abertura da porta e abra a porta
do rodapé para a esquerda.
3. Volte a colocar o depósito de água.
Se o programa parar porque o depósito
de água de condensação está cheio: Prima o botão START/PAUSE para continuar o ciclo de secagem.
O depósito de água tem um volume de
aprox. 4,5 litros. Isto é suficiente para
cerca de 8 kg de roupa previamente
centrifugada a 1000 rpm.
A condensação pode ser utilizada como água destilada, por ex. para ferros
a vapor. No entanto, filtre primeiro a
condensação (por ex. com um filtro de
café) para remover os resíduos e pequenos restos de cotão.
3. Limpe o cotão do interior da porta e da
câmara frontal do permutador de calor.
Limpe a junta da porta com um pano húmido.
4. Vire ambas as abas de bloqueio para
dentro.
5. Use o puxador para puxar o permutador de calor para fora da base e segure
nele na horizontal para evitar derramar
qualquer resto de água.
Page 29

6. Para esvaziar o permutador de calor, segure nele na vertical sobre uma bacia.
Cuidado Não utilize objectos
pontiagudos para o limpar. O
permutador de calor pode ganhar fugas.
7. Limpe o permutador de calor.
É aconselhável utilizar uma escova ou enxaguá-lo abundantemente com um chuveiro.
8. Volte a colocar o permutador de calor e
fixe-o no lugar (vire ambas as abas de
bloqueio para fora até encaixarem no lugar).
9. Feche a porta no rodapé.
A máquina não irá funcionar se o indicador do PERMUTADOR DE CALOR
ainda estiver aceso.
electrolux 29
Cuidado Nunca trabalhe com a
máquina sem o permutador de calor.
Limpar o tambor
Cuidado Atenção! Não utilize
abrasivos ou palha de aço para limpar
o tambor.
A cal da água ou os agentes de limpeza podem formar uma película quase invisível no interior do tambor. O grau de
secagem da roupa deixa então de ser
detectado com fiabilidade. A roupa está mais húmida do que devia quando é
retirada da máquina.
Use um detergente doméstico vulgar (por
ex. à base de vinagre) para limpar o interior
do tambor e os frisos.
Limpe o painel de controlo e o
alojamento
Cuidado Não utilize produtos de
limpeza para móveis ou agentes de
limpeza agressivos para limpar a
máquina.
Utilize um pano húmido para limpar o painel
de controlo e o alojamento.
O QUE FAZER SE ...
Faça o diagnóstico de avarias
Se, durante o funcionamento, aparecer o código de erro E... mais um número ou letra)
no visor múltiplo: Desligue e volte a ligar o
Problema Causa possível Solução
A máquina de secar não
funciona.
Resultados de secagem
insatisfatórios.
Filtros de cotão entupidos. Limpe o filtro de cotão.
Filtro de cotão entupido. Limpe o filtro de cotão.
A ficha de alimentação não está ligada ou o fusível não está a funcionar correctamente.
A porta de carregamento está
aberta.
Premiu o botão START/PAUSE
(INÍCIO/PAUSA)?
Programa errado seleccionado.
aparelho. Reinicie o programa. Prima o botão START/PAUSE (Início/Pausa). Se o erro
voltar a aparecer, contacte a Serviço de assistência indicando o código de erro
Ligue a ficha à tomada. Verifique o
fusível na caixa de fusíveis (instalação doméstica).
Feche a porta.
Prima novamente o botão START/
PAUSE (INÍCIO/PAUSA).
Seleccione um programa diferente
na próxima vez que secar roupa
(consulte o capítulo "Vista geral de
programas").
Page 30

30 electrolux
Permutador de calor entupido
com cotão.
Sobrecarga de roupa.
Ranhuras de ventilação na base
cobertas.
Resíduos no interior do tambor ou
nos frisos no tambor.
Condutância de água no local de
instalação diferente da definição
padrão da máquina.
Quando se prime um botão, a máquina não reage.
A luz do tambor não funciona.
O tempo do programa visualizado muda de forma
incorrecta ou mantém-se
inalterado durante muito
tempo.
Programa inactivo, indicador
DEPÓSITO está
aceso.
Protecção de secagem. Após o início do programa, a opção já não
pode ser definida.
O selector de programas está na
posição O off .
Lâmpada fundida.
O tempo do programa é corrigido
automaticamente dependendo do
tipo e do volume de roupa e do nível de humidade.
O depósito de condensação está
cheio.
O ciclo de secagem termina pouco tempo depois
do programa começar.
ANTICREASE (ANTI-RU-
Roupa carregada insuficiente ou
demasiado seca para o programa
seleccionado.
GAS) aceso.
Limpe o permutador de calor.
Respeite os volumes de carga recomendados.
Destape as ranhuras de ventilação
na base.
Limpe o interior do tambor e os respectivos frisos.
Volte a programar a definição padrão para o grau de secagem (ver
o capítulo "Definições da máquina").
Rode o selector de programas para O off . Defina novamente o pro-
grama.
Rode o selector de programas para qualquer programa.
Substitua a lâmpada (consulte a
secção seguinte).
Processo automático; este não é
um erro da máquina.
Esvazie o depósito de condensação e inicie o programa com o botão START/PAUSE (START/PAUSE).
Seleccione um programa de tempo ou um nível de secagem mais
elevado (por ex.
TRA) em vez de
EXTRA (EX-
CUPBOARD
(ARMÁRIO).
O ciclo de secagem dura
um tempo anormalmente
longo. Nota: Após até 5
horas, o ciclo de seca-
Filtro de cotão entupido. Limpe o filtro de cotão.
gem termina automaticamente (ver "Fim do ciclo
de secagem")
Filtro de cotão entupido. Limpe o filtro de cotão.
Volume de carga demasiado gran-
de.
Roupa mal torcida.
Temperatura ambiente demasiado
alta. Desactivação temporária do
compressor para evitar a sobrecar-
ga.
Reduza o volume de carga.
A roupa tem de ser muito bem torcida.
Processo automático, não há problemas com o aparelho. Se possível, baixe a temperatura ambiente.
Verifique a solidez das cores dos
Descoloração Solidez das cores dos tecidos.
tecidos. Seque apenas tecidos de
cor semelhante.
Page 31

electrolux 31
Mudar a lâmpada de iluminação interior
Utilize apenas as lâmpadas específicas para máquinas de secar. Pode obter as lâmpadas especiais no Departamento de apoio
ao cliente, ET n.º 112 552 000-5.
Advertência Quando se desliga o
aparelho, a luz interior apaga-se
automaticamente após 4 minutos
quando se abre a porta.
Advertência Não utilize lâmpadas
padrão! Elas desenvolvem demasiado
calor e podem danificar a máquina!
Advertência Antes de substituir a
lâmpada, desligue a ficha.
1. Desaperte a tampa por cima da lâmpada (encontra-se imediatamente por trás
DADOS TÉCNICOS
Este aparelho cumpre as seguintes Directivas UE:
– 2006/95/CE de 12.12.2006 Directiva de baixa tensão
– 89/336/CEE de 03.05.1989 Directiva de compatibilidade electromagnética in-
cluindo a Directiva de alteração 92/31/CEE
– 93/68/CEE de 22.07.1993 Directiva sobre a marcação CE
Altura x largura x profundidade 85 x 60 x 58 cm
Volume do tambor 108 l
Profundidade com a porta de carregamen-
to aberta
A altura pode ser ajustada em 1,5 cm
Peso quando vazia aprox. 40,5 kg
Volume de carga (conforme o programa)
Tensão 230 V
Fusível necessário 10 A
Alimentação total absorvida 2350 W
Classe de eficiência energética
Consumo de energia (8 kg de algodão, pré-
-drenado a 1000 rpm)
Consumo de energia médio anual 282 kWh
Utilização Doméstica
Temperatura ambiente admitida +5 °C a +35 °C
Os valores de consumo foram estabelecidos sob as condições de utilização. Podem vari-
2)
Dados de consumo
ar quando a máquina for utilizada para fins domésticos.
Programa
da abertura de carregamento, na parte
superior; consulte a secção "Descrição
da máquina".)
2. Substitua a lâmpada fundida.
3. Volte a apertar a tampa.
Verifique o posicionamento correcto de
uma junta o-ring antes de voltar a aparafusar a tampa da luz da porta. Não use a máquina a junta o-ring na tampa da luz da porta estiver em falta.
Advertência Por razões de
segurança, deve apertar bem a tampa.
Se tal não acontecer, a máquina de
secar não pode funcionar.
109 cm
1)
máx. 8 kg
B
4,48 kWh
Consumo de energia em kWh / tempo
de secagem médio em min.
Page 32

32 electrolux
COTTON CUPBOARD (ALGODÃO ARMÁ-
2) 3)
RIO)
COTTON IRON (ALGODÃO PARA FER-
2)
RO)
SYNTHETICS CUPBOARD (SINTÉTICOS
ARMÁRIO)
1) Em alguns países, podem ser necessários outros dados de volume de carga por causa dos métodos de medida
serem diferentes.
2) de acordo com EN 61121
2)
4,48 / 135 (8 kg de carga, pré-drenada a
1000 rpm)
4,30 (8 kg de carga, pré-drenada a 1400
rpm)
3,8 / 108 (8 kg de carga, pré-drenada a
1000 rpm)
1,30 / 45 (3 kg de carga, pré-drenada a
1200 rpm)
DEFINIÇÕES DA MÁQUINA
Definição Implementação
BUZZER (ALARME SONORO) permanentemente desligado
Dureza da água
A água contém calcário e sais
minerais, cujas quantidades
variam de acordo com a área
geográfica, alterando também
os seus valores de condutividade.
Grandes variações da condutividade da água em comparação com os valores predefinidos de fábrica podem influenciar ligeiramente a humidade
residual da roupa no fim do ciclo. Pode regular a sensibilidade do sensor de secagem
com base nos valores de condutividade da água.
1. Rode o selector de programas para qualquer programa.
2. Prima simultaneamente os botões BUZZER e DRYNESS e
mantenha-os premidos durante aprox. 5 segundos.
3. O alarme sonoro está sempre desligado por defeito. Pode usar
o botão BUZZER para activar ou desactivar o som mas a máquina não memoriza a sua selecção.
1. Rode o selector de programas para qualquer programa.
2. Prima simultaneamente os botões DRYNESS e START/PAU-
SE e mantenha-os premidos durante aprox. 5 segundos. A definição actual aparece no visor:
–
–
–
3. Prima o botão START PAUSE INÍCIO PAUSA de forma sequencial até definir o nível desejado.
4. Para memorizar a definição, prima simultaneamente os botões DRYNESS e START/PAUSE ou rode o selector para a
posição O off
baixa condutividade <300 micro S/cm
condutividade média 300-600 micro S/cm
condutividade elevada >600 micro S/cm
SUGESTÕES PARA OS INSTITUTOS DE TESTE
Parâmetros possíveis a verificar pelos Institutos de Teste:
• Consumo de energia (corrigido com a humidade final) durante o ciclo cupboard
dry cotton com carga nominal.
• Consumo de energia (corrigido com a humidade final) durante o ciclo cupboard
dry cotton com meia carga.
• Humidade final (durante Cupboard dry
cotton, Iron dry cotton e Cupboard dry Easy care)
• Eficácia da condensação (corrigida com
a humidade final) durante o ciclo cupboard dry cotton com carga nominal e
meia carga
Todos os ciclos têm de ser testados de acordo com a IEC 61121 (Máquinas de secar para uso doméstico – Métodos para avaliar o
desempenho).
Page 33

INSTALAÇÃO
Importante O aparelho tem de ser
transportado na posição vertical.
Posicionamento do aparelho
• Recomendamos que, para a sua comodidade, instale a máquina junto à máquina
de lavar roupa.
• A máquina de secar roupa deve ser instalada num local limpo, sem formação de
sujidade.
• O ar deve poder circular livremente em redor da máquina. Não obstrua a grelha de
ventilação frontal ou as grelhas de entrada de ar na traseira da máquina.
• Para reduzir ao mínimo a vibração e o ruído durante o funcionamento da máquina, instale-a sobre uma superfície firme e
nivelada.
• Uma vez colocada na posição permanente de funcionamento, verifique se está totalmente nivelada com a ajuda de um nível de bolha de ar. Se não estiver, eleve
ou baixe os pés da máquina até que se
encontre perfeitamente nivelada.
• Nunca deve retirar os pés. Não reduza o
espaço até ao chão com pilhas de tapetes, tábuas ou objectos semelhantes. Tal
pode provocar um aumento de calor que
pode interferir no funcionamento da máquina.
Importante
• O ar quente emitido pela máquina pode
atingir temperaturas até 60°C. Assim sendo, a máquina não deve ser instalada sobre bases que não sejam resistentes a altas temperaturas.
• Durante o funcionamento da máquina de
secar, a temperatura ambiente não deve
ser inferior a +5°C nem superior a +35°C,
pois pode afectar o desempenho da máquina.
• Se a máquina for deslocada, deverá ser
transportada na vertical.
• O aparelho não pode ser instalado atrás
de uma porta com fechadura, de uma porta de correr ou de uma porta com dobradiças para o lado oposto ao do aparelho,
de forma a que impeça a abertura total
da máquina de secar.
electrolux 33
Retirar a embalagem de segurança
durante o transporte
Cuidado
Antes da utilização, todas as peças da embalagem de transporte devem ser retiradas.
1. Abra a porta de carregamento
2. Retire as bandas adesivas do interior da
máquina por cima do tambor.
3. Retire o tubo de folha de alumínio e o calço de poliestireno da máquina.
Ligação eléctrica
Para mais informações sobre a tensão de
alimentação, o tipo de corrente e os fusíveis necessários, consulte a placa de características. A placa de características está instalada junto da abertura de carregamento
(consulte o capítulo "Descrição do produto").
Advertência O fabricante declina
qualquer responsabilidade por danos
ou ferimentos causados pelo não
cumprimento das precauções de
segurança acima referidas.
Caso seja necessário substituir o cabo
de alimentação, esta operação deve
ser efectuada pelo Centro de Assistência.
Advertência O cabo de alimentação
deve estar acessível após a instalação
da máquina.
Inversão da porta
Para facilitar a carga ou descarga da roupa,
a porta pode ser invertida.
Advertência A porta só deve ser
invertida por um técnico de assistência
autorizado.
Page 34

34 electrolux
Contacte o seu Centro de Assistência local.
O técnico efectua a inversão da porta a seu
custo.
Acessórios especiais
Os seguintes acessórios especiais estão disponíveis no Centro de Apoio ao Cliente ou
no seu concessionário autorizado
Kit de instalação intermédia para máquina
de lavar roupa e máquina Iron Aid:
Estes kits de instalação intermédia podem
ser utilizados para colocar a máquina de
ASSISTÊNCIA
No caso de avarias técnicas, verifique primeiro se pode solucionar o problema com
a ajuda das instruções de funcionamento consulte o capítulo O que fazer se….
Se não conseguir solucionar o problema,
contacte o Departamento de Apoio ao Cliente ou um dos nossos concessionários.
Para podermos ajudá-lo rapidamente, necessitamos das seguintes informações:
– Descrição do modelo
– Número do produto (PNC)
– Número de série (S No. encontra-se na
placa de características colada ao produto
- para a localizar, consulte o capítulo Descri-
ção do produto ))
Iron Aid e a máquina de lavar roupa automática Electrolux (60cm de largura, com carregamento frontal) uma em cima da outra para poupar espaço A máquina de lavar roupa automática fica por baixo e a máquina
de Iron Aid por cima. Podem ser fornecidas
duas versões:
• sem placa de empilhar
• com placa de empilhar extraível
Leia cuidadosamente o manual fornecido
com o kit de instalação.
– Tipo de avaria
– Quaisquer mensagens de erro visualizadas no aparelho
Para ter os números de referência do aparelho necessários sempre à mão, recomendamos que os escreva aqui:
Descrição do modelo:
PNC: ........................................
N.º de série: ........................................
........................................
Page 35

electrolux 35
Page 36

www.electrolux.com/shop
136909801-B-282010
 Loading...