

Page 1

TUMBLE DRYER
TORKTUMLARE
KUIVAUSRIMPU
SUfiILWNAÅ MAfiINA
INSTRUCTION BOOKLET
BRUKSANVISNING
KÄYTTÖOHJE
RUKOVODSTVO
PO ÈKSPLUATACII
125 992 614
EDC 5330
GB
S
FIN
RUS
Page 2
Dear customer,
Please read these operating instructions carefully and pay particular attention to the safety notes indicated in
the first pages.
We recommend that you keep this instruction booklet for future reference and pass it on to any future owners.
Transport damages
After unpacking the machine please check it is not damaged. If in doubt, do not start it but contact your local
Service Centre.
The symbols you will see on some paragraphs of this booklet have the following meaning:
The warning triangle emphasize information that is particularly important for your safety or correct
functioning of the appliance.
The information marked with this symbol provides additional instructions and practical tips on the use of
the appliance.
Tips and information about economical and ecological use of the machine are marked with this symbol.
Our contribution to the protection of the
environment: we use recycled paper.
Contents
Important safety information ......................3
Disposal ..............................................................3
Tips for environmental protection ............4
Technical specifications................................4
Description of the appliance ......................4
Adjusting the level of conductivity............5
Installation ..........................................................6
• Unpacking ............................................................6
• Positioning ............................................................6
• Electrical connection ............................................6
• Stacking kit ..........................................................6
• Draining kit............................................................6
• Door reversal ........................................................6
Use ........................................................................7
• The control panel ..............................................7-9
• Programme chart ................................................10
• Operating sequence............................................11
• Useful hints ........................................................12
Maintenance and Cleaning ........................13
• External cleaning ................................................13
• Cleaning the door ..............................................13
• Cleaning the filters ..............................................13
• Cleaning the condenser unit ..............................13
• Emptying the water reservoir..............................14
• Cleaning the air intake grille................................14
• Cleaning the drum ..............................................14
Something not working? ............................15
2
Page 3
Important safety information
These warnings have been provided in the interest of safety. You MUST read them carefully before installing or
using the appliance.
Installation
• Any electrical work required to install this
appliance should be carried out by a qualified
electrician or competent person.
• Care must be taken to ensure that the appliance
does not stand on the electrical supply cable.
• If the machine is situated on a carpeted floor, please
adjust the feet in order to allow air to circulate freely.
Use
• This appliance is designed for domestic use only.
If the machine is used for any other purposes or is
not used correctly, the manufacturer accepts no
responsibility for any damage that might occur.
• Always unplug the appliance after use.
• Clothes which are dripping wet should not be
placed in the dryer.
• Danger of explosion: Never tumble dry items that
have been in contact with inflammable solvents (petrol,
methylated spirits, dry cleaning fluid and the like). As
these substances are volatile, they could cause an
explosion. Tumble dry only items washed with water.
• Risk of fire: items that have been spotted or soaked
with vegetable or cooking oil constitute a fire hazard
and should not be placed in the tumble dryer.
• If you have washed your laundry with stain
remover you must execute an extra rinse cycle
before loading your tumble dryer.
• Please make sure that no gas lighters have
accidentally been left in pockets of garments to be
loaded into appliance.
• Do not dry canvas shoes or sports shoes, as they
could get stuck between the door and the drum,
thus blocking this latter.
• Leave the door slightly ajar when the appliance is not
being used. This will allow the seal to be preserved.
• Clean fluff filters after using the tumble dryer. To
prevent fire risks, do not use the appliance if the
fluff filters are damaged or without filters.
• Do not allow fluff to accumulate around the dryer.
General safety
• It is dangerous to alter the specifications or
attempt to modify this product in any way.
• Under no circumstances should you attempt to
repair the machine yourself. Repairs carried out by
inexperienced persons may cause injury or serious
malfunctioning. Contact your local Service Centre.
Always insist on genuine spare parts.
Child safety
• Children are often not aware of how dangerous
electrical appliances can be. When the machine is
working, children should be carefully supervised
and not be allowed to play with the appliance.
• The packaging components (e.g. plastic film, polystyrene)
can be dangerous to children - danger of suffocation!
Keep them out of children’s reach.
• Make sure that children or pets do not climb into
the drum.
• When the appliance is to be scrapped, cut off the
electrical supply cable and destroy the plug with
the remaining cable. Disable the door catch in
order to prevent children from becoming trapped
inside while playing.
Disposal
• Packaging materials
The materials marked with the symbol are
recyclable.
This means that they can be recycled by disposing
of them properly in appropriate collection
containers.
• Machine
Use authorised disposal sites for your old appliance.
Help to keep your country tidy!
•
The symbol on the product or on its packaging
indicates that this product may not be treated as
household waste. Instead it shall be handed over to
the applicable collection point for the recycling of electrical
and electronic equipment. By ensuring this product
is disposed of correctly, you will help prevent potential
negative consequences for the environment and human
health, which could otherwise be caused by in appropriate
waste handling of this product. For more detailed
information about recycling of this product, please
contact your local city office, your household waste
disposal service or the shop where you purchased
the product.
3
Old appliance
ENGLISH
Page 4
Tips for environmental protection
To save energy and to help protect the environment,
we recommend that you follow these hints:
• Try to load the maximum capacity of the machine
as small loads are uneconomical.
• Always load well spun laundry. The higher the spin
speed, the lower the electricity consumption and
the shorter the drying times.
• Do not over-dry laundry, this avoids creasing and
saves energy.
Select the drying programme according to the
type of laundry and the required degree of
dryness.
• To utilize the maximum load, laundry which is to
be dried ready to put away (store dry) can be dried
together with items to be ironed. To do this, select
the programme for iron-dry, remove the iron-dry
items at the end of the programme and then
finish-dry the rest of the load.
• Clean the filters regularly to avoid excessive drying
times and high electricity consumption.
• Ventilate the room well. The room temperature
should not exceed +35°C during drying.
Technical specifications
DIMENSIONS: Height 85 cm
Width 60 cm
Depth 58 cm
ELECTRICAL CONNECTION: 220/230 V/50 Hz
MAX. POWER ABSORBED: 2200 W
MIN. FUSE RATING: 10 A
MAX. DRYING CAPACITY: Cotton, linen 6 kg
Synthetics 2.5 kg
CONSUMPTION: Cotton, linen 4.37 kWh (6.5 kg store dry)
Cotton, linen 3.60 kWh (6.5 kg iron dry)
Synthetics 1.40 kWh (2.5 kg store dry)
This appliance complies with the following E.E.C. Directives:
- 73/23 EEC of 19.2.73 (Low Voltage Directive) and subsequent modifications;
- 89/336 EEC of 3.5.89 (Electromagnetic Compatibility Directive) and subsequent modifications.
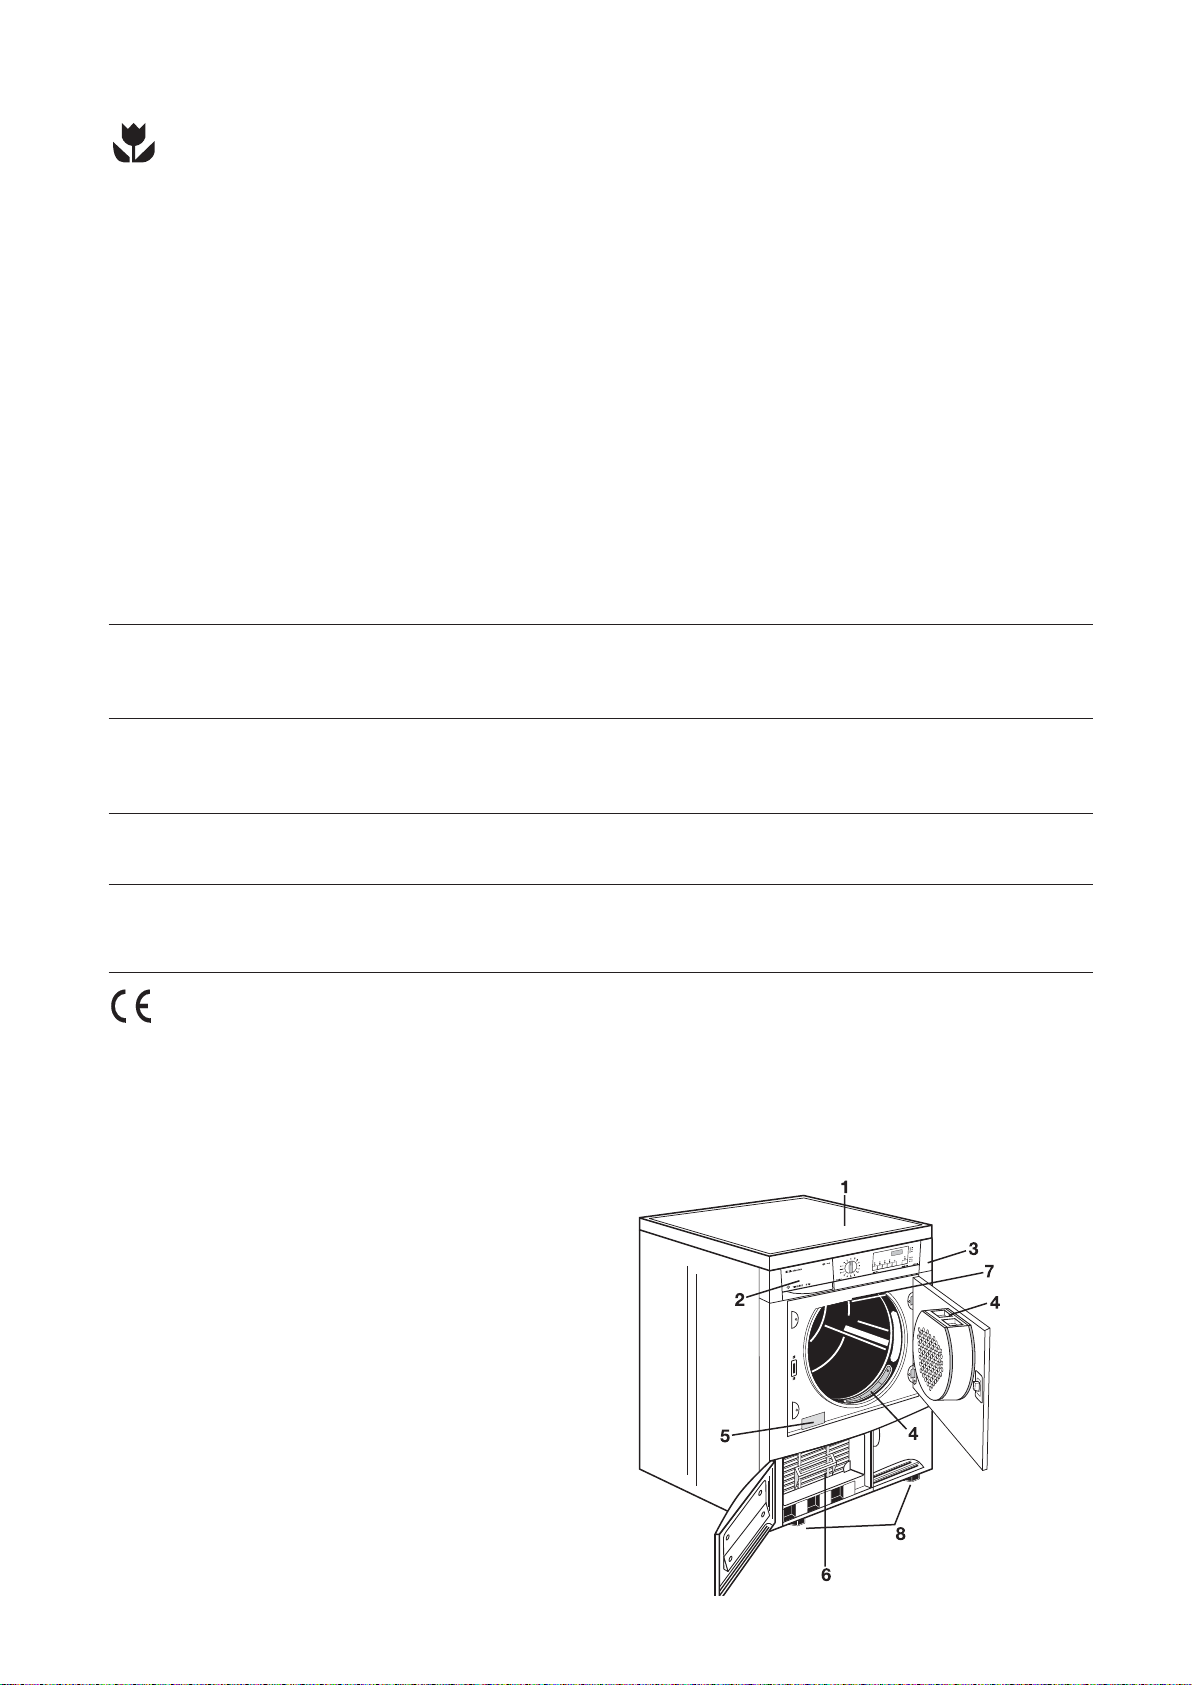
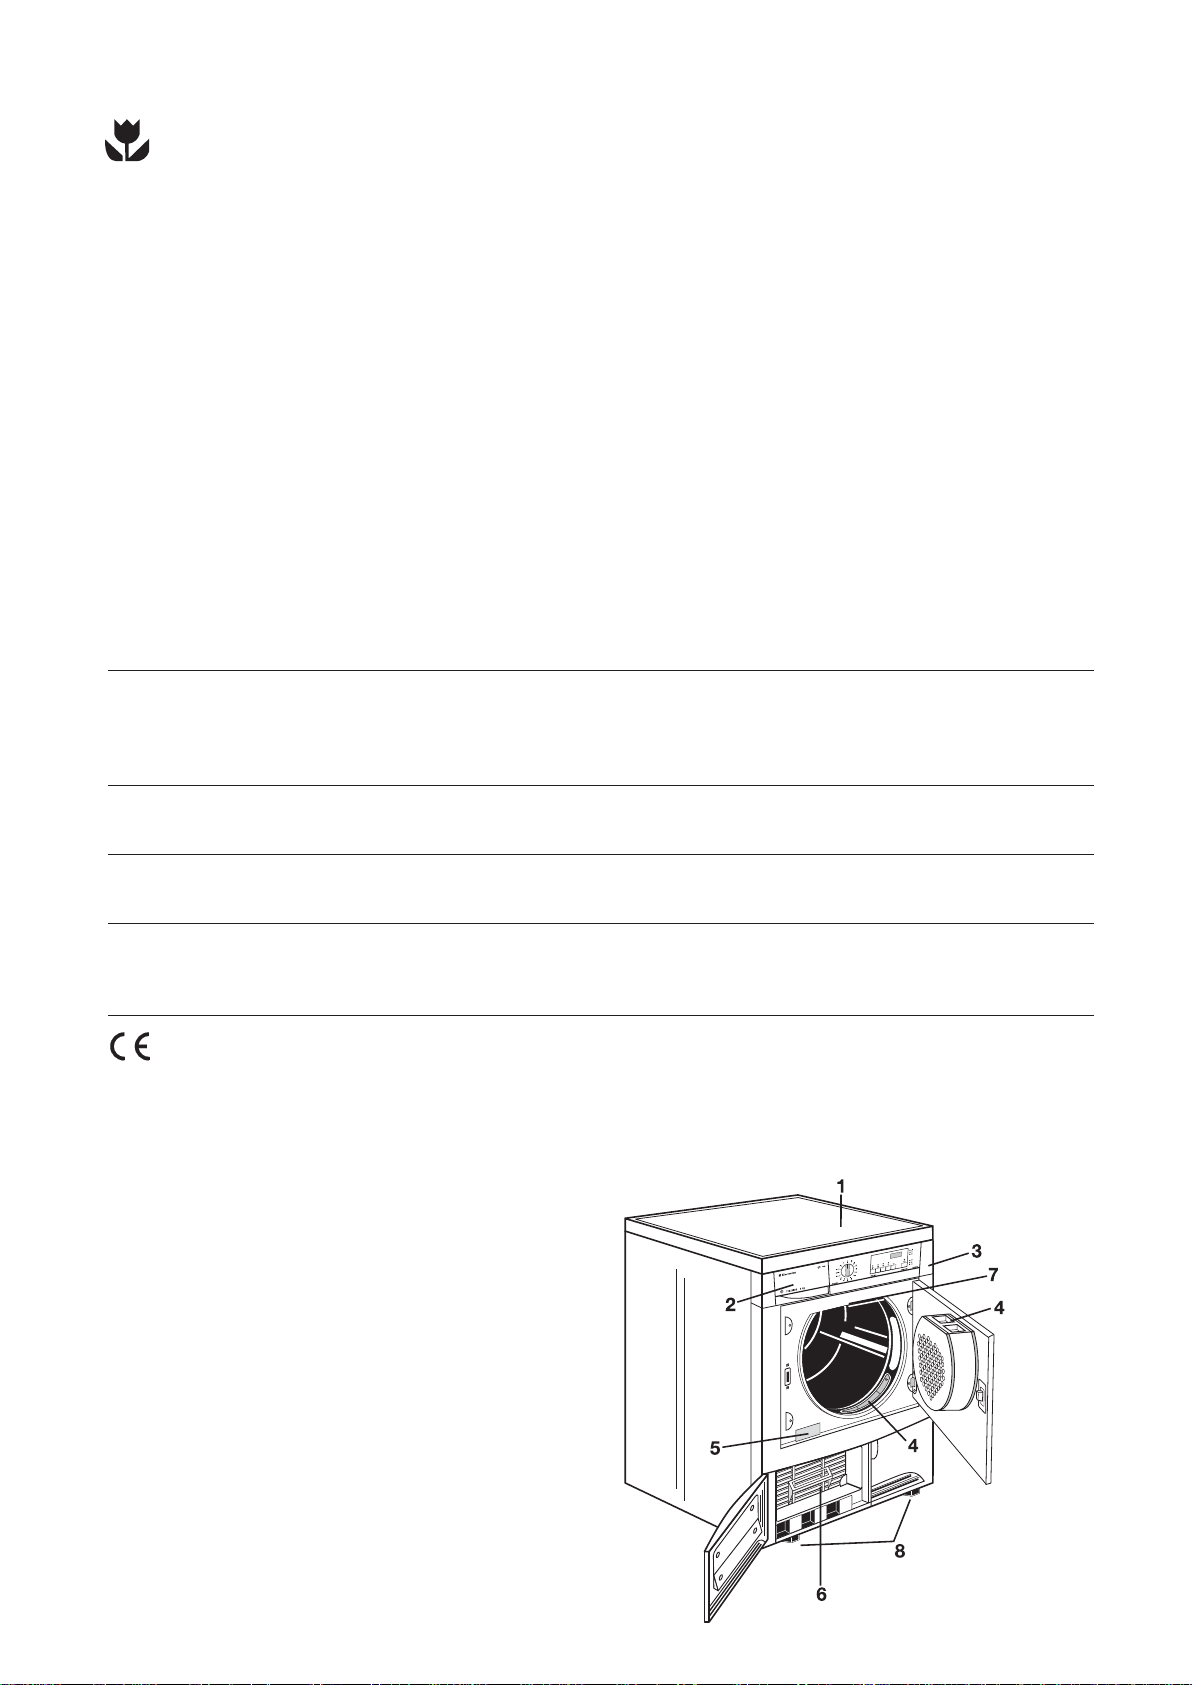
Description of the appliance
01 Table top
02 Water reservoir
03 Control panel
04 Fluff filters
05 Rating Plate
06 Condenser Unit
07 Drum light
08 Adjustable feet
0
4
Page 5

Adjusting the level of conductivity
START/PAUSE
Water contains, a variable quantity of limestone and
mineral salts of which quantities vary according to
geographical locations thus varying its conductivity
values.
Relevant variations of the conductivity of the water
compared to those prefixed by the factory could
slightly influence the residual humidity of the
laundry at the end of the cycle.
Your dryer allows you to regulate the sensitivity of
the drying sensor based on conductivity values of the
water by using the following procedure.
Procedure:
Turn the programme selector dial to switch on the
appliance
In selection mode press simultaneously the buttons 3
and 6 until «
C0» appears on the digits.
Display Conductivity degree
CC 00
CC 00
CC 00
Normally, the appliance is factory-set to the
highest level; however, certain models may be
configured differently.
Low < 300
Medium 300 - 600
High > 600
Approximative value
(µS/cm)
Memorizing the new
setting:
Simultaneously press down the buttons 3 and 6 until
the previous drying cycle time appears again on the
display and the buzzer sounds.
ENGLISH
Adjusting the level of
conductivity:
Press the button 5 sequentially: the level of
conductivity is indicated by the lighting of the
horizontal hyphens.
5
Page 6
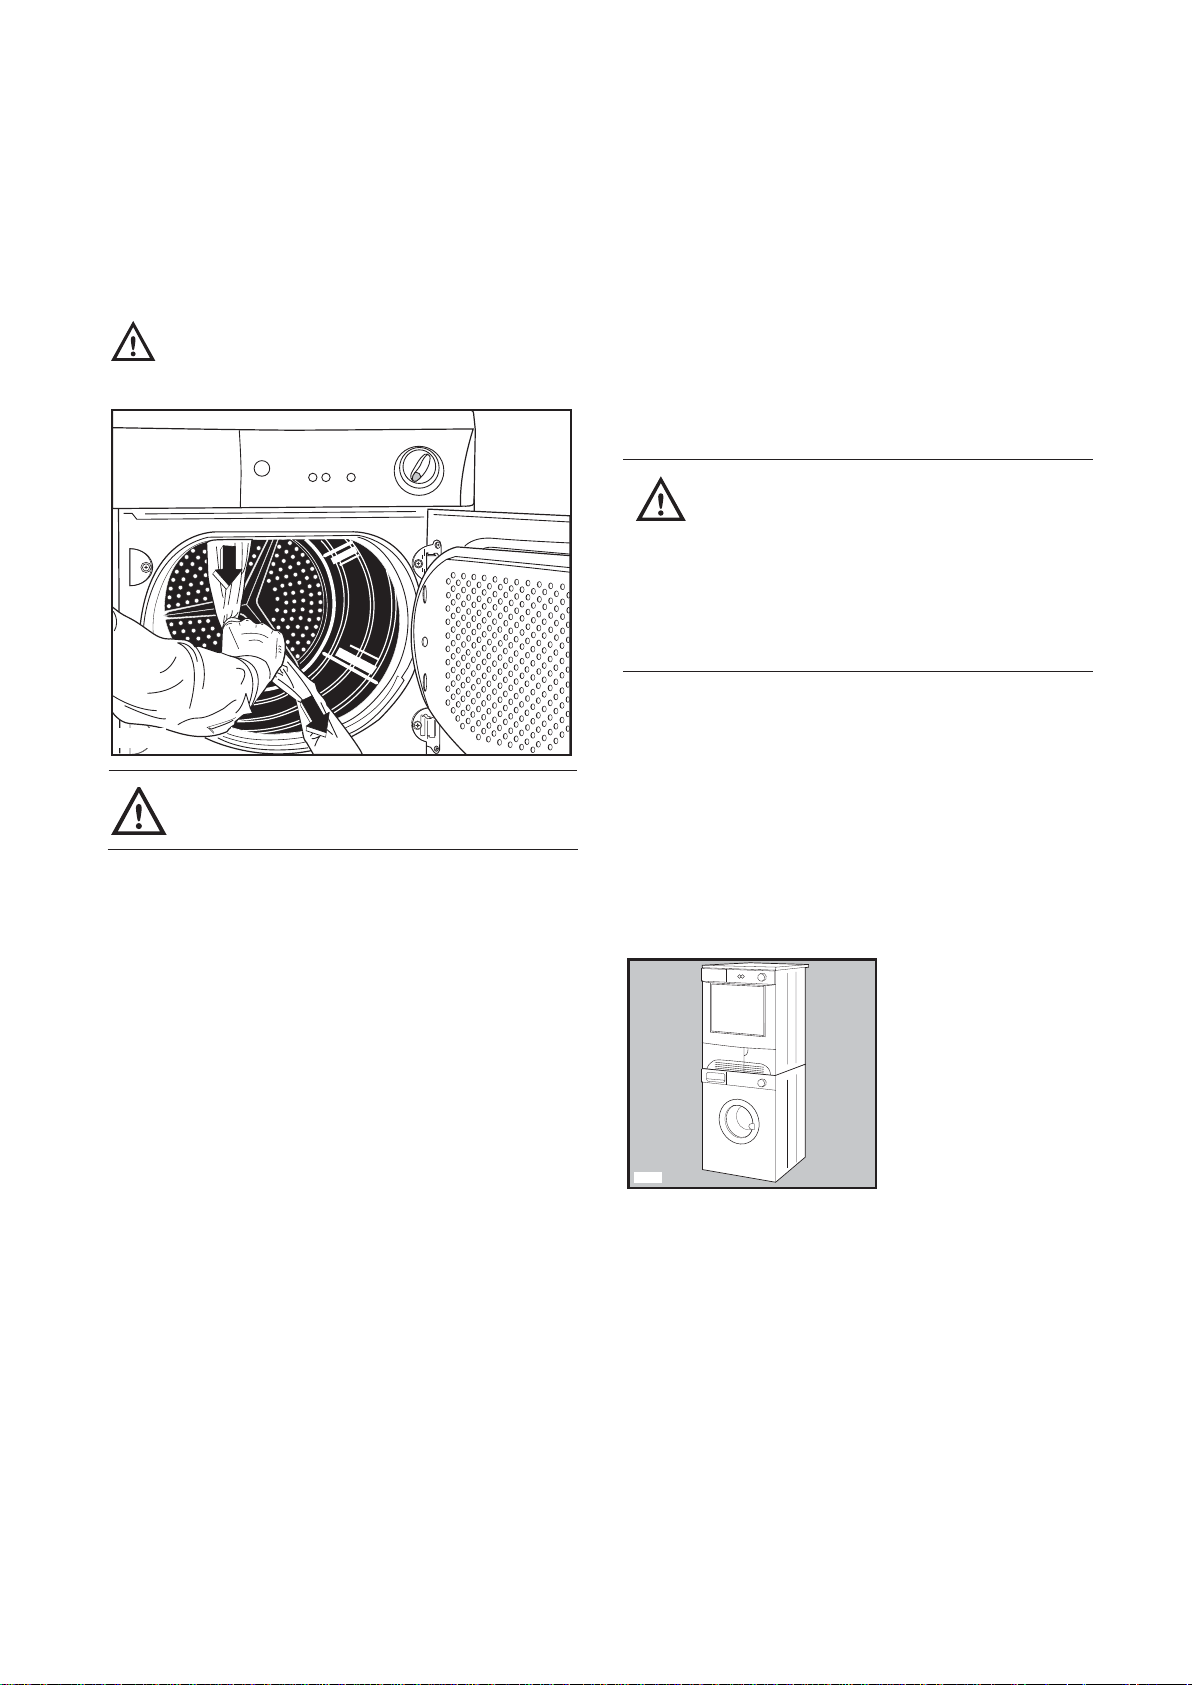
Installation
P1106
P1148
Warning!
Unpacking
Slide out the polythene bag with the
polystyrene stuffing before using the
appliance.Pull off adhesive strips from inside
machine on top of drum
Should the appliance be moved, it must be
transported vertically.
Positioning
It is recommended that, for your convenience, the
machine is positioned close to your washing machine.
The tumble dryer must be installed in a clean place,
where dirt does not build up.
Air must be able to circulate freely all round the
appliance. Do not obstruct the front ventilation grille
or the air intake grille at the back of the machine.
To keep vibration and noise to a minimum when the
dryer is in use, it should be placed on a firm, level
surface.
Once in its permanent operating position, check
that the dryer is absolutely level with the aid of a
spirit level. If it is not, raise or lower the feet until
it is.
The feet must never be removed.
Do not restrict the floor clearance through deep-
pile carpets, strips of wood or similar. This might
cause heat build-up which would interfere with
the operation of the appliance.
Important
The hot air emitted by the tumble dryer can reach
temperatures of up to 60°C. The appliance must
therefore not be installed on floors which are not
resistant to high temperatures.
When operating the tumble dryer, the room
temperature must not be lower than +5°C and
higher than +35°C, as it may affect the performance
of the appliance.
Electrical connection
This machine is designed to operate on a 220-230 V,
single-phase, 50 Hz supply.
Check that your domestic electrical installation can
take the maximum load required (2.2 kW), also
taking into account any other appliances in use.
Connect the machine to an earthed socket, in
accordance with current wiring regulations.
The manufacturer declines any
responsibility for damage or injury
through failure to comply with the
above safety precaution.
Should the appliance power supply
cable need to be replaced, this must
be carried out by our Service
Centre.
Important!
The power supply cable must be accessible after
installing the machine.
Stacking kit
A special stacking kit is available through your
dealer, to enable the mounting of the dryer on top of
a front loading washing machine with cover’s depth
between 48 and 60 cm.
Read carefully the instructions supplied with the kit.
Draining kit
A special draining kit is available through your dealer, it
allows you to drain the condensed water produced
during the drying phase directly in the sink.
Read carefully the instructions supplied with the kit.
Door reversal
To make it easier to load or unload the laundry the
door can be reversed.
This operation must be carried out by qualified
personnel.
Please contact the nearest Service Centre.
6
Page 7
Use
12 345678910
90 min
60 min
30 min
START/PAUSE
EDC 5330
PROGRAM
FUNCTION
TIMELINE 6 kg
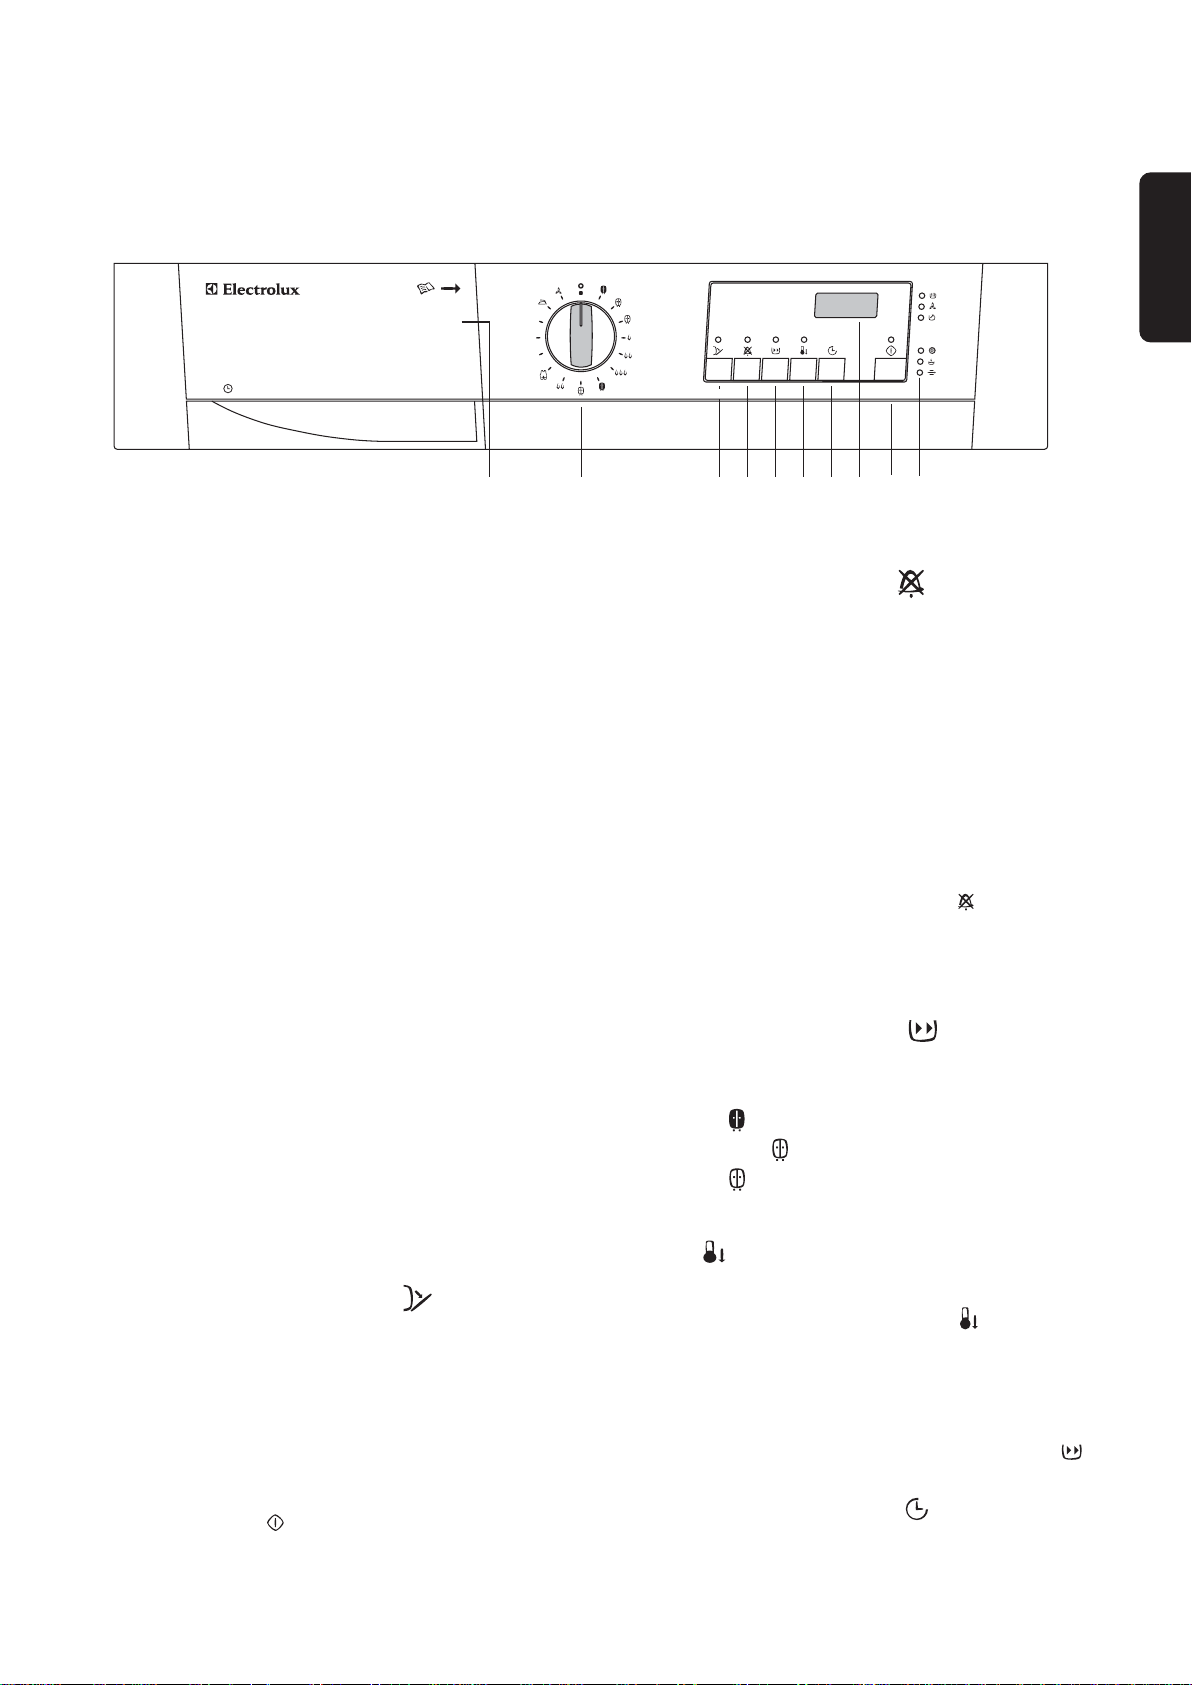
The control panel
ENGLISH
1 Programme chart
A programme chart is in the interior part of water
reservoir or together with the instruction booklet.
2 Programme/Time selector dial
Allows you to select electronically controlled or time
controlled drying.
Turn the dial to the required programme or time.
Electronically controlled drying
(automatic)
The appliance runs these programmes with the help
of probes which detect the degree of dampness of
the laundry.
Simply select the programme according to the type
of laundry and degree of drying required.
Time controlled drying
Can be used to finish off drying if necessary.
Select the 90 or 60 minute programme for cottons
or the 30 minute programme for synthetics.
To cancel a programme which is running, turn the
programme selector dial to “0”.
At the end of drying, turn the selector dial to “0” to
switch the machine off before removing the laundry.
4 “Buzzer OFF” button
A buzzer sounds
• when selecting the programme
• when depressing the buttons
• when an incorrect option selection is made
• when the programme selector dial is turned to
another position during the programme or when
you depress an option button during the cycle
• at the end of the programme
• when the water reservoir is full
• if the machine is not working correctly
• when the small door at the bottom is open
By depressing button “Buzzer OFF” the acoustic
signal is switched off.
The corresponding light comes on.
5 “Quick drying” button
By depressing this button the drying time is reduced
in the following COTTON programmes:
• extra dry
• ready to wear
• store dry
The corresponding light illuminates. This option
cannot be selected together with “low temperature”
function .
3 “Door opening” button
Press this button to open the door. The light above
the button will light up.
Opening the door by means of this button is
possible only if the tumble dryer is on
(programme selector dial set to a programme or
drying time).
If you open the door during a programme, in order
to restart the programme you must re-press the
“START/PAUSE” button again after having
closed the door.
6 “Low temperature” button
Pressing this button allows drying to be performed
at a lower temperature, for delicate items.
The corresponding pilot light comes on.
This option can also be used for time controlled drying.
This function cannot be used with “Quick drying” .
7 “DELAY START” button
This button allows you to delay the starting of the
programme by 12 hours max.
7
Page 8

This option must be selected after having selected
the programme and before pressing “START/PAUSE”
to start the programme.
Every time the button is pressed, the time is
increased by 30 minutes, until the display shows a
delay of “2 hours”. After this, the delay is displayed
hour by hour.
The minutes or hours of delay that have been
selected are displayed for 3 seconds, then the
display shows the duration of the previously
selected programme.
The countdown begins after you have pressed the
“START/PAUSE” button.
To cancel the delay time press first the
“START/PAUSE” button and then the “DELAY
START” button until the display indicates
press the “START/PAUSE” button again.
When the delay is cancelled, after 3 seconds the
display shows the duration of the programme.
During the delayed start, it is not possible to change
the programme or the delay time that have been
selected. To do this, you must first switch off the
machine by setting the programme selector dial to
“0”. Select the new programme, the options and the
delayed start, then press the “START/PAUSE”
button.
To cancel or change options that have been
selected, simply set the appliance to PAUSE. Once
you perform the desired operation, press once again
the “START/PAUSE” button.
If you wish to add more laundry while the machine is
performing the countdown, simply open the door.
When you close the door, press the “START/PAUSE”
button again to cause the countdown to be
resumed.
. Then
0’
1.20
When the programme starts, the remaining time is
displayed every 5 minutes.
• Delayed start
If you have selected a delay time by means of the
relevant button, the display shows it for 3
seconds; then it shows the duration of the
previously selected programme.
The countdown is displayed every 30 minutes until it
displays “90 minutes” and then hour by hour.
3
• End of programme
A flashing zero indicates the end of the
programme and it is displayed after the “anticreasing” phase.
8 DISPLAY
The display shows the following information:
• duration of selected programme
• delayed start
• end of programme
• incorrect option selection
• alarm code
• Duration of selected programme
After you have selected the programme, its
duration (in hours and minutes) appears on the
display. It is calculated automatically on the basis
of the maximum load accepted for each type of
fabric and of the required degree of drying.
0
• Incorrect option selection
If you select an option that is not compatible with
the programme you have selected, the display
shows Err (error).
8
Page 9
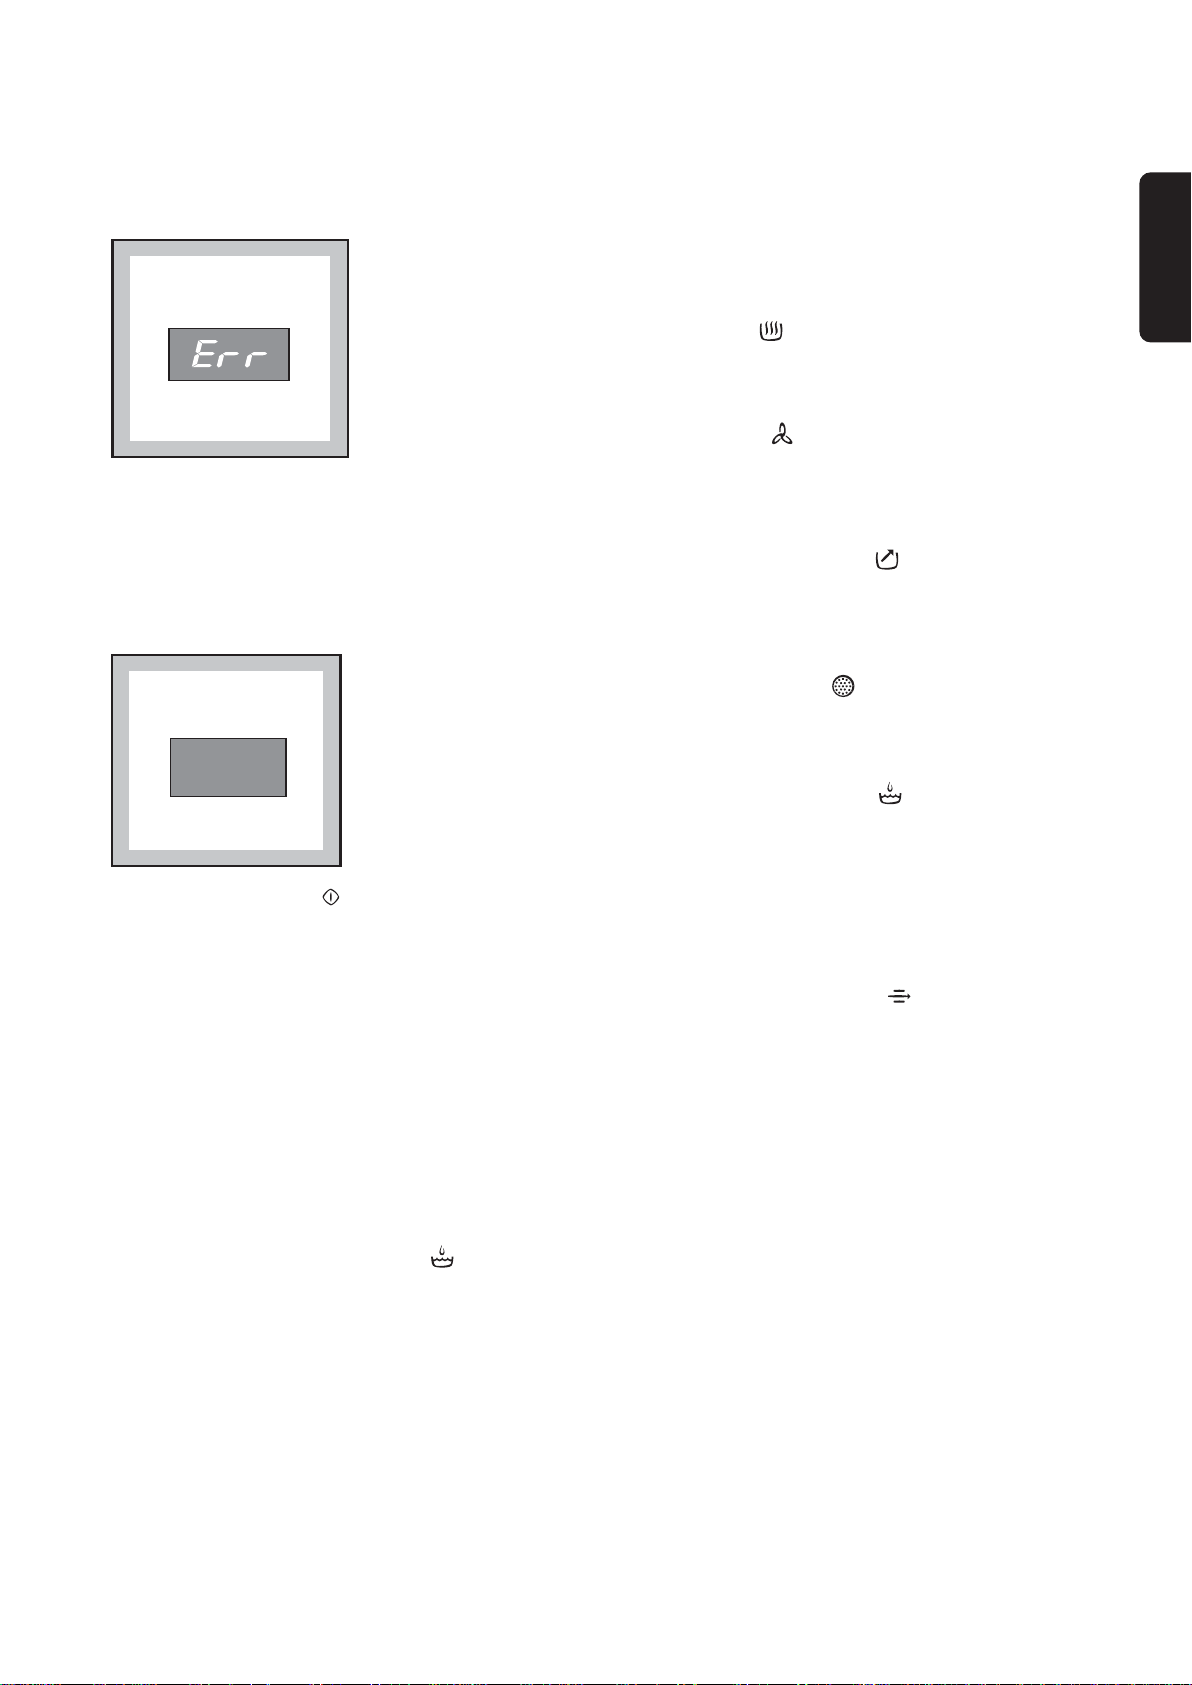
This code will reappear during the execution of the
programme if you press one of the option buttons or
turn the programme selector.
• Alarm code
In case of a functional anomaly, the display shows
an alarm code (e.g. E21). See page 14 for more
detailed information.
E21
10 Indicator lights
These lights indicate the following functions:
ENGLISH
“Drying” light
This light indicates that the appliance is in the drying
phase.
“Cooling” light
This light indicates that the appliance is in the
cooling phase. At the end of drying, there is a
10 minute cooling phase to cool the laundry.
“End of programme” light
This light is on at the end of the cooling phase,
during the anti-creasing phase and at the end of the
programme.
“Filter cleaning” light
This light illuminates at the end of the programme to
remind you that the filters must be cleaned.
“Water reservoir full” light
9 “START/PAUSE” button
Press this button to start the dryer after having
selected the programme and the options.
The relevant light will stop flashing. If you have
chosen a delayed start, the machine will begin the
countdown.
If the door of the appliance or the small door at
the bottom is opened while the programme is
running, this button must be pressed again after
closing the door in order to restart the programme
from the point at which it was interrupted.
This button must be depressed also after a power
failure and after having re-inserted the water
reservoir, if it has been emptied in the middle of a
programme after lighting up of light
In both cases the light of the Start/Pause button
flashes to remind you that the start button needs to
be pressed again.
.
This light comes on at the end of the programme to
remind you that the water reservoir must be emptied
out. If this light illuminates during a programme this
means that the water reservoir is full. The buzzer
sounds, the programme stops, the light of the
Start/Pause button flashes.
“Condenser cleaning” light
It comes on every 80 cycles to remind you that the
condenser must be cleaned.
9
Page 10

Programme chart
Automatic drying (electronic programmes)
Type of laundry
Cotton & linen
Synthetics
Jumpers
Synthetics
(*) According to IEC 61121 Standards.
• Baby cycle is a special programme for jumpers to be dried “ready to wear”.
• Easy iron is a special programme for synthetics.
Degree of drying
required
extra dry
ready to wear
store dry
slightly damp
iron dry
machine iron dry
extra dry
store dry
iron dry
Baby cycle
Easy Iron
Max-load
6 kg
6 kg
6 kg
6 kg
6 kg
6 kg
2.5 kg
2.5 kg
2.5 kg
1 kg
(10 jumpers)
2.5 kg
(1)
Programme
(*)
(*)
(*)
Time controlled drying
Type of laundry Drying time Max-load
Cotton
Cotton
Synthetics
(1) Never overfill the drum (do not load large quilts, for example).
Drying times vary according to:
• The type of laundry
• The size of the load
• The degree of drying required
• The degree of spinning prior to drying.
90 min
60 min
30 min
(1)
6 kg
6 kg
2.5 kg
Programme
selector dial position
90 min
60 min
30 min
Fresh & Cool
This position on programme selector dial can be used to freshen the laundry (e.g. to remove a persistent
odour of moth-balls). Programme duration 10 mins.
Load
It is often difficult to estimate the weight of items to be dried. We therefore recommend that you adopt the
following guidelines:
• cotton, linen: drum full but not too tightly packed;
• synthetics: drum no more than half full;
• delicate fabrics: drum no more than one third full.
10
Page 11
Operating sequence
P1108
P1149
Before using your tumble dryer for the first time, we
recommend to place a few damp cloths inside the
appliance and dry for 30 minutes.
There may be dust inside a brand new tumble dryer.
Drying
1. Connect the appliance.
2. Open the door (see picture).
3. Load the items one at a time, shaking them out
loosely.
4. Close the door. Please check the laundry does
not get caught between the door and filter.
5. Select the drying programme or time. The lights
, and come on. The light of the
“START/PAUSE” button flashes and the
display shows the duration of the programme.
6. If required, press the low temperature button
and/or the “Buzzer OFF” button or the
“Quick drying” button
.
7. Select the “DELAY START” if required. The
selected delay appears on the display for 3
seconds, then the duration of the selected
programme is displayed.
8. Press the “START/PAUSE” button the
corresponding light stops flashing and drying
starts. Only the light remains lit. If you have
selected the delayed start, the machine begins
its countdown.
If the programme selector dial is turned to
another position, when the machine is running,
the buzzer will sound, the programme phase
indicator lights will flash and Err appears on the
display.
The drum turns alternately in both directions
during drying.
All drying programmes end with a 10 minute
cooling phase light is on).
You may remove the laundry after this phase.
The lights , and illuminate.
The display shows a static zero.
9. If the laundry is not removed at the end of the
cycle, the dryer performs an anti-creasing
phase (duration: 30 minutes maximum).
If you do not remove the laundry, the dryer will stop
automatically at the end of the anti-creasing phase.
Lights , and remain lit and the buzzer
sounds every 10 seconds for 2 minutes.
The light of the “START/PAUSE” button goes
off and a flashing zero appears on the display.
10. Turn the programme selector dial to “0”; all the
lights go out. The appliance is switched off.
Remove the laundry.
If you open and then close the door before
turning the selector dial to “0” all the lights
corresponding to the phases making up the
performed programme come on and the
display shows the duration of the programme.
After each use
• Clean the filters (see page 13).
• Empty the water reservoir (see page 14).
Important!
If the drying programme has to be stopped before it
reaches the end, we recommend that you turn the
programme selector dial to position and wait
until the end of this cooling phase before removing
the laundry. This will avoid a build-up of heat inside
the appliance.To do this first turn the dial to “0” and
then to and depress “START/PAUSE” button
Modifying the programme
To change a programme which is running, first
cancel it by turning the programme selector dial to
“0”. Select the new programme and press the
“START/PAUSE” button.
ENGLISH
.
11
Page 12
Useful hints
• Try to load to the maximum capacity of the
machine as small loads are uneconomical.
For information, here is a list of the average
weights of some common laundry items.
Sheet 700 - 1000 g
Tablecloth 400 - 500 g
Kitchen towel 70 - 120 g
Table napkin 50 - 100 g
Towelling hand towel 150 - 250 g
Bathrobe 1000 - 1500 g
Man’s shirt 200 - 300 g
Pillowcase 100 - 200 g
Man’s pyjamas 400 - 500 g
Ladies’ nightdress 200 - 250 g
• Never tumble dry the following:
Particularly delicate items such as net curtains,
woollen, silk, fabrics with metal trim, nylon tights,
bulky materials such as anoraks, blankets,
eiderdowns, sleeping bags, feather quilts and any
items containing rubber foam or materials similar
to rubber foam.
• Always follow the instructions on garment labels:
• Avoid drying dark clothes with light coloured fluffy
items such as towels as they could attract the
fluff.
• The laundry must be thoroughly spun before
tumble drying.
• Easy-care items, too, e.g. shirts, should be
briefly pre-spun before drying (depending on
crease resistance approx. 30 seconds or using the
special brief spin programme of your washing
machine).
• Knitted textiles (knitted underwear) may shrink a
little during drying. Please do not overdry items of
this type. It is advisable to allow for shrinkage
when choosing the size of new purchases.
• You can also put starched items into your dryer.
However, to achieve the desired starched effect,
choose the programme “iron dry”. To remove any
starch residues, wipe out the internal drum after
drying with a moist cloth and then rub it dry.
• To avoid a static charge when drying is
completed, use either a fabric softener when you
are washing the laundry or a fabric conditioner
specifically for tumble dryers.
• Remove the laundry when the dryer has finished
drying.
• If individual items are still damp after drying, set a
brief post-drying time, but at least 30 minutes.
This will be necessary particularly for multilayered
items (e.g. collars, pockets, etc.).
may be tumble dried
normal drying (high temperature)
delicate drying (low temperature)
do not tumble dry
• Close pillowcases and covers with fasteners to
prevent small laundry items getting tangled inside
them. Close press studs, zips and hooks and tie
belts and apron strings.
• Sort laundry according to type and degree of
drying required.
• Do not over-dry laundry, this avoids creasing and
saves energy.
12
Page 13

Maintenance and Cleaning
A
U
T
O
R
E
V
E
R
S
E
kg 5
kg 2,5
8
0
0
/
9
0
0
7
0
'
-
9
0
'
3
5
'
-
5
0
'
1
0
0
0
/
1
2
0
0
6
5
'
-
8
5
'
3
0
'
-
4
5
'
8
0
0
/
9
0
0
8
0
'
-
1
0
0
'
5
5
'
-
7
0
'
1
0
0
0
/
1
2
0
0
7
5
'
-
9
5
'
5
0
'
-
6
5
'
6
5
0
5
0
'
-
6
0
'
3
0
'
-
3
5
'
kg
2,5
kg 1
P1151
P1110
A
U
T
O
R
E
V
E
R
S
E
kg
5
kg 2
,5
8
0
0
/
9
0
0
7
0
'
-
9
0
'
3
5
'
-
5
0
'
1
0
0
0
/
1
2
0
0
6
5
'
-
8
5
'
3
0
'
-
4
5
'
8
0
0
/
9
0
0
8
0
'
-
1
0
0
'
5
5
'
-
7
0
'
1
0
0
0
/
1
2
0
0
7
5
'
-
9
5
'
5
0
'
-
6
5
'
6
5
0
5
0
'
-
6
0
'
3
0
'
-
3
5
'
kg
2,5
k
g 1
P1150
P1155
P1154
P1153
A
U
T
O
R
E
V
E
R
S
E
kg 5
kg
2,5
8
0
0
/
9
0
0
7
0
'
-
9
0
'
3
5
'
-
5
0
'
1
0
0
0
/
1
2
0
0
6
5
'
-
8
5
'
3
0
'
-
4
5
'
8
0
0
/
9
0
0
8
0
'
-
1
0
0
'
5
5
'
-
7
0
'
1
0
0
0
/
1
2
0
0
7
5
'
-
9
5
'
5
0
'
-
6
5
'
6
5
0
5
0
'
-
6
0
'
3
0
'
-
3
5
'
kg
2
,5
kg
1
P1152
You must disconnect the appliance from the
electricity supply, before you can carry out any
cleaning or maintenance work.
External cleaning
Use only soap and water and then dry thoroughly.
Important: do not use methylated spirit, diluents or
similar products.
Cleaning the door
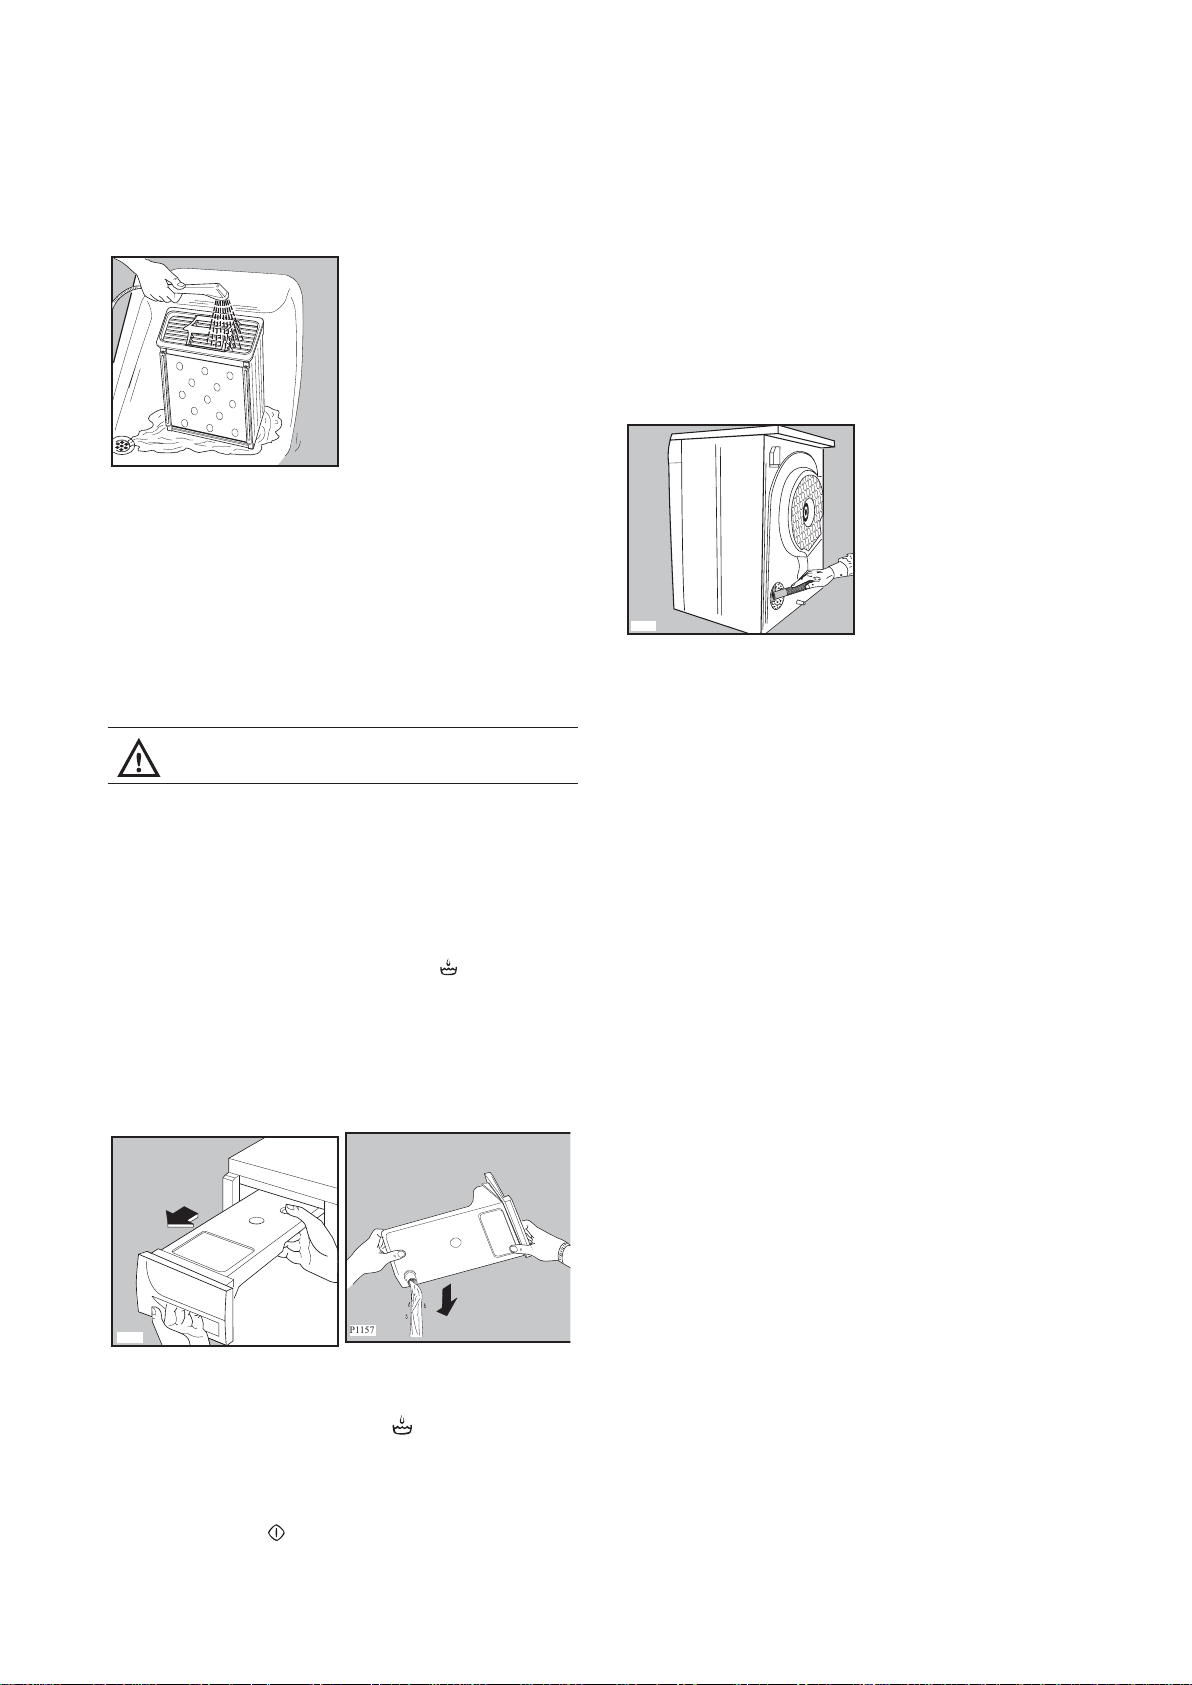
Clean periodically the interior part of the door to
remove any fluff from the seals around the filter.
Accurate cleaning ensures correct drying.
After a while, a withish patina due to detergent
residue on laundry forms on the filters. When this
occurs, clean the filters with warm water using a
brush. Remove the filter in the door opening as per
picture (it can be positioned with the tooth facing to
the left or to the right).
Do not use the appliance without filters.
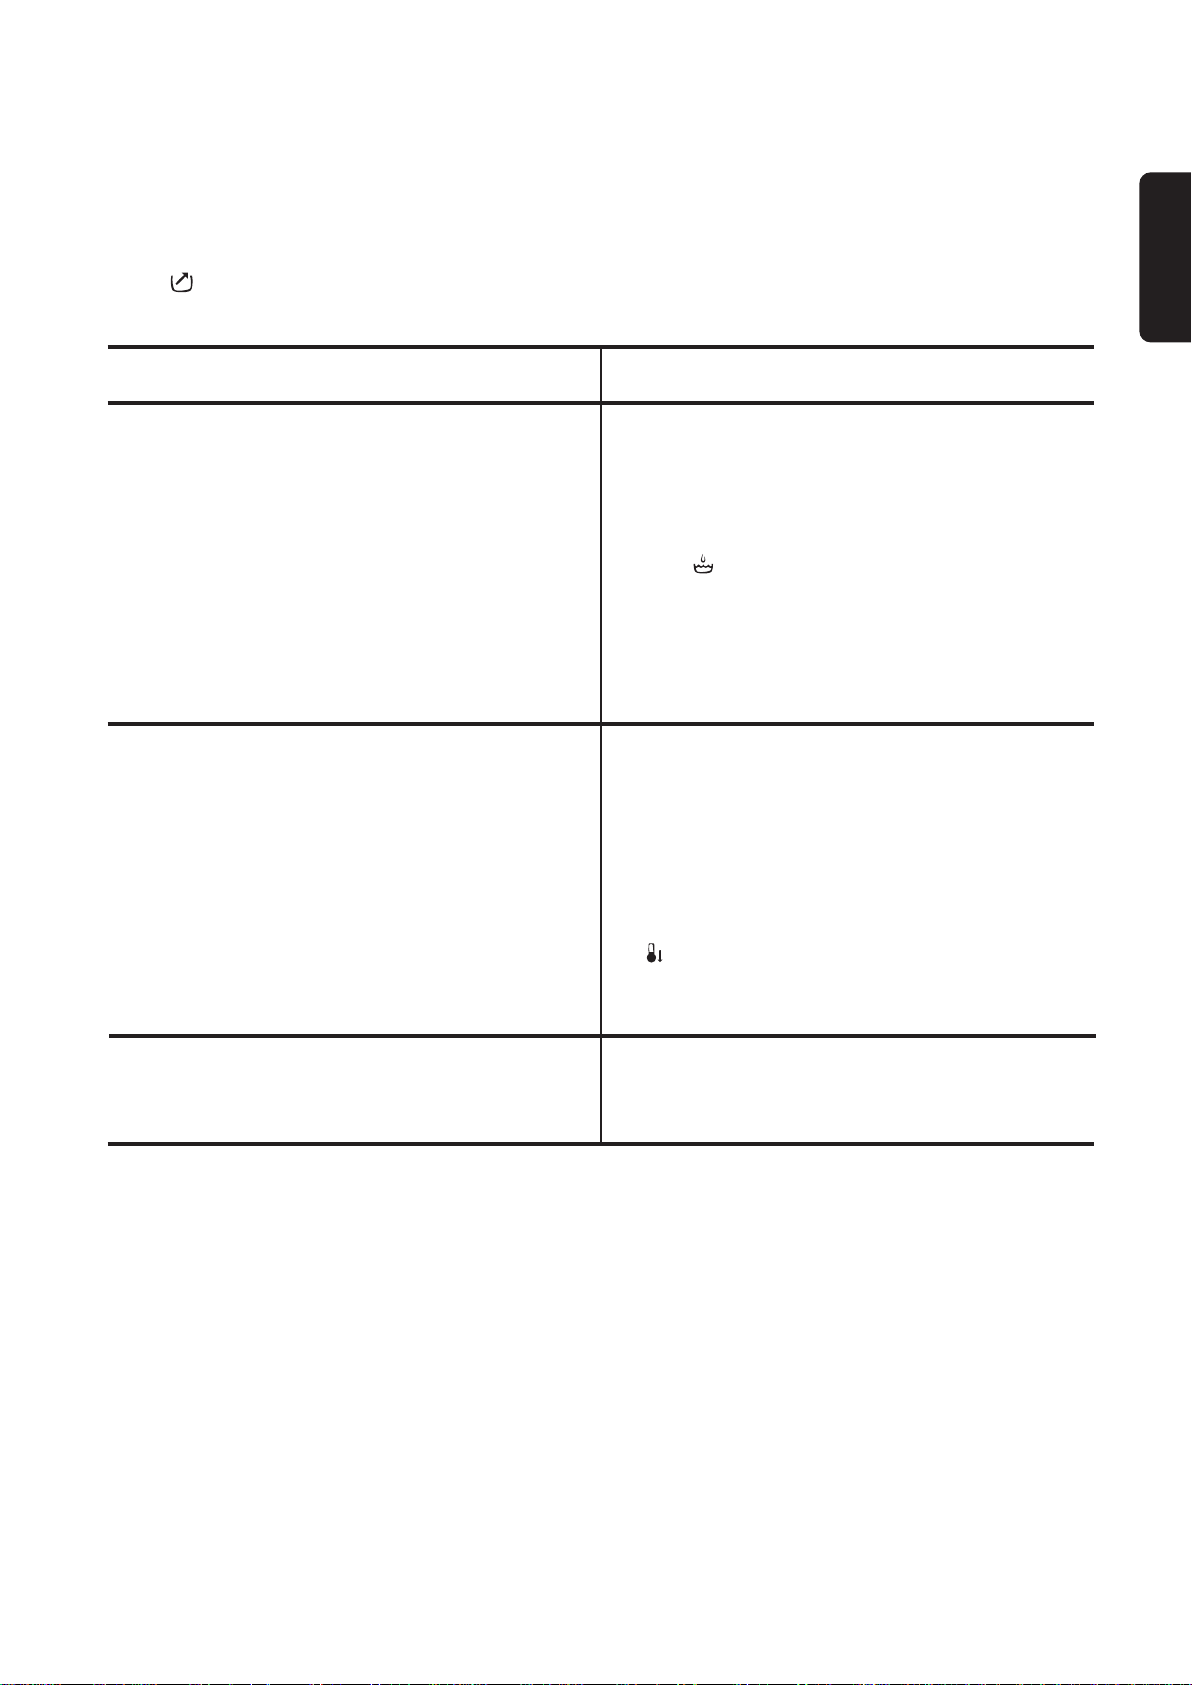
Cleaning the condenser unit
Clean the condenser when light (Condenser
cleaning) comes on.
The condenser is situated at the lower part of the
cabinet behind a small door. To open the door,
push the catch as per picture.
ENGLISH
Cleaning the filters
Your dryer will only function well if the filters are
clean.
The filters collect all the fluff which accumulates
during drying and they must therefore be cleaned
at the end of each programme, before removing
the laundry, with a damp cloth.
The light (Filter cleaning) is on to remind you this
operation.
The filter in the inner door must be removed for
cleaning.
Do not be alarmed by the amount of fluff. It is not
due to excessive wear caused by the dryer. All
fabric loses fluff when drying but it goes un-noticed
in the air. In a tumble dryer it simply collects in the
filter.
During the drying cycle or at the end, it is normal for
water to be present on the surface of the condenser
insertion.
To pull out the condenser, first turn the two red
stops downwards and then remove the condenser
unit holding it at the handle.
13
Page 14
Clean it with a brush and rinse it under the shower if
P1157
P1156
P0639
necessary.
Also clean the outside, removing all fluff.
Clean the rubber seal round the condenser cabinet
and in the inner part of the small door with a damp
cloth.
Important! Do not use pointed objects or utensils to
clean the spaces between the plates, as this could
damage the condenser and make it permeable.
Re-fit the condenser, turn the red stops upwards
and close the door.
Do not use this appliance if the condenser
has not been fitted.
Emptying the water reservoir
Water extracted from the laundry condenses inside
the machine and is collected in a reservoir.
The reservoir must be emptied after each drying
cycle to ensure efficient operation when the
machine is next used. The pilot light (Water
reservoir full) reminds you this operation.
Proceed as follows:
•Pull out the reservoir
•Turn it upside down and let water flow down
•Re-fit the reservoir
Handy tip: The condensed water may be used in a
steam iron or to top up a battery, etc. In this case it
must be filtered (e.g. through a coffee filter).
Cleaning the air intake grille
Using a vacuum cleaner remove the fluff from the air
intake grille at the back of the appliance.
P1162
Cleaning the drum
When your laundry does not reach the desired
degree of dryness, in other words, when it turns out
either too dry or too damp, we advise you to clean
the inside of the drum with a cloth soaked with
vinegar.
This will eliminate the slight patina that has formed
in the drum (due to residues of detergent and
softeners used in the washing, and to the lime
contained in the water), which prevents the probes
from detecting the correct degree of dryness.
The reservoir must be re-inserted correctly.
If this is not done the pilot light comes on during
next drying and the programme stops, leaving the
laundry damp. The buzzer will sound.
After emptying and inserting the reservoir the
“START/PAUSE” button has to be depressed
again to allow the programme to continue.
14
Page 15
Something not working?
Before contacting your local Service Centre, please make the following checks.
Important!
If light (End of programme) flashes, the buzzer sounds and an alarm code is displayed, switch the machine
off and call the Service Centre.
Problem Possible cause
ENGLISH
• The dryer does not work:
• The dryer does not dry properly:
• The door(s) is(are) open.
• The plug is not fitted into the wall socket.
• There is no electricity supply from the wall socket.
• The selector dial is not set correctly.
• The water reservoir is full or not correctly inserted
(light is on). The programme starts in any case
but it stops after approx. 4 minutes.
• The “START/PAUSE” button has not been
depressed.
• The “DELAY START” option has been selected.
• The filters are clogged.
• The condenser is clogged.
• The water reservoir is full.
• The selected cycle is not suitable for the laundry.
• Insufficient drying time.
• The laundry has not been spun properly.
• The low temperature function “Temperature low.”
has been selected.
• Excessive laundry load.
• The dryer is not correctly installed.
• The drum light does not light up:
If, after the above checks, there is still a fault, call
your local Service Centre.
Please make sure you give the model and serial
number of the appliance.
• The Programme/Time selector dial is on position
“0”.
• The lamp is defective.
This information can be found on the rating plate
(see picture on page 4).
15
Page 16
Bästa kund,,
vi ber dig att läsa igenom den här bruksanvisningen noggrant.
Framför allt är det viktigt att du läser säkerhetsinformationen på de första sidorna i bruksanvisningen. Förvara
alltid bruksanvisningen lättillgänglig, så att du snabbt kan hitta den och slå upp information i den vid ett senare
tillfälle. Om du säljer maskinen ska bruksanvisningen lämnas över till nästa ägare..
Transportskador
Kontrollera att torktumlaren inte är skadad. Eventuella transportskador skall omedelbart anmälas till den som
ansvarat för transporten. Skador, felaktigheter och ev. saknade delar skall omedelbart anmälas till säljaren.
Så här använder du bruksanvisningen
Några stycken i bruksanvisningen är försedda med en symbol. Dessa symboler betyder följande:
Här finns viktig information om olämplig användning av torktumlaren som skulle kunna förorsaka
person- och egendomsskada.
Här finns information, som är särskilt viktig för att erhålla bästa möjliga torkresultat.
Här finns viktiga miljö- och energispartips.
Vårt bidrag till miljöskyddet är att vi
använder returpapper.
Innehållsförteckning
Viktig säkerhetsinformation . . . . . . . . . . . 17
Bortforsling/avfallshantering
Energisparråd
. . . . . . . . . . . . . . . . . . . . . . . . . 18
FÖR ANVÄNDAREN
Beskrivning av torktumlaren
Tekniska data
. . . . . . . . . . . . . . . . . . . . . . . . . 18
Justering av restfuktingheten
FÖR INSTALLATÖREN
Installation
Uppackning . . . . . . . . . . . . . . . . . . . . . . . . . . . .20
•
Placering av tumlaren . . . . . . . . . . . . . . . . . . . .20
•
Viktigt ved installation av kondenstumlare . . . .20
•
Elektrisk anslutning . . . . . . . . . . . . . . . . . . . . . .20
•
Monteringssats för tvättpelare (extra tillbehör) . . .20
•
Sats för tömning av kondensvatten. . . . . . . . . .20
•
Hänga om luckan . . . . . . . . . . . . . . . . . . . . . . .20
•
. . . . . . . . . . . . . . . . . . . . . . . . . . . .20
Bruk . . . . . . . . . . . . . . . . . . . . . . . . . . . . . . . . . . . 21
Beskrivning av panelens funktioner . . . . . . .21-23
•
Programöversikt . . . . . . . . . . . . . . . . . . . . . . . .24
•
. . . . . . . . . . 17
. . . . . . . . . . 18
. . . . . . . . . 19
Så här använder du torktumlaren.. . . . . . . . . . .25
•
Viktiga råd och tips för dig som torkar . . . 26
Allt kan inte torkas i tumlaren. . . . . . . . . . . . . . 26
•
Stärkta textilier . . . . . . . . . . . . . . . . . . . . . . . . . 26
•
Krympning. . . . . . . . . . . . . . . . . . . . . . . . . . . . . 26
•
Vad är ludd? . . . . . . . . . . . . . . . . . . . . . . . . . . . 26
•
Tid- och energiförbrukning . . . . . . . . . . . . . . . . 26
•
Tvättmärkning . . . . . . . . . . . . . . . . . . . . . . . . . . 26
•
Skötsel och rengöring. . . . . . . . . . . . . . . . . 27
Rengöra torktumlarens utsida . . . . . . . . . . . . .27
•
Rengöra luckan . . . . . . . . . . . . . . . . . . . . . . . . .27
•
Rengöra filtren . . . . . . . . . . . . . . . . . . . . . . . . .27
•
Rengöring av kondensorn . . . . . . . . . . . . . . . . .27
•
Tömning av vattenbehållaren . . . . . . . . . . . . . .28
•
Korrekt placering av vattenbehållare . . . . . . . .28
•
Rengöring av luftintagsgallret . . . . . . . . . . . . . .28
•
Rengöring av trumma . . . . . . . . . . . . . . . . . . . .28
•
Om torktumlaren inte fungerar . . . . . . . .29
Reklamation . . . . . . . . . . . . . . . . . . . . . . . . . . .29
•
Konsumentkontakt . . . . . . . . . . . . . . . . . . . . . .29
•
Service och reservdelar . . . . . . . . . . . . . . . . . .29
•
Garanti (gäller för Finland) . . . . . . . . . . . . . . . . .29
•
16
Page 17
Viktig säkerhetsinformation
Följande varningsuppgifter är till för den allmänna säkerheten. Läs noga igenom dem före installation och
användning av apparaten.
Installation
• Alla installationsarbeten och ingrepp i produkten, liksom
förändring av den elektriska anslutningssladden, skall
utföras av behörig fackman. Arbeten utförda av personer
med otillräckliga kunskaper, kan försämra produktens
funktion och förorsaka skada på person och egendom.
• Se till att maskinen inte står på anslutningssladden.
• Om maskinen har placerats på ett mattbelagt golv,
måste du justera dess fötter så att luften får
möjlighet att cirkulera fritt.
Användning
• Maskinen får endast användas i hushållet och
endast för angivet ändamål.
• När du har använt maskinen ska du alltid dra ut
stickkontakten ur vägguttaget.
• Tvätt som inte har centrifugerats får aldrig torkas i
torktumlaren.
• Plagg och textilier som behandlats med brandfarliga
rengörings- och lösningsmedel (tvättbensin, alkohol,
fläckborttagningsmedel etc) får aldrig torkas i
torktumlaren. Brandrisk föreligger! Endast textilier som
tvättats i vatten får torkas i torktumlaren.
• Risk för brand: plagg som fläckats eller dränkts in
med vegitabilisk olja eller frityrolja utgör en
brandfara och för inte torkas i torktumlare.
• Om du har använt fläckborttagare som innehåller
lösningsmedel måste plaggen sköljas extra
noggrannt före torktumling.
• Kontrollera alltid att det inte glömts kvar någon
gaständare/cigarrettändare i klädesplaggen. Det
gäller även tändare som inte fungerar.
• Låt luckan på torktumlaren stå öppen mellan
torkprogrammen. Det gör att gummilisten som
tätar runt luckan håller längre och tätar bättre.
• Använd aldrig torktumlaren utan luddfilter eller
med trasiga luddfilter. Brandrisk föreligger!
• Torka aldrig gymnastikskor (tennisskor, joggingskor
etc) i torktumlaren. Skorna kan komma emellan
trumman och luckan och därmed blockera trumman.
Allmänna säkerhetsföreskrifter
• Det är farligt att på något sätt förändra
torktumlaren eller dess egenskaper.
• Försök aldrig att själv reparera maskinen.
Reparationer som inte har utförts av fackman kan
leda till svåra olyckor eller driftstörningar.
• Service och reparationer skall utföras av leverantören
legitimerat serviceföretag. Kontrollera att delarna byts
ut mot original reservdelar – för säker drift.
Barnsäkerhet
• Barn förstår oftast inte hur farligt det kan vara att
leka med elektriska maskiner. Därför ska du hålla
uppsikt över maskinen under drift. Låt inte barnen
leka med torktumlaren.
• Förpackningsmaterial (t ex plastfolie och frigolit) kan
vara farligt för barn. Risk för kvävning! Se till att barnen
inte kommer åt att leka med förpackningsmaterialet.
• Kontrollera att barn eller små djur inte tar sig in i
torktumlarens trumma.
• När torktumlaren är uttjänt och ska forslas bort, ska du
dra ut stickkontakten och skära av nätkabeln.
Stickkontakten och resterna av nätkabeln ska också
kastas. Lucklåset ska förstöras. På så sätt kan lekande
barn inte bli instängda i torktumlarna och därmed
försättas i livsfara.
Bortforsling/
avfallshantering
• Hantering av förpackningsavfall
De material i förpackningen som kan återanvändas
är märkta med symbolen och skall i princip
återanvändas.
>PE< står för polyeten
>PS< står för polystyrol
>PP< står för polypropylen
Pappemballaget bör läggas i en pappersinsamlingscontainer, om en sådan finns i ert område.
• Deponering av uttjänt maskin
Kontakta din kommun för information om var du
kan lämna din maskin.
• Avfallshantering när den slitits ut
Symbolen på produkten eller emballaget
anger att produkten inte får hanteras som
hushållsavfall. Den skall i stället lämnas in på
uppsamlingsplats för atervinning av el- och
elektronikkomponenter. Genom att säkerställa att
produkten hanteras på rätt sätt bidrar du till att
förebygga eventuellt negativa miljö- och
hälsoeffekter som kan uppstå om produkten
kasseras som vanligt avfall. För ytterligare
upplysningar om återvinning bör du kontakta
lokala myndigheter eller sophämtningstjänst eller
affären där du köpte varan.
17
SVENSKA
Page 18
Energisparråd
Din torktumlare arbetar ekonomiskt om du följer
dessa råd.
• Fyll alltid maskinen helt. Se programöversikten på
sidan 31. Torkning med halvfylld maskin är
oekonomiskt.
• Före torkningen ska tvätten vara väl centrifugerad.
Ju högre centrifugeringsvarvtal, desto kortare
torktid och desto lägre strömförbrukning.
• Undvik att torktumla kläderna för länge. Välj det
rätta torkprogrammet och därmed den önskade
torkningsgraden. Kläder som torkats för länge kan
krympa mer än normalt och dessutom vara svåra
att stryka.
• För att utnyttja maskinens fulla kapacitet kan tvätt
som ska vara helt skåptorr torkas tillsammans
med tvätt som bara ska vara stryktorr. Välj ett
program för stryktorr tvätt. När detta program är
färdigt tas den stryktorra tvätten helt enkelt ut och
den övriga tvätten torkas färdigt med ett annat
program.
• Luddfiltren bör rengöras regelbundet för att
undvika längre torktider och högre
strömförbrukning.
• Utrymmet där torktumlaren står ska vara
ventilerat. Under torkningen bör
rumstemperaturen inte överstiga +35°C.
Tekniska data
MÅTT: höjd 850 mm justerbar + 8 mm
bredd 600 mm
djup 580 mm
djup med öppen lucka 1008 mm
REKOMMENDERAD bomull 6,0 kg torra kläder
MAXIMAL MÄNGD: syntet 2,5 kg torra kläder
ELANSLUTNING: nätspänning 220-230 V, 50 Hz
totaleffekt 2200 W, 10 Amp
STRÖMFÖRBRUKNING: bomull 4.37 kilowattimme (6 kg skåptorr tvätt)
bomull 3,6 kilowattimme (6 kg stryktorr tvätt)
syntetmaterial 1,4 kilowattimme (2,5 kg skåptorr tvätt)
Denna apparat uppfyller kraven i EG-direktivet 89/336/EEG, 73/32/EEG.
Vi reserverar oss för ändringar.
Beskrivning av torktumlaren
1 Topplock
2 Vattenbehållare
3 Kontrollpanel
4 Luddfilter
5 Typskylt
6 Kondensor
7 Lampa för innerbelysning
8 Justerbara fötter
18
Page 19

Justering av restfuktigheten
START/PAUSE
Vatten innehåller olika mängd kalk och mineralsalter.
Mängden varierar beroende på geografiska
förhållanden och det påverkar vattnets konduktivitet
(elektriska ledningsförmåga).
Lokala variationerna i vattnets konduktivitet jämfört
med de fasta värden som är fabriksinställda kan
påverka restfuktigheten i tvättgodset efter
programmets slut.
Du kan själv anpassa känsligheten på torktumlarens
sensor som känner av konduktiviteten genom att
göra enligt följande.
LED lampa Konduktivitet
CC 00
CC 00
Cirka
värdenµS/cm
Låg < 300
Medium 300 - 600
SVENSKA
Gå in i inställningsläget:
• Vrid programvredet till ett torkprogram.
• Tryck samtidigt in knapparna 3 och 6.
• Håll knapparna intryckta tills programfaslamporna
börjar blinka och lampan för torkfase
sken.
«C0»
ser med fast
Justera konduktiviteten:
Tryck på 5 flera gånger tills:
programindikeringslampan för önskad konduktivitet
lyser, se tabellen nedan
CC 00
Normalt är högsta värdet fabriksinställt, men
vissa modeller kan ha ett annat värde inställt.
Spara inställningen:
• Tryck samtidigt in knapparna 3 och 6.
• Håll knapparna intryckta tills indikeringslamporna
ovanför slutar att blinka och en ljudsignal hörs.
Hög > 600
19
Page 20

Installation
P1106
P1148
Varning!
Uppackning
Innan du använder torktumlaren måste du avlägsna (se
bilden) polyetenpåsen med polystyrenfyllning. Dra av
den självhäftande tejpen som är ovanpa trumman inuti
maskinen
Torktumlaren skall transporteras vertikalt.
Torktumlaren kan installeras på ett plant golv eller
ovanpå en tvättmaskin. Tumlaren skall i båda fallen
stå i våg, använd vattenpass för kontroll. Eventuella
justeringar kan göras med maskinens fötter.
Se till att tumlaren har god ventilation undertill,
blockera inte lufttillförseln med klädesplagg eller
liknande.
Sörj för god luftväxling genom luftgallret i sockeln.
Tjock matta är på grund av detta olämpligt som
underlag för torktumlaren.
Elektrisk anslutning
Maskinen levereras med sladd och stickkontakt för
anslutning till 220-230 V 1 fas 10 A. Vid placering i
våtutrymmen t ex. badrum skall maskinen anslutas
enligt gällande bestämmelser. Fast elanslutning får
endast utföras av behörig elinstallatör.
Skador orsakade av felaktig elinstallation
omfattas inte av
konsumentbestämmelserna,
Konsumentköp EHL.
Om anslutningssladden måste bytas ut
skall detta arbete utföras av auktoriserad
service.
Efter att maskinen har ställts upp skall det gå att
kunna komma åt elledningen.
Monteringssats för tvättpelare
Extra tillbehör
Det är möjligt att montera torktumlaren på en
frontmatad tvättmaskin, men då måste tumlaren
skruvas fast i tvättmaskinen. För detta erfordras en
monteringssats som du beställer hos din återförsäljare.
Läs instruktionerna som medföljer leveransen noga
innan du installerar torktumlaren.
Viktigt vid installation av
kondenstumlare
• Utblåsningsluften från torktumlaren kan bli upptill
+60°C. Placera därför aldrig tumlaren på ett
temperaturkänsligt golv.
• Rumstemperaturen måste ligga mellan +5° och
35°C, eftersom temperaturen kan påverka
maskinens prestanda.
• Utrymmet omkring torktumlaren skall vara så
dammfritt som möjligt.
• De justerbara fötterna får inte tas bort. Avståndet
mellan golv och torktumlare är nödvändigt för
luftcirkulationen. Blockerad ventilation ger förhöjd
temperatur inne i tumlaren, vilket påverkar
tumlarens funktion.
OBS! Ställs kombinationen på en sockel, fundament
eller liknande skall den förankras så det inte finns
någon risk för att den kan falla ner.
Sats för tömning av kondensvatten
Hos auktoriserade aterförsäljare finns en speciell
sats som används för att tömma ut kondensvattnet
som bildas under torkningen direkt i vasken.
Följ noggrant anvisningarna som medföljer satsen.
Hänga om luckan
För enklare iläggning och uttagning av tvätt kan
luckan hängas om åt andra hållet. Detta får dock
endast göras av en behörig fackman. Kontakta
närmaste servicecenter.
20
Page 21

Bruk
12 345678910
90 min
60 min
30 min
START/PAUSE
EDC 5330
PROGRAM
FUNCTION
TIMELINE 6 kg
SVENSKA
1 Programkort
Ett programschema finns inuti vattenbehållaren
ellertillsammans med instruktionsboken.
2 Program/tidsväljare
Du kan välja mellan elektroniskt eller
tidsstyrtprogram.Vrid väljaren till önskat program
eller torktid.
Elektroniska (automatiska) program
Torktumlaren kör dessa program med hjälp
avsonder som känner av tvättens fuktighetsgrad.Välj
ett program som är lämpligt för tvätten ochönskad
torrhetsgrad
Tidsstyrda program
Dessa program kan användas för att
slutföratorkningen vid behov.Välj program på 90
eller 60 minuter för bomull ellerprogram på 30
minuter för syntet.Vrid program/tidsväljaren till läge
“0” för att avbrytaett pågående program.Vrid
program/tidsväljaren till läge “0” efter
avslutatprogram och ta sedan ut tvätten.
3 Knapp för lucköppning
Tryck på knappen för att öppna
luckan.Kontrollampanovanför knappen tänds.
Lucköppning med denna knapp är endast möjlig
närtorktumlaren är påslagen (programväljaren
inställd på torkprogram eller torktid).
Om torktumlarens lucka öppnas medan
programmet är igång avbryts torkningen.Stäng
luckan och tryck åter på knappen Start/Paus för
att startatorkprogrammet från den punkt där det har
avbrutits
4 Knapp för deaktivering av summer
Summern ljuder
• när ett program väljs.
• när knapparna tryck ned.
• när ett felaktigt tillval väljs.
• när program/tidsväljaren vrids till ett annat
lägeeller en tillvalsknapp trycks ned under ett
pågående program.
• när torkprogrammet är avslutat.
• när vattenbehållaren är full.
• om maskinen inte fungerar korrekt.
• när torktumlarens lucka eller den lilla luckannedtill
är öppen.
Tryck på knappen för att deaktivera summern
• när ett program väljs.
• när knapparna tryck ned.
• när program/tidsväljaren vrids till ett annat
lägeeller en tillvalsknapp trycks ned under ett
pågående program.
• när torkprogrammet är avslutat.
Motsvarande kontrollampa tänds.
5 Knapp för snabbtorkning
Tryck på knappen för att minska torktiden i
följandeprogram för bomull:
• Extra torrt
• Supertorrt
• Skåptorrt
Motsvarande kontrollampa tänds. Detta tillval
kananvändas tillsammans med tillvalet
skontorkning.
21
Page 22

6 Knapp för skontorkning
Tryck på knappen för att minska temperaturen
vidtorkning av särskilt ömtåliga plagg. Motsvarande
kontrollampa tänds.Detta tillval kan användas som
tidsstyrt program.
Detta tillval kan inte användas tillsammans
medtillvalet snabbtorkning.
7 Knapp för senarelagd start
Med denna knapp kan du senareläggaprogrammets
start med max. 12 timmar.
Detta tillval ska väljas efter valet av program, men
innan du trycker på knappen Start/Paus för att
starta torkprogrammet.
Varje gång du trycker på knappen ökar tiden med
30 minuter tills displayen visar en fördröjning på 2
timmar. Efter detta visas fördröjningen timme för
timme.
Displayen visar minuterna eller timmarna för den
valda fördröjningen i 2 sekunder, därefter visas det
valda programmets längd.
Nedräkningen börjar efter det att du har tryckt på
knappen Start/Paus .
Radera den senarelagda starten genom att trycka
upprepade gånger på knappen för senarelagd star
ttills displayen visar 0’.
Tryck åter på knappen Start/Paus .
När den senarelagda starten har raderats visar
displayen programmets längd.
Om du under nedräkningen vill ändra program eller
den valda senarelagda starten är det nödvändigt att
stänga av torktumlaren genom att vrida
programväljaren till läge “0”. Välj nytt program, tillval
och senarelagd start. Tryck sedan på knappen
Start/Paus .
Radera eller ändra tillvalen genom att placera
torktumlaren i pausläge. Gör önskat moment och
tryck åter på knappen Start/Paus .
Det går bra att lägga in mer tvätt i torktumlaren
under nedräkningen, det är bara att öppna luckan
och lägga in tvätten. Stäng luckan och tryck åter på
knappen Start/Paus . Torktumlaren
fortsättermed nedräkningen.
8 DISPLAY
Displayen visar följande information:
• Programmets längd
• Senarelagd start
• Programslut
• Felaktigt tillval
• Larmkod
• Programmets längd
Programmets längd (i timmar och minuter) visas på
displayen efter programvalet. Programmets längd
räknas ut automatiskt på basis av textiltypernas
max. tvättmängd och önskad torrhetsgrad.
1.20
När programmet startar, visas programmets
kvarvarande tid var 5:e minut.
• Senarelagd start
Om du har valt senarelagd start visar displayen
fördröjningen i 2 sekunder, därefter visas det valda
programmets längd.
Nedräkningen visas var 30:e minut tills displayen
visar 90 minuter. Efter detta visas nedräkningen
timme för timme.
3
• Programslut
En blinkande nolla indikerar programslutet. Nollan
visas efter skrynkelskyddsfasen.
0
22
Page 23

• Felaktigt tillval
Om du väljer ett tillval som inte är kompatibelt
med det valda programmet visar displayen Err (fel).
Denna kod visas även om du trycker på en av
tillvalsknapparna eller vrider på programväljaren
under ett pågående program.
• Varningskoder
Vid driftproblem kan vissa varningskoder visas,
t.ex. E20 (se avsnittet “Om tvättmaskinen inte
fungerar”).
10 Kontrollampor
Kontrollampornas funktion:
Torkning
Kontrollampan indikerar att torktumlaren kör
torkningsfasen.
Avkylning
Kontrollampan indikerar att torktumlaren kör
avkylningsfasen. Programmet avslutas med en
avkylningfas på 10 minuter för att tvätten ska
svalna.
Programslut
Kontrollampan tänds vid slutet av avkylningsfasen,
under skrynkelskyddsfasen och vid programslutet.
Rengöring av luddfilter
Signallampan tänds vid programslutet för att
påminna dig om att luddfiltren måste rengöras.
Vattenbehållare
SVENSKA
E21
9 Knapp Start/Paus
Tryck på knappen för att sätta igång torktumlaren
efter det att du har valt ett program och tillvalen.
Motsvarande kontrollampa slocknar. Torktumlaren
börjar nedräkningen om du har valt senarelagd
start.
Om torktumlarens lucka eller den lilla luckan nedtill
öppnas medan programmet är igång avbryts
torkningen. Stäng luckan och tryck åter på knappen
för att starta torkprogrammet från den punkt där det
har avbrutits.
Tryck på knappen även efter ett strömavbrott.
Detta gäller även när signallampan för
vattenbehållaren tänds under ett pågående
program. I så fall ska du tömma vattenbehållaren,
sätta tillbaka den och åter trycka på knappen.
I båda fallen blinkar kontrollampan
Start/Paus för att påminna dig om att det är
nödvändigt att trycka åter på knappen
för knappen
.
Signallampan tänds vid programslutet för att
påminna dig om att vattenbehållaren måste
tömmas. Om signallampan tänds under ett
pågående program betyder det att vattenbehållaren
är full. Summern ljuder, programmet avbryts och
kontrollampan för knappen Start/Paus blinkar.
Rengöring av kondensor
Signallampan tänds vart 80:e program för att
påminna dig om att kondensorn måste rengöras.
23
Page 24

Programöversikt
Automatisk torkning (elektroniska program)
Typ av tvätt Önskad torrhetsgrad Mängd
Bomull och linne
Syntetmaterial
Tröjor
Syntet
(*) Enligt standard CEI 1121.
• Programmet babymjukt är ett specialprogram för tröjor. Plaggen supertorkas och kan användas omedelbar
Extra torrt
Torrt
Skåptorrt
Halvtorrt
Stryktorrt
Mangeltorrt
Extra torrt
Skåptorrt
Stryktorrt
Babymjukt
Lättstruket
1 kg (10 tröjor)
(1)
i kg Program
6
6
6
6
6
6
2,5
2,5
2,5
2,5 kg
(*)
(*)
(*)
• Lättstruket är ett specialprogram för syntetet.
Tidstyrd torkning
Typ av tvätt Torktid Mängd
Bomull
Bomull
Syntet
Obs! Vid torkning av blandmaterial skall plaggets tvättmärkning följas.
Torktiden varierar beroende på
• typen av tvätt
• mängden tvätt
• hur fuktig tvätten är.
90 min
60 min
30 min
(1)
i kg Programväljarinställning
6
6
2,5
90’
60’
30’
Avkylning
Denna inställning på programväljaren använder du för att fräscha upp tvätten (t.ex. för att avlägsna en envis
doft av malkulor).
Mängd
Det är ofta svårt att uppskatta vikten på den tvätt som ska torktumlas. Vi rekommenderar därför att du beaktar
följande riktlinjer:
• Bomull, linne: trumman kan vara helt fylld, men tvätten får inte vara för hårt packad.
• Syntetmaterial: trumman får inte fyllas till mer än hälften.
• Ömtåliga material: trumman får ej fyllas till mer än en tredjedel.
24
Page 25

P1108
P1149
Så här använder du torktumlaren
Innan tumlaren används första
gången
I en ny tumlare kan det eventuellt finnas damm eller
smuts. Lägg därför i några fuktiga, rena trasor och
torka dessa i ca: 30 minuter.
Torkning
1. Anslut torktumlaren.
2. Öppna luckan.
3. Skaka ut plaggen en aning och stoppa sedan in
dem i trumman ett i taget.
4. Stäng luckan. Kontrollera att inget plagg har
fastnat mellan luckan och filtret.
Torktumlaren stannar automatiskt efter
skrynkelskyddsfasen om tvätten inte tas ut.
Kontrollamporna , och förblir tända
och summer ljuder i 2 minuter.
10. Vrid program/tidsväljaren till läge “0”. Samtliga
kontrollampor slocknar. Torktumlaren är
avstängd.
Ta ut tvätten.
Om du öppnar och stänger luckan innan
program/tidsväljaren har vridits till läge “0” tänds
programfasernas kontrollampor för det aktuella
torkprogrammet.
Efter användning
• Rengör luddfiltren (se sid. 27).
• Töm vattenbehållaren (se sid. 28).
Observera!
Om du måste avbryta torktumlingsprogrammet
innan det har avslutats, rekommenderar vi att du
vrider programväljaren till (avkylning). Vänta
sedan tills denna programfas har avslutats innan du
tar ut tvätten. På så vis undviker du att värme byggs
upp inuti torktumlaren.
SVENSKA
5. Välj program eller torktid. Kontrollamporna ,
och tänds.
6. Tryck ev. på knappen för skontorkning
och/eller knappen för deaktivering av
summer eller knappen för snabbtorkning .
7. Välj ev. senarelagd start .
8. Tryck på knappen Start/Paus. Motsvarande
kontrollampa slutar att blinka och programmet
startar. Endast kontrollampan förblir tänd.
Maskinen börjar nedräkningen om du har valt
senarelagd start.
Summern ljuder och programfasernas
kontrollampor blinkar om program/tidsväljaren
vrids till ett annat läge under ett pågående
program.
Trumman snurrar växelvis i båda riktningar
under torktumlingen.
Samtliga program avslutas med en 10 minuter
lång avkylningsfas (kontrollampan är tänd).
Efter denna fas kan du ta ut tvätten.
Kontrollamporna , och tänds och en
lijudsignal hörs.
9. Om tvätten inte tas ut efter avslutat program, kör
torktumlaren en skrynkelskyddsfas på max. 30
minuter.
Ändring av program
Ändra ett pågående program på följande sätt: Vrid
först program/tidsväljaren till läge “0” för att radera
det pågående programmet. Välj nytt program och
tryck på knappen Start/Paus .
25
Page 26

Viktiga råd och tips för dig som torkar
Sortera och förbered din tvätt före
torkning
Sortera tvätten efter textilsort (se tvättmärkning i
respektive plagg) och önskad torrhetsgrad. Dra igen
blixtlås och knyt ihop lösa band. Band till påslakan
och örngott skall knytas ihop så att inte små plagg
samlas inuti.
Detta kan du inte torka i din tumlare
• Speciellt ömtåliga textilier som t.ex. gardiner av
syntetfibrer, siden och nylonstrumpor.
• Plagg som innehåller skumgummi eller gummi-
liknande material.
• Ylle och plagg som innehåller ull, eftersom dessa
då filtas ihop och krymper.
Torka aldrig plagg som behandlats med
brandfarliga vätskor (bensin, alkohol,
fläckborttagningsmedel) i tumlaren på grund
av brandrisken.
Vad är ludd?
När du börjar använda torktumlaren, blir du nog
förvånad över mängden ludd i luddfiltren.
Det är helt normalt och betyder inte att din tumlare
sliter på tvätten. Under användning och tvätt för
hand eller i maskin, lossnar fibrer och trådar (ludd),
men sitter kvar på plaggens yta.
Vid torkning utomhus blåses luddet bort med hjälp
av vinden, men i tumlaren samlas det upp i filtren
och sväller genom torkningsprocessen.
Tid- och energiförbrukning
Energiförbrukning och torktid beror på mängd tvätt
som torkas, restfuktighet efter centrifugering, storlek
på plaggen, typ av textilier och önskad torrhetsgrad.
En överfull torktumlare ger dåligt torkresultat och
skrynkliga plagg.
För att få lägre energiförbrukning och kortare torktid
skall tvätten vara väl centrifugerad.
Vi rekommenderar en tvättmaskin med minst 800
varv eller högre varvtal för normaltvätt.
Även strykfribehandlade plagg, som t.ex. skjortor,
ska centrifugeras mellan 10-30 sek. före torkningen.
Stärkta textilier
Stärkta textilier kan också torkas i tumlaren. För att
få bästa effekt bör en torktid för «stryktorrt» som har
viss restfuktighet väljas. Efter avslutad torkning skall
tumlaren torkas inuti med en fuktig trasa och
därefter med en torr trasa så att eventuella
stärkelserester försvinner.
Krympning
Speciellt vävda textilier (t. ex. trikåer) har lätt för att
krympa i större eller mindre grad allt efter kvalitet.
Detta beror i första hand på att plaggen i tumlaren
torkas «svävande», i motsats till när de hängtorkas.
Undvik att övertorka dessa plagg utan välj
programmet Stryktorrt.
Tvättmärkning i plagg som visar hur plagget bör torkas.
Hur mycket väger torr tvätt?
För att du skall kunna fylla din torktumlare rätt är här
några riktvärden. Dessa är baserade på
bomullsplagg.
Cirkavikt i gram
Badrock ..............................................................1200
Påslakan................................................................700
Lakan ....................................................................500
Frottéhandduk, örngott ........................................200
Skjorta, nattlinne ..................................................200
Pyjamas, blus, ......................................................100
Kortkalsonger, sockor ..........................................100
Långkalsonger ......................................................300
TORKNING Plantorkning Dropptorkning Hängtorkning
26
Normal
temp.
Låg
temp.
Kan torkas i
torktumlare
Torkas ej i
torktumlare
Page 27

Skötsel och rengöring
A
U
T
O
R
E
V
E
R
S
E
kg 5
kg 2,5
8
0
0
/
9
0
0
7
0
'
-
9
0
'
3
5
'
-
5
0
'
1
0
0
0
/
1
2
0
0
6
5
'
-
8
5
'
3
0
'
-
4
5
'
8
0
0
/
9
0
0
8
0
'
-
1
0
0
'
5
5
'
-
7
0
'
1
0
0
0
/
1
2
0
0
7
5
'
-
9
5
'
5
0
'
-
6
5
'
6
5
0
5
0
'
-
6
0
'
3
0
'
-
3
5
'
kg 2,5
kg 1
P1151
P1110
A
U
T
O
R
E
V
E
R
S
E
kg
5
k
g
2,
5
8
0
0
/
9
0
0
7
0
'
-
9
0
'
3
5
'
-
5
0
'
1
0
0
0
/
1
2
0
0
6
5
'
-
8
5
'
3
0
'
-
4
5
'
8
0
0
/
9
0
0
8
0
'
-
1
0
0
'
5
5
'
-
7
0
'
1
0
0
0
/
1
2
0
0
7
5
'
-
9
5
'
5
0
'
-
6
5
'
6
5
0
5
0
'
-
6
0
'
3
0
'
-
3
5
'
k
g 2
,5
k
g
1
P1150
P1155
P1154
P1177
A
U
T
O
R
E
V
E
R
S
E
k
g
5
k
g
2,5
8
0
0
/
9
0
0
7
0
'
-
9
0
'
3
5
'
-
5
0
'
1
0
0
0
/
1
2
0
0
6
5
'
-
8
5
'
3
0
'
-
4
5
'
8
0
0
/
9
0
0
8
0
'
-
1
0
0
'
5
5
'
-
7
0
'
1
0
0
0
/
1
2
0
0
7
5
'
-
9
5
'
5
0
'
-
6
5
'
6
5
0
5
0
'
-
6
0
'
3
0
'
-
3
5
'
k
g 2
,5
k
g
1
P1152
Du måste dra ut torktumlarens stickkontakt ur
vägguttaget innan du rengör den eller utför
underhåll.
Rengöra torktumlarens utsida
Använd milt rengöringsmedel och vatten när du
rengör torktumlaren utvändigt. Torka ytan noggrant.
Obs! Använd aldrig alkoholbaserade
rengöringsmedel, lösningsmedel eller liknande
produkter.
Rengöra luckan
Rengör luckans insida regelbundet för att avlägsna
allt ludd som samlas i anslutning till filtret. Rengör
noggrant för att säkerställa en optimal torktumling.
Rengöra filtren
Torktumlaren kan bara fungera som den ska om
filtren är rengjorda.
I filtren samlas allt ludd som uppstår vid
torktumlingen och de måste därför rengöras med en
fuktig trasa efter varje program, innan du tar ut
tvätten.
Signallampan lyser för att påminna dig om detta
moment.
Efter en tag bildas en vitaktig hinna på filtren som
beror på rester av tvättmedel från tvätten. Du kan få
bort det genom att rengöra filtren med varmt vatten
och en borste. Avlägsna i så fall filtret i
lucköppningen i enlighet med bilden (det kan sitta
med spärren åt vänster eller höger).
SVENSKA
Använd inte torktumlaren utan filter.
Rengöring av kondensorn
Rengör kondensorn när signallampan tänds.
Kondensorn skall regelbundet rengöras från ludd för
att inte förlänga torktiden och öka energiförbrukningen.
Kondensorn är placerad i sockeln bakom en liten
lucka. Du öppnar luckan genom att trycka på
låsspärren som bilden visar.
Det är normalt att det finns vatten i kondensorns
utrymme under ett pågående eller efter ett
torkprogram.
Vrid först de två röda låsknapparna inåt som bilden
nedan visar och ta sedan ut kondensorn i handtaget.
Filtret på insidan av luckan måste avlägsnas när det
ska rengöras.
27
Page 28

Rengör den med en borste och skölj den vid behov
P1157
P1156
P0639
P1162
under duschen.
Även utsidan skall rengöras och allt ludd tas bort.
Rengör gummitätningen runt kondensorn och inuti
luckan med en fuktig trasa.
Viktigt! Använd aldrig spetsiga föremål eller verktyg
för att komma in mellan lamellerna. Då kan
kondensorn skadas och bli otät.
Sätt tillbaka kondensorn, vrid upp de röda
låsknapparna och stäng luckan.
Använd aldrig torktumlaren utan kondensorn på
plats.
Töm och sätt tillbaka vattenbehållaren. Tryck åter på
knappen Start/Paus så att programmet kan
fortsätta från den punkt där det har avbrutits.
Anmärkning
Det uppsamlade kondensvattnet kan användas till
ångstrykjärn. Innan du gör det bör du emellertid sila
vattnet genom en fin sil eller ett kaffefilter av papper.
På så sätt silas även de minsta ludden i
kondensvattnet bort.
Rengöring av luftintagsgallret
Ta bort luddet från luftintagsgallret bak på
torktumlaren med hjälp av en dammsugare.
Tömning av vattenbehållare
Kondensvattnet från tvätten samlas i en
vattenbehållare.
Vattenbehållaren ska tömmas efter varje program för
att garantera god funktion nästa gång som
torktumlaren används. Signallampan lyser för att
påminna dig om detta moment.
Gör så här:
• Dra ut vattenbehållaren.
• Vänd vattenbehållaren uppochner och låt vattnet
rinna ut.
• Sätt tillbaka vattenbehållaren.
Korrekt placering av vattenbehållare.
Om placeringen är fel tänds signallampan under
nästa program och programmet avbryts trots att
tvätten inte är torr. Summern ljuder.
Rengöring av trumma
Rengör trumman med en trasa neddränkt i vinäger
när tvätten inte längre torkar till önskad torrhetsgrad
(när tvätten är antingen för torr eller för blöt).
Rengöringen avlägsnar den tunna hinnan som har
bildats i trumman (p.g.a. tvätt- och
sköljmedelsrester och kalk som finns i vattnet).
Hinnan hindrar sonderna att känna av
torrhetsgraden.
28
Page 29

Om torktumlaren inte fungerar
Typ av fel Möjlig orsak
• Maskinen startar inte:
• Torkningen tar lång tid eller tvätten blir
inte tillräckligt torr:
Reklamation
Vid försäljning till konsument i Sverige gäller den
svenska konsumentlagstiftningen.
Kom ihåg att spara kvittot för eventuell reklamation.
KKoonnssuummeennttkkoonnttaakktt
Har du frågor angående produktens funktion eller
användning ber vi dig att kontakta vår
konsumentkontakt på tel. 0771-11 44 77 eller via
e-mail på vår hemsida www.zanussi.se.
Service och reservdelar
Har du frågor om eller vill beställa service eller
reservdelar ber vi dig att kontakta återförsäljaren
eller vår rikstäckande service på tel. 020 - 76 76 76
eller via e-mail på www.elektroservice.se.
Se adressen till ditt närmaste service-kontor i telefonkatalogen Gula sidorna under Hushållsutrustning,
vitvaror-service.
Innan du beställer service, enligt EHL
åtagandet, kontrollera först om du kan
avhjälpa felet själv.Här i bruksanvisningen
finns en tabell, som beskriver enklare fel och
hur man kan åtgärda dem.
Observera,elektriska fel skall alltid åtgärdas av
certifierad elektriker
• Torktumlarens lucka och/eller den lilla luckan
nedtill på torktumlaren är öppen.
• El saknas till maskinen
• Programväljaren inte rätt inställd
• Startknappen inte intryckt
• Vattenbehållaren full eller fel isatt (lampan lyser).
Programmet sätts i gång ändå, men avbryts efter
ca 3 minuter.
• Tvätten dåligt centrifugerad
• Luddfiltren i luckan igensatta
• Kondensorn igensatt
• Har skontorkning valts?
• Rumstemperaturen för hög
• Har rätt program/torktid valts?
• För mycket tvätt
• Vattenbehållaren full
nnan du kontaktar service, skriv upp följande
enligtdataskylten (se sidan 18):
Modellbeteckning.......................................................
Produktnummer..........................................................
Serienummer..............................................................
Inköpsdatum...............................................................
Hur och när uppträder felet?
Garanti (gäller för Finland)
Produktens garantitid kan definieras separat.
Finnsdet ingen separat definierad garantitid, har
produkten garanti enligt den gällande lagstiftningen
och de lokala bestämmelserna. Garantivillkoren
uppfyller branschens allmänna villkor enligt den
gällande lagstiftningen. Spara inköpskvittot som
verifikation förinköpsdatumet, som avgör
garantitidens början.
Kostnaderna kan debiteras även under tid som
omfattas av kostnadsfri service
•vid onödigt servicebesök.
•om tillverkarens anvisningar för installation,
användning och skötsel inte följts
SVENSKA
29
Page 30

Hyvä asiakas,
ole hyvä ja lue tämä käyttöohje huolellisesti ja huomioi erityisesti turvallisuusohjeet ensimmäisillä sivuilla.
Suosittelemme, että säilytät tämän käyttöohjeen huolellisesti myöhempää käyttöä varten ja annat sen edelleen
myös kuivausrummun mahdolliselle uudelle käyttäjälle.
Kuljetusvauriot
Pakkauksen purkamisen yhteydessä tarkistetaan, ettei kone ole vaurioitunut kuljetuksessa.
HUOMIO! Mikäli kone on vaurioitunut, on siitä välittömästi ilmoitettava jälleenmyyjälle.
Vinkkejä käyttöohjeen lukemiseen
Käyttöohjeen muutamat kappaleet on merkitty tietyllä symboolilla. Nämä symboolit tarkoittavat seuraavaa:
Kappaleessa annetaan tärkeää tietoa kuivausrummun käytöstä, jonka huomiotta jättäminen voi
aiheuttaa laitteeseen teknisiä vikoja.
Kappaleessa annetaan tietoa, joka on erityisen tärkeää kuivausrummun moitteettomalle toiminnalle.
Kappaleessa on tärkeää tietoa ympäristönsuojelusta.
Me suojelemme luontoa käyttämällä
uusiopaperia.
Sisällysluettelo
Turvallisuusohjeet . . . . . . . . . . . . . . . . . . . .31
Hävittäminen
Vinkkejä ympäristön suojeluun
KÄYTTÄJÄLLE
Kuivausrummun kuvaus
Tekniset tiedot
Kosteuden tunnistimen säätäminen.....33
Käyttö
• Ohjelmapaneeli . . . . . . . . . . . . . . . . . . . . . .34-36
• Ohjelmataulukko . . . . . . . . . . . . . . . . . . . . . . .37
• Näin käytät kuivausrumpua . . . . . . . . . . . . . . .38
. . . . . . . . . . . . . . . . . . . . . . . . . . . . . . . .34
Tärkeitä neuvoja ja vihjeitä . . . . . . . . . . .39
• Lajittele ja valmistele pyykkisi ennen kuivausta . .39
• Mitä kuivausrummussa ei voi kuivata . . . . . . .39
• Tärkätyt tekstiilit . . . . . . . . . . . . . . . . . . . . . . . .39
• Kutistuminen . . . . . . . . . . . . . . . . . . . . . . . . . .39
• Mitä on nukka? . . . . . . . . . . . . . . . . . . . . . . . .39
• Ajan- ja energiankulutus . . . . . . . . . . . . . . . . .39
• Kuinka paljon kuiva pyykki painaa? . . . . . . . . .39
• Pesumerkinnät . . . . . . . . . . . . . . . . . . . . . . . . .39
. . . . . . . . . . . . . . . . . . . . . . . . .31
. . . . . . . . .32
. . . . . . . . . . . . . .32
. . . . . . . . . . . . . . . . . . . . . . . .32
Hoito ja puhdistus . . . . . . . . . . . . . . . . . . . .40
• Puhdistaminen ulkoa . . . . . . . . . . . . . . . . . . . .40
• Luukun puhdistaminen . . . . . . . . . . . . . . . . . .40
• Nukkasihtien puhdistaminen . . . . . . . . . . . . . .40
• Lauhduttimen puhdistaminen . . . . . . . . . . . . .40
• Vesisäiliön tyhientäminen . . . . . . . . . . . . . . . . .41
• Ilmanottoaukon säleikön puhdistaminen . . . . .41
• Rummun puhdistus . . . . . . . . . . . . . . . . . . . . .41
Jos kuivausrumpu ei toimi . . . . . . . . . . . .42
• Huolto ja varaosat . . . . . . . . . . . . . . . . . . . . . .42
• Kuluttajaneuvonta . . . . . . . . . . . . . . . . . . . . . .42
• Maahantuoja . . . . . . . . . . . . . . . . . . . . . . . . . .42
• Takuu . . . . . . . . . . . . . . . . . . . . . . . . . . . . . . . .42
ASENTAJALLE
Asennus . . . . . . . . . . . . . . . . . . . . . . . . . . . . . .43
• Pakkauksen purkaminen . . . . . . . . . . . . . . . . .43
• Kuivausrummun sijoittaminen . . . . . . . . . . . . .43
• Tärkeää lauhduttimella varustetun
kuivausrummun asennuksessa . . . . . . . . . . . .43
• Sähköliitäntä . . . . . . . . . . . . . . . . . . . . . . . . . .43
• Asennussarja pesukoneen päälle asentamista
varten . . . . . . . . . . . . . . . . . . . . . . . . . . . . . . . .43
• Tiivistyneen veden poistosarja . . . . . . . . . . . . .43
• Avautumissuunnan muuttaminen . . . . . . . . . .43
30
Page 31

Turvallisuusohjeet
Seuraavat varoitukset ovat tärkeitä yleisen turvallisuuden kannalta. Lue ne huolella ennen koneen asennusta tai käyttöä.
Asennus
• Kaikki asennustyöt ja tuotteeseen tehtävät muutokset,
kuten liitäntäjohdon vaihtaminen, ovat
ammattiasentajan työtä. Asiantuntemattoman henkilön
tekemät toimenpiteet saattavat vaikuttaa tuotteen
toimintaan ja aiheuttaa henkilö- ja esinevahinkoja.
• Tarkista, että kone ei ole liitäntäjohdon päällä.
• Jos koneen alla on matto, on jalkoja säädeltävä
siten, että ilma pääsee kiertämään vapaasti.
Käyttö
• Kone on tarkoitettu ainoastaan kotikäyttöön.
• Koneen käyttämisen jälkeen on aina muistettava
irrottaa pistoke pistorasiasta.
• Linkoamatonta pyykkiä ei saa koskaan kuivata
kuivausrummussa.
• Herkästi syttyvillä puhdistus- ja liuotinaineilla
(alkoholilla, tahranpoistoaineella yms.) käsiteltyjä
tekstiilejä ei saa koskaan kuivata
kuivausrummussa. Palovaara! Vain vedellä pestyjä
tekstiilejä voidaan kuivata kuivausrummussa.
• Tulipalon vaara: vaatekappaleita, joissa on
ruokaöljyä aiheuttavat palon vaaran, eikä niitä tule
laittaa kuivausrumpuun.
• Jos pyykkiin on pestäessä lisätty tahranpoistoainetta,
tulee pyykki huuhdella perusteellisesti ennen
kuivausrumpuun asettamista.
• Tarkista aina, että vaatteiden taskuun ei ole jäänyt
esimerkiksi kaasu- tai tupakansytytintä. Sytyttimiä, jotka
eivät toimi, ei myöskään saa joutua kuivausrumpuun.
• Pidä kuivausrummun luukkua auki kuivausohjelmien
välillä. Näin luukun kumitiiviste kestää kauemmin
käyttökelpoisena ja tiivistää paremmin.
• Älä käytä kuivausrumpua, jos suodattimet ovat
vaurioituneita tai jos niitä ei ole asennettu. Palovaara!
• Älä koskaan kuivaa urheilukenkiä (tenniskenkiä,
lenkkikenkiä jne.) kuivausrummussa. Kengät voivat
ajautua rummun ja luukun väliin ja siten jumiuttaa
kuivausrummun toiminnan.
• Älä kuivaa hiekkaisia vaatteita kuivausrummussa.
Yleiset turvallisuusohjeet
• Kuivausrummun teknisten ominaisuuksien
muuttaminen voi olla hengenvaarallista.
• Älä yritä itse korjata konetta. Asiantuntemattoman
henkilön tekemät korjaukset saattavat johtaa
onnettomuuteen tai käyttöhäiriöön.
• Huollot ja mahdolliset korjaukset on annettava
valtuutetun huoltoliikkeen tehtäväksi. Varmistaaksesi
laitteesi moitteettoman kunnon, vaadi aina
käytettäväksi sopivinta, siis alkuperäistä varaosaa.
Lapsiturvallisuus
• Lapset eivät yleensä ole tietoisia sähkölaitteiden
vaarallisuudesta. Koneen käydessä lapsia pitää
valvoa eikä heidän saa antaa leikkiä koneella.
• Pakkausmateriaalit (esim. muovikalvo,
polystyreeni) voivat olla vaaraksi lapsille tukehtumisvaara! Pidä ne lasten ulottumattomissa.
• Varmista, että lapset tai kotieläimet eivät pääse
kuivausrumpuun.
• Jos kone aiotaan romuttaa, irrota pistotulppa
pistorasiasta ja katkaise liitosjohto koneen puoleisesta
päästä. Tee luukun lukko käyttökelvottomaksi,
etteivät lapset jää rumpuun loukkuun leikkiessään.
Hävittäminen
• Pakkausmateriaalit
Materiaalit, jotka on merkitty symbolilla ovat
kierrätettäviä.
>PE< polyeteeni
>PS< polystyreeni
>PP< polypropyleeni
Tämä tarkoittaa, että materiaalit voidaan kierrättää
viemällä ne niille tarkoitettuihin keräyslaatikoihin.
• Kone
Vie vanha koneesi viralliselle kaatopaikalle.
Tarvittaessa ota yhteyttä kuntasi jäteasioita
hoitavaan viranomaiseen. Auta pitämään
ympäristömme puhtaana!
• Käytöstä poistettujen laitteiden hävitäminen
Symboli , joka on merkitty tuotteeseen tai sen
pakkaukseen, osoittaa, että tätä tuotetta ei saa
käsitellä talousjätteenä. Tuote on sen sijaan
luovutettava sopivaan sähkö- ja elektroniikkalaitteiden
kierrätyksestä huolehtivaan keräyspisteeseen.
Tämän tuotteen asianmukaisen hävittämisen
varmistamisella autetaan estämään sen mahdolliset
ympäristöön ja terveyteen kohdistuvat
haittavaikutukset, joita voi aiheutua muussa
tapauksessa tämän tuotteen epäasianmukaisesta
jätekäsittelystä. Tarkempia tietoja tämän tuotteen
kierrättämisestä saa paikallisesta kunnantoimistosta,
talousjätehuoltopalvelusta tai liikkeestä, josta tuote
on ostettu.
31
SUOMI
Page 32

Vinkkejä ympäristön suojeluun
Kuivausrummun käyttö on taloudellista, kun oheisia
ohjeita noudatetaan.
• Täytä kone aina täyteen. Katso ohjelmia sivulta 33.
Puolillaan olevan koneellisen kuivaaminen ei ole
taloudellista.
• Kuivattavan pyykin tulee olla hyvin lingottu. Mitä
korkeampaa linkousnopeutta käytetään, sitä
lyhyempi kuivausaika tarvitaan ja sitä
alhaisemmalla energiankulutuksella pärjätään.
• Varo kuivaamasta vaatteita liian kauan. Valitse
aina oikea kuivausohjelma ja pyykin kuivausaste.
Vaatteet, joita kuivataan liian kauan, kutistuvat
normaalia enemmän, ja lisäksi niiden silittäminen
on hankalaa.
Kuivausrummun kuvaus
1Työtaso
2 Vesisäiliö
• Koneen täyden kapasiteetin hyödyntämiseksi
kannattaa täysin kuivaksi haluttava pyykki kuivata
silityskuivan pyykin kanssa. Valitse tällöin
silityskuivan pyykin ohjelma. Kun ohjelma on
valmis, ota silityskuiva pyykki vain koneesta ja jätä
muut pyykit koneeseen kuivattavaksi toisella
ohjelmalla.
• Nukkasihdit täytyy puhdistaa säännöllisin väliajoin,
jotta kuivausajat eivät pitene ja virrankulutus
kasva.
• Tilan, jossa kuivausrumpu on, on oltava ilmastoitu.
Kuivauksen aikana huoneenlämpötila ei saa
nousta yli +35 °C:een.
3 Ohjelmapaneeli
4 Nukkasihti
5 Arvokilpi
6 Lauhdutin
7 Sisävalon lamppu
8 Säädettävät jalat
Tekniset tiedot
Korkeus 850 mm säädettävä + 8 mm
Leveys 600 mm
Syvyys 580 mm
Syvyys, kun luukku auki 1008 mm
Kapasiteetti, puuvilla 6 kg kuivia vaatteita
Kapasiteetti, tekokuidut 2,5 kg kuivia vaatteita
Verkkojännite 220/230 V, 50Hz
Kokonaisteho 2200 W, 10 A
Kulutusarvot: valko- kirjopyykki 4,37 kWh (6 kg kaappikuiva)
3,60 kWh (6 kg silityskuiva)
tekokuidut 1,4 kWh (2,5 kg kaappikuiva)
Tämä laite täyttää EY:n direktiivien 89/336/ETY ja 73/32/ETY vaatimukset.
Oikeudet muutoksiin pidätetään.
32
Page 33

Kosteuden tunnistimen säätö
START/PAUSE
Veden sisältämä kalkki ja mineraalisuolat vaihtelevat
alueellisesti. Tämä vaikuttaa myös veden
johtamiskyvyn arvoihin.
Paikallisten arvojen vaihtelut voivat poiketa tehtaalla
asetettujen arvojen mukaiseen säätöön. Tämä
mahdollinen eroavaisuus voi vaikuttaa pyykin
jäännöskosteuteen ohjelman lopussa.
Laitteessasi on mahdollisuus säätää kosteuden
tunnistinta siten, että se huomioi paikallisen
vedenkorvuusarvon. Toimi seuraavasti, kun haluat
säätää kosteuden tunnistimen arvoja.
Kosteuden tunnistimen asetustila:
Käännä ohjelmanvalitsinta kuvan mukaiseen
asentoon.
Paina valinta-toiminnossa samanaikaisesti
näppäimiä 3 ja 6 kunnes
paikalle.
c o
ilmaantuu numerojen
Näyttö Tunnistimen säätö
c o
c o
”
c o
Tavallisesti tehdasasetus on säädettu
korkeimpaan arvoon, kuitenkin erilaisia
tehdasasetuksia, mallista riippuen, saattaa
esiintyä.
Matala
Keskitaso 300 - 600
Korkea
Likimääräinen arvo
(µS/cm)
< 300
> 600
Uuden säätöarvon tallentaminen:
Paina yhtä aikaa näppäimiä 3 ja 6 kunnes
edellisen kuivausjakson aika ilmestyy jälleen
näyttöön ja äänimerkki soi.
SUOMI
Kosteuden tunnistimen säätäminen:
Paina näppäintä 5 jaksottain: vaakatasossa syttyvät
tavuviivat osoittavat johtavuuden tason.
33
Page 34

Käyttö
12 345678910
90 min
60 min
30 min
START/PAUSE
EDC 5330
PROGRAM
FUNCTION
TIMELINE 6 kg
Ohjelmapaneeli
1 Ohjelmataulukko
Kuivauksen aikana vesi kertyy säiliöön.
Tyhjentääksesi säiliön, katso kappale "Hoito ja
puhdistus".
2. Ohjelman/ajanvalitsin
Voit valita elektronisesti ohjatun tai aikaohjatun
kuivauksen.
Käännä valitsin halutun ohjelman tai ajan kohdalle.
Elektronisesti ohjattu kuivaus (automaattinen)
Kone suorittaa ohjelmat anturien avulla. Anturit
havaitsevat pyykin kosteusasteen.
Valitse pyykin tyyppiä vastaava ohjelma ja vaadittu
kuivausaste.
Aikaohjattu kuivaus
Voidaan tarvittaessa käyttää kuivauksen
viimeistelyyn.
Valitse 90 tai 60 minuutin ohjelma puuvillalle ja 30
minuutin ohjelma tekokuiduille.
Peruuta käynnissä oleva ohjelma kääntämällä
ohjelman/ajanvalitsin “0”-kohtaan.
4. Äänimerkin poiskytkentäpainike
Äänimerkki kuuluu,
• kun valitset ohjelman
• kun painat painikkeita
• jos valitset virheellisen valinnaisen toiminnon
• jos käännät ohjelman/ajanvalitsimen toiseen
asentoon ohjelman aikana tai painat valinnaisen
toiminnon painiketta ohjelman aikana
• kun ohjelma loppuu
• kun vesisäiliö on täysi
• jos kone ei toimi asianmukaisesti
• jos koneen luukku tai alaosan pieni luukku on
auki.
Kun painat painiketta , äänimerkki kytketään pois
seuraavissa tapauksissa:
• kun valitset ohjelman
• kun painat painikkeita
• jos käännät ohjelman/ajanvalitsimen toiseen
asentoon ohjelman aikana tai painat valinnaisen
toiminnon painiketta ohjelman aikana
• kun ohjelma loppuu.
Painikkeen merkkivalo syttyy.
3. Luukun vapautus -painike
Paina painiketta avataksesi luukun. Painikkeen
yläpuolella oleva merkkivalo syttyy.
Luukku voidaan avata tällä painikkeella ainoastaan,
jos kuivausrumpu on toiminnassa (ohjelmanvalitsin
on asetettu ohjelman tai kuivausajan kohdalle).
Jos avaat luukun ohjelman aikana, käynnistä
ohjelma uudelleen painamalla Käynnistys/Tauko painiketta.
5. Pikakuivauspainike
Kun painat tätä painiketta, seuraavien
puuvillaohjelmien kuivausaika lyhenee:
• erittäin kuiva
• kuiva
• kaappikuiva
Painikkeen merkkivalo syttyy. Tätä valinnaista
toimintoa ei voida käyttää yhdessä alhaisen
lämpötilan valinnaisen toiminnon kanssa.
34
Page 35

6 Alhaisen lämpötilan paini )
0
3
1.20
Kun painat tätä painiketta, arat tekstiilit kuivataan
alhaisemmalla lämpötilalla. Painikkeen merkkivalo
syttyy. Tätä vallinnaista toimintoa voidaan käyttää
myös aikaohjatussa kuivauksessa.
Tätä vallinnaista toimintoa ei voida käyttää
pikakuivauksen kanssa.
7 Ajastinpainike
Tällä painikkeella ohjelman käynnistystä voidaan
siirtää enintään 12 tuntia.
Tämä valinnainen toiminto tulee valita ohjelman
valinnan jälkeen ja ennen Käynnistys/Tauko painikkeen painamista ohjelman käynnistämiseksi.
Aina kun painiketta painetaan, aika kasvaa 30
minuutilla, kunnes näytöllä näkyy “2 tuntia”. Tämän
jälkeen aika näytetään tunneittain.
Valitsemasi ajastuksen minuutit tai tunnit näytetään
2 sekunnin ajan, minkä jälkeen näytöllä näkyy valitun
ohjelman kesto.
Aikalaskenta alkaa, kun painat Käynnistys/Tauko painiketta .
Poista ajastus painamalla ajastinpainiketta, kunnes
näytöllä näkyy 0’. Paina tämän jälkeen
Käynnistys/Tauko -painiketta uudelleen.
Kun ajastus on poistettu, näytöllä näkyy ohjelman
kesto.
Aikalaskennan aikana ei voida muuttaa ohjelmaa tai
valittua ajastusta. Jos haluat muuttaa niitä, sinun
tulee sammuttaa kone asettamalla ohjelmanvalitsin
“0”-kohtaan. Valitse uusi ohjelma, valinnaiset
toiminnot ja ajastus ja paina Käynnistys/Tauko painiketta .
Peru tai muuta valitsemasi valinnaiset toiminnot
asettamalla kone Tauko-tilaan. Kun olet suorittanut
haluamasi toimenpiteen, paina Käynnistys/Tauko painiketta uudelleen.
Jos haluat lisätä pyykkiä koneen aikalaskennan
aikana, voit avata luukun. Kun suljet luukun, paina
Käynnistys/Tauko -painiketta uudelleen, jotta kone
jatkaa aikalaskentaa.
• Valitun ohjelman kestod
Kun olet valinnut ohjelman, sen kesto (tunteina ja
minuutteina) ilmaantuu näytölle. Se lasketaan
automaattisesti jokaiselle tekstiilityypille hyväksytyn
maksimimäärän ja vaaditun kuivausasteen
perusteella.
Kun ohjelma käynnistyy, jäljelle jäävä aika näytetään 5
minuutin välein.
• Ajastettu käynnistys
Jos olet valinnut ajastetun käynnistyksen sitä
vastaavalla painikkeella, se näkyy näytöllä 2
sekunnin ajan. Tämän jälkeen näytöllä näkyy valitun
ohjelman kesto.
Aikalaskenta näytetään 30 minuutin välein, kunnes
näytöllä näkyy “90 minuuttia”.
Tämän jälkeen se näytetään tunneittain.
• Ohjelman loppu
Vilkkuva nolla osoittaa ohjelman loppumista ja
näytetään “rypistymisenesto”-vaiheen jälkeen.
SUOMI
8 Näyttö
Näytöllä näkyvät seuraavat tiedot:
• Valitun ohjelman kesto
• Ajastettu käynnistys
• Ohjelman loppu
• Virheellinen valinnaisen toiminnon valinta
• Hälytyskoodi.
• Virheellinen valinnaisen toiminnon valinta
Jos valitset valinnaisen toiminnon, joka ei sovi
yhteen valitsemasi ohjelman kanssa, näytöllä näkyy
Err (virhe).
35
Page 36

Tämä koodi ilmaantuu myös ohjelman ollessa
E21
käynnissä, jos painat yhtä valinnaisen toiminnon
painikkeista tai käännät ohjelmanvalitsinta.
• Hälytysmerkit
Ongelmatilanteissa näyttöön saattaa ilmestyä
hälytysmerkkejä, esimerkiksi E21
9 Käynnistys/Tauko -painike
Paina tätä painiketta käynnistääksesi
kuivausrummun, kun olet valinnut ohjelman ja
valinnaiset toiminnot.
Painikkeen merkkivalo alkaa vilkkua. Jos olet
valinnut ajastetun käynnistyksen, kone aloittaa
aikalaskennan.
Jos koneen luukku tai alaosan pieni luukku avataan
ohjelman ollessa käynnissä, painiketta tulee painaa
uudelleen luukun sulkemisen jälkeen ohjelman
jatkamiseksi kohdasta, jossa se keskeytettiin.
Tätä painiketta tulee painaa myös sähkökatkon
jälkeen ja asennettaessa vesisäiliö takaisin, jos
vesisäiliön merkkivalo on syttynyt ohjelman
aikana ja vesisäiliö on tyhjennetty.
Käynnistys/Tauko -painikkeen merkkivalo
vilkkuu kummassakin tapauksessa muistuttaakseen,
että Käynnistys/Tauko -painiketta tulee painaa
uudelleen.
10 Merkkivalot
Nämä merkkivalot osoittavat seuraavia toimintoja:
KUIVAUS-MERKKIVALO
Tämä merkkivalo osoittaa, että kone suorittaa
kuivausta.
JÄÄHDYTYS-MERKKIVALO
Tämä merkkivalo osoittaa, että kone suorittaa
jäähdytystä. Kuivauksen lopussa on 10 minuutin
jäähdytysvaihe pyykin jäähdyttämiseksi.
OHJELMAN LOPPU -MERKKIVALO
Tämä merkkivalo syttyy jäähdytysvaiheen lopussa,
rypistymisenestovaiheessa ja ohjelman lopussa.
NUKKASIHTIEN PUHDISTUS -MERKKIVALO
Tämä merkkivalo syttyy ohjelman lopussa
muistuttamaan, että nukkasihdit tulee puhdistaa.
VESISÄILIÖ TÄYSI -MERKKIVALO
Tämä merkkivalo syttyy ohjelman lopussa
muistuttamaan, että vesisäiliö tulee tyhjentää. Jos
tämä merkkivalo syttyy ohjelman aikana, vesisäiliö
on täysi. Äänimerkki kuuluu, ohjelma keskeytyy ja
Käynnistys/Tauko -painikkeen merkkivalo vilkkuu.
LAUHDUTTIMEN PUHDISTUS -MERKKIVALO
Merkkivalo syttyy 80 kuivauksen välein
muistuttamaan, että lauhdutin tulee puhdistaa.
36
Page 37

Ohjelmataulukko
Elektroniset ohjelmat
Pyykin laji
Erittäin kuiva
Kuiva
Puuvilla ja Pellava
Tekokuidut
Puserot
Tekokuidut
(*) CEI 1121:n mukainen ohjelma.
• Vauvaohjelma on erikoisohjelma puseroille, jotka tulee kuivata “käyttövalmiiksi”.
• Siliävät on erikoisohjelma tekokuiduille.
Kaappikuiva
Hieman kostea
Silityskuiva
Mankelointikuiva
Erittäin kuiva
Kaappikuiva
Silityskuiva
Vauvaohjelma
Siliävät
Kuivausaste
Max pyykimäärä
6 kg
6 kg
6 kg
6 kg
6 kg
6 kg
2,5 kg
2,5 kg
2,5 kg
1 kg
(10 puserot)
2,5 kg
(1)
Ohjelma
(*)
(*)
(*)
SUOMI
Aikaohjattu kuivaus
Pyykin laji
Puuvilla
Puuvilla
Tekokuidut
HUOM! Noudata vaatteen pesumerkintöjä, kun kuivaat sekoitekankaisia vaatteita.
Kuivausaikaan vaikuttaa:
• pyykin laji
• pyykin määrä
• linkouksen aste ennen kuivausta
Kuivausaika
90 min
60 min
30 min
Max pyykimäärä
6 kg
6 kg
2,5 kg
(1)
Ohjelmanvalitsimen asento
90’
60’
30’
JJäääähhddyyttyyss
Ohjelmanvalitsimen Jäähdytys-asennossa pyykkiä voidaan raikastaa (voidaan esimerkiksi poistaa koipallojen
pinttynyt tuoksu).
Määrä
Kuivattavan pyykin määrää on usein vaikea arvioita. Suosittelemme, että otat huomioon seuraavat ohjeet:
puuvilla, pellava: rumpu voi olla täynnä, mutta pyykki ei kuitenkaan saa olla pakattuna liian tiiviisti
•
tekokuidut: rumpu täytetään vain puolilleen
•
arat materiaalit: rumpu täytetään vain kolmasosalta
•
37
Page 38

Näin käytät kuivausrumpua
Ennen ensimmäistä käyttökertaa
Uudessa kuivausrummussa saattaa olla pölyä tai likaa.
Laita sen vuoksi kuivausrumpuun muutama kostea,
puhdas liina ja anna niiden kuivua noin 30 minuutin
ajan.
1. Asenna laite käyttöohjeen asennusohjeiden
mukaisesti.
2. Avaa luukku ja aseta lingottu pyykki rumpuun.
3. Sulje luukku ja varmista, että pyykki on hyvin
rummussa.
4. Valitse kuivausaika.
5. Valitse ohjelma tai kuivausaika. Merkkivalot ,
ja syttyyvät.
6. Paina tarvittaessa alhaisen lämpötilan painiketta
ja/tai äänimerkin poiskytkentäpainiketta tai
pikakuivauspainiketta .
7. Valitse tarvittaessa ajastettu käynnistys .
8. Paina Käynnistys/Tauko -painiketta: sen
merkkivalo lakkaa vilkkumasta ja kuivaus
käynnistyy. Ainoastaan merkkivalo jää
palamaan. Jos olet valinnut ajastetun
käynnistyksen, kone aloittaa aikalaskennan.
Jos ohjelman/ajanvalitsin on käännetty toiseen
asentoon koneen ollessa käynnissä, äänimerkki
kuuluu ja ohjelmavaiheiden merkkivalot
vilkkuvat.
Rumpu pyörii vuorotellen oikealle ja vasemmalle
kuivauksen aikana.
Kaikki ohjelmat päättyvät 10 minuutin
jäähdytysvaiheella (merkkivalo palaa).
Voit poistaa pyykin tämän vaiheen jälkeen.
Merkkivalot , ja syttyvät ja äänimerkki
kuuluu..
Merkkivalot , ja jäävät palamaan ja
äänimerkki kuuluu 2 minuutin ajan.
10. Käännä ohjelman/ajanvalitsin “0”-kohtaan; kaikki
merkkivalot sammuvat. Kone on sammutettu.
Poista pyykki.
Jos avaat ja suljet luukun ennen valitsimen
kääntämistä “0”-kohtaan, kaikki käynnissä
olevan ohjelman vaiheiden merkkivalot syttyvät.
Jokaisen käytön jälkeen
• Puhdista nukkasihdit (ks. sivu 40).
• Tyhjennä vesisäiliö (ks. sivu 41).
Tärkeää!
Jos kuivausohjelma on keskeytetty ennen sen
päättymistä, suosittelemme, että käännät
ohjelmanvalitsimen asentoon ja odotat kunnes
tämä vaihe loppuu, ennen kuin poistat pyykit
kuivausrummusta. Näin vältetään liiallisen lämmön
kehittyminen kuivausrummun sisällä.
Ohjelman muutos
Muuttaaksesi käynnissä olevan ohjelman se tulee
ensin peruuttaa. Käännä ohjelman/ajanvalitsin “0”kohtaan. Valitse uusi ohjelma ja paina
Käynnistys/Tauko -painiketta .
9. Ellei pyykkiä poisteta ohjelman päätyttyä,
kuivausrumpu suorittaa rypistymisenestovaiheen
(kesto: maks. 30 minuuttia).
Ellet poista pyykkiä, kuivausrumpu pysähtyy
automaattisesti rypistymisenestovaiheen jälkeen.
38
Page 39

Tärkeitä neuvoja ja vihjeitä
Lajittele ja valmistele pyykkisi ennen
kuivausta
Lajittele pyykki tekstiilien (ks. vaatteen
pesumerkintä) ja halutun kuivuusasteen mukaan.
Sulje vetoketjut ja solmi irtonaiset nauhat. Solmi
pussilakanoiden ja tyynyliinojen nauhat yhteen,
etteivät pienet vaatekappaleet mene niiden sisään.
Mitä kuivausrummussa ei voi kuivata
• Erityisen arkoja tekstiilejä, kuten esim.
tekokuitukankaisia verhoja, silkkiä ja nailonsukkia.
• Vaatteita, joissa on vaahtomuovia tai
muovintapaisia aineita.
• Villaa ja vaatteita, joissa on villaa, koska ne
vanuttuvat ja kutistuvat.
Älä koskaan kuivaa kuivausrummussa
vaatteita, joita on käsitelty herkästi syttyvillä
aineilla (bensiini, alkoholi, tahranpoistoaine)
syttymisvaaran vuoksi.
Tärkätyt tekstiilit
Tärkättyjä tekstiilejä voi kuivata kuivausrummussa.
Jotta tulos on paras mahdollinen, on valittava
kuivausaika “silityskuiva”, joka jättää vaatteet
hieman kosteiksi. Kuivauksen jälkeen on
kuivausrumpu pyyhittävä sisältä kostealla rievulla ja
sen jälkeen kuivalla rievulla, jottei koneeseen jää
tärkkiä.
Kutistuminen
Erityisesti neulotut tekstiilit (esim. trikoo) kutistuvat
helposti niiden laadusta riippuen. Tämä johtuu siitä,
että vaatteet kuivataan rummussa vapaasti,
päinvastoin kuin ripustettuna kuivumaan. Vältä
kuivaamasta näitä vaatteita liikaa valitsemalla
silityskuiva-ohjelma.
Mitä on nukka?
Käyttäessäsi kuivausrumpua, huomaat nukkasihtiin
kertyvän nukkaa.
Se on aivan normaalia eikä se merkitse sitä, että
kuivausrumpusi kuluttaa pyykkiä. Käytön sekä
käsinpesun tai konepesun aikana kankaista irtoaa
kuituja ja lankoja (nukkaa), mutta se jää kankaan
pintaan.
Kun vaatteet kuivataan ulkona, tuuli puhaltaa nukan
pois, mutta kuivausrummussa se kerääntyy sihtiin ja
laajenee kuivauksen aikana.
Ajan- ja energiankulutus
Energiankulutus ja kuivausaika riippuvat kuivattavan
pyykin määrästä, linkouksen jättämästä
kosteudesta, vaatteen koosta, tekstiilien laadusta ja
halutusta kuivuudesta.
Liian täysi kuivausrumpu ei kuivaa hyvin ja jättää
vaatteet ryppyisiksi.
Jotta kuivausrumpu kuluttaisi vähemmän energiaa ja
käyttäisi vähemmän aikaa, on vaatteet lingottava
hyvin. Suosittelemme pesukonetta, joka linkoaa
vähintään 800 kierrosta minuutissa valko- ja
kirjopyykkiohjelmilla.
Kuinka paljon kuiva pyykki painaa?
Tässä on joitakin suuntaa antavia ohjeita, jotta
osaisit täyttää kuivausrumpusi oikein. Nämä ohjeet
on annettu puuvillavaatteille.
paino grammoina
Kylpytakki 1200
Pussilakana 700
Lakana 500
Froteepyyhe, tyynyliina 200
Paita, yöpaita 200
Pyjama, pusero 100
Lyhyet alushousut, sukat 100
Pitkät alushousut 300
SUOMI
Vaatteiden pesumerkinnöistä näet, kuinka vaate on kuivattava.
Normaali
lämpötila
Alhainen
lämpötila
KUIVAUS Tasokuivaus Kuivaus tippuvana Kuivaus narulla
39
Voidaan kuivata
kuivausrummussa
Ei saa kuivata
kuivausrummussa
Page 40

Hoito ja puhdistus
Kuivausrumpu täytyy irrottaa virtalähteestä, ennen
kuin voit puhdistaa tai huoltaa sitä.
Puhdistaminen ulkoa
Käytä ainoastaan saippuaa ja vettä ja kuivaa lopuksi
huolella.
Tärkeää: älä käytä denaturoitua spriitä, liuottimia tai
vastaavia tuotteita.
Luukun puhdistaminen
Puhdista luukun sisäosa säännöllisin väliajoin, jotta
saat poistettua nukan nukkasihdin ympärillä olevista
tiivisteistä. Tarkka puhdistus varmistaa oikean
kuivaustoiminnan.
RSE
50
6
VE
'
0
6
-
'
0
5
UTORE
5
,
2
A
g
k
00
'
2
5
3
0 / 1
-
'
0
100
3
1
900
g
'
k
/
5
9
'
800
5
7
'
0
0
1
5'
0 / 1200
'
6
0
-
8
100
'
0
5
00
9
'
'
5
0
8
7
00 /
-
8
-
'
'
5
5
6
5
'
0
9
'
-
5
'
4
0
-
7
'
0
3
5
g
k
'
0
5
-
'
5
3
5
,
2
g
k
P1150
Nukkasuodattimien puhdistaminen
Kun pesukone on ollut käytössä jonkin aikaa,
nukkasuodattimien pintaan muodostuu vaalea kerros,
joka johtuu pesuainejäämistä. Kerros voidaan poistaa
pesemällä nukkasuodattimet lämpimällä vedellä ja
harjalla. Poista nukkasuodatin luukun aukosta kuvan
mukaisesti (se voidaan sijoittaa niin, että kieleke
osoittaa joko vasempaan tai oikeaan).
E
S
0
R
5
6
E
V
E
R
'
0
O
6
'
T
0
5
U
,5
A
2
g
0
k
0
'
2
1
5
/
3
0
-
0
'
0
1
0
3
0
1
0
9
g
'
/
k
5
0
9
0
8
-
'
5
7
'
0
0
0
2
1
10
'
/
5
-
0
'
6
0
0
0
-
1
8
'
0
5
0
0
9
'
'
/
5
0
0
8
7
0
-
8
'
'
5
5
6
5
'
0
9
'
5
'
4
0
-
7
'
0
3
5
g
k
'
0
5
'
5
3
,5
2
g
k
P1152
Älä käytä kuivausrumpua ilman
nukkasuodattimia.
Lauhduttimen puhdistaminen
Puhdista lauhdutin, kun merkkivalo syttyy.
Lauhdutin on puhdistettava
säännöllisesti nukasta, jottei se turhaan pidennä
kuivausaikaa eikä lisää energiankulutusta.
Lauhdutin sijaitsee pienen luukun takana laitteen
alaosassa. Avaa luukku painamalla salpaa kuvan
osoittamalla tavalla.
Kuivausrumpu toimii moitteettomasti vain, jos
nukkasuodattimet ovat puhtaat.
Nukkasuodattimet keräävät kaiken nukan, jota
muodostuu kuivauksen aikana, ja tämä nukka täytyy
poistaa jokaisen kuivausohjelman päätyttyä
kostealla liinalla ennen kuin otat pyykit pois
rummusta.
Merkkivalo palaa muistuttamassa sinua
toimenpiteestä.
650
'
0
6
' -
TOREVERSE
0
5
5
,
2
AU
g
k
'
200
5
- 3
'
0
1000 / 1
3
1
g
'
k
5
9
'
800 / 900
75
'
0
10
/ 1200
5'
'
6
0
1000
8
' 0
0
5
90
'
'
5
0
00 /
7
- 8
8
'
' 5
6
55
'
0
- 9
5'
'
4
0
7
' 0
3
5
g
k
'
0
5
' 35
5
,
2
g
k
P1110
P1151
Sisäluukun nukkasuodatin täytyy irrottaa
puhdistusta varten.
Älä huolestu nukan määrästä, se ei johdu
kuivausrummun aiheuttamasta liiallisesta vaatteen
kulumisesta. Kaikista tekstiileistä irtoaa nukkaa,
mutta sitä ei huomaa ilmassa. Kuivausrummussa se
vain kertyy nukkasuodattimeen.
P1177
Ohjelman aikana tai lopussa on normaalia, jos
lauhduttimen asetustasolla on vettä.
Vedä lauhdutin ulos kääntämällä ensin kaksi
punaista rajoitinta alaspäin ja irrottamalla
lauhdutinyksikkö kahvasta kiinni pitäen.
P1154
P1155
40
Page 41

Puhdista lauhdutin harjalla ja huuhtele se
tarvittaessa suihkulla.
Vesisäiliö tulee asentaa asianmukaisesti
paikalleen
Ellei näin tapahdu, merkkivalo syttyy seuraavan
kuivauksen aikana ja ohjelma keskeytyy, jolloin
pyykki jää kosteaksi. Äänimerkki kuuluu.
Kun vesisäiliö on tyhjennetty ja asennettu paikalleen,
-painiketta tulee painaa uudelleen, jotta ohjelma
jatkuu.
P0639
Puhdista lauhdutin myös ulkopuolelta ja poista
kaikki nukka.
Puhdista lauhdutinta ja pienen luukun sisäosaa
ympäröivä kumitiiviste kostealla liinalla.
Asenna lauhdutin takaisin paikalleen, käännä
punaiset rajoittimet ylöspäin ja sulje ovi.
Tärkeää!
Älä koskaan käytä teräviä esineitä tai työkaluja
päästäksesi lauhduttimen rakoihin. Lauhdutin saattaa
vahingoittua tai alkaa vuotaa.
Älä koskaan käytä kuivausrumpua, kun
lauhdutin ei ole paikallaan.
Vesisäiliön tyhjennys
Pyykistä irtoava vesi tiivistyy koneen sisällä ja kertyy
vesisäiliöön.
Vesisäiliö täytyy tyhjentää jokaisen ohjelman jälkeen,
jotta voidaan varmistaa koneen tehokas toiminta
seuraavalla käyttökerralla. Merkkivalo muistuttaa
sinua toimenpiteestä.
Toimi seuraavasti:
• Vedä vesisäiliö ulos.
• Käännä se ylösalaisin ja anna veden valua ulos.
• Asenna vesisäiliö paikalleen.
Ohje
Kerättyä lauhdevettä voidaan käyttää hyväksi
höyrysilityksessä. Ensin se tulisi kuitenkin siivilöidä
hienon sihdin tai kahvin suodatinpaperin lävitse
llauhdevedessä olevien pienien nukkahiukkasten
siivilöimiseksi pois.
SUOMI
Ilmanottoaukon säleikön
puhdistaminen
Poista nukka kuivausrummun takana sijaitsevan
ilmanottoaukon säleiköstä imurilla.
P1162
Rummun puhdistus
Jos pyykkisi kuivausaste ei ole halutun mukainen,
ts. jos se on liian kuivaa tai liian kosteaa, puhdista
rummun sisäpuoli etikalla kostutetulla pyyhkeellä.
Tämä poistaa rumpuun muodostuneen ohuen
vaalean kerroksen, joka johtuu pesuun käytettyjen
pesu- ja huuhteluaineiden jäämistä ja vedessä
olevasta kalkkikivestä. Kerroksen vuoksi anturit eivät
kykene havaitsemaan oikeaa kuivausastetta.
P1156
P1157
41
Page 42

Jos kuivausrumpu ei toimi
Vika Mahdollinen Syy
• Kone ei toimi:
• Kuivaus kestää kauan tai pyykki ei
kuivu tarpeeksi:
•Kuivausrummun luukku ja/tai alaosan pieni ovi ovat
avoinna.
•Laitteeseen ei tule virtaa.
•Ohjelmanvalitsinta ei ole säädetty oikein.
•Käynnistyspainiketta ei ole painettu.
•Ohjelma käynnistyy joka tapauksessa, mutta
pysähtyy noin 3 minuutin kuluttua.
•Vesisäiliö on täynnä tai se on asetettu väärin.
• Pyykki on lingottu huonosti.
• Luukun nukkasuodattimet ovat täynnä.
• Lauhdutin on täynnä.
• Vesisäiliö on täynnä.
• Hellävaraisen kuivauksen toiminto “alennettu
teho” on valittu.
• On valittu väärä ohjelma/kuivausaika.
• Liian paljon pyykkiä.
Huolto ja varaosat
Huollot, varaosatilaukset ja mahdolliset korjaukset on
annettava valtuutetun huoltoliikkeen tehtäväksi.
Lähimmän valtuutetun huoltoliikkeen numeron löydät
soittamalla numeroon 0200-2662 (0,1597
mk/min) + pvm),* tai katsomalla puhelinluettelon
keltaisilta sivuilta kohdasta “kodinkoneiden huoltoa”.
Varmistaaksesi laitteesi moitteettoman toiminnan,
vaadi aina käytettäväksi sopivinta, siis alkuperäistä
varaosaa.
* Mainitse soittaessasi tuotteen merkki. Kopioi
arvokilvestä tuotteen tiedot alla olevaan kohtaan, niin
ne löytyvät helposti, jos sinun pitää ottaa yhteys
huoltoliikkeeseen.
Malli (Model) . . . . . . . . . . . . . . . . . . . . . . . . . . . . . . . .
Tuotenumero (Prod. nr.) . . . . . . . . . . . . . . . . . . . . . . .
Sarjanumero (Serial. nr.) . . . . . . . . . . . . . . . . . . . . . . .
€/min (0,95
Kuluttajaneuvonta
Tuotettasi tai sen käyttöä koskeviin kysymyksiin saat
vastauksen kuluttajaneuvonnastamme soittamalla
numeroon 0200-2662 (0,1597
pvm).
carelux.fsh@electrolux.fi
€/min (0,95 mk/min) +
Maahantuoja
Oy Electrolux Kotitalouskoneet Ab Rosenlew
Pakkalankuja, 6
01510 VANTAA
Takuu
Tuotteen takuuaika voidaan ilmoittaa erikseen. Ellei
takuuaikaa ole erikseen määritelty, noudatetaan
vallitsevaa lainsäädäntöä ja kansallisia määräyksiä.
Takuuehdot noudattavat vallitsevan lainsäädännön
mukaisia yleisiä ehtoja.
Ostokuitti säilytetään, koska takuun alkaminen
määritetään ostopäivän mukaan. Korvaus huollosta
voidaan periä myös takuuaikana:
· aiheettomasta huoltokäynnistä
· ellei valmistajan laitteen asennuksesta, käytöstä ja
hoidosta antamia ohjeita ole noudatettu.
.
42
Page 43

AASSEENNTTAAJJAALLLLEE
Varoitus!
Pakkauksen purkaminen
Liu'uta polyeteenipussi ja polystyreenitäytteet
ulos ennen kuivausrummun käyttöä.Vedä
tarranauhat koneesta rummun päälle.
P1106
Jos kuivausrumpua siirretään, se täytyy
kuljettaa pystyasennossa.
Sähköliitäntä
Kone liitetään 220-230 V sähköverkkoon 10 A
sulakkeella suojamaadoitetun pistorasian kautta.
Koneen asennuksen jälkeen pistoke on oltava
helposti saatavilla.
Liitäntäjohdon vaihto- ja asennustyöt on
annettava valtuutetun huoltoliikkeen tehtäväksi
Asennussarja pesukoneen päälle
asentamista varten
lisävaruste
Kuivausrumpu voidaan asentaa edestä täytettävän
pesukoneen päälle, jolloin kuivausrumpu on
ruuvattava kiinni pesukoneeseen. Tähän tarvitaan
asennussarja, jonka voit hankkia omalta
jälleenmyyjältäsi.
Ennen kuivausrummun asentamista lue mukana
toimitetut ohjeet huolella.
SUOMI
Kuivausrummun sijoittaminen
Kuivausrumpu voidaan asentaa tasaiselle lattialle tai
pesukoneen päälle. Kuivausrummun on aina oltava
vaakasuorassa, tarkasta se vatupassilla. Koneen
jalkoja voidaan tarvittaessa säätää. Varmista riittävä
ilmankierto kuivausrummun alaosasta. Älä tuki
ilmanottoaukkoja vaatteilla tai vastaavalla.
Huolehdi siitä, että ilmanvaihto pääsee tapahtumaan
hyvin jalustan ilmaritilän kautta.
Tämän vuoksi paksu matto ei sovi
kuivausrummun alustaksi.
Tärkeää lauhduttimella varustetun
kuivausrummun asennuksessa
• Kuivausrummun ulos puhaltama ilma voi olla jopa
+60°C. Älä siksi koskaan sijoita kuivausrumpua
lämpöä kestämättömälle alustalle.
• Kuivausrumpua käytettäessä huoneen lämpötilan
täytyy olla +5 …+35 ºC, koska muuten laitteen
toiminta saattaa kärsiä.
• Kuivausrumpua ympäröivän tilan on oltava
mahdollisimman pölytön.
• Säädettäviä jalkoja ei saa irrottaa. Alustan ja
kuivausrummun väliin on ehdottomasti jätettävä
rako ilmanvaihtoa varten. Tukkiutunut ilmanvaihto
nostaa kuivausrummun sisäosan lämpötilaa, mikä
vaikuttaa kuivausrummun toimintaan.
P1148
Tiivistyneen veden poistosarja
Valtuutetuilta jälleenmyyjiltä saatavalla erikoissarjalla
voidaan poistaa jokaisen kuivausjakson aikana
muodostuva tiivistynyt vesi suoraan pesualtaaseen.
Noudata sarjan ohessa toimitettuja ohjeita
huolellisesti.
Avautumissuunnan muuttaminen
Tarvittaessa luukun avautumissuunta voidaan
muuttaa oikealle avautuvaksi.
Avautumissuunnan voi muuttaa vain huoltoliike.
43
Page 44

삇ʇВП˚И ФУНЫФ‡ЪВО¸!
иУТЛП ‚‡Т ‚МЛП‡ЪВО¸МУ ЛБЫ˜ЛЪ¸ ‰‡ММУВ ЫНУ‚У‰ТЪ‚У ФУ ˝НТФОЫ‡Ъ‡ˆЛЛ Л У·‡ЪЛЪ¸ УТУ·ВММУВ
‚МЛП‡МЛВ М‡ ФЛ‚В‰fiММ˚В М‡ ФВ‚˚ı ТЪ‡МЛˆ‡ı Т‚В‰ВМЛfl ФУ ·ВБУФ‡ТМУТЪЛ.
кВНУПВМ‰ЫВП ‚‡П ТУı‡МЛЪ¸ ˝ЪУ ЫНУ‚У‰ТЪ‚У ‰Оfl ФУО¸БУ‚‡МЛfl ЛП ‚ ·Ы‰Ы˘ВП Л ФВВ‰‡Ъ¸ В„У
‚УБПУКМ˚П ·Ы‰Ы˘ЛП ‚О‡‰ВО¸ˆ‡П.
èÓ‚ÂʉÂÌËfl ‚Ó ‚ÂÏfl Ô‚ÓÁÍË
к‡ТФ‡НУ‚‡‚ П‡¯ЛМЫ, ФУ‚В¸ЪВ Вfi ТУı‡ММУТЪ¸. З ТОЫ˜‡В ТУПМВМЛИ МВ ‚НО˛˜‡ИЪВ Вfi Л У·‡ЪЛЪВТ¸ ‚
лВ‚ЛТМ˚И ˆВМЪ.
й·УБМ‡˜ВМЛfl, НУЪУ˚В ‚˚ ‚ТЪВЪЛЪВ fl‰УП Т МВНУЪУ˚ПЛ Ф‡‡„‡Щ‡ПЛ ЫНУ‚У‰ТЪ‚‡ ЛПВ˛Ъ
ÒÎÂ‰Û˛˘Â Á̇˜ÂÌËÂ:
иВ‰ЫФВК‰‡˛˘ЛИ ЪВЫ„УО¸МЛН ФУ‰˜fiНЛ‚‡ВЪ Т‚В‰ВМЛfl, НУЪУ˚В ˜ВБ‚˚˜‡ИМУ ‚‡КМ˚ ‰Оfl
‚‡¯ВИ ·ВБУФ‡ТМУТЪЛ ЛОЛ Ф‡‚ЛО¸МУИ ˝НТФОЫ‡Ъ‡ˆЛЛ ФЛ·У‡.
й·УБМ‡˜ВММ˚В ˝ЪЛП ТЛП‚УОУП Т‚В‰ВМЛfl ФВ‰УТЪ‡‚Оfl˛Ъ ‰УФУОМЛЪВО¸МЫ˛ ЛМЩУП‡ˆЛ˛ Л
Ф‡НЪЛ˜М˚В Т‚В‰ВМЛfl ФУ ˝НТФОЫ‡Ъ‡ˆЛЛ ФЛ·У‡.
л‚В‰ВМЛfl Л ЛМЩУП‡ˆЛfl ФУ ˝НУМУПМУПЫ Л ˝НУОУ„Л˜МУПЫ ЛТФУО¸БУ‚‡МЛ˛ П‡¯ЛМ˚ У·УБМ‡˜ВМ˚
‰‡ММ˚П ТЛП‚УОУП.
燯 ‚Í·‰ ‚ Á‡˘ËÚÛ ÓÍÛʇ˛˘ÂÈ Ò‰˚: Ï˚
ЛТФУО¸БЫВП ФУ‚ЪУМУ ФВВ‡·УЪ‡ММЫ˛ ·ЫП‡„Ы.
ëÓ‰ÂʇÌËÂ
ȼɚɠɧɵɟ ɫɜɟɞɟɧɢɹ
ɩɨ ɛɟɡɨɩɚɫɧɨɫɬɢ ..............................................45
ɍɬɢɥɢɡɚɰɢɹ .......................................................45
ɋɜɟɞɟɧɢɹ ɩɨ ɡɚɳɢɬɟ
ɨɤɪɭɠɚɸɳɟɣ ɫɪɟɞɵ ........................................46
Ɍɟɯɧɢɱɟɫɤɢɟ ɯɚɪɚɤɬɟɪɢɫɬɢɤɢ ........................46
Ɉɩɢɫɚɧɢɟ ɩɪɢɛɨɪɚ ..........................................46
ɍɫɬɚɧɨɜɤɚ ɭɪɨɜɧɹ ɩɪɨɜɨɞɢɦɨɫɬɢ ................47
ɍɫɬɚɧɨɜɤɚ.......................................................... 48
Ɋɚɫɩɚɤɨɜɤɚ.......................................................48
Ɋɚɡɦɟɳɟɧɢɟ.....................................................48
ɉɨɞɤɥɸɧɟɧɢɟ ɤ ɷɥɟɤɬɪɨɫɟɬɢ...........................48
Ʉɨɦɩɥɟɤɬ ɞɥɹ ɭɫɬɚɧɨɜɤɢ ɜ ɤɨɥɨɧɧɟ................48
ɂɡɦɟɧɟɧɢɟ ɧɚɩɪɚɜɥɟɧɢɹ ɨɬɤɪɵɬɢɹ ɞɜɟɪɢ .....48
ɉɨɞɤɥɸɱɟɧɢɟ ɫɥɢɜɧɨɝɨ ɲɥɚɧɝɚ...................... 48
дренажная труба..........................................
ɗɤɫɩɥɭɚɬɚɰɢɹ ...................................................49
ɉɚɧɟɥɶ ɭɩɪɚɜɥɟɧɢɹ .................................... 49-51
ɉɪɨɝɪɚɦɦɧɚɹ ɤɚɪɬɨɱɤɚ ....................................52
ɉɨɫɥɟɞɨɜɚɬɟɥɶɧɨɫɬɶ ɪɚɛɨɬɵ..........................53
ɉɨɥɟɡɧɵɟ ɫɜɟɞɟɧɢɹ......................................... 54
Ɉɛɫɥɭɠɢɜɚɧɢɟ ɢ ɭɯɨɞ ..................................... 55
ɇɚɪɭɠɧɚɹ ɱɢɫɬɤɚ .............................................. 55
ɑɢɫɬɤɚ ɞɜɟɪɢ .................................................... 55
Ɉɱɢɫɬɤɚ ɮɢɥɶɬɪɨɜ ........................................... 55
Ɉɱɢɫɬɤɚ ɤɨɧɞɟɧɫɚɬɨɪɚ..................................... 55
ɋɥɢɜ ɜɨɞɵ ɢɡ ɛɚɱɤɚ ......................................... 56
Ɉɱɢɫɬɤɚ ɜɨɡɞɭɯɨɡɚɛɨɪɧɨɣ ɪɟɲɺɬɤɢ ................ 56
ɑɬɨ-ɬɨ ɧɟɢɫɩɪɚɜɧɨ? ........................................ 57
44
Page 45

З‡КМ˚В Т‚В‰ВМЛfl ФУ ·ВБУФ‡ТМУТЪЛ
щЪЛ Т‚В‰ВМЛfl ФЛ‚У‰flЪТfl ‚ ЛМЪВВТ‡ı ·ВБУФ‡ТМУТЪЛ. иВВ‰ ЫТЪ‡МУ‚НУИ ЛОЛ ˝НТФОЫ‡Ъ‡ˆЛВИ ФЛ·У‡ Лı
зЦйЕпйСаей Ъ˘‡ЪВО¸МУ ЛБЫ˜ЛЪ¸.
ìÒÚ‡Ìӂ͇
• г˛·˚В ‡·УЪ˚, МВУ·ıУ‰ЛП˚В ‰Оfl ЫТЪ‡МУ‚НЛ
ФЛ·У‡, ‰УОКМ˚ ‚˚ФУОМflЪ¸Тfl
Н‚‡ОЛЩЛˆЛУ‚‡ММ˚П ˝ОВНЪЛНУП ЛОЛ
НУПФВЪВМЪМ˚П ФВТУМ‡ОУП.
• зВУ·ıУ‰ЛПУ У·‡ЪЛЪ¸ ‚МЛП‡МЛВ М‡ ЪУ, ˜ЪУ·˚
ФЛ·У МВ ТЪУflО М‡ ˝ОВНЪЛ˜ВТНУП Н‡·ВОВ.
• Esli maßina ustanovlena na kovrovom
pokrytii otregulirujte noΩki takim
obrazom, ©toby obespe©itw svobodnuæ
cirkulåciæ vozduha.
щНТФОЫ‡Ъ‡ˆЛfl
• ùÚÓÚ ÔË·Ó Ô‰̇Á̇˜ÂÌ Î˯¸ ÚÓθÍÓ ‰Îfl
·˚ЪУ‚У„У ФЛПВМВМЛfl. ЦТОЛ П‡¯ЛМ‡
ЛТФУО¸БЫВЪТfl ‚ ЛМ˚ı ˆВОflı, ЛОЛ ЛТФУО¸БЫВЪТfl
МВФ‡‚ЛО¸МУ, ЛБ„УЪУ‚ЛЪВО¸ МВ МВТfiЪ МЛН‡НУИ
УЪ‚ВЪТЪ‚ВММУТЪЛ Б‡ ‚УБПУКМ˚И Ы˘В·.
• иУТОВ ЛТФУО¸БУ‚‡МЛfl ‚ТВ„‰‡ ‚˚МЛП‡ИЪВ ‚ЛОНЫ
ФЛ·У‡ ЛБ УБВЪНЛ.
• зВУЪК‡ЪУВ ·ВО¸fi МВ ТОВ‰ЫВЪ ФУПВ˘‡Ъ¸ ‚
ТЫ¯ЛО¸МЫ˛ П‡¯ЛМЫ.
йФ‡ТМУТЪ¸ ‚Б˚‚‡
•
ФУФЛЪ‡ММУВ ‚УТФО‡ПВМfl˛˘ЛПЛТfl
‡ТЪ‚УЛЪВОflПЛ (·ВМБЛМ, ПВЪЛОУ‚˚И ТФЛЪ,
КЛ‰НУТЪЛ ‰Оfl ıЛП˜ЛТЪНЛ Л ТıУКЛВ Т МЛПЛ). н‡Н
Н‡Н ˝ЪЛ ‚В˘ВТЪ‚‡ У˜ВМ¸ ОВЪЫ˜ЛВ, УМЛ ПУ„ЫЪ
ТЪ‡Ъ¸ ФЛ˜ЛМУИ ‚Б˚‚‡. лЫ¯ЛЪВ ‚ П‡¯ЛМВ ОЛ¯¸
ЪУО¸НУ ‚˚ТЪЛ‡ММУВ ‚ ‚У‰В ·ВО¸fi.
• ì·Â‰ËÚÂÒ¸, ˜ÚÓ ‚ ͇χ̇ı Ô‰̇Á̇˜ÂÌÌÓ„Ó
‰Îfl ÒÛ¯ÍË ‚ χ¯ËÌ ·Âθfl Ì ÓÒÚ‡ÎËÒ¸
„‡ÁÓ‚˚ Á‡ÊË„‡ÎÍË.
• зВ ТЫ¯ЛЪВ ‚ П‡¯ЛМВ У·˚˜МЫ˛ Л ТФУЪЛ‚МЫ˛
У·Ы‚¸ ЛБ ЪН‡МЛ, Ъ‡Н Н‡Н УМ‡ ПУКВЪ ФЛОЛФМЫЪ¸
ПВК‰Ы О˛НУП Л ·‡‡·‡МУП Л Б‡·ОУНЛУ‚‡Ъ¸
В„У.
• иЛ МВЛТФУО¸БУ‚‡МЛЛ ФЛ·У‡ УТЪ‡‚¸ЪВ О˛Н
ТОВ„Н‡ ФЛУЪН˚Ъ˚П, ˜ЪУ ФУБ‚УОЛЪ Т·ВВ˜¸
ЫФОУЪМВМЛВ.
• Posle ispolwzovaniå sußilwnoj maßiny
o©istite filwtry dlå volokon. Dlå
predupreΩdeniå poΩara ne ispolwzujte
pribor s povreΩdønnymi filwtrami ili
bez nih.
• Sohranåjte v ©istote pol vokrug maßiny.
: ÌËÍÓ„‰‡ Ì ÒÛ¯ËÚ ·Âθfi,
й·˘‡fl ·ВБУФ‡ТМУТЪ¸
• г˛·УВ ЛБПВМВМЛВ ı‡‡НЪВЛТЪЛН ЛОЛ КВ
Т‡ПУ„У ФЛ·У‡ fl‚ОflВЪТfl УФ‡ТМ˚П.
• зЛ ФЛ Н‡НЛı У·ТЪУflЪВО¸ТЪ‚‡ı МВ ТОВ‰ЫВЪ
ВПУМЪЛУ‚‡Ъ¸ П‡¯ЛМЫ Т‡ПУПЫ. кВПУМЪ,
‚˚ФУОМВММ˚И МВУФ˚ЪМ˚П ФВТУМ‡ОУП, ПУКВЪ
М‡МВТЪЛ Ы˘В· ЛОЛ ТЪ‡Ъ¸ ФЛ˜ЛМУИ ТВ¸fiБМ˚ı
МВЛТФ‡‚МУТЪВИ. й·‡ЪЛЪВТ¸ ‚ ‚‡¯ лВ‚ЛТМ˚И
ˆВМЪ б‡МЫТТЛ. ЗТВ„‰‡ ЪВ·ЫИЪВ ЛТФУО¸БУ‚‡МЛfl
ОЛ¯¸ ЪУО¸НУ ЩЛПВММ˚ı Б‡Ф‡ТМ˚ı ˜‡ТЪВИ.
ЕВБУФ‡ТМУТЪ¸ ‰Оfl ‰ВЪВИ
• б‡˜‡ТЪЫ˛ ‰ВЪЛ МВ УТУБМ‡˛Ъ, М‡ТНУО¸НУ
УФ‡ТМ˚П ПУКВЪ ·˚Ъ¸ ФЛ·У. дУ„‰‡ П‡¯ЛМ‡
‡·УЪ‡ВЪ, Б‡ ‰ВЪ¸ПЛ МВУ·ıУ‰ЛПУ ФЛТЪ‡О¸МУ
ТОВ‰ЛЪ¸ Л МВ ФУБ‚УОflЪ¸ ЛП Л„‡Ъ¸ Т П‡¯ЛМУИ.
• мФ‡НУ‚У˜М˚В П‡ЪВЛ‡О˚ (Ъ.В. ФОfiМН‡,
ФУОЛТЪЛУО) ПУ„ЫЪ ·˚Ъ¸ УФ‡ТМ˚ПЛ ‰Оfl ‰ВЪВИ Л
ТЪ‡Ъ¸ ФЛ˜ЛМУИ Ы‰Ы¯ВМЛfl! лУ‰ВКЛЪВ Лı ‚МВ
ФУОfl ‰УТfl„‡ВПУТЪЛ.
• м·В‰ЛЪВТ¸, ˜ЪУ ‰ВЪЛ ЛОЛ ‰УП‡¯МЛВ КЛ‚УЪМ˚В
МВ Б‡ОВБОЛ ‚ ·‡‡·‡М.
• иЛ ЫЪЛОЛБ‡ˆЛЛ П‡¯ЛМ˚ УЪВК¸ЪВ
˝ОВНЪЛ˜ВТНЛИ ¯МЫ Л ЫМЛ˜ЪУК¸ЪВ ‚ЛОНЫ Т
Н‡·ВОВП. лОУП‡ИЪВ Б‡ПУН О˛Н‡, ˜ЪУ·˚ ‰ВЪЛ ‚У
‚ВПfl Л„˚ МВ ТПУ„ОЛ Б‡Н˚Ъ¸Тfl ‚ П‡¯ЛМВ.
мЪЛОЛБ‡ˆЛfl
• ìÔ‡ÍÓ‚Ó˜Ì˚ χÚ¡Î˚
å‡Ú¡Î˚, ÔÓϘÂÌÌ˚ ÒËÏ‚ÓÎÓÏ ,
Ô‰̇Á̇˜ÂÌ˚ ‰Îfl Ô‡·ÓÚÍË.
щЪУ УБМ‡˜‡ВЪ, ˜ЪУ УМЛ ПУ„ЫЪ ·˚Ъ¸ ФВВ‡·УЪ‡М˚
ФУТОВ Лı ФУПВ˘ВМЛfl ‚ ТФВˆЛ‡О¸М˚В Т·УМ˚В
НУМЪВИМВ˚.
凯Ë̇
•
СОfl ЫЪЛОЛБ‡ˆЛЛ ‚‡¯ВИ ТЪ‡УИ ТЫ¯ЛО¸МУИ
П‡¯ЛМ˚ ЛТФУО¸БЫИЪВ ТФВˆЛ‡О¸МУ
ФВ‰М‡БМ‡˜ВММ˚В Т‚‡ОНЛ. ЗМВТЛЪВ Т‚УИ ‚НО‡‰ ‚
ФУ‰‰ВК‡МЛВ ˜ЛТЪУЪ˚ ‚ ‚‡¯ВИ ТЪ‡МВ!
RUSSKIJ
45
Page 46

낉ÂÌËfl ÔÓ Á‡˘ËÚ ÓÍÛʇ˛˘ÂÈ Ò‰˚
СОfl ˝НУМУПЛЛ ˝ОВНЪУ˝МВ„ЛЛ Л Уı‡М˚
УНЫК‡˛˘ВИ ТВ‰˚ ВНУПВМ‰ЫВП ‚‡П ТУ·О˛‰‡Ъ¸
ТОВ‰Ы˛˘ЛВ Ф‡‚ЛО‡:
• лЪ‡‡ИЪВТ¸ П‡НТЛП‡О¸МУ Б‡„ЫК‡Ъ¸ П‡¯ЛМЫ,
Ъ‡Н Н‡Н МВФУОМ‡fl Б‡„ЫБН‡ fl‚ОflВЪТfl
МВ˝НУМУПЛ˜МУИ
• ЗТВ„‰‡ Б‡„ЫК‡ИЪВ ıУУ¯У УЪК‡ЪУВ ·ВО¸fi. уВП
‚˚¯В ТНУУТЪ¸ УЪКЛП‡, ЪВП ПВМ¸¯В ·Ы‰ВЪ
‡ТıУ‰ ˝МВ„ЛЛ Л ‚ВПfl ТЫ¯НЛ.
• зВ ФВВТЫ¯Л‚‡ИЪВ ·ВО¸fi. щЪУ ФВ‰УЪ‚‡˘‡ВЪ
В„У ТПЛМ‡МЛВ Л ФУБ‚УОflВЪ Т˝НУМУПЛЪ¸
˝ОВНЪУ˝МВ„Л˛. З˚·ВЛЪВ ФУ„‡ППЫ ТЫ¯НЛ
ТУ„О‡ТМУ ЪЛФЫ ·ВО¸fl Л МВУ·ıУ‰ЛПУИ ТЪВФВМЛ
ТЫ¯НЛ.
.
• СОfl ЛТФУО¸БУ‚‡МЛfl П‡НТЛП‡О¸МУИ Б‡„ЫБНЛ
·ВО¸fi, ФВ‰М‡БМ‡˜ВММУВ ‰Оfl ı‡МВМЛfl ‚
¯Н‡ЩЫ ПУКВЪ ТЫ¯ЛЪ¸Тfl ‚ПВТЪВ Т ·ВО¸fiП ‰Оfl
„О‡КВМЛfl. СОfl ˝ЪУ„У ‚˚·ВЛЪВ ФУ„‡ППЫ
·ВО¸fl ‰Оfl „О‡КВМЛfl, ‚ НУМˆВ ФУ„‡ПП˚
‚˚М¸ЪВ ЪУ ·ВО¸fi, НУЪУУВ ‚˚ ТУ·Л‡ВЪВТ¸
‚˚„О‡‰ЛЪ¸, ФУТОВ ˜В„У Б‡‚В¯ЛЪВ ТЫ¯НЫ
УТЪ‡‚¯В„УТfl НУОЛ˜ВТЪ‚‡.
• Periodi©eski o©ixajte filwtry dlå
predupreΩdeniå ©rezmerno bolwßogo
vremeni sußki i rashoda ™lektro™nergii.
• пУУ¯У ФУ‚ВЪЛ‚‡ИЪВ ФУПВ˘ВМЛВ. ЗУ ‚ВПfl
ТЫ¯НЛ ЪВПФВ‡ЪЫ‡ ‚ ФУПВ˘ВМЛЛ МВ ‰УОКМ‡
ФВ‚˚¯‡Ъ¸ +35°C.
нВıМЛ˜ВТНЛВ ı‡‡НЪВЛТЪЛНЛ
кДбеЦкх: Ç˚ÒÓÚ‡ 85 ÒÏ
òËË̇ 60 ÒÏ
ÉÎÛ·Ë̇ 58 ÒÏ
щгЦднкйианДзаЦ: 220/230 З/50 Йˆ
еДдл. ийнкЦЕгьЦеДь ейфзйлнъ: 2200 ЗЪ
еаз. ейфзйлнъ икЦСйпкДзанЦгЦв: 10 A
RUSSKIJ
ЗЦл ЕЦгъь ика лмтдЦ: пОУФУН, ОfiМ 6 Í„
лЛМЪВЪЛН‡ 2,5 Í„
кДлпйС щзЦкЙаа: пОУФУН, ОfiМ 4,37 ÍÇÚ˜ (6 Í„ ·Âθfl ‰Îfl ı‡ÌÂÌËfl)
пОУФУН, ОfiМ 3,60 ÍÇÚ˜ (6 Í„ ·Âθfl ‰Îfl „·ÊÂÌËfl)
Sintetika 1,40 kVt© (2,5 kg belwå dlå hraneniå)
чÌÌ˚È ÔË·Ó ÒÓÓÚ‚ÂÚÒÚ‚ÛÂÚ ÒÎÂ‰Û˛˘ËÏ ‰ËÂÍÚË‚‡Ï Öùë:
- 73/23 Цщл УЪ 19.2.73 (СЛВНЪЛ‚‡ ФУ МЛБНУПЫ М‡ФflКВМЛ˛) Л ФУТОВ‰Ы˛˘ЛВ ЛБПВМВМЛfl;
- 89/336 Цщл УЪ 3.5.89 (СЛВНЪЛ‚‡ ФУ ˝ОВНЪУП‡„МЛЪМУИ ТУ‚ПВТЪЛПУТЪЛ) Л ФУТОВ‰Ы˛˘ЛВ ЛБПВМВМЛfl;
Opisanie pribora
1 Rabo©aå poverhnostw
2 Ba©ok dlå vody
3 Panelw upravleniå
4 Filwtry dlå volokon
5 Zavodskaå tabli©ka
6 Kondensator
7 Lampo©ka Rsvexeniå barabana
8 Regulirovo©nye noΩki
43
46
Page 47

ɋɠɞɮɦɣɫɩɝɥɛ ɮɫɩɝɨɺ ɪɫɩɝɩɟɣɧɩɬɭɣ
ȼɨɞɚ ɫɨɞɟɪɠɢɬ ɪɚɡɧɨɨɛɪɚɡɧɨɟ ɤɨɥɢɱɟɫɬɜɨ
ɢɡɜɟɫɬɧɹɤɨɜɵɯ ɢ ɦɢɧɟɪɚɥɶɧɵɯ ɫɨɥɟɣ, ɱɶɺ
ɤɨɥɢɱɟɫɬɜɨ ɜɚɪɶɢɪɭɟɬɫɹ ɜ ɡɚɜɢɫɢɦɨɫɬɢ ɨɬ
ɝɟɨɝɪɚɮɢɱɟɫɤɨɝɨ ɩɨɥɨɠɟɧɢɹ, ɬɚɤɢɦ ɨɛɪɚɡɨɦ,
ɜɚɪɶɢɪɭɸɬɫɹ ɢ ɜɟɥɢɱɢɧɵ ɩɪɨɜɨɞɢɦɨɫɬɢ.
Ɋɟɥɟɜɚɧɬɧɵɟ ɜɚɪɢɚɰɢɢ ɩɪɨɜɨɞɢɦɨɫɬɢ ɜɨɞɵ ɩɨ
ɫɪɚɜɧɟɧɢɸ ɫ ɬɟɦɢ, ɱɬɨ ɨɛɭɫɥɨɜɥɟɧɵ ɡɚɜɨɞɨɦ,
ɦɨɝɭɬ ɨɤɚɡɵɜɚɬɶ ɥɺɝɤɨɟ ɜɨɡɞɟɣɫɬɜɢɟ ɧɚ
ɨɫɬɚɬɨɱɧɭɸ ɜɥɚɠɧɨɫɬɶ ɫɬɢɪɤɢ ɜ ɤɨɧɰɟ ɰɢɤɥɚ.
ɋɭɲɢɥɶɧɚɹ ɭɫɬɚɧɨɜɤɚ ɩɨɡɜɨɥɹɟɬ ɜɚɦ
ɪɟɝɭɥɢɪɨɜɚɬɶ ɱɭɜɫɬɜɢɬɟɥɶɧɨɫɬɶ ɞɚɬɱɢɤɚ ɫɭɲɤɢ,
ɱɬɨ ɨɫɧɨɜɵɜɚɟɬɫɹ ɧɚ ɜɟɥɢɱɢɧɚɯ ɩɪɨɜɨɞɢɦɨɫɬɢ
ɜɨɞɵ, ɡɚ ɫɱɺɬ ɫɥɟɞɭɸɳɟɣ ɩɪɨɰɟɞɭɪɵ.
ɉɪɨɰɟɞɭɪɚ:
ɉɨɜɟɪɧɭɬɶ ɩɪɨɝɪɚɦɦɧɵɣ ɫɟɥɟɤɬɨɪ ɧɚ
ɜɤɥɸɱɟɧɢɟ ɭɫɬɪɨɣɫɬɜɚ.
ȼ ɪɟɠɢɦɟ ɜɵɛɨɪɚ ɧɚɠɚɬɶ ɨɞɧɨɜɪɟɦɟɧɧɨ ɤɧɨɩɤɢ
3 ɢ 6 ɩɨɤɚ ɧɟ ɩɨɹɜɢɬɫɹ «
C0».
Ⱦɢɫɩɥɟɣ
C 0
C 0
C 0
Ɉɛɵɱɧɨ ɧɚ ɡɚɜɨɞɟ ɭɫɬɪɨɣɫɬɜɨ ɧɚɫɬɪɚɢɜɚɟɬɫɹ
ɧɚ ɫɚɦɵɣ ɜɵɫɨɤɢɣ ɭɪɨɜɟɧɶ; ɬɟɦ ɧɟ ɦɟɧɟɟ,
ɧɟɤɨɬɨɪɵɟ ɦɨɞɟɥɢ ɦɨɝɭɬ ɧɚɫɬɪɚɢɜɚɬɶɫɹ ɩɨɞɪɭɝɨɦɭ.
ɋɬɟɩɟɧɶ ɩɪɨɜɨɞɢɦɨɫɬɢ
ɞɢɫɩɥɟɹ
ɧɢɡɤɚɹ
ɫɪɟɞɧɹɹ
ɜɵɫɨɤɚɹ
ɉɪɢɦɟɪɧɚɹ ɜɟɥɢɱɢɧɚ
(µS/cm)
< 300
300 - 600
> 600
ɋɨɯɪɚɧɟɧɢɟ ɧɨɜɨɣ
ɭɫɬɚɧɨɜɤɢ:
RUSSKIJ
Ɋɟɝɭɥɢɪɨɜɤɚ ɭɪɨɜɧɹ
ɩɪɨɜɨɞɢɦɨɫɬɢ:
Ɂɚɬɟɦ ɧɚɠɚɬɶ ɤɧɨɩɤɭ 5: ɭɪɨɜɟɧɶ ɩɪɨɜɨɞɢɦɨɫɬɢ
ɛɭɞɟɬ ɩɨɤɚɡɚɧ ɡɚɝɨɪɟɜɲɢɦɢɫɹ ɝɨɪɢɡɨɧɬɚɥɶɧɵɦɢ
ɱɺɪɬɨɱɤɚɦɢ.
Ɉɞɧɨɜɪɟɦɟɧɧɨ ɧɚɠɚɬɶ ɤɧɨɩɤɢ 3 ɢ 6, ɩɨɤɚ ɜɪɟɦɹ
ɩɪɟɞɵɞɭɳɟɝɨ ɫɭɲɢɥɶɧɨɝɨ ɰɢɤɥɚ ɧɟ ɩɨɹɜɢɬɶɫɹ
ɫɧɨɜɚ ɧɚ ɞɢɫɩɥɟɟ, ɢ ɧɟ ɩɪɨɡɜɭɱɢɬ ɫɢɝɧɚɥ.
START/PAUSE
47
Page 48

Ustanovka
дренажная труба
читать забота попечение внимание оператор c
дренаж канализация водосток.
Raspakovka
Udalite poli™tilenovyj meßok s
penoplastovoj nabivkoj pered na©alom
ispolwzovaniå sußilwnoj maßiny.
Pri neobhodimosti maßinu sleduet
perenositw v vertikalwnom poloΩenii.
ê‡ÁÏ¢ÂÌËÂ
СОfl ‚‡¯В„У Ы‰У·ТЪ‚‡ ВНУПВМ‰ЫВЪТfl ‡БПВТЪЛЪ¸
ТЫ¯ЛО¸МЫ˛ П‡¯ЛМЫ fl‰УП ТУ ТЪЛ‡О¸МУИ.
лЫ¯ЛО¸М‡fl П‡¯ЛМ‡ ‰УОКМ‡ ЫТЪ‡М‡‚ОЛ‚‡Ъ¸Тfl ‚
˜ЛТЪУП ПВТЪВ, ‚ НУЪУУП МВ ТН‡ФОЛ‚‡ВЪТfl „flБ¸.
ЗУНЫ„ П‡¯ЛМ˚ ‰УОКВМ Т‚У·У‰МУ ˆЛНЫОЛУ‚‡Ъ¸
‚УБ‰Ыı. зВ Б‡ТОУМflИЪВ ОЛˆВ‚Ы˛ ‚ВМЪЛОflˆЛУММЫ˛
В¯fiЪНЫ ЛОЛ КВ ‚УБ‰ЫıУБ‡·УМ˚В В¯fiЪНЛ М‡
Б‡‰МВИ ТЪУУМВ П‡¯ЛМ˚.
СОfl ТМЛКВМЛfl ‰У ПЛМЛПЫП‡ ¯ЫП‡ Л ‚Л·‡ˆЛЛ ‚У
‚ВПfl ‡·УЪ˚ П‡¯ЛМЫ ТОВ‰ЫВЪ ‡БПВТЪЛЪ¸ М‡
ФУ˜МУИ Л У‚МУИ ФУ‚ВıМУТЪЛ.
иУТОВ УНУМ˜‡ЪВО¸МУИ ЫТЪ‡МУ‚НЛ М‡ ПВТЪУ
ФУ‚В¸ЪВ ФЛ ФУПУ˘Л ТФЛЪУ‚У„У ЫУ‚Мfl, ˜ЪУ
П‡¯ЛМ‡ ‚˚У‚МВМ‡. иЛ МВУ·ıУ‰ЛПУТЪЛ
ФУ‰МЛПЛЪВ ЛОЛ УФЫТЪЛЪВ Вfi ФЛ ФУПУ˘Л МУКВН.
зУКНЛ МВ ТОВ‰ЫВЪ Ы‰‡ОflЪ¸ МЛ ‚ НУВП ТОЫ˜‡В.
зВ ‰УФЫТН‡ИЪВ ТЫКВМЛfl ФУТ‚ВЪ‡ НУ‚‡ПЛ Т
‰ОЛММ˚П ‚УТУ
ПУКВЪ ФЛ‚ВТЪЛ Н ФВ„‚Ы, НУЪУ˚И ТФУТУ·ВМ
УЪЛˆ‡ЪВО¸МУ ТН‡Б‡Ъ¸Тfl М
ÇÌËχÌËÂ
ÉÓfl˜ËÈ ‚ÓÁ‰Ûı, ‚˚ıÓ‰fl˘ËÈ ËÁ ÒÛ¯ËθÌÓÈ Ï‡¯ËÌ˚,
ПУКВЪ ‰УТЪЛ„‡Ъ¸ ЪВПФВ‡ЪЫ˚ 60°C. лОВ‰У‚‡ЪВО¸МУ,
ФЛ·У МВ ‰УОКВМ ТЪУflЪ¸ М‡ ФУН˚ЪЛflı ФУОУ‚, МВ
‚˚‰ВКЛ‚‡˛˘Лı ‚˚ТУНЛı ЪВПФВ‡ЪЫ.
Vo vremå raboty sußilwnoj maßiny
temperatura v pomexenii ne dolΩna bytw
niΩe +5S° i vyße +35S°, tak kak ™to moΩet
otricatelwno skazatwså na rabote pribora.
Ï, ‰Â‚flÌÌ˚ÏË ÂÈ͇ÏË Ë Ú.Ô. ùÚÓ
‡ ‡·ÓÚÂ ÔË·Ó‡.
иУ‰НО˛˜ВМЛВ Н ˝ОВНЪУТВЪЛ
С‡ММ‡fl П‡¯ЛМ‡ ‡Б‡·УЪ‡М‡ ‰Оfl ‡·УЪ˚ УЪ
˝ОВНЪУТВЪЛ Т У‰МУЩ‡БМ˚П М‡ФflКВМЛВП 220230 З, 50 Йˆ.
м·В‰ЛЪВТ¸, ˜ЪУ ‚‡¯‡ ‰УП‡¯Мflfl ˝ОВНЪЛ˜ВТН‡fl
ТЛТЪВП‡ ТФУТУ·М‡ ‚˚‰ВК‡Ъ¸ П‡НТЛП‡О¸МЫ˛
М‡„ЫБНЫ (2,2 НЗЪ), Ы˜ЛЪ˚‚‡fl ‡·УЪЫ Л ‰Ы„Лı
˝ОВНЪУФЛ·УУ‚.
иУ‰НО˛˜‡ИЪВ П‡¯ЛМЫ ЪУО¸НУ Н УБВЪН‡П Т
Б‡БВПОВМЛВП, ‚ ТУУЪ‚ВЪТЪ‚ЛЛ Т
‰ВИТЪ‚Ы˛˘ЛПЛ Ф‡‚ЛО‡ПЛ ˝ОВНЪУЪВıМЛНЛ.
аБ„УЪУ‚ЛЪВО¸ УТ‚У·УК‰‡ВЪТfl УЪ О˛·УИ
УЪ‚ВЪТЪ‚ВММУТЪЛ Б‡ Ы˘В· О˛‰flП ЛОЛ
ЛПЫ˘ВТЪ‚Ы ‚ ТОЫ˜‡В МВ‚˚ФУОМВМЛfl
‚˚¯ВЫН‡Б‡ММ˚ı ФВ‰УТЪУУКМУТЪВИ.
иЛ МВУ·ıУ‰ЛПУТЪЛ Б‡ПВМ˚ Н‡·ВОfl
ФЛЪ‡МЛfl ФЛ·У‡ ˝Ъ‡ УФВ‡ˆЛfl ‰УОКМ‡
‚˚ФУОМflЪ¸Тfl ЪУО¸НУ specialistom iz
avtorizovannogo izgotovitelem
servisnogo centra.
иУТОe ЫТЪ‡МУ‚НЛ П‡¯ЛМ˚ ‰УОКeМ ·˚Ъ¸
У·eТФe˜eМ Т‚У·У‰М˚И ‰УТЪЫФ Н Н‡·eО˛ ФЛЪ‡МЛfl.
Komplekt dlå ustanovki v kolonne
U vaßego distribwætera vy moΩete kupitw
specialwnyj komplekt, pozvolåæxij
ustanovitw sußilwnuæ maßinu na stiralwnuæ,
imeæxuæ glubinu ot 48 do 60sm.
Vnimatelwno izu©ite prilagaemoe k komplektu
rukovodstvo po ™kspluatacii.
Izmenenie napravleniå otkrytiå
dveri
Dlå bolee løgkoj zagruzki ili razgruzki
belwå vozmoΩno izmenitw napravlenie
otkrytiå dveri. Èta operaciå dolΩna bytw
vypolnena kvalificirovannym personalom.
Obratitesw v vaß Servisnyj centr Zanussi.
48
Page 49

щНТФОЫ‡Ъ‡ˆЛfl
è‡ÌÂθ ÛÔ‡‚ÎÂÌËfl
TIMELINE 6 kg
1 èÓ„‡ÏÏ̇fl ͇ÚӘ͇
èÓ„‡ÏmÌ˚ ͇ÚÓ˜Ía ̇ flÁ˚Í ̇ıÓ‰ËÚÒfl ‚
Ô‡ÍÂÚÂ Ò ËÌÒÚÛ͈ËflÏË.
2 лВОВНЪУ ‚˚·У‡ ФУ„‡ПП˚
ЛОЛ ‚ВПВМЛ
иУБ‚УОflВЪ ‚˚·Л‡Ъ¸ ТЫ¯НЫ, НУМЪУОЛЫВПЫ˛
˝ОВНЪУМЛНУИ ЛОЛ ‚ВПВМВП.
иУ‚ВМЛЪВ ТВОВНЪУ М‡ МВУ·ıУ‰ЛПЫ˛ ФУ„‡ППЫ
ЛОЛ ‚ВПfl.
ëۯ͇ Ò ˝ÎÂÍÚÓÌÌ˚Ï ÍÓÌÚÓÎÂÏ
(‡‚ÚÓχÚ˘ÂÒ͇fl)
иЛ·У ·Ы‰ВЪ ‚˚ФУОМflЪ¸ ˝ЪЛ ФУ„‡ПП˚ Т
ФУПУ˘¸˛ ‰‡Ъ˜ЛНУ‚, НУЪУ˚В УФВ‰ВОfl˛Ъ
ТЪВФВМ¸ ‚О‡КМУТЪЛ ·ВО¸fl.
Ç˚·ÂËÚ ÔÓ„‡ÏÏÛ, ÒÓÓÚ‚ÂÚÒÚ‚Û˛˘Û˛ ÚËÔÛ
·ВО¸fl Л МВУ·ıУ‰ЛПУИ ТЪВФВМЛ ТЫ¯НЛ.
лЫ¯Н‡ Т НУМЪУОВП ‚ВПВМЛ
щЪ‡ ЩЫМНˆЛfl ПУКВЪ ЛТФУО¸БУ‚‡Ъ¸Тfl ‰Оfl
Б‡‚В¯ВМЛfl ТЫ¯НЛ ‚ ТОЫ˜‡В МВУ·ıУ‰ЛПУТЪЛ.
З˚·ВЛЪВ 90-ПЛМЫЪМЫ˛ ФУ„‡ППЫ ‰Оfl ıОУФН‡
ЛОЛ КВ 30-ПЛМЫЪМЫ˛ ФУ„‡ППЫ ‰Оfl ТЛМЪВЪЛНЛ.
СОfl УЪПВМ˚ ЛТФУОМflВПУИ ФУ„‡ПП˚ ФУ‚ВМЛЪВ
ТВОВНЪУ ‚ ФУОУКВМЛВ “0”.
З НУМˆВ ТЫ¯НЛ ФУ‚ВМЛЪВ Ы˜НЫ ТВОВНЪУ‡ ‚
ФУОУКВМЛВ “0” ФВВ‰ ЪВП, Н‡Н ‚˚МЫЪ¸ ·ВО¸fi.
4 дМУФН‡ УЪНО˛˜ВМЛfl Б‚ЫНУ‚У„У
Ò˄̇·
Zvukovoj signal podaøtså pri:
• vybore programmy
• naΩatii knopok
• vybore nesootvetstvuæxej funkcii
• pri nepravilwnoj ustanovke selektora
programm libo pri naΩatii læboj opcii vo
vremå raboty maßiny
• v konce programmy
• zapolnenii ba©ka vodoj
• nepravilwnoj rabote sußilwnoj maßiny
• otkrytoj dverce v niΩnej ©asti maßiny
Dlå otklæ©eniå zvukovogo signala naΩmite
™tu knopku . Zagoritså sootvetstvuæxaå
signalwnaå lampa.
5 Кнопка «Быстрой сушки»
Нажав на эту кнопку время сушки уменьшится в
следующих программах для хлопка:
• Очень сухое бельё
• Бельё готовое к носке
• Бельё пригодное для хранения
Загорится соответствующая сигнальная лампа.
Кнопка «Быстрой сушки» не может использоваться
с функцией «Низкой температуры» .
RUSSKIJ
3 дМУФН‡ УЪН˚ЪЛfl О˛Н‡
з‡КПЛЪВ ˝ЪЫ НМУФНЫ ‰Оfl УЪН˚ЪЛfl О˛Н‡.
Nad knopkoj zaΩgøtså signalwnaå lampa.
Vy smoΩete otkrytw læk posredstvom ™toj
knopki, tolwko esli sußilwnaå maßina
vklæ©ena. Esli Vy otkroete læk vo vremå
programmy, to dlå vozobnovleniå raboty
sußilwnoj maßiny neobhodimo exø raz
naΩatw knopku «Pusk/Pauza» .
6 дМУФН‡ МЛБНУИ ЪВПФВ‡ЪЫ˚
з‡К‡ЪЛВ ˝ЪУИ НМУФНЛ ФУБ‚УОflВЪ ‚˚ФУОМЛЪ¸
ТЫ¯НЫ ФЛ ·УОВВ МЛБНУИ ЪВПФВ‡ЪЫВ,
ФВ‰М‡БМ‡˜ВММЫ˛ ‰Оfl ЪУМНЛı ЪН‡МВИ.
лУУЪ‚ВЪТЪ‚Ы˛˘‡fl ТЛ„М‡О¸М‡fl О‡ПФ‡ Б‡„УЛЪТfl.
щЪ‡ ЩЫМНˆЛfl ПУКВЪ ·˚Ъ¸ Ъ‡НКВ ЛТФУО¸БУ‚‡М‡
‰Оfl ТЫ¯НЛ Т Ъ‡ИПВУП.
Knopka «Nizkoj temperatury» ne moΩet
ispolwzovatwså s funkciej «Bystroj sußki» .
49
Page 50

7 Knopka «Pusk s zaderΩkoj»
Pri pomoxi dannoj knopki moΩno zaderΩatw
pusk programmy maksimum do 12 ©asov. NaΩav
na dannuæ knopku, vremå otloΩennogo starta
budet menåtså kaΩdye 30 minut poka na
displee ne pokaΩetså 2 ©asa. Potom ots©øt
vremeni budet menåtså kaΩdyj ©as.
Dannaå opciå dolΩna bytw vybrana posle
ustanovki programmy i pered naΩatiem knopki
«Pusk/Pauza».
Vremå zaderΩki zapuska programmy,
vybrannoe pri pomoxi sootvetstvuæxej
knopki, pokazyvaetså na displee v te©enii
3 sekund. Zatem vnovw otobraΩaetså
prodolΩitelwnostw predvaritelwno vybrannoj
programmy.
Obratnyj s©øt vremeni na©nøtså posle
naΩatiå knopki «Pusk/Pauza».
Dlå otmeny zaderΩki zapuska programmy,
naΩmite knopku «Pusk/Pauza» i zatem «Pusk s
zaderΩkoj» do teh por poka na displee ne
poåvitså 0’. NaΩmite vnovw knopku «Pusk/Pauza».
Dlå annulirovaniå ili izmeneniå ranee
vybrannyh opcii, naΩmite na «Pauzu».
Ustanovite Ωelaemuæ programmu, naΩmite exø
raz knopku «Pusk/Pauza».
• OtloΩennyj start
Время задержки запуска программы,
выбранное при помощи соответствующей
кнопки, показывается на дисплее в течении
3 секунд. Затем вновь отображается
продолжительность предварительно
выбранной программы.
Время отложенного старта будет менятся
каждые 30 минут пока на дисплее не
покажется 90 минут. Потом отсчёт времени
будет менятся каждый час.
• Конец программы
Na displee zamigaet nolw.
8 Displej
• ProdolΩitelwnostw
• Окончание
• Oтложенный старт
• Ошибка при выборе
• Kод неисправности.
• ProdolΩitelwnostw programmy
Posle vybora programmy na displee
otobraΩaetså ee prodolΩitelwnostw v ©asah i
minutah (napr. 2.05).
Vremå vsegda rass©ityvaetså avtomati©eski na
osnovanii maksimalwnogo rekomendovannogo
koli©estva belwå dlå kaΩdogo tipa tkani.
• Ошибка при выборе
Esli vybiraetså nesovmestimaå funkciå s
Vybrannoj programmoj stirki, na displee
poåvitså nadpisw “(UU”.
Posle zapuska programmy ostato©noe vremå
menåetså kaΩdye 5 minut.
50
Page 51

• Коды неисправностей
V slu©ae neispravnosti v rabote pribora na
displee otobraΩaætså specialwnye kody
neispravnostej, naprimer, “E20” (sm.razdel
«Esli maßina ne rabotaet»).
9 дМУФН‡ “иЫТН/Ф‡ЫБ‡”
з‡КПЛЪВ ˝ЪЫ НМУФНЫ М‡ 1 ТВНЫМ‰Ы ‰Оfl
‚НО˛˜ВМЛfl ТЫ¯ЛО¸МУИ П‡¯ЛМ˚, ФВ‰‚‡ЛЪВО¸МУ
‚˚·‡‚ ФУ„‡ППЫ. иУТО˚¯ЛЪТfl Б‚ЫНУ‚УИ
ТЛ„М‡О.
ЦТОЛ УЪН˚‚‡ВЪТfl О˛Н ‚У ‚ВПfl ‡·УЪ˚
ФУ„‡ПП˚, ЪУ ˝ЪЫ НМУФНЫ ТОВ‰ЫВЪ М‡К‡Ъ¸ В˘fi
‡Б ФУТОВ Б‡Н˚ЪЛfl О
‡·УЪ˚ ФУ„‡ПП˚ ЛБ ЪУ„У ФУОУКВМЛfl, ‚ НУЪУУП
УМ‡ ·˚О‡ УТЪ‡МУ‚ОВМ‡.
щЪЫ НМУФНЫ ТОВ‰ЫВЪ Ъ‡НКВ М‡КЛП‡Ъ¸ ФУТОВ
УЪНО˛˜ВМЛfl ФЛЪ‡МЛfl Л ФУТОВ ЫТЪ‡МУ‚НЛ М‡ ПВТЪУ
·‡˜Н‡ ‰Оfl ‚У‰˚, ВТОЛ ‚˚ В„У ‚˚МЫОЛ ‰Оfl
УФУУКМВМЛfl ‚У ‚ВПfl ‡·УЪ˚ П‡¯ЛМ˚. З У·УЛı
ТОЫ˜‡flı О‡ПФ‡ ·Ы‰ВЪ ПЛ„‡Ъ¸, М‡ФУПЛМ‡fl У
МВУ·ıУ‰ЛПУТЪЛ ФУ‚ЪУМУ„У М‡К‡ЪЛfl НМУФНЛ.
˛Í‡ ‰Îfl ‚ÓÁÓ·ÌÓ‚ÎÂÌËfl
ã‡ÏÔ‡ “äÓ̈ ÔÓ„‡ÏÏ˚”
ùÚ‡ ·ÏÔ‡ ÏË„‡ÂÚ ‚ ÍÓ̈ هÁ˚ Óı·ʉÂÌËfl Ë
‚Ó ‚ÂÏfl Ù‡Á˚ ÔÓÚË‚ ÒÏË̇ÌËfl ·Âθfl.
г‡ПФ‡ “уЛТЪНa ЩЛО¸ЪУ‚”
щЪ‡ О‡ПФ‡ Б‡„У‡ВЪТfl ‚ НУМˆВ ФУ„‡ПП˚,
cЛ„М‡ОЛБЛЫfl, ˜ЪУ ТОВ‰ЫВЪ У˜ЛТЪЛЪ¸ ЩЛО¸Ъ˚.
лЛ„М‡О¸М‡fl О‡ПФ‡ “з‡ФУОМВМЛfl ·‡˜Н‡”
щЪ‡ О‡ПФ‡ ПЛ„‡ВЪ ФЛ М‡ФУОМВМЛЛ ·‡˜Н‡ ‚У‰УИ.
ЗУ ‚ВПfl ‡·УЪ˚ ФУ„‡ПП˚ ·‡˜УН ПУКМУ
УФУУКМЛЪ¸. З ˝ЪУП ТОЫ˜‡В, ФУТОВ В„У ЫТЪ‡МУ‚НЛ
М‡ ПВТЪУ, МВУ·ıУ‰ЛПУ В˘fi ‡Б М‡К‡Ъ¸ НМУФНЫ
‚НО˛˜ВМЛfl ‰Îfl ‚ÓÁÓ·ÌÓ‚ÎÂÌËfl ‡·ÓÚ˚
ÔÓ„‡ÏÏ˚.
щЪ‡ О‡ПФ‡ ·Ы‰ВЪ Ъ‡НКВ ПЛ„‡Ъ¸ ‚ НУМˆВ Щ‡Б˚
ТЫ¯НЛ (ФУТОВ УıО‡К‰ВМЛfl) Л ‚У ‚ВПfl Щ‡Б˚
ФУЪЛ‚ ТПЛМ‡МЛfl.
Лампа «Чистка конденсатора»
Эта лампа загорается каждые 80 циклов,
напоминая, что необходимо очистить
конденсатор.
RUSSKIJ
10 à̉Ë͇ÚÓÌ˚ ·ÏÔ˚ Ù‡Á˚
ÒÛ¯ÍË
щЪЛ О‡ПФ˚ У·УБМ‡˜‡˛Ъ ‡БОЛ˜М˚В Щ‡Б˚
ФУ„‡ПП˚, ‚˚ФУОМflВП˚В ‚ ‰‡ММ˚И ПУПВМЪ.
ã‡ÏÔ‡ “ëۯ͇”
ùÚ‡ ·ÏÔ‡ Ó·ÓÁ̇˜‡ÂÚ, ˜ÚÓ ÔË·Ó Ì‡ıÓ‰ËÚÒfl ‚
Ù‡Á ÒÛ¯ÍË.
ã‡ÏÔ‡ “éı·ʉÂÌËfl”
щЪ‡ О‡ПФ‡ У·УБМ‡˜‡ВЪ, ˜ЪУ ФЛ·У М‡ıУ‰ЛЪТfl ‚
Щ‡БВ УıО‡К‰ВМЛfl. З НУМˆВ ТЫ¯НЛ ФВ‰ЫТПУЪВМ‡
10-ПЛМЫЪМ‡fl Щ‡Б‡ УıО‡К‰ВМЛfl ·ВО¸fl.
ÖÒÎË Î‡ÏÔ‡ ËÎË ПЛ„‡ВЪ, ЪУ ˝ЪУ УБМ‡˜‡ВЪ
МВУ·ıУ‰ЛПУТЪ¸ ФУ‚ЪУМУ„У М‡К‡ЪЛfl НМУФНЛ
‚НО˛˜ВМЛfl ‰Оfl ‚УБУ·МУ‚ОВМЛfl ‡·УЪ˚
ФУ„‡ПП˚.
51
Page 52

èÓ„‡ÏÏ̇fl ͇ÚӘ͇
Ä‚ÚÓχÚ˘ÂÒ͇fl Òۯ͇ (˝ÎÂÍÚÓÌÌ˚ ÔÓ„‡ÏÏ˚)
íËÔ ·Âθfl
Хлопок-лён Очень сухое бельё
Бельё готовое к носке
Бельё пригодное для хранения
Слегка влажное бельё
Бельё для глажения
Бельё для глажения – каландром
Синтетика Очень сухое бельё
Бельё пригодное для хранения
Бельё для глажения
Ползунки Baby-цикл
Синтетика Облегчённое глажение
(*) ëӄ·ÒÌÓ Òڇ̉‡Ú‡Ï CEI 1121.
• Облегчённое глажение - специальная программа для синтетических тканей.
çÂÓ·ıÓ‰Ëχfl
ТЪВФВМ¸ ТЫ¯НЛ
å‡ÍÒ.
Á‡„ÛÁ͇
6
6
6
6
6
6
2,5
2,5
2,5
1
1 (10 T)
2,5
(1)
, Í„
ëۯ͇ Ò Ú‡ÈÏÂÓÏ
íËÔ ·Âθfl ÇÂÏfl ÒÛ¯ÍË
å‡ÍÒ.
Á‡„ÛÁ͇
(1)
, Í„
иУОУКВМЛВ Ы˜НЛ ‚˚·У‡
èÓ„‡Ïχ
(*)
(*)
(*)
ÔÓ„‡ÏÏ˚
Хлопок
Хлопок
Синтетика
(1) çËÍÓ„‰‡ Ì Ô„ÛʇÈÚ ·‡‡·‡Ì (Ì Á‡„ÛʇÈÚ ·Óθ¯Ë ӉÂfl·, ̇ÔËÏÂ).
ÇÂÏfl ÒÛ¯ÍË Á‡‚ËÒËÚ ÓÚ:
• íËÔ‡ ·Âθfl
• äÓ΢ÂÒÚ‚‡ ·Âθfl
• Необходимой степени сушки
• лЪВФВМЛ УЪКЛП‡ ФВВ‰ ТЫ¯НУИ.
90 мин
60 мин
30 мин
6
6
2,5
90 мин
60 мин
30 мин
йТ‚ВКВМЛВ Л УıО‡К‰ВМЛВ
щЪУ ФУОУКВМЛВ ТВОВНЪУ‡ ФУ„‡ПП ПУКВЪ ·˚Ъ¸ ЛТФУО¸БУ‚‡МУ ‰Оfl УТ‚ВКВМЛfl ·ВО¸fl (М‡ФЛПВ, ‰Оfl
Ы‰‡ОВМЛfl ТЪУИНУ„У Б‡Ф‡ı‡ М‡ЩЪ‡ОЛМ‡).
ᇄÛÁ͇
у‡ТЪУ ·˚‚‡ВЪ ТОУКМУ УФВ‰ВОЛЪ¸ ‚ВТ ·ВО¸fl ‰Оfl ТЫ¯НЛ. З ˝ЪУП ТОЫ˜‡В ВНУПВМ‰ЫВП ‚‡П
ФЛ‰ВКЛ‚‡Ъ¸Тfl ТОВ‰Ы˛˘В„У:
пОУФУН, ОfiМ
•
лЛМЪВЪЛН‡
•
нУМНЛВ ЪН‡МЛ
•
: ·‡‡·‡М ФУОМ˚И, МУ МВ М‡·ЛЪ˚И ·ЛЪНУП;
: Ì ·ÓΠÔÓÎÓ‚ËÌ˚ ·‡‡·‡Ì‡;
: Ì ·ÓΠÚÂÚË ·‡‡·‡Ì‡.
52
Page 53

иУТОВ‰У‚‡ЪВО¸МУТЪ¸
55-56 )
‡·ÓÚ˚
иВВ‰ ФВ‚˚П ЛТФУО¸БУ‚‡МЛВП ‚‡¯ВИ
ТЫ¯ЛО¸МУИ П‡¯ЛМ˚ ВНУПВМ‰ЫВП ФУПВТЪЛЪ¸ ‚
МВfi МВПМУ„У ‚О‡КМУ„У ·ВО¸fl Л ТЫ¯ЛЪ¸ В„У ‚
ЪВ˜ВМЛВ 30 ПЛМЫЪ.
З МУ‚УИ ТЫ¯ЛО¸МУИ П‡¯ЛМВ ПУКВЪ ЛПВЪ¸Тfl
Ф˚О¸.
ëۯ͇
1. èÓ‰Íβ˜ËÚ ÔË·Ó.
2. éÚÍÓÈÚÂ Î˛Í Ì‡Ê‡ÚËÂÏ ÒÓÓÚ‚ÂÚÒÚ‚Û˛˘ÂÈ
НМУФНЛ.
3. ᇄЫБЛЪВ ·ВО¸fi, Н‡К‰Ы˛ ‚В˘¸ ФУ
УЪ‰ВО¸МУТЪЛ, ТОВ„Н‡ ‚ТЪflıЛ‚‡fl В„У.
4. á‡ÍÓÈÚ βÍ. ì·Â‰ËÚÂÒ¸, ˜ÚÓ ·Âθfi ÌÂ
ÔÓÔ‡ÎÓ ÏÂÊ‰Û Î˛ÍÓÏ Ë ÙËθÚÓÏ.
5. Выберите программу сушки или время сушки.
Зажгутся лампы , и .
Сигнальная лампа кнопки «Пуск/Пауза»
будет мигать, на дисплее появится
продолжительность программы.
6. При необходимости нажмите кнопку низкой
температуры и /или кнопку отключения
звукового сигнала или кнопку быстрой
сушки .
7. При необходимости выберите время
задержки пуска. Время задержки запуска
программы, выбранное при помощи
соответствующей кнопки, показывается на
дисплее в течении 3 секунд. Затем вновь
отображается продолжительность
предварительно выбранной программы.
8. Нажмите кнопку «Пуск/Пауза» ,
соответствующая лампа перестанет мигать и
начнётся сушка. Будет гореть лампа .
Если Вы выбрали «отложенный старт»
начнётся отсчёт времени.
Если селектор выбора программ повёрнут в
другое положение во время сушки,
прозвенит звуковой сигнал, замигают
сигнальные лампы дисплея выполнения
программы и на дисплее появится Err. Во
время сушки барабан будет вращаться
попеременно в обоих направлениях. Все
программы сушки заканчиваются 10минутной фазой охлаждения (загорается
лампа ). После данной фазы Вы можете
вынуть бельё.
Загорятся , и , На дисплее
появится ноль.
9. Если в конце сушки бельё не было вынуто
машина выполнит фазу противосминания
(продолжительность 30 мин. максимум).
Машина остановится автоматически в конце
фазы противосминания. Лампы , и
будут продолжать гореть и звуковой сигнал
будет подаваться каждые 10 секунд в
течении 2 минут. Сигнальная лампа кнопки
«Пуск/Пауза» потухнет и на дисплее
появится мигающий ноль.
10. Поверните селектор программы в положение
«0», все лампы погаснут. Сушильная машина
выключена. Выньте бельё.
Если Вы откроете и закроете дверь прежде
чем повернуть селектор в положение «0»,
все соответствующие лампы дисплея
выполнения программы загорятся и на
дисплее появится продолжительность
программы.
иУТОВ Н‡К‰У„У ЛТФУО¸БУ‚‡МЛfl
• й˜ЛТЪЛЪВ ЩЛО¸Ъ Л УФУУКМЛЪВ ·‡˜УН ‰Оfl
‚Ó‰˚ (ÒÏÓÚË ÒÚ. 51-52).
З‡КМУ
иЛ МВУ·ıУ‰ЛПУТЪЛ УТЪ‡МУ‚НЛ ФУ„‡ПП˚ ТЫ¯НЛ
‰У Вfi Б‡‚В¯ВМЛfl, ВНУПВМ‰ЫВП ФУ‚ВМЫЪ¸
ТВОВНЪУ ‚˚·У‡ ФУ„‡ПП ‚ ФУОУКВМЛВ
(УıО‡К‰ВМЛВ) Л ‰УК‰‡Ъ¸Тfl НУМˆ‡ ˝ЪУИ Щ‡Б˚,
ФУТОВ ˜В„У ‚˚М¸ЪВ ·ВО¸fi. щЪУ ФВ‰УЪ‚‡ЪЛЪ
У·‡БУ‚‡МЛВ ТНУФОВМЛfl ЪВФО‡ ‚ ФЛ·УВ.
аБПВМВМЛВ ФУ„‡ПП˚
СОfl ЛБПВМВМЛfl ‡·УЪ‡˛˘ВИ ФУ„‡ПП˚
МВУ·ıУ‰ЛПУ ТМ‡˜‡О‡ УЪПВМЛЪ¸ Вfi ФУ‚УУЪУП ‚
ФУОУКВМЛВ “0”. б‡ЪВП ‚˚·ВЛЪВ МУ‚Ы˛
ФУ„‡ППЫ Л М‡КПЛЪВ НМУФНЫ ‚НО˛˜ВМЛfl .
RUSSKIJ
53
Page 54

иУОВБМ˚В Т‚В‰ВМЛfl
• лЪ‡‡ИЪВТ¸ П‡НТЛП‡О¸МУ Б‡„ЫК‡Ъ¸ П‡¯ЛМЫ, Ъ‡Н
Н‡Н МВФУОМ‡fl Б‡„ЫБН‡ fl‚ОflВЪТfl МВ˝НУМУПЛ˜МУИ.
СОfl ТФ‡‚НЛ, МЛКВ ФЛ‚У‰ЛЪТfl ТВ‰МЛИ ‚ВТ
М‡Л·УОВВ ‡ТФУТЪ‡МfiММ˚ı ‚В˘ВИ.
èÓÒÚ˚Ìfl 700 - 1000 „.
ë͇ÚÂÚ¸ 400 - 500 „.
дЫıУММУВ ФУОУЪВМˆВ 70 - 120 „.
лЪУОУ‚‡fl Т‡ОЩВЪН‡ 50 - 100 „.
е‡ıУ‚УВ ФУОУЪВМˆВ 150 - 250 „.
ŇÌÌ˚È ı‡Î‡Ú 1000 - 1500 „.
еЫКТН‡fl Ы·‡¯Н‡ 200 - 300 „.
燂ÓÎӘ͇ 100 - 200 „.
еЫКТН‡fl ФЛК‡П‡ 400 - 500 „.
ЬВМТН‡fl МУ˜М‡fl Ы·‡¯Н‡ 200 - 250 „.
• зЛНУ„‰‡ МВ ТЫ¯ЛЪВ ‚ П‡¯ЛМВ ТОВ‰Ы˛˘ВВ:
йТУ·ВММУ ЪУМНЛВ ‚В˘Л, Ъ‡НЛВ Н‡Н Ъ˛ОВ‚˚В
Б‡М‡‚ВТНЛ, ¯ВТЪ¸, ¯fiОН, ЪН‡МЛ Т
ПВЪ‡ООЛ˜ВТНЛПЛ ‚УОУНМ‡ПЛ, Н‡ФУМУ‚˚В
НУО„УЪНЛ, У·˙fiПЛТЪ˚В ‚В˘Л, Ъ‡НЛВ Н‡Н НЫЪНЛ,
У‰ВflО‡, ЛБ‰ВОЛfl Т ФЫıУ‚˚П М‡ФУОМВМЛВП,
ТФ‡О¸М˚В ПВ¯НЛ, ФВУ‚˚В У‰ВflО‡ Л О˛·˚В
‚В˘Л, ТУ‰ВК‡˘ЛВ ФУУОУМ ЛОЛ ТıУ‰М˚В Т МЛП
П‡ЪВЛ‡О˚.
• ЗТВ„‰‡ ФЛ‰ВКЛ‚‡ИЪВТ¸ ЛМТЪЫНˆЛИ М‡
˝ЪЛНВЪН‡ı ·ВО¸fl:
podleΩit sußke v maßine
• лЪ‡‡ИЪВТ¸ МВ ТЫ¯ЛЪ¸ ЪfiПМУВ ·ВО¸fi ‚ПВТЪВ ТУ
Т‚ВЪО˚ПЛ ‚УТЛТЪ˚ПЛ ‚В˘‡ПЛ, Ъ‡НЛПЛ Н‡Н
ФУОУЪВМˆ‡, Ъ‡Н Н‡Н УМЛ ПУ„ЫЪ ФЛЪfl„Л‚‡Ъ¸
‚УТЛМНЛ.
• иВВ‰ П‡¯ЛММУИ ТЫ¯НУИ ·ВО¸fi ТОВ‰ЫВЪ
Ъ˘‡ЪВО¸МУ УЪК‡Ъ¸.
ç ÚÂ·Û˛˘Ë „·ÊÂÌËfl ‚¢Ë
•
Ы·‡¯НЛ, МВУ·ıУ‰ЛПУ МВПМУ„У УЪК‡Ъ¸ ФВВ‰
ТЫ¯НУИ (‚ Б‡‚ЛТЛПУТЪЛ УЪ Лı ЫТЪУИ˜Л‚УТЪЛ Н
ТПЛМ‡МЛ˛, ‚ ЪВ˜ВМЛВ 30 ТВНЫМ‰
ФЛ·ОЛБЛЪВО¸МУ, ЛОЛ КВ ФЛ ФУПУ˘Л
ТФВˆЛ‡О¸МУИ НУУЪНУИ ФУ„‡ПП˚ УЪКЛП‡
‚‡¯ВИ ТЪЛ‡О¸МУИ П‡¯ЛМ˚).
• нЛНУЪ‡КМУВ ·ВО¸fi (ЪЛНУЪ‡КМУВ МЛКМВВ
·ВО¸fi) ‚У ‚ВПfl ТЫ¯НЛ ПУКВЪ ТВТЪ¸. зВ
ФВВТЫ¯Л‚‡ИЪВ ‚В˘Л ˝ЪУ„У ЪЛФ‡. кВНУПВМ‰ЫВП
Ы˜ЛЪ˚‚‡Ъ¸ ЫТ‡‰НЫ ‚В˘ВИ ФЛ Лı ФУНЫФНВ.
• З ТЫ¯ЛО¸МЫ˛ П‡¯ЛМЫ ПУКМУ Б‡„ЫК‡Ъ¸ Ъ‡НКВ
Л М‡Н‡ıП‡ОВММУВ ·ВО¸fi. нВП МВ ПВМВВ, ‰Оfl
М‡ЛОЫ˜¯В„У М‡Н‡ıП‡ОЛ‚‡МЛfl ‚˚·ВЛЪВ
ФУ„‡ППЫ ТЫ¯НЛ ‰Оfl „О‡КВМЛfl. СОfl Ы‰‡ОВМЛfl
УТЪ‡ЪНУ‚ Н‡ıП‡О‡ ФУТОВ ТЫ¯НЛ ФУЪЛЪВ
‚МЫЪВММ˛˛ ФУОУТЪ¸ ·‡‡·‡М‡ ‚О‡КМУИ
ЪflФУ˜НУИ Л ‚˚ЪЛЪВ М‡ТЫıУ.
• СОfl ФВ‰ЫФВК‰ВМЛfl У·‡БУ‚‡МЛfl
ТЪ‡ЪЛ˜ВТНУ„У Б‡fl‰‡ ФУТОВ Б‡‚В¯ВМЛfl ТЫ¯НЛ
ЛТФУО¸БЫИЪВ ТПfl„˜ЛЪВОЛ ЪН‡МЛ ‚У ‚ВПfl
ТЪЛНЛ ·ВО¸fl, ЛОЛ КВ ТФВˆЛ‡О¸М˚И
НУМ‰ЛˆЛУМВ ЪН‡МВИ, ТФВˆЛ‡О¸МУ
ФВ‰М‡БМ‡˜ВММ˚И ‰Оfl П‡¯ЛММУИ ТЫ¯НЛ.
• Ç˚̸Ú ·Âθfi, ÍÓ„‰‡ ÒÛ¯ËÎ͇ Á‡ÍÓ̘Ë·
‡·ÓÚÛ.
• ЦТОЛ УЪ‰ВО¸М˚В ‚В˘Л УТЪ‡МЫЪТfl ‚О‡КМ˚ПЛ
ФУТОВ ТЫ¯НЛ, ‚НО˛˜ЛЪВ НУУЪНЫ˛ ФУ„‡ППЫ
Б‡‚В¯‡˛˘ВИ ТЫ¯НЛ,
ФУБ‚УОЛЪ ‚˚ТЫ¯ЛЪ¸ ПМУ„УТОУИМ˚В ‚В˘Л
(М‡ФЛПВ, ‚УУЪМЛНЛ, Н‡П‡М˚ Л Ъ.‰.).
МВ ПВМВВ 20 ПЛМЫЪ
, Ú‡ÍË ͇Í
. ùÚÓ
У·˚˜М‡fl ТЫ¯Н‡ (‚˚ТУН‡fl ЪВПФВ‡ЪЫ‡)
·ВВКМ‡fl ТЫ¯Н‡ (МЛБН‡fl ЪВПФВ‡ЪЫ‡)
Ì ÒÛ¯ËÚ¸ ‚ χ¯ËÌÂ
• ᇂflКЛЪВ Б‡‚flБНЛ М‡‚УОУ˜ВН Л ˜ВıОУ‚, ˜ЪУ·˚
ПВОНЛВ ‚В˘Л МВ ФУФ‡ОЛ ‚МЫЪ¸. б‡НУИЪВ
НМУФНЛ, Б‡ТЪfiКНЛ-ПУОМЛЛ Л Н˛˜НЛ, ‡ Ъ‡НКВ
Б‡‚flКЛЪВ ВПМЛ Л Б‡‚flБНЛ Щ‡ЪЫНУ‚.
• йЪТУЪЛЫИЪВ ·ВО¸fi ‚ Б‡‚ЛТЛПУТЪЛ УЪ ЪЛФ‡ Л
МВУ·ıУ‰ЛПУИ ТЪВФВМЛ ТЫ¯НЛ.
• зВ ФВВТЫ¯Л‚‡ИЪВ ·ВО¸fi: ˝ЪУ ФВ‰УЪ‚‡˘‡ВЪ
ТПЛМ‡МЛВ Л ˝НУМУПЛЪ ˝МВ„Л˛.
54
Page 55

й·ТОЫКЛ‚‡МЛВ Л ЫıУ‰
иВВ‰ ‚˚ФУОМВМЛВП О˛·˚ı УФВ‡ˆЛИ ФУ ЫıУ‰Ы
ЛОЛ У·ТОЫКЛ‚‡МЛ˛ ФЛ·У‡ В„У ТОВ‰ЫВЪ
УЪНО˛˜ЛЪ¸ УЪ ТВЪЛ.
ç‡ÛÊ̇fl Ó˜ËÒÚ͇
аТФУО¸БЫИЪВ ОЛ¯¸ ЪУО¸НУ МВИЪ‡О¸М˚В ПУ˛˘ЛВ
ТВ‰ТЪ‚‡ Л ‚У‰Ы, ФУТОВ ˜В„У Ъ˘‡ЪВО¸МУ
ФУЪЛ‡ИЪВ ФЛ·У.
ЗМЛП‡МЛВ:
‡ТЪ‚УЛЪВОflПЛ ЛОЛ ТıУ‰М˚ПЛ Т МЛПЛ
ФУ‰ЫНЪ‡ПЛ.
МВ ФУО¸БЫИЪВТ¸ ПВЪЛОУ‚˚П ТФЛЪУП,
Âistka dveri
Periodi©eskaå ©istka vnutrennej storony
dveri neobhodima dlå udaleniå volokon,
nakaplivaæxihså so vremenem vokrug
filwtra, i obespe©ivaet ™ffektivnuæ sußku.
O©istka filwtrov
Sußilwnaå maßina ne moΩet rabotatw
ispravno pri zasorennyh filwtrah. Filwtry
sobiraæt vse volokna, kotorye obrazuætså
pri sußke, sledovatelwno, neobhodimo
snimatw i o©ixatw filwtry posle kaΩdoj
sußki pri pomoxi vlaΩnoj tkani.
Na paneli zagoritså lampa , signaliziruå,
©to sleduet o©istitw filwtry.
УМЛ ТУ·Л‡˛ЪТfl ‚ПВТЪВ Л У·‡БЫ˛Ъ ·УО¸¯УИ
У·˙fiП, Н‡Н ВБЫО¸Ъ‡Ъ ТЫ¯НЛ.
Vremå ot vremeni na filwtrah obrazuetså
belovatyj naløt, vyzvannyj nali©iem
ostatkov moæxih sredstv na belwe. Kogda ™to
slu©aetså, o©istite filwtry xøtkoj pod
teploj vodoj. Vynwte filwtr kak ukazano na
ris (åzy©ok filwtra moΩet bytw napravlen
libo vlevo libo vpravo).
зВ ЛТФУО¸БЫИЪВ ФЛ·У ·ВБ ЩЛО¸Ъ‡.
é˜ËÒÚ͇ ÍÓ̉ÂÌÒ‡ÚÓ‡
Kogda na paneli zagoritså lampa , sleduet
o©istitw kondensator.
иВЛУ‰Л˜ВТНЛ У˜Л˘‡ИЪВ НУМ‰ВМТ‡ЪУ, 3-4 ‡Б‡ ‚
„У‰, ‚ Б‡‚ЛТЛПУТЪЛ УЪ ЪУ„У, Н‡Н ˜‡ТЪУ
ЛТФУО¸БЫВЪТfl ТЫ¯ЛО¸М‡fl П‡¯ЛМ‡.
й˜ЛТЪЛЪВ В„У ˘fiЪНУИ Л ФУПУИЪВ В„У ФУ‰ ‰Ы¯ВП
‚ ТОЫ˜‡В МВУ·ıУ‰ЛПУТЪЛ.
Kondensator nahoditså v niΩnej ©asti
maßiny za malenwkoj dvercej. Otkrojte
dvercu, kak ukazano na ris.
RUSSKIJ
ÇÌËχÌËÂ:
ÙËθڇ.
зВ ТОВ‰ЫВЪ ·ВТФУНУЛЪ¸Тfl ФУ ФУ‚У‰Ы ЪУ„У
НУОЛ˜ВТЪ‚‡ ‚УОУНУМ, НУЪУУВ ТУ·Л‡ВЪТfl ‚
ЩЛО¸Ъ‡
ЛБМУТУП ‚˚ТЫ¯Л‚‡ВП˚ı ЪН‡МВИ, ‡ МВ
МВЛТФ‡‚МУИ ‡·УЪУИ П‡¯ЛМ˚. аТЪЛ‡МЛВ
ЪН‡МВИ ‚У ‚ВПfl МУТНЛ Л ТЪЛНЛ ·ВО¸fl У·‡БЫВЪ
‚УОУНМ‡. ЦТОЛ ·ВО¸fi ТЫ¯ЛЪТfl М‡ ‚Вfi‚НВ, ЪУ
‚УОУНМ‡ ЫМУТЛЪ ‚ВЪВ, ‡ ‚ ТЫ¯ЛО¸МУИ П‡¯ЛМВ
Ы‰‡ОЛЪВ ‚УОУНМ‡ Ъ‡НКВ Л ‚УНЫ„
ı
. ùÚÓ Ó·ÛÒÎÓ‚ÎÂÌÓ ÌÓχθÌ˚Ï
В процессе или в конце цикла сушки
допускается появление небольшого количества
воды в отсеке конденсатора.
Dlå togo, ©toby vytaxitw kondensator
sleduet povernutw dva krasnyh diska vniz i
vynutw ego derΩa za ru©ku.
55
Page 56

й˜ЛТЪЛЪВ Ъ‡НКВ Л М‡ЫКМЫ˛ ФУ‚ВıМУТЪ¸ Л
Ы‰‡ОЛЪВ ‚УОУНМ‡.
иУЪЛЪВ ‚О‡КМУИ ЪН‡М¸˛ ВБЛМУ‚УВ
ЫФОУЪМВМЛВ ‚УНЫ„ ФУfiП‡ О˛Н‡, ‡ Ъ‡НКВ
‚МЫЪВММВВ ЫФОУЪМВМЛВ НУМ‰ВМТ‡ЪУ‡.
ЗМЛП‡МЛВ!
ФВ‰ПВЪ‡ПЛ ЛОЛ ЛМТЪЫПВМЪУП ‰Оfl У˜ЛТЪНЛ
ФУТЪ‡МТЪ‚‡ ПВК‰Ы ФО‡ТЪЛМ‡ПЛ, Ъ‡Н Н‡Н ˝ЪУ
ПУКВЪ ФУ‚В‰ЛЪ¸ НУМ‰ВМТ‡ЪУ Л Т‰ВО‡Ъ¸ В„У
МВ„ВПВЪЛ˜М˚П.
зВ ФУО¸БЫИЪВТ¸ Б‡УТЪfiММ˚ПЛ
зВ ЛТФУО¸БЫИЪВ ˝ЪУЪ ФЛ·У ·ВБ
ЫТЪ‡МУ‚ОВММУ„У НУМ‰ВМТ‡ЪУ‡.
O©istka vozduhozabornoj
reßøtki
Ispolwzuå pylesos udalite pylw s
vozduhozabornoj reßøtki.
ëÎË‚ ‚Ó‰˚ ËÁ ·‡˜Í‡
лУ‰ВК‡˘‡flТfl ‚ ·ВО¸В ‚О‡„‡ НУМ‰ВМТЛЫВЪТfl ‚
П‡¯ЛМВ Л ТУ·Л‡ВЪТfl ‚ ·‡˜УН. щЪУЪ ·‡˜УН
ТОВ‰ЫВЪ УФУУКМflЪ¸ ФУТОВ Н‡К‰УИ ТЫ¯НЛ ‰Оfl
У·ВТФВ˜ВМЛfl ˝ЩЩВНЪЛ‚МУИ ФУТОВ‰Ы˛˘ВИ
˝НТФОЫ‡Ъ‡ˆЛЛ.
ÇÌËχÌËÂ:
·‡˜УН Б‡ФУОМЛЪТfl ‚У‰УИ, ЪУ М‡ Ф‡МВОЛ Б‡„УЛЪТfl
·ÏÔ‡ , ТЛ„М‡ОЛБЛЫfl, ˜ЪУ ·‡˜УН ТОВ‰ЫВЪ
УФУУКМЛЪ¸. Belwø pri ™tom ostaøtså vlaΩnym.
Vodu iz ba©ka moΩno slitw daΩe vo vremå raboty
programmy.
臂ЛО¸МУ ЫТЪ‡М‡‚ОЛ‚‡ИЪВ М‡ ПВТЪУ ·‡˜УН.
иУТОВ ˝ЪУИ ФУˆВ‰Ы˚, ФВВ‰ ЪВП, Н‡Н П‡¯ЛМ‡
‚УБУ·МУ‚ЛЪ ‡·УЪЫ, ‚ ЪВ˜ВМЛВ МВТНУО¸НЛı ТВНЫМ‰
П‡¯ЛМ‡ ·Ы‰ВЪ ·ВБ‰ВИТЪ‚У‚‡Ъ¸, ‡ О‡ПФ‡
“Б‡ФУОМВМЛВ ·‡˜Н‡ ‰Оfl ‚У‰˚” ·Ы‰ВЪ ФУ‰УОК‡Ъ¸
„УВЪ¸.
иУОВБМ˚И ТУ‚ВЪ:
·˚Ъ¸ ЛТФУО¸БУ‚‡М‡ ‰Оfl ЫЪ˛„‡ Т
Ф‡У„ВМВ‡ЪУУП, ‰Оfl ‡ННЫПЫОflЪУМ˚ı ·‡Ъ‡ВИ
Л Ъ.‰. З ˝ЪУП ТОЫ˜‡В Вfi ТОВ‰ЫВЪ ФУЩЛО¸ЪУ‚‡Ъ¸
(М‡ФЛПВ, ˜ВВБ НУЩВИМ˚И ЩЛО¸Ъ).
ÂÒÎË ‚Ó ‚ÂÏfl ‡·ÓÚ˚ ÔÓ„‡ÏÏ˚ ÒÛ¯ÍË
НУМ‰ВМТЛЫВП‡fl ‚У‰‡ ПУКВЪ
56
Page 57

уЪУ-ЪУ МВЛТФ‡‚МУ?
)
иВВ‰ ЪВП, Н‡Н У·‡ЪЛЪ¸Тfl ‚ ‚‡¯ лВ‚ЛТМ˚И ˆВМЪ б‡МЫТТЛ, ФУ‚В¸ЪВ ТОВ‰Ы˛˘ВВ:
зВЛТФ‡‚МУТЪ¸
ëÛ¯Ëθ̇fl χ¯Ë̇ Ì ‡·ÓÚ‡ÂÚ:
•
çÂÛ‰Ó‚ÎÂÚ‚ÓËÚÂθÌ˚Â
•
ÂÁÛθڇÚ˚ ÒÛ¯ÍË:
ЗУБПУКМ‡fl ФЛ˜ЛМ‡
• éÚÍ˚Ú Î˛Í.
• ЗЛОН‡ МВ ‚ТЪ‡‚ОВМ‡ ‚ М‡ТЪВММЫ˛ УБВЪНЫ.
• йЪТЫЪТЪ‚ЛВ ˝ОВНЪУФЛЪ‡МЛfl ‚ УБВЪНВ.
• зВФ‡‚ЛО¸МУ ЫТЪ‡МУ‚ОВМ‡ Ы˜Н‡ ТВОВНЪУ‡.
• Ň˜ÓÍ ‰Îfl ‚Ó‰˚ ÔÓÎÌ˚È.
• зВ ·˚О‡ М‡К‡Ъ‡ НМУФН‡ ‚НО˛˜ВМЛfl .
• Была выбрана функция «Отложенного пуска».
• á‡ÒÓÂÌ˚ ÙËθÚ˚.
• á‡ÒÓÂÌ ÍÓ̉ÂÌÒ‡ÚÓ.
• Ň˜ÓÍ ‰Îfl ‚Ó‰˚ ÔÓÎÌ˚È.
• Ç˚·‡Ì̇fl ÔÓ„‡Ïχ ÌÂÔ˄Ӊ̇ ‰Îfl ‰‡ÌÌÓ„Ó
ÚËÔ‡ ·Âθfl.
• ç‰ÓÒÚ‡ÚÓ˜ÌÓ ‚ÂÏfl ÒÛ¯ÍË.
• ÅÂθfi ·˚ÎÓ ÔÎÓıÓ ÓÚʇÚÓ.
• Е˚О‡ ‚˚·‡М‡ ЩЫМНˆЛfl ТЫ¯НЛ ФЛ МЛБНУИ
ЪВПФВ‡ЪЫВ .
• óÂÁÏÂ̇fl Á‡„ÛÁ͇ ·Âθfl.
• ëÛ¯Ëθ̇fl χ¯Ë̇ ÌÂÔ‡‚ËθÌÓ ÛÒÚ‡ÌÓ‚ÎÂ̇.
RUSSKIJ
• Лампочка освещения
барабана не горит:
ЦТОЛ КВ ФУТОВ ФУ‚В‰ВМЛfl ‚˚¯ВУФЛТ‡ММУИ
ФУ‚ВНЛ МВЛТФ‡‚МУТЪ¸ МВ ЫТЪ‡МЛО‡Т¸,
У·‡ЪЛЪВТ¸ ‚ ‚‡¯ лВ‚ЛТМ˚И ˆВМЪ.
臂ËθÌÓ ÒÓÓ·˘ËÚ ÏÓ‰Âθ Ë Á‡‚Ó‰ÒÍÓÈ ÌÓÏÂ
ÔË·Ó‡.
ùÚË ‰‡ÌÌ˚ ‚˚ ̇ȉfiÚ ̇ Á‡‚Ó‰ÒÍÓÈ Ú‡·Î˘ÍÂ
(sm. ris. na str.43).
46
• Селектор выбора программ повёрнут в
порложение «0»
Лампочка перегорела
57
Page 58

From the Electrolux Group. The world’s No.1 choice.
The Electrolux Group is the world’s largest producer of powered appliances for kitchen, cleaning and outdoor use. More than
55 million Electrolux Group products (such as refrigerators, cookers, vacuum cleaners, chain saws and lawn mowers) are sold
each year to a value of approx.14 billion USD in more than 150 countries around the world.
MADE IN EEC
 Loading...