

TUMBLE DRYER
SUSZARKA DO BIELIZNY
BUBNOVÁ SUSI C KA
ROTAC NÁ BUBNOVÁ SUS I C KA
CENTRIFUGÁS SZÁRÍTÓGÉP
INSTRUCTION BOOKLET
INSTRUKCJA OBSLUGI
NÁVOD K OBSLUZE
NÁVOD NA OBSLUHU
HASZNÁLATI ÚTMUTATÓ
125 992 325
EDC 5310
GB
CZ
PL
SK
H
Dear customer,
Please read these operating instructions carefully and pay particular attention to the safety notes indicated in
the first pages.
We recommend that you keep this instruction booklet for future reference and pass it on to any future owners.
Transport damages
After unpacking the machine please check it is not damaged. If in doubt, do not start it but contact your local
Service Centre.
The symbols you will see on some paragraphs of this booklet have the following meaning:
The warning triangle emphasize information that is particularly important for your safety or correct
functioning of the appliance.
The information marked with this symbol provides additional instructions and practical tips on the use of
the appliance.
Tips and information about economical and ecological use of the machine are marked with this symbol.
Our contribution to the protection of the
environment: we use recycled paper.
Contents
Important safety information ......................3
Disposal ..............................................................3
Tips for environmental protection ............4
Technical specifications................................4
Description of the appliance ......................4
Adjusting the level of conductivity............5
Installation ..........................................................6
• Unpacking ............................................................6
• Positioning ............................................................6
• Electrical connection ............................................6
• Stacking kit ..........................................................6
• Door reversal ........................................................6
Use ........................................................................7
• The control panel ..............................................7-8
• Programme chart ..................................................9
• Operating sequence............................................10
• Useful hints ........................................................11
Maintenance and Cleaning ........................12
• External cleaning ................................................12
• Cleaning the door ..............................................12
• Cleaning the filters ..............................................12
• Cleaning the condenser unit ..............................12
• Emptying the water reservoir ..............................13
• Cleaning the air intake grille................................13
• Cleaning the drum ..............................................13
Something not working? ............................14
2
Important safety information
These warnings have been provided in the interest of safety. You MUST read them carefully before installing or
using the appliance.
Installation
• Any electrical work required to install this
appliance should be carried out by a qualified
electrician or competent person.
• Care must be taken to ensure that the appliance
does not stand on the electrical supply cable.
• If the machine is situated on a carpeted floor, please
adjust the feet in order to allow air to circulate freely.
Use
• This appliance is designed for domestic use only.
If the machine is used for any other purposes or is
not used correctly, the manufacturer accepts no
responsibility for any damage that might occur.
• Always unplug the appliance after use.
• Clothes which are dripping wet should not be
placed in the dryer.
• Danger of explosion: Never tumble dry items that have
been in contact with inflammable solvents (petrol,
methylated spirits, dry cleaning fluid and the like). As
these substances are volatile, they could cause an
explosion. Tumble dry only items washed with water.
• Risk of fire: items that have been spotted or soaked with
vegetable or cooking oil constitute a fire hazard and
should not be placed in the tumble dryer.
• If you have washed your laundry with stain
remover you must execute an extra rinse cycle
before loading your tumble dryer.
• Please make sure that no gas lighters have
accidentally been left in pockets of garments to be
loaded into appliance.
• Do not dry canvas shoes or sports shoes, as they
could get stuck between the door and the drum,
thus blocking this latter.
• Leave the door slightly ajar when the appliance is not
being used. This will allow the seal to be preserved.
• Clean fluff filters after using the tumble dryer. To
prevent fire risks, do not use the appliance if the
fluff filters are damaged or without filters.
• Do not allow fluff to accumulate around the dryer.
General safety
• It is dangerous to alter the specifications or
attempt to modify this product in any way.
• Under no circumstances should you attempt to
repair the machine yourself. Repairs carried out by
inexperienced persons may cause injury or serious
malfunctioning. Contact your local Service Centre.
Always insist on genuine spare parts.
ENGLISH
Child safety
• Children are often not aware of how dangerous
electrical appliances can be. When the machine is
working, children should be carefully supervised
and not be allowed to play with the appliance.
• The packaging components (e.g. plastic film,
polystyrene) can be dangerous to children danger of suffocation! Keep them out of children’s
reach.
• Make sure that children or pets do not climb into
the drum.
• When the appliance is to be scrapped, cut off the
electrical supply cable and destroy the plug with
the remaining cable. Disable the door catch in
order to prevent children from becoming trapped
inside while playing.
Disposal
• Packaging materials
The materials marked with the symbol are
recyclable.
This means that they can be recycled by disposing
of them properly in appropriate collection
containers.
• Machine
Use authorised disposal sites for your old appliance.
Help to keep your country tidy!
• Old appliance
The symbol on the product or on its packaging
indicates that this product may not be treated as
household waste. Instead it shall be handed over to
the applicable collection point for the recycling of
electrical and electronic equipment. By ensuring this
product is disposed of correctly, you will help prevent
potential negative consequences for the environment
and human health, which could otherwise be caused
by in appropriate waste handling of this product.For
more detailed information about recycling of this
product, please contact your local city office, your
household waste disposal service or the shop where
you purchased the product.
3
Tips for environmental protection
To save energy and to help protect the environment,
we recommend that you follow these hints:
• Try to load the maximum capacity of the machine
as small loads are uneconomical.
• Always load well spun laundry. The higher the spin
speed, the lower the electricity consumption and
the shorter the drying times.
• Do not over-dry laundry, this avoids creasing and
saves energy.
Select the drying programme according to the
• To utilize the maximum load, laundry which is to
be dried ready to put away (store dry) can be dried
together with items to be ironed. To do this, select
the programme for iron-dry, remove the iron-dry
items at the end of the programme and then
finish-dry the rest of the load.
• Clean the filters regularly to avoid excessive drying
times and high electricity consumption.
• Ventilate the room well. The room temperature
should not exceed +35°C during drying.
type of laundry and the required degree of
dryness.
Technical specifications
DIMENSIONS: Height 85 cm
Width 60 cm
Depth 58 cm
ELECTRICAL CONNECTION: 220/230 V/50 Hz
MAX. POWER ABSORBED: 2400 W
MIN. FUSE RATING: 16 A
MAX. DRYING CAPACITY: Cotton, linen 5 kg
Synthetics 2.5 kg
CONSUMPTION: Cotton, linen 3.64 kWh (5.5 kg store dry)
Cotton, linen 3.64 kWh (5.5 kg iron dry)
Synthetics 1.40 kWh (2.5 kg store dry)
This appliance complies with the following E.E.C. Directives:
- 73/23 EEC of 19.2.73 (Low Voltage Directive) and subsequent modifications;
- 89/336 EEC of 3.5.89 (Electromagnetic Compatibility Directive) and subsequent modifications.
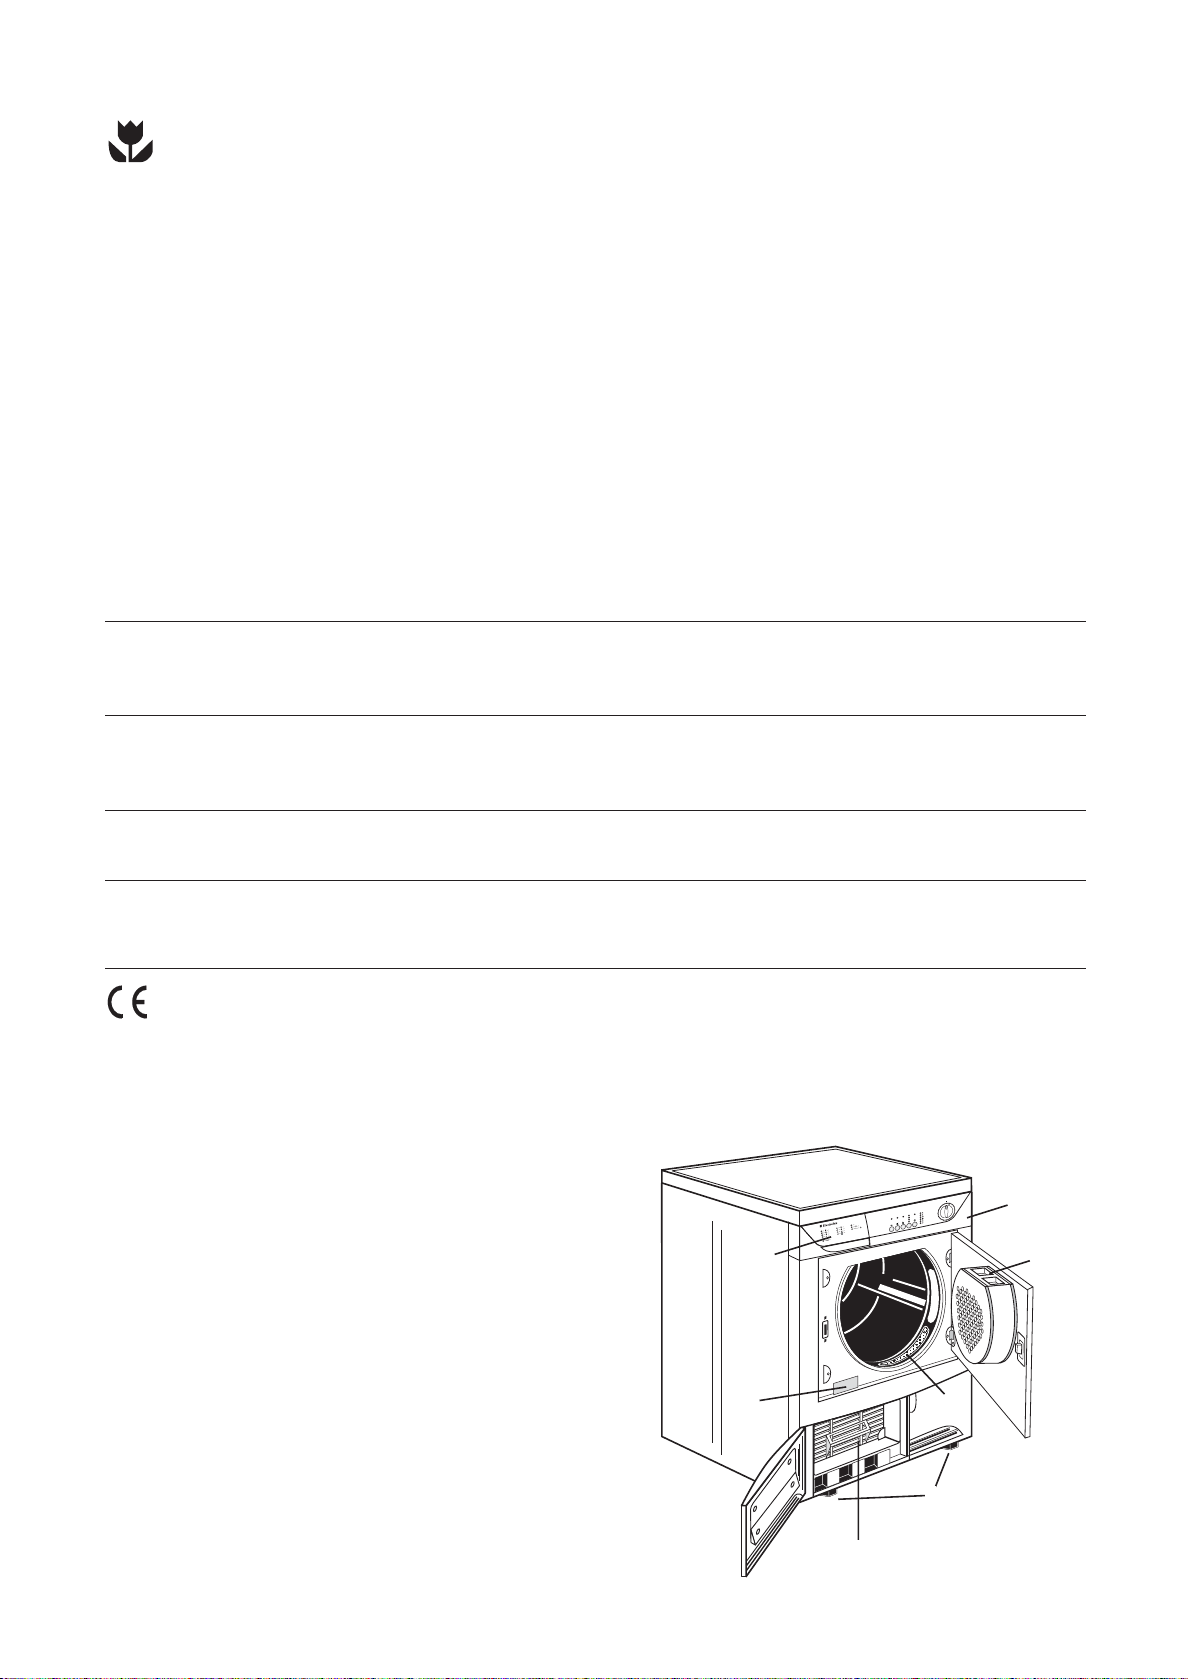
Description of the appliance
310
5
C
ED
0
L
A
30
B
60
C
9
0
D
K
h
9
E
J
h
6
F
H
G
h
3
- 90
60
03
L
G
H
A
J
B
K
C
D
E
F
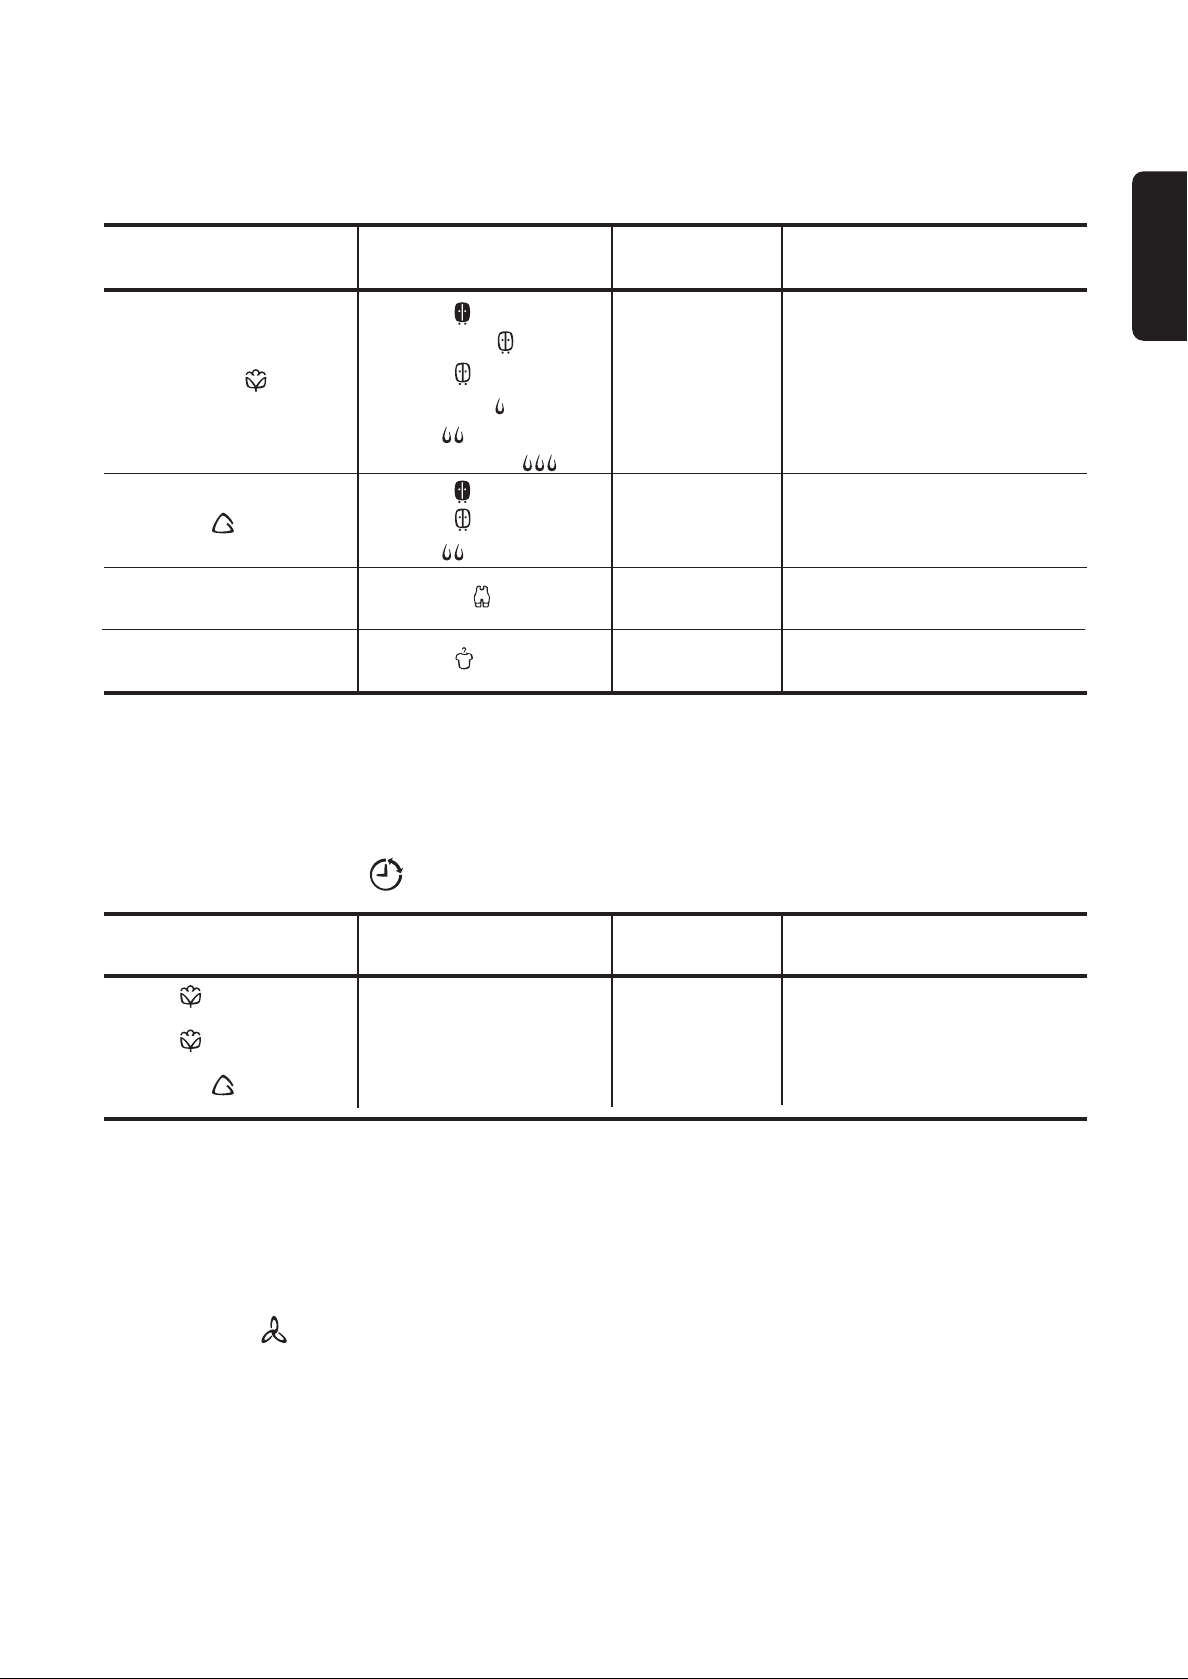
01 Control panel
02 Water reservoir
03 Fluff filters
04 Rating Plate
05 Condenser Unit
06 Adjustable feet
2
4
3
1
3
6
5
4
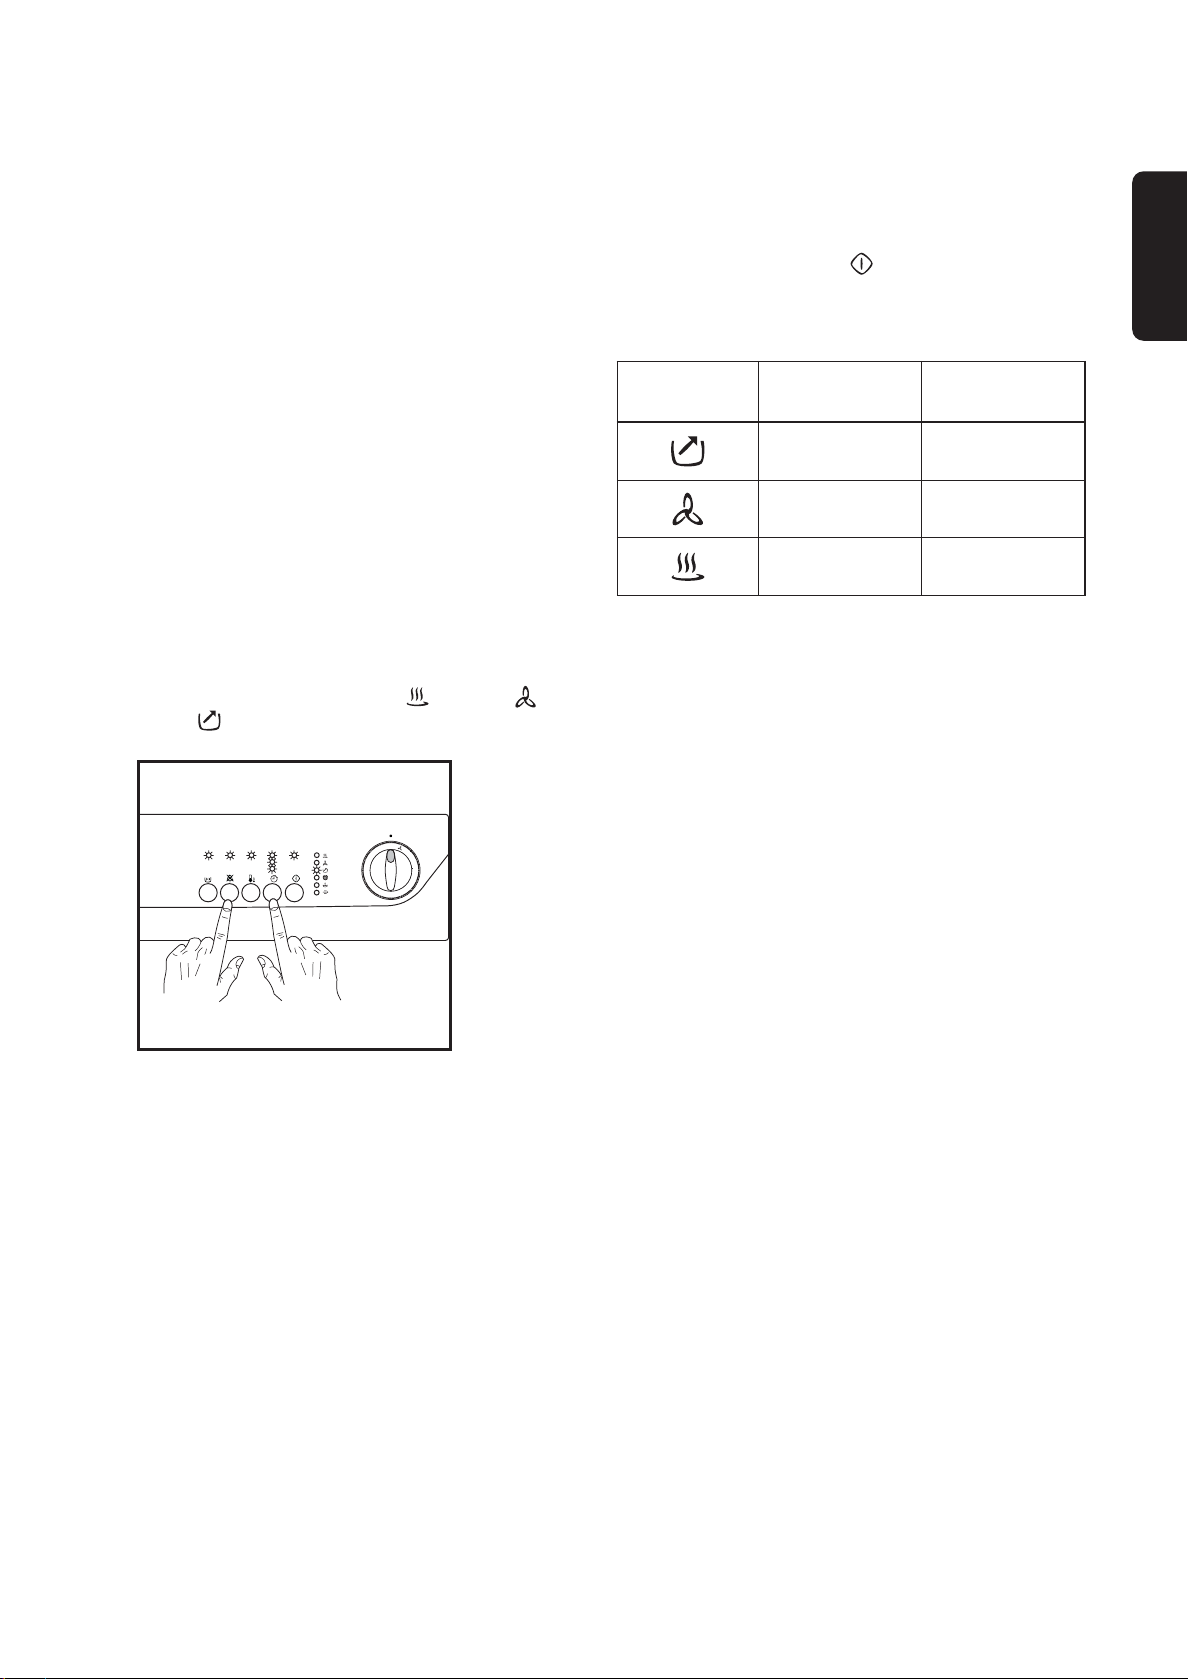
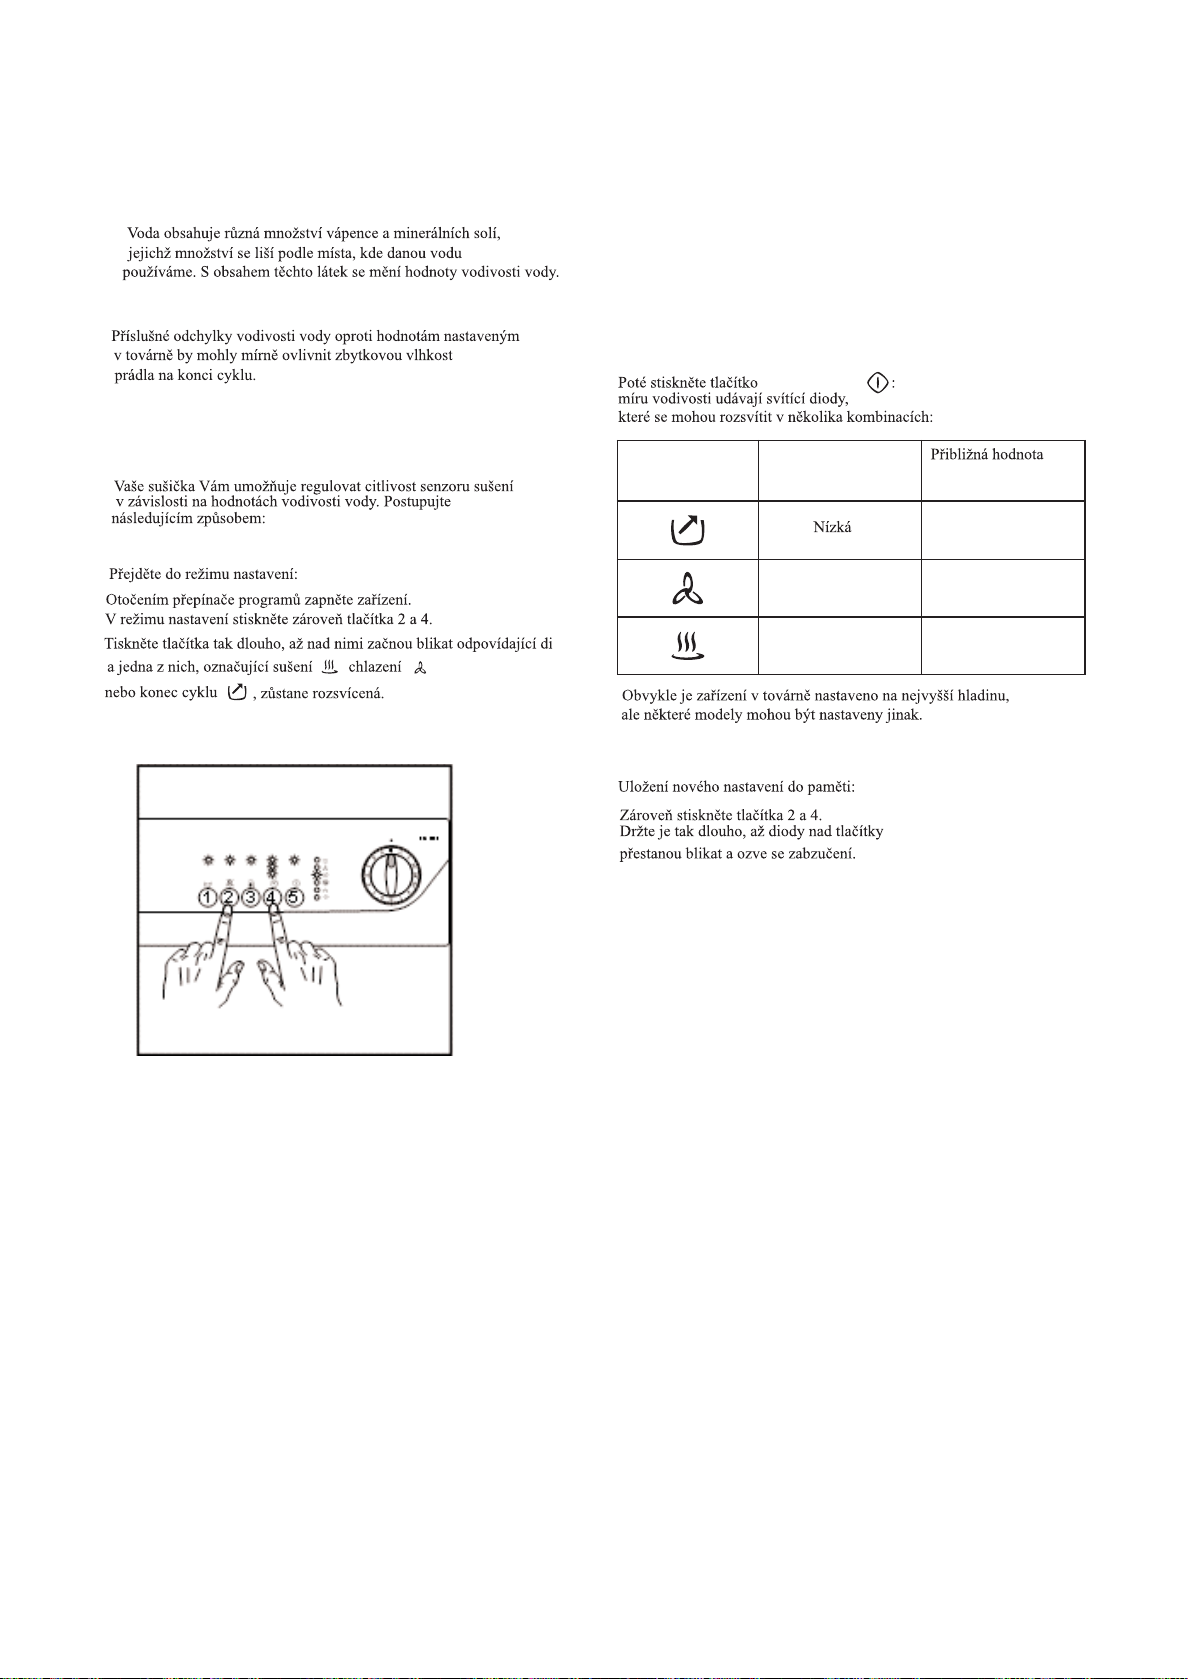
Adjusting the level of conductivity
Water contains, a variable quantity of limestone and
mineral salts of which quantities vary according to
geographical locations thus varying its conductivity
values.
Relevant variations of the conductivity of the water
compared to those prefixed by the factory could
slightly influence the residual humidity of the laundry
at the end of the cycle.
Your dryer allows you to regulate the sensitivity of
the drying sensor based on conductivity values of
the water by using the following procedure.
To access adjustment mode:
Turn the programme selector dial to switch on the
appliance. In selection mode, press simultaneously
the buttons 2 and 4.
Press the buttons down until the pilot lights above
each ones begin to flash and one of the pilot lights
indicating the drying phase lights , cooling
,
or
end cycle remains lit.
EDC 5310
0
A
L
B
3
0
C
60
D
90
E
K
F
J
G
12345
H
Adjusting the level of conductivity:
Press the START/PAUSE button sequentially:
the level of conductivity is indicated by the phase
pilot lights, which light in various combinations as
follows:
LED lit Conductivity
Approximate value
µS/cm
Low < 300
Medium 300 - 600
High > 600
Normally, the appliance is factory-set to the highest
level; however, certain models may be configured
differently.
Memorizing the new setting:
Simultaneously press the buttons 2 and 4.
Press the buttons down until the pilot lights above
each ones stop flashing and the buzzer sounds.
ENGLISH
5
Installation
Warning!
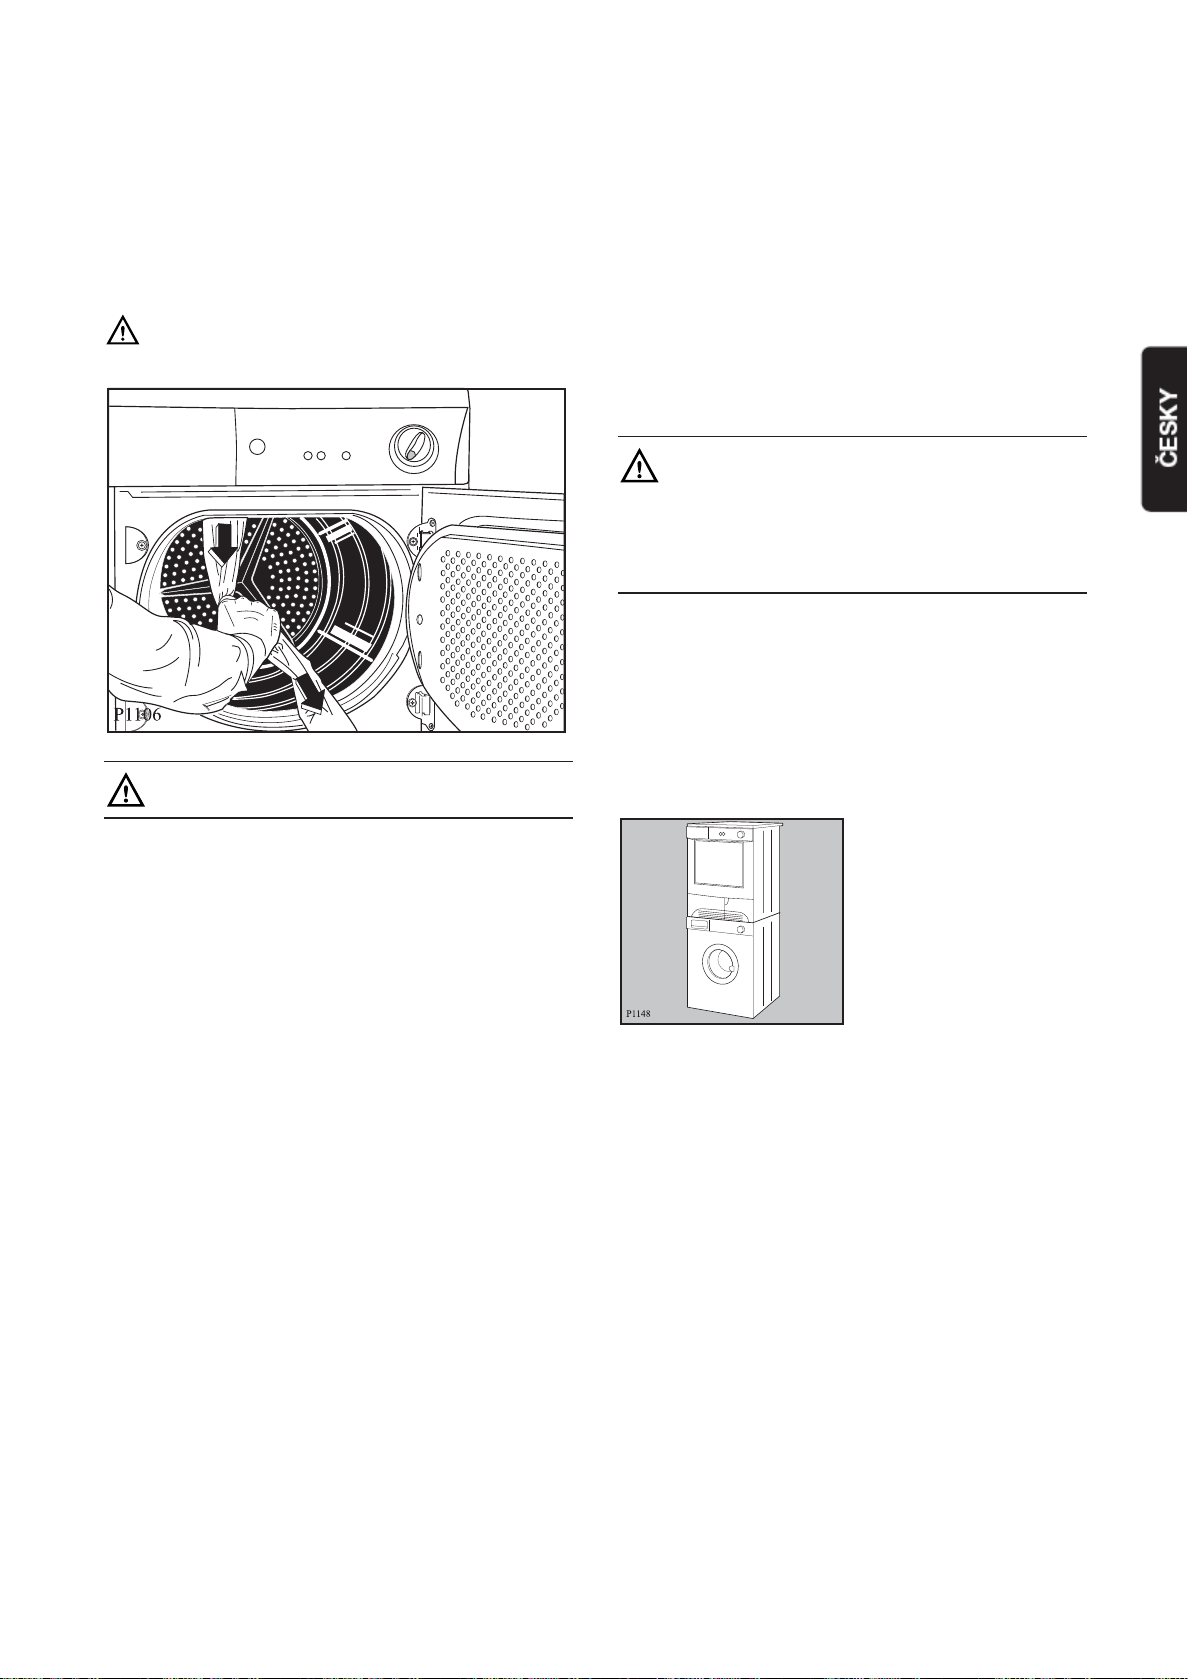
Unpacking
Slide out the polythene bag with the
polystyrene stuffing before using the
appliance.
P1106
Should the appliance be moved, it must be
transported vertically.
Positioning
It is recommended that, for your convenience, the
machine is positioned close to your washing
machine.
The tumble dryer must be installed in a clean place,
where dirt does not build up.
Air must be able to circulate freely all round the
appliance. Do not obstruct the front ventilation grille
or the air intake grille at the back of the machine.
To keep vibration and noise to a minimum when the
dryer is in use, it should be placed on a firm, level
surface.
Once in its permanent operating position, check
that the dryer is absolutely level with the aid of a
spirit level. If it is not, raise or lower the feet until
it is.
The feet must never be removed.
Do not restrict the floor clearance through deeppile carpets, strips of wood or similar. This might
cause heat build-up which would interfere with
the operation of the appliance.
Important
The hot air emitted by the tumble dryer can reach
temperatures of up to 60°C. The appliance must
therefore not be installed on floors which are not
resistant to high temperatures.
When operating the tumble dryer, the room
temperature must not be lower than +5°C and
higher than +35°C, as it may affect the performance
of the appliance.
Electrical connection
This machine is designed to operate on a 220-230 V,
single-phase, 50 Hz supply.
Check that your domestic electrical installation can
take the maximum load required (2.4 kW), also
taking into account any other appliances in use.
Connect the machine to an earthed socket, in
accordance with current wiring regulations.
The manufacturer declines any
responsibility for damage or injury
through failure to comply with the
above safety precaution.
Should the appliance power supply
cable need to be replaced, this must
be carried out by our Service
Centre.
Important!
The power supply cable must be accessible after
installing the machine.
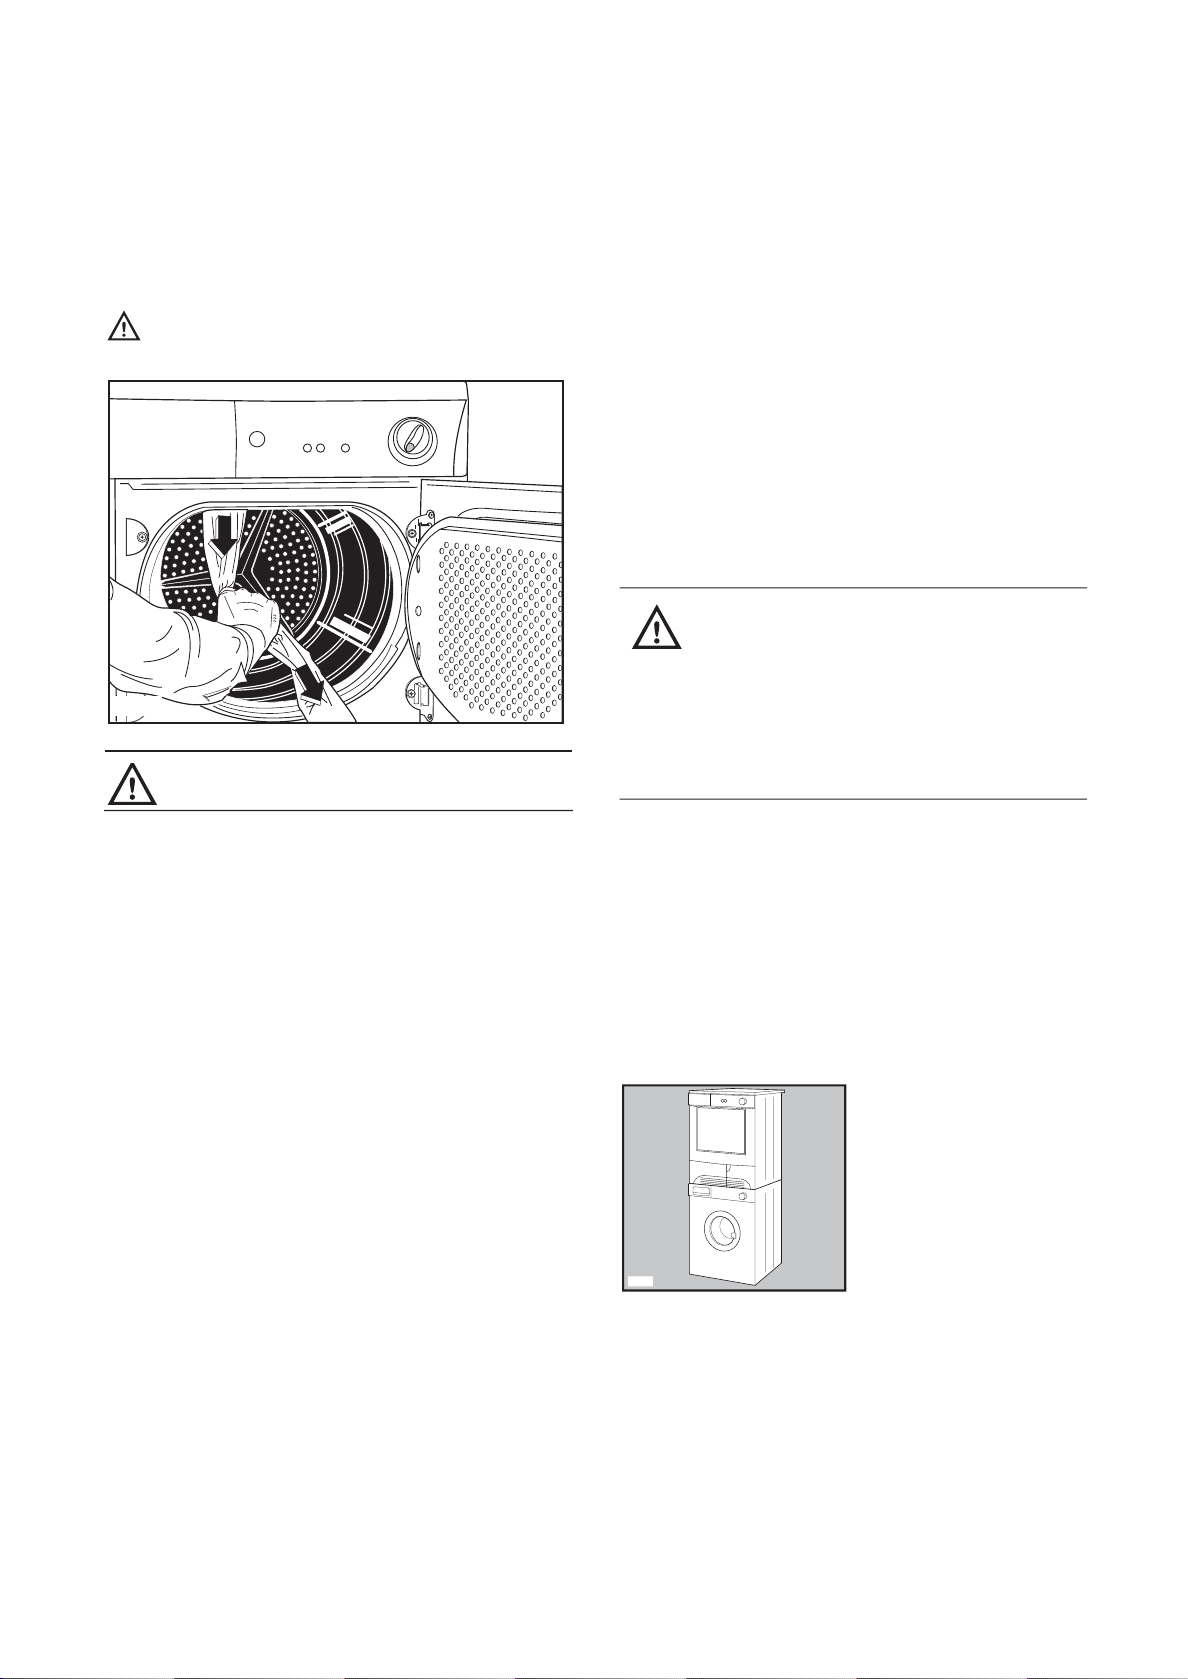
Stacking kit
A special stacking kit is available through your
dealer, to enable the mounting of the dryer on top of
a front loading washing machine with cover’s depth
between 48 and 60 cm.
Read carefully the instructions supplied with the kit.
P1148
Door reversal
To make it easier to load or unload the laundry the
door can be reversed.
This operation must be carried out by qualified
personnel.
Please contact the nearest Service Centre.
6
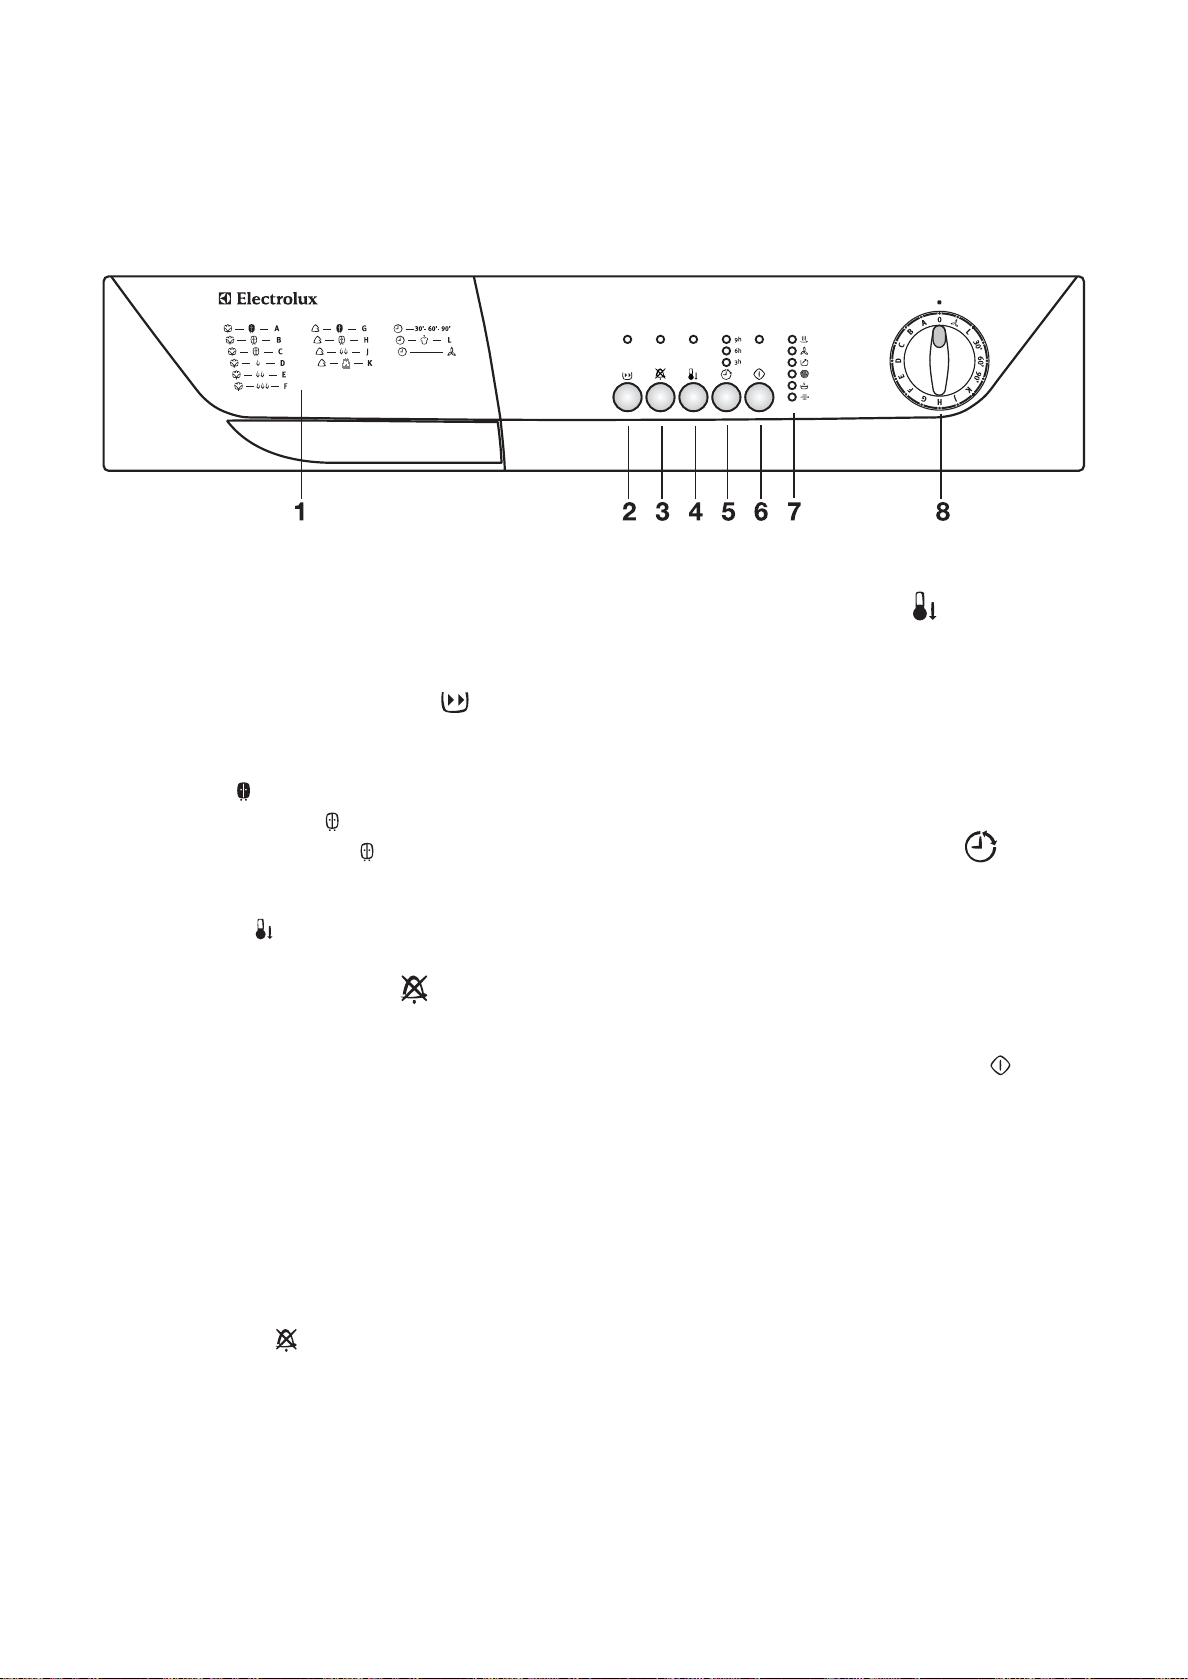
Use
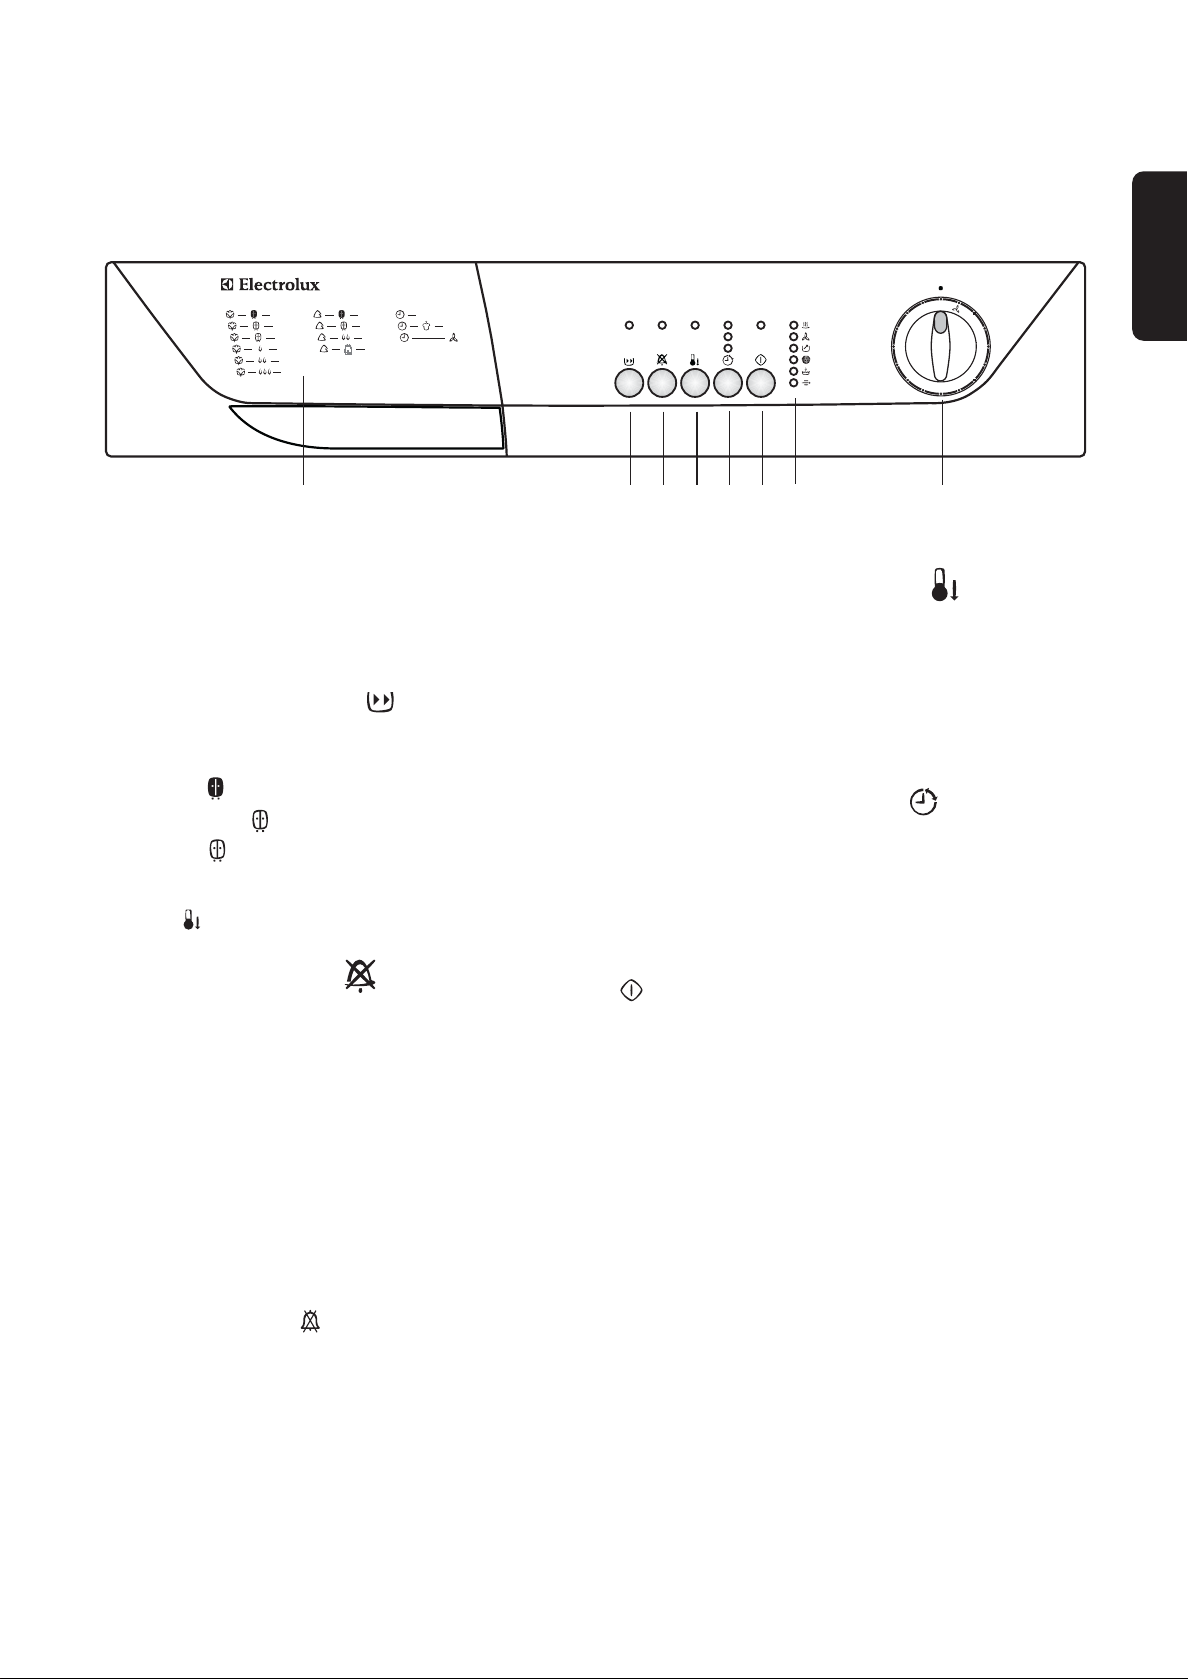
The control panel
A
B
C
D
E
F
1 234567 8
EDC 5310
0
30- 60- 90
G
H
J
K
L
9h
6h
3h
A
L
B
C
D
E
30
60
90
K
F
J
G
H
ENGLISH
1 Programme guide
This will help you to select the correct programme
for drying.
2 Quick drying button
By depressing this button the drying time is reduced
in the following COTTON programmes:
• extra dry
• ready to wear
• store dry
The corresponding light illuminates. This option
cannot be selected together with “low temperature”
function .
3
Buzzer OFF button
A buzzer sounds
• when selecting the programme
• when depressing the buttons
• when an incorrect option selection is made
• when the programme selector dial is turned to
another position during the programme or when
you depress an option button during the cycle
• at the end of the programme
• when the water reservoir is full
• if the machine is not working correctly
• when the door of the appliance or the small door at
the bottom are open
By depressing button the acoustic signal is
switched off in the following cases:
• when selecting the programme
• when depressing the buttons
• when the programme selector dial is turned to
another position during the programme or when
you depress an option button during the cycle
• at the end of the programme.
The corresponding light comes on.
4 Low temperature button
Pressing this button allows drying to be performed
at a lower temperature, for delicate items.
The corresponding pilot light comes on.
This option can also be used for time controlled
drying.
This function cannot be used with QUICK DRYING.
5 DELAYED START button
This button allows you to delay the starting of the
programme by 3, 6 or 9 hours.
Press the button until the light relevant to the
desired delay lights up.
This option must be selected after having selected
the programme and before pressing START/PAUSE
to start the programme.
The machine begins the countdown, which is shown
by the pilot lights. For example, if you have chosen a
9-hour delay (pilot light 9h lit), after 3 hours, 9h goes
out and 6h lights up; after 3 more hours, 6h goes out
and 3h lights up. When the 9 hours are over (pilot
light 3h off), the drying cycle begins.
During the delayed start period, it is not possible to
change the programme or the selected delay. If you
wish to do so, you must first cancel everything by
rotating the programme selector dial to position “0”.
Select the new programme, the options and the
delayed start, then press START/PAUSE.
If you wish to change only the options, this can be
done on condition that the new option(s) is(are)
compatible with the programme. Set the machine to
PAUSE by depressing the relevant button, select the
new option(s) and depress START/PAUSE button
again.
If you wish to add some laundry while the machine
is performing the countdown, after having done so
and having closed the door, press START/PAUSE
again, in order to allow the machine to complete the
remaining countdown time.
7
6 Start/Pause button
Press this button to start the dryer after having
selected the programme and the options.
The relevant light will stop flashing. If you have
chosen a delayed start, the machine will begin the
countdown.
If the door of the appliance or the small door at
the bottom is opened while the programme is
running, this button must be pressed again after
closing the door in order to restart the programme
from the point at which it was interrupted.
This button must be depressed also after a power
failure and after having re-inserted the water
reservoir, if it has been emptied in the middle of a
programme after lighting up of light
In both cases the light of the Start/Pause button
flashes to remind you that the start button needs to
be pressed again.
.
“Filter cleaning” light
This light illuminates at the end of the programme to
remind you that the filters must be cleaned.
“Water reservoir full” light
This light comes on at the end of the programme to
remind you that the water reservoir must be emptied
out. If this light illuminates during a programme this
means that the water reservoir is full. The buzzer
sounds, the programme stops, the light of the
Start/Pause button flashes.
“Condenser cleaning” light
It comes on every 80 cycles to remind you that the
condenser must be cleaned.
8 Programme/Time selector dial
7 Indicator lights
These lights indicate the following functions:
“Drying” light
This light indicates that the appliance is in the drying
phase.
“Cooling” light
This light indicates that the appliance is in the
cooling phase. At the end of drying, there is a
10 minute cooling phase to cool the laundry.
“End of programme” light
This light is on at the end of the cooling phase,
during the anti-creasing phase and at the end of the
programme.
Allows you to select electronically controlled or time
controlled drying.
Turn the dial to the required programme or time.
Electronically controlled drying
(automatic)
The appliance runs these programmes with the help
of probes which detect the degree of dampness of
the laundry.
Simply select the programme according to the type
of laundry and degree of drying required.
Time controlled drying
Can be used to finish off drying if necessary.
Select the 90 or 60 minute programme for cottons
or the 30 minute programme for synthetics.
To cancel a programme which is running, turn the
programme selector dial to “0”.
At the end of drying, turn the selector dial to “0” to
switch the machine off before removing the laundry.
8
Programme chart
Automatic drying (electronic programmes)
Type of laundry
Cotton & linen
Synthetics
Jumpers
Jackets, trousers,
dresses, skirts.
(*) According to CEI 1121 Standards.
• Baby cycle “K” is a special programme for jumpers to be dried “ready to wear”.
• Dry fresh “L” is designed to clean and freshen garments labelled “dry clean only” at home, in your tumble
dryer, using the special product available on the market.
Degree of drying
required
extra dry
ready to wear
store dry
slightly damp
iron dry
machine iron dry
extra dry
store dry
iron dry
Baby cycle
Dry fresh
Max-load
5 kg
5 kg
5 kg
5 kg
5 kg
5 kg
2.5 kg
2.5 kg
2.5 kg
1 kg
(10 jumpers)
1 - 4 garments
(1)
Programme
A
B
C(*)
D
E(*)
F
G
H(*)
J
K
L
ENGLISH
Time controlled drying
Type of laundry Drying time Max-load
Cotton
Cotton
Synthetics
(1) Never overfill the drum (do not load large quilts, for example).
Drying times vary according to:
• The type of laundry
• The size of the load
• The degree of spinning prior to drying.
• The requested drying degree.
90 min
60 min
30 min
(1)
5 kg
5 kg
2.5 kg
Programme
selector dial position
90’
60’
30’
Fresh & Cool
This position on programme selector dial can be used to freshen the laundry (e.g. to remove a persistent
odour of moth-balls). Programme duration 10 mins.
Load
It is often difficult to estimate the weight of items to be dried. We therefore recommend that you adopt the
following guidelines:
• cotton, linen: drum full but not too tightly packed;
• synthetics: drum no more than half full;
• delicate fabrics: drum no more than one third full.
9
Operating sequence
Before using your tumble dryer for the first time, we
recommend to place a few damp cloths inside the
appliance and dry for 30 minutes.
There may be dust inside a brand new tumble dryer.
Drying
1. Connect the appliance.
2. Open the door.
P1149
3. Load the items one at a time, shaking them out
loosely.
4. Close the door. Please check the laundry does
not get caught between the door and filter.
5. Select the drying programme or time. The lights
, and come on.
6. If required, press the low temperature button
and/or the buzzer OFF button or the
QUICK drying button .
7. Select the DELAYED START if required.
8. Press the Start button : the corresponding
light stops flashing and drying starts. Only the
light remains lit. If you have selected the
delayed start, the machine begins its countdown.
If the programme selector dial is turned to
another position, when the machine is running,
the buzzer will sound and the programme phase
indicator lights will flash.
The drum turns alternately in both directions
during drying.
All drying programmes end with a 10 minute
cooling phase (light is on).
You may remove the laundry after this phase.
The lights , and illuminate and the
buzzer sounds.
9. If the laundry is not removed at the end of the
cycle, the dryer performs an anti-creasing
phase (duration: 30 minutes maximum).
If you do not remove the laundry, the dryer will stop
automatically at the end of the anti-creasing phase.
Lights , and remain lit and the buzzer
sounds for 2 minutes.
P1108
10. Turn the programme selector dial to “0”; all the
lights go out. The appliance is switched off.
Remove the laundry.
If you open and then close the door before
turning the selector dial to “0” all the lights
corresponding to the phases making up the
performed programme come on.
After each use
• Clean the filters (see page 12).
• Empty the water reservoir (see page 13).
Important!
If the drying programme has to be stopped before it
reaches the end, we recommend that you turn the
programme selector dial to position and wait
until the end of this cooling phase before removing
the laundry. This will avoid a build-up of heat inside
the appliance.To do this first turn the dial to “0” and
then to and depress Start button
Modifying the programme
To change a programme which is running, first
cancel it by turning the programme selector dial to
“0”. Select the new programme and press the Start
button .
10
.
Useful hints
• Try to load to the maximum capacity of the
machine as small loads are uneconomical.
For information, here is a list of the average
weights of some common laundry items.
Sheet 700 - 1000 g
Tablecloth 400 - 500 g
Kitchen towel 70 - 120 g
Table napkin 50 - 100 g
Towelling hand towel 150 - 250 g
Bathrobe 1000 - 1500 g
Man’s shirt 200 - 300 g
Pillowcase 100 - 200 g
Man’s pyjamas 400 - 500 g
Ladies’ nightdress 200 - 250 g
• Never tumble dry the following:
Particularly delicate items such as net curtains,
woollen, silk, fabrics with metal trim, nylon tights,
bulky materials such as anoraks, blankets,
eiderdowns, sleeping bags, feather quilts and any
items containing rubber foam or materials similar
to rubber foam.
• Always follow the instructions on garment labels:
• Avoid drying dark clothes with light coloured fluffy
items such as towels as they could attract the
fluff.
• The laundry must be thoroughly spun before
tumble drying.
• Easy-care items, too, e.g. shirts, should be
briefly pre-spun before drying (depending on
crease resistance approx. 30 seconds or using the
special brief spin programme of your washing
machine).
• Knitted textiles (knitted underwear) may shrink a
little during drying. Please do not overdry items of
this type. It is advisable to allow for shrinkage
when choosing the size of new purchases.
• You can also put starched items into your dryer.
However, to achieve the desired starched effect,
choose the programme “iron dry”. To remove any
starch residues, wipe out the internal drum after
drying with a moist cloth and then rub it dry.
• To avoid a static charge when drying is
completed, use either a fabric softener when you
are washing the laundry or a fabric conditioner
specifically for tumble dryers.
• Remove the laundry when the dryer has finished
drying.
• If individual items are still damp after drying, set a
brief post-drying time, but at least 30 minutes.
This will be necessary particularly for multilayered
items (e.g. collars, pockets, etc.).
ENGLISH
may be tumble dried
normal drying (high temperature)
delicate drying (low temperature)
do not tumble dry
• Close pillowcases and covers with fasteners to
prevent small laundry items getting tangled inside
them. Close press studs, zips and hooks and tie
belts and apron strings.
• Sort laundry according to type and degree of
drying required.
• Do not over-dry laundry, this avoids creasing and
saves energy.
11
Maintenance and Cleaning
You must disconnect the appliance from the
electricity supply, before you can carry out any
cleaning or maintenance work.
External cleaning
Use only soap and water and then dry thoroughly.
Important: do not use methylated spirit, diluents or
similar products.
P1152
0
5
6
'
0
6
OREV
'
T
0
5
U
5
,
2
A
g
0
k
'
20
1
5
/
3
-
00
'
0
1
0
3
0
1
0
9
g
'
/
k
5
0
9
80
-
'
5
7
'
0
0
0
2
0
1
'
1
/
-
0
'
0
65
0
0
-
1
8
'
0
5
0
90
'
/
0
85'
70
0
-
8
-
'
'
5
6
55
'
0
9
'
5
'
4
0
-
7
0'
3
5
g
k
0'
5
-
'
5
3
5
2,
g
k
E
S
R
E
Cleaning the door
Clean periodically the interior part of the door to
remove any fluff from the seals around the filter.
Accurate cleaning ensures correct drying.
E
S
0
R
5
6
VE
E
'
0
6
OR
-
'
50
UT
,5
2
A
g
0
k
0
'
2
1
5
3
/
0
-
0
0
1
0'
3
0
1
0
9
g
'
/
k
5
9
00
8
'
75
'
0
0
0
2
0
1
1
'
/
5
0
'
6
0
00
-
1
8
'
0
5
0
0
9
'
'
/
5
0
0
8
7
0
8
-
-
'
'
5
5
6
5
'
0
9
'
5
'
4
0
-
7
'
0
3
5
g
k
'
0
5
-
'
5
3
5
,
2
kg
P1150
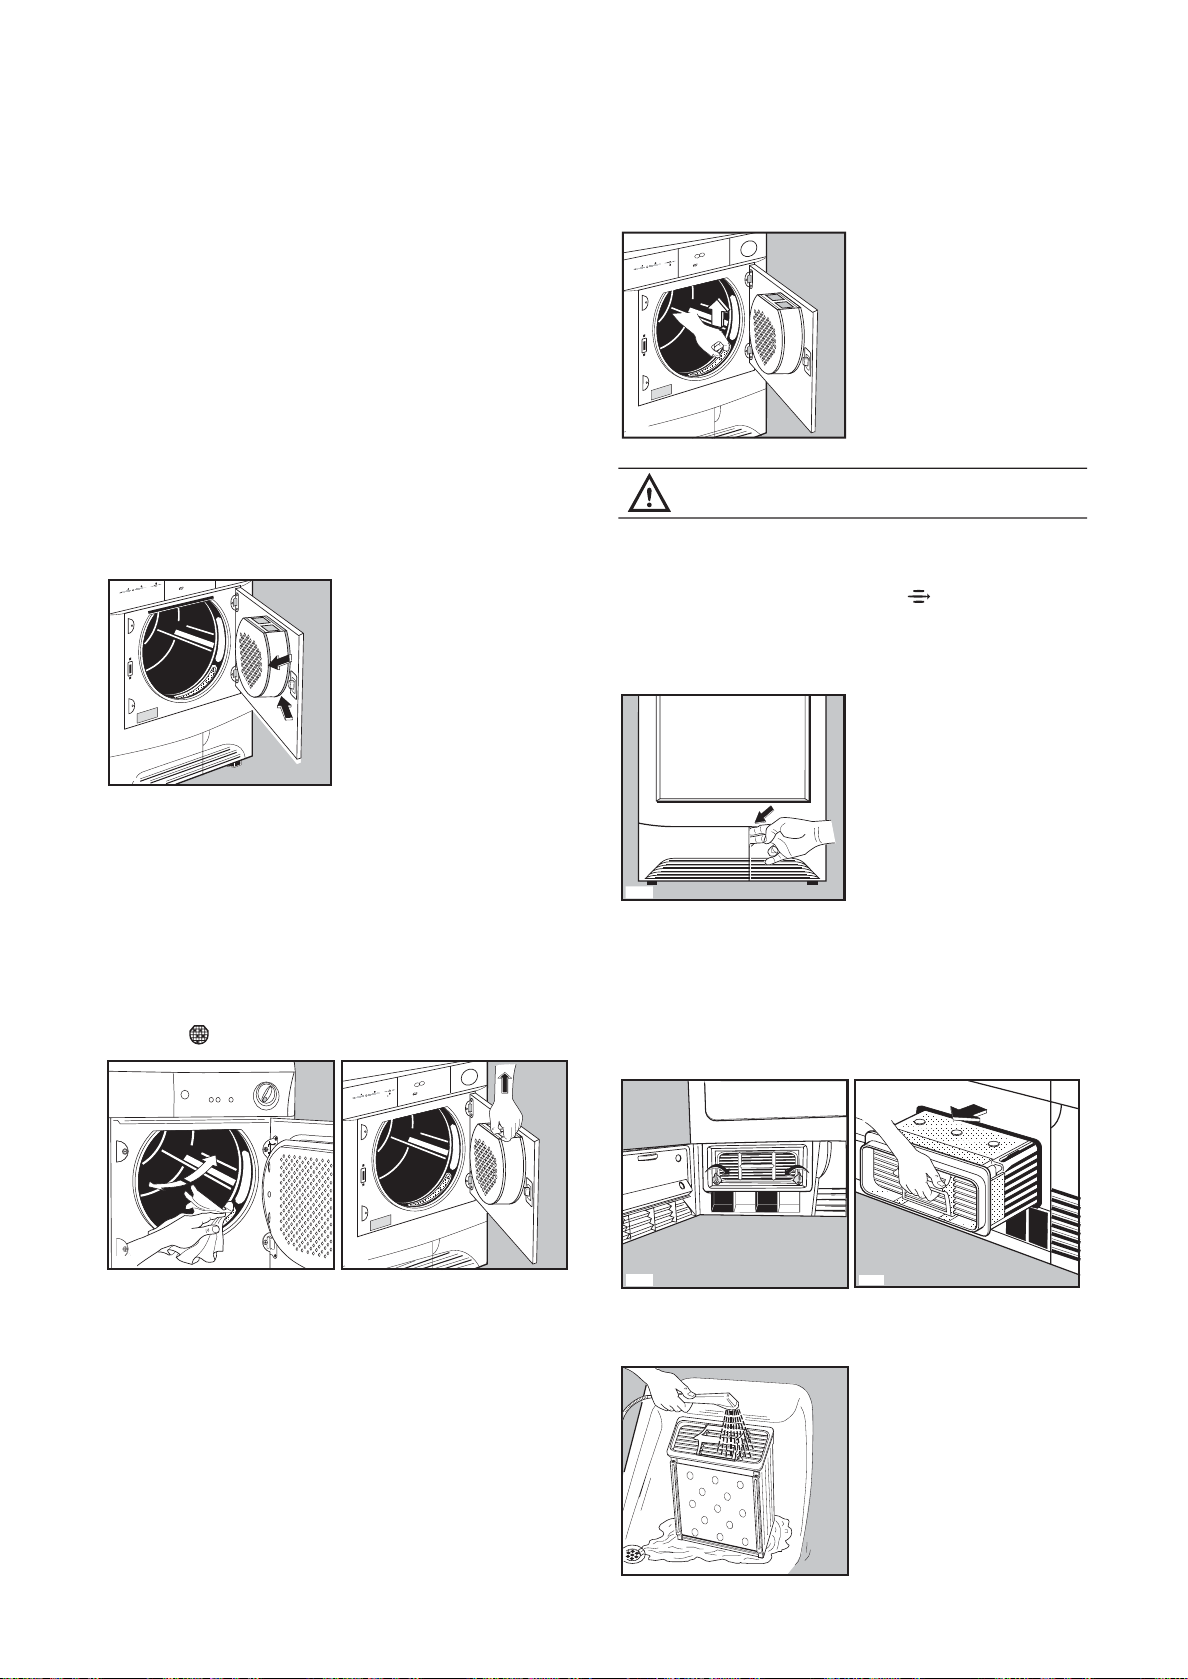
Cleaning the filters
Your dryer will only function well if the filters are
clean.
The filters collect all the fluff which accumulates
during drying and they must therefore be cleaned
at the end of each programme, before removing
the laundry, with a damp cloth.
The light is on to remind you this operation.
SE
0
R
5
6
E
V
E
R
'
0
6
O
-
'
T
50
U
A
0
kg 2,5
0
'
2
5
1
3
/
0
-
0
'
0
1
0
3
0
0
9
/
kg 1
5'
0
9
0
-
8
'
5
7
'
0
0
0
2
0
1
'
1
/
5
-
0
'
6
0
0
-
8
10
'
0
5
0
0
9
'
'
/
5
0
0
8
7
0
-
8
'
-
'
5
5
6
5
'
0
9
'
-
'
45
0
-
7
'
0
3
kg 5
'
0
5
'
5
3
kg 2,5
Do not use the appliance without filters.
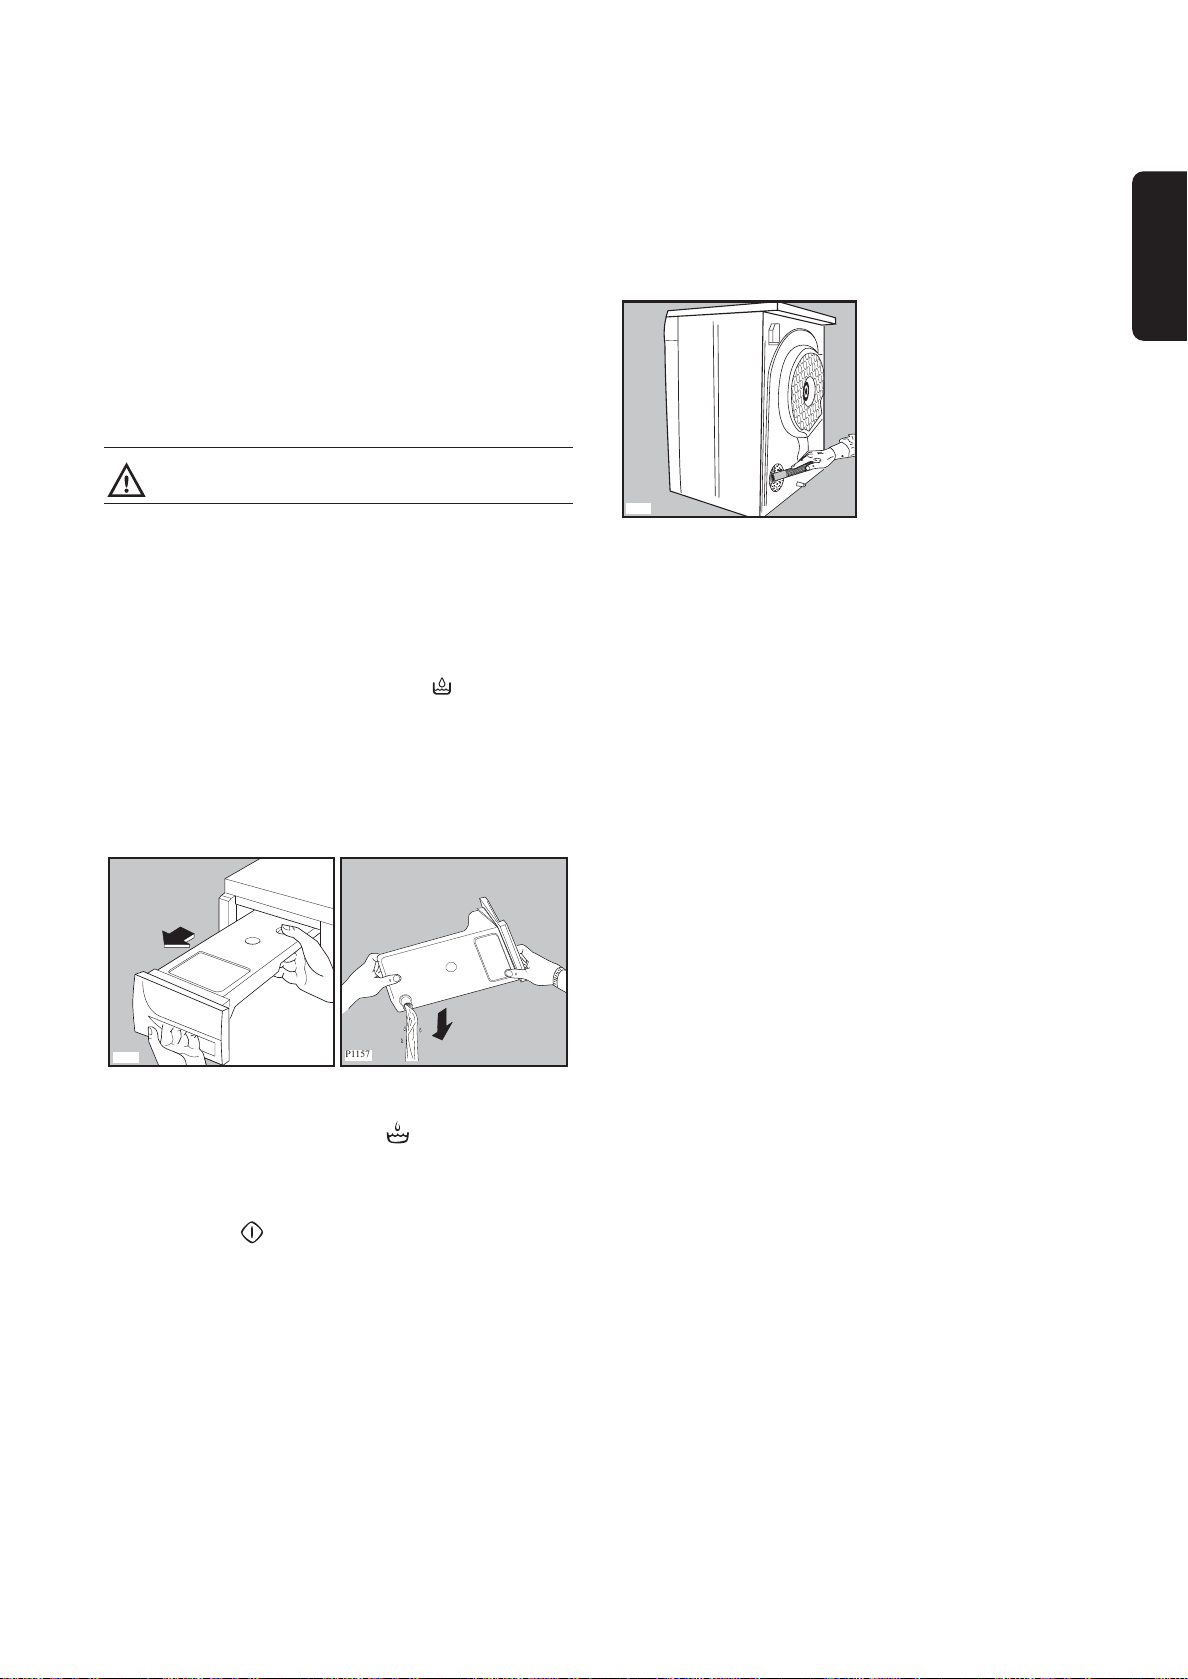
Cleaning the condenser unit
Clean the condenser when light comes on.
The condenser is situated at the lower part of the
cabinet behind a small door. To open the door,
push the catch as per picture.
P1153
During the drying cycle or at the end, it is normal for
water to be present on the surface of the condenser
insertion.
To pull out the condenser, first turn the two red
stops downwards and then remove the condenser
unit holding it at the handle.
P1110
P1151
The filter in the inner door must be removed for
cleaning.
Do not be alarmed by the amount of fluff. It is not
due to excessive wear caused by the dryer. All fabric
loses fluff when drying but it goes un-noticed in the
air. In a tumble dryer it simply collects in the filter.
After a while, a withish patina due to detergent
residue on laundry forms on the filters. When this
occurs, clean the filters with warm water using a
brush. Remove the filter in the door opening as per
picture (it can be positioned with the tooth facing to
the left or to the right).
P1154
P1155
Clean it with a brush and rinse it under the shower if
necessary.
P0639
12
Also clean the outside, removing all fluff.
Clean the rubber seal round the condenser cabinet
and in the inner part of the small door with a damp
cloth.
Important! Do not use pointed objects or utensils to
clean the spaces between the plates, as this could
damage the condenser and make it permeable.
Re-fit the condenser, turn the red stops upwards
and close the door.
Do not use this appliance if the condenser
has not been fitted.
Cleaning the air intake grille
Using a vacuum cleaner remove the fluff from the air
intake grille at the back of the appliance.
ENGLISH
P1162
Emptying the water reservoir
Water extracted from the laundry condenses inside
the machine and is collected in a reservoir.
The reservoir must be emptied after each drying
cycle to ensure efficient operation when the
machine is next used. The pilot light reminds
you this operation.
Proceed as follows:
•Pull out the reservoir
•Turn it upside down and let water flow down
•Re-fit the reservoir
P1156
The reservoir must be re-inserted correctly.
If this is not done the pilot light comes on during
next drying and the programme stops, leaving the
laundry damp. The buzzer will sound.
After emptying and inserting the reservoir the
START-button has to be depressed again to
allow the programme to continue.
Handy tip: The condensed water may be used in a
steam iron or to top up a battery, etc. In this case it
must be filtered (e.g. through a coffee filter).
P1157
Cleaning the drum
When your laundry does not reach the desired
degree of dryness, in other words, when it turns out
either too dry or too damp, we advise you to clean
the inside of the drum with a cloth soaked with
vinegar.
This will eliminate the slight patina that has formed
in the drum (due to residues of detergent and
softeners used in the washing, and to the lime
contained in the water), which prevents the probes
from detecting the correct degree of dryness.
13
Something not working?
Before contacting your local Service Centre, please make the following checks:
Important!
If during the drying phase the END pilot light starts blinking and the buzzer sounds, please switch your tumble
dryer off and contact your local Service Centre.
Problem Possible cause
• The dryer does not work:
• The dryer does not dry properly:
• The door(s) is(are) open.
• The plug is not fitted into the wall socket.
• There is no electricity supply from the wall socket.
• The selector dial is not set correctly.
• The water reservoir is full or not correctly inserted
(light is on). The programme starts in any case
but it stops after approx. 4 minutes.
• The start button has not been depressed.
• The DELAYED START option has been selected.
• The filters are clogged.
• The condenser is clogged.
• The water reservoir is full.
• The selected cycle is not suitable for the laundry.
• Insufficient drying time.
• The laundry has not been spun properly.
• The low temperature function has been
selected.
• Excessive laundry load.
• The dryer is not correctly installed.
If, after the above checks, there is still a fault, call
your local Service Centre.
Please make sure you give the model and serial
number of the appliance.
This information can be found on the rating plate
(see picture on page 4).
14
Vázení zákazníci,
2
prosíme vás, abyste si pozorn™ precetli tento návod a zam™rili svou pozornost predevsím na bezpecnostní
predpisy uvedené na prvních stránkách. Doporucujeme návod uschovat, abyste do n™ho mohli nahlédnout i
kdykoli v budoucnosti, a eventuáln™ ho predat novému majiteli v prípad™ prodeje tohoto spotrebice.
Skody zp√sobené pri doprav™
Když spotřebič vybalíte, zkontrolujte, zda není poškozen. Jestliže máte nějaké pochybnosti, spotřebič
nepoužívejte a kontaktujte servisní středisko.
Symboly, použité u některých odstavců této příručky, mají následující význam:
Trojúhelníkovou znackou anebo upozorñovacími vyrazy (Pozor! nebo Upozorn™ní!) jsou vyznaceny
pokyny zvlást d√lezité pro vasi bezpecnost a pro správné fungování prístroje. Prosíme vás o jejich
dodrzování.
Informace s tímto symbolem slouzí jako dodatek k pokyn√m pro praktické pouzití prístroje.
Tulipán oznacuje rady a doporucení k hospodárnému vyuzívání spotrebice s ohledem na zivotní
prostredí.
Náš příspěvek k ochraně životního prostředí:
používáme recyklovaný papír.
Obsah
Důležité informace
Likvidace
.........................................................15
Rady pro ochranu zivotního
prostredí
..........................................................16
Technická specifikace
Popis spotřebiče
Nastavení vodivosti............................................18
Instalace
• Rozbalení ........................................................17
• Umístění..........................................................17
• Elektrické zapojení..........................................17
• Instalace spotřebičů nad sebou .....................17
• Změna směru otevírání dvířek ........................17
..........................................................17
......................................15
...............................16
..........................................16
16
16
17
17
17
19
19
19
19
19
19
Použití ..............................................................18
• Ovládací panel...........................................18-19
• Tabulka programů...........................................20
• Pracovní postup..............................................21
• Užitečné rady..................................................22
Čištění a údržba...........................................23
•Vn™jsí cist™ní...................................................23
• Cist™ní dvírek ..................................................23
• Cist™ní filtr√.....................................................23
• Čištění kondenzatóru......................................23
• Vyprazdňování sběrné nádoby .......................24
• Cist™ní vnitrní cásti bubnu ..............................24
• Cist™ní zadní mrízky........................................24
20
20-21
22
23
24
25
25
25
25
26
26
26
26
Když něco nefunguje správně ...............25
Záruka, servis a náhradní díly
................26
28
7
15
Důležité informace
Následující upozornění poskytujeme v zájmu celkové bezpečnosti. Před instalací spotřebiče a jeho používáním si je
musíte pečlivě přečíst.
ČESKY
Instalace
• Jsou-li potrebné úpravy existujícího domácího
rozvodu elektrického proudu, je potrebné obrátit
se na specializovaného technika.
• Po instalaci zarízení se ujist™te, ze není postaveno
na sítovém kabelu.
• Jestlize je zarízení umíst™no na podlaze pokryté
kobercem, je potrebné nastavit nozky tak, aby
bylo umozn™no volné proud™ní vzduchu mezi
spotrebicem a podlahou.
Pouzití
• Toto zarízení je urceno pro pouzití v domácnosti.
Vyrobce neodpovídá za skody, které by mohli
vzniknout nesprávnym pouzitím anebo jinym
pouzitím nez, pro které bylo zarízení vyrobeno.
• Po kazdém pouzití vytáhn™te zástrcku ze zásuvky.
• Nevkládejte do zarízení prádlo, které je pouze
odkapané.
• Nebezpecí vybuchu: v zarízení nesuste prádlo
chemicky znecist™né (napr. prádlo znecist™né
prostredky pro chemické cist™ní), protoze by
mohlo dojít k vybuchu. Zarízení pouzívejte pouze
na susení prádla vypraného ve vod™.
•Vzdycky zkontrolujte, zda se v kapsách prádla
urceného na vysusení nenacházejí zapalovace
cigaret.
• Do zarízení nevkládejte tenisky, protoze by se
mohli zachytit mezi dvírky a bubnem a zablokovat
ho.
• Po ukoncení susení nechejte pootevrená dvírka,
aby bylo umozn™né vyv™trání zarízení.
• Filtry musí byt vycist™ny po kazdém pouzití.
V rámci prevence pozáru nepouzívejte zarízení
sposkozenymi filtry anebo bez filtr√.
• Nedovolte, aby se kolem zarízení nahromadilo
chmyrí.
Bezpečnost obecně
• Je nebezpecné provád™t jakékoli úpravy
technickych vlastností zarízení.
• Nepokousejte se sami opravovat zarízení. Opravy
vykonané nezkusenymi osobami mohou vést ke
vzniku skod. V prípad™ potreby se pokazdé
obratte na autorizované servisní stredisko Zanussi
a vyzadujte pouzití originálních náhradních díl√.
Bezpecnost d™tí
•D™ti neznají nebezpecí spojená s elektrickymi
spotrebici. B™hem fungování prístroje je nutno d™ti
hlídat a nenechat je hrát se spotrebicem - mohlo
by se stát, ze se do susicky zavrou.
• Cásti obalu (fólie, polystyren) mohou byt pro d™ti
nebezpecné. Nebezpecí udusení! Drzte je proto z
dosahu d™tí.
• Zajist™te, aby se d™ti ani malá domácí zvírata
nedostaly do bubnu susicky.
•V prípad™ vyrazení prístroje do odpadu vytáhn™te
zástrcku z el. sít™, odrízn™te prívodní kabel a kabel
i se zástrckou vyhodte. Poskodte zavírací
mechanismus dvírek, aby se hrající si d™ti nemohly
v sus
icce zavrít a z√stat v ní uv™zn™né.
Likvidace
Obalové materiály
Materiály oznacené symbolem jsou
recyklovatelné.
>PE<=polyethylen
>PS<=polystyren
>PP<=polypropylen
K jejich druhotnému vyuzití musí byt tyto materiály
vhozeny do príslusnych kontejner√.
Prístroj
Pri vyrazení vaseho starého prístroje pouzijte jen
autorizované skládky. Pomozte nám udrzet vase
m™sto cisté!
16

Rady pro ochranu zivotního prostredí
Doporucujeme vám rídit se pri pouzívání zarízení
následujícími pokyny, které vám umozní usetrit
elektrickou energii a chránit zivotní prostredí:
•Pred pouzitím zarízení zcela naplñte buben. Malé
nápln™ jsou neekonomické.
•Pred susením prádlo rádn™ vyzdímejte. Pokles
spotreby elektrické energie a zkrácení doby susení
je prímo úm™rny zvysení rychlosti otácení pri
odstredování.
• Doporucuje se nesusit prádlo prílis dlouho, aby
nedoslo ke vzniku záhyb√ a k nadm™rné spotreb™
elektrické energie. Zvolte druh programu a dobu
susení podle druhu pouzitého prádla a
pozadovaného stupn™ vysusení.
• Aby bylo mozné zcela vyuzít maximální kapacitu
zarízení, je mozné susit spolu prádlo “suché
k uskladn™ní“ a prádlo “suché k zehlení”. Zvolte
program pro susení “suché k zehlení” a po jeho
ukoncení vyberte príslusnou cást prádla. Po
následné volb™ doby susení vhodné pro prádlo
“suché k uskladn™ní” pokracujte v susení
• Po kazdém cyklu susení d√sledn™ vycist™te filtry.
Takhle osetrená susicka bude vykazovat mensí
spotrebu elektrické energie.
• Zabezpecte dokonalé v™trání pracovního prostoru.
Teplota prostredí v okolí susicky b™hem její
cinnosti by nem™la prekrocit +35 °C.
Technická specifikace
ROZMĚRY Výška 85 cm
Šířka 60 cm
Hloubka 58 cm
NAPÁJECÍ NAPĚTÍ A FREKVENCE 220-230V/50Hz
MAX. INSTALOVANÝ VÝKON 2400 W
JIŠTĚNÍ 16 A
MAXIMÁLNÍ DOPORUČENÁ NÁPLŇ Bavlna a len 5 kg
Syntetické tkaniny 2,5 kg
SPOTŘEBA Bavlna a len 3,64 kWh (5,0 kg suché k uskladnění)
Syntetické tkaniny 3 kWh (5,0 kg suché k žehlení)
Syntetické tkaniny 1,4 kWh (2,5 kg suché k uskladnění)
HLUČNOST 64 db(A)
Tento spotřebič odpovídá následujícím předpisům EEC:
73/23/EEC z 19.2.73 - Předpis ohledně nízkého napětí.
89/336/EEC ze 3.5.89 - Předpis o elektromagnetické kompatibilitě.
Popis spotrebice
1 Ovládací panel
2Sb™rná nádoba
3 Filtry
4 Typovystítek
5 Kondenzátor
6 Nastavitelné nozky
17
Nastavení vodivosti
Nastavení vodivosti
START/PAUZA
dioda rozsvícena
Vodivost
Vezetõképesség
Alacsony < 300
Støední 300 - 600
Støední
Vysoká > 600
Becsült érték
µS/cm
18
Instalace
Upozorn™ní!
Rozbalení
Pred pouzitím zarízení stáhn™te polyetylenovy
sácek obsahující vyplñovy kus z polystyrénu.
V prípad™ následné prepravy, musí byt
zarízení prepravováno ve vertikální poloze.
Elektrické zapojení
Prístroj m√ze fungovat pri 220-230 V a 50 Hz.
Ov™rte si, ze vás domácí elektricky rozvod unese
maximální zatízení spotrebice (2,4 kW) plus prípadné
jiné soucasn™ zapnuté domácí elektrospotrebice.
Spotrebic zapojte na zásuvku s uzemn™ním.
Vyrobce se zríká jakékoli zodpov™dnosti za
skody nebo poran™ní způsobená nedodrzením
vyse uvedeného bezpecnostního predpisu.
Kdybyste potrebovali vym™nit prívodní kabel,
vym™na musí byt provedena nasím
technickym servisem.
D√lezité: Prívodní kabel musí z√stat prístupny i
po instalaci prístroje.
Instalace spotřebičů nad sebou
U vaseho prodejce najdete speciální soupravu, která
vám umozní instalaci susicky nad pracku s predním
pln™ním s hloubkou v rozmezí od 48 do 60 cm.
ČESKY
Umíst™ní
Z praktického hlediska je pro pouzití susicky
vhodné, aby se nacházela v blízkosti pracky.
Pro její správnou cinnost je potrebné, aby bylo okolí
udrzováno v cistém stavu (zbaveno prachu a
textilních vláken).
Musí byt zabezpeceno také volné proud™ní vzduchu
kolem susicky. Za tímto úcelem musí nasávací
mrízky na prední i na zadní stran™ zarízení z√stat
volné.
Zarízení m√ze byt ulozeno na libovolny druh ploché
podlahy. Musí se nacházet v dokonalé horizontální
poloze (pri kontrole m√zete pouzít vodováhu).
Prostrednictvím vyskov™ nastavitelnych nozek je
mozné vykompenzovat nerovnosti a sklon podlahy.
Neodstrañujte nozky zarízení. Nesnizujte
vzdálenost zarízení od podlahy pouzitím koberc√
anebo vysokych koberc√. Mohlo by to negativn
ovlivnit cinnost zarízení.
D√lezitá informace!
Horky vzduch vypoust™ny ze susicky m√ze
dosahovat teploty az 60 °C. Zarízení proto nesmí
byt instalováno na podlaze, která nesnásí vysoké
teploty.
Pro správnou cinnost zarízení teplota prostredí
v jeho blízkosti nesmí byt nizsí nez +5 °C a vyssí
nez +35 °C, a to i v prípad™, kdy zarízení není
v provozu.
™
Pri montázi presn™ dodrzujte pokyny pro montáz,
které jsou soucástí soupravy.
Zm™na sm™ru otevírání dvírek
V prípad™ potreby zm™nit sm™r otevírání dvírek
se obratte na autorizované servisní stredisko
Electrolux.
19
Použití
Ovládací panel
EDC 5310
1 Tabulka program√
Pom√ze vám pri volb™ správného programu susení.
2 Tlacítko rychlého vysusení
Stisknutím uvedeného tlacítka dojde ke snízení doby
susení v následujících programech pro bavlnu:
• extra suché
•pripravené k oblecení
• suché k ulození do skrín™
Rozsvítí se odpovídající kontrolky. Tato volitelná
funkce nem√ze byt pouzita spolu s volitelnou funkcí
„snízení teploty“ .
3 Tlacítko vypnutí alarmu
K aktivaci alarmu dochází
•pri volb™ programu
•pri stisknutí libovolného tlacítka
•pri vyb™ru nesprávné volitelné funkce
•pri pretocení volice program√ do jiné polohy v
pr√b™hu programu nebo pri stisknutí tlacítka
volitelné funkce b™hem pracího programu
• po ukoncení pracího programu
•pri napln™ní nádoby na vodu
• kdyz zarízení nepracuje predepsanym zp√sobem
• jsou-li otevrená dvírka nebo kryt na dn™ zarízení.
Stisknutím tlacítka dojde k prerusení alarmu v
následujících prípadech:
•pri volb™ programu
•pri stisknutí libovolného tlacítka
•pri pretocení volice program√ do jiné polohy v
pr
√b™hu programu nebo pri stisknutí tlacítka
volitelné funkce b™hem pracího programu
• po ukoncení pracího programu
Rozsvítí se príslusná kontrolka.
4 Tlacítko snízení teploty
Po stisknutí uvedeného tlacítka prob™hne susení
choulostivého prádla pri snízené teplot™.
Rozsvítí se príslusná kontrolka.
Tato volitelná funkce m√ze byt pouzita také pri
programech casov™ vymezeného susení.
Tato volitelná funkce nem√ze byt pouzita spolu s
Rychlym vysusením.
5 Tlacítko ODLOZENY START
Toto tlacítko slouzí k odlození startu programu o 3, 6
nebo 9 hodin.
Stisknout uvedené tlacítko tolikrát, kolikrát je treba k
rozsvícení kontrolky odpovídající pozadované dob™
odlození startu.
Tato volitelná funkce m√ze byt vybrána po uskutecn™ní
volby programu a dríve, nez bude zahájen zvoleny
program stisknutím tlacítka START/PAUZA .
Zarízení zahájí odpocet indikovany kontrolkami.
Napríklad, pokud bylo zvoleno odlození o 9 hodin
(kontrolka 9h rozsvícena), po uplynutí 3 hodin se
zhasne kontrolka 9h a rozsvítí kontrolka 6h; po
dalsích 3 hodinách dojde k zhasnutí kontrolky 6h a
rozsvícení kontrolky 3h. Po vyprsení 9 hodin
(kontrolka 3h zhasnuta) bude zahájen cyklus susení.
B™hem doby odlození startu je mozné zm™nit
program nebo zvolenou dobu odlození. V takovém
prípad™ je treba nejdríve vynulovat vsechna
nastavení pretocením volice program√ do polohy „0“.
Zvolte novy program, vyberte volitelné funkce a
nastavte dobu odlození startu, následn™
stiskn™te tlacítko START/PAUZA.
Dle potreby lze rovn™z provést pouze zm™nu
volitelnych funkcí, avsak pouze v prípad™, jsou-li tyto
kompatibilní se zvolenym programem. Preruste
program stisknutím príslusného tlacítka, vyberte
novou/é volitelnou/é funkci/e a op™tovn™ stiskn™te
tlacítko START/PAUZA.
pak
20
Prejete-li si pridat prádlo b™hem odpoctu zbyvající
doby, uci$nte tak, a po zavrení dvírek stiskn™te op™t
tlacítko START/PAUZA, aby zarízení pokracovalo v
odpoctu.
6 Tlacítko Start/Pauza
Stisknutí uvedeného tlacítka slouzí k uvedení
susicky do chodu, a to po zvolení programu a
vyb™ru volitelnych funkcí.
Príslusná kontrolka prestane blikat. V prípad™, ze
bylo zvoleno odlození startu, zarízení zahájí
odpocítávání zbylé doby.
Dojde-li v pr√b™hu programu k otevrení dvírek
nebo krytu na dn™ zarízení, je treba po jejich
uzavrení znovu stisknout toto tlacítko za úcelem
op™tovného zahájení programu v míst™, ve
kterém byl prerusen.
Toto tlacítko musí byt stisknuto také po prerusení
dodávky elektrické energie a op™tovném vlození
nádoby na vodu v prípad™, byla-li tato vyprázdn™na
b™hem programu, po rozsvícení kontrolky .
V obou prípadech bude kontrolka tlacítka
Start/Pauza blikat,
op™tovného stisknutí uvedeného tlacítka.
címz poukazuje na nutnost
Kontrolka „Napln™ní nádoby na vodu“
K rozsvícení této kontrolky dojde po ukoncení
programu s cílem pripomenout potrebu vyprázdn™ní
nádoby s vodou. Rozsvícení uvedené kontrolky
b™hem programu poukazuje na napln™ní nádoby.
Dojde k aktivaci alarmu a prerusení programu, coz je
provázeno blikáním kontrolky Start/Pauza.
Kontrolka „Vycistit kondenzátor“
Rozsvítí se po kazdych 80 cyklech s cílem
pripomenout potrebu vycist™ní kondenzátoru.
8 Volic program√ / Doby
Slouzí k volb™ elektronickych program√ susení nebo
casov™ vymezeného susení.
Prostrednictvím otocného knoflíku nastavit
pozadovany program nebo zvolenou dobu.
Elektronické susení (automatické)
Zarízení provádí uvedené programy s pouzitím sond,
které zjistují stupe$n vlhkosti b™hem susení. Zvolte
program podle druhu prádla a pozadovaného stupn™
vysusení.
ČESKY
7 Kontrolky
Kontrolky slouzí k indikaci následujících funkcí:
Kontrolka „Susení“
Tato kontrolka indikuje probíhající fázi susení.
Kontrolka „Ochlazování“
Tato kontrolka indikuje probíhající fázi ochlazování.
Po ukoncení susení prob™hne fáze 10 minutového
ochlazování prádla.
Kontrolka „Ukoncení programu“
K rozsvícení této kontrolky dojde po ukoncení fáze
ochlazování, b™hem fáze slouzící k zabrán™ní krcení
a po ukoncení programu.
Kontrolka „Vycistit filtr“
K rozsvícení této kontrolky dojde po ukoncení
programu s cílem pripomenout potrebu vycist™ní
filtru.
Casov™ vymezené susení
Pouzívá se dle potreby, a to k dokoncení susení.
Zvolte program 90 nebo 60 minut pri susení bavlny a
program 30 minut pro syntetické tkaniny.
Probíhající program je mozné zrusit pretocením
volice program√ do polohy „0“.
Prejete-li si vytáhnout prádlo po ukoncení cyklu
susení, pretocte otocny knoflík do polohy „0“.
21
 Loading...