

Page 1
822 949 465_EDB7510U.book Seite 1 Montag, 26. Januar 2009 9:45 21
Steam Iron EDB7510U
Instruction book
Page 2
822 949 465_EDB7510U.book Seite 2 Montag, 26. Januar 2009 9:45 21
G
H
F
E
J
D
K
C
B
L
M
A
N, O
1
23
2
Page 3
822 949 465_EDB7510U.book Seite 3 Montag, 26. Januar 2009 9:45 21
g
Dear Customer,
g
Please read these operating
instructions through carefully.
Above all please observe the
safety instructions on the first few
pages of these operating instructions! Please keep these operating
instructions for later reference. Pass
them on to any subsequent owner
of the appliance.
Using the warning triangle and/or
1
the key words (Danger!, Caution!,
Important!), information that is
important for your safety or the
correct functioning of the appliance is highlighted. It is essential
that this information is observed.
0 This symbol guides you step by
step through the operation of the
appliance.
Next to this symbol you will find
3
additional information and practical tips on using the appliance.
Tips and information about the
2
economical and environmentally
friendly use of the appliance are
marked with the clover.
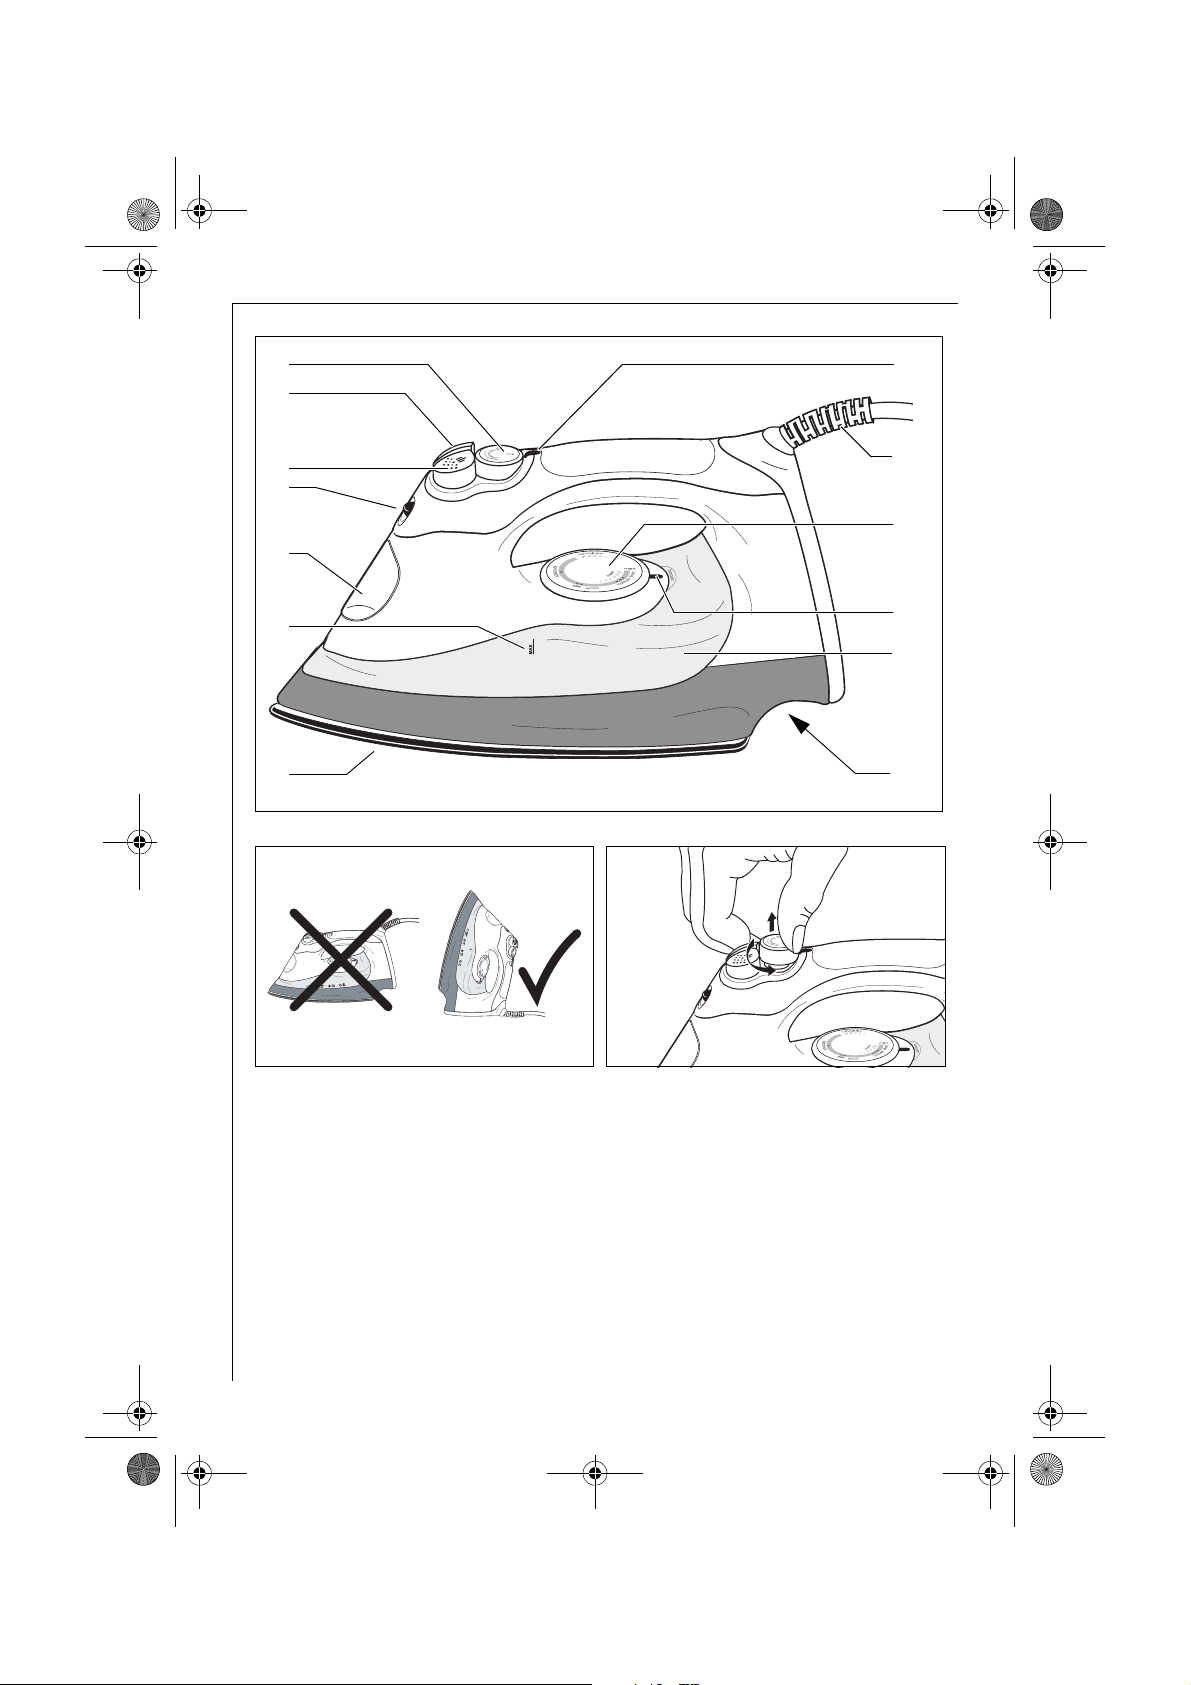
Appliance Description (Fig. 1)
A Soleplate
B Maximum water level indicator
C Filling aperture with cover
D Spray nozzle
E Spray button
F Steam jet button
G Steam selector
H Power ON light
J Mains cable
K Temperature selector
L Temperature control light
M Water tank (capacity 280 ml)
N Cable wrap facility
O Rating plate
1 Safety Instructions
This appliance corresponds to
accepted technological standards
with regards to safety. Nevertheless, as a manufacturer we consider it our obligation to make you
aware of the following safety information.
General Safety
• The operating voltage of the appliance and the mains voltage as well
as the type of current must match
(see the rating plate).
• Only plug into a correctly installed
earthed mains socket.
• Always remove the plug when the
appliance is not in use.
• Never pull the plug from the socket
by means of the mains cable!
• Prior to cleaning or in the event of
a malfunction, unplug the appliance first!
• The iron is not to be used if it has
been dropped, if there are visible
signs of damage or if it is leaking.
• Do not use the appliance if the
mains cable is damaged.
• Do not let the mains cable of an
appliance hang over the edge of a
table or bench top or touch any hot
surface.
• Do not use the appliance with an
extension cable unless this cable
has been checked and tested by a
qualified technician or service person.
• Do not place an appliance on or
near a hot gas flame, electric element or on a heated oven. Do not
place on top of any other appliance.
• Repairs to this appliance, including
replacement of the mains cable,
may only be carried out by qualified service engineers. Considerable danger may result from
improper repairs. If repairs become
necessary, please contact the
3
Page 4
822 949 465_EDB7510U.book Seite 4 Montag, 26. Januar 2009 9:45 21
g
Customer Care Department or
your authorised dealer.
• If the appliance is used for purposes other than those intended or
used incorrectly, no liability can be
accepted for any damage that may
be caused.
• This appliance is not intended for
use by persons (including children) with reduced physical, sensory or mental capabilities or lack
of experience and knowledge
unless they have been given initial
supervision or instruction concerning use of the appliance by a person responsible for their safety.
Child Safety
• Never leave the appliance unattended while in use. If children
come into contact with a hot
steam iron it could lead to serious
burns.
• Keep children away from electrical
appliances.
• Packaging material, e.g. plastic
bags, should not be accessible to
children.
• Children should be supervised to
ensure that they do not play with
the appliance.
Safety in operation
• The steam iron must be used and
rested on a stable surface.
• When placing the iron on its stand,
ensure that the surface on which
the stand is placed is stable.
• Caution! When in use, the soleplate and cover of the steam iron
reach high operating temperatures.
• When steam ironing, steam is
emitted from the holes in the soleplate where if care is not taking,
there is a risk of burns.
• A steam iron takes approximately
30 minutes to cool down. Only
store the appliance once it is cool
and after emptying any remaining
water.
• Do not wind the cord around the
soleplate while the steam iron is
still hot.
• Always unplug the steam iron from
the power outlet before filling or
emptying the water tank.
Safety in cleaning and care
• Follow the cleaning instructions.
• Prior to cleaning, unplug the appliance first and allow the steam iron
to cool completely.
• Do not immerse the appliance in
water or any other liquid.
Operating
Before first use
0 Remove any adhesive stickers,
plastic covers or cardboard
sleeves from the soleplate.
0 Ensure that all adhesive is
removed by rubbing the soleplate
with a cloth dampened with methylated spirits.
0 Fill the water tank (see following
chapter) and empty the water. This
will rinse out any foreign particles
remaining from the manufacturing
process.
When turned on for the first time,
3
your new steam iron may give off
vapours for up to 10 minutes. This
is due to the initial heating of the
materials used. It is safe, not detrimental to the performance of the
steam iron, and will not reoccur.
Filling the steam iron with
water
Before filling the steam iron with
1
water ensure that the plug is
removed from the power outlet.
The steam iron can be filled with
water while it is hot.
0 Turn the steam selector (Fig. 1/G)
to the "dry" setting.
4
Page 5

822 949 465_EDB7510U.book Seite 5 Montag, 26. Januar 2009 9:45 21
g
0
Place the steam iron on its heel and
open the filling aperture cover
(Fig.1/C).
0 Using the beaker provided, slowly
pour water into the filling aperture
until the maximum water level (Fig.
1/B) is reached. Do not exceed the
maximum water level indicator.
0 Push the filling aperture cover
firmly to close.
The special soleplate design
3
allows you to use tap water with
your iron without affecting the
steam performance. However, in
very hard water areas we recommend the use of distilled or demineralised water.
Do not fill the steam iron with fab-
1
ric conditioner, starches or other
solutions as these will damage the
steam mechanism. Do not use
contaminated water.
Using your steam iron
0 Plug the power cable into a
220-240 V power outlet.
The power ON light (Fig 1/H, positioned on top of the handle) will
illuminate to indicate that the
steam iron is switched on and is
heating up.
0 Turn the temperature selector
(Fig. 1/K) to the desired setting by
aligning the setting on the selector
with the temperature control light
(Fig. 1/L).
The temperature control light will
illuminate to indicate that the iron
is heating to the selected temperature. When the temperature control
light goes out the iron is at the
selected temperature and is ready
to iron.
When the temperature selector is
3
changed from a high setting to a
lower temperature setting during
ironing, the temperature control
light will go out immediately. This
indicates that the iron is cooling to
the selected temperature. To
ensure that the iron has reached
the selected temperature and is
not too hot, wait until the temperature control light comes on again
and then goes out before ironing.
Dry ironing
0 Connect the steam iron to the
mains and set the desired temperature as described above.
0 Select "dry" on the steam selector
(Fig. 1/G).
This will cut off the steam flow if
there is water in the tank.
Steam ironing
0 Connect the steam iron to the
mains and set the desired temperature as described above.
When steam ironing, ensure that
3
the temperature selector is set to
any temperature within the steam
band, and that the tank is at least
1/4 full of water.
0 Turn the steam selector (Fig. 1/G)
to the desired steam setting.
Using the spray mist
The spray mist can be used when
steam or dry ironing to predampen hard to iron fabrics.
Ensure that the tank is at least ¼
3
full of water.
0 Press the spray button (Fig. 1/E)
during ironing to release a fine mist
from the spray nozzle (Fig. 1/D).
Using the steam jet function
The steam jet function can be used
when dry or steam ironing, when
the temperature control is set to
any temperature within the steam
band or above the two dot (••) setting.
Ensure that the tank is at least ¼
3
full of water.
5
Page 6

822 949 465_EDB7510U.book Seite 6 Montag, 26. Januar 2009 9:45 21
g
0 Select the desired temperature
and wait until the temperature control light goes out.
0 Press the steam jet button
(Fig. 1/F) several times with the
iron on the soleplate to prime the
pump.
If the water tank has run dry, it may
3
be necessary to re-prime the pump
after filling the steam iron with
water.
The steam iron is equipped with a
3
drip-stop system. This system
automatically stops water flowing
to the steam chamber should the
temperature fall too low to generate steam. This prevents dripping,
even at low temperatures.
Steaming hanging items of
clothing
The vertical steam jet function is
3
ideal for steaming curtains, suits
and delicate fabrics.
0
Hang the article concerned on a
hanger and hold the steam iron at a
distance of 10–20 cm from the
material.
0 Now press the steam jet button
(Fig. 1/F).
Do not attempt to freshen up
1
clothing whilst it is still being worn.
Risk of burning!
Care and Cleaning
After each use
0 Turn the power off and remove the
plug from the power outlet.
0 Allow the steam iron to cool before
winding the cord around the builtin cord wrap (Fig. 1/N).
Storage
0 Always store the steam iron on its
heel rest (see Fig. 2).
Do not store the steam iron with
the soleplate facing down, or in the
carton.
Cleaning
0 To clean the exterior of the steam
iron, wipe with a damp soft cloth
and wipe dry.
Do not use harsh abrasives, chem-
1
ical cleaners or solvents, as these
will damage the surface.
Cleaning the removable
steam valve
0 To remove the steam valve, turn
the steam selector anticlockwise
to the "clean" setting so that the
steam valve pops up
0 Gently scrub the tip of the valve
with a steel wool soap pad moistened in warm water.
0 Rinse and dry with a clean cloth.
0 Replace the steam valve and turn
clockwise to lock into position.
(see Fig. 3)
Cleaning the steam holes
0 To remove scale build up in the
steam holes that may affect your
iron’s steam performance, use a
cotton wool tip moistened in methylated spirits.
Cleaning the Stainless Steal
soleplate
Do not use scouring pads, abra-
1
sives or harsh cleaners to clean
your soleplate, as these will
scratch and damage the surface.
0 To remove burnt residue from the
soleplate, iron over a damp cloth
while the steam iron is hot.
0 Using a stainless steel or metal
cleaner, rub gently with a damp
cloth and wipe dry.
.
6
Page 7

822 949 465_EDB7510U.book Seite 7 Montag, 26. Januar 2009 9:45 21
g
Ironing Guide
Selecting the ironing
temperature
0
Always read garment labels and follow the manufacturer’s ironing
instructions. Refer to the Ironing
Chart on page 8 for temperature
recommendations.
Hints
• Sort articles to be ironed according
to the type of fabric. This will
reduce the need to adjust the temperature to suit varying garments.
• Start with garments requiring lower
temperatures and work your way
through to items requiring higher
temperatures.
• Fabrics such as velour, wool, linen
and silk are best ironed with an
ironing cloth to prevent shine
marks.
• If you are unsure of the fabric content of a garment, test a small area
such as a seam or inside hem section before ironing a visible area.
Start with a low temperature and
gradually increase the heat to find
the best setting for ironing the garment.
• When reducing the temperature to
iron sensitive fabrics, allow
approximately 2 minutes for the
steam iron to cool to the new setting.
• Pure woollen fabrics (100 % wool)
can be steam ironed with the temperature dial set to Wool. Use an
ironing cloth to prevent shine
marks on the fabric.
• Never iron areas of a garment
where perspiration marks are visible, as the heat of the steam iron
will fix the stains, making them
permanent.
Tec hn ical D at a
Mains voltage: 220 – 240 V / 50 Hz
Power
consumption: 1850 – 2200 W
Disposal
Packaging material
2
The packaging materials are environmentally friendly and can be
recycled. The plastic components
are identified by markings, e.g.
>PE<, >PS<, etc. Please dispose of
the packaging materials in the
appropriate container at the community waste disposal facilities.
Old appliance
2
The symbol W on the product or
on its packaging indicates that this
product may not be treated as
household waste. Instead it shall
be handed over to the applicable
collection point for the recycling of
electrical and electronic equipment. By ensuring this product is
disposed of correctly, you will help
prevent potential negative consequences for the environment and
human health, which could otherwise be caused by inappropriate
waste handling of this product. For
more detailed information about
recycling of this product, please
contact your local city office, your
household waste disposal service
or the shop where you purchased
the product.
7
Page 8

822 949 465_EDB7510U.book Seite 8 Montag, 26. Januar 2009 9:45 21
g
Ironing Chart
FABRI C
Acrylic • Dry iron on wrong side.
Acetate •
Nylon &
Polyester
Rayon • Iron on wrong side of fabric.
Viscose •
Silk ••
Cotton
Blends
Wool &
Wool Blen ds
Cotton ••
Corduroy ••• Steam iron on wrong side or use an ironing cloth.
Linen ••• to "max"
TEMPERATURE
SETTING
•
••
•• Steam iron on wrong side or use an ironing cloth.
IRONING RECOMMENDATION
Dry iron on wrong side while still damp or use spray to
dampen.
Iron on wrong side while still damp or use spray to
dampen.
Mainly dry iron. Steam can be used under manufacturer’s
instructions.
Iron on wrong side. Use an ironing cloth to prevent shine
marks.
Check label and follow manufacturer’s instructions.
Use setting for the fibre requiring the lowest setting.
Dry iron while still damp or use spray to dampen.
Use steam medium to high.
Iron on wrong side or use an ironing cloth to prevent shine
marks, especially with dark colours.
Dry iron while still damp or use spray to dampen.
Use steam medium to high.
Denim ••• to "max" Use maximum steam.
Varied ironing speeds and fabric dampness can mean that the optimal setting can differ from
that recommended in the table!
8
Page 9

822 949 465_EDB7510U.book Seite 9 Montag, 26. Januar 2009 9:45 21
GUARANTEE
This guarantee is in addition to your statutory and other legal rights.
Electrolux products are carefully designed, manufactured, tested and inspected and in
consequence, we undertake to replace or repair any part found to be defective in material or
workmanship, within one year of delivery to the original purchaser, free of charge. You may be
required to take the product to your nearest service provider if the product requries attention
during the first year.
There are certain conditions which may invalidate this guarantee:
a. It is dependent upon the appliance being correctly installed and used in accordance
with the Company's instructions under normal domestic conditions within the United
Kingdom or the Republic of Ireland.
b. Service at all times must be carried out by an Electrolux Service Representative or
authorised agent.
c. The guarantee may be invalidated by unauthorised repair or modification of the
appliance.
d. You may be charged by Electrolux PLC if you call for an engineer to resolve a
problem that we believe is covered in the instruction booklet.
The Company does not accept liability for defects arising from neglect, misuse or accident.
Proof of the date of purchase will be required before service under guarantee is provided.
For further assistance call
Electrolux PLC Floorcare Helpline on 08445 614 614.
Calls to this number will be charged at 5 pence per minute at all times from a BT Landline.
Important:
For future reference we suggest you record the following details here, and keep the receipt
with this booklet as proof or purchase.
g
Purchased from:
Date purchased Model No
Electrolux PLC, Addington Way, LUTON, BEDFORDSHIRE, LU4 9QQ
Features of the Electrolux small domestic appliances and accessories with it are protected in
Great Britain and abroad by Patents of Registered Designs.
Electrolux PLC may introduce modifications to their product from time to time, and
consequently the details given in this booklet are subject to alteretion without notice.
9
Page 10

822 949 465_EDB7510U.book Seite 10 Montag, 26. Januar 2009 9:45 21
g
10
Page 11

822 949 465_EDB7510U.book Seite 11 Montag, 26. Januar 2009 9:45 21
g
11
Page 12

822 949 465_EDB7510U.book Seite 12 Montag, 26. Januar 2009 9:45 21
Share more of our thinking at
www.electrolux.co.uk EDB7510U (822 949 465 - 01 - 0109)
 Loading...