

Page 1
일렉트로룩스 커피 메이커
ECM3100 / ECM3130
Page 2
E
그림1
D
F
C
B
G
H
J
A
1
432
Page 3
한국어
고객님께
일렉트로룩스 제품을 구매해 주셔서 감사합
니다. 사용하시기 전에 먼저 본 사용설명서
를 주의 깊게 읽어보십시오. 사용 중 언제라
도 참고할 수 있도록 사용설명서를 잘 보관하
십시오.
본 기호가 있거나 다음과 같은 문구들(위험!
주의! 중요!)이 표시된 내용은 고객의 안전과
제품의 올바른 기능을 위해 중요하므로 반드시
숙지해주시기 바랍니다.
본 기호는 제품 사용에 대한 추가 정보나 실용
적인 도움말을 제공합니다.
본 기호는 제품의 경제적/환경 친화적인 사용에
관한 정보입니다.
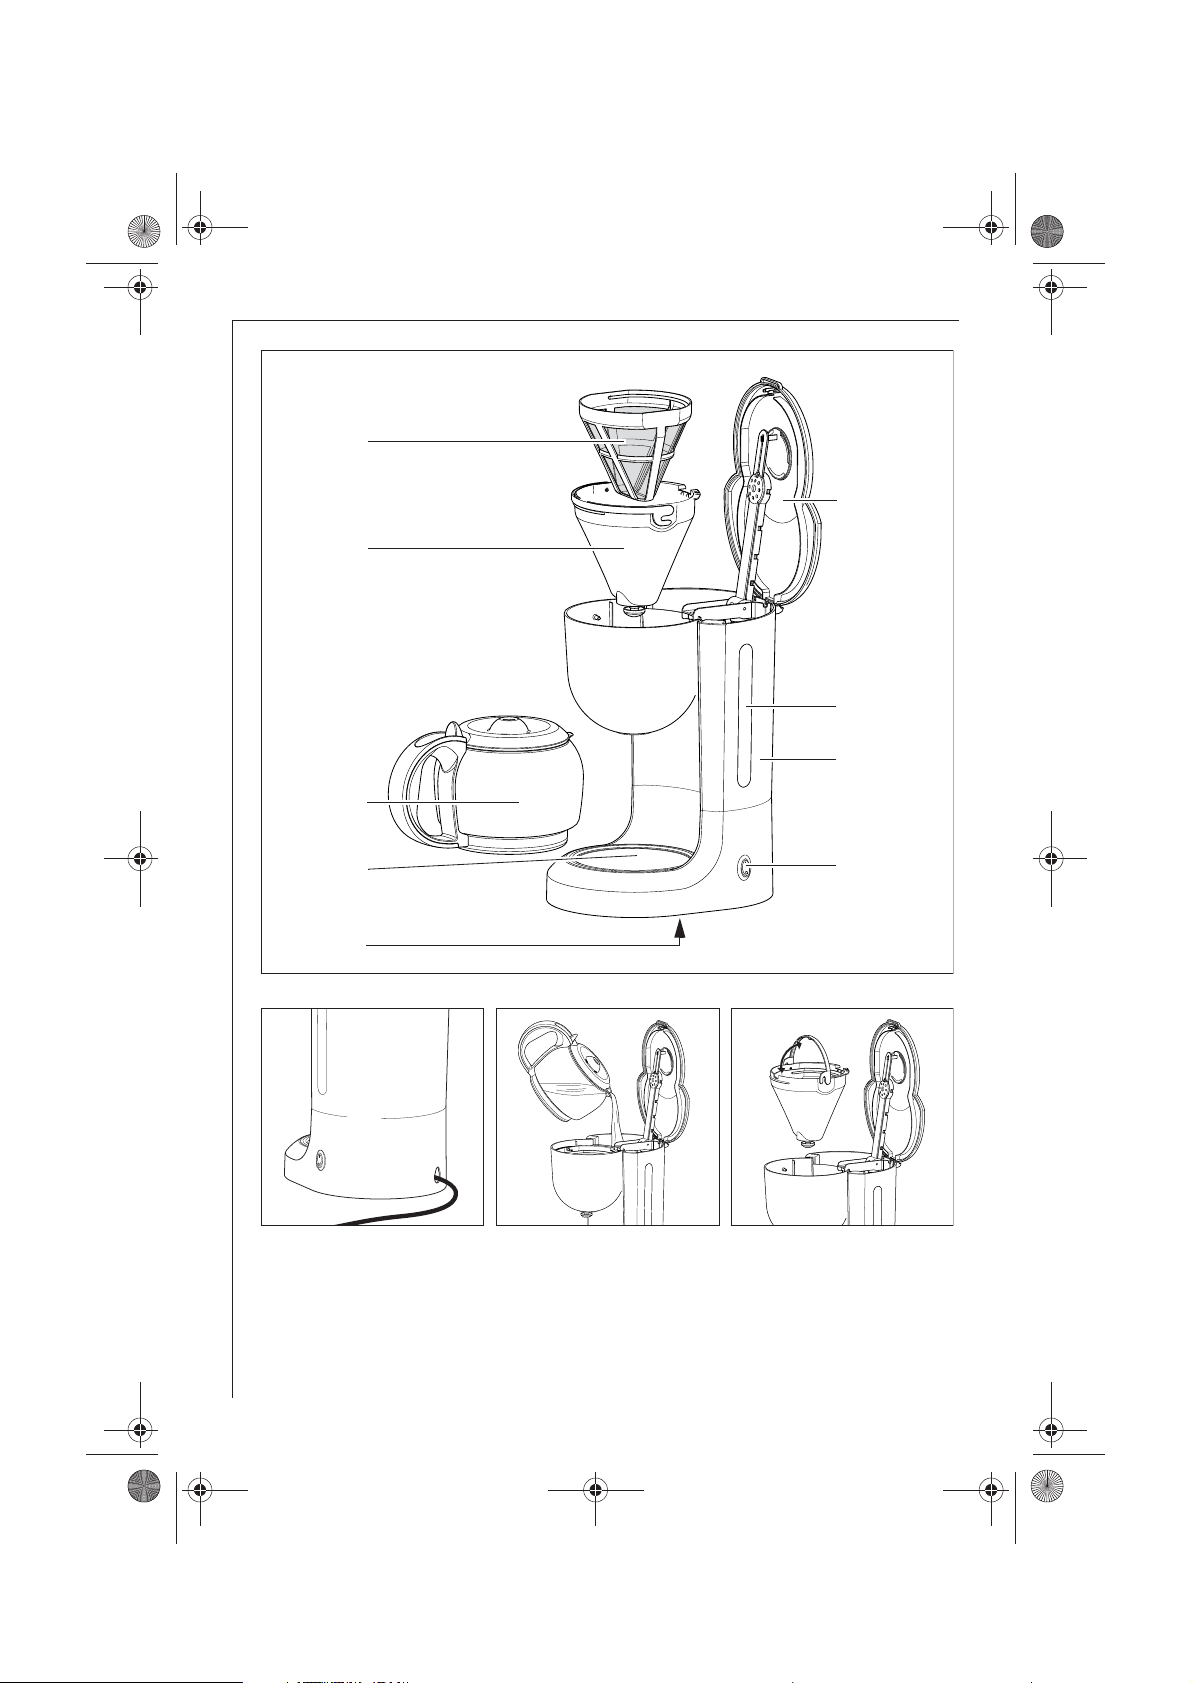
제품 명칭(그림 1)
A On / Off 버튼과 램프
B 물통
C 물 수위 표시창
D 뚜껑
E 물세척 가능한 영구필터
F 분리형 필터 홀더 및 누수 방지 밸브
G 양면 수위 표시된 유리 용기
H 가열판
J 제품 정보 표시판 (제품 밑면)
안전에 대한 사항
본 제품은 안전기준법에 의거한 기술 기준을 충
족합니다. 또한, 본 제품의 제조 및 판매사로서
저희는 사용자에게 아래와 같이 추가적인 안전
정보를 제공하고자 합니다.
일반 안전사항
●
제품의 작동 전압과 가정에서 사용할 전압이
일치해야 합니다. 제품 밑면의 제품 정보 표시
판을 참조하십시오.
●
올바르게 설치된 콘센트에만 플러그를 꽂아 주
십시오.
●
다음과 같은 경우에는 제품을 사용하지 마십시오.
- 제품 코드가 손상된 경우
- 몸체가 파손된 경우
●
제품 코드를 잡아당겨 콘센트로부터 플러그를
제거하지 마십시오.
●
전원 코드가 손상되었을 경우에는 반드시 일렉
트로룩스 고객 센터로 연락하시기 바랍니다.
●
본 제품의 수리는 반드시 공인된 기술자에 의
해서 이루어져야 합니다. 임의적인 수리는 위
험할 수 있으니, 수리가 필요할 때에는 반드시
본사 고객 센터나 구입처로 문의해 주십시오.
●
본 제품은 실내용 및 가정용입니다. 일렉트로
룩스는 본래의 기능과 맞지 않거나 부적절한
사용으로 발생하는 어떠한 손상에 대해서도 책
임지지 않습니다.
●
어린이 등 취급이 익숙치 않는 자나 신체적, 정
신적 문제가 있는 자, 혹은 경험이나 지식이 부
족한 자가 본 제품을 사용하지 않도록 주의하
십시오.
어린이 안전사항
●
작동 중에는 항상 제품을 주시해 주십시오. 제
품 사용 도중 어린이가 주변에 있을 시에는 각
별히 주의하십시오.
●
제품 포장재 (예, 비닐봉지)는 어린이의 손이
닿지 않도록 해주십시오.
한국어
3
Page 4
한국어
4
제품 사용시 주의사항
●
코드가 제품의 가열판에 닿지 않도록 주의해
주십시오.
●
제품을 청소하거나 유지 보수 전에는 먼저 전
원을 끄시고 반드시 전원 플러그를 제거해 주
십시오.
●
제품이 사용 중일 때에는 가열판, 추출부, 필터
커버 등이 매우 뜨거울 수 있습니다. 어린이가
주변에 있을 시 각별히 주의해 주십시오.
●
제품이 가열되어 있을 때에는 물을 채우지 마
십시오. 제품의 전원을 끄신 후에, 약 5분 동안
열을 식힐 수 있도록 기다려 주십시오.
●
제품에 낀 물때를 제거하실 때에는 사용 설명
서를 참조해 주십시오.
●
제품을 물 속에 완전히 담그지 마십시오.
●
일렉트로룩스는 본래의 기능과 맞지 않거나 부
적절한 사용으로 발생하는 어떠한 손상에 대해
서도 책임을 지지 않습니다.
●
작동 중에는 항상 제품을 주시해 주십시오. 잠
시라도 제품을 방치해야 할 때에는 전원을 끄
고 콘센트에서 플러그를 제거해 주십시오.
폐기
제품 포장재
제품의 포장재는 환경친화적이며, 재활용
이 가능합니다. 플라스틱 구성품들은
>PE<, >PS< 와 같은 기호로 표시되어 있
습니다. 제품 포장재들은 분리 수거하여
쓰레기 처리 박스에 버려 주십시오.
오래된 제품
이 기호가 표시되어 있는 제품 및
포장은 가정용 쓰레기로 처리될 수 없습
니다. 이러한 제품은 가전제품 재활용 전
문 수거 업체에 넘겨져야 합니다. 본 제품
을 적절한 방법으로 처리함으로써 고객님
께서는 환경보호에 도움을 주실 수 있습
니다. 보다 자세한 재활용 처리 정보를 원
하시면, 가까운 수거업체 또는 제품구입
처로 문의해 주십시오.
작동 방법
코드 보관 장치 (그림 2)
본 커피 메이커는 코드 보관 장치를 가지고
있습니다. 코드가 너무 긴 경우, 필요치 않
은 부분은 제품 옆면 코드 보관 장치에 넣을
수 있습니다.
처음 사용 전
커피 메이커를 처음 사용하시기 전에, 커피
와필터없이깨끗한물만넣고한두번정
도 제품을 작동해 주십시오.
커피 만들기
☞ 뚜껑을 열고(그림 1/D) 물통에 차가운 물을
채워 주십시오.
물통에 물을 채우실 때에는 반드시 차갑고
깨끗한 물만 사용해 주십시오.증류수, 우유,
이미 만들어진 커피, 차 등을 물통에 넣지 마
십시오.
물통에는 큰 컵으로 2잔부터 10잔까지 또는
작은 컵으로 4잔부터 15잔까지 원하는 만큼
의 물을 채울 수 있도록 표시가 되어 있습니
다.
분쇄 커피가 물에 많이 흡수될수록 추출되
는 커피의 양은 줄어들 수 있습니다.
☞ 영구 필터에 분쇄 원두를 넣으십시오.
☞ 중간 굵기 정도의 분쇄 원두를 이용해 주십
시오. 커피의 양은 개인의 취향에 따라 다릅
니다. 평균적으로 진한 맛 커피 한 잔에는 계
량 스푼으로 한 스푼 정도의 분량 (약 6-7
g)이 적당합니다.
☞ 뚜껑을 닫고 유리 용기를 가열판에 놓아 주
십시오.
Page 5

5
한국어
☞ On/Off 버튼을 눌러 전원을 켜 주십시오.
(그림 1/A)
☞ 전원 표시등에 불이 들어옵니다.
☞ 잠시 후에 뜨거운 물이 필터로 흘러듭니다.
☞ 추출이 끝나면, 제품은 자동으로 보온 기능
으로 전환됩니다.
제품 사용 후 반드시 On/Off 버튼을 눌러 전
원을 꺼 주십시오.
☞ 유리 용기를 제거합니다.
가열되는 동안에는 유리 용기를 30초 이상
분리하지 마십시오. 유리 용기를 꺼내면, 누
수방지 장치가 작동하여 커피가 열판에 떨
어지는 것을 방지해 줍니다. 아울러 가열판
은 커피를 뜨겁게 보온시켜 주며 이것은
On/Off 버튼을 눌러 제품의 전원을 끌 때까
지 유지됩니다.
커피의 농도를 고르게 하시려면, 드시기 전에
유리 용기 안의 커피를 잘 휘저어 주십시오.
물이 소진된 후, 물을 다시 채우시려면 제품
의 전원을 끄시고 제품이 충분히 식을 수 있
도록 몇 분 동안 기다려 주십시오.
청소와 보관
청소 전에는 반드시 전원 코드를 콘센트로부
터 제거하십시오.
☞ 필터 홀더를 청소할 때에는 필터 홀더를
꺼내주시고 세척 후 다시 넣어주십시오.
(그림 4)
☞ 누수 방지 밸브를 깨끗이 세척하시려면 헹구
는 동안 밸브를 몇 차례 작동시켜 주십시오.
☞ 제품을 청소할 때 젖은 천을 사용하시되, 제
품 내부로 물이 스며들지 않게 해주시고 제
품을 절대 물에 담그지 마십시오.
물때 제거
물 때 제거는 커피 메이커를 좀 더 오래 사용할
수 있게 합니다.
제품 수명을 연장시키기 위해서는 3개월에 한 번
정도 물 때 제거를 권장합니다.
석회질 제거를 하실 때에는 환경친화적인 제거제
만 사용해 주시고 제품에 표기된 지시사항을 따
라 주십시오. 농축 포름산 제거제나 파우더 형태
의 제거제는 사용하지 마십시오.
먼저 물통 안에 물을 채우고 제거제를 넣습
니다. 순서를 바꿔 제거제를 넣고 물을 넣으
실 수 없습니다.
유리 용기를 가열판에 올려 놓으십시오.
제거제가 작용할 수 있도록 약 15분 정도 그
대로 둔 후에 제품의 전원 스위치를 켭니다.
물통 안의 물과 제거제의 혼합액이 모두 유
리 용기로 떨어지면 제품의 전원을 꺼 주십
시오.
필요하다면 이와 같은 과정을 몇 차례 반복
해 주십시오.
석회질을 제거한 후에 깨끗한 물을 사용하
여 여과 과정을 적어도 두 번 이상 진행하십
시오.
흐르는 물에 유리 용기와 뚜껑, 필터 홀더를
깨끗하게 씻어주시고 세척 과정이 진행되는
동안에 누수 방지 밸브를 반복해서 작동시
켜 주십시오.
유리 용기
유리 용기가 파손되었을 경우에는 고객 센터를
통해 새 제품으로 구입하실 수 있습니다. 정확
한 모델명은 제품 아랫면의 제품 정보 표시판
(그림 1/J)을 참조해 주십시오.
Page 6

제품 기술 정보
사용 전압 : 220V / 60Hz
소비 전력 : 915W
본 제품은 다음의 IEC 규정을 준비합니다.
●
2006/95/EC - 저전압 규정
●
89/336/EEC with amendments
92/31/EEC and 93/68/EEC - EMC 규정
6
Page 7

7
Safety
Instructions
This appliance corresponds to accepted
technological standards with regards to
safety. Nevertheless, as a manufacturer,
we consider it our duty to familiarise you
with the following safety instructions.
GENERAL SAFETY
• The appliance must be connected only
to a power supply at a voltage and
frequency which comply with the
specifications on the rating plate on
the underside of the appliance!
• The appliance should only be plugged
into a socket installed according to
regulations.
• Never pick up the appliance if
– the lead is damaged,
– the housing is damaged.
• Never use the lead to pull the plug out
from the socket.
• If the supply cord is damaged, it must
be replaced by the manufacturer, its
service agent or similarly qualified
persons in order to avoid a hazard.
• Repairs to this appliance may only be
carried out by qualified service
engineers. Considerable danger may
result from improper r epairs. If repairs
become necessary , please contact the
Electrolux Customer Care Department
or Electrolux authorised dealer.
• The appliance is intended only for
preparing coffee in the home, not for
commercial use. The manufacturer
accepts no liability for damage caused
by improper use or use other than for
the intended purpose.
• This appliance is not intended for use
by persons (including children) with
reduced physical, sensory or mental
capabilities or lack of experience and
knowledge supervision or instruction
concerning use of the appliance by a
person responsible for their safety.
Dear customer,
Please read these operating instructions
through carefully. Above all, please follow
the safety instructions on the first few
pages of these operating instructions!
Please keep the operating instructions for
future reference. If applicable, pass these
instructions on to the next owner of the
appliance.
The warning triangle and/or key words
(Danger!, Caution!, Important!), draw
your attention to information which
is important for your safety or the
correct functioning of the appliance.
It is essential that this information is
observed.
This symbol guides you step by step
through the operating procedure for
your appliance.
Next to this symbol you receive
additional information and practical
tips on using the appliance.
The clover indicates tips and
information about the economical and
environmentally friendly use of the
appliance.
Description of The
Appliance
(Figure 1)
A ON/OFF switch with pilot light
B Water reservoir
C Water level indicator
D Hinged lid
E Washable permanent filter
F Removable filter holder with
anti-drip valve
G Coffee jug with graduation on
both sides
H Warming plate
J Rating plate (under appliance)
9
Page 8

8
•
•
•
•
•
•
•
•
•
•
D
product may not be treated as
n
d
is
u
d
se
of
te
e.
e.
it
h
oir
lk,
e
is
all
e
of
SAFETY OF CHILDREN
Never leave the appliance running
unattended. Take particular care when
children are around!
Children should be supervised to
ensure that they do not play with the
appliance.
POINTS TO NOTE WHEN USING
THE APPLIANCE
Never allow the cord to come into
contact with the hotplate!
Before cleaning and carrying out
maintenance, switch the appliance off
and unplug from the mains socket.
The hotplate, water outlet pipe and
filter cover will heat up during use.
Keep children away!
Do not fill the appliance with water
when it is hot. Switch the coffee maker
off and wait approx. 5 minutes for it
to cool down!
Please follow the instructions for
descaling!
Never immerse the unit in liquid.
The manufacturer accepts no liability
for any damage caused by improper
or incorrect use.
Do not leave the appliance unattended.
Unplug from the mains socket even
when leaving the room for a short time.
isposal
PACKAGING MATERIAL
The packaging materials are
environmentally friendly and can be
recycled. The plastic components are
identified by markings, e.g. >PE<,
>PS<, etc. Please dispose of the
packaging materials in the appropriate
container at the community waste
disposal facilities.
OLD APPLIANCE
The symbol
on its packaging indicates that this
6
on the product or
household waste. Instead it shall be
handed over to the applicable collectio
point for the recycling of electrical an
electronic equipment. By ensuring th
product is disposed of correctly, yo
will help prevent potential negative
consequences for the environment an
human health, which could otherwi
be caused by inappropriate waste
handling of this product. For more
detailed information about recycling
this product, please contact your
local city office, your household was
disposal service or the shop where
you purchased the product.
Operation
CORD STORAGE (Figure 2)
Your coffee machine has a cord storag
If the mains lead is too long, you can
push cable that is not needed into the
compartment at the back of the applianc
BEFORE USING YOUR COFFEE
MAKER FOR THE FIRST TIME
Before using the appliance for the first
time, clean it by running water through
once or twice without using paper filter
and coffee.
MAKING COF
Open the lid (Figur
Fill in water (Figure 3).
Fill the water reservoir only with fres
cold water . Never fill the water r eserv
with mineral water, distilled water , mi
ready made coffee, tea etc.
You can use the coffee jug to fill in th
amount of water you require. There
a gauge for 2–10 big cups / 4–15 sm
cups in the water reservoir and on th
coffee jug.
The markings apply for the amount
fresh water.
The quantity of coffee produced is
lower as the ground coffee absorbs
water.
FEE
e 1/D).
Page 9

9
Insert the filter (figure 1/E) in the filter
holder (figure 1/F). This product has
a permanent filter. If you want to use
a paper filter, take out the permanent
filter and insert the paper filter in the
filter holder
Fill in ground coffee.
Please use ground coffee, medium
grind. The quantity of coffee is matter
of personal taste. For an average
strong coffee one measuring spoon
(approx. 6-7g) is suf
ficient per cup.
Close the lid (Figur
e 1/D).
Place the coffee jug complete with lid
onto the warming plate.
Switch on the appliance with the
ON/OFF switch (Figure 1/A).
The pilot lamp lights up. After a few
seconds, hot water flows into the filter
When the water has stopped flowing,
the appliance automatically switches
to the warming mode.
After use the appliance must be
switched of
f by hand.
Remove the jug.
While boiling, the jug must not be
removed for longer than 30seconds
or the filter will overflow.
Once the jug has been removed,
the filter valve prevents coffee from
dripping onto the warming plate.
The warming plate always keeps the
coffee hot. It remains on until the
appliance is switched off with the
ON/OFF switch (Figure 1/A) and the
pilot lamp goes out.
To guarantee uniform coffee strength
it should be stirred in the coffee jug
after pr
eparation.
If the water has stopped flowing and
you wish to refill water for a fresh jug
of coffee, switch the appliance off and
allow it to cool down for a few minutes.
Cleaning and Care
Unplug the power cord from the mains
socket befor
e cleaning.
To clean the filter holder, swing up the
handle and remove the filter holder
(Figur
e 4).
To clean the filter valve thoroughly,
activate it several times while it is being
rinsed.
Replace filter holder and swing handle
down (Figur
e 4).
Clean the appliance with a damp cloth
but never immerse it in water
!
Coffee jug and jug lid are dishwasher
proof.
DESCALING - MAKING YOUR COFFEE
MAKER LAST LONGER
As a precautionary measure, we
recommend descaling every three months.
Only use an environmentally friendly
descaler and follow the instructions on the
packet. Please do not use a descaler with
a concentrated formic base, or any
descaler in powder form.
Fill the water reservoir with water and
only then add the descaler. Not vice
versa! Place the coffee jug with its lid
onto the warming plate. Allow the
descaler to take effect for about 15
minutes, then switch the appliance on.
Switch it off when the descaler solution
has finished flowing through.
If necessary repeat the descaling
process. Following this, allow the
appliance to run at least twice with
plain water. Thoroughly rinse the coffee
jug, lid and filter holder under running
water, activate the filter valve repeatedly
during the rinse process.
9
Page 10

10
Coffee Jug
If your coffee jug smashed, you can
purchase a new one from your sales dealer
or the service centre specifying the model
of your coffee maker, see rating plate
(Figure 1/J).
Technical Data
Mains Voltage: 220V/60Hz
Power Consumption: 915
W
This appliance conforms with the
following EC Directives:
• Low Voltage Directive 2006/95/EC
• EMC Directive 89/336/EEC with
amendments 92/31/EEC and
93/68/EEC
6
Page 11

ECM3100 / ECM3130
Page 12

 Loading...