

Page 1

EBGL30X
................................................ .............................................
EN OVEN USER MANUAL
Page 2

www.electrolux.com
2
CONTENTS
1. SAFETY INFORMATION . . . . . . . . . . . . . . . . . . . . . . . . . . . . . . . . . . . . . . . . . . . . . . . . . . . 3
2. SAFETY INSTRUCTIONS . . . . . . . . . . . . . . . . . . . . . . . . . . . . . . . . . . . . . . . . . . . . . . . . . . 4
3. PRODUCT DESCRIPTION . . . . . . . . . . . . . . . . . . . . . . . . . . . . . . . . . . . . . . . . . . . . . . . . . 6
4. BEFORE FIRST USE . . . . . . . . . . . . . . . . . . . . . . . . . . . . . . . . . . . . . . . . . . . . . . . . . . . . . . 7
5. DAILY USE . . . . . . . . . . . . . . . . . . . . . . . . . . . . . . . . . . . . . . . . . . . . . . . . . . . . . . . . . . . . . 7
6. CLOCK FUNCTIONS . . . . . . . . . . . . . . . . . . . . . . . . . . . . . . . . . . . . . . . . . . . . . . . . . . . . . 9
7. USING THE ACCESSORIES . . . . . . . . . . . . . . . . . . . . . . . . . . . . . . . . . . . . . . . . . . . . . . . . 9
8.
ADDITIONAL FUNCTIONS . . . . . . . . . . . . . . . . . . . . . . . . . . . . . . . . . . . . . . . . . . . . . . . . 10
9. HELPFUL HINTS AND TIPS . . . . . . . . . . . . . . . . . . . . . . . . . . . . . . . . . . . . . . . . . . . . . . . 11
10.
CARE AND CLEANING . . . . . . . . . . . . . . . . . . . . . . . . . . . . . . . . . . . . . . . . . . . . . . . . . . . 22
11. WHAT TO DO IF… . . . . . . . . . . . . . . . . . . . . . . . . . . . . . . . . . . . . . . . . . . . . . . . . . . . . . . 24
12.
INSTALLATION . . . . . . . . . . . . . . . . . . . . . . . . . . . . . . . . . . . . . . . . . . . . . . . . . . . . . . . . . 25
13. GARANTIE, GARANZIA, GUARANTEE . . . . . . . . . . . . . . . . . . . . . . . . . . . . . . . . . . . . . . . 28
WE’RE THINKING OF YOU
Thank you for purchasing an Electrolux appliance. You’ve chosen a product that brings with it
decades of professional experience and innovation. Ingenious and stylish, it has been designed
with you in mind. So whenever you use it, you can be safe in the knowledge that you’ll get great
results every time.
Welcome to Electrolux.
Visit our website for:
Get usage advice, brochures, trouble shooter, service information:
www.electrolux.com
Register your product for better service:
www.electrolux.com/productregistration
Buy Accessories, Consumables and Original spare parts for your appliance:
www.electrolux.com/shop
CUSTOMER CARE AND SERVICE
We recommend the use of original spare parts.
When contacting Service, ensure that you have the following data available.
The information can be found on the rating plate. Model, PNC, Serial Number.
Warning / Caution-Safety information
General information and tips
Environmental information
Subject to change without notice.
Page 3

1. SAFETY INFORMATION
Before the installation and use of the appliance, carefully
read the supplied instructions. The manufacturer is not
responsible if an incorrect installation and use causes injuries and damages. Always keep the instructions with
the appliance for future reference.
1.1 Children and vulnerable people safety
WARNING!
Risk of suffocation, injury or permanent disability.
• This appliance can be used by children aged from 8
years and above and persons with reduced physical,
sensory or mental capabilities or lack of experience and
knowledge if they are supervised by an adult or a person who is responsible for their safety.
• Do not let children play with the appliance.
• Keep all packaging away from children.
• Keep children and pets away from the appliance when
it operates or when it cools down. Accessible parts are
hot.
• If the appliance has a child safety device, we recommend that you activate it.
• Cleaning and user maintenance shall not be made by
children without supervision.
ENGLISH 3
1.2 General Safety
• Internally the appliance becomes hot when in operation. Do not touch the heating elements that are in the
appliance. Always use oven gloves to remove or put in
accessories or ovenware.
• Do not use a steam cleaner to clean the appliance.
• Before maintenance cut the power supply.
Page 4

www.electrolux.com
4
• Do not use harsh abrasive cleaners or sharp metal
• To remove the shelf supports first pull the front of the
scrapers to clean the glass door since they can scratch
the surface, which may result in shattering of the glass.
shelf support and then the rear end away from the side
walls. Install the shelf supports in the opposite sequence.
2.
SAFETY INSTRUCTIONS
2.1 Installation
WARNING!
Only a qualified person must install this appliance.
• Remove all the packaging.
• Do not install or use a damaged appli-
ance.
• Obey the installation instruction sup-
plied with the appliance.
• Always be careful when you move the
appliance because it is heavy. Always
wear safety gloves.
• Do not pull the appliance by the handle.
• Keep the minimum distance from the
other appliances and units.
• Make sure that the appliance is installed
below and adjacent safe structures.
• The sides of the appliance must stay
adjacent to appliances or to units with
the same height.
Electrical connection
WARNING!
Risk of fire and electrical shock.
• All electrical connections should be
made by a qualified electrician.
• The appliance must be earthed.
• Make sure that the electrical information
on the rating plate agrees with the power supply. If not, contact an electrician.
• Always use a correctly installed shock-
proof socket.
• Do not use multi-plug adapters and extension cables.
• Make sure not to cause damage to the
mains plug and to the mains cable.
Contact the Service or an electrician to
change a damaged mains cable.
• Do not let mains cables to come in
touch with the appliance door, specially
when the door is hot.
• The shock protection of live and insulated parts must be fastened in such a
way that it cannot be removed without
tools.
• Connect the mains plug to the mains
socket only at the end of the installation. Make sure that there is access to
the mains plug after the installation.
• If the mains socket is loose, do not
connect the mains plug.
• Do not pull the mains cable to disconnect the appliance. Always pull the
mains plug.
• Use only correct isolation devices: line
protecting cut-outs, fuses (screw type
fuses removed from the holder), earth
leakage trips and contactors.
• The electrical installation must have an
isolation device which lets you disconnect the appliance from the mains at all
poles. The isolation device must have a
contact opening width of minimum 3
mm.
2.2 Use
WARNING!
Risk of injury, burns or electric
shock or explosion.
Page 5

• Use this appliance in a household environment.
• Do not change the specification of this
appliance.
• Make sure that the ventilation openings
are not blocked.
• Do not let the appliance stay unattended during operation.
• Deactivate the appliance after each
use.
• Be careful, when you open the appliance door while the appliance is in operation. Hot air can release.
• Do not operate the appliance with wet
hands or when it has contact with water.
• Do not apply pressure on the open
door.
• Do not use the appliance as a work
surface or as a storage surface.
• Always keep the appliance door closed
when the appliance is in operation.
• Open the appliance door carefully. The
use of ingredients with alcohol can
cause a mixture of alcohol and air.
• Do not let sparks or open flames to
come in contact with the appliance
when you open the door.
• Do not put flammable products or items
that are wet with flammable products
in, near or on the appliance.
WARNING!
Risk of damage to the appliance.
ENGLISH 5
• Use a deep pan for moist cakes. Fruit
juices cause stains that can be permanent.
2.3 Care and Cleaning
WARNING!
Risk of injury, fire or damage to
the appliance.
• Before maintenance, deactivate the appliance and disconnect the mains plug
from the mains socket.
• Make sure the appliance is cold. There
is the risk that the glass panels can
break.
• Replace immediately the door glass
panels when they are damaged. Contact the Service.
• Be careful when you remove the door
from the appliance. The door is heavy!
• Clean regularly the appliance to prevent
the deterioration of the surface material.
• Remaining fat or food in the appliance
can cause fire.
• Clean the appliance with a moist soft
cloth. Only use neutral detergents. Do
not use abrasive products, abrasive
cleaning pads, solvents or metal objects.
• If you use an oven spray, obey the safety instructions on the packaging.
• Do not clean the catalytic enamel (if applicable) with any kind of detergent.
• To prevent damage or discoloration to
the enamel:
– do not put ovenware or other objects
in the appliance directly on the bottom.
– do not put aluminium foil directly on
the bottom of the appliance.
– do not put water directly into the hot
appliance.
– do not keep moist dishes and food in
the appliance after you finish the cooking.
– be careful when you remove or install
the accessories.
• Discoloration of the enamel has no effect on the performance of the appliance. It is not a defect in the sense of
the warranty law.
2.4 Internal light
• The type of light bulb or halogen lamp
used for this appliance, is only for
household appliances. Do not use it for
house lighting.
WARNING!
Risk of electrical shock.
• Before replacing the lamp, disconnect
the appliance from the power supply.
• Only use lamps with the same specifications.
2.5 Disposal
WARNING!
Risk of injury or suffocation.
Page 6
www.electrolux.com
6
• Disconnect the appliance from the
mains supply.
• Cut off the mains cable and discard it.
• Remove the door catch to prevent children and pets to get closed in the appliance.
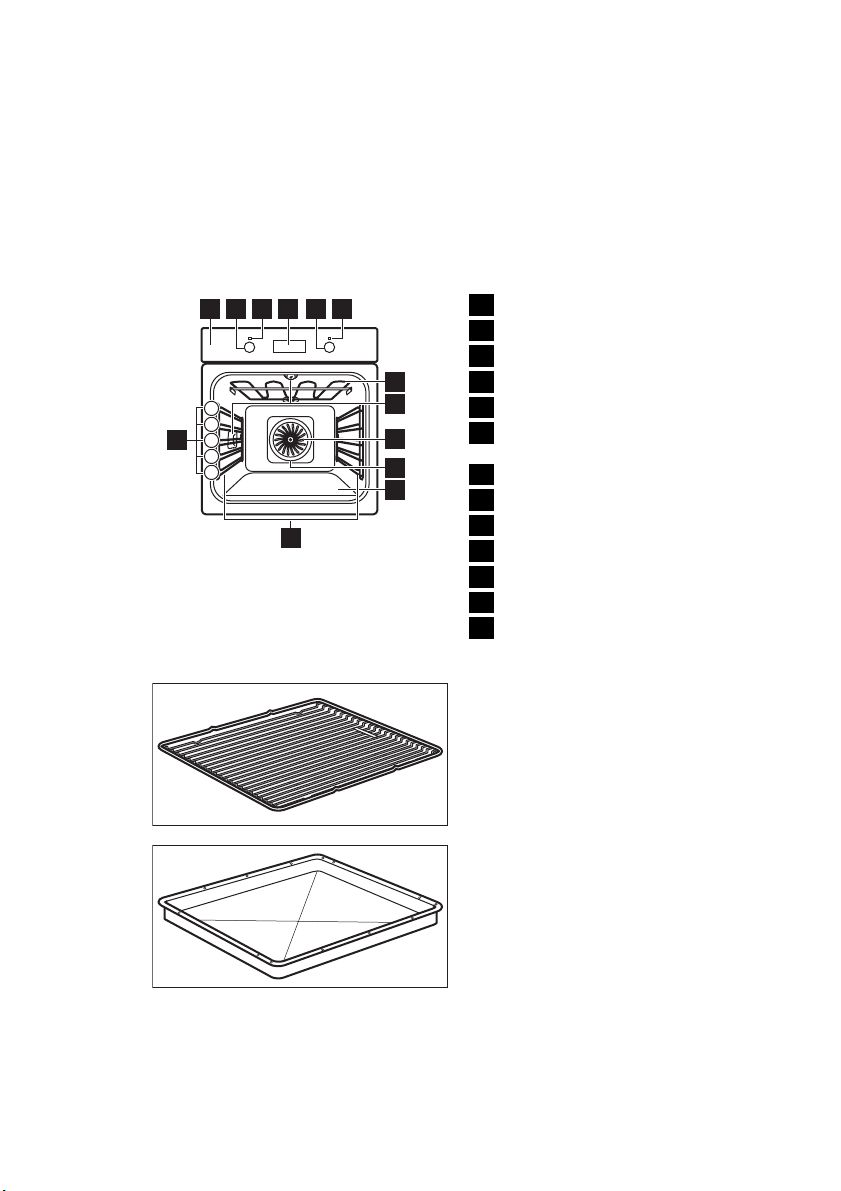
3. PRODUCT DESCRIPTION
41 2 3 5 6
5
4
3
13
2
1
12
3.1 Accessories
10
11
• Dispose of the appliance at any shop
that sells new appliances or at the official SENS collection point. You can find
the list of the official SENS collection
points at www.sens.ch.
Control panel
1
Knob for the oven functions
2
Power lamp / symbol
3
7
8
9
Electronic programmer
4
Knob for the temperature
5
Temperature lamp / symbol / indica-
6
tor
Heating element
7
Lamp
8
Fan
9
Rear wall heating element
10
Bottom heat
11
Shelf support, removable
12
Shelf positions
13
Wire shelf
For cookware, cake tins, roasts.
Baking tray
For cakes and biscuits.
Page 7
4. BEFORE FIRST USE
ENGLISH 7
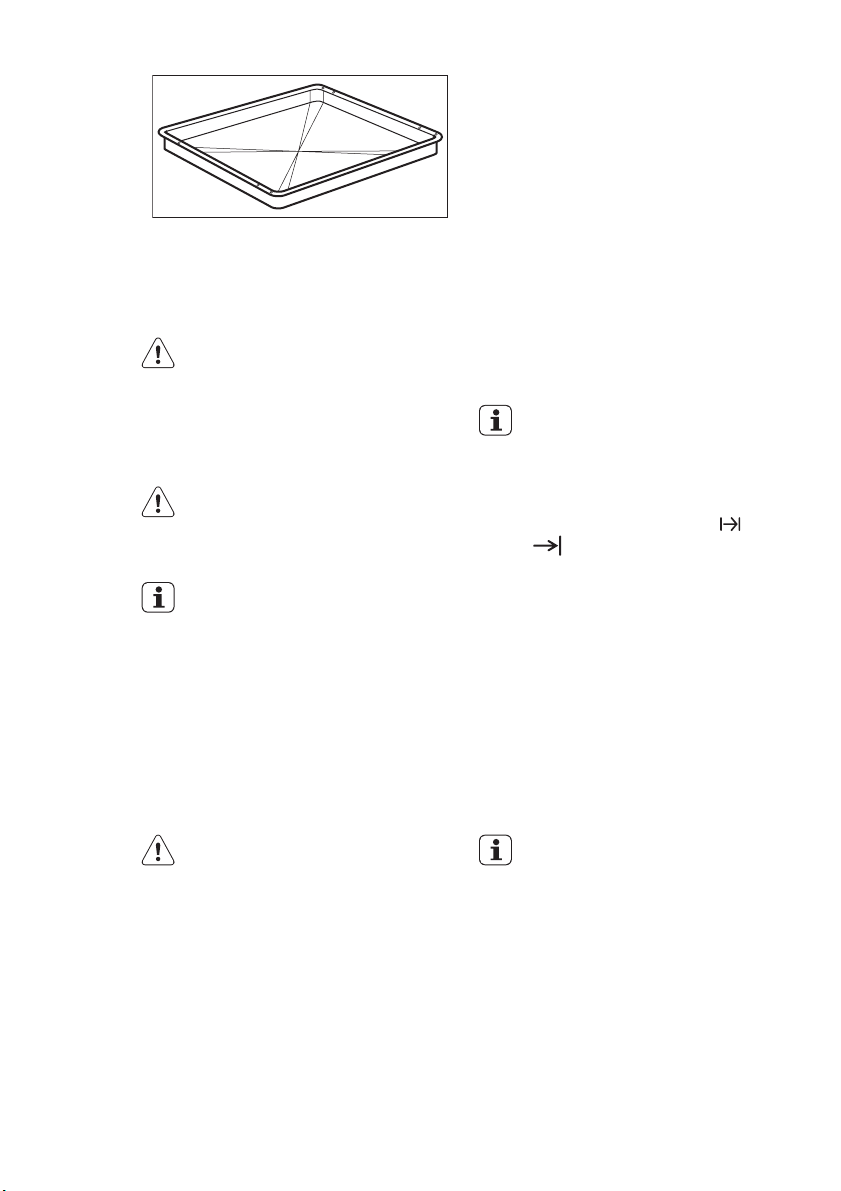
Grill- / Roasting pan
To bake and roast or as a pan to collect
fat.
WARNING!
Refer to the Safety chapters.
4.1 Initial Cleaning
• Remove all parts from the appliance.
• Clean the appliance before first use.
Refer to chapter "Care and Cleaning".
4.2 Setting the time
You must set the time before you
operate the appliance.
When you connect the appliance to the
electrical supply the indicator for the Time
of Day function flashes.
Press the + or - button to set the correct
time.
5. DAILY USE
WARNING!
Refer to the Safety chapters.
To use the appliance, press the control
knob. The control knob comes out.
5.1 Activating and deactivating
the appliance
1.
Turn the control knob for the oven
functions to select an oven function.
2.
Turn the control knob for the temperature to select a temperature.
3.
To deactivate the appliance turn the
control knobs for the oven functions
and temperature to off position.
After approximately five seconds, the
flashing stops and the display shows the
time of day you set.
Useful information:
• To change the time, press the Selection
button again and again until the indicator for the Time of Day function flashes.
You must not set the Duration
End
• In case of a power cut up to 1 hour, the
time of day is shown and the indicator
for the Time of Day function flashes.
Make sure that the time is correct and
press the Selection button to stop the
flashing.
• In case of a power cut longer than 1
hour, you must set the time again.
• The indicator comes on when the oven
heats up.
• The lamp comes on when the appliance operates.
• The symbol shows whether the knob
controls one of the cooking zones, the
oven functions or the temperature.
) function at the same time.
Knob symbol, indicator or
lamp (depends on the model refer to the appliance overview):
or
Page 8
www.electrolux.com
8
5.2 Oven functions
Oven function Application
Light To activate the lamp without a cooking function.
True Fan Cooking To bake on up to 3 oven levels at the same time
Pizza Setting To bake food on one shelf position for a more in-
Conventional Cooking To bake and roast food on one shelf position.
Bottom Heat To bake cakes with crispy bottom and to pre-
Defrost To defrost frozen food.
Grilling To grill flat food and to toast bread.
Fast Grilling To grill flat food in large quantities and to toast
Turbo Grilling To roast larger meat joints or poultry with bones
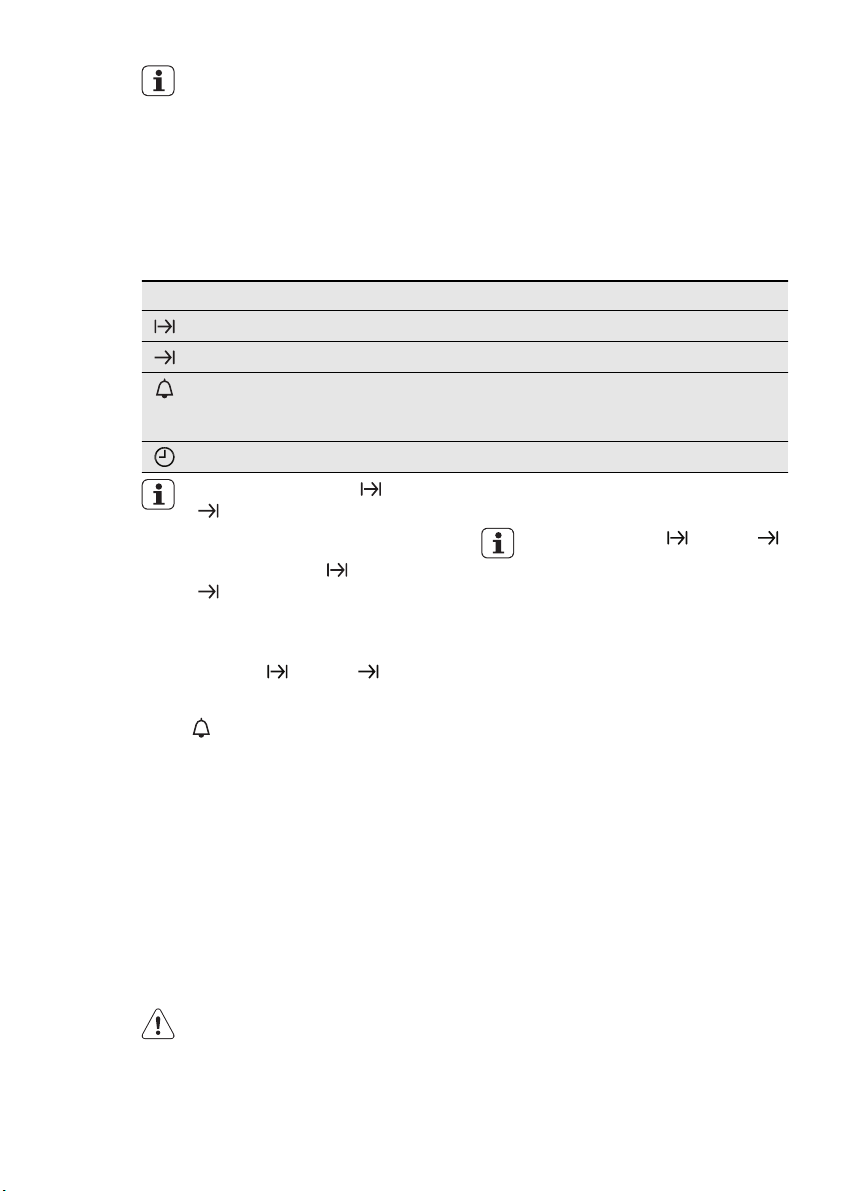
5.3 Electronic programmer
1 2 3
hr min
and to dry food. Set the oven temperatures 20 40 °C lower than when using Conventional
Cooking.
tensive browning and a crispy bottom. Set the
temperature 20 - 40 °C lower than for Conventional Cooking.
serve food.
bread.
on one shelf position. Also to make gratins and
to brown.
Function indicators
1
Time display
2
Function indicator
3
Button +
4
Selection button
5
Button -
6
456
Page 9
If you do not use the appliance for
3 minutes, the brightness of the
display decreases to lower the
power consumption. When you
press a button, the display goes
back to the active mode.
6. CLOCK FUNCTIONS
Clock function Application
Duration To set how long the appliance must operate.
End To set when the appliance must be deactivated.
Minute Minder To set a countdown time. An acoustic signal sounds af-
Time of day To set, change or check the time of day.
You can use Duration and End
at the same time to set the
time when the appliance must be
activated and then deactivated.
First set Duration
.
6.1 Setting the clock functions
1.
For Duration and End , set an
oven function and temperature. This
is not necessary for the Minute Mind-
.
er
2.
Press the Selection button again and
again until the indicator for the necessary clock function flashes.
3.
Press + or - to set the time for the
necessary clock function.
The display shows the indicator for
the clock function you set. When the
set time ends, the indicator flashes
ENGLISH 9
ter the time period is completed. This function has no
effect on the operation of the appliance.
and an acoustic signal sounds for two
minutes.
With the Duration and End
, then End
functions, the appliance deactivates automatically.
4.
Press a button to stop the signal.
5.
Turn the knob for the oven functions
and the knob for the temperature to
the off position.
6.2 Cancelling the clock
functions
1.
Press the Selection button again and
again until the necessary function indicator flashes.
2.
Press and hold the button -.
The clock function goes out after
some seconds.
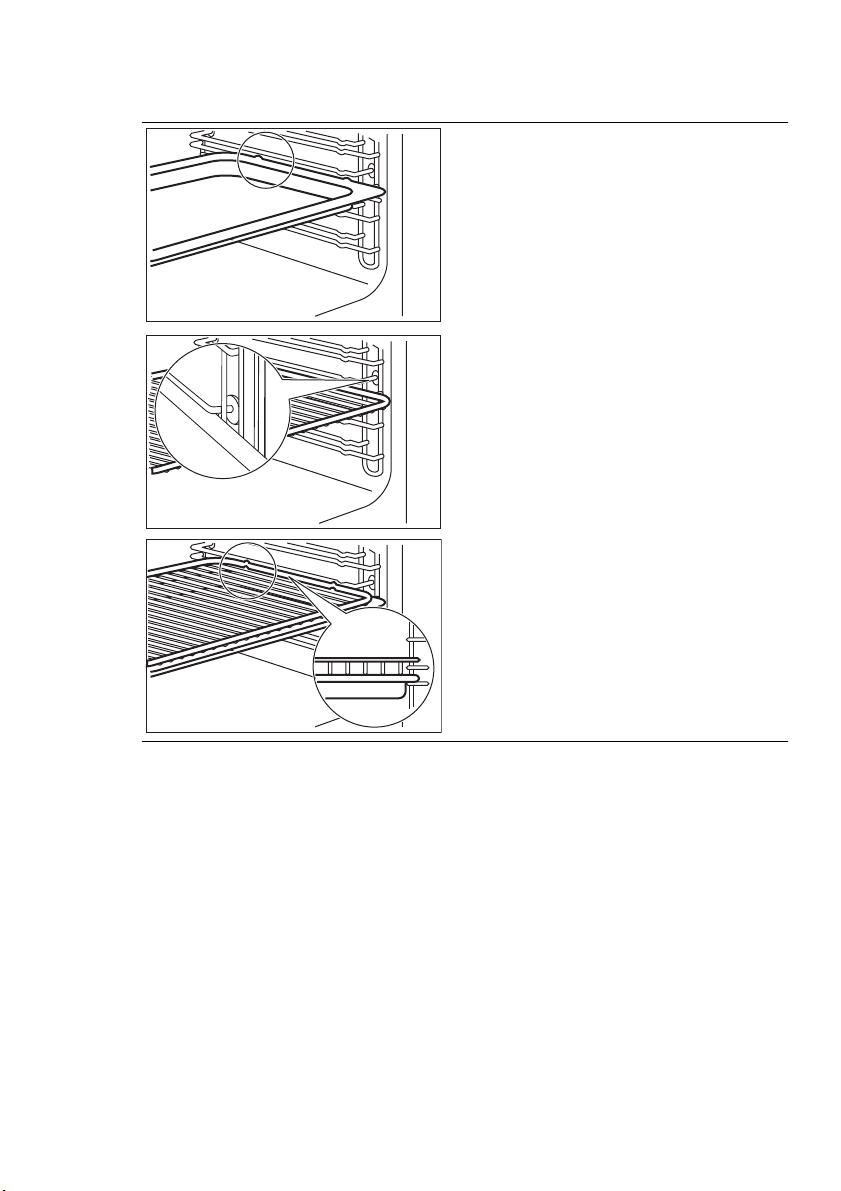
7. USING THE ACCESSORIES
WARNING!
Refer to the Safety chapters.
Page 10
www.electrolux.com
10
7.1 Inserting the accessories
Baking tray:
Push the baking tray between the guide
bars of the shelf support.
Wire shelf:
Push the shelf between the guide bars of
the shelf support and make sure that the
feet point down.
Wire shelf and baking tray together:
Push the baking try between the guide
bars of the shelf support and the wire
shelf on the guide bars above.
• All accessories have small indentations
at the top of the right and left side to increase safety. The indentations are also
anti-tip devices.
8. ADDITIONAL FUNCTIONS
8.1 Cooling fan
When the appliance operates, the cooling
fan activates automatically to keep the
• The high rim around the shelf is a device which prevents cookware from
slipping.
surfaces of the appliance cool. If you deactivate the appliance, the cooling fan can
continue to operate until the appliance
cools down.
Page 11

9. HELPFUL HINTS AND TIPS
ENGLISH 11
The temperature and baking times
in the tables are guidelines only.
They depend on the recipes, quality and quantity of the ingredients
used.
9.1 Baking
General instructions
• Your new appliance may bake or roast
differently to the appliance you had before. Adapt your usual settings (temperature, cooking times) and shelf positions to the values in the tables.
• With longer baking times, the appliance
can be switched off about 10 minutes
before the end of baking time, to use
the residual heat.
When you use frozen food, the trays
in the appliance can twist during bak-
ing. When the trays get cold again,
the distortion will be gone.
How to use the Baking Tables
• We recommend to use the lower temperature the first time.
• If you cannot find the settings for a special recipe, look for the one that is almost the same.
• Baking time can be extended by 10 15 minutes, if you bake cakes on more
than one level.
• Cakes and pastries at different heights
do not always brown equally at first. If
this occurs, do not change the temperature setting. The differences equalize
during the baking procedure.
• Unless otherwise stated, the values in
the tables assume that the appliance is
cold when the cooking starts.
9.2 Tips on baking
Baking results Possible cause Remedy
The bottom of the cake is
not browned sufficiently.
The cake sinks and becomes soggy, lumpy or
streaky.
The cake sinks and becomes soggy, lumpy or
streaky.
The cake sinks and becomes soggy, lumpy or
streaky.
The cake is too dry.
The cake is too dry.
The cake browns unevenly.
The cake browns unevenly.
The shelf position is in-
correct.
The oven temperature is
too high.
The baking time is too
short.
There is too much liquid
in the mixture.
The oven temperature is
too low.
The baking time is too
long.
The oven temperature is
too high and the baking
time is too short.
The mixture is unevenly
distributed.
Put the cake on a lower
The next time you bake,
set a slightly lower oven
Set a longer baking time.
You cannot decrease
baking times by setting
higher temperatures.
Use less liquid. Be careful
with mixing times, especially if you use a mixing
The next time you bake,
set a higher oven temper-
The next time you bake,
set a shorter baking time.
Set a lower oven temper-
ature and a longer baking
Spread the mixture evenly
on the baking tray.
shelf.
temperature.
machine.
ature.
time.
Page 12

www.electrolux.com
12
The cake is not ready in
the baking time given.
9.3 Baking on one level:
Baking in tins
Ring cake or brioche
Madeira cake / fruit
cakes
Fatless sponge
cake / Fatless
sponge cake
Fatless sponge
cake / Fatless
sponge cake
Flan base - short
pastry
Flan base - sponge
mixture
Apple pie / Apple
pie (2 tins Ø20 cm,
diagonally off set)
Apple pie / Apple
pie (2 tins Ø20 cm,
diagonally off set)
Cheesecake Conventional
1)
Baking results Possible cause Remedy
The oven temperature is
too low.
Type of baking Oven function Shelf
position
True Fan Cook-
1 150 - 160 50 - 70
The next time you bake,
set a slightly higher oven
temperature.
Temperature
(°C)
ing
True Fan Cook-
1 140 - 160 70 - 90
ing
True Fan Cook-
2 140 - 150 35 - 50
ing
Conventional
2 160 35 - 50
Cooking
True Fan Cook-
ing
True Fan Cook-
2
170 - 180
2 150 - 170 20 - 25
ing
True Fan Cook-
2 160 60 - 90
ing
Conventional
1 180 70 - 90
Cooking
1 170 - 190 60 - 90
Cooking
Preheat the oven.
Time
(min)
1)
10 - 25
Cakes / pastries / breads on baking trays
Type of baking Oven function
Plaited bread /
bread crown
Conventional
Cooking
Shelf
position
Christmas stollen Conventional
Cooking
Temperature
(°C)
Time
(min)
3 170 - 190 30 - 40
2
160 - 180
1)
50 - 70
Page 13

ENGLISH 13
Type of baking Oven function
Bread (rye bread):
1. First part of baking process.
2. Second part of
Conventional
Cooking
baking process.
Cream puffs /
eclairs
Conventional
Cooking
Swiss roll Conventional
Cooking
Cake with crumble
topping (dry)
Buttered almond
cake / sugar cakes
Fruit flans (made
with yeast dough /
sponge mixture)
Fruit flans (made
with yeast dough /
sponge mixture)
Fruit flans made
with short pastry
True Fan Cook-
Conventional
True Fan Cook-
2)
Conventional
2)
True Fan Cook-
ing
Cooking
ing
Cooking
ing
Yeast cakes with
delicate toppings
(e. g, quark, cream,
Conventional
Cooking
custard)
1)
Preheat the oven.
2)
Use a deep pan.
Shelf
position
1
3
3
Temperature
(°C)
1)
1. 230
2. 160 - 180
190 - 210
180 - 200
1)
1)
3 150 - 160 20 - 40
3
190 - 210
1)
3 150 35 - 55
3 170 35 - 55
3 160 - 170 40 - 80
3
160 - 180
1)
Time
(min)
1. 20
2. 30 - 60
20 - 35
10 - 20
20 - 30
40 - 80
Biscuits
Type of baking Oven function
Short pastry biscuits
Short bread / Short
bread / Pastry
Stripes
Short bread / Short
bread / Pastry
Stripes
Biscuits made with
sponge mixture
True Fan Cook-
ing
True Fan Cook-
ing
Conventional
Cooking
True Fan Cook-
ing
Shelf
position
Temperature
(°C)
3 150 - 160 10 - 20
3 140 20 - 35
3
160
1)
3 150 - 160 15 - 20
Time
(min)
20 - 30
Page 14

www.electrolux.com
14
Type of baking Oven function
Pastries made with
egg white, merungues
Macaroons
Biscuits made with
yeast dough
Puff pastries
Rolls
Rolls
Small cakes / Small
cakes (20 per tray)
Small cakes / Small
cakes (20 per tray)
1)
Preheat the oven.
True Fan Cook-
ing
True Fan Cook-
ing
True Fan Cook-
ing
True Fan Cook-
ing
True Fan Cook-
ing
Conventional
Cooking
True Fan Cook-
ing
Conventional
Cooking
Bakes and gratins
Dish Oven function
Pasta bake
Lasagne
Vegetables au
1)
gratin
Baguettes topped with melted cheese
Sweet bakes
Fish bakes
Stuffed vegetables
1)
Preheat the oven
Conventional
Cooking
Conventional
Cooking
Turbo Grilling or
True Fan Cooking
Turbo Grilling or
True Fan Cooking
Conventional
Cooking
Conventional
Cooking
Turbo Grilling or
True Fan Cooking
Shelf
position
Temperature
(°C)
3 80 - 100 120 - 150
3 100 - 120 30 - 50
3 150 - 160 20 - 40
160
150
170
1)
1)
1)
1)
1)
(°C)
3
3
3
3
3
Shelf posi-
tion
170 - 180
190 - 210
Temperature
1 180 - 200 45 - 60
1 180 - 200 25 - 40
1 160 - 170 15 - 30
1 160 - 170 15 - 30
1 180 - 200 40 - 60
1 180 - 200 30 - 60
1 160 - 170 30 - 60
Time
(min)
20 - 30
10 - 25
10 - 25
20 - 35
20 - 30
Time
(min)
Page 15

ENGLISH 15
9.4 Multileveled Baking
Cakes / pastries / breads on baking trays
True Fan Cooking
Type of baking
2 levels 3 levels
Cream puffs /
Eclairs
1 / 4 ---
Dry streusel cake 1 / 4 --- 150 - 160 30 - 45
1)
Preheat the oven.
Biscuits / small cakes / small cakes / pastries / rolls
True Fan Cooking
Type of baking
Shelf position
2 levels 3 levels
Short pastry biscuits
1 / 4 1 / 3 / 5 150 - 160 20 - 40
Short bread /
Short bread /
1 / 4 1 / 3 / 5 140 25 - 50
Pastry Stripes
Biscuits made
with sponge mix-
1 / 4 --- 160 - 170 25 - 40
ture
Biscuits made
with egg white,
1 / 4 --- 80 - 100 130 - 170
meringues
Macaroons 1 / 4 --- 100 - 120 40 - 80
Biscuits made
with yeast dough
1 / 4 --- 160 - 170 30 - 60
Puff pastries 1 / 4 ---
Rolls 1 / 4 --- 180 30 - 55
Small cakes /
Small cakes (20
1 / 4 ---
per tray)
1)
Preheat the oven.
Temperature
(°C)
160 - 180
1)
Temperature
(°C)
150
1)
1)
170 - 180
Time (min)Shelf position
25 - 45
Time (min)
30 - 50
25 - 40
9.5 Pizza Setting
Type of baking
Pizza (thin crust)
Shelf posi-
tion
2
Pizza (with a lot of topping) 2 180 - 200 20 - 30
Temperature
(°C)
200 - 230 1)
Time
(min)
2)
15 - 20
Page 16

www.electrolux.com
16
Type of baking
Shelf posi-
tion
Temperature
(°C)
Time
(min)
Tarts 1 180 - 200 40 - 55
Spinach flan 1 160 - 180 45 - 60
Quiche Lorraine 1 170 - 190 45 - 55
Swiss Flan 1 170 - 190 45 - 55
Apple cake, covered 1 150 - 170 50 - 60
Vegetable pie 1 160 - 180 50 - 60
Unleavened bread
Puff pastry flan
Flammekuchen (Pizza-like dish from
Alsace)
Piroggen (Russian version of calzone)
1)
Preheat the oven.
2)
Use a deep pan.
9.6 Roasting
Roasting dishes
• Use heat-resistant ovenware to roast
(refer to the instructions of the manufacturer).
• You can roast large roasting joints directly in the deep pan (if present) or on
the wire shelf above the deep pan.
• Roast lean meats in the roasting tin with
the lid. This keeps the meat more succulent.
• All types of meat that can be browned
or have crackling can be roasted in the
roasting tin without the lid.
2
2
2
2
• We recommend that you cook meat
and fish weighing 1 kg and above in the
appliance.
• To prevent the meat juices or fat from
burning onto the pan, put some liquid
into the deep pan.
• If necessary, turn the roast (after 1 / 2 2 / 3 of the cooking time).
• Baste large roasts and poultry with their
juices several times during roasting.
This gives better roasting results.
• You can deactivate the appliance approximately 10 minutes before the end
of the roasting time, and use the residual heat.
230 - 250
160 - 180
230 - 250
180 - 200
1)
10 - 20
1)
45 - 55
1)
12 - 20
1)
15 - 25
9.7 Roasting with Turbo Grilling
Beef
Type of
meat
Quantity
Pot roast 1 - 1.5 kg
Roast beef
or fillet: rare
Roast beef
or fillet: medium
per cm of
thickness
per cm of
thickness
Oven
function
Conven-
tional
Cooking
Turbo Grill-
ing
Turbo Grill-
ing
Shelf po-
sition
Tempera-
ture (°C)
1 230 120 - 150
1
1
190 - 200
180 - 190
1)
1)
Time
(min)
5 - 6
6 - 8
Page 17

ENGLISH 17
Type of
meat
Roast beef
or fillet: well
done
1)
Preheat the oven
Quantity
per cm of
thickness
Oven
function
Turbo Grill-
ing
Pork
Type of
meat
Quantity
Shoulder,
neck, ham
1 - 1.5 kg
joint
Chop, spare
rib
1 - 1.5 kg
Meat loaf 750 g - 1 kg
Porkknuckle
(precooked)
750 g - 1 kg
Oven
function
Turbo Grill-
ing
Turbo Grill-
ing
Turbo Grill-
ing
Turbo Grill-
ing
Veal
Type of
meat
Quantity Oven
function
Roast veal 1 kg Turbo Grill-
ing
Knuckle of
veal
1.5 - 2 kg Turbo Grilling
Shelf po-
sition
1
Shelf po-
sition
Tempera-
ture (°C)
170 - 180
Tempera-
ture (°C)
1)
1 160 - 180 90 - 120
1 170 - 180 60 - 90
1 160 - 170 50 - 60
1 150 - 170 90 - 120
Shelf po-
sition
Tempera-
ture (°C)
1 160 - 180 90 - 120
1 160 - 180 120 - 150
Time
(min)
8 - 10
Time
(min)
Time
(min)
Lamb
Type of
meat
Leg of
lamb, roast
lamb
Saddle of
lamb
Game
Type of
meat
Saddle of
hare, leg of
hare
Quantity Oven
function
1 - 1.5 kg Turbo Grill-
ing
1 - 1.5 kg Turbo Grill-
ing
Quantity Oven
function
up to 1 kg Conven-
tional
Cooking
Shelf po-
sition
Tempera-
ture (°C)
1 150 - 170 100 - 120
1 160 - 180 40 - 60
Shelf po-
sition
1
Tempera-
ture (°C)
1)
230
Time
(min)
Time
(min)
30 - 40
Page 18

www.electrolux.com
18
Type of
meat
Saddle of
venison
Quantity Oven
function
1.5 - 2 kg Conven-
tional
Cooking
Haunch of
venison
1.5 - 2 kg Conven-
tional
Cooking
1)
Preheat the oven
Poultry
Type of
meat
Poultry portions
Half chicken 400 - 500 g
Chicken,
poulard
Quantity Oven
function
200 - 250 g
each
Turbo Grill-
ing
Turbo Grill-
each
ing
1 - 1.5 kg Turbo Grill-
ing
Duck 1.5 - 2 kg Turbo Grill-
ing
Goose 3.5 - 5 kg Turbo Grill-
ing
Turkey 2.5 - 3.5 kg Turbo Grill-
ing
Turkey 4 - 6 kg Turbo Grill-
ing
Shelf po-
sition
Tempera-
ture (°C)
1 210 - 220 35 - 40
1 180 - 200 60 - 90
Shelf po-
sition
Tempera-
ture (°C)
1 200 - 220 30 - 50
1 190 - 210 35 - 50
1 190 - 210 50 - 70
1 180 - 200 80 - 100
1 160 - 180 120 - 180
1 160 - 180 120 - 150
1 140 - 160 150 - 240
Time
(min)
Time
(min)
Fish (steamed)
Type of
meat
Quantity Oven
function
Whole fish 1 - 1.5 kg Conven-
tional
Cooking
9.8 Grilling
• Always grill with the maximum temperature setting.
• Set the shelf in the shelf position as recommended in the grilling table.
• Always set the pan to collect the fat into
the first shelf position.
Shelf po-
sition
Tempera-
ture (°C)
Time
(min)
1 210 - 220 40 - 60
• Grill only flat pieces of meat or fish.
• Always preheat the empty oven with
the grill functions for 5 minutes.
CAUTION!
Always grill with the oven door
closed.
Page 19

ENGLISH 19
Grilling
Food to be
grilled
Shelf posi-
tion
Temperature
(°C)
Time (min)
1st side 2nd side
Roast beef 2 210 - 230 30 - 40 30 - 40
Filet of beef 3 230 20 - 30 20 - 30
Back of pork 2 210 - 230 30 - 40 30 - 40
Back of veal 2 210 - 230 30 - 40 30 - 40
Back of lamb 3 210 - 230 25 - 35 20 - 25
Whole Fish,
500 - 1000g
3 / 4 210 - 230 15 - 30 15 - 30
Fast Grilling
Food to be grilled
Shelf posi-
tion
1st side 2nd side
Time (min)
Burgers / Burgers 4 8 - 10 6 - 8
Pork fillet 4 10 - 12 6 - 10
Sausages 4 10 - 12 6 - 8
Fillet steaks, veal steaks 4 7 - 10 6 - 8
Toast / Toast
1)
5 1 - 3 1 - 3
Toast with topping 4 6 - 8 ---
1)
Preheat the oven
9.9 Convenience food
True Fan Cooking
Convenience food Shelf position Temperature (°C) Time (min)
Pizza, frozen 2 200 - 220 15 - 25
Pizza American, frozen
Pizza, chilled 2 210 - 230 13 - 25
Pizza Snacks, frozen
French Fries, thin 3 200 - 220 20 - 30
French Fries, thick 3 200 - 220 25 - 35
Wedges / Croquettes
Hash Browns 3 210 - 230 20 - 30
Lasagne / Cannelloni, fresh
2 190 - 210 20 - 25
2 180 - 200 15 - 30
3 220 - 230 20 - 35
2 170 - 190 35 - 45
Page 20

www.electrolux.com
20
Convenience food Shelf position Temperature (°C) Time (min)
Lasagne / Cannelloni, frozen
Oven baked cheese 3 170 - 190 20 - 30
Chicken Wings 2 190 - 210 20 - 30
Frozen Ready Meals
Food to be
Frozen pizza
Chips
(300 - 600
g)
Baguettes
Fruit flans
1)
9.10 Defrosting
Remove the food packaging. Put the food
on a plate.
Chicken 1000 100 - 140 20 - 30
Meat 1000 100 - 140 20 - 30 Turn halfway through
Meat 500 90 - 120 20 - 30 Turn halfway through
Trout 150 25 - 35 10 - 15 ---
Strawberries 300 30 - 40 10 - 20 ---
Butter 250 30 - 40 10 - 15 ---
Cream 2 x 200 80 - 100 10 - 15
Gateau 1400 60 60 ---
2 160 - 180 40 - 60
cooked
Oven functions
Conventional
Cooking
1)
Conventional
Cooking or Tur-
bo Grilling
Conventional
Cooking
Conventional
Cooking
Turn chips 2 or 3 times during cooking
Dish Weight (g)
Defrosting
time (min)
Shelf po-
Temperature
sition
as per manu-
3
facturer’s in-
3 200 - 220
as per manu-
3
facturer’s in-
as per manu-
3
facturer’s in-
Do not cover it with a bowl or a plate. This
can extend the defrost time.
Use the first oven shelf position. The one
on the bottom.
Further de-
frosting time
(min)
(°C)
structions
structions
structions
Time (min)
as per manufac-
turer’s instruc-
tions
as per manufac-
turer’s instruc-
tions
as per manufac-
turer’s instruc-
tions
as per manufac-
turer’s instruc-
tions
Comment
Place the chicken on
an upturned saucer
placed on a large
plate Turn halfway
through
Cream can also be
whipped when still
slightly frozen in pla-
ces
Page 21

9.11 Preserving - Bottom Heat
Things to note:
• Use only preserve jars of the same dimensions available on the market.
• Do not use jars with twist-off and bayonet type lids, or metal tins.
• Use the first shelf from the bottom for
this function.
• Put no more than six one-litre preserve
jars on the baking tray.
Soft fruit
Preserve Temperature (°C)
Strawberries, blueberries, raspberries, ripe gooseberries
Stone fruit
Preserve Temperature (°C)
Pears, guinces,
plums
160 - 170 35 - 45 ---
160 - 170 35 - 45 10 - 15
ENGLISH 21
• Fill the jars up to the same level and
close with a clamp.
• The jars cannot touch each other.
• Put approximately 1 / 2 litre of water into the baking tray to give sufficient
moisture in the oven.
• When the liquid in the jars starts to simmer (after approx. 35 - 60 minutes with
one-litre jars), stop the oven or decrease the temperature to 100 °C (see
the table).
Cooking time
until simmering
(min)
Cooking time
until simmering
(min)
Continue to
cook at 100 °C
(min)
Continue to
cook at 100 °C
(min)
Vegetables
Preserve Temperature (°C)
Carrots
1)
160 - 170 50 - 60 5 - 10
Cooking time
until simmering
(min)
Continue to
cook at 100 °C
(min)
Cucumbers 160 - 170 50 - 60 ---
Mixed pickels 160 - 170 50 - 60 5 - 10
Kohlrabi, peas, asparagus
1)
Leave standing in oven when switched off
9.12 Drying - True Fan Cooking
Cover the oven shelves with baking
parchment.
160 - 170 50 - 60 15 - 20
For best results: deactivate the appliance
after half the time required. Open the appliance door and let the appliance cool
down. After that finish the drying process.
Vegetables
Food to be
dried
Shelf position
1 level 2 levels
Temperature
(°C)
Time
(h)
Beans 3 1 / 4 60 - 70 6 - 8
Page 22

www.electrolux.com
22
Food to be
dried
Shelf position
1 level 2 levels
Peppers 3 1 / 4 60 - 70 5 - 6
Vegetables for
sour
3 1 / 4 60 - 70 5 - 6
Mushrooms 3 1 / 4 50 - 60 6 - 8
Herbs 3 1 / 4 40 - 50 2 - 3
Fruit
Food to be
dried
Shelf position
1 level 2 levels
Plums 3 1 / 4 60 - 70 8 - 10
Apricots 3 1 / 4 60 - 70 8 - 10
Apple slices 3 1 / 4 60 - 70 6 - 8
Pears 3 1 / 4 60 - 70 6 - 9
10. CARE AND CLEANING
WARNING!
Refer to the Safety chapters.
Notes on cleaning:
• Clean the front of the appliance with a
soft cloth with warm water and a cleaning agent.
• To clean metal surfaces, use a usual
cleaning agent.
• Clean the oven interior after each use.
Then you can remove dirt more easily
and it does not burn on.
• Clean all oven accessories after each
use and let them dry.
• If you have nonstick accessories, do
not clean them using aggressive
agents, sharp-edged objects or a dishwasher. It can cause a damage to the
nonstick coating.
10.1 Catalytic walls
The walls with a catalytic coating are selfcleaning. They absorb fat which collects
on walls while the appliance operates.
Temperature
(°C)
Temperature
(°C)
To support this self-cleaning process
heat the appliance without any food
regularly:
• Turn the lamp on.
• Remove accessories from the appliance.
• Clean the oven floor with warm water
and washing up liquid, then dry it.
•
Set the
• Set the oven temperature to 250 °C
and let appliance operate for 1 hour.
• Clean the cavity with a soft and damp
sponge.
function.
WARNING!
Do not attempt to clean catalytic
surface with oven sprays, abrasive
cleaners, soap or other cleaning
agents. This will damage the catalytic surface.
Spots or discolouration of the catalytic surface have no effect on
the catalytic properties.
Time
(h)
Time (h)
Page 23

10.2 Shelf supports
Removing the shelf supports
2
1
ENGLISH 23
You can remove the shelf supports to
clean the side walls.
1.
Pull the front of the shelf support
away from the side wall.
2.
Pull the rear end of the shelf support
away from the side wall and remove
it.
Installing the shelf supports
Install the shelf supports in the opposite
sequence.
A
A
10.3 Removing / inserting the
door
To clean the door remove it.
CAUTION!
Be careful when you remove the
door from the appliance. The door
is heavy. There is a risk of injury or
damage to the appliance.
Removing the door
1.
Open the door as far as it goes.
2.
Press down the clamping levers (A)
on the two door hinges.
Page 24

www.electrolux.com
24
10.4 Lamp
Before you change the lamp:
• Deactivate the appliance.
• Remove the fuses from the fuse box or
45°
WARNING!
Danger of electrocution! Disconnect the fuse before you replace
the lamp.
The lamp and the lamp glass cover can be hot.
deactivate the circuit breaker.
CAUTION!
Put a cloth on the bottom of the
interior of the appliance. It prevents damage to the lamp glass
cover and the cavity.
Always use the same lamp type.
3.
Close the door until it is at an angle
of approximately 45°.
4.
Hold the door with one hand on each
side and pull it away from the appliance at an upwards angle.
Put the door with the outer side
down on a soft and level surface
to prevent scratches.
Inserting the door
To insert the door do the above steps in
the opposite sequence.
3.
Replace the lamp with a halogen, 230
V, 40 W, 300 °C heat resistant oven
lamp.
4.
Install the glass cover.
Replacing the side lamp:
1.
Remove the left shelf support to get
access to the lamp.
2.
Use a narrow, blunt object (e.g. a teaspoon) to remove the glass cover.
Clean the glass cover.
Replacing the top lamp:
1.
Turn the lamp glass cover counterclockwise to remove it.
2.
Clean the glass cover.
11. WHAT TO DO IF…
WARNING!
Refer to the Safety chapters.
3.
Replace the lamp with a halogen, 230
V, 25 W, 300 °C heat resistant oven
lamp.
4.
Install the glass cover.
5.
Install the shelf support.
Page 25

ENGLISH 25
Problem Possible cause Remedy
The appliance does not
heat up.
The appliance is deactivated.
Activate the appliance.
Refer to the chapter "Daily use".
The appliance does not
heat up.
The appliance does not
heat up.
The appliance does not
heat up.
The clock is not set. Set the clock. Refer to
"Setting the time".
The necessary settings
are not set.
The fuse in the fuse box
is released.
Make sure that the settings are correct.
Do a check of the fuse. If
the fuse is released more
than one time, contact a
qualified electrician.
The lamp does not oper-
The lamp is defective. Replace the lamp.
ate.
The display shows 12.00. There was a power cut. Set the clock.
Steam and condensation
settle on the food and in
the appliance.
You left the dish in the
appliance for too long.
Do not keep the dishes in
the appliance for longer
than 15 - 20 minutes after
the cooking ends.
If you cannot find a solution to the problem yourself, contact your dealer or the
service centre.
We recommend that you write the data here:
Model (Mod.) .........................................
Product number (PNC) .........................................
Serial number (Serie:) .........................................
The necessary data for the service centre
is on the rating plate. The rating plate is
on the front frame of the appliance cavity.
12. INSTALLATION
WARNING!
Refer to the Safety chapters.
The handle profile can be replaced to match the décor of your
kitchen. The change must be
done by an authorized person.
Use only genuine replacement
parts.
Page 26

www.electrolux.com
26
12.1 Installing the oven
min.
3 mm
To lift the appliance, do not use
the door handle.
AA
180
A
B
ca.50
N 585-592
442
A 595
A = appliance
N = recess
WARNING!
Installation into flammable material
must agree with NIN SEV 1000
(Swiss Association of the Cantonal
Fire Insurance Companies) fire
protection guidelines and regulations.
115
N min. 550
A 567
20
N 560-568
A 592
A
12.2 Installing the oven under a
work surface
Before the installation, connect the oven
to the electrical supply. Refer to "Electrical
connection".
1.
Use the side handles to hold the appliance and slide it flush into the recess.
CAUTION!
Make sure the cable is free when
you slide the appliance.
2.
Use a minimum of 2 screws to attach
the appliance on the 2 sides (Detail
A).
Page 27

ENGLISH 27
AA
180
115
N min. 550
A 567
20
N 560-568
A 592
AB
ca.50
N 600
A 595
442
min. 20
10
B
20
A
12.3 Electrical connection
Use a power cable of H05VV-F or higher.
Connect the appliance to a socket supply
line. If there is no socket supply line, the
electrical installation must have an isolation device which lets you disconnect the
appliance from the power supply. The iso-
400V 2 ~
400V
L1PE
L2
123
45
A = appliance
N = recess
WARNING!
Installation into flammable material
must agree with NIN SEV 1000
(Association of Cantonal Fire Insurers) fire protection guidelines
and regulations.
CAUTION!
Make sure the cable is free when
you move the appliance.
1.
Push the cooker into the recess so
that it is flush with the surrounding
units.
2.
Use at least 2 screws to fix the appliance on both sides (Detail A).
WARNING!
When installing next to a wood-fuelled boiler, a heatproof and heatinsulating plate must be mounted
at the height of the appliance and
at least 30 cm deep.
lation device must have a contact opening
width of minimum 3 mm (in reference to
NIN SEV 1000). The customer must have
a socket for the electrical connection that
is accessible and outside the coordination
room. The length of the connection cable
must be approximately 120 cm with lines
connected directly to the power supply.
Only a qualified person can connect the appliance to the electricity supply.
1.
Do the electrical connections as in the
connection illustration.
Phase definitions: L1, L2 (or R, S).
2.
Secure the cord grip.
CAUTION!
If service is required always disconnect the appliance from the
power supply.
Page 28

www.electrolux.com
28
2
3
4
1
1 = 45 mm
2 = 45 mm
123
4
3 = 60 mm
4 = 60 mm
= 70 mm
13. CH GARANTIE, GARANZIA, GUARANTEE
13.1 Kundendienst, service-clientèle, Servizio clienti, Customer
Service Centres
Servicestellen Points de Serv-
ice
5506 Mägenwil/Zürich Industriestrasse 10
3018 Bern Morgenstrasse 131
9000 St. Gallen Zürcherstrasse 204e
4052 Basel St. JakobTurm Birsstrasse 320B
6020 Emmenbrücke Seetalstrasse 11
Servizio dopo
vendita
1028 Préverenges Le Trési 6
Point of
Service
6928 Manno
Via Violino 11
Page 29

ENGLISH 29
Servicestellen Points de Serv-
ice
7000 Chur Comercialstrasse 19
Ersatzteilverkauf/Points de vente de
rechange/Vendita pezzi di ricambio/
spare parts service:
5506 Mägenwil, Industriestrasse 10, Tel.
0848 848 111
Fachberatung/Verkauf/Demonstration/Vente/Consulente (cucina)/Vendita
8048 Zürich, Badenerstrasse 587, Tel.
044 405 81 11
Garantie Für jedes Produkt gewähren wir
ab Verkauf bzw. Lieferdatum an den Endverbraucher eine Garantie von 2 Jahren.
(Ausweis durch Garantieschein, Faktura
oder Verkaufsbeleg). Die Garantieleistung
umfasst die Kosten für Material, Arbeitsund Reisezeit. Die Garantieleistung entfällt
bei Nichtbeachtung der Gebrauchsanweisung und Betriebs-vorschriften, unsachgerechter Installation, sowie bei Beschädigung durch äussere Einflüsse, höhere Gewalt, Eingriffe Dritter und Verwendung von
Nicht-Original Teilen.
Garantie Nous octroyons sur chaque
produit 2 ans de garantie à partir de la
date de livraison ou de la mise en service
au consommateur (documenté au moyen
d’une facture, d’un bon de garantie ou
d’un justificatif d’achat). Notre garantie
couvre les frais de mains d’œuvres et de
déplacement, ainsi que les pièces de rechange. Les conditions de garantie ne
sont pas valables en cas d’intervention
Servizio dopo
vendita
d’un tiers non autorisé, de l’emploi de
pièces de rechange non originales, d’erreurs de maniement ou d’installation dues
à l’inobser-vation du mode d’emploi, et
pour des dommages causés par des influences extérieures ou de force majeure.
Garanzia Per ogni prodotto concediamo
una garanzia di 2 anni a partire dalla data
di consegna o dalla sua messa in funzione. (fa stato la data della fattura, del
certificato di garanzia o dello scontrino
d’acquisto) Nella garanzia sono comprese
le spese di manodopera, di viaggio e del
materiale. Dalla copertura sono esclusi il
logoramento ed i danni causati da agenti
esterni, intervento di terzi, utilizzo di ricambi non originali o dalla inosservanza
delle prescrizioni d’istallazione ed istruzioni per l’uso.
Warranty For each product we provide a
two-year guarantee from the date of purchase or delivery to the consumer (with a
guarantee certificate, invoice or sales receipt serving as proof). The guarantee
covers the costs of materials, labour and
travel. The guarantee will lapse if the operating instructions and conditions of use
are not adhered to, if the product is incorrectly installed, or in the event of damage
caused by external influences, force majeure, intervention by third parties or the
use of non-genuine components.
Point of
Service
14. ENVIRONMENT CONCERNS
Recycle the materials with the symbol
. Put the packaging in applicable
containers to recycle it.
Help protect the environment and human
health and to recycle waste of electrical
and electronic appliances. Do not dispose
appliances marked with the symbol
with the household waste. Return the
product to your local recycling facility or
contact your municipal office.
Page 30

www.electrolux.com
30
Page 31

ENGLISH 31
Page 32

www.electrolux.com/shop
892956588-A-042013
 Loading...