

Page 1
Built-in Compact Oven
Fan cooking, Grill
OPERATING INSTRUCTIONS
EBC GL6(S)
(55 cm)
EBC GL60(S)
(60 cm)
The documentation for the compact oven is 3-part: Instructions for use, baking / roasting chart
and supplementary technical sheet. The safety instructions in the supplementary technical sheet
are an integral part of this documentation.
Do not operate the appliance until you have read all documents and safety instructions.
In order to guarantee that you have taken note of the content of these instructions, we request
that you send the complete warranty card to Customer Service in Mägenwil. Please hand
these instructions to anyone who may use this appliance.
Page 2
Start-up
Use
AnwendungAnwendung
- Press button with your finger tip –> set within 5 seconds!
Have you already set the time? See page 4
1
Page
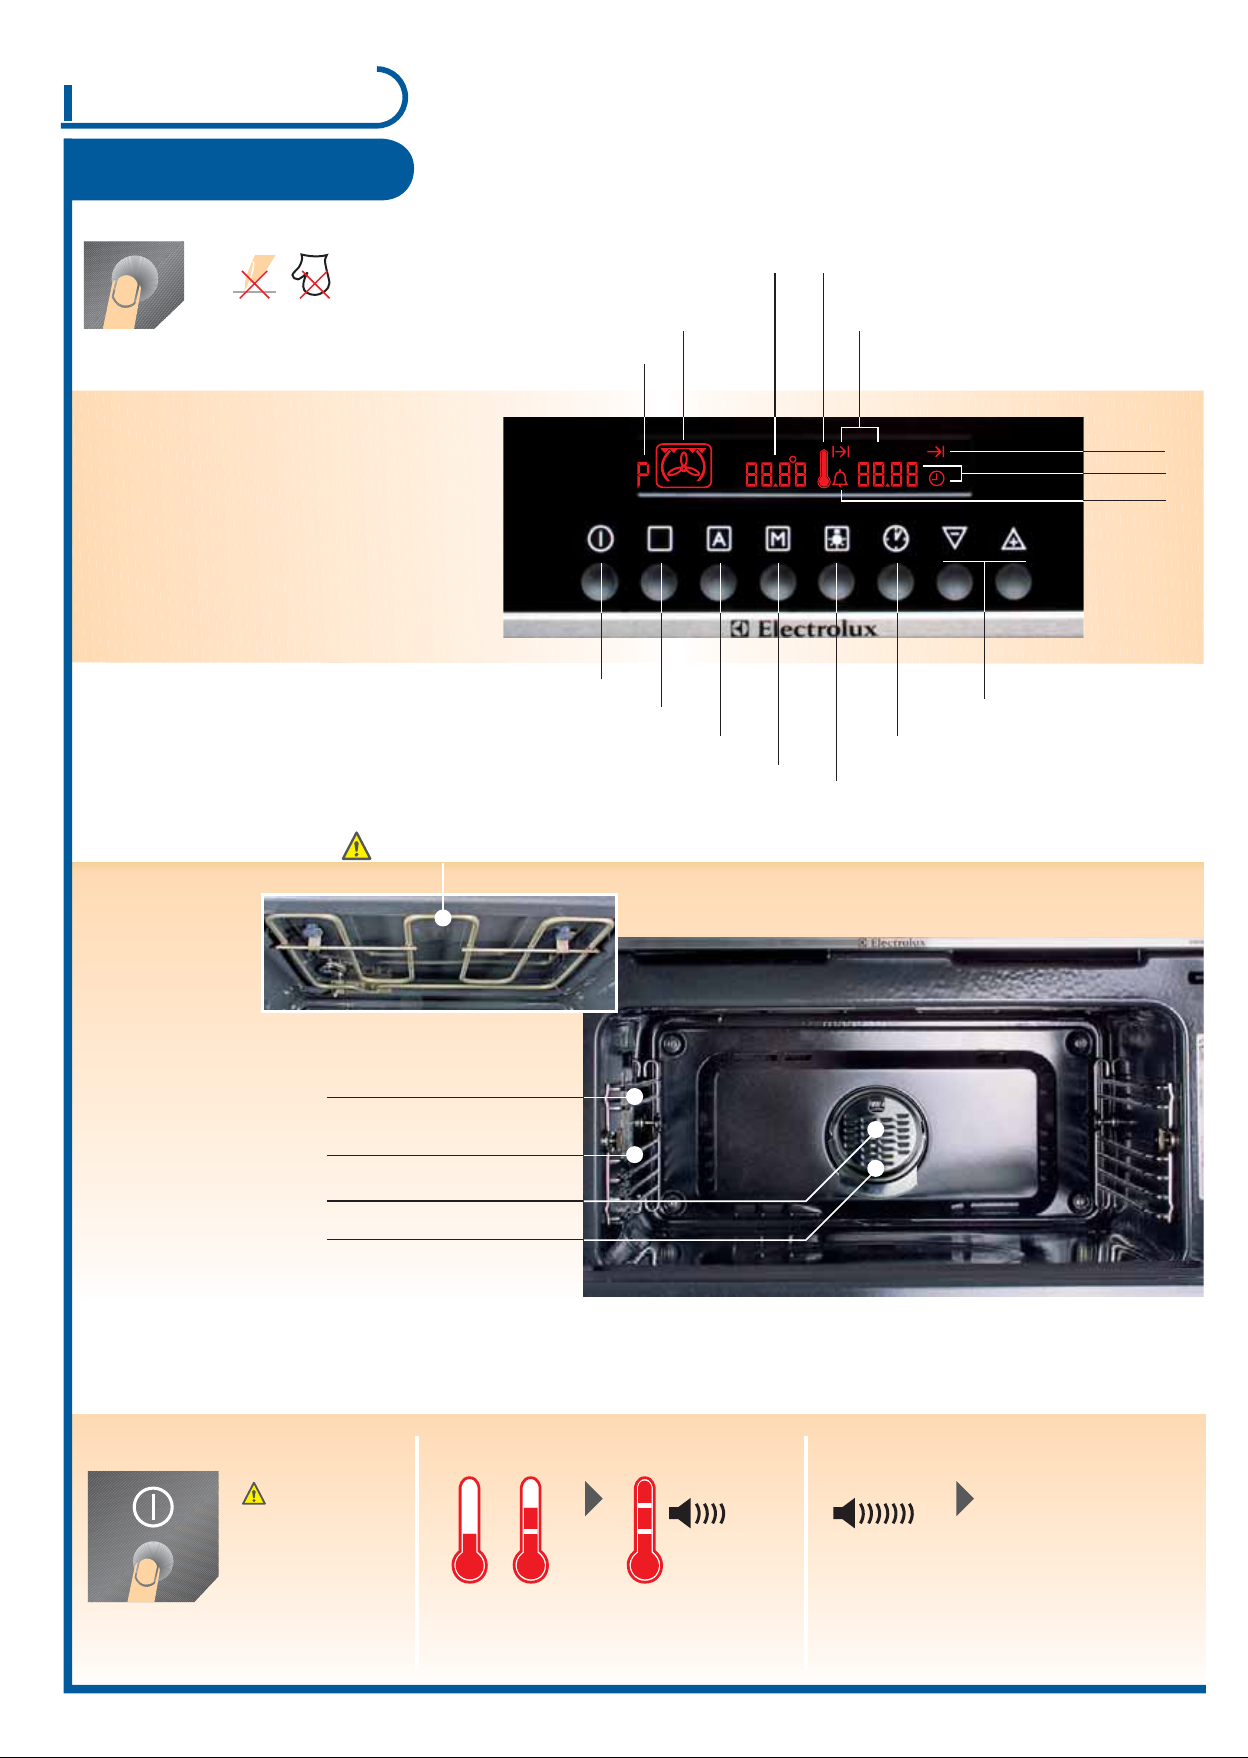
Control panel
Baking area
P = Automatic programme 1-12
Oven function
P = Memory function
(d = Demo function)
ON / Off
Oven functions
Automatic programme
Do not place aluminium foil / aluminium tray on the oven base
Grill elements
Temperature
Time
Memory function
Thermometer symbol
Cook time
min
Clock functions
Light ON/OFF
(during operations)
End time
Time
Count down
Setting
temperature & time
General
Switch on/off appliance
No function when
door opened
Oven light
- is switched on as soon as a function
is started or the door is open
-
goes out after 10 minutes when the door
is open and appliance is switched off
Griddle guides (4 oven levels)
Rear wall heating element
Meat fat filter
Temperature display
BEEP
If time / end is up
BEEP
(2 min.)
Appliance switches
off automatically
Switch off BEEP:
Press any button
When the appliance is switched off the
residual heat is displayed until the
temperature has dropped to 40 °C
Appliance heats up Temperature reached
After switching off the appliance the fan runs
until the temperature is less than 80 °C.
Page 3
Baking / Roasting
During operation...
the temperature can be changed
(in 5 °C steps)
Select oven function
PROGRAMMED RECIPES
A
see baking and roasting table and programmed recipes
the oven function can
be changed
2
Page
MEMORY FUNCTION
M
Possible to store one setting that will
be used again and again
Press «M» button for 2 seconds until signal
is audible (for new function button press
again for 2 seconds)
Start the memory function:
1. Switch on oven
2. Call up memory storage with M button
1 2
Switch on
Replace grease trap after roasting
with hot air and turbo grilling.
Remove grease trap when baking.
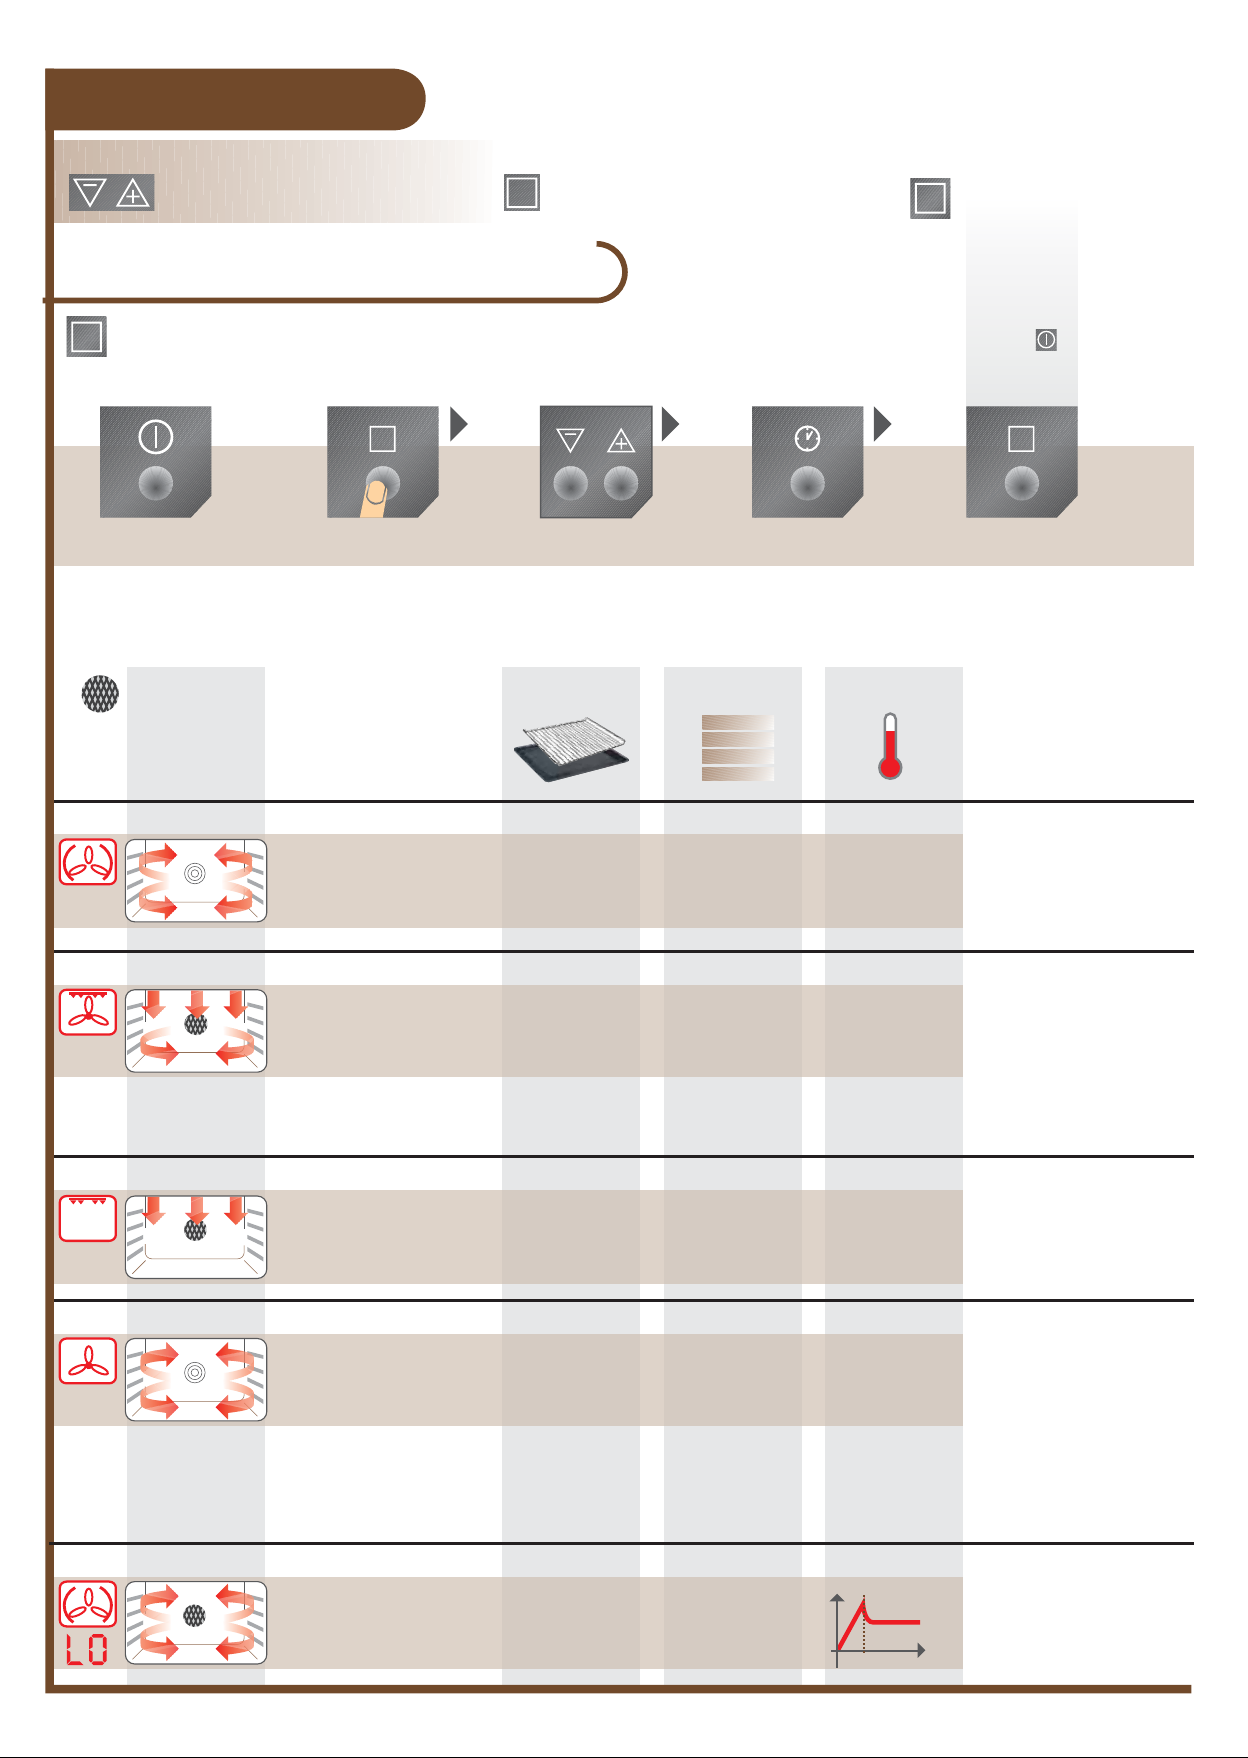
FUNCTIONS
FAN COOKING
TURBOGRILL
FOR…
- Pastry
(up to 2 levels)
- Select temp. 15° C lower than
indicated on recipes
- High joints
- Rollbraten (sliced roast pork)
- Poultry
- Gratins/casseroles
- etc.
Select function Select poss.
temperature
Press button repeatedly...
(within 5 sec.)
Plates / grid
1 or 2* plates 1 plate: 2 or 3
1 grid + 1 plate
Select poss.
time / end
(see clock function, p.4)
4
3
2
1
2* plates: 1 + 4
Grid: 2 or 3
Plate: 1 level
below
TemperatureOven level
Presetting:
170 °C
Setting range:
30-250 °C
Presetting:
180 °C
Setting range:
30-250 °C
M
evt. select
memory function
(*optional accessories p.5)
Avoid excessive contamination:
- Use grease trap
- Use high-rimmed plate
with strainer*
- Use grease trap/high-rimmed
plate with strainer*
- The joint is cooked once it
no longer holds down
- Leave the roast uncovered
for about 10 minutes before
slicing
GRILL SIZE
- For flat grilled food such as steaks,
cutlets, sausages, fish
- Grilled toast
- Melting marzipan/ice cream
- Overcrusting of casseroles
DEFROSTING & DRYING
- Baking/drying of herbs,
fruit, vegetables (1 to 2 levels,
change plates from time to time)
- Defrosting
LOW TEMPERATURE COOKING
- Tender, juicy roasting (lean meat)
- NOT suitable for braised
meat or roast pork.
1 grid + 1 plate
1 or 2* plates Presetting:
1 grid + 1 plate
Grid: 3 or 4
Plate: 1 level
below
1 plate: 2
2* plates: 1 + 3
Grid: 3 oder 4
Plate: 1
Presetting:
230 °C
Setting range:
30-250 °C
30 °C
Setting range:
30-100 °C
Automatic
°C
120°
10 Min.
-
Distance to heating element can
be varied up or down by grid
curve
- Insert the baking tray below as
a collection pan
- Line griddle with
baking paper
- Place dry food in single
layers/close together
- Open oven every now and
then, cool down half-way
- Dry sheets are particularly
suitable
- Check degree of dryness regularly
(moist or crumbly)
- Sear the meat in the pan!
- Use grease trap for roasting!
80°
- Do not cover the meat in the oven!
Min.
Page 4
General
Baking / Roasting
Baking tins
- Place lean meat, venison, meat loaf directly
on roasting dish
- Light forms require longer baking/roasting times
- Place baking forms/dish on shelf
- Use baking ceramics/heat-resistant
forms with hot-air
(Roasting tray, Pyrex or stoneware)
(*optional accessories p. 4)
Grill grid
- Grill with curve upwards to prevent
slipping of roast/baking dish
3
Page
Sauces
- Allow the gravy to brown slightly, then pour on
hot water
- With a roasting time of over 1h: Do not add
gravy ingredients into the roasting tin until
1/2h before the end
Frozen pastry
- Place the griddle lined with baking paper
to avoid distortion of baking sheet
(differences in temperature)
- Use professional tray*
(e.g. pizza)
Grill
- Do not insert very fatty grilled food too close under the heating element
- Always supervise grilling
- If several items of food have to be grilled in succession; clean the griddle each time
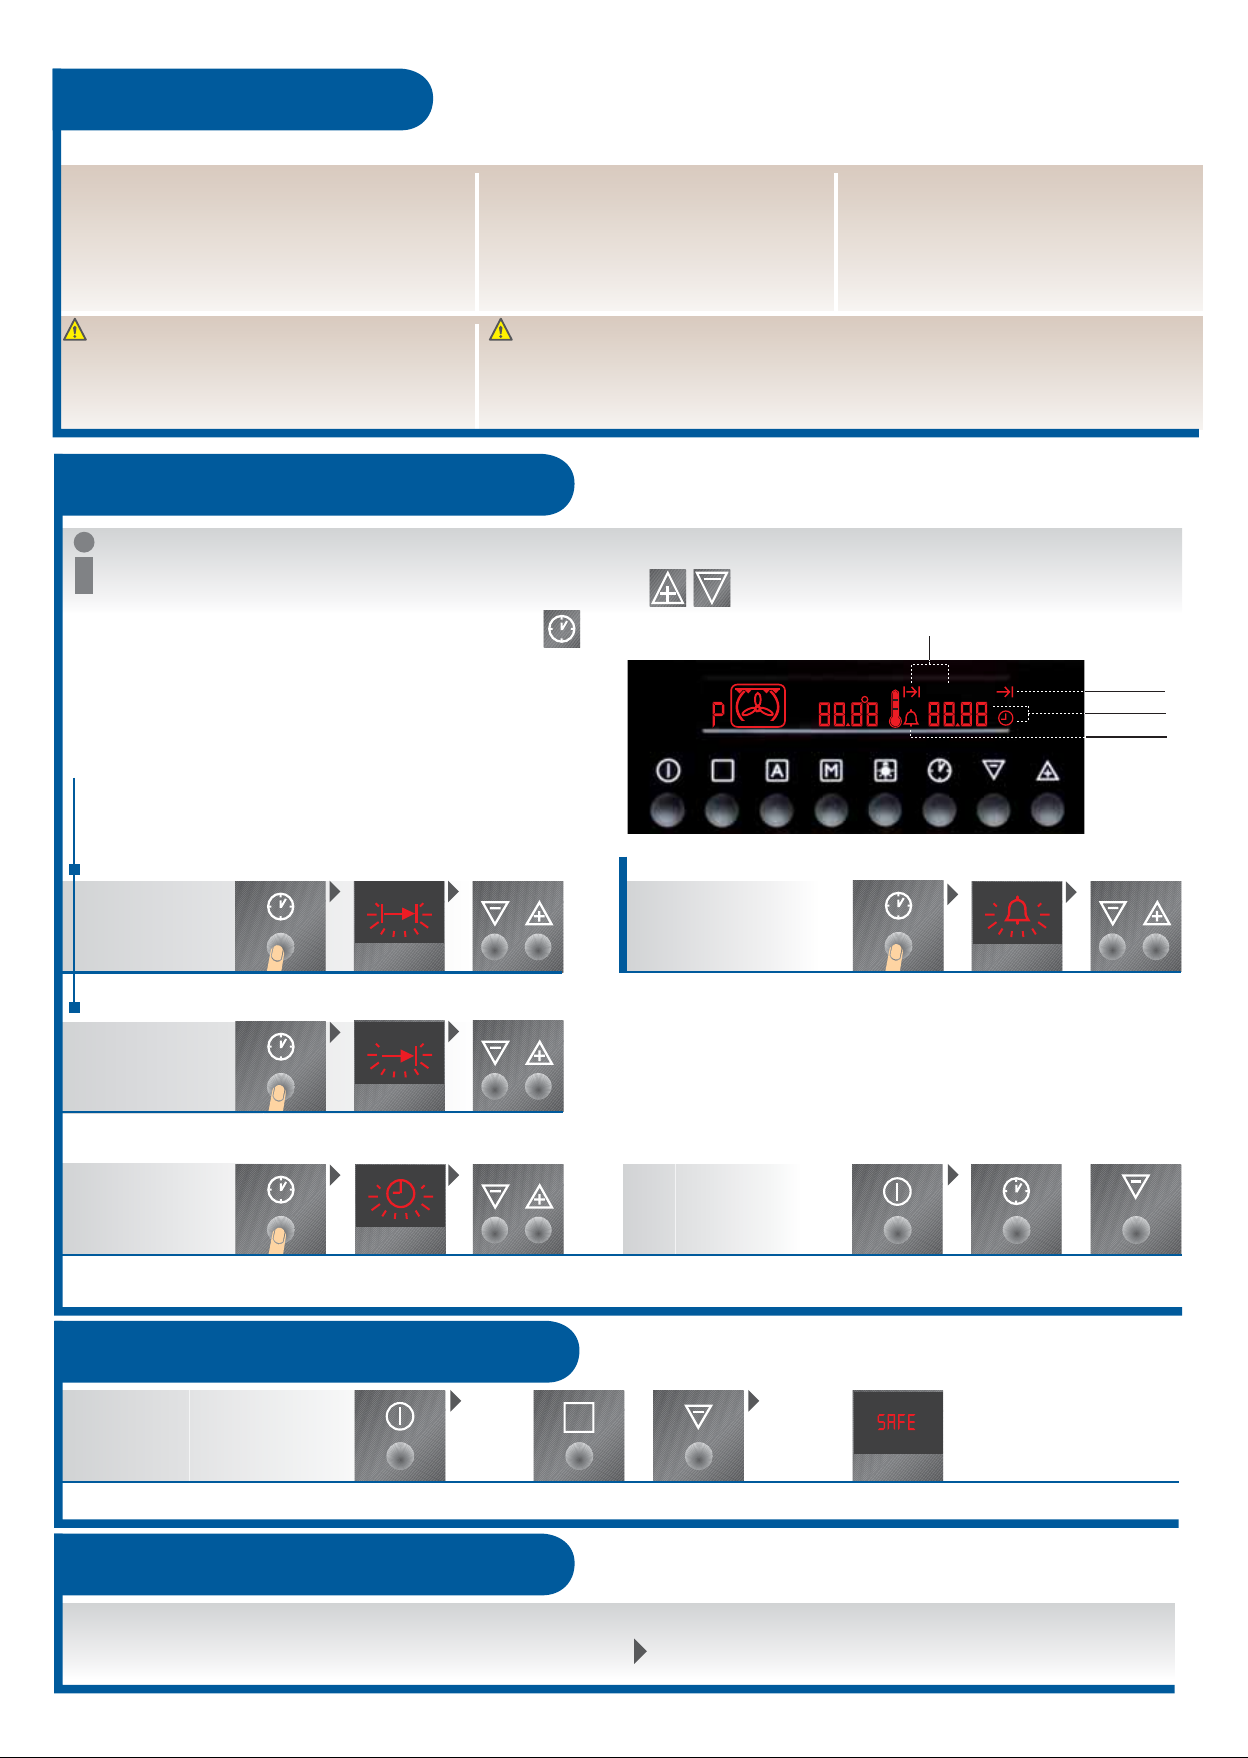
Clock functions
- After setting a time, symbol flashes for 5 sec., afterwards the time, short time or duration is illuminated, and the time starts.
- While the corresponding symbol flashes (5 sec.): Set/change times
- By repeated touch the current time can be prompted
COOKING TIME / END FUNCTION can be used at the same time:
- the oven shall be switched on and off automatically at the later time
- a programme is selected.
COOK TIME
(first select oven function)
0 to 23 hrs. 59 min. 0 to 99 minutes
COUNT DOWN
No impact on oven operation
Cook time
min
End time
Time
Count down
END TIME
TIME
When will the meal be ready?
change (e.g. Summer-/ Wintertime)
set
Child Safety Device
Button locking mechanism
Switching off
set duration
set time
No function
can be
selected!
Time can only be faded out, if no other display is active!
Is the time faded out:
- Display is illuminated when
switched on
- Display goes out when switched off
fading in/out
+
A
Press the off switch at the same time for about
2 seconds, until the display goes out/lights up
Switching off Press off button at the same
Child Safety Device on
+
time for about 2 seconds until
display goes out/lights up
Press the same button again
for about 2 seconds in order to
switch off child lock!
Oven Safety cut-out
If the function and temperature is set WITHOUT time
restriction,the oven switches off automatically as follows:
at 30 - 120 °C
at 120 - 200 °C
at 200 - 250 °C
after 12,5 h
after 8,5 h
after 5,5 h
«OFF» appears in the display
Switching on after safety cut-out:
Switch the oven off completely, it can be switched again.
Page 5
Start-up
Setting the clock
The oven operates only when the clock has been set!
4
Page
After electrical connection/
power failure the set clock
symbol flashes
Set current time
After 5 seconds the flashing stops
And time shows the time
Demo Mode
To test or carry out all
operating modes.
The oven does not heat.
1 2
Switch off appliance
A
Press simultaneously for about 2
seconds until the signal is audible!
+
Initial cleaning
12
Take out accessories and rinse
(p. cleaning + service p. 5)
Initial heating
Clean with water + detergent
(except oven cover)
–> see Cleaning + service (p. 5)
Demo Mode is
switched on
Press the same button again
for about 2 seconds to turn off
Demo mode!
Remove objects from the oven!
Not the type plate!
Air the area well during initial
heating phase.
12 3
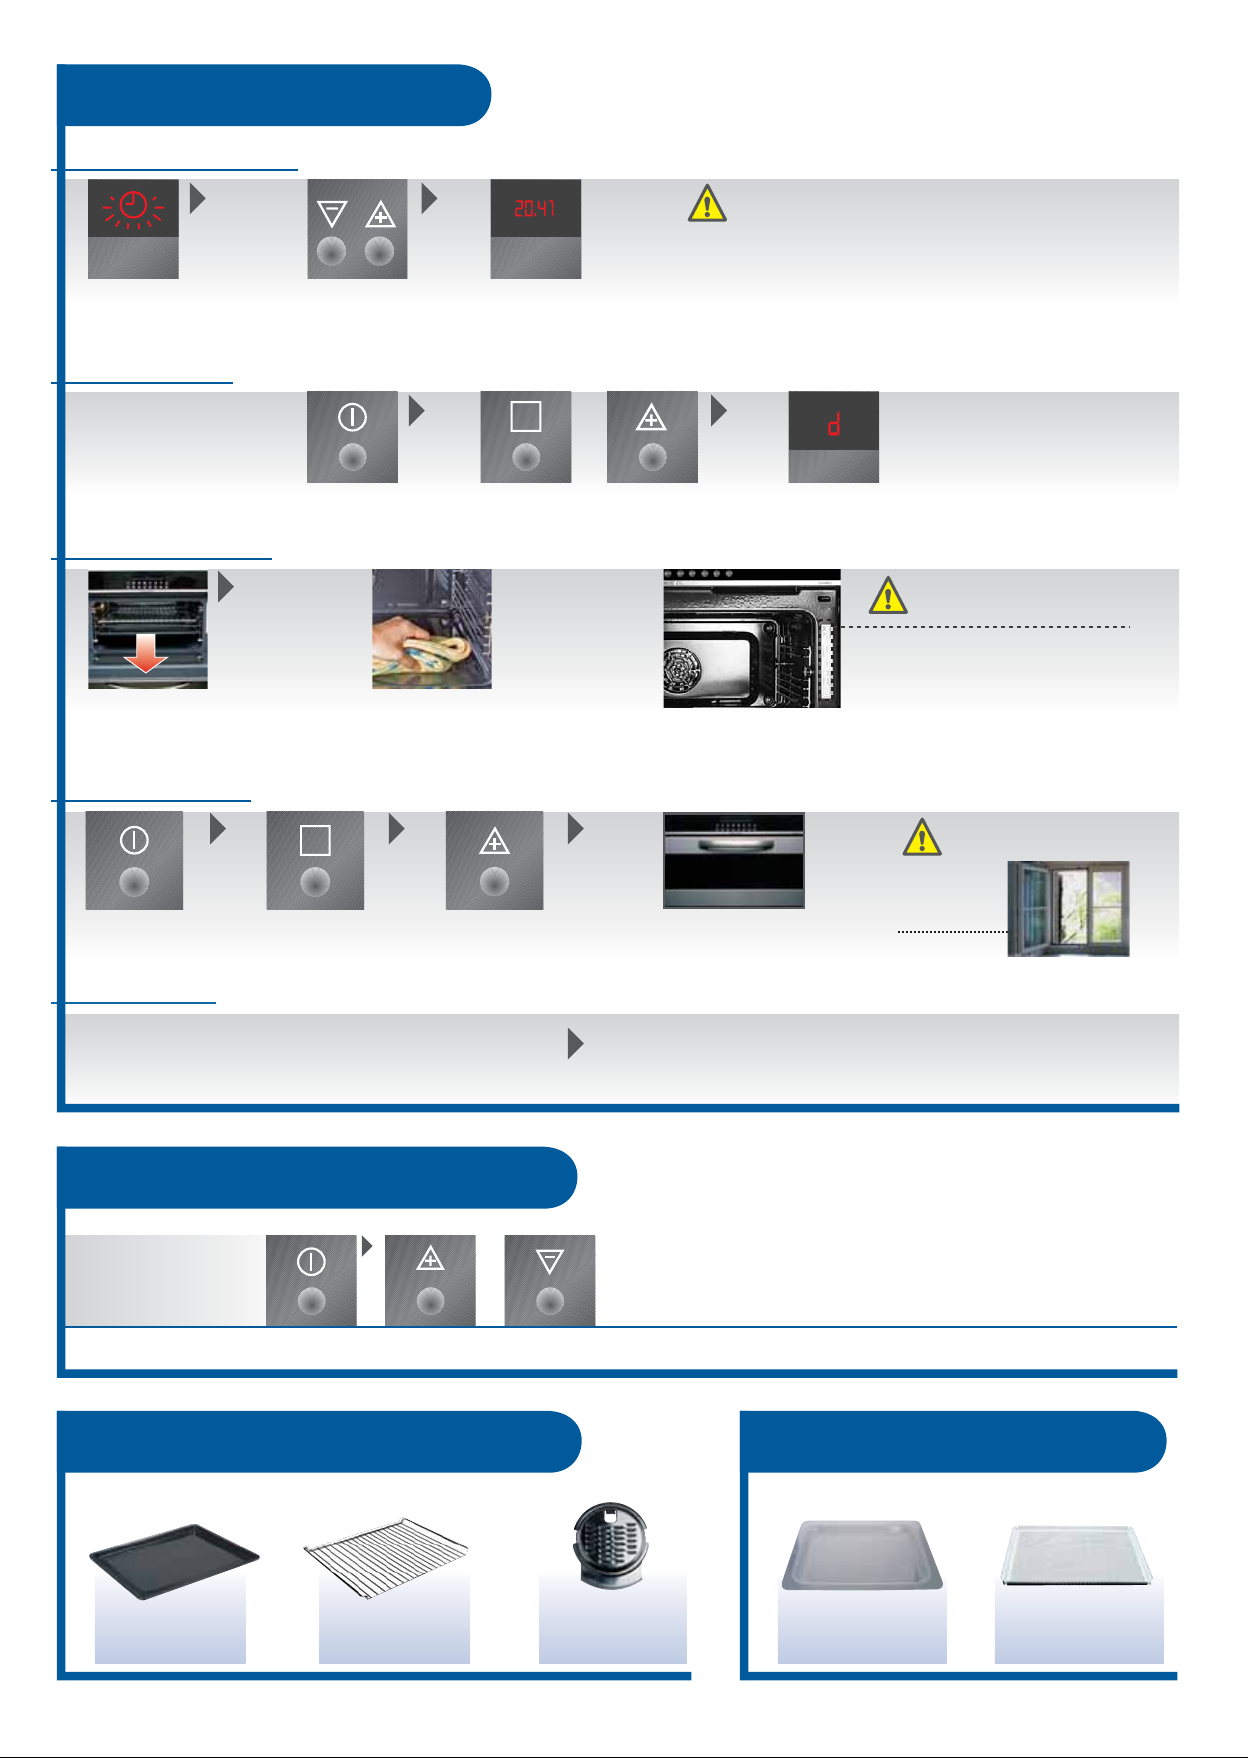
Switch on Set 250° C
Preheating
Because set temperatures are reached very quickly,
preheating is unnecessary for most programmes...
Select «Fan cooking»
Buttons-signal
+
Switching on/off
Switching off
Accessories (standard equipment)
Press simultaneously for about 2
seconds until the signal is audible
Operate closed 60 mins,
switch off again
Recommendation preheating at:
- Meat dishes / short slices of meat (fillet, sirloin, cutlet, chops)
-> Meat pores close faster and roast meat remains juicy
- Cookies diverging slightly, bread roll, pastries, biscuit rolls
Press the same button again for
about 2 seconds in order to switch on
the signal again!
Open window!
Optional accessories
Pastry grid Baking/Roast/Grill
Subject to technical modifications
(chromium steel)
Meat fat filter
Use the enclosed order form to order extra equipment
Pastry/baked goods
Glass baking tray
GBS 426
03/2005
professional plate
Drying/Baking (non-stick)
PB 426
Page 6
Cleaning and care
While cleaning oven shelf runners, lamp glass and oven door, heating elements must not be switched on.
The oven has to be cooled down so as to be able to touch the central panels safely. Only the oven light must be switched on.
NEVER use high-pressure water cleaner for the oven!
Clean the appliance thoroughly and frequently! Avoid repeated burning of residue.
Cleanemail oven
- Do not use fine steel wool, scratching and scrubbing cleaning agents!
- You can use commercially available oven spray. Observe the manufacturer’s instructions
-> Wash the inside of the oven with warm detergent lye or vinegar cleaner and a sponge/cloth
TIP: Clean chrome parts in the oven with moistened steel ball (available from major distributors); no steel wool!
- Always keep the door seal, door seal surface and the inside clean. Lack of appliance cleanliness can lead to hazardous situations.
5
Page
Oven cover with catalytic cleaning aid
at temperatures over 200° C small contaminations and grease marks are deoxidised free of odour and fat.
- do not use scratching or scouring cleaning agents, oven sprays/steel wool
-> these damage the catalytic cleaning aid
- Only open the oven for a short time -> this supports the catalytic cleaning aid
- do not use textile cloths, the shedding gets caught on the rough surfaces!
Control panel + oven door
- no aggressive/acidic or glass-ceramics cleaning agent
- no steel wool / pot cleaner
Cleaning movements
No rotating movements
when cleaning, as surfaces
will be damaged!
TIP: Clean with a soft, clean, moist micro-fibre cloth!
- Hinge brackets must always bear firmly on the hinges from the door to the oven!
- Clean inside panel with hot detergent lye
- Soak heavy contamination
- Keep rubber seals clean and do not damage!
(raised porous surface)
Alulook outside surfaces:Outside surfaces chromium steel smoothed:
- If necessary a commercially available
chromium steel cleaner can be used
-> Observe manufacturer’s instructions
in using these cleaning agents!
Glass interior has a heat-reflective protective layer Do not scratch with a knife, scraper or scotch brite etc!
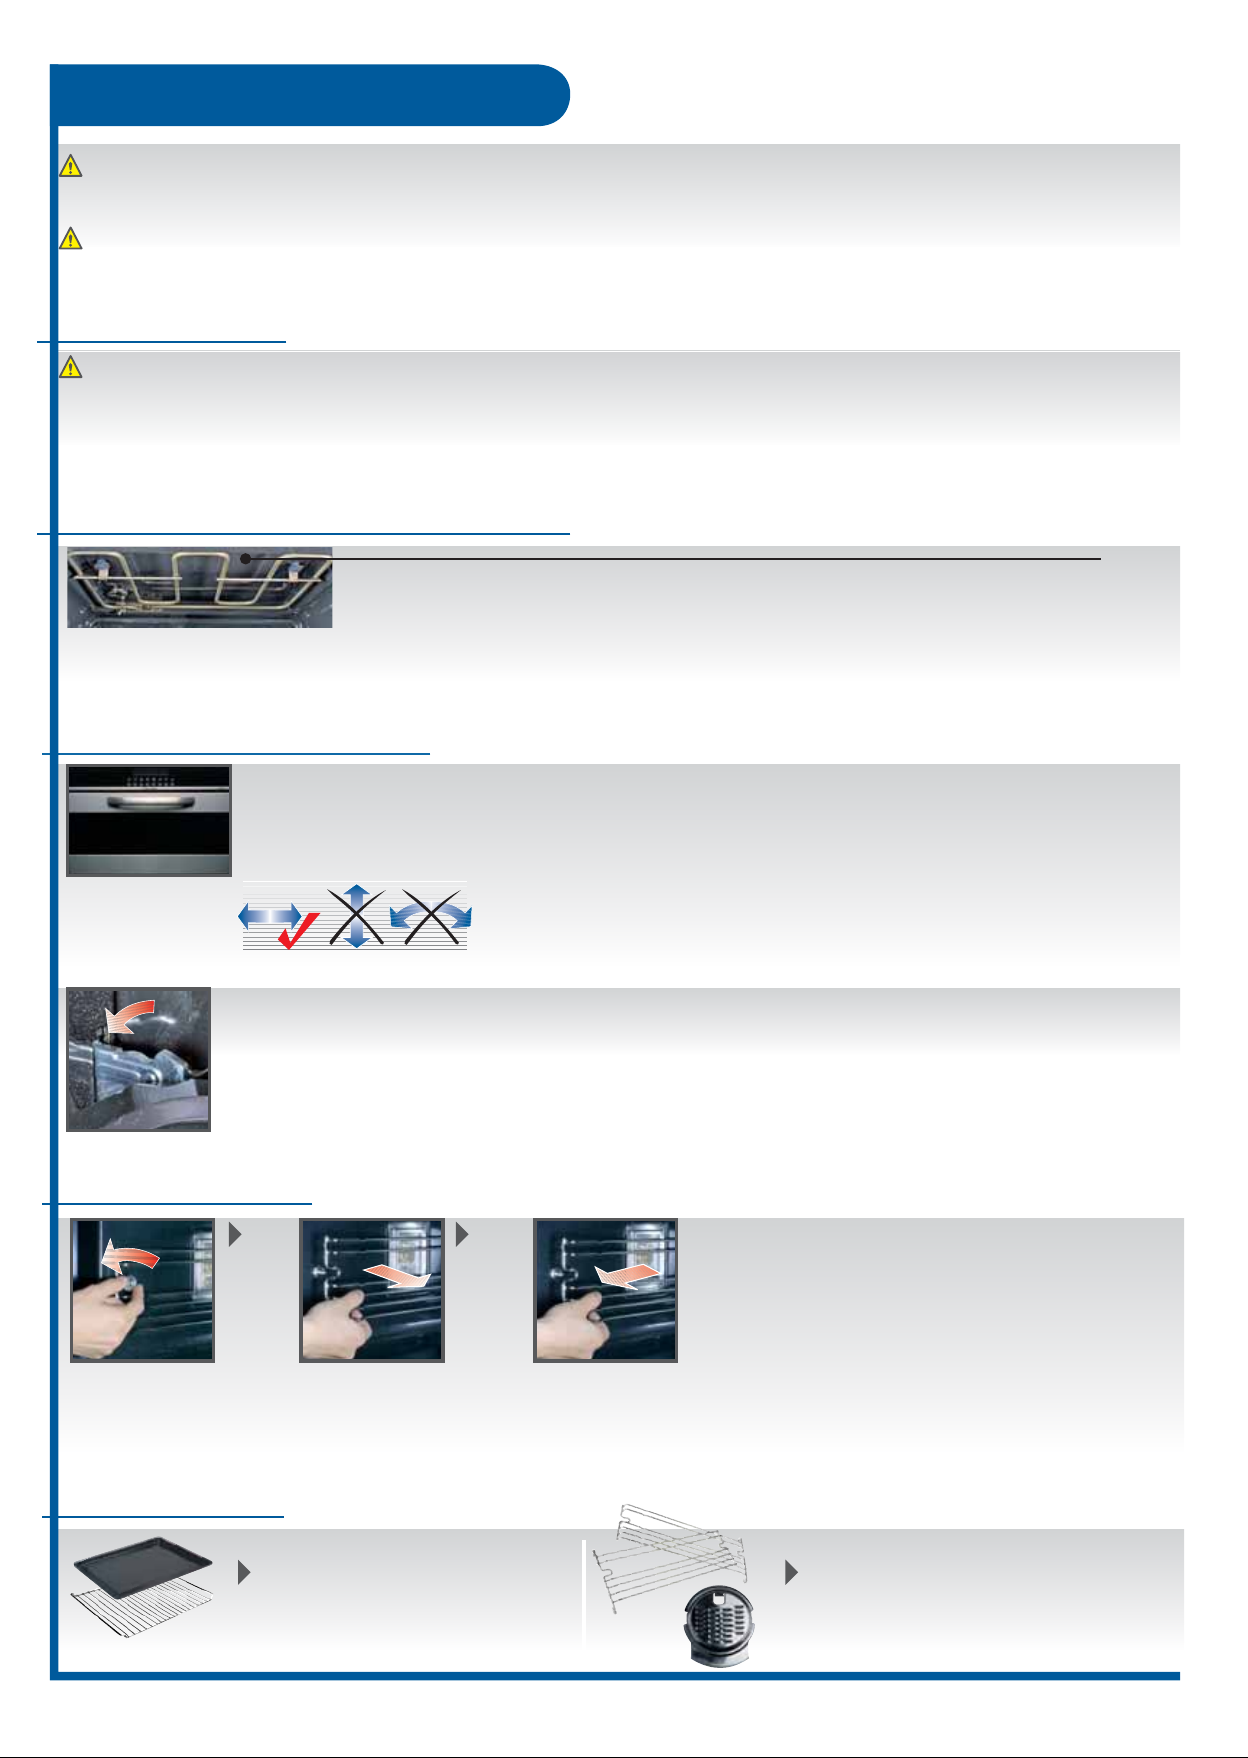
Remove slide rails
Unscrew knurled nut Pull oven shelf gently
over the set screw
TIP: Clean griddle guides with brush in a hot detergent lye or with steel ball
Pull out to the front
Clean accessory
Clean with hot detergent lye
(not suitable for dishwashers)
Reinstall:
Insert behind and reinsert
over the set screw.
Screw tightly with knurled nut.
Wash with a soft brush in hot detergent
lye or in the dishwasher
TIP: In cases of stubborn residue use
a stainless steel ball
(only on chromium panels!)
Page 7

Built-in Compact Oven
Fan cooking, Grill
Programmed Recipes
Baking-/ Rosting Table
EBC GL6(S)
(55 cm)
EBC GL60(S)
(60 cm)
This document is an integral part of the instructions for EBC GL6/60 (S)
Useful tips…
Information for baking duration can change, as egg sizes,
Binding ability of flour as well as the mould material vary!
03/2005 by Electrosuisse
Bakery goods...
…is not rising.... • Temperature is too high!
…not browning..... • Raise temperature/time poss. use short
…too dark........... • Reduce temperature/time poss. raise
…too dry.......... • Raise temperature/time poss. raise
…too moist............ • Reduce temperature/time poss. raise
• dark baking trays at top/bottom heat
• Add more liquid to the dough!
• Add less liquid to the dough!
Page 8

Fan cooking
Setting, see «Instructions» page 2
- The cooking times and temperatures given are standard values
- The indications for weight are calculated for the unbaked pastry without a baking dish
- For temperature indications with * the oven is preheated at the specified temperature
Oven
Roasting/baking
dishware
Meat / fi sh / poultry / game
Chicken Nuggets frozen
Duck 2 kg, stuffed
Fish ngers
Trout in foil 250 - 300 g Rost 250 3 15 - 20 Smear foil with butter
Meat loaf 1000 g
Chicken leg 2 pcs.
Chicken halves 2 pcs. à 500 g Rost-Griddle 200 3 40 - 50
Whole chicken 1 kg Rost-Griddle 200 2 50 - 60 Turn after 20 min.
Braised beef 1 kg
Roast beef 1 kg 220* 2 25 - 40 preheat, 10 min. standing time
Roast pork 1 kg 200 2 75 - 85
Roast veal 1 kg 200 2 60 - 70
Griddle /
baking paper
Griddle with
strainer
Griddle /
baking paper
Heat resistant
dish on grid
Heat resistant
dish on grid
Heat resistant
dish on grid
Pastries
Broccoli and leek pastries Griddle 190 2 40 - 50 Prick base well
Fruit pastries with fresh
Fruit and 400 g cast
Fruit pastry with frozen
Fruit and 700 g cast
Vegetable pastry Griddle 200 2 40 - 50
Cheese pastry 1900 g Griddle 180 2 45 - 55 Prick base well
Mushroom pastry Griddle 180 2 40 - 50 Prick base well
Quiche 1200 g
Griddle 190 2 45 - 55 Prick base well
Griddle 200 2 50 - 60 Prick base well
Griddle round
30 cm, grill
Sweet cookies
Chräbeli/ Springerli 35 pcs. each 10 g Griddle 170
Gingerhead/ honey cookies up to 100 g Griddle 170 2 15 - 25
Mailänderli/ Butter cookies 5 mm thick Griddle 170
Macaroons 30 pcs. each 10 g Griddle 230* 2 6 - 8 should only be stewed
Meringues 2 griddles x 15 pcs. each 30 g Griddle 100
Shortcrust pastry base 350 g
Diam. 24 - 26 cm
Shortcrust pastry base in small aluminium
moulds 9 pcs. each 30 g, Diam. base 6 cm
Shortbread biscuits 1 sheet 30 pcs. each 10 g Griddle 180*
Grill / Griddle round 180 1 25 - 32
Small aluminium
moulds / grill
Temp.
in ˚C
Level
from
Time in
minutes
Notes
Bottom
190* 3 15 - 20
180 2 110 - 130
210 3 15 - 20
200 2 60 - 75 Turn after 20 min.
200 3 35 - 45 Glass dish with strainer
200 2 75 - 85
190 2 35 - 45 Prick base well
2
1 + 3
2
1 + 3
2
1 + 3
190 2 18 -23
2
1 + 3
12 - 15
13 - 16
17 - 22 Brush Mailänderli 2 x with egg
120 - 150
15 - 20
17 - 22
According to manufacturer’s
instructions
Or according to
manufacturer’s instructions
Griddle on level 1,
do not turn chicken
10 Min. im abgeschalteten
Ofen stehen lassen
Switch off oven,
leave it 10 min.
Switch off oven,
leave it 10 min.
Blanch vegetables,
prick base well
Leave to dry overnight
Brush base well
and leave standing
for about 1 hr
Cream puff/ Choux pastry 20 pcs. each 30 g Griddle 200 2 35 - 40
Cinnamon star/ chocolate balls
30 pcs. 8 - 10 mm thick
Griddle 140*
2
1 + 3
18 - 23
19 - 24
Page 9

Fan cooking
Settings, see «Instructions» page 2
For temperature indications with * the oven is preheated at the specified temperature
Oven
Puff pastry / Apero baking
Ham croissant 40 - 50 g, frozen Griddle 200
Mini pizza 15 - 20 g, frozen Griddle 190*
Aperomix 15 - 20 g, frozen Griddle 190*
Prussiennes up to 20 g, frozen Griddle 200*
Party Quiches 15 - 30 g, frozen Griddle 190*
Viennese sausages in pastry Griddle 200 2 25 - 30
Sausages in pastry up to 20 - 30 g, frozen Griddle 200*
Fillet in pastry, ca. 1 kg Griddle 180* 2 40 - 50
Roasting/baking
dishware
Bagel / bread/ pizza
2 breads each 650 g pastry Griddle 200 2 50 - 60
Bread roll 12- 16 each 40 - 50 g Griddle 230 3 20 - 25
1 braided bread 900 - 1000 g Griddle 190 2 32 - 40
1 tarte ambee around 30 cm, 1100 g Griddle 220* 3 20 - 25 Manufacturer‘s instructions
Freshly baked bread rolls 30 - 40 g Griddle 200* 3 5 - 7 Manufacturer‘s instructions
Freshly baked bread rolls 30 - 40 g frozen Griddle 200* 3 15 - 17 Manufacturer‘s instructions
Freshly baked croissant chilled Griddle 180* 3 3 - 5 Manufacturer‘s instructions
Freshly baked croissant chilled 40 - 50 g frozen Griddle 200* 3 12 - 15 Manufacturer‘s instructions
Fresh baked baguettes 40 - 50 g Griddle 200* 3 8 - 12 Manufacturer‘s instructions
Fresh baked baguettes 40 - 50 g frozen Griddle 200* 3 15 - 20 Manufacturer‘s instructions
Pizza (original griddle ) Griddle 230* 3 17 - 25
Pizza round, 30 cm Griddle 240* 3 12 - 15 Original baking tray
Pizza «Mini» frozen Grid 250 3 7 - 10 Manufacturer‘s instructions
Ham in bread pastry 1500 g - 2000 g Griddle 200 2 60 - 80
Baggel 40 - 50 g Griddle 200 3 15 - 20
Sweet bagel
1 ring cake 1000 -1200 g Grill / ring cake form 170 2 40 - 50
1 braided nutcake lled without
mould 600 - 800 g
Crumble cakes 700 - 800 g
1 nut or almond cakes
600 - 800 g
Original baking tray 170 2 28 - 35
Grill / spring
form 26 cm
Grill / cake form
30x11x7 cm high
Temp.
in ˚C
Level
from
Time in
minutes
Bottom
2
1 + 3
2
1 + 3
2
1 + 3
2
1 + 3
2
1 + 3
2
1 + 3
190 2 30 - 40
180 2 35 - 45
25 - 30
10 - 13
10 - 13
10 - 13
10 - 13
15 - 20
Notes
Manufacturer‘s instructions
no preheating 3 min. longer
Manufacturer‘s instructions
no preheating 3 min. longer
Manufacturer‘s instructions
no preheating 3 min. longer
Manufacturer‘s instructions
no preheating 3 min. longer
Manufacturer‘s instructions
no preheating 3 min. longer
Manufacturer‘s instructions
no preheating 3 min. longer
Fruit loaf approx. 1000 g Griddle 180 2 40 - 50
Bagel, small, un lled
16 pcs. 40 - 50 g
Bagel, small, lled
12 pcs. 70 - 80 g
Cakes / pies
For pastry that does not rise heavily, do not
use high-rimmed moulds (springs forms)
Apple strudel 1pcs. 1200 g Griddle 200 2 50 - 60
Biscuit roulades Griddle 230* 2 8 - 10
Sponge cake spring form 26 cm
Griddle 190 3 15 - 20
Griddle 180 3 18 - 23
Oven
Roasting/baking
dishware
Temp.
in ˚C
Level
from
Time in
minutes
Bottom
Spring form 26 cm,
grill
180* 1 35 - 40
Notes
Strudel before baking
2 x buttered
Page 10

Fan cooking
Settings, see «Instructions» page 2
Warning: For pastry that does not rise heavily, do not use high-rimmed moulds (spring forms)
Cakes (marble-, Tirolean, fruit,
lemon-) approx. 1000 g
Covered apple cakes 1300 g
Ring cake 1000 g
Rum-, Orange-, Carrot cake
pieces (Schnitte) 1200 g
Batter fruit cakes 1000 g
Apple / crumble cakes 190 2 40 - 50
Zucchetti cakes 1600 g 180 1 55 - 60
Cake form 30x11x8
cm, grill
Griddle around
28 - 30 cm, grill
Cake form 30x11x8
cm, grill
Griddle 180 2 25 - 30
Griddle around
30 cm grill
170 1 55 - 65
190 2 45 - 55
170 1 50 - 60
170 2 45 - 55
Position of baking
dishes, in the centre,
diagonally to the wall
Position of baking dish:
in the centre
Various dishes
Casserole/ Gratins Gratin dish on grid 180 2 40 - 50
Gratin potatoes, 1 kg potato Gratin dish on grid 180 2 40 - 50
Cheese souf ée for 4 persons
Pre-packed lasagne 400 g
Baked potatoes
Oven chips frozen 250 3 20 - 30 manufacturer’s instructions
Oven croquettes frozen 190 3 25 - 30 manufacturer’s instructions
Moussaka for 4 persons Gratin dish on grid 180 2 50 - 60
Heat resistant
dish on grid
Original container
on grid
Griddle / Baking
paper
170 2 50 - 60 Butter dish and dust with our
250 2 15 - 20
230 3 20 - 30
without preheating or
manufacturer’s instructions
Potato halved,
turn once
Grill size
Settings, see «Instructions» page 2
Oven
Do not preheat grill
Rosting / Baking
dishware
Temp.
in ˚C
Level
from
Time in
minutes
Notes
Bottom
Sausages Grid up 250 3 ca. 15
Steak llets up to 4 pcs Grid up 250 3 ca. 15
Whole sh 200 – 250 g Grid up 250 3 ca. 15
Grilled snails Grid up 250 3 ca. 15
Grilled sausages Grid up 250 3 ca. 15
Ham and cheese toast Grid down 250 3 10 - 15 Turn after 6 - 8 min.
Pork chops lean 4 pcs each 200 g Grid up 250 3 15 - 20 Turn after approx. 10 min.
Toast Hawaii Glass baking tray 250 3 15 - 20
Toast on its own 8 pcs 7 x 8 cm Grid up 250 3
1. Seite 7
2. Seite 3
Turn after 9 mins
Without preheating
Turbogrill
Settings, see «Instructions» page 2
Oven
Do not preheat grill
Rosting / Baking
dishware
Temp.
in ˚C
Level
from
Time in
minutes
Bottom
Gnocchi Parisian style
Gnocchi Piemonteser style 200 2 15 - 20
Gnocchi Roman style 200 2 20 - 25
Potato casserole 190 2 30 - 40
Heat resistant
dish on grid
200 2 15 - 20
Notes
Page 11

Programmed Recipes
Example:
BEEP
(2 min.)
21
Switch on oven
P1
Preparation
- 1 orig.
- 2 rolls of pastry formed
- all ingredients room temperature
- peel apples, remove core and cut into 12 pieces
Ingredients cast
2 eggs 100 g
Sugar 50 g
Salt 3 g
Cream 200 g
Apple strudel
griddle
Select desired
programme
«P1» to «P12»
Press button several times...
Preparation cast
Stir eggs, sugar and salt until
smooth and the sugar has dissolved,
then mix in the cream.
Cooking time appears «Cooking time»
illuminates
- Postpone start: A delayed cooking time can be set
(see «end» in the instructions)
- End cooking time early: Switch off oven
Ingredients topping
Pastry (1.5 rolls) 480 g
Hazelnut grated 50 g
Apples 1000 g
Finishing
Place dough on the greased tray, dab the base well,
distribute hazelnuts evenly and position cut apples. Place the cast over
the apples.
Baking without preheating
Fan cooking 190 °C groove 3 55 min
Signal when end
(
press any button!)
Wrap the other half of the dough
in transparent film and freeze
P2
Preparation
- 1 orig. griddle
- 2 rolls of pastry formed
- all ingredients room temperature
- peel apples, remove core and cut into 12 pieces
Ingredients cast
4 eggs 200 g
Sugar 100 g
Salt 6 g
Cream 400 g
P3
Preparation:
- Tomato sauce
- all ingredients room temperature
Ingredients dough:
Water 250 g
1 egg 50 g
Ye ast 20 g
Olive oil 30 g
Salt 10 g
Plain flour 500 g
Topping:
600 g pizza cheese (feta), roughly grated, per pizza 150 g
Extras 400 g:
ham, salami, mushrooms, bacon cubes, anchovies, per pizza 100g
Finishing:
Split the dough into 4 portions, form into round shape, add flour
and shape into 3-4 mm thick slices. Brush with cold tomato sauce,
leave approx. 1cm edge. Line with desired extra ingredients and
sprinkle cheese over.
Baking with preheating 250 °C:
Fan cooking 250 °C groove 3 20 min
Apple strudel with frozen fruit
Preparation cast
Stir eggs, sugar and salt until
smooth and the sugar has dissolved,
then mix in the cream.
Pizza
4 pce. round Ø 28 cm
Preparation dough:
Dissolve yeast in water and knead
into elastic dough with the remaining
ingredients. Leave the dough covered
for 30 min, beat 3 times during this
time
Ingredients topping
Pastry (1.5 rolls) 480 g
Hazelnut grated 50 g
Apples 1000 g
Finishing
Place dough on the greased tray, dab the base well,
distribute hazelnuts evenly and position cut apples. Place the cast over
the apples.
Baking without preheating:
Fan cooking 190 °C groove 3 65 min
Ingredients tomato sauce:
2 cans of peeled, chopped tomatoes 800 g
Onions finely chopped 100 g
Cloves of garlic, finely chopped 2 pcs.
Salt, pepper, oregano or pizza spices
Preparation tomato sauce:
Mix onions, garlic, spices and tomatoes and reduce fluid until you have a
plump sauce. Leave to cool.
Bake every 2 pizzas one after the other
Wrap the other half of the
dough in transparent film and freeze
Page 12

P4
Quiche Lorraine
Preparation
-
1 griddle round Ø'af 30 cm, grease well
-
all ingredients room temperature
Ingredients dough
Plain flour 200 g
2 eggs 100 g
Butter (refrigerated)
in cubes 120 g
Salz 4 g
Finishing
Stir egg with cream well, add the remaining ingredients and mix well.
Pour cheese into form and bake.
P5
Ingredients dough
Semi-white flour 400 g
Rye flour 150 g
Salt 10 g
Ye ast 20 g
Milk 200 g
Water 200 g
For farmhouse bread (dark) plain flour
can be replaced with Greyish-brown flour
:
:
:
Preparation:
Mix flour, salt and butter until a crumbly mixture
forms, add the eggs and knead into a dough.
Leave the dough to stand and cool, then shape
evenly, add to prepared form and pierce well.
Farmhouse bread
Preparation dough
Dissolve dough into fluid, add the remaining
ingredients and knead into elastic dough. Leave
the dough covered for 30-40 min, beat 2-3 times
during this time.
(1 slice 980 g)
Ingredients Topping and cast:
Diced bacon 200 g
Cheese mix roughly grated 150 g
Cream, sour cream 250 g
2 eggs 100 g
Seasoning (salt, pepper, nutmeg, spices) 6 g
Baking without preheating:
Fan cooking 190 °C groove 3 45 min
If lumps appear, prick these at once.
Finishing:
First form the dough into a round shape, then lengthen, dip
the upper side into flour and set on a sheet. Leave the
bread in the closed oven (switched off) again. Before baking
cut the bread crosswise.
Baking without preheating
Fan cooking 200 °C groove 2 55 min
:
P6
Preparation
- Baking dish: orig. griddle with baking paper
- all ingredients room temperature
Ingredients dough
Plain flour 500 g
Sugar 5 g
Salt 10 g
Ye ast 20 g
Butter 50 g
1 egg 50 g
Milk 250 g
P7
Preparation:
- Cake form 32x11x8 cm high
-
all ingredients room temperature
-
Chop roughly
Ingredients quantity
Plain flour 100 g
Corn flour 100 g
Salt 1 g
Hazelnut ground 100 g
Sugar 200 g
Margarine oder Butter 200 g
5 eggs 250 g
Flour 50 g
Sieve baking powder 4 g
dark chocolate
Braided bread
Preparation dough
Dissolve dough into fluid, add the remaining
ingredients and knead into elastic dough. Leave
the dough covered for 30 min, beat 3 times
during this time.
Chocolate hazelnut cakes
:
200 g
(1slice 885 g)
Finishing:
Split the dough into 2 large identical sized pieces, form
these into approx. 40 cm long strips Put these sections
onto the sheet, leave for 20 min. and brush with egg.
Baking without preheating
Fan cooking 190 °C groove 2 40 min
Preparation:
Mix flour, salt, hazelnut, sugar, butter until you get a
crumbly mixture. Add eggs and stir. Finally mix in flour
and chocolate
Baking without preheating:
Fan cooking 170 °C groove 2 65 min
.
:
Page 13

P8
Preparation:
-
all ingredients room temperature
Ingredients quantity
Plain flour 500 g
Butter 250 g
Sugar 250 g
Salt 3 g
Lemon seeds
2 eggs 100 g
Milano
:
1
Preparation
Stir butter, sugar, salt and lemon, stir
egg through until the mixture forms
Finally add flour and quickly knead
into a dough. Leave dough in fridge.
:
Work
Shape the Milano biscuits 5 mm thick, shape and put
on sheet, brush twice with egg. Before baking leave
the egg to dry on the biscuits. This adds sheen.
Baking before preheating
Fan cooking 180 °C groove 3 25 min
P9
Preparation
Grease Pyrex form 30 x 21 cm with butter.
Ingredients
Potatoes 1000 g
Milk 200 g
Cream 200 g
Grated cheese
Salt, freshly-ground pepper, nutmeg,
seasoning, garlic powder
P10
Preparation
Take chicken out of fridge 1 hour in advance.
Ingredients
1 chicken 1000-12000 g
Groundnut oil
Salt, pepper, paprika,
Garlic powder, a little mustard
Potatoes au gratin
60 g
Roast chicken
Preparation
Clean chicken inside and
2 tbsp
outside, wash and dry with
kitchen towel. Mix the spices
with groundnut oil and brush
evenly over the chicken
for 4-5 persons
for 2 persons
.
Preparation
Peel the potatoes, cut into 3mm thick slices and layer in a dish
Season with salt, pepper, nutmeg, spices, garlic powder. Mix milk
and cream and pour over the potatoes. Finally sprinkle the grated
cheese over.
Bake without preheating
Fan cooking 190 °C groove 2 65 min
Baking tin
Pyrex dish with insert filter on grill
or
ceramic or roasting tin on roasting grill
Baking with preheating
Fan cooking 210 °C groove 2 60 min
Turn after 20 min.
210 °C
.
P11
Preparation
Take meat out of fridge 1 hour in advance.
Ingredients
Roast pork (neck) 1000 g
Groundnut oil
Salt, pepper, Paprika, a little mustard
P12
Preparation
Take meat out of fridge 1 hour in advance
Ingredients
Beef steak
Groundnut oil
Salt, pepper, Paprika, spices
Roast pork
Preparation
Wash pork and dry with kitchen towel.
2 tbsp
Mix the spices with groundnut oil and
brush evenly over the meat. Place in
roasting tin and then start roasting.
Turn the meat half way through the
roasting time.
Roast beef
Preparation
1000 g
2 tbsp
Wash beef steak, dry with kitchen
towel and season. Heat oil in frying
pan. Sear the beef steak well on all
sides (10 min). Cook with low
temperature automatic
for 4-6 persons
Baking tin
Pyrex ceramic dish or cast iron roasting tin
Baking with preheating
Fan cooking 190 °C groove 2 100 min
Turn after 30 min.
for 4-6 persons
.
Baking tin
Pyrex ceramic dish or cast iron roasting tin without lid
Baking with preheating
Low temperature
(120 - 80 °C).
Internal temperature 60 °C (rose)
190 °C
.
120 °C / 10 min
80 °C groove 2 140 min
Page 14

Low temperature cooking «LO»
Settings, see «Instructions» page 2
- The specified times and temperatures are standard values.
Oven
Before cooking, sear in the frying pan
Roast beef half, internal temperature 55 °C Grill, heat resistant dish 1000 2 120 / 80 110 - 130
Pork loin, internal temperature 65 °C Grill, heat resistant dish 1000 2 120 / 80 140 - 160
Roast veal, internal temperature 65 °C Grill, heat resistant dish 1000 2 120 / 80 150 - 180
Roasting/ baking
dishware
Weight g
Level
from
Bottom
Temp
in °C
Time in
minutes
Drying
Settings, see «Instructions» page 2
- Use drying sheets (optional extra). After the drying time switch off the oven, open and leave to cool down, preferably overnight.
Oven
Roasting/ baking
dishware
Vegetables
Beans Drying sheet 75 2 + 4 6 - 9
Herbs Drying sheet 40 - 50 2 + 4 2 - 4
Chilli peppers Drying sheet 75 2 + 4 5 - 8
Mushrooms Drying sheet 50 2 + 4 6 - 9
Vegetables for soup Drying sheet 75 2 + 4 5 - 6
Fruit
Apple slices Drying sheet 75 2 + 4 6 - 9
Apricots Drying sheet 75 2 + 4 8 - 12
Pears Drying sheet 75 2 + 4 9 - 13
Plums Drying sheet 75 2 + 4 8 - 12
Temp.
in ˚C
Level
from
Bottom
Time in
hours
Notes
Open oven now and then
Open oven now and then
Sterilising
Settings, see «Instructions» page 2
Berries
Vegetables, carrots, mixed pickles, asparagus
Fruit, pears, quinces, stone fruit
Roasting/ baking
dishware
High-rimmed
griddle with water
High-rimmed
griddle with water
High-rimmed
griddle with water
Oven
Temp.
in ˚C
175 2 45 - 55
175 2 45 - 55
175 2 45 - 55
Level
from
Bottom
Time in
hours
Notes
Glasses at most 16 cm high,
until starts bubbling sterilise at
150 ˚C for 40 mins, afterwards
45 min standing time in oven
Glasses at most 16 cm high,
until starts bubbling sterilise at
150 ˚C for 60 mins, afterwards
45 min standing time in oven,
repeat after 24 hours 175 ˚C,
until bubbling starts after
leave standing for 45 mins
Glasses at most 16 cm high,
until starts bubbling sterilise at
150 ˚C for 60 mins, afterwards
45 min standing time in oven
Page 15

Built-in Compact oven
Fan cooking, Grill
Technical data/Problem solving
Customer service/Warranty
Safety instructions
Installations
EBC GL6(S)
(55 cm)
EBC GL60(S)
(60 cm)
This document is an integral part of the documentation for the
installation compact oven EBC GL 6/60(S)
Page 16

Installation Instructions
Details see safety instructions page C
A
Page
Electrical connection / supply
Connection by means of a power socket shall be provided by the customer, so that the power socket is available and outside the range of coordination
1. Clamp connection as per the connection diagram
2. Secure the strain relief
The electro connection has to be carried out by a licensed fitter.
For a network connecting line, use line version H05VV-F or higher.
Installation has to be carried out using a supply line with plug or it shall be provided with a separator laid in the home installation with at
least 3 mm contact gap, which separates the equipment at the same time and all-pin, according to NIN 2000.
During installation in combustible matter, NIN 2000, section 4.2.2 and fire protection guidelines and
Installation
Place the appliance in front of the
recess and connect the mains plug.
- Cable length: 1.50 m from appliance
- Plug: version 12
regulations of the Association of Cantonal Fire Insurance shall be strictly adhered to.
Push the oven into the recess Fix the oven on the both sides with
231
CAUTIOIN: Do not pen in the cable!
When connected to the mains, secure
cable into the cable routing on the left
hand side.
For servicing the appliance must be disconnected!
2 screws (detail A)
Variants
If the compact oven is built in directly over the installation oven in combinations, this must be done with the enclosed support
bracket set no. 315 68 3900. Look at installation sheet no. 315 6837 00 for the installation standard.
When installing several appliances only one recess is necessary. The support brackets are also available as optional extras.
EBC GL6 (S) (55 cm, 230 V) EBC GL60 (S) (60 cm, 230 V)
cable
routing
cable
routing
03/2005
Page 17

Technical Data
Read label
5…
...
B
Page
37,7 cm
40,8 cm
20,5 cm
- Bakery volumen 31,5 l
Indications conditional of manufacture
According to model 2 glass recesses are visible on the left side of the front panel. These are conditional on production technique and
have no impact on quality and life span of the appliance.
Problem Solving
Problem Cause Solution
The oven is not working - Check fuses
- The oven is not getting hot even though the
mode of operation and temperature are
switched on
- Heating element and fan are not working
Oven light is not working
Customer service needs this data
for all enquiries/orders!
Exernal dimensions for:
cm
Height
Width
Depth
Depth when
door open
Fault in the power supply
- Automatic programm with delayed
cooking start was set
- Possible that the demo mode is activated! Switch off
Bulb is defective!
EBC GL6 (S)
56,7 56,7
81,9 81,9
EBC GL60 (S)
38,837,8
59,254,8
Improper work can result in damage to persons or property. If you cannot
remove interferences with these tips, please contact your customer
service (see page B).
- Mains plug connected?
Cancel automatic settings or reset
-> Clock functions see 5, operating instructions
demo mode:
Exchange bulb -> see page B
1. 2.
Switch off
Fan cooking (Rear wall
heating element): 1650 W
Turbo grill: 1500 W
Grill size: 1500 W
+
A
At the same time press until
the signal is audible
Service-Symbol
light (Errorr-Code)
Symbol time of day is flashing Power cut Set time of day -> see page 4, Instructions for use
According to error
Notify customer service
Changing Lamps
Before changing lamp, disconnect or unscrew fuses!
25 W, 230/ 240 V – E14
*
constant up to 300 °C
Squared lamp cover
1
Remove griddle guide,
Unclip glass carefully!!
2
Unscrew light bulb
*
–> Electo specialist dealer or
central replacement part service
Warranty
Assembly in
reverse order
For each product we issue a warranty of 2 years (display by letter of guarantee, invoice or sales document) to the end consumer from sale or
delivery date. The warranty covers the costs for materials, work and travel time, it is not applicable in the event of non observance of instructions
for use and operating regulations, improper installation and damage caused by external influences, force majeure, third party interferences
and use of non-original parts.
Subject to technical modifications.
Page 18

SOS
Safety instructions
- In the case of emergency immediately pull out the mains plug or
switch circuit breaker to OFF
- ONLY use appliance once you have read and understood these instructions
- Only use for standard home cooking and roasting, in accordance with these instructions
- Only use when installed and in-house. Electric shocks, risk of injury!
- Keep these instructions safe for other persons using the oven
- Disregarding these instructions/safety instructions can result in this appliance
posing a danger
- After use check whether the appliance is switched off
- NEVER use for heating purposes or purposes other than those described
- NEVER use when defective or you suspect there are defects/damage
- Installation only by specialist while observing the installation instructions and
the local regulations
- Installation in combustible materia: Adhere to NIN2000 guidelines
and fire prevention act
- Install appliance at a suitable working height (eye level)
- The power supply must comply with details on appliance. The appliance has to be
connected to power supply and protective earthing by a specialist as standard,
via mains plug or permantely connected via network circuit breaker
(all-pin 3 mm contact gap)
- The mains plug or circuit breaker must be within reach at ally times
-
Do not allow the cord to come into contact with the back of the appliance/hot parts
- Always supervise when heating oil/fat, do not overheat it can become inflamed: Fire risk!
Extinguish fire with fire blanket or foam extinguisher
- Always keep the oven clean (build up of odours)
- Clean inside carefully. Do not use sharp objects (Damage)
- Prior to cleaning, disconnect appliance from mains and leave to cool down!
- Before exchanging oven lamp disconnect appliance from mains, pull out mains
plug or disconnect the mains fuse
- Do not clean appliance with steam or high pressure device.
Do not use combustible cleaning agent
- If oven shelf runners are removed for cleaning, always ensure you reinstall them
correctly. Otherwise there is a risk of grills or shelves falling. Burn hazard
- Only install or remove grease trap when the appliance is switched off.
-
Do not use appliance in the case of defect or suspicion of defect,
immediatley disconnect from mains. Repair work to be carried out by
authorised customer service.
- Do not damage mains cable, e.g. jamming, sharp edges, heat etc.
Do not use appliance with defective mains cable, disconnect immediately.
ONLY have mains cable/plug and oven door replaced by customer service,
in order to avoid hazards
- Do not open oven housing. Oven doors must only be removed by service technician.
Risk of injury
- For safety reasons only use original replacement parts and accessories
- Only use accessories recommended by the manufacturer and
oven-suited dishware
.
This applicance meets the EC directives:
- 73/23/EWG Low voltage directive including amendment 90/683/EWG
- 89/336/EWG EMV directive including amendment 92/31/EWG
- 93/68/EWG CE identification directive
C
-
CAUTION!
have to be complied with, in order to elimiate the risk of fire,
electric shock and injuries to persons
- Appliance parts become hot during use. Burn hazard!
- An oven that is switched off must not be used for storing hot, cold or
cooled meals. Moisture from the food can cause corrosion in the appliance.
- Only use supplied accessories and suitable, heat-resistant dishware,
observe manufacturer's instructions.
- In using alcoholic ingredients in the oven, highly inflammable gas can
emerge, Caution when opening the door, no flames, sparks, blaze nearby.
- Keep oven door closed when grilling and oversee appliance.
Keep children away. Window is especially hot; Burn hazard!
- Only handle hot cookware with oven gloves or thermo gloves
- Keep children away from hot oven. Non-instructed persons, especially
children, must not operate the oven or only under supervision.
- Caution when closing the oven door. Risk of catching parts of your
own body or someone else’s.
-
Caution when taking out grills/shelves with cooked food. The grills/shelves
can slide down when in a sloping position. Caution: Burn hazard
- Containers with hot liquid can tip if they hang over the edge of the grill.
Caution: Burn hazard
- Avoid overheating: Detrimental steam can develop, alcohol can ignite,
food can dry out and inflame
- Clean appliance and remove food residues regularly (hygiene,
Fire hazard, service life of appliance)
- Clean appliance and remove food residues regularly (hygiene,
Fire hazard, service life of appliance
- Switch off the oven after use. Disconnect the appliance from the mains
for long periods of non-use.
- Do not load, climb or sit on over door.
- Do not pull mains plug from power socket by the cable.
Do not touch mains plug/-socket with wet hands
- Adhere to national and regional regulations when disposing of range
- Packaging: Recyclable, the foil and the hard foam parts hav e been
- Range: Pull the out of power socket. Cut off mains cable.
The symbol on the product or its packaging indicates that this product
should not be treated as normal household waste, but must be left at a
collection point for the recycling of electrical and electronic appliances.
In correctly disposing of this product you are making a contribution to the
protection of the environment and the health of the rest of the population.
The environment and health are at danger through incorrect waste disposal.
f the appliance is used, the basic safety precautions
labelled accordingly. Dispose of at a public waste-disposal site
Take appliance and mains cable to public waste-disposal site/
dealer or the official SENS collection points / recyclers. A list of
official collection points is available at www.sens.ch
Page
Customer service
One number for all locations
- 0848 848 111 http://www.electrolux.ch
4127 Birsfelden
Hauptstrasse 52
3063 Ittigen/Bern
Ey 5
1028 Préverenges
Le Trési 6
Zürich/Mägenwil
5506 Mägenwil
Industriestrasse 10
The Electrolux Group.
The Electrolux Group is the world's largest producer of household appliances, cleaning equipment and products for the forest and garden sector.
Every year the Electrolux Group sells over 55 million products (refrigerators, stoves, washing machines, vacuum cleaners and lawn mowers) to the value
of around 14 billion US Dollar in over 150 countries worldwide.
This TSM SUCCESS MANUAL® was checked by Electrosuisse as to compliance with the safety-relevant standards and analysed by means
of an applied risk analysis for sufficiency and correctness of instructions for the safe use of the appliance.
TSM SUCCESS MANUAL®-safe to use-easy to understand due to TSM®-Total Security Management and ergonomic communication
The world’s No. 1 choice.
or
9014 St. Gallen
Zürcherstrasse 204 e
6032 Emmen
Buholzstrasse 1
7000 Chur
Comercialstrasse 19
6916 Grancia
Zona Industriale E
8048 Zürich
Badenerstrasse 587
5506 Mägenwil
Industriestrasse 10
®
Cooking advice/Sales
Replacement parts
sales
- 0848 848 023
- 044 405 81 11
 Loading...