

Page 1
min
Start-up
Use
AnwendungAnwendung
- Press button with your finger tip –> set within 5 seconds!
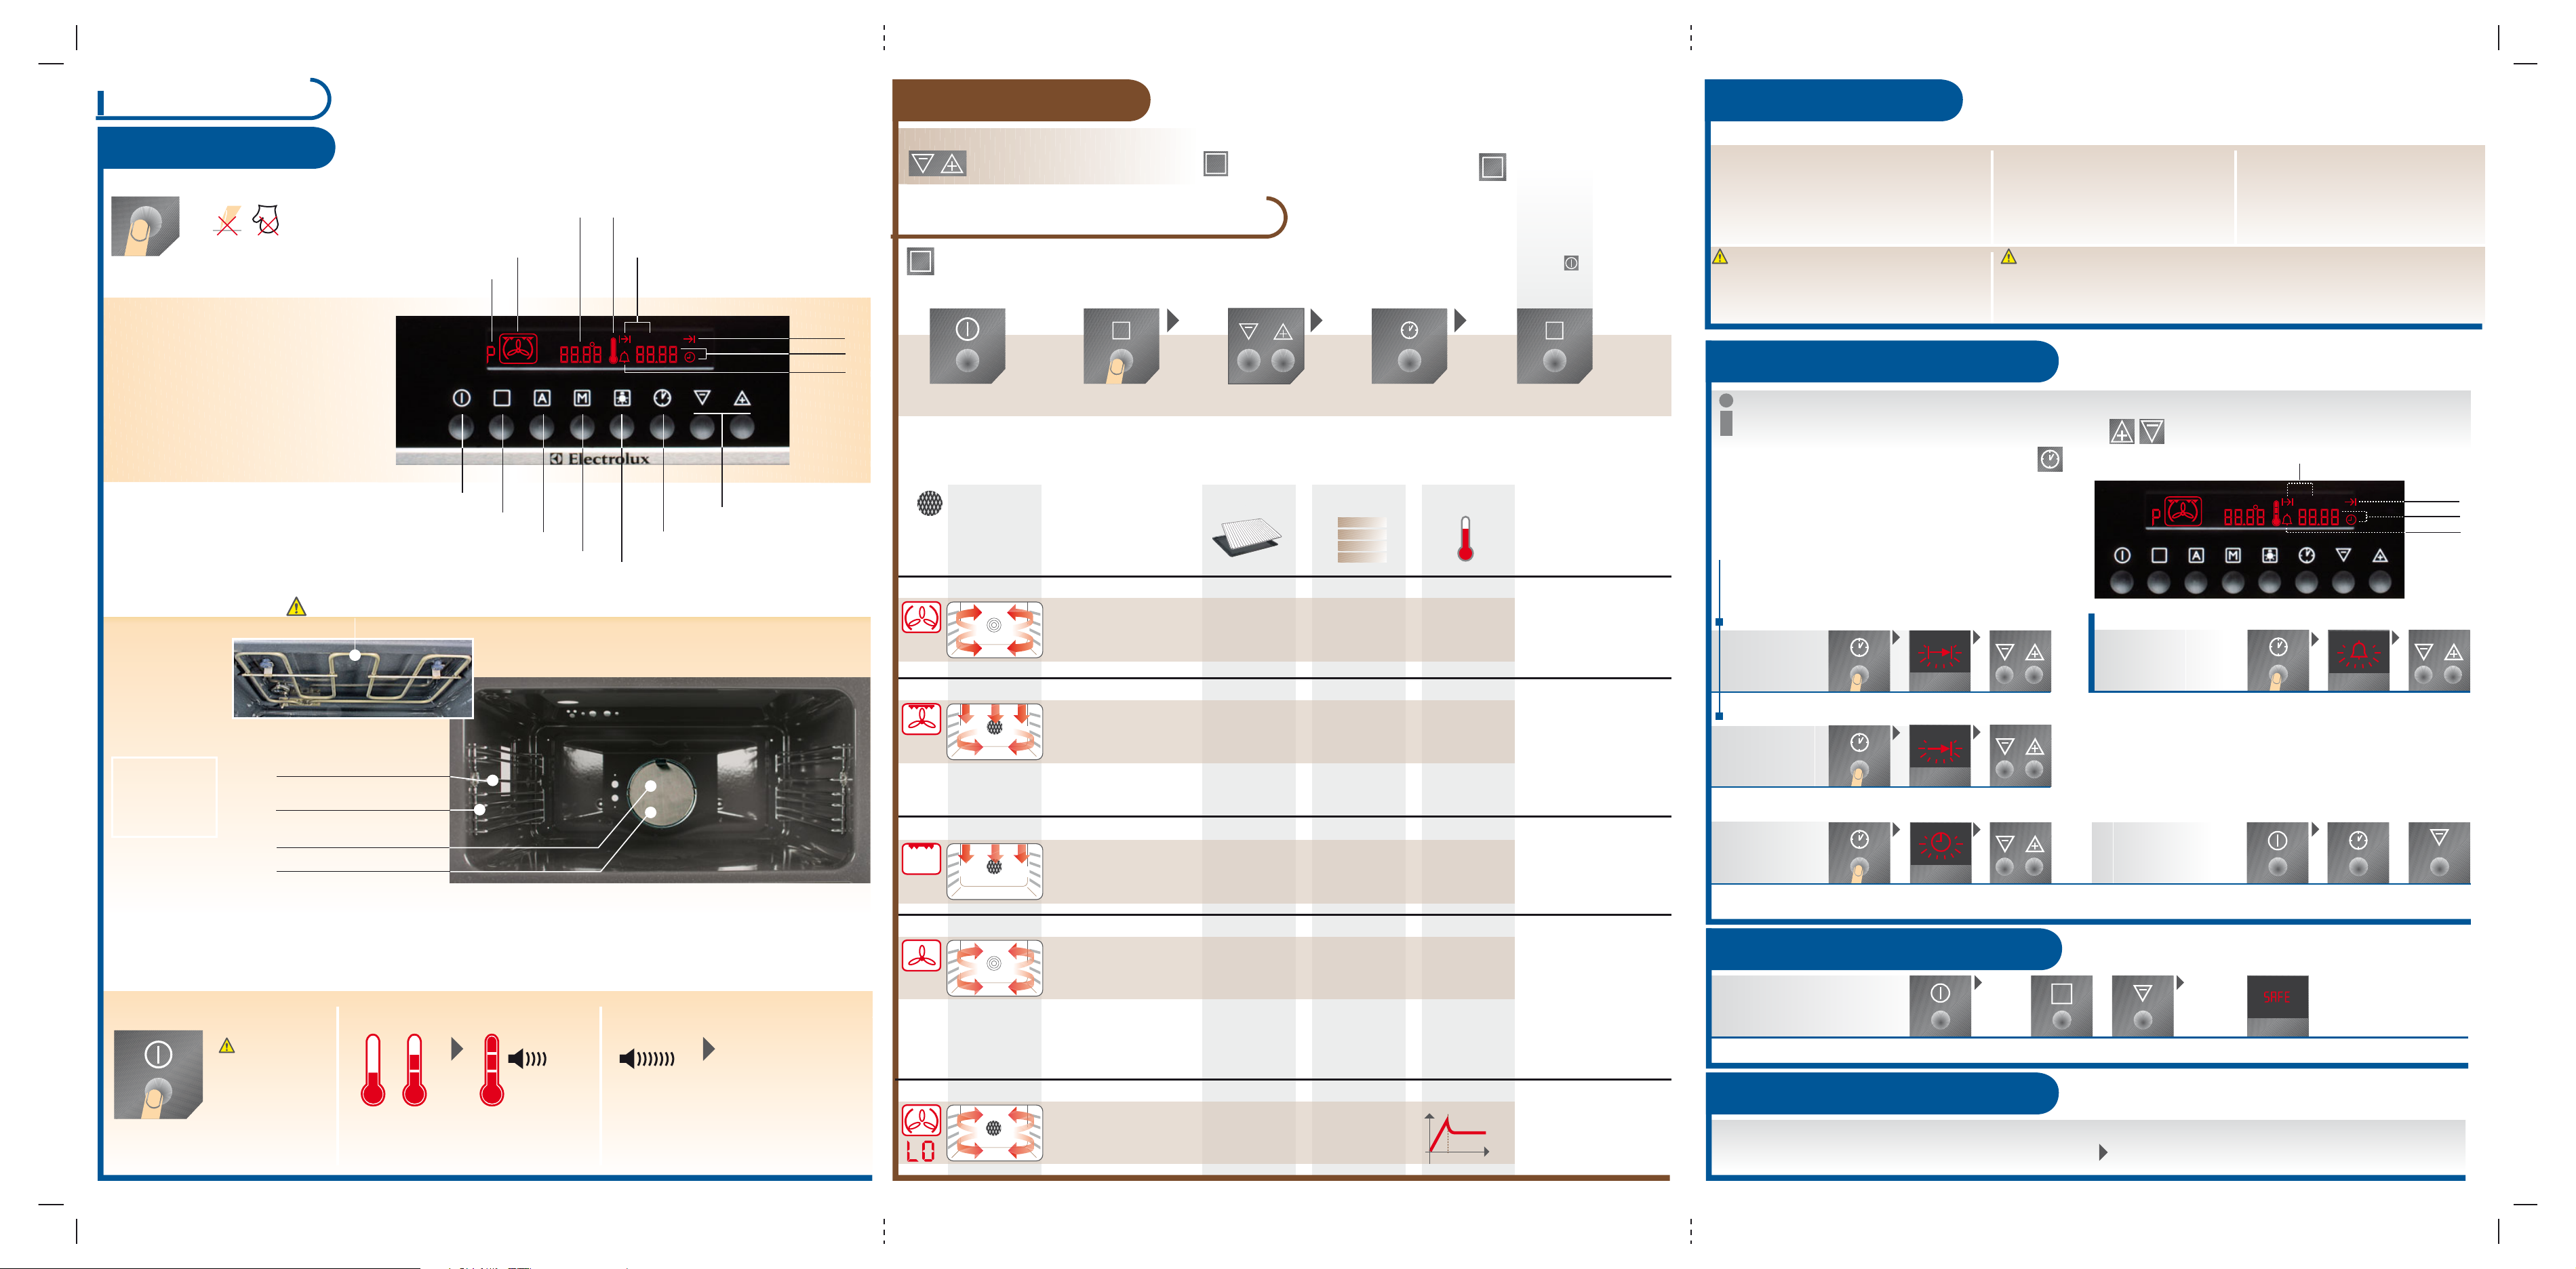
Control panel
Have you already set the time? See page 4
P = Memory function
(d = Demo function)
P = Automatic programme 1-12
Oven function
Temperature
Time
Thermometer symbol
Cook time
min
1
Page
End time
Time
Count down
Baking / Roasting
During operation...
the temperature can be changed
(in 5 °C steps)
Select oven function
PROGRAMMED RECIPES
A
see baking and roasting table and programmed recipes
1 2
the oven function can
be changed
2
Page
MEMORY FUNCTION
M
Possible to store one setting that will
be used again and again
Press «M» button for 2 seconds until signal
is audible (for new function button press
again for 2 seconds)
Start the memory function:
1. Switch on oven
2. Call up memory storage with M button
M
General
Baking / Roasting
Baking tins
- Place lean meat, venison, meat loaf directly
on roasting dish
- Light forms require longer baking/roasting times
- Place baking forms/dish on shelf
- Use baking ceramics/heat-resistant
forms with hot-air
Frozen pastry
- Place the griddle lined with baking paper
to avoid distortion of baking sheet
(differences in temperature)
- Use professional tray*
(Roasting tray, Pyrex or stoneware)
(e.g. pizza)
(*optional accessories p. 4)
Clock functions
Grill grid
- Grill with curve upwards to prevent
slipping of roast/baking dish
Grill
- Do not insert very fatty grilled food too close under the heating element
- Always supervise grilling
- If several items of food have to be grilled in succession; clean the griddle each time
Sauces
- Allow the gravy to brown slightly, then pour on
hot water
- With a roasting time of over 1h: Do not add
gravy ingredients into the roasting tin until
1/2h before the end
3
Page
Baking area
Oven light
- is switched on as soon as a function
is started or the door is open
-
goes out after 10 minutes when the door
is open and appliance is switched off
Griddle guides (4 oven levels)
As a shelf runner safety device,
all insertable components have
a small curved indentation at
the bottom on the right and
left-hand edge.
Always insert insertable
components so that this
indentation is at the
back of the oven interior.
Rear wall heating element
Meat fat filter
General
Switch on/off appliance
No function when
door opened
When the appliance is switched off the
residual heat is displayed until the
temperature has dropped to 40 °C
ON / Off
Oven functions
Automatic programme
Memory function Light ON/OFF
Do not place aluminium foil / aluminium tray on the oven base
Grill elements
Temperature display
BEEP
Appliance heats up Temperature reached
Setting
temperature & time
Clock functions
(during operations)
If time / end is up
(2 min.)
BEEP
After switching off the appliance the fan runs
until the temperature is less than 80 °C.
Appliance switches
off automatically
Switch off BEEP:
Press any button
Switch on
Replace grease trap after roasting
with hot air and turbo grilling.
Remove grease trap when baking.
Select function Select poss.
Press button repeatedly...
FUNCTIONS
FAN COOKING
TURBOGRILL
GRILL SIZE
DEFROSTING & DRYING
LOW TEMPERATURE COOKING
FOR…
- Pastry
(up to 2 levels)
- Select temp. 15° C lower than
indicated on recipes
- High joints
- Rollbraten (sliced roast pork)
- Poultry
- Gratins/casseroles
- etc.
- For flat grilled food such as steaks,
cutlets, sausages, fish
- Grilled toast
- Melting marzipan/ice cream
- Overcrusting of casseroles
- Baking/drying of herbs,
fruit, vegetables (1 to 2 levels,
change plates from time to time)
- Defrosting
- Tender, juicy roasting (lean meat)
- NOT suitable for braised
meat or roast pork.
Select poss.
temperature
(within 5 sec.)
Plates / grid
1 or 2* plates 1 plate: 2 or 3
2* plates: 1 + 4
1 grid + 1 plate
1 grid + 1 plate
1 or 2* plates Presetting:
1 grid + 1 plate
Grid: 2 or 3
Plate: 1 level
below
Grid: 3 or 4
Plate: 1 level
below
1 plate: 2
2* plates: 1 + 3
Grid: 3 oder 4
Plate: 1
time / end
(see clock function, p.4)
4
3
2
1
TemperatureOven level
Presetting:
170 °C
Setting range:
30-250 °C
Presetting:
180 °C
Setting range:
30-250 °C
Presetting:
230 °C
Setting range:
30-250 °C
30 °C
Setting range:
30-100 °C
Automatic
°C
120°
10 Min.
evt. select
memory function
(*optional accessories p.5)
Avoid excessive contamination:
- Use grease trap
- Use high-rimmed plate
with strainer*
- Use grease trap/high-rimmed
plate with strainer*
- The joint is cooked once it
no longer holds down
- Leave the roast uncovered
for about 10 minutes before
slicing
-
Distance to heating element can
be varied up or down by grid
curve
- Insert the baking tray below as
a collection pan
- Line griddle with
baking paper
- Place dry food in single
layers/close together
- Open oven every now and
then, cool down half-way
- Dry sheets are particularly
suitable
- Check degree of dryness regularly
(moist or crumbly)
- Sear the meat in the pan!
- Use grease trap for roasting!
80°
- Do not cover the meat in the oven!
Min.
- After setting a time, symbol flashes for 5 sec., afterwards the time, short time or duration is illuminated, and the time starts.
- While the corresponding symbol flashes (5 sec.): Set/change times
- By repeated touch the current time can be prompted
COOKING TIME / END FUNCTION can be used at the same time:
- the oven shall be switched on and off automatically at the later time
- a programme is selected.
COOK TIME
END TIME
TIME
(first select oven function)
When will the meal be ready?
change (e.g. Summer-/ Wintertime)
set
0 to 23 hrs. 59 min. 0 to 99 minutes
set duration
set time
COUNT DOWN
No impact on oven operation
Time can only be faded out, if no other display is active!
Is the time faded out:
- Display is illuminated when
switched on
- Display goes out when switched off
fading in/out
Switching off Press off button at the same
Child Safety Device
+
A
Press the off switch at the same time for about
2 seconds, until the display goes out/lights up
Child Safety Device on
Button locking mechanism
Switching off
No function
can be
selected!
Automatic switch off
If the function and temperature is set WITHOUT time
restriction,the oven switches off automatically as follows:
at 30 - 120 °C
at 120 - 200 °C
at 200 - 250 °C
after 12,5 h
after 8,5 h
after 5,5 h
«OFF» appears in the display
Switching on after automatic switch off:
Switch the oven off completely, it can be switched again.
Cook time
End time
Time
Count down
+
time for about 2 seconds until
display goes out/lights up
Press the same button again
for about 2 seconds in order to
switch off child lock!
Page 2
EBC GL6(S)
(55 cm)
EBC GL60(S)
(60 cm)
Start-up
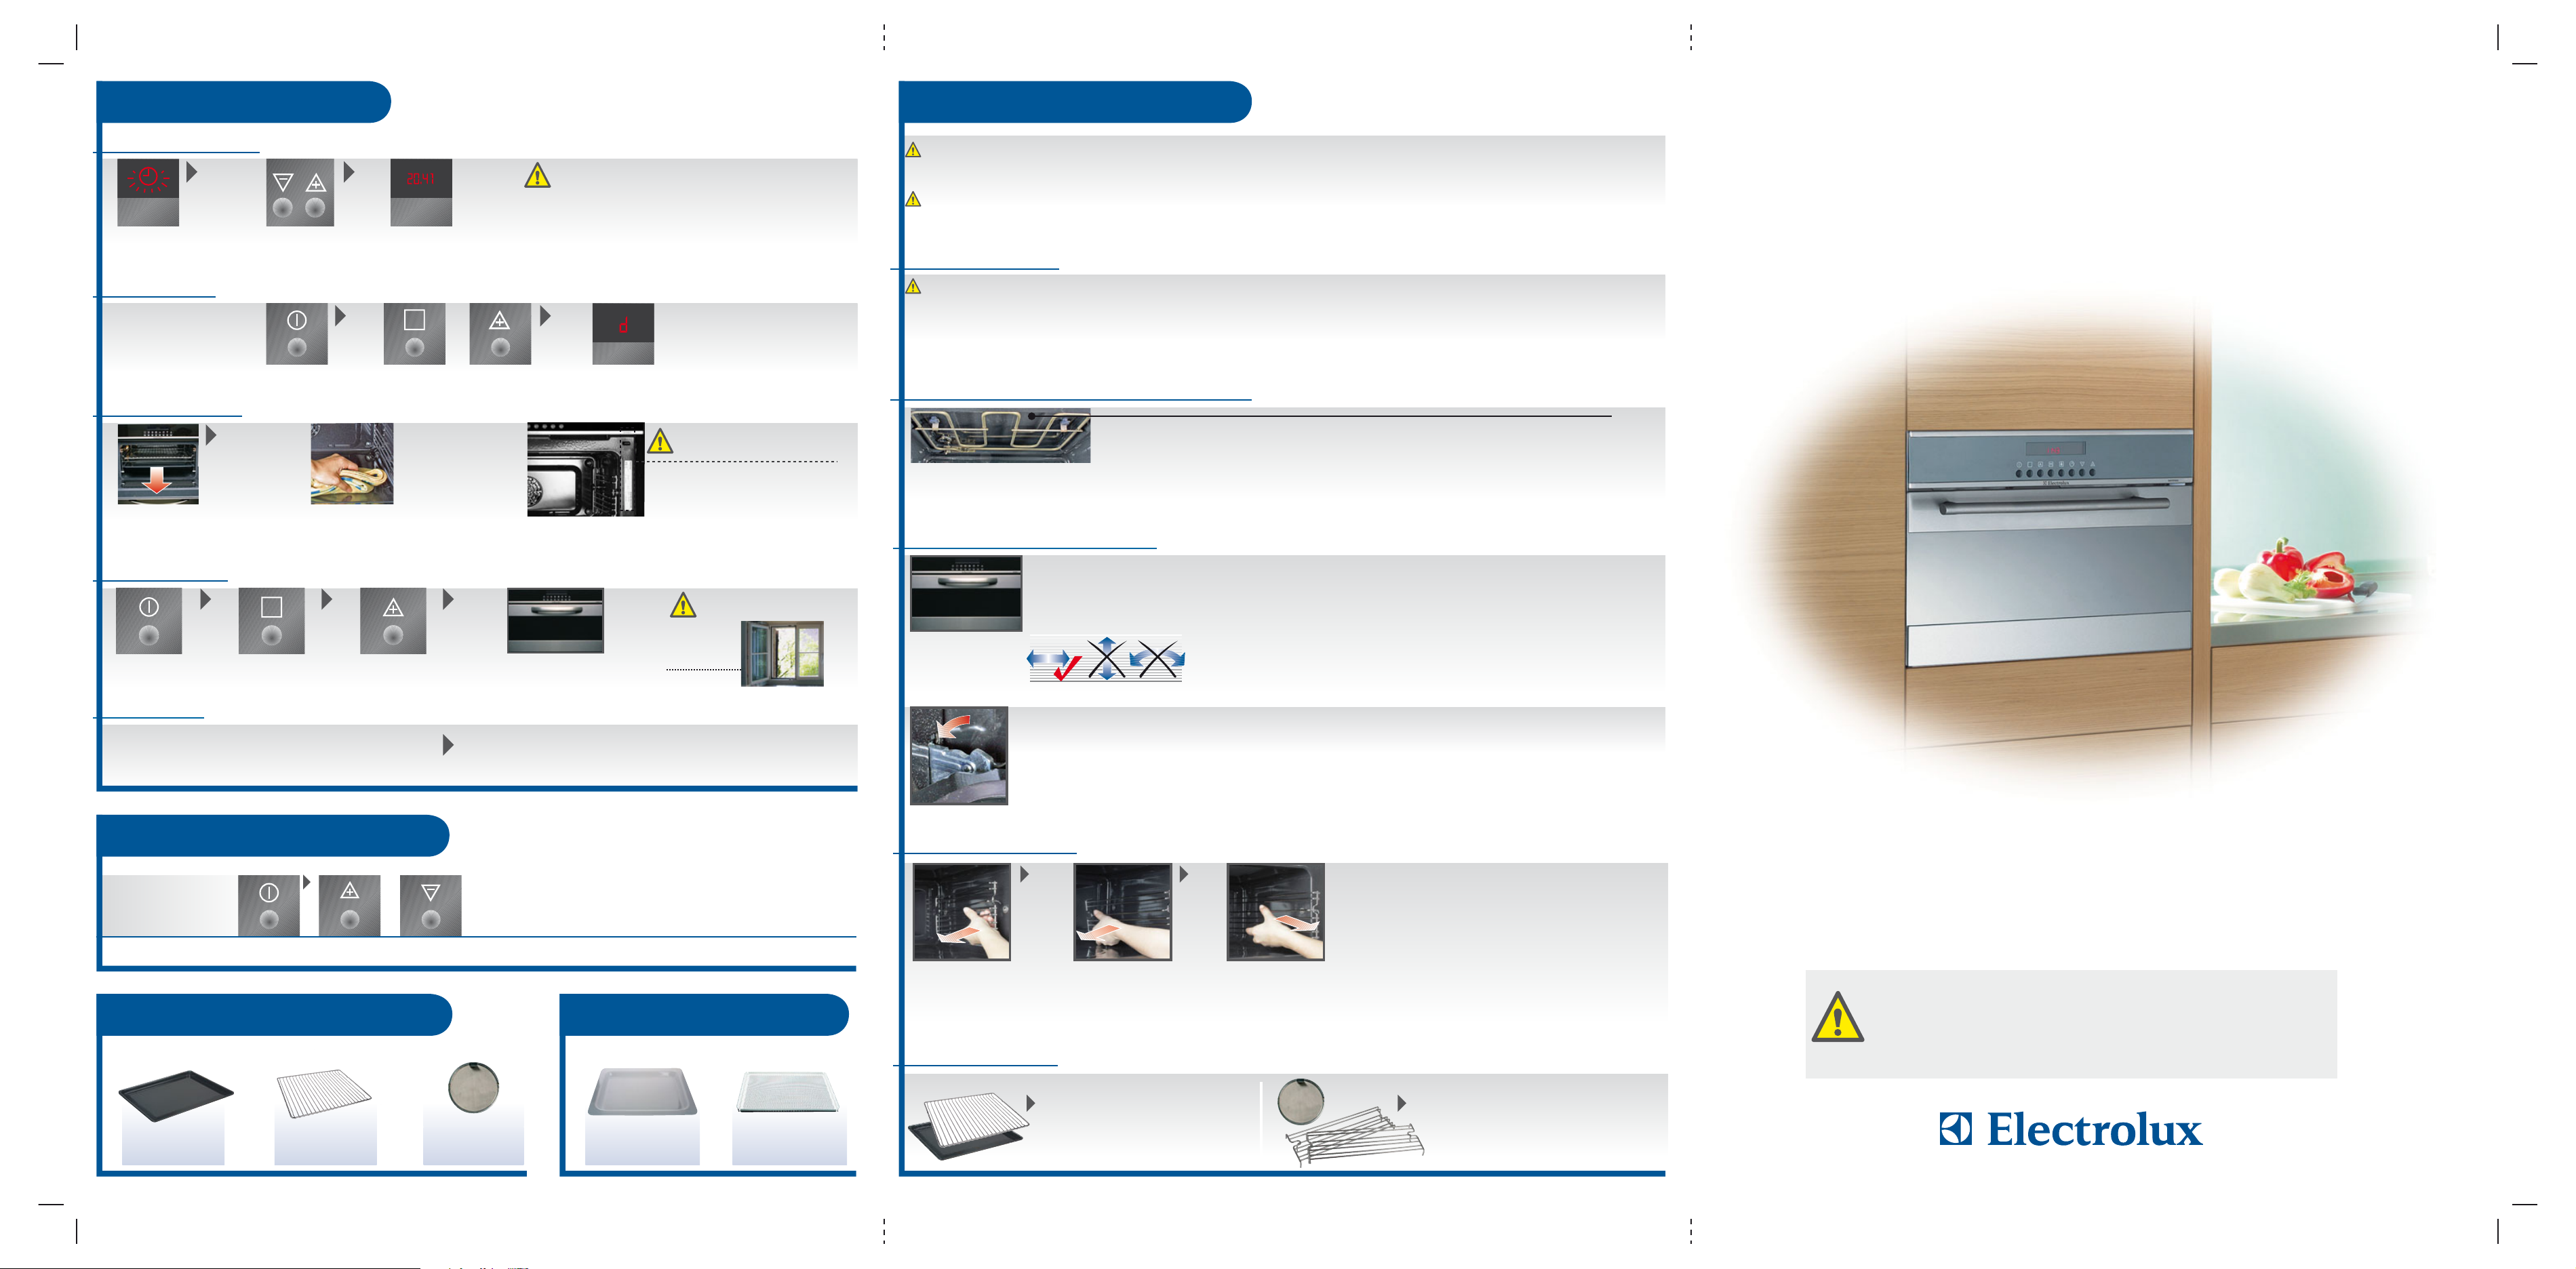
Setting the clock
The oven operates only when the clock has been set!
4
Page
Cleaning and care
While cleaning oven shelf runners, lamp glass and oven door, heating elements must not be switched on.
The oven has to be cooled down so as to be able to touch the central panels safely. Only the oven light must be switched on.
5
Page
Built-in Compact Oven
After electrical connection/
power failure the set clock
symbol flashes
Set current time
After 5 seconds the flashing stops
And time shows the time
Demo Mode
To test or carry out all
operating modes.
The oven does not heat.
1 2
Switch off appliance
A
Press simultaneously for about 2
seconds until the signal is audible!
+
Initial cleaning
12
Take out accessories and rinse
(p. cleaning + service p. 5)
Initial heating
Clean with water + detergent
(except oven cover)
–> see Cleaning + service (p. 5)
12 3
Switch on Set 250° C
Select «Fan cooking»
Preheating
Because set temperatures are reached very quickly,
preheating is unnecessary for most programmes...
Operate closed 60 mins,
switch off again
Recommendation preheating at:
- Meat dishes / short slices of meat (fillet, sirloin, cutlet, chops)
-> Meat pores close faster and roast meat remains juicy
- Cookies diverging slightly, bread roll, pastries, biscuit rolls
Demo Mode is
switched on
Press the same button again
for about 2 seconds to turn off
Demo mode!
Remove objects from the oven!
Not the type plate!
Air the area well during initial
heating phase.
Open window!
NEVER use high-pressure water cleaner for the oven!
Clean the appliance thoroughly and frequently! Avoid repeated burning of residue.
Cleanemail oven
- Do not use fine steel wool, scratching and scrubbing cleaning agents!
- You can use commercially available oven spray. Observe the manufacturer’s instructions
-> Wash the inside of the oven with warm detergent lye or vinegar cleaner and a sponge/cloth
TIP: Clean the chrome parts in the oven interior with a non-scratch / non-abrasive cleaning sponge (obtainable from large distributors).
No steel wool or stainless steel scourers.
- Always keep the door seal, door seal surface and the inside clean. Lack of appliance cleanliness can lead to hazardous situations.
Oven cover with catalytic cleaning aid
at temperatures over 200° C small contaminations and grease marks are deoxidised free of odour and fat.
- do not use scratching or scouring cleaning agents, oven sprays/steel wool
-> these damage the catalytic cleaning aid
- Only open the oven for a short time -> this supports the catalytic cleaning aid
- do not use textile cloths, the shedding gets caught on the rough surfaces!
(raised porous surface)
Control panel + oven door
Alulook outside surfaces:Outside surfaces chromium steel smoothed:
- no aggressive/acidic or glass-ceramics cleaning agent
- no steel wool / pot cleaner
Cleaning movements
No rotating movements
when cleaning, as surfaces
will be damaged!
TIP: Clean with a soft, clean, moist micro-fibre cloth!
- Hinge brackets must always bear firmly on the hinges from the door to the oven!
- Clean inside panel with hot detergent lye
- Soak heavy contamination
- Keep rubber seals clean and do not damage!
Glass interior has a heat-reflective protective layer Do not scratch with a knife, scraper or scotch brite etc!
- If necessary a commercially available
chromium steel cleaner can be used
-> Observe manufacturer’s instructions
in using these cleaning agents!
Fan cooking, Grill
OPERATING INSTRUCTIONS
Buttons-signal
+
Switching on/off
Switching off
Accessories (standard equipment)
Pastry grid Baking/Roast/Grill
Subject to technical modifications
(chromium steel)
Press simultaneously for about 2
seconds until the signal is audible
Meat fat filter
Press the same button again for
about 2 seconds in order to switch on
the signal again!
Optional accessories
Use the enclosed order form to order extra equipment
Glass baking tray
GBS 426
Pastry/baked goods
professional plate
Drying/Baking (non-stick)
PB 426 S
Remove slide rails
First of all pull the baking
tray guide away from the
oven wall at the front.
Clean accessory
Clean with hot detergent lye
(not suitable for dishwashers)
Unhook baking tray
guide at the back.
Remove by pulling
towards you.
Re-inserting:
Important! The rounded-off ends of the guide
bars must point to the front!
To re-insert the baking tray guides, first hook
on again at the back and then insert at the front
and press in.
Wash with a soft brush in hot detergent
lye or in the dishwasher
The documentation for the compact oven is 3-part: Instructions for use, baking / roasting chart
and supplementary technical sheet. The safety instructions in the supplementary technical sheet
are an integral part of this documentation.
Do not operate the appliance until you have read all documents and safety instructions.
In order to guarantee that you have taken note of the content of these instructions, we request
that you send the complete warranty card to Customer Service in Mägenwil. Please hand
these instructions to anyone who may use this appliance.
11/2005
 Loading...