

Page 1
EA150.book Seite 1 Freitag, 5. Dezember 2003 10:47 10
EA 150
Espressoautomat
Automatic Espresso Machine
Cafetière automatique expresso
Máquina de espresso
Máquina de Café Expresso Automática
Automatisk espresso maskin
Espressoautomaatti
Автоматическая кофеварка эспрессо
Automat na espreso
Ekspres ciœnieniowy
Automata presszókávéfõzõ-gép
Gebrauchsanweisung
Operating Instructions
Notice d’utilisation
Instrucciones de uso
Manual de Instruções
Bruksanvisning
Käyttöohje
Инструкция по эксплуатации
Návod k použití
Instrukcja obs³ugi
Használati utasítás
Page 2
EA150.book Seite 2 Freitag, 5. Dezember 2003 10:47 10
Page 3
3
4
3
4
EA150.book Seite 2 Freitag, 5. Dezember 2003 10:47 10
2
1
2
2
Page 4
5
6
7
EA150.book Seite 3 Freitag, 5. Dezember 2003 10:47 10
5
14
8
11
3
12
9
15
4
10
13
16
3
Page 5

EA150.book Seite 10 Freitag, 5. Dezember 2003 10:47 10
g
Dear Customer,
g
Please read this instruction manual
carefully. Please pay particular
attention to the safety instructions.
Retain it for future reference.
Give the instruction manual to any
future owner of the machine.
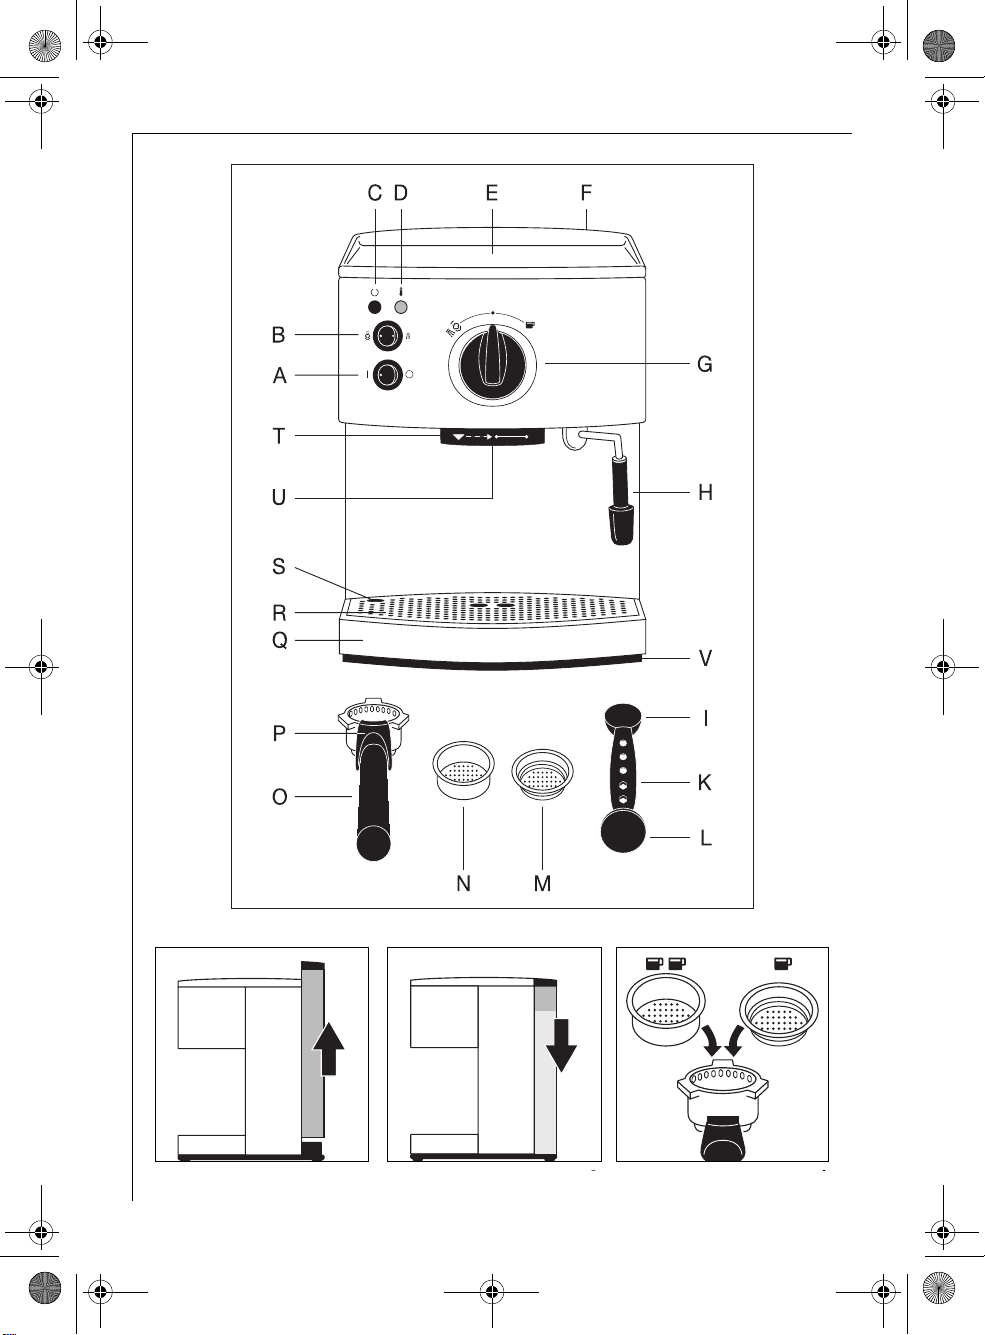
Equipment (Figure 1)
A On/off switch
B Water/steam selection switch
C Power indicator light
D Temperature indicator
E Cup storage area
F Water tank (at the rear)
G Selector dial for coffee, steam
and hot water
H Steam nozzle (with attachment)
I Measuring spoon
K Maintenance tool
L Ground coffee presser
M 1-cup filter
N 2-cup filter
O Filter holder
P Finger protector
Q Drip catcher
R Drip grating
S Fill level indicator
T Brew head with filter holder retainer
U Filter in brew head (inside)
V Rating plate
1 Safety instructions
Safety when setting up the
appliance
• The appliance must be stable when
standing. Check that the site at which
the appliance is to be installed is even
and level.
• The appliance may only be connected
to a mains supply which has a voltage,
electricity type and frequency that
complies with the specifications on the
rating plate (see underside of the
appliance).
Safety when operating the
appliance
• Never bring the electrical cord in
contact with hot components of the
appliance.
• Never remove the power plug from the
power point by pulling on the cord.
• Do not use the appliance if:
– the cord is damaged or
– there is visible damage to the
housing.
• The steam nozzle, filter, filter holder
and retainer necessarily become hot
during use.
• Ensure that children are kept away.
• The metal housing will necessarily
become warm during use.
• Do not remove the filter holder during
the brewing process as the appliance is
pressurised. The risk of burns exists.
• Fill the water tank only with cold
water, never with milk or other liquids.
• Do not use the appliance if the water
tank has not been filled.
• Do not use the appliance without the
drip tray or the drip grating.
Safety during cleaning
• Prior to maintenance or cleaning
ensure that the appliance has been
switched off and that the power plug
has been disconnected.
• Follow the instructions referring to
decalcification.
• Do not immerse the appliance in water.
10
Page 6

EA150.book Seite 11 Freitag, 5. Dezember 2003 10:47 10
g
Safety during repairs
In the event that the appliance needs
to be repaired, including changing the
electrical cord, send the appliance to
the dealer (as the use of special tools is
required) from which the appliance
was purchased, or to any AEG
Customer Service centre (see the last
page for addresses).
Repairs to electrical appliances may
only be carried out by qualified service
engineers. Improper repairs can give
rise to significant hazards for the user.
If the appliance is used for purposes
other than those for what it was
intended or is operated wrongly, no
liability for possible damages can be
accepted.
This appliance conforms with the
;
following EU Directives:
• 73/23/EEC dated 19.02.1973 “Low
Voltage Directive”, including
Modification Directive 93/68/EEC
• 89/336/EEC dated 03.05.1989 “EMC
Directive”, including Modification
Directive 92/31/EEC
Prior to using the appliance for
the first time
Please read the safety instructions in
order to prevent danger to yourself
and damage to the appliance.
0 Insert the power plug into the power
outlet.
Prior to preparing an espresso for the
first time you should rinse out the
heating system once by filling the tank.
Proceed exactly as described in the
section “Making an espresso” and
“Frothing milk”, but without placing
any ground coffee in the filter. Place a
container that is as large as possible in
the middle of the drip grating
(figure 1/ R) and under the steam
nozzle (figure 1/H).
Making an espresso
After having been brewed, the espresso
should be covered with a dense frothy
layer, the so-called crema.
To achieve an aromatic espresso with
crema, fresh, clear water, the correct
size grounds and the water
temperature are important.
1. Adding water (Figures 2, 3)
0 Pull the water tank upwards and out of
the appliance (figure 2).
0 Open the tank lid.
0 Fill the water tank with cold, clear
water only.
Ensure that the water line does not lie
below the MIN (minimum) line or
above the MAX (maximum) line.
0 Close the tank lid.
0 Replace the water tank and press it
downwards so that it is sitting firmly in
the appliance (figure 3).
You can also lift the tank lid and fold it
3
to the side. This enables you to fill the
water tank directly when it is in the
appliance, e.g. with a jug.
2. Switching on the appliance /
preheating cups
0 Switch the appliance on using the on/
off switch (figure 1/A). The power
indicator (figure 1/ C, red) and the
temperature indicator (figure 1/ D,
orange) will illuminate.
As soon as the operating temperature
has been attained, the temperature
indicator will go out. The temperature
indicator may illuminate again while
the appliance is being used to indicate
that the appliance is re-heating.
You can place one or more cups with
the opening facing downwards on the
cup storage area (figure 1/E).
3. Adding espresso grounds
(figures 4, 5)
0 Take the filter holder, fold back the
finger protector and place the 1-cup
11
Page 7

EA150.book Seite 12 Freitag, 5. Dezember 2003 10:47 10
g
filter or the 2-cup filter into the filter
holder (figure 4).
0 Fill the filter with espresso grounds.
Use:
1 full measuring spoon for the 1-cup
filter, 2 full measuring spoons for the
2-cup filter.
0 Lightly press the espresso grounds into
the filter (figure 5) using the ground
coffee presser (figure 1/L). Ensure that
after pressing the coffee, the filter is
still filled to the rim with espresso
grounds. Clean any espresso grounds
away from the rim of the filter.
Do not press the espresso grounds too
3
firmly into the filter. In such an event
the flow of water through the coffee
can decrease significantly. (See also
“What to do if…”)
If you grind espresso grounds yourself,
3
choose the “middle” fineness level.
4. Screwing on the filter holder
(Figures 6, 7)
0 Position the filter holder in the filter
retainer such that the handle of the
filter holder is located below the left
white triangle (figure 6,“1“).
0 Twist the filter holder to the right as
far as it will go (figure 6,“2“), so that
the handle is pointing forwards and is
located beneath the white line
between the two points (figure 7,“3“).
5. Placing cup(s) underneath
(Figure 8)
0 Place one or two cups under the
openings in the filter holder (figure 8).
6. Brewing an espresso
0 Switch the water/steam selection
switch (figure 1/ B) to the symbol .
0 When the appliance has attained its
operating temperature, turn the
selector dial (figure 1/G) to the
symbol . The water will now be
forced through the espresso grounds
under high pressure.
0 When the desired amount of espresso
has been brewed, turn the selector dial
left again to the “•” position.
Please note that when making an
3
espresso the water-steam selection
switch (figure 1/B) is always at the
position. If the espresso is brewed at
the position, the taste of the coffee
can be adversely affected due to the
higher brewing temperature.
Each time after making an espresso or
after using steam/hot water when the
selector dial is turned to the “•”
position, any remaining water is
directed to the drip tray. Each
additional cup is brewed using fresh
water. This is how to obtain the total
enjoyment out of espresso. This is why
the drip tray must be emptied
regularly.
7. Removing the drip tray
(Figure 9)
0 Twist the filter holder to the left and
out of the retainer.
0 Fold the finger protector forwards and
hold it down. Tap the used espresso
grounds out of the filter holder and
out of the filter (figure 9).
0 Rinse the filter holder and the filter
with warm water. Do not clean the
filter holder in the dishwasher!
If the appliance is not going to be used
3
for a longer period of time, do not
screw the filter holder back in. This will
increase the life of the seal located on
the brew head.
Creating steam/frothing milk
(Figures 10, 11)
The hot steam can be used to froth
milk for a cappuccino or to heat
liquids.
1. Switch on the appliance.
0 Place the attachment provided onto
the steam nozzle (figure 10).
12
Page 8

EA150.book Seite 13 Freitag, 5. Dezember 2003 10:47 10
g
0 Switch on the appliance using the on/
off switch (figure 1/A). Wait until the
appliance has attained its operating
temperature and the orange
temperature indicator has gone out
(figure 1/D).
0 Switch the water/ steam selection
switch (figure 1/B) to the symbol .
2. Creating steam/frothing milk
0 Pour some milk or other liquid to be
heated into a heat-proof container.
0 Immerse the steam nozzle into the milk
or liquid to be heated (figure 11).
0 Turn the selector dial (figure 1/G) to
the left onto the symbol. The
appliance will now begin to create
steam. At the beginning some drops of
water may drip out of the nozzle as
well.
Important: So as not to prevent the
steam from exiting, the steam nozzle
must not touch the base of the
container.
0 Stop steam from being emitted by
turning the selector dial (figure 1/G)
back to the right into the “•” position.
0 Place the steamed liquid to one side
and turn the steam selection switch
back to the symbol for a couple of
seconds. This will remove any milk
residue or residue from other liquids
out of the nozzle. Caution: The steam
is hot.
To achieve a fine, creamy milk froth it
3
is best to use cool low-fat milk.
Making a cappuccino
Fill a large coffee cup from ½ to ¾ full
of espresso. Pour the frothed milk over
the top. Sprinkle a little cocoa over the
milk froth.
3. Heating water
0 Turn the water/steam selection switch
(figure 1/ B) to the position.
0 Place a container under the steam
nozzle (figure 1/H).
0 Turn the selector dial for coffee, steam
and hot water (figure 1/G) to the
position. Hot water will be emitted
from the steam nozzle.
0 After the desired amount of hot water
has been obtained, turn the selector
dial for coffee, steam and hot water
(figure 1/G) to the “•” position.
Cleaning and care
Daily care
We recommend that, each day prior to
the first and after the last espresso, you
rinse out the system for approx. 10
seconds without espresso grounds in
order to prevent particles coffee from
becoming lodged in the appliance.
Proceed as for making an espresso, but
without using espresso grounds.
0 Afterwards, turn the selector dial
(figure 1/ G) briefly to the position.
0 Pour any remaining water out of the
water tank.
Cleaning (figures 12, 13)
Prior to cleaning the appliance, switch
1
it off and disconnect the power plug.
Do not clean any part of the
appliance in the dishwasher.
0 Wipe all the appliance’s surfaces using
a damp cloth. Do not use harsh or
scratching cleaning agent.
0 Rinse out the water tank at least once
a week in normal rinse water.
0 Clean the 1-cup filter and the 2-cup
filter from time to time using a brush.
Steam nozzle
0 Remove the attachment from the
steam nozzle and rinse the attachment
in normal rinse water.
0 Wipe the steam nozzle clean using a
damp cloth. You can use the
maintenance guide (figure 1/K) to
screw off the nozzle head to clean it or
decalcify it.
Drip grating and drip tray
The drip tray must be emptied when
the level indicator (figure 1/S) is
protruding above the drip grating.
13
Page 9

EA150.book Seite 14 Freitag, 5. Dezember 2003 10:47 10
g
0 Insert your fingers into the holes in the
drip grating. Remove the drip grating
and rinse it under running water
(figure 12).
0 To empty it, hold the drip tray on both
sides and pull it forwards and out of
the appliance (figure 13).
0 Remove the plastic attachment with
the level indicator and rinse both
under running water (figure 14).
0 Place the plastic attachment with the
level indicator back into the drip tray.
0 Push the clean drip tray back into the
appliance and place the drip grating
back in.
Cleaning the brew filter
The brew filter through which the hot
water flows is located on the brew
head. Check from time to time to
ensure that the holes in the brew filter
have not become blocked by coffee
particles.
If the holes have become blocked:
0 Unscrew the brew filter using a coin
(figure 15).
0 Remove the brew filter and seal
(figure 16/1) and remove the brew
filter’s seal (figure 16/2).
0 Clean the brew filter with warm water
and a brush.
0 Rinse the seal with warm rinse water.
If the appliance is to be transported at
3
temperatures below zero:
0 Empty the water tank.
0 Turn the selector dial (figure 1/G) to
the position and let the appliance
dry.
Decalcifying
If the espresso is flowing through the
filter at a slower rate than usual, it is
time for the appliance to be
decalcified.
We recommend that you decalcify the
machine once every three months with
liquid decalcifier. If you live in an area
with hard water the decalcifying
procedure may have to be carried out
14
more often. When doing this follow
the instructions provided by the
manufacturer of the decalcifier.
Important: Prior to decalcifying,
remove the brew filter (figure 1/U) and
the brew filter’s seal, as described in
the section “Cleaning the brew filter”
(figures 15, 16).
First pour the water into the water
tank, then add the decalcifier; never in
the reverse order. At least 0.5 litres of
water must be used. The decalcifier
should be added accordingly.
0 Remove the power plug from the
power point and allow the appliance to
cool.
0 Remove the steam nozzle with the
attachment (figure 1/H).
0 Place the filter holder in position
without the filter.
0 Place a sufficiently large container
under the filter holder.
0 Insert the power plug into the power
point and switch on the appliance.
0 Afterwards, turn the selector dial
(figure 1/ G) to the position and let
approx. ¼ of the decalcifier flow
through the system.
0 Then switch off the appliance and
allow the decalcifying solution to act
for approx. 10 minutes.
Repeat this procedure with an
additional ¼ of the decalcifying
solution.
0 Turn the selector dial (figure 1/G) to
the position. Allow the remaining
decalcifying solution to flow over the
nozzle and act for another 10 minutes.
0 Then thoroughly clean the water tank.
0 Fill the water tank with fresh water
and allow half to flow over the brew
head and the other half to flow over
the nozzle.
Repeat the procedure if there is a lot of
limescale.
0 After decalcifying the appliance,
replace the brew filter and seal.
Page 10

EA150.book Seite 15 Freitag, 5. Dezember 2003 10:47 10
g
What to do if…
• the espresso temperature is too low:
– Carry out the brewing procedure
without using espresso grounds, but
using the filter and filter holder, in
order to preheat the system.
–Preheat the cups.
– Decalcify the appliance.
• the flow speed decreases noticeably:
– Do not press the espresso grounds
too firmly into the filter.
– Do not grind the espresso grounds
too finely (“medium” fineness).
– Decalcify the appliance.
• the espresso is flowing out of the side
of the filter holder:
– Ensure that the filter holder has
been placed in the retainer correctly.
– Twist the filter holder a little more
firmly into the retainer.
– Clean any espresso grounds away
from the rim of the filter holder.
• no espresso is coming out:
– Ensure that the water tank has been
filled and is correctly in place.
– Ensure that the filter holder has
been placed in the retainer correctly.
– Ensure that the water/steam
selection switch (figure 1/B) is in the
position and the selector dial for
water, steam and hot water
(figure 1 /G) has been turned right to
the position.
– Do not press the espresso grounds
too firmly into the filter.
– Clean the brew filter.
– Decalcify the appliance.
• the crema is no longer being produced
as it should:
– Ensure that there are enough
espresso grounds in the filter.
– Always use fresh espresso grounds.
– Press the espresso grounds lightly.
• too little milk froth is created when
steaming milk:
– Always use cool, fresh and low-fat
milk.
– Clean the steam nozzle.
• the flow increases:
– the espresso grounds have been
ground too rough:
– Ensure that there are enough
espresso grounds in the filter.
• the coffee machine switches itself off
while operating:
The appliance pump is equipped with a
temperature fuse that protects it from
overheating. The temperature fuse
interrupts the machine’s operation, if
the machine is operated for too long or
if the pump is run without water.
– Set the on / off switch to “off” and
remove the plug from the mains
socket.
– Leave the machine to cool for at
least 20 minutes. Fill up with water.
– Plug the appliance into the mains
again and switch it on. If the
appliance still does not work, please
contact our Customer Care
Department.
Technical data
• Input supply voltage: 230 v, 50 Hz
• Power consumption: 1000 W
(See rating plate on the underside of
the appliance.)
2 Disposal
Packaging material
• Place the packaging cardboard in
the waste paper collection.
• The plastic bag made of
polyethylene (PE) and the CFC-free
foam parts can be deposited at a
collection point or a recycling
centre.
15
Page 11

EA150.book Seite 8 Freitag, 5. Dezember 2003 10:47 10
Garantiebedingungen
AEG Kundenservice in Deutschland
AEG Kundenservice in Europa
In Deutschland stehen wir Ihnen für Fragen,
Anregungen oder bei Problemen rund um unsere
Kleingeräte und Raumpflegegeräte
montags bis freitags von 8 bis 18 Uhr
zur Verfügung.
AEG-Serviceline: 01805-30 60 80
(Deutsche Telekom 0,12 Euro/Min.)
Fax: 0911-323-49 1930
E-Mail:
service.kleingeraete@aeg-hausgeraete.de
Sollte dieses AEG Gerät wider Erwarten nicht
funktionieren, erfolgt in unserer Zentralwerkstatt
eine kompetente und fachkundige Instandsetzung.
AEG Kleingeräte-Zentralwerkstatt
Firma Trepesch GmbH
Steinstraße 21
90419 Nürnberg
Der Endabnehmer dieses Geräts (Verbraucher) hat bei einem
Kauf dieses Geräts von einem Unternehmer (Händler) in
Deutschland im Rahmen der Vorschriften über den Verbrauchsgüterkauf gesetzliche Rechte, die durch diese Garantie
nicht eingeschränkt werden. Diese Garantie räumt dem Verbraucher also zusätzliche Rechte ein. Dies vorausgeschickt, leisten wir, AEG Hausgeräte GmbH, gegenüber dem Verbraucher
Garantie für dieses Gerät für den Zeitraum von 24 Monaten ab Übergabe zu den folgenden Bedingungen:
1. Mit dieser Garantie haften wir dafür, dass dieses neu hergestellte Gerät im Zeitpunkt der Übergabe vom Händler an
den Verbraucher die in unserer Produktbeschreibung für
dieses Gerät aufgeführten Eigenschaften aufweist. Ein
Mangel liegt nur dann vor, wenn der Wert oder die Gebrauchstauglichkeit dieses Geräts erheblich gemindert ist.
Zeigt sich der Mangel nach Ablauf von sechs (6) Monaten
ab dem Übergabezeitpunkt, so hat der Verbraucher nachzuweisen, dass das Gerät bereits im Übergabezeitpunkt
mangelhaft war. Nicht unter diese Garantie fallen Schäden
oder Mängel aus nicht vorschriftsmäßiger Handhabung sowie Nichtbeachtung der Gebrauchsanweisungen.
2. Dieses Gerät fällt nur dann unter diese Garantie, wenn es
in einem der Mitgliedsstaaten der Europäischen Union gekauft wurde, es bei Auftreten des Mangels in Deutschland
betrieben wird und Garantieleistungen auch in Deutschland erbracht werden können. Mängel müssen uns inner-
In diesen Ländern gelten die Garantiebedingungen der örtlichen
Vertriebsorganisationen. Diese können dort eingesehen werden.
In these countries our AEG sales organisations own guarantee
conditions are applicable. Please obtain further details direct.
Österreich, 4010 Linz, 0732 / 770101 - 30
Belgique/België, 1502 Lembeek, 02/363.04.44
Czech Republic, Hanusova ul., Praha 4, 02/6112 6112
Danmark, 7000 Fredericia, 70 11 74 00
España, Madrid, 1-885-2700
France, 60307 Senlis, 03-44 62 24 24
Great Britain, Service Force 08705 929 929
Hellas, 18346 MOÓXATO, 01/4822646
Island, Reykjavik (Bræóurnir Ormsson hf), 91-3 88 20
Italia, 33080 Porcia (PN), 0434 39 41
Kroatien, 10000 Zagreb, 385 1 6323 333
Luxembourg, 1273 Luxembourg-Hamm, 4 24 31-443
Magyarország, 1142 Budapest, 36-1-252-1773
Nederland, 2400 AC Alphen aan den Rijn, 0172-468 300
Norge, 0516 Oslo, 22 72 58 00
Poland, 02-034 Warszawa, 022 874 33 33
Portugal, 2635-445 Rio de Mouro, (21) 926 75 75
Romania, Bucuresti, B-dul Timisoara 90, 01-444-25-81
Russia, 129090 Moscow, +7 095 956 2917, 937 7893
Slovakia, 81105 Bratislava, 07/4333 9757
Slovenija, Tražaška 132, 1000 Ljubljana, 01 24 25 730
Schweiz/Svizzera, 5506 Mägenwil, 062/889 93 00
Suomi, Porissa, puh. (02) 622 3300
Sverige, 10545 Stockholm, 08-672 53 60
Turkey, Tarlabasi cad no:35 Taksim/Istanbul-0, 262-7249420
halb von zwei (2) Monaten nach dessen Kenntnis angezeigt
werden.
3. Mängel dieses Geräts werden wir innerhalb angemessener
Frist nach Mitteilung des Mangels unentgeltlich beseitigen; die zu diesem Zweck erforderlichen Aufwendungen,
insbesondere Arbeits- und Materialkosten werden von uns
getragen. Über diese Nachbesserung hinausgehende Ansprüche werden durch diese Garantie dem Verbraucher
nicht eingeräumt.
4. Im Garantiefall ist das Gerät vom Verbraucher an die für
seinen Wohnort zuständige AEG-Zentralwerkstatt zu versenden, wobei das Gerät gut zu verpacken ist und die vollständige Anschrift des Verbrauchers zusammen mit einer
kurzen Fehlerbeschreibung in das Paket zu legen ist. Zum
Nachweis des Garantie-Anspruchs ist der Sendung der Original-Kaufbeleg (Kassenzettel, Rechnung) beizufügen.
5. Garantieleistungen bewirken weder eine Verlängerung
noch einen Neubeginn der Garantiezeit für dieses Gerät;
ausgewechselte Teile gehen in unser Eigentum über.
6. Mängelansprüche aus dieser Garantie verjähren in zwei (2)
Jahren ab dem Zeitpunkt der Übergabe des Geräts vom
Händler an den Verbraucher, der durch den Original-Kaufbeleg (Kassenzettel, Rechnung) zu belegen ist; wenn dieses
Gerät gewerblich genutzt wird, beträgt die Verjährungsfrist sechs (6) Monate.
AEG Hausgeräte GmbH, D-90429 Nürnberg, Muggenhofer Straße 135 Änderungen vorbehalten
Page 12

EA150.book Seite 80 Freitag, 5. Dezember 2003 10:47 10
AEG Hausgeräte GmbH
Postfach 1036
D-90327 Nürnberg
http://www.aeg.hausgeraete.de
© Copyright by AEG
822 949 255 - 0603
Änderungen vorbehalten
Subject to change without notice
Sous réserve de modifications
Salvo modificaciones
Sujeito a alterações sem aviso prévio
Med reservation för ändringar
Oikeus muutoksiin pidätetään
Право на изменения сохраняется
Zmìny vyhrazeny
Mo¿e ulec zmianie bez powiadomienia
A változtatások jogát fenntartjuk
 Loading...