

Page 1

EA 1000
Espressoautomat
Automatic Espresso Machine
Macchina per caffé espresso
Machine à espresso
Espressokeitin
Gebrauchsanweisung
Operating Instructions
Istruzioni per l’uso
Mode d’emploi
Käyttöohje
Page 2
1
B
A
Q
C
D
P
F
H
2
O
M
K
L
N
J
G
Page 3

5
3
4
2
5
8
D
B
C
A
3
11
12
6
9
4
10
13
3
7
Page 4
17
18
B
A
14
18
8
9
15
10
10
16
4
17
17
D
A
B
C
18
19
172120
18
Page 5

g
Dear customer,
g
Please read these operating instructions carefully. Above all please
observe the safety instructions on the
initial pages of these operating instructions! Please keep the operating instructions for later reference. Pass them on to
any subsequent owner of the appliance.
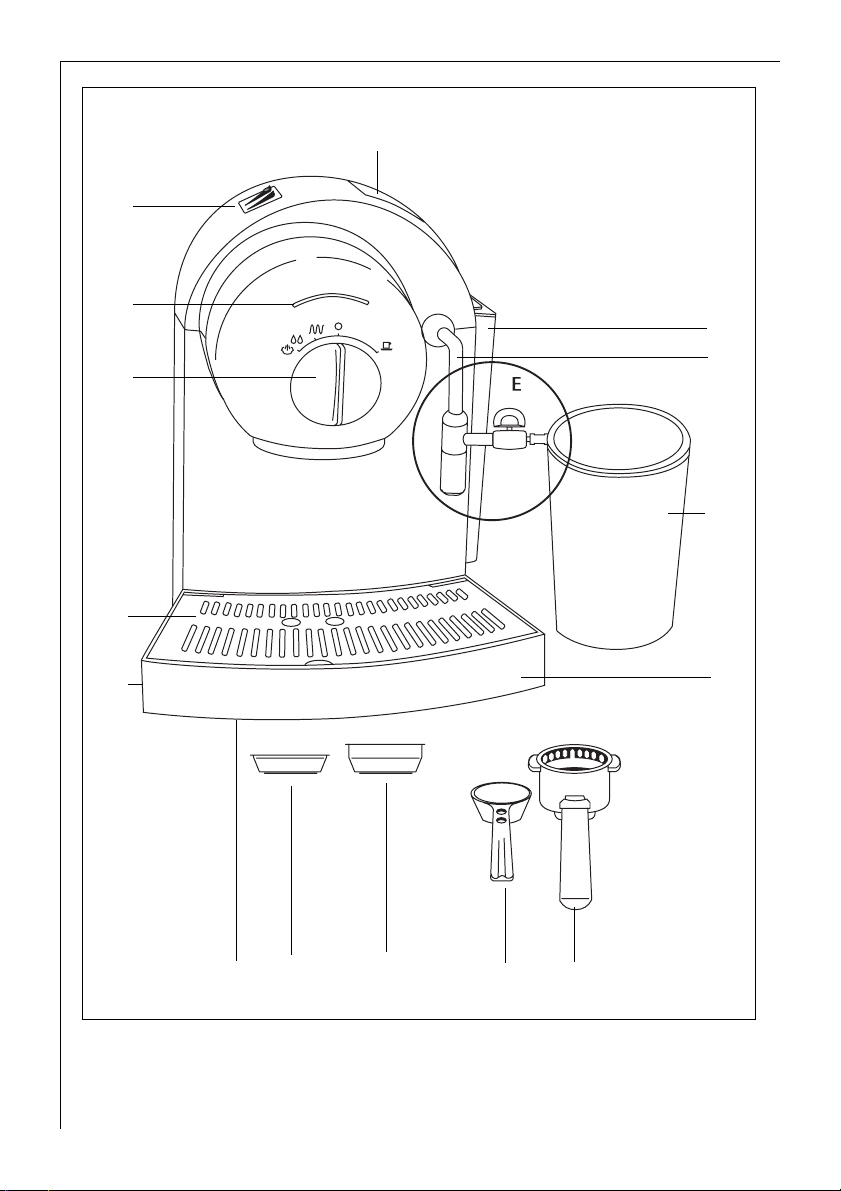
Features (Figure 1)
A Operating features
B Water tank lid
C Water tank (removable)
D Nozzle for steam and hot water
E Frothed milk spout
F Receptacle with lid and feed pipe
G Drip tray (removable)
H Drip grid (removable)
J Filter holder with finger guard
K 1 cup crema-plus filter
L 2 cup crema-plus filter
M Rating plate (on the underside of the
appliance)
N Measuring spoon
O Cord compartment (on the underside
of the appliance)
P Selector dial for steam, hot water and
espresso
Q Temperature indicator (orange)
Operating Features (Figure 2)
A On/off switch with indicator (red)
B Switch for hot water or
steam mode
Frothed Milk Spout
(Figures 3 and 14)
A Knob for regulating the froth
B Suction piece
C Milk discharge outlet
D Connector
E Flexible hose
1 Safety Instructions
• The operating voltage and mains voltage must match! (See rating plate on
the underside of the espresso machine.)
• Never allow the mains lead to come
into contact with hot parts!
• Never pull the plug from the socket by
means of the mains lead!
• Do not use the appliance if:
– the mains lead is damaged,
– the casing shows signs of damage
• Brew head, filter holder, filter, swing
nozzle and milk discharge outlet
become hot during use.
• Keep children away!
• Follow the instructions on descaling!
• Prior to carrying out maintenance or
cleaning, ensure that the appliance is
switched off and unplugged from the
mains!
• Do not submerge the appliance in
water!
• Do not operate the appliance if there is
no water in the fresh water container!
• Only fill the water tank with cold water
- never with milk or other liquids!
• Do not remove the filter holder during
the brewing procedure! Risk of burn-
ing!
• Do not operate the appliance without
the drip tray and drip grid!
• If it is necessary to repair the appliance
or to replace the mains cord, send the
appliance either to the specialist dealer
you bought it from (specialist tools
must be used for repairs), or to your
nearest AEG customer service centre
(see back page). Electrical appliances
may only be repaired by trained technicians. Improper repairs can give
rise to significant hazards for the
user. If the appliance is used for purposes other than those intended or
used incorrectly, no liability can be
accepted for any damage that may
be caused.
12
Page 6

g
Technical Data
Power consumption: 1365 W
Mains voltage: 220 - 240 V
This appliance complies with the fol-
;
lowing EC directives:
– 73/23/EEC dated 19.02.1973 “Low
Voltage Directive”, including
Amending Directive 93/68/EEC
– 89/336/EEC dated 03.05.1989 “EMC
Directive”, including Amending
Directive 92/31/EEC
Cord Compartment (Figure 4)
Your espresso machine has a cord compartment in the base of the casing for
storing surplus cord.
Water Filter
The espresso machine is fitted with a
water filter. This water filter helps to
remove the majority of such elements
as chlorine from tap water that might
otherwise spoil the flavour. This allows
the full flavour of your espresso to
develop. In addition, the lime content
in the water is greatly reduced when
the water filter is used.
Inserting and changing the water
filter
0 Remove the water filter that comes
with the appliance from its plastic
packaging and rinse it thoroughly
under running water.
0 Raise the lid at the top of the water
tank (Figure 1/B).
0 Insert the water filter into the holder
at the bottom of the water tank and
turn (Figure 5). Ensure that the filter is
fully and correctly in place!
0 Fill the water tank with tap water and
insert.
0 Rinse the filter cartridge with at least
half a tank of water. To do this, proceed as described in the section To
heat water.
The water might become slightly discoloured (not damaging to health).
The tap water is filtered as soon as it is
drawn in by the pump.
Please note that the filter cartridge
must be replaced either after
approx. 500 cups of espresso have
been brewed or after 6 weeks
(whichever is the sooner). The cartridge cannot be cleaned and must
be replaced with a new one.
Important: Regardless of how often
the appliance has been used the water
filter must be changed without fail at
the latest after 2 months in order to
avoid a build-up of bacteria in the filter.
A special revolving disk is located on
3
the lid of the water filter on which the
date of the next filter change can be
set.
You can obtain a replacement water
filter either from a specialist dealer
(E-No. 900 084 951/4) or from your
nearest AEG customer service centre
(ET-No. 900 084 951/4).
Before Using for the First Time
Before making espresso for the first
time you should run a tankful of water
through the machine without using
espresso coffee in order to clean the
heating system. Proceed exactly as
described in the following section “To
prepare espresso” but do not put any
ground coffee in the filter. Place as
large a receptacle as possible in the
middle of the drip grid beneath the
two filter holder outlets and beneath
the steam nozzle (Figure 1/D).
13
Page 7

g
To Prepare Espresso
After brewing, the espresso should be
3
covered with a thick, frothy layer
known as the crema. The most important factors in making a full-flavoured
espresso with crema are fresh water,
the correct size of espresso coffee
grounds and water temperature.
Preparation
Important: Use only cold, clear water
to fill the water tank. Do not use mineral water, distilled water, milk or other
liquids!
We recommend pre-warming the
3
appliance, filter holder and cup before
preparing the first cup of espresso. By
doing this you will always obtain an
evenly heated espresso.
0 Open the water tank lid.
0 Remove the water tank by the handle
and fill it with cold, clear water
(Figure 6).
0 Replace the water tank.
0 Switch the appliance on using the on/
off switch (Figure 2/A). The indicator
(red) is illuminated.
When the temperature indicator (Figure 1/Q) is illuminated the espresso
machine is ready for use.
Filling with espresso coffee
(Figure 8)
0 Depending on whether you want to
brew one or two cups of espresso,
insert the 1 cup crema-plus filter (Figure 1/K) or the 2 cup crema-plus filter
(Figure 1/L) into the filter holder.
Important: Do not put in any espresso
coffee when using the appliance for
the first time!
0 Use the measuring spoon (Figure 1/N)
to measure the espresso coffee into the
filter and level off.
0 Clean any excess coffee from the rim
of the filter holder.
Inserting the filter holder
0 Turn the filter holder to the right in the
retaining ring until it locks audibly into
place (Figure 9).
Check that the arrow on the finger
guard on the filter holder is pointing
to the brew head.
Brewing espresso
0 Place one or two cups beneath the fil-
ter holder discharge outlet (Figure 10).
0 Turn the selector dial (Figure 1/P)
clockwise to the “espresso preparation” position (Figure 11/A).
0 When the required quantity of espresso
has been brewed, turn the selector dial
anti-clockwise back to the 0 position
(Figure 11/B).
Important: To give you a fully satisfying espresso, each time you turn the
selector dial back to the 0 position
after preparing an espresso or using
the steam/hot water mode any remaining water is fed into the drip tray. This
guarantees that each cup of espresso is
prepared with fresh water. The drip tray
should, therefore, be emptied regularly.
Removing the filter holder
(Figure 12)
0 Turn the filter holder to the left and
remove from the retaining ring.
If you are not going to use the appli-
3
ance for a lengthy period, do not refit
the filter holder. In this way you extend
the lifetime of the seal on the brew filter.
Cleaning the filter and filter
holder
The filter and filter holder should be
cleaned after each use.
0 Push the finger guard on the filter
holder forwards with your thumb.
0 Tap the used espresso grounds out of
the filter holder and filter (Figure 13).
Take care to keep pressing the finger
guard with your thumb as otherwise
the filter will fall out.
14
Page 8

g
0 Remove the filter from the filter
holder.
0 Clean the filter thoroughly with warm
water. Make certain that there are no
espresso coffee grounds remaining in
the small holes in the filter.
0 Rinse the filter holder in warm water.
Information: Do not clean the filter
holder in a dishwasher.
To Froth or Heat up Milk
You can make cappuccino, café au lait
and cocoa, or even just heat up water
or milk (for example as a drink with
honey against colds) using the frothed
milk spout (Figure 3/A, B, C, D).
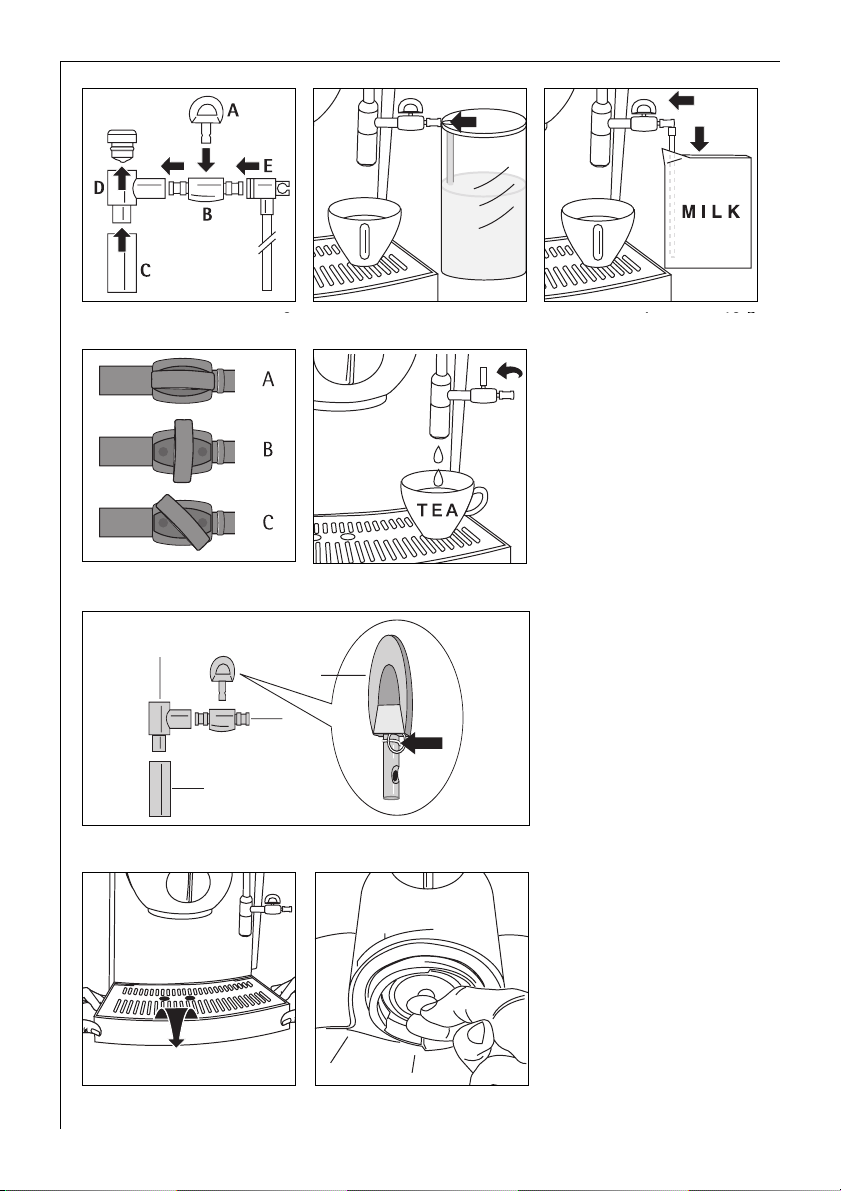
Assembling and attaching the
frothed milk spout
(Figures 14, 15 and 16)
0 Insert the knob for regulating the froth
(Figure 14/A) into the suction piece
(Figure 14/B) and press firmly into
place.
0 Insert the suction piece (Figure 14/B)
into the connector (Figure 14/D), and
connect the milk discharge outlet
(Figure 14/C) to the connector
(Figure 14/D).
0 Firmly push the complete frothed milk
spout onto the nozzle (Figure 1/D) until
the red seal is no longer visible and
attach the receptacle (Figure 15).
Information: You can also suck up the
milk directly from the carton using the
flexible hose (Figures 14/E and 16).
Check that the milk carton does not
exceed the height of the frothed milk
spout. The flexible hose must be
inserted down into the milk carton.
0 To do this, attach the hose to the
frothed milk spout and insert the other
end into the milk carton.
0 Place a cup under the steam nozzle
(Figure 1/D).
0 Position the switch (Figure 2/B) to
“steam mode” .
0 Turn the selector dial (Figure 1/P) to
the warm up position (Figure 11/C).
When the temperature indicator (Fig-
ure 1/Q) is illuminated the espresso
machine is ready for use.
0 Turn the selector dial (Figure 1/P) to
the steam or hot water position
(Figure 11/D).
The milk will be sucked out of the
receptacle. It is then mixed with steam
in the frothed milk spout, and at the
same time heated and frothed up. The
frothed-up milk flows through the milk
discharge outlet into the waiting cup.
Important: Using the knob for regulating the froth (Figure 3/A) you can set
the amount of froth (more or less
added air) and the temperature of the
milk to your taste (Figure 17/A, B, C). To
do this turn the knob slowly to the
right or to the left until you achieve
the desired result.
Figure 17/A: maximum froth/
warm milk
Figure 17/B: no froth
Figure 17/C: less froth/hot milk
0 After making the frothed milk, turn the
selector dial (Figure 1/P) back to the
0 position.
Important! After each frothing procedure it is essential that the frothed
milk spout is cleaned thoroughly as
described in the section, Cleaning,
Cleaning the frothed milk spout
(Figure 19).
Preparing cappuccino
For one serving of cappuccino, half or
two thirds fill a large cup with espresso
and then add the frothed milk.
Preparing cocoa
0 Put cocoa powder into the receptacle
(Figure 1/F) together with the milk.
0 Attach the receptacle to the frothed
milk spout (Figure 1/E).
0 Now proceed as for frothing milk.
15
Page 9

g
Heating water
Important: When heating water the
suction piece (Figure 3/B) must always
be fitted and the knob for regulating
the foam (Figure 3/A) must always be
closed (Figure 18). Otherwise hot water
could spray out of the side of the connector (Figure (3/D).
0 Turn the switch (Figure 2/B) to the “hot
water” position .
0 Place a container beneath the steam
nozzle (Figure 1/D).
0 Turn the selector dial (Figure 1/P)
to the “hot water” position
(Figure 11/D). Hot water will emerge
from the steam nozzle.
0 Once the required quantity of hot
water has been produced, turn the
selector dial (Figure 1/P) back to the
0 position (Figure 11/B).
Cleaning
Always unplug the appliance from the
mains and allow the espresso machine
to cool down before cleaning.
Clean the appliance casing with a
damp cloth, but never immerse it in
water!
Cleaning the filter and filter
holder
Proceed as described in the section To
prepare espresso, Cleaning the filter
and filter holder.
Cleaning the fresh water container
0 Dispose of any water remaining in the
fresh water container and clean it if
necessary in ordinary washing-up
water.
Cleaning the frothed milk spout
(Figure 19)
Important: Clean all parts that have
come into contact with milk (frothed
milk spout, receptacle including lid and
feed pipe, steam nozzle, flexible hose,
drip tray and drip grid) in ordinary
washing-up water immediately after
use!
16
Check that you wash not only the
individual parts of the frothed milk
spout (Figure 19/B, C, D), but particularly the knob for regulating the
froth (Figure 19/A).
During the frothing procedure milk
deposits can form in the crevice on the
knob (Figure 19/A “arrow”). As these
deposits can impair the frothing result,
we recommend that the part indicated
in the figure with an “arrow” should be
cleaned particularly thoroughly. Finally,
rinse the parts with clear water and dry
them.
Do not clean these parts in a dishwasher as this could damage the seals.
Cleaning the drip grid and
drip tray
The drip tray can be removed for
cleaning with the aid of the fingersized cavities on the right and left
sides. Lift the drip tray and pull it forwards and away from the appliance
base (Figure 20). You can wash the drip
tray and drip grid in ordinary washingup water.
Cleaning the brew head and
brew filter
Once it has been used for a while the
brew head should be cleaned with a
damp cloth. If it is particularly soiled,
unscrew the brew filter using a coin
(Figure 21) and clean it under running
water.
To Descale – and Keep your
Espresso Machine in Good
Condition for Longer
The service life of your espresso
machine can be lengthened with regular descaling. As a precaution we recommend descaling every three months.
For areas with hard water more frequent descaling is required. If the
water filter is used the appliance needs
to be descaled less often.
For descaling use a liquid, environmentally-friendly descaling agent availa-
Page 10

g
ble generally at retail outlets. Only use
it in accordance with the manufacturer's instructions. Do not use a formic acid based descaler.
0 Unplug the appliance from the mains
and allow it to cool.
It is important that you also remove
the brew filter on the brew head
(Figure 21). Unscrew the steam nozzle (Figure 1/D) and remove the
water filter from the water tank!
0 Insert the filter holder without the fil-
ter.
0 Place a sufficiently large container
under the filter holder.
Important: First fill the water tank
with 0.5 l of water, then add the
appropriate amount of descaling agent
as recommended by the manufacturer.
Never do this the other way round!
0 Insert the plug in the socket and switch
the appliance on using the on/off
switch (Figure 2/A).
0 Turn the selector dial (Figure 1/P) to
the “espresso preparation” position
(Figure 11/A) and allow approx. a quarter of the descaling solution to run
through the system.
0 Switch off the appliance using the on/
off switch and allow the descaling
solution to take effect for approx.
10 minutes.
0 Repeat the procedure, allowing a fur-
ther quarter of the solution to run
through the system.
Descaling the nozzle
0 Place a sufficiently large container
under the nozzle.
0 Turn the switch (2/B) to the “hot
water” position .
0 Turn the selector dial (Figure 1/P)
to the “steam” or “hot water” position
and allow a further quarter of
the descaling solution to flow through
the system.
0 Switch off the appliance using the on/
off switch and allow the descaling
solution to take effect for approx.
10 minutes.
0 Repeat the procedure, allowing a fur-
ther quarter of the solution to run
through the system.
The water tank must be completely
cleaned of all traces of descaling solution.
0 Fill the water tank with fresh water.
0 Pump half of the water through the
filter holder as described above, and
allow the other half to run through the
steam nozzle.
0 Replace the brew filter and the water
filter.
0 Replace the nozzle.
Repeat the descaling procedure if there
is heavy scaling.
What to do if ...
... the temperature of the espresso is
too low?
• Before actually preparing the espresso
carry out a brewing procedure without
espresso coffee but with the filter and
filter holder in place to pre-warm
them.
• Pre-warm the cups with hot water.
• Descale the appliance.
... the rate of flow is conspicuously
reduced?
• Do not tamp down the espresso
grounds too firmly in the filter.
• Descale the appliance.
• If the espresso coffee is ground too
finely the crema-plus filter can clog.
Clean the fine holes thoroughly under
running water.
... no espresso is produced?
• Check that the fresh water container
has been filled and correctly inserted.
• Check that the filter holder has been
correctly inserted.
• Check that the selector dial (Figure 1/P)
has been set to “espresso preparation”
(Figure 11/A).
• Possibly the espresso coffee has been
ground too finely.
• Clean the brew filter.
• Descale the appliance.
17
Page 11

g
... the quality of the crema froth is
deteriorating?
• Always use espresso coffee.
• Check that there is sufficient espresso
coffee in the filter.
• Tamp down the espresso coffee gently.
... the rate of flow increases sharply?
• The espresso coffee has been ground
too coarsely.
• Check that there is sufficient espresso
coffee in the filter.
... the espresso runs out of the side
of the filter holder?
• Check that the filter holder has been
correctly inserted.
• Clean any excess coffee from the rim
of the filter holder.
• Clean the seal and check for any damage.
... there is too little froth produced
when frothing the milk?
• Always use cool, fresh (low fat!) milk.
• Use a suitable container (e.g., a jug).
• Clean the frothing nozzle and knob for
regulating the froth.
2 Protecting the Environment
Do not simply throw packaging material away.
• The cardboard box can be deposited in
the old paper collection or the relevant
refuse collection system.
• Deposit plastic bags made from polyethylene (PE) at a PE collection point
for recycling.
• Foam polystyrene (PS) padding items
are free of CFCs.
Please inquire with your local authority
about your local recycling centre.
Customer Service
Our products are of the highest quality.
Should you nevertheless have ques-
tions concerning the use of this appliance, please write to us. Only with your
support can we be sure to develop
appliances to suit your needs.
18
Page 12

AEG Kundendienst in Deutschland
AEG Kundendienst in Europa
Sollte dieses AEG Gerät wider Erwarten nicht
funktionieren, senden Sie es bitte an
folgende Adresse:
Beginnt die Postleitzahl Ihres Wohnortes
mit 2 - 3 - 4 - 5
AEG Kleingeräte-Zentralwerkstatt
Firma Elektro Stefan Irsen
Sachtlebenstraße 1, 41541 Dormagen
Beginnt die Postleitzahl Ihres Wohnortes
mit 0 - 1 - 6 - 7 - 8 - 9
AEG Kleingeräte-Zentralwerkstatt
Firma Trepesch GmbH
Steinstraße 500, 90419 Nürnberg
In Deutschland stehen wir Ihnen für Fragen,
Anregungen oder bei Problemen rund um unsere
Kleingeräte und
Raumpflegegeräte montags bis freitags
von 8 bis 18 Uhrzur Verfügung.
AEG Serviceline unter 01805-30 60 80*
Fax: 0911/ 3 23-49 19 30
E-Mail: service.kleingeraete@aeg-hausgeraete.de
*(Deutsche Telekom 0,12 Euro/min.)
Garantiebedingungen
Der Endabnehmer dieses Geräts (Verbraucher) hat bei einem
Kauf dieses Geräts von einem Unternehmer (Händler) in
Deutschland im Rahmen der Vorschriften über den Verbrauchsgüterkauf gesetzliche Rechte, die durch diese Garantie
nicht eingeschränkt werden. Diese Garantie räumt dem Verbraucher also zusätzliche Rechte ein. Dies vorausgeschickt, leisten wir, AEG Hausgeräte GmbH, gegenüber dem Verbraucher
Garantie für dieses Gerät für den Zeitraum von 24 Monaten ab Übergabe zu den folgenden Bedingungen:
1. Mit dieser Garantie haften wir dafür, dass dieses neu hergestellte Gerät im Zeitpunkt der Übergabe vom Händler an
den Verbraucher die in unserer Produktbeschreibung für
dieses Gerät aufgeführten Eigenschaften aufweist. Ein
Mangel liegt nur dann vor, wenn der Wert oder die
Gebrauchstauglichkeit dieses Geräts erheblich gemindert
ist. Zeigt sich der Mangel nach Ablauf von sechs (6) Monaten ab dem Übergabezeitpunkt, so hat der Verbraucher
nachzuweisen, dass das Gerät bereits im Übergabezeitpunkt mangelhaft war. Nicht unter diese Garantie fallen
Schäden oder Mängel aus nicht vorschriftsmäßiger Handhabung sowie Nichtbeachtung der Gebrauchsanweisungen.
2. Dieses Gerät fällt nur dann unter diese Garantie, wenn es
in einem der Mitgliedsstaaten der Europäischen Union
gekauft wurde, es bei Auftreten des Mangels in Deutschland betrieben wird und Garantieleistungen auch in
In diesen Ländern gelten die Garantiebedingungen der örtlichen
Vertriebsorganisationen. Diese können dort eingesehen werden.
In these countries our AEG sales organisations own guarantee
conditions are applicable. Please obtain further details direct.
Österreich, 4010 Linz, 0732 / 770101 - 30
Belgique/België, 1502 Lembeek, 02/363.04.44
Czech Republic, AEG Domaci spotebice, Praha 4, 1140 00
Danmark, 7000 Fredericia, 70 11 74 00
España, Madrid, 1-885-2700
France, 60307 Senlis, 03-44 62 24 24
Great Britain, Customer Servive 08706 055 055
Hellas, 18346 MOÓXATO, 01/4822646
Island, Reykjavik (Bræóurnir Ormsson hf), 91-3 88 20
Italia, 20394 Agrate Brianza (Milano), 39 / 68 99-8 39
Kroatien, 10000 Zagreb, 385 1 6323 333
Luxembourg, 1273 Luxembourg-Hamm, 4 24 31-433
Magyarország, 1142 Budapest, 36-1-252-773
Nederland, 2400 AC Alphen aan den Rijn, 0172-468 300
Norge, 0516 Oslo, 22 72 58 00
Poland, 02-034 Warszawa, 022 874 33 33
Portugal, 2635-445 Rio de Mouro, (01) 926 75 75
Romania, 713421 Bucaresti, 01-230-8730
Russia, 129090 Moscow, +7 095 956 2917, 937 7893
Slovakia, 81105 Bratislava, 07/4333 9757
Slovenija,
Tražaška 132, 1000 Ljubljana, 01 24 25 730
Schweiz/Svizzera, 5506 Mägenwil, 0848 848 348
Suomi, Porissa, puh. (02) 622 3300
Sverige, 10545 Stockholm, 08-738 60 00
Turkey, Tarlabasi cad no:35 Taksim/Istanbul-0, 262-7249420
Deutschland erbracht werden können. Mängel müssen uns
innerhalb von zwei (2) Monaten nach dessen Kenntnis
angezeigt werden.
3. Mängel dieses Geräts werden wir innerhalb angemessener
Frist nach Mitteilung des Mangels unentgeltlich beseitigen; die zu diesem Zweck erforderlichen Aufwendungen,
insbesondere Arbeits- und Materialkosten werden von uns
getragen. Über diese Nachbesserung hinausgehende
Ansprüche werden durch diese Garantie dem Verbraucher
nicht eingeräumt.
4. Im Garantiefall ist das Gerät vom Verbraucher an die für
seinen Wohnort zuständige AEG-Zentralwerkstatt zu versenden, wobei das Gerät gut zu verpacken ist und die vollständige Anschrift des Verbrauchers zusammen mit einer
kurzen Fehlerbeschreibung in das Paket zu legen ist. Zum
Nachweis des Garantie-Anspruchs ist der Sendung der Original-Kaufbeleg (Kassenzettel, Rechnung) beizufügen.
5. Garantieleistungen bewirken weder eine Verlängerung
noch einen Neubeginn der Garantiezeit für dieses Gerät;
ausgewechselte Teile gehen in unser Eigentum über.
6. Mängelansprüche aus dieser Garantie verjähren in zwei (2)
Jahren ab dem Zeitpunkt der Übergabe des Geräts vom
Händler an den Verbraucher, der durch den Original-Kaufbeleg (Kassenzettel, Rechnung) zu belegen ist; wenn dieses
Gerät gewerblich genutzt wird, beträgt die Verjährungsfrist sechs (6) Monate.
AEG Hausgeräte GmbH, D-90429 Nürnberg, Muggenhofer Straße 135 Änderungen vorbehalten
 Loading...