

Page 1

COMPETENCE 2040 B
Build-in conventional single oven
AEG
Instruction Book
Page 2

Congratulationsi
The Compeience oven should make your cooking and baking
more pleasurable, not simply because of its attractive appear
ance but also because of its intrinsic qualities.
It is economical in terms of energy oonsumption, easy to operate,
and simple to care for.
Read the operating instructions careftjlly before first use and you
will be sure to experience a great deal of satisfaction from using
your oven to cook, bake, roast and grill your food.
Read the instructions prior to using the appliance and keep them for future reference.
Printed on recycled paper.
AEG - putting words into action.
5
Page 3

Contents
Safety instructions
For the installer
For the user
Appliance description
Features
First use
Operating the controls
Pre-cleaning the oven
4
4
5
6
Operating the timer
How to use the oven
General
Grilling
Cleaning and care
Oven
Optional extras
What to do if ...
Service
7/8
9/10
11/12
13-15
16/17
18
19
M
I
Page 4

Safety instructions
For the When installing cooking appliances into kitchen furniture the en-
installer dosed installation instructions must l3e stitctly adhered to.
For the - When you use the oven, the oven doors and cooking
user plates become hot, so please be sure to keep small chil
dren away from the immediate vicinity.
This particuiarly applies when you are grilling.
- Overheated fat and cooking oil may ignite. Prepare foods re
quiring fat or oil (chips) only under constant supervision,
- Do not use the appliance to heat your room.
- Take care when using smail electrical appliances near the
cooker. Connection leads should not come in contact with hot
hobs/cooking zones, or get trapped in the hot oven door.
- Do not line tine oven base with aluminium foil or place any other
cooking utensil on the base, as this will trap heating resulting in
damage to the enamel interior. This would invalidate the war
ranty.
- The vitreous enamel in your oven is very durable. However, vit
reous enamel is adversely affected by fruit acids (rhubard,
lemon, etc.) and tea which will discolour and dull the enamel.
The performance of the oven is not affected. To prevent spill
age of the above coming in contact with the enamel, place the
cooking container on a baking sheet,
- Do not place the grill/meat pan on the cooking plate to
make gravy. The direct heat vwit weaken the pan base result
ing in w^ing and twisting of the pan when next used as a
meat or grill pan.
- Do not use die door as a shelf or resting area for oven
utensils as this may damage the glass and the door
hinges.
- Do not clean the Inside or outside of the glass oven
doors with Ш1У abrasive cleaning agent as this creates
stress on die glass.
- The appliance complies with radio interference suppression
specifications EN 55014 (previously EEC Directive 87/308)
and as appropriate with EN 60555 relating to the Retroactive
Effect of the Wains Supply.
Page 5
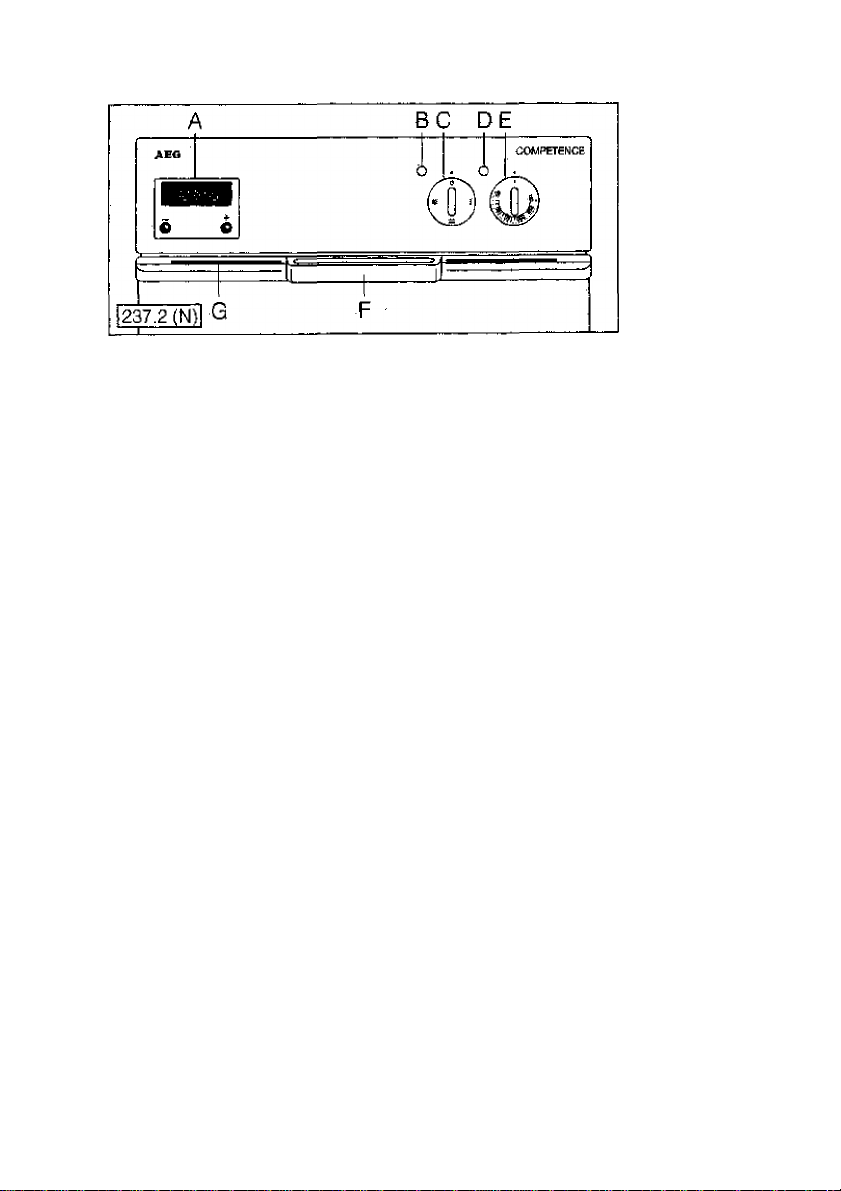
Appliance description
A Electronic clock with minute minder and auto-stop facility
B Pilot light (yellow) is on when the appliance is
switched on
C Cooking method selector (Conventional and Grilling)
D Thermostat control light (red) is on when the oven
is heating
E Temperature oontrol for the oven and the grill
F Handle to open the oven door
G Vapour vent - may get hoi during cooking.
Take care and do not touch.
An oven needs to vent the cooking vapours created inside during
cooking to the outside and on a build-in oven these are vented
through the front of the appliance. If the vapours were vented into
the housing unit they would destroy the furniture,
PLEASE NOTE THAT ON WHITE APPLIANCES SOME
DISCOLOURATION IN THIS AREA IS UNAVOIDABLE, Regular
cleaning wilt keep this to a minimum.
First Use
Features
Choose whether you want to use the oven or the grill and set the Operating
cooking method selector (C) accordingly: @ for the oven and 0 the cmitrol
for the grill. knobs
The Control knob E can be turned clockvwse to set the oven tem
perature and anti-clockwise to turn off.
su
<0
Z)
<
Page 6

■cleaning
the oven
Before using the oven for the first time, clean all accessories with
warm water and washing-up liquid. Then switch the oven on and
select the highest temperature and leave the oven on for at least
one hour with the oven door closed.
During this period there is an unavoidable odour which is not
harmful to health. We recommend that the room is well venti
lated for your convenience.
When the oven has cooled down, clean it with warm water and
washing-up liquid.
Page 7

Operating the electronic tinier
As soon as the oven is connected to the electrical supply the indi
cator on the display window is flashing. This also happens after a
power cut.
When the time of day has been set on the clock the oven is ready
for use. To set the time of day proceed as follows,
- Press buttons ® and[0) simultaneously and 12.00 appears in
the display window and symbol ^ is flashing,
- Set the time of day by pressing button or while symbol
® is flashing.
Please note: The oven is now ready for operation.
To alter the time on the dock proceed as for setting the time of
day.
Setting
the time
of day
Page 8

Howto
the oven
to evritch off
automatically
- Select the cooking method as required (§ tw the oven or 0
for grilling).
- Select the temperature required.
- Press button hoid it depressed until the required cooking
time shows in display C. The oven switches on and, after the
selected time has elapsed, switches automatically off.
- Whiie the automatic stop facility has been selected symbol ^
is illuminated.
Please note
At the end, an audible signal will sound for about two minutes.
This can be cancelled by pressing button or [^.
Switch off
Turn all controls to the off position.
Page 9

Oven
Before using for the first time, refer to the section describing precieaning of ttie oven.
This is a conventionai oven with top and bottom heat. You can
oniy bake on one ievei at any one time. However, you have the faciii^ for zoned cooking, the oven wiil be hotter al the top and cool
er towards the bottom. Therefore, foods that require siightly dif
ferent temperatures may be cooked at the same time.
The shelf positions feature 6 leveis. The cooking tabies suppiied
recommend the sheif postfion that wili produce the best re
suits.
Generri
Shelf levels
&
§
Page 10

Roasting and stewing
Recommen-
dations
Cooking
temperatures
and times
Wipe and weigh the meat. If stuffing is used, weigh the stuffed
joint to caicuiate the cooking time. Place the joint in a suitabie
roasting dish, season with sait and pepper and brush iean joints
with melted fat.
When cooking pies, place the dish on, a baking sheet to avoid
spillage onto the floor of the oven.
The times and temperatures given in the roasting chart provide a
guide only to cooking meat. Some adjustments may be neces
sary, depending on the type of meat to be cooked. Cooking
times have been given for meat which is at room temperature.
Prime cuts can be cooked at higher temperatures than cheaper
cuts that require a longer cooking time to tenderise the meat. A
thick joint will require longer to cook through than a thinner one. A
boned roiled joint will require longer cooking time than one with
the bone left in, as bone is a conductor of heat.
A small joint will require longer cooking, pro rata than a-large one,
Allow an extra 30 minutes for joints up to and including 1.5 kg
(3 lbs).
If the joint is cooked in foil the temperature has to be increased by
10"C. To brown the joint, remove foil for the last 15 minutes or so
of the cooking time.
If cooking from frozen, place joint in a covered container and ex
tend the calculated cooking time by approximately one third. To
brown and crisp meat, remove cover for the last 30 minutes of the
cooking period.
Conventional
cooking
10
Please use cooking chart for shelf positions and temperatures as
indicated for conventional cooking.
Ovenware
Never use stainless steel in the oven as it reflects the heat. Meat,
poultry and fish should be cooked in ovenproof dishes or, for
large quantities, in the metal meat pan.
Choose a dish that is just a little larger than the joint itself. This will
contain any fat in a smaller area and reduce splashing. If you wish
to roast potatoes in the same dish, allowance should be made
when selecting the size of dish.
Never place cooking containers on the base of the oven, but on
the wire shelf which should be Inserted onto the fourth or fifth level
from the top, depending on the size of the food to be
cooked.
Page 11

Prime cuts of meat such as steaks and chops, or fish weighing
less than 1 kg, can be either fried or griiled. Sait iarge pieces
shortiy before griiiing and smail ones just after griiiing.
Turn meat/fish after haif the griiiing time so that both sides are uni
formly browned. Turn thin pieces once - thicker pieces need turn
ing more often.
Turn knob C to 0 and knob E to the highest setting.
Place the wire shelf onto the enamel pan and select a shelf posi
tion, dependent on the thickness of the food you wish to grill.
If the food is cooking too quickly, choose a lower shelf position or
lower the temperature.
If the food is cooking too slowly, choose a higher shelf position or
use a higher temperature.
The oven door is closed during griiiing
There is no need to pre-heat the grill unless you prefer to do
so.
Grili pan and wire shelf can be cleaned more easily if soaked in
water with washing-up liquid after use.
How to use
the grill
Traditional
grilling
11
Page 12

Inserting/ Warning!
r«noiring Hie handle must be removed whilst grilling. Falling to do
grill handle so mil result in overheating of the handle. This may cause
damage leading to breakage of the handle.
Inserting the handle
Lock it into the grip at the front of the pan. See iilustration.
Make sure that the handle is firmly attached to the pan!
Removing the handle
Press the button on the handle. See illustration.
12
Page 13

Cleaning and care
Allow the oven to cool down and switch off before cleaning.
Ovens which are cleaned after every use need very little attention,
if left and used again, fat splashes will bake on and a^e then diffi
cult to remove.
Clean glass surfaces, trims and controls with a soft cloth and
lukewarm water. Polish dry with a soft doth.
Vitreous enamel interior surfaces can be cleaned with:
- a damp cloth and mild detergent
- cream cleaners such as “Jif and a soft cloth
- oven cleaners such as “Ovenpad” or "Kleenoff.
Do carefully follow the manufacturer’s instructions on the
cleaning materials you use.
Take care that oven cleaners do not come into contact wifri the
element or any other part of the oven other than the vitreous
enamel.
Do not use scouring pads or abrasive powder which may
scratch the surface of any part of the appliance.
The oven can be illuminated for cleaning. To do this, turn the con
trol knob to the lamp position.
For thorough cleaning various parts can be removed:
Before
cleaning
the oven
Cleaning
Oven
lighting
WARNING! Isolate die oven from supply before replacing oven lamp.
To clean the glass cover or change the oven lamp, the glass
cover can be taken off by turning it anti-clockwise.
Cleaning the
lamp cover or
replacing the
oven lamp
13
Page 14

Removing
the oven door
Fully open the oven door
1, Lift the door catch on both door hinges {see illustration).
2. Lift the door up and pull forward, away from the oven (grip the
sides - do not pull on the door handle).
Replacing
the oven door
14
1. Insert both brackets into the oven frame.
2. Fully open the door and return door catohes to their working
positions (see illustration).
Page 15

To clean the sides of the oven, the shelf supports can be re-
nnoved {see illustration).
Pull the shelf support at the bottom towards the oentre of the
oven and unhook from the top. Replace in reverse order.
Removing
the shelf
supports
(D
15
Page 16

Optional extras
Additional wire shelf
E No. 697 307 541
Ceramic oven dish
E No. 611 899 660
Extra large meat pan
{slots into oven shelf supports)
ENo. 611 898 626
16
Baking sheet
E No. 611 898 620
Page 17

|25.2
КТК
Ё No. 611 896 601
К\ /7
Í
S
17
Page 18

What to do if... (something goes wrong?)
Faults you ... the pilot lamps do not show?
can rectify ... the oven does not heat?
yourself 1. All the relevant switches may not have been operated.
2. The fuse in the fuse box hay have blown.
3. IMPORTANT - Make sure that the oven door is closed
completely.
... the fuses keep blowing?
Please call an approved and qualified etectrician.
... the oven lamp fails?
See cleaning ^d care on page 13.
Replacement lamps are not covered by warranty and are
not free of charge.
... the oven cannot be switched on?
Check whether the symbol ® is flashing. If it is, press button
or [^. Select the correct time of day if necessary.
Please make sure that you are not able to rectify a fault
yourself before calling a service engineer in connection
with any of these problems. The cost of calling out an engi
neer will not be covered by tiie warranty.
Therefore, be sure to follow very carefully the instructions
in this booklet and any additional information which may
accompany this appliance.
AEG elet^rlcal appliances comply with current safety reg
ulations. Repairs should only be carried out by a qualified
AEG engineer or AEG appointed service agents. Repairs
carried out by unauthorised personnel could lead to dam
age and could pose a considerable safety hazard to the
user.
18
Page 19

Service
Should you be unable to locate the cause of the problem in spite
of the above check list, please contact your AEG Service Depart
ment, quoting the E and F numbers, or the KD number which you
wiil find on the rating plate (see lllustratlon/arrow).
Please transfer these numbers to the space provided beiow for
your convenience.
These numbers enable the Service Department to prepare as far
as possible any spare parts required to rectify the fault on first
cali. This may save you money.
E-No
.................................................................
F-No
..................................................................
KD
..........
- ... /
AEG Service in the United Kingdom
AEG Domestic Appliances Limited
Head Office:
217 Bath Road
Slough, Berks SL1 4AW
Tel.: 017 53-87 25 06
Telefax: 017 53-51 22 71
AEG Northern Service Centre:
Unit 20, Haigh Park
Haigh Avenue
Stockport
Gt. Manchester SK4 1QR
Tel,: 01 61-4872205
Telefax: 01 61-4 7411 91
Service Appointments:
Bristol: 011 79-25 28 80
Norfolk: 016 03-76 5515
AEG Scottish Service
Centre: Block 11, Unit 1
Dundyvan industrial Estate
Coatbridge
Lan^kshire MLS 4AQ
Tel,: 012 36-44 03 87
Telefax: 012 36-44 02 56
19
Page 20

AEG
AEG Hausgeräte GmbH
Postfach 1036
D-90327 Nürnberg
© Copyright by AEG
H 260 279 440 - 01961 ./03 -
 Loading...