

Page 1
AE7355
Vacuum Cleaner
Bode nstaubsauger
Aspirateur traîneau
Stofzuiger
Aspirapolvere
Aspirado de polvo
Aspirador
Η λεκτρική σκούπ α
Ele k trik li s üpürge
Operating Instructions
Gebrauch sanw e isung
M ode d'em ploi
Gebruik saanw ijzing
Instruzioni per l’uso
Instrucciones de uso
Instruções de utilização
Οδη ϊες χρήσεω ς
Kullanm a k ılavuzu
Page 2

Description of parts...........................................................................1
Im portant safeguards ........................................................................1
Instructions for use ............................................................................1
M aintenance ........................................................................................1
Re m oving th e conte nts of th e dust container ..........................1
Re placing th e filters..........................................................................1
Re placing or cleaning th e cartridge filter..................................2
Cleaning th e m otor filter.................................................................2
H anging th e exh aust filter.............................................................. 2
Operating th e h ose in/out of th e suction inlet.........................2
Prote cting th e e nvironm ent...........................................................2
Block ed air flow and dirty filters ...................................................2
Besch re ibung ....................................................................................... 3
Für Ih re Sich e rh e it..............................................................................3
Inbetrie bnah m e ...................................................................................3
Ve rw endung und W artung ..............................................................3
Ausle eren de s Staubbe h älters.........................................................3
Ausw ech seln / reinigen der Filte r ..................................................3
Ersetzen oder reinigen des Cartridge Filters (Rundfilters)....... 4
Re inigung des M otorfilte rs ..............................................................4
Ersetzung des Abluftfilters..............................................................4
Entnah m e bzw . Einse tzen des Saugsch lauch es .........................4
Um w e ltsch utz......................................................................................4
Description de votre aspirate ur.....................................................5
Consignes de sécurité ........................................................................5
M ode d’em ploi .....................................................................................5
Entre tien ................................................................................................5
Com m ent vider le conte ne ur à poussière ...................................5
Re m place m ent et nettoyage des filtres ...................................... 6
Re m place m ent ou ne ttoyage de la cartouch e filtrante .........6
Nettoyage du filtre m oteur .............................................................6
Re m place m ent du filtre de sortie d’air........................................6
Com m ent enlevez et m ettre en place le fle xib le ......................6
Pour le respect de l’e nvironnem ent..............................................6
Blocages e t filtres sale s .....................................................................6
Besch rijving..........................................................................................7
Belangrijk e ve iligh eidsinstructies..................................................7
In geb ruik ne m en ...............................................................................7
Onde rh oud ............................................................................................7
Stofcontainer le gen ...........................................................................7
Filte rs vervangen.................................................................................7
Filte rcassette vervangen of reinigen ............................................8
M otorfilter sch oonm ak en ................................................................8
Uitblaasfilte r ve rvangen ...................................................................8
Z uigslang inzetten en losnem en ....................................................8
M ilieub esch erm ing.............................................................................8
Geblok k e erde luch tstroom en vuile filters.................................8
Descrizione ............................................................................................9
Im portanti indicazioni ine renti la sicurezza..............................9
Istruzioni per l'uso ..............................................................................9
M anutenzione ......................................................................................9
Rim uovere la polvere dal contenitore ..........................................9
Sostituzione dei filtri .........................................................................9
Sostituzione o pulizia de l filtro a cartu ccia ...............................10
Pulizia de l Filtro m otore ...................................................................10
Sostituzione del filtro in uscita......................................................10
Collegam e nto/Scollegam ento del fle ssibile alla presa di
aspirazione ............................................................................................10
Tute la am bientale ...............................................................................10
Riciclaggio de ll'apparecch io............................................................10
Flu sso dell'aria bloccato e filtri sporch i.......................................10
Descripcion ...........................................................................................11
Norm as im ortantes de seguridad..................................................11
Intrucciones de uso ............................................................................11
M antenim iento....................................................................................11
Vaciado del depósito.........................................................................11
Sustitucion de los filtros ..................................................................11
Cam biar o lim piar e l filtro...............................................................12
Lim pieza del filtro de l m otor ..........................................................12
Cam biar el filtro de salida de aire .................................................12
M anejo de la m anguera cone xión / de sconexión de la
tom a de aspiración .............................................................................12
Prote cción del m edio am bie nte .....................................................12
Re ciclaje del Aparato al final su vida útil...................................12
Obstrucción de la circulación del aire y filtros sucios............12
Descriçao ...............................................................................................13
Instruçoe s de se gurança...................................................................13
Instruçoe s de utilizaçao....................................................................13
M anutençao.........................................................................................13
Re m ove r o lixo do depósito .............................................................13
Substituição ou lim peza dos filtros ..............................................13
Substituição ou lim peza da cassete do filtro.............................14
Lim peza do filtro do m otor.............................................................14
Substituiçâo do filtro de e xaustão de saída de ar...................14
Colocar e retirar a m angue ira no encaixe de sucção do
aspirador................................................................................................14
Prote cção do am biente .....................................................................14
Re ciclagem de aparelh os fora de uso..........................................14
Bloq ue io do fluxo de ar e filtros sujos .........................................14
Χαρακτη ριστικά....................................................................... 15
Ση µαντικέ ς οδη γίες ασφάλειας ................................................15
Οδη γίες χρήσεως .................................................................... 15
Συντήρη ση ...............................................................................15
Αφαίρεση σκόνη ς απ ό το δ οχείο .............................................15
Αντικατάσταση τω ν φίλτρω ν....................................................15
Αντικατάσταση ή καθαρισµός του φίλτρου σε κυλινδρικό
π ερίβλη µ α ............................................................................... 16
Καθαρισµός φίλτρου κινη τήρα .................................................16
Καθαρισµός φίλτρου εξαγω γής ............................................... 16
Λειτουργία του λάστιχου στο στόµιο εισαγω γής / εξα γω γής ....16
Προστασία του π εριβάλλοντος ................................................16
Μ π λοκαρισµ έ νη ροή αέ ρα και βρώµικα φίλτρα .......................16
Özellik ler................................................................................................17
Öne m li em niye t önlem le ri ...............................................................17
Kullanm a talim atlari..........................................................................17
Bak im ......................................................................................................17
Toz h aznesinin boşaltılm ası.............................................................17
Filtre lerin de ğiştirilm esi ....................................................................17
Silindir filtre nin te m izlenm esi........................................................18
M otor filtrenin tem izlenm esi..........................................................18
H ava çık ış filtresinin tem izlenm esi ................................................18
H ortum u bağlantı yerine yerle ştirm e / çık arm a....................... 18
Çe vreyi k oru m a...................................................................................18
Tek nik ozellik le r...................................................................................18
Üretim ye ri ............................................................................................18
Page 3
AE7355
XL
•
•
•
•
10
•
•
1
7
9
3
2
5
6
8
4
Page 4
11
16
12
13
14
15
17
A
B
D
18
C
E
19
Page 5
20 21 22
23
27
30
24
31
25
26
28
29
32
Page 6

Dear Custom er
Th ank you for ch oosing an AEG- Electrolux cleaner. To
ensure total satisfaction, re ad th is Instruction book
carefully.
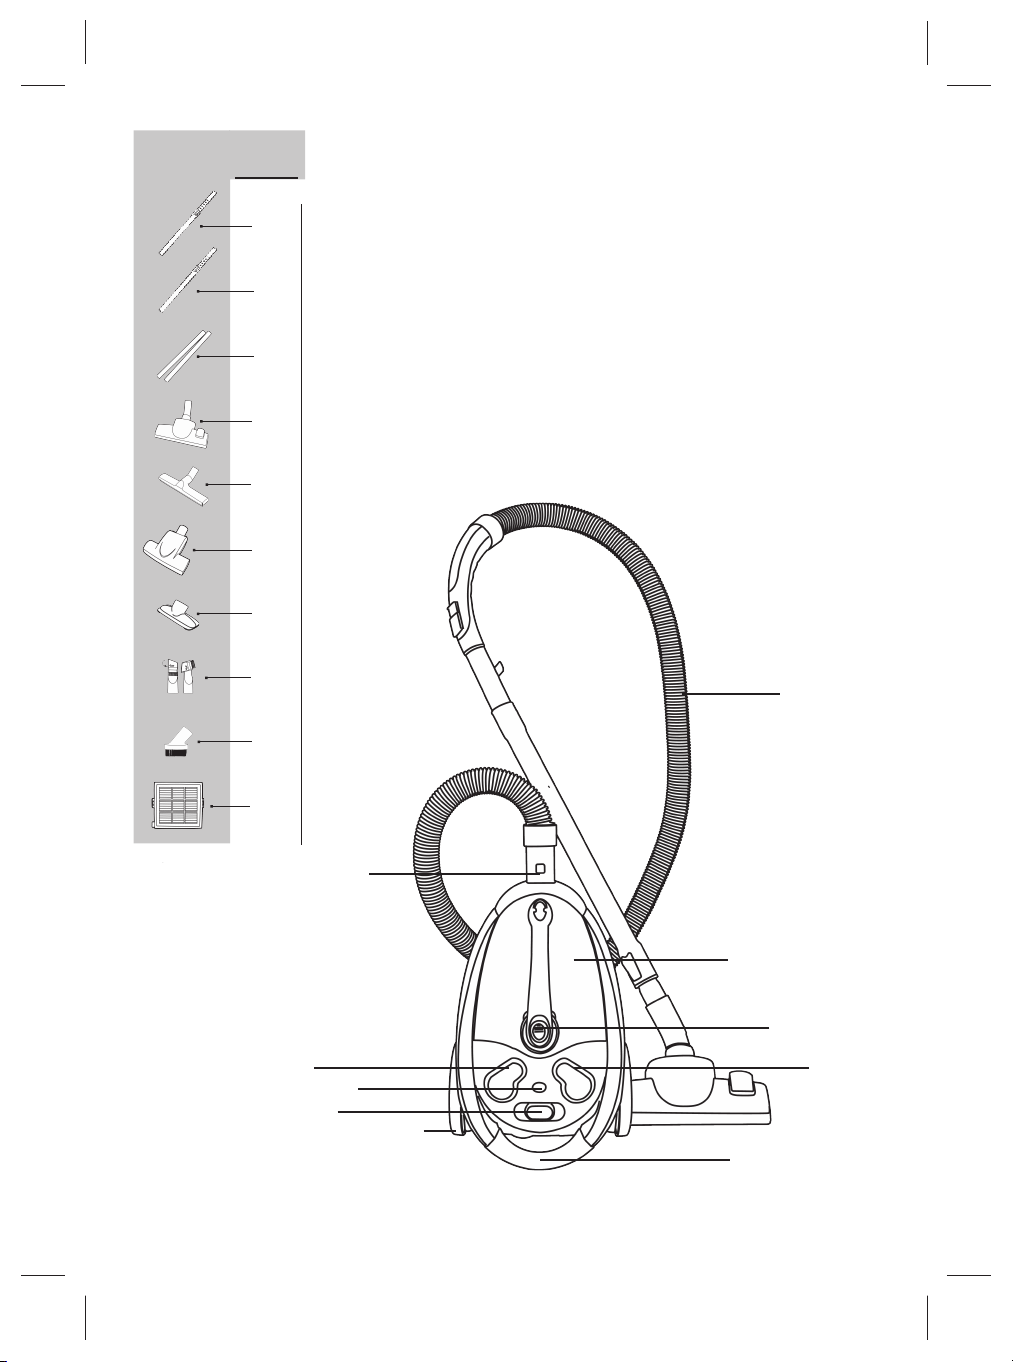
Description of parts
1. Suction inlet
2. Electronic perform ance indicator
3. On/off sw itch
4. Cab le rew ind button
5. Variable pow e r control
6. W h eel
7. Dust containe r
8. Carrying h andle
9 . Dust container open button
10. H ose
11. Tele scopic tube
12. D ual purpose floor nozzle
13. Crevice nozzle
14. Uph olste ry nozzle
15. D usting brush
16. H EPA filter
17. Nose cone
18. Vertical park ing
19 . H orizontal parking
Im portant safeguards
• Re ad th is instruction book let carefully.
• Before using th e appliance , ch eck th at th e m ains
pow er voltage corresponds to th e voltage sh ow n on
th e rating plate.
• Do not sw itch th e appliance on if it appe ars to be
faulty in any w ay or it h as a dam aged cord or plug.
• Do not try to repair th e appliance by you rself.
• Alw ays re m ove th e plug from th e pow er sock e t w h en
th e appliance is not in use and before carrying out
any cleaning or m ainte nance ope rations.
• Never leave th e appliance unattended w h en it is sw itch ed
on. Keep th e appliance out of reach of ch ildren.
• Th is appliance is for dom estic use only. Use as
de scribed in th is instruction book let.
• Do not pu ll th e appliance by th e cord. Do not unplug
by pulling on th e cord.
• Do not use appliance on w et surfaces or to vacuum
liq uids, m ud, ash and burning cigare tte butts. Do not
vacuum up any h igh ly flam m able or explosive
sub stances or gases.
• Do not unplug th e vacuum cle ane r w ith w et h ands.
• Do not ope rate th e vacuum cleaner too close to
h eate rs and radiators, stove s e tc.
• Before you start using th e vacuum cle aner, please
rem ove large or sh arp ob jects from th e floor to
prevent dam age to th e dust container and h ose.
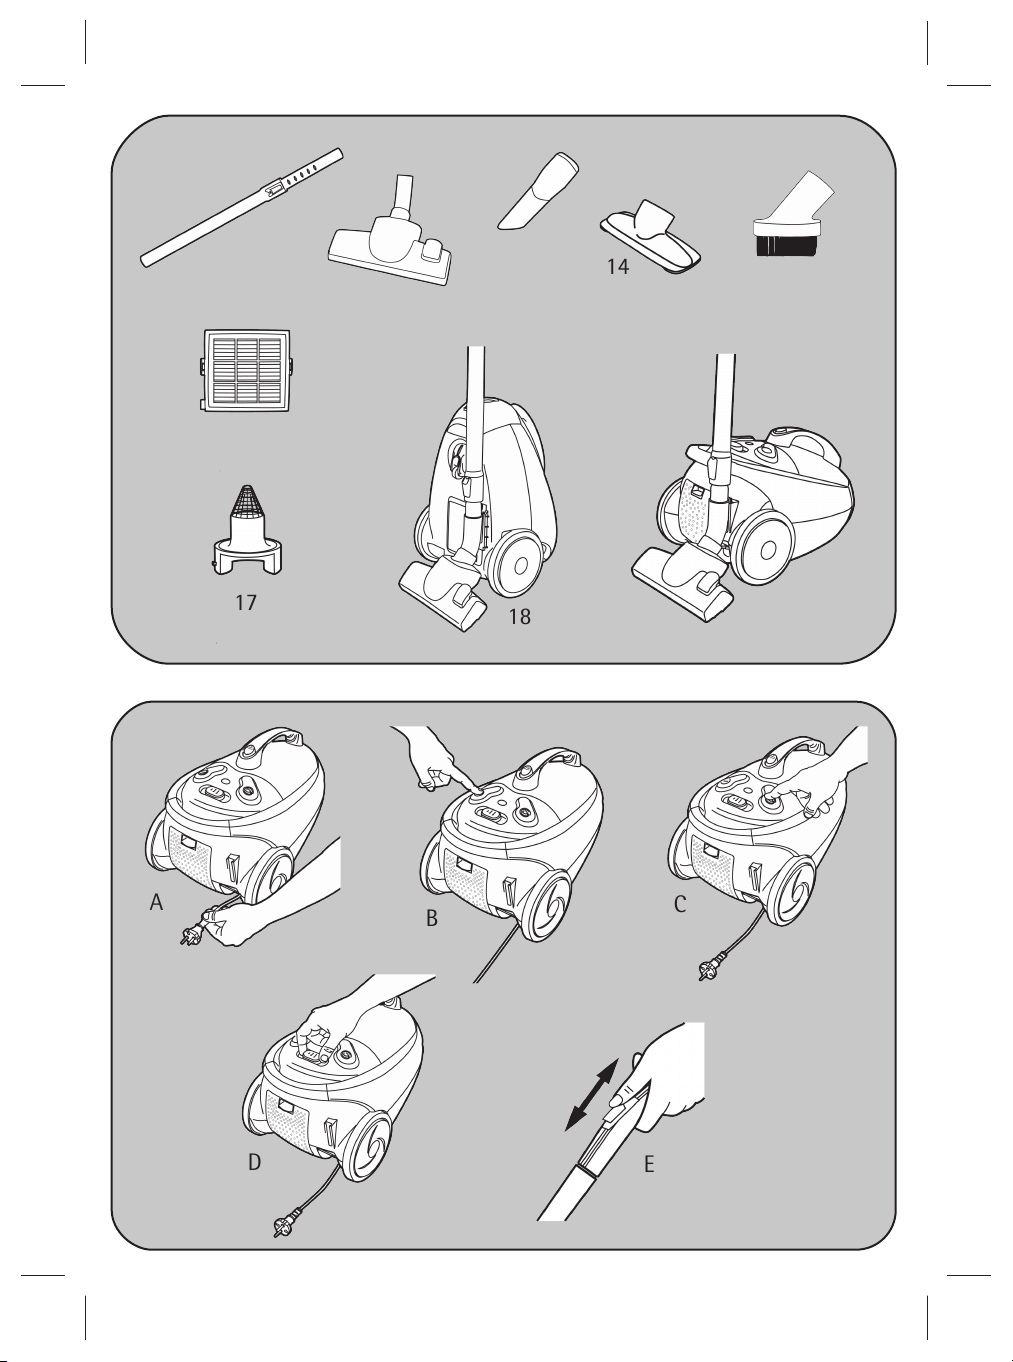
Instructions for use
Before placing into ope ration m ake certain th at th e
filte rs are in th e proper position.
A Unw ind a sufficient length of cable and insert th e
plug into th e pow er sock et. A YELLO W m ark on th e
pow er cable sh ow s th e ide al cable le ngth . D o not
extend th e cable beyond th e RED m ark .
B Press th e O N/O FF button to sw itch th e appliance on.
On initial start up full pow er is reach ed after
approxim ately 1- 2 se conds.
C To rew ind th e pow er cable, press th e rew ind button
w ith foot, and guide th e cable w ith h and to ensure
th at it doe s not w h ip causing dam age.
D By m oving th e variab le pow er control, th e suction
pow er can be adjusted.
E Suction can also b e regulated on th e h ose h andle by
opening / closing th e aperture.
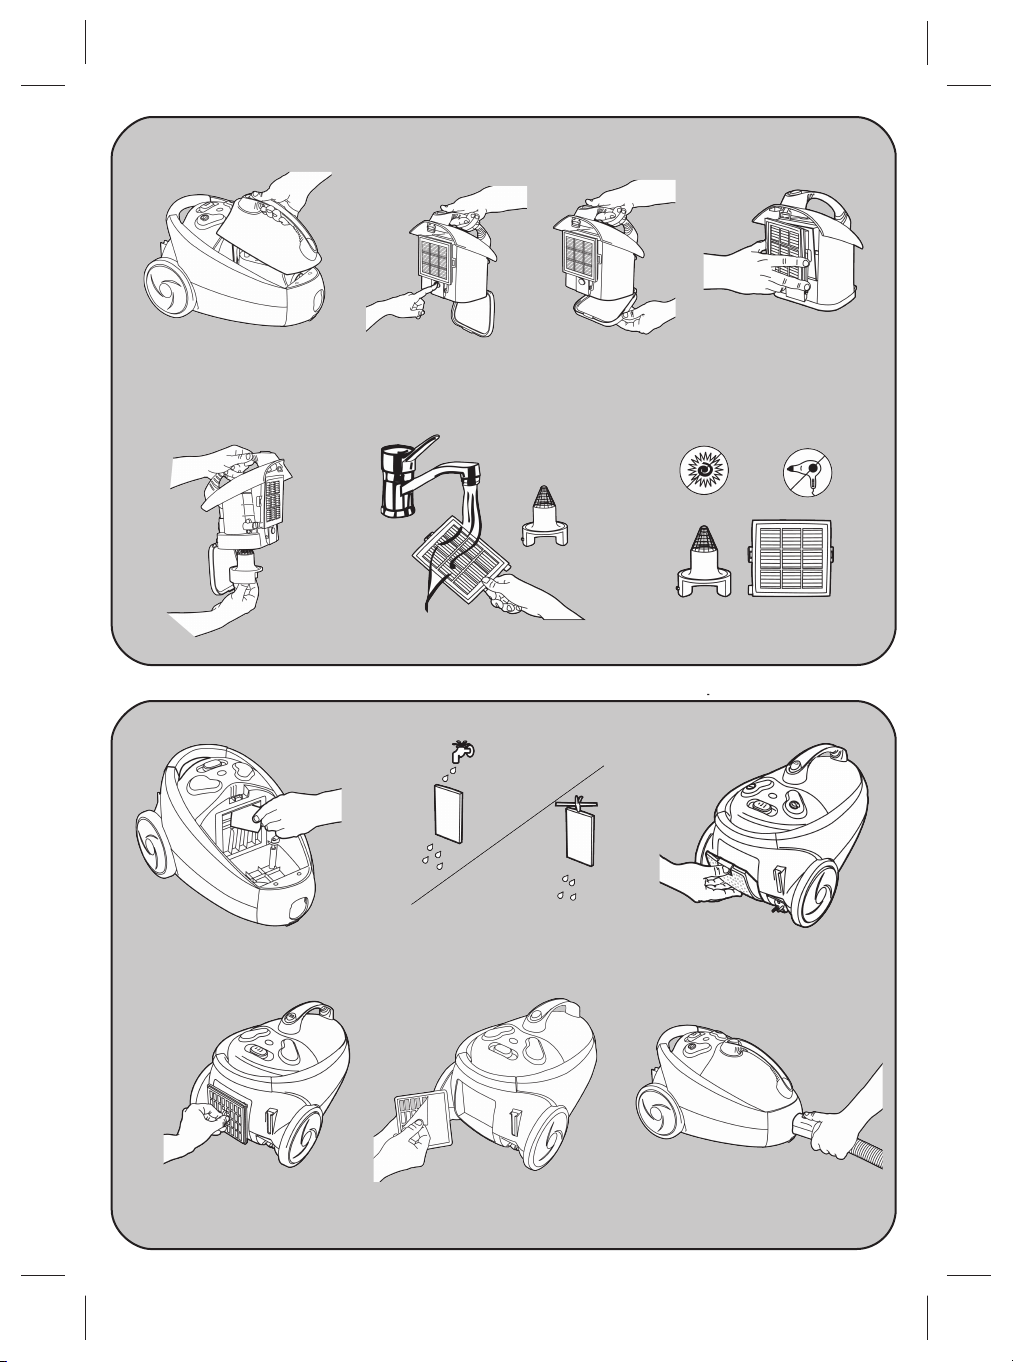
M aintenance
Re m oving th e contents of th e dust container
• Never operate th e cleaner w ith out th e dust container
installe d.
• Th e cleaner is eq uipped w ith an e lectronic
perform ance indicator.
• Th e dust container m ust be em ptied if th e perform ance
indicator ch anges to red w h en th e cleaner is operating at
m axim um le vel and th e nozzle is raise d from th e floor.
20 Re m ove th e dust containe r by push ing th e ope n
bu tton on th e h andle .
23 Re m ove th e filte r from its place .
21 Re m ove th e contents of th e dust container by
push ing th e orange - colou red ope ning button.
23 Pu t th e filter back into its place.
22 Close th e dust containe r lid until it clicks.
20 Pu t th e dust container back into th e cleaner.
Please note: It is norm al for th e red ligh t of th e
indicator to flick e r on and off during use.
If th e dust container is em ptied and th e indicator is
still active, it m eans th at th e cartridge filte r is
clogged. In th is case, follow th e instructions of
ch apte r 'Replacing or cleaning th e cartridge filte r'.
Re placing th e filters
• Filters sh ould be replace d at le ast tw ice a year or
w h en th e y becom e visibly soiled.
• Alw ays ope rate th e cleaner w ith filters installed to
avoid reduced suction.
• Disconnect from e lectrical outle t before ch anging
th e filters.
1
Page 7

Re placing or cleaning th e cartridge filter
20 Re m ove th e dust container by using th e open button
on th e h andle .
23 Re m ove th e filte r from its place .
24 Re m ove th e protector m esh from th e cartridge filter.
25 Sh ake th e dirt from th e filter and th e m esh into a
bin, if necessary th e filte r and m e sh can be rinsed,
w ith cold w ate r, under a tap.
26 Air dry th e m for approxim ately 24 h ours, to ensure it
is com pletely dry be fore re- using. Avoid dire ct
sunligh t and extrem e drying circum stances.
If you w ish to u se your appliance w h ile th e cartridge
filte r is drying, you m ay u se th e extra cartridge filte r
inserted in th e pack aging b ox.
24 Insert th e protector m esh into its place by push ing it
onto th e cartridge filte r.
23 Pu t th e filter back into its place.
20 Insert th e dust containe r back into th e cleane r by
pressing it dow n until it click s.
Cartridge filter re fe rence num ber: Menalux F102
Cleaning th e m otor filter
If ne cessary, th e m otor filte r also can be w ash ed or
replace d at least tw ice a year or if clogged.
20 Re m ove th e dust container by using th e open button
on th e h andle .
27 Re m ove th e filte r from its place .
28 Rinse it under tap w ate r and dry it com ple te ly.
27 Pu t th e filter back into its place.
20 Insert th e dust containe r back into th e cleane r by
pressing it dow n until it click s.
M otorfilter refe rence nu m ber: M enalux F132
Ch anging th e exh aust filter
29 Open th e filte r grill.
30 Re m ove th e exh aust filter w ith grill.
31 Tak e th e filter out of th e grill and insert a new one.
30 Insert th e filter w ith grill into th e cleaner.
29 Close th e filter grill.
Exh aust filter reference nu m ber: M e nalux F132
Operating th e h ose in/out of th e su ction inle t
32 To connect th e h ose into th e suction inlet push it
until it clicks.
To disconnect th e h ose from th e suction inle t push
th e button at th e end of th e h ose.
Protecting th e environm ent
• Attem pt to recycle pack aging m aterial and old
appliances.
• Th e cardboard packaging can be place d in th e w aste
paper colle ction.
• Deposit th e plastic bag m ade of polye th yle ne (PE) at
th e PE colle ction point for recycling.
• Deposit th e polystyrene foam at th e PS colle ction
point for recycling. Recycling th e Appliance at th e
end of its life.
• Th e plastic com ponents all carry a m aterial
ide ntification m ark ing so th at, lik e th e oth e r
m aterials, th e y can recycled at th e end of th e life of
th e appliance.
Please inq uire w ith you r local auth ority.
Block e d air flow and dirty filters
• Th e cleaner stops autom atically if a block age occurs
in th e nozzle /tube /h ose or if th e filters are block e d
w ith dirt.
• D isconnect from m ains and allow th e cle aner to cool
for 20- 30 m inute s. Rem ove blockage and/or clean filters.
• Re start th e cleaner.
Th is appliance conform s w ith th e follow ing EC
Directive s:
• Low Voltage D irective 2006/9 5/EC
• EM C Directive 89 /336/EEC w ith am e ndm ents
9 2/31/EEC and 9 3/68/EEC
Th e sym bol on th e produ ct or on its pack aging
indicate s th at th is product m ay not be tre ated as
h ouseh old w aste. Instead it sh all be h ande d over to
th e applicable colle ction point for th e recycling of
ele ctrical and e lectronic equipm ent. By ensuring th is
product is disposed of correctly, you w ill h e lp
prevent potential ne gative conseq uences for th e
environm ent and h um an h e alth , w h ich could
oth erw ise be caused by inappropriate w aste h andling
of th is product. For m ore detaile d inform ation abou t
recycling of th is product, please contact your local
city office, your h ouseh old w aste disposal service or
th e sh op w h ere you purch ased th e product.
2
Page 8

Se h r gee h rte Kundin, seh r ge e h rte r Kunde,
lesen Sie bitte diese Gebrauch sanweisung sorgfältig durch .
Beach ten Sie vor alle m die Sich erh e itsh inw eise auf den ersten
Seiten dieser Gebrauch sanweisung! Bew ah ren Sie bitte die
Gebrauch sanw eisung zum späteren Nach sch lagen auf. Geben
Sie diese an eventuelle Nach besitzer des Gerätes w eiter.
Besch re ib ung
1. Sch lauch ansch luss
2. Betrieb sanzeige
3. Ein- /Aus- Sch alter
4. Knopf für Kabelaufw ick lung
5. Le istungsregulierung
6. Rad
7. Staubbeh älte r
8. Tragegriff
9 . Öffnungstaste für Staubbeh älte r
10. Sch lauch
11. Tele sk oproh r
12. Um sch altbare Bodendüse
13. Fugendüse
14. Polste rdüse
15. M öbelpinse l
16. Cartridge Rundfilte r
17. CYCLONE K e ge l
18. Park position vertik al
19 . Park position h orizontal
Für Ih re Sich erh eit
• Gerät nich t m it W asser reinigen.
• Le se n Sie die se Bedienungsanleitung sorgfältig.
• Vor Inbetriebnah m e des Gerätes prüfe n Sie bitte, ob
Ih re Netzspannung der auf dem Gerät ange gebenen
Netzspannung entsprich t.
• Verw ende n Sie das Gerät nich t m it besch ädigtem K abel!
• Unsere Kundenbetreuung und unseren Beste llservice für
Z ubeh ör erreich en Sie per Telefon, Mail, und Fax. Montag
bis Freitag von 8.00 bis 18.00 Uh r sind w ir für Sie da.
Progre ss- Se rvice- Line : 01805 – 30 60 80*
*aus dem Festnetz de r Deutsch en Telek om Euro 0,12/M in.
Fax: 09 11- 323- 49 19 30
E- Mail: info.service@ progress- staugsauger.de
• In der Sch w eiz steh en w ir Ih nen für Frage n, Anregungen
oder bei Problem en von M ontag bis Donnerstag von 8.-
12.00 Uh r, 13.30- 17.00 Uh r, am Freitag vom 8.00-
12.00 Uh r, 13.30-16.30 Uh r zur Verfügung.
Serviceline: 0848 89 9 300, Fax 062 889 9 3 10.
• Ste ck e n Sie das Ge rät im m er aus, w enn S ie es nich t
verw enden und bevor Sie den Filter ausw ech seln.
• Lassen S ie das Gerät nich t unbeaufsich tigt, w enn e s
in Betrieb ist. Kinder von Elek trogeräten fernh alten.
• D as Gerät ist nur für den norm alen H aush altsgebrauch –
verw enden Sie es nur wie in dieser Anleitung besch rie ben.
• Netzstecker nie am K abel aus der Steckdose zieh en. Kabel
nich t m it dem Gerät oder den Saugbürsten überfah ren.
• Nich t zum Aufsaugen von Flüssigk eite n, Sch lam m ,
h eiße r Asch e, glüh e nder Z igare tte n ve rw ende n. Nich t
in de r Näh e entflam m barer Gase verw enden.
• Netzste ck er nie m it nassen H änden in die Steck dose
stecken ode r h erauszieh e n.
• Gerät k eine n W itterungse inflüssen, keiner
Feuch tigk eit und k e iner H itzeq ue lle ausse tzen.
• Ve rm eiden Sie die Aufnah m e h arte r, spitze r
Gegenstände , da diese Staubbeh älter, Saugsch lauch
und M otor besch ädigen k önnen.
Inbetriebnah m e
• Prüfen Sie, ob die Filter/Staubbeh älter rich tig eingesetzt
sind. Verw enden Sie das Gerät nur mit rich tig eingesetztem
Staubbeh älter und rich tig eingesetzten Filtern.
A Kabel an die Strom versorgung ansch ließen. Eine gelbe
Mark ierung am Netzk abel zeigt die ideale Kabellänge. Zieh en
Sie das Kabel nie länger als bis zur roten Mark ierung.
B Z u m Einsch alten de s Ge räts den Ein- /Aus- Sch alter
drücken. Nach dem Einsch alten des Geräte s ist die
volle Le istung nach e tw a 1- 3 Sek unde n e rreich t.
C Zum Zurück spule n des Kabels den Knopf m it dem
Fuß drück en und das Kabe l m it de r H and fü h ren,
dam it e s nich t verdreh t w ird.
D Z ur Erh öh ung / Reduzie rung der Saugstärk e de n
Le istungsregle r versch ieben.
E Z u r Regulierung der Länge des Tele sk oproh res
drücken Sie bitte den Sch iebe regle r nach unten und
zie h e n S ie das Roh r nach unten (Ve rlängerung) bzw .
sch ieben es nach oben (Ve rk ürzung).
Verw e ndung und W artung
Ausle e ren des Staubbeh älters
• Ve rw ende n Sie das Gerät nur m it rich tig
eingesetzte m Staubbeh älte r.
20 Drück en Sie die Öffnungstaste und zieh en Sie de n
Staubbeh älte r h eraus.
23 Entfe rne n Sie de n Filte r von seinem Platz.
21 Entfe rne n Sie de n Sch m utz durch Drück en der
orange – farbenen Taste .
23 Setzen Sie den Filter zurück in se ine n Platz.
22 Sch ließe n Sie de n Staubbeh älterde ck e l bis er k lick t.
20 Setzen Sie den Staubbeh älter in das Gerät zurück .
• Der Staubbe h älter m uss entleert w erden, sobald die
Anzeige auf rot um gesprungen ist, b ei m axim ale r
Le istung und von Boden abgeh obener Bodendüse.
Ausw ech seln / reinigen de r Filter
• Bitte beach ten Sie: Verstopfte Filter füh ren zu einer
verm inderten Saugleistung und ggf. zu einem Absch alten
des Gerätes durch Überh itzung. Das Gerät in diesem Fall
ca. 30 M inuten abk üh le n lassen, Filte r reinigen bzw .
erneuern und Gerät ansch ließend erneut starten.
H inw eis: Größere M e nge n e inge saugte n Feinstaubs
ode r Tie rh aare k önnen die Filter verstopfen und eine
h äufige re und gründlich ere Re inigung der Filter bzw .
einen h äufigere n Filte rw ech sel erforderlich m ach en.
• Um eine Besch ädigung des Ge räts zu verm eiden,
nich t oh ne Staubb e h älte r oder Filter staub saugen,
die s k ann zu sch w eren Defek te n am Gerät füh ren.
• Vor dem Au sw ech seln de r Filte r den Ste ck e r aus der
Ste ck dose zieh en.
3
Page 9

• H inw eis: W ird das Ge rät zw eck e ntfre m de t ode r
falsch be dient, k ann k eine H aftung für eventuelle
Sch äde n ü bernom m en w erde n. Ve rstopfte Filte r
k önne n nich t im Rah m en de r Garantie leistung in
unserer W e rk statt gereinigt w erden.
Ersetzen oder reinigen de s Cartridge Filters
(Rundfilte rs)
20 Drück en Sie die Öffnungstaste am H andgriff u nd
zie h e n den Staubb eh älte r h eraus.
23 Entfe rne n Sie de n Filte r von seinem Platz.
24 Z ieh en Sie das Sch utzgitter vom Kartusch enfilter ab.
25 Den Sch m utz vom Filter übe r einem Beh älter
absch ütteln, dabei leich t auf eine feste Unterlage
k lopfen. Falls notw endig, den Filter und das Sch utznetz
unter fließendem , k altem W asser durch k lopfen reinigen.
Falls Sie Ih r Gerät w äh rend de s Trock nens de s
Cartridge- Rundfilters benützen m öch ten, sollte der
in de r Verpack ung zusätzlich beigele gte CartridgeRundfilter verw endet w erden.
26 Lufttrock nu ng für ca. 24 Stunden. Sich erzustellen ist,
dass der Filter vor erneuter Benutzu ng völlig trock en
ist. D ire k te Sonneneinstrah lung u nd e xtrem e
Trock nungsverh ältnisse sind zu verm eiden.
24 Einsatz de s Sch utznetzes an die vorgese h e ne Position
durch D rü ck e n auf den Cartridge Filter (B).
23 Setzen Sie den Filter zurück in se ine n Platz.
20 Durch Drück e n der Arretierungstaste se tzen Sie den
Staubbeh älte r w ieder in de n Staubsauger ein.
Bestellnum m er des Cartridge Rundfilters : Menalux F102
Re inigung des M otorfilte rs
• Falls notw endig k ann der M otorfilter ausgew asch en oder
ersetzt w erden. Dies sollten Sie regelm äßig überprüfen
und reinigen bzw . ersetzen w enn er verstopft ist.
20 Drück en Sie die Öffnungstaste am H andgriff und
zie h e n Sie de n Staubbeh älter h eraus.
27 Entfe rne n Sie de n Filte r von seinem Platz.
28 Spülen Sie den Filte r m it w arm em W asser aus und
lassen Sie den Filter k om plett trock ne n.
27 Setzen Sie den Filter zurück in se ine n Platz.
20 Setzen Sie den Staubbeh älter zu rück in den Sauger.
Bestellnum m er des M otorfilters : Menalu x F132
Ausw ech seln de s Abluftfilters
29 Öffnen Sie den Filtergrill.
30 Entfernen Sie den Abluftfilte r zusam men m it dem Grill.
31 Entfe rne n Sie den Filter vom Grill und setzte n Sie
einen neuen Filter ein.
30 Setzen Sie den Grill w ieder ein.
31 Sch ließe n Sie de n Filte rgrill.
Bestellnum m er des Abluftfilters: M e nalux F132
Entnah m e bzw . Einsetzen des Saugsch lauch es
32 Ansch luss / Lösen des Saugsch lauch es an der Saugöffnung.
Stecken Sie den Ansch lussstutzen des Saugsch lauch e s
bis zur Einrastung in die Saugöffnung.
Z u m Abne h m en des Saugsch lauch es ist die
Entriegelungstaste zu drück e n und der
Ansch lussstutze n h e rauszuzieh e n.
Um w eltsch utz
• W erfen Sie das Ve rpackungsm ate rial und Altgeräte
nich t einfach w e g.
• Der Verpack ungsk arton sollte m it dem Altpapier
entsorgt w erde n.
• Kunststoffteile aus PE sind an de n PE- S am m elste lle n
ode r ü ber den grünen Punk t zu e ntsorgen. Entsorgen
Sie das Gerät an seinem Lebe nsende entsprech end
de n gesetzlich en Vorsch rifte n.
• Styroporte ile sind an de n Sam m elstellen in
Re cyclingh öfe n zu entsorgen.
• D ie Plastik teile h aben alle eine Identifik ationsm ark ierung,
sodass sie – w ie die anderen Mate rialien – recycelt
w erden k önnen.
• Beach ten Sie die gesetzlich en Vorsch riften.
Dieses Gerät erfüllt folgende EC Norm e n:
• Niedrig- Spannungs- Norm 2006/9 5/EC
• EM C Norm 89 /336/EEC und Ergänzung 9 2/31/EEC
sow ie 9 3/68/EEC
Das Sym bol auf de m Produk t ode r se ine r
Ve rpackung w eist darauf h in, dass die se s Produk t
nich t als norm ale r H aush altsabfall zu beh ande ln ist,
sonde rn an einem Sam m elpunk t für das Recycling
von ele k trisch en und e lek tronisch en Ge räten
abgegebe n w erden m uss. Durch Ih ren Beitrag zum
k orre k ten Entsorgen dieses Produk ts sch ützen Sie die
Um w e lt und die Gesundh e it Ih rer M itm ensch en.
Um w e lt und Ge sundh eit w erden durch falsch e s
Entsorgen gefäh rde t. W eitere Inform ationen über
das Recycling dieses Produ k ts erh alten Sie von Ih re m
Rath aus, Ih rer M üllabfuh r oder dem Gesch äft, in de m
Sie das Produk t gek auft h aben.
4
Page 10

Ch ére Clie nte , Ch er Client,
Nous vous rem ercions d'avoir ch oisi un aspirateur AEGElectrolux. Pour garantir une satisfaction totale , lire
attentivem ent ce m ode d'em ploi. A conserver pour s'y référer.
Description de votre aspirate ur
1. Connexion du flexible
2. Indicateur de rem plissage du bac à poussière
3. Pédale m arch e/arrêt
4. Pédale d’e nroule ur de câble
5. Variate ur de puissance
6. Roues
7. Conte ne ur à poussière
8. Poignée de transport
9 . Bouton d'ouverture du conte ne ur à poussière
10. Fle xib le ave c réglage de débit d ’air
11. Tube m étal te lescopique
12. Suce ur com biné pour tapis et sols durs
13. Suceur long
14. Petit suce u r
15. Brosse m euble s
16. Cartouch e filtrante
17. Cône d'aspiration
18. Park ing ve rtical
19 . Park ing h orizontal
Consigne s de sécu rité
• Lise z attentive m ent ce m ode d’e m ploi
• Avant d’utiliser cet aspirate ur,contrôlez que la
tension du réseau corresponde à la te nsion figurant
sur la plaq u e signalétiq ue se trouvant sous l’appareil.
• Ne m ettez pas en m arch e l’aspirateur s’il vous se m ble
q u’il com porte un défaut ou si le cordon
d’alim entation, ou la prise sont endom m agés.
N’essaye z e n aucun cas de répare r l’appareil vous-
m êm e. Les réparations faites par de s personne s non
q ualifiées ou inexpérim entée s peu ve nt donne r lie u à
de s ble ssures et/ou de s pannes grave s. L’e ntre tien de
cet appare il doit être e ffectué par un Centre S ervice
Agréé e n utilisant q ue des pièces d’origine. Pour
obte nir l'adresse du Centre Service Agréé le plus
proch e de votre dom icile, vous pou ve z contacte r
notre Se rvice Conseils Cosom m ateurs.
• Débranch ez toujours l’appareil, avant toute
opération d’entretien ou lorsque vous le transportez.
• Gardez toujours l’appareil h ors de portée de s enfants
et veillez à ce qu’il ne soit pas en fonctionnem ent
sans surve illance.
• Cet appare il est exclusivem ent destiné à un usage
dom estiq ue e t pour uniquem ent de s poussières
sèch es. Pour l’utilisation, ve uillez vous conform ez aux
instructions figurant sur ce tte notice.
• Ne jam ais tirer l’appareil par le cordon
d’alim entation. Ne pas tire r sur le cordon pour le
débranch e r.
• N’aspirez pas de liquides. N’aspirez pas d’objets pointus.
N’aspirez pas de braises ch audes ou de m égots incandescents.
N’aspirez jam ais à proximité de gaz inflamm ables. Les produits
en bombe aérosol peuvent être inflamm ables. Ne pas
vaporiser de tels produits à proxim ité ou sur l'aspirateur.
• Ne jam ais aspirer de poussière s extrèm em ent fines
telles que plâtre, cim ent, ce ndres froide s, farine, etc.
• Les dom mages provoqués par l'aspiration de poussières
extrèm em ent fines ne sont pas couverts par la garantie.
• Ne débranch e z pas l’appareil ave c les m ains h um ide s.
• Ne pas utiliser trop prêt du ch auffage, radiateur, poêles etc.
• Avant de com m e nce r à aspirer,assurez vou s que de
trop gros objets ne se trouve nt pas sur la surface à
aspirer et ceci pour évite r d’e ndom m age r le
contene ur à poussière et le fle xible.
M ode d’em ploi
• Avant toute utilisation, assurez vous que les filtres
sont bie n en place .
A Déroulez une longueur de cordon d’alim entation suffisante
et branch ez l’appareil sur une prise de courant. Une m arque
JAUNE sur le câble indiq ue la longueur idéale du cordon. Ne
jamais tirer le cordon au delà de la m arque ROUGE.
B Appuyez sur la pédale March e/arrêt pour m ettre en
m arch e l’aspirateur. Au dém arrage , la pleine
puissance est atte inte après 1 à 2 seconde s environ.
C Pour enrouler le cordon d’alim entation, il suffit
d’appuyer sur la pédale d’e nroule ur de câble après avoir
débranch é l’appareil. Il est conseillé de tenir la prise de
courant pendant l’enroulem ent du câble afin d’éviter
qu’elle ne vous h eurte ou ne h eurte les m eubles.
D La puissance d’aspiration pe ut être m odulée de deux
façons : en actionnant le variateur m écaniq ue de
puissance se trouvant sur le corps de l’aspirateur (D),
E ou à l’aide du régulateur se trouvant sur la poignée
du fle xible (E).
Entretie n
Com m ent vide r le conteneur à poussière
• Ne jam ais utiliser l'appareil si le conte ne ur à
poussière n'est pas en place.
• Pe ndant l’utilisation de l’aspirateur l’indicateur
lum ineux de rem plissage du bac à poussière est vert.
Ceci est tout à fait norm al.
20 Enlevez le conte ne ur à poussière en actionnant le
bou ton sur la poignée.
23 Enlevez le filtre de son logem ent.
21 Videz le contenu du conte ne ur à poussière en
poussant sur le bou ton d’ouvertu re orange.
23 Re m ettez le filtre en place.
22 Re fe rm ez le conteneur à poussière jusq u ’au click.
20 Re place z le conteneur à poussière dans l’aspirate ur.
• Attention : Il est tout à fait norm al que le voyant rouge
de l’indicateur clignote pendant l’utilisation de l’aspirateur.
Si le bac à poussière est vide et que l’indicate ur s’allum e,
ce la veut dire q ue la cartouch e filtrante est colm atée.
Dans ce cas, suivre les instructions dans le ch apitre
„Rem placem ent ou nettoyage de la cartouch e filtrante”.
5
Page 11

Re m placem ent et nettoyage des filtres
• Le bac à poussière doit être vidé lorsq ue l’indicateur
de re m plissage devient rouge. La vérification doit
toujours se faire le suceur soulevé du sol.
• Le s filtres doivent être nettoyés lorsq u’ils sont sales
et au m oins deux fois par an.
• N’utilise z jam ais l’appareil sans les filtres, ce q ui
pourrait provoq ue r une perte d’efficacité et
endom m ager le m oteur.
• Débranch ez toujours l’aspirateur avant de nettoyer les filtres.
Re m placem ent ou nettoyage de la cartouch e
filtrante
20 Enlevez le conte ne u r à poussière en actionnant le
bou ton sur la poignée.
23 Enlevez le filtre de son logem ent.
24 Sortir la cartouch e filtrante de la cage de prote ction.
25 Secouer la poussière se trouvant sur la cartouch e
filtrante et la cage de protection. Si nécessaire la
cartouch e filtrante et la cage de prote ction peu ve nt
être rincées à l’eau froide du robinet.
26 Les laisser séch er à l’air libre pendant e nviron 24
h eure s, pou r vous assurez q u’ils soie nt com plètem ent
secs avec d’être réutilisée s. Eviter l’e xposition directe
aux rayons du soleil ainsi qu’un séch age dans des
conditions extrêm es.
Si vous souh aite z utilise r votre aspirateur pendant
q ue le filtre type "autom obile" séch e, vous de ve z
m ettre en place le filtre supplém entaire q ue vous
trouverez dans l'em ballage.
24 Insérer la cage de protection dans son logem ent en le
poussant sur la cartouch e filtrante.
23 Re m ettez le filtre en place.
20 Re m ettez en place le contene ur à poussière e n
poussant ve rs le bas jusq u'au click .
Référence de la cartouch e filtrante: M e nalu x F102
Nettoyage du filtre m oteur
20 Enlevez le conte ne u r à poussière en actionnant le
bou ton sur la poignée.
27 Enlevez le filtre de son logem ent.
28 Rincez le à l'eau tiède et laissez le séch er com plètem ent.
27 Re m ettez le filtre en place.
20 Re place z le conteneur à poussière dans l’aspirate ur.
Re m placem ent du filtre de sortie d’air
29 Ouvrez le cou ve rcle arrière.
30 Enlevez le filtre ave c grille.
31 Enlevez le filtre de la grille et insérez y un nouve au
filtre.
30 Re m ettre le filtre avec grille dans l’aspirateur.
29 Referm ez le couve rcle arrière .
Référence du filtre de sortie d’air: Menalu x F132
Com m ent enleve z et m ettre en place le fle xible
32 Pou r connecter le flexible, poussez le juq u'au click .
Pour e nlever le flexible, il suffit de pousser le bouton
sur le bout du flexible .
Pour le respe ct de l’environnem ent
• Ne jetez pas l’em ballage, ni les appare ils usagés
n’im porte où !
• Le carton d’em ballage peut être m is à la colle cte de s
vieux papiers.
• Le sac en polyéth ylène (PE) peut être rem is à un
point collecte de PE pour le recyclage.
• La m ousse de polystyrene (PS) pe ut être rem is à un
point collecte de PS pour le recyclage.
• Re nse igne z vous auprès de s services adm inistratifs de
votre com m une pour connaître le centre de
recyclage dont dépe nd votre dom icile .
Blocages et filtres sales
• L'aspirate ur s'arrête autom atiq u em ent en cas
d'obstruction du flexible/tube/suceur ou si le s filtres
sont trop sale s.
• D ans de tels cas, le débranch e r du secteur, e t le laisser
refroidir pe ndant 20 - 30 m inutes. Supprim er la cause
du blocage et/ou nettoye r/re m place r les filtres.
• Puis redém arrez l'aspirate ur.
Dans le souci d’une am élioration constante de nos
produits,nous nous rése rvons le droit d’apporter à
le urs caractéristiq ues toute s m odifications liées à
l’évolution tech nique (décre t du 23.03.78).
Cet appare il est conform e aux directive s suivantes de
la C.E. :
• 2006/9 5/CE relative a la “basse tension”
• 89 /336/CEE “D irective CEM ” y com pris le s directive s
de m odifications 9 2/31/CEE e t 9 3/68/CEE.
Référence du filtre m oteur: Menalu x F132
Le sym bole sur le produit ou son em ballage
indiq ue que ce produit ne peut être traité com m e
déch et m énager. Il doit être re m is au point de
collecte dédié à cet e ffet (collecte et recyclage du
m atériel éle ctrique et électroniq ue). En procédant à
la m ise au reb ut de l'appareil dans le s règles de l’art,
nous préservons l'environne m ent et notre sécurité,
s’assurant ainsi q ue les déch ets seront traités dans
de s conditions optim um . Pour obte nir plus de détails
sur le recyclage de ce produit, ve uillez pre ndre
contact ave c le s services de votre com m une ou le
m agasin où vous avez e ffectué l'ach at.
6
Page 12

Geach te k lant,
Le e s deze gebruik saanw ijzing aandach tig door voordat u
de stofzuige r in gebruik nee m t e n le t vooral op de
veiligh e idsinstructie s. Be w aar h e t boe k je zodat u nog
eens iets k unt nale zen.
Besch rijving
1. Z u igopening
2. Indicatielam pje stofzak vol
3. Aan/uit- toe ts
4. Toe ts voor snoeropw ik k eling
5. Z u igk rach trege laar
6. W iel
7. Stofcontainer
8. Draaggreep
9 . Toets om de stofcontainer te opene n
10. Slang
11. Tele scoopzuigbuis
12. O m sch ak elbare zuigm ond
13. K ie re nzuigm ond
14. M eube lzuigm ond
15. Plum eau
16. Filte rcassette
17. Ta ut h olderen og forfilteret
18. Verticale parkeerstand
19 . H orizontale park e e rstand
Belangrijk e veiligh eidsinstructie s
• Le e s deze gebruik saanw ijzing aandach tig.
• Controleer voor h et in geb ruik nem en of de
netspanning in uw w oning en de op de stofzuiger
aangegeven ne tspanning ove re enk om en.
• Gebruik de stofzuiger nie t als h ij defect lijk t of als
h et snoer of de stek k er besch adigd is.
• Probeer de stofzuiger nooit zelf te h erstellen. Neem voor
reparaties altijd contact op m et onze service- afdeling.
• Tre k altijd de stek k er uit h e t stopcontact w anneer de
stofzuiger niet in ge bruik is e n voordat u e e n filter
gaat vervangen.
• Laat de stofzuiger nooit onbeh eerd w annee r h ij
ingesch ak eld is. Buiten be reik van k inderen h ouden.
• De stofzuiger is alleen gesch ik t voor h uish oude lijk
gebruik . Gebruik h e m zoals aangegeven in deze
gebruik saanw ijzing.
• Trek de stek ker nooit aan h et snoer uit h et stopcontact.
• Gebruik de stofzuiger niet op een natte onde rgrond
of voor h e t opzu igen van vloe istoffe n, m odde r, as of
sigarettenpeuk en. Nooit lich t- ontvlam bare of
explosie ve stoffen opzuigen. Stofzuiger niet in de
bu urt van ontvlam bare gassen gebruik en.
• De ste k k e r nooit m et natte h anden uit h e t
stopcontact trek k en.
• De stofzuige r niet te dich t bij verw arm ingstoe ste llen,
radiatoren, k ach els enz. gebruik en en opbergen.
• Voordat u de stofzuiger gaat gebruik en, grote of
sch erpe voorw erpen van de vloer ve rw ijde ren om
be sch adiging van stofcontainer en slang te voork om en.
In geb ruik nem en
• Controleer of de filters en de stofcontainer goed op h un
plek zitten voordat u de stofzuiger insch ak elt. Gebruik
de stofzuiger nooit zonde r filters of stofcontainer.
A Rol voldoende snoer af en steek de stek k e r in h e t
stopcontact. Een gele m ark ering op h et aansluitsnoer
geeft de ide ale snoerle ngte aan. Rol h et snoer nie t af
tot voorbij de rode m ark e ring.
B Druk op de aan/uit- toe ts om de stofzuiger in te
sch ak elen. Na h e t insch ak ele n w ordt h et volle
verm ogen na 1- 3 seconde n bereik t.
C Om h e t snoer w ee r op te rollen, druk t u m et u w voe t
op de toets. H ou d de stek k e r vast zodat deze geen
sch ade k an ve roorzak en.
D D e zuigk rach t k an w orde n afgesteld m et beh ulp van
de zuigk rach tre gelaar.
E De lengte van de tele scoopzuigbuis kunt u instellen
door de sch uifre ge laar naar be ne den te duw en en de
bu is naar be neden (verlengen) resp. naar b ove n
(verk orten) te sch uiven.
Onderh oud
Stofcontainer legen
• Gebruik de stofzuiger nooit zonder stofcontainer.
20 Druk op de ope ningstoets op de h andgreep e n trek
de stofcontainer uit de stofzuiger.
23 Z et de filter terug in zijn plaats.
21 Ve rw ijder h et vuil door op de oranje toets te druk k en.
23 Z et de filterset terug in de stofcom par tim ent.
22 Sluit h et dek sel van de stofcontainer totdat h et vastk lik t.
20 Z et de stofcontainer w eer in de stofzuiger.
Filters vervangen
• H e t indicatielam pje stofzak vol brandt tijde ns h et
gebruik groen. D e stofcontainer m oet gele e gd
w orden zodra h e t lam pje rood is, bij m axim aal
verm ogen e n m et de zuigm ond van de vloer.
• Le t op: H e t is norm aal dat h et rode lich tje van de
stofzakvol indicator aan en uit gaat tijdens h et gebruik .
Als de stofcontainer ge leegt is en de stofzak vol
indicator is nog ste e ds aan, betek ent dat dat de
filte rcassette verstopt is. In dat geval dient u de
instructies b ij Ve rvanging of reiniging van de
filte rcassette op te volgen.
• De filte rs m oeten m instens 2 m aal per jaar vervangen
w orden of w anneer ze zich tbaar vuil zijn.
• Gebruik de stofzuiger nooit zonde r filte rs. Daardoor
verm inde rt h et zuigverm ogen.
• Tre k de stek k e r uit h et stopcontact voordat u de
filte rs gaat ve rvangen.
• Le t op: verstopte filters leiden tot verm inderd
zu igve rm ogen en evt. tot overve rh itting van de
stofzuiger. De stofzu iger in dat geval ca. 30 m inuten
laten afk oelen, filters ve rvangen en stofzu iger w eer
insch ak ele n.
7
Page 13
Filtercassette vervangen of reinigen
20 Druk op de openingstoe ts op de h andgree p en trek
de stofcontainer uit de stofzuiger.
23 Z et de filter terug in zijn plaats.
24 Ve rw ijder de besch e rm h oes van de filte rcassette .
25 Sch u d h e t stof van h et filte r en de besch erm h oes in
de vuilnisbak . Eve ntueel k unt u h et filte r en de h oes
onde r k oud strom end w ate r sch oonspoele n.
26 Laat h et filter ca. 24 uur aan de luch t drogen. Z e t h e t
filte r pas w ee r in als h et h elem aal droog is. Ve rm ijd
direct zonlich t en extrem e droogom standigh eden.
Als u de stofzuige r w ilt gebruik en te rw ijl de
filte rcassette nog niet droog is, k unt u de
m ee ge leverde extra filtercassette gebruik en.
24 Druk de be sch erm h oes w eer op de filtercasse tte.
23 Z et de filterset terug in de stofcom par tim ent.
20 Z et de stofcontainer w eer in de stofzuige r e n druk op
de openingstoe ts totdat u e e n k lik h oort.
Bestelnum m e r filtercassette : M enalux F102
M otorfilte r sch oonm ak en
• Indien nodig, k an h et m otorfilte r w orden
uitge w assen of vervangen. Doe dit m instens 2 m aal
per jaar of als h et filte r ve rstopt is.
20 Druk op de openingstoe ts op de h andgree p en trek
de stofcontainer uit de stofzuiger.
27 Neem h et m otorfilte r uit de stofzuige r.
28 Spoel h e t filter uit onder w arm strom end w ater e n
laat h e t goed drogen.
27 Z et h et filter w ee r op z'n ple k .
20 Z et de stofcontainer w eer in de stofzuige r e n druk op
de openingstoe ts totdat u e e n k lik h oort.
Bestelnum m e r m otorfilte r : M e nalu x F132
Uitblaasfilter vervangen
29 Open h et filte rrooster.
30 Ve rw ijder h et filter en h et rooster.
31 Nee m h et filter uit h et rooster e n ze t ee n nieuw filter in.
30 Z et h et rooste r w eer in de stofzuiger.
29 Sluit h et filterrooste r.
M ilieubesch erm ing
• Ve rpak k ingsm ate riaal en afge dank te apparate n niet
zom aar w e ggooien!
• H e t verpak k ingsk arton k an in e e n container voor oud
papier gede pone e rd w orde n.
• Kunststoffen m et de aanduiding > PE< e n > PS<
k unnen h ergebruik t w orden.
Geblok k eerde luch tstroom en vuile filte rs
• De stofzuiger stopt autom atisch als e r e e n
verstopping ontstaat in de zuigm ond, buis of slang
of als de filte rs door vuil w orden geblok keerd.
• Tre k de stek ker uit h e t stopcontact e n laat de
stofzuiger 20 tot 30 m inuten afk oele n. Verw ijder de
verstopping en/of m aak de filters sch oon.
• Sch ak e l de stofzuiger w eer in.
Dit apparaat voldoet aan de volge nde EU rich tlijne n:
• Laagspanningsrich tlijn 2006/9 5/EC
• EM C- rich tlijn 89 /336/EEC m et toevoeging 9 2/31/EEC
en 9 3/68/EEC
H e t sym bool op h et product of op de verpak k ing
w ijst erop dat dit product niet als h uish oudafval m ag
w orden beh andeld. H et m oet ech te r naar ee n plaats
w orden gebrach t w aar elek trisch e en elek tronisch e
apparatuur w ordt gerecycled. Als u ervoor zorgt dat dit
product op de correcte m anier w ordt verw ijderd,
voork omt u m ogelijk voor mens en m ilieu negatieve
gevolgen die zich zouden k unnen voordoen in geval van
verk eerde afvalbeh andeling. Voor m eer details in verband
m et h et recyclen van dit product, neem t u h et best
contact op m et de gem e entelijk e instanties, h et bedrijf of
de dienst belast m et de verwijdering van h uish oudafval
of de w ink el w aar u h et product h ebt gek och t.
Bestelnum m e r uitlaatfilte r : Menalu x F132
Zuigslang inzetten en losnem en
32 Z uigslang inze tten door h em in de zuigopening te
druk ken tot h ij vastk lik t.
Z u igslang losne m en door de ontgrendelingstoets in
te druk k en.
8
Page 14

Gentile cliente,
grazie per aver sce lto AEG-Ele ctrolux viva spin. Per garantire
la m assim a soddisfazione, leggere attentam ente q uesto
libretto di istruzioni. Conservatelo per farvi riferim ento.
Descrizione
1. Foro di aspirazione
2. Indicatore contenitore pie no
3. Interruttore ON/O FF
4. Tasto riavvolgim ento cavo
5. Re golazione pote nza
6. Ruota
7. Conte nitore della polvere
8. M aniglia per il trasporto
9 . Pulsante per l’apertura de l conte nitore della polvere
10. Tubo flessibile
11. Tubo tele scopico in m etallo
12. Spazzola tappeti/pavim enti
13. Bocch e tta per fe ssure
14. Spazzola per im bottiti
15. Penne llo pe r i m obili
16. Filtro
17. Rete di prote zione
18. Posizionam ento verticale
19 . Posizionam ento orizzontale
Im portanti indicazioni ine re nti la sicurezza
• Leggere attentam e nte il prese nte Manuale di istruzioni.
• Prim a di utilizzare l'appare cch io, controllare ch e la
tensione di alim entazione corrisponda al voltaggio
indicato sulla targh etta di identificazione.
• Non accendere l'apparecch io q ualora appaia difettoso o
evide nzi un cavo o una spina danneggiati. Non cercare di
ripararlo. Per le riparazioni o per rich iedere gli accessori,
rivolgersi presso i centri di assistenza tecnica (sulle pagine
bianch e alla voce "Electrolux Assistenza tecnica" oppure
sulle pagine gialle alla voce "Elettrodom e stici Riparazioni
e accessori "sotto" Z anussi Servizio Te cnico").
• Estrarre sem pre la spina dalla presa quando
l'aspirapolvere non è in u so e prim a di eseguire le
operazioni di pulizia e di m anute nzione.
• Non lasciare m ai incustodito l'apparecch io quando è in
funzione. Te ne rlo lontano dalla portata dei bam bini.
• Questo apparecch io è destinato e sclusivam ente all'uso
dom estico e de ve essere utilizzato in conform ità alla
descrizione fornita nel presente Manuale di istruzioni.
• Non tirare il cavo dell'apparecch io. Non staccare la
spina tirando il cavo.
• Non utilizzare l'aspirapolvere su superfici bagnate o per aspirare
liquidi, fango, cenere e m ozziconi di sigaretta accesi. Non
aspirare sostanze o gas altamente infiam mabili od esplosivi.
• Non disinserire la spina dell'apparecch io con le m ani bagnate.
• Non utilizzare l'aspirapolve re ne lle im m ediate vicinanze
di caloriferi, stufe ed altri oggetti ch e generano calore.
• Prim a di com inciare, rim uovere dal pavim ento
oggetti ingom branti o taglie nti per e vitare danni al
contenitore de lla polve re o al fle ssib ile.
Istruzioni per l'uso
• Prim a di m ette re in funzione l'apparecch io,
assicu rarsi ch e i filtri si trovino ne lla posizione giusta.
A Prim a di utilizzare l'aspirapolvere, svolgere il cavo in
m odo ch e presenti una lungh ezza sufficiente e d
inserire la spina nella pre sa. Un se gno GIALLO posto
sul cavo indica la lungh ezza ideale. Non te ndere il
cavo oltre il segno RO SSO .
B Pe r accendere l'apparecch io prem ere il tasto ON/OFF.
Nei prim i avvii la m assim a pote nza e’ raggiunta dopo
circa 1 - 2 secondi.
C Per riavvolgere il cavo, azionare con il pie de
l'apposito tasto e guidare il cavo con la m ano per
assicu rarsi ch e non si avvolga troppo velocem ente
causando eve ntuali danni.
D La potenza può essere regolata spostando l'apposito
tasto di com ando.
E Si può regolare l’aspirazione m eccanicam ente anch e
aprendo/ch iudendo l’apertu ra sull’im pugnatura del
tubo fle ssibile.
M anutenzione
Rim uove re la polve re dal contenitore
• Usare se m pre l’aspirapolve re con il contenitore della
polvere inse rito.
• Il contenitore della polvere deve essere svuotato se la spia
diventa rossa quando l’aspirapolvere sta funzionando alla
m assim a potenza e la spazzola è sollevata da terra.
20 Rim uovere il conte nitore della polve re prem endo il
pulsante sull’im pugnatura.
23 Rim uovere il filtro dal suo posto.
21 Rim uovete il contenuto de l conte nitore pre m endo il
pulsante di apertura color arancione.
23 Inserire il filtro nel suo posto.
22 Ch iudete il coperch io del conte nitore della polvere
fino allo scatto.
20 Inserire il conte nitore della polvere dietro
all’aspirapolve re prem endo prim a di agganciarlo.
• Nota: Pe r la luce rossa è norm ale dell'indicatore
trem olare in funzione e a riposo durante l'uso.
Se il contenitore della polve re è svuotato e l'indicatore
è ancora attivo, significa ch e il filtro de lla cartuccia è
bloccato. In q uesto caso, segua le istruzioni del
capitolo 'Sostituzione o pulizia del filtro a cartuccia '.
Sostituzione dei filtri
• I filtri devono essere sostituiti alm eno due volte
all'anno oppure q uando sono visibilm ente sporch i.
• Azionare l'appare cch io solo con i filtri inse riti, al fine
di evitare una riduzione della forza di aspirazione .
• Disinse rire la corrente prim a di procedere alla
sostituzione dei filtri.
9
Page 15

Sostituzione o pulizia de l filtro a cartu ccia
20 Rim uovere il conte nitore della polve re prem endo il
pulsante sull’im pugnatura.
23 Rim uovere il filtro dal suo posto.
24 Rim uove re la griglia di protezione dal filtro a cartuccia.
25 Scuotere il filtro e la griglia di prote zione in un
cestino al fine di e lim inare lo sporco, e se ne cessario
risciacquarli sotto acqua fredda.
26 Lasciar asciugare per circa 24 ore prim a di riutilizzarli.
Evitare la luce diretta del sole e fonti di calore.
Se volete usare il vostro apparecch io m entre il filtro
in carta si sta asciugando, potete usare un e xtra
filtro in carta ch e trovate all’interno de lla scatola.
24 Inserire la griglia di prote zione prem endola sul filtro
a cartuccia.
23 Inserire il filtro nel suo posto.
20 Inserire il contenitor della polvere die tro
all’aspirapolve re prem endo prim a di agganciarlo.
Re fe renza filtro in carta: M e nalux F102
Pulizia del filtro m otore
Se ne cessario, il filtro m otore puň e sse re lavato o
sostituito alm eno du e volte all’anno se intasato.
20 Rim uovere il conte nitore della polve re prem endo il
pulsante sull’im pugnatura.
27 Rim uovere il filtro dal suo posto.
28 Riasciacq uate lo sotto un rubinetto e lasciatelo
asciugare com ple tam ente.
27 Inserire il filtro nel suo posto.
20 Ch iudete il coperch io del conte nitore della polvere
fino allo scatto.
Re fe renza filtro m otore: Menalu x F132
Sostituzione del filtro in uscita
29 Aprite la griglia poste riore.
30 Rim uovete il filtro con la griglia.
31 Togliete il filtro dalla griglia e inse rire un nuovo filtro
nella griglia.
30 Inserire il filtro con la griglia nell’aspirapolve re.
29 Ch iudere la griglia poste riore.
Re fe renza m icrofiltro: M enalux F132
Colle gam ento/Scolle gam ento del flessibile alla
presa di aspirazione
32 Pe r colle gare il flessibile alla presa di aspirazione ,
prem ere e colle gare.
• Pe r scolle gare il flessibile dalla pre sa di aspirazione ,
prem ere il bottone alla fine del flessibile.
Tutela am bie ntale
• Riciclare, per q uanto possibile , i ve cch i apparecch i e
gli im ballaggi.
• L'im ballaggio in cartone può essere sm altito nel
raccoglitore della carta usata.
• D e positare il sacch etto in polietilene (PE) nell'apposito
punto di raccolta, ai fini del relativo riciclaggio.
• Depositare la gom m a pium a del polistirolo al punto
de ll'accum ulazione de l PS per riciclare.
Riciclaggio dell'apparecch io
• Tutti i com ponenti in m ateria plastica sono dotati di
una m arcatura di identificazione del m ateriale , in
m odo da pote r essere tranquillam ente riciclati, com e
gli altri m ateriali, nel m om ento in cui l'apparecch io
non vie ne piů uti lizzato.
• Rivolgersi a tale scopo all’ente locale responsabile per
la tute la am bientale.
Flusso de ll'aria bloccato e filtri sporch i
• L'aspirapolve re si arresta autom aticam ente q ualora la
bocch etta/il tubo/il tubo fle ssibile risulti ostruito,
oppure se i filtri sono intasati da im pu rità.
• D opo aver disinserito l'aspirapolvere dall'alim entazione
elettrica, lasciarlo raffreddare per 20- 30 m inuti.
Rim uove re l'eve ntuale ostruzione e/o pulire i filtri.
• Avviare nuovam ente l'apparecch io.
Questa apparecch iatura è conform e alle se guenti
Direttive CE:
• Direttiva Bassa te nsione 2006/9 5/CE
• Direttiva EM C 89 /336/EEC e successivi em endam enti
9 2/31/EEC e 9 3/68/EEC
Il sim bolo sul prodotto o sulla confe zione indica
ch e il prodotto non de ve essere conside rato com e un
norm ale rifiuto dom estico, m a deve essere portato
nel punto di raccolta appropriato per il riciclaggio di
appare cch iature elettrich e ed elettronich e.
Provvede ndo a sm altire q uesto prodotto in m odo
appropriato, si contribuisce a evitare potenziali
conseguenze negative per l’am biente e per la salute ,
ch e potrebbero de rivare da uno sm altim ento
inadeguato del prodotto. Pe r inform azioni più
de ttagliate sul riciclaggio di q u e sto prodotto,
contattare l’ufficio com unale , il se rvizio locale di
sm altim ento rifiuti o il ne gozio in cui è stato
acq uistato il prodotto.
10
Page 16

Estim ado cliente
Le agradecem os que h aya ele gido un viva spin de AEGElectrolux. Para su absoluta satisfacción, lea de tenidam ente
este folleto de instrucciones y consérve lo com o referencia.
Descripcion
1. Tom a m anguera aspiración
2. Indicador de funcionam iento
3. Interruptor de encendido/apagado
4. Pulsador recogecable s
5. Re gulador de pote ncia de aspiracion
6. Rueda
7. Depósito
8. Asa para transporte
9 . Botón de apertura del de pósito
10. M anguera
11. Tubo tele scópico
12. Cepillo doble posición
13. Boq uilla para espacios e strech os
14. Boq uilla para tapice rías
15. Cepillo para basula
16. Cartuch o filtrante
17. M alla protectora
18. Park ing h orizontal
19 . Park ing ve rtical
Norm as im ortantes de seguridad
• Le a de tenidam ente este folleto de instrucciones.
• Antes de utilizar el aparato, com pruebe que la tensión de
alim entación de la red dom éstica corresponde a la
tensión indicada e n la placa de caracte rísticas del aparato.
• No conecte e l aparato si e ste presenta alguna anom alía
de cualq uier tipo, o si tiene el cable o e l ench ufe
danado. No intente re parar usted m ism o el aparato.
Para solicitar asistencia técnica o accesorios, opóngase
en contacto con el Servicio de Atención al Cliente.
• Desench ufe sie m pre el aparato de la red cuando no
lo esté utilizando o cuando lleve a cabo cualq uier
trabajo de lim pieza o m antenim iento del m ism o.
• Nunca de je el aparato desatendido cuando se encuentre
ench ufado. Manténgalo fue ra del alcance de los ninos.
• Este aparato es solo para uso dom éstico. Solo se debe
utilizar siguie ndo las instrucciones de este folleto.
• No arrastre el aparato tirando del cable . No lo
de se nch ufe tirando del cable.
• No utilice el aparato sobre superficies m ojadas, ni para
aspirar líq uidos, barro, cenizas o colillas de cigarrillos
ence ndidas. No se debe aspirar ninguna sustancia q ue
sea altam ente inflam able o explosiva, ni gases.
• No de se nch ufe e l aspirador con las m anos m ojadas.
• No acerq ue dem asiado el aspirador a fuentes de calor
com o cale factores, radiadores, estufas, etc.
• Antes de com e nzar a usar el aspirador, por favor
asegúrese de que no h aya obje tos en el suelo para
prevenir dańos en el depósito o e n el tubo flexible.Lea
detenidam ente este folleto de instrucciones.
Intrucciones de uso
• Antes de pone r el aspirador e n m arch a, com pruebe
q ue los filtros se encuentran colocados
corre ctam ente.
A Ante s de utilizar e l aparato, extraiga una longitud
suficiente de cable y conecte el e nch ufe a la red. Una
m arca AMARILLA e n el cable le indicaré cual es la
longitud ideal. No extienda el cable m ás allá de la
m arca ROJA.
B Pulse el botón de encendido / apagado para poner e l
aparato e n m arch a. En e l prim er u so, la m áxim a
potencia es conseguida en 1 ó 2 se gundos
aproxim andam ente.
C Para recoger el cable de alim entación, pulse con el
pie el botón recogecable s, y guíe el cable con la
m ano para asegurar q ue el ench ufe no golpee
causando algún dano.
D Para ajustar la potencia de succión, utilice el m ando
de regulación.
E Tam bién puede realizarse abriendo o cerrando la
rejilla situada en el m ango del tubo.
M antenim iento
Vaciado de l depósito
• El depósito debe se r vaciado si el indicador cam bia de
verde a rojo cuando e l aspirador funciona a la
m áxim a potencia y el ce pillo se le vanta de l sue lo.
• Antes de encender su aspirador com pruebe q ue
siem pre está instalado e l depósito.
20 Extraiga el depósito m ediante e l botón de apertu ra
situado en el asa.
23 Sacar el filtro.
21 Vaciar el contenido del depósito presionando e l
botón naranja.
23 Colocar de nu evo e l filtro en su sitio.
22 Cerrar el depósito con un ‘click ’.
20 Colocar el depósito de nuevo en el aspirador.
• Obse rvación: Es norm al que la luz roja del indicador
parpadee durante la utilización.
Si e l depósito está vacío y el indicador continúa
activo, significa q ue el filtro está saturado. En ese
caso, siga las instrucciones del capítulo „Sustitución
o lim pieza de l filtro” .
Sustitucion de los filtros
• Los filtros se deben sustituir por lo m enos dos ve ces
al ano o cuando estén visible m ente sucios.
• Sie m pre se debe utilizar el aspirador con los filtros
colocados para e vitar una re ducción de aspiración.
• Antes de cam biar los filtros, desench ufe el aparatote
la red.
• No utilice una lavadora para lavar los filtros.
11
Page 17

Cam b iar o lim piar el filtro
20 Extraiga el depósito m ediante e l b otón de apertura
situado en el asa.
23 Sacar el filtro.
24 Re tire la m alla protectora del cartuch o del filtro.
25 Sacude el polvo del filtro y la m alla. Si es necesario, el
filtro y la malla se puede n lavar bajo el grifo con agua fría.
26 Dejar se car al aire durante aproxim adam e nte 24
h oras, asegurándose de q ue están com pletam ente
secos ante s de utilizarlos de nuevo. Evitar luz solar
directa y condiciones de secado extre m as.
Si de se a utilizar su electrodom éstico m ientras se e stá
secando el filtro, debe utilizar el filtro extra incluido
en la caja de su aspirador.
24 Coloca de nuevo la m alla prote ctora alre dedor del
filtro (B).
23 Colocar de nu evo e l filtro en su sitio.
20 Coloque el depósito nuevam ente en el aspirador
aje rcie ndo presión h asta que encaje con el sistem a “clic”.
Núm ero de re fe rencia del cartuch o filtrante :
M e nalux F102
Lim pieza del filtro del m otor
Si es necesario, el filtro de l m otor se puede lavar o
reem plazar por lo m enos dos vece s al año o si se atasca.
20 Extraiga el depósito m ediante e l b otón de apertura
situado en el asa.
27 Sacar el filtro.
28 Aclarar bajo e l grifo y dejar secar com pletam ente .
27 Colocar de nu evo e l filtro en su sitio.
20 Colocar el depósito de nuevo en el aspirador.
Núm ero de referencia del filtro m otor: M enalux F132
Cam b iar el filtro de salida de aire
29 Abra la cubierta en la parte posterior del aspirador.
30 Re tire el filtro de salida de aire junto con su rejilla.
31 Extraiga el filtro de la rejilla y ponga un nuevo filtro
en la rejilla.
30 Coloq ue en su lugar la rejilla junto con el filtro.
29 Cierre la cubierta presionándola h asta que suene un clic.
Núm ero de referencia del m icro filtro: M enalux F132
M anejo de la m angue ra conexión / de sconexión
de la tom a de aspiración
32 Para conectar el tubo flexible en la boq uilla de
succión, presione h asta que encaje con el sistem a “clic”.
Para de sconectar el tubo flexible de la boquilla de
succión, presione el botón del de l final del tubo fle xible.
Protección de l m edio am biente
• Inte nte re ciclar tanto el m aterial del em balaje com o
cualq uier aparato antiguo.
• La caja del em balaje se puede depositar e n el
contene dor de papel.
• Deposite la bolsa de plástico fabricada de polietileno
(PE) en un punto o contenedor de reciclaje.
• Deposite la espum a de l poliestireno en e l punto de la
cole cción del PS para reciclar.
Re ciclaje de l Aparato al final su vida útil
• Todos los com ponentes de plástico llevan m arcados
un sím bolo que identifica el tipo de m aterial de l q ue
están com puestos para poder se r re ciclados al final
de l periodo de uso del aparato.
• Por favor, consulte a la autoridad local.
Obstrucción de la circulación del aire y filtros
sucios
• El aspirador se de tiene autom áticam ente si ocurre
alguna obstrucción e n la boq uilla / tubos /
m anguera, o si los filtros se encuentran m uy sucios.
• Desench ufe e l aparato de la re d y deje q ue e l aparato
se e nfríe durante 20 - 30 m inutos. Retire la causa de
la obstrucción y/o lim pie los filtros.
• Vuelva a pone r en m arch a el aspirador.
Este aparato cum ple los re q uisitos de las siguientes
directivas europeas:
• Directiva de baja te nsión 2006/9 5/CE
• Directiva EM C (Com patibilildad ele ctrom agnética)
89 /336/CEE con las m odificacione s 9 2/31/CEE y
9 3/68/CEE
El sím bolo en el producto o en su em balaje
indica q ue este producto no se pue de tratar com o
de spe rdicios norm ales de l h ogar. Este producto se
de be entregar al punto de recole cción de eq uipos
eléctricos y ele ctrónicos para reciclaje. Al asegurarse
de q ue este producto se de se ch e correctam ente,
uste d ayudará a evitar posibles consecuencias
negativas para el am biente y la salud pública, lo cual
podría ocurrir si este producto no se m anipula de
form a adecuada. Para obte ner inform ación m ás
de tallada sobre el reciclaje de este producto, póngase
en contacto con la adm inistración de su ciudad, con
su servicio de desech os del h ogar o con la tie nda
donde com pró el producto.
Detalle s de l fabricante
Suzh ou Kingcle an Floorcare Co. Ltd.
Xiangyang Road, Suzh ou New District.
Suzh ou, Jiangsu, Ch ina, 215009
12
Page 18

Instruções de utilização
Obridado por te r e scolh ido um aspirador AEG- Electrolux
viva spin. Para garantir satisfação total, le ia este livro de
instruçõe s com cuidado.
Descriçao
1. Encaixe de sucção da m angue ira
2. Indicador de perform ance do depósito do lixo
3. Botão de Ligar/D esligar
4. Te cla de recolh a autom ática do cabo eléctrico
5. Se lector de potência de aspiração / cu rsor
6. Rodas
7. Com partim ento para de pósito do lixo
8. Pe ga de transporte
9 . Botão para abrir o depósito do lixo / poeiras
10. M angueira de aspiração com re gulação débito de ar
11. Tubo tele scópico/m etal/plástico consoante o m odelo
12. Escova de dupla função, para carpetes e soalh os
13. Tubo para frestas e rodapés
14. Bocal para pisos duros
15. Escova para m óveis
16. Cassete filtro cilindrica
17. Cone de protecção do de pósito de poe iras
18. Parq ueam ento na vertical
19 . Parq ueam ento na h orizontal
Instruçoes de se gurança
• Le ia cuidadosam ente este livro de instruções.
• Antes de utilizar o seu aspirador ve rifiq ue se a tensão
da corrente eléctrica dom éstica corre sponde à tensão
inscrita na placa do apare lh o.
• Não ligue o aparelh o se lh e parecer q ue está avariado
ou se a fich a ou o cabo e léctrico estive rem
danificados. Não tente efectuar reparações. Para
reparações ou aquisição de acessórios contacte os
Se rviços de Assistência Técnica da Ele ctrolux.
• Re tire sem pre a fich a da tom ada q uando o aparelh o
não estive r e m uso e antes de e fe ctuar q ualq uer
lim peza ou operação de m anutenção.
• Nunca de ixe o aparelh o e m funcionam e nto se m
vigilância. Mante nh a- o fora do alcance de crianças.
• Este aspirador destina- se exclusivam ente a uso
dom éstico. Utilize- o de acordo com as instruções.
• Não arraste o seu aspirador nem o desligue da fich a
puxando pelo cabo eléctrico.
• Não utilize o aspirador em supe rfícies m olh adas ou
para aspirar líq uidos, lam a, resíduos incandescente s
(cinzas, b rasas, pontas de cigarro … ). Não aspire
sub stâncias ou gases inflam áve is ou explosivos.
Estes m ateriais podem causar danos sérios ao m otor
– danos que não e stão cobertos pela garantia.
• Não de sligue o apare lh o com as m ãos h úm idas.
• Não utilize o apare lh o dem asiado próxim o de
aquece dores, irradiadores, fogões de sala, etc..
• Antes de utilizar o aspirador rem ova objectos de grandes
dim ensões e objectos pontiagudos ou cortantes, para
evitar danificar o depósito de lixo ou a m angueira .
Instruçoes de utilizaçao
• Antes de u tilizar o seu aspirador certifiq ue- se de q ue
os filtros estão corre ctam ente colocados.
A Desenrole um a q uantidade suficiente de cabo
eléctrico e ligue a fich a à tom ada de corre nte antes
de utilizar o aspirador. U m a m arca AM ARELA indica a
q uantidade de cabo ideal. Não e stiq ue o cabo para
além da m arca VERM ELH A.
B Carregue no botão Ligar/Desligar para ligar o aparelh o.
Ao ligar o aspirador atinge- se a potência m áxim a após
1- 2 segundos. Aconselh a-se a regular a potência de
aspiraçao no MIN ante s de ligar o aparelh o.
C Para recolh e r o cabo eléctrico carre gue com o pé na
tecla de recolh a autom ática e orie nte - o com a m ão
de m odo a que não ch icoteie, causando estragos.
D Para aum entar / dim inuir a potência de sucção,
ajuste o cursor de controlo no corpo do apare lh o.
E A sucção tam bém pode se r regulada através da pe ga
da m angueira, abrindo / fech ando o respiradouro .
M anutençao
Re m ove r o lixo do depósito
• Nunca funcionar com o aspirador se m o de pósito do
lixo estar instalado no aparelh o.
• O de pósito de poeiras te m de se r e svaziado se o
indicador de perform ance m udar da cor verde para a
cor verm elh a q uando o aspirador e stive r a funcionar
na potência m áxim a e a escova le vantada do ch ão.
20 Re tirar o de pósito do lixo, utilizandoo botão na pega
para e sse e fe ito.
23 Re tirar o filtro do seu lugar.
21 Re tirar o lixo do contentor pre m indo o b otão
laranja de abe rtura.
23 Voltar a pôr o filtro no seu lugar.
22 Fech ar a tam pa do conte ntor de poeiras até ouvir um clic.
20 Voltar a colocar o contentor de poeiras dentro do aspirador.
• Nota: É norm al para a luz verm elh a do indicador
cintilar sobre e fora durante o uso.
Se o recipiente da poeira for esvaziado e o indicador
for ainda ativo, significa q ue o filtro do cartuch o
está obstruído. Neste caso, siga as instruções do
capítulo 'Substituicao ou lim peza da cassete do filtro'.
Substituição ou lim peza dos filtros
• O s filtros devem ser substituídos pelo m enos duas
veze s por ano ou quando estiverem visivelm ente sujos.
• U tilize sem pre o aspirador com os filtros instalados
para evitar redução do poder de aspiração do aparelh o.
• Desligue o aparelh o da corrente antes de m udar
lim par o contentor ou os filtros. Nunca lave os
filtros na m áquina da louça / roupa.
13
Page 19

Substituição ou lim peza da cassete do filtro
O aspirador deve funcionar sem pre com o filtro instalado.
20 Abrir o capot do aprelh o e retirar o depósito de
poeiras do aspirador.
23 Re tirar o filtro do seu lugar.
24 Re tirar a re de de protecçãoda cassete filtro cilindrica.
25 Sacudir a sujidade do filtro e da rede para um caixote .
Se necessário o filtro e a rede pode m ser lavados, com
água fria, debaixo da água corrente da torneira.
26 Deixar se car com pletam ente ao ar cerca de 24 h oras,
para garantir q ue estão com pletam entesecos ante s
de se rem reutilizados. Evitar a e xposição directa ao
sol, e situaçoes de calor inte nso ( secadores,
aquece dores, e tc).
Se quiser continuar a utilizar o aparelh o enq uanto o
filtro está a secar, pode faze- lo, utilizando o filtro extra
que se encontra de ntro da em balagem do aparelh o.
24 Voltar a colocar a rede de protecção no filtro,
bastando e ncaixá- la na cassete filtro cilindrica.
23 Voltar a pôr o filtro no seu lugar.
20 Inserir novam ente o de pósito do lixo no aspirador
pressionando até ouvir um clic.
Re fe rência do filtro: M e nalux F102
Lim peza do filtro do m otor
Se necessário, o filtro do m otor tam b ém pode ser
lavado ou substituido no m ínim o duas vezes por ano
se ficar entupido com a sujidade.
20 Abrir o capot superior e retirar o de pósito de poeiras
do aspirador, prem indo o botão de abertura.
27 Re tirar o filtro do seu lugar.
28 Lavar debaixo de água corre nte e deixar secar
com pletam e nte ao ar.
27 Voltar a pôr o filtro no seu lugar.
20 Inserir novam ente o depósito de poeiras no aspirador.
Fech ar o capot superior
Re fe rência do filtro do m otor: Menalu x F132
Substituiçâo do filtro de exaustão de saída de ar
29 Abra a tam pa de tre nte .
30 Re tire a grelh a posterior para rem ove r o filtro de
exaustao com grelh a.
29 Ponh a o filtro com grelh a e torne a colocá- la no aspirador.
31,30 Fech e a tam pa pressionando- a até ouvir um
estalido.
Re fe rência do filtro de exaustao: Menalux F132
Colocar e retirar a m angueira no encaixe de
sucção do aspirador
32 Para colocar a m angueira no encaixe de sucção do
aspirador, pressione até ouvir um clic.
Para rem ove r a m angueira do e ncaixe de sucção do
aspirador, pressione o botão no final da m angueira
Protecção do am biente
• Te nte reciclar o m aterial de em balagem e os
apare lh os fora de uso.
• A e m balagem de cartão deve se r colocada nos
contentores de papel para re ciclagem .
• Deposite os sacos de plástico de polietile no (PE) nos
contentores para plásticos de polietile no.
• Deposite a espum a do poliestireno no ponto da
cole ção do PS para reciclagem .
Re ciclagem de apare lh os fora de uso
• Todos com ponentes de plástico estão ide ntificados
com um a m arca e spe cífica indicando q ue pode m ser
reciclados, tal com o outros m ateriais plásticos,
q uando o aparelh o e stiver fora de uso.
• Inform e- se junto da autarq uia da sua re sidência,
para re colh a deste m aterial. Ajude tam bém a
prote ge r o am biente.
Bloq ueio do fluxo de ar e filtros sujos
• O aspirador pára autom aticam e nte se ocorrer um
entupim e nto a níve l das e scovas/tubos/m angue ira ou
se os filtros estiverem m uito sujos.
• Nesta circu nstância de sligue o aspirador da corrente
e de ixe - o arrefe cer durante 20- 30 m inutos. Rem ova
a causa do entupim ento e/ou lim pe os filtros. Em
caso de necessidade pode se m pre recorrer a um
Se rviço de Assistência Técnica da Marca.
• Ligue novam ente o aspirador.
Este aparelh o está de acordo com as se guintes
Directivas EC :
• Directiva Baixa Voltagem 2006/9 5/EC
• Directiva EM C 89 /336/EEC com aditam entos
9 2/31/EEC e 9 3/68/EEC
O sím bolo no produto ou na em balagem indica
q ue este produto não pode ser tratado com o lixo
dom éstico. Em vez disso, deve se r entregue ao centro
de recolh a se lectiva para a reciclagem de
eq uipam ento eléctrico e ele ctrónico. Ao garantir u m a
elim inação ade q uada deste produ to, irá ajudar a
evitar eventuais conseq uências negativas para o m eio
am biente e para a saúde púb lica, q ue , de outra
form a, poderiam ser provocadas por um tratam ento
incorre cto do produto. Para obte r inform ações m ais
porm enorizadas sobre a reciclagem de ste produto,
contacte os serviços m unicipalizados locais, o centro
de re colh a se lectiva da sua área de re sidência ou o
estabele cim ento onde adq uiriu o produto.
14
Page 20

Αξιότιµ η π ελάτισ σα, αξιότιµ η π ελάτη ,
Ευχαριστούµε π ου επ ιλέ ξατε µία σκούπ α AEG/ELECTROLUX.
Προσέ ξτε π ριν απ’ όλα τις υποδείξεις ασφαλείας.
Χαρακτη ριστικά
1 Στόµιο εισαγω γής λάστιχου
2 Η λεκτρονικός δείκτη ς λειτουργίας
3 Πλήκτρο έ ναρξη ς / λήξη ς
4 Πλήκτρο επ αναφοράς καλω δίου
5 Ρυθµ ιστής ισχύος
6 Ρόδ α
7 ∆οχείο σκόνη ς
8 Λαβή µεταφοράς
9 Πλήκτρο ανοίγµατος δ οχείου σκόνη ς
10 Λάστιχο
11 Τη λεσκοπ ικός σω λήνας
12 Πέ λµα δ ιπ λής λειτουργίας
13 Πέ λµα για στενέ ς κοιλότη τες
14 Πέ λµα για ταπ ετσαρίες
15 Βουρτσάκι
16 Φίλτρο σε κυλινδρικό π ερίβλη µα
17 Αφαιρεστε το κωνοειδ εσ εξαρτη µ α απ ο τη θεση του
18 Θέ ση για κάθετη τοπ οθέ τη ση
19 Θ έ ση για οριζόντια τοπ οθέ τη ση
Ση µ αντικέ ς οδη γίες ασφάλειας
• ∆ιαβάστε τις οδη γίες χρήσεω ς π ροσεκτικά.
• Πριν χρη σιµ οπ οιήσετε τη συσκευή, ελέ γξτε ότι η
συσκευή συνδέ εται σε ρεύµα του οπ οίου η τάση και το
είδος ρεύµ ατος συµ φω νούν µ ε τα στοιχεία π ου
αναγράφονται στη ν π ινακίδα τη ς συσκευής.
• Μ η ν θέ σετε τη συσκευή σε λειτουργία α ν εµφανίζει
οποιοδ ήπ οτε πρόβλη µα.
• Μ η ν επιχειρήσετε να δ ιορθώσετε βλάβες µόνοι σας.
Όλες οι εργασίες συντήρη ση ς και επισκευής π ρέπ ει να
π ραγµατοποιούνται απ ό εξουσιοδ οτη µέ να συνεργεία.
• Να βγάζετε π άντα το φις απ ό τη ν π ρίζα όταν δ εν
χρη σιµ οπ οιείται τη συσκευή ή π ροχω ρείτε σε
καθαρισµό και συντήρη ση τη ς σκούπ ας.
• Να λειτουργεί η συσκευή µόνον εφόσον βρίσκεται υπ ό
τη ν επ ιτήρη σή σας . Να κρατάτε τα παιδιά µακριά απ ό
τη συσκευή.
• Η συσκευή αυτή π ροορίζεται µόνο για οικιακή χρήση .
Χρη σιµοποιήστε τη ν σκούπ α όπ ω ς αναφέρεται στις οδη γίες.
• Μ η ν τραβάτε τη συσκευή απ ό το καλώδ ιο. Μ η ν
χρη σιµ οπ οιείται τη συσκευή αν είναι φθαρµέ νο το
καλώδιο. Σε π ερίπ τω ση φθοράς ή βλάβη ς του καλωδίου,
π ρέ π ει να αντικατασταθεί απ ό εξουσιοδοτη µ έ νο
συνεργείο. Α υτό δεν καλύπ τεται απ ό τη ν εγγύη ση .
• Ποτέ µη ν σκουπίζετε σε βρεγµέ νους χώρους, υγρά,
λάσπ η , καυτή στάχτη και αναµ µ έ να απ οτσίγαρα. Μη ν
σκουπ ίζετε κοντά σε εύφλεκτα αέ ρια.Μ η ν σκουπ ίζετε
σκόνη απ ό ασβέ στη , τσιµ έ ντο, αλεύρι, κρύες ή ζεστέ ς
στάχτες. Τα π αραπ άνω µ π ορούν να π ροκαλέ σουν
σοβαρές βλάβες σ το µοτέ ρ – βλάβες π ου δ εν
καλύπ τονται απ ό τη ν εγγύη ση .
• Μ η ν βγάζετε το φις απ ό τη ν π ρίζα µε βρεγµέ να χέ ρια.
• Μ η ν λειτουργείτε τη ν συσκευή κοντά σε καλοριφέ ρ,
φούρνους και κάθε π η γή θερµότη τας.
• Πριν θέ σετε σε λειτουργία τη σκούπ α, µετακινήστε και
µαζέ ψ τε µεγάλα και αιχµ η ρά αντικείµενα, π ου µπ ορούν
να π ροκαλέ σουν ζη µιά στο κάδο συλλογής σκόνη ς και
στο λάστιχο
Οδη γίες Χρήσεω ς
Πριν τη ν εκκίνη ση ελέ γξτε αν τα φίλτρα βρίσκονται στη
θέ ση τους..
A Ξετυλίξτε όσο καλώδιο θεω ρείται απ αραίτη το και
βάλτε το φις στη πρίζα. Έ να ΚΙΤΡΙΝΟ ση µάδι δείχνει
τη ν ιδανική έ κταση του καλω δίου. Μ η ν π ροεκτείνετε το
καλώδ ιο π έ ρα απ ό το κόκκινο ση µ άδ ι.
B Πιέ στε το π λήκτρο έναρξη ς/λήξη ς. Αρχικά, η π λήρη ισχύς
επ ιτυγχάνεταιύστερα απ ό περίπ ου 1-2 δευτερόλεπ τα.
C Για να επανατυλίξετε το καλώδ ιο π ιέ στε το αντίστοιχα
π λήκτρο µε το π όδι και ταυτόχρονα οδη γήστε το
καλώδ ιο µε το χέ ρι για τη ν απ οφυγή τυχόν ζη µ ιών.
D Μετακινώντας το ρυθµιστή ισχύος προσαρµόζετε τη ν ισχύ.
E Η ισχύς µπ ορεί επ ίση ς να ρυθµιστεί και µέ σο του
διαφράγµατος π ου υπ άρχει στη λαβή στο λάστιχο.
Συντήρη ση
Αφαίρεση σκόνη ς απ ό το δοχείο
Πάντοτε να λειτουργείτε τη ν σκούπ α µε τη ν σακούλα
σκόνη ς τοπ οθετη µ έ νη .
20 Aφαιρέστε το δ οχείο σκόνη ς π ατώντας το π λήκτρο
ανοίγµατος π ου βρίσκεται στη λαβή.
23 Αφαιρέ στε το φίλτρο απ ό τη θέ ση του.
21 Αφαιρέ στε το π εριεχόµ ενο του δοχείου π ατώντας το
π ορτοκαλί π λήκτρο.
23 Τοπ οθετήστε το φίλτρο π ίσω στη θέ ση του.
22 Κλείστε το δοχείο µέ χρι να ακουστεί χαρακτη ριστικός
ήχος ότι κούµπ ω σε
20 Αφαιρέ στε τη σακούλα και αντικαταστήστε µ ε
καινούργια (εικ. 22).
Αντικατάστασ η τω ν φίλτρω ν
• Το δοχείο σκόνη ς π ρέπ ει να αδειάζετε µόλις ο δείκτη ς
µετατραπ εί σε κόκκινο και όταν η συσκευή λειτουργεί µε
µέ γιστη ισχύ και το π έ λµα δεν ακουµ π ά στο π άτω µα.
• Τα φίλτρα θα π ρέπ ει να αντικαθιστούνται τουλάχιστον
δύο φορές το χρόνο.
• Πάντοτε να λειτουργείτε τη σκούπ α µε τα φίλτρα
τοποθετη µ έ να, για να απ οφύγετε µειω µέ νη απ ορρόφη ση .
• Απ οσυνδέ στε τη σκούπα απ ό το η λεκτρικό ρεύµα
π ροτού αλλάξετε τα φίλτρα.
Ση µείω ση : Είναι φυσιολογικό η κόκκινη λυχνία να
αναβοσβήνει κατά τη διάρκεια λειτουργίας τη ς σκούπ ας.
Αν έ χετε αδειάσει το δοχείο σκόνη ς και η λυχνία είναι
ακόµ η ενεργή, ση µαίνει ότι έ χει βουλώσει το φίλτρο
π ου βρίσκεται σε κυλινδρικό π ερίβλη µα. Σε αυτή τη
π ερίπ τω ση , ακολουθήστε τις οδη γίες π ου θα βρείτε
στο κεφάλαιο « Α ντικατάστα ση ή καθαρισµ ός του
φίλτρου σε κυλινδρικό π ερίβλη µα».
15
Page 21

Αντικατάστασ η ή καθαρισµός του φίλτρου σε
κυλινδρικό π ερίβλη µ α
20 Αφαιρέ στε το δ οχείο σκόνη ς π ατώντας το π λήκτρο
ανοίγµατος π ου βρίσκεται στη λαβή.
23 Αφαιρέ στε το φίλτρο απ ό τη θέ ση του.
24 Αφαιρέ στε το π ροστατευτικό π λέ γµα απ ό το φίλτρο.
25 Τινάξτε τη σκόνη καλά απ ό το φίλτρο και το π ροστατευτικό.
Αν κρίνετε απ αραίτη το, ξεβγάλετέ το κάτω απ ό τη βρύση .
26 Αφήστε το να στεγνώσει για 24 ώρες, ώστε να είστε
σίγουροι ότι είναι εντελώς στεγνό π ριν ξαναχρη σιµ οποιη θεί.
Απ οφύγετε το στέ γνω µα µε τον ήλιο ή µε σεσουάρ. Αν
θέ λετε να χρη σιµ οποιήσετε τη ν σκούπα καθώς το φίλτρο
στεγνώνει, θα π ρέπ ει να χρη σιµοποιήσετε το επ ιπ λέον
φίλτρο που υπάρχει στη συσκευασία.
24 Τοπ οθετήστε το π ροστατευτικό π λέ γµα στη θέ ση του.
23 Τοπ οθετήστε το φίλτρο π ίσω στη θέ ση του.
20 Τοπ οθετήστε το δοχείο σκόνη ς π ίσω στη σκούπα.
Προτεινόµ ενο φίλτρο σε κυλινδρικό π ερίβλη µ α:
Me nalux F102
Καθαρισµ ός φίλτρου κινη τήρα
Αν κρίνετε απ αραίτη το, το φίλτρο κινη τήρα µπ ορεί
επ ίση ς να ξεβγαλθεί µ ε νερό ή να αντικατασταθεί
τουλάχιστον δύο φορέ ς το χρόνο.
20 Αφαιρέ στε το δ οχείο σκόνη ς π ατώντας το π λήκτρο
ανοίγµατος π ου βρίσκεται στη λαβή.
27 Αφαιρέ στε το φίλτρο απ ό τη θέ ση του.
28 Ξεβγάλτε κάτω απ ό νερό και στεγνώστε το π λήρω ς.
27 Τοπ οθετήστε το φίλτρο π ίσω στη θέ ση του.
20 Τοπ οθετήστε το δοχείο σκόνη ς π ίσω στη σκούπα.
Προτεινόµ ενο φίλτρο κινη τήρα: Me nalux F132
Καθαρισµ ός φίλτρου εξαγω γής
29 Α νοίξτε τη γρίλια για να αφαιρέ σετε το φίλτρο εξαγω γής.
30 Αφαιρέ στε το φίλτρο απ ό τη γρίλια.
31 Εισάγετε νέ ο φίλτρο.
29 Κλείστε τη γρίλια.
Προτεινόµ ενο φίλτρο εξαγω γής: Me nalux F132
Λειτουργία του λάστιχου στο στόµ ιο εισαγω γής /
εξαγω γής
32 Για να συνδέ σετε το λάστιχο στο στόµιο εισαγω γής,
σπ ρώξτε το µέ χρι να κλειδ ώσει.
Για να απ οσυνδέ στε το λάστιχο απ ό το στόµιο
εισαγω γής, π ιέ στε το π λήκτρο π ου βρίσκετε στο τέ λος
του λάστιχου.
Προστασ ία του π εριβάλλοντος
• Προσπ αθήστε να ανακυκλώσετε τα υλικά συσκευασίας
και τις π αλαιέ ς συσκευέ ς.
• Το χαρτόνι συσκευασίας µπ ορεί να π εταχτεί στους
κάδους συλλογής χάρτου.
• Ανακύκλω ση τη ς συσ κευής στο τέ λος του κύκλου
ζω ής τη ς.
• Τα π λαστικά τµήµ ατα τη ς συσκευής, φέ ρουν σήµα
αναγνώριση ς, ώστε να µπορούν να ανακυκλω θούν στο
τέ λος του κύκλου ζω ής τη ς συσκευής.
• Παρακαλούµε, επ ικοινω νήστε µε τους τοπ ικούς φορείς.
Μ π λοκαρισµ έ νη ροή αέρα και βρώµ ικα φίλτρα
• H σκούπα σταµατά αυτόµατα αν π αρουσιαστεί
µπ λοκάρισµα στο π έ λµα/σω λήνα/λάστιχο ή αν τα
φίλτρα είναι βουλω µ έ να απ ό βρω µιά..
• Απ οσυνδέ στε τη σκούπα απ ό το η λεκτρικό ρεύµα και
αφήστε τη ν να κρυώσει για π ερίπ ου 20-30 λεπτά.
Αφαιρέ στε το µπ λοκάρισµα και/ή καθαρίστε τα φίλτρα.
• Επαναλειτουργήστε τη σκούπ α.
Η συσκευή αυτή συµµορφώνεται µε τους ακόλουθους
νόµους τη ς ΕΕ:
• Κανονισµ ός χαµη λής τάση ς 2006/9 5/EC
• Κανονισµ ός EM C 89 /336/EEC συµ π εριλ.
τροπ οπ οίη ση 9 2/31/EEC και 9 3/68/EEC
Το σύµβολο στο π ροϊόν ή επάνω στη συσκευασία
του υπ οδ εικνύει ότι δεν πρέ π ει να µ εταχειρίζεστε το
π ροϊόν αυτό ω ς οικιακό απ όρριµµα . Αντιθέ τω ς
θαπ ρέ π ει να π αραδ ίδεται στο κατάλλη λο ση µείο
συλλογής για τη ν ανακύκλωση η λεκτρικού και
η λεκτρονικού εξοπ λισµού. Εξασφαλίζοντας ότι το
π ροϊόν αυτό διατίθεται σω στά, συµβάλλετε στη ν
απ οτροπ ή ενδ εχόµενω ν αρνη τικών συνεπ ειών για το
π εριβάλλον και τη ν ανθρώπινη υγεία, οι οπ οίες θα
µπ ορούσαν δ ιαφορετικά να π ροκλη θούν απ ό
ακατάλλη λο χειρισµό απ όρριψ η ς του προϊόντος αυτού.
Για λεπ τοµερέ στερες π λη ροφορίες σχετικά µε τη ν
ανακύκλω ση του π ροϊόντος αυτού, επ ικοινω νήστε µε
το δ η µαρχείο τη ς π εριοχής σας, τη ν τοπ ική σας
υπ η ρεσία απ οκοµιδής οικιακών απ ορριµµάτω ν ή µε το
κατάστη µα όπ ου αγοράσατε το π ροϊόν.
16
Page 22

Değerli M üşterim iz,
AEG - ELECTRO LUX e lek trik li süpürgeyi seçtiğiniz için
teşek k ür ederiz. S üpürge nizin pe rform ansından tam
olarak m em nun k alm anız için, bu k ullanm a kılavuzunu
dik k atlice ok uyunuz. Ye dek parça siparişi ve rirk en lütfen
süpü rgenizin m odel ism ini be lirtin.
Özellik ler
1. H ortum bağlantısı
2. Elek tronik perform ans göste rgesi
3. Açm a/Kapam a dü ğm e si
4. Kablo geri sarm a düğm esi
5. Em iş gücü k ontrol regülatörü
6. Te k erlek
7. Toz h aznesi
8. Taşım a kolu
9 . Toz h aznesi açm a düğm esi
10. H ortum
11. Tele sk opik boru
12. İk i fonk siyonlu yüzey başlık
13. D ar aralık ucu
14. D öşem e başlığı
15. Toz alm a fırçası
16. Silindir filtre
17. K oruyucu ünite
18. D ik ey park pozisyonu
19 . Yatay park pozisyonu
ÖNEM Lİ EM NİYET ÖNLEM LERİ
• Bu k ullanm a kılavuzunu dik k atlice ok uyun.
• Cih azı k ullanm adan önce şebek e voltajının, bilgi
plak asında belirtilen voltaja uyup uym adığını kontrol edin.
• Süpürgeyi, arızalı olm ası ya da k ablosunun ve ya
fişinin h asarlı olm ası durum unda çalıştırm ayınız.
Cih azı k endiniz onarm aya çalışm ayınız. Tam ir ya da
yedek parça tale pleriniz için Electrolux Yetk ili servis
ile irtibata geçiniz.
• K ullanılm adığı zam anlarda, tem izlik ve tam ir esnasında,
h er zam an süpürgenin fişini prizden çıkarınız.
• Asla süpürgeyi çalışır durum dayk en gözetim siz
bırak m ayın. Çocuk ları cih azdan uzak tutun ve onunla
oynam asına izin verm eyin.
• Cih az sadece e v k ullanım ı içindir. Cih azı k ullanm a
k ılavuzunda belirtile n şe k ilde k ullanınız.
• Cih azı k ablosundan çek m eyiniz. Cih azı ele k trik
fişinden çık arm ak için k ablosundan çek m e yiniz.
Cih azı h asarlı k ablo ile k ullanm ayınız. Eğer k ablo
h asarlı ise servis m erk ezi tarafından değiştirilm elidir.
Bu değişim garanti k apsam ı dışındadır.
• Süpürgeyi ıslak ze m inlerde ya da sıvı, çam ur, k ül ve
sigara izm ariti te m izle m ek için k ullanm ayınız. Yanıcı
ya da patlayıcı nitelik te m adde leri veya gazları
süpü rm ek için k ullanm ayınız.
• Yuk arıda belirtilen m addele r, süpürge m otorunun ciddi
olarak h asarlanm asına nede n olabilir. Bu sebepte n
k aynak lanan h asar, garanti k apsam ında değildir.
• Süpürgenin fişini ıslak elle fişten çek m eyiniz.
• Süpürgeyi ısıtıcılara, radyatörle re, fırınlara vs. yakın
çalıştırm ayınız.
• Toz h aznesinin ve h ortum un h asarlanm asını önle m ek
için, süpürm eye başlam adan önce büyük ve k e sk in
nesneleri zem inden k aldırınız.
Kullanm a Talim atlari
Süpürgeyi çalıştırm adan önce filtrelerin yerinde
olduğundan ve düzgün ye rleştirildiğinden em in olun.
A Kabloyu yeteri k adar uzatarak fişini prize tak ınız.
Kablo üzerindek i SARI işaret ide al uzunluğu göste rir.
Kabloyu KIM IZ I işareti geçecek şek ilde uzatm ayınız.
B Açm a/ Kapam a düğm esine basarak cih azı çalıştırın.
Ilk çalıştırm ada süpürgenin tam gü ce ulaşm ası 1- 2
saniye içinde olu r.
C Kabloyu geri sarm ak için, ayağınızla k ablo sarm a
bu tonuna basınız ve k abloyu dolaşarak h asara se bep
olm asını engelle m ek için elinizle tutunuz.
D Em iş gücü, e m iş gücü k ontrol re gulatörü h arek et
ettirilerek ayarlanabilir.
E Em iş gücünü ayrıca h ortum tutm a yerindek i delik
açarak /k apatarak da k ontrol edebilirsiniz.
BAKIM
Toz h aznesinin boşaltılm ası (5.sayfaya bak ınız)
Süpürgeyi toz h aznesi ye rine yerle ştirilm eden asla
çalıştırm ayınız.
20 Toz h aznesini, taşım a k olu üzerindek i açm a
düğm esine basarak çıkarınız.
23 Kol üze rindek i açm a süğm e sini k ullanarak toz
h azne sini açın.
21 Turuncu re nk li açm a düğm e sini ite rek toz h aznesini
açın ve içindek ile ri boşaltın.
23 Filtreyi tek rar ye rine yerleştirin
22 Toz h aznesinin k apağı, ‘k lik ’ se si duyulduğunda tam
olarak k apanm ış olacak tır.
20 Toz h aznesini tek rar süpürgeye ye rle ştiriniz.
Filtrele rin Değiştirilm esi
• Ancak süpürgenin başlığını zem ine tem as ettirm eden
en yük sek güçte çalıştırdığınızda, bu göstergenin rengi
k ırm ızı olarak yanıyorsa, toz h aznesini boşaltm alısınız.
• Not: K ullanım sırasında göste rgenin k ırm ızı ışığının
yanıp sönm e si norm aldir. Toz h aznesi b oşaltıldığında,
göste rgenin h ala yanm ası ise , silindir filtrenin
tık anm ış olduğunu be lirtir. Bu durum da,” Silindir
filtrenin değiştirilm esi ya da tem izlenm esi”
bölüm ünde verile n talim atları tak ip e din.
• Filtrele r e n az yılda ik i defa ya da gözle görülür
şek ilde k irlendiğinde de ğiştirilm elidir.
• Em iş gücünün azalm asını önle m ek için süpürgeyi h er
zam an filtreler tak ılı vaziyette çalıştırınız.
• Filtrele ri değiştirm eden önce süpürgenin elek tik
ak ım ını k esin.
17
Page 23
Silindir filtrenin de ğiştirilm esi ya da tem izlenm esi
20 Toz h aznesini, taşım a k olu üze rindek i açm a
düğm esine basarak çıkarınız.
23 Kol üzerinde k i açm a süğm esini k ullanarak toz
h azne sini açın.
24 Silindir filtreyi k oruyucu ünite den çık arın.
25 Filtrede k i ve k oru yu cu ünite dek i tozu çöp k ovasına
boşaltın. Eğe r gerek li ise, filtre ve k oruyucu ünite
m usluğun altında soğuk su ile durulanabilir.
26 Yak laşık 24 saat açık h avada k urum asını be k leyin ve
tek rar kullanm adan önce tam olarak kuruduğundan
em in olun.
• Doğrudan güneş ışığına ya da aşırı k u ru h avaya
m aru z k alm am asına dik k at e din ( saç k urutm a
m akinesi, vs.).
Eğer sü pürgenizi silindir filtre k ururk e n k ullanm ak
isterseniz, am balaj k utu suna yerleştirilm iş olan
ye dek silindir filtreyi k ullanabilirsiniz.
24 Koruyucu üniteyi, silindir filtre üzerine yerleştirin
23 Filtreyi tek rar ye rine yerleştirin
23 Silindir filtreyi, toz h aznesine yerleştirin ve iyice
yerine oturana k adar saat dönüş yönünde çevirin.
20 Toz h aznesini tek rar süpürgeye ye rle ştirin.
Silindir filtre referans nu m arası: Menalu x F102
M otor filtrenin tem izlenm esi
• Eğer gerek li ise, m otor filtresi de yık anabilir ya da
değiştirilebilir. Bu işlem , filtre en az yılda ik i defa ya da
gözle görülür şek ilde k irlendiğinde gerçek leştirilm elidir.
20 Toz h aznesini, taşım a k olu üze rindek i açm a
düğm esine basarak çıkarınız.
27 Filtreyi ye rinden çık arın.
28 Filtreyi, m uslu ğun altında soğuk su ile durulayin ve
iyice k urutun.
27 Filtreyi tek rar ye rine tak ın.
20 Toz h aznesini tek rar süpürgeye ye rle ştirin.
M otor filtre refe rans num arası: M e nalux F132
H ava çıkış filtresinin tem izlenm esi
29 Filtre ızgarasını açın.
30 Filtreyi ızgara ile birlik te çık arın.
31 Filtreyi ızgaradan çık arın ve yeni bir filtre ye rleştirin.
30 Filtreyi ızgara ile birlik te tek rar süpürgeye ye rleştirin.
29 Filtre ızgarasını k apatın.
H ava çık ış filtresi re ferans nu m arası: M enalux F132
H ortum u bağlantı ye rine yerleştirm e / çık arm a
32 H ortum u bağlantı ye rine tak m ak için k lik sesi ge lene
k adar itin.
H ortum u b ağlantı yerinden çık arm ak için, h ortum un
sonundak i düğm e ye basın.
Çevreyi Korum a
• Am balaj m alzem esini ve e sk i cih azinizi, geri
dönüşüm le ri yapılabileceğini düşü ne rek elden çık arın.
• K arton k utuyu atık kağıt toplam a nok tasına bırak abilirsiniz.
• Polietilenden (PE) m am ul olan plastik torbayı, PE
toplam a nok tasına bırakabilirsiniz.
• Polistirende n (PS) m am ul olan k öpük m alzem eyi, PS
toplam a nok tasına bırakabilirsiniz.
Cih azı elden çık arm a
• Cih azın bütün plastik parçalarında, m alzem e tanım
bilgile ri işaretlenm iştir. D olayısıyla b u m alzem ele r,
cih az öm rünü doldu rdu ğunda ve e lden çık arılırk en
uygun geri dönüşüm nok talarına bırak ılabilirler.
• Bu k onuda b ilgi alm ak için çevre ile ilgili ye re l
k urum lara başvurabilirsiniz.
Tık anm ış h ava akım ı ve k irli filtreler
Başlık ta/borularda/h ortum da tık anm a olduğunda ya da
filtreler k irlendiğinde, elek trik li süpürge otom atik olarak
durur.Böyle bir durum da, cih azın fişini prizden çek in ve
20-30 dak ik a bek leyin. Tık anık lığı giderin ve / veya
filtreleri tem izle yin. Elek trik li süpürge yi tek rar çalıştırın.
Tek nik ozellik ler
Çalışm a gerilim i: 230 V/50 H z
M ak sim um Güç: 2100W
Cih azınızın kullanım öm rü 10 yıldır. K ullanım öm rü
üre tici ve/veya ith alatçı firm anın cih azınızla ilgili
yedek parça tem ini ve bak ım sü resini ifade ede r.
Electrolux D ay.Tuk . M am . San ve
Tic. A.S.
Tarlabasi Bulvari No. 35
Tak sim Istanbul
Te l: 0 212 29 3 10 20, Fax: 0 212 251 9 1 44
Ucre tsiz Tuk e tici Danism a H atti
0 800 211 61 69
Üretim Yeri (Place of production):
Suzh ou Kingcle an Floorcare Co. Ltd.
Xiangyang Road, Suzh ou New District
Suzh ou, Jiangsu, 215009 , Ch ina
Bu cih az aşağıdak i EC Direk tifle ri ile uyum ludur:
• 2006/9 5/EC sayılı Düşük Voltaj Direk tifi
• 9 2/31/EEC ve 9 3/68/EEC değişik lik le rini de k apsayan
89 /336/EEC sayılı EMC Direk tifi
Ürün veya ürünün ambalajı üzerindek i sem bolü, bu
ürünün norm al ev atığı gibi işlem görem eyeceğini belirtir.
Bunun yerine, ele k trikli ve elek tronik ek ipm anların geri
dönüşüm ü için belirlenen toplam a nok talarına teslim
edilm elidir. Bu ürünün doğru bir şek ilde elde n
çıkarılm asını sağlayarak, ak si bir şek ilde şek ilde
atılm asının ve ya im h a edilm esinin ortaya çık arabileceği,
çevre ve insan sağlığı açısından potansiyel olum suz
sonuçları önlem eye yardım cı olm uş olursunuz. Bu ürünün
geri dönüşüm ü h ak k ında dah a detaylı bilgi için lütfen
yerel şeh ir büronuz, ev çöpü toplam a servisiniz ya da
ürünü satın aldığınız m ağaza ile tem asa geçiniz.
18
T4005B 02 06 02
Page 24

Electrolux H ausgeräte Vertriebs Gm bH
M uggenh ofer Str. 135
D– 9 0429 Nürnberg
h ttp://w w w .e lectrolux.de
© Copyrigh t by Electrolux
T4005B 02 06 02
Sh are m ore of our th ink ing at
w w w .electrolux.com
 Loading...