

Page 1
EN User Manual 2
Freezer
PT Manual de instruções 17
Congelador
ES Manual de instrucciones 33
Congelador
A82700GNX0
A82700GNW0
Page 2
www.aeg.com
2
CONTENTS
1. SAFETY INFORMATION...........................................................................................3
2. SAFETY INSTRUCTIONS.......................................................................................... 4
3. PRODUCT DESCRIPTION........................................................................................ 6
4. OPERATION.............................................................................................................. 6
5. DAILY USE..................................................................................................................8
6. HINTS AND TIPS..................................................................................................... 10
7. CARE AND CLEANING.......................................................................................... 11
8. TROUBLESHOOTING.............................................................................................12
9. INSTALLATION....................................................................................................... 14
10. TECHNICAL INFORMATION...............................................................................16
FOR PERFECT RESULTS
Thank you for choosing this AEG product. We have created it to give you
impeccable performance for many years, with innovative technologies that help
make life simpler features you might not find on ordinary appliances. Please
spend a few minutes reading to get the very best from it.
Visit our website for:
Get usage advice, brochures, trouble shooter, service information:
www.aeg.com
Register your product for better service:
www.registeraeg.com
Buy Accessories, Consumables and Original spare parts for your appliance:
www.aeg.com/shop
CUSTOMER CARE AND SERVICE
Always use original spare parts.
When contacting our Authorised Service Centre, ensure that you have the
following data available: Model, PNC, Serial Number.
The information can be found on the rating plate.
Warning / Caution-Safety information
General information and tips
Environmental information
Subject to change without notice.
Page 3

1. SAFETY INFORMATION
Before the installation and use of the appliance,
carefully read the supplied instructions. The
manufacturer is not responsible if an incorrect
installation and use causes injuries and damages. Always
keep the instructions with the appliance for future
reference.
1.1 Children and vulnerable people safety
• This appliance can be used by children aged from 8
years and above and persons with reduced physical,
sensory or mental capabilities or lack of experience
and knowledge if they have been given supervision or
instruction concerning use of the appliance in a safe
way and understand the hazards involved.
• Do not let children play with the appliance.
• Cleaning and user maintenance shall not be made by
children without supervision.
• Keep all packaging away from children.
ENGLISH
3
1.2
General Safety
•
This appliance is intended to be used in household
and similar applications such as:
– Farm houses; staff kitchen areas in shops, offices
and other working environments
– By clients in hotels, motels, bed and breakfast and
other residential type environments
• Keep ventilation openings, in the appliance enclosure
or in the built-in structure, clear of obstruction.
• Do not use mechanical devices or other means to
accelerate the defrosting process, other than those
recommended by the manufacturer.
• Do not damage the refrigerant circuit.
• Do not use electrical appliances inside the food
storage compartments of the appliance, unless they
are of the type recommended by the manufacturer.
Page 4
www.aeg.com4
• Do not use water spray and steam to clean the
appliance.
• Clean the appliance with a moist soft cloth. Only use
neutral detergents. Do not use abrasive products,
abrasive cleaning pads, solvents or metal objects.
• Do not store explosive substances such as aerosol
cans with a flammable propellant in this appliance.
• If the supply cord is damaged, it must be replaced by
the manufacturer, its service agent or similarly
qualified persons in order to avoid a hazard.
2. SAFETY INSTRUCTIONS
2.1 Installation
WARNING!
Only a qualified person must
install this appliance.
• Remove all the packaging.
• Do not install or use a damaged
appliance.
• Obey the installation instruction
supplied with the appliance.
• Always be careful when you move the
appliance because it is heavy. Always
wear safety gloves.
• Make sure the air can circulate around
the appliance.
• Wait at least 4 hours before
connecting the appliance to the
power supply. This is to allow the oil
to flow back in the compressor.
• Do not install the appliance close to
radiators or cookers, oven or hobs.
• The rear of the appliance must stand
against the wall.
• Do not install the appliance where
there is direct sunlight.
• Do not install this appliance in areas
that are too humid or too colds, such
as the construction appendices,
garages or wine cellars.
• When you move the appliance, lift it
by the front edge to avoid scratching
the floor.
2.2 Electrical connection
WARNING!
Risk of fire and electrical
shock.
• The appliance must be earthed.
• Make sure that the electrical
information on the rating plate agrees
with the power supply. If not, contact
an electrician.
• Always use a correctly installed
shockproof socket.
• Do not use multi-plug adapters and
extension cables.
• Make sure not to cause damage to
the electrical components (e.g. mains
plug, mains cable, compressor).
Contact the Service or an electrician
to change the electrical components.
• The mains cable must stay below the
level of the mains plug.
• Connect the mains plug to the mains
socket only at the end of the
installation. Make sure that there is
access to the mains plug after the
installation.
• Do not pull the mains cable to
disconnect the appliance. Always pull
the mains plug.
2.3 Use
WARNING!
Risk of injury, burns,
electrical shock or fire.
Page 5
ENGLISH
5
• Do not change the specification of
this appliance.
• Do not put electrical appliances (e.g.
ice cream makers) in the appliance
unless they are stated applicable by
the manufacturer.
• Be careful not to cause damage to
the refrigerant circuit. It contains
isobutane (R600a), a natural gas with a
high level of environmental
compatibility. This gas is flammable.
• If damage occurs to the refrigerant
circuit, make sure that there are no
flames and sources of ignition in the
room. Ventilate the room.
• Do not let hot items to touch the
plastic parts of the appliance.
• Do not put soft drinks in the freezer
compartment. This will create
pressure on the drink container.
• Do not store flammable gas and
liquid in the appliance.
• Do not put flammable products or
items that are wet with flammable
products in, near or on the appliance.
• Do not touch the compressor or the
condenser. They are hot.
• Do not remove or touch items from
the freezer compartment if your hands
are wet or damp.
• Do not freeze again food that has
been thawed.
• Obey the storage instructions on the
packaging of frozen food.
2.4 Care and cleaning
• Before maintenance, deactivate the
appliance and disconnect the mains
plug from the mains socket.
• This appliance contains hydrocarbons
in the cooling unit. Only a qualified
person must do the maintenance and
the recharging of the unit.
• Regularly examine the drain of the
appliance and if necessary, clean it. If
the drain is blocked, defrosted water
collects in the bottom of the
appliance.
2.5 Disposal
WARNING!
Risk of injury or suffocation.
• Disconnect the appliance from the
mains supply.
• Cut off the mains cable and discard it.
• Remove the door to prevent children
and pets to be closed inside of the
appliance.
• The refrigerant circuit and the
insulation materials of this appliance
are ozone-friendly.
• The insulation foam contains
flammable gas. Contact your
municipal authority for information on
how to discard the appliance
correctly.
• Do not cause damage to the part of
the cooling unit that is near the heat
exchanger.
WARNING!
Risk of injury or damage to
the appliance.
Page 6
4
5
3
1 2
1 2
3
4
7
6
5
www.aeg.com6
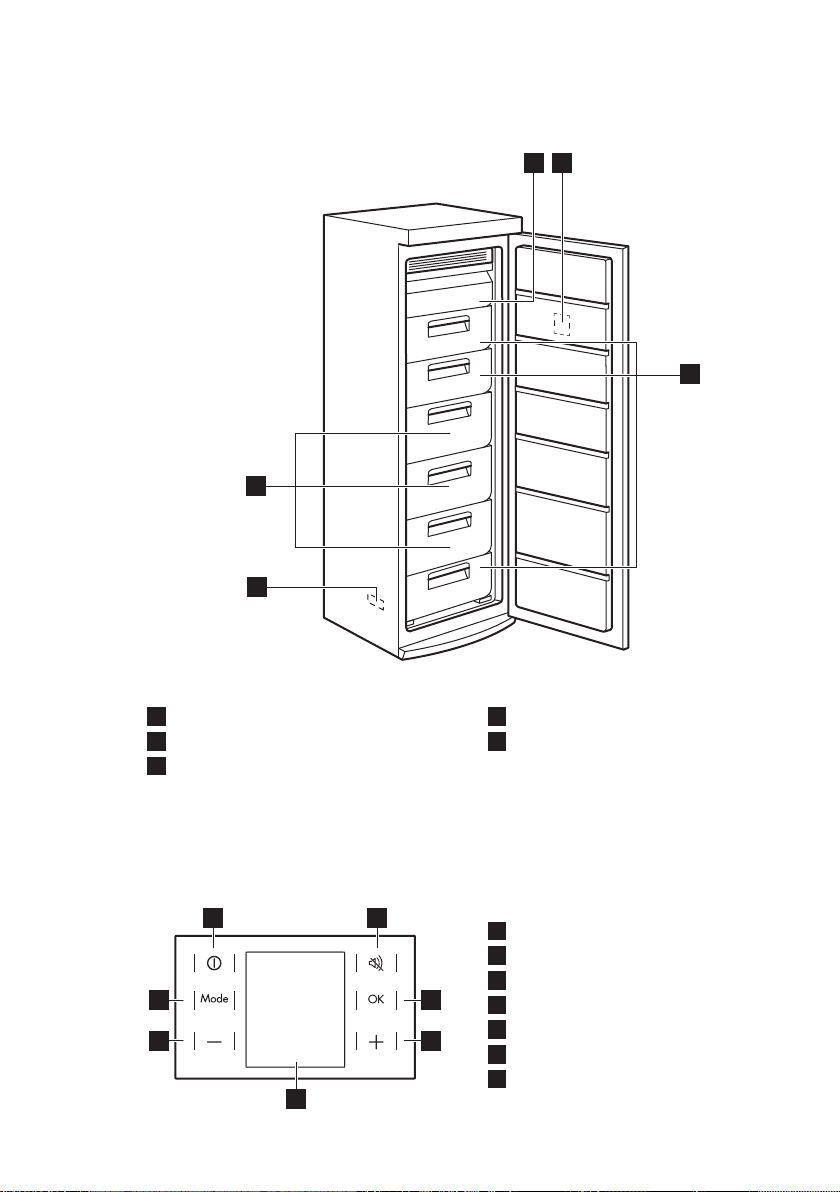
3. PRODUCT DESCRIPTION
3.1 Product overview
4. OPERATION
Flap
1
Control panel
2
Freezer baskets
3
4.1 Control panel
Rating plate
4
Maxibox baskets
5
ON/OFF button
1
Alarm reset button
2
OK button
3
Temperature warmer button
4
Display
5
Temperature colder button
6
Mode button
7
Page 7
A
BC
D
E
F
ENGLISH
7
It is possible to change the button sound
volume by pressing Mode and the
Display
4.2 Switching on
1. Connect the mains plug to the power
socket.
2. Press the appliance ON/OFF if the
display is off.
The alarm buzzer could operate after few
seconds.
The temperature indicators show the set
default temperature.
To reset the alarm refer to "High
temperature alarm".
To select a different set temperature
refer to "Temperature regulation".
If "dEMo" appears on the display, refer
to "What to do if..." chapter.
If the door remains open for
some minutes, the light will
turn off automatically. The
light is reset by closing and
opening the door itself.
4.3 Switching off
1. Press the appliance ON/OFF button
for a few seconds.
The display switches off.
2. Disconnect the mains plug from the
power socket.
temperature colder buttons together for
a few seconds. Change is reversible.
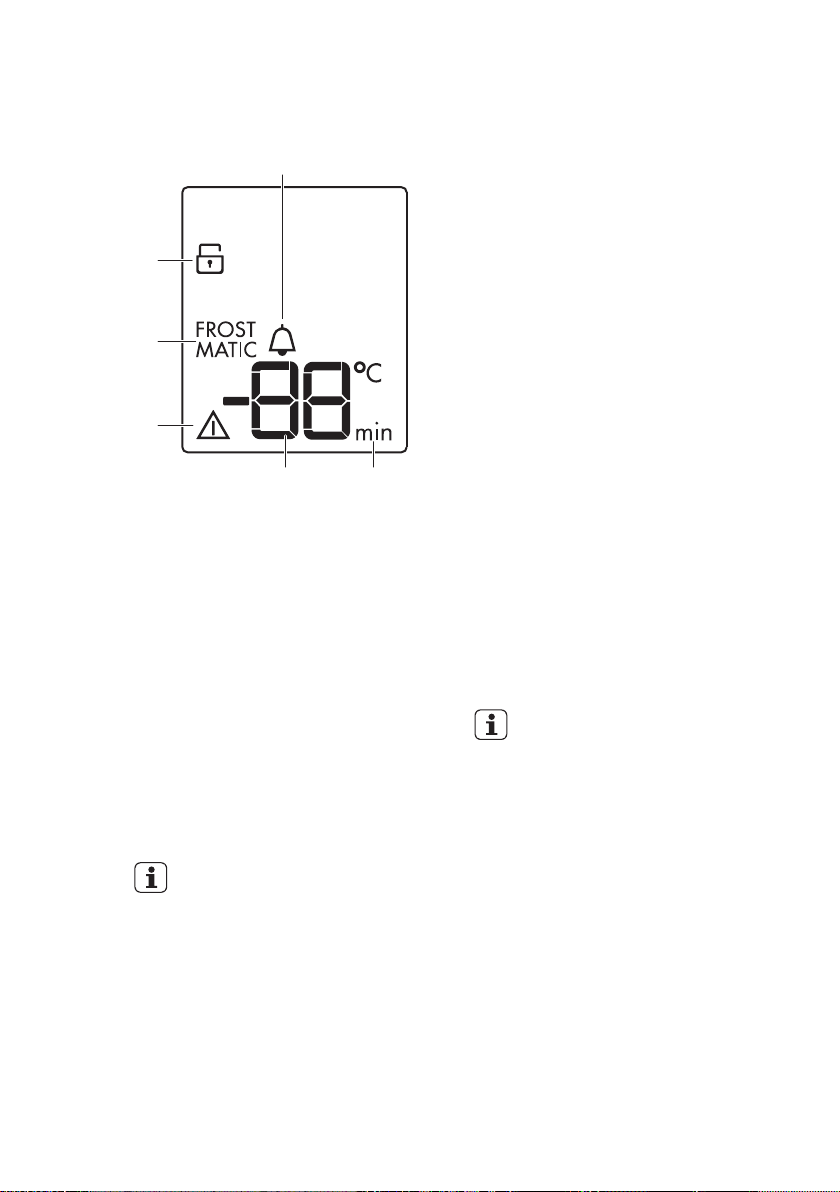
A) MinuteMinder function
B) Timer
C) Temperature indicator
D) Alarm indicator
E) FROSTMATIC function
F) ChildLock function
4.4 Temperature regulation
The set temperature of the freezer may
be adjusted by pressing the temperature
button.
Default temperature:
• -18°C for the freezer
The temperature indicator shows the set
temperature.
The set temperature will be
reached within 24 hours.
After a power failure the set
temperature remains stored.
4.5 High temperature alarm
An increase in the temperature in the
freezer compartment (for example due to
an earlier power failure) is indicated by:
• a flashing of the alarm and freezer
temperature indicators;
• a sounding of the buzzer.
Press any button to reset the alarm.
The buzzer switches off.
The freezer temperature indicator shows
the highest temperature reached for a
few seconds. Then show again the set
temperature.
The alarm indicator continues to flash
until the normal conditions are restored.
Page 8

www.aeg.com8
4.6 FROSTMATIC function
The FROSTMATIC function accelerates
the freezing of fresh food and, at the
same time, protects foodstuffs already
stored from undesirable warming.
1. Press Mode button until the
corresponding icon appears.
The FROSTMATIC indicator flashes.
2. Press OK button to confirm.
The FROSTMATIC indicator is shown.
The FROSTMATIC function
shuts off automatically after
52 hours.
To switch off the function
before its automatic end,
repeat the steps until the
FROSTMATIC indicator goes
off.
4.7 Door open alarm
An acoustic alarm will sound if the door
is left open for a few minutes. The door
open alarm conditions are indicated by:
• a flashing Alarm indicator;
• an acoustic buzzer.
When normal conditions are restored
(door closed), the alarm will stop. The
buzzer can also be switched off by
pressing any button.
4.8 MinuteMinder function
The MinuteMinder function is to be used
to set an acoustic alarm at the preferred
time, useful for example when a recipe
requires to cool down food products for
a certain length of time or when a
reminder is needed in order not to forget
the bottles placed in the freezer for fast
cooling.
1. Press Mode until the corresponding
icon appears.
The MinuteMinder indicator flashes.
The Timer shows the set value (30
minutes) for a few seconds.
2. Press the Timer regulator to change
the Timer set value from 1 to 90
minutes.
3. Press OK to confirm.
The MinuteMinder indicator is shown.
The Timer starts to flash (min).
It is possible to change the time at any
time during the countdown and at the
end by pressing the Temperature colder
button and the Temperature warmer
button.
At the end of the countdown, the
MinuteMinder indicator flashes and an
audible alarm sounds. Press OK to switch
off the sound and terminate the function.
It is possible to deactivate the function at
any time during the countdown by
repeating the function steps, until the
indicator turns off.
4.9 ChildLock function
Activate the ChildLock function to lock
the buttons from unintentional
operation.
1. Press Mode until the corresponding
icon appears.
The ChildLock indicator flashes.
2. Press OK to confirm.
The ChildLock indicator is shown.
To deactivate the ChildLock function,
repeat the procedure until the ChildLock
indicator goes off.
DAILY USE
5.
WARNING!
Refer to Safety chapters.
5.1 Storage of frozen food
When first starting-up or after a period
out of use, before putting the products
in the compartment let the appliance run
at least 2 hours with the FROSTMATIC
function turned on. The freezer drawers
ensure that it is quick and easy to find
the food package you want. If large
quantities of food are to be stored,
remove all drawers except for the
bottom drawer which needs to be in
place to provide good air circulation. On
all shelves it is possible to place food
that protrude until 15 mm from the door.
Page 9
2
1
ENGLISH
9
WARNING!
In the event of accidental
defrosting, for example due
to a power failure, if the
power has been off for
longer that the value shown
in the technical
characteristics chart under
"rising time", the defrosted
food must be consumed
quickly or cooked
immediately and then refrozen (after cooling).
5.2 Freezing fresh food
The freezer compartment is suitable for
freezing fresh food and storing frozen
and deep-frozen food for a long time.
To freeze small amount of fresh foods it
is not necessary to change the present
setting.
To freeze fresh food activate the
FROSTMATIC function at least 24 hours
before placing the food to be frozen in
the freezer compartment.
Place the fresh food to be frozen in the
two top compartments.
The maximum amount of food that can
be frozen in 24 hours is specified on the
rating plate, a label located on the
inside of the appliance.
The freezing process lasts 24 hours:
during this period do not add other food
to be frozen.
When the freezing process is completed,
return to the required temperature (see
"FROSTMATIC Function").
5.4 Cold accumulators
The freezer contains at least one cold
accumulator which increases storage
time in the event of a power cut or
breakdown.
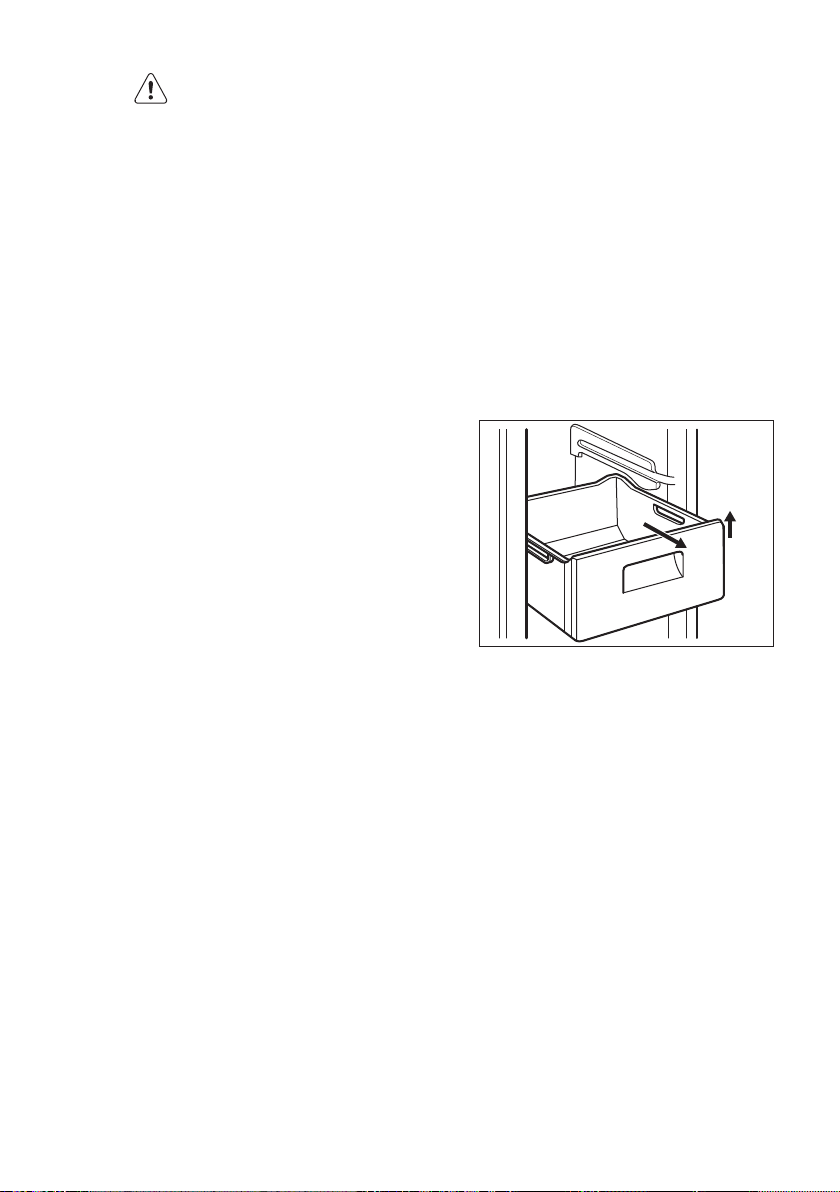
5.5 Removal of freezing baskets and glass shelves from the freezer
The freezing baskets have a limit stop to
prevent their accidental removal or
falling out. At the time of its removal
from the freezer, pull the basket towards
yourself and, upon reaching the end
point, remove the basket by tilting its
front upwards.
At the time of putting it back, slightly lift
the front of the basket to insert it into the
freezer. Once you are over the end
points, push the baskets back in their
position.
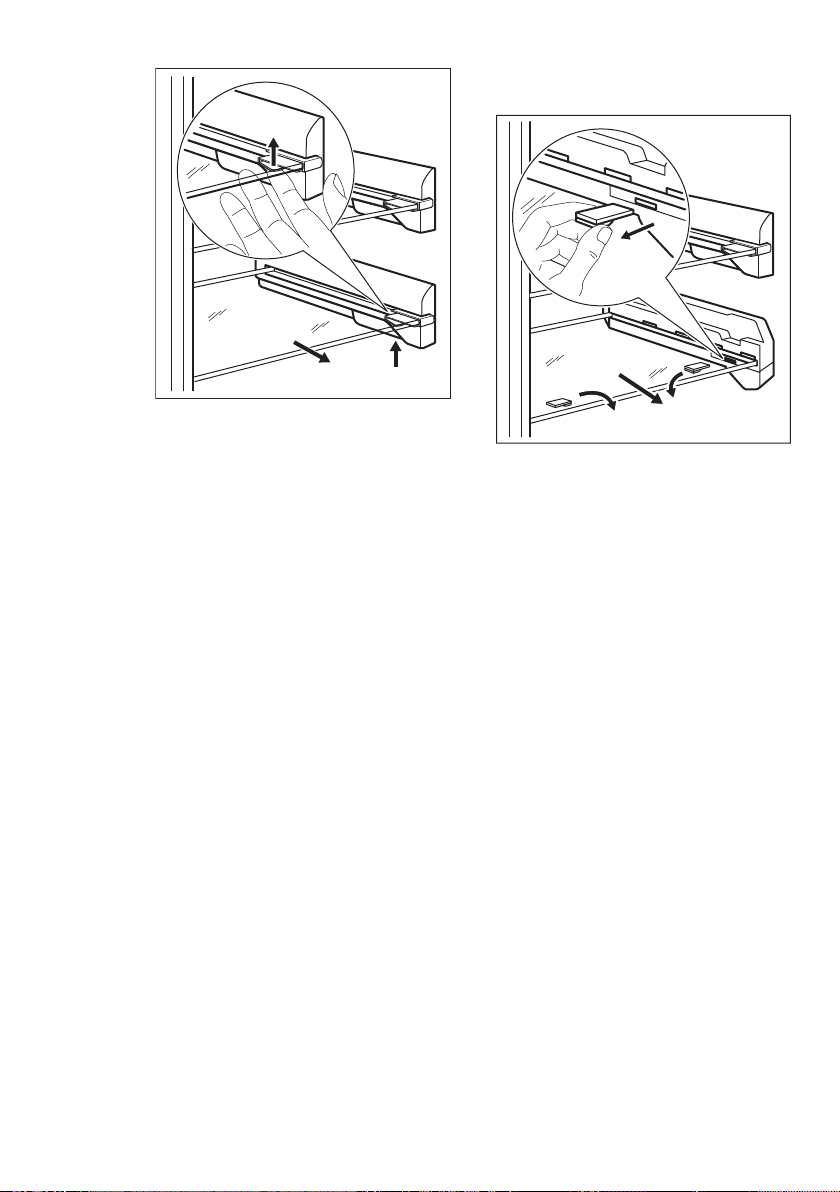
The appliance is equipped with shelf
stops to secure the shelves.
The shelves must be lifted up (1) on each
side and than pulled outwards (2).
5.3 Thawing
Deep-frozen or frozen food, prior to
being used, can be thawed in the
refrigerator compartment or at room
temperature, depending on the time
available for this operation.
Small pieces may even be cooked still
frozen, directly from the freezer: in this
case, cooking will take longer.
Page 10
1
1
2
2
1
1
1
10
www.aeg.com
The glass shelves equipped with
expander rollers are secured with locking
pins.
To remove them, loose the locking pin
on each side on the expander roller. If
necessary, use a screwdriver.
6. HINTS AND TIPS
Afterwards pull out both locking pins (1)
and pull the glass shelf outwards (2).
6.1 Normal operating sounds
The following sounds are normal during
operation:
• A faint gurgling and bubbling sound
from coils sound when refrigerant is
pumped.
• A whirring and pulsating sound from
the compressor when refrigerant is
pumped.
• A sudden cracking noise from inside
appliance caused by thermic
dilatation (a natural and not
dangerous physical phenomenon).
• A faint click noise from the
temperature regulator when the
compressor switches on or off.
6.2 Hints for energy saving
• Do not open the door frequently or
leave it open longer than absolutely
necessary.
• If the ambient temperature is high
and the Temperature Regulator is set
to low temperature and the appliance
is fully loaded, the compressor may
run continuously, causing frost or ice
on the evaporator. If this happens, set
the Temperature Regulator toward
warmer settings to allow automatic
defrosting and so a saving in
electricity consumption.
• If foreseen, do not remove the cold
accumulators from the freezer basket.
6.3 Hints for freezing
To help you make the most of the
freezing process, here are some
important hints:
• the maximum quantity of food which
can be frozen in 24 hrs. is shown on
the rating plate;
• the freezing process takes 24 hours.
No further food to be frozen should
be added during this period;
• freeze only top quality, fresh and
thoroughly cleaned, foodstuffs;
• prepare food in small portions to
enable it to be rapidly and completely
frozen and to make it possible
subsequently to thaw only the
quantity required;
Page 11
ENGLISH 11
• wrap up the food in aluminium foil or
polythene and make sure that the
packages are airtight;
• do not allow fresh, unfrozen food to
touch food which is already frozen,
thus avoiding a rise in temperature of
the latter;
• lean foods store better and longer
than fatty ones; salt reduces the
storage life of food;
• water ices, if consumed immediately
after removal from the freezer
compartment, can possibly cause the
skin to be freeze burnt;
• it is advisable to show the freezing in
date on each individual pack to
enable you to keep tab of the storage
time.
6.4 Hints for storage of frozen
food
To obtain the best performance from this
appliance, you should:
7. CARE AND CLEANING
WARNING!
Refer to Safety chapters.
7.1 General warnings
CAUTION!
Unplug the appliance before
carrying out any
maintenance operation.
This appliance contains
hydrocarbons in its cooling
unit; maintenance and
recharging must therefore
only be carried out by
authorized technicians.
The accessories and parts of
the appliance are not
suitable for washing in a
dishwasher.
7.2 Cleaning the interior
Before using the appliance for the first
time, the interior and all internal
accessories should be washed with
lukewarm water and some neutral soap
• make sure that the commercially
frozen foodstuffs were adequately
stored by the retailer;
• be sure that frozen foodstuffs are
transferred from the foodstore to the
freezer in the shortest possible time;
• not open the door frequently or leave
it open longer than absolutely
necessary;
• once defrosted, food deteriorates
rapidly and cannot be refrozen;
• do not exceed the storage period
indicated by the food manufacturer.
to remove the typical smell of a brandnew product, then dried thoroughly.
CAUTION!
Do not use detergents or
abrasive powders, as these
will damage the finish.
7.3 Periodic cleaning
CAUTION!
Do not pull, move or
damage any pipes and/or
cables inside the cabinet.
CAUTION!
Take care of not to damage
the cooling system.
CAUTION!
When moving the cabinet,
lift it by the front edge to
avoid scratching the floor.
Page 12
www.aeg.com12
The equipment has to be cleaned
regularly:
1. Clean the inside and accessories with
lukewarm water and some neutral
soap.
2. Regularly check the door seals and
wipe clean to ensure they are clean
and free from debris.
3. Rinse and dry thoroughly.
4. If accessible, clean the condenser
and the compressor at the back of
the appliance with a brush.
This operation will improve the
performance of the appliance and
save electricity consumption.
7.4 Defrosting the freezer
The freezer compartment is frost free.
This means that there is no build up of
frost when it is in operation, neither on
the internal walls nor on the foods.
The absence of frost is due to the
continuous circulation of cold air inside
8. TROUBLESHOOTING
WARNING!
Refer to Safety chapters.
the compartment, driven by an
automatically controlled fan.
7.5 Periods of non-operation
When the appliance is not in use for long
periods, take the following precautions:
1. Disconnect the appliance from
electricity supply.
2. Remove all food.
3. Clean the appliance and all
accessories.
4. Leave the door/doors open to
prevent unpleasant smells.
WARNING!
If the cabinet will be kept on,
ask somebody to check it
once in a while to prevent
the food inside from spoiling
in case of a power failure.
8.1 What to do if...
Problem Possible cause Solution
The appliance does not operate.
The mains plug is not con-
There is no voltage in the
The appliance is noisy. The appliance is not sup-
Audible or visual alarm is on. The cabinet has been re-
The appliance is switched
off.
nected to the mains socket
correctly.
mains socket.
ported properly.
cently switched on or the
temperature is still too
high.
Switch on the appliance.
Connect the mains plug to the
mains socket correctly.
Connect a different electrical
appliance to the mains socket.
Contact a qualified electrician.
Check if the appliance stands
stable.
Refer to "Door Open Alarm"or
"High Temperature Alarm".
Page 13
ENGLISH 13
Problem Possible cause Solution
The temperature in the appliance is too high.
Refer to "Door Open Alarm"or
"High Temperature Alarm".
The door is left open. Close the door.
The temperature in the appliance is too high.
Contact a qualified electrician
or contact the nearest Authorised Service Centre.
A rectangular symbol is
shown instead of numbers
on the Temperature Display.
Temperature sensor problem.
Contact the nearest Authorised Service Centre (the cooling system will continue to
keep food products cold, but
temperature adjustment will
not be possible).
The lamp does not work. The lamp is in stand-by. Close and open the door.
The lamp does not work. The lamp is defective. Contact the nearest Author-
ised Service Centre.
The compressor operates
continually.
Many food products were
The room temperature is
Food products placed in
Temperature is set incorrectly.
put in at the same time.
too high.
the appliance were too
warm.
The door is not closed cor-
Refer to "Operation" chapter.
Wait some hours and then
check the temperature again.
Refer to climate class chart on
the rating plate.
Allow food products to cool to
room temperature before storing.
Refer to "Closing the door".
rectly.
There is too much frost and
ice.
The FROSTMATIC function
is switched on.
The door is not closed correctly or the gasket is de-
Refer to "FROSTMATIC function".
Refer to "Closing the door".
formed/dirty.
The compressor does not
start immediately after
This is normal, no error has
occurred.
The compressor starts after a
period of time.
pressing the FROSTMATIC,
or after changing the temperature.
Water flows on the floor. The melting water outlet is
not connected to the
Attach the melting water out-
let to the evaporative tray.
evaporative tray above the
compressor.
Page 14

www.aeg.com14
Problem Possible cause Solution
Temperature cannot be set. The FROSTMATIC or
COOLMATIC function is
switched on.
The temperature in the appliance is too low/too high.
The temperature regulator
is not set correctly.
The food products' temperature is too high.
The door has been
opened often.
The FROSTMATIC function
is switched on.
There is no cold air circulation in the appliance.
Switch off FROSTMATIC or
COOLMATIC manually, or wait
until the function resets automatically to set the temperature. Refer to "FROSTMATIC
or COOLMATIC function".
Set a higher/lower temperature.
Let the food products temperature decrease to room temperature before storage.
Open the door only if necessary.
Refer to "FROSTMATIC function".
Make sure that there is cold air
circulation in the appliance.
If the advice does not lead
to the desired result, contact
the nearest Authorised
Service Centre.
8.2 Closing the door
1. Clean the door gaskets.
2. If necessary, adjust the door. Refer to
"Installation".
3. If necessary, replace the defective
door gaskets. Contact the Authorised
Service Centre.
9. INSTALLATION
WARNING!
Refer to Safety chapters.
9.1 Positioning
This appliance can be installed in a dry,
well ventilated indoor where the ambient
temperature corresponds to the climate
class indicated on the rating plate of the
appliance:
8.3 Replacing the lamp
The appliance is equipped with a longlife
LED interior light.
Only service is allowed to replace the
lighting device. Contact your Authorised
Service Centre.
Climate
class
SN +10°C to + 32°C
N +16°C to + 32°C
ST +16°C to + 38°C
T +16°C to + 43°C
Ambient temperature
Page 15
A
B
100 mm
min
20 mm
2
4
3
1
ENGLISH
15
Some functional problems
might occur for some types
of models when operating
outside of that range. The
correct operation can only
be guaranteed within the
specified temperature
range. If you have any
doubts regarding where to
install the appliance, please
turn to the vendor, to our
customer service or to the
nearest Service Centre
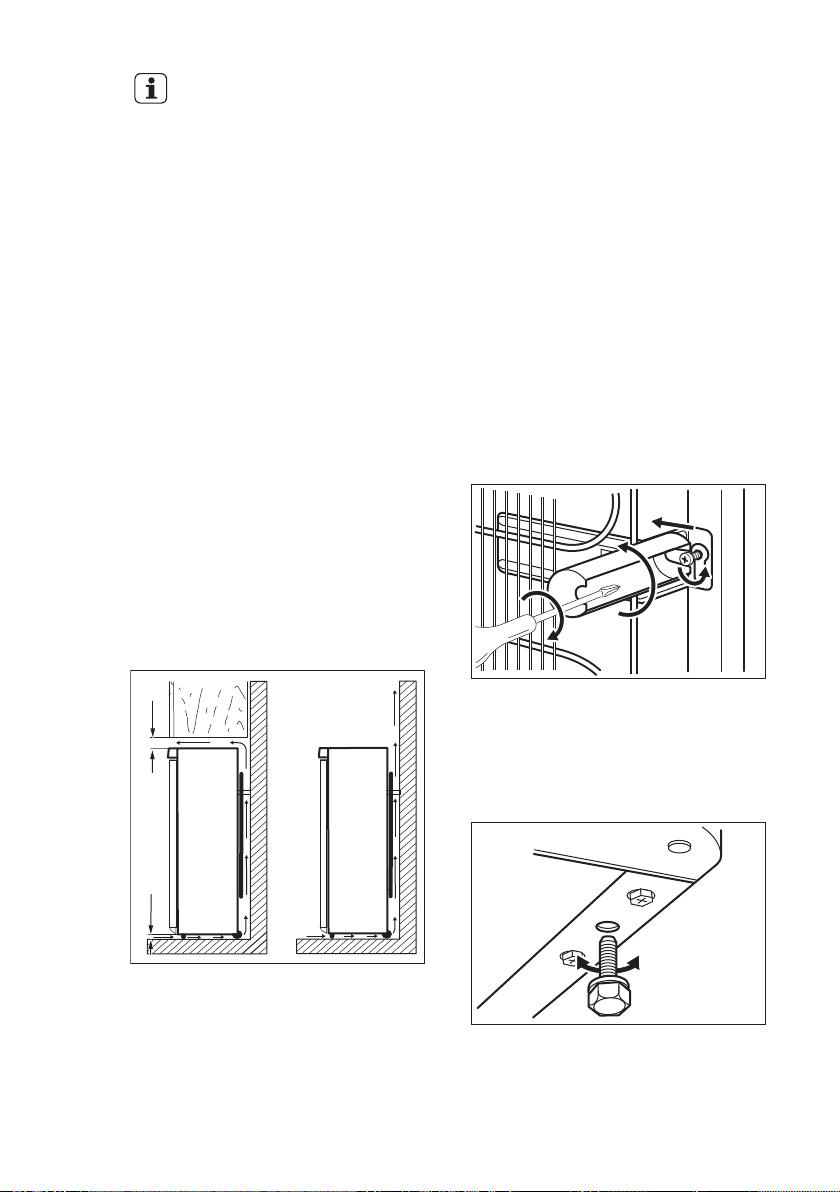
9.2 Location
The appliance should be installed well
away from sources of heat such as
radiators, boilers, direct sunlight etc.
Ensure that air can circulate freely around
the back of the cabinet. To ensure best
performance, if the appliance is
positioned below an overhanging wall
unit, the minimum distance between the
top of the cabinet and the wall unit must
be at least 100 mm . Ideally, however, the
appliance should not be positioned
below overhanging wall units. Accurate
levelling is ensured by one or more
adjustable feet at the base of the
cabinet.
• The appliance must be earthed. The
power supply cable plug is provided
with a contact for this purpose. If the
domestic power supply socket is not
earthed, connect the appliance to a
separate earth in compliance with
current regulations, consulting a
qualified electrician.
• The manufacturer declines all
responsibility if the above safety
precautions are not observed.
• This appliance complies with the
E.E.C. Directives.
9.4 Rear spacers
You can find the two spacers in the bag
with documentation.
1. Release the screw.
2. Engage the spacer below the screw.
3. Turn the spacer to the right position.
4. Tighten again the screws.
9.5 Levelling
When placing the appliance ensure that
it stands level. This can be achieved by
two adjustable feet at the bottom in
front.
9.3 Electrical connection
• Before plugging in, ensure that the
voltage and frequency shown on the
rating plate correspond to your
domestic power supply.
9.6 Door reversibility
In case you want to change the opening
direction of the door, contact the nearest
Page 16
www.aeg.com16
Authorised Service Centre. The
Authorised Service specialist will carry
10. TECHNICAL INFORMATION
10.1 Technical data
Height mm 1850
Width mm 595
Depth mm 668
Rising time Hours 28
Voltage Volts 230 - 240
Frequency Hz 50
The technical information are situated in
the rating plate, on the external or
11. ENVIRONMENT CONCERNS
Recycle the materials with the symbol .
Put the packaging in applicable
containers to recycle it. Help protect the
environment and human health and to
recycle waste of electrical and electronic
appliances. Do not dispose appliances
out the reversibility of the doors at your
cost.
internal side of the appliance and in the
energy label.
marked with the symbol with the
household waste. Return the product to
your local recycling facility or contact
your municipal office.
Page 17

PORTUGUÊS
ÍNDICE
1. INFORMAÇÕES DE SEGURANÇA........................................................................18
2. INSTRUÇÕES DE SEGURANÇA............................................................................ 19
3. DESCRIÇÃO DO PRODUTO..................................................................................21
4. FUNCIONAMENTO................................................................................................21
5. UTILIZAÇÃO DIÁRIA...............................................................................................24
6. SUGESTÕES E DICAS.............................................................................................25
7. MANUTENÇÃO E LIMPEZA...................................................................................26
8. RESOLUÇÃO DE PROBLEMAS..............................................................................28
9. INSTALAÇÃO.......................................................................................................... 30
10. INFORMAÇÃO TÉCNICA.................................................................................... 32
PARA RESULTADOS PERFEITOS
Obrigado por escolher este produto AEG. Criámo-lo para lhe oferecer um
desempenho impecável durante vários anos, com tecnologias inovadoras que
tornam a sua vida mais fácil – funcionalidades que poderá não encontrar em
aparelhos comuns. Continue a ler durante alguns minutos para tirar o máximo
partido do produto.
Visite o nosso website para:
Resolver problemas e obter conselhos de utilização, catálogos e informações
sobre serviços:
www.aeg.com
Registar o seu produto para beneficiar de um serviço melhor:
www.registeraeg.com
17
Adquirir acessórios, consumíveis e peças de substituição originais para o seu
aparelho:
www.aeg.com/shop
APOIO AO CLIENTE E ASSISTÊNCIA
Utilize sempre peças de substituição originais.
Quando contactar o nosso Centro de Assistência Autorizado, certifique-se de
que tem os seguintes dados disponíveis: Modelo, PNC, Número de Série.
A informação encontra-se na placa de características.
Aviso / Cuidado - Informações de segurança
Informações gerais e sugestões
Informações ambientais
Sujeito a alterações sem aviso prévio.
Page 18

www.aeg.com
18
1. INFORMAÇÕES DE SEGURANÇA
Leia atentamente as instruções fornecidas antes de
instalar e utilizar o aparelho. O fabricante não é
responsável por lesões ou danos resultantes de
instalação e utilização incorrectas. Guarde sempre as
instruções junto do aparelho para futura referência.
1.1 Segurança para crianças e pessoas vulneráveis
• Este aparelho pode ser utilizado por crianças com 8
anos ou mais e por pessoas com capacidades físicas,
sensoriais ou mentais reduzidas ou com pouca
experiência e conhecimento se tiverem recebido
supervisão ou instruções relativas à utilização do
aparelho de forma segura e compreenderem os
perigos envolvidos.
• Não permita que as crianças brinquem com o
aparelho.
A limpeza e a manutenção básica não devem ser
•
efectuadas por crianças sem supervisão.
• Mantenha todos os materiais de embalagem fora do
alcance das crianças.
1.2
Segurança geral
•
Este aparelho destina-se exclusivamente a utilizações
domésticas ou semelhantes, tais como:
– turismo rural; áreas de cozinha destinadas ao
pessoal em lojas, escritórios e outros ambientes de
trabalho;
– utilização por clientes de hotéis, motéis e outros
ambientes do tipo residencial.
• Mantenha desobstruídas as aberturas de ventilação
do aparelho ou da estrutura onde ele se encontra
encastrado.
• Não utilize um dispositivo mecânico ou qualquer meio
artificial para acelerar o processo de descongelação
além daqueles recomendados pelo fabricante.
• Não danifique o circuito de refrigeração.
Page 19

• Não utilize aparelhos eléctricos dentro dos
compartimentos do aparelho destinados a alimentos,
a não ser que sejam do tipo recomendado pelo
fabricante.
• Não utilize jactos de água ou vapor para limpar o
aparelho.
• Limpe o aparelho com um pano macio e húmido.
Utilize apenas detergentes neutros. Não utilize
produtos abrasivos, esfregões, solventes ou objectos
metálicos.
• Não guarde substâncias explosivas, como latas de
aerossóis com agente de pressão inflamável, dentro
do aparelho.
• Se o cabo de alimentação estiver danificado, deve ser
substituído pelo fabricante, por um agente de
assistência ou por uma pessoa igualmente qualificada,
para evitar perigos.
2. INSTRUÇÕES DE SEGURANÇA
PORTUGUÊS
19
2.1 Instalação
ADVERTÊNCIA!
A instalação deste aparelho
só deve ser efectuada por
uma pessoa qualificada.
• Remova toda a embalagem.
• Não instale nem utilize o aparelho se
ele estiver danificado.
• Cumpra as instruções de instalação
fornecidas com o aparelho.
• Tenha sempre cuidado quando
deslocar o aparelho porque o
aparelho é pesado. Use sempre luvas
de protecção.
• Certifique-se de que o ar pode
circular em torno do aparelho.
• Aguarde pelo menos 4 horas antes de
ligar o aparelho à fonte de
alimentação. Isto permite que o óleo
regresse ao compressor.
• Não instale o aparelho perto de
radiadores, fogões, fornos ou placas.
• A parte posterior do aparelho deve
ficar virada para uma parede.
• Não instale o aparelho em locais com
luz solar directa.
• Não instale este aparelho em locais
demasiado húmidos ou frios, como
anexos exteriores, garagens ou caves.
• Quando deslocar o aparelho, eleve-o
na parte da frente para evitar riscar o
chão.
2.2 Ligação eléctrica
ADVERTÊNCIA!
Risco de incêndio e choque
eléctrico.
• O aparelho tem de ficar ligado à
terra.
• Certifique-se de que a informação
sobre a ligação eléctrica existente na
placa de características está em
conformidade com a alimentação
eléctrica. Se não estiver, contacte um
electricista.
• Utilize sempre uma tomada bem
instalada e à prova de choques
eléctricos.
• Não utilize adaptadores de tomadas
duplas ou triplas, nem cabos de
extensão.
Page 20

20
www.aeg.com
• Certifique-se de que não danifica os
componentes eléctricos (ficha e cabo
de alimentação eléctrica, compressor,
etc.). Contacte a assistência técnica
ou um electricista se for necessário
substituir componentes eléctricos.
• O cabo de alimentação eléctrica deve
ficar abaixo do nível da ficha.
• Ligue a ficha à tomada eléctrica
apenas no final da instalação.
Certifique-se de que a ficha fica
acessível após a instalação.
• Não puxe o cabo de alimentação
para desligar o aparelho. Puxe
sempre a ficha de alimentação.
2.3 Utilização
ADVERTÊNCIA!
Risco de ferimentos,
queimaduras, choque
eléctrico ou incêndio.
• Não altere as especificações deste
aparelho.
• Não coloque dispositivos eléctricos
(por ex. máquinas de fazer gelados)
no interior do aparelho, excepto se
forem autorizados pelo fabricante.
• Tenha cuidado para não provocar
danos no circuito de refrigeração.
Contém isobutano (R600a), um gás
natural com um alto nível de
compatibilidade ambiental. Este gás
é inflamável.
• Se ocorrerem danos no circuito de
refrigeração, certifique-se de que não
existem chamas e fontes de ignição
na divisão. Ventile bem a divisão.
• Não permita que objectos quentes
toquem nas peças de plástico do
aparelho.
• Não coloque bebidas gaseificadas
dentro do congelador. Isto irá criar
pressão no recipiente da bebida.
• Não guarde gases e líquidos
inflamáveis no aparelho.
• Não coloque produtos inflamáveis,
nem objectos molhados com
produtos inflamáveis, no interior,
perto ou em cima do aparelho.
• Não toque no compressor ou no
condensador. Estes estão quentes.
• Não remova nem toque em peças do
compartimento de congelação com
as mãos húmidas ou molhadas.
• Não volte a congelar alimentos que já
foram descongelados.
• Cumpra as instruções de
armazenamento das embalagens dos
alimentos congelados.
2.4 Manutenção e limpeza
ADVERTÊNCIA!
Risco de ferimentos ou
danos no aparelho.
• Antes de qualquer acção de
manutenção, desactive o aparelho e
desligue a ficha da tomada eléctrica.
• Este aparelho contém
hidrocarbonetos na sua unidade de
arrefecimento A manutenção e o
recarregamento só devem ser
efectuados por uma pessoa
qualificada.
• Inspeccione regularmente o
escoamento do aparelho e limpe-o,
se necessário. Se o orifício de
escoamento estiver bloqueado, a
água descongelada fica acumulada
na parte inferior do aparelho.
2.5 Eliminação
ADVERTÊNCIA!
Risco de ferimentos ou
asfixia.
• Desligue o aparelho da alimentação
eléctrica.
• Corte o cabo de alimentação eléctrica
e elimine-o.
• Remova a porta para evitar que
crianças ou animais de estimação
fiquem fechados no interior do
aparelho.
• O circuito de refrigeração e os
materiais de isolamento deste
aparelho não prejudicam a camada
de ozono.
• A espuma de isolamento contém gás
inflamável. Contacte a sua autoridade
municipal para saber como eliminar o
aparelho correctamente.
• Não provoque danos na parte da
unidade de arrefecimento que está
próxima do permutador de calor.
Page 21

3. DESCRIÇÃO DO PRODUTO
4
5
3
1 2
1 2
3
4
7
6
5
3.1 Visão geral do produto
PORTUGUÊS 21
Porta
1
Painel de comandos
2
Cestos do congelador
3
4. FUNCIONAMENTO
4.1 Painel de comandos
Placa de características
4
Cestos Maxibox
5
Botão ON/OFF
1
Botão de reposição do alarme
2
Botão OK
3
Botão de aumento da temperatura
4
Visor
5
Botão de diminuição da temperatura
6
Botão Mode
7
Page 22

A
BC
D
E
F
22
www.aeg.com
É possível alterar o som predefinido dos
botões premindo simultaneamente
Mode e o botão de diminuição da
Visor
4.2 Ligar
1. Ligue a ficha numa tomada eléctrica.
2. Prima o botão ON/OFF do aparelho
se o visor estiver desligado.
O alarme sonoro poderá funcionar após
alguns segundos.
Os indicadores de temperatura
apresentam a temperatura predefinida.
Para desligar o alarme, consulte “Alarme
de temperatura elevada”.
Para seleccionar uma temperatura
diferente, consulte “Regulação da
temperatura”.
Se o visor apresentar "dEMo", consulte
o capítulo “O que fazer se…”.
Se a porta permanecer
aberta durante alguns
minutos, a luz desliga-se
4.3 Desligar
1. Prima o botão ON/OFF do aparelho
automaticamente. A luz é
reposta se a porta for
fechada e novamente
aberta.
durante alguns segundos.
temperatura durante alguns segundos. A
alteração é reversível.
A) Função MinuteMinder
B) Temporizador
C) Indicador de temperatura
D) Indicador de alarme
E) Função FROSTMATIC
F) Função ChildLock
O visor desliga-se.
2. Desligue a ficha da tomada eléctrica.
4.4 Regulação da temperatura
A temperatura definida para o
congelador pode ser regulada
pressionando o botão da temperatura.
Temperatura predefinida:
• -18 °C para o congelador
O indicador de temperatura apresenta a
temperatura seleccionada.
A temperatura seleccionada
será alcançada ao fim de 24
horas. Após uma falha de
energia, a temperatura
seleccionada permanece
memorizada.
4.5 Alarme de temperatura elevada
Um aumento da temperatura no
compartimento do congelador (por
exemplo, devido a uma falha de
alimentação) é indicado por:
• intermitência dos indicadores de
alarme e temperatura do congelador;
Page 23

PORTUGUÊS
23
• alarme sonoro.
Prima qualquer botão para reinicializar o
alarme.
O alarme sonoro desliga-se.
O indicador de temperatura do
congelador apresenta durante alguns
segundos a temperatura mais elevada
que foi atingida. Em seguida, apresenta
novamente a temperatura seleccionada.
O indicador de alarme continua a piscar
até que as condições normais sejam
restabelecidas.
4.6 Função FROSTMATIC
A função FROSTMATIC acelera a
congelação de alimentos frescos e
também protege os alimentos já
armazenados contra um aquecimento
indesejável.
1. Prima o botão Mode até aparecer o
ícone correspondente.
O indicador FROSTMATIC fica
intermitente.
2. Prima o botão OK para confirmar.
Aparece o indicador FROSTMATIC.
A função FROSTMATIC é
desactivada
automaticamente após 52
horas.
Para desactivar a função
antes da desactivação
automática, repita os passos
até que o indicador
FROSTMATIC se apague.
4.7 Alarme de porta aberta
Ouve-se um alarme sonoro se a porta
permanecer aberta durante alguns
minutos. As condições do alarme de
porta aberta são indicadas por:
• indicador de alarme intermitente;
• alarme sonoro.
Quando as condições normais são
restabelecidas (porta fechada), o alarme
pára. Também pode desligar o alarme
sonoro premindo qualquer botão.
4.8 Função MinuteMinder
A função MinuteMinder serve para
definir um sinal sonoro para uma hora
escolhida, sendo útil, por exemplo,
quando uma receita requer o
arrefecimento de produtos alimentares
durante algum tempo ou quando é
necessário um aviso para não se
esquecer das garrafas colocadas no
congelador para arrefecimento rápido.
1. Prima Mode até aparecer o ícone
correspondente.
O indicador MinuteMinder fica
intermitente.
O temporizador apresenta o valor
definido (30 minutos) durante alguns
segundos.
2. Prima o botão regulador do
temporizador para alterar o valor
definido do temporizador entre 1 e
90 minutos.
3. Prima OK para confirmar.
Aparece o indicador MinuteMinder.
O temporizador apresenta (min). a
piscar.
É possível alterar o tempo em qualquer
momento, durante a contagem
decrescente e no final, bastando premir
o botão de diminuição da temperatura e
o botão de aumento da temperatura.
No fim da contagem decrescente, o
indicador MinuteMinder fica intermitente
e o aparelho emite um alarme sonoro.
Prima OK para desligar o som e terminar
a função.
É possível desactivar a função em
qualquer momento durante a contagem
decrescente, repetindo os passos da
função até que o indicador se apague.
4.9 Função ChildLock
Active a função ChildLock para impedir a
utilização acidental dos botões.
1. Prima Mode até aparecer o ícone
correspondente.
O indicador ChildLock fica intermitente.
2. Prima OK para confirmar.
Aparece o indicador ChildLock.
Para desactivar a função ChildLock,
repita a acção até que o indicador de
ChildLock se apague.
Page 24

www.aeg.com
24
5. UTILIZAÇÃO DIÁRIA
ADVERTÊNCIA!
Consulte os capítulos
relativos à segurança.
5.1 Armazenamento de alimentos congelados
Quando ligar pela primeira vez ou após
um período sem utilização, deixe o
aparelho em funcionamento durante 2
horas ou mais com a função
FROSTMATIC activada antes de colocar
os produtos no compartimento. As
gavetas do congelador permitem
encontrar a embalagem pretendida com
rapidez e facilidade. Se pretender
armazenar grandes quantidades de
alimentos, retire todas as gavetas,
excepto a gaveta inferior que deve ficar
no seu sítio para permitir uma boa
circulação de ar. Pode colocar alimentos
que fiquem salientes até 15 mm da porta
em todas as prateleiras.
ADVERTÊNCIA!
Em caso de descongelação
acidental, por exemplo,
devido a falta de
electricidade, se a energia
estiver desligada durante
mais tempo do que o
“Tempo de autonomia”
indicado na tabela de
características técnicas, os
alimentos descongelados
terão de ser consumidos
rapidamente ou cozinhados
imediatamente e depois
novamente congelados
(depois de arrefecerem).
5.2 Congelar alimentos frescos
O congelador é adequado para congelar
alimentos frescos e conservar alimentos
congelados e ultracongelados a longo
prazo.
Para congelar pequenas quantidades de
alimentos frescos, não é necessário
alterar a regulação actual.
Para congelar alimentos frescos, active a
função FROSTMATIC pelo menos 24
horas antes de colocar os alimentos a
congelar no congelador.
Coloque os alimentos frescos a congelar
nos dois compartimentos superiores.
A quantidade máxima de alimentos que
podem ser congelados em 24 horas está
indicada na placa de características,
situada no interior do aparelho.
O processo de congelação demora 24
horas: não introduza mais alimentos para
congelar durante este período.
Quando o processo de congelação
terminar, regresse à temperatura
desejada (consulte “Função
FROSTMATIC”).
5.3 Descongelação
Antes de serem utilizados, os alimentos
congelados e ultra-congelados podem
ser descongelados no compartimento
do frigorífico ou à temperatura
ambiente, dependendo do tempo
disponível para esta operação.
Os artigos pequenos podem ser
cozinhados ainda congelados,
directamente do congelador: neste caso,
a confecção demora mais tempo.
5.4 Acumuladores de frio
O congelador possui, pelo menos, um
acumulador de frio que aumenta o
tempo de armazenamento em caso de
falha de energia.
5.5 Remoção dos cestos de congelação e das prateleiras de vidro do congelador
Os cestos de congelação têm um
batente limitador para evitar a sua
remoção acidental ou queda. Quando
retirar um cesto do congelador, puxe-o
na sua direcção e, ao atingir o batente,
retire o cesto inclinando a parte dianteira
para cima.
Page 25

2
1
Para voltar a colocá-lo, levante
1
1
2
2
1
1
1
ligeiramente a parte dianteira do cesto
para o introduzir no congelador. Assim
que passar pelos batentes, empurre os
cestos para a devida posição.
O aparelho está equipado com batentes
nas prateleiras para as segurar.
É necessário levantar (1) as prateleiras
em ambos os lados e só depois puxá-las
para fora (2).
PORTUGUÊS 25
As prateleiras de vidro que têm sistema
de expansão encontram-se fixas com
pinos de bloqueio.
Para retirar as prateleiras, liberte o pino
de bloqueio de cada lado no rolo de
expansão. Se necessário, utilize uma
chave de parafusos.
De seguida, remova ambos os pinos de
bloqueio (1) e puxe as prateleiras de
vidro para fora (2).
6. SUGESTÕES E DICAS
6.1 Sons de funcionamento
normais
Os seguintes sons são normais durante o
funcionamento:
• Um som de gorgolejar ou borbulhar
quando o refrigerante está a ser
bombeado.
• Um som sibilante e ritmado
proveniente do compressor quando o
refrigerante está a ser bombeado.
• Um ruído repentino de estilhaçar no
interior do aparelho, causado pela
dilatação térmica (fenómeno físico
natural e não perigoso).
• Um ruído de clique proveniente do
regulador de temperatura quando o
compressor é ligado e desligado.
Page 26

www.aeg.com26
6.2 Conselhos para poupar
energia
• Não abra a porta muitas vezes, nem a
deixe aberta mais tempo do que o
absolutamente necessário.
• Se a temperatura ambiente for alta e
o regulador de temperatura se
encontrar na definição de baixa
temperatura com o aparelho
completamente cheio, o compressor
pode funcionar continuamente,
causando gelo no evaporador. Se isto
acontecer, coloque o regulador de
temperatura em definições mais
quentes, para permitir a
descongelação automática e poupar
no consumo de electricidade.
• Se existirem, não retire os
acumuladores de frio do cesto do
congelador.
6.3 Conselhos para a
congelação
Para o ajudar a tirar partido do processo
de congelação, eis alguns conselhos
importantes:
• a quantidade máxima de alimentos
que podem ser congelados em 24
horas está indicada na placa de
características;
• o processo de congelação demora 24
horas; não devem ser adicionados
mais alimentos para congelação
durante este período;
• congele apenas alimentos de boa
qualidade, frescos e bem limpos;
• prepare os alimentos em pequenas
quantidades para permitir que sejam
rápida e completamente congelados
e para poder descongelar apenas a
quantidade necessária;
• embrulhe os alimentos em folha de
alumínio ou politeno e certifique-se
de que as embalagens são
herméticas;
• não permita que os alimentos frescos
e não congelados entrem em
contacto com os alimentos já
congelados, para evitar o aumento da
temperatura dos alimentos
congelados;
• os alimentos magros conservam-se
melhor e durante mais tempo do que
o alimentos gordos; o sal reduz o
tempo de conservação dos alimentos;
• os alimentos podem causar
queimaduras na pele quando tocados
imediatamente após a sua remoção
do compartimento do congelador,
devido à congelação da água;
• é aconselhável que anote a data de
congelação em cada embalagem
para poder controlar o tempo de
armazenamento.
6.4 Conselhos para o
armazenamento de alimentos
congelados
Para obter o melhor desempenho deste
aparelho, siga estas indicações:
• certifique-se de que os alimentos
congelados comercialmente foram
armazenados adequadamente pelo
vendedor;
• certifique-se de que os alimentos
congelados são transferidos do
supermercado para o congelador no
tempo mais curto possível;
• não abra a porta muitas vezes, nem a
deixe aberta mais tempo do que o
necessário;
• uma vez descongelados, os alimentos
degradam-se rapidamente e não
podem voltar a ser congelados;
• não exceda o período de
armazenamento indicado pelo
produtor dos alimentos.
MANUTENÇÃO E LIMPEZA
7.
ADVERTÊNCIA!
Consulte os capítulos
relativos à segurança.
Page 27

PORTUGUÊS 27
7.1 Avisos gerais
CUIDADO!
Desligue o aparelho da
tomada eléctrica antes de
qualquer operação de
manutenção.
Este aparelho contém
hidrocarbonetos na unidade
de refrigeração, pelo que a
manutenção e a recarga
devem ser efectuadas
exclusivamente por técnicos
autorizados.
Os acessórios e as peças
deste aparelho não podem
ser lavados na máquina de
lavar loiça.
7.2 Limpeza do interior
Antes de utilizar o aparelho pela primeira
vez, limpe o interior e todos os
acessórios internos com água morna e
detergente neutro, para remover o
cheiro típico de um produto novo, e
seque minuciosamente.
CUIDADO!
Não utilize detergentes ou
pós abrasivos, pois estes
produtos danificam o
acabamento.
7.3 Limpeza periódica
CUIDADO!
Não puxe, não desloque,
nem danifique quaisquer
tubos e/ou cabos no interior
do aparelho.
CUIDADO!
Tenha cuidado para não
danificar o sistema de
arrefecimento.
CUIDADO!
Quando deslocar o
aparelho, eleve-o na parte
da frente para evitar riscar o
chão.
O equipamento tem de ser limpo
regularmente:
1. Limpe o interior e os acessórios com
água morna e um pouco de
detergente neutro.
2. Verifique regularmente os vedantes
da porta e limpe-os para garantir que
estão limpos e sem resíduos.
3. Enxagúe e seque cuidadosamente.
4. Se estiver acessível, limpe o
condensador e o compressor na
parte de trás do aparelho com uma
escova.
Esta operação vai melhorar o
desempenho do aparelho e reduzir o
consumo de electricidade.
7.4 Descongelar o congelador
O compartimento do congelador é do
tipo “frost free”. Isto significa que não há
qualquer formação de gelo durante o
seu funcionamento, quer nas paredes
interiores, quer nos alimentos.
A ausência de gelo deve-se à circulação
contínua de ar frio no interior do
compartimento, accionado por um
ventilador controlado automaticamente.
7.5 Períodos de inactividade
Quando não utilizar o aparelho durante
longos períodos, adopte as seguintes
precauções:
1. Desligue o aparelho da alimentação
eléctrica.
2. Retire todos os alimentos.
3. Limpe o aparelho e todos os
acessórios.
4. Deixe a(s) porta(s) aberta(s) para
evitar cheiros desagradáveis.
ADVERTÊNCIA!
Se o aparelho permanecer
ligado, peça a alguém para
o verificar com alguma
regularidade, para evitar
que os alimentos no interior
se estraguem em caso de
falha eléctrica.
Page 28

www.aeg.com28
8. RESOLUÇÃO DE PROBLEMAS
ADVERTÊNCIA!
Consulte os capítulos
relativos à segurança.
8.1 O que fazer se…
Problema Causa possível Solução
O aparelho não funciona. O aparelho está desligado. Ligue o aparelho.
A ficha não está correcta-
mente introduzida na tomada eléctrica.
Não existe voltagem na
tomada eléctrica.
O aparelho emite demasiado ruído.
O aviso sonoro ou visual está ligado.
O visor da temperatura
apresenta um símbolo rectangular em vez de números.
A lâmpada não funciona. A lâmpada está em es-
A lâmpada não funciona. A lâmpada está avariada. Contacte o Centro de Assis-
O aparelho não está
apoiado correctamente.
O aparelho foi ligado recentemente e a temperatura está ainda demasiado
elevada.
A temperatura no aparelho
está demasiado elevada.
A porta foi deixada aberta. Feche a porta.
A temperatura no aparelho
está demasiado elevada.
Problema no sensor de
temperatura.
pera.
Ligue a ficha correctamente na
tomada eléctrica.
Ligue outro aparelho eléctrico
na tomada eléctrica. Contacte
um electricista qualificado.
Verifique se o aparelho está
estável.
Consulte “Alarme de porta
aberta” ou “Alarme de temperatura elevada”.
Consulte “Alarme de porta
aberta” ou “Alarme de temperatura elevada”.
Contacte um electricista qualificado ou o Centro de Assistência Técnica Autorizado
mais próximo.
Contacte o Centro de Assistência Técnica Autorizado
mais próximo (o sistema de refrigeração irá continuar a manter os produtos alimentares
frios, mas a regulação da temperatura não será possível).
Feche e abra a porta.
tência Técnica Autorizado
mais próximo.
Page 29

Problema Causa possível Solução
O compressor funciona continuamente.
Guardou demasiados ali-
A temperatura ambiente
Os alimentos colocados no
A temperatura seleccionada não é adequada.
mentos ao mesmo tempo.
está demasiado elevada.
aparelho estavam demasiado quentes.
A porta não está bem fe-
Consulte o capítulo “Funcionamento”.
Aguarde algumas horas e
volte a verificar a temperatura.
Consulte a classe climática na
placa de características.
Deixe que os alimentos arrefeçam até à temperatura ambiente antes de os guardar.
Consulte “Fechar a porta”.
chada.
Existe demasiado gelo acumulado.
A função FROSTMATIC está activa.
A porta não está bem fechada ou a junta da porta
Consulte “Função FROSTMATIC”.
Consulte “Fechar a porta”.
está deformada/suja.
O compressor não arranca
imediatamente após o bot-
Isto é normal e não significa qualquer problema.
O compressor arranca após
um período de tempo.
ão FROSTMATIC ser pressionado ou após uma alteração da regulação de temperatura.
Existe água a escorrer para
o chão.
A saída da água descongelada não está ligada ao
tabuleiro de evaporação,
Encaixe o tubo de saída da
água descongelada no tabu-
leiro de evaporação.
por cima do compressor.
Não é possível definir a temperatura.
A função FROSTMATIC ou
COOLMATIC está activada.
Desactive manualmente a fun-
ção FROSTMATIC ou COOL-
MATIC ou aguarde que a fun-
ção se desactive automatica-
mente antes de regular a tem-
peratura. Consulte “Função
FROSTMATIC ou COOLMAT-
IC”.
A temperatura no aparelho
está demasiado baixa/alta.
O regulador de temperatura não está bem posicio-
Seleccione uma temperatura
mais alta/baixa.
nado.
A temperatura de algum
produto está demasiado
elevada.
Deixe que a temperatura dos
alimentos diminua até à tem-
peratura ambiente antes de os
guardar.
PORTUGUÊS 29
Page 30

30
www.aeg.com
Problema Causa possível Solução
A porta foi aberta muitas
vezes.
A função FROSTMATIC está activa.
Não há circulação de ar
frio no interior do aparelho.
Abra a porta apenas quando
for mesmo necessário.
Consulte “Função FROSTMATIC”.
Certifique-se de que o ar frio
pode circular no interior do
aparelho.
Se estes conselhos não
resultarem, contacte o
Centro de Assistência
Técnica Autorizado mais
próximo.
8.2 Fechar a porta
1. Limpe as juntas da porta.
2. Se necessário, ajuste a porta.
Consulte “Instalação”.
3. Se as juntas da porta estiverem
defeituosas, substitua-as. Contacte
9. INSTALAÇÃO
ADVERTÊNCIA!
Consulte os capítulos
relativos à segurança.
9.1 Posicionamento
Este aparelho deve ser instalado num
espaço interior seco e bem ventilado,
onde a temperatura ambiente
corresponda à classe climática indicada
na placa de características do aparelho:
Classe
climática
SN +10 °C a +32 °C
N +16 °C a +32 °C
ST +16 °C a +38 °C
T +16 °C a +43 °C
Temperatura ambiente
um Centro de Assistência Técnica
Autorizado.
8.3 Substituir a lâmpada
O aparelho está equipado com uma luz
interior LED de longa duração.
Apenas a assistência técnica está
autorizada a substituir o dispositivo de
iluminação. Contacte um Centro de
Assistência Técnica Autorizado.
Podem ocorrer alguns
problemas de
funcionamento em alguns
tipos de modelos se
estiverem a funcionar fora
destas condições. O
funcionamento correcto só
pode ser garantido no
intervalo de temperaturas
indicado. Se tiver dúvidas
em relação ao local onde
deve instalar o aparelho,
contacte o vendedor, o
nosso serviço de apoio ao
cliente ou o serviço de
assistência técnica mais
próximo.
9.2 Localização
O aparelho deve ser instalado num local
afastado de fontes de calor, como
radiadores, termoacumuladores, luz solar
directa, etc. Certifique-se de que o ar
pode circular livremente atrás do
Page 31

A
B
100 mm
min
20 mm
2
4
3
1
PORTUGUÊS
31
aparelho. Para garantir o melhor
desempenho possível se o aparelho
estiver debaixo de uma unidade
suspensa na parede, a distância mínima
entre o topo do aparelho e a unidade de
parede deve ser pelo menos 100 mm.
Em todo o caso, deve-se evitar colocar o
aparelho debaixo de uma unidade
suspensa na parede. O nivelamento
preciso é garantido por um ou vários pés
ajustáveis na base do aparelho.
9.4 Espaçadores traseiros
Pode encontrar os dois espaçadores no
saco da documentação.
1. Desaperte o parafuso.
2. Encaixe o espaçador debaixo do
parafuso.
3. Rode o espaçador para a posição
correcta.
4. Volte a apertar os parafusos.
9.5 Nivelamento
Quando instalar o aparelho, certifique-se
de que ele fica nivelado. Isto pode ser
conseguido com os dois pés ajustáveis
na base, à frente.
9.3 Ligação eléctrica
• Antes de ligar a ficha na tomada,
certifique-se de que a voltagem e a
frequência indicadas na placa de
características correspondem à rede
eléctrica da sua casa.
• O aparelho tem de ficar ligado à
terra. A ficha do cabo de alimentação
é fornecida com um contacto para
esse fim. Se a tomada eléctrica
doméstica não estiver ligada à terra,
ligue o aparelho a uma ligação à terra
separada que cumpra as normas
actuais; consulte um electricista
qualificado.
• O fabricante declina toda a
responsabilidade caso as precauções
de segurança acima não sejam
cumpridas.
• Este aparelho está em conformidade
com as Directivas da UE.
9.6 Reversibilidade das portas
Na eventualidade de pretender alterar o
sentido de abertura da porta, contacte o
Centro de Assistência Técnica
Autorizado mais próximo. Os custos da
inversão da abertura das portas pelo
técnico do Centro de Assistência Técnica
Autorizado serão suportados pelo
cliente.
Page 32

www.aeg.com32
10. INFORMAÇÃO TÉCNICA
10.1 Dados técnicos
Altura mm 1850
Largura mm 595
Profundidade mm 668
Tempo de autonomia Horas 28
Voltagem Volts 230 - 240
Frequência Hz 50
As informações técnicas encontram-se
na placa de características, que está no
exterior ou no interior do aparelho, bem
como na etiqueta de energia.
11. PREOCUPAÇÕES AMBIENTAIS
Recicle os materiais que apresentem o
símbolo . Coloque a embalagem nos
contentores indicados para reciclagem.
Ajude a proteger o ambiente e a saúde
pública através da reciclagem dos
aparelhos eléctricos e electrónicos. Não
elimine os aparelhos que tenham o
símbolo juntamente com os resíduos
domésticos. Coloque o produto num
ponto de recolha para reciclagem local
ou contacte as suas autoridades
municipais.
Page 33

ESPAÑOL
CONTENIDO
1. INFORMACIÓN SOBRE SEGURIDAD...................................................................34
2. INSTRUCCIONES DE SEGURIDAD....................................................................... 35
3. DESCRIPCIÓN DEL PRODUCTO...........................................................................37
4. FUNCIONAMIENTO...............................................................................................37
5. USO DIARIO............................................................................................................ 40
6. CONSEJOS..............................................................................................................41
7. MANTENIMIENTO Y LIMPIEZA.............................................................................42
8. SOLUCIÓN DE PROBLEMAS.................................................................................44
9. INSTALACIÓN.........................................................................................................46
10. INFORMACIÓN TÉCNICA...................................................................................48
PARA OFRECER UNOS RESULTADOS PERFECTOS
Gracias por escoger este producto AEG. Este artículo ha sido creado para ofrecer
un rendimiento impecable durante muchos años, con innovadoras tecnologías
que facilitarán su vida y prestaciones que probablemente no encuentre en
electrodomésticos corrientes. Por favor, dedique algunos minutos a la lectura
para disfrutar de todas sus ventajas.
Consulte en nuestro sitio web:
Obtener consejos, folletos, soluciones a problemas e información de servicio:
www.aeg.com
Registrar su producto para recibir un mejor servicio:
www.registeraeg.com
33
Adquirir accesorios, artículos de consumo y recambios originales para su
aparato:
www.aeg.com/shop
ATENCIÓN Y SERVICIO AL CLIENTE
Le recomendamos que utilice recambios originales.
Al contactar con nuestro centro autorizado de servicio técnico, cerciórese de
tener la siguiente información a mano: Modelo, PNC, Número de serie.
La información se puede encontrar en la placa de características.
Advertencia / Precaución-Información sobre seguridad
Información general y consejos
Información medioambiental
Salvo modificaciones.
Page 34

www.aeg.com
34
1. INFORMACIÓN SOBRE SEGURIDAD
Antes de instalar y utilizar el aparato, lea atentamente
las instrucciones facilitadas. El fabricante no se hace
responsable de los daños y lesiones causados por una
instalación y uso incorrectos. Guarde siempre las
instrucciones junto con el aparato para futuras
consultas.
1.1 Seguridad de niños y personas vulnerables
• Este electrodoméstico puede ser utilizado por niños
de 8 años en adelante y personas cuyas capacidades
físicas, sensoriales o mentales estén disminuidas o
que carezcan de la experiencia y conocimientos
suficientes para manejarlo, siempre que cuenten con
las instrucciones o la supervisión sobre el uso del
electrodoméstico de forma segura y comprendan los
riesgos.
No deje que los niños jueguen con el aparato.
•
• La limpieza y el mantenimiento no podrán realizarlas
niños sin supervisión.
• Mantenga los materiales de embalaje fuera del
alcance de los niños.
1.2
Seguridad general
•
Este aparato está concebido para utilizarse en
aplicaciones domésticas y similares, tales como:
– Granjas; áreas de cocina para el personal en
tiendas, oficinas y otros entornos de trabajo
– Por clientes en hoteles, moteles, pensiones y otros
entornos de tipo residencial
• Mantenga libres de obstrucciones las aberturas de
ventilación del alojamiento del aparato o de la
estructura empotrada.
• No utilice dispositivos mecánicos ni medios artificiales
para acelerar el proceso de descongelación, excepto
los recomendados por el fabricante.
• No dañe el circuito del refrigerante.
Page 35

• No utilice dispositivos eléctricos dentro de los
compartimientos para alimentos del aparato, salvo si
son del tipo recomendado por el fabricante.
• No utilice pulverizadores ni vapor de agua para
limpiar el aparato.
• Limpie el aparato con un paño suave humedecido.
Utilice solo detergentes neutros. No utilice productos
abrasivos, estropajos duros, disolventes ni objetos
metálicos.
• No almacene sustancias explosivas tales como latas
de aerosol con un propulsor flamable en este aparato.
• Si el cable eléctrico sufre algún daño, el fabricante, su
servicio técnico o un profesional tendrán que
cambiarlo para evitar riesgos.
2. INSTRUCCIONES DE SEGURIDAD
ESPAÑOL
35
2.1 Instalación
ADVERTENCIA!
Solo un electricista
cualificado puede instalar
este aparato.
• Retire todo el embalaje
• No instale ni utilice un aparato
dañado.
• Siga las instrucciones de instalación
suministradas con el aparato.
• El aparato es pesado, tenga cuidado
siempre cuando lo mueva. Utilice
siempre guantes de protección.
• Asegúrese de que el aire pueda
circular alrededor del aparato.
• Espere al menos 4 horas antes de
conectar el aparato a la alimentación
eléctrica. Esto es para permitir que el
aceite regrese al compresor.
• No instale el aparato cerca de
radiadores, cocinas, hornos o placas
de cocción.
• La parte posterior del aparato se
debe colocar contra la pared.
• No instale el aparato donde reciba luz
solar directa.
• No coloque este aparato en lugares
demasiado húmedos o fríos, como
anexos a una construcción, garajes o
bodegas.
• Al mover el aparato, levántelo por el
borde frontal para no arañar el suelo.
2.2 Conexión eléctrica
ADVERTENCIA!
Riesgo de incendios y
descargas eléctricas.
• El aparato debe conectarse a tierra.
• Asegúrese de que las
especificaciones eléctricas de la placa
coinciden con las del suministro
eléctrico de su hogar. En caso
contrario, póngase en contacto con
un electricista.
• Utilice siempre una toma con
aislamiento de conexión a tierra
correctamente instalada.
• No utilice adaptadores de enchufes
múltiples ni cables prolongadores.
• Asegúrese de no provocar daños en
los componentes eléctricos (como
enchufe, cable de alimentación,
compresor). Póngase en contacto con
un electricista o con el servicio
técnico para cambiar un cable
dañado.
• El cable de alimentación debe estar
por debajo del nivel del enchufe de
alimentación.
Page 36

36
www.aeg.com
• Conecte el enchufe a la toma de
corriente únicamente cuando haya
terminado la instalación. Asegúrese
de tener acceso al enchufe del
suministro de red una vez instalado el
aparato.
• No desconecte el aparato tirando del
cable de conexión a la red. Tire
siempre del enchufe.
2.3 Uso
ADVERTENCIA!
Existe riesgo de lesiones,
quemaduras, descargas
eléctricas o incendios.
• No cambie las especificaciones de
este aparato.
• El utilice otros aparatos eléctricos
(como máquinas de hacer helados)
dentro de aparatos de refrigeración, a
menos que el fabricante haya
autorizado su utilización
• Tenga cuidado para no dañar el
circuito de refrigerante. Contiene
isobutano (R600a), un gas natural con
alto grado de compatibilidad
medioambiental. Este gas es
inflamable.
• Si se daña el circuito del refrigerante,
evite las llamas y fuentes de ignición
en la habitación. Ventile la habitación.
• No toque con elementos calientes las
piezas de plástico del aparato.
• No coloque bebidas con gas en el
congelador. Se creará presión en el
contenedor de la bebida.
• No almacene gas ni líquido
inflamable en el aparato.
• No coloque productos inflamables ni
objetos mojados con productos
inflamables dentro, cerca o encima
del aparato.
• No toque el compresor ni el
condensador. Están calientes.
• No retire ni toque elementos del
compartimento congelador con las
manos húmedas o mojadas.
• No vuelva a congelar alimentos que
se hayan descongelado.
• Siga las instrucciones del envase de
los alimentos congelados.
2.4 Mantenimiento y limpieza
ADVERTENCIA!
Podría sufrir lesiones o dañar
el aparato.
• Antes de proceder con el
mantenimiento, apague el aparato y
desconecte el enchufe de la red.
• Este equipo contiene hidrocarburos
en la unidad de refrigeración. Solo
una persona cualificada debe realizar
el mantenimiento y la recarga de la
unidad.
• Examine periódicamente el desagüe
del aparato y límpielo si fuera
necesario. Si el desagüe se bloquea,
el agua descongelada se acumulará
en la base del aparato.
2.5 Desecho
ADVERTENCIA!
Existe riesgo de lesiones o
asfixia.
• Desconecte el aparato de la red.
• Corte el cable de conexión a la red y
deséchelo.
• Retire la puerta para evitar que los
niños y las mascotas queden
encerrados en el aparato.
• El circuito del refrigerante y los
materiales aislantes de este aparato
no dañan la capa de ozono.
• La espuma aislante contiene gas
inflamable. Póngase en contacto con
las autoridades locales para saber
cómo desechar correctamente el
aparato.
• No dañe la parte de la unidad de
refrigeración que está cerca del
intercambiador de calor.
Page 37

3. DESCRIPCIÓN DEL PRODUCTO
4
5
3
1 2
1 2
3
4
7
6
5
3.1 Descripción del producto
ESPAÑOL 37
Tapa
1
Panel de control
2
Cajones de congelador
3
4. FUNCIONAMIENTO
4.1 Panel de control
Placa de características
4
Cestos Maxibox
5
Tecla ON/OFF
1
Tecla de reinicio de alarma
2
Tecla OK
3
Tecla de calentamiento de
4
temperatura
Pantalla
5
Tecla de enfriamiento de
6
temperatura
Tecla Mode
7
Page 38

A
BC
D
E
F
38
www.aeg.com
Se puede cambiar el volumen del sonido
de las teclas pulsando al mismo tiempo
unos segundos la tecla Mode y la de
Pantalla
4.2 Encendido
1. Conecte el enchufe a la toma de
corriente.
2. Pulse ON/OFF del aparato si la
pantalla está apagada.
Puede que oiga la señal acústica de
alarma tras unos segundos.
Los indicadores de temperatura
muestran la temperatura
predeterminada programada.
Para restaurar la alarma, consulte la
sección "Alarma de temperatura alta".
Para programar otra temperatura,
consulte la sección "Regulación de la
temperatura".
Si "dEMo" aparece en la pantalla,
consulte el capítulo "Qué hacer si...".
Si se deja la puerta abierta
durante unos minutos, la luz
se apagará
automáticamente. La luz se
vuelve a encender al cerrar y
abrir la puerta.
4.3 Apagado
1. Pulse la tecla de encendido/apagado
del aparato durante unos segundos.
menor temperatura. El cambio es
reversible.
A) Función MinuteMinder
B) Temporizador
C) Indicador de temperatura
D) Indicador de alarma
E) Función FROSTMATIC
F) Función ChildLock
La pantalla se apaga.
2. Desenchufe el aparato de la toma de
corriente.
4.4 Regulación de la temperatura
La temperatura programada en el
congelador puede ajustarse pulsando la
tecla de temperatura.
Temperaturas predeterminadas:
• -18°C para el congelador
El indicador de temperatura muestra la
temperatura programada.
La temperatura programada
se alcanza en un plazo de 24
horas. Después de un corte
del suministro eléctrico, la
temperatura ajustada se
guarda.
4.5 Alarma de temperatura alta
Un aumento de la temperatura del
compartimento congelador (por
ejemplo, por falta de energía eléctrica)
se indicará mediante:
Page 39

ESPAÑOL
39
• el parpadeo de los indicadores de
temperatura del congelador y alarma;
• el sonido de la señal acústica.
Pulse cualquier tecla para reiniciar la
alarma.
La señal acústica se apaga.
El indicador de temperatura del
congelador muestra la temperatura más
alta alcanzada durante unos segundos. A
continuación vuelve a mostrar la
temperatura programada.
El indicador de alarma sigue
parpadeando hasta que se restablecen
las condiciones normales.
4.6 Función FROSTMATIC
La función FROSTMATIC acelera la
congelación de alimentos frescos al
tiempo que impide que se calienten los
alimentos ya almacenados
1. Pulse la tecla Mode hasta que
aparezca el icono correspondiente.
El indicador FROSTMATIC parpadea.
2. Pulse la tecla OK para confirmar.
Aparece el indicador FROSTMATIC.
La función FROSTMATIC se
desactiva automáticamente
después de 52 horas.
Para apagar la función antes
del final automático, repita
los pasos hasta que el
indicador FROSTMATIC se
apague.
4.7 Alarma de puerta abierta
Si la puerta se queda abierta durante
unos minutos, sonará una señal acústica.
Los indicadores de puerta abierta son los
siguientes:
• un indicador de alarma intermitente;
• una señal acústica.
Una vez restablecidas las condiciones
normales (puerta cerrada), la alarma
acústica se detendrá. La señal acústica se
puede parar pulsando cualquier tecla.
deseada y es útil, por ejemplo, para
recetas que precisan el enfriamiento de
un alimento durante un tiempo
determinado, o cuando se necesita un
recordatorio para no olvidar que se han
colocado botellas en el congelador para
que se enfríen rápidamente.
1. Pulse Mode hasta que aparezca el
icono correspondiente.
El indicador MinuteMinder parpadea.
El temporizador muestra el tiempo
programado (30 minutos) durante unos
segundos.
2. Pulse el regulador del temporizador
para programar un valor entre 1 y 90
minutos.
3. Pulse OK para confirmar.
Aparece el indicador MinuteMinder.
El temporizador empieza a parpadear
(min).
El tiempo puede modificarse en
cualquier momento durante la cuenta
atrás y al finalizar, pulsando las teclas de
enfriamiento o calentamiento de
temperatura.
Al terminar la cuenta atrás, parpadea el
indicador MinuteMinder y suena la
alarma. Pulse OK para apagar el sonido y
desactivar la función.
La función se puede desactivar en
cualquier momento durante la cuenta
atrás repitiendo los pasos de la función
hasta que se apague el indicador.
4.9 Función ChildLock
Active la función ChildLock para
bloquear las teclas frente a pulsaciones
accidentales.
1. Pulse Mode hasta que aparezca el
icono correspondiente.
El indicador ChildLock parpadea.
2. Pulse OK para confirmar.
Aparece el indicador ChildLock.
Para activar la función ChildLock, repita
el procedimiento hasta que el indicador
ChildLock se apague.
4.8 Función MinuteMinder
La función MinuteMinder se utiliza para
ajustar una alarma acústica a la hora
Page 40

www.aeg.com
40
5. USO DIARIO
ADVERTENCIA!
Consulte los capítulos sobre
seguridad.
5.1 Conservación de alimentos congelados
Al poner en marcha el aparato por
primera vez o después de un periodo sin
uso, déjelo en marcha al menos durante
2 horas con la función FROSTMATIC
encendida antes de colocar productos
en el compartimento. Los cajones de
congelados aseguran una búsqueda fácil
y rápida del paquete de alimentos que
se desea encontrar. Cuando tenga que
conservar grandes cantidades de
alimentos, quite todos los cajones
excepto el último, que debe permanecer
en su sitio para la correcta circulación del
aire. En todos los estantes se pueden
colocar alimentos que sobresalgan hasta
15 mm de la puerta
ADVERTENCIA!
En caso de producirse una
descongelación accidental,
por ejemplo, por un corte
del suministro eléctrico, si la
interrupción ha durado más
que el valor indicado en la
tabla de características
técnicas bajo la
especificación "periodo de
tiempo en descongelación",
los alimentos
descongelados deberán
consumirse cuanto antes o
cocinarse de inmediato, y
luego volverse a congelar
(después de que se hayan
enfriado).
5.2 Congelación de alimentos frescos
El compartimento del congelador es
adecuado para congelar alimentos
frescos y conservar a largo plazo los
alimentos congelados y ultracongelados.
Para congelar pequeñas cantidades de
alimentos frescos no es necesario
cambiar el ajuste actual.
Para congelar alimentos frescos, active la
función FROSTMATIC al menos 24 horas
antes de introducir los alimentos en el
compartimento congelador.
Coloque los alimentos que vaya a
congelar en los dos compartimentos
superiores.
La cantidad máxima de alimentos que
puede congelarse en 24 horas se indica
en la placa de características, una
etiqueta situada en el interior del
aparato.
El proceso de congelación dura 24 horas:
durante ese tiempo no deben añadirse
otros alimentos para congelar.
Cuando haya finalizado el proceso de
congelación, vuelva a ajustar la
temperatura adecuada (consulte
"Función FROSTMATIC").
5.3 Descongelación
Los alimentos ultracongelados o
congelados, antes de utilizarlos, se
pueden descongelar en el
compartimento frigorífico o a
temperatura ambiente, dependiendo del
tiempo de que se disponga.
Es posible incluso cocinar piezas
pequeñas congeladas, tomadas
directamente del congelador: en tal
caso, el tiempo de cocción será más
prolongado.
5.4 Acumuladores de frío
El congelador contiene al menos un
acumulador de frío que alarga el periodo
de conservación en caso de que se
produzca un corte de corriente o una
avería.
5.5 Extracción de los cestos de congelados y estantes de cristal del congelador
Los cestos de congelados llevan un tope
para impedir que se salgan de las guías
Page 41

2
1
1
1
2
2
1
1
1
ESPAÑOL 41
o se caigan. Para extraer un cesto del
congelador, tire de él hacia fuera y,
cuando llegue al tope, retírelo tirando
suavemente de su parte delantera hacia
arriba.
Para volver a colocarlo en su lugar,
levante ligeramente la parte delantera
del cesto e insértelo en el congelador.
Cuando haya superado los topes,
empuje los cestos hasta el fondo.
El aparato dispone de topes en los
estantes para fijarlos.
Los estantes se deben levantar (1) de
cada lado y después tirar hacia afuera (2).
Los estantes de cristal con extensores
están sujetos con pasadores de bloqueo.
Para extraerlos, afloje el pasador de
bloqueo a cada lado del extensor. Si es
necesario, utilice un destornillador.
Tire después de los dos pasadores (1) y
tire hacia afuera del estante de cristal (2).
6. CONSEJOS
6.1 Sonidos de funcionamiento
normal
Los ruidos siguientes son normales
durante el funcionamiento:
• Un gorgoteo y burbujeo débil desde
el serpentín cuando se bombea el
refrigerante.
Page 42

www.aeg.com42
• Un zumbido o sonido intermitente
desde el compresor cuando se
bombea el refrigerante.
• Un chasquido repentino desde el
interior del aparato debido a la
dilatación térmica (un fenómeno físico
natural no peligroso).
• Un chasquido débil desde el
regulador de temperatura cuando se
activa o desactiva el compresor.
6.2 Consejos para ahorrar
energía
• No abra la puerta con frecuencia ni la
deje abierta más tiempo del
estrictamente necesario.
• Si la temperatura ambiente es alta, se
ha ajustado un valor de temperatura
alto y el aparato está totalmente
lleno, el compresor podría funcionar
sin detenerse y generar escarcha o
hielo en el evaporador. En tal caso,
gire el regulador de temperatura
hasta valores más bajos para facilitar
la descongelación automática y
ahorrar en el consumo eléctrico.
• Si los tiene, no saque los
acumuladores de frío del cesto de
congelación.
6.3 Consejos sobre la
congelación
Para aprovechar al máximo el proceso de
congelación, tenga en cuenta:
• la cantidad máxima de alimentos que
puede congelarse en 24 horas se
indica en la placa de características;
• el proceso de congelación requiere
24 horas. No añada más alimentos
para congelar durante ese tiempo;
• congele sólo alimentos de máxima
calidad, frescos y perfectamente
limpios;
• divida los alimentos en porciones
pequeñas para agilizar el proceso de
congelación y facilitar la
descongelación y uso de las
cantidades necesarias;
• envuelva los alimentos en papel de
aluminio o polietileno y compruebe
que los envoltorios quedan
herméticamente cerrados;
• no permita que alimentos frescos y
sin congelar entren en contacto con
alimentos ya congelados, así evitará
que aumente su temperatura;
• los alimentos magros se congelan
mejor que los grasos; la sal reduce el
tiempo de almacenamiento de los
alimentos;
• el hielo que se consume
inmediatamente después de extraerlo
del congelador puede provocar
quemaduras por congelación en la
piel;
• se recomienda etiquetar cada
paquete con la fecha de congelación
para controlar el tiempo de
almacenamiento.
6.4 Consejos para el
almacenamiento de alimentos
congelados
Para obtener el máximo rendimiento de
este aparato, deberá:
• comprobar que el comerciante ha
mantenido los productos congelados
correctamente almacenados;
• procurar que los alimentos
congelados pasen de la tienda al
congelador en el menor tiempo
posible;
• evitar la apertura frecuente de la
puerta o dejarla abierta más tiempo
del estrictamente necesario;
• los alimentos descongelados se
deterioran con rapidez y no pueden
congelarse de nuevo;
• no supere el tiempo de
almacenamiento indicado por el
fabricante de los alimentos.
MANTENIMIENTO Y LIMPIEZA
7.
ADVERTENCIA!
Consulte los capítulos sobre
seguridad.
Page 43

ESPAÑOL 43
7.1 Advertencias generales
PRECAUCIÓN!
Antes de realizar tareas de
mantenimiento, desenchufe
el aparato
Este aparato contiene
hidrocarburos en la unidad
de refrigeración por lo que
cualquier tarea de
mantenimiento o recarga
debe ser realizada por
personal técnico
homologado.
Los accesorios y las piezas
del aparato no deben
lavarse en el lavavajillas.
7.2 Limpieza del interior
Antes de utilizar el aparato por primera
vez, debe lavar su interior y todos los
accesorios internos con agua templada y
jabón neutro para eliminar el típico olor
de los productos nuevos. A continuación
seque bien todo.
PRECAUCIÓN!
No utilice detergentes ni
polvos abrasivos, ya que
podrían dañar el acabado.
7.3 Limpieza periódica
PRECAUCIÓN!
No mueva, dañe ni tire de
los conductos o cables del
interior del armario.
PRECAUCIÓN!
Tenga cuidado para no
dañar el sistema de
refrigeración.
PRECAUCIÓN!
Al mover el frigorífico,
levántelo por el borde
frontal para no arañar el
suelo.
El equipo debe limpiarse de forma
regular:
1. Limpie el interior y los accesorios con
agua templada y un jabón neutro.
2. Revise y limpie periódicamente las
juntas de la puerta para mantenerlas
limpias y sin restos;
3. Aclare y seque a fondo.
4. Si se puede acceder, limpie el
condensador y el compresor de la
parte posterior del aparato con un
cepillo.
Esa operación mejorará el
rendimiento del aparato y reducirá el
consumo eléctrico.
7.4 Descongelación del congelador
El congelador no forma escarcha. Esto
significa que, durante el funcionamiento,
no se forma escarcha ni en las paredes
internas del aparato ni sobre los
alimentos.
La ausencia de escarcha se debe a la
continua circulación del aire frío en el
interior del compartimento impulsado
por un ventilador controlado
automáticamente.
7.5 Periodos de inactividad
Si el aparato no se utiliza durante un
tiempo prolongado, tome las siguientes
precauciones:
1. Desconecte el aparato de la red
eléctrica.
2. Extraiga todos los alimentos.
3. Limpie el electrodoméstico y todos
sus accesorios
4. Deje la puerta o puertas abiertas
para que no se produzcan olores
desagradables.
ADVERTENCIA!
Si el armario va a
mantenerse abierto, procure
que alguien lo vigile de vez
en cuando para que los
alimentos de su interior no
se estropeen si se
interrumpe el suministro
eléctrico.
Page 44

www.aeg.com44
8. SOLUCIÓN DE PROBLEMAS
ADVERTENCIA!
Consulte los capítulos sobre
seguridad.
8.1 Qué hacer si...
Problema Posible causa Solución
El aparato no funciona. El aparato se apaga. Encienda el aparato.
El aparato no está correc-
tamente enchufado a la
toma de corriente.
No hay tensión en la toma
de corriente.
El aparato hace ruido. El aparato no está bien
apoyado en el suelo.
La alarma audible o visual
está activada.
Aparece un símbolo rectangular en lugar de números
en la pantalla de temperatura.
La bombilla no funciona. La bombilla está en es-
El aparato se ha conectado recientemente o la
temperatura sigue siendo
demasiado alta.
La temperatura del horno
es demasiado alta.
La puerta se ha dejado
abierta.
La temperatura del horno
es demasiado alta.
Problema en el sensor de
temperatura.
pera.
Enchufe el aparato correctamente a la toma de corriente.
Enchufe un aparato eléctrico
diferente a la toma de corriente. Llame a un electricista
cualificado.
Compruebe que los soportes
del aparato descansan sobre
una superficie estable.
Consulte "Alarma de puerta
abierta" o "Alarma de temperatura alta".
Consulte "Alarma de puerta
abierta" o "Alarma de temperatura alta".
Cierre la puerta del aparato.
Llame a un electricista homologado o póngase en contacto
con el centro de servicio técnico autorizado más cercano.
Póngase en contacto con el
centro de servicio técnico autorizado más cercano (el sistema de refrigeración seguirá
manteniendo fríos los alimentos, pero no podrá ajustar la
temperatura).
Cierre y abra la puerta.
Page 45

ESPAÑOL 45
Problema Posible causa Solución
La bombilla no funciona. La bombilla es defectuosa. Póngase en contacto con el
servicio técnico autorizado
más cercano.
El compresor funciona continuamente.
Se han guardado muchos
La temperatura está ajustada incorrectamente.
alimentos al mismo tiem-
Consulte el capítulo de funcionamiento.
Espere unas horas y vuelva a
comprobar la temperatura.
po.
La temperatura ambiente
es demasiado alta.
Consulte la tabla de clase climática en la placa de datos
técnicos.
Los alimentos introducidos
en el aparato estaban demasiado calientes.
La puerta no está bien cerrada.
La función FROSTMATIC
está activada.
Hay demasiada escarcha. La puerta no se ha cerrado
correctamente o la junta
Deje que los alimentos se enfríen a temperatura ambiente
antes de almacenarlos.
Consulte la sección "Cierre de
la puerta".
Consulte la sección “Función
FROSTMATIC”.
Consulte la sección "Cierre de
la puerta".
está deformada/sucia.
El compresor no se pone en
marcha inmediatamente después de pulsar FROSTMAT-
Esto es normal y no significa que exista un error.
El compresor se pone en
marcha después de un cierto
tiempo.
IC o tras cambiar la temperatura.
Hay agua en el suelo. El agua de la descongela-
ción no fluye hacia la bandeja de evaporación situa-
Fije la salida de agua de de-
scongelación a la bandeja de
evaporación.
da sobre el compresor.
No es posible ajustar la temperatura.
La función FROSTMATIC o
COOLMATIC está activada.
Apague manualmente la fun-
ción FROSTMATIC o COOL-
MATIC, o espere hasta que se
restablezca automáticamente
antes de ajustar la tempera-
tura. Consulte "Función
FROSTMATIC o COOLMAT-
IC".
La temperatura del aparato
es demasiado baja/alta.
El regulador de temperatura no se ha ajustado cor-
Seleccione una temperatura
más alta o baja.
rectamente.
Page 46

www.aeg.com46
Problema Posible causa Solución
La temperatura de los productos es demasiado alta.
La puerta se ha abierto
con frecuencia.
La función FROSTMATIC
está activada.
No hay circulación de aire
frío en el aparato.
Deje que la temperatura de
los productos descienda a la
temperatura ambiente antes
de guardarlo.
Si es necesario, cierre la puerta.
Consulte la sección “Función
FROSTMATIC”.
Compruebe que el aire frío circula libremente en el aparato.
Si el consejo anterior no
ofrece resultados, llame al
servicio técnico autorizado
más cercano.
8.2 Cierre de la puerta
1. Limpie las juntas de la puerta.
2. Si es necesario, ajuste la puerta.
Consulte "Instalación".
3. Si es necesario, cambie las juntas
defectuosas. Póngase en contacto
con el servicio técnico autorizado.
9. INSTALACIÓN
ADVERTENCIA!
Consulte los capítulos sobre
seguridad.
9.1 Colocación
El aparato se puede instalar en un lugar
interior seco y bien ventilado en el que la
temperatura ambiente se corresponda
con la clase climática indicada en la
placa de características del aparato:
Clase
climática
SN +10°C a + 32°C
N +16°C a + 32°C
ST +16°C a + 38°C
Temperatura ambiente
8.3 Cambio de la bombilla
El aparato está equipado con una luz
LED interior de larga duración.
El dispositivo de iluminación solo debe
ser sustituido por el servicio técnico.
Póngase en contacto con el servicio
técnico.
Clase
climática
T +16°C a + 43°C
Temperatura ambiente
Page 47

A
B
100 mm
min
20 mm
2
4
3
1
ESPAÑOL
47
Se puede producir algún
problema de
funcionamiento en algunos
modelos cuando se usan
fuera de ese rango. Sólo se
puede garantizar el correcto
funcionamiento dentro del
rango de temperatura
especificado. Si tiene
cualquier duda respecto al
lugar de instalación del
aparato, consulte al
vendedor, a nuestro servicio
de atención al cliente o al
servicio técnico más
cercano.
9.2 Ubicación
Instale el aparato alejado de fuentes de
calor, como radiadores, calderas, luz
solar directa, etc. Asegúrese también de
que el aire pueda circular sin obstáculos
por la parte trasera del aparato. Para
garantizar el mejor rendimiento, si el
aparato se coloca debajo de un mueble
de cocina colgado en la pared, deje una
distancia mínima de 100 mm entre la
parte superior del aparato y el mueble
de pared . Sin embargo, no conviene
colocar el aparato debajo de muebles de
pared. La base del aparato está provista
de una o varias patas ajustables para
garantizar un nivelado correcto del
mismo.
9.3 Conexión eléctrica
• Antes de conectar el aparato,
compruebe que el voltaje y la
frecuencia indicados en la placa de
datos técnicos se corresponden con
el suministro de la vivienda.
• El aparato debe conectarse a tierra. El
enchufe del cable de alimentación se
suministra con un contacto para tal
fin. Si la toma de red de la vivienda
carece de conexión a tierra, conecte
el aparato a una toma de tierra
conforme con la normativa, después
de consultar a un electricista
profesional
• El fabricante declina toda
responsabilidad si no se toman las
precauciones antes indicadas.
• Este aparato cumple las directivas
CEE.
9.4 Separadores traseros
Encontrará los dos separadores en la
bolsa que contiene la documentación.
1. Afloje el tornillo.
2. Encaje el separador debajo del
tornillo.
3. Gire el separador a la posición
derecha.
4. Apriete de nuevo los tornillos.
9.5 Nivelación
Al colocar el aparato compruebe que
queda nivelado. Esto se puede
conseguir utilizando las dos patas
ajustables de la parte inferior delantera.
Page 48

www.aeg.com
48
10. INFORMACIÓN TÉCNICA
10.1 Datos técnicos
Alto mm 1850
Ancho mm 595
Fondo mm 668
Tiempo de elevación horas 28
Tensión Voltios 230 - 240
Frecuencia Hz 50
9.6 Cambio del sentido de apertura de la puerta
Para cambiar el sentido de apertura de la
puerta, póngase en contacto con el
servicio técnico más próximo. El personal
del centro de servicio técnico cambiará
el sentido de apertura de las puertas con
gastos a su cargo.
La información técnica se encuentra en la
placa de datos técnicos situada en el
lado exterior o interior del aparato, y en
la etiqueta de consumo energético.
11. ASPECTOS MEDIOAMBIENTALES
Recicle los materiales con el símbolo .
Coloque el material de embalaje en los
contenedores adecuados para su
reciclaje. Ayude a proteger el medio
ambiente y la salud pública, así como a
reciclar residuos de aparatos eléctricos y
*
electrónicos. No deseche los aparatos
marcados con el símbolo junto con los
residuos domésticos. Lleve el producto a
su centro de reciclaje local o póngase en
contacto con su oficina municipal.
Page 49

ESPAÑOL 49
Page 50

www.aeg.com50
Page 51

ESPAÑOL 51
Page 52

www.aeg.com/shop
280154027-A-292014
 Loading...