

Page 1

A 80300 GT
PERFEKT IN FORM UND FUNKTION
Gebrauchsanleitung
ΕΕγγχχεειιρρίίδδιιοο οοδδηηγγιιώώνν ττοουυ χχρρήήσσττηη
User Manual
Manuel d'utilisation
Page 2
2
DE
Inhalt
Technische Daten . . . . . . . . . . . . . . . . . . . . . . . . . . . . . . . .2
Sicherheitshinweise . . . . . . . . . . . . . . . . . . . . . . . . . . . . . .6
Produktbeschreibung . . . . . . . . . . . . . . . . . . . . . . . . . . . . .6
Schalttafel . . . . . . . . . . . . . . . . . . . . . . . . . . . . . . . . . . . . . .7
Anzeige . . . . . . . . . . . . . . . . . . . . . . . . . . . . . . . . . . . . . . . .7
Aufstellung . . . . . . . . . . . . . . . . . . . . . . . . . . . . . . . . . . . . . .7
Erste Benutzung . . . . . . . . . . . . . . . . . . . . . . . . . . . . . . . . .8
Technische Daten
Modell BMI 310
A 80300 GT
Volumen (brutto) l 299
Volumen (netto) l 292
Höhe ohne/mit Rädern cm 87,6
Breite cm 132,5
Tiefe cm 66,5
Gewicht kg 75
Energieverbrauch in 24 Stunden kWh/24 h 0,69
Gefrierkapazität kg/24 h 28
Gefrierhaltezeit Stunden 52
Nennleistung W 120
Spannung V 230-240
Klimaklasse SN/N/ST
Electrolux. Thinking of you.
Share more of our thinking at www.electrolux.com
Entsorgung
Sie tragen mit der Sicherstellung der korrekten Entsorgung des Produkts dazu bei, potentielle
Schäden für die Umwelt und menschliche Gesundheit zu vermeiden.
Das Symbol auf dem Produkt deutet darauf hin, dass dieses Produkt nicht als Hausmüll
behandelt werden darf, sondern einer geeigneten Sammelstelle für das Recycling von
elektrischen und elektronischen Geräten zugeführt werden muss. Eine genauere Auskunft über
das Recycling dieses Produkts erhalten Sie von Ihrem zuständigen Stadtamt, Ihrem kommunalen
Abfallwirtschaftsbetrieb oder Ihrem Fachhändler, wo Sie das Gerät gekauft haben.
Ein-/Ausschalten . . . . . . . . . . . . . . . . . . . . . . . . . . . . . . . . .8
Tägliche Benutzung . . . . . . . . . . . . . . . . . . . . . . . . . . . . . .8
Reinigung und Pflege . . . . . . . . . . . . . . . . . . . . . . . . . . . .12
Nützliche Hinweise und Tipps . . . . . . . . . . . . . . . . . . . . .12
Was ist zu tun, wenn... . . . . . . . . . . . . . . . . . . . . . . . . . . .13
Kundendienst und Reparaturen . . . . . . . . . . . . . . . . . . .14
Page 3
3
DE
Sicherheitshinweise
Bevor Sie aber das Gerät aufstellen und benutzen, sollten
Sie diese Gebrauchsanweisung aufmerksam durchlesen.
Sie enthält Sicherheitsmaßnahmen, Hinweise,
Informationen und Ideen. Wenn das Gerät nach den hier
beschriebenen Anweisungen benutzt wird, wird es zu Ihrer
größten Zufriedenheit einwandfrei funktionieren.
Diese Hinweise dienen Ihrer Sicherheit. Sie müssen diese
aufmerksam durchlesen, bevor Sie das Kühlgerät
aufstellen oder benutzen.
Benutzen Sie das Gefriergerät nur zur Lagerung von
eingefrorenen Lebensmitteln, zum Einfrieren von
frischen Lebensmitteln und zur Zubereitung von
Eiswürfeln.
Nehmen Sie Eiswürfel oder Speiseeis sofort nach der
Entnahme aus dem Gefriergerät nicht gleich in den
Mund, weil diese Frostbrand verursachen können.
Gestatten Sie den Kindern nicht, im Inneren des
Gefriergeräts zu spielen oder sich dort zu verbergen,
weil sie daraus möglicherweise nicht herauskommen
und ersticken könnten.
Bewahren Sie keine Glasbehälter mit Flüssigkeit im
Gefriergerät auf, weil der Glasbehälter platzen kann.
Sorgen Sie dafür, dass das Gefriergerät nicht auf dem
Stromkabel aufgestellt wird.
Vor der Instandhaltung oder Reinigung muss das Gerät
vom Stromnetz getrennt werden (Netzstecker aus der
Steckdose ziehen).
Im Inneren des Geräts dürfen keine Elektrogeräte (z.B.
Eismacher) betrieben werden.
In Ihrem Gefriergerät kommt ein umweltfreundliches
Gas - Isobutan -R600a) - zur Anwendung. Allerdings ist
Vorsicht geboten, weil Isobutan entzündlich ist. Daher
ist es wichtig, dafür zu sorgen, dass die Rohrleitung
des Kühlmittels nicht beschädigt ist.
Diese Gebrauchsanweisung sollte auf einem sicheren Ort
aufbewahrt werden, damit sie in Zukunft jederzeit zum
Nachschlagen bereitsteht.
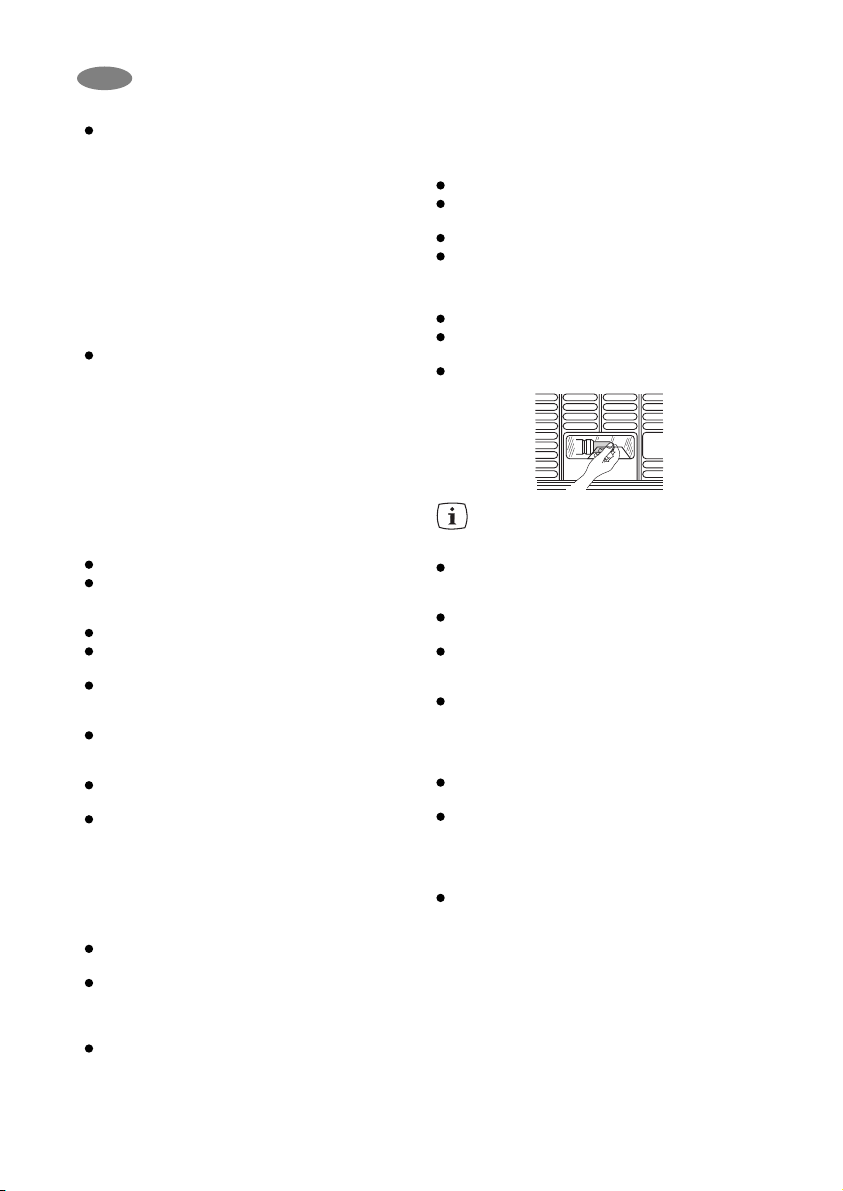
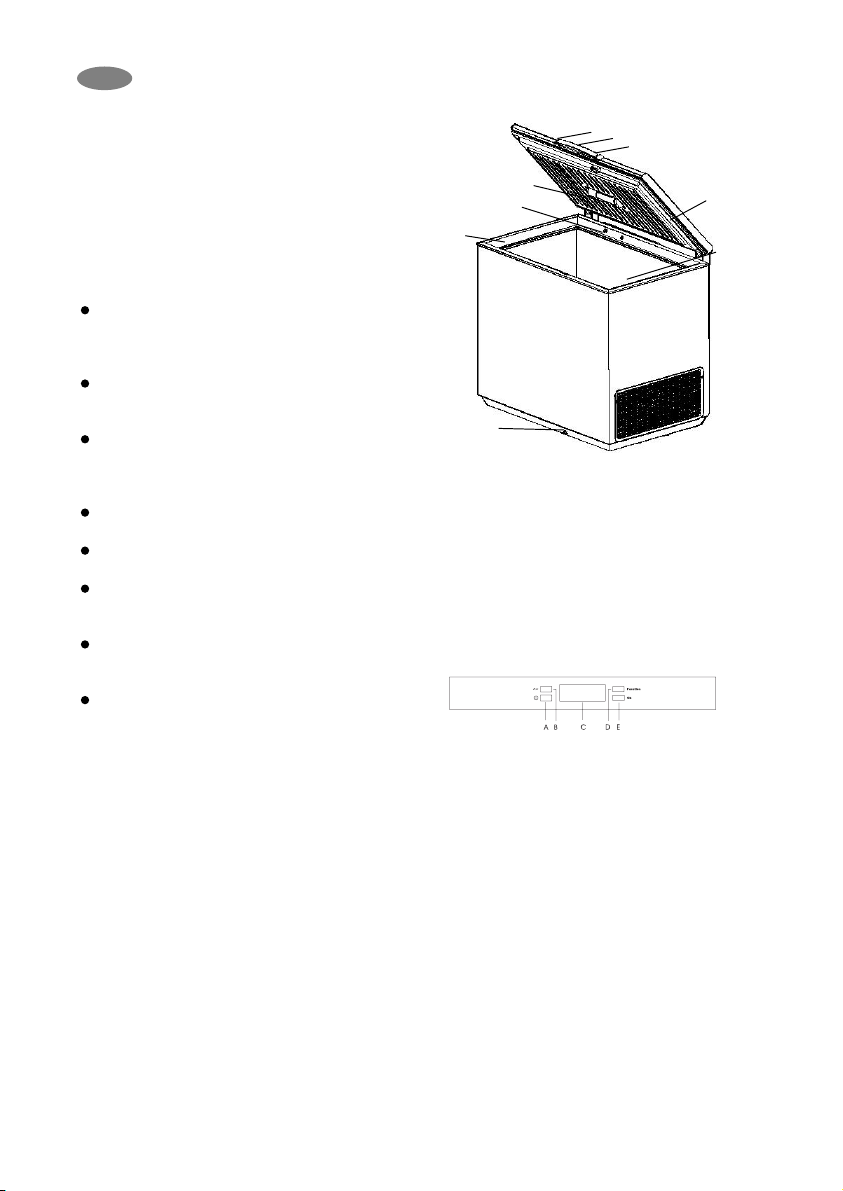
Produktbeschreibung
1. Deckelgriff
2. Sicherheitsschloss
3. Dichtung
4. Schmelzwasserabfluss
5. Schalttafel
6. Oberkante
7. Licht
8. Ventil: Deckel leicht wieder zu öffnen
Schalttafel
A - Gerät EIN/AUS Knopf
B - Drehknopf für Temperaturregelung
C - Anzeige
D - Funktionsknopf
E - Bestätigungsknopf
Anzeige
Zeigt an, dass das Gerät eingeschaltet ist, wird bei
Einschaltung der Super Freeze Funktion schneller.
Zeigt an, dass die Temperatur des Gefriergeräts nicht
niedrig genug ist, oder dass der Deckel offen
gelassen wurde.
Zeigt an, dass die Super Freeze Funktion für die
Einlagerung von größeren Mengen von frischen
Lebensmitteln eingeschaltet ist, und schaltet die
Alarmglocke aus.
Zeigt an, dass die Getränkekühlfunktion
eingeschaltet ist.
Zeigt an, dass die Sparmodus Funktion eingeschaltet
ist.
Zeigt an, dass die Kindersicherung eingeschaltet ist.
Zeigt die Temperatur im Kühlgerät an.
Zeigt die Anzahl von Minuten an, für die Getränke zu
kühlen sind, wenn die Getränkekühlfunktion
eingeschaltet ist.
Aufstellung
Warten Sie nach dem Auspacken mindestens 2
Stunden, bevor Sie das Gefriergerät an das Stromnetz
anschließen, um sicherzustellen, dass der
Kühlmittelkreis einwandfrei arbeitet.
Stellen Sie das Gefriergerät in einem trockenen, gut
belüfteten Raum auf. Meiden Sie bei der Auswahl des
Aufstellungsortes die Nähe von Wärmequellen oder
direkte Sonnenbestrahlung.
1
6
2
3
8
7
4
5
Page 4
4
DE
Die Raumtemperatur sollte der Klimaklasse
entsprechen, für die das Gefriergerät ausgelegt ist
(siehe Kapitel "Technische Daten").
Stellen Sie das Gefriergerät waagrecht auf eine feste
Oberfläche so auf, dass das Gerät auf allen vier
Füssen steht.
Für den optimalen Betrieb und zur Vermeidung von
Schäden bei der Öffnung des Deckels muss ein
Abstand von jeweils 5 cm von den angrenzenden
Wandflächen freigelassen werden.
Bevor Sie das Gefriergerät an die Stromversorgung
anschließen, prüfen Sie, ob die Netzspannung und die
Spannungsangabe im Kapitel "Technische Daten"
unter "Spannung" übereinstimmen.
Gefahr!
Achten Sie darauf, dass das Gefriergerät nicht auf dem
Stromkabel steht.
Auf keinen Fall am Netzkabel ziehen, wenn das
Gefriergerät aus einer Ecke herausgenommen werden
soll.
Das Netzkabel darf nur durch qualifiziertes Personal
eines Fachreparaturbetriebs ausgewechselt werden.
Sorgen Sie dafür, dass der Netzstecker nicht durch die
Rückwand des Gefriergeräts zusammengedrückt oder
beschädigt wird.
Sorgen Sie für ausreichende Belüftung in der
Umgebung des Geräts.
Elektrische Arbeiten zur Aufstellung dieses Geräts
dürfen nur durch einen qualifizierten Elektriker
ausgeführt werden.
Achtung! Dieses Gerät muss geerdet werden.
Erste Benutzung
Vor dem ersten Gebrauch muss das Innere des
Kühlgeräts erst gereinigt werden (siehe Kapitel
"Reinigung und Pflege").
Schließen Sie das Kühlgerät an das Stromnetz an.
Drücken Sie den Knopf A und schalten Sie damit das
Gerät ein.
Die Anzeige wird hell.
Das Symbol ( ) blinkt auf der Anzeigetafel und die
Alarmglocke ertönt, weil die Temperatur im Inneren
des Gefriergeräts für die Einlagerung von
Lebensmitteln nicht tief genug ist.
Drücken Sie den Knopf E und schalten Sie damit die
Alarmglocke aus. Das Symbol ( ) hört im Normalfall
nach einigen Stunden auf zu blinken.
Lebensmittel dürfen erst nach dem Verschwinden des
Symbols ( ) von der Anzeigetafel in das
Gefriergerät eingelagert werden. Die Temperatur im
Inneren des Gefriergeräts ist im Sparmodus ( ) auf
-18°C als optimale Lagertemperatur eingestellt.
Ein-/Ausschalten
Schalten Sie das Gefriergerät ein
Zur Einschaltung des Geräts drücken Sie auf Knopf
(A).
Die Anzeigetafel wird hell.
Schalten Sie das Gefriergerät aus
Drücken Sie auf Knopf (A) länger als eine Sekunde, bis
der Countdown "3-2-1" verschwindet und eine Folge
von Tonsignalen ertönt.
Die Anzeige erlischt.
Warnung! Stellen Sie bitte keine Gegenstände auf die
Schalttafel, weil diese eine ungewollte Ausschaltung des
Gefriergeräts verursachen könnten.
Tägliche Benutzung
Temperatureinstellung
Die Temperatur kann zwischen -15°C und -24°C eingestellt
werden. Wir empfehlen Ihnen, die Temperatur des
Gefriergeräts auf -18°C einzustellen, weil bei dieser
Temperatur das Einfrieren von frischen Speisen und die
Konservierung der gefrorenen Lebensmittel garantiert
sind.
Drücken Sie mehrmals den Knopf (B), bis die
gewünschte Temperatur eingestellt ist.
Die Temperatur auf der Anzeige blinkt und zeigt die
eingestellte Temperatur an.
Drücken Sie den Knopf (E), um die gewünschte
Temperatur zu bestätigen. Sie hören ein Tonsignal.
Das Blinken der Temperaturanzeige hört auf und es
erscheint die Temperatur im Inneren des Gefriergeräts.
Die neu eingestellte Temperatur wird erst in einigen
Stunden erreicht. Bis dieser Zustand erreicht ist,
können der angezeigte Temperaturwert und der
eingestellte Wert unterschiedlich sein.
Achtung! Eine Differenz zwischen angezeigter Temperatur
und eingestellter Temperatur gilt als normal, insbesondere
in den folgenden Fällen:
Die Temperatureinstellung wurde kurzzeitig geändert.
Der Deckel der Tiefkühltruhe ist für längere Zeit offen
gelassen worden.
In das Gefriergerät wurden warme Speisen
eingelagert.
Die Super Freeze Funktion wurde eingeschaltet.
Super Freeze Funktion
Wenn mehr als 3-4 kg frisches Fleisch eingefroren werden
soll, muss das Gefriergerät vorgekühlt werden.
Drücken Sie mehrmals den Knopf (D) mindestens 24
Stunden vor der Einlagerung von frischen
Lebensmitteln, bis das entsprechende Symbol ( )
auf der Anzeigetafel zu blinken beginnt.
Drücken Sie innerhalb von wenigen Sekunden Knopf
(E), um die Einschaltung der Super Freeze Funktion zu
bestätigen. Das Symbol ( ) hört zu blinken auf, Sie
hören ein Tonsignal und die Animation auf der
Anzeigetafel wird schneller.
Page 5
5
DE
Lagern Sie die einzufrierenden Speisen in das
Kühlgerät ein. Nach 52 Stunden schaltet sich diese
Funktion automatisch aus und das Gerät kehrt zur
normalen Lagerungstemperatur zurück. Durch
wiederholtes Drücken auf den Knopf (D) - bis das
entsprechende Symbol ( ) wieder zu blinken
beginnt - kann diese Funktion jederzeit ausgeschaltet
werden. Anschließend wird per Knopfdruck auf (E) die
Ausschaltung dieser Funktion bestätigt.
Getränkekühlfunktion
Diese Funktion wird als Sicherheitswarnung verwendet,
wenn Glasflaschen in das Gefriergerät eingelagert werden,
die aber platzen können, wenn sie zu lange im Gerät
gelassen werden.
Drücken Sie mehrmals den Knopf (D), bis das
entsprechende Symbol ( ) auf der Anzeigetafel zu
blinken beginnt.
Drücken Sie innerhalb von wenigen Sekunden Knopf
(E), um die Einschaltung der Getränkekühlfunktion zu
bestätigen. Das Symbol ( ) hört zu blinken auf und
Sie hören ein Tonsignal.
Um die gewünschte Zeitdauer in Minuten (von 1 bis
90) einzustellen, drücken Sie bitte mehrmals oder
kontinuierlich den Knopf (B).
Stellen Sie die Getränke in das Gefrierapparat.
Wenn die eingestellte Zeitdauer abgelaufen ist, ertönt
das Alarmsignal und das Symbol ( ) und die Zeit
blinken auf der Anzeigetafel.
Drücken Sie den Knopf (E), um den Alarm
auszuschalten.
Nehmen Sie die Getränke aus dem Gefriergerät. Diese
Funktion kann jederzeit ausgeschaltet werden, indem
Sie erst den Knopf (D) drücken, bis das
entsprechende Symbol ( ) auf der Anzeigetafel zu
blinken beginnt, und dann den Knopf (E) zur
Bestätigung des Ausschaltens dieser Funktion
drücken.
Sparmodus Funktion
Verwenden Sie diese Funktion, um die Temperatur des
Gefriergeräts automatisch auf den optimalen Wert (18°C) einzustellen, weil bei dieser Temperatur das
Einfrieren von frischen Speisen und die Konservierung der
gefrorenen Lebensmittel garantiert sind.
Drücken Sie mehrmals den Knopf (D), bis das
entsprechende Symbol ( ) auf der Anzeigetafel zu
blinken beginnt.
Drücken Sie innerhalb von wenigen Sekunden Knopf
(E), um die Einschaltung der Sparmodus Funktion zu
bestätigen. Das Symbol ( ) hört zu blinken auf und
Sie hören ein Tonsignal. Durch Drücken des Knopfes
(B) können diese Funktion jederzeit ausgeschaltet und
ein neuer Temperaturwert gewählt werden.
Anschließend wird per Knopfdruck auf (E) die Wahl
bestätigt.
Funktion Kindersicherung
Durch diese Funktion wird verhindert, dass Kinder mit den
Knöpfen auf der Bedienungstafel spielen. In diesem Fall
wird das Drücken von beliebigen Knöpfen keinen Einfluss
auf den Betrieb des Geräts haben.
Drücken Sie mehrmals den Knopf (D), bis das
entsprechende Symbol ( ) auf der Anzeigetafel zu
blinken beginnt.
Drücken Sie innerhalb von wenigen Sekunden Knopf
(E), um die Einschaltung die Funktion Kindersicherung
zu bestätigen. Das Symbol ( ) hört zu blinken auf
und Sie hören ein Tonsignal.
Die Knöpfe auf der Bedienungstafel sind jetzt gesperrt.
Durch Drücken des Knopfes (D) bis das
entsprechende Symbol ( ) auf der Anzeigetafel
wieder blinkt, und Bestätigung mit dem Knopf (E) kann
diese Funktion jederzeit ausgeschaltet werden.
Alarm
Wenn die Temperatur des Gefriergeräts nicht tief genug ist,
ertönt die Alarmglocke und das Symbol ( ) und die
Temperaturanzeige auf der Anzeigetafel blinken. Wenn der
Normalzustand wieder erreicht ist, wird nur der
Temperaturwert weiter blinken. Der höchste
Temperaturwert, den das Gerät erreicht hat, wird
gespeichert.
Zur Ausschaltung des Tonsignals drücken Sie bitte auf
Knopf (E). Jetzt erscheint für einige Sekunden der
höchste Temperaturwert, den das Gefriergerät erreicht
hat. Anschließend wird die tatsächliche Temperatur im
Inneren des Gefriergeräts angezeigt.
Das Symbol ( ) wird solange angezeigt, bis die
Temperatur im Gerät höher als die eigenstellte
Temperatur ist.
Ursachen des Alarms:
Einlagerung von größeren Mengen von frischen
Lebensmitteln.
Öffnung des Gerätedeckels für längere Zeit.
Fehlermeldung des Systems, siehe Kapitel "Was ist zu
tun, wenn...".
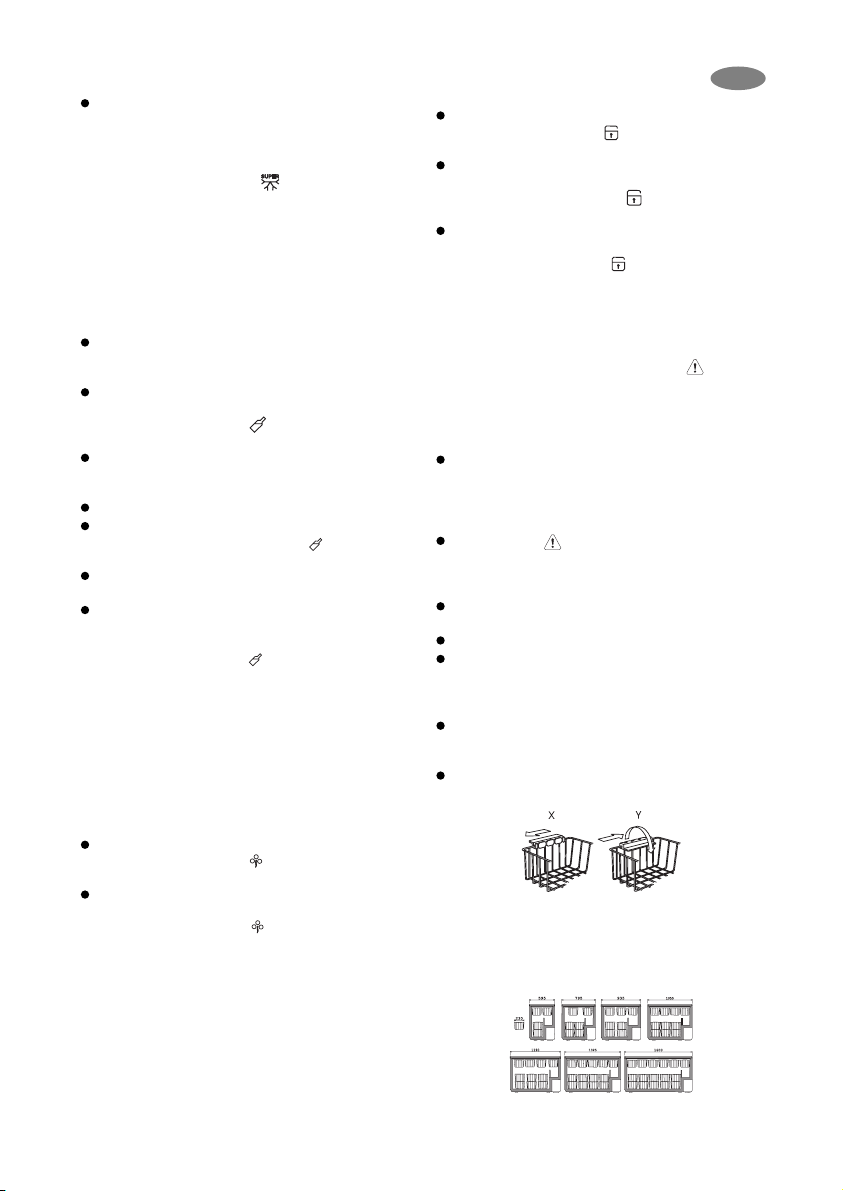
Lagerkörbe
Hängen Sie die Körbe auf die Oberkante (X) oder
stellen Sie die stapelbaren Körbe in das Gefriergerät
(Y).
Drehen Sie und arretieren Sie die Griffe für diese zwei
Positionen wie abgebildet.
Zusätzliche Körbe sind bei Ihrem örtlichen Vertragshändler
erhältlich oder können auf der Website von Electrolux
bestellt werden (je nach Land unterschiedlich). Die
Illustrationen auf dieser Seite zeigen, wie viele Körbe in die
verschiedenen Gefriergeräte passen.
Page 6
6
DE
Sicherheitsschloss
Führen Sie den Schlüssel in das Schloss ein und
drehen Sie den Schlüssel.
Ersatzschlüssel sind von Ihrem örtlichen Vertragshändler
erhältlich.
Wichtig! Bewahren Sie die Schlüssel immer außerhalb der
Reichweite von Kindern auf. Vor der Entsorgung eines
alten Gefrierschranks entfernen Sie bitte die Schlüssel
daraus.
Öffnen und Schließen des Deckels
Der Deckel des Geräts ist mit einer dicht schließender
Dichtung ausgerüstet und wird sofort nach einer
Schließung keine Wiederöffnung zulassen.
Warten Sie einige Minuten, bis sich der Deckel wieder
öffnen lässt.
Das Öffnen des Deckels wird durch ein Ventil erleichtert.
Der Griff darf nicht mit Gewalt angezogen werden.
Reinigung und Pflege
Abtauen des Gefriergeräts
Wenn die Eisschicht eine Stärke von 10-15 mm erreicht
hat, muss das Gefriergerät abgetaut werden. Wir
empfehlen Ihnen, das Abtauen dann vorzunehmen, wenn
im Gefriergerät wenig oder keine Lebensmittel gelagert
werden.
Trennen Sie das Gerät vom Stromnetz.
Entleeren Sie den Inhalt des Gefriergeräts, packen Sie
das Gefriergut in Zeitungspapier und bewahren Sie es
an einem kalten Ort auf.
Lassen Sie den Deckel des Geräts offen.
Nehmen Sie den Stopfen für die
Schmelzwasserableitung heraus.
Das Schmelzwasser kann auf einem Tablett (siehe
Abbildung) aufgefangen werden. Falls Ihr Gerät damit
ausgerüstet ist, verwenden Sie dazu bitte den Teiler.
Den Abtauvorgang können Sie beschleunigten, indem
Sie mit Hilfe des mitgelieferten Schabers das Eis von
den Gerätewänden abziehen.
Lassen Sie die Innenflächen des Gerätes gründlich
trocknen.
Vergessen Sie nicht, den Stopfen für die
Schmelzwasserableitung wieder einzusetzen.
Wichtig! Messer oder andere spitze Gegenstände dürfen
nicht zur Entfernung von Eis oder Reif verwendet werden.
Reinigung
Am günstigsten ist es, die Reinigung des Gefriergeräts
nach dem Abtauen vorzunehmen.
Trennen Sie das Gerät vom Stromnetz und entfernen
Sie daraus alle nicht fest eingebauten Teile.
Für die Reinigung des Gefriergeräts verwenden Sie
bitte einen nassen Tuch. Verwenden Sie dabei warmes
Wasser und ein mildes, nicht aromatisiertes
Reinigungsmittel.
Vor dem Wiedereinsetzen säubern Sie die nicht fest
eingebauten Teile.
Wichtig! Verwenden Sie bitte für die Reinigung Ihres
Gefriergeräts niemals starke Reinigungsmittel,
Scheuerpulver oder Reinigungsmittel mit Duftaroma.
Wenn das Gerät nicht benutzt wird
Trennen Sie das Gerät vom Stromnetz.
Nehmen Sie alle Lebensmittel aus dem Gefriergerät
heraus.
Reinigen Sie das Gefriergerät wie oben beschrieben.
Lassen Sie den Deckel einen Spalt offen.
Ersetzen der Glühbirne
Trennen Sie das Gerät vom Stromnetz.
Schrauben Sie die defekte Glühbirne heraus und
setzen Sie eine neue Glühbirne (max. 15W) ein.
Schließen Sie das Gerät wieder an das Stromnetz an.
Nützliche Hinweise und Tipps
Einfrieren von Lebensmitteln
Vor dem Einfrieren müssen frische Lebensmittel
luftdicht und feuchtigkeitsabsperrend verpackt
werden, um eine Austrocknung zu vermeiden.
Verwenden Sie immer einwandfreie Lebensmittel
bester Qualität.
Vor der Einlagerung von warmen Speisen in das
Gefriergerät müssen diese erst auf Zimmertemperatur
abgekühlt werden.
Teilen Sie die Lebensmittel vor dem Einfrieren in
kleinere Portionen auf. Damit wird erreicht, dass der
Gefriervorgang schneller abläuft und nur die zum
sofortigen Verzehr benötigte Mengen an
Lebensmitteln aufgetaut werden.
Tragen Sie auf die Verpackung der einzufrierenden
Lebensmittel das Datum des Einfrierens auf.
Stellen Sie frische, einzufrierende Lebensmittel
möglichst nahe zu den kältesten Seiten des
Gefriergeräts ab und sorgen Sie dafür, dass diese
nicht in direkte Berührung mit den bereits gefrorenen
Lebensmittel im Gefriergerät kommen.
Gefrorene Lebensmittel können überall im Gefriergerät
gelagert werden, müssen aber mindestens 5 mm
unterhalb der Oberkante gehalten werden.
Wenn der Gefriervorgang zu langsam verläuft, leidet
darunter die Qualität der einzufrierenden Lebensmittel. Die
Menge (in kg) an frischen Lebensmitteln, die in 24 Stunden
eingefroren werden können, wird im Kapitel "Technische
Daten" unter "Gefrierkapazität" angegeben.
Page 7
7
DE
Lebensmittellagerung
Für frisch eingefrorene Lebensmittel: die
Lagerungszeit entnehmen Sie bitte der
untenstehenden Tabelle.
Für Lebensmittel, die im tiefgekühlten Zustand gekauft
wurden: beachten Sie bitte die angegebenen
Verfallszeiten.
Wenn Sie tiefgekühlte Lebensmittel einkaufen, achten
Sie stets darauf, ob diese bei der richtigen Temperatur
gelagert worden sind. Kaufen Sie keine Ware, die eine
nasse oder verletzte Verpackung aufweist. Verstauen
Sie die gekaufte Tiefkühlware so schnell wie möglich in
Ihrem Gefriergerät. Wir empfehlen Ihnen, eine
Isolierkühltasche für den Transport der Ware nach
Hause zu verwenden.
Wichtig! Beachten Sie bitte, dass völlig oder teilweise
aufgetaute Lebensmittel nicht wieder eingefroren werden
dürfen. Allerdings dürfen Speisen, die durch Kochen aus
aufgetauten Lebensmitteln zubereitet wurden, eingefroren
werden
Bei Stromsperre oder Ausfall des
Gefriergeräts
Öffnen Sie bitte nicht den Deckel.
Wichtig! Wenn die Stromsperre die im Kapitel "Technische
Daten" unter "Haltbarkeitsdauer" angegebenen Werte
übersteigt, müssen die aufgetauten Lebensmittel schnell
verzehrt oder sofort gekocht und (nach Abkühlung) wieder
eingefroren werden.
Was ist zu tun, wenn...
Um bei einer möglichen Betriebsstörung die Kosten eines
unnötigen Besuchs in der Fachwerkstatt zu vermeiden,
versuchen Sie zunächst die nachfolgenden Tipps
anzuwenden:
Ihr Gefriergerät arbeitet nicht
Ist das Gerät an das Stromnetz angeschlossen?
Ist eine Haushaltssicherung durchgebrannt?
Gibt es eine Stromsperre?
Ist der Temperaturregler auf die Position AUS gestellt?
Der Alarmton ertönt weiter und/oder das rote
Licht/Symbol ( ) leuchtet
Ist der Deckel nicht ganz geschlossen? Siehe weiter
unten.
Ist der Temperaturregler den Umgebungsbedingungen
gerecht eingestellt?
Wurde das Gefriergerät zu nahe an einer Wärmequelle
aufgestellt?
Das Innenlicht geht nicht an
Ist das Gerät an das Stromnetz angeschlossen?
Hat sich die Glühbirne in ihrer Fassung gelockert oder
ist sie ausgebrannt?
Der Motor scheint zu viel zu laufen
Ist der Deckel nicht ganz geschlossen? Siehe weiter
unten.
Ist die Raumtemperatur höher als üblich?
Wurde gerade eine größere Menge frischer
Lebensmittel in das Gefriergerät eingelagert?
Wird der Deckel zu oft geöffnet?
Ist der Temperaturregler den Umgebungsbedingungen
gerecht eingestellt?
Ist die Deckeldichtung beschädigt oder deformiert?
Gibt es ausreichenden Raum für die Luftzirkulation um
das Gefriergerät herum?
Wurde die Super Freeze Funktion versehentlich
eingeschaltet?
Temperatur ist zu hoch
Wurde gerade eine größere Menge von Lebensmitteln
in das Gefriergerät eingelagert?
Wird der Deckel zu oft geöffnet?
Ist der Temperaturregler den Umgebungsbedingungen
gerecht eingestellt?
Zu viel Eis wurde gebildet
Ist der Deckel nicht ganz geschlossen? Siehe weiter
unten.
Wurde der Schmelzwasserabflussstopfen richtig
eingesteckt?
Der Deckel schließt nicht ganz
Gibt es zu viel Eis oder eine Verpackung, die den
Deckel an einer korrekten Schließung behindern?
Gibt es Lebensmittelverpackungen, die den Deckel
blockieren?
Ist die Deckeldichtung verschmutzt oder verklebt?
Gibt es eine Zitterbewegung am Gefriergerät oder
scheint das Gerät unstabil aufgestellt zu sein?
Der Deckel lässt sich schwer öffnen
Ist die Deckeldichtung verschmutzt oder verklebt?
Ist das Ventil blockiert?
Wenn Sie weitere Hilfe benötigen, wenden Sie sich bitte an
Ihre örtliche Vertragswerkstatt.
Kundendienst und Reparaturen
Im Falle eines Ausfalls oder Fehlbetriebs muss Ihr
Gefriergerät durch eine Electrolux Vertragswerkstatt
repariert werden.
Wichtig! Unter keinen Umständen sollten Sie versuchen,
das Gerät selbst zu reparieren.
Page 8
8
DE
Klimaklassen Umgebungstemperaturgrenzen
SN von +10°C bis +32°C
N von +16°C bis +32°C
ST von +18°C bis +38°C
T von +18°C bis +43°C
Dieses Gerät erfüllt die Auflagen folgender EG-Richtlinien:
73/23/EWG vom 19. 02. 1973 (Richtlinie über Niederspannungen)
89/336/EWG vom 03. 05. 1989 (einschließlich Änderungsrichtlinie 92/31/EWG - EMV-Richtlinie)
Page 9
9
EL
Electrolux. Thinking of you.
Share more of our thinking at www.electrolux.com
ΤΤοοπποοθθέέττηησσηη ααπποορρρριιµµµµάάττωωνν κκααιι σσκκοουυππιιδδιιώώνν
ΗΗ σσυυσσκκεευυήή ααυυττήή µµεε ττηηνν ττοοπποοθθέέττηησσηη ααννάάµµ εεσσαα σστταα κκααττάάλλλληηλλαα ααπποορρρ
ριιµµµµάάττωωνν κκααιι σσκκοουυππιιδδιιώώνν
ααπποοφφεεύύγγεειι ττιιςς εεππιιδδρράάσσεειι ςς κκααιι ααπποοττεελλέέσσµµαατταα πποουυ κκαατταασσττρρέέφφοουυνν ττοο ππεερριιββάάλλλλοονν κκααι
ι ββλλάάππττοουυνν ττηηνν
υυγγεείίαα..
ΤΤοο σσύύµµββοολλοο ππααρροουυσσιιάά ζζεειι όόττιι δδεενν δδιιααχχεειιρρίίζζεεττααιι ωωςς αα ππόόρρρριιµµµµαα,, ππρρέέππεειι νναα µµεεττααφφεερρθθε
είί σσεε
κκααττάάλλλληηλλοουυςς ττόόπποουυςς κκααιι χχώώρροουυςς ααππόόρρρριιψψηηςς όόπποουυ σσυυγγκκεεννττρρώώννοο υυνν τταα ηηλλεεκκττρριικκάά κκααιι ηηλλεεκκττρροοννιικκάά
µµηηχχααννή
ήµµαατταα κκααιι ααννττααλλλλαακκττιικκάά.. ΠΠλληηρροοφφοορρίί εεςς γγιιαα ττηηνν αανναακκύύκκλλωωσσηη ττωωνν ααπποορρρριιµµµµάάττωωνν ττοουυ
ππρροοϊϊόόννττοοςς µµπποορρεείίττεε νναα ζζη
ηττήήσσεε ττεε ααππόό ττιιςς δδηηµµοοττιικκέέςς ααρρχχέέςς,, ττιιςς ννττόόππιιεεςς δδηηµµόόσσιιεεςς ααρρχχέέςς κκααθθααρριιόόττηηττααςς
ήή ττοο µµααγγααζζίί όόπποουυ ααγγοορράάσσααττεε
ττηηνν σσυυσσκκεευυήή..
ΠΠεερριιεεχχόόµµεεννοο
Τεχνικά στοιχεία . . . . . . . . . . . . . . . . . . . . . . . . . . . . . . . .10
Οδηγίες ασφάλειας . . . . . . . . . . . . . . . . . . . . . . . . . . . . .12
Η περιγραφή του προϊόντα . . . . . . . . . . . . . . . . . . . . . .12
Πίνακας ελέγχου . . . . . . . . . . . . . . . . . . . . . . . . . . . . . . .12
Λυχνία . . . . . . . . . . . . . . . . . . . . . . . . . . . . . . . . . . . . . . . .13
Θέση σε λειτουργία . . . . . . . . . . . . . . . . . . . . . . . . . . . . .13
Πρώτη χρήση . . . . . . . . . . . . . . . . . . . . . . . . . . . . . . . . . .13
Πλήκτρο απ/ενεργοποιήσης . . . . . . . . . . . . . . . . . . . . .13
Καθηµερινή χρήση . . . . . . . . . . . . . . . . . . . . . . . . . . . . .14
Συρτάρια κατάψυξης . . . . . . . . . . . . . . . . . . . . . . . . . . .15
Συντήρηση και καθαρισµός . . . . . . . . . . . . . . . . . . . . . .15
Χρήσιµες πληροφορίες και ιδέες . . . . . . . . . . . . . . . . .16
Κατάψυξη τροφίµων . . . . . . . . . . . . . . . . . . . . . . . . . . . .16
Εάν κάτι δεν λειτουργεί… . . . . . . . . . . . . . . . . . . . . . . . .16
Σέρβις και ανταλλακτικά . . . . . . . . . . . . . . . . . . . . . . . .16
ΤΤεεχχννιικκάά σσττοοιιχχεείίαα
Modell BMI 310
A 80300 GT
Μεικτή χωρητικότητα λίτρο 299
Καθαρή χωρητικότητα λίτρο 229
Ύψος χωρίς τις ρόδες
/µε τις ρόδες cm 87,6
Πλάτος cm 132,5
Βάθος cm 66,5
Βάρος κιλά 75
Κατανάλωση ενέργειας/24ώρες kWh/24ώρες 0,69
Ικανότητα κατάψυξης κιλά/24ώρες 28
Χρόνος αναµονής ώρες 52
Ισχύς λειτουργίας W120
Μοτέρ V 230-240
Τάξη κλίµατος SN/N/ST
Page 10
10
ΟΟδδηηγγίίεεςς αασσφφάάλλεειιααςς
Πριν από την εγκατάστασ η και χρήση της συσκευής
διαβάστε προσεχτικά το εγχειρίδιο οδηγιών του χ
ρήστη. Περιλαµβάνει οδηγίες ασφάλειας, συµβουλές,
πληροφορίες και ιδέες . Εάν ο καταψύκτης
χρησιµοποιείται σύµφωνα µε τις οδηγίες του
εγχειριδίο υ, θα λειτουργεί κανονικά και θα σας
παρέχει µεγαλύτερη ικανοποίηση.
Προειδοποιήσεις που αφορούν την προσωπική σας
ασφάλεια. Πριν από την εγκ ατάσταση και χρήση της
συσκευής διαβάστε τις προσεχτικά.
Χρησιµοποιείστε τον καταψύκτη µόνο για
αποθήκευση καταψυγµένων τροφί µων,
κατάψυξη φρέσκων τροφίµων και για να φτιάξετε
παγάκια.
Ο πάγος και το παγωτό µπορεί να προκαλέσουν
πόνο εάν καταναλωθούν αµέσως µετά την
εξαγωγή τους από την κατάψυξη.
Μην επιτρέπετε στα παιδιά να παίζουν ή να
κρυφτούν στο εσωτερικό χώρο το υ καταψύκτη,
γιατί µε το κλείσιµο της πόρτας µπορούν να
κλειστούν µέσα κα ι να πνίξουν.
Μην αποθηκεύετε στον καταψύκτη εµφια λωµένα
ποτά και υγρά γιατί µπορούν να εκραγούν.
Όταν τοποθετείτε τον καταψύκτη, προσέ ξτε να
µην στέκεται πάνω στο καλώδιο παροχής.
Πριν από το σέρβις ή καθαρισµό αφαιρέσ τε την
πρίζα από την υποδοχή ή .απενεργοποιήστε την
συσκευή.
Στο εσωτερικό χώρο της συσκευής µην χρ
ησιµοποιήστε άλλη ηλεκτρονική συσκευή (π.χ.
συσκευή παγωτού).
Η συσκευή δεν περιέχει υλικά που κατασ τρέφουν
το περιβάλλον, περιέχει φυσικό αέριο, το ψυκτικό
στοιχείο της εί ναι το ισοβουτάνιο (R600a) που
απαιτεί όµως µεγάλη προσοχή λόγω που είναι
πολύ εύφλεκτο και εκρηκτικό. Γι´ αυτό προσέξτε
να µην τραυµατιστεί η σωλήνωσ η της συσκευής
κατάψυξης.
∆ιατηρήστε το εγχειρίδιο οδηγιών του χρή στη µαζί µε
την συσκευή, γιατί µπορεί να το χρειάζεστε στο
µέλλον.
ΗΗ ππεερριιγγρρααφφήή ττοουυ ππρροοϊϊόόνντταα
1. Χειρολαβή της πόρτας
2. Κλειδαριά ασφάλειας
3. Σφραγίδα
4. Σωλήνας αποχέτευσης των νερών απόψυξης
5. Πίνακας ελέγχου
6. Ανώτερη άκρη
7. Φωτισµός
8. Βαλβίδα: απλό ξανάνοιγµα της πόρτας
ΠΠίίνναακκααςς εελλέέγγχχοουυ
A Πλήκτρο απ/ενεργοπο
ίησης της συσκευής
B Πλήκτρο του ρυθµιστή θερµοκρασίας
C Λυχνία
D Πλήκτρο επιλογής λειτουργιών
E Πλήκτρο επικύρωσης
1
6
2
3
8
7
4
5
EL
Page 11

11
ΛΛυυχχννίίαα
δείχνει ότι η συσκευή είναι σε λειτουργία και
επιταχύνεται σε περίπτωση ταχείας
κατάψυξης (Super Freeze)
δείχνει ότι η εσωτερική θερµοκρασία του
καταψύκτη είναι περισσότερο υψηλή απ´ ότι
θα έπρεπε ή έµεινε ανοιχτή η πόρτα.
δείχνει ότι η λειτουργία ταχείας κατάψυξης
(Super Freeze) είναι ενεργοποιηµένη για
καταψυχθεί µεγάλη ποσότητα τροφίµων και
θ´ απενεργοποιεί τον συναγερµό
δείχνει ότι η λειτουργία ψύξης ποτών (Drinks
Chill) είναι ενεργοποιηµένη
δείχνει ότι η λειτουργία εξοικονόµησης
ενέργειας (Eco Mode) είναι ενεργοποιηµένη
δείχνει ότι η λειτουργία (Child Lock) είναι
ενεργοποιηµένη
δείχνει την εσωτερική θερµοκρασία του
καταψύκτη
δείχνει ότι για πόσα λεπτά πρέπει να ψυχθούν
τα ποτά σε περίπτωση που η συσκευή είναι σε
λειτουργία ψύξης ποτών (Drinks Chill).
ΘΘέέσσηη σσεε λλεειιττοουυρργγίίαα
Πριν τοποθετήστε τον ρευµατολήπτη στον
ρευµατοδότη περιµένετε τουλάχιστον 2 ώρες.
Έτσι εξασφαλίζετε να επιτευχθεί η απαιτούµενη
θερµοκρασία κατάψυξης.
Τοποθετήστε την συσκευή σε ξηρό χώρο που
εξαερίζεται καλά. Αποφεύγετε την τοποθέτηση
της συσκευής σε ηλιόλουστο µέρος ή κοντά σε
οτιδήποτε εκπέµπει θερµότητα.
Η θερµοκρασία περιβάλλοντος πρέπει να
αντιστοιχεί στην τάξη κλήµατος που είναι
σχεδιαστεί ο καταψύκτης. Βλ. τα αναγραφόµενα
στο κεφάλαιο «Τεχνικά Στοιχεία».
Όταν τοποθετείτε τη συσκευή βεβαιωθείτε ότι
είναι επίπεδη και σταθερή. Τα τέσσερα
υποστηρίγµατα θα πρέπει να ακουµπούν στο
έδαφος.
Κατά την διάρκεια της σωστής λειτουργίας της
συσκευής, καθώς κι ανοίγοντας την πόρτα
λάβετε υπόψη σας ότι αποφεύγετε κάθε είδος
τραύµατος αν κατά την τοποθέτηση της
συσκευής τηρήστε τουλάχιστον αποστάσεις 5
εκατ. στο οπίσθιο και πλάγιο µέρος.
Πριν συνδέσετε την συσκευή µε την κεντρική
παροχή, ελέγξετε αν η ένταση αντιστοιχεί µε τα
αναγραφόµενα στο λήµµα «Ένταση» του
κεφαλαίου «Τεχνικά Στοιχεία».
ΠΠΡΡΟΟΣΣΟΟΧΧΗΗ!!
Όταν τοποθετείτε τον καταψύκτη, προσέξτε να
µην στέκεται πάνω στο καλώδιο παροχής.
Μην αφαιρείτε τον ρευµατολήπτη τραβώντας το
καλώδιο, ιδιαίτερα όταν ο καταψύκτης έχει
αποµακρυνθεί από τη θέση του.
Εάν το καλώδιο παροχής ρεύµατος είναι
φθαρµένο θα πρέπει να αντικατασταθεί από
εξειδικευµένο προσωπικό του τµήµατος
τεχνικής υποστήριξης.
Σιγουρευτείτε ότι ο ρευµ ατολήπτης δεν
συνθλίβεται ή φθείρεται από το πίσω µέρος του
καταψύκτη.
Πρέπει να κυκλοφορεί επαρκής ποσότητα αέρα
γύρω από τη συσκευή.
Οποιαδήποτε ηλεκτρολογική δουλειά που
χρειάζεται σε θέση λειτουργία της συσκευής θα
πρέπει να εκτελεσθούν από εξειδικευµένους
ηλεκτρολόγους.
ΠΠΡΡΟΟΣΣΟΟΧΧΗΗ!!
Η συσκευή πρέπει να γειωθεί.
ΠΠρρώώττηη χχρρήήσσηη
Πριν την πρώτη χρήση σας συνιστούµε
ναπλένετετο εσωτερικό της συσκευής. Βλ.
τοκεφάλαιο «Συντήρηση και καθαρισµός».
Πρέπει η συσκευή να συνδεθεί µε την
κεντρικήπαροχή.
Για την ενεργοποίηση της συσκευής πατήστε
τοκουµπί (A).
Ανάβει ο πίνακας ελέγχου.
Στον πίνακα ελέγχου αρχίζει να αναβοσβήνει το
σύµβολο ( ) και ενεργοποιείται ο συναγερµός,
επειδή η εσωτερική θερµοκρασία του καταψύκτη
είναι περισσότερο υψηλή απ´ ότι θα έπρεπε για
αποθήκευση τροφίµων.
Για να σταµατήσετε τον συναγερµό πατήστε το
κουµπί (Ε). Σε κανονικές συνθήκες σε λίγες ώρες
το σύµβολο ( ) θα σταµατήσει να
αναβοσβήνει.
Τα τρόφιµα µπορούν να τοποθετηθούν στον
καταψύκτη µόνο µετά την απενεργοποίηση του
συµβόλου ( ). Η θερµοκρασία του καταψύκτη
είναι ρυθµισµένη σε -18ΊC που είναι η κατάλληλη
θερµοκρασία σε λειτουργία εξοικονόµησης
ενέργειας (Eco Mode) ( ).
ΠΠλλήήκκττρροο ααππ//εεννεερργγοοπποοιιήήσσηηςς
ΕΕννεερργγοοπποοίίηησσηη ττοουυ κκααττααψψύύκκττηη
Για την ενεργοποίηση της συσκευής πατήστε το
κουµπί (A).
Θα ανάψει ο πίνακας ελέγχου.
ΑΑππεεννεερργγοοπποοίίηησσηη ττοουυ κκααττααψψύύκκττηη
Πατήστε το κουµπί (A) για λίγα
δευτερόλεπταώσπου θα ανάψει η λυχνία «3-2-1»
και θα ακουστεί σειρά των συγκεκριµένων ήχων.
Θα σβήσει ο πίνακας ελέγχου.
EL
Page 12

12
ΠΠρροοσσοοχχήή!!
Μην τοποθετήστε κανένα
αντικείµενοπάνω στον πίνακα ελέγχου, γιατί αυτό
µπορεί να προκαλεί την τυχαία απενεργοποίηση
του καταψύκτη.
ΚΚααθθηηµµεερριιννήή χχρρήήσσηη
ΡΡύύθθµµιισσηη θθεερρµµοοκκρραασσίίααςς
Η θερµοκρασία του καταψύκτη ρυθµίζεται µεταξύ 15ΊC και -24ΊC. Σας συνιστούµε ότι για να
εξασφαλίσετε όσο την κατάλληλη κατάψυξη, τόσο
την κατάλληλη αποθήκευση των κατεψυγµένων
τροφίµων, να επιλέξτε την θερµοκρασία -18ΊC.
Πατήστε ξανά το πλήκτρο (B) ώσπου δεν ανάψει
η επιθυµητή θερµοκρασία.
Τα ψηφία αναβοσβήνουν στον δείκτη
θερµοκρασίας και δείχνει την ρυθµιζόµενη
θερµοκρασία.
Για επικύρωση της επιθυµητής θερµοκρασίας
πατήστε το πλήκτρο (Ε). Θ´ ακούσετε έναν
συριστικό ήχο.
Η θερµοκρασία σταµατάει ν´ αναβοσβήνει στον
δείκτη που δείχνει πάλι την εσωτερική
θερµοκρασία του καταψύκτη.
Σε λίγες ώρες η θερµοκρασία θα φτάσει την
επιθυµητή ρυθµιζόµενη. Σε αυτό το χρονικό
διάστηµα είναι συνηθισµένο ότι η θερµοκρασία
που βλέπουµε στον δείκτη αδιαφορεί από την
επιθυµητή ρυθµιζόµενη.
ΠΠρροοσσοοχχήή!!
Πρόκειται για συνηθισµένη διαφορά της
θερµοκρασίας που βλέπουµε στον δείκτη και της
επιθυµητής ρυθµιζόµενης θερµοκρασίας, ιδιαίτερα
σε περίπτωση, όταν:
Η θερµοκρασία έχει τροποποιηθεί πρόσφατα.
Η πόρτα έµεινε ανοιχτή για περισσότερο καιρό.
Τοποθετήσατε καυτό φαγητό στον καταψύκτη.
Η συσκευή είναι σε λειτουργία ταχείας
κατάψυξης (Super Freeze).
ΗΗ λλεειιττοουυρργγίίαα ττααχχεείίααςς κκααττάάψψυυξξηηςς
((SSuuppeerr FFrreeeezzee))
Όταν επιθυµείτε να καταψυχθούν πάνω από 3-4κιλά
φρέσκων τροφίµων, χρειάζεται η πρόψυξη του
εσωτερικού χώρου του καταψύκτη.
Τουλάχιστον 24 ώρες πριν από την τοποθέτηση
για κατάψυξη των φρέσκων τροφίµων πατήστε
ξανά το πλήκτρο (D) ώσπου θα ανάψει
αναβοσβήνοντας στον δείκτη το σχετικό
σύµβολο( ).
Για επικύρωση της ταχείας κατάψυξης πατήστε
το πλήκτρο (Ε) σε λίγα δευτερόλεπτα. Θα
σταµατήσει να αναβοσβήνει το σύµβολο ( ),
θ´ ακούσετε έναν συριστικό ήχο και
επιταχύνεται η παρουσίαση του δείκτη.
Τοποθετήστε τα τρόφιµα στον καταψύκτη. Οι
θερµοστάτες διακόπτουν αυτήν την λειτουργία
της συσκευής αυτόµατα µετά από 52 ώρες και ο
καταψύκτης εξακολουθεί να λειτουργεί µε την
κανονική θερµοκρασία αποθήκευση. Η
λειτουργία αυτή µπορεί να σταµατήσει µε το
πάτηµα του πλήκτρου (D), ώσπου το σχετικό
σύµβολο ( ) θ´ αρχίσει να αναβοσβήνει στον
δείκτη. Μετά πατήστε το πλήκτρο (Ε) που θα
επικυρώσει την ενεργοποίηση της λειτουργίας
αυτής.
ΨΨύύξξηη πποοττώώνν ((DDrriinnkkss CChhiillll))
Αυτή η λειτουργία χρησιµοποιείται ως
προειδοποίηση, όταν τοποθετούµε εµφιαλωµένα
ποτά στον καταψύκτη. Αν τα ξεχάσουµε µπορούν να
εκραγούν.
Πατήστε ξανά το πλήκτρο (D) ώσπου θα ανάψει
το σχετικό σύµβολο ( ) στον δείκτη.
Σε λίγα δευτερόλεπτα πατήστε το πλήκτρο (Ε)
για να τεθεί η συσκευή σε λειτουργία ψύξης
ποτών. Το σύµβολο ( ) παύει να αναβοσβήνει
κι ακούτε ένα συριστικό ήχο.
Πατήστε ξανά ή συνεχώς το πλήκτρο (Β) για να
ρυθµιστεί ο επιθυµητός χρόνος (από 1 έως 90
λεπτά).
Τοποθετήστε τα ποτά στον καταψύκτη.
Όταν περάσει το χρονικό διάστηµα που έχουµε
ρυθµίσει, ο συναγερµός θα ενεργοποιηθεί και
θα ανάψουν αναβοσβήνοντας το σύµβολο ( )
και ο χρόνος.
Για να σταµατήσετε τον συναγερµό πατήστε το
πλήκτρο (Ε).
Βγάλτε τα ποτά από τον καταψύκτη. Η
λειτουργία αυτή διακόπτεται οποτεδήποτε,
αρκεί να πατήσετε το πλήκτρο (D) µέχρι να
αναβοσβήσει πάλι το σχετικό σύµβολο ( )
στον δείκτη. Για την επικύρωση της
απενεργοποίησης πατήστε το πλήκτρο (E).
ΛΛεειιττοουυρργγίίαα εεξξοοιικκοοννόόµµηησσηηςς
εεννέέρργγεειιααςς ((EEccoo MMooddee))
Μ´ αυτήν την λειτουργία µπορείτε να ρυθµίσετε
αυτοµάτως την καταλληλότερη εσωτερική
θερµοκρασία (-18ΊC) του καταψύκτη, πράγµα που
εξασφαλίζει την κατάλληλη συντήρηση και
αποθήκευση των κατεψυγµένων τροφίµων µε την
χαµηλότερη κατανάλωση ενέργειας.
Πατήστε ξανά το πλήκτρο (D) ώσπου θα ανάψει
το σχετικό σύµβολο ( ) στον δείκτη.
Σε λίγα δευτερόλεπτα πατήστε το πλήκτρο (E)
για να επικυρωθεί η λειτουργία εξοικονόµησης
ενέργειας (Eco Mode). Το σύµβολο ( )
σταµατάει να αναβοσβήνει και ακούγεται ένας
συριστικός ήχος. Η λειτουργία αυτή διακόπτεται
οποτεδήποτε, αρκεί να πατήσετε το πλήκτρο (Β)
για να ξαναρυθµίσετε την θερµοκρασία. Για την
επικύρωση της επιλογής πατήστε το πλήκτρο
(E).
ΛΛεειιττοουυρργγίίαα CChhiilldd LLoocckk
Όταν η συσκευή είναι σε αυτήν την λειτουργία τα
παιδιά δεν µπορούν να παίζουν µε τα πλήκτρα του
πίνακα ελέγχου, λόγω που τα πατήµατα δεν έχουν
επίδραση.
EL
Page 13

13
Πατήστε ξανά το πλήκτρο (D) ώσπου το σχετικό
σύµβολο ( ) αρχίζει να αναβοσβήνει στον
δείκτη.
Σε λίγα δευτερόλεπτα πατήστε ξανά το πλήκτρο
(Ε) για να επικυρωθεί η ενεργοποίηση της
λειτουργίας (Child Lock). Το σύµβολο ( )
σταµατά να αναβοσβήνει και ακούγεται ένας
συριστικός ήχος.
Είναι κλειδωµένα τα πλήκτρα του πίνακα
ελέγχου. Η λειτουργία αυτή διακόπτεται
οποτεδήποτε, αρκεί να πατήσετε το πλήκτρο (D)
ώσπου το σχετικό σύµβολο ( ) θ´ αρχίσει να
αναβοσβήνει ξανά στον δείκτη. Μετά πατήστε το
πλήκτρο (Ε) που θα επικυρώσει την
ενεργοποίηση της λειτουργίας αυτής.
ΣΣυυννααγγεερρµµόόςς
Σε περίπτωση που η εσωτερική θερµοκρασία του
καταψύκτη είναι περισσότερο υψηλή απ´ ότι θα
έπρεπε, θα ενεργοποιηθεί ο συναγερµός, το
σύµβολο ( ) και ο δείκτης θερµοκρασίας θ´
αρχίσουν να αναβοσβήνουν στον πίνακα ελέγχου.
Μετά που πρόκειται πάλι για κανονικές συνθήκες, θα
αναβοσβήνει µόνο η θερµοκρασία του καταψύκτη. Η
υψηλότερη εσωτερική θερµοκρασία του καταψύκτη
διατηρείται στη µνήµη της συσκευής.
Για την ενεργοποίηση του συναγερµού πατήστε
το πλήκτρο (Ε). Θα ανάψει για µερικά
δευτερόλεπτα η παντοτινή υψηλότερη
θερµοκρασία, κι έπειτα θα ανάψει πάλι η
πραγµατική εσωτερική θερµοκρασία.
Το σύµβολο ( ) θα µείνει αναµµένη µέχρι η
εσωτερική θερµοκρασία του καταψύκτη είναι
υψηλότερη από την επιθυµητή θερµοκρασία
που έχουµε ρυθµίζει στον θερµοστάτη.
Οι αιτίες ενεργοποίησης του συναγερµού:
Τοποθέτηση µεγάλης ποσότητας τροφίµων.
Η πόρτα έµεινε ανοιχτή για πολύ καιρό.
Η βλάβη του συστήµατος. Βλ. το κεφάλαιο «Εάν
κάτι δεν λειτουργεί…»
ΣΣυυρρττάάρριιαα κκααττάάψψυυξξηηςς
Κρεµάστε τα συρτάρια στο ανώτερη άκρη του
καταψύκτη (Χ) ή τοποθετήστε το ένα στο άλλο
και µετά όλα µαζί στο εσωτερικό χώρο του
καταψύκτη (Y).
Γυρίστε προς τα κάτω και στερεώνεστε τις
χειρολαβές σύµφωνα µε τις εικόνες.
Μπορείτε να παραγγείλετε κι άλλα συρτάρια από το
ντόπιο κέντρο σέρβις ή στην ιστοσελίδα της
Electrolux (ανάλογα από την χώρα). Οι εικόνες, που
βλέπετε στην σελίδα αυτή, δείχνουν πόσα συρτάρια
µπορούν να τοποθετούνται στα διάφορα µοντέλα
καταψυκτών.
ΚΚλλεειιδδααρριιάά αασσφφάάλλεειιααςς
Κατά την διάρκεια γυρίζοντας πατήστε το κλειδί
στη κλειδαριά.
Αναπληρωµατικά κλειδιά παραγγέλνονται από το
ντόπιο κέντρο σέρβις.
Προσοχή! ∆ιατηρήστε το κλειδί πάντα µακριά απότα
παιδιά σε χώρο που δεν µπορούν να το φτάσουν.
Πριν πεταχτεί ο παλιός καταψύκτης στα σκουπίδια
βγάλτε το κλειδί.
ΆΆννοοιιγγµµαα κκααιι κκλλεείίσσιιµµοο ττηηςς ππόόρρττααςς
Αφού η πόρτα έχει φλάντζα, µετά το κλείσιµο δεν
ξανανοίγει εύκολα.
- Περιµένετε λίγο πριν την ξανανοίξετε. Το άνοιγµα
το διευκολύνει µια βαλβίδα. Μην τραβάτε την
χειρολαβή µε το ζόρι.
ΣΣυυννττήήρρηησσηη κκααιι κκααθθααρριισσµµόόςς
ΑΑππόόψψυυξξηη ττοουυ κκααττααψψύύκκττηη
Όταν το πάχος του πάγου φθάσει τα 10-15 mm, ο
καταψύκτης πρέπει να αποψυχθεί. Σας συνιστούµε
ότι να αποψύξετε τον καταψύκτη όταν έχει µέσα
ελάχιστα τρόφιµα.
Αφαιρέστε την πρίζα από την υποδοχή.
Βγάλετε τα κατεψυγµένα τρόφιµα από τον
καταψύκτη, τυλίγετε σε χαρτί εφηµερίδας και
διατηρήστε τα σε κρύο µέρος.
Αφήστε την πόρτα της συσκευής ανοιχτή.
Αφαιρέστε το καπάκι από το σωλήνα της
εξαγωγής του νερού.
Μαζέψτε σ´ ένα δίσκο το νερό που έλιωσε από
τον πάγο σύµφωνα µε την συνηµµένη εικόνα.
Αν έχετε χρησιµοποιήστε το διαχωριστικό.
Η απόψυξη µπορεί να γίνει πιο γρήγορα, αν
ξύστε την περιοχή και αφαιρέστε την επίστρωση
του πάγου µε τον πλαστικό ξύστη που σας
παρέχεται.
Σκουπίστε προσεχτικά τον εσωτερικό χώρο του
καταψύκτη.
Μην ξεχνάτε να βάλετε πίσω το καπάκι του
σωλήνα της εξαγωγής του νερού.
ΣΣηηµµααννττιικκόό!!
Για να ξύσετε την πάχνη ή το πάγο
αποφύγετε να χρησιµοποιήσετε αιχµηρά, µυτερά ή
σκληρά εξαρτήµατα.
ΚΚααθθααρριισσµµόόςς
Είναι πρακτικό να καθαρίζετε την συσκευή µετά την
απόψυξη.
Αφαιρέστε την πρίζα από την υποδοχή.
Αφαιρέστε όλα τα κινούµενα εξαρτήµατα και το
αερισµένο πάτωµα σύµφωνα µε την εικόνα.
Σας συνιστούµε για το καθαρισµό
χρησιµοποιήσετε βρεγµένο πανί, ζεστό νερό και
EL
Page 14

14
καθαριστικό οικιακής χρήσης.
Πριν ξανατοποθέτηση καθαρίστε και τα βγαλµένα
εξαρτήµατα καθώς και το αερισµένο πάτωµα.
ΣΣηηµµααννττιικκόό!!
Για τον καθαρισµό µην χρησιµοποιήστε
δυνατό καθαριστικό, καθαριστικό µε οξέα ή άρωµα.
ΕΕκκττόόςς λλεειιττοουυρργγίίααςς
Αφαιρέστε την πρίζα από την υποδοχή.
Βγάλτε όλα τα τρόφιµα από τον καταψύκτη.
Σκουπίστε τον καταψύκτη σύµφωνα µε
τααναφερόµενα επάνω.
Αφήστε λίγο το κάλυµµα ανοιχτά.
ΑΑλλλλααγγήή λλυυχχννίίααςς
Αφαιρέστε την πρίζα από την υποδοχή.
Ξεβιδώστε και βγάλτε το κάλυµµα της λάµπας
καιη λυχνία µπορεί να αλλαχθεί ξανά. (µάξιµουµ.
15W).
Μετά την αλλαγή της λυχνίας επανατοποθετήστε
το κάλυµµα της λάµπας και βάλτε την πρίζα στην
υποδοχή.
ΧΧρρήήσσιιµµεεςς ππλληηρροοφφοορρίίεεςς κκααιι ιιδδέέεεςς
ΚΚααττάάψψυυξξηη ττρροοφφίίµµωωνν
Πριν την κατάψυξη τυλίγετε τα φρέσκα τρόφιµα
αεροστεγώς, έτσι τα τρόφιµα θα διατηρούν την
υγρασία τους και δεν θα ξεραθούν.
Τοποθετήστε µόνο φρέσκα τρόφιµα άριστης
ποιότητας.
Μην τοποθετήστε για κατάψυξη ζεστό φαγητό.
Αφήστε το να φθάσει την θερµοκρασία δωµατίου.
Πριν κατάψυξη µοιράστε το φαγητό σε µικρότερες
µερίδες µε αποτέλεσµα να καταψυχθούν πιο
γρήγορα και µπορείτε να βάλετε για απόψυξη
µόνο την ποσότητα σύντοµης κατανάλωσης.
Στη συσκευή να γράφετε την ηµεροµηνία της
κατάψυξης.
Το φαγητό που βάλατε για κατάψυξη τοποθετήστε
κοντά στους παγωµένους τοίχους του καταψύκτη
έτσι ώστε να µην αγγίζουν τα ήδη υπάρχοντα
κατεψυγµένα τρόφιµα.
Τα κατεψυγµένα τρόφιµα µπορούν να
αποθηκεύσουν οπουδήποτε εντός χώρου
κατάψυξης, αλλά να βρίσκεται χαµηλότερα
τουλάχιστον µε 5 mm από την ανώτερη άκρη της
συσκευής.
Εάν η κατάψυξη γίνεται αργά, τα κατεψυγµένα
τρόφιµα χάνουν την ποιότητα τους. Μην ξεχνάτε να
ακολουθήσετε την ποσότητα κατάψυξης (σε κιλά) ανά
24 ώρες που αναγράφεται στο λήµµα «Ισχύς
κατάψυξης» στο κεφαλαίο «Τεχνικά Στοιχεία».
ΑΑπποοθθήήκκεευυσσηη ττρροοφφίίµµωωνν
Μην ξεχνάτε να ακολουθήσετε τον χρόνο
αποθήκευσης κατεψυγµένων τροφίµων που
αναγράφεται στον παρακάτω πίνακα.
Αγορασµένα κατεψυγµένα τρόφιµα µην
αποθηκεύσετε µετά την ηµεροµηνία
κατανάλωσης.
Σε περίπτωση που αγοράσατε κατεψυγµένα
τρόφιµα να βεβαιωθείτε αν τα έχουν
αποθηκεύσει σε κατάλληλη θερµοκρασία. Μην
αγοράζετε τρόφιµα που έχουν συσκευασία µε
υγρό ή βλάβη. Τα αγορασµένα τρόφιµα
τοποθετήστε στον καταψύκτη όσο το δυνατόν
συντοµότερα. Σας συνιστούµε ότι στη µεταφορά
στο σπίτι των τέτοιων τροφίµων χρησιµοποιήστε
σακούλα αεροστεγή.
ΣΣηηµµααννττιικκόό!!
Μην ξεχνάτε ότι τα τρόφιµα που έχουν
αποψυχθεί ολόκληρα ή εν µέρος δεν επιτρέπονται
να ξανακαταψυχθούν. Τα φαγητά όµως που
µαγειρεύονται χρησιµοποιώντας κατεψυγµένα
τρόφιµα µπορούν να καταψυχθούν.
ΣΣεε ππεερρίίππττωωσσηη δδιιαακκοοππήήςς ήή
έέλλλλεειιψψηη ρρεεύύµµααττοοςς
- Μην ανοίγετε την πόρτα.
Σηµαντικό! Εάν το χρονικό διάστηµα της διακοπής
ρεύµατος ξεπεράσει το χρονικό όριο που
αναγράφεται στο κεφάλαιο «Τεχνικά Στοιχεία» στο
λήµµα «Χρόνος απόψυξης», το αποψυγµένο
φαγητό πρέπει να καταναλωθεί όσο το δυνατό
συντοµότερο ή να µαγειρευτεί αµέσως και µετά που
κρύωσε να ξανακαταψυχθεί.
ΕΕάάνν κκάάττιι δδεενν λλεειιττοουυρργγεείί……
Στα παρακάτω δίνονται πληροφορίες σχετικά µε τα
µικρότερα προβλήµατα ώστε να αποφύγετε την
άχρηστη επιβάρυνση στο σέρβις.
ΗΗ σσυυσσκκεευυήή κκααττάάψψυυξξηηςς δδεενν λλεειιττοουυρργγεείί κκααθθόόλλοουυ
Ο ρευµατολήπτης δεν είναι σωστά
συνδεδεµένοςµε τον ρευµατοδότη της κεντρικής
παροχής.
Έχει καεί η ασφάλεια.
∆εν υπάρχει τάση στην κεντρική παροχή.
∆εν είναι αναµµένος ο θερµοστατικός
διακόπτης.
ΑΑκκοούύγγεεττααιι οο ήήχχοοςς ττοουυ σσυυννααγγεερρµµοούύ κκααιι ααννάάββεειι
ηη
κκόόκκκκιιννηη ππρροοεειιδδοοπποοιιηηττιικκήή λλυυχχννίίαα.. (( ))
Η πόρτα έχει κλείσει απολύτως. Βλ. παρακάτω.
Ο θερµοστατικός διακόπτης έχει ρυθµιστεί
λάθοςµε τους περιβαλλοντικούς κανόνες.
EL
Page 15

15
Ο καταψύκτης βρίσκεται πολύ κοντά σε κάποια
πηγή θέρµανσης.
∆εν λειτουργεί ο εσωτερικός φωτισµός
Ο ρευµατολήπτης δεν είναι σωστά
συνδεδεµένος µε τον ρευµατοδότη της
κεντρικής παροχής.
Αν η λάµπα έχει γυριστεί σωστά ή κάηκε;
ΟΟ κκιιννηηττήήρρααςς λλεειιττοουυρργγεείί ππααρρααππάάννωω ααππ´´ όόττιι θθαα
έέππρρεεππεε
Η πόρτα έχει κλείσει σωστά . Βλ. παρακάτω.
Είναι µεγάλη η θερµοκρασία στο γύρω χώρο.
Τοποθετήσατε µεγάλη ποσότητα τροφίµων για
να καταψυχθούν.
Ανοίγατε αρκετά συχνά την πόρτα.
Ο θερµοστατικός διακόπτης έχει ρυθµιστεί
λάθοςµε τους περιβαλλοντικούς κανόνες.
Αν έπαθε καµιά ζηµιά η φλάντζα της πόρτας;
Αν υπάρχει αρκετός χώρος γύρω από την
συσκευή για κύκλωση αέρα;
Η συσκευή είναι σε λειτουργία ταχείας
κατάψυξης.
ΥΥππάάρρχχεειι µµεεγγάάλληη θθεερρµµοοκκρραασ
σίίαα σσττοο εεσσωωττεερριικκόό ττηηςς
σσυυσσκκεευυήήςς
Τοποθετήσατε µεγάλη ποσότητα τροφίµων για
καταψυχθούν.
Ανοίγατε αρκετά συχνά την πόρτα.
Ο θερµοστατικός διακόπτης έχει ρυθµιστεί
λάθος µε τους περιβαλλοντικούς κανόνες.
ΥΥππάάρρχχεειι ππάάρραα πποολλύύ ππάάγγοοςς
Η πόρτα δεν έχει κλειστεί καλά. Βλ. παρακάτω.
Η τάπα της εξαγωγής εξάτµισης νερού είναι
τοποθετηµένη σωστά.
ΗΗ ππόόρρτταα δδεενν κκλλεείίννεεττααιι σσφφιικκττάά
Υπάρχει πάρα πολύ πάχνη ή κάποιο τρόφιµο
εµποδίζει να κλειστεί η πόρτα.
Τα τρόφιµα που τοποθετήσατε να καταψυχθούν
εµποδίζουν να κλειστεί η πόρτα.
Η φλάντζα της πόρτας είναι βρώµικη ή κολλάει.
Η συσκευή δεν υποστηρίζεται σωστά.
ΗΗ ππόόρρτταα ααννοοίίγγεειι δδύύσσκκοολλαα
Η φλάντζα της πόρτας είναι βρώµικη ή κολλάει.
Βούλωσε η βαλβίδα?
Εφόσον αυτές οι οδηγίες δεν οδηγούν σε
αποτέλεσµα, καλέστε το κοντινότερο Κέντρο Σέρβις.
ΣΣέέρρββιιςς κκααιι ααννττααλλλλαακκττιικκάά
Εάν είναι απαραίτητο να καλέσετε την υπηρεσία
σέρβις, απευθυνθείτε στο κέντρο σέρβις Electrolux.
Προσοχή! Σε καµία περίπτωση µην προσπαθήστε
να επισκευάσετε την συσκευή ίδιος.
ΤΤάάξξηη κκλλίίµµααττοοςς ΘΘεερρµµοοκκρραασσίίαα ππεερριιββάάλλλλοοννττοοςς
SN από + 10ΊC έως +32ΊC
N από + 16ΊC έως +32ΊC
ST από + 18ΊC έως +38ΊC
T από + 18ΊC έως +43ΊC
Η συσκευή αυτή είναι σύµφωνη µε τις παρακάτω οδηγίες της Ε.Ο.Κ:
- 73/23/EΟK από 19.02.1973 (Οδηγία χαµηλής τάσης) και τις ακόλουθες τροποποιήσεις
- 89/336/EΟK από 3.05.1989 (Οδηγία Ηλεκτροµαγνητικής Συµβατότητας) και τις τροποποιήσεις 92/31/EΟK
EL
Page 16

16
EN
Technical Data
Contents
Model BMI 310
A 80300 GT
Volume (gross) Liter 299
Volume (net) Liter 292
Height without/with roller Cm 87,6
Width Cm 132,5
Depth Cm 66,5
Weight Kg 75
Energy consumption/24h kWh/24h 0,69
Freezing capacity kg/24h 28
Hold-over time Hours 52
Rated power Watt 120
Voltage Volts 230-240
Climatic class SN/N/ST
Electrolux. Thinking of you.
Share more of our thinking at www.electrolux.com
Technical Data . . . . . . . . . . . . . . . . . . . . . . . . . . . . . .18
Safety Information . . . . . . . . . . . . . . . . . . . . . . . . . . .20
Product Description . . . . . . . . . . . . . . . . . . . . . . . . . .20
Control panel . . . . . . . . . . . . . . . . . . . . . . . . . . . . . . .20
Display . . . . . . . . . . . . . . . . . . . . . . . . . . . . . . . . . . .20
Installation . . . . . . . . . . . . . . . . . . . . . . . . . . . . . . . . .20
First use . . . . . . . . . . . . . . . . . . . . . . . . . . . . . . . . . .21
Switch on-off . . . . . . . . . . . . . . . . . . . . . . . . . . . . . . .21
Daily use . . . . . . . . . . . . . . . . . . . . . . . . . . . . . . . . . .21
Care and Cleaning . . . . . . . . . . . . . . . . . . . . . . . . . . .22
Helpful hints and tips . . . . . . . . . . . . . . . . . . . . . . . . .23
What to do if... . . . . . . . . . . . . . . . . . . . . . . . . . . . . . .23
Service or repair . . . . . . . . . . . . . . . . . . . . . . . . . . . .24
Disposal
By ensuring this product is disposed of correctly, you will help prevent potential damaging
consequences for the environment and human health.
The symbol on the product indicates that this product may not be treated as household waste, but must
be taken instead to a suitable collection point for the recycling of electrical and electronic equipment.
For more detailed information about recycling of this product, please contact your local city office, your
household waste disposal service or the shop where you purchased the appliance.
Page 17

17
EN
Safety Information
Before installing and using the appliance read this user's
instruction book carefully. It contains safety precautions,
hints, information and ideas. If the freezer is used in
compliance with the instructions written, it will operate
properly and provide you with greatest satisfaction.
These warnings are provided in the interest of safety. You
must read them carefully before installing or using the
appliance.
Use the freezer only for storing frozen food, freezing
fresh food and making ice cubes.
Do not eat ice cubes or ice lollies immediately after
taking them out of the freezer, since they may cause
frost burns.
Do not allow children to play or hide inside the freezer,
since they may become trapped inside and suffocate.
Do not store glass containers with liguids in the freezer,
since they may burst.
Ensure that the freezer is not resting on the power
supply cable.
Before servicing or cleaning, always unplug the
appliance or disconnect the power supply.
Do not use other electrical appliances (such as ice
cream makers) inside the appliance.
Your appliance contains an environmentally friendly
natural gas, isobuthane (R600a). Caution is required
however, since isobuthane is flammable. Therefore it is
essential to ensure that the refrigerant pipelines are not
damaged.
It is most important that this instruction book should be
retained with the appliance for future reference.
Product Description
1. Lid handle
2. Security lock
3. Seal
4. Divider
5. Defrost water drain
6. Control panel
7. Upper edge
8. Light
9. Valve: easy re-opening of lid
10. Low-frost system: reduces ice-build-up in the chest
freezer by up to 80 percent
Control panel
A - Appliance ON/OFF button
B - Temperature regulation button
C - Display
D - Function button
E - Confirmation button
Display
Indicates the appliance is swiched on, speeds up
when the Super Freeze function is activated.
Indicates that the freezer temperature is not
sufficiently low or that the lid has been left open.
Indicates the Super Freeze function is activated for
large quantities for fresh food and switches off the
beeping alarm.
Indicates the Drinks Chill fuction is activated.
Indicates the Eco Mode function is activated.
Indicates the Child Lock function is activated.
Indicates the temperature inside the freezer.
Indicates the number of minutes drinks are to be
chilled for, when the Drinks Chill function in active.
Installation
Wait at least 2 hours before connecting the freezer to
the power supply to ensure the refrigerant circuit is fully
efficient.
Install the freezer in a dry, well ventilated room. Avoid
locations near a source of heat or in direct sunlight.
The room temperature should correspond to the
climatic classification for which the freezer was
designed, see chapter "Technical data".
Place the freezer horizontally on a firm surface, resting
on all four feet.
For optimum operation and in order to avoid damage
when the lid is opened, leave a space of at least 5 cm
from the rear wall and 5 cm at the sides.
Before connecting the freezer to the power supply,
ensure that the voltage corresponds to that indicated in
chapter "Technical data" under "Voltage".
1
6
2
3
8
7
4
5
Page 18

18
EN
Danger!
Ensure that the freezer is not resting on the power
supply cable.
Do not remove the power supply cable by pulling on its
lead, particularly when the freezer is being pulled out of
its niche.
The power supply cable may only be replaced by a
qualified service personel.
Ensure that the power plug is not squashed or
damaged by the back of the freezer.
There must be adequate ventilation around the
appliance.
Any electrical work required to install this appliance
should be carried out by a qualified electrician.
First use
Before first use, the freezer should be cleaned inside,
see chapter "Care and cleaning".
Plug in the appliance.
Press button (A) to switch the appliance on.
The display will illuminate.
The symbol ( ) will flash on the display and the alarm
will beep, since the temperature inside the freezer is
not yet sufficiently low for food storage.
Press button (E) to switch the alarm off. The symbol
( ) will normally stop flashing after several hours.
Only place food inside the freezer once the symbol
( ) has gone. The temperature of the freezer is set to
reach -18°C, which is the optimal storage temperature
as set in the Eco Mode ( )
Switch on-off
Switch on the freezer
Press button (A) to switch the appliance on.
The display comes on.
Switch off the freezer
Press button (A) for more than one second until the
countdown "3-2-1" disappears and you hear a
sequence of beeps.
The display goes off.
Warning! Do not place objects on the control panel, as
they might accidentally switch off the freezer.
Daily use
Temperature adjustment
The temperature may be adjusted between -15°C and 24°C. We suggest setting the freezer tem+G41perature to
-18°C, which guarantees proper freezing and conservation
of frozen food.
Press button (B) several times until the desired
temperature is reached.
The temperature on the display flashes and indicates
the temperature set.
Press button (E) to confirm the desired temperature.
You will hear a beep.
The temperature on the display stops flashing again
and indicates the temperature inside the freezer.
The newly adjusted temperature is reached after
several hours. During this time it is normal that the
temperature displayed is different from the temperature
set.
Attention! Differences between the temperature displayed
and the temperature set are normal, especially when:
The temperature setting has recently been adjusted.
The lid has been left open for a long time.
Warm food has been placed in the freezer.
The Super Freeze function is activated.
Super Freeze function
If more than 3-4 kg of fresh food is to be frozen, the freezer
needs to be pre-cooled.
At least 24 hours before placing fresh food in the
freezer, press button (D) several times until the
corresponding symbol ( ) flashes on the display.
Press button (E) within
a few seconds to confirm the Super Freeze activation.
The symbol ( ) stops flashing, you will hear a beep
and the animation on the display speeds up.
Place the food in the freezer. After 52 hours this
function will automatically stop and the freezer will
return to normal storage temperature. This function
can be de-activated at any time by pressing button (D)
until the corresponding symbol ( ) flashes on the
display again and then by pressing button (E) to
confirm the de-activation.
Drinks Chill function
Use this function as a safety warning when placing bottles
in the freezer, as they may burst when forgotten in the
appliance.
Press button (D) several times until the corresponding
symbol ( ) flashes on the display.
Press button (E) within a few seconds to confirm the
Drinks Chill activation. The symbol ( ) stops flashing
and you will hear a beep.
Press button (B) several times or continuously to set
the desired number of minutes (from 1 to 90 minutes).
Place the drinks in the freezer.
At the end of the set time, the alarm will beep and the
symbol ( ) and the time will flash on the display.
Press button (E) to switch the alarm off.
Remove the drinks from the freezer. It is possible to de-
activate this function at any time by pressing button (D)
until the corresponding symbol ( ) flashes on the
display again and then by pressing button (E) to
confirm the de-activation.
Eco Mode function
Use this function to automatically set the freezer
temperature to its best level (- 18°C), which guarantees
proper conservation of frozen food at the lowest energy
consumption.
Page 19

19
EN
Press button (D) several times until the corresponding
symbol ( ) flashes on the display.
Press button (E) within a few seconds to confirm the
Eco Mode activation. The symbol ( ) stops flashing
and you will hear a beep. It is
possible to de-activate this function at any time by
pressing button (B) to change the selected
temperature and then by pressing button (E) to confirm
the selection.
Child Lock function
This function prevents children from playing with the
buttons on the control panel. Any possible pressing of the
buttons will have no effect.
Press button (D) several times until the corresponding
symbol ( ) flashes on the display.
Press button (E) within a few seconds to confirm the
Child Lock activation. The symbol ( ) stops flashing
and you will hear a beep.
The buttons on the control panel are now locked. It is
possible to de-activate this function at any time by
pressing button (D) until the corresponding symbol
( ) flashes on the display again and then by pressing
button (E) to confirm the de-activation.
Alarm
If the freezer temperature is not sufficiently low, the alarm
will beep and the symbol ( ) and the temperature
indication will flash on the display. When normal conditions
are restored, only the freezer temperature continues to
flash.The highest temperature the freezer reached is
memorised.
Press button (E) to switch the alarm off. The highest
temperature the freezer reached then appears on the
display for some seconds. Then the display returns to
showing the temperature of the freezer.
The symbol ( ) remains on as long as the
temperature in the freezer is higher than the
temperature set.
The alarm can be due to:
Insertion of a large amount of fresh food.
Opening the lid too long.
A defect in the system, see chapter "What to do if...".
Storage baskets
Hang the baskets on the upper edge (X) or place the
stackable baskets inside the freezer (Y).
Turn and fix the handles for these two positions, as
shown in the drawings.
Spare baskets can be obtained from your local Service
Force Centre or from the Electrolux website (depending on
country). The illustrations on this page show how many
baskets can be placed in the various freezer models.
Security lock
Push the key in the lock while turning.
Spare keys can be obtained from your local Service Force
Centre.
Important! Keep the keys out of reach of children. Before
disposing of an old freezer remove the keys.
Opening and closing the lid
As the lid is fitted with a tightly closing seal, it will not reopen easily immediatedly after closing.
Wait a few minutes before re-opening the lid. A valve
will allow the lid to be re-opened easily. Never pull the
handle violently.
Care and Cleaning
Cleaning
Disconnect the appliance from the power supply.
Remove all loose accessories and the vented floor, as
shown on the illustration.
Use a damp cloth to clean your freezer. Use hot water
and a mild, non-aromatic detergent.
Clean the loose accessories and the vented floor,
before replacing them again.
Important! Never use strong detergents, scouring powder
or aromatic detergents to clean your freezer.
Cleaning
The best time to clean your freezer is after defrosting.
Disconnect the appliance from the power supply and
remove all loose accessories.
Use a damp cloth to clean your freezer. Use hot water
and a mild, non-aromatic detergent.
Clean the loose accessories, before replacing them
again.
Important! Never use strong detergents, scouring powder
or aromatic detergents to clean your freezer.
When not in use
Disconnect the appliance from the power supply.
Remove all food from the freezer.
Clean the freezer as described above.
Leave the lid slightly open.
Page 20

20
EN
Changing the light bulb
Disconnect the appliance from the power supply.
Unscrew the bulb, and replace it with a new bulb (max.
15W).
Plug in the appliance.
Helpful hints and tips
Freezing food
Before freezing, fresh food must be packed in airtight
and moisture-proof packaging to prevent it from drying
out.
Only use fresh food of the best quality.
Always leave hot food to cool to room termperature
before placing in the freezer.
Divide food into small portions before freezing; this
ensures that freezing is more rapid, and that you only
need to defrost the amount needed for immediate
consumption.
Mark the freezer packaging with the date of freezing.
Place fresh food for freezing close to the cold sides of
the freezer, making sure that it is not in contact with the
frozen food already in the freezer.
Frozen food can be stored anywhere inside the freezer,
but should be kept at least 5 mm below the upper
edge.
Never fill the freezer further than the loading line shown on
the illustration.
If freezing is too slow, the quality of the food being frozen
deteriorates. The amount of fresh food (expressed in kg)
that can be frozen in 24 hours is indicated in the chapter
"Technical data" under "Freezing capacity".
Food storage
For fresh frozen food, please refer to the storage
period table underneath.
For purchased frozen food, never exceed the expiry
date.
When you buy frozen food, make sure that it has been
stored at the correct temperature. Do not buy products
which have wet or damaged packaging. Place
purchased products in your freezer as quickly as
possible. We recommend using an insulated bag to
bring such products home with you.
Important! Remember that fully or partially defrosted food
must not be re-frozen. However, dishes which have been
cooked using defrosted food may be frozen.
In the case of a power failure or
breakdown
Do not open the lid.
Important! If the power has been off for longer that the
value shown in the chapter "Technical data" under "Holdover time", the defrosted food must be consumed quickly
or cooked immediately and then refrozen (after cooling).
What to do if...
Try the solutions suggested here first to avoid the cost of an
unnecessary service call.
Your freezer will not operate
Is the power supply cord unplugged?
Has a household fuse blown?
Is there a power failure?
Is the temperature control set to the Off position?
The alarm remains audible and/or the red
light/symbol ( ) is on
Is the lid not closed completely? See underneath.
Is the temperature control set correctly for the
surrounding conditions?
Is the freezer too close to a source of heat?
The inside light does not work
Is the power supply cord unplugged?
Is the light bulb loose in the socket or burned out?
The motor seems to run too much
Is the lid not closed completely? See underneath.
Is the room termperature hotter than normal?
Has a large amount of fresh food just been added to
the freezer?
Is the lid opened often?
Is the temperature control set correctly for the
surrounding conditions?
Is the lid seal damaged or deformed?
Is there enough air circulation space around the
freezer?
Is the Super Freeze function activated accidentally?
Termperature is too warm
Has a large amount of food just been added to the
freezer?
Is the lid opened often?
Is the temperature control set correctly for the
surrounding conditions?
The lid will not close completely
Is there excessive frost or a package preventing the lid
from closing?
Are food packages blocking the lid?
Is the lid seal dirty or sticky?
Does the freezer wobble or seem unstable?
Page 21

21
EN
The lid is difficult to open
Is the lid seal dirty or sticky?
Is the valve blocked?
If you still need help, please contact your local Sercive
Force Centre.
Service or repair
In cases of breakdown or faults, your freezer must be
serviced by an authorized Electrolux Service Centre.
Important! Under no circumstances should you attempt to
repair the appliance yourself
Climatic classification Ambient temperature limits
SN from +10°C to +32°C
N from +16°C to +32°C
ST from +18°C to +38°C
T from +18°C to +43°C
This appliance complies with the following EC Directives:
73/23/EEC of 19. 02. 1973 Low-Voltage Directive
89/336/EEC of 03. 05. 1989 (including Amendment Directive 92/31/EEC - EMC Directive)
Page 22

22
FR
Electrolux. Thinking of you.
Share more of our thinking at www.electrolux.com
Dépôt en tant que déchet
Si vous déposer l'appareil en tant que déchet spécial, vous évitez les éventuelles conséquences
nuisibles a l'environnement et a la santé.
Sur le produit, le symbole indique que l'appareil n'est pas de déchet ménager, mais il faut le
transporter dans un site de collecte et de traitement des déchets électroniques et électriques.
Pour en savoir plus sur le recyclage de l'appareil, contacter les autorités locales, organisation de
propreté publique locale ou le magasin ou vous avez acheté l'appareil.
Contenu
Informations de sécurité . . . . . . . . . . . . . . . . . . . . . . . . .27
La description du produit . . . . . . . . . . . . . . . . . . . . . . . .27
Panel de contrôle . . . . . . . . . . . . . . . . . . . . . . . . . . . . . . .27
Témoins . . . . . . . . . . . . . . . . . . . . . . . . . . . . . . . . . . . . . . .27
Installation . . . . . . . . . . . . . . . . . . . . . . . . . . . . . . . . . . . . .27
Premiere utilisation . . . . . . . . . . . . . . . . . . . . . . . . . . . . . .28
Bouton On/Off . . . . . . . . . . . . . . . . . . . . . . . . . . . . . . . . .28
Utilisation journaliere . . . . . . . . . . . . . . . . . . . . . . . . . . . .28
Maintenance et nettoyage . . . . . . . . . . . . . . . . . . . . . . . .30
Idées et astuces utiles . . . . . . . . . . . . . . . . . . . . . . . . . . .30
Qu'est-ce qu'il faut faire si... . . . . . . . . . . . . . . . . . . . . . . .31
Service et réparation . . . . . . . . . . . . . . . . . . . . . . . . . . . .13
Modèle BMI310
A 80300 GT
Volume(brut) litre 299
Volume (net) litre 292
Hauteur cm 87,6
Largeur cm 132,5
Profondeur cm 66,5
Poids kg 75
Consommation d'énergie /24 heures kWh/24 heures 0,69
Capacité de congélation kg/24 heures 28
Temps de réchauffement heure 52
Puissance nominale Watt 120
Tension Volt 230-240
Classe SN/N/ST
Page 23

23
FR
Informations de sécurité
Avant de mettre en service et de commencer a utiliser
l'appareil, lire attentivement cette notice d'utilisation qui
vous informe sur les précautions de sécurité, donne
des conseils et des idées, révele des astuces. Si vous
utilisez le congélateur conformément aux consignes
prescrites, il fonctionnera correctement, et il vous
servira a votre plaisir.
Ces informations servent la sécurité. Avant
l'installation et l'utilisation de l'appareil, lire
attentivement ce qui suit.
N'utiliser le congélateur que pour stocker des
produits alimentaires congelés, congeler des
produits alimentaires frais, et produire des
glaçons.
Ne pas consommer les glaçons ou les esquimaux
juste apres les avoir sortis du congélateur, parce
qu'ils provoquent des engelures.
Ne pas permettre aux enfants de jouer a l'intérieur
du congélateur ou de s'y cacher, parce que le
couverce peut se fermer et ils peuvent s'y
asphyxier.
Ne pas stocker des bouteilles pleines de liquide
dans le congélateur, parce qu'elles peuvent
s'éclater.
Faire attention a ce que le congélateur ne soit pas
placé sur le câble secteur.
Avant réparation ou nettoyage, sortir le câble
secteur du secteur ou bien mettre l'appareil hors
circuit.
Ne pas utiliser d'autres appareils électriques a
l'intérieur de l'appareil (p.ex. : appareil glacier). L'appareil recele du gaz naturel, antipollution,
notamment de l'isobutan (R600a). Tout de meme,
on doit agir avec précaution, parce que l'isobutan
est inflammable. C'est pourquoi il faut que la
tuyauterie du congélateur soit toujours intacte.
Vous devez impérativement garder la présente
notice d'utilisation a côté de l'appareil, parce que
vous pourrez en avoir besoin plus tard.
La description du produit
1. La poignée du couvercle
2. Serrure de sécurité
3. Sceau
4. Draineur de l'eau dégivrée
5. Panel de contrôle
6. Bord supérieur
7. Lumiere
8. Valve: réouverture facile du couvercle
9. Systeme de givrage contrôlé: réduit la génération de
glace dans le congélateur par 80 pour cent
Panel de contrôle
A - Bouton On/Off de l'appareil
B - Bouton de régulation de température
C - Témoin
D - Bouton de choix de fonction
E - Bouton OK
Témoins
Montre que l'appareil est en état "on", s'accélere
quand la fonction de congélation super (Super
Freeze) est active.
Montre que la température du congélateur n'est pas
assez basse, ou bien le couvercle est resté ouvert.
Montre que la fonction de congélation super (Super
Freeze) est active pour congeler une grande quantité
de produits alimentaires frais, et désactive l'alarme
sonore.
Montre que la fonction de refroidisement de boisson
(Drinks Chill) est active.
Montre que le régime de fonctionnement
économique (Eco Mode) est actif.
Montre que la fonction de serrure d'enfant (Child
Lock) est active.
Montre la température a l'intérieur du congélateur.
Indicates the number of minutes drinks Montre
combien de minutes faut-il pour refroidir les boissons
quand la fonction de refroidissement de boisson
(Drinks Chill) est active.
Installation
Avant de se connecter sur le secteur attendre au moins
2 heures, assurer ainsi que le circuit congélateur soit
tout a fait pret a fonctionner.
Mettre en place le congélateur dans un local sec, bien
aéré. Eviter les sources de chaleur et le soleil direct.
La température du local soit conforme a la classe clima
du congélateur. Voir le chapitre "Descriptif technique".
1
6
2
3
8
7
4
5
Page 24

24
FR
Mettre le congélateur sur un sol stable et horizontal,
sur lequel tous les quatre pieds de celui-ci prennent
appui.
Pour le fonctionnement optimal et pour éviter les
accidents au moment de l'ouverture du couvercle,
laisser au moins 5 cm d'écart sur le côté et le derriere.
Avant de connecter le congélateur sur le secteur
électrique, vérifier que la tension est la meme que celle
qui figure dans le chapitre "Descriptif technique" dans
la rubrique "Tension".
Danger!
Faire attention a ce que le congélateur ne soit pas
placé sur le câble secteur.
Ne par sortir le câble secteur en tirant le câble luimeme, et encore moins ne pas tirer le congélateur par
le câble.
Ce n'est que le technicien qui soit autorisé a changer
le câble secteur.
Faire attention a ce que le derriere du congélateur ne
comprime et ne blesse le câble secteur.
Il faut assurer une ventilation suffisante autour de
l'appareil.
Ce n'est que le technicien d'électricité qui soit autorisé
a faire les travaux nécessaires pour installer l'appareil.
Avertissement! Mettre a la masse l'appareil.
Premiere utilisation
Avant la premiere utilisation, nettoyer l'intérieur du
congélateur. Voir le chapitre "Maintenance et
nettoyage".
Connecter l'appareil sur le secteur électrique.
Pour démarrer l'appareil, appuyer le bouton (A).
Le témoin s'éclaire.
Le symbole ( ) commence a clignoter, l'alarme
donne le signal, puisque la température n'est pas
assez basse dans le congélateur pour y stocker des
produits alimentaires.
Pour arreter l'alarme, appuyer le bouton (E). Dans le
cas normal, le symbole ( ) s'arrete a clignoter dans
quelques heures.
Ne palcer de produits alimentaires dans le congélateur
qu'apres ce que le symbole ( ) s'est désactivé. La
température du congélateur est réglé a -18°C,
puisque, dans le mode de fonctionnement
économique (Eco Mode) ( ), c'est la température
optimale.
Bouton On/Off
La mise en marche du congélateur
Pour mettre en marche l'appareil, appuyer le bouton
(A).
Le témoin s'éclaire.
Arreter le congélateur
Appuyer le bouton (A) plus d'une seconde, jusqu'a ce
que le compte a rebours "3-2-1" n'apparaît, et la série
de signaux sonores ne sonne.
Le témoin s'éteint.
Avertissement! Ne mettre aucun objet sur le panel de
contrôle, parce qu'il pourrait éventuellement arreter le
congélateur.
Utilisation journaliere
Régulation de température
La température est réglable entre -15°C et -24°C. On vous
conseille de définir la température du congélateur a -18°C,
ce qui assure une congélation intérieure correcte et le
stockage correct des produits alimentaires congelés.
Appuyer encore une fois le bouton (B) jusqu'a ce que
la température désirée n'apparaît sur le panel.
Le numéro clignote sur le panel et montre la
température définie.
Pour confirmer la température désirée, appuyez le
bouton (E). A ce moment on entend un signal sonore.
La température ne clignote plus sur le panel, et le
panel montre la température a l'intérieur du
congélateur.
La température redéfinie se réalise en quelques
heures. Il est normal que cependant la température
indiquée differe de celle qui a été définie.
Attention! La différence entre la température indiquée et
définie est normale, notamment si:
Vous avez récemment redéfini la température.
Le couvercle a été ouvert pendant longtemps.
Vous avez mis un plat chaud dans le congélateur.
La fonction de congélation super (Super Freeze) est en
marche.
La fonction de congélation super
(Super Freeze)
Si vous désirez congeler plus de 3-4 kg de produits
alimentaires frais, il faut prérefroidir le congélateur.
Au moins 24 heures avant l'introduction des produits
frais, poussez le bouton (D), jusqu'a ce que le symbole
correspondant ( ) n'apparaît en clignotant sur le
panel.
Pour confirmer la congélation super, appuyez dans
quelques secondes le bouton (E). Le symbole ( )
ne clignote plus, on entend un signal sonore et
l'animation sur le panel s'accélere.
Mettre le plat dans le congélateur. Cette fonction
s'arrete automatiquement apres 52 heures, et le
congélateur revient a la température de stockage
normale. Vous pouvez désactiver a tout moment cette
fonction si vous appuyez le bouton (D) jusqu'a ce que
le symbole correspondant ( ) ne commence a
clignoter sur le panel, et puis en appuyant le bouton (E)
vous confirmez la désactivation de la fonction.
Page 25

25
FR
Fonction de refroidissement des
boissons (Drinks Chill)
Cette fonction s'utilise comme avertissement de sécurité
quand vous mettez des bouteilles de verre dans le
congélateur, puisqu'elle peuvent crever si vous les y
oubliez dans l'appareil.
Appuyez de nouveau le bouton (D), jusqu'a ce que le
symbole correspondant ( ) ne commence a
clignoter sur le panel.
Appuyez dans quelques secondes le bouton (E) pour
activer la fonction de refroidissement des boissons. Le
symbole ( ) ne clignote plus et on entend un signal
sonore.
Appuyez de nouveau ou sans interruption le bouton (B)
pour définir le nombre des minutes souhaité (de 1 a 90
minutes). -Mettre les boissons dans le congélateur.
Le temps défini passé, l'alarme donne un signal sonore
et le symbole ( ) et le temp apparaissent en
clignotant sur le panel.
Pour désactiver l'alarme, appuyez le bouton (E).
Sortir les boissons du congélateur. Vous pouvez
désactiver a tout moment cette fonction si vous
appuyez le bouton (D) jusqu'a ce que le symbole
correspondant ( ) ne commence a clignoter sur le
panel, et puis en appuyant le bouton (E) vous
confirmez la désactivation de la fonction.
La fonction de mode économique
(Eco Mode)
Par cette fonction, vous pouvez définir automatiquement la
température du congélateur comme vous souhaitez
(- 18°C), qui garantit la conservation correcte des produits
alimentaires congelés en meme temps qu'une
consommation d'énergie la plus basse possible.
Appuyez de nouveau le bouton (D), jusqu'a ce que le
symbole correspondant ( ) ne commence a
clignoter sur le panel.
Appuyez dans quelques secondes le bouton (E) pour
confirmer l'activation du mode économique (Eco
Mode). Le symbole ( ) ne clignote plus et on entend
un signal sonore. Vous pouvez désactiver cette
fonction a tout moment si -en appuyant le bouton (B) vous modifiez la température, et puis vous confirmez
votre choix en appuyant le bouton (E).
Bloquage contre enfants (Child Lock)
Par cette fonction vous pouvez empecher que les enfants
jouent par les boutons qui se trouvent sur le panel de
contrôle. En appuyant n'importe quel bouton, cela ne
fonctionnera pas.
Appuyez de nouveau le bouton (D), jusqu'a ce que le
symbole correspondant ( ) ne commence a
clignoter sur le panel. - Appuyez dans quelques
secondes le bouton (E) pour confirmer l'activation de la
fonction de bloquage contre enfants (Child Lock). Le
symbole ( ) ne clignote plus et on entend un signal
sonore.
Les boutons du panel de contrôle sont alors bloqués.
Vous pouvez désactiver a tout moment cette fonction
si vous appuyez le bouton (D) jusqu'a ce que le
symbole correspondant ( ) ne commence a
clignoter sur le panel, et
puis en appuyant le bouton (E) vous confirmez la
désactivation de la fonction.
Alarme
Si la température du congélateur n'est pas assez basse,
l'alarme donne un signal sonore, et le symbole ( ) et la
température commencent a clignoter sur le panel. Quand
la température normale revient, ce n'est que la
température du congélateur qui clignote. La mémoire de
l'appareil garde la température la plus haute du
congélateur
Pour arreter le signal sonore, poussez le bouton (E).
Puis, pour quelques secondes, la température la plus
haute apparaît sur le panel. Apres, le panel montrera la
température du congélateur.
Le symbole ( ) reste sur le panel jusqu'a ce que la
température du congélateur soit plus haute que la
température définie par le thermostat.
Les raisons possibles du signal d'alarme:
Y avoir mis une grande quantité de produits frais.
Avoir tenu ouvert le couvercle trop longtemps.
Le défaut du systeme. Voir le chapitre " Qu'est-ce qu'il
faut faire si...".
Paniers de stockage
Pendre les paniers au bord supérieur du congélateur
(X) ou bien placer les paniers superposables a
l'intérieur du congélateur (Y).
Tourner et fixer les poignées a ces deux positions,
conformément aux dessins.
Pouvoir acheter plus de paniers de la part du service local
ou sur la page web d'Electrolux (pas dans tous les pays).
Les illustrations qui figurent sur cette page montrent
combien de panier pouvez-vous placer dans les différents
types de congélateur.
Serrure de sécurité
Pousser la clé en tournant dans la serrure. Pouvoir
acheter des clés de remplacement du service local.
Page 26

26
FR
Important! Tenir les clés dans un endroit ou les enfants
n'ont pas acces. Avant de placer un vieux congélateur a
côté des poubelles, en sortir la clé.
Ouverture et fermeture du couvercle
Puisque le couvercle se ferme par un joint hermétique,
apres fermeture il ne s'ouvre pas facilement.
Attendre quelques minutes avant de le réouvrir. Une
valve facilite la réouverture du couvercle. Ne jamais
tirer violemment la poignée.
Maintenance et nettoyage
Dégivrage du congélateur
Quand le givre atteint une épaisseur de 10-15 mm, il faut
dégivrer le congélateur. Il est conseillé de dégivrer le
congélateur quand on n'y stocke pas ou guere de produits
alimentaires.
Déconnecter l'appareil.
Sortir les produits alimentaires du congélateur, les
emballer dans du papier, les tenir dans un endroit froid.
Laisser ouvert le couvercle de l'appareil.
Débouchonner le draineur de l'eau.
Ramasser l'eau déglacée sur un plat, comme vous le
voyez sur le dessein. S'il y en a, utiliser le sépareur.
Vous pouver accélérer le dégivrage, si vous éliminez la
glace des cloisons par le racloir fourni.
Bien essuyer l'intérieur du congélateur.
Ne pas oublier de remettre le bouchon du draineur de
l'eau dégivrée.
Important! Pour éliminer le givre ou la glace, ne pas
utiliser de couteau ou d'autre outil aigu.
Nettoyage
Il est conseillé de procéder au nettoyage apres le
dégivrage.
Déconnecter l'appareil, et en sortir tous les éléments
amovibles.
Pour nettoyer le congélateur, utiliser un chiffon
humide. Utiliser de l'eau chaude et un détersif doux,
sans arôme.
Avant de les remettre, nettoyer aussi les éléments
sortis.
Important! Pour nettoyer le congélateur, ne pas utiliser de
détersif fort, poudre abrasive ou détersif arômatisé.
Hors d'utilisation
Déconnecter l'appareil.
Sortir tous les produits alimentaires du congélateur.
Nettoyer le congélateur comme décrit plus haut.
Laisser le couvercle entrouvert.
Changement d'ampoule
Déconnecter l'appareil.
Démonter l'ampoule et la changer (max. 15W).
Connecter l'appareil.
Idées et astuces utiles
Congélation d'aliments
Avant congélation, emballer les produits alimentaires
frais d'une façon hermétique et imperméable, pour
empecher le dessechement.
Ne congeler des produits alimentaires que de la
premiere qualité.
Avant de placer des plats chauds dans le congélateur,
laisser les refroidir a la température ambiante.
Avant congélation, partager les plats en petites
portions, ainsi la congélation demande moins de
temps, et vous ne devez décongeler que la portion que
vous allez consommer.
Indiquer la date de la congélation sur l'emballage.
Mettre les plats a congeler pres de la cloison froide du
congélateur de façon qu'ils ne touchent pas les
produits alimentaires congelés qui se trouvent déja
dans le congélateur.
Vous pouvez stocker les produits alimentaires
congelés n'importe ou dans le congélateur, mais il doit
rester au moins 5 mm entre eux et le bord supérieur du
congélateur.
Si la congélation se fait lentement, la qualité des produits
alimentaires congelés se détériore. La quantité (en kg) de
produits alimentaires congelable en 24 heures se trouve
indiquée dans le chapitre "Descriptif technique" dans la
rubrique "Capacité de congélation".
Page 27

27
Stockage des produits alimentaires
Pour la durée de stockage des produits alimentaires
frais, regardez le tableau suivant.
Ne jamais stocker des produits alimentaires congelés
achetés si le temps de préférence a consommation est
déja périmé.
A l'achat de produits alimentaires congelés, vérifier
qu'ils ont été stockés a une température correcte. Ne
pas acheter de produits alimentaires dont l'emballage
est humide ou endommagé. Mettre le plus vite les
produits alimentaires achetés dans le congélateur. On
vous conseille d'utiliser un sac isolant pour rentrer ce
type de produits alimentaires.
Important! Ne pas oublier qu'il n'est pas permis de
recongeler les produits alimentaires entierement ou en
partie décongelés. Par contre, les plats préparés a partir
de produits alimentaires congelés peuvent etre congelés.
En cas de rupture d'électricité
Ne pas ouvrir le couvercle.
Important! Si la durée de la rupture d'électricité dépasse
le temps indiqué dans le chapitre "Descriptif technique"
dans la rubrique "Temps de réchauffement", il faut vite
consommer les produits alimentaires décongelés, ou bien
il faut tout de suite en préparer des plats et (apres
refroidissement) les recongeler.
Qu'est-ce qu'il faut faire si...
Pour éviter les frais injustifiés du service, essayez d'abord
ce qui suit.
Le congélateur ne marche pas
Est-ce que l'appareil n'est pas déconnecté?
Est-ce que le plomb a sauté?
Est-ce qu'il n'y a pas une rupture d'électricité?
Est-ce que le régulateur de température n'est pas dans
une position "off"?
Il y a un signal sonore de l'alarme et un signal visuel
par le témoin rouge ( )
Est-ce que le couverce est bien fermé? Voir plus bas.
Est-ce que le régulateur de température est fixé
conformément aux conditions du milieu?
Est-ce que le congélateur n'est-il pas trop pres d'une
source de chaleur?
La lumiere intérieure ne marche pas
Est-ce que l'appareil n'est pas déconnecté?
Est-ce que l'ampoule est montée trop légerement,
n'est-elle pas craquée?
Le moteur marche trop
Est-ce que le couvercle est bien fermé? Voir plus bas.
Est-ce que la température du local n'est pas plus haute
que normalement?
Est-ce que vous n'avez pas mis une quantité plus
grande de produits alimentaires frais dans le
congélateur?
Est-ce que vous n'ouvriez pas souvent le couvercle?
Est-ce que le régulateur de température est fixé
conformément aux conditions du milieu?
Est-ce que le joint du couvercle n'est pas déformé ou
endommagé?
Est-ce qu'il y a suffisamment de place autour du
congélateur pour que l'air puisse circuler?
Est-ce que vous n'avez peut-etre pas activé la
fonction de congélation super?
La température est trop haute
Est-ce que vous n'avez pas mis une quantité plus
grande de produits alimentaires frais dans le
congélateur?
Est-ce que vous n'ouvriez pas souvent le couvercle?
Est-ce que le régulateur de température est fixé
conformément aux conditions du milieu?
Il y a trop de glace
Est-ce que le couvercle est bien fermé? Voir plus
bas.
Est-ce que le draineur de l'eau est bien bouchonné?
Le couvercle se ferme mal
Est-ce qu'il n'y a pas trop de givre ou bien un paquet
de produit alimentaire qui empeche la fermeture?
Est-ce qu'il n'y a pas de paquets de produit
alimentaire qui embarrassent le couvercle?
Est-ce que le joint du couverce n'est pas pollué ou
poisseux?
Est-ce que le congélateur ne boite pas, n'est pas
instable?
Le couvercle s'ouvre difficilement
Est-ce que le joint du couverce n'est pas pollué ou
poisseux?
Est-ce que la valve est-elle obturée?
Si vous avez toujours besoin de l'assistance, contactez le
service local.
Service et réparation
En cas de défaut, détraquement de l'appareil, ne faire
réparer le congélateur que dans un service agréé par
Electrolux.
Important! N'essayez pas de réparer en aucun cas vousmeme l'appareil.
FR
Page 28

28
Classe Limites de température extérieure
SN De +10°C à +32°C
N De +16°C à +32°C
ST De +18°C à +38°C
T De +18°C à +43°C
L'appareil est conforme aux directives CE suivantes:
Directive CEE 73/23. du 19.02.1973. sur la basse tension
Directive CEE 89/336. du 03.05.1989. (y compris la directive amendée CEE 92/31 - Directive de Compatibilité
Électromagnétique)
FR
Page 29

29
Page 30

30
820 418 819 - 00 - 25052007
Page 31

31
Page 32

820 418 819 - 00 - 25052007
www.electrolux.com
www.aeg - electrolux.de
www.aeg - electrolux.el
www.aeg - electrolux.en
www.aeg - electrolux.fr
 Loading...