

Page 1

ARCTIS
Gefriertruhen
Chest freezers
Congélateurs-bahuts
Congélatori
Diepvrieskist
P akastinarkut
ΨυγειοΨυγειο
Ψυγειο
ΨυγειοΨυγειο
Gebrauchsanweisung
Operating Instructions
Mode d’emploi
Istruzioni per l’uso
Gebrauiksaanwijzing
Käyttöohje
Οδηγιεζ λειτουργιαζΟδηγιεζ λειτουργιαζ
Οδηγιεζ λειτουργιαζ
Οδηγιεζ λειτουργιαζΟδηγιεζ λειτουργιαζ
Page 2
1.
2. 3.
4.
6.
5.
7.
Page 3
8. 9.
10. 11.
12. 13.
Page 4

14.
15.
Page 5
820417795
Page 6
Dear customer,
Before placing your new refrigerator/freezer into operation please read
these operating instructions carefully. They contain important information for safe use, for installation and for care of the appliance.
Please keep these operating instructions for future reference. Pass them
on to possible new owners of the appliance.
These operating instructions are for use with several technically comparable models with varying accessories. Please observe the notes which
apply to your model.
Notes which are important for your safety or for the proper functioning
of the appliance are stressed with a warning triangle ands or with signal words (Warning!, Caution!, Attention!). Please observ the following carefully.
This symbol guides you step by step in the operation of the appliance.
Supplementary information regarding operation and practical appli-
cations of the appliance appear after this symbol.
Tips and notes concerning economical and environmentally sound use
of the appliance are marked with the cloverleaf.
Explanations- of the technical terminology used in the operating in-
structions can be found at the end in the section “Technical Terminology”.
The operating instructions contain instructions for the correction of
possible malfunctions by the user in the section “What to do if ...”. If
these instructions should not be sufficient, our customer, service department is always available to you.
The symbol on the product or on its packaging indicates that this product
may not be treated as household waste. Instead it shall be handed over
to the applicable collection point for the recycling of electrical and
electronic equipment. By ensuring this product is disposed of correctly ,
you will help prevent potential negative consequences for the
environment and human health, which could otherwise be caused by
inappropriate waste handling of this product. For more detailed
information about recycling of this product, please contact your local
city office, your household waste disposal service or the shop where
you purchased the product.
Printed on paper manufactured with environmentally sound proc-
esses – he who thinks ecologically acts accordingly ...
25
Page 7

Contents
Safety .....:............................................................................... 27
Disposal .................................................................................. 29
Appliance Packaging Information ................................................... 29
Disposal of old Appliances ........................................................... 29
Installation .............................................................................. 30
Installation Location ................................................................... 30
The refrigerator or freezer needs air . ............................................. 30
Appliance Alignment ................................................................... 31
Electrical Connection .................................................................. 31
Appliance Description ................................................................ 32
Control Panel ........................................................................... 32
Digital temperature display .......................................................... 32
T emperature W arning .................................................................. 32
Interior Accessories .................................................................... 33
Prior to Initial Start-Up .............................................................. 33
Initial Start-Up ......................................................................... 34
T emperature Adjustment ............................................................ 34
Switching the Appliance Off ........................................................ 35
Maximum capacity / Stacking limit .............................................. 36
Freezing ................................................................................. 36
The role of the pressure equalisation valve ................................... 38
Low Frost System ..................................................................... 38
Frozen Storage ......................................................................... 38
Defrosting .............................................................................. 39
Cleaning and care ..................................................................... 40
Energy Saving Tips .................................................................... 41
What to do if ... ...................................................................... 41
Correcting Malfunctions ............................................................... 41
Replace light bulb ...................................................................... 42
Customer Service ...................................................................... 43
Regulations, Standards, Guidelines ............................................... 43
Special accessories .................................................................... 44
T echnical T erminology ................................................................ 45
26
Page 8

Safety
The safety of our freezers is in accordance with recognised technological
standards and appliance safety legislation. We nevertheless feel that
it is important to acquaint you with the following safety guidelines:
Use for Intended Purpose
• The freezer is intended for household use. It is suitable for freezing
and storage of frozen food. The manufacturer assumes no liability
for damages occurring through improper operation or use of the
appliance for unintended purposes.
• Alterations or changes to the freezer are not permitted for reasons
of safety.
• If you use the freezer in a commercial application or for purposes
other than the freezing or frozen storage of foods, please observe
al! valid legal regulations for your application.
Prior to initial start-up
• check the refrigerator/freezer for transport damage. Do not under
any circumstances connect a damaged appliance! Please contact
your supplier in the event of damage.
Refrigerant
The refrigerant isobutane (R600a) is contained within the refrigerant
circuit of the appliance, a natural gas with a high level of environmental compatibility, which is nevertheless flammable.
• During transportation and installation of the appliance, be certain
that none of the components of the refrigerant circuit become damaged.
• If the refrigerant circuit should become damaged:
- avoid open flames and sources of ignition;
– thoroughly ventilate the room in which the appliance is situated.
Safety for Children
• Packaging materials (e.g. films, styrofoam) can be dangerous for
children. Danger of suffocation! Keep packaging materials away from
children!
• For appliances with lockable lids: Children playing could get locked
in. Danger of suffocation! Keep the key out of the reach of children
and do not leave it near the appliance.
27
Page 9

Safety
• Before disposing of old appliances make them inoperable. Remove
plug from mains, sever the power cable, remove or destroy any snap
or latch closures. This eliminates the danger that playing children
lock themselves into the appliance (danger of suffocation!) or place
themselves into other life-endangering situations.
• Children often do not recognise the dangers involved with household appliances. Please provide for the necessary supervision and do
not allow children to play with the appliance!
Daily Operation
• Containers with flammable gases or fluids can develop leaks through
contact with the cold. Danger of explosion! Do not store containers
with flammable substances, such as aerosol cans, refill cartridges
for cigarette lighters etc. in the refrigerator/freezer.
• Bottles and cans may not be placed in the freezer compartment.
They can burst when the contents freeze - or even explode if the
contents contain carbonic acid! Never place sodas, juices, beer , wine,
champagne etc. into the freezer compartment. Exception: Spirits
with high alcohol content may be stored in the freezer compartment.
• Do not place ice cream or ice cubes directly from the freezer compartment into the mouth. Very cold ice can freeze to the lips or
tongue and cause injury.
• Never touch frozen goods with wet hands. Hands can freeze to the
goods.
• Do not operate any electrical appliances in the refrigerator/freezer
(e.g. electric ice cream makers, mixers etc.).
• Before cleaning the appliance always pull the mains plug out or switch
off/disengage the household fuse.
• When unplugging always pull the plug from the mains socket, do not
pull on the cable.
28
In case of malfunction
• If a malfunction should occur at the appliance, refer first to the
section “What to do if...” in these operating instruction. If the instructions in this section are not sufficient, do not undertake any
further work on your own.
• Refrigerators/freezers may only be repaired by trained personnel.
Repairs carried out by untrained personnel can lead to substantial
danger. Please contact your dealer or our customer service department for repairs.
Page 10

• For the electrician: Before carrying out any work on the freezer
always pull out the mains plug or switch off/disengage the household fuse.
Disposal
Appliance Packaging Information
All materials are environmentally sound! They can be dumped or burned
at an incinerating plant without danger!
About the materials: The plastics can be recycled and are identified as
follows:
>PE< for polyethylene, e.g. the outer covering and the bags in the
interior.
>PS< for polystyrene foam, e.g. the pads, which are all free of
chlorofluorocarbon.
The carton parts are made from recycled paper and should be disposed
of at a waste-paper recycling collection location.
Disposal of old Appliances
For environmental reasons, refrigeration appliances must be disposed
of properly. This applies to your old appliance, and - at the end of its
service life - for your new appliance as well.
Warning! Before disposing of old appliances make them inoperable.
Remove plug from mains, sever the power cable, remove or destroy
any snap or latch closures. This eliminates the danger that playing
children lock themselves into the appliance (danger of suffocation!) or
place themselves into other life-endangering situations.
Disposal:
• The appliance may not be disposed of with domestic waste or bulky
refuse.
• The refrigerating circuit may not be damaged.
• Information concerning collection schedules or locations can be ob-
tained from the local disposal authorities or town hall.
29
Page 11

Installation
Installation Location
The appliance should be set up in a well ventilated, dry room. The
basement is an optimal place for chest freezers.
Warning! The appliance may not be exposed to spray or splash water.
Danger of electrical shock!
Energy use is affected by the ambient temperature. The appliance should
therefore
– not be exposed to direct sunlight;
– not be installed next to radiators, cookers or other sources of heat;
- only be installed at a location whose ambient temperature corresponds to the climate classification, for which the appliance is designed.
The climate classification is stipulated on the serial plate which can be
found on the inner side of the lid. The following table shows which
ambient temperature is correct for each climate classification:
Climate classification for an ambient temperature of
SN +10 to +32 °C
N +16 to +32 °C
ST +18 to +38 °C
T +18 to +43 °C
The refrigerator or freezer needs air
The side walls become warm whilst the appliance is on. The heat is
generated by the special refrigerating system (shell condenser) and
prevents condensate and thus rust from forming on the side walls. In
order for the heat to be able to be dissipated, air must be able to
circulate around all the side walls.
Attention! To function correctly the appliance requires good ventilation. Make sure that the side walls and the base of the appliance are
not covered or obstructed.
30
Page 12

Appliance Alignment
The appliance must have a solid, level footing. Please compensate for
uneven floors with appropriate supports.
Electrical Connection
W ARNING – THIS APPLIANCE MUST BE EARTHED
Please ensure that the voltage and current indicated on the rating
plate agree with the voltage of your electricity supply.
220/240 volts (i. e. 220/240V AC).
If your appliance has been equipped with a mains lead with a moulded
on type plug, you must comply with the following regulations:
The plug moulded on to the cord incorporates a fuse. For replacement,
use a 13 amp BS 1362 fuse. Only AST A approved or certified fuses should
be used. The fuse cover/carrier must be replaced in the event of changing the fuse. The plug must not be used if the fuse cover/carrier ist
lost. A replacement cover/carrier must be obtained from an electrical
goods retailer. If the socket outlets in your home are not suitable for
the plug fitted to the appliance, then the plug must be cut off and an
appropriate one fitted. When fitting the plug please note the following
points:
Important
The wires in the mains lead are coloured in accordance with the following code:
Green and Yellow Earth
Blue Neutral
Brown Live
As the colours of the wires in the mains lead of this appliance may not
correspond with the coloured markings indentifying the terminals in
your plug, proceed as follows:
1. The wire which is coloured green and yellow must be connected to
the earth terminal in your plug, which is marked with the letter E or
by the earth symbol or coloured green, or green and yellow.
2. The wire which is coloured brown must be connected to the live
terminal which is marked with the letter L or coloured red.
3. The wire which is coloured blue must be connected to the neutral
terminal which is marked with the letter N or coloured black.
When wiring the plug, ensure that all strand of wire are securely retained in each terminal.
Do not forget to tighten the mains lead clamp on the plug.
31
Page 13

Warning! A cut-off plug inserted into a 13 amp socket is a serious safety
(shock) hazard. Ensure that the cut-off plug is disposed of safely.
Voltage 220/240V A C
Fuse rating 13 amps
o left.
for further information. The rating plate is inside,
Appliance Description
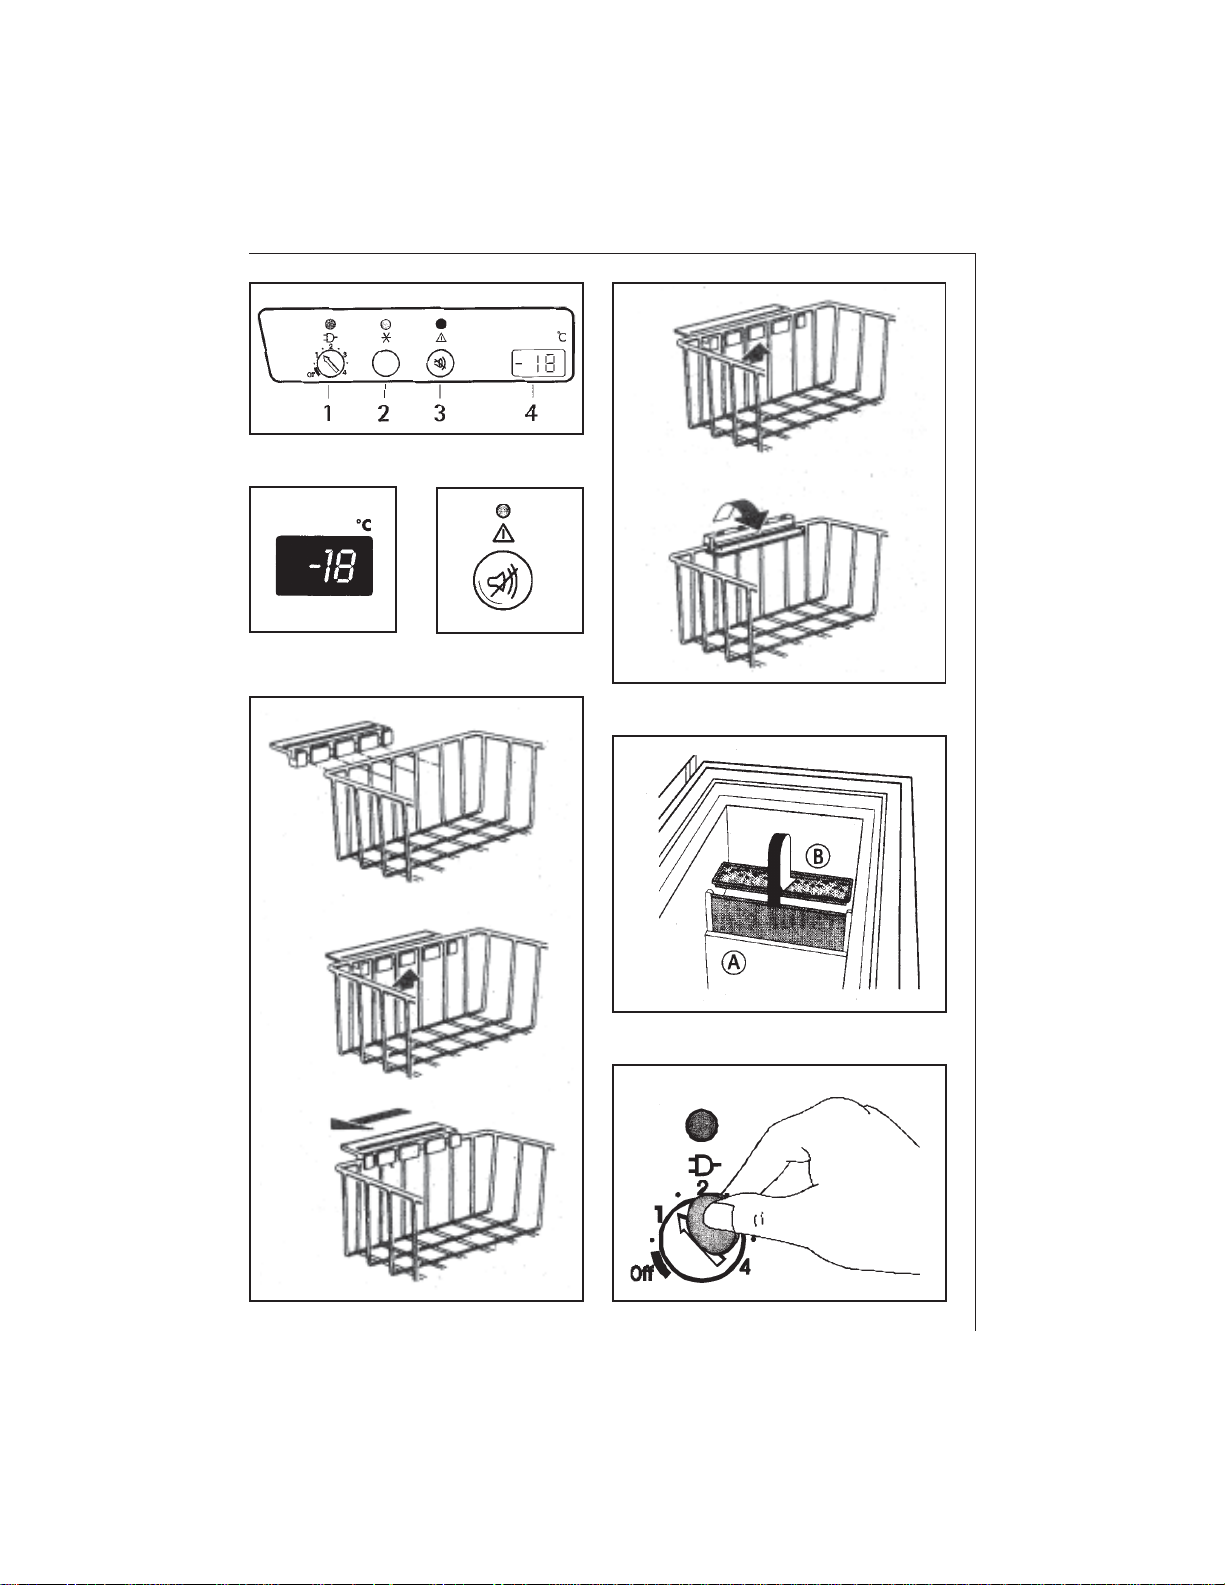
Control Panel
Fig. 1
1 Temperature controller and power supply pilot light (green)
2 FROSTMA TIG button for the super-freeze function and FROSTMATIC
pilot light (yellow)
3 W ARNING OFF button (to switch off the warning buzzer) and warning
pilot light (red)
4 Digital temperature display
Digital temperature display
Fig. 2
Each model has a digital temperature display integrated into the handle
of the lid. During normal operation, this shows the temperature of the
frozen products in oC. However, the exceptions below are possible:
- In the case of SUPER FROST mode of operation, the display shows an
„SP” sign as well.
- If there is a failure of the temperature display , a small square can be
seen in the bottom right or top right corner . (See Chapter „Things to
be done if …” )
The temperature display indicates the temperature of the frozen food
and therefore changes relatively slowly, if you put fresh goods in for
example. If you leave the lid open for a long time, the temperature
warning may respond, the temperature display may however remain
unchanged. In this case there is no malfunction. Press the WARNING
OFF button, to switch the warning buzzer off. The red warning light
goes out automatically after a short time.
Temperature Warning
Fig. 3
If the temperature in the freezer is too high, the warning O buzzer
sounds and the red warning light flashes. Q The warning buzzer and red
warning light are triggered:
32
Page 14

– if the storage temperature required has not yet been reached when
starting the freezer; if the storage temperature is no longer maintained (malfunction);
– after inserting fresh foodstuffs in a greater quantity than permitted
by the freezing capacity (see section on “Freezing”);
– if the lid is left open too long.
You can switch off the warning buzzer with the WARNING OFF button.
The red warning light continues to flash until it is sufficiently cold
again inside the freezer.
The warning buzzer and red warning light are not triggered:
- if the power supply is interrupted;
– if the electronic thermostat is faulty.
Interior Accessories
Storage baskets
Fig. 4
Insert handles as shown in Fig. 4 if the basket is to be suspended on the
plastic cover frame on the upper edge of your chest freezer.
If baskets are to be placed in the chest freezer and stacked above each
other; the handles are to be folded inwards as shown in Fig. 5.
The handles then serve as a support for the basket to be placed on top.
Dividing partition
(Fig. 6)
The appliance is equipped with a removable dividing partition. With
the dividing partition you can divide the freezer into a large storage
section A and a smaller freezing section B (also see section on “Freez-
ing”). The dividing partition can additionally be used:
– for catching defrost water (see section on “Defrosting”);
– as a freezing tray (e.g. for prefreezing berries).
For this purpose, the dividing partition can either be placed on the
bottom of the small freezing section B or put into a storage basket.
Prior to Initial Start-Up
Please clean the appliance interior and all accessories prior to initial
start-up (see section: “Cleaning and Care”).
Remove the ice packs - if they have been supplied with your model.
33
Page 15

Only place the ice packs to freeze on the floor of the freezer once the
optimal storage temperature of -18 °C has been reached.
After approx. 24 hours place the ice packs (if they were supplied with
your model) onto the freezing trays which are inserted in the storage
baskets hung at the top of the freezer.
If the freezing trays are being used for pre-freezing, you can place the
ice packs directly onto the frozen foods in the baskets hung at the top
of the freezer.
Re-freeze tfaswed ice packs in the same fashion, e.g. after cleaning
the appliance.
Initial Start-Up
Stick the plug into the socket, then turn the temperature controller
away from the „off” zone, this way the green lamp showing the energy
supply will be on.
- If the temperature adjuster is in the „off” zone and the plug of the
device has been connected to the socket, the device will not work,
neither will the display, and the control lamps will not be on.
- The device runs in SUPER FROST mode for 5 hours, the yellow SUPER
FROST indicator lamp will be on.
- If you want to stop the SUPER FROST mode, keep pressing the SUPER
FROST button for 2 seconds. At this time, instead of the „SP” sign,
the display will show the inner temperature, the yellow lamp indicating SUPER FROST will go out.
Press the WARNING OFF button, to switch the warning buzzer off. The
red warning light goes out automatically after some time.
After power-supply failure or when starting up the device for the first
time, the device switches to SUPER FROST mode for 5 hours, if the
temperature in the freezer is too high. An „SP” sign will appear on the
display. If you want to switch it off before the 5 hours is over, keep
pressing the SUPER FROST button for 2 seconds.
Temperature Adjustment
Fig. 7
A coin has to be used to turn the temperature controller. This makes it
more difficult to inadvertently adjust the temperature (child protection).
Position „off” means: device switched off
Position “1” means: warmest internal temperature
Position “4” means: coldest internal temperature
Recommended position: “2” to “3”
34
Page 16

Twist the temperature controller to position “2” to “3” using a coin.
The following influences are of decisive importance for the internal
temperature:
– ambient temperature;
– quantity of food stored;
– frequent or prolonged opening of the lid.
Therefore regularly monitor that the optimal storage temperature of
–18 °C or colder is maintained, either using the thermometer or the
digital temperature display depending on which model you have.
If necessary, correct the temperature setting, until the thermometer
or the digital temperature display shows -18 °C or colder.
From a nutritional point of view, -18 °C is considered a sufficiently
cold storage temperature.
Saving energy for half or partial loads
Fig. 8
Some models enable you to save energy if your freezer is only half full
or less.
To do this, distribute all the frozen foods in the lower area of the
freezer in such a way that they do not exceed the green marking1) A on
the dividing partition.
Turn the temperature controller in the green economy area 1) B.
Ensure that the optimal storage temperature of -18 °C or colder is
maintained. (Fig. 9)
Attention! If frozen foods are stored above the green marking on the
partition, turn the temperature controller to position “2” to “4” again.
Switching the Appliance Off
In order to switch off the device, turn the temperature controller button anti-clockwise, until it hits the „off” zone. At this point, the green
lamp will go out.
If the appliance is to be removed from service for a lengthy period:
In order to switch off the device, turn the temperature controller button anti-clockwise, till it hits the „off” zone. Then pull the plug out of
the socket.
1
) not included with all models
35
Page 17

Remove the mains plug or switch off or turn out the circuit breaker or
fuse.
Defrost freezer compartment and clean thoroughly (see section: “Cleaning and Care”).
Then leave the lid open to avoid odours.
Maximum capacity / Stacking limit
Fig. 10
To be able to store larger quantities or bulky products for freezing
you can remove all the storage baskets. The appliance will still
function safely if used in this way.
Do not stack the products higher than the lower edge of the plastic
frame.
Freezing
Tip: To freeze fresh foods use the small freezing compartment on
the right of the dividing partition (also see section on “Interior
accessories/ dividing partition”). This enables you to separate already frozen foods from fresh foods. Always make sure already
frozen goods cannot defrost by coming into contact with fresh products. If the freezing compartment is too small you can freeze part
of the products in the large storage section on the left of the dividing partition.
36
Attention!
• Before freezing food the temperature in the freezer must be -18
°C or colder.
• Please observe indicated freezing capacity on the serial plate.
The freezing capacity represents the maximum amount of fresh
goods that can be frozen within 24 hours. If you freeze goods on
several days, one after the other, freeze amounts equal to 2/3
to 3/4 of the capacity indicated on the serial plate.
• Thawed foods which have not been processed further (cooked
into meals) may not under any circumstances be frozen a second
time.
In order to utilize the maximum freezing capacity, keep pressing the
SUPER FROST button for 2 seconds 24 hours before the freezing, in the
case of smaller quantity, 4-6 hours before the freezing.
Page 18

At this point, the yellow warning light lights up, the „SP” sign will
appear on the display. (Fig. 11)
The F AST FREEZE button need not be pressed for freezing of small quantities of up to 3 kg.
All foods must be packed air tight prior to freezing, so that they do not
dry out or lose their flavour, and so that no flavour contamination of
other frozen goods occurs.
Caution! Do not touch the frozen foods with wet hands. Hands can
freeze to the goods.
Place the packed food products into the freezer. Ensure they come into
contact with the side walls. Unfrozen goods may not come into contact
with already frozen goods, otherwise the frozen goods may start to thaw .
If more products have to be frozen, keep on the fast freeze switch
otherwise switch the fast freeze function off about 24 hours after inserting the food products, for smaller quantities earlier. To do this,
press the FROSTMATIC button again. The yellow FROSTMATIC display
goes out.
If you do not switch off the „SUPER FROST” mode by pressing the „SUPER FROST” button, the device will automatically switch back to normal operation after 48 hours (the yellow warning lamp goes out, the
temperature of the inner space will appear on the display instead of
the „SP” sign). After this, the device will cool the inside compartment
according to the value specified by the temperature controller.
Tips:
• The following are suited for the packaging of frozen goods:
– freezer bags and polyethylene wraps;
- special cans for frozen goods;
– extra-thick aluminium foil
• The following are suitable for closing bags and foil: plastic clips,
rubber bands or adhesive tape.
• Before closing press out the air from the bags and foil, as air make
the frozen products dry out more easily and wastes space.
• Make flat packages, because these freeze more quickly.
• Do not fill cans for frozen goods to the brim with liquid or paste-like
goods, because liquids expand during freezing.
Note for inspection authorities:
Botch plans for the determination of freezing performance or warm-up
time can be requested directly from the manufacturer.
37
Page 19

The role of the pressure equalisation valve
(not induded with all models)
Fig. 12
The pressure equalisation valve installed in your machine performs
automatically the elimination of the pressure difference which
otherwisw would make the opening of the cover difficult or even impossible.
Its operation may – as the case may be - be heard due to the air flowing
in through the airing outlet arraged in the rear wall of the deep freezer
box.
For a safe operation, keep the two openings of the valve free, do not
cover therm!
LOW FROST SYSTEM
(not induded with all models)
The patented LOW FROST System reduces the ice- build-up in the chest
freezer by up to 80 percent, which results in up to five times long er
periods between the requirement to defrost.
To get the full benefit of the system, please observe the following
points:
The amount of ice-build-up in any freezer is ve ry much dependent of
the moist u re of the surrounding air. The ice will build up quicker in a
humid climate th an in a dry climate. Therefore you should avoid installing your freezer in ve ry humid surroundings.
The LOW FROST system minimizes the amount of ice caused by the
natural te mperature cycle of the freezer. Howeve r , ice-build-up from
other sources is not reduced. The most important other sources a re
poorly wrapped food and wa rm air introduced when the lid is opened.
Therefore, it is important to ensure that the lid isn’t opened unnecessarily, and the lid is not obst ru cted by packs of food when closed.
If food sta red in the freezer is not wrapped p roperl y, humidity from
the food will settie as ice on the freezer walls. Food quality will also
deteriorate, so ensure that food put in the freezer is wrapped weil.
Maintenance and Cleaning.
The LOW FROST system does not need any maintenance or cleaning
during normal use. If needed the pipe can be wiped with a soft cloth.
Do n ot use any sharp or piercing tools, as this may damage the system.
Frozen Storage
Attention! Before filling the freezer for the first time with previously
frozen goods, the necessary storage temperature of -18 °C must have
been attained.
38
Page 20

• Load freezer only with packaged frozen goods, so that they do not
dry out or lose their flavour, and so that no flavour contamination of
other frozen goods can occur.
• Please observe maximum storage times and expiry dates of frozen
goods.
• Store ice cream and fatty foods in the lower area of the freezer
(near to the bottom).
Defrosting
Whilst in operation and when the lid is opened, the moisture inside the
freezer forms hoar frost. Remove this hoar frost from time to time
with a soft plastic scraper, e.g. a spatula. Do not under any circumstances use hard or pointed objects for this purpose.
Defrost the freezer when the layer of hoar frost has become 4 mm
thick. For models with a no-frost system at least once a year.
Models with a minimum frost system do not need to be defrosted as
often, as in the case of these appliances ice and hoar frost take longer
to build up in the freezer. The minimum frost system is maintenance
free throughout the entire service life of the appliance.
A convenient time for defrosting is any time when the appliance is
empty, or only minimally loaded.
Warning!
• Do not use electrical heating appliances or any other mechanical or
artificial devices to speed up the defrosting process, with the exception of those recommended in these operating instructions.
• Do not use defrosting sprays, because they may be health endangering and/or contain substances damaging to plastics.
About Press the FROSTMATIC button twelve hours before defrosting so
that the frozen goods are thoroughly deep frozen to cope with the
interruption.
Caution! Do not touch frozen goods with wet hands Hands can freeze
to the goods.
Remove frozen goods, pack them in several layers of newspaper, cover
them and store them in a cool place, e.g. in a refrigerator.
Remove the mains plug or switch off or turn out the circuit breaker or
fuse.
Remove the interior accessories (baskets, trays etc.).
Pull out the plug of the defrost water outlet at the bottom of the
freezer. (Fig. 13)
To catch the defrost water , place the freezing trays (not included with
all models), the dividing partition or another flat receptacle under the
defrost water outlet. (Fig. 14)
39
Page 21

Tip: To accelerate the defrosting process, place a saucepan with hot
water in the appliance and close the lid. Remove pieces of ice that
break away before defrosting is complete.
After defrosting thoroughly clean the freezer interior, as well as interior accessories (see section: “Cleaning and Care”).
Cleaning and care
For hygienic reasons the appliance interior, including interior accessories, should be cleaned regularly.
Warning!
• The appliance may not be connected to the power supply whilst it is
being cleaned. Electric shock hazard! Before cleaning, pull out the
mains plug or switch off or disengage fuse.
• Never clean the appliance with a steam cleaner. Moisture could accumulate in electrical components, danger of electrical shock! Hot
vapours can lead to the damage of plastic parts.
• T ake care that no fluid enters the control panel on the handle or any
other electrical parts.
40
• The appliance must be dry before it is placed back into service.
Attention!
• Ethereal oils and organic solvents can attack plastic parts, e.g.
- Juice from lemon or orange peel;
– butyric acid;
– cleansers which contain acetic acid.
Do not bring such substances into contact with parts of the appliance.
• Do not use any abrasive cleansers.
Defrost the freezer compartment (see section: “Defrosting”).
Clean the appliance and the interior accessories with a cloth and luke-
warm water . Commercially available dish washing detergents may also
be used.
The recommended cleanser can be obtained from customer service
under article number 4006009-43/7.
Page 22

After cleaning wipe with fresh water and rub dry.
Attention! R einsert the plug of the defrost water outlet at the base of
the freezer after cleaning.
After everything is dry place appliance back into service.
Energy Saving Tips
• Do not install the appliance near cookers, radiators orother sources
of warmth. High ambient temperatures cause longer, more frequent
operation of the compressor.
• In order to guarantee sufficient ventilation, do not cover or obstruct
the sides and base of the appliance.
• Do not place warm foods into the appliance. Allow warm foods to
cool first.
• Do not leave the lid open any longer than necessary.
• Do not set the temperature colder than necessary.
• Place frozen goods into the refrigerator for thawing. Cold from fro-
zen goods is thus used for cooling in the refrigerator.
What to do if ...
Correcting Malfunctions
Perhaps a malfunction has been caused by a minor error, which you can
correct yourself with the help of the following instructions. Do not
attempt any further repairs if the following instructions do not help in
each specific case.
Warning! Refrigerators/freezers may only be repaired by trained personnel. Repairs carried out by untrained personnel can lead to substantial danger for the user. Please contact your dealer or our customer
service department for repairs.
41
Page 23

Malfunction
Possible cause
Remedy
The appliance is not
functioning, the green
power supply pilot light
is not illuminated.
W arning sound can be
heard, red light
flashes. The following
values can be seen on
the display: from -
o
12
C to 30oC.
The red warning light and
the yellow FROSTMATIC
display are flashing, the
compressor operates in
continuous operation.
The mains plug is not
plugged in.
The power supply has
been interrupted:
power cut in the supply
network, faulty fuse,
socket or another fault in
the household electrical
system.
Temperature controller
button in the „off” zone.
Too large a quantity of
warm products has been
put in the freezer.
The lid has been left open
for a long time.
Appliance malfunction.
Insert mains plug.
Mains malfunctions are
to be corrected by an
electrician.
Turn the button clockwise from the „off”
zone.
Please consult the
sectionon “Freezing”.
Only leave the lid open
for as long as is necessary.
Call the customer service department.
A small square can be
seen on the bottom
right or top right corner of the display, but
the device is functioning.
Replace light bulb
Fig. 15
How Change the bulb
Before changing the bulb, isolate the appliance from the electricity
supply. Unscrew the bulb, and replace it with a new bulb (max. 15W).
Then reconnect the electricity supply. Extra bulbs are available from
your local Zanussi Service Force Centre.
42
Device failure.
Call the service.
Page 24

Customer Serv ice
If you cannot find the remedy for a malfunction in these operating
instructions, please contact your dealer or our customer service department. Addresses and telephone numbers are listed in the accompanying booklet “Guarantee Conditions/Customer Service Locations”.
Selective ordering of replacement parts can save unnecessary travel
and costs. For this reason always provide the following appliance information:
• Model name
• Product number (E-No.)
• Manufacturing number (F-No.)
These specifications can be found on the serial plate an the inner side
of the lid. We recommend that you enter this information here, so that
it is handy if needed.
In the event of a problem, keep the freezer closed and inform the
customer service department of the nature of the malfunction.
Please note: Costs for unnecessarily calling out the customer service
team are borne by the customer even during the guarantee period.
Regulations, Standards, Guidelines
This appliance was designed for household use and was manufactured
in accordance with the appropriate standards.
During manufacturing, necessary measures were taken especially in
compliance with the law governing the safely of appliances (GSG), the
regulations for the prevention of accidents caused by refrigerating
equipment (VBG 20) and the regulations of the association of German
Electrical Engineers (VDE).
The refrigerant circuit has been checked for leaks.
This-appliance is in accordance with the following EU guidelines:
– 73/23/EEC of 19/2J 1973 - Low Voltage Directive
– 89/336/EEC of 3/5/1989
(including Modification Directive 92/31 /EEC) – EMC Directive
43
Page 25

Special accessories
Additional products can be purchased from your sales dealer as special
accessories:
• Lid lock (to be retrofitted)
Order no. 920 761 502
• Extra universal storage baskets
Order no. 920 761 503
The gross capacity of your freezer determines how many storage
baskets may be used to fill the freezer.
Model with Gross capacity Number of storage baskets when fully packed
162 litre 6
191 litre 7
227 litre 9
262 litre 10
333 litre 13
The gross capacity of your freezer can be found on the serial plate of
your chest freezer on the inner side of the lid.
Technical Terminology
• Refrigerant
Fluids which are used for refrigeration are called refrigerants. They
have a relatively low boiling point; so low , that the warmth of foods
in the refrigeration appliance can cause them to boil or vaporise.
• Refrigerant circuit
Sealed circulation system, in which the is found. The refrigerant
circuit consists for the most part of an evaporator, a compressor, a
condenser and tubing.
• Evaporator
44
Page 26

The refrigerant is evaporated in the evaporator. Like all fluids, refrigerants require warmth in order to be evaporated. Like all fluids,
refrigerants require warmth in order to be evaporated. This is why
the evaporator is located inside the freezer or directly behind the
interior walls and as a result is not visible.
• Compressor
The compressor looks like a small bin. It is powered by a built-in
electric motor. It is the task of the compressor to withdraw vaporous refrigerant from the evaporator, to compress it and feed it to
the condenser.
• Condenser
The refrigerant which has been compressed by the compressor, is
liquefied in the condenser. Thus warmth is released, which is given
off into the surrounding air at the surface of the condenser. The
condenser is therefore attached to the outside of the appliance or
directly behind the exterior sides and is thus not visible.
45
 Loading...