

Page 1
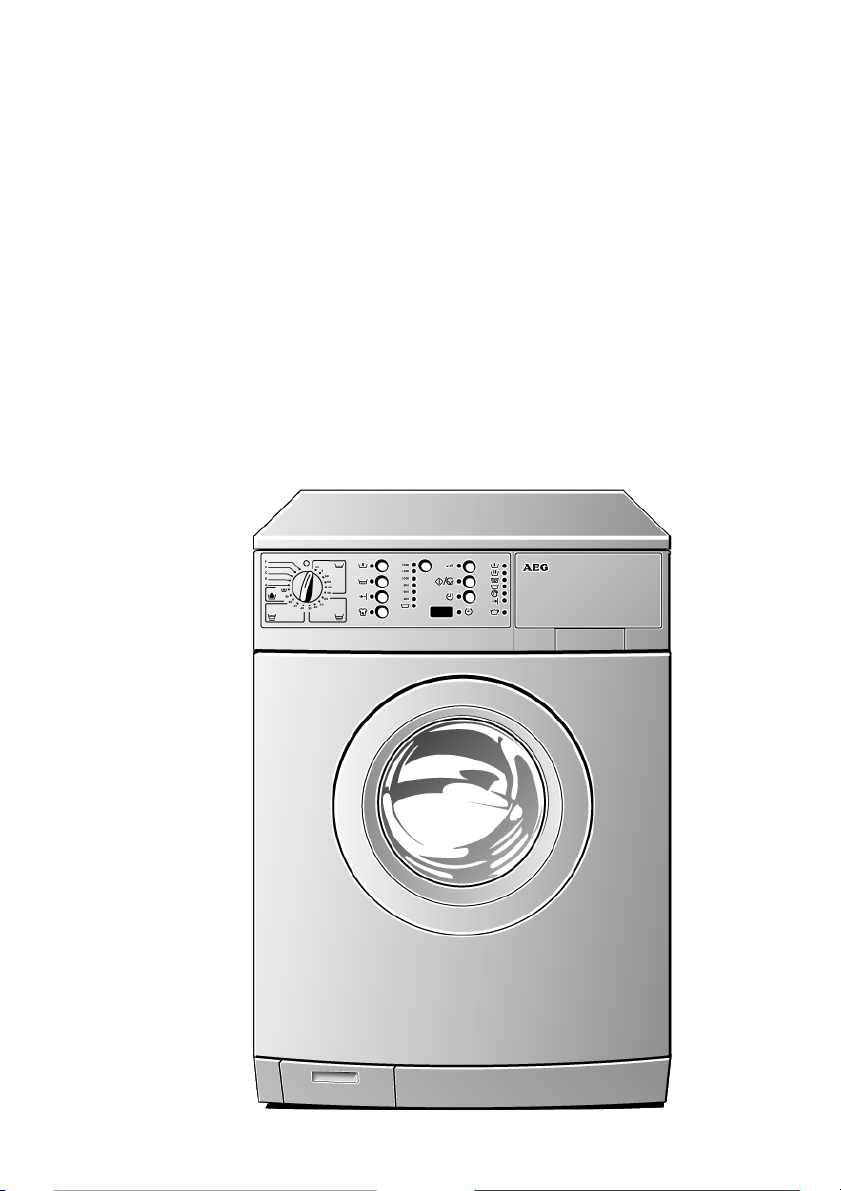
ÖKO-LAVAMAT 86720 update
The environmentally friendly washing machine
User Instructions
Page 2

Dear customer,
g
Please read these user instructions carefully.
Above all, observe the "Safety" section in the first pages. Keep these
user instructions in a safe place for future reference. Please pass them
along to future owners of the appliance.
Important information concerning your safety and proper functioning
1
of the appliance is highlighted with the warning triangle or the signal
words (Warning!, Caution!, Attention!). Please observe carefully.
0 1. This symbol guides you step by step when operating the appliance.
2. ...
3. ...
Next to this symbol you receive additional information and practical
3
tips on using the appliance.
Tips and information about the economical and environmentally
2
friendly use of the machine are marked with the clover.
These user instructions include tips for the correction of possible malfunctions by the user. See the section "What to do when...".
Our customer service department is at your disposal should technical
problems occur. See also the "Service" section.
Printed on paper manufactured with environmentally sound processes.
He who thinks ecolo
2
ically acts accordingly ...
Page 3

Contents
CONTENTS
Operating instructions . . . . . . . . . . . . . . . . . . . . . . . . . . . . . . . . . . . . 6
Safety . . . . . . . . . . . . . . . . . . . . . . . . . . . . . . . . . . . . . . . . . . . . . . . . . . . . . . . . 6
Disposal . . . . . . . . . . . . . . . . . . . . . . . . . . . . . . . . . . . . . . . . . . . . . . . . . . . . . . 8
Environmental protection tips . . . . . . . . . . . . . . . . . . . . . . . . . . . . . . . . . . 9
Description of the appliance . . . . . . . . . . . . . . . . . . . . . . . . . . . . . . . . . . . . 10
Front view . . . . . . . . . . . . . . . . . . . . . . . . . . . . . . . . . . . . . . . . . . . . . . . . . . . . . 10
Drawer for detergent and conditioner . . . . . . . . . . . . . . . . . . . . . . . . . . . . . 10
Control panel . . . . . . . . . . . . . . . . . . . . . . . . . . . . . . . . . . . . . . . . . . . . . . . . . . 11
Program selector . . . . . . . . . . . . . . . . . . . . . . . . . . . . . . . . . . . . . . . . . . . . 11
Additional program buttons . . . . . . . . . . . . . . . . . . . . . . . . . . . . . . . . . . . 12
Consumption data and required time . . . . . . . . . . . . . . . . . . . . . . . . . . . . 13
What does "update" mean? . . . . . . . . . . . . . . . . . . . . . . . . . . . . . . . . . . . . . 13
Before washing the first time . . . . . . . . . . . . . . . . . . . . . . . . . . . . . . . . . . . 14
Prepare washing cycle . . . . . . . . . . . . . . . . . . . . . . . . . . . . . . . . . . . . . . . . . . 14
Sort washing and prepare . . . . . . . . . . . . . . . . . . . . . . . . . . . . . . . . . . . . . . . . 14
Washing types and care symbols . . . . . . . . . . . . . . . . . . . . . . . . . . . . . . . . . . 15
Detergent and conditioner . . . . . . . . . . . . . . . . . . . . . . . . . . . . . . . . . . . . . . . 16
Which detergent and conditioner? . . . . . . . . . . . . . . . . . . . . . . . . . . . . . 16
How much detergent and conditioner? . . . . . . . . . . . . . . . . . . . . . . . . . 16
Use of water softener . . . . . . . . . . . . . . . . . . . . . . . . . . . . . . . . . . . . . . . . . . . 16
Execute a washing cycle . . . . . . . . . . . . . . . . . . . . . . . . . . . . . . . . . . . . . . . . 17
Brief instructions . . . . . . . . . . . . . . . . . . . . . . . . . . . . . . . . . . . . . . . . . . . . . . . 17
Set the washing program . . . . . . . . . . . . . . . . . . . . . . . . . . . . . . . . . . . . . . . . 17
Change spin speed/select rinse hold . . . . . . . . . . . . . . . . . . . . . . . . . . . . . . . 18
Set delay time . . . . . . . . . . . . . . . . . . . . . . . . . . . . . . . . . . . . . . . . . . . . . . . . . 18
Open and close fill-in door . . . . . . . . . . . . . . . . . . . . . . . . . . . . . . . . . . . . . . . 19
Fill-in the laundry . . . . . . . . . . . . . . . . . . . . . . . . . . . . . . . . . . . . . . . . . . . . . . 19
Add detergent/conditioner . . . . . . . . . . . . . . . . . . . . . . . . . . . . . . . . . . . . . . 20
Start washing program . . . . . . . . . . . . . . . . . . . . . . . . . . . . . . . . . . . . . . . . . . 21
Washing program sequence . . . . . . . . . . . . . . . . . . . . . . . . . . . . . . . . . . . . . . 22
If washing cycle is completed/remove the washing . . . . . . . . . . . . . . . . . . 23
3
Page 4

Contents
Program tables . . . . . . . . . . . . . . . . . . . . . . . . . . . . . . . . . . . . . . . . . . . . . . . . 24
Washing . . . . . . . . . . . . . . . . . . . . . . . . . . . . . . . . . . . . . . . . . . . . . . . . . . . . . . 24
Separate Softening/Starching/Conditioning . . . . . . . . . . . . . . . . . . . . . . . 26
Separate Rinsing . . . . . . . . . . . . . . . . . . . . . . . . . . . . . . . . . . . . . . . . . . . . . . . 26
Separate Spinning . . . . . . . . . . . . . . . . . . . . . . . . . . . . . . . . . . . . . . . . . . . . . . 26
Cleaning and caring (for your appliance) . . . . . . . . . . . . . . . . . . . . . . . . . 27
Control panel . . . . . . . . . . . . . . . . . . . . . . . . . . . . . . . . . . . . . . . . . . . . . . . . . . 27
Detergent drawer . . . . . . . . . . . . . . . . . . . . . . . . . . . . . . . . . . . . . . . . . . . . . . . 27
Washing drum . . . . . . . . . . . . . . . . . . . . . . . . . . . . . . . . . . . . . . . . . . . . . . . . . 28
Fill-in door . . . . . . . . . . . . . . . . . . . . . . . . . . . . . . . . . . . . . . . . . . . . . . . . . . . . 28
What to do when… . . . . . . . . . . . . . . . . . . . . . . . . . . . . . . . . . . . . . . . . . . . . 29
Trouble Shooting . . . . . . . . . . . . . . . . . . . . . . . . . . . . . . . . . . . . . . . . . . . . . . . 29
If the washing results are not satisfactory . . . . . . . . . . . . . . . . . . . . . . . . . . 32
Perform emergency drain . . . . . . . . . . . . . . . . . . . . . . . . . . . . . . . . . . . . . . . . 33
Clean the circulating pump . . . . . . . . . . . . . . . . . . . . . . . . . . . . . . . . . . . . . . 34
Emergency release for fill-in door . . . . . . . . . . . . . . . . . . . . . . . . . . . . . . . . . 35
Additional rinse and/or water cooling . . . . . . . . . . . . . . . . . . . . . . . . . . . . . . 35
Program protection . . . . . . . . . . . . . . . . . . . . . . . . . . . . . . . . . . . . . . . . . . . . 38
Installation and Connection Instructions . . . . . . . . . . . . . . . . 39
Installation Safety Precautions . . . . . . . . . . . . . . . . . . . . . . . . . . . . . . . . . . 39
Dimensions of the appliance . . . . . . . . . . . . . . . . . . . . . . . . . . . . . . . . . . . . 40
Front and Side Views . . . . . . . . . . . . . . . . . . . . . . . . . . . . . . . . . . . . . . . . . . . . 40
Rear View . . . . . . . . . . . . . . . . . . . . . . . . . . . . . . . . . . . . . . . . . . . . . . . . . . . . . 40
Installation of the appliance . . . . . . . . . . . . . . . . . . . . . . . . . . . . . . . . . . . . 41
Transporting the appliance . . . . . . . . . . . . . . . . . . . . . . . . . . . . . . . . . . . . . . . 41
Remove transportation protection . . . . . . . . . . . . . . . . . . . . . . . . . . . . . . . . 41
Prepare the installation place . . . . . . . . . . . . . . . . . . . . . . . . . . . . . . . . . . . . 42
Installation on a concrete base . . . . . . . . . . . . . . . . . . . . . . . . . . . . . . . . 43
Installation on vibrating floors . . . . . . . . . . . . . . . . . . . . . . . . . . . . . . . . . 43
Levelling on uneven floors . . . . . . . . . . . . . . . . . . . . . . . . . . . . . . . . . . . . . . . 43
4
Page 5

Contents
Power supply . . . . . . . . . . . . . . . . . . . . . . . . . . . . . . . . . . . . . . . . . . . . . . . . . . 44
Water connection . . . . . . . . . . . . . . . . . . . . . . . . . . . . . . . . . . . . . . . . . . . . . 45
Permissible water pressure . . . . . . . . . . . . . . . . . . . . . . . . . . . . . . . . . . . . . . . 45
Water feed . . . . . . . . . . . . . . . . . . . . . . . . . . . . . . . . . . . . . . . . . . . . . . . . . . . . 46
Water drain-off . . . . . . . . . . . . . . . . . . . . . . . . . . . . . . . . . . . . . . . . . . . . . . . . 47
Delivery head above 1m . . . . . . . . . . . . . . . . . . . . . . . . . . . . . . . . . . . . . . . . . 47
Technical data . . . . . . . . . . . . . . . . . . . . . . . . . . . . . . . . . . . . . . . . . . . . . . . . 48
Customer Service/Warranty . . . . . . . . . . . . . . . . . . . . . . . . . . . . . . 49
Further Customer Service Centres . . . . . . . . . . . . . . . . . . . . . . . 51
Index . . . . . . . . . . . . . . . . . . . . . . . . . . . . . . . . . . . . . . . . . . . . . . . . . . . . . . . . 54
Service . . . . . . . . . . . . . . . . . . . . . . . . . . . . . . . . . . . . . . . . . . . . . . . . . . . . . . 55
5
Page 6

Operating instructions
OPERATING INSTRUCTIONS
1 Safety
The safety standards of AEG electric appliances are in keeping with the
recognised rules of technology and the law governing the safety of
appliances. Nevertheless as a manufacturer we are committed to familiarise you with the following safety instructions:
Prior to initial start-up
• Observe the "Installation and Connection Instructions" below in
these user instructions.
• If the appliance is delivered during the winter and temperatures are
below freezing, allow the appliance to stand at room temperature for
24 hours before operation
Intended use
• The washing machine is intended exclusively for the washing of normal household washing in the home. If the appliance is used for purposes other than those intended, or if it is improperly operated, the
manufacturer can assume no liability for damages which may occur.
• Additions or modifications to the washing machine are strictly forbidden due to safety reasons.
• Use only those detergents which are suitable for the washing
machine. Observe instructions provided by the detergent manufacturer.
• Laundry to be washed may not contain any flammable solvents. This
must also be taken into consideration when washing pre-washed
laundry.
• Do not use the washing machine for dry-cleaning.
• Dyes and bleaches may only be used in the washing machine if such
use has been expressly endorsed by the manufacturer of these products. We can assume no liability for damages which may occur.
• Use tap water only. Rain water and industrial water may only be used
if they fulfil requirements in accordance with DIN1986 and DIN1988.
• Damage due to frost is not covered by the guarantee! If the washing
machine is located in a room in which below freezing temperatures
might occur, emergency draining must be carried out if danger of
freezing occurs (see "Emergency Draining"). Furthermore, the inlet
hose must be disconnected from the tap and laid on the floor.
6
Page 7

Operating instructions
Safety of children
• Packaging materials (e.g. sheet and Styrofoam) can be dangerous for
children. Danger of asphyxiation! Keep packaging materials at a safe
distance from children.
• Children are often unable to recognise the dangers involved with
electrical appliances. Provide for proper supervision during operation,
and do not allow children to play with the washing machine – the
danger exists that a child might lock itself into the appliance.
• Make certain that children or small animals do not climb into the
drum of the washing machine.
• If the washing machine needs to be disposed of, remove the mains
plug, destroy the door lock, cut off the electrical cable and dispose of
the plug and remaining cable separately. In this way children are prevented from locking themselves in and are not exposed life threatening danger.
General safety
• Repairs to the washing machine may only be carried out by trained
personnel. Improper repairs can lead to extreme danger. If repairs are
required, contact our customer service department or your authorised dealer.
• Never place the washing machine into operation if the power cable is
damaged or the control panel, the countertop or the base are damaged to such an extent that the inside of the machine is accessible.
• Switch off the washing machine before cleaning, maintenance and
servicing. In addition, pull out the mains plug or – in the case of permanent connection – pull the circuit breaker, or completely remove
screw type fuses.
• Never remove the mains plug by pulling on the cable. Always grip the
plug.
• Octopus plugs, couplings and extension cables may not be used. Danger of overheating!
• Do not clean the washing machine with a jet stream of water. Danger
of electrical shock!
• When high temperature washing programs are selected, the glass in
the fill-in door becomes hot. Do not touch!
7
Page 8

Operating instructions
• Allow the wash-water to cool before emergency draining of the
appliance, cleaning of the circulation pump or emergency opening of
the door.
• Small animals may gnaw at electrical power cables and water hoses.
Danger of electrical shock and water damage! Keep small animals
away from the washing machine.
2 Disposal
Dispose of the packaging!
Dispose of washing machine packaging materials properly. All packaging materials are environmentally sound and can be safely disposed of,
or burned in a refuse incineration plant.
The plastic parts can be reused:
• The external plastic cover and the bags inside are made of polyethylene (marking >PE<).
• The padding is made of CFC free expanded polystyrene
(marking >PS<).
Corrugated components are made from recycled paper and should be
disposed of at a paper recycling station.
Dispose of your old appliance!
If, at some point in time, the service life of the appliance has expired,
please take it to your nearest recycling centre, or to your appliance
dealer, who will accept the old appliance for a minimal fee.
8
Page 9

Operating instructions
2 Environmental protection tips
• No pre-wash is required for normally soiled washing. This saves you
detergent, water and time (and is good for the environment!).
• If the indicated load capacities are taken full advantage of, the washing machine is especially efficient.
• For small loads, use only one half to one third of the recommended
detergent quantity.
• Stains and soiling confined to given areas can be removed by means
of appropriate pre-treatment. You can then wash at lower temperatures.
• Wash lightly to medium soiled cottons with the energy saving program.
• Softeners are often not required. Try it! If you use a dryer, your washing will be soft and fluffy, even without softeners.
• A water softener should be used for water within a hardness range of
mid to high (as of hardness level II, see "Detergents and Conditioners").
Detergent can then always be dosed for water hardness level I
(= soft).
9
Page 10
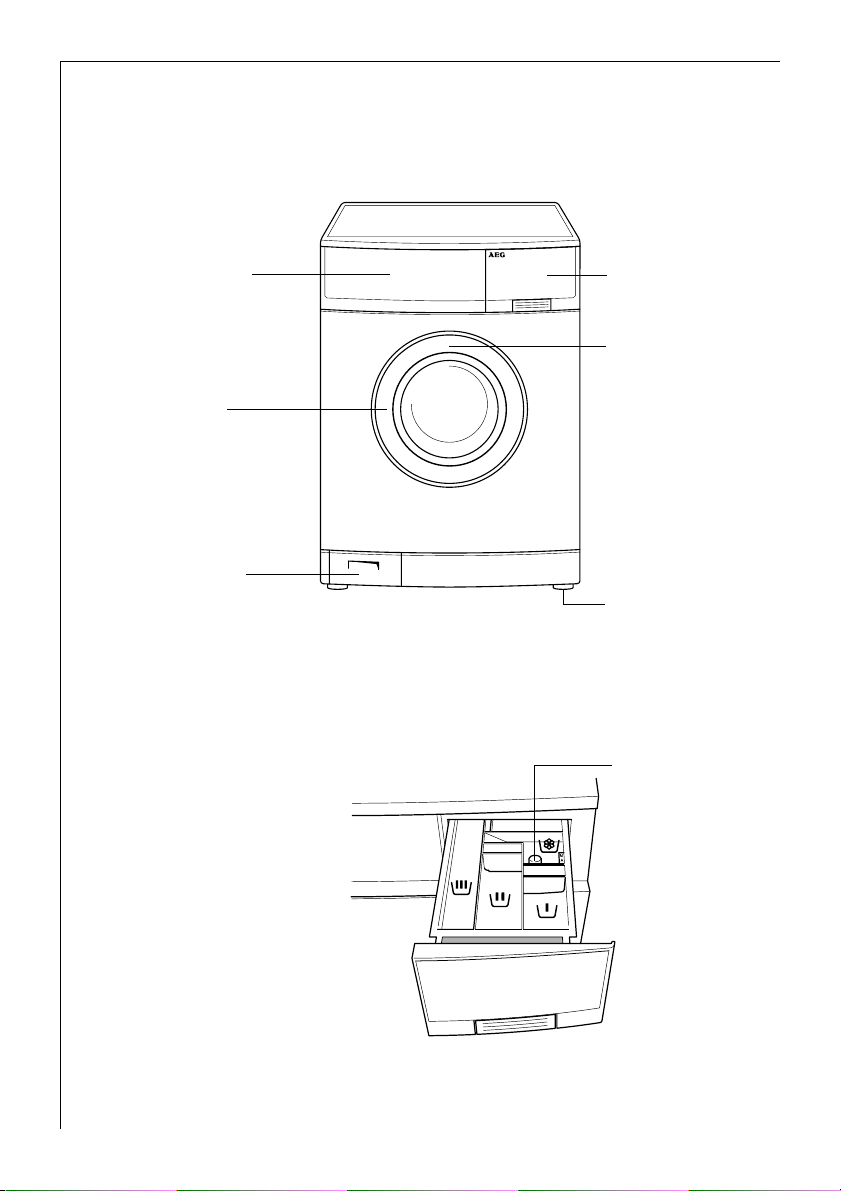
Operating instructions
Description of the appliance
Front view
Control panel
Fill-in door
Flap in front of
circulation
pump
Drawer for
detergent and
softener
Identication plate
(behind door)
Threaded feet
(height adjustable);
right rear:
automatically
adjusted foot
Drawer for detergent and conditioner
k Conditioner/softener
or water softener
l Primary detergent
(powder) and water
softener if required
m stain remover
w Liquid conditioner
(softener, finisher,
starch)
10
Siphon cap
(must be securely
in place)
Page 11
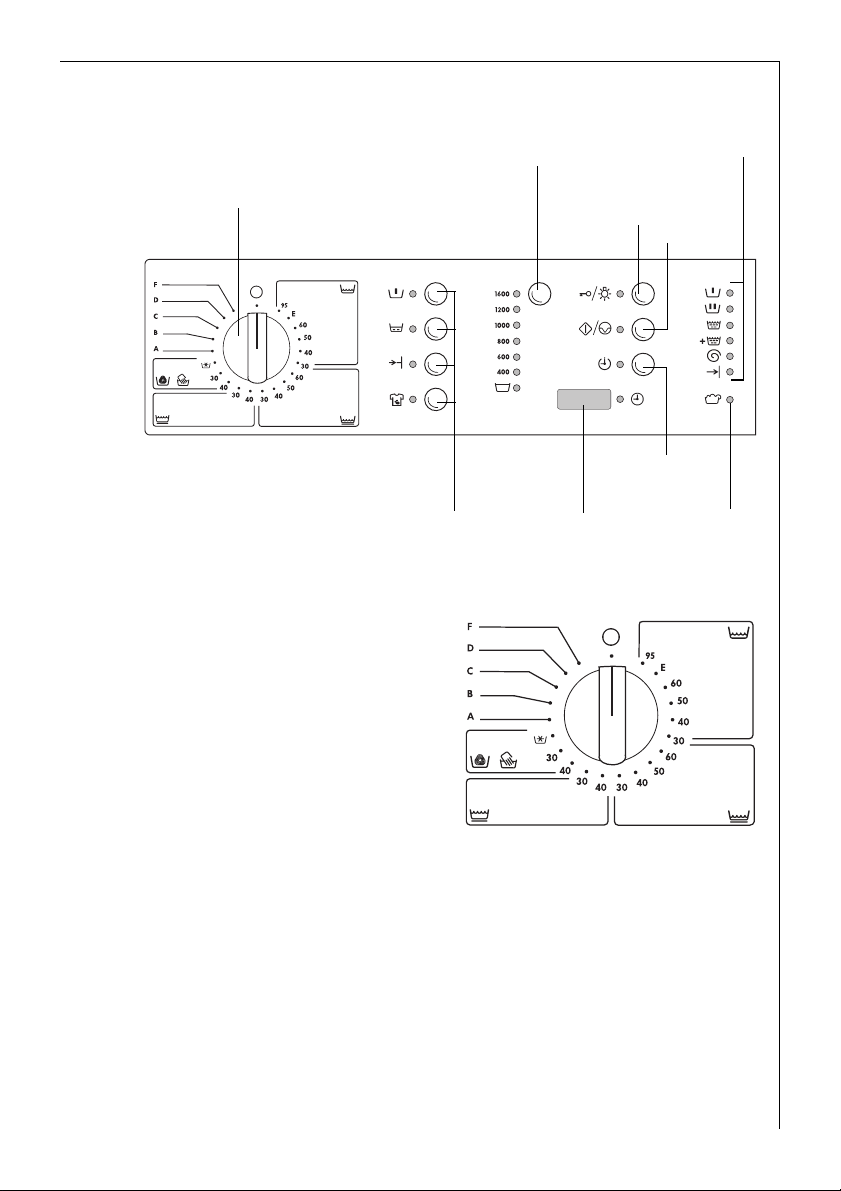
Control panel
S
P
pin/RINSE HOLD
button
Operating instructions
rogram progress
display
Program selector
Additional program buttons
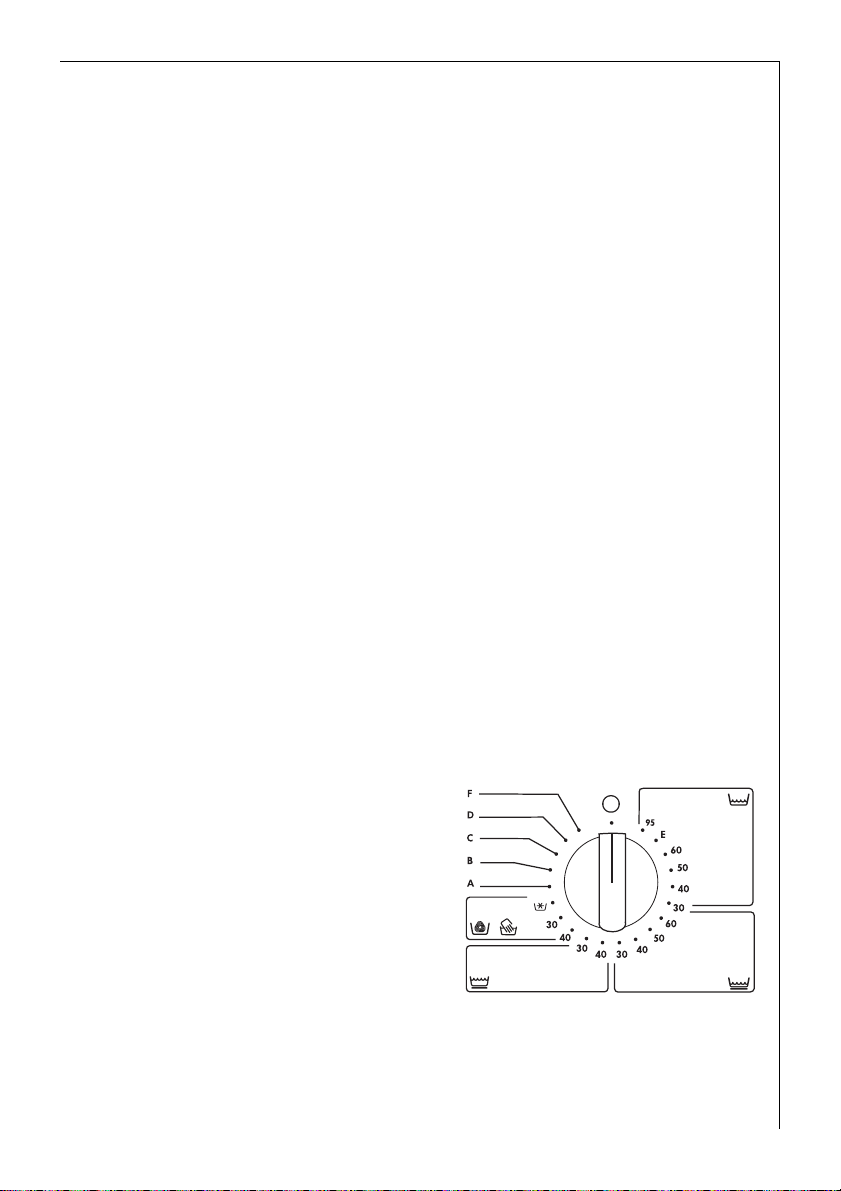
Program selector
The program selector defines the
nature of the washing cycle (e.g.
water level, drum movement,
number of rinses, spin speed) to
suit the type of washing, as well as
the wash temperature.
DOOR/LIGHT
button
Multidisplay
START/
PAUSE
button
DELAY TIMER
button
OVERDOSING
indicator
I (OFF)
Switches the washing machine off,
the machine is switched on in all
other positions.
t (COTTONS/ LINEN)
Main washing cycle for cottons/linen at 30 °Cto 95 °C.
Position E: Energy saving program at approx. 67 °C for lightly to nor-
2
mally soiled cotton washing, extended washing time. Cannot be combined with < (QUICK WASH) and ä (STAIN).
} (EASY-CARES)
Main washing cycle for easy-care textiles at 30 °C to 60 °C.
11
Page 12
Operating instructions
à (DELICATES)
Main washing cycle for delicates at 30 °C or 40 °C.
s P (WOOL/HAND WASHABLES)
Main washing cycle (r/cold to 40 °C) for machine washable wool as
well as for hand washable woollen fabrics and silk with the care symbol
ï (Hand Washing).
A (GENTLE RINSE)
Separate gentle rinse, e.g. for rinsing hand washed textiles (2 rinse
cycles and short spin).
B (STARCH.)
Separate starching, separate softening, separate conditioning of wet
washing (1 rinse, liquid conditioner is washed in from the compartment
w, and spinning).
C (PUMP OUT)
Pumping out the water after a rinse hold (without spinning).
D (SPIN)
Pump out the water at the end of a rinse or a spin, or a separate spin of
hand washed cotton-/linen.
F (SHORT SPIN)
Pump out the water at the end of a rinse and short spin, (easy-care
washing, delicates, wool).
12
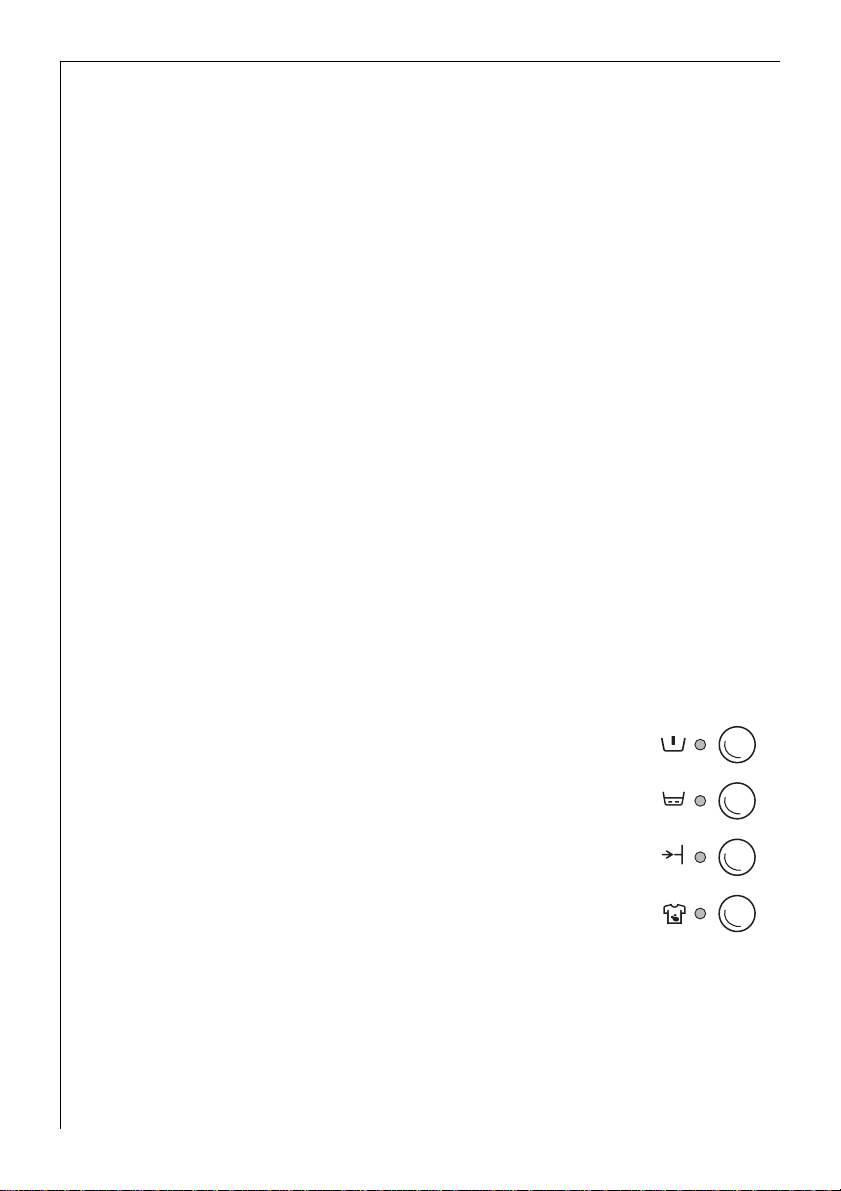
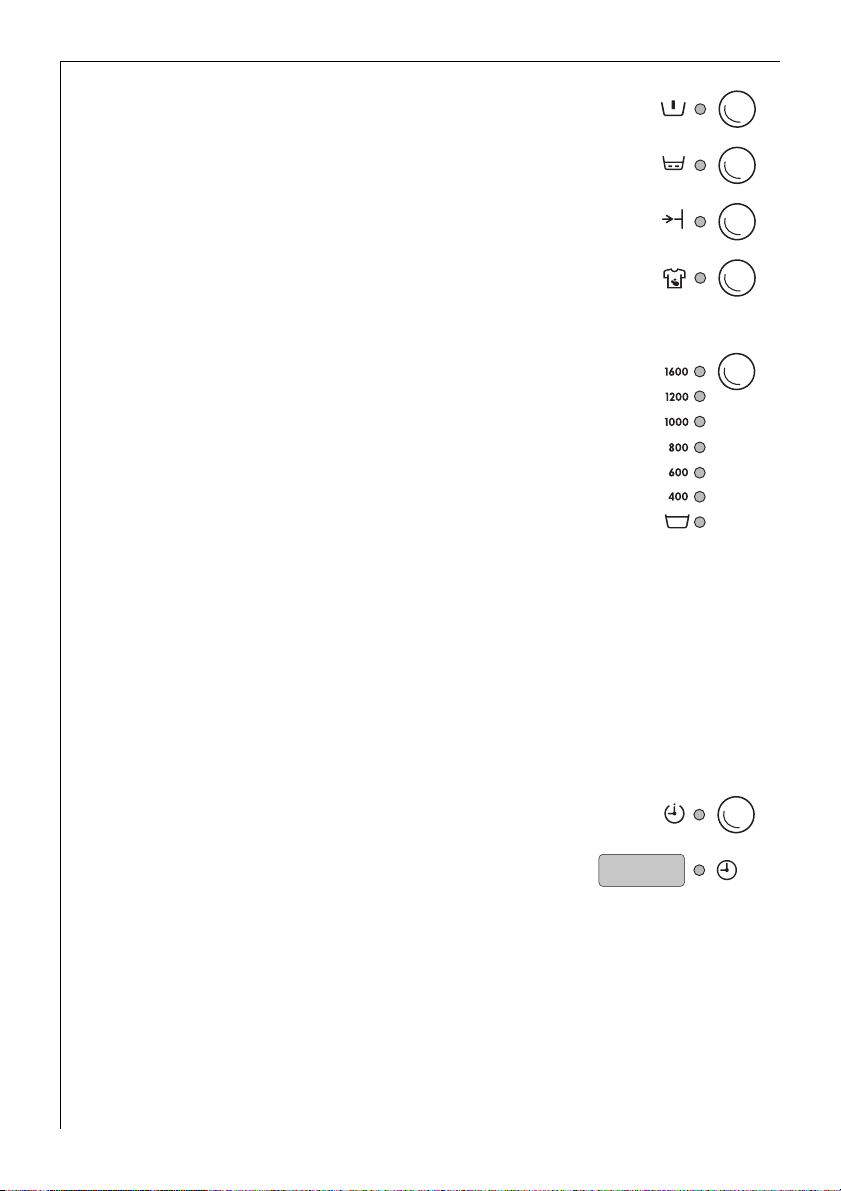
Additional program buttons
The additional program buttons are used to adapt
the washing program to suit the degree of soiling of
the washing. Additional programs are not required
for normally soiled washing.
The different functions can be combined together
depending on the program.
k (PRE WASH)
Cold pre-wash prior to subsequent, automatic main
washing cycle.
q (SOAKING)
Approx. 1 hour at 40 °C. Can be extended using the b (DELAY TIMER)
button up to a maximum of 19 hours. Tha main washing program then
follows.
Page 13
Operating instructions
< (QUICK WASH)
Shortened main washing cycle for lightly soiled washing.
ä (STAIN)
For the treatment of extremely soiled washing or stained washing with
stain remover.
When the setting s/P (WOOL/HAND WASH) is chosen, the additional
3
programs cannot be selected (any buttons pressed do not have any
effect).
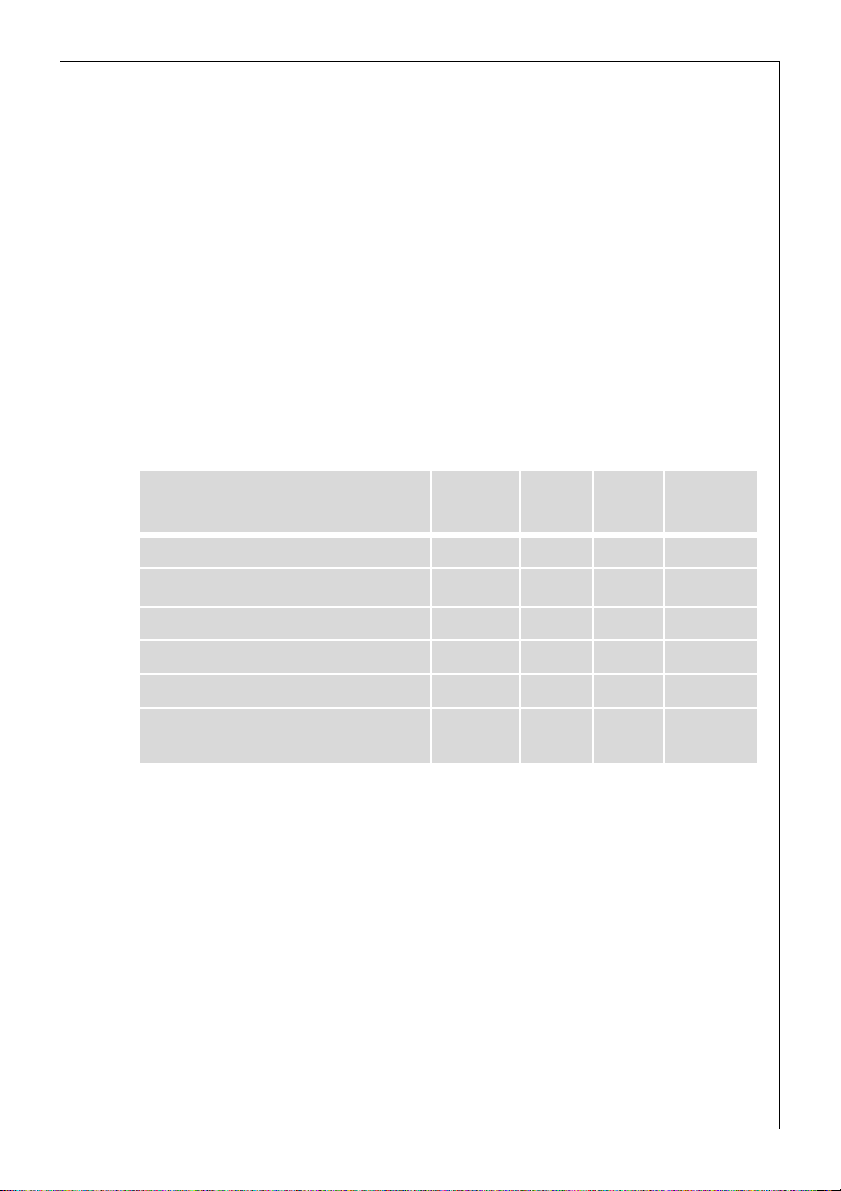
Consumption data and required time
The values given in the following table for selected programmes were
calculated under standard conditions. They provide a useful guide for
operation in the home.
Program Selector/ Temperature
t (COTTONS/LINEN) 95 5 39 1.65 133
t (COTTONS/ LINEN) 60
t (COTTONS/LINEN) 40 5 39 0.55 11 3
} (EASY-CARES) 40 2.5 42 0.42 84
à (DELICATES) 30 2.5 49 0.40 64
s/P (WOOL/HAND-WASHABLES)
30
1) Note: program selection for testing per EN 60 456
1
Fill weight
in kg
5 39 0.89 11 9
2 39 0.20 36
Water
in litre
Energy
in kWh
What does "update" mean?
New fabrics or new detergents could, in the future, require a new
washing technique (e. g. an additional rinse, more water to wash in the
detergent, ...).
Your washing machine is prepared for this eventuality. The controller is
fully electronic. The software in which the controller is defined can be
re-programmed.
If a new state of the art is achieved in washing technology, you can
bring your washing machine up to the latest standard with an update.
Time
in minutes
13
Page 14

Operating instructions
For more information concerning updates, please contact customer
service. Customer service can also inform you of the costs involved in
an update.
Before washing the first time
0 1. Pull the detergent drawer a short distance out of the control panel.
2. Pour about 1 litre of water through the detergent drawer and into the
washing machine. This is required in order to seal the wash-water container so that the ECO valve can function properly.
3. Run a washing cycle without any washing (t/COTTONS 95, with
detergent quantity cut in half).
This serves to remove residues resulting from production of the appliance from the drum and the wash-water container.
Prepare washing cycle
Sort washing and prepare
• Sort washing according to care symbol and type (see "Washing types
and care symbols").
• Empty all pockets.
• Remove metal objects (paper clips, safety pins etc.).
• In order to prevent bunching up of washing and damage to washing,
close zippers, button up duvets and pillow cases, and tie up loose
ends from, for example, aprons.
• Turn articles with double layered textiles inside out (sleeping bags,
anoraks etc.).
• Coloured, knitted fabrics, as well as wool and textiles with appliqués
should be turned inside out.
• Place small and delicate articles (baby booties, stockings, bras etc.)
into a washing net, a pillow case with zipper, or in large socks before
washing.
• Treat net curtains particularly carefully. Remove metal curtain rail
rollers or burred plastic rollers, or wrap these in a net or bag.
We cannot accept any liability for damage.
• Do not wash coloured and white washing together. White washing
will otherwise turn grey.
14
Page 15

Operating instructions
• New, coloured washing often contains excessive dye. Wash these
items separately the first time.
• Mix small and large articles of washing! This improves washing effi-
ciency, and the washing is more favourably distributed during the
spin cycle.
• Fluff washing before placing into the washing machine.
• Do not place folded washing into the drum.
• Observe tips for proper care such as "wash separately" and "wash sep-
arately several times"!
Washing types and care symbols
Care symbols assist in the selection of the correct washing program.
Washing should be sorted according to type and care symbol. The temperatures indicated in the care symbols are maximum temperatures.
Cottons ç
Textiles made from cotton and linen which bear this care symbol are
insensitive to mechanical stress and high temperatures. The
t (COTTONS/LINEN) program is appropriate for this type of washing.
Linen èë
Textiles made from cotton and linen which bear these care symbols are
insensitive to mechanical stress. The t (COTTONS/LINEN) program is
appropriate for this type of washing.
Easy-care washing êíî
Fabrics such as treated cottons, cotton mixtures and synthetics with
this care symbol need to be handled carefully in machines. The
} (EASY-CARES) program is suitable for this type of washing.
Delicates ì
Fabrics such as those with layered fibres, micro-fibres, as well as synthetics and net curtains with this care symbol require particularly careful
handling. The à (DELICATES) program is suitable for this type of
washing.
Wool and particularly delicate washing 9 ìï
Textiles such as wool, wool mixtures and silk which bear these care
symbols are especially sensitive to mechanical stress. The
s/P (WOOL/HAND WASHABLES) program is appropriate for this type
of washing.
Important! Fabrics with this care symbol ñ (Do Not Wash!) must not
be washed in the washing machine!
15
Page 16

Operating instructions
Detergent and conditioner
Which detergent and conditioner?
Use only detergents and conditioners which are suitable for use in
washing machines. Always observe the manufacturer’s instructions.
How much detergent and conditioner?
The required quantity depends upon:
• the amount of washing
If the detergent manufacturer does not include dosing instructions for
2
reduced loads, use one third less for half loads and only half of the full
load detergent quantity for very small loads.
• extent of soiling of the washing
• hardness of tap water
Observe instructions for use and dosing provided by the detergent and
conditioner manufacturer.
Use of water softener
A water softener should be used for mid to high water hardness (as of
water hardness level II). Observe manufacturer’s instructions! Always
dose detergent for water hardness level I (= soft). Your local water
works can provide you with information concerning water hardness.
16
Due to the fact that the water softener is added before the primary
2
detergent (pre-softening of water), only eighty percent of the quantity
of water softener indicated on the package is required.
Information on water hardness
Water Hardness
I – soft 0 – 7 to 1.3
II – middle-hard 7 – 14 1.3 – 2.5
III – hard 14 – 21 2.5 – 3.8
IV – very hard greater than 21 greater than 3.8
Water hardness in °dH
(German hardness scale)
Water hardness in mmol/l
(millimol per litre)
Page 17
Operating instructions
Execute a washing cycle
Brief instructions
A washing cycle proceeds in the following steps:
0 1. Set the correct washing program:
– select the program and the temperature with the program selector
– select additional program(s) if required
2. If necessary change the spin speed/o select (RINSE STOP).
] (DELAY TIMER) if necessary.
3. Set
4. Open fill-in door, insert washing.
5. Close the fill-in door.
6. Add detergent/conditioner.
7. Start washing program.
After the washing program runs out:
Attention! If the washing cycle is completed at the end of a rinse, run
a C (PUMP OUT), D (SPIN) or F (SHORT SPIN) cycle before opening the
fill-in door.
8. Open the fill-in door and remove the washing.
9. Switch off the washing machine: set program selector to I (OFF).
Set the washing program
See "Program Tables" for suitable program, correct temperature and
3
possible additional programs for various types of washing.
0 1. Set program selector to the
desired program with the desired
temperature.
The anticipated duration of the
selected program appears in the
multi-display in minutes.
17
Page 18
Operating instructions
2. If necessary select additional program(s):
The indicators for the additional programs selected
illuminate.
– To change the selection press another button.
– To cancel a selection, press the button again.
Change spin speed/select rinse hold
0 If necessary change the spin speed for the final
spin/select rinse hold:
keep pressing the spin/o (RINSE HOLD) button
until the desired spin speed (or o/RINSE HOLD)
is displayed.
If o (RINSE HOLD) is chosen, the washing is
left in the last rinse water, it is not spun.
If the spin cycle speed is not changed, the final
3
spin is automatically adapted to the washing program:
– t (COTTONS/LINEN) 1600 r.p.m.
– } (EASY-CARES) 1200 r.p.m.
– Ã (DELICATES) 1200 r.p.m.
– s/P (WOOL/HAND WASHABLES) 1200 r.p.m.
The speed for the intermediate spin is dependent on the program
selected and cannot be changed.
Set delay time
0 If necessary set the delay timer:
keep pressing the b (DELAY TIMER) button
until the desired time delay is displayed in
the multidisplay, in the form 12h for a delay
to the start of the program of 12 hours.
If 19h is displayed and you press the button
again, the wash time for the washing program set appears (displayed
without h!). In this condition the delay timer is not set.
When the q (SOAKING) button is pressed, the delay timer defines the
soaking period. (Without the delay timer the soaking period is approx.
1hour.)
18
Page 19

Operating instructions
Open and close fill-in door
0 Open: press the K/W DOOR/LIGHT button.
The door springs open.
0 Close: Press the fill-in door tightly closed.
When the appliance is switched on, the K/W (DOOR/LIGHT) indicator
indicates whether the door can be opened:
– Green: Door can be opened (unless program protection is activated,
see also "Program Protection").
– Off: Door cannot be opened at the moment.
– Red: Door is open.
When the door is open the drum is illuminated. The lighting is auto-
3
matically extinguished after approx. 3 minutes.
Fill-in the laundry
See "Program Tables" for maximum loads.
3
For instructions concerning proper preparation of washing see
"Washing types and care symbols".
0 1. Sort and prepare washing according to type.
2. Open door: Press the K/W (DOOR/LIGHT) button. The door pops open.
3. Fill the washing.
Attention! Do not trap any washing when closing the door! The fabrics
and the machine could be damaged!
4. Close the door firmly.
19
Page 20
Operating instructions
Add detergent/conditioner
For instructions concerning detergents and conditioners see
3
"Detergents and Conditioners".
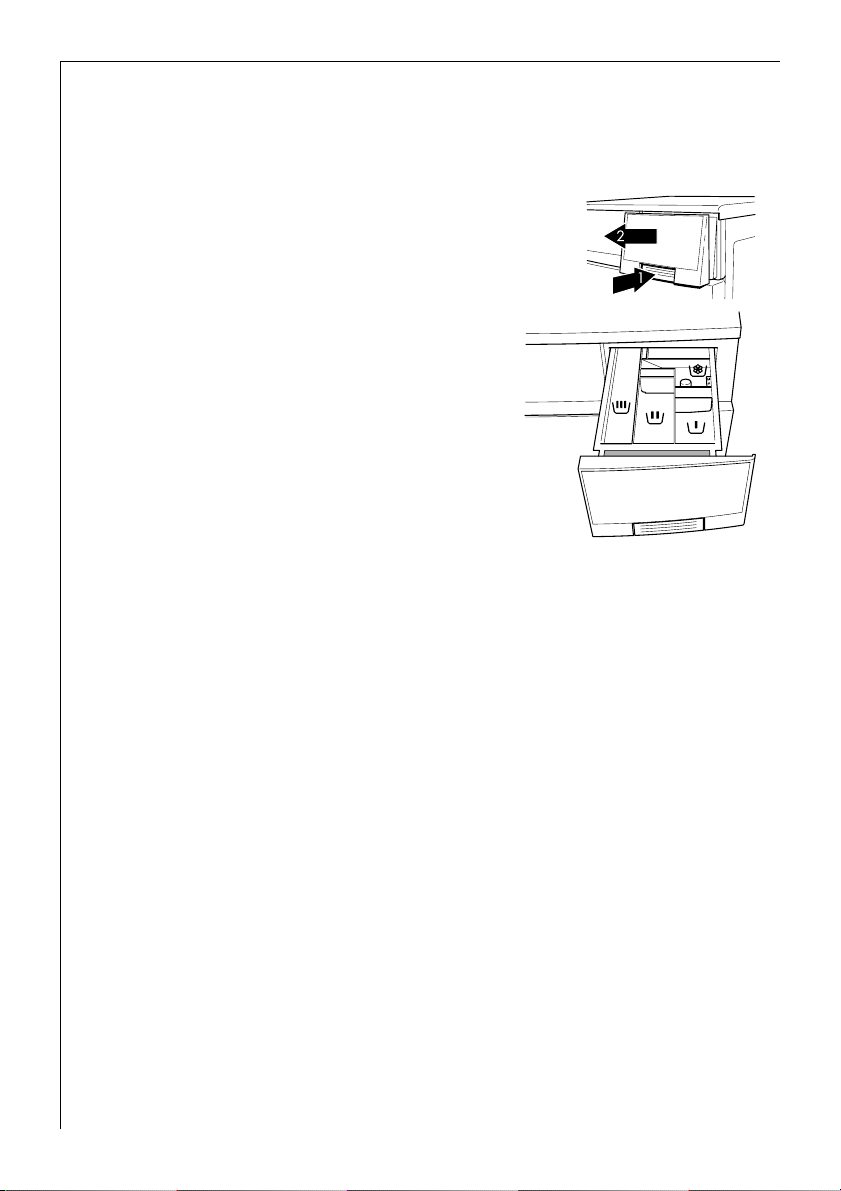
0 1. Open drawer: press in the flap on the
drawer so as to be able to grasp the handle
(1), pull out the drawer (2).
2. Add detergent/conditioner.
k
l
m
w
Pre wash detergent/detergent for soaking
(for additional programs PRE WASH/
SOAKING), or water softener.
Powder detergent
(if you use a water softener and need compartment k for the pre-wash/softener,
add the water softener to the detergent in
compartment l.)
Stain remover
(only with additional program STAIN)
Liquid conditioner (softener, finisher, starch)
Attention! Fill the compartment at the most up to the MAX mark.
Thick liquid detergents are eventually diluted up to the MAX mark,
powdered starch is dissolved.
3. Push in the drawer all the way.
When using liquid detergents:
Add liquid detergent with dosing containers provided by the detergent
manufacturer. Observe instructions on detergent package.
20
Page 21

Operating instructions
Start washing program
0 1. Check whether the water tap is opened.
2. Start washing program:
Press O/s (START/PAUSE) button.
The washing program is started or starts at the end
of the delay time set.
If the K/W (DOOR/LIGHT) indicator flashes red when the
3
O/s (START/PAUSE) button is pressed, the door is not properly closed.
Close the door firmly and press the O/s (START/PAUSE) button again.
If a delay time has been selected:
The selected delay time runs, and the time remaining until program
start (in full hours) appears in the multi-display. During this time, washing can be added or delay time can be changed or deleted.
• Add washing: press the O/s (START/PAUSE) button, the door can be
opened. Then close the door and press the O/s (START/PAUSE) button again.
• Change or cancel the time delay: keep pressing the b (DELAY TIMER)
button until the desired time is displayed; when the program duration is displayed (such as 110 ), the washing program starts without
delay.
21
Page 22
Operating instructions
Washing program sequence
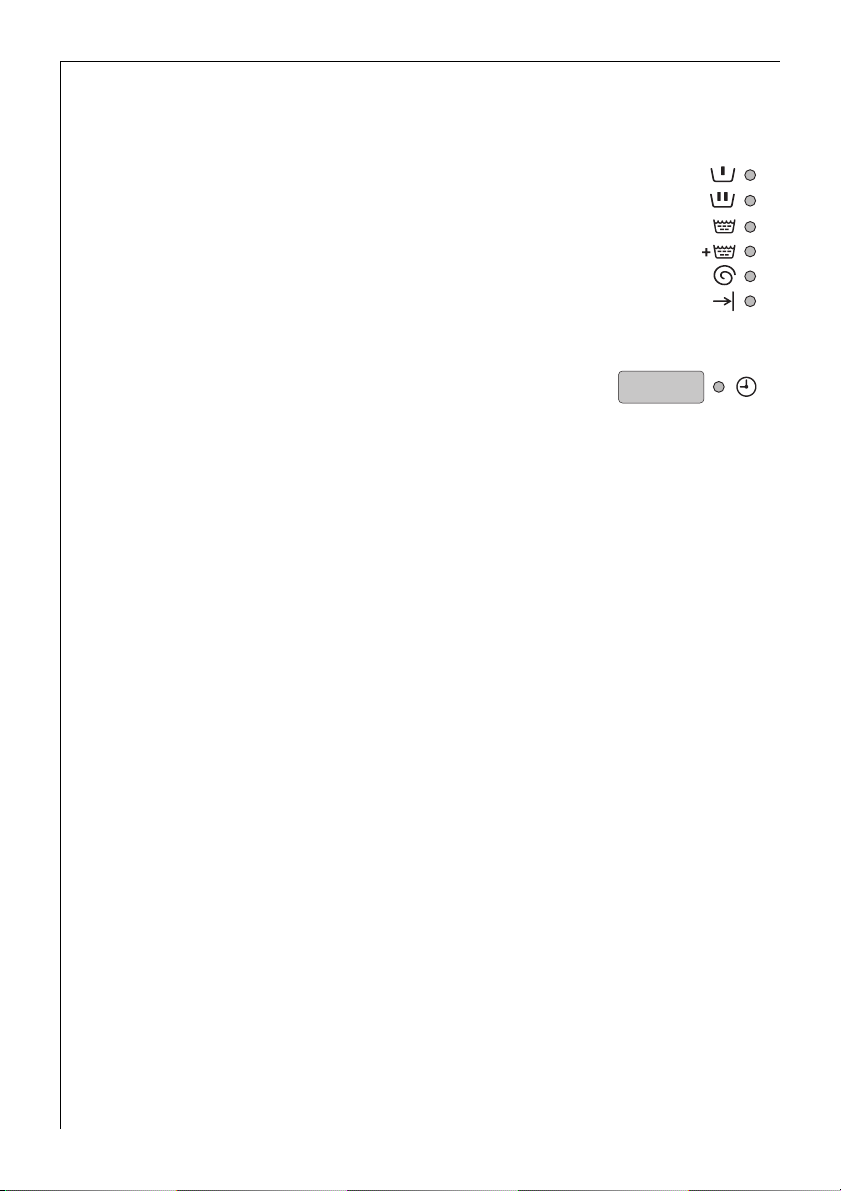
Program progress display
Prior to the start, the program steps
chosen are displayed on the program
progress display. During the washing
program the current program step is
displayed.
Multi-display
The expected time remaining (in minutes) to
the end of the program is displayed in the
multidisplay.
Remaining run time may be stopped or corrected by the washing
3
machine controls with automatic program adaptation (amount of
washing, washing type, imbalance recognition, special rinse cycle etc.).
Change spin speed
During the washing program, the spin speed can be changed or
o (RINSE HOLD) set.
Other settings cannot be altered.
(Pre-Wash)
(Main Wash)
(Rinse)
(Rinse+)
(Spin)
(End)
Program interruption
0 To end the washing program early, turn the program selector to
I (OFF).
Using the O/s (START/PAUSE) button, the washing program can be
3
interrupted at any time, and then continued by pressing the button
again. The washing program cannot be changed during the pause.
22
Page 23

Operating instructions
If washing cycle is completed/remove the washing
Once the washing program has come to an end, L (END) illuminates
on the program progress display.
If o (RINSE HOLD) was selected, the indicator beside the
O/s (START/PAUSE) button flashes.
0 1. After an end rinse the water must first be pumped out:
– Press either the O/s (START/PAUSE) button (the washing will be
spun in accordance with the program that has just been completed;
the spin speed can also be changed during spinning using the SPIN
button),
or
– turn the program selector to C (PUMP OUT), and press the
O/s (START/PAUSE) button (the water is pumped out without spinning),
or
– turn the program selector to D (SPIN) or F (SHORT SPIN), and press
the O/s (START/PAUSE) button (the washing will be spun or short
spun).
At the end of this program step, the L (END) indicator illuminates.
2. Open the fill-in door.
As soon as the indicator beside the K/W (DOOR/LIGHT) button is
green, the door can be opened (not if program protection is activated,
see "Program Protection").
3. Remove the washing.
4. Set program selector to I OFF.
5. Pull the detergent drawer out a little after washing so that it can dry
out. Leave the door ajar so that air can circulate in the washing
machine.
If the Å (OVERDOSING) indicator illuminates, then too much deter-
3
gent was used in the washing program just completed, and as a result
an additional rinse performed. For the next wash observe the detergent
manufacturer’s dosing instructions appropriate to the load!
Attention! If the washing machine is not used for a lengthy period of
time:
Close the tap and disconnect the washing machine from the mains.
(Aqua control with aqua alarm does not function if the washing
machine has been disconnected from the power supply.)
23
Page 24
Operating instructions
Program tables
Washing
Not all possible settings are given in the following, but those that are
useful and meaningful in everyday use.
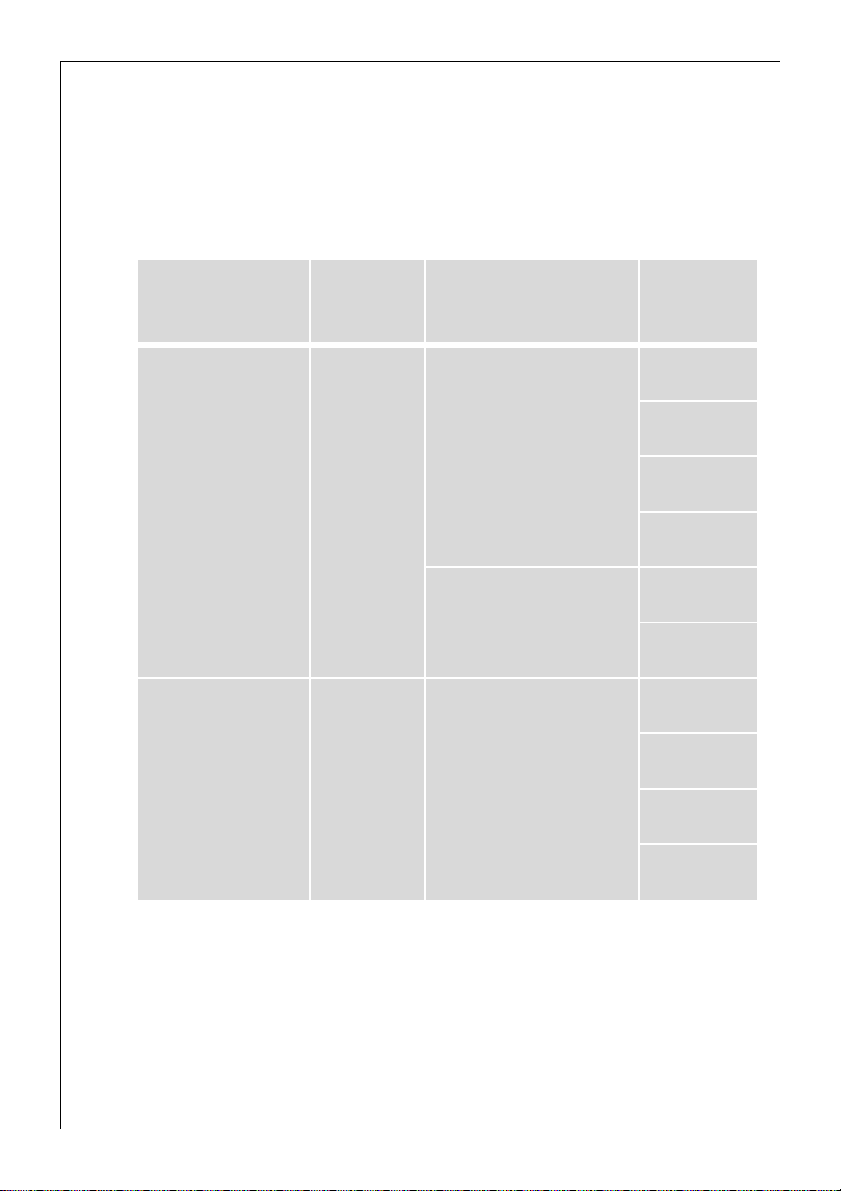
Washing Types,
Care Symbols
Cottons
ç
Linen
èë
max. load
(dry weight)
5kg
5kg
1)
Program selector
temperature
t (COTTONS/LINEN)
95
Energy Saving Program:
t (COTTONS/LINEN)
E
t (COTTONS/LINEN)
30 to 60
possible
additional
programs
k
(PRE WASH)
q
(SOAK)
]
(QUICK WASH)
ä
(STAINS)
k
(PRE WASH)
q
(SOAKING)
k
(PRE WASH)
q
(SOAKING)
]
(QUICK WASH)
ä
(STAIN)
24
Page 25
Operating instructions
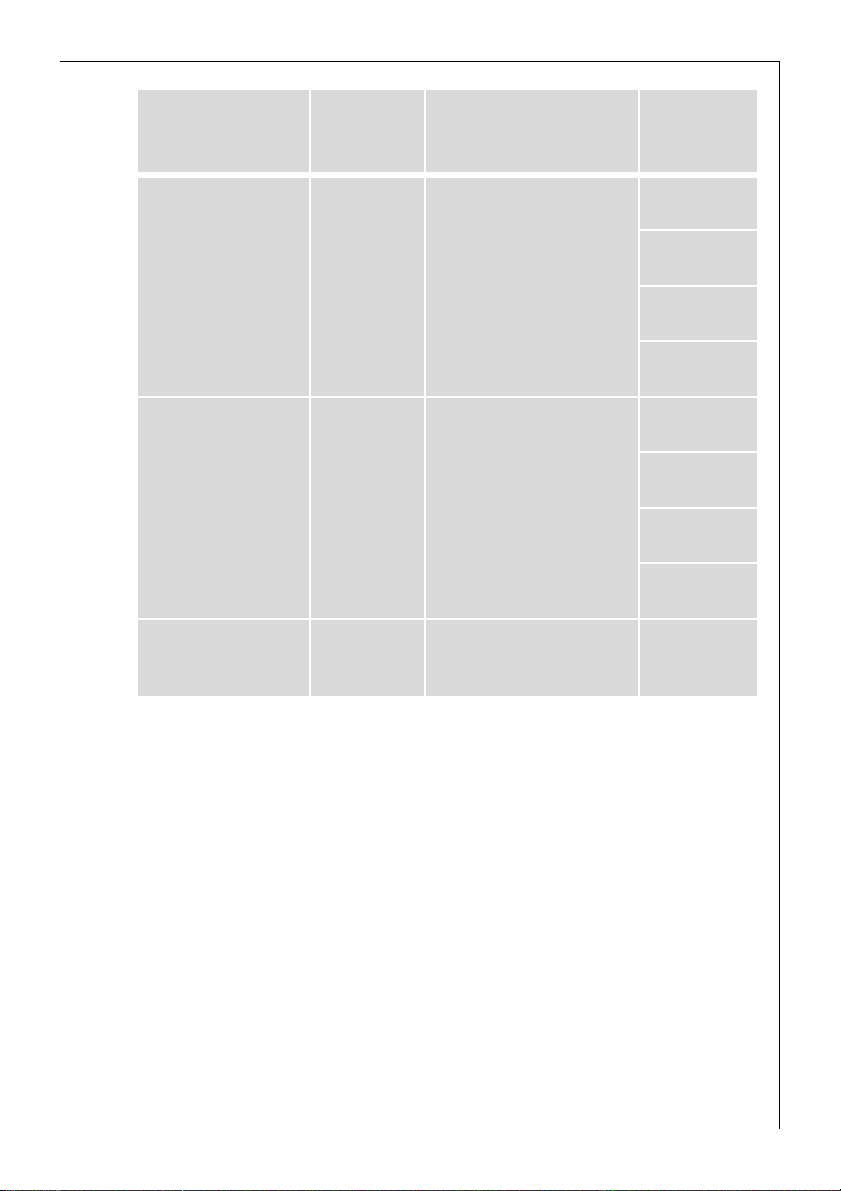
Washing Types,
Care Symbols
Easy-cares
êíî
Delicates
ì
Wool/Hand Washables
9 ìï
max. load
(dry weight)
2.5kg
2.5kg
(or 15-20m
curtains)
2kg
1)
temperature
} (EASY-CARES)
30 to 60
Program selector
à (DELICATES)
2
30, 40
sP
(WOOL/HAND WASHABLES)
r (cold) to 40
possible
additional
programs
k
(PRE WASH)
q
(SOAKING)
]
(QUICK WASH)
ä
(STAIN)
k
(PRE WASH)
q
(SOAKING)
]
(QUICK WASH)
ä
(STAIN)
1) A 10-litre bucket contains about 2.5kg of dry washing (cotton).
25
Page 26
Operating instructions
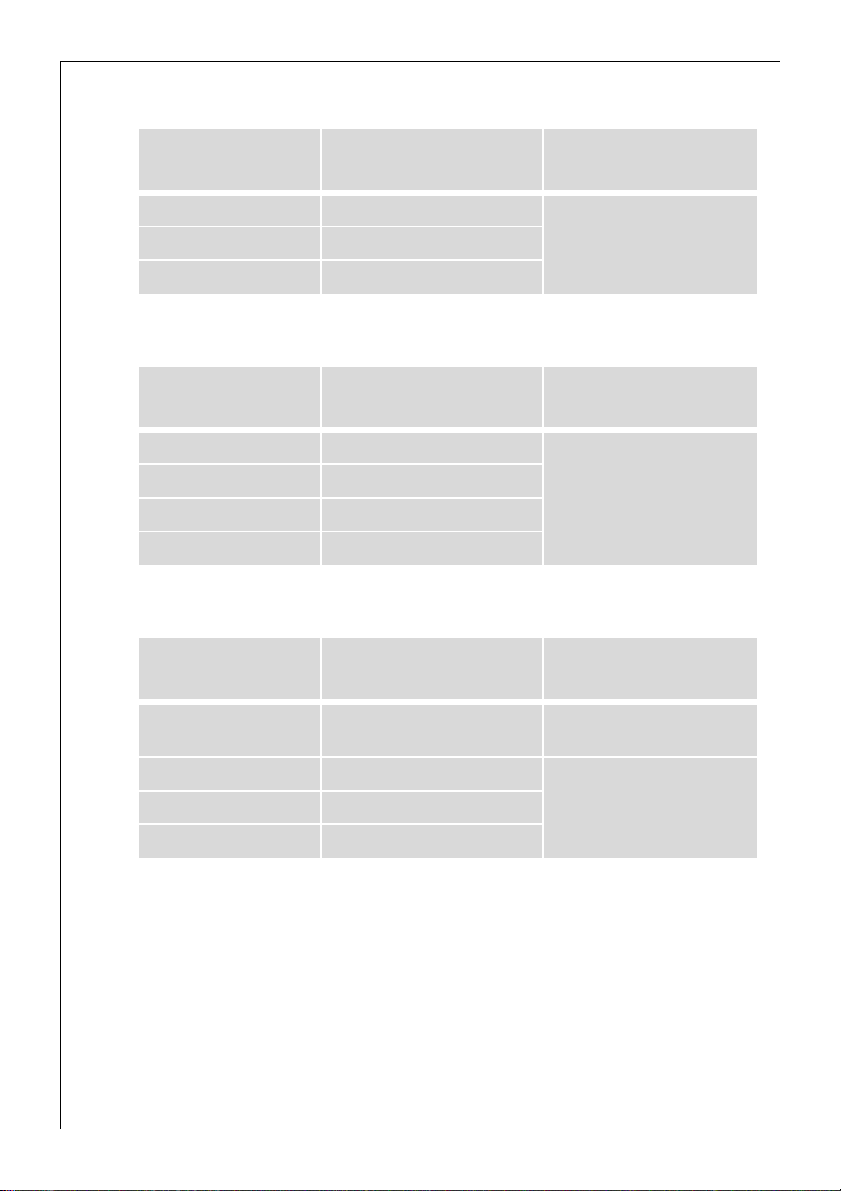
Separate Softening/Starching/Conditioning
Type of washing
Cottons/ Linen 5kg
Easy-Cares 2.5kg
Delicates 2.5kg
Separate Rinsing
Type of washing
Cottons/ Linen 5kg
Easy-cares 2.5kg
Delicates 2.5kg
Wool/Hand Washables 2kg
Separate Spinning
Type of washing
Cottons/ Linen 5kg
Easy-cares 2.5kg
Delicates 2.5kg
Wool/Hand Washables 2kg
Max. filling quantity
(dry weight)
Max. filling quantity
(dry weight)
Max. filling quantity
(dry weight)
Program selector
B
(STARCH)
Program selector
A
(GENTLE RINSE)
Program selector
D
(SPIN)
F
(SHORT SPIN)
26
Page 27
Operating instructions
Cleaning and caring (for your appliance)
Control panel
Attention! Do not use furniture care products or aggressive cleansers
for cleaning control panels and control elements.
0 Wipe control panels with a moist cloth. Use warm water.
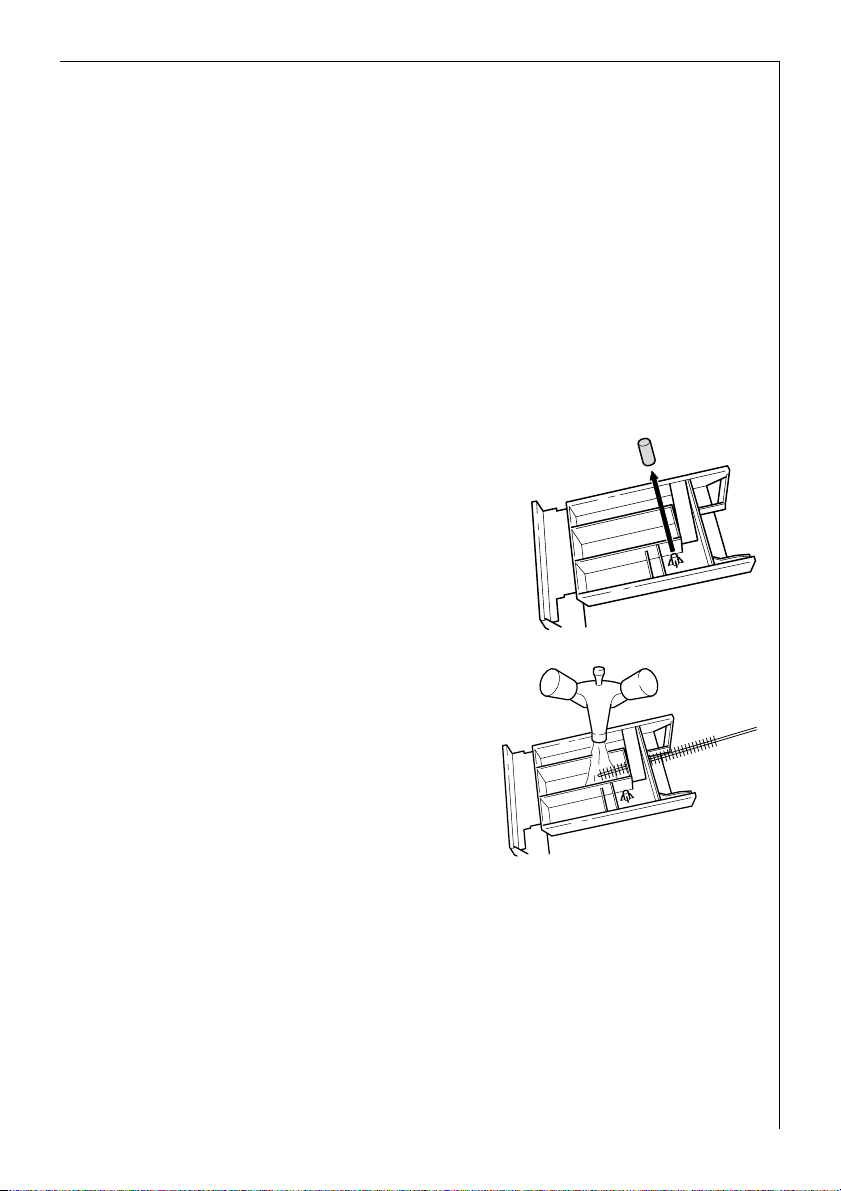
Detergent drawer
The detergent drawer should be cleaned from time to time.
0 1. Pull the detergent drawer out as far as it will go.
2. Remove the detergent drawer by pulling sharply.
3. Remove siphon cap.
4. Clean the siphon cap under running
water.
5. Clean compartments with warm water
from the rear. For best results use a
bottle brush.
6. Push the siphon cap all the way on so
that it is securely seated.
7. Clean the entire compartment area of
the washing machine with a brush.
8. Set the detergent drawer into the guide tracks and push in.
27
Page 28

Operating instructions
Washing drum
The washing drum is made of rust-free stainless steel. Rusty objects in
the washing drum may lead to rust deposits on the drum.
Attention! Do not clean the stainless steel drum with acid containing
decalcifying agents, abrasives containing chlorine or iron, or steel wool.
Appropriate cleansers are available from our customer service department.
0 Remove rust deposits at the drum with a stainless steel cleanser.
Fill-in door
0 Check on a regular basis to see if deposits or foreign objects are present
in or at the rubber sleeve behind the door, and remove.
28
Page 29
Operating instructions
What to do when…
The somewhat different, in comparison to older wash-
3
ing machines, whistling noise during spinning is due to
the modern drive system.
A rattling sound on startup – in particular when using
for the first time – is caused by the circulation pump
and is due to the design.
Trouble Shooting
In the event of a malfunction, try to eliminate the problem yourself
with the help of the instructions listed here. If you request customer
service assistance for one of the malfunctions listed here, or for an
operator error, a charge will be billed for the customer service technician’s visit, even during the guarantee period.
• If error code (1 or (2 appears at the multi-display, you may
be able to eliminate the error yourself (see the following table of
malfunctions).
After the error has been eliminated, press the O/s button (START/
PAUSE). If the error code is again displayed, contact customer service.
• Please contact customer service for all other error displays and
inform them of the error code.
Malfunction Possible Cause Remedy
Washing machine does
not work.
The machine does not
take in water.
Error code
appears.
(1
Mains plug is not
plugged in.
House fuse in defective. Replace fuse.
Door is not closed properly.
O/s (START/ PAUSE) button not pressed long enough.
Tap is closed. Open tap.
Sieve in the threaded fitting
on the water inlet hose is
blocked.
Insert mains plug.
Close door; lock must engage
audibly.
Keep O/s (START/PAUSE)
button pressed until the program starts.
Unscrew the hose from the
tap, remove the sieve and
clean under running water.
29
Page 30

Operating instructions
Malfunction Possible Cause Remedy
Washing machine
vibrates during operation or is unstable.
Excessive foaming during the main wash.
Water runs out from
under the washing
machine.
Softener was not
washed in, compartment w for conditioner is full with
water.
Washing is creased.
The height adjustable
threaded feet are not
correctly adjusted.
There is only very little washing in the drum (e.g. only a
toweling dressing gown).
Water could not be completely pumped out prior to
spinning because
the drain hose is kinked
or
the circulation pump is
clogged.
Probably too much detergent
was used.
Threaded fitting on the
water inlet hose is leaking.
Drain hose is leaking.
Circulation pump cover is
not closed properly.
Washing is trapped in the
door.
Suction cap in the compartment for conditioner is not
correctly positioned or is
blocked.
Too much washing was
placed in the appliance.
Adjust the feet as per the
installation and connection
instructions.
Does not impair function.
Check the drain hose and if
necessary remove any kink or
clean the circulation pump
and remove any foreign bodies from the pump housing.
Dose detergent exactly in
accordance with the manufacturer’s instructions.
Screw the inlet hose tight.
Check drain hose and if
necessary replace.
Close cover properly.
Stop program, remove washing from the door, start a
new program.
Clean detergent drawer,
place suction cap firmly in
position.
Put less washing in the appliance.
30
Page 31
Operating instructions
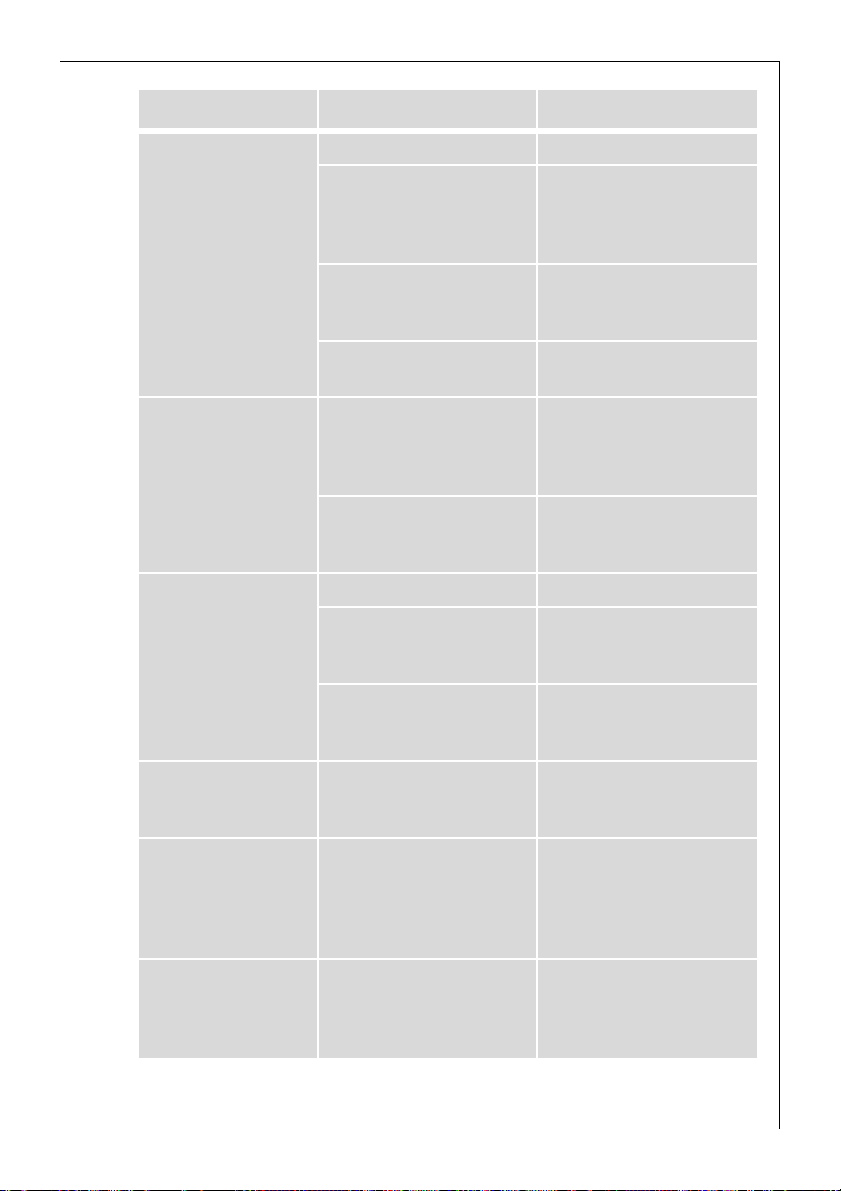
Malfunction Possible Cause Remedy
Drain hose is kinked. Remove kink.
Washing is not spun
properly, water is still
visible in the drum.
Error code
The fill-in door cannot
be opened when the
appliance is switched
on.
Remnants of detergent
are building up in the
detergent drawer.
Rinse water is cloudy.
When an additional
program button is
pressed, the corresponding indicator
does not illuminate.
Program progress display flashes constantly.
(2 appears.
Maximum pumping height
(drain height 1m above the
floor on which the machine
is standing) exceeded.
Circulation pump is blocked.
In the case of siphon connection: siphon is blocked.
The door is locked for safety
reasons (Indicator next to
K/W (DOOR/LIGHT) button
is off).
Program protection is set.
Tap is not fully open. Open tap completely.
The sieve in the coupling of
the inlet hose at the tap is
clogged.
The sieve in the coupling of
the inlet hose at the appliance is clogged.
The cause is probably a
detergent with a high silicate
content.
The additional program
selected cannot be combined
with the program set.
Program protection is
switched on; the program
selector has been moved
during the washing cycle.
Please contact customer
service who have a retrofit
kit for pumping to heights of
greater than 1m.
Switch off the machine and
unplug from the mains, clean
the circulation pump.
Clean siphon.
Wait until the indicator is
green.
Program protection is deactivated
(see "Program Protection").
Clean sieve.
Clean sieve.
No negative impact on the
rinsing results, possibly use
liquid detergent.
Make another choice.
Turn program selector back
to original position
(see “Program Protection”).
31
Page 32

Operating instructions
If the washing results are not satisfactory
If the washing is grey and there are calcium deposits in the drum
• Too little detergent was used.
• The wrong detergent was used.
• Special soiling was not pre-treated.
• Program or temperature not set correctly.
• When using component detergents, the individual components were
not used in the correct proportions.
If there are still gray stains on the washing
• Washing soiled with ointments, grease or oils was washed with too
little detergent.
• Too lower temperature was used for washing.
• A common cause is that softener – particularly that in concentrated
form – has got onto the washing. Wash out any such spots as quickly
as possible and use that particular softener carefully.
If at the end of the last rinse foam is still visible
• Modern detergents can cause foam also in the last rinse. The washing
is however sufficiently rinsed.
32
If there are white remnants on the washing
• This is an insoluble material contained in modern detergents.
This is not the result of unsatisfactory rinsing.
Shake or brush the washing. Perhaps you should turn the washing
inside out before washing in future. Reconsider choice of detergent,
possibly use liquid detergent.
Page 33
Operating instructions
Perform emergency drain
• If the washing machine no longer pumps out the water then an
emergency drain must be performed.
• If the washing machine is located in a room in which below freezing
temperatures might occur, emergency draining must be carried out if
danger of freezing occurs.
Furthermore, the inlet hose must be disconnected from the tap and
laid on the floor.
Warning! Switch the washing machine off and pull the mains plug
1
prior to emergency draining.
Attention! The water which runs out of the emergency draining hose
can be hot. There is a danger of scolding! Before an emergency drain
first allow the water to cool down!
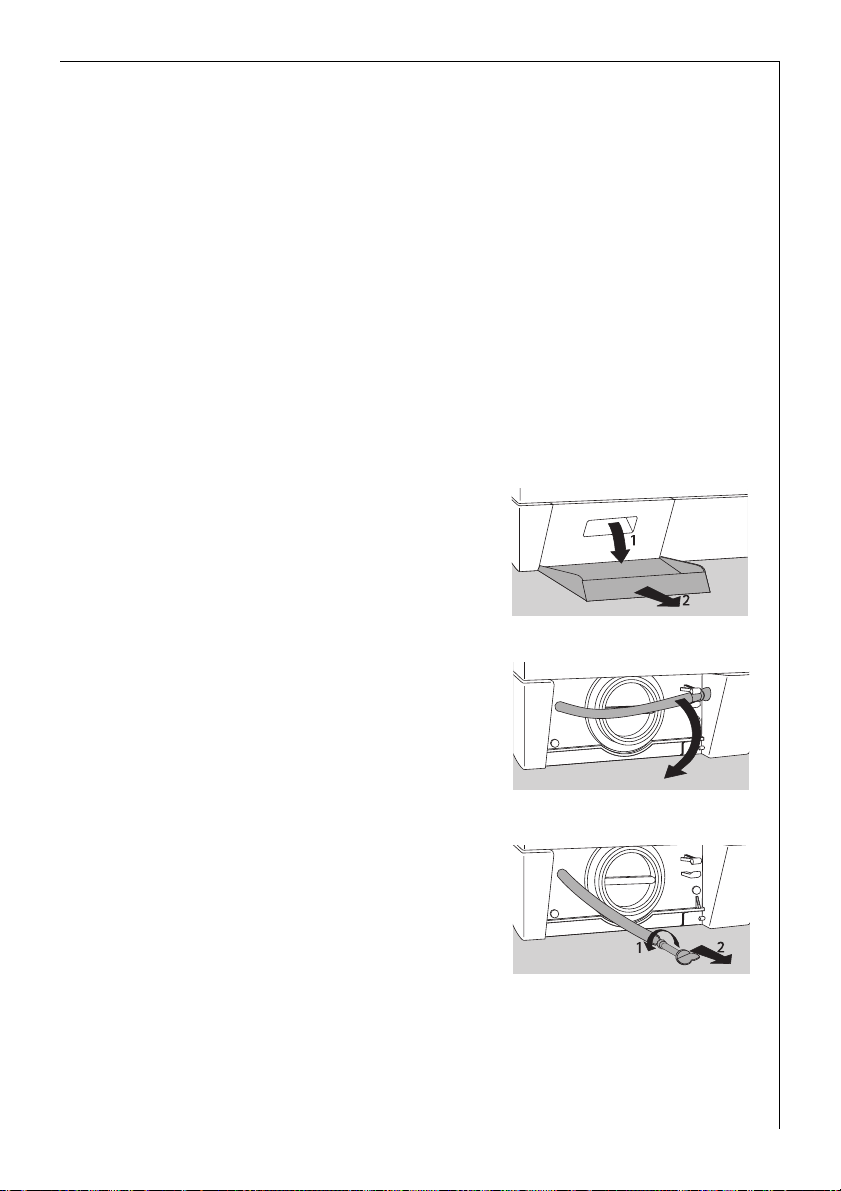
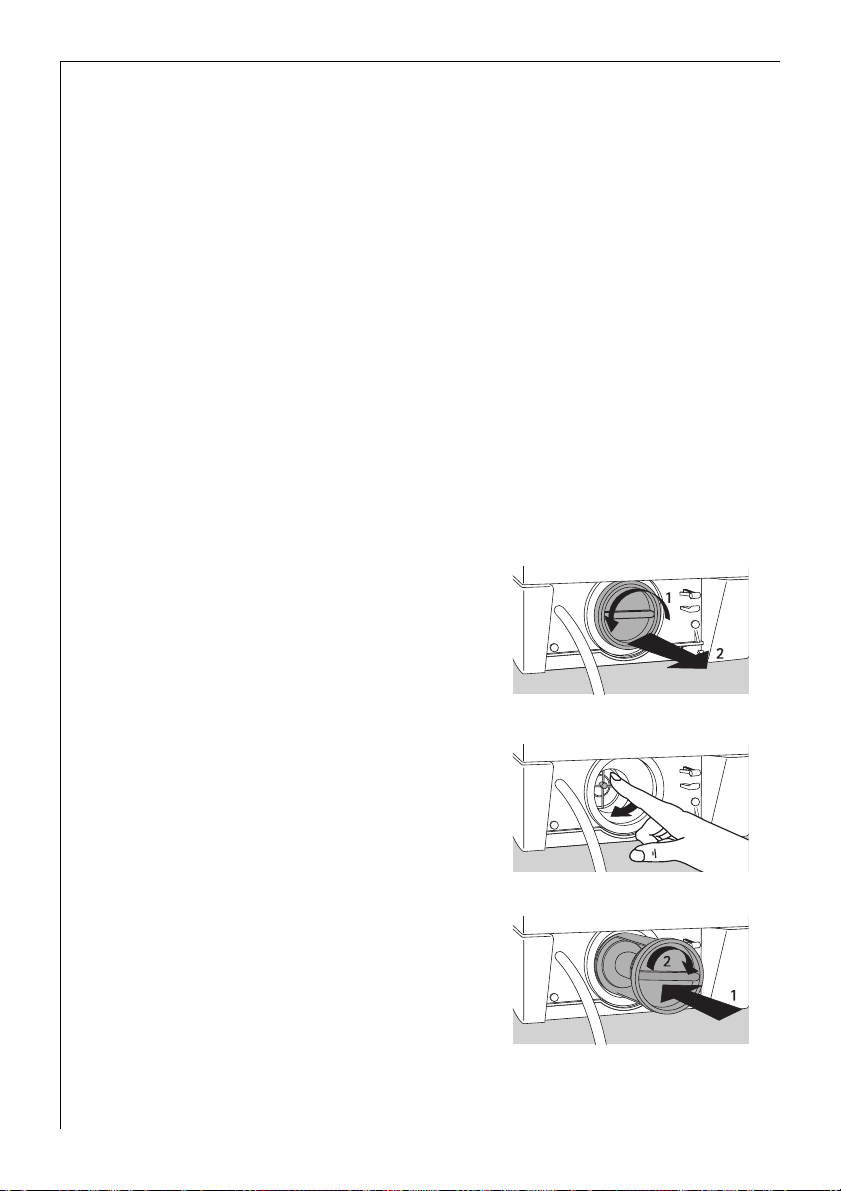
0 1. Have a flat container on hand to catch the water running out.
2. Open the flap on the left of the pedestal
cover downwards and remove.
3. Remove the emergency drain hose from
the bracket.
4. Pull the emergency drain hose out a little.
5. Place the container under the hose.
6. Undo and remove the plug in the end of
the emergency drain hose by turning it in
an anti-clockwise direction.
The wash-water runs out. Depending
upon the amount of water, it may be
necessary to empty the container several
times. Temporarily close the emergency
drain hose with the plug to this end.
33
Page 34
Operating instructions
When the water is completely drained:
7. Press the end stop firmly back into the emergency drain hose.
8. Push the emergency drain hose back in a little and allow it to snap into
the mounting.
9. Put on the flap and close.
The ECO valve does not function when the machine has been fully
3
emptied. Therefore add approx. 1liter of water before the next wash
(pour in through the detergent drawer).
Clean the circulating pump
Warning! Switch off the washing machine and pull the mains plug
1
before cleaning the circulation pump!
0 1. First perform emergency draining (see above: "Perform Emergency
Drain").
2. Lay a cloth on the floor in front of the circulation pump cover. Some
water may run out.
3. Unscrew the circulation pump cover in an
anti-clockwise direction and remove.
4. Remove foreign body from the pump
housing.
5. Check whether it is possible to turn the
pump impeller. (Jerky pump movement is
normal.) If it is not possible to turn the
impeller, contact customer service.
6. Replace cover (insert stud on the cover
into the guide slot) and tighten in a
clockwise direction.
7. Close emergency drain hose, push in and
fix in place.
8. Close the flap.
34
Page 35
Operating instructions
Emergency release for fill-in door
If the fill-in door can no longer be opened (e.g. due to a defective door
release or power failure during the washing program), it can be opened
with the help of the emergency release.
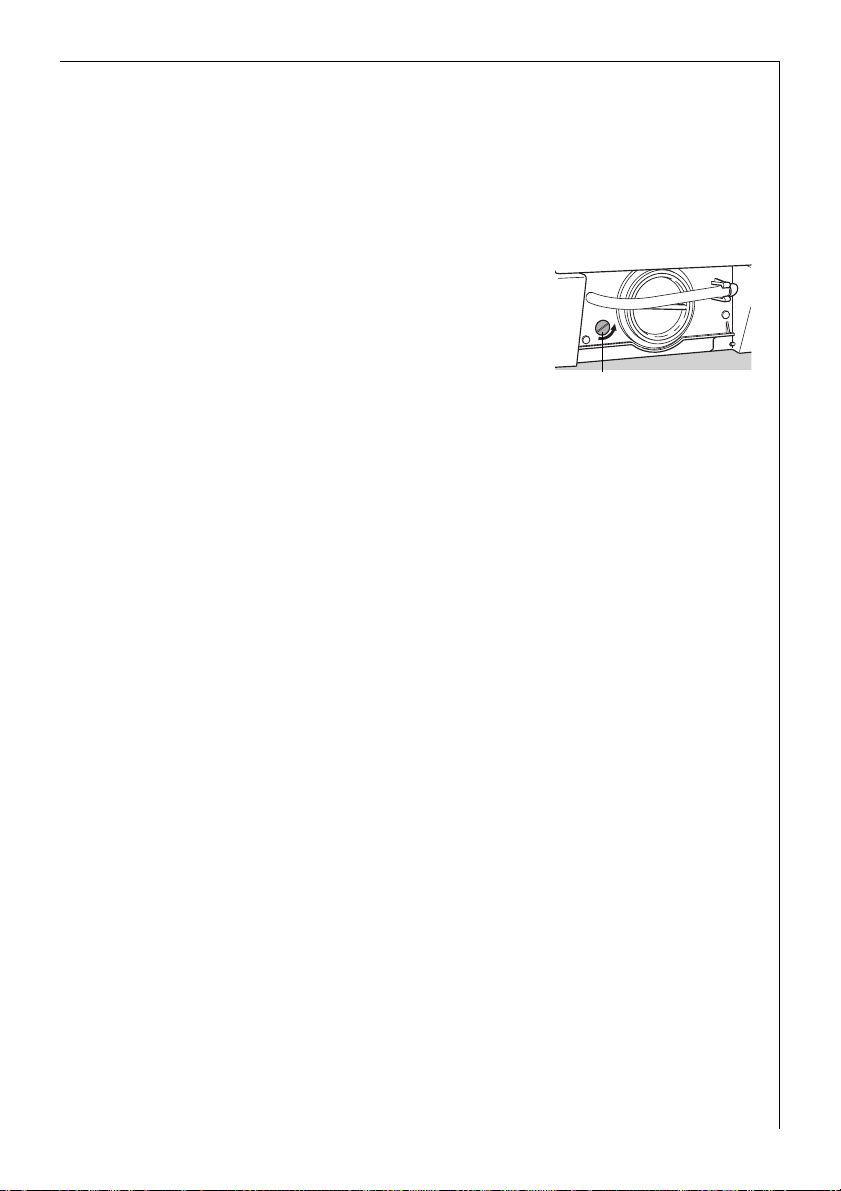
0 1. If water can be seen at the window in the fill-in door, perform emer-
gency draining first (see "Perform emergency drain").
2. Turn the knob in an anti-clockwise direction
with the aid of a coin or with a screwdriver.
The door springs open.
Rotating knob
Additional rinse and/or water cooling
The washing machine is adjusted for extremely economical water
usage.
• For people who suffer from an allergy to detergents, it can be useful
to rinse with more water (additional rinse).
• It may be necessary to cool the wash-water before it is pumped out,
in order to prevent damage to plastic drain pipes (wash-water cooling).
The program duration and water consumption are increased by water
3
cooling and/or the additional rinse.
Additional rinse
If this function is enabled, an additional rinse in performed for the pro-
3
grams t (COTTONS/LINEN), } (EASY-CARES) and
à (DELICATES).
As supplied from the factory, the additional rinse function is not enabled.
Enabling the additional rinse function:
0 1. Turn the program selector to F (SHORT SPIN).
2. Press the q (SOAKING) button for at least 5 seconds.
After the button has been kept pressed for 5 seconds, + Á
+) flashes on the program progress indicator for 5 seconds.
(Rinse
35
Page 36

Operating instructions
3. Whilst +Á is flashing, release the q (SOAKING) button.
The additional rinse function is enabled once the flashing has ceased.
It continues to be enabled until specifically disabled.
When the additional rinse function is enabled, the +Á indicator on
the program progress display illuminates prior to program start and
during the additional rinse.
4. If you wish to check whether the additional rinse function is enabled:
– Turn the program selector to F (SHORT SPIN).
– Press the q (SOAKING) button briefly.
If +Á flashes on the program progress display, the additional rinse
function is enabled.
Disabling the additional rinse function:
0 1. Turn the program selector to F (SHORT SPIN).
2. Press the q (SOAKING) button for at least 5 seconds.
As soon as the button is pressed +Á flashes on the program progress
display. After 5 seconds +Á ceases to flash and illuminates continuously for a further 5 seconds.
3. Whilst +Á is continuously illuminated, release the q (SOAKING)
button.
Once +Á has ceased to illuminate, the additional rinse function is
disabled.
Wash-water cooling
The water is cooled prior to pumping out at the end of the main wash-
3
ing cycle (by adding cold water). This setting is only effective for
t (COTTON/LINEN) at a temperature of over 40 °C.)
Wash-water cooling is not selected upon delivery from the factory.
Select wash-water cooling:
0 1. Turn the program selector to F (SHORT SPIN).
2. Press the k (PRE WASH) button for at least 5 seconds.
After the button has been kept pressed for 5 seconds, l (Main Wash)
flashes on the program progress indicator for 5 seconds.
3. Whilst l is flashing, release the k (PRE WASH) button.
After blinking has stopped, wash-water cooling is selected. It remains
functional until it is deleted.
36
Page 37

Operating instructions
4. If you want to check and see if wash-water cooling has been selected:
– Turn the program selector to F (SHORT SPIN).
– Press the k (PRE WASH) button briefly.
If l flashes on the program progress display, the water cooling function is enabled.
Delete wash-water cooling:
0 1. Turn the program selector to F (SHORT SPIN).
2. Press the k (PRE WASH) button for at least 5 seconds.
As soon as the button is pressed l flashes on the program progress
display. After 5 seconds l ceases to flash and illuminates continu-
ously for 5 seconds.
3. Whilst l is continuously illuminated, release the k (PRE WASH) but-
ton.
Once l has ceased to illuminate, the water cooling function is disabled.
Additional rinse and water cooling
The additional rinse and water cooling functions can be combined.
Enable as under “Additional Rinse” and “Water Cooling”.
37
Page 38

Operating instructions
Program protection
In order to secure a program setting against inadvertent change (e.g.
accidental turning of the program selector or activation of buttons),
program protection can be selected. This prevents damage to your
washing caused by, for example, playing children.
Program protection can be selected or deleted even during a washing
3
program.
Select program protection:
0 1. Select the desired program settings.
2. Press the O/s button (START/PAUSE) to start the program.
3. Press and hold the k button (PRE WASH) and the q button
(SOAKING) simultaneously for 5 seconds. The program progress display
blinks for 5 seconds and program protection is selected.
As long as program protection is selected, no further settings can be
3
made. The door cannot be opened with the K/W button (DOOR/
LIGHT). Even after the washing cycle has been completed, program pro-
tection must be deleted before the door can be opened.
If an attempt is made to change the selected settings during the wash-
ing cycle by activating a button, the program progress display blinks for
5 seconds.
If an attempt is made to change selected settings by turning the program selector, the program progress display blinks until the program
selector is returned to its original position. The washing cycle remains
unaffected in either case.
The program selector must be in its original position in order to delete
3
program protection.
Delete program protection:
0 Press and hold the k button (PRE WASH) and the q button
(SOAKING) simultaneously for 5 seconds. The program progress display
blinks for 5 seconds and then remains continuously lit for 5 seconds.
Program protection is deleted.
38
Page 39

Installation and Connection Instructions
INSTALLATION AND CONNECTION
INSTRUCTIONS
Installation Safety Precautions
• Do not tip the washing machine over the front or the left side (seen
from the front). Electrical components could become wet!
• Check the washing machine for transport damages. You should never
connect a damaged appliance. In the event of a damage consult your
dealer.
• Make certain that all shipping braces have been removed and that
the splash guard is attached to the appliance, see "Shipping Brace
Removal". Otherwise damage may occur to the machine or close by
furniture during the spin cycle.
• The plug may only be inserted into a properly installed earthing con-
tact safety socket. Extension cables, octopus plugs or adapters may
not be used.
• For permanent connection a current interruption device must be pro-
vided for in the electrical circuit (fuse, circuit breaker, ground fault
circuit interrupter or the like) with a contact opening of at least
3 mm which allows for disconnection of the appliance at all poles.
Permanent connection may only be carried out by an authorised
electrician.
• Before starting your appliance please ensure that the nominal volt-
age and type of current specified on the rating plate are the same as
those used at the place of installation. Please also refer to the rating
plate for the type of fuse to be used.
• Prior to carrying out modifications on the appliance (on the worktop
or front door) pull out the mains plug.
• The mains feed-line may only be replaced by the customer service or
by an authorised electrician.
39
Page 40
Installation and Connection Instructions
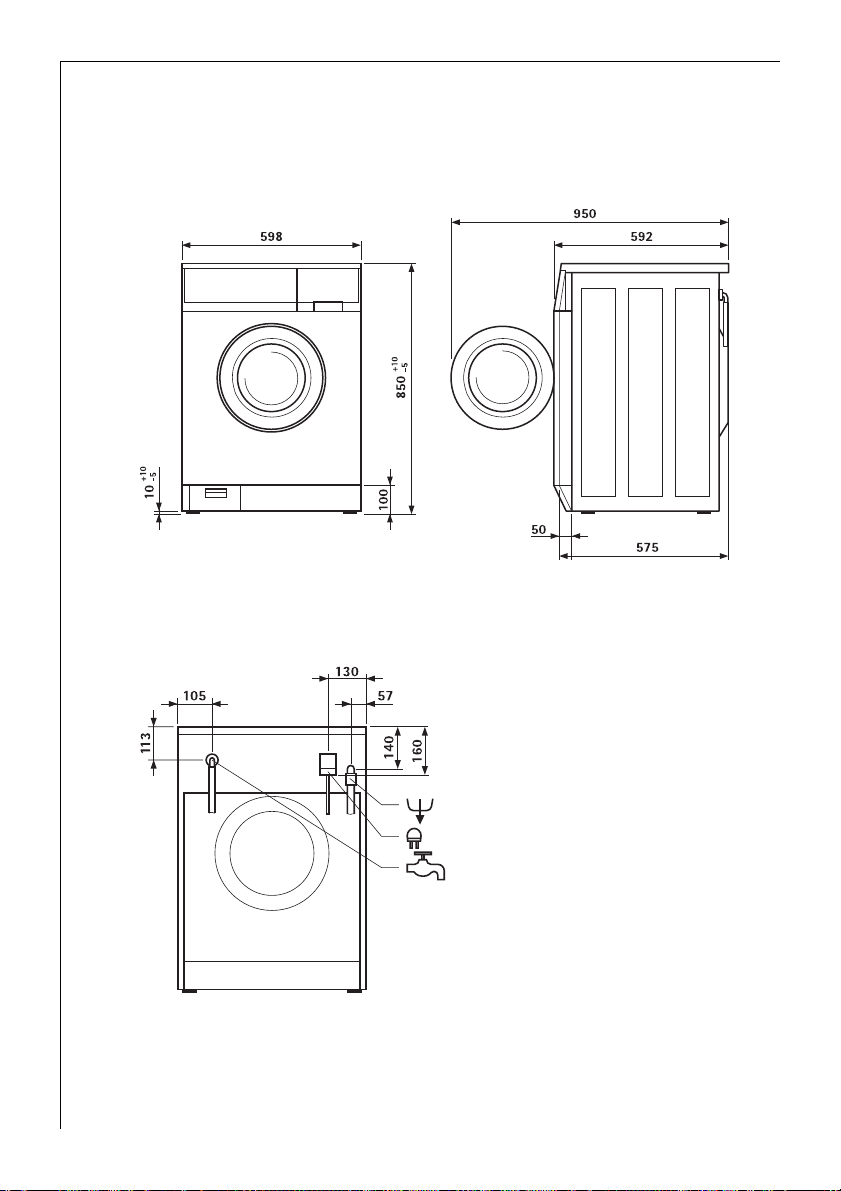
Dimensions of the appliance
Front and Side Views
Rear View
40
Page 41
Installation and Connection Instructions
Installation of the appliance
Washing machines with arched covers are not suited for installation
3
beneath countertops.
Transporting the appliance
• Do not lay the washing machine on the front or on the left side (seen
from the front); otherwise the electrical components could become
wet!
• Never transport the appliance without transportation protection.
Remove the protection only at the place of installation! Transportation without protection can lead to damages to the appliance.
• Neither lift the appliance by an open door nor by the base.
• The appliance weighs approx. 85kg.
By transportation with a trolley:
• Place the trolley only sidewise. The tip of the trolley should not be
longer than 24 cm, otherwise the float-switch can get damaged.
Remove transportation protection
Attention! Be absolutely certain that all shipping braces have been
removed before installing the appliance.
Store all shipping braces in a safe place in case they are required for
future transport (moving).
41
Page 42

Installation and Connection Instructions
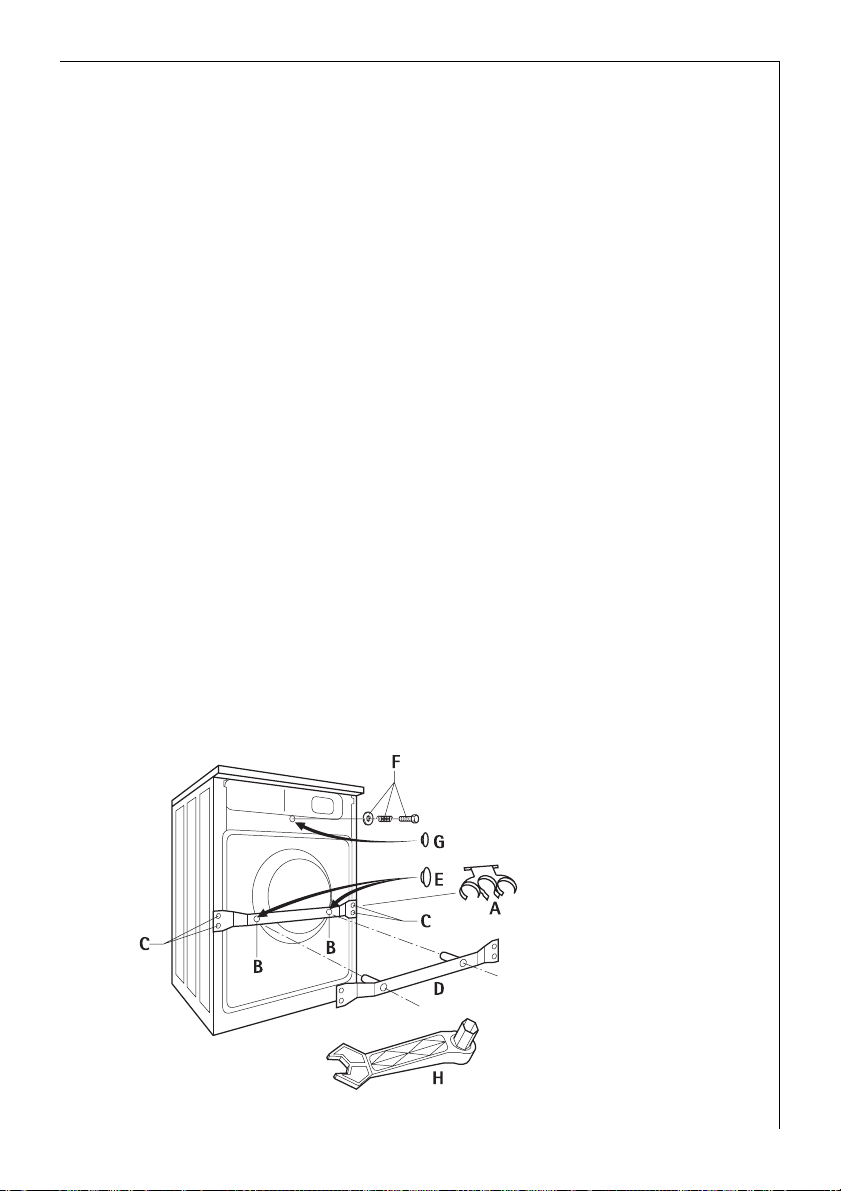
Special spanner H and cover caps E (2 off) and G (1 off) are supplied
3
with the appliance.
0 1. Remove flexible tubing holder A.
2. Remove the two screws B with special spanner H.
3. Remove the four screws C.
4. Detach transportation rail D.
5. Close the two large openings with the cover caps E.
Attention! Press cover caps forcefully in, so that they snap into the
rear wall (protecting the interior of the appliance against sprayed
water).
6. Drive in the screws C into the four small holes again.
7. Remove the screw and compression spring F with special spanner H,
cover the hole with caps G.
Attention! Press cover caps forcefully in, so that they snap into the
rear wall (protecting the interior of the appliance against sprayed
water).
Prepare the installation place
• The installation surface must be clean and dry, free of floor wax and
other smearing substances, so that the appliance does not slip off. Do
not use any lubricant as sliding aid.
• Installation on a high-veil carpet or floor tiles with soft sponge backs
is not recommended because the standing safety of the appliance is
then no longer ensured.
• By installation surfaces with small-format tiles, lay a conventional
rubber mat underneath.
• Small unevenness of the floor surface should never be levelled out by
laying pieces of wood, carton or similar elements, but rather basically
compensated by adjusting the screw feet.
• When it is unavoidable to install the appliance besides a gas or a
coal-fuelled cooker, due to spatial reasons: insert a piece of heatinsulating board (85 x 57 cm) between the cooker and the washing
machine; the board side facing the cooker must be provided with an
aluminium foil.
• The washing machine may not be installed in a frost-endangered
room. Frost-caused damages!
• Flexible feed and drain tubings may not be crinkled or squeezed.
42
Page 43
Installation and Connection Instructions
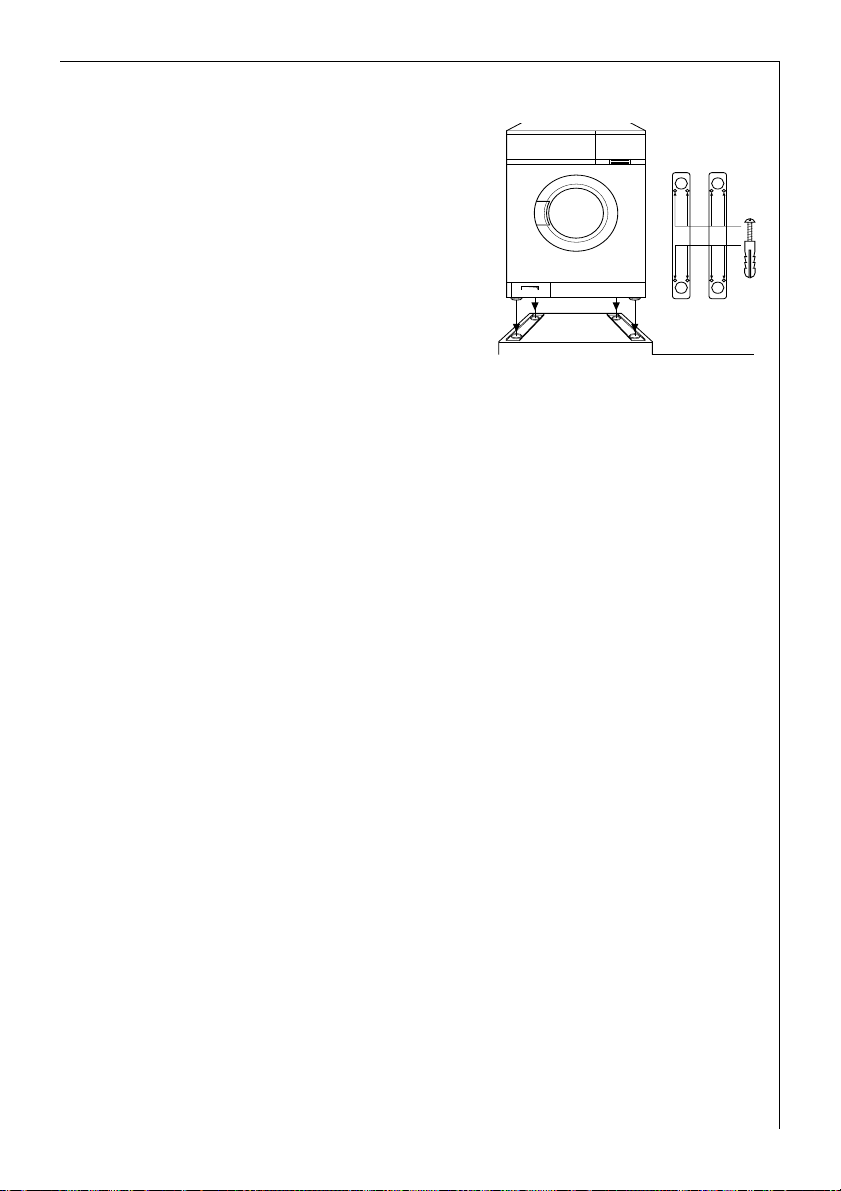
Installation on a concrete base
When installing on a concrete base,
for safety reasons it is imperative
that steel plates are installed, the
washing machine is then installed in
these plates. The steel plates are
available from customer service
under ET-No. 645 425 058.
Installation on vibrating
floors
In the case of floors that vibrate, especially wooden floors with floorboards that flex, a water-proof wooden panel of at least 15 mm thickness must be firmly screwed to at least 2 floor beams. If possible, install
the appliance in a corner of the room: the wooden floor is more firmly
supported in the corners and thus has less tendency to resonant vibration.
Levelling on uneven floors
Automatically adjusted foot: The rear right foot of your washing
3
machine includes a telescopic leg. It assures a stable stance for the
appliance, even during high speed spin cycles.
If the washing machine nevertheless does not demonstrate good stability, proceed as follows:
0 1. Set the three adjustable feet to the default dimension of 10 mm. Use
the included special key for the removal of transport braces to this end.
If the automatically adjusted foot does not reach to the floor:
2. manually lengthen the automatically adjusted foot (back right) by the
necessary measure.
Check installation with a water level.
Attention! Never compensate for small areas of unevenness in the
floor through the use of wooden wedges, cardboard or the like. Levelling may only be carried out with the adjustable feet.
43
Page 44
Installation and Connection Instructions
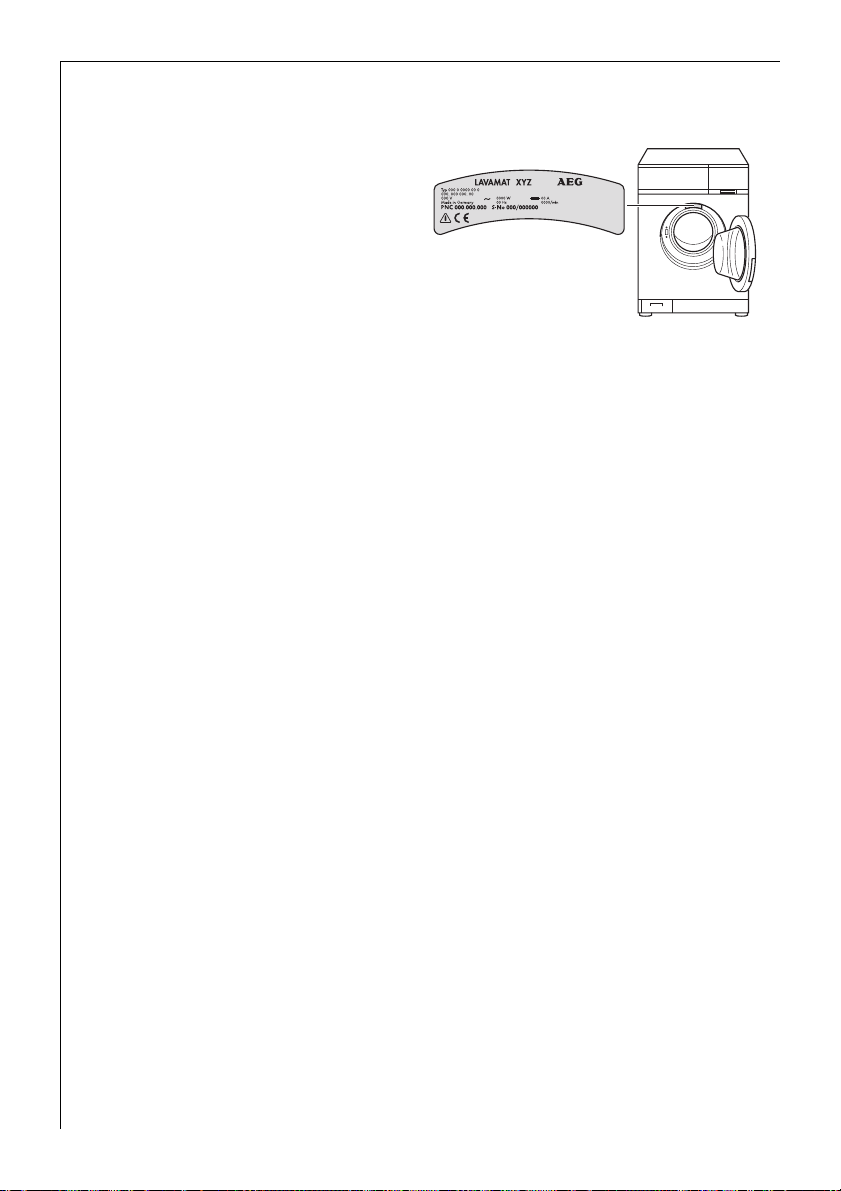
Power supply
Details on the mains voltage,
type of current and the necessary fuse protection are to be
found on the rating plate. The
rating plate is above and
behind the door.
For permanent electrical connection within the electrical
circuit, provisions must be made which allow for electrical disconnection of the appliance from the mains with a contact opening of at least
3 mm at all poles. Suitable devices include circuit breakers, fuses
(threaded fuses must be entirely removed from the socket), ground
fault circuit interrupters and contactors. Permanent connection may
only be carried out by an authorised electrician.
;
This appliance conforms to the following EC directives
– "Low-Voltage Directive" 73/23/EWG dated 19 February 1973
and Directive amendment 93/68/EWG
– "EMC Directive" 89/336/EWG dated 3 May 1989
and Directive amendment 93/68/EWG
44
Page 45

Installation and Connection Instructions
Water connection
The washing machine is provided with safety devices which prevent
3
reverse pollution of drinking water and conform to the State regulations issued by water supply authorities (e.g. in Germany: DVGW Directives). Further protective measures in the installation are hence
unnecessary.
Attention! Appliances for cold water connection may not be connected to warm water!
Permissible water pressure
Water pressure must be equal to a least 1 bar (= 10N/cm2 = 0.1 MPa),
and no more than 10 bar (= 100N/cm
• By more than 10 bar: connect a pressure reduction valve upstream.
• By less than 1 bar: Unscrew the flexible inlet tubing on the magnetic
inlet valve on one side of the appliance and remove the flow meter
(thereby remove the sieve by means of a pair of pointed pliers and
then remove the rubber washer behind it). Remount the sieve.
2
= 1 MPa).
45
Page 46
Installation and Connection Instructions
Water feed
A flexible pressure tubing of 1.5m length is supplied.
If a longer feed tubing is needed, a complete VDE-approved tubing set
with mounted screw connections, supplied by our customer service,
should be used exclusively.
– For washing machines without Aqua-Control, tubing sets are availa-
ble in lengths of 2.2m, 3.5m and 5m.
– For washing machines with Aqua-Control, tubing sets are available in
lengths of 2.0m, 2.9m and 3.9m.
Attention! Under no circumstances may tubing be pieced together for
the purpose of lengthening!
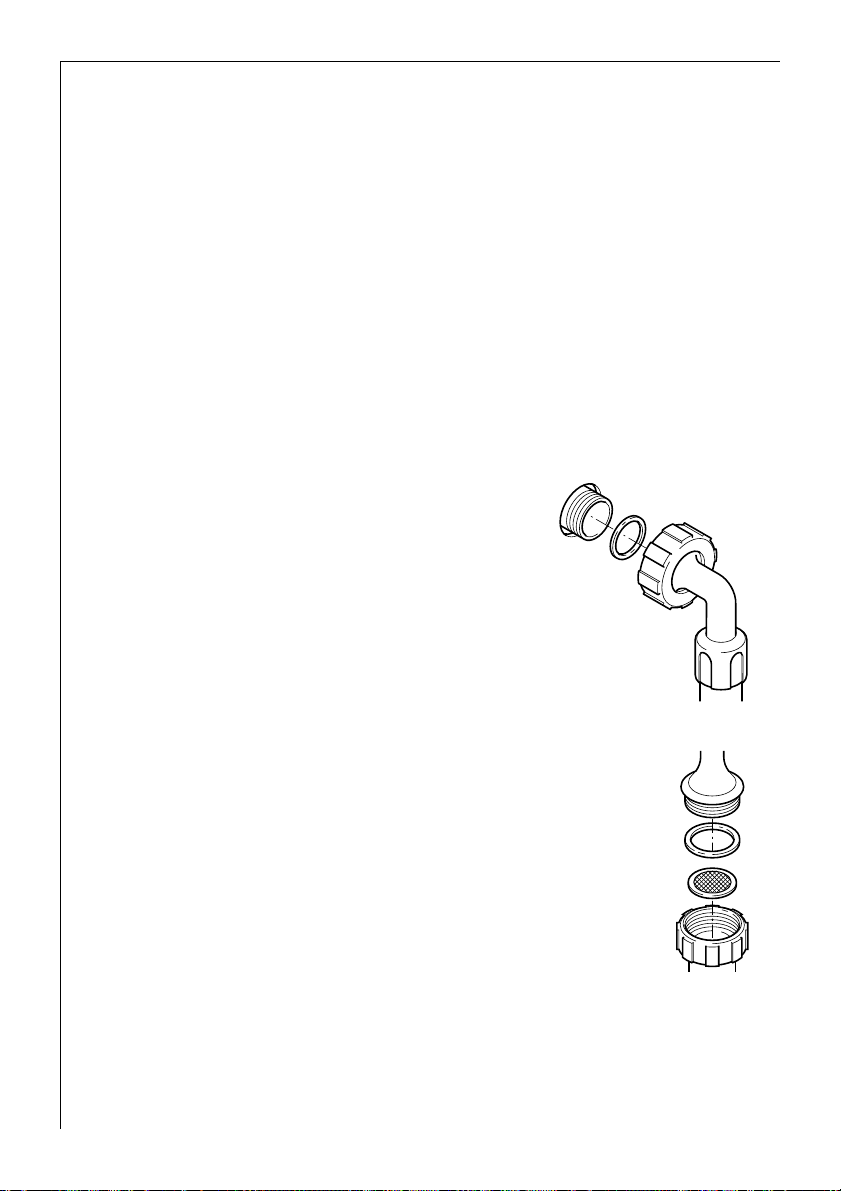
Sealing rings are either inserted in plastic nuts of the tubing screw con-
3
nection or contained in an accompanying packet. Do not use other
seals.
0 1. Connect the angled hose connector to the
machine.
Attention! Plastic nut at the tube coupling
may only be hand tightened.
2. Connect the straight hose connector to a water tap with an
R 3/4 (inch) thread.
Important! Only tighten the plastic nuts on the hose connectors by hand.
3. By opening the water tap slowly prior to the initial operation, check whether the connection is tight.
46
Page 47
Installation and Connection Instructions
Water drain-off
The drain-off tubing can be connected either to a siphon or be hanged
in a washing or sink basin or in a bathtub.
For extension (max. 3 m floor length and up to 80 cm high) only original tubing may be used. The customer service supplies drain-off tubing
of 2.7 and 4m lengths.
Water drain-off inside a siphon
The spout at the end of the tubing fits all common siphon types.
0 Make the connection spout/siphon secure with a tubing clip.
Water drain-off inside a basin
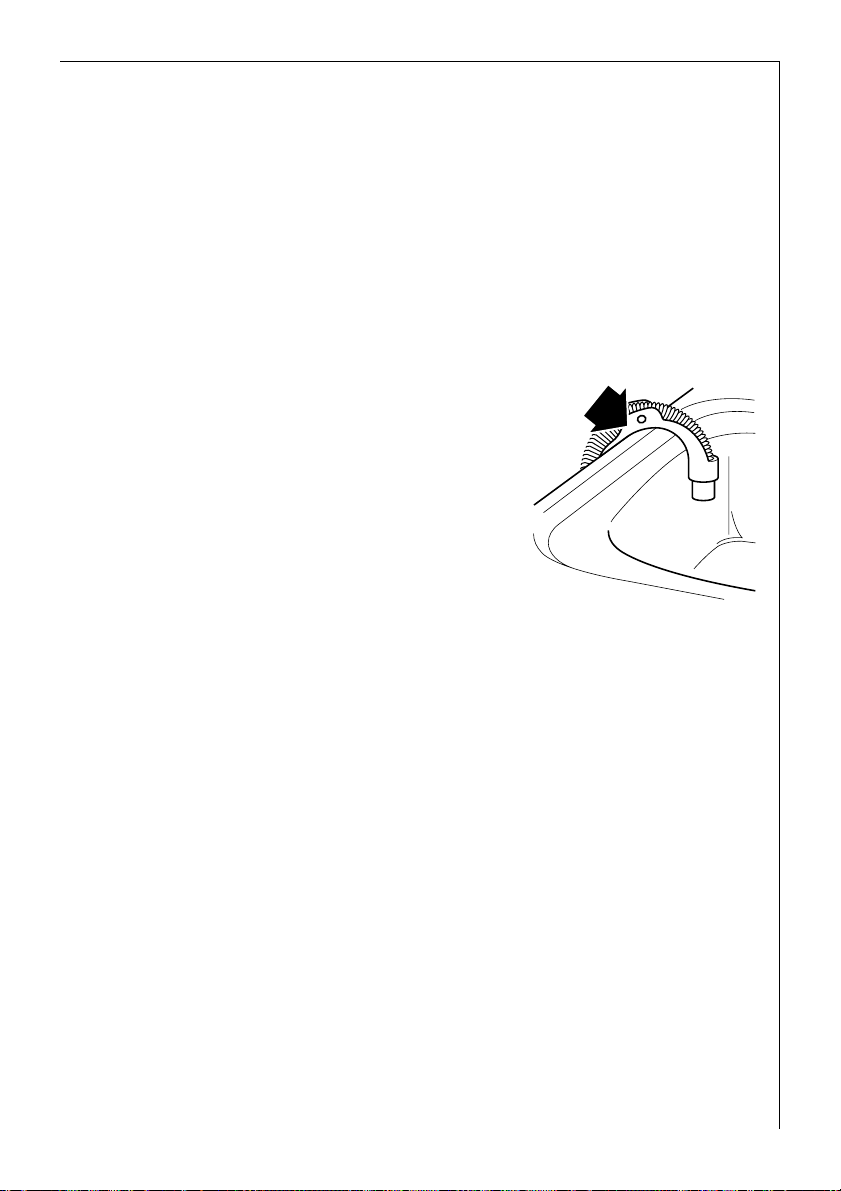
For hanging in a wash basin, sink or bath,
the drain hose must be prevented from
moving using the detachable elbow supplied.
The tube could otherwise be pushed out of
the basin by the reactive force imparted by
draining water.
Small sink basins are not suitable!
0 Fasten the elbow on the water tap or on
the wall by means of the hole.
Delivery head above 1m
Every washing machine is provided with a suds pump for draing the
washing/rinsing suds, which can deliver liquids via the drain-off tubing
up to a height of 1m, measured from the standing level of the machine.
For delivery heights above 1m please establish contact with the AEG
customer service.
47
Page 48

Installation and Connection Instructions
Technical data
Height x Width x Depth 85x60x60cm
Depth with open door 95cm
Height adjustment approx. +10/-5mm
Weight when empty approx. 85kg
Load (depending on the program) max. 5kg
Area of use Household
Wash cycle drum speed max. 53min
Spin cycle drum speed see type plate
Water pressure 1-10bar
(=10–100N/cm
2
= 0.1 – 1.0MPa)
-1
r.p.m.
48
Page 49

Customer Service/Warranty
CUSTOMER SERVICE/WARRANTY
Ceská republika
ELECTROLUX DOMÁCå SPOTØEBIÈE CZ
DIVIZE ELECTROLUX S.R.O.
Customer Centre
Hanusova ul.
140 21 Praha 4
Tel.: 02/61 12 61 12
Telefax: 02/61 12 35 04
tø. Gen. Piky 3
613 00 Brno
Tel.: 05/45 24 51 13
Telefax: 05/45 24 51 03
Záruka, servis a náhradní díly
Pøeètìte si tento návod k obsluze a dodržujte v nìm uvedené rady a pokyny. V
mnoha pøípadech si budete moci vyjasnit jakékoli pochybnosti sami a tudíž vyhnout
se zbyteèným voláním do servisu. Pøedchozí èásti nazvané „Co dìlat, když...“ a
„Servis“ obsahuje doporuèení, co by se mìlo zkontrolova døíve, než zavoláte servisního technika.
Jestliže po tìchto kontrolách závada stále existuje, zavolejte vaše nejbližší
autorizované servisní støedisko AEG. Ujistìte se, že mùžete sdìlit model, èíslo
výrobku a sériové èíslo spotøebièe. Tyto informace naleznete na datovém štítku
pøístroje. Originální náhradní díly lze koupit od autorizovaných støedisek servisu
AEG.
Podmínky záruky
My, výrobce, zaruèujeme, že jestliže bìhem 12 mìsícù od data zakoupení tohoto
spotøebièe AEG se tento spotøebiè nebo jakákoli jeho èást ukážou jako vadné
pouze z dùvodu vadného zpracování nebo vadného materiálu, provedeme podle
našeho uvážení bud’ opravu nebo výmìnu téhož bez placení za prací, materiál
nebo pøepravu za pøedpokladu, že
– spotøebiè byl správnì instalován a používán pouze na napìtí na štítku jmeno-
vitých hodnot
– spotøebiè byl používán pouze pro normální domácí úèely a v souladu s pokyny
výrobce pro provoz a údržbu na spotøebièi neprovádìla servis, údržbu ani
opravu jiná než námi autorizovaná osoba
– všechny servisní práce podle této záruky musí provádìt servis AEG nebo jím
autorizované støedisko
– každý vymìnìný spotøebiè nebo vymìnìná vadná souèást se stanou naším
vlastnictvím
– tato záruka platí vedle vašich zákonných nebo jinak právnì podložených práv
49
Page 50

Customer Service/Warranty
Výjimky – tato záruka se nevztahuje na:
– poškození nebo požadavky vzniklé v dùsledku pøepravy, nesprávného použití
nebo nedbalosti, výmìny žárovek a snímatelných èástí ze skla nebo plastických
hmot
– náklady spojené s požadavky na odstranìní závad spotøebièe, který je nes-
právnì instalován
– spotøebièe, které jsou používány v komerèním prostøedí vèetnì pronajímaných
– zemì Evropského spoleèenství. Lze použít standarní záruku, ale zajištìní, že
spotøebiè splòuje normy platné v pøíslušné zemi, kam byl spotøebiè dopraven, je
na zodpovìdnosti a na náklady vlastníka. Mùže být vyžadován doklad o koupi.
Model............................................................................................
Èíslo výrobku (Prod. No.)......................................................
Seriové èíslo (Serial. No.)......................................................
eventuelnì KD . . . . . . . . . / . . .
Bezpeènost
Pøeètìte si tento návod a varovná upozornìní na zaèátku tohoto návodu.
Výrobce nezodpovídá za vady zpùsobené nesprávnì používaným výrob-
kem nebo výrobkem používaným pro jiné úèely než jsou úèely specifikované v tomto návodu.
Technické zmìny výrobku vyhrazeny.
V pøípadì problému volejte zdarma
0800/16 00 16
50
Page 51

Customer Service/Warranty
Further Customer Service Centres
Weitere Kundendienststellen im Ausland
In diesen Ländern gelten die Garantiebedingungen der örtlichen Partner. Diese können dort eingesehen werden.
Further after-sales service agencies overseas
In these countries our AEG agents’ own guarantee conditions are applicable. Please obtain further details direct.
Autres agences étrangères assurant le service après-vente
Dans ces pays, les conditions de garantie des concessionnaires de la
région sont valables. Vous pouvez les consulter sur place.
Otros puntos de Postventa en el extranjero
En estos países rigen las condiciones de nuestros representantes locales.
las cuales pueden ser consultadas allí mismo.
Ulteriori uffici del servizio tecnico assistenza clienti all’estero
In questi paesi sono valide le condizioni di garanzia dei partner locali.
Queste condizioni possono essere esaminante sul luogo.
Serviços de assistência técnica no estrangeiro
Nestes países são válidas as condições de garantia dos concessionários
locais, podendo aí ser consultadas.
U.A.E. Abu Dhabi
Universal Trading Company
P.O. Box 43 99
Tel.: 335331
Egypt
Middle East Commercial
Center
P.O. Box 19
Kairo-Heliopolis
Tel.: 29917/31634
Australia
ANDI-Co Pty. Ltd
9 Kingston Town Close
Oakleigh VIC 3166
Tel.: (03) 9569 1235
Fax: (03) 9569 1450
Jordan
Jordan Household
Supply Co. Ltd.
P.O. Box 3/68
Amman/Tel.: 69 70 50
Kanada
EURO-LINE Appliances
2150 Winston PARK Drive 20
Oakville, Ontario L6H 5V1
Tel.: 905 829 3980
Fax: 905 829 3985
Korea (South)
Core Incorp.
3/F Chewoo Bldg.
200 Nonhyun-Dong
Kangnam-Ku
Seoul
Telefon 82 2 549 89 61
Malta
ITC
International Trading Company
White House Building
Mountbatte Street
Blata L-Bajda/Tel.: 220644
Mauritius
Happy World Centre Ltd.
P.O. 7 54
1 Chausee Street
Port Louis
Tel.: 25355
Namibia
AEG NAMIBIA (PTY) LIMITEDJeppe Street
Northern Industrial Area
Windhoek
Tel.: (061) 21-6082/4
Fax: (061) 217838
51
Page 52

Customer Service/Warranty
Bahrain/Arabian Gulf
A.A. Zayani & Sons
P.O. Box 9 32
Bahrain
Tel.: 261060
Bulgaria
Electrolux Bulgaria E.O.O.D.
91 Levski Blvd.
1000 Sofia
Tel.: 2 806676
Fax. 2 980 5276
Cyprus
Servilan Co. Ltd.
P.O. Box 36 05
77, Kennedy Ave.
Nicosia
Tel.: 311 477
Estonia
Electrolux Estonia Ltd.
Mustamäe tee 24
EE0006 Tallinn
Tel.: (372) 6 650 090
Fax: (372) 6 650 092
Hongkong
Wo Kee Services Ltd.
585-609 Castle Peak Road
Kwai Chung N.T.
Hongkong
Tel.: 2494 4000
Israel
Evis Ltd.
P.O. Box 70 39
Tel-Aviv – 67013
Tel.: 3257311
Croatia
Electrolux D.O.O.
Suplova 7
10000 Zagreb
Tel.: 1 61 19512
Fax: 1 61 19513
Kuwait/Arabian Gulf
Ali Al-Ghanim Est.
P.O. Box 10 83
Tel.: 5322463
Fax: 5242114
Lebanon
Adib & Assaferi
P.O. Box 539
Tripoli
Latavia
Electrolux Latavia Ltd.
Terlaton Street 42/44
1011 Riga
Tel.: 371 2 297821
Fax: 371 2 821286
Lthuania
Electrolux Lthuania
Verkui 29
2600 Vilnus
Tel.: 372 272 3326
Fax: 372 272 3366
Malaysia
Arzbergh Engineering
No. 49A/B, Jalan Petaling
Utama 7
4600 Petaling Jaya
Tel.: 3 795 1084
Fax: 3 795 1082
New Zealand
Euro-Life New Zealand Ltd.
Privat Bag
58 Symonds Street
Auckland
Tel.: (09) 525 2222
Nouvelle Caledonie
Socometra N.C.
B.P. 483
Nouman
Tel.: 275444
Oman
Moshin Haider Darwish
P.O. Box 1 35
Muscat
Tel.: 703743
Poland
Electrolux Poland Spolka Z.O.O.
Ul. Kolejowa 57
01 2100 Warzawa
Tel.: 22 632 1487
Fax: 22 632 7938
Russia
Sovinservice – Electrolux –
Nokia
109028, Moskow,
Pevcheskiy Per., 1/2
Tel.: (8-095) 916 00-51
Fax: (8-095) 917-91-08
(SA, white products, TV – radioelectronics)
Saudi Arabia
Alia Trading Corporation
P.O. Box 4101
King Abdul Aziz Street
Riyadh
Tel.: 4645977
Al Nahas Est.
Musaidia Market I
P.O. Box 1 15 29
Jeddah
Tel.: 6606852
52
Page 53

Customer Service/Warranty
Japan
Electrolux Japan Ltd.
Yasuda Warehouse 4F 3-3-12
Heiwajima Ota-Ku
Tokyo
Tel.: 81 3 3544 3363
Fax: 81 3 3763 6143
Thailand
OLYMPIA Thai Ltd.
44 Ratchadapisek Road
10320 Bangkok
Tel.: 2 513 6111
Fax: 2 513 2574
Hungary
Lehel Hutogepyar KFT
(AEG Div)
Erzsebet’Kiralyne Utja 87
1142 Budapest
Tel.: 00361/251 84 4
Singapore
Arzbergh Engineering
19 Tanglin Road 06-07
Singapore 247909
Tel.: 65 7356572
Fax: 7351124
Slovakia Rep.
Electrolux Slovakia S.R.O.
Seberiniho 1
821 03 Bratislava
Tel.: 7 239 745
Fax: 7 572 1072
USA
ANDI Co. Appl. Inc. East
65 Campus Plaza
Edison, New Jersey 0837
USA/Tel.: (201) 2258839
Slovenia
Electrolux Slovenia D.O.O.
Traska Ul. 132
1000 Ljubljana
Tel.: 61 1234 137
Fax: 61 1234 238
South Africa
AEG (Pty) Ltd.
55, 12th Road
P.O. Box 1 02 64
Kew/Johannesburg 2000
Tel.: 8069111
Syria
Masri & Shami
P.O. Box 24 96
Damascus
Tel.: 214080
53
Page 54

Index
INDEX
A
Additional rinse . . . . . . . . . . . . . . . . . . . . . . 35
Automatically adjusted foot . . . . . . . .10
, 43
C
Calcium . . . . . . . . . . . . . . . . . . . . . . . . . . . . 32
Cancel program . . . . . . . . . . . . . . . . . . . . . . 22
Conditioner . . . . . . . . . . . . . . 10
liquid . . . . . . . . . . . . . . . . . . . . . . . . . . . . 10
Cotton mixtures . . . . . . . . . . . . . . . . . . . . . 15
Cottons . . . . . . . . . . . . . . . . . . 11
Curtains . . . . . . . . . . . . . . . . . . . . . . . . . . . . 25
Customer service . . . . . . . . . . 28
, 16, 17, 20
, 15, 24, 26
, 29, 49, 55
D
Danger of freezing . . . . . . . . . . . . . . . . .6, 33
Delay timer . . . . . . . . . . . . . . . . . . 11
Delicates . . . . . . . . . . . . . . . . . 12
Detergent . . . . . . . . . . . . . . . . 10
liquid . . . . . . . . . . . . . . . . . . . . . . . . . . . . 20
Detergent for soaking . . . . . . . . . . . . . . . . . 20
, 18, 21
, 15, 25, 26
, 16, 17, 20
E
Easy-cares . . . . . . . . . . . . . . . 11, 15, 25, 26
ECO valve . . . . . . . . . . . . . . . . . . . . . . . .14
Emergency release . . . . . . . . . . . . . . . . . . . 35
End rinse . . . . . . . . . . . . . . . . . . . . . . . . . . . 23
Energy saving . . . . . . . . . . . . . . . . . . . .11
, 34
, 24
G
Guarantee . . . . . . . . . . . . . . . . . . . . 6, 29, 49
H
Hand washables . . . . . . . . . . . . . . . 12, 25, 26
L
Linen . . . . . . . . . . . . . . . . . . . . 11, 15, 24, 26
Liquid detergent . . . . . . . . . . . . . . . . . . . . . 20
M
Multidisplay . . . . . . . . . . .11, 21, 22, 29, 55
N
Net curtains . . . . . . . . . . . . . . . . . . . . . .14, 15
O
Open door . . . . . . . . . . . .19, 23, 31, 35, 38
Overdosing . . . . . . . . . . . . . . . . . . . . . . .11
, 23
P
Pre-wash . . . . . . . . . . . . . . . . 12, 18, 20, 24
Pre-wash detergent . . . . . . . . . . . . . . . . . . 20
Program progress display . . . . . . . . . . . . . .22
Program protection . . . . . . . . . . . 19
, 23, 38
Q
Quick wash . . . . . . . . . . . . . . . . . . 13, 18, 24
R
Rating plate . . . . . . . . . . . . . . . . . 10, 44, 55
Rinse + . . . . . . . . . . . . . . . . . . . . . . . . . 35
Rinse hold . . . . . . . . . . . . . . . . . . . . . . . 11
, 36
, 18
S
Silk . . . . . . . . . . . . . . . . . . . . . . . . . . . . . 12, 15
Soaking . . . . . . . . . . . . . . . . . . . . . . . . . . . . .12
Softener . . . . . . . . . . . . . . . . . . . . . .9
Softening . . . . . . . . . . . . . . . . . . . . . . . . . . .26
Spin . . . . . . . . . . . . . . . . . 11
Spinning . . . . . . . . . . . . . . . . . . . . . . . . . . . .26
Stain remover . . . . . . . . . . . . . . . . . . . . . . . .20
Stains . . . . . . . . . . 9
Starching . . . . . . . . . . . . . . . . . . . . . . . . . . . .26
, 10, 13, 18, 20, 24, 32
, 10, 20
, 12, 17, 18, 22
U
Update . . . . . . . . . . . . . . . . . . . . . . . . . . . . . .13
W
Washing
coloured . . . . . . . . . . . . . . . . . . . . . . . . . .14
delicate . . . . . . . . . . . . . . . . . . . 12
easy-care . . . . . . . . . . . . . . . . . . . . . . 11
gentle rinse . . . . . . . . . . . . . . . . . . . . 12
lightly soiled . . . . . . . . . . . . . . . . . . . . 9
normally soiled . . . . . . . . . . . . . . . . . . . . . .9
soaking . . . . . . . . . . . . . . . . . . . . . . . 20
starching . . . . . . . . . . . . . . . . . . 10
Wash-water
circulation pump . . . . . . . . . . . . . . . 10
cooling . . . . . . . . . . . . . . . . . . . . . . . . . . .36
emergency drain . . . . . . . . . . . . . . . . . . .33
Water
cooling . . . . . . . . . . . . . . . . . . . . . . . . . . .35
hardness . . . . . . . . . . . . . . . . . . . . . . . 9
pump out . . . . . . . . . . . . . . . . . . . . . 12
softener . . . . . . . . . . . . . . . . . 9
Wool . . . . . . . . . . . . . . . . . . . . 12
hand washable . . . . . . . . . . . . . . . . . 12
, 14, 15
, 15
, 26
, 13
, 24
, 12, 20
, 34
, 16
, 23
, 10, 16, 20
, 15, 25, 26
, 25
54
Page 55
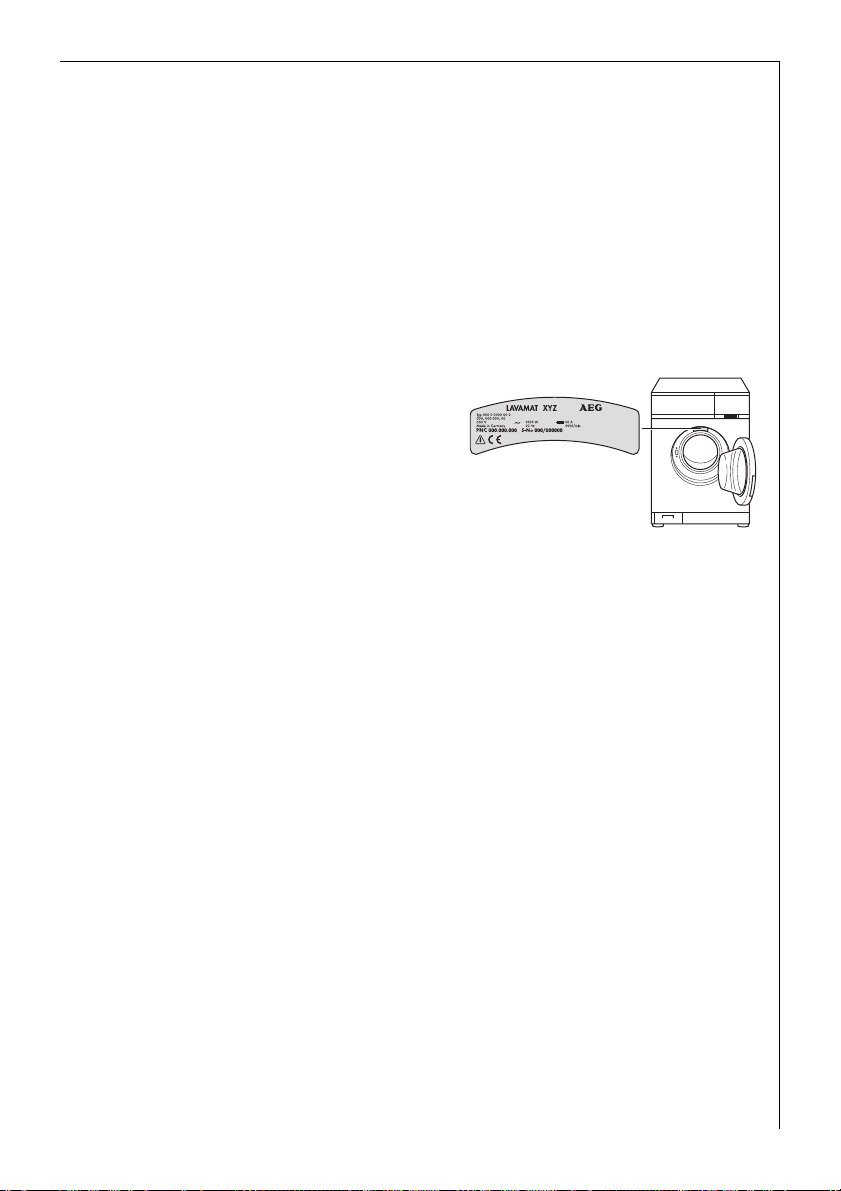
SERVICE
If a malfunction should occur at the appliance, refer first to the section
"What to do when ..." in these user instructions. If you do not find any
applicable instructions there, contact your customer service centre.
(Addresses and telephone number can be found in the "Customer
Service/Guarantee" section.)
Be well prepared before you phone. This facilitates the diagnosis and
the decision as to whether a customer service visit is necessary. With
our checklist you can gather important information before making
your call:
Make a note of the PNC number
and the S-number.
Both of these number can be found
on the serial plate on the inside of
the door of your washing machine.
......................................................
PNC
......................................................
S-No.
In addition to this please establish if possible:
• How is the malfunction noticeable ?
• Under what circumstances does the malfunction occur?
• Do an error message (( and an number) appear in the multi-display?
Service
You will be charged even during the warranty period
– if you could have corrected the malfunction yourself with the help of
the malfunctions table (see "What to do when ..." section),
– if the customer service technician is required to make several trips
because he had not received all relevant information before his visit,
and must return, for example, to pick up replacement parts. This
additional driving can be avoided if your telephone call is well prepared, as described above.
55
Page 56

AEG Hausgeräte GmbH
Postfach 1036
D-90327 Nürnberg
http://www.aeg.hausgeraete.de
© Copyright by AEG
H 243 295 140 – 02- 0900
 Loading...