

Page 1

8060 TW
IT ASCIUGABIANCHERIA ISTRUZIONI PER L’USO 2
EN TUMBLE DRYER USER MANUAL 32
Page 2

2
INDICE
4 INFORMAZIONI PER LA SICUREZZA
6 CONSIDERAZIONI AMBIENTALI
7 DESCRIZIONE DEL PRODOTTO
8 ACCESSORI
10 PANNELLO DEI COMANDI
11 PREPARAZIONE AL PRIMO UTILIZZO
12 PROGRAMMI
14 USO DELL'APPARECCHIATURA
18 CONSIGLI E SUGGERIMENTI UTILI
20 PULIZIA E CURA
27 RISOLUZIONE DEI PROBLEMI
29 DATI TECNICI
30 INSTALLAZIONE
ASSISTENZA
Prima di contattare il centro di
assistenza, assicurarsi di avere a portata
di mano i seguenti dati. Le informazioni
sono riportate sulla targhetta.
Modello
PNC
Numero di serie
In questo manuale sono riportati i
seguenti simboli:
Avvertenza - Importanti informazioni di
sicurezza.
Informazioni e consigli generali
Informazioni in materia di sicurezza
ambientale
Con riserva di modifiche
Page 3

PER RISULTATI PERFETTI
Grazie per aver scelto di acquistare questo prodotto AEG. Lo abbiamo creato per
fornirvi prestazioni impeccabili per molti anni, grazie a tecnologie innovative che vi
semplificheranno la vita - funzioni che non troverete sui normali elettrodomestici. Vi
invitiamo di dedicare qualche minuto alla lettura per sapere come trarre il massimo
dal vostro elettrodomestico.
ACCESSORI E PRODOTTI DI CONSUMO
All'interno del webshop AEG troverete tutto ciò che vi serve per fare in modo che i
vostri elettrodomestici AEG siano sempre perfettamente puliti e funzionanti. Non
mancano inoltre una vasta gamma di accessori studiati e realizzati conformemente
agli elevati standard qualitativi che vi aspettate: pentole, scolaposate, portabottiglie
e sacchi biancheria delicati...
Visitate il webshop su
www.aeg.com/shop
ITALIANO
3
VISITA IL NOSTRO SITO WEB:
- Prodotti
- Brochure
- Libretto istruzioni
- Risoluzione dei problemi
- Informazioni sui servizi
www.aeg.com
Page 4

4
INFORMAZIONI PER LA SICUREZZA
Per la vostra sicurezza e per garantire un impiego corretto, prima di installare e utilizzare per la prima volta
l'apparecchiatura, vi consigliamo di
leggere con attenzione il manuale
per l'utente, inclusi i suggerimenti e
le avvertenze. Per evitare errori ed
incidenti, è importante garantire che
tutte le persone che utilizzano l'apparecchiatura ne conoscano il funzionamento e le caratteristiche di sicurezza. Conservare queste istruzioni ed
allegarle all'apparecchiatura in caso
di trasporto o di vendita, in modo
che chiunque la utilizzi sia correttamente informato sul suo utilizzo e
sulle precauzioni di sicurezza.
- Prima di utilizzare l'apparec-
chiatura leggere il manuale di istruzioni.
NORME DI SICUREZZA
GENERALI
• È pericoloso modificare le specifiche
o cercare di alterare il prodotto in
qualunque modo.
• Quest'apparecchiatura non deve essere utilizzata da bambini o da persone le cui capacità fisiche, sensoriali o
mentali o la cui mancanza di esperienza e conoscenze sull'uso dell'apparecchiatura impediscano loro di
utilizzarla senza rischi in assenza di
una persona responsabile per la loro
incolumità.
• Evitare che bambini e animali domestici possano entrare nel cesto. Per sicurezza, ispezionare il cesto prima
dell'utilizzo.
• Oggetti come monete, spille di sicurezza, chiodi, viti, pietre o altri materiali duri e taglienti possono danneggiare gravemente l'apparecchiatura;
prestare attenzione a non introdurli
insieme alla biancheria.
• Oggetti di gommapiuma (schiuma di
lattice), cuffie da bagno, tessuti impermeabili (nel caso non sia disponibile un programma di asciugatura
dedicato), articoli in gomma e indumenti o cuscini con imbottitura in
gommapiuma non devono essere
asciugati nell'asciugabiancheria.
• Verificare che la spina di alimentazione rimanga accessibile dopo l'installazione.
• Dopo l'uso, per la manutenzione o la
pulizia, staccare sempre la spina dell'alimentazione.
• Non cercare in nessun caso di modificare o riparare l’apparecchiatura da
soli. Le modifiche o riparazioni eseguite da persone non esperte possono causare seri danni o malfunzionamenti. Contattare il Centro di assistenza locale. Richiedere sempre l'installazione di ricambi originali.
• I capi con macchie di olio da cucina,
acetone, benzina, cherosene, smacchiatori, trementina, cere e prodotti
per rimuovere la cera devono essere
lavati in acqua calda con abbondante
detersivo prima di essere introdotti
nell'asciugabiancheria.
• Pericolo di esplosione: non inserire
nell'asciugatrice capi che siano stati a
contatto con solventi infiammabili
(benzina, alcol denaturato, liquidi per
la pulizia a secco e simili). Queste sostanze sono volatili, perciò possono
creare un rischio di esplosione. Inserire nell'asciugabiancheria solo capi
lavati in acqua.
• Pericolo di incendio: i capi che siano
stati sporcati o imbevuti con olio vegetale o da cucina non devono essere inseriti nell'asciugabiancheria per
evitare potenziali rischi di incendio.
• I capi trattati con smacchiatori devono essere risciacquati in acqua prima
di essere introdotti nell'asciugabiancheria.
• Prima di inserire i capi nell'asciugabiancheria, verificare che nelle tasche
non siano stati dimenticati accendini
o fiammiferi
• L'acqua di condensa non può essere
usata per bere o preparare pietanze.
Page 5

Farlo potrebbe causare problemi alla
salute di persone e animali domestici.
• Non sedersi o salire sulla porta. L'apparecchiatura potrebbe ribaltarsi.
AVVERTENZA!
• Rischio di incendio! Per evi-
tare il rischio di auto combustione, non arrestare mai l'asciugabiancheria prima del
termine del ciclo di asciugatura. Nel caso sia assolutamente necessario, fare attenzione perché la biancheria e il cesto possono essere
molto caldi.
• Non bisogna lasciare che si
accumuli lanugine nel cesto
dell'asciugabiancheria.
ITALIANO
zione dell’apparecchiatura, l’intervento dovrà essere effettuato da personale qualificato e competente.
• La superficie posteriore dell'apparecchiatura dovrà essere appoggiata alla
parete
• Se l’apparecchiatura è installata su un
tappeto o simile, regolare i piedini.
L’aria deve circolare liberamente al di
sotto dell’apparecchiatura.
• Dopo aver installato l’apparecchiatura, verificare che il cavo dell’alimentazione elettrica non sia schiacciato.
• Se l'asciugabiancheria è installata sopra la lavabiancheria, deve obbligatoriamente essere utilizzato l’apposito kit di montaggio (accessorio opzionale - consultare il capitolo: "ACCESSORI").
5
• Pericolo di scosse elettriche! Non
pulire l'apparecchiatura con getti
d’acqua.
• L'ultima fase del programma di asciugatura è una fase di raffreddamento
per proteggere i capi di biancheria.
• Non introdurre nell’asciugabiancheria capi che siano stati lavati con sostanze chimiche industriali.
• Assicurare la buona ventilazione nell'ambiente in cui è installata la macchina.
INSTALLAZIONE
• Quest'apparecchiatura è pesante. Si
prega di prestare attenzione in fase
di spostamento dell'apparecchiatura.
• Al momento del disimballaggio, verificare che l'apparecchiatura non abbia subito danni. In caso di dubbi,
non utilizzarla e rivolgersi al Centro di
assistenza.
• Disimballare completamente l'apparecchiatura prima dell'installazione.
L'inosservanza di tale disposizione
può causare gravi danni all'apparecchiatura e all'abitazione. Vedere la
relativa sezione del manuale di istruzioni.
• Se si rendesse necessaria una modifica all'impianto elettrico per l'installa-
USO
DELL’APPARECCHIATURA
• L'apparecchiatura è destinata solo all'uso domestico. Non deve essere
utilizzata ad altri scopi.
• Asciugare esclusivamente tessuti idonei all'asciugatura nell'asciugabiancheria. Seguire le istruzioni riportate
sull'etichetta dei singoli capi.
• Non introdurre nell'asciugabiancheria capi non lavati.
• Non introdurre un carico superiore a
quello consigliato. Rispettare il volume di carico massimo. Consultare il
relativo capitolo nel libretto di istruzioni.
• Non introdurre nell'asciugabiancheria capi ancora troppo bagnati.
• Non introdurre nell'asciugabiancheria indumenti che siano stati a contatto con prodotti volatili a base di petrolio. Se si utilizza uno smacchiatore
o un detergente volatile, attendere
che il prodotto sia completamente
evaporato prima di introdurre i capi
nell’apparecchiatura.
• Non utilizzare mai l'asciugabiancheria
se il cavo di alimentazione, il pannello dei comandi, il piano di lavoro o la
base sono danneggiati in modo tale
da rendere accessibili le parti interne.
Page 6

6
• Ammorbidenti o prodotti equivalenti
devono essere utilizzati seguendo le
indicazioni del produttore.
• Rischio di incendio! Non asciugare
capi rovinati contenenti materiale di
rivestimento o imbottiture (cuscini,
giacche, piumoni, ecc). Il materiale di
rivestimento o le imbottiture potrebbero fuoriuscire e provocare un incendio.
SICUREZZA BAMBINI
• Questa apparecchiatura non deve essere utilizzata da bambini o persone
inferme senza supervisione.
• I bambini non sono in grado di riconoscere i rischi associati alle apparecchiature elettriche. È consigliabile
controllare che i bambini non giochino con l'apparecchiatura.
AVVERTENZA!
• Vi è il pericolo di soffocamento! I componenti di imballaggio (come il polistirolo o i sacchetti di plastica) possono essere molto pericolosi per i
bambini, tenerli fuori dalla
portata dei bambini.
• Tenere in un luogo sicuro e al di fuori
della portata dei bambini anche tutti
i detersivi.
• Evitare che i bambini o gli animali
domestici entrino nel cesto.
SMALTIRE
L'APPARECCHIATURA
• Scollegare la spina dalla presa di corrente.
• Tagliare il cavo di rete e smaltirlo.
• Rimuovere il fermo della porta. Ciò
evita che i bambini o gli animali domestici restino chiusi nell'apparecchiatura. Vi è il rischio di soffocamento.
CONSIDERAZIONI AMBIENTALI
MATERIALI DI IMBALLAGGIO
Riciclare i materiali con il simbolo .
Buttare l'imballaggio negli appositi
contenitori per il riciclaggio.
Il simbolo
confezione indica che il prodotto non
deve essere considerato come un
normale rifiuto domestico, ma deve
essere portato nel punto di raccolta
appropriato per il riciclaggio di
apparecchiature elettriche ed
elettroniche. Provvedendo a smaltire
questo prodotto in modo appropriato,
si contribuisce a evitare potenziali
conseguenze negative, che potrebbero
derivare da uno smaltimento
sul prodotto o sulla
inadeguato del prodotto. Per
informazioni più dettagliate sul
riciclaggio di questo prodotto,
contattare l’ufficio comunale, il servizio
locale di smaltimento rifiuti o il negozio
in cui è stato acquistato il prodotto.
Dove portare gli apparecchi fuori
uso?
In qualsiasi negozio che vende
apparecchi nuovi oppure si
restituiscono ai centri di raccolta
ufficiali della SENS oppure ai
riciclatori ufficiali della SENS.
La lista dei centri di raccolta ufficiali
della SENS è visibile nel sito
www.sens.ch.
Page 7
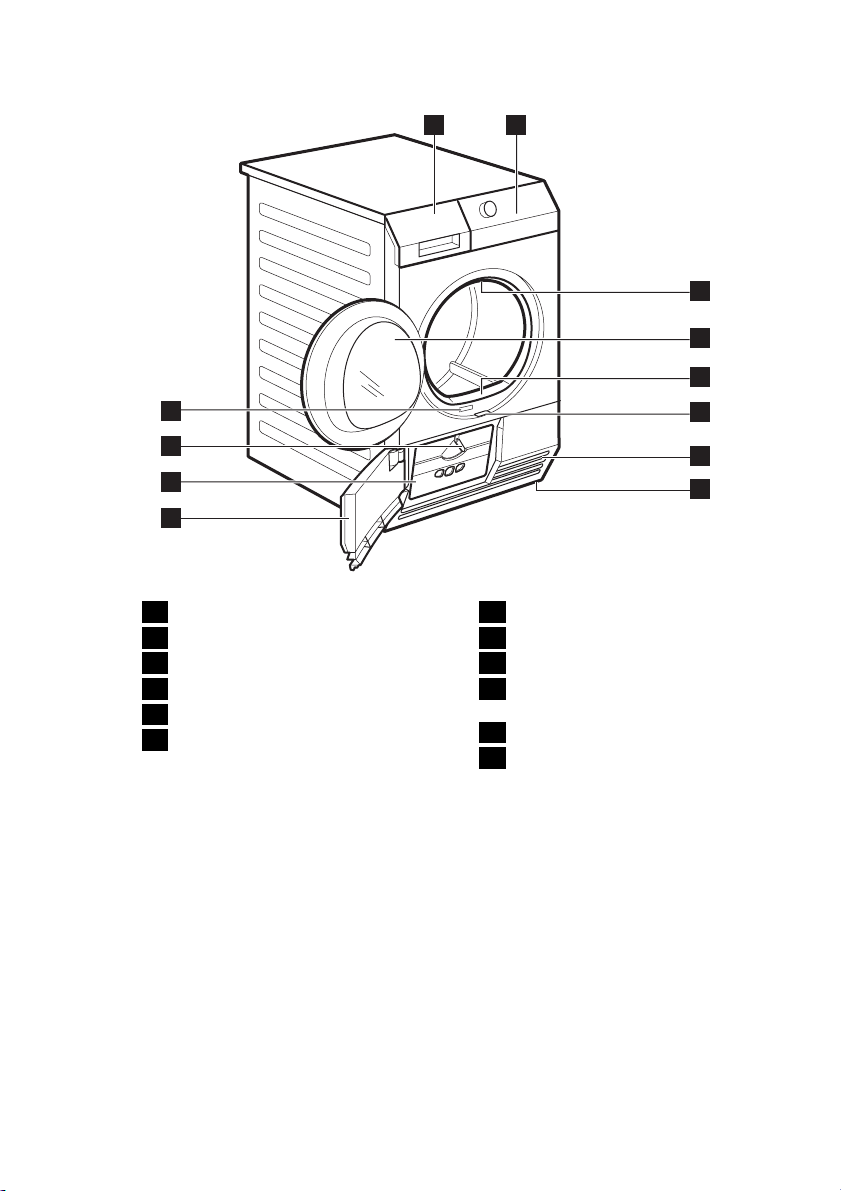
DESCRIZIONE DEL PRODOTTO
1 2
ITALIANO
3
4
5
7
12
11
10
9
Contenitore dell'acqua
1
Pannello dei comandi
2
Luce cesto
3
Porta (reversibile)
4
Filtro principale
5
Far scorrere il tasto per aprire la
6
porta dello scambiatore di calore
6
7
8
Fessure per il ricircolo dell'aria
7
Piedini regolabili
8
Porta dello scambiatore di calore
9
Coperchio dei filtri dello scambia-
10
tore di calore
Manopola di blocco
11
Targhetta dei dati
12
Page 8

8
ACCESSORI
KIT DI INSTALLAZIONE IN
COLONNA
Nome prodotto: SKP11
Disponibile presso il vostro distributore
autorizzato. Il kit per il montaggio può
essere usato solo con le lavabiancheria
specificate nel foglietto. Vedere il foglietto allegato.
Leggere attentamente le istruzioni fornite con il kit.
KIT DI SCARICO
mente. Il contenitore dell’acqua deve
trovarsi all’interno dell’apparecchiatura.
Il tubo installato deve trovarsi ad un’altezza tra i 50 cm e un massimo di 1 m
da terra. Il tubo non deve essere attorcigliato. Se possibile ridurre la lunghezza del tubo.
Leggere attentamente le istruzioni fornite con il kit.
PIEDISTALLO CON CASSETTO
Nome prodotto: PDSTP10.
Disponibile presso il vostro distributore
autorizzato.
Per posizionare l’apparecchiatura più in
alto, ad un’altezza che faciliti l’introduzione e l’estrazione della biancheria.
Il cassetto può essere utilizzato per
conservare tutto ciò che riguarda la
biancheria come ad es.: asciugamani,
prodotti per la pulizia ed altro.
Leggere attentamente le istruzioni fornite con l'accessorio.
Nome prodotto: DK11.
Disponibile presso il vostro distributore
autorizzato (può essere collegato ad alcuni tipi di asciugabiancheria)
Kit di installazione per lo scarico dell’acqua di condensa in un lavello, un sifone, una conduttura, ecc. Dopo aver
eseguito l’installazione, il contenitore
dell’acqua viene scaricato automatica-
Page 9

CESTELLO DI ASCIUGATURA
ITALIANO
Disponibile presso il vostro distributore
autorizzato (può essere collegato ad alcuni tipi di asciugabiancheria)
Il cestello permette di eseguire
un’asciugatura sicura all’interno
dell’asciugabiancheria.
•scarpe sportive
•lana
• peluche
•intimo
Leggere attentamente le istruzioni fornite con il kit.
9
Page 10

10
PANNELLO DEI COMANDI
1 2
356 4
Selettore dei programmi
1
Display
2
Tasto Avvio/Pausa (Start/Pause)
3
Funzione tasti
4
DISPLAY
Simbolo Descrizione
, ,
, —
—
- - -
Spie del programma
5
Tasto On/Off con funzione Auto
6
Off
grado di asciugatura extra: minimo, medio, massimo
tempo antipiega: predefinito, intervallo (30 min. - 120
min.)
centrifuga iniziale biancheria (800 - 1800 giri/minuto)
predefinita
segnale acustico attivato
sicurezza bambini attivata
funzione tempo attivata
spiascarico del contenitore dell'acqua
spiapulizia del filtro principale
spiapulizia dei filtri dello scambiatore di calore
Page 11

Simbolo Descrizione
spia fase di asciugatura
spia fase di raffreddamento
spia fase antipiega
partenza ritardata attivata
-
-
durata del ciclo
intervallo durata programma (10 min. - 2 ore)
intervallo partenza ritardata (30 min. - 20 ore)
PREPARAZIONE AL PRIMO UTILIZZO
ITALIANO
11
Pulire il cesto dell’asciugabiancheria
con un panno umido o impostare un
programma breve ( ad es. della durata
di 30 minuti) con un carico di panni
umidi.
ATTENZIONE
Il compressore e il relativo sistema
all’interno dell’asciugabiancheria vengono riempiti con un agente speciale
esente da CFC (Cloro-Fluoro-Carburi).
Il sistema deve essere a tenuta stagna.
Un sistema danneggiato può causare
perdite e danni all’apparecchiatura.
All'inizio del ciclo di asciugatura (3-5
min.) il funzionamento potrebbe essere
leggermente più rumoroso. Ciò è dovuto all'avvio del compressore ed è un fenomeno normale per le apparecchiature alimentate da compressore, come:
frigoriferi, congelatori.
Page 12

12
PROGRAMMI
Programmi
Extra (Extratrocken)
Carico
1)
8 kg
Normale
(Schrank-
trocken)
8 kg
2)
Pronto Stiro
(Bügeltroc-
2)
ken)
Extra Silent
(Extra Leise)
8 kg
8 kg
Jeans 8 kg
Piumoni
(Daunen)
3 kg
Tempo
(Zeitpro-
8 kg
gramm)
Extra Rapido
(Mix Extra
3 kg
Kurz)
Extra (Extratrocken)
3,5 kg
Proprietà
Cotoni (Baumwolle)
Asciugatura di indumenti in cotone. Grado di asciugatura: Extra.
Asciugatura di indumenti in cotone. Grado di asciugatura: normale.
Asciugatura di indumenti in cotone. Grado di asciugatura: adatto
per la stiratura.
Asciugatura delicata di indumenti
in cotone con riduzione del rumore al minimo. Il programma può
essere utilizzato di notte.
Asciugatura di capi sportivi come
jeans, felpe e simili, in tessuti di
spessore diverso (ad esempio su
colletto, polsini e cuciture).
Asciugatura di piumoni singoli o
matrimoniali e cuscini (con imbottitura in piume, piumini o sintetica).
Asciugatura di biancheria con il
tempo impostato dall'utente. La
durata deve tenere conto del carico. Asciugatura di un capo o un
carico di biancheria ridotto; si consiglia di utilizzare durate brevi.
Asciugatura di tessuti in cotone e
sintetici, a basse temperature.
Sintetici (Mischgewebe)
Asciugatura di tessuti spessi o
multistrato, ad esempio maglioni,
biancheria da letto, tovaglie.
Funzioni di-
sponibili
tutte tranne
Tempo
(Zeitwahl)
tutte tranne
Tempo
(Zeitwahl)
tutte tranne
Tempo
(Zeitwahl)
tutte tranne
Tempo
(Zeitwahl)
tutte tranne
Tempo
(Zeitwahl)
tutte tranne
Antipiega
(Knitter-
schutz) e
Tempo
(Zeitwahl)
tutte tranne
Più Asciutto
(Trocken +)
e Carico
centrif. A (U/
Min.)
tutte tranne
Tempo
(Zeitwahl)
tutte tranne
Tempo
(Zeitwahl)
Tipo
di tes-
suto
Page 13

ITALIANO
13
Programmi
Carico
1)
Normale
(Schrank-
trocken)
3,5 kg
2)
Pronto Stiro
(Bügeltroc-
3,5 kg
ken)
Stiro Facile
(Leichtbügeln)
1 kg (o
5 ca-
micie)
Outdoor
(Active
2 kg
Wear)
Sport
(Sportklei-
2 kg
dung)
Seta (Seide) 1 kg
Proprietà
Asciugatura di tessuti sottili da
non stirare, ad esempio camicie in
tessuti misti, tovaglie, indumenti
per bambini, calzini, articoli di corsetteria.
Asciugatura per tessuti sottili da ripassare col ferro, ad esempio maglieria o camicie.
Per asciugare facilmente tessuti
come per esempio magliette e camicette e per poterli stirare senza
nessuna fatica. I risultati possono
essere diversi a seconda dei vari tipi di tessuto e delle loro rifiniture.
Mettere direttamente i tessuti nell'asciugabiancheria. Dopo il ciclo,
togliere immediatamente i tessuti
asciutti e disporli sugli appendini.
Asciugatura per indumenti per l'aria aperta, tecnici, sportivi, in pile,
giacche impermeabili e traspiranti,
giacca aderente dotata di interno
rimovibile o rivestimento isolante
interno.
Asciugatura di capi sportivi, tessuti
sottili e leggeri, microfibra, poliestere, che non richiedono stiratura.
Asciugatura di capi in seta con aria
calda e movimenti delicati.
Funzioni di-
sponibili
tutte tranne
Tempo
(Zeitwahl)
tutte tranne
Tempo
(Zeitwahl)
tutte tranne
Tempo
(Zeitwahl)
tutte tranne
Antipiega
(Knitter-
schutz) e
Tempo
(Zeitwahl)
tutte tranne
Tempo
(Zeitwahl)
tutte tranne
Antipiega
(Knitter-
schutz) e
Tempo
(Zeitwahl)
Tipo
di tes-
suto
Page 14

14
Programmi
Carico
1)
Proprietà
Funzioni di-
sponibili
Asciugatura di capi in lana. I capi
diventano morbidi e soffici. Consigliamo di togliere i capi subito dopo la fine del programma.
Il ciclo di asciugatura dei capi in
Lana (Wolle)
lana di questa asciugabiancheria è
stato testato e approvato da
Woolmark Company. Il ciclo è
adatto ad asciugare indumenti in
lana con etichetta "lavaggio a ma-
1 kg
no", purché gli indumenti siano lavati in un ciclo di lavaggio a mano
approvato da Woolmark e asciugati in asciugabiancheria secondo
le istruzioni fornite dal produttore.
Più Asciutto
(Trocken +) ,
Segnale
Acustico (Si-
gnal) , Tem-
po (Zeitwahl)
3)
, Partenza
Ritardata
(Zeitvorwahl)
(M1129).
Per aumentare o ridurre il grado di
umidità residua della biancheria è
possibile utilizzare la funzione Più
Asciutto (Trocken +) .
1)
peso massimo dei capi asciutti
2)
Ai soli fini normativi:
Per effettuare un test relativo alle prestazioni, utilizzare i programmi standard indicati nel
documento EN 61121. Se si rendesse necessario correggere il grado di umidità residuo
della biancheria, regolare il programma utilizzando la funzione Più Asciutto (Trocken +) .
3)
Solo con il cestello di asciugatura; consultare il capitolo ACCESSORI
Tipo
di tes-
suto
USO DELL'APPARECCHIATURA
PREPARAZIONE DELLA
BIANCHERIA
Asciugare esclusivamente capi
idonei per essere asciugati
nell’asciugabiancheria. Assicurarsi che i capi siano idonei per
essere asciugati nell’asciugabiancheria. Controllare il tipo di
tessuto riportato sui capi.
Tipo
di tessuto
Caratteristiche
Idoneo per essere asciugato
nell'asciugabiancheria
Idoneo per essere asciugato
nell'asciugabiancheria a temperatura normale
Tipo
Caratteristiche
di tessuto
Idoneo per essere asciugato
nell'asciugabiancheria a tem-
peratura ridotta
Non idoneo per essere
asciugato nell'asciugabian-
cheria
Preparare la biancheria in modo adeguato:
• chiudere le cerniere, abbottonare i
copripiumini e annodare eventuali
lacci o nastri (ad esempio quelli dei
grembiuli) - la biancheria potrebbe
aggrovigliarsi
Page 15

• verificare che le tasche siano vuote,
rimuovere gli oggetti metallici (graffette, spille da balia, ecc.).
• rivoltare i capi con 2 strati di tessuto
(ad es. nel caso di eschimo foderato
in cotone, lo strato in cotone deve
trovarsi all'esterno).
Solo asciugatura:
• cotoni con programmi Cotoni (Baumwolle)
• sintetici e misti con programmi Sintetici (Mischgewebe)
• separare i tessuti colorati resistenti e
quelli colorati leggeri; i colori potrebbero stingere
• jersey di cotone e maglioni solo con i
programmi idonei; gli indumenti potrebbero restringersi
Non introdurre un carico di
biancheria superiore al massimo
consentito di 8kg.
CARICO DELLA BIANCHERIA
ITALIANO
l’apparecchiatura è accesa, alcune indicazioni vengono visualizzate sul display.
15
FUNZIONEAUTO OFF
Per ridurre il consumo di energia, la
funzione Auto Off disattiva automaticamente l’apparecchiatura:
• se entro 5 minuti non viene premuto
il tasto Avvio/Pausa (Start/Pause) .
• dopo 5 minuti dal termine del programma.
Premere il tasto Auto Off per attivare
l'apparecchiatura.
IMPOSTAZIONE DI UN
PROGRAMMA
1.
Aprire la porta dell'apparecchiatura
2.
Caricare la biancheria senza schiacciarla.
3.
Chiudere la porta dell'apparecchiatura.
ATTENZIONE
Fare attenzione a non incastrare
la biancheria tra la porta e la
guarnizione di gomma.
ACCENSIONE
DELL'APPARECCHIATURA
Premere il tasto On/Off per attivare
o disattivare l'apparecchiatura. Quando
Usare il selettore dei programmi per
impostare il programma. Il display indica la durata massima del programma.
Il tempo di asciugatura visualizzato corrisponde al carico di 5
kg per programmi cotone e
jeans. Per gli altri programmi il
tempo di asciugatura è correlato ai carichi consigliati. Il tempo
di asciugatura dei programmi
cotone e jeans con un carico superiore ai 5 kg è più lungo.
FUNZIONI SPECIALI
Oltre al programma è possibile impostare una o più funzioni speciali.
Page 16

16
Per attivare o disattivare la funzione
premere il tasto idoneo.
• al termine del ciclo
• all'inizio e alla fine della fase antipiega
• all'interruzione del ciclo
La funzione segnale acustico è sempre
attiva. È possibile utilizzare questa funzione per attivare o disattivare il segnale sonoro.
Quando la funzione è attivata, sul display compare il simbolo corrispondente.
FUNZIONE PIÙ ASCIUTTO
(TROCKEN +)
Questa funzione permette di ottenere
una biancheria più asciutta. 3 sono le
selezioni possibili:
minima: la selezione predefinita correlata al programma.
media: la selezione per ottenere una
biancheria più asciutta.
massima: la selezione per ottenere la
biancheria più asciutta possibile.
FUNZIONE ANTIPIEGA
(KNITTERSCHUTZ)
Prolunga di 30, 60, 90 o 120 minuti la fase antipiega normale (30 minuti) al termine del ciclo di asciugatura. Questa
funzione evita che la biancheria si
sgualcisca. La biancheria può essere
estratta durante la fase antipiega.
FUNZIONE CARICO CENTRIF.
A (U/MIN.)
Questa funzione permette di impostare
le migliori condizioni di asciugatura della biancheria. È possibile utilizzare questa funzione se si conosce la velocità di
centrifuga iniziale del lavaggio. Una velocità di centrifuga superiore riduce la
quantità di acqua all’interno della biancheria.
FUNZIONE SEGNALE
ACUSTICO (SIGNAL)
Quando la funzione segnale acustico è
attiva, viene emesso un segnale:
FUNZIONE TEMPO
(ZEITWAHL)
Funziona solo il programma Tempo .
Consente di impostare un tempo personalizzato di asciugatura compreso tra
10 min. e 2 ore (con incrementi di 10
minuti).
FUNZIONE PARTENZA
RITARDATA (ZEITVORWAHL)
Consente di ritardare l'inizio di
un programma di asciugatura
da un minimo di 30 min. fino ad
un massimo di 20 ore.
1.
Impostare il programma di asciugatura e le funzioni.
2.
Premere ripetutamente il tasto Partenza Ritardata (Zeitvorwahl) finché
il tempo di ritardo desiderato non
compare sul display (ad es.
il programma deve iniziare dopo 12
ore).
3.
Per attivare la funzione Partenza Ritardata (Zeitvorwahl) , premere il tasto Avvio/Pausa (Start/Pause) . Il display mostra lo scorrere del tempo.
se
FUNZIONE SICUREZZA
BAMBINI
La sicurezza bambini può essere impostata per evitare che giochino con l’apparecchiatura. La funzione sicurezza
bambini blocca tutti i tasti e il selettore
dei programmi (la funzione non blocca
il tasto Auto/Off ). Per attivare la sicurezza bambini premere contemporaneamente i tasti Più Asciutto (Trocken
+) e Antipiega (Knitterschutz) finché il
simbolo
Per disattivarla premere nuovamente i
non compare sul display.
Page 17

tasti sopra indicati finché il simbolo non
scompare.
È possibile attivare la funzione sicurezza
bambini:
• prima di premere il tasto Avvio/Pausa
(Start/Pause) ; l'apparecchiatura non
può partire
• dopo aver premuto il tasto Avvio/
Pausa (Start/Pause) ; tutti i tasti e il
selettore dei programmi sono disattivati
AVVIO DEL PROGRAMMA
Per attivare il programma premere il tasto come indicato in figura. Il LED al di
sopra del tasto si illumina di rosso.
MODIFICA DEL PROGRAMMA
Per modificare programma, premere il
tasto
recchiatura. Premere
On/Off per disattivare l'appa-
On/Off per at-
ITALIANO
17
tivare l'apparecchiatura e impostare
nuovamente il programma.
AL TERMINE DEL
PROGRAMMA
Quando il ciclo di asciugatura è stato
completato, il simbolo
display. Se la funzione Segnale Acustico (Signal) è attiva, viene emesso un segnale acustico intermittente per un minuto.
Per estrarre la biancheria:
1.
Premere il tasto Auto/Off per 2 secondi per disattivare l'apparecchiatura.
2.
Aprire la porta dell'apparecchiatura.
3.
Estrarre la biancheria.
4.
Chiudere la porta dell'apparecchiatura.
Dopo ciascun ciclo di asciugatura:
• pulire il filtro
• svuotare il contenitore dell'acqua
(Consultare il capitolo PULIZIA E CU-
RA).
lampeggia sul
Page 18

18
CONSIGLI E SUGGERIMENTI UTILI
CONSIGLI ECOLOGICI
• Non utilizzare ammorbidenti per lavare ed asciugare. Nell’asciugabiancheria la biancheria diventa automaticamente soffice.
• L'acqua di condensa può essere utilizzata come acqua distillata, ad
esempio per la stiratura a vapore. Se
necessario, pulire prima l’acqua di
condensa (ad es. con un filtro per caffè) per eliminare eventuali residui e
pelucchi.
• Mantenere sempre pulite le fessure
per il ricircolo dell'aria sulla parte inferiore dell'apparecchiatura.
• Utilizzare i volumi di carico indicati
nel capitolo dei programmi.
• Assicurarsi che vi sia un buon ricircolo d'aria dove è stata installata l’apparecchiatura.
• Pulire il filtro principale dopo ogni ciclo di asciugatura.
• Pulire i filtri dello scambiatore di calore quando la spia corrispondente
appare sul pannello dei comandi.
• Centrifugare accuratamente la biancheria prima dell'asciugatura.
intimo da donna 100 g
mutande da uo-
mo
tovagliolo 100 g
strofinaccio 100 g
100 g
DUREZZA DELL'ACQUA E
CONDUTTIVITÀ
La durezza dell’acqua può essere differente in base alle diverse aree. La durezza dell’acqua ha effetto sulla conduttività dell’acqua e sul funzionamento
del sensore della conduttività all’interno dell’apparecchiatura. Se si conosce
il valore della conduttività dell’acqua, è
possibile regolare il sensore per
un’asciugatura perfetta.
Per modificare la conduttività del sensore:
1.
Ruotare il selettore dei programmi
sul programma disponibile.
2.
Premere contemporaneamente 2
tasti (vedere la figura). Tenere premuti finché non appare sul display
uno dei seguenti simboli:
PESI MEDI DELLA
BIANCHERIA
accappatoio 1.200 g
copripiumino 700 g
camice da lavoro
da uomo
pigiama da uomo 500 g
lenzuola 500 g
tovaglia 250 g
camicia da uomo 200 g
camicia da notte 200 g
federa 200 g
asciugamano in
spugna
camicetta 100 g
600 g
200 g
–
μS/cm
–
300-600 μS/cm
–
μS/cm
3.
Premere ripetutamente il tasto per
impostare il livello desiderato (vedere la figura).
bassa conduttività <300
media conduttività
alta conduttività >600
Page 19

4.
Per memorizzare l’impostazione,
premere contemporaneamente 2
tasti come indicato al punto 2.
ITALIANO
2.
Premere contemporaneamente 2
tasti (vedere le figura) e tenerli premuti finché non viene visualizzata la
corretta impostazione:
19
SPIA DEL CONTENITORE
DELL’ACQUA PIENO
Per impostazione predefinita la spia
è sempre accesa. Viene visualizzata al
termine del ciclo o quando il contenitore dell’acqua è pieno. Quando si usa un
dispositivo esterno per svuotare il contenitore, la spia può essere spenta.
Per attivare e disattivare la spia:
1.
Ruotare il selettore dei programmi
sul programma disponibile.
–
il simbolo
bolo
to.
–
il simbolo
bolo
è spento e la spia
viene visualizzata; il sim-
è costantemente spen-
è acceso e la spia
viene visualizzata; il sim-
è attivo.
Page 20

20
PULIZIA E CURA
PULIRE IL FILTRO PRINCIPALE
Al termine di ogni ciclo, la spia (pulire il filtro principale) si illumina per ri-
cordare che il filtro principale deve essere pulito.
Per pulire il filtro principale:
Il filtro raccoglie lanugine. La lanugine si forma durante l'asciugatura degli indumenti nell'asciugabiancheria.
1.
Aprire la porta.
2.
Tirare il filtro.
3.
Aprire il filtro.
Page 21
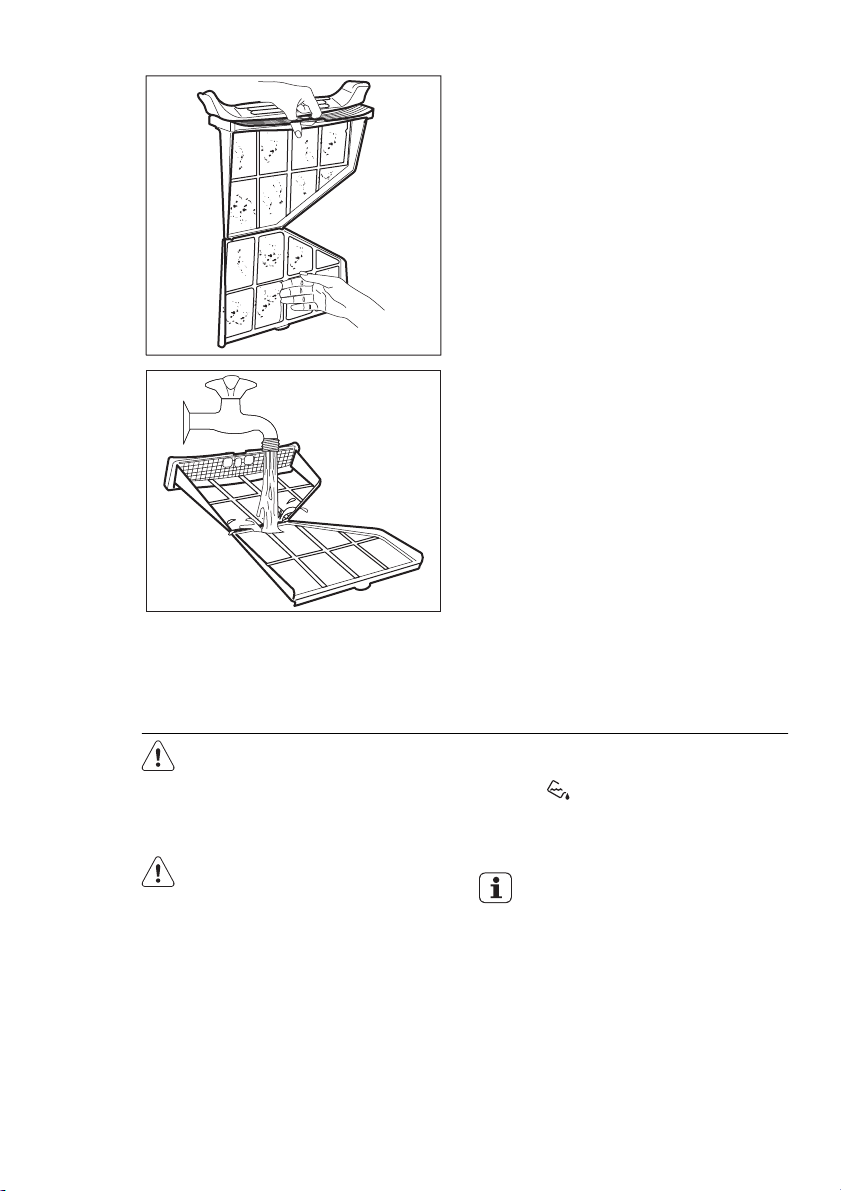
ITALIANO
4.
Pulire il filtro con la mano bagnata.
5.
Se necessario, pulire il filtro sotto
l'acqua corrente con uno spazzolino.
Chiudere il filtro.
21
ATTENZIONE
Non mettere in funzione l'asciugabiancheria senza il filtro principale o con filtri danneggiati o
intasati.
Pulire il filtro principale dopo
ogni ciclo di asciugatura. Il filtro
ostruito aumenta la durata del
ciclo e causa un consumo di
energia maggiore.
SVUOTARE IL CONTENITORE
DELL'ACQUA
Svuotare il contenitore dell'acqua dopo
ogni ciclo di asciugatura.
6.
Rimuovere la lanugine dall'attacco
del filtro. Per ciò può essere usato
un aspirapolvere.
7.
Mettere il filtro all'interno della presa del filtro.
Se il contenitore dell’acqua è pieno, il
programma si arresta automaticamente
e la spia
svuotare il contenitore del-
l'acqua si accende. Per proseguire con
il programma, svuotare il contenitore
dell'acqua e premere il tasto di avvio.
Per svuotare automaticamente il
contenitore dell'acqua è possibile installare un accessorio (vedere il capitolo: ACCESSORI)
Page 22
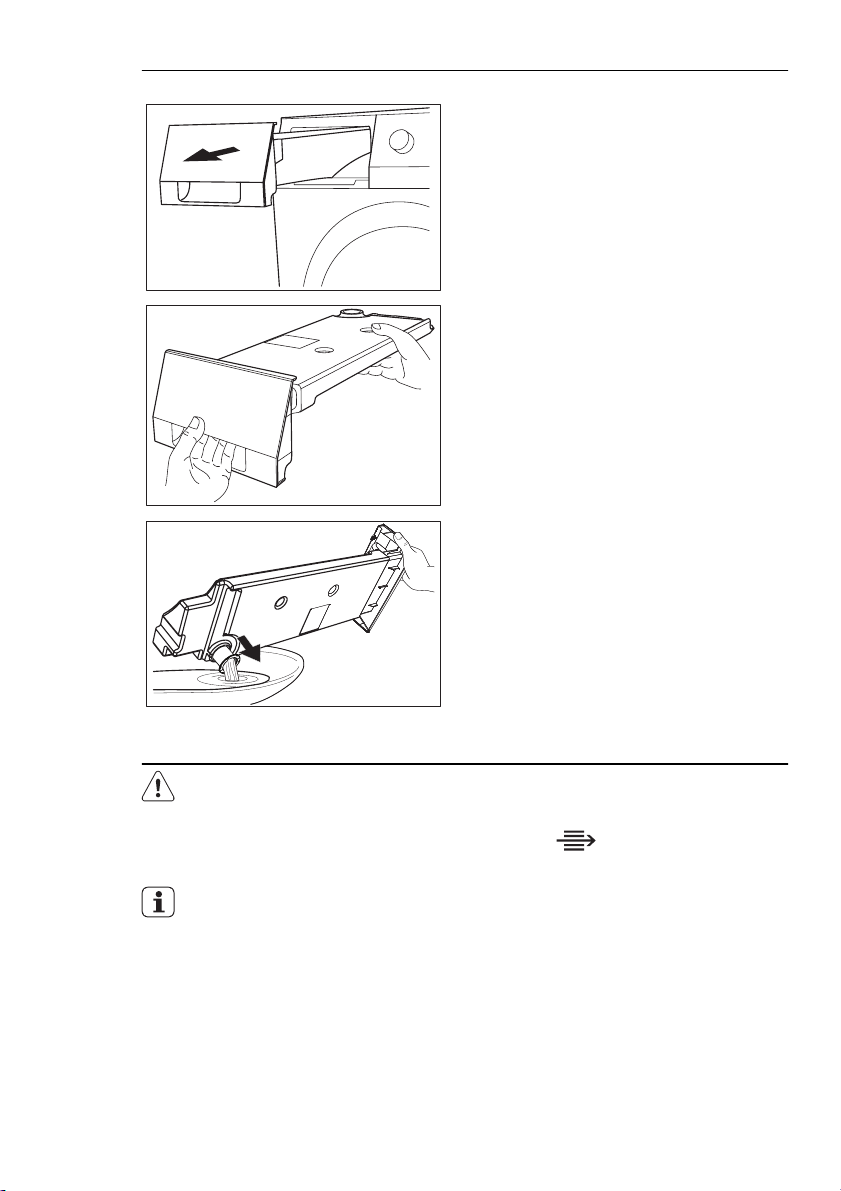
22
Per svuotare il contenitore dell'acqua:
1.
Tirare il contenitore dell'acqua.
2.
Spostare il contenitore in posizione
orizzontale.
3.
Estrarre il raccordo in plastica e
svuotare il contenitore dell'acqua in
una bacinella o simile.
AVVERTENZA!
Rischio di avvelenamento. L'acqua di condensa non può essere usata per bere o preparare
pietanze.
L'acqua di condensa può essere
utilizzata come acqua distillata,
per esempio nel ferro a vapore.
Tuttavia, occorre prima filtrare
l'acqua di condensa (ad esempio con un filtro per caffé) per
eliminare eventuali residui e pelucchi.
4.
Riposizionare il raccordo in plastica
e il contenitore dell'acqua.
PULIZIA DEI FILTRI DELLO
SCAMBIATORE DI CALORE
Se la spia pulire i filtri dello scambiatore di calore è accesa, i filtri devono
essere puliti.
Page 23
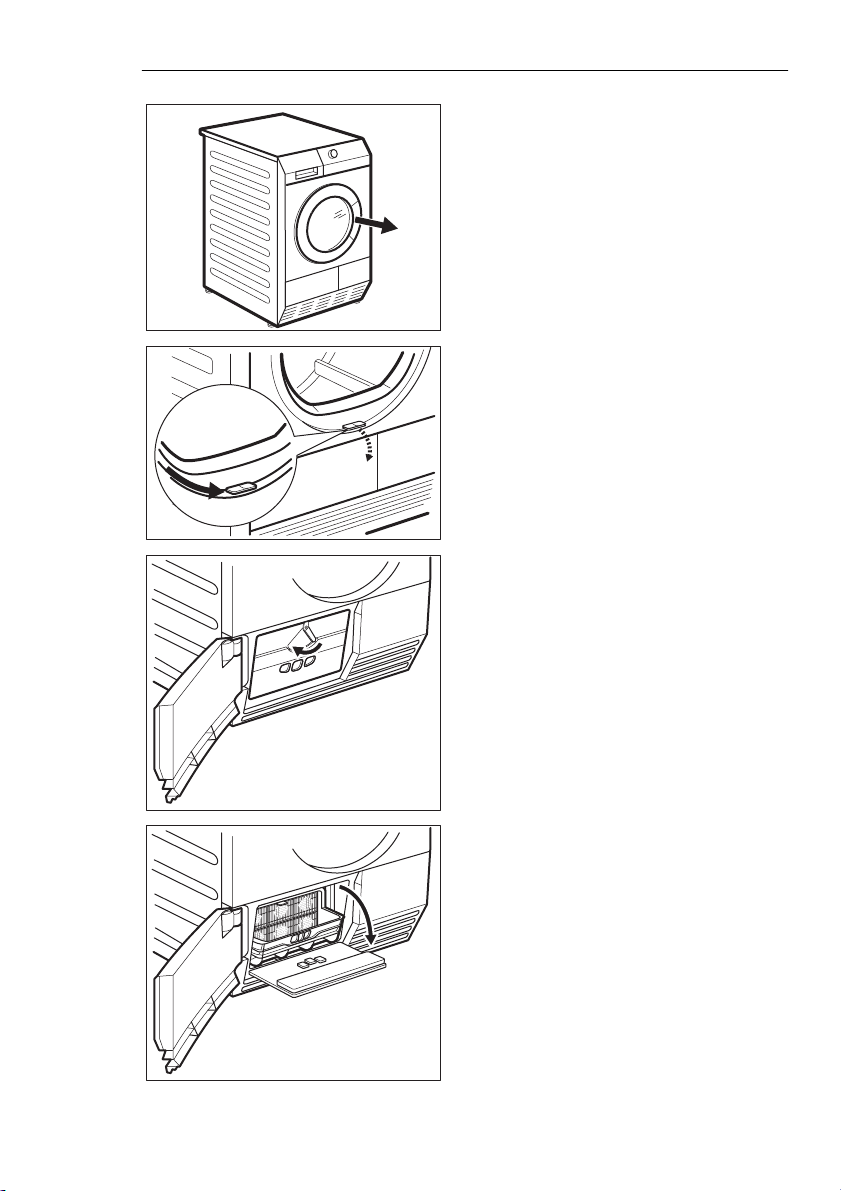
Pulire i filtri.
ITALIANO
1.
Aprire la porta.
2.
Spostare il pulsante di rilascio sul
fondo dell'apertura della porta ed
aprire la porta dello scambiatore di
calore.
3.
Ruotare il blocco per sbloccare il
coperchio dello scambiatore di calore.
23
4.
Abbassare il coperchio dei filtri dello scambiatore di calore.
Page 24
24
5.
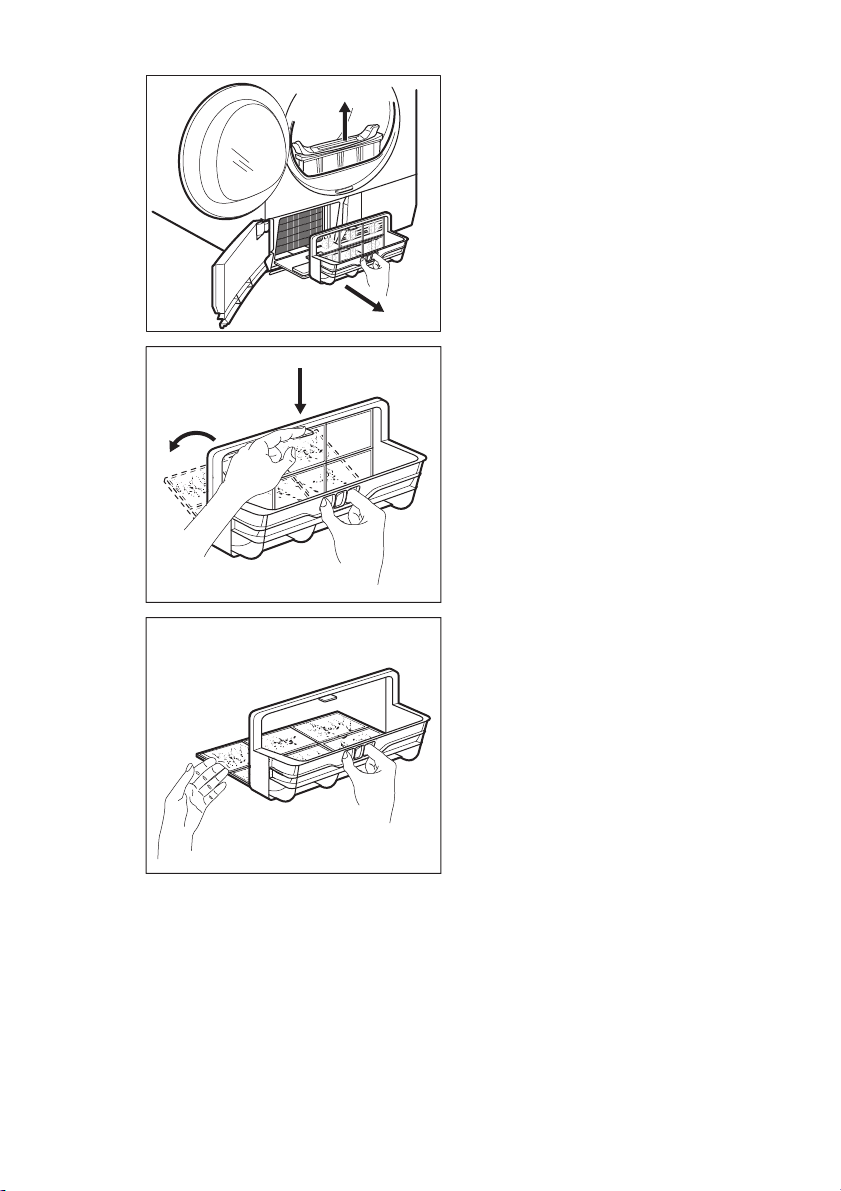
Sollevare il filtro principale. Mantenere il filtro dello scambiatore di
calore ed estrarlo dalla parte inferiore dello scomparto.
6.
Premere la levetta per aprire il filtro.
7.
Pulire il filtro con la mano bagnata.
Se necessario, pulire il filtro sotto
l'acqua corrente con uno spazzolino.
Chiudere il filtro.
Page 25
ITALIANO
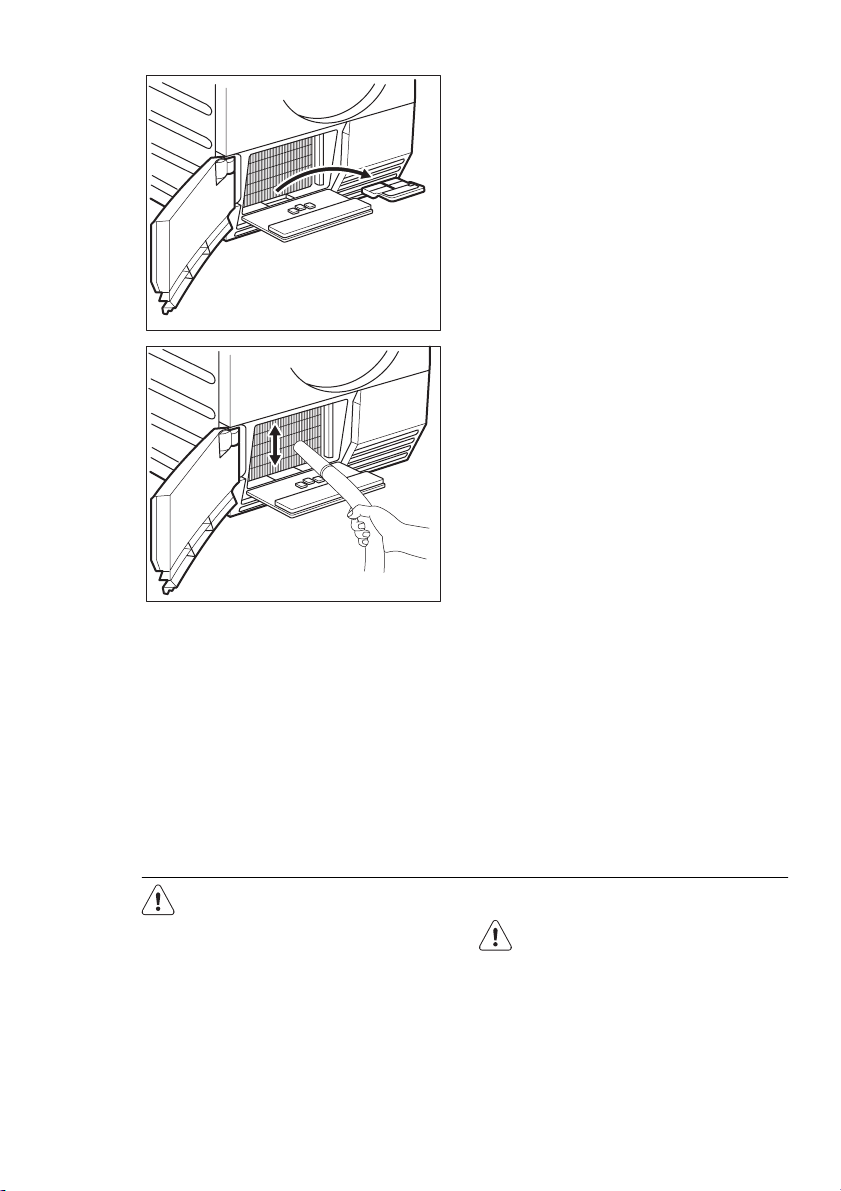
8.
Pulire il filtro piccolo dalla base.
9.
Se necessario, una volta ogni 6 mesi, rimuovere la lanugine dallo
scomparto dello scambiatore di calore. È possibile utilizzare un aspirapolvere.
25
ATTENZIONE
Non utilizzare l'asciugabiancheria se i filtri dello scambiatore di
calore sono bloccati a causa
della lanugine. Questo potrebbe danneggiare l'asciugabiancheria. Aumenta inoltre il consumo di energia.
Non utilizzare oggetti affilati per
la pulizia dello scomparto dello
scambiatore di calore.
Non utilizzare l'asciugabiancheria senza i filtri.
10.
Riposizionare il filtro piccolo e il filtro dello scambiatore di calore.
11.
Chiudere il coperchio dello scambiatore di calore.
12.
Bloccare il fermo finché non scatta.
13.
Chiudere il coperchio dei filtri dello scambiatore di calore.
14.
Chiudere lo sportellino dello
scambiatore di calore.
15.
Inserire il filtro principale.
PULIZIA DEL CESTO
AVVERTENZA!
Scollegare l'apparecchiatura prima di eseguire la pulizia.
Utilizzare un normale sapone neutro
per pulire la superficie interna del cesto
e le scanalature del cesto stesso. Asciugare le superfici pulite con un panno
morbido.
Page 26

26
ATTENZIONE
Non usare detergenti corrosivi o
pagliette metalliche per pulire il
cesto.
PULIZIA DEL PANNELLO DEI
COMANDI E
DELL'ALLOGGIAMENTO
Utilizzare un normale sapone neutro
per pulire il pannello dei comandi e l'alloggiamento.
Utilizzare un panno umido. Asciugare le
superfici pulite con un panno morbido.
ATTENZIONE
Per pulire l'apparecchiatura, non
utilizzare detergenti per la pulizia dei mobili o corrosivi.
Page 27
RISOLUZIONE DEI PROBLEMI
RISOLUZIONE DEI PROBLEMI
ITALIANO
27
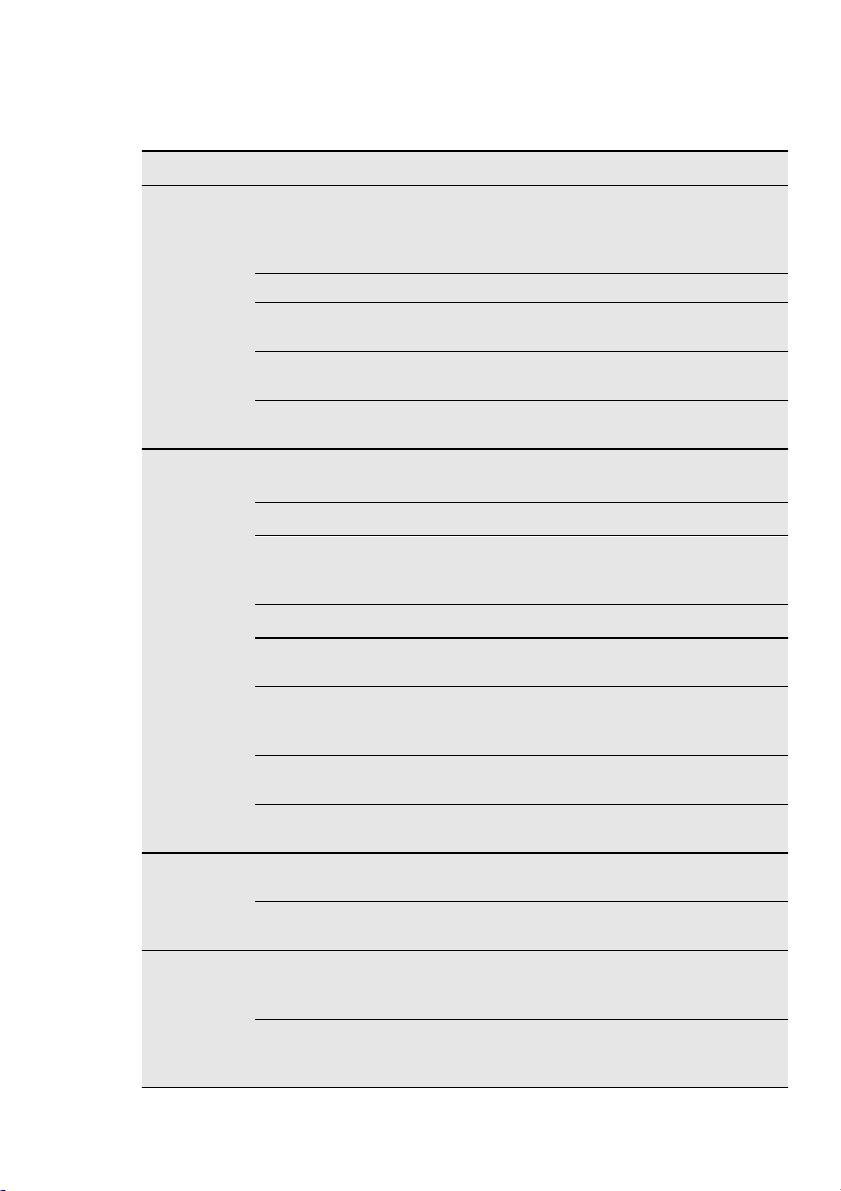
Problema
1)
L'asciugabiancheria
non funziona.
Risultati di
asciugatura
insoddisfacenti.
La porta non
si chiude.
Err (Errore)
sul display.
Possibile causa Soluzione
Inserire la spina nella presa.
L'asciugabiancheria non è collegata all’alimentazione.
Controllare il fusibile nella sca-
tola elettrica (installazione do-
mestica)
La porta è aperta. Chiudere la porta.
Il tasto Auto/Off non è stato
premuto.
Il tasto Avvio/Pausa non è stato
premuto.
Il dispositivo si trova in modalità
standby.
Scelta del programma sbagliato.
Il filtro è ostruito.
La funzione Più Asciutto era in
modalità minima.
Il condensatore è ostruito.
Carico eccessivo.
La griglia di ricircolo dell'aria è
ostruita.
È presente dello sporco nella
superficie interna del cesto.
Durezza dell'acqua troppo elevata.
Il filtro non si blocca in posizione.
La biancheria è bloccata tra la
porta e la guarnizione.
Si è tentato di cambiare programma o funzione dopo l’avvio
del ciclo.
La funzione che si è tentato di
attivare non può essere selezionata con il programma scelto.
Premere il tasto Auto/Off .
Premere il tasto Avvio/Pausa .
Premere il tasto Auto/Off .
Impostare il programma corret-
2)
to.
Pulire il filtro.
3)
Modificare la funzione Più
Asciutto da modalità media a
massima.
Pulire il condensatore.
Rispettare il volume di carico
massimo.
Pulire la griglia di ricircolo del-
l'aria nella parte inferiore
dell’apparecchiatura.
Pulire la superficie interna del
cesto.
Impostare un livello corretto4).
Posizionare correttamente il fil-
tro.
Sistemare il carico correttamen-
te nel cesto.
Spegnere e riaccendere l’asciu-
gabiancheria. Effettuare una
nuova selezione.
Spegnere e riaccendere l’asciu-
gabiancheria. Effettuare una
nuova selezione.
3)
Page 28
28
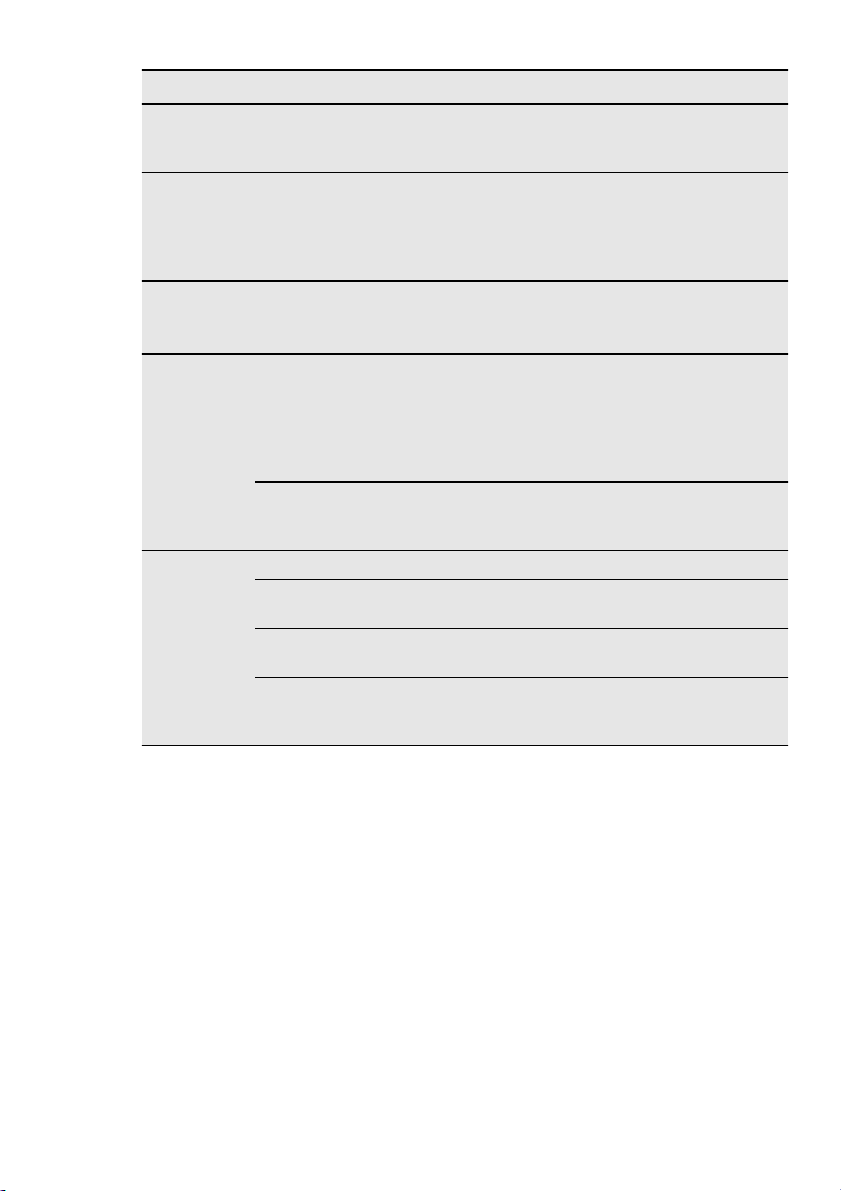
Problema
Nessuna luce nel cesto
1)
Luce del cesto difettosa.
Possibile causa Soluzione
Contattare il Centro di assisten-
za per sostituire la luce del ce-
sto.
Il tempo
scorre in
maniera insolita sul display.
Programma
inattivo.
Il tempo residuo al termine del
ciclo viene calcolato in base al
volume e all’umidità della biancheria.
Il contenitore dell'acqua è pieno.
Procedura automatica, non si
tratta di un'anomalia.
Svuotare il contenitore dell'ac-
3)
, premere il tasto Avvio/
qua
Pausa .
Impostare la durata del pro-
gramma. La durata deve tenere
Ciclo di
asciugatura
troppo breve.
Volume di biancheria troppo ridotto.
La biancheria è troppo asciutta.
conto del carico. Asciugatura di
un capo o un carico di bianche-
ria ridotto; si consiglia di utilizza-
re durate brevi.
Impostare la durata del pro-
gramma o un grado di asciuga-
tura superiore (ad es. Extra )
Il filtro è ostruito. Pulire il filtro.
Ciclo di
asciugatura
troppo lun-
5)
go
Carico eccessivo.
La biancheria non è stata centrifugata a sufficienza.
Temperatura molto elevata non si tratta di un'anomalia dell'apparecchiatura.
1)
Se sul display compare un messaggio di errore (ad es. E51): Spegnere e riaccendere
l’asciugabiancheria. Selezionare un nuovo programma. Premere il tasto Avvio/Pausa . Non
funziona? - contattare il Centro di assistenza e fornire il codice di errore.
2)
seguire la descrizione del programma - consultare il capitolo PROGRAMMI
3)
consultare il capitolo PULIZIA E CURA .
4)
consultare la sezione DUREZZA DELL'ACQUA nel capitolo CONSIGLI E SUGGERIMENTI
UTILI
5)
Nota: Dopo massimo 5 ore, il ciclo di asciugatura termina automaticamente (consultare la
sezione Ciclo di asciugatura completato ).
Rispettare il volume di carico
massimo.
Centrifugare correttamente la
biancheria.
Se possibile, abbassare la temperatura ambiente.
Page 29
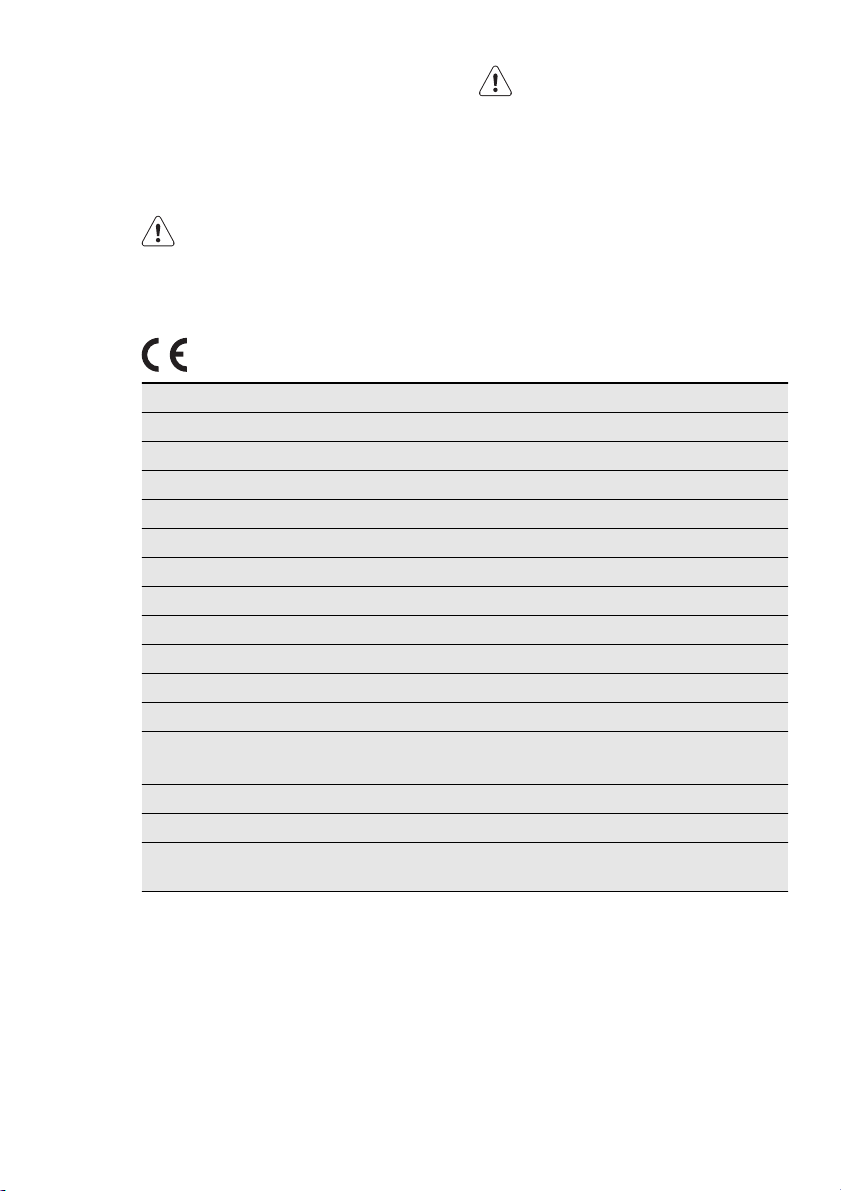
LAMPADINA INTERNA DEL
CESTO
Questa apparecchiatura dispone di una
lampadina interna che si accende e si
spegne, rispettivamente, quando si
apre e si chiude la porta.
AVVERTENZA!
Non guardare direttamente il fascio luminoso.
DATI TECNICI
altezza x larghezza x profondità 850 x 600 x 600 mm (massimo 640 mm)
volume del cesto 118 l
profondità massima con porta aperta 1090 mm
larghezza massima con porta aperta 950 mm
altezza regolabile 850 mm (+ 15 mm - regolazione piedini)
peso apparecchiatura 56 kg
volume carico massimo 8 kg
tensione 230 V
frequenza 50 Hz
fusibile necessario 4 A
potenza totale 800 W
classe di efficienza energetica A
consumo di energia elettrica kWh/ciclo
1)
1,92 kWh
ITALIANO
Per sostituire la lampadina interna, contattare il Centro di assistenza.
Prima di sostituire la lampadina
interna, scollegare la spina dalla
presa elettrica.
29
consumo annuale di energia 108,3 kWh
tipo di uso Domestico
temperatura ambiente per il corretto
funzionamento
1)
8 kg di cotone, centrifugato a 1000 giri/min con riferimento a EN 61121
da + 5°C a + 35°C
Page 30
30
INSTALLAZIONE
POSIZIONAMENTO
DELL'APPARECCHIATURA
• L'asciugabiancheria deve essere installata in luogo pulito, dove non si
accumuli lo sporco.
• L’aria deve circolare liberamente intorno all’apparecchiatura. Assicurarsi
che le fessure anteriori per il ricircolo
dell'aria nella parte inferiore dell'apparecchiatura non siano bloccate.
• Per ridurre al minimo le vibrazioni e il
rumore quando l'asciugabiancheria è
in funzione, posizionarla su una superficie piana e stabile.
• Una volta posizionata l'apparecchiatura, verificare che sia in piano utilizzando una livella. Se l'apparecchiatura non è in piano, regolare i piedini.
• Non rimuovere i piedini. Non ridurre
la distanza libera dal pavimento con
tappeti spessi, passatoie o simili. Ciò
potrebbe aumentare il calore e interferire con il funzionamento dell’apparecchiatura.
• La temperatura dell'aria calda
all'interno dell'asciugabiancheria può raggiungere i
60°C. L’apparecchiatura non
deve essere installata su pavimenti che non resistono alle
alte temperature.
• Per non compromettere la
prestazione dell'asciugabiancheria, durante il funzionamento la temperatura ambiente non deve essere inferiore a +5°C e superiore a
+35°C.
• Se è necessario spostare l'apparecchiatura, farlo verticalmente.
• L'apparecchiatura non deve
essere installata dietro una
porta bloccabile, una porta
scorrevole, una porta con una
cerniera sul lato opposto a
quello dell'apparecchiatura.
Così facendo si impedirebbe
l'apertura completa dell'asciugabiancheria.
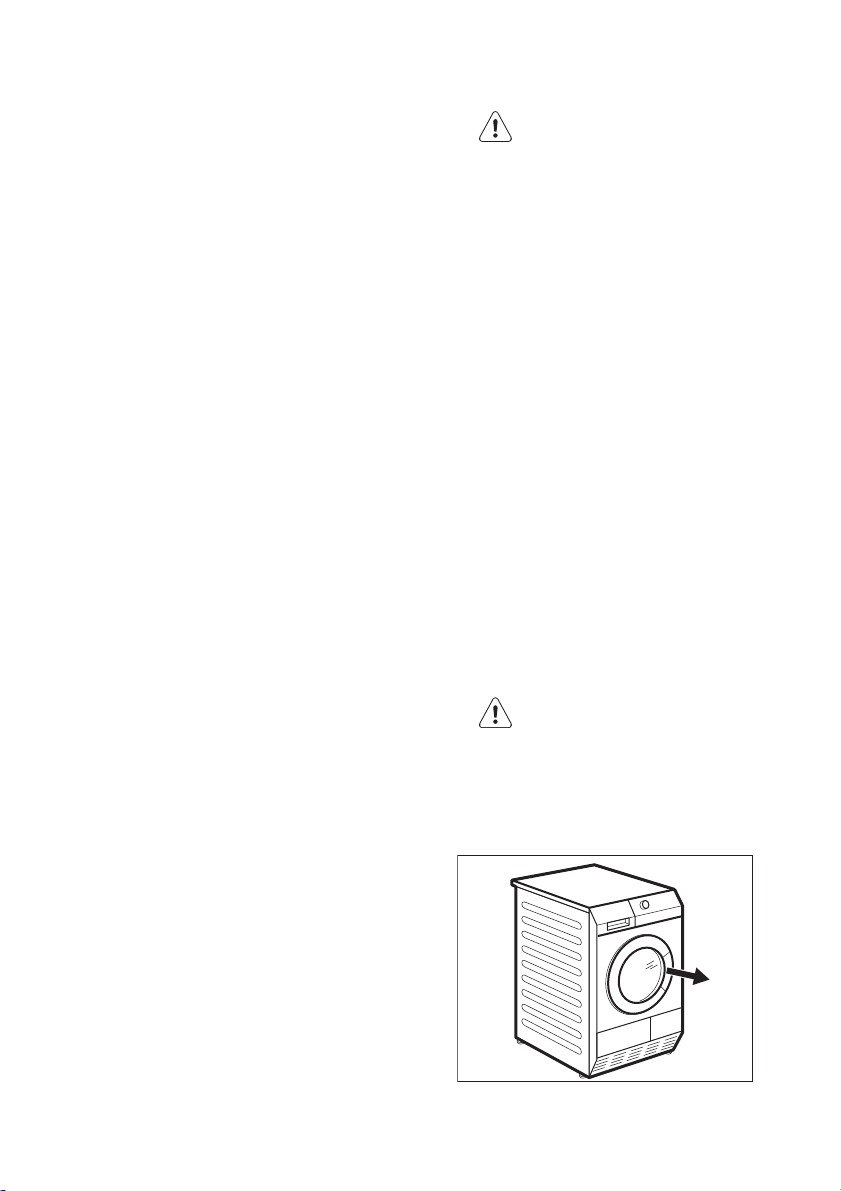
DISIMBALLO
ATTENZIONE
Prima di utilizzare l'apparecchiatura,
tutti i materiali di imballaggio utilizzati
per il trasporto devono essere rimossi.
Per rimuovere i blocchi in polistirolo:
1.
Aprire la porta.
2.
Estrarre tubo di plastica con i blocchi in polistirolo dal cesto.
Page 31
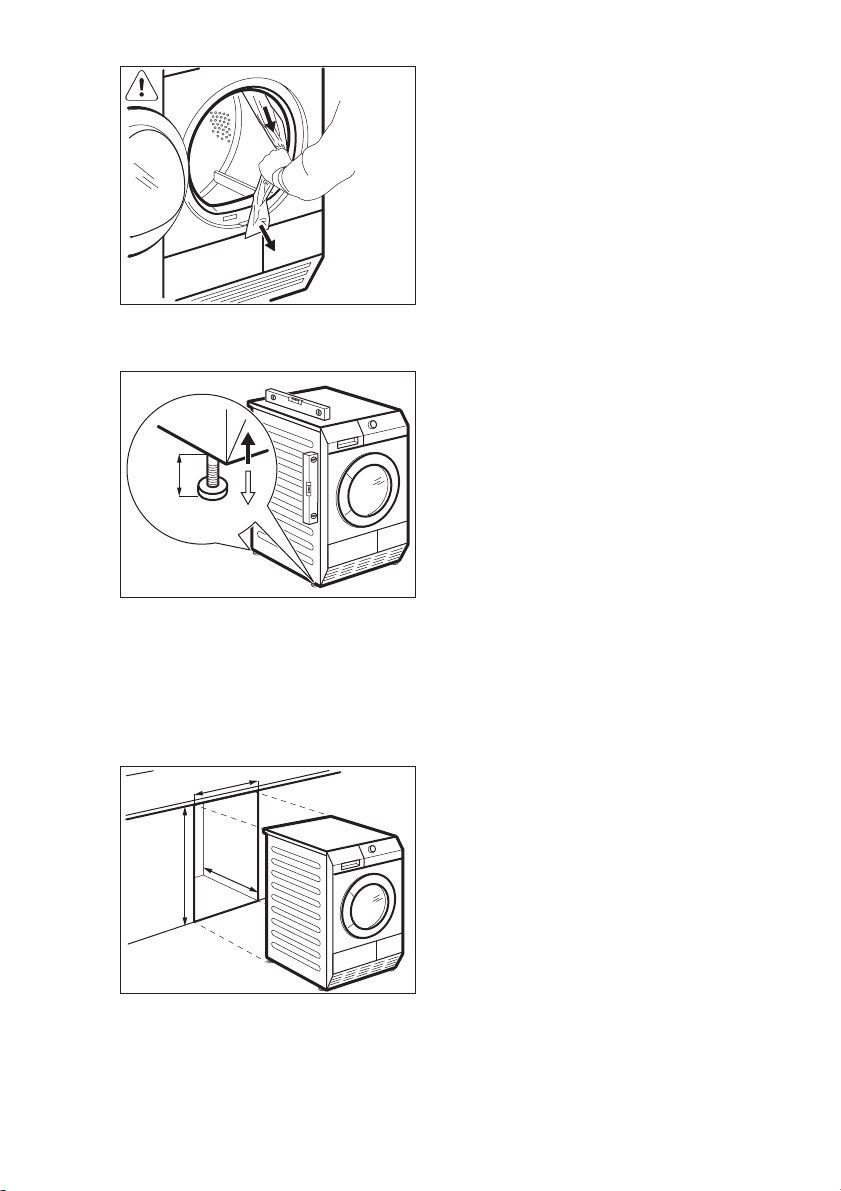
È possibile regolare l’altezza dell’asciugabiancheria. Per farlo, regolare i piedini (vedere la figura).
15mm
INSTALLAZIONE SOTTO UN
PIANO
L'apparecchiatura può essere montata
senza nessun supporto oppure sotto il
banco della cucina con la corretta spaziatura (vedere figura).
600 mm
ITALIANO
31
INVERSIONE DELLA PORTA
La porta può essere montata sul lato
opposto dall’utente. Può essere utile
per introdurre ed estrarre la biancheria
o nel caso di limitazioni per l’installazione dell’apparecchiatura. (vedere il foglietto allegato).
COLLEGAMENTO ELETTRICO
• Collegare l'apparecchiatura ad una
presa di terra, conformemente alle
normative in vigore.
• Verificare che i dati elettrici riportati
sulla targhetta del modello corrispondano a quelli dell'impianto.
• Utilizzare sempre una presa antishock
elettrico correttamente installata.
• Non utilizzare prese multiple e prolunghe. Vi è il rischio di incendio.
• Qualora il cavo elettrico debba essere sostituito, l’intervento dovrà essere
effettuato dal Centro di assistenza
del produttore.
• Evitare di schiacciare o danneggiare
la presa e il cavo dietro l'apparecchiatura.
• Non tirare il cavo di alimentazione
per scollegare l’apparecchiatura. Tirare solo la spina.
• La spina deve essere asciutta.
> 850 mm
600 mm
Page 32

32
CONTENTS
34 SAFETY INFORMATION
36 ENVIRONMENT CONCERNS
37 PRODUCT DESCRIPTION
38 ACCESSORIES
40 CONTROL PANEL
41 BEFORE FIRST USE
42 PROGRAMMES
44 USING THE APPLIANCE
48 HINTS AND TIPS
50 CARE AND CLEANING
57 TROUBLESHOOTING
59 TECHNICAL INFORMATION
60 INSTALLATION
SERVICE
When contacting Service, ensure that
you have the following data available.
The information can be found on the
rating plate.
Model
PNC
Serial Number
The following symbols are used in this
user manual:
Warning - Important Safety information.
General information and tips
Environmental information
Subject to change without notice
Page 33
FOR PERFECT RESULTS
Thank you for choosing this AEG product. We have created it to give you
impeccable performance for many years, with innovative technologies that help
make life simpler – features you might not find on ordinary appliances. Please spend
a few minutes reading to get the very best from it.
ACCESSORIES AND CONSUMABLES
In the AEG webshop, you’ll find everything you need to keep all your AEG
appliances looking spotless and working perfectly. Along with a wide range of
accessories designed and built to the high quality standards you would expect, from
specialist cookware to cutlery baskets, from bottle holders to delicate laundry bags…
Visit the webshop at:
www.aeg.com/shop
ENGLISH
33
VISIT OUR WEBSITE FOR:
- Products
- Brochures
- User manuals
- Trouble shooter
- Service information
www.aeg.com
Page 34
34
SAFETY INFORMATION
In the interest of your safety and to
ensure the correct use, before installing and first using the appliance,
read this user manual carefully, including its hints and warnings. To
avoid unnecessary mistakes and accidents, it is important to ensure that
all people using the appliance are
thoroughly familiar with its operation
and safety features. Save these instructions and make sure that they
remain with the appliance if it is
moved or sold, so that everyone using it through its life will be properly
informed on appliance use and safety.
- Read the instruction manual be-
fore the appliance use.
GENERAL SAFETY
• It is dangerous to alter the specifications or attempt to modify this product in any way.
• This appliance is not intended for use
by persons (including children) with
reduced physical and sensory conditions or lack of experience and
knowledge, unless they have been
given supervision or instruction concerning use of the appliance by a
person responsible for their safety.
• Make sure that small children and
pets do not climb inside the drum.
To avoid this, please check into the
drum before using.
• Any objects such as coins, safety
pins, nails, screws, stones or any other hard, sharp material can cause extensive damage and must not be
placed into the machine.
• Items such as foam rubber (latex
foam), shower caps, waterproof textiles (if there is no special drying programme), rubber backed articles and
clothes or pillows fitted with foam
rubber pads must not be dried in the
tumble dryer.
• Make sure that there is access to the
mains plug after the installation.
• Always unplug the appliance after
use, cleaning and maintenance.
• Under no circumstances should you
attempt to repair the machine yourself. Repairs carried out by inexperienced persons may cause injury or
serious malfunctioning. Contact your
local Service Centre. Always insist on
genuine spare parts.
• Items that have been soiled with substances such as cooking oil acetone,
petrol, kerosene, spot removers, turpentine, waxes and wax removers
should be washed in hot water with
an extra amount of detergent before
being dried in the tumble dryer.
• Danger of explosion: Never tumble
dry items that have been in contact
with inflammable solvents (petrol,
methylated spirits, dry cleaning fluid
and the like). As these substances are
volatile, they could cause an explosion. Only tumble dry items washed
with water.
• Risk of fire: items that have been
spotted or soaked with vegetable or
cooking oil constitute a fire hazard
and should not be placed in the tumble dryer.
• If you have washed your laundry with
stain remover you must execute an
extra rinse cycle before loading your
tumble dryer.
• Please make sure that no gas lighters
or matches have accidentally been
left in pockets of garments incase
they are loaded into appliance
• The condensed water is not applicable to drink or to prepare food. It can
cause health problems to people and
pets.
• Do not seat or lean on the load door.
The appliance can tilt.
Page 35

WARNING!
• Risk of fire! To prevent from
the risk of self combustion
do not stop a tumble dryer
before the end of the drying cycle unless all items are
quickly removed and spread
out so that the heat is dissipated.
• Lint must not be allowed to
accumulate around the tumble dryer.
• Risk of electric shock! Do not spray
down the appliance with jets of water.
• The final part of a tumble dryer cycle
occurs without heat ( cool down cycle ) to ensure that the items are left
at a temperature that ensures that
items will not be damaged.
• The tumble dryer is not to be used if
industrial chemicals have been used
for cleaning.
• Ensure you have good ventilation in
the installation room to avoid the
back flow of gases into the room
from appliances burning other fuels,
including open fires.
INSTALLATION
• This appliance is heavy. Be careful
when you move the appliance.
• When unpacking the appliance,
check that it is not damaged. If in
doubt, do not use it and contact the
Service Centre.
• All packaging must be removed before use. Dangerous damage can occur to the product and to property if
this is not adhered to. See relevant
section in the user manual.
• Each electrical work necessary to install this appliance must be done by
a qualified electrician or competent
person.
• The rear surface of the appliance
must be put against the wall
• If the appliance is installed on the
carpet or equivalent, adjust the feet.
ENGLISH
35
Air must flow freely below the appliance.
• After the appliance installation, check
that it is not squeeze or stay on the
electrical supply cable.
• If the tumble dryer is put on top of a
washing machine, it is mandatory to
use the stacking kit (optional accessory - see chapter: "ACCESSORIES").
USE
• This appliance is for domestic use
only. It must not be used for other
functions .
• Only dry fabrics which are applicable
to dry in the tumble dryer. Follow the
instructions on each piece of clothing
label.
• Do not dry not washed items in the
tumble dryer.
• Do not put more load than recommended. Obey the maximum load
volume. See the related chapter in
the user manual.
• Clothes which are dripping wet must
not be put in the tumble dryer.
• Garments which have been in contact
with volatile petroleum products
should not be machine dried. If volatile cleaning fluids are used, care
should be taken to ensure that the
fluid is removed from the garment
before placing in the appliance.
• Do not use the tumble dryer if the
power supply cable, the control panel, the working surface or the base
are damaged so that the inside of
the tumble dryer is accessible.
• Fabric softener or equivalent products must be used as specified by the
fabric softener manufacturer.
• Risk of fire! Do not dry the damaged
items which contain padding or fillings (pillows, jackets, duvets, etc.).
The padding or fillings can get out
and cause the fire.
Page 36
36
CHILD SAFETY
• This machine is not intended for use
by young children or infirm persons
without supervision.
• Children often do not recognise the
hazards associated with electrical appliances. Children should be supervised to ensure that they do not play
with the appliance.
WARNING!
• Danger of suffocation! The
packaging components (e.g.
plastic film, polystyrene) can
be dangerous to children Keep them out of children’s
reach.
ENVIRONMENT CONCERNS
• Keep all detergents in a safe place
out of children’s reach.
• Make sure that children or pets do
not climb inside the drum.
DISCARD THE APPLIANCE
• Disconnect the mains plug from the
mains socket.
• Cut off the mains cable and discard
it.
• Discard the door catch. This prevents
children or pets to be closed in the
appliance. There is a risk of suffocation.
PACKAGING MATERIALS
Recycle the materials with the symbol
. Put the packaging in applicable
containers to recycle it.
The symbol
packaging indicates that this product
may not be treated as household
waste. Instead it should be taken to the
appropriate collection point for the
recycling of electrical and electronic
on the product or on its
equipment. By ensuring this product is
disposed of correctly, you will help
prevent potential negative
consequences for the environment and
human health, which could otherwise
be caused by inappropriate waste
handling of this product. For more
detailed information about recycling of
this product, please contact your local
council, your household waste disposal
service or the shop where you
purchased the product.
Page 37
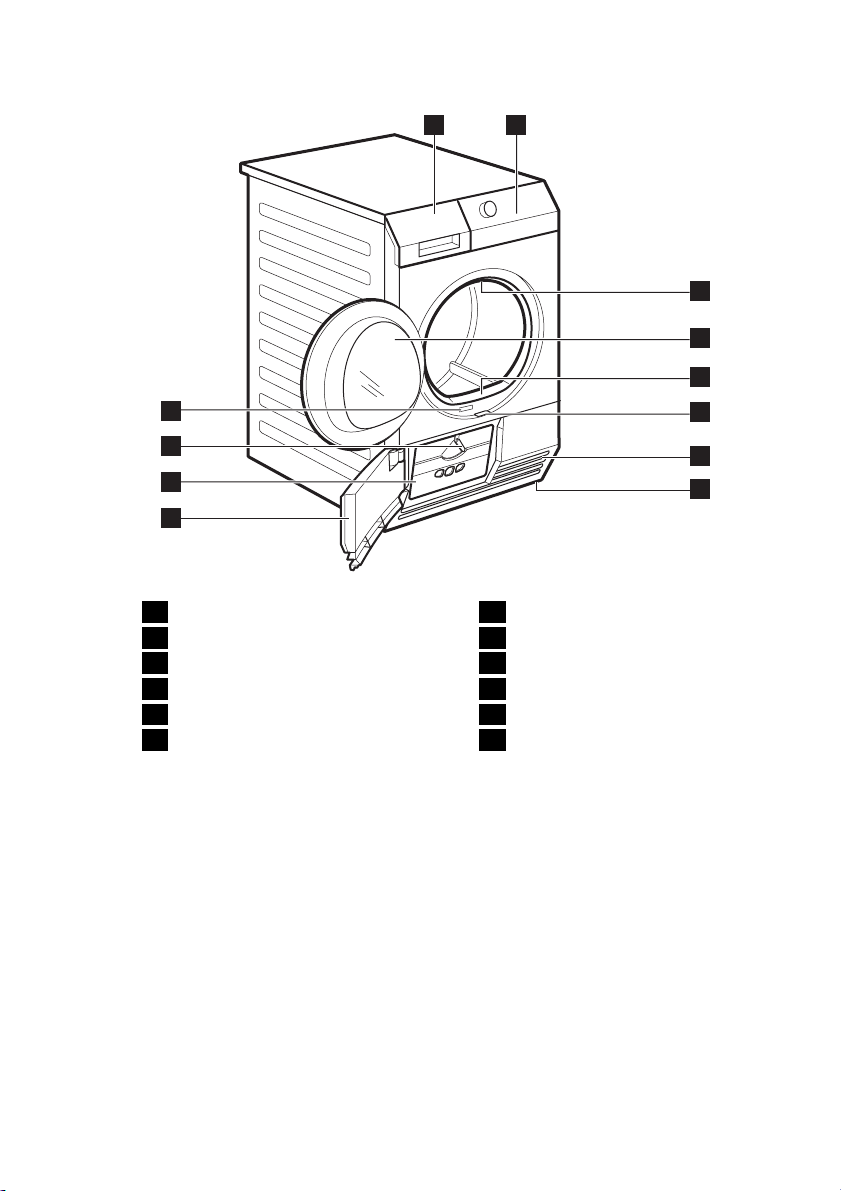
PRODUCT DESCRIPTION
1 2
ENGLISH
3
4
5
37
12
11
10
9
Water container
1
Control panel
2
Drum light
3
Load door (reversible)
4
Primary filter
5
Sliding button to open the heat ex-
6
changer door
Airflow slots
7
Adjustable feet
8
Heat exchanger door
9
Heat exchanger filters cover
10
Lock knob
11
Rating plate
12
6
7
8
Page 38
38
ACCESSORIES
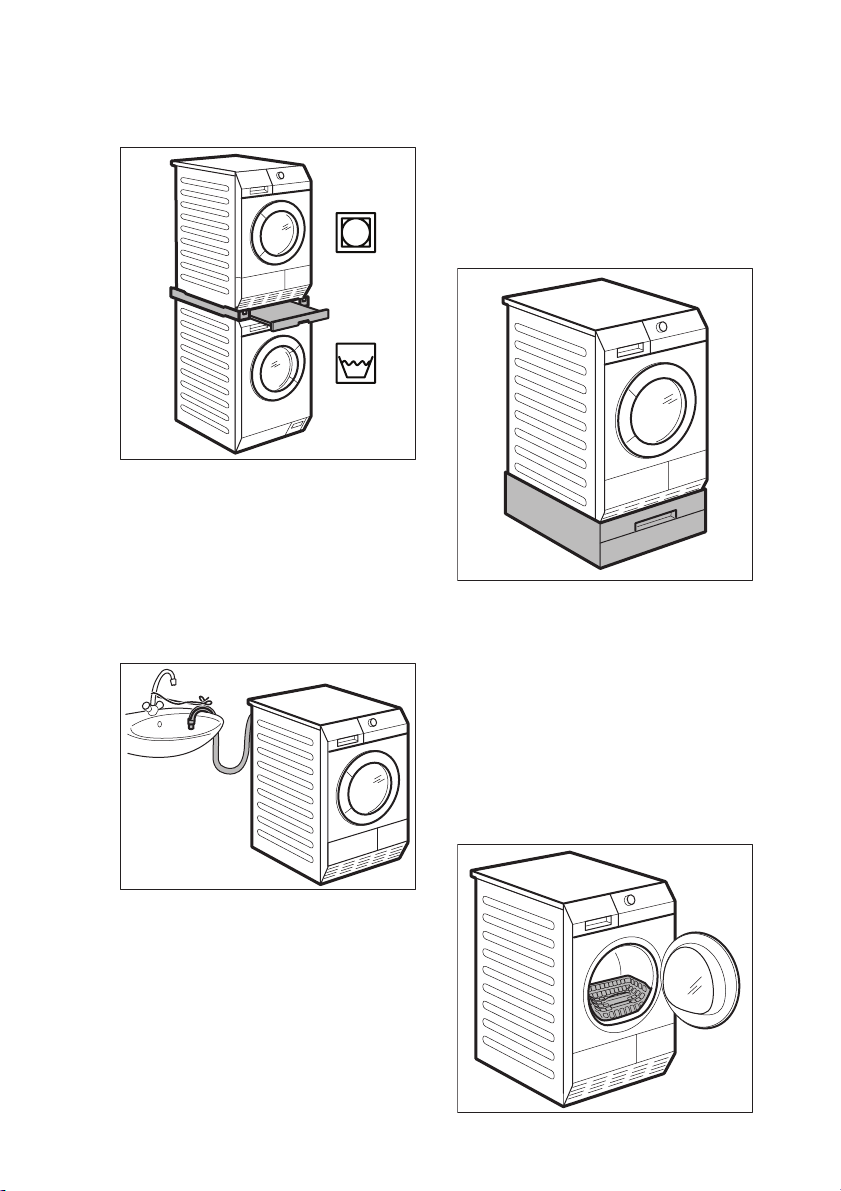
STACKING KIT
Product name: SKP11
Available from your authorized dealer.
Stacking kit can be used only with the
washing machines specified in the leaflet. See leaflet attached.
Read carefully the instructions supplied
with the kit.
DRAINING KIT
1 m from floor level. The hose cannot
be in loop. If possible decrease the
length of the hose.
Read carefully the instructions supplied
with the kit.
PEDESTAL WITH THE DRAWER
Product name: PDSTP10.
Available from your authorized dealer.
To put the appliance higher at the level
which helps to easy load and remove
the laundry .
The drawer can be use for laundry storage e.g. : towels, cleaning products and
more.
Read carefully the instructions supplied
with the accessory.
Product name: DK11.
Available from your authorized dealer
(can be attached to some types of the
tumble dryers)
Installation kit for through draining of
the condensed water into a basin, siphon, gully, etc. After installation the
water container is drained automatically. The water container must stay in the
appliance.
Installed hose must be on the height
from minimum of 50 cm to maximum of
DRYING RACK
Page 39

Available from your authorized dealer
(can be attached to some types of the
tumble dryers)
Drying rack accessory let to dry safely in
the tumble dryer:
• sport shoes
ENGLISH
39
•wool
• soft toys
• lingerie
Read carefully the instructions supplied
with the kit.
Page 40
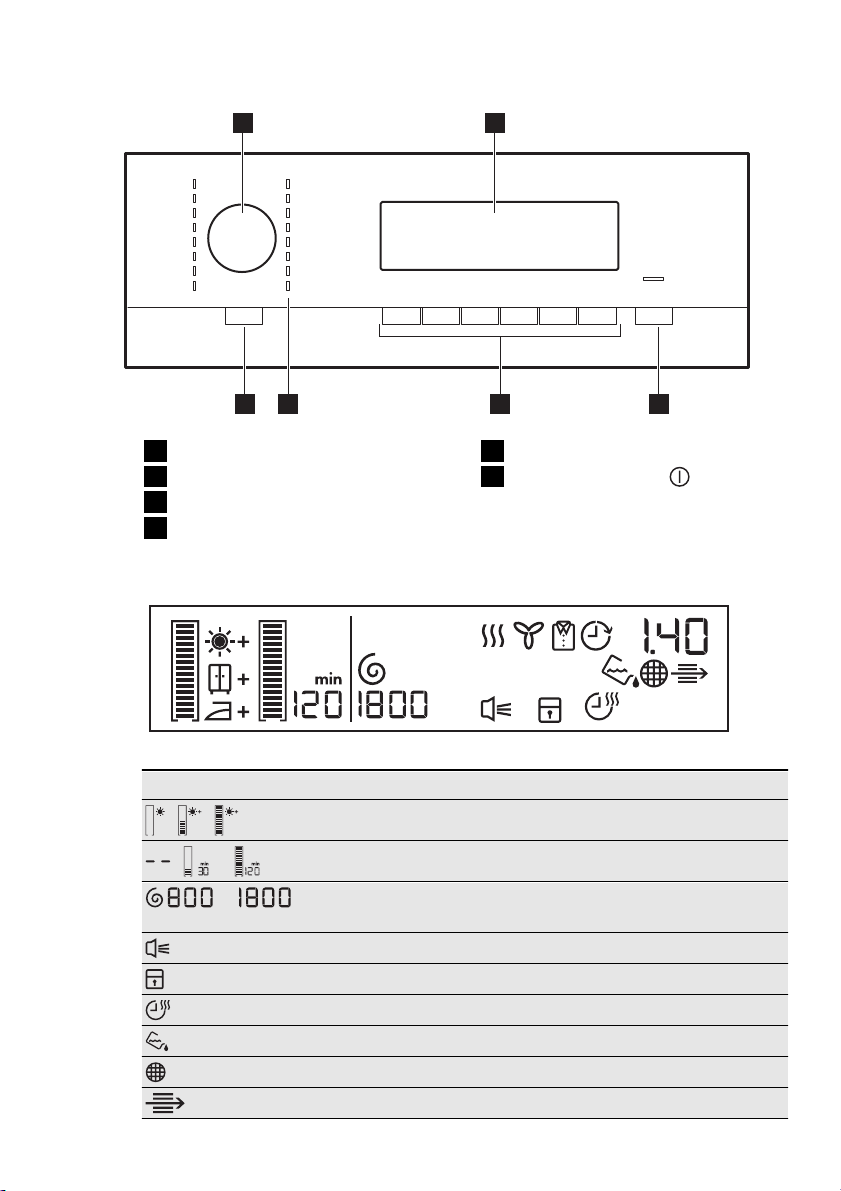
40
CONTROL PANEL
1 2
356 4
Programme dial
1
Display
2
Push button Start/Pause
3
The function push buttons
4
DISPLAY
Symbol Description
, ,
, —
—
- - -
Programme indicators
5
Push button On/Off with Auto
6
Off function
extra dryness level: minimum, moderate, maximum
anti-crease time: default, interval (30 min. - 120 min.)
initial laundry centrifugation (800 — 1800 rpm)
default
buzzer activated
child lock activated
time drying function activated
drain the water container indicator
clean the primary filter indicator
clean the heat exchanger filters indicator
Page 41
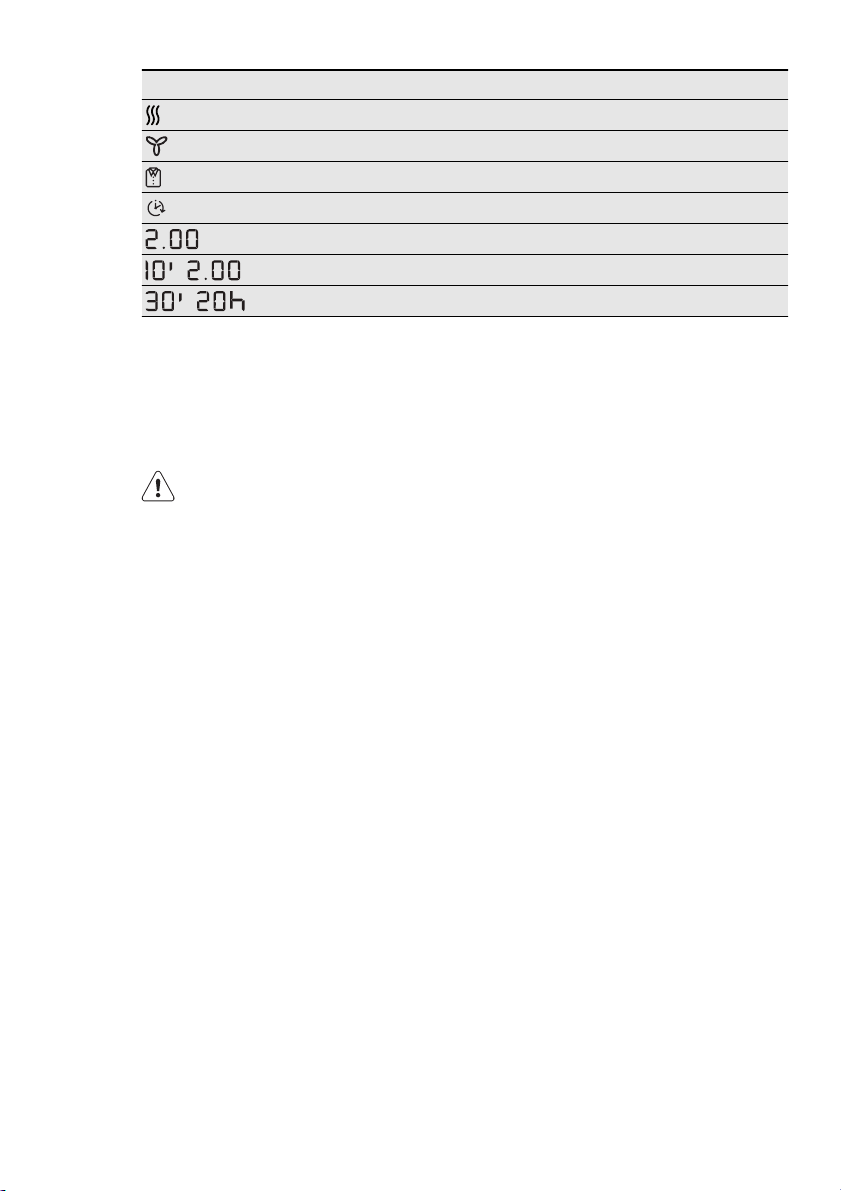
Symbol Description
-
-
BEFORE FIRST USE
drying cycle phase indicator
cooling cycle phase indicator
crease guard cycle phase indicator
delay start activated
cycle time
time programme interval (10 min. - 2h.)
delay start interval (30 min. - 20h.)
ENGLISH
41
Clean the tumble dryer drum with a
moist cloth or set a short programme
(e.g. 30 minutes time programme) with
the load of moist cloths.
CAUTION!
The compressor and its system in the
tumble dryer is filled with the special
agent which is free from fluoro-chloro-
hydrocarbons. This system must stay
tight. The damage of the system can
cause the leakage and damage of the
appliance.
At the beginning of drying cycle (3-5
min.) there could be a slightly higher
sound level. It is because of start of the
compressor that is normal for compressor powered appliances such: refrigerators, freezers .
Page 42
42
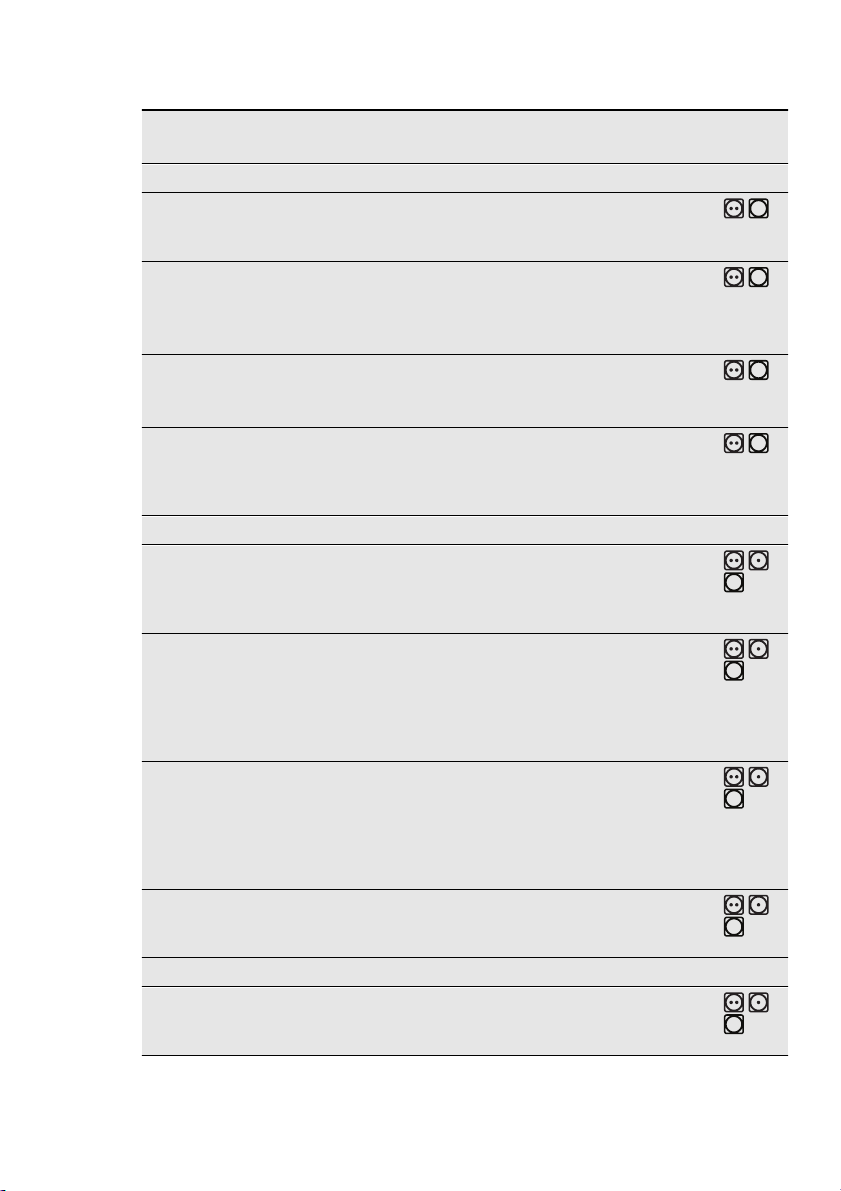
PROGRAMMES
Pro-
grammes
Load
1)
Extra Dry
(Extratrock-
8 kg
en)
Cupboard
Dry
(Schrank-
trocken)
8 kg
2)
Iron Dry (Bügeltrocken)
2)
Extra Silent
(Extra Leise)
8 kg
8 kg
Jeans 8 kg
Duvets
(Daunen)
Time (Zeitprogramm)
3 kg
8 kg
Extra Quick
Mixed (Mix
3 kg
Extra Kurz)
Extra Dry
(Extratrock-
3,5 kg
en)
Properties
Cottons (Baumwolle)
To dry cotton pieces of clothing.
Drying level: extra dry.
To dry cotton pieces of clothing.
Drying level: cupboard dry.
To dry cotton pieces of clothing.
Drying level: applicable to iron.
To gently dry cotton pieces of
clothing with the noise decreased
to the minimum. The programme
can be used at night.
To dry leisure clothing such as
jeans, sweat-shirts of different material thicknesses (e.g. at the neck,
cuffs and seams).
To dry single or double duvet and
pillows (with feather, down or synthetic fillings).
To dry laundry with the time set by
the user. The time value must be
related to the load. To dry one
item or small quantities of the
laundry we recommend to use
short times.
To dry cotton and synthetic fabrics, uses low temperature.
Synthetics (Mischgewebe)
To dry thick or multi-layered fabrics, e. g. pullovers, bedding, table
linen.
Available
functions
all except
Time Drying
(Zeitwahl)
all except
Time Drying
(Zeitwahl)
all except
Time Drying
(Zeitwahl)
all except
Time Drying
(Zeitwahl)
all except
Time Drying
(Zeitwahl)
all except
Anticrease
(Knitter-
schutz) and
Time Drying
(Zeitwahl)
all except
Dry Plus
(Trocken+)
and Spun at
RPM (U/
Min.)
all except
Time Drying
(Zeitwahl)
all except
Time Drying
(Zeitwahl)
Fabric
mark
Page 43
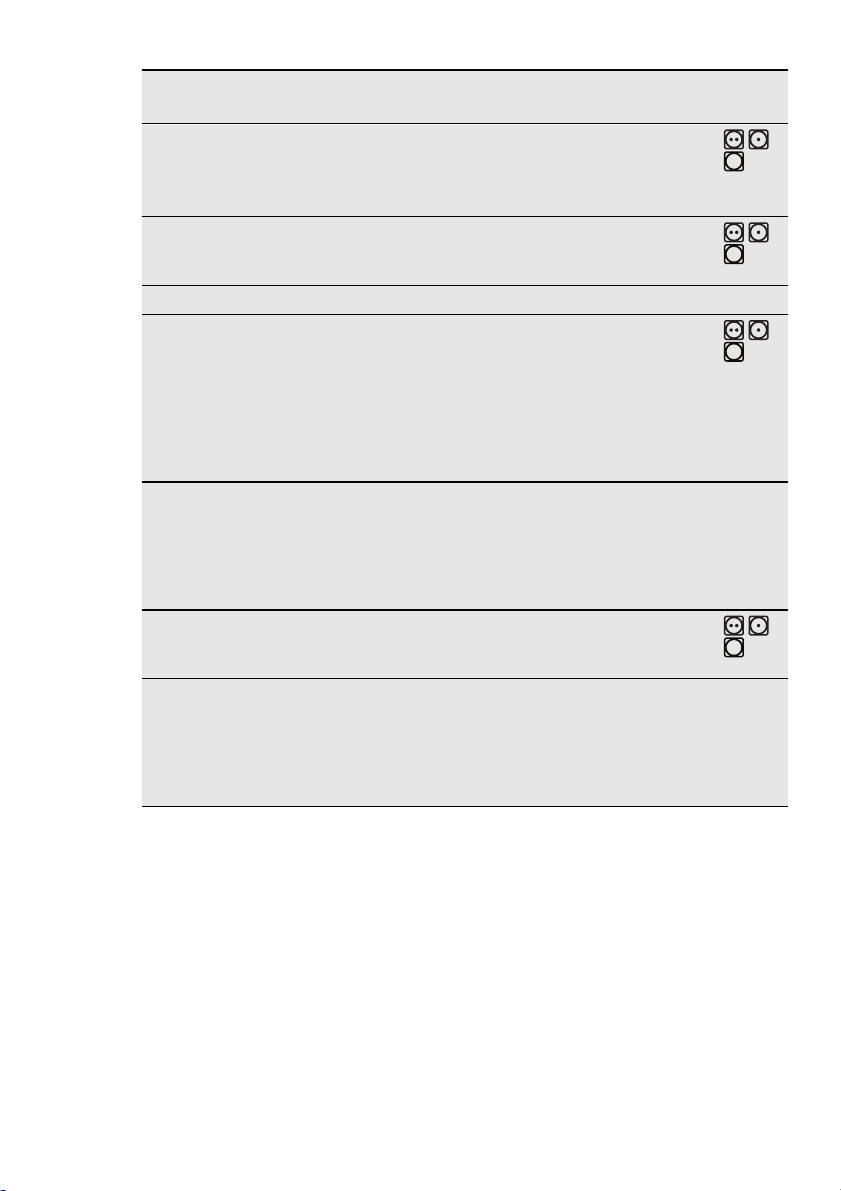
ENGLISH
43
Pro-
grammes
Load
1)
Cupboard
Dry
(Schrank-
trocken)
Iron Dry (Bügeltrocken)
Easy Iron
(Leichtbügeln)
3,5 kg
2)
3,5 kg
1 kg
(or 5
shirts)
Active Wear 2 kg
Sports
(Sportklei-
2 kg
dung)
Silk/Lingerie
(Seide)
1 kg
Properties
To dry thin fabrics which are not ironed, e.g. easy care shirts, table
linen, baby clothes, socks, lingerie
with bones or wires.
To dry thin fabrics which are also
to be ironed, e.g. knitwear, shirts.
To dry easy care fabrics such shirts
and blouses; for minimum ironing
effort. The results can be different
for to the different types of fabric
and its finish. Put fabrics in the
tumble dryer straight. After the cycle, immediately remove dried
fabrics and put on a cloths hanger.
To dry outdoor pieces of clothing,
technical, sports, pile fabrics, waterproof and breathable jackets,
shell jacket teamed with a removable fleece or inner insulation.
To dry sportswear, thin and light
fabrics, microfiber, polyester,
which are not ironed.
To dry silk/lingerie with warm air
and gentle movement.
Available
functions
all except
Time Drying
(Zeitwahl)
all except
Time Drying
(Zeitwahl)
all except
Time Drying
(Zeitwahl)
all except
Anticrease
(Knitter-
schutz) and
Time Drying
(Zeitwahl)
all except
Time Drying
(Zeitwahl)
all except
Anticrease
(Knitter-
schutz) and
Time Drying
(Zeitwahl)
Fabric
mark
Page 44
44
Pro-
grammes
Load
1)
Properties
Available
functions
To dry the cloths made of wool .
The cloths become soft and cosy.
We recommend to remove the
cloths immediately after the programme end.
The default wool drying cycle of
Wool
(Wolle)
this tumble drying machine has
been tested and approved by The
Woolmark Company. The cycle is
suitable to dry wool garments
1 kg
which are labelled "hand wash"
provided that the garments are
washed in a Woolmark endorsed
hand washing cycle and tumble
dried according to the instructions
Dry Plus
(Trocken+) ,
Buzzer (Sig-
nal) , Time
Drying (Zeit-
3)
, De-
wahl)
lay Start
(Zeitvorwahl)
issued by the manufacturer.
(M1129).
To increase or to decrease the level of the remaining moisture of the
laundry you can use the function
Dry Plus (Trocken+) .
1)
maximal weight of dry clothes
2)
For test institutes only:
To make a performance test use the standard programmes which are specified in the EN
61121 document. If is necessary to correct the remaining moisture level of the laundry,
adjust the programme with the Dry Plus (Trocken+) function .
3)
Only with the drying rack — see chapter ACCESSORIES
Fabric
mark
USING THE APPLIANCE
PREPARING THE LAUNDRY
Dry only the laundry applicable
to dry in the tumble dryer. Make
sure if the laundry is applicable
to dry in the tumble dryer. Do
the check of the fabric mark on
the clothes.
Fabric
mark
Property
Applicable to dry in the tumble dryer
Applicable to dry in the tumble dryer at standard temperature
Applicable to dry in the tumble dryer at decreased temperature
Fabric
Property
mark
Not applicable to dry in the
tumble dryer
Correctly prepare the laundry:
• close zips, button up duvet covers
and attach loose ties or ribbons (e.g.
ribbons of aprons) - laundry can tangle
• make sure the pockets are empty remove metal items (paper clips,
safety pins, etc.).
• turn items with 2 fabric layers inside
out (e.g. cotton lined anoraks, the
cotton fabric layer must be external).
Dry only:
• cotton and linen with Cottons (Baumwolle) programmes
Page 45
• synthetic and mixtures with Synthetic
(Mischgewebe) programmes
• separately the strong coloured textiles and the light coloured textiles colours can bleed
• cotton jersey and knitwear only with
the applicable programmes - items
can shrink
Do not put more laundry than
the maximum load which is 8
kg.
LOADING THE LAUNDRY
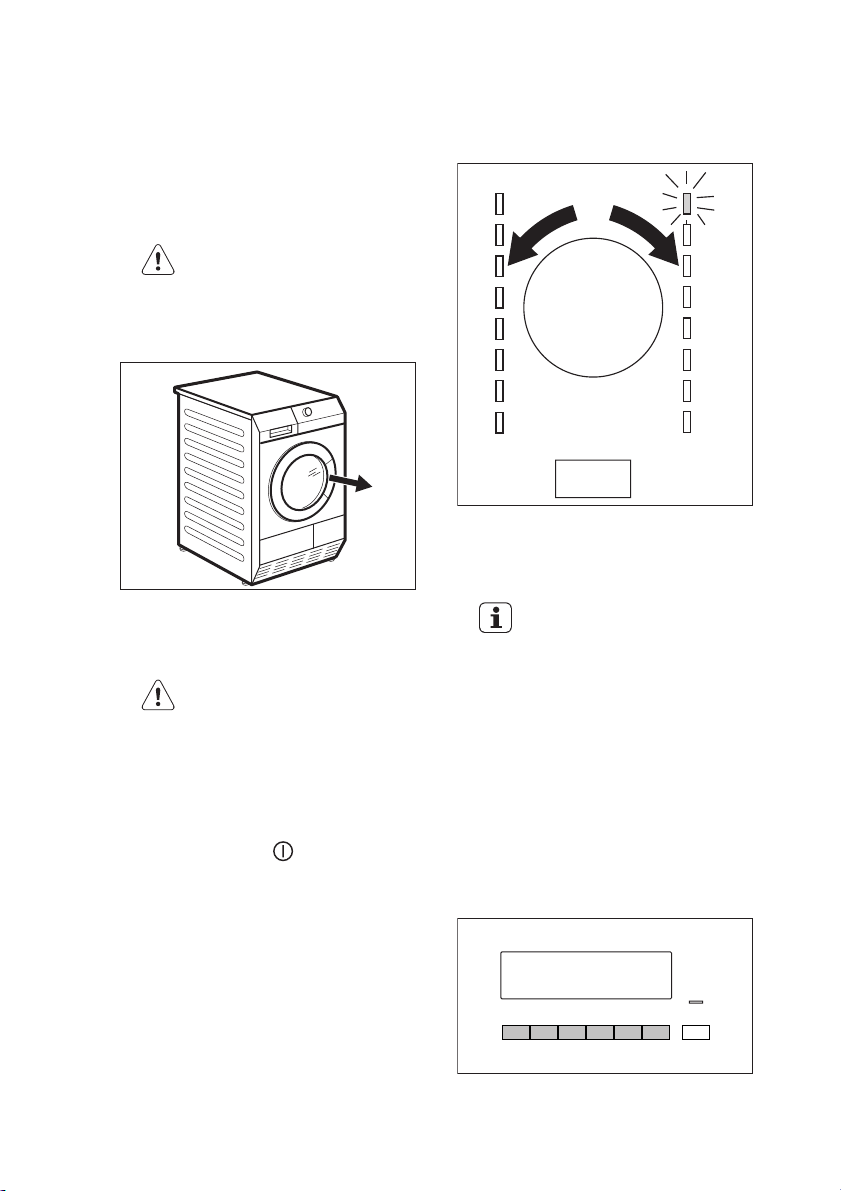
1.
Pull the appliance door
2.
Load loosely the laundry.
3.
Close the appliance door.
CAUTION!
Do not lock the laundry in between the appliance door and
rubber seal.
SWITCHING ON THE
APPLIANCE
Push the On/Off button to activate
or to deactivate the appliance. When
the appliance is on, some indications
come in to the view on the display.
ENGLISH
Push the Auto Off button to activate
the appliance.
45
SETTING A PROGRAMME
Use the programme dial to set the programme. The possible time to complete the programme come into view
on the display.
The drying time you see is related to the load of 5 kg for cotton and jeans programmes. For
the other programmes the drying time is related to the recommended loads. The drying time
of the cotton and jeans programmes with the load more
than 5 kg is longer.
SPECIAL FUNCTIONS
Together with the programme you can
set 1 or more special functions.
To activate or deactivate the function
push the applicable push button.
AUTO OFF FUNCTION
To decrease the energy consumption,
the Auto Off function deactivates automatically the appliance:
• if the Start/Pause button was not
pushed in the time of 5 minutes.
• after 5 minutes from the programme
end.
When the function is activated the applicable symbol comes into the view on
the display.
Page 46
46
THE DRY PLUS (TROCKEN+)
FUNCTION
This function helps to get the laundry
more dried. There are 3 possible selections:
minimum - the default selection which
is related to the programme.
moderate — the selection to get the
more dried laundry.
maximum — the selection to get the
much more dried laundry.
THE ANTICREASE
(KNITTERSCHUTZ) FUNCTION
Extends of 30, 60, 90 or 120 minutes the
standard anticrease phase (30 minutes)
at the end of the drying cycle. This
function prevents the laundry from
creases. The laundry can be removed
during the anticrease phase.
THE SPUN AT RPM (U/MIN.)
FUNCTION
This function helps to set the best condition to dry the laundry. If you know
the initial spin speed when you washed
you can use this function. Higher spin
speed causes that the laundry contains
less water.
THE BUZZER (SIGNAL)
FUNCTION
When the buzzer function is activated
you can hear the buzzer at the:
•cycle end
• anti-crease phase start and end
• cycle interruption
The buzzer function is by default always
on. You can use this function to activate
or deactivate the sound.
THE DELAY START
(ZEITVORWAHL) FUNCTION
Let to delay the start of a drying
programme from minimum of
30 minutes to maximum of 20
hours.
1.
Set the drying programme and
functions.
2.
Push the Delay Start (Zeitvorwahl)
button again and again until the
necessary time of the delay come
into the view on the display (e.g.
if the programme has to start af-
ter 12 hours.)
3.
To activate the Delay Start (Zeitvorwahl) function, push the Start/
Pause button. The time to start decreases on the display.
CHILD LOCK FUNCTION
The child lock can be set to prevent the
children to play with the appliance. The
child lock function locks all push buttons and the programme dial (this function does not lock Auto/Off button). To
activate the child lock function push the
Dry Plus (Trocken+) and Anticrease
(Knitterschutz) buttons at the same time
until the symbol
the display. To deactivate push again
the above buttons until the symbol go
out of view.
You can activate the child lock function:
• before you push the Start/Pause button - the appliance cannot start
• after you push the Start/Pause button
- all the push buttons and the programme dial are deactivated
come into view on
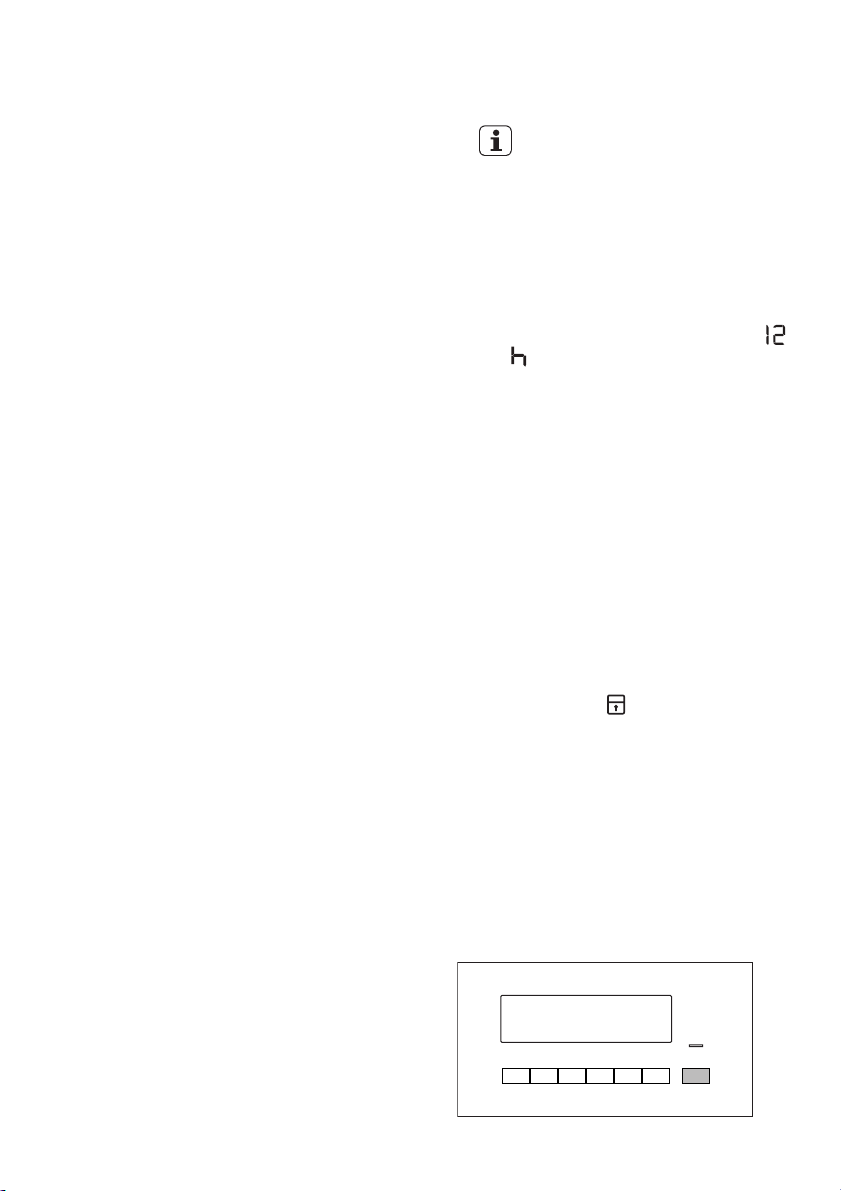
STARTING A PROGRAMME
THE TIME DRYING
(ZEITWAHL) FUNCTION
Operates only with the Time programme. Lets the user to set special
time of drying programme from minimum 10 min. to maximum of 2 hours (in
10 min. steps).
Page 47

To activate the programme push the
button as on the illustration. The LED
above the button illuminates in red colour.
CHANGE A PROGRAMME
To change a programme, push the
On/Off button to deactivate appliance.
Push the
pliance and then set the programme
again.
On/Off to activate the ap-
ENGLISH
47
the Buzzer (Signal) function is on, an
acoustic signal sounds intermittently for
one minute.
To remove the laundry:
1.
Push the Auto/Off button for 2 seconds to deactivate the appliance.
2.
Open the appliance door.
3.
Remove the laundry.
4.
Close the appliance door.
After each drying cycle:
AT THE END OF PROGRAMME
When the drying cycle is completed,
symbol flashes on the display. If
the
• clean the filter
• drain the water container
(See chapter CARE AND CLEANING.)
Page 48
48
HINTS AND TIPS
ECOLOGICAL HINTS
• Do not use fabric softener to wash
and then dry. In the tumble dryer
laundry becomes soft automatically.
• Use the condensate as distilled water, e.g. for steam ironing. If it is necessary clean the condensate before
(e.g. with a coffee filter) to remove
possible small pieces of fluff.
• Always keep the airflow slots on the
bottom of the appliance clear.
• Use the load volumes which are
specified in the programmes chapter.
• Make sure that is good airflow in the
appliance installation position.
• Clean the primary filter after each
drying cycle.
• Clean the heat exchanger filters
when the applicable indicator comes
into the view on the control panel.
• Spin good the laundry before drying.
AVERAGE LAUNDRY WEIGHTS
bathrobe 1200 g
quilt cover 700 g
man’s work shirt 600 g
man’s pyjamas 500 g
sheet 500 g
tablecloth 250 g
man’s shirt 200 g
night dress 200 g
pillow case 200 g
towelling towel 200 g
blouse 100 g
ladies’ briefs 100 g
men’s underpants 100 g
napkin 100 g
tea cloth 100 g
WATER HARDNESS AND
CONDUCTIVITY
Water hardness can be different for different locations. Water hardness has an
effect on the water conductivity and the
operation of the conductivity sensor in
the appliance. If you know the value of
the water conductivity you can adjust
the sensor to dry with the better results.
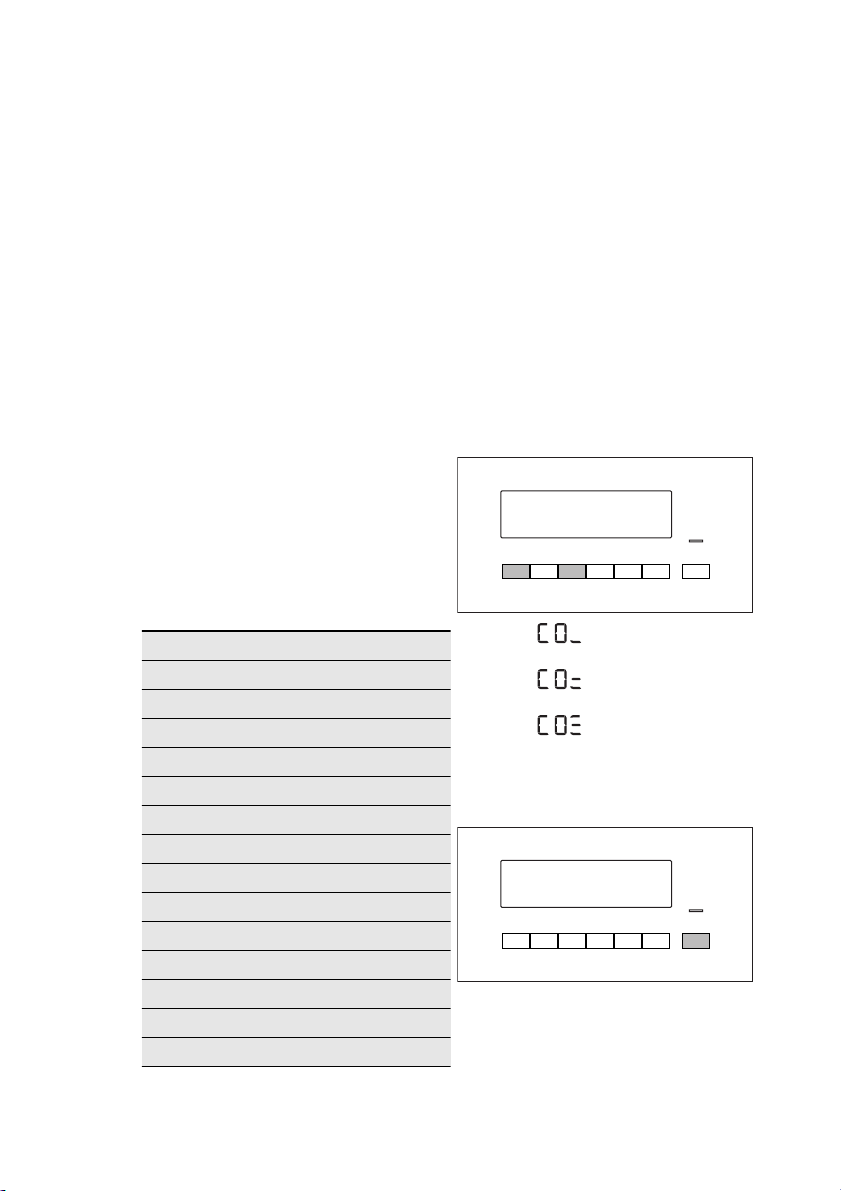
To change the sensor conductivity:
1.
Turn the programme dial to available programme.
2.
Push at the same time 2 buttons
(see the illustration). Hold down until one of the symbols come into
view on the display:
–
μS/cm
–
300-600 μS/cm
–
μS/cm
3.
Push the button again and again
until you set necessary level (see
the illustration).
4.
To memorise the setting push at
the same time 2 buttons as are
specified in the point 2.
low conductivity <300
moderate conductivity
high conductivity >600
Page 49
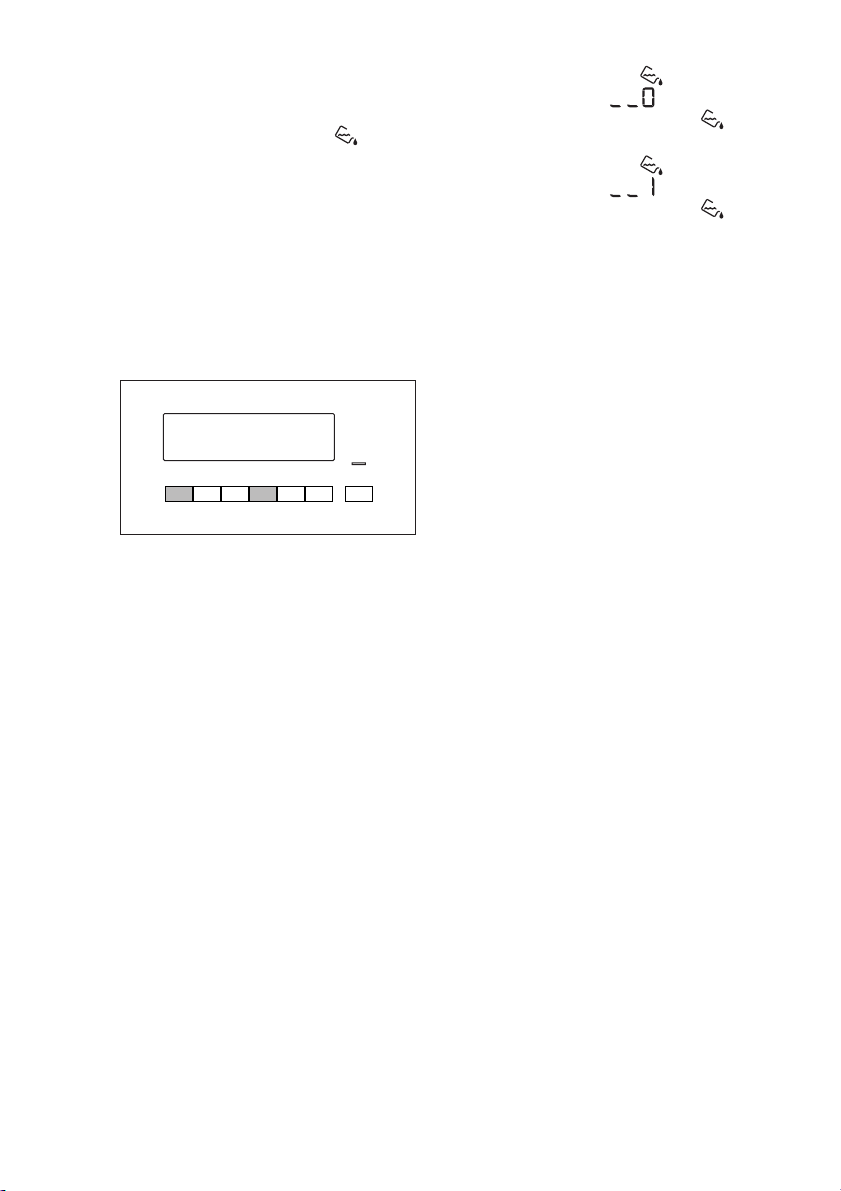
WATER CONTAINER FULL —
INDICATION
By default the indication is always
on. It comes into the view at the end of
the cycle or when the water container is
full. When you use an external equipment to drain the container, the indication can be off.
To activate or deactivate the indication:
1.
Turn the programme dial to available programme.
2.
Push at the same time 2 buttons
(see the illustration) and hold down
until you see the correct setting:
–
the indication
indicator
view — the indication
manently off
–
the indication
indicator
view — the indication
vated
ENGLISH
49
is off and the
comes into the
is per-
is on and the
comes into the
is acti-
Page 50
50
CARE AND CLEANING
CLEANING THE PRIMARY
FILTER
At the end of each cycle the indicator
(clean the primary filter) is on to tell
you that the primary filter must be
cleaned.
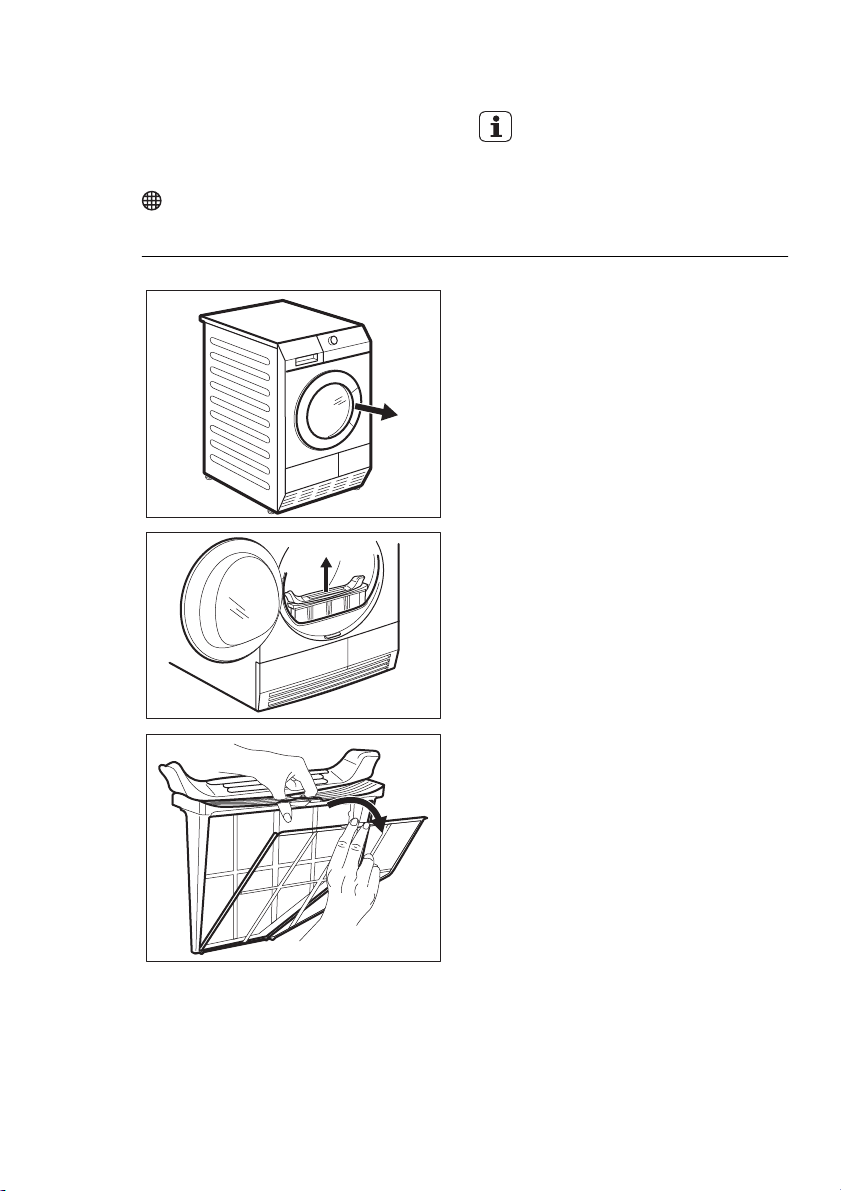
To clean the primary filter:
The filter collects the fluff. The
fluff occurs while the cloths are
dried in the tumble dryer.
1.
Open the door.
2.
Pull the filter.
3.
Open the filter.
Page 51
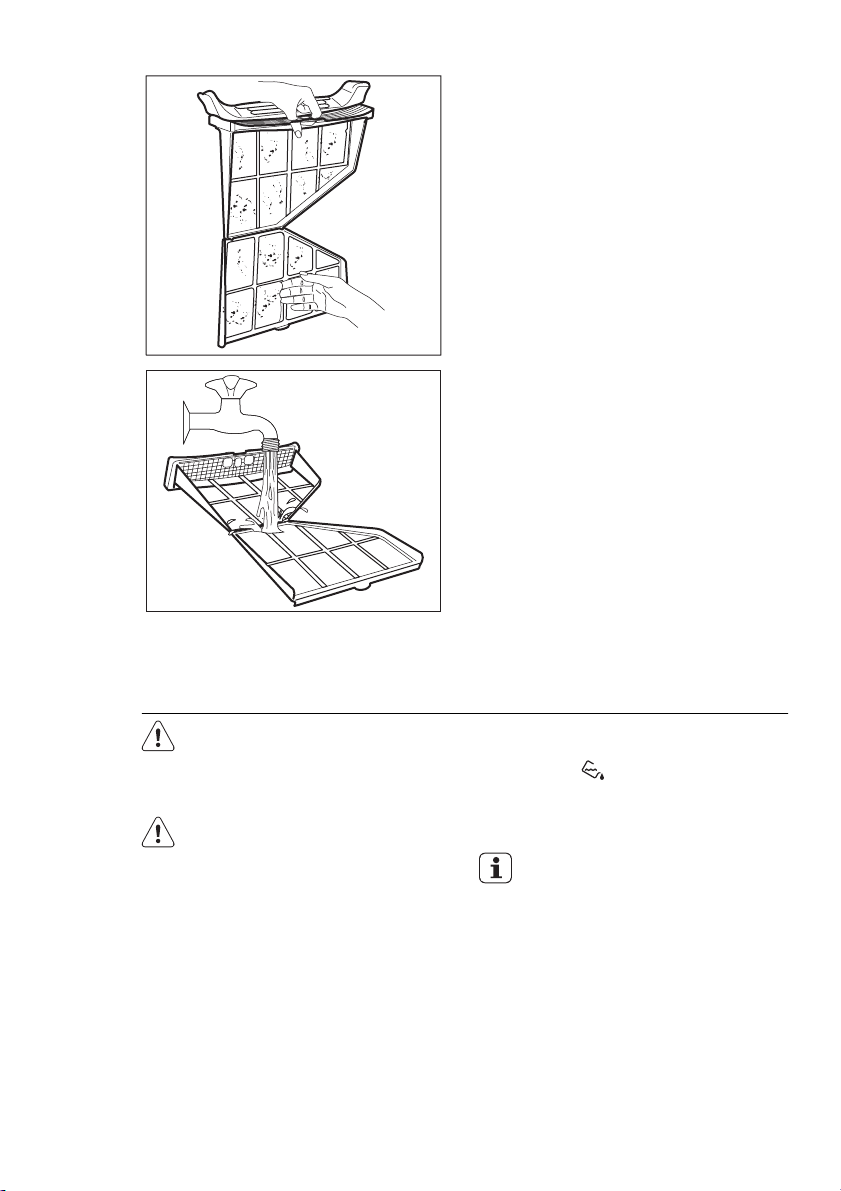
ENGLISH
4.
Use a moist hand to clean the filter.
5.
If necessary clean the filter with
warm water using a brush.
Close the filter.
51
CAUTION!
Do not operate the tumble dryer without the primary filter or
with damaged or blocked filter.
Clean the primary filter after
each drying cycle. Clogged filter
increases the cycle time and
causes higher energy consumption.
DRAINING THE WATER
CONTAINER
Drain the water container after each
drying cycle.
6.
Remove fluff from the filter socket.
For this a vacuum cleaner can be
used.
7.
Put the filter inside the filter socket.
If the water container is full, the programme breaks off automatically and
the indicator
drain the water con-
tainer is on. To continue the programme, drain the water container and
press the start button.
To drain the water container automatically you can install draining accessory (see chapter: AC-
CESSORIES)
Page 52
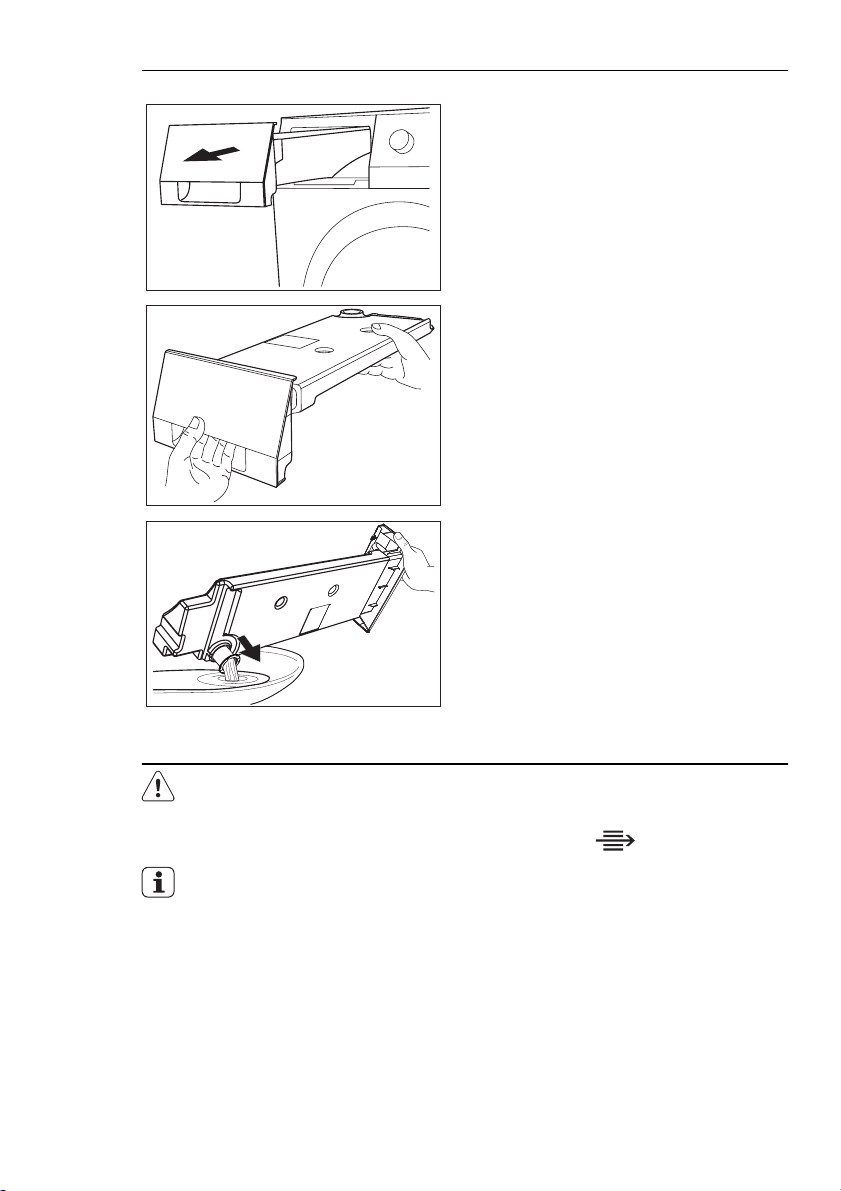
52
To drain the water container:
1.
Pull the water container.
2.
Move the water container in horizontal position.
3.
Move the plastic connection out
and drain the water container into a
sink or equivalent receptacle.
WARNING!
Risk of poisoning. The condensed water is not applicable
to drink or to prepare food.
The condensed water can be
used as distilled water, e.g. for
steam ironing. If necessary filter
the condensed water (e.g. with a
coffee filter) to remove possible
residue and small pieces of fluff.
4.
Move plastic connection in and install water container.
CLEANING THE HEAT
EXCHANGER FILTERS
If the indicator clean the heat exchanger filters is on, the filters must be
cleaned.
Page 53
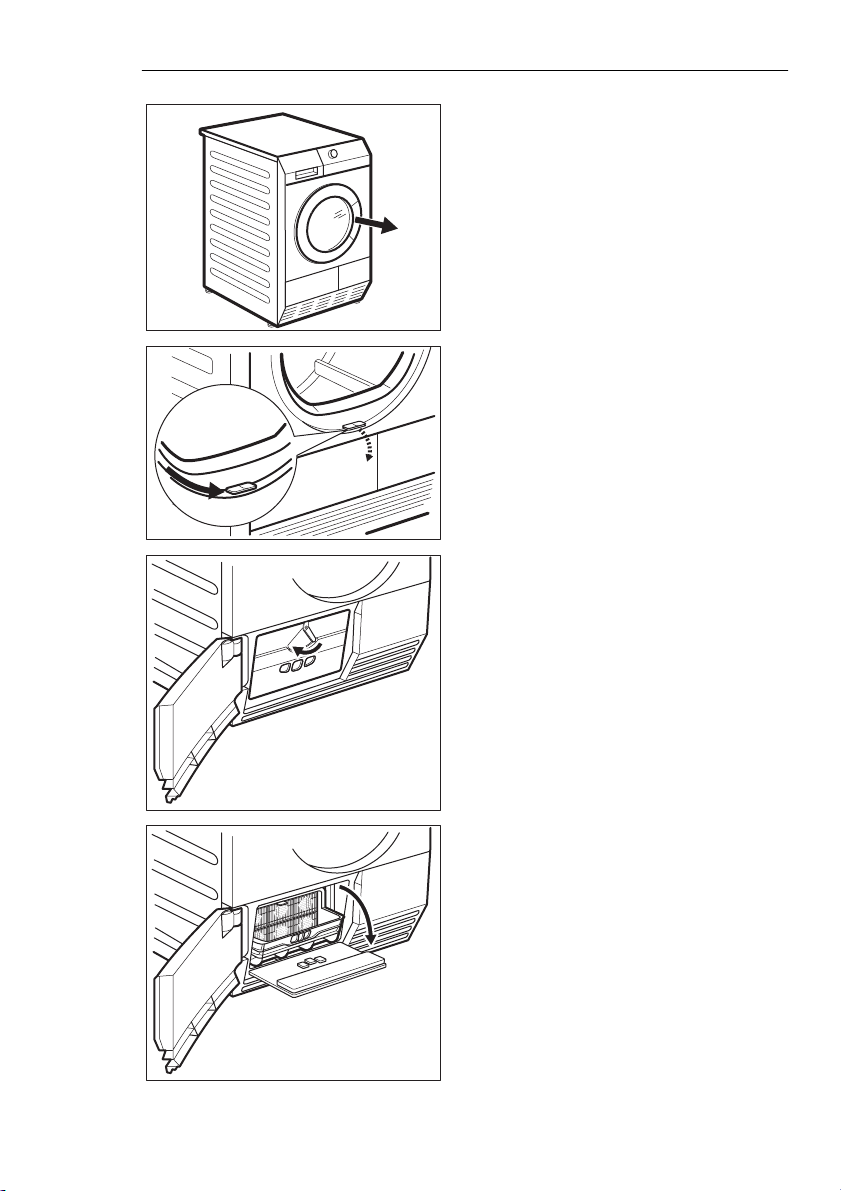
To clean the filters:
1.
Open the loading door.
2.
Move the release button on the
bottom of the door opening and
open the heat exchanger door.
3.
Turn the blockage to unlock the
heat exchanger cover.
ENGLISH
53
4.
Lower the heat exchanger filters
cover.
Page 54
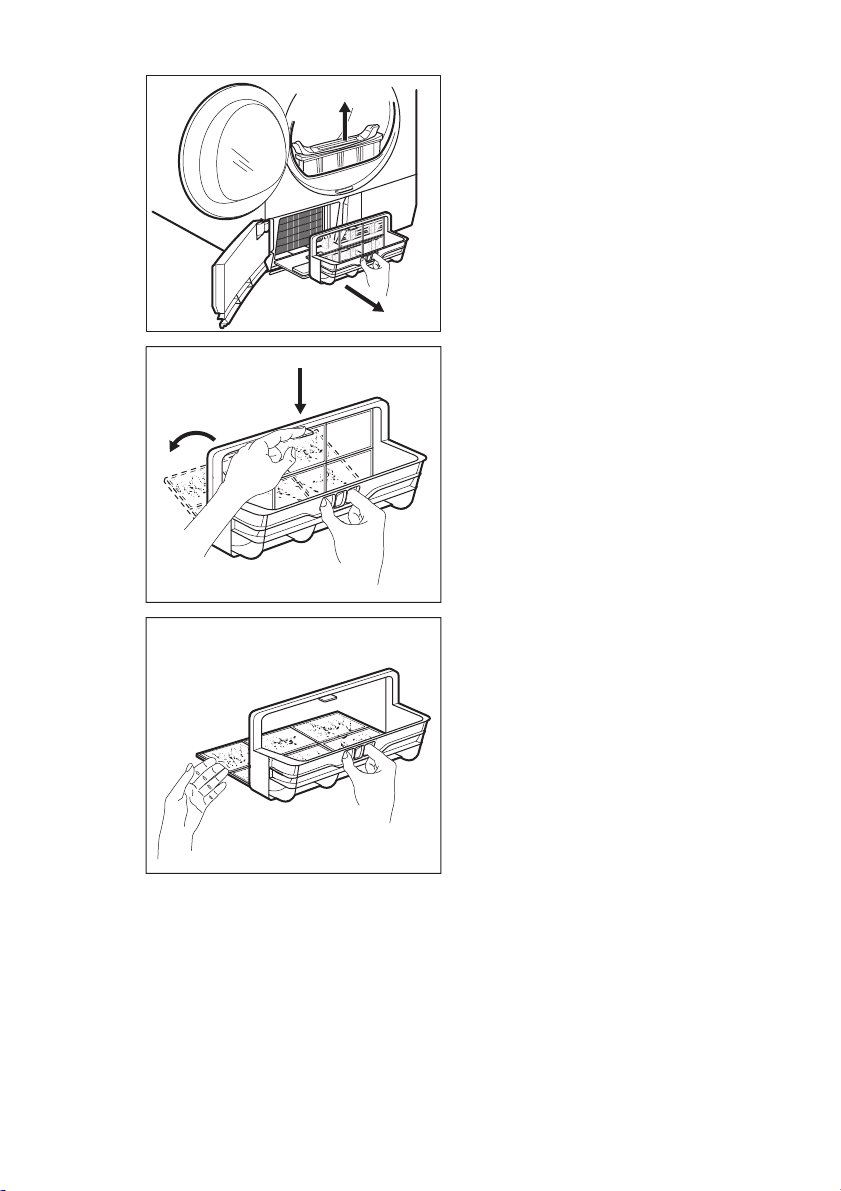
54
5.
Lift the primary filter. Hold the heat
exchanger filter and pull it out from
the bottom compartment.
6.
Push the hook to open the filter.
7.
Use a moist hand to clean the filter.
If necessary clean the filter with
warm water using a brush.
Close the filter.
Page 55
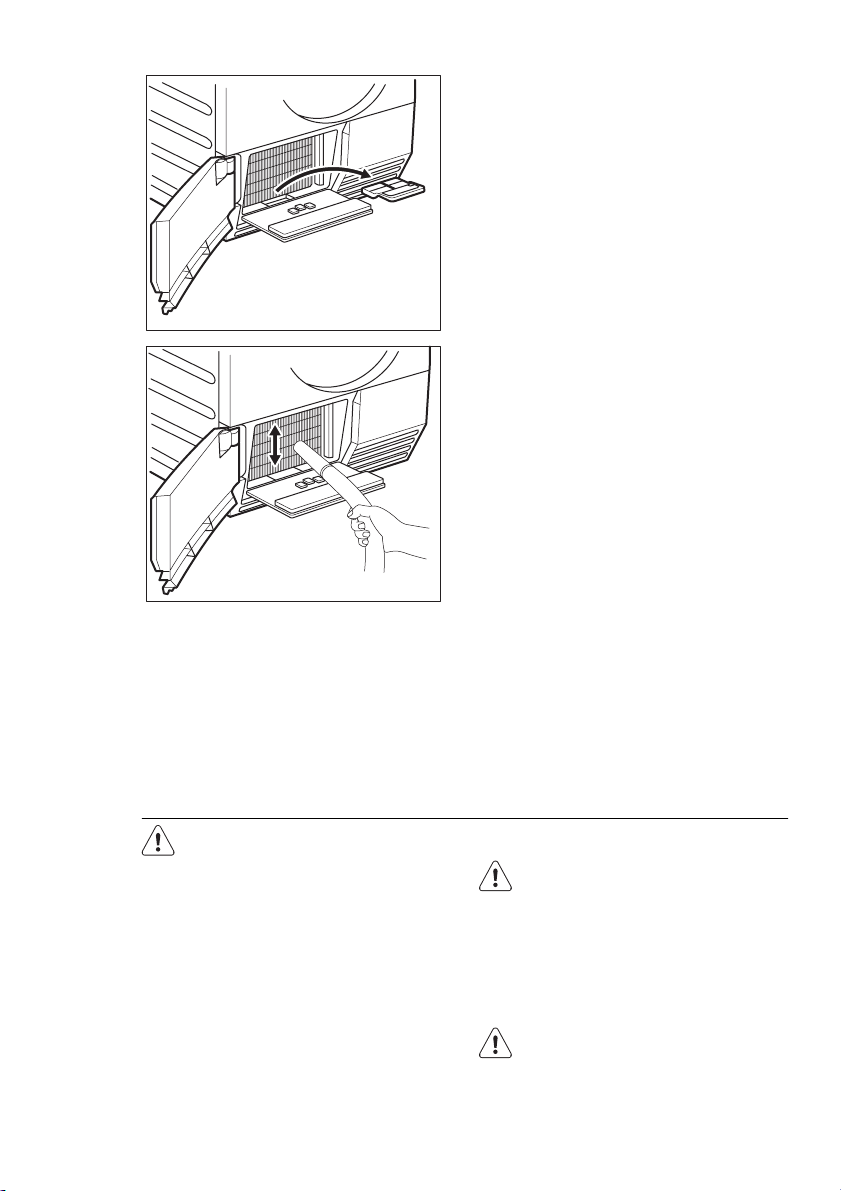
8.
Clean the small filter from the base
9.
If necessary, one time for each 6
months, remove the fluff from the
heat exchanger compartment. You
can use a vacuum cleaner.
ENGLISH
55
CAUTION!
Do not operate the tumble dryer when the heat exchanger filters are blocked with fluff. This
could cause the damage to the
tumble dryer. This also increases
energy consumption.
Do not use sharp objects to
clean the heat exchanger compartment.
Do not operate the tumble dryer without the filters.
10.
Put the small filter and heat exchanger filter back.
11.
Close the heat exchanger cover.
12.
Lock the blockage until it snaps.
13.
Close the heat exchanger filters
cover.
14.
Close the heat exchanger door.
15.
Put the primary filter.
CLEANING THE DRUM
WARNING!
Disconnect the appliance before you clean it.
Use a standard neutral soap detergent
to clean the inner surface of the drum
and drum ribs. Dry the cleaned surfaces
with a soft cloth.
CAUTION!
Do not use abrasive materials or
steel wool to clean the drum.
Page 56

56
CLEANING THE CONTROL
PANEL AND HOUSING
Use a standard neutral soap detergent
to clean the control panel and housing.
Use a moist cloth to clean. Dry the
cleaned surfaces with a soft cloth.
CAUTION!
Do not use furniture cleaning
agents or cleaning agents which
can cause corrosion to clean the
appliance.
Page 57
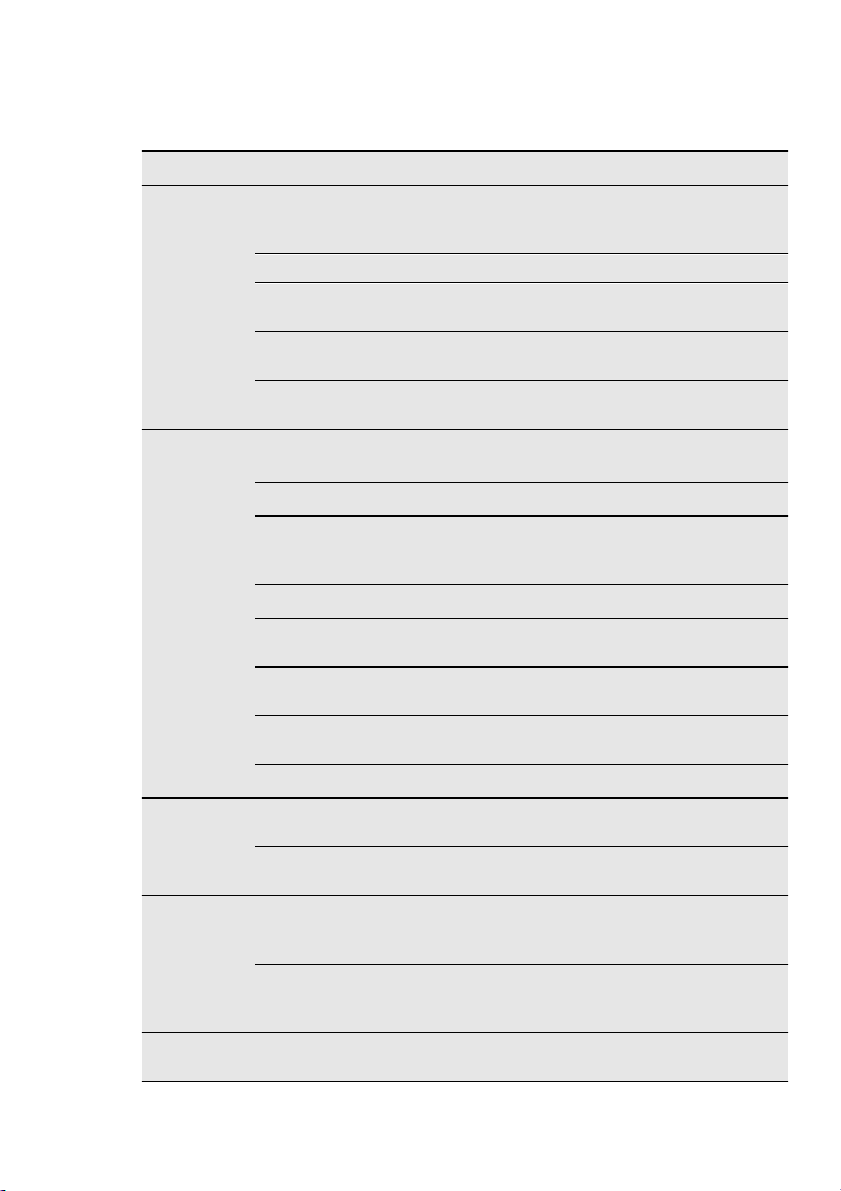
TROUBLESHOOTING
TROUBLESHOOTING
ENGLISH
57
Problem
1)
The tumble
dryer does
not operate.
Unsatisfactory drying
results.
The door
does not
close.
Err (Error)
on the display.
No drum
light
Possible cause Remedy
The tumble dryer is not connected to mains supply.
Connect in at mains socket.
Check fuse in fuse box (domes-
tic installation).
The loading door is opened. Close the loading door.
The Auto/Off button was not
pushed.
The Start/Pause button was not
pushed.
The appliance is in the standby
mode.
Incorrect programme selection.
The filter is clogged.
The Dry Plus function was in
minimum mode.
The condenser is clogged.
Too high volume of the load.
The airflow grill is clogged.
Dirt on the inner surface of the
drum.
Too high water hardness.
The filter not locked in the posi-
tion.
The laundry is locked between
the door and the seal.
You try to change the pro-
gramme or the function after
the start of the cycle.
The function you try to activate
is not applicable with the selected programme.
Defective drum light.
Push the Auto/Off button.
Push the Start/Pause button.
Push the Auto/Off button.
Do the selection of the applica-
ble programme.
Clean the filter.
2)
3)
Change the Dry Plus function to
the moderate or maximum
mode.
Clean the condenser.
3)
Obey the maximum load vol-
ume.
Clean the airflow grill in the bot-
tom of the appliance.
Clean the inner surface of the
drum.
Set applicable water hardness4).
Put the filter in the correct posi-
tion.
Put the load correctly in the
drum.
Turn the tumble dryer off and
on. Make the new selection.
Turn the tumble dryer off and
on. Make the new selection.
Contact the service centre to re-
place the drum light.
Page 58
58
Problem
1)
Abnormally
elapsing
time on the
display.
Programme
inactive.
The time to end is calculated on
the basis of the volume and
dampness of the laundry.
The water container is full.
Possible cause Remedy
The automatic procedure — this
is not the appliance malfunction.
Drain the water container3) ,
push the Start/Pause button.
Do the selection of time pro-
gramme. The time value must
Too small laundry volume.
Drying cycle
too short.
be related to the load. To dry
one item or small quantities of
the laundry we recommend to
use short times.
Do the selection of time proThe laundry is too dry.
gramme or higher drying level
(e.g. Extra Dry )
The filter is clogged. Clean the filter.
Too high volume of the load.
Drying cycle
too long
The laundry not spun sufficient-
5)
ly.
Very high room temperature -
this is not the appliance malfunction.
1)
If there is an error message on the display (e.g. E51): Turn the tumble dryer off and on.
Make a selection of the new programme. Push the Start/Pause button. Does not operate? contact the service centre and give the error code.
2)
follow the programme description — see PROGRAMMES chapter
3)
see CARE AND CLEANING chapter
4)
see section WATER HARDNESS in HINTS AND TIPS chapter
5)
Note: After maximum 5 hours the drying cycle ends automatically (see Drying cycle
complete section).
DRUM INTERNAL LAMP
This appliance has an internal lamp that
comes on when you open the door and
goes off when the door is closed.
Obey the maximum load volume.
Spin correctly the laundry.
If possible, lower the room temperature.
To replace the internal lamp,
contact the service centre.
Disconnect the mains plug from
the mains socket before the replacement of the internal lamp.
WARNING!
Do not look directly into the
beam of the lamp.
Page 59
TECHNICAL INFORMATION
height x width x depth 850 x 600 x 600 mm (maximal 640 mm)
drum volume 118 l
maximum depth with the load door
opened
maximum width with the load door
opened
adjustable height 850 mm (+ 15 mm - feet regulation)
the appliance weight 56 kg
maximum load volume 8 kg
voltage 230 V
frequency 50 Hz
necessary fuse 4 A
total power 800 W
energy efficiency class A
energy consumption kWh/cycle
annual energy consumption 108,3 kWh
type of use Domestic
permitted ambient temperature + 5°C to + 35°C
1)
8 kg of cotton, centrifuged at 1000 rpm with reference to EN 61121
ENGLISH
59
1090 mm
950 mm
1)
1,92 kWh
Page 60
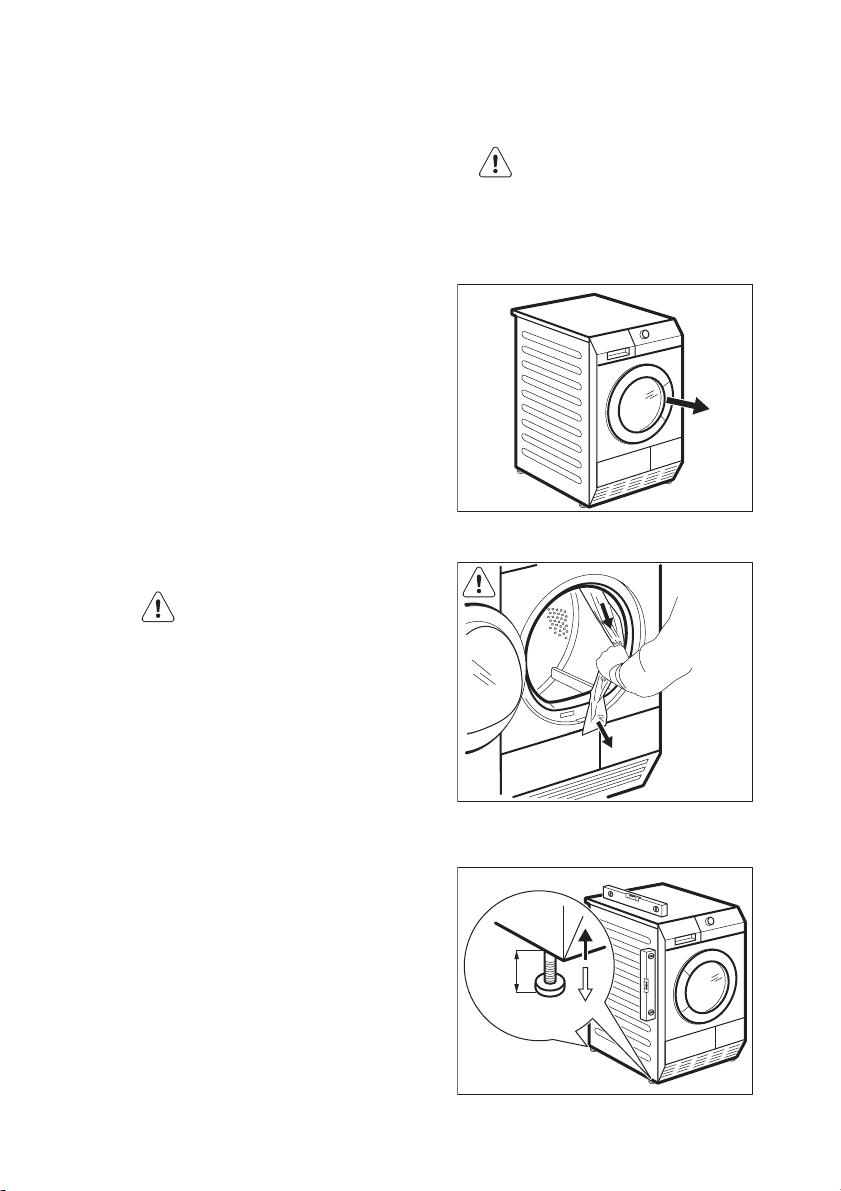
60
INSTALLATION
APPLIANCE POSITIONING
• The tumble dryer must be installed in
a clean position, where dirt does not
collect.
• Air must flow freely around the appliance. Make sure that the front airflow
slots in the bottom of the appliance
are not blocked .
• To keep vibration and noise at the
minimum, when the tumble dryer operates, it must be put on a stable and
flat surface.
• When the appliance is put in its permanent position, check if is fully level
with the aid of a spirit level. If it is
not, adjust the feet until it is.
• Do not remove the feet. Do not decrease the floor clearance through
thick carpets, bar of wood or equivalent. This can increase the heat which
can cause interference with the operation of the appliance.
• The temperature of the hot
air which occurs in the tumble
dryer can increase to 60 °C.
The appliance must not be installed on the floor which is
not resistant to high temperatures.
• When the tumble dryer operates, the room temperature
must not be lower than +5 °C
and higher than +35 °C. This
can cause unwanted effect on
the performance of the appliance.
• If it is necessary to move the
appliance, it must be moved
vertically.
• The appliance must not be installed behind a lockable
door, a sliding door, a door
with a hinge on the opposite
side to that of the appliance
in such a way that a full opening of the tumble dryer is restricted.
UNPACKING
CAUTION!
Before use all parts of the transport
packaging must be removed.
To remove the polystyrene blockages:
1.
Open the load door.
2.
Pull plastic hose with the polystyrene blockages out from the drum.
It is possible to adjust the height of the
tumble dryer. To do that adjust the feet
(see picture).
15mm
Page 61
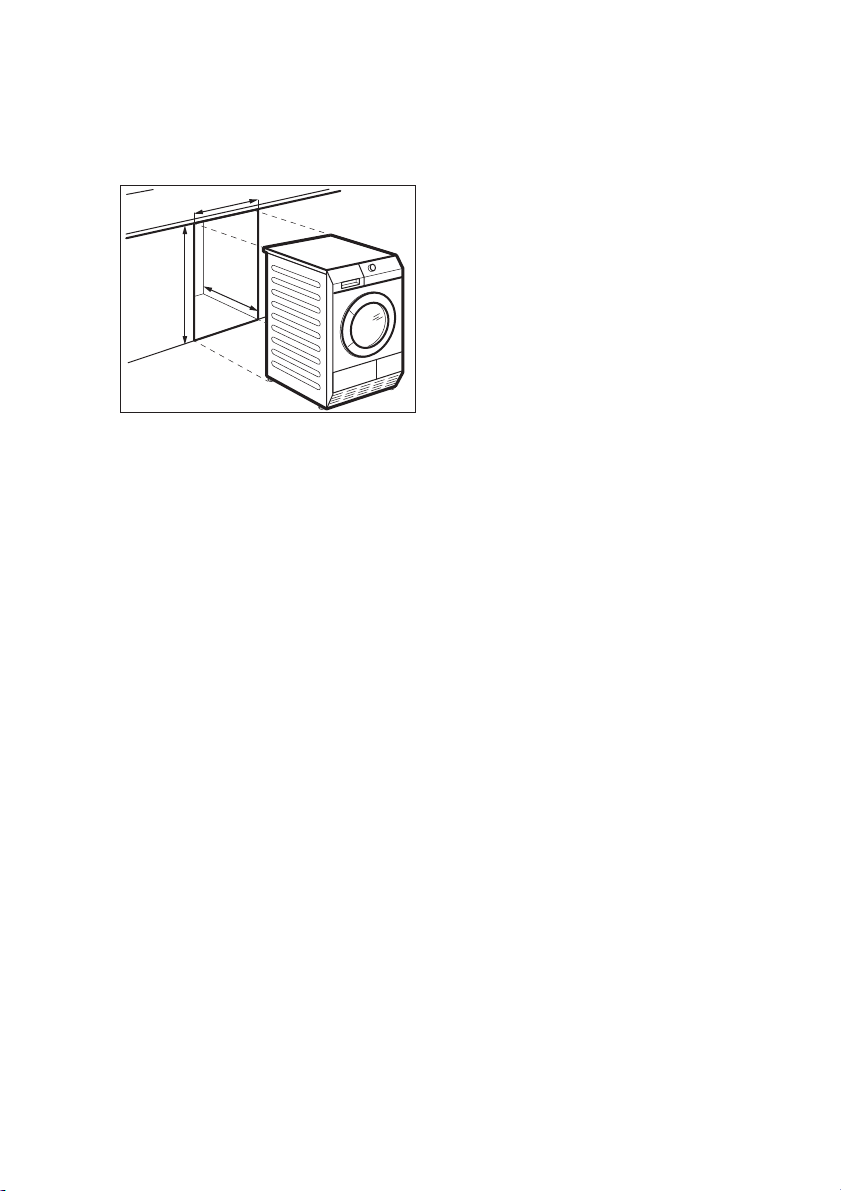
ENGLISH
61
INSTALLATION UNDER A
COUNTER
The appliance can be installed as freestanding or below the kitchen counter
with correct space (see picture).
600 mm
> 850 mm
600 mm
THE LOAD DOOR REVERSAL
The load door can be installed by the
user in the opposite side. It can help to
easily put and remove the laundry or if
there is a limit to install the appliance.
(see separate leaflet).
ELECTRICAL CONNECTION
• Connect the machine to an earthed
socket, in accordance with current
wiring regulations.
• Make sure that the electrical data on
the rating plate agrees with the power supply.
• Always use a correctly installed
shockproof socket.
• Do not use multiple plugs and extension cables. There is a risk of fire.
• Should the appliance power supply
cable need to be replaced, this must
be carried out by our Service Centre.
• Make sure not to squash or cause
damage to the mains plug and cable
behind the appliance.
• Do not pull the mains cable to disconnect the appliance. Always pull
the mains plug.
• The plug must be dry.
Page 62

62
Page 63

ENGLISH
63
Page 64
www.aeg.com/shop 136918500-B-362011
 Loading...