

Page 1
76301K-mn
Ceramic glass hob
Table de cuisson vitrocéramique
Piano di cottura in vetroceramica
Installation and Operating Instructions
Instructions de montage et mode d’emploi
Istruzioni di montaggio e per l’uso
Page 2

Dear Customer,
Please read these user instructions carefully and keep them to refer to
later.
Please pass the user instructions on to any future owner of the appliance.
The following symbols are used in the text:
1 Safety instructions
Warning! Information that affects your personal safety.
Important! Information that prevents damage to the appliance.
3 Useful tips and hints
2 Environmental information
2
Page 3

Contents
Operating Instructions. . . . . . . . . . . . . . . . . . . . . . . . . . . . . . . . . . . . . 4
Safety instructions. . . . . . . . . . . . . . . . . . . . . . . . . . . . . . . . . . . . . . . . . . . . . . 4
Description of the Appliance. . . . . . . . . . . . . . . . . . . . . . . . . . . . . . . . . . . . . 6
Cooking zones and control panel. . . . . . . . . . . . . . . . . . . . . . . . . . . . . . . . . . . 6
Digital displays. . . . . . . . . . . . . . . . . . . . . . . . . . . . . . . . . . . . . . . . . . . . . . . . . . 7
Safety cut-out function for the cooking zones . . . . . . . . . . . . . . . . . . . . . . . 7
Operating the hob . . . . . . . . . . . . . . . . . . . . . . . . . . . . . . . . . . . . . . . . . . . . . . 8
Touch control sensor panels . . . . . . . . . . . . . . . . . . . . . . . . . . . . . . . . . . . . . . . 8
Switching on the appliance . . . . . . . . . . . . . . . . . . . . . . . . . . . . . . . . . . . . . . . 8
Switching off the appliance . . . . . . . . . . . . . . . . . . . . . . . . . . . . . . . . . . . . . . . 9
Heat settings selecting . . . . . . . . . . . . . . . . . . . . . . . . . . . . . . . . . . . . . . . . . . . 9
Keep warm setting. . . . . . . . . . . . . . . . . . . . . . . . . . . . . . . . . . . . . . . . . . . . . . . 9
Switching the triple ring zone on and off . . . . . . . . . . . . . . . . . . . . . . . . . . . 10
Switching the casserole zone on and off . . . . . . . . . . . . . . . . . . . . . . . . . . . . 11
STOP+GO function. . . . . . . . . . . . . . . . . . . . . . . . . . . . . . . . . . . . . . . . . . . . . . . 12
Switching off a cooking zone. . . . . . . . . . . . . . . . . . . . . . . . . . . . . . . . . . . . . . 12
Residual Heat Indicator. . . . . . . . . . . . . . . . . . . . . . . . . . . . . . . . . . . . . . . . . . . 13
Cooking using the automatic warm up function. . . . . . . . . . . . . . . . . . . . . . 13
Cooking without the automatic warm up function. . . . . . . . . . . . . . . . . . . . 14
Child safety lock. . . . . . . . . . . . . . . . . . . . . . . . . . . . . . . . . . . . . . . . . . . . . . . . . 15
Timer . . . . . . . . . . . . . . . . . . . . . . . . . . . . . . . . . . . . . . . . . . . . . . . . . . . . . . . . . . 18
Uses, Tables and Tips . . . . . . . . . . . . . . . . . . . . . . . . . . . . . . . . . . . . . . . . . . . . 21
Pans. . . . . . . . . . . . . . . . . . . . . . . . . . . . . . . . . . . . . . . . . . . . . . . . . . . . . . . . . . . 21
Advice on Cooking with and without Automatic Warm up . . . . . . . . . . . . . 22
Settings for Cooking on the Zones . . . . . . . . . . . . . . . . . . . . . . . . . . . . . . . . . 23
Cleaning and Care . . . . . . . . . . . . . . . . . . . . . . . . . . . . . . . . . . . . . . . . . . . . . . 24
What to do if … . . . . . . . . . . . . . . . . . . . . . . . . . . . . . . . . . . . . . . . . . . . . . . . . 25
Rectifying faults. . . . . . . . . . . . . . . . . . . . . . . . . . . . . . . . . . . . . . . . . . . . . . 25
Disposal . . . . . . . . . . . . . . . . . . . . . . . . . . . . . . . . . . . . . . . . . . . . . . . . . . . . . . . 26
Installation Instructions . . . . . . . . . . . . . . . . . . . . . . . . . . . . . . . . . . . 27
Service . . . . . . . . . . . . . . . . . . . . . . . . . . . . . . . . . . . . . . . . . . . . . . . . . . . . . . 29
Assembly . . . . . . . . . . . . . . . . . . . . . . . . . . . . . . . . . . . . . . . . . . . . . . . . . . . . 89
3
Page 4

Operating Instructions
1 Safety instructions
Please comply with these instructions. If you do not, any damage re-
3
sulting is not covered by the warranty.
5 This appliance conforms with the following EU Directives:
– 73/23/EEC dated 19.02.1973 Low Voltage Directive
– 89/336/EEC dated 03.05.1989 EMC Directive inclusive of Amending
Directive 92/31/EEC
– 93/68/EEC dated 22.07.1993 CE Marking Directive
Correct use
• This appliance should be used only for normal domestic cooking and
frying of food.
• The appliance must not be used as a work surface or as a storage surface.
• Additions or modifications to the appliance are not permitted.
• Do not place or store flammable liquids, highly inflammable materials
or fusible objects (e.g. plastic film, plastic, aluminium) on or near the
appliance.
Children’s safety
• Small children must be kept away from the appliance.
• Only let bigger children work on the appliance under supervision.
General safety
• The appliance may only be installed and connected by trained, registered service engineers.
• Built-in appliances may only be used after they have built in to suitable built-in units and work surfaces that meet standards.
• In the event of faults with the appliance or damage to the glass ceramic (cracks, scratches or splits), the appliance must be switched off
and disconnected from the electrical supply, to prevent the possibility
of an electric shock.
• Repairs to the appliance must only be carried out by trained registered service engineers.
4
Page 5

Safety during use
• Remove stickers and film from the glass ceramic.
• There is the risk of burns from the appliance if used carelessly.
• Cables from electrical appliances must not touch the hot surface of
the appliance or hot cookware.
• Overheated fats and oils can ignite quickly. When cooking with fat or
oil (e.g. chips) do not leave the appliance unattended.
• Switch the cooking zones off after each use.
Safety when cleaning
• For cleaning, the appliance must be switched off and cooled down.
• For safety reasons, the cleaning of the appliance with steam jet or
high-pressure cleaning equipment is not permitted.
How to avoid damage to the appliance
• The glass ceramic can be damaged by objects falling onto it.
• The edge of the glass ceramic can be damaged by being knocked by
the cookware.
• Cookware made of cast iron, cast aluminium or with damaged bottoms can scratch the glass ceramic if pushed across the surface.
• Objects that melt and things that boil over can burn onto the glass
ceramic and should be removed straightaway.
• Do not use the cooking zones with empty cookware or without cookware.
5
Page 6

Description of the Appliance
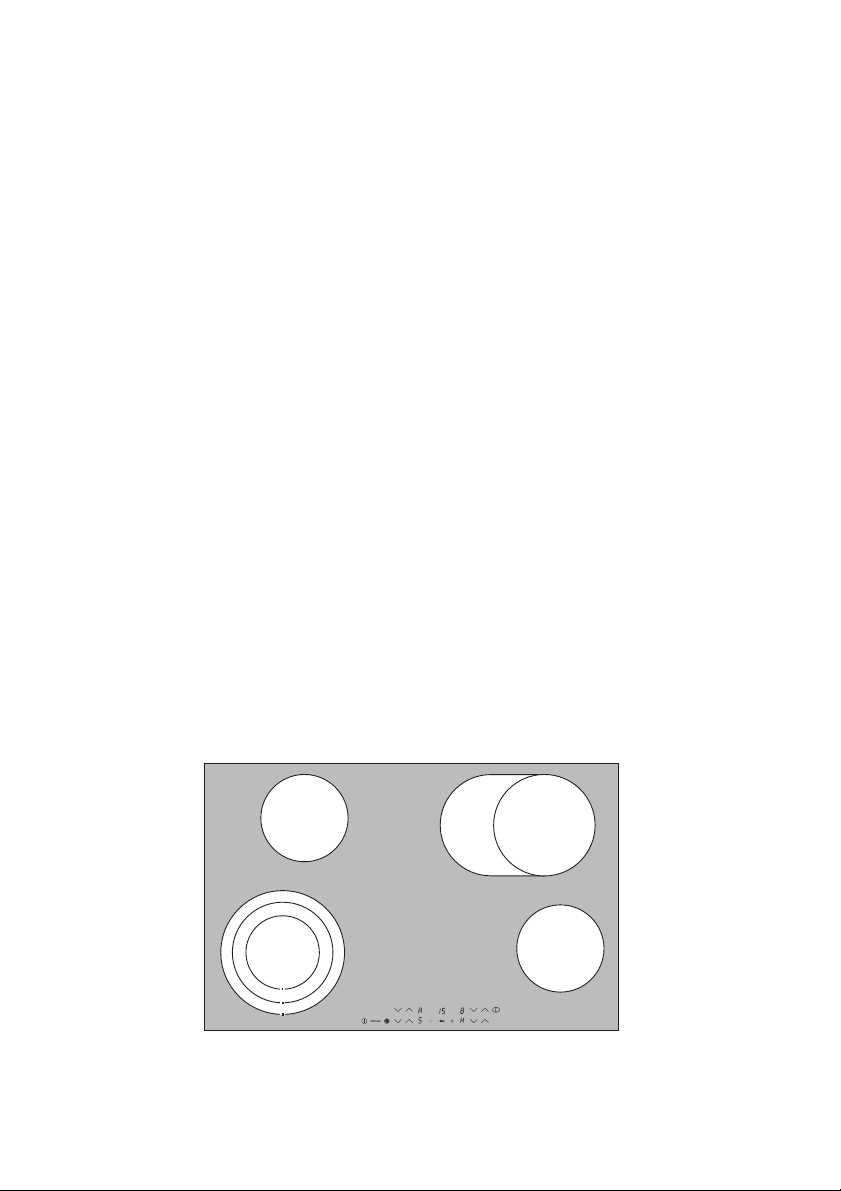
Cooking zones and control panel
Single ring cooking zone
1200W
Casserole zone
2400W
Sensor panel
6
Triple ring cooking zone
Three-ring sensor panel
Sensor panel
”Stop+Go”
”On/Off”
2300W
Three-ring control lamps
Cooking setting
selector
Indicator for cooking setting/ residual warmth
Control panel
Casserole zone control lamp
“Timer” with
control indicators
Single ring cooking zone
1200W
Casserole zone sensor panel
Cooking setting selector
Page 7

Digital displays
The four display panels that belong to the four cooking zones indicate:
– ¾ after having been switched on,
– u when a keep warm setting has been selected,
– ¿ to Ç, depending on the cooking setting selected,
– 2 to 6 (with decimal point) for intermediate cooking settings,
– a when the automatic warm up function is in operation,
– h when there is residual warmth,
– l when the child safety device has been switched on,
– e when there is a malfunction
1 Safety cut-out function for the cooking zones
If one of the cooking zones is not switched off after a certain period of
time or the cooking setting is not altered, that particular cooking zone
will automatically switch itself off.
Any residual warmth will be indicated with h (as for “hot”) in the digital displays corresponding to the particular cooking zones.
The cooking zones switch themselves off when:
• Heat setting u, 1 - 2 after 6 hours
• Heat setting 3 - 4 after 5 hours
• Heat setting 5 after 4 hours
• Heat setting 6 - 9 after 1.5 hours
3 Should one or more cooking zones switch themselves off before the pe-
riods of time indicated have elapsed, see the chapter “What to do if …”.
Other causes for a cooking zone switching itself off
All cooking zones will immediately switch themselves off if liquid boils
over and lands on the control panel.
The same thing will happen if you place a damp cloth on the control
panel. In both instances, after the liquid or cloth has been removed, the
appliance will need to be switched on again using the main switch I.
7
Page 8
Operating the hob
Touch control sensor panels
To operate the touch control sensor panels, touch the desired panel
with the tip of your pointed finger until the relevant displays illuminate
or go out, or until the desired function is carried out.
3 Ensure that you are only touching one sensor panel when operating the
appliance. If you finger is too flat on the panel, the sensor panel below
may be actuated as well.
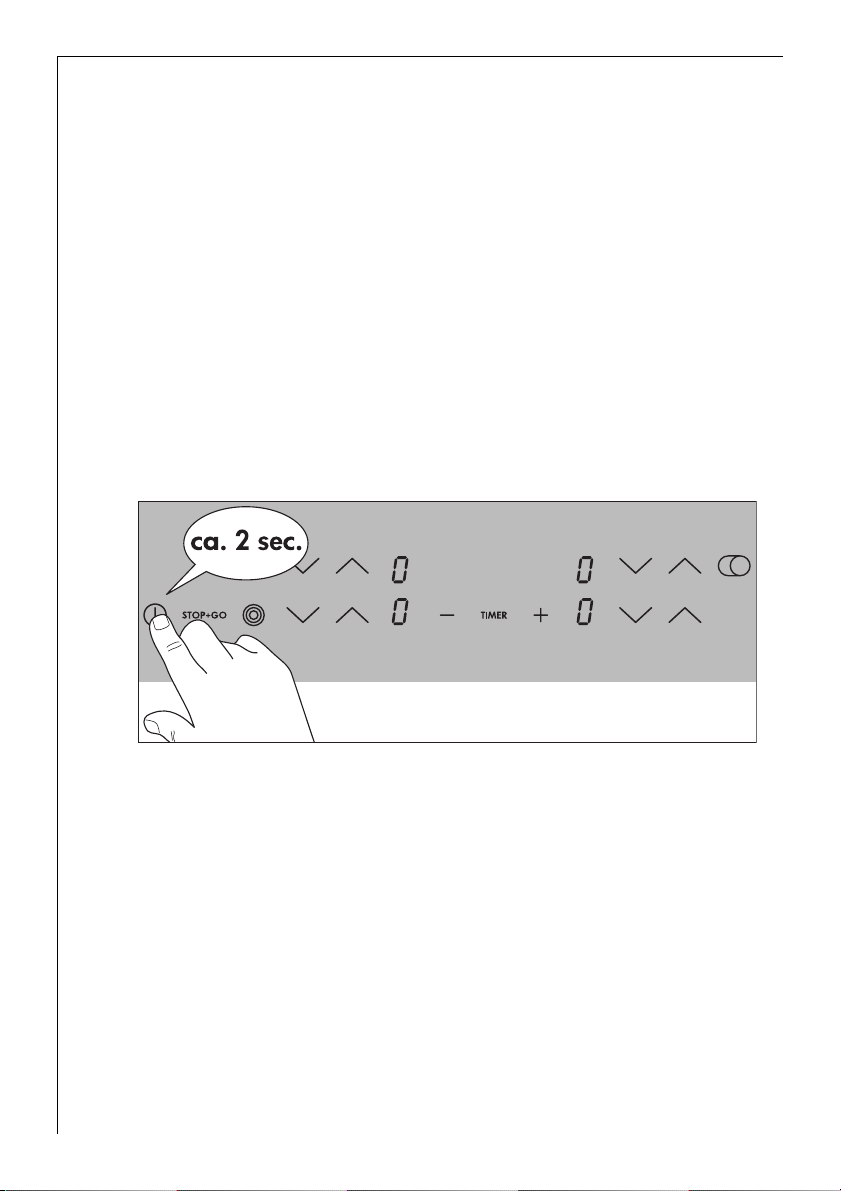
Switching on the appliance
The entire appliance is switched on using the ”On/Off” sensor panel
I.
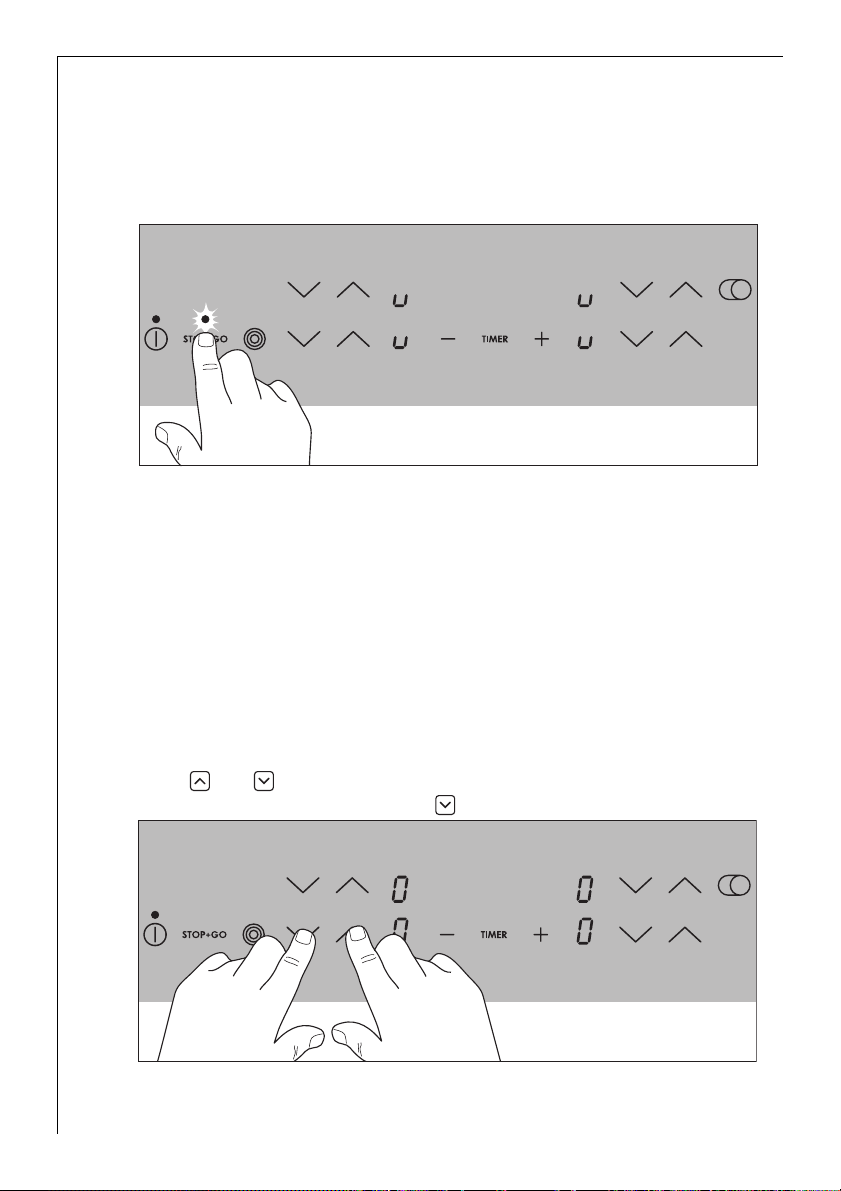
Touch the “On/Off” sensor panel for approx. two seconds.
The digital displays will show ¾.
3 After the “On/Off” sensor panel has been actuated to switch on your
appliance, a cooking setting must be selected for a cooking zone within
approx. 10 seconds, or a time must be set using the timer (egg timer
function). If not, the appliance will switch itself off again for reasons
related to safety.
8
Page 9

Switching off the appliance
To completely switch off the appliance, actuate the “On/Off” sensor
panel I.
Touch the “On/Off” sensor panel for approx. one second.
3 After switching off a single cooking zone or the entire cooking surface,
the existing residual warmth will be displayed in the digital displays of
the corresponding cooking zones in the form of h (for “hot”).
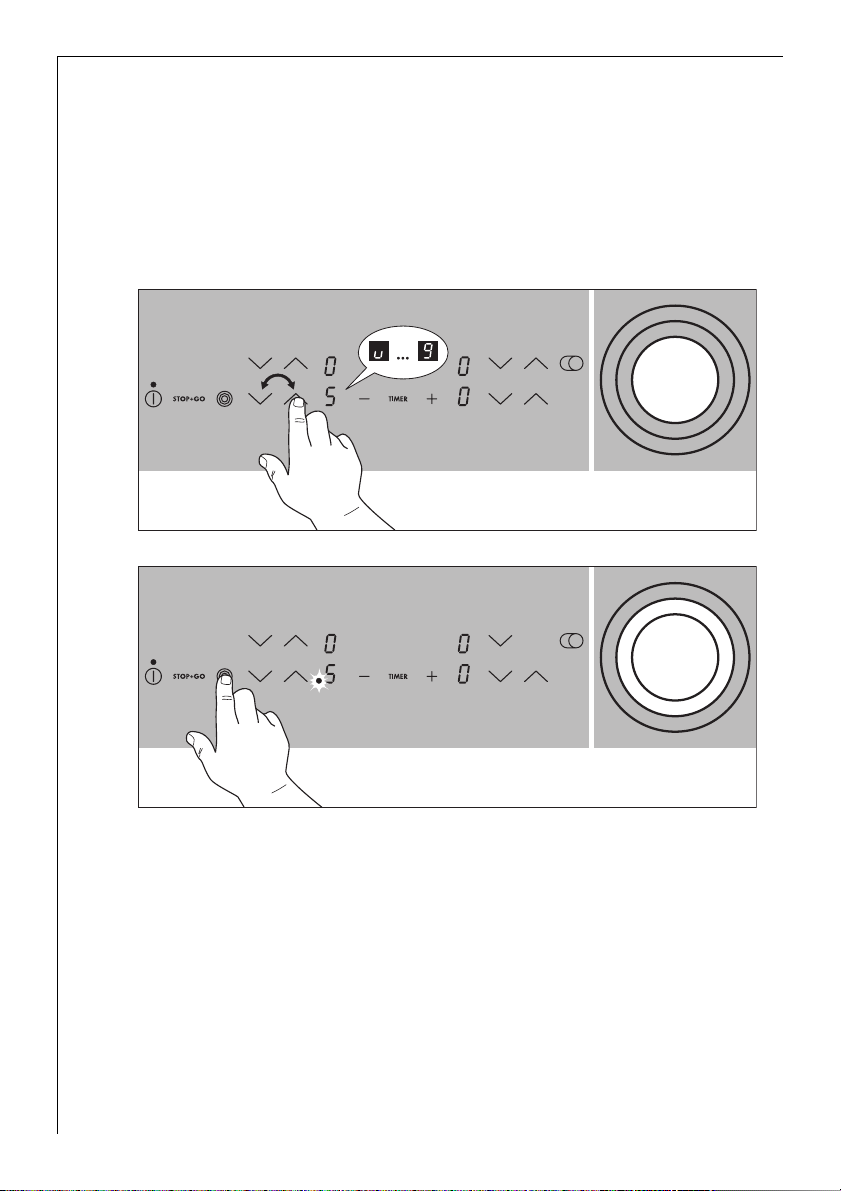
Heat settings selecting
For setting and changing the heat setting (u to Ç) for the selected
cooking zone.
Raise the heat setting using the heat setting selector sensor panel .
Lower the heat setting using the heat setting selector sensor panel .
Keep warm setting
Each of the 4 cooking zones has a keep warm setting u.
Use the heat setting selector sensor panel to set the keep warm set-
ting u.
9
Page 10
Switching the triple ring zone on and off
According to the size of the saucepan or frying pan, when using the triple ring cooking zone you can switch from a smaller cooking zone to a
larger cooking zone using the “triple ring zone” sensor panel.
3 You can only switch to the next size if a heat setting has already been
set for the smaller heating ring.
1. Set the desired heat setting.
2. Touch the “triple ring” sensor panel.
10
This will switch the setting to the centre heating ring. The lower control
lamp will illuminate.
Page 11
3. Touch the “triple ring” sensor panel to activate the outer heating ring.
The upper control lamp will illuminate.
4. To switch off the outer heating ring, touch the “triple ring” sensor panel, and the heating ring that is outermost at the time will switch off.
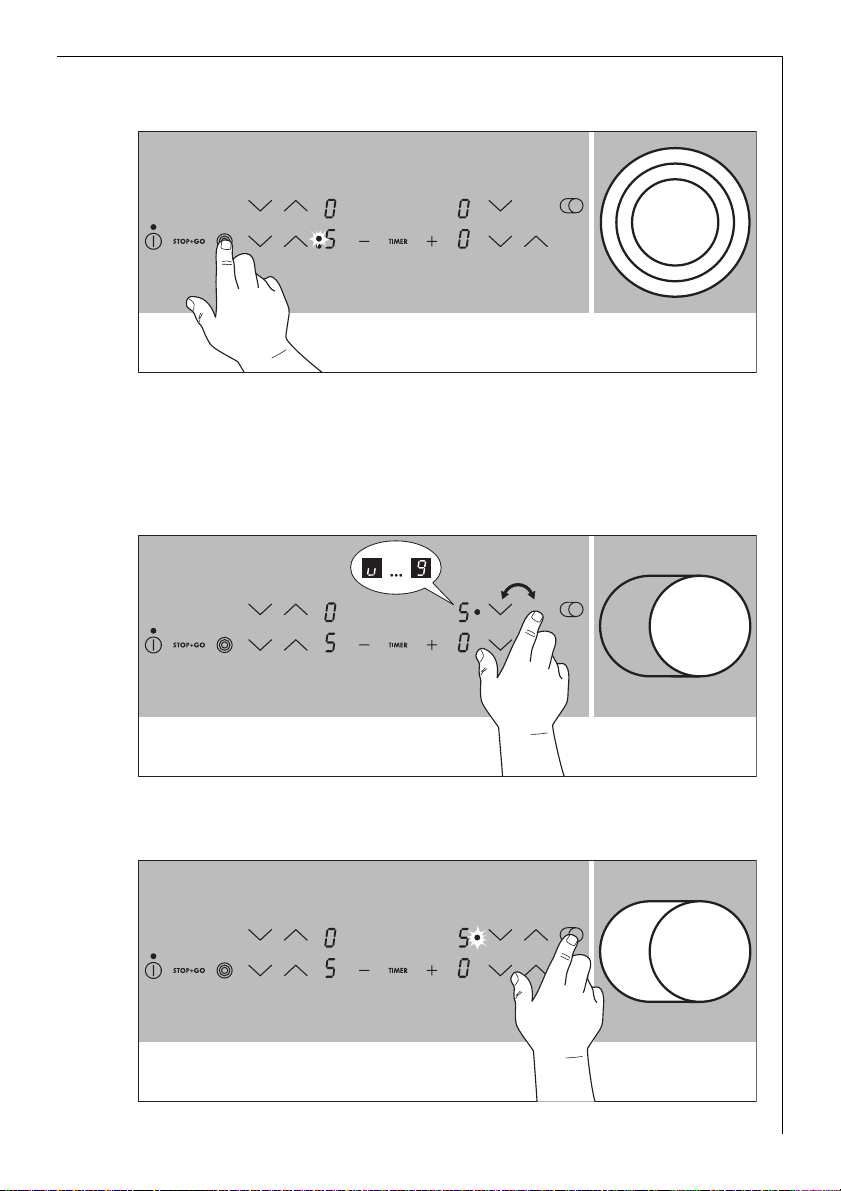
Switching the casserole zone on and off
1. Set the desired heat setting.
2. To switch the casserole zone on or off, place your finger flat on the
“casserole zone” sensor field until the indicator light illuminates or goes
off.
11
Page 12
STOP+GO function
When the “Stop+Go” sensor panel is actuated all cooking zones that
are switched on are simultaneously switched to the keep warm setting.
The control light for the “Stop+Go” sensor panel will illuminate. The
keep warm setting will be indicated in the display with u.
When the “Stop+Go” sensor panel is actuated again, the cooking settings that were previously selected are reset and the control light goes
out.
3 The timer is not stopped by the Stop+Go function.
If an automatic warm up function was selected in the heating up
stage a this will be stopped by the Stop+Go function, and the previously selected cooking setting will be reset by actuating the “Stop+Go”
sensor panel again.
Switching off a cooking zone
1. To switch off a cooking zone touch the heat setting selector sensor
panel and simultaneously, or return the setting to zero using the
heat setting selector sensor panel .
12
Page 13
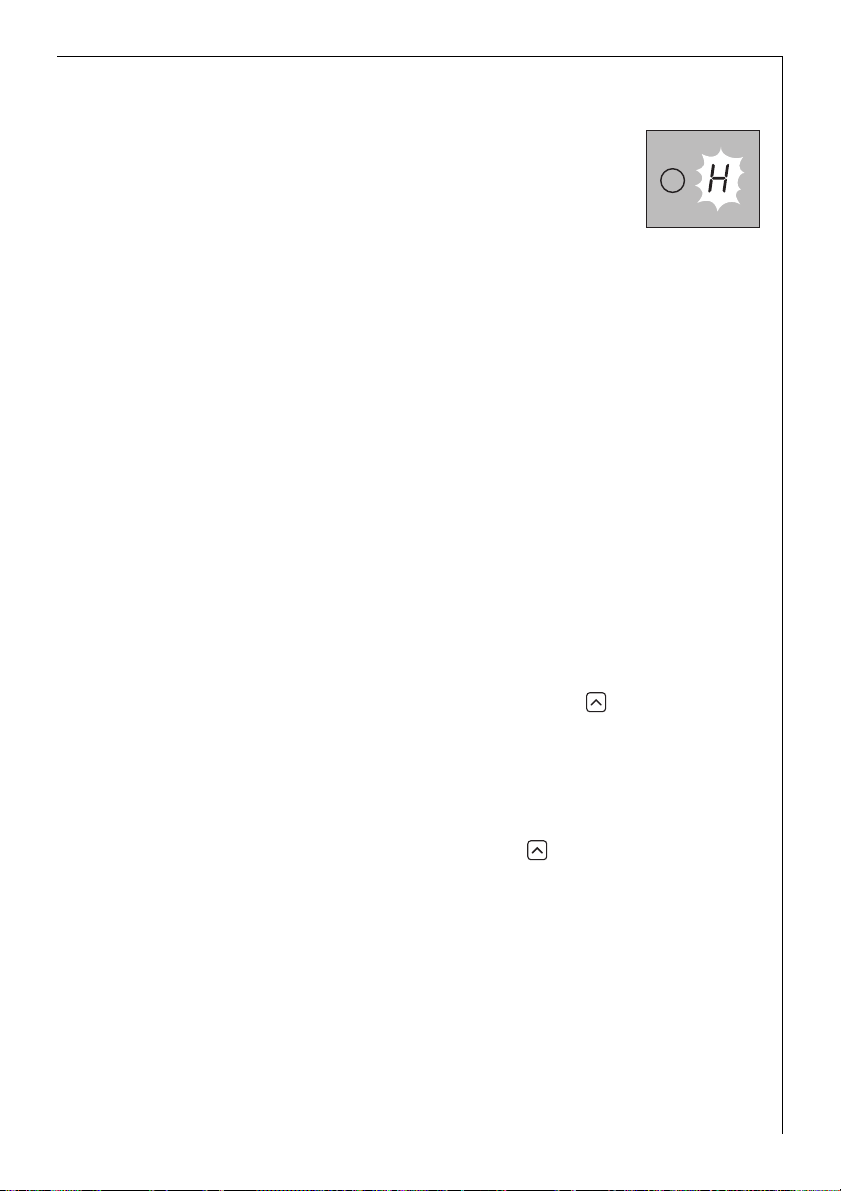
Residual Heat Indicator
When an individual cooking zone or the entire hob is
switched off, any residual heat is shown with an h (for
“Hot”) in the digital display for the appropriate cooking
zones.
Even after the cooking zone has been switched off, the
residual heat indicator only goes out when the cooking zone is cold.
2 You can use the residual heat for melting and keeping food warm.
1 Important! As long as the residual heat indicator is illuminated, there
is a risk of burns.
1 Important! If the power supply is interrupted the h symbol will also
go out and information about residual heat will no longer be available.
However, it is still possible to burn yourself. This can be avoided by taking care around the hob.
Cooking using the automatic warm up function
All of the cooking surface’s four cooking zones can be adjusted to any
of nine settings, and are equipped with an automatic warm up function:
– ¿, lowest heat setting
– Ç, highest heat setting
– a, automatic warm up function.
When you select the desired heat setting using the heat setting selector sensor panel, the cooking zone will operate at maximum power
for a certain period of time and will then automatically switch back to
the follow-on heat setting that has been set.
The length of time that the automatic warm up function operates depends on the follow-on heat setting selected.
1. Touch the heat setting selector sensor panel to set the desired heat
setting from ¿ to Æ. The heat setting that has been set will then be
displayed. After a period of 5 seconds, the a (=automatic warm up
function) will appear in the display in place of the heat setting. After
13
Page 14
the warm up period has finished, the heat setting will once more be
displayed.
3 If you should choose a higher heat setting while the automatic func-
tion is in operation, e.g. from Á to Ã, the period of time that the warm
up function is in operation will be adjusted accordingly. If you select a
lower setting, the warm up period will end immediately.
You can cook using the automatic warm up function only if the cooking zone is cold or moderately warm. If a cooking zone is already hot
when you switch it on (h indicator), the automatic warm up function
cannot be used.
Cooking without the automatic warm up function
If you wish to use the cooking zones without the automatic warm up
function, select the desired heat setting using the heat setting selector
sensor panel .
1. Touch the heat setting selector sensor panel in order to set the de-
sired heat setting from Ç to ¿.
3 You can change the setting at any time using the heat setting selector
sensor panels and .
14
Page 15
Child safety lock
You can use the child safety lock to safeguard against unwanted use of
the cooking surface.
Switching on the child safety lock
To be able to switch on the child safety lock the appliance must be
switched on, but all the cooking zones must be switched off.
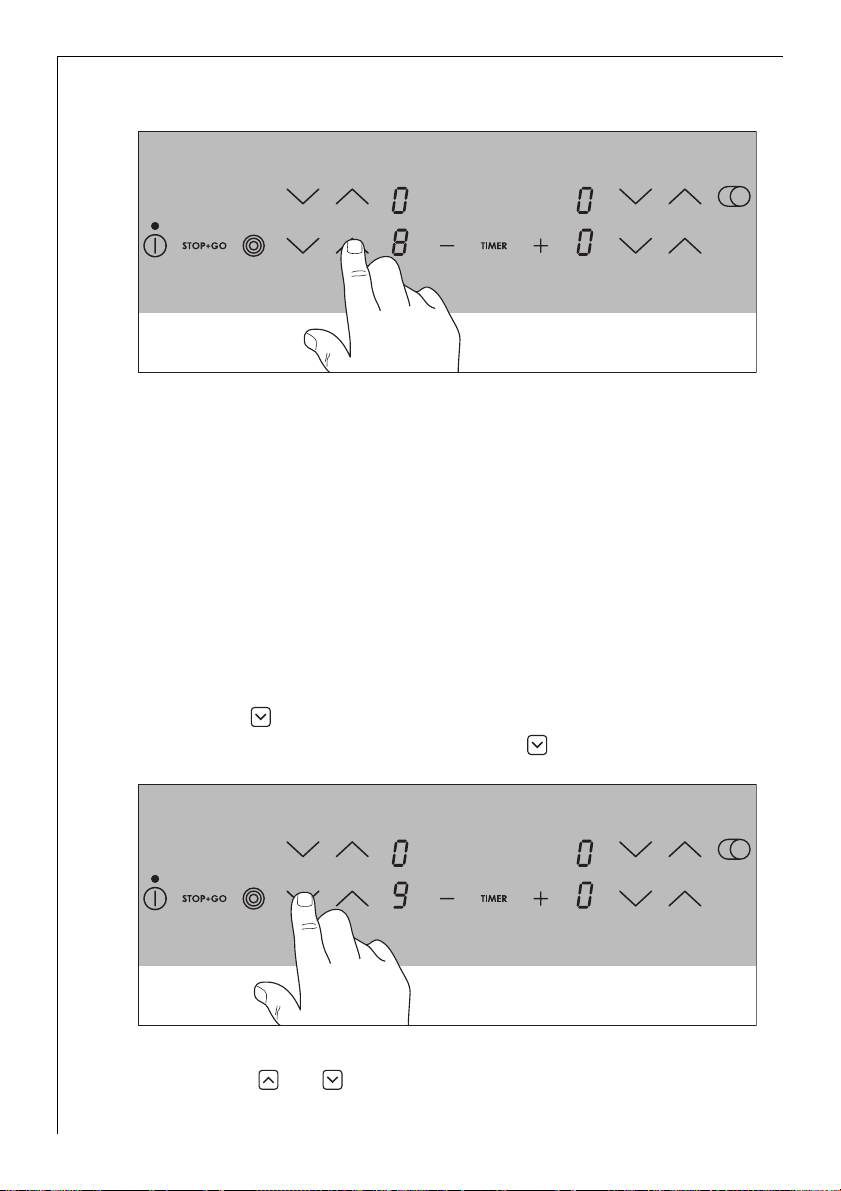
1. Touch the sensor field for approx. three seconds.
An acoustic signal will sound as confirmation.
2. Touch any heat setting sensor field .
l will appear in the displays, and the child safety lock is activated. The
appliance will switch itself off automatically after a few seconds.
15
Page 16

Overriding the child safety lock
The child safety lock can be overridden in order to use the appliance
(until the appliance is switched off again). When the appliance is
switched on again the child safety device is activated once again.
1. Switch on the appliance.
When the child safety device has been activated, l will be displayed.
2. Touch any two heat setting sensor fields and simultaneously.
16
An acoustic signal will sound as confirmation. The child safety device
has been overridden until the appliance is switched off, and the cooking surface can be used as normal.
Page 17

Switching off the child safety lock
1. Switch on the appliance.
When the child safety device has been activated, l will be displayed.
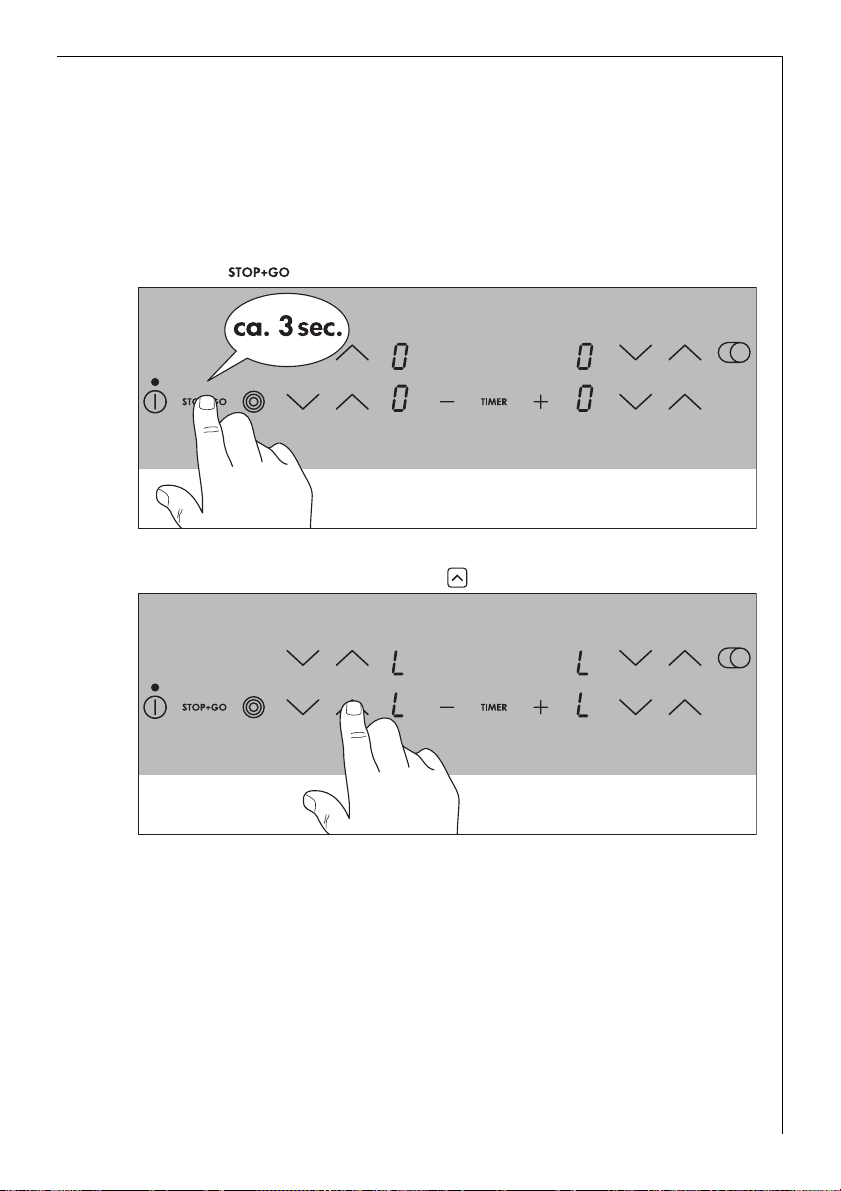
2. Touch the sensor field for approx. three seconds.
An acoustic signal will sound as confirmation.
3. Touch any heat setting sensor field .
The displays will become dark, and the child safety device is switched
off. The appliance will switch itself off automatically after a few seconds.
17
Page 18
Timer
There are two ways to use the timer:
– as a safety cut-out function. Set a cooking period for a cooking
zone, and after this time has elapsed the cooking zone will automatically switch itself off. This function can be used for more than one
cooking zone simultaneously.
– as a countdown timer without a cut-out function (“egg timer”),
whereby an acoustic signal can be heard after the set period of time
has elapsed.
3 The countdown timer cannot be used if a cooking zone is switched on.
Safety cut-out
The cooking zone(s) for which you want to use the safety cut-out function must be switched on.
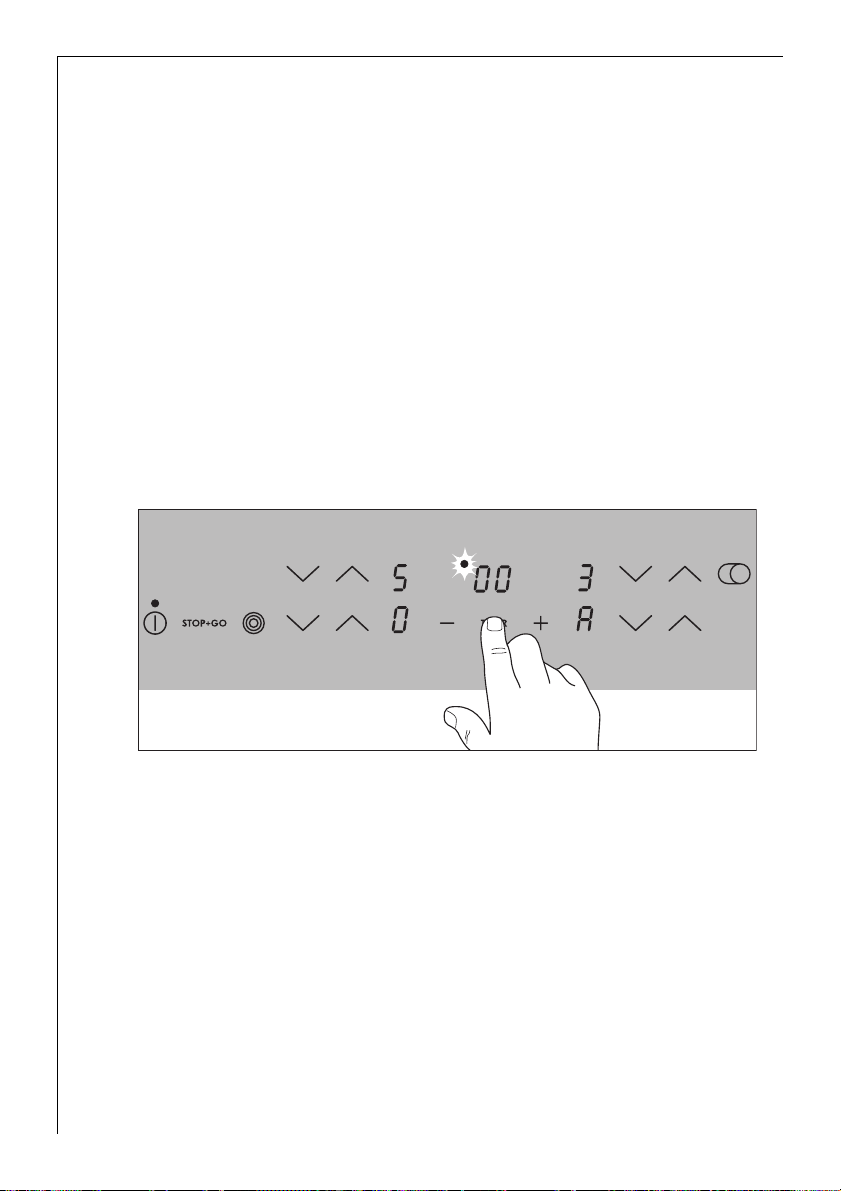
1. Using the timer sensor panel, select the cooking zone for which the
safety cut-out is to be set.
18
By touching the timer sensor panel once the first active cooking zone is
selected in a clockwise direction, and the corresponding control lamp
will flash rapidly. Hereby the (e.g.) left rear control lamp corresponds to
the left rear cooking zone. 00 will appear in the timer display.
The next active cooking zone is selected by touching the timer sensor
panel again.
Page 19
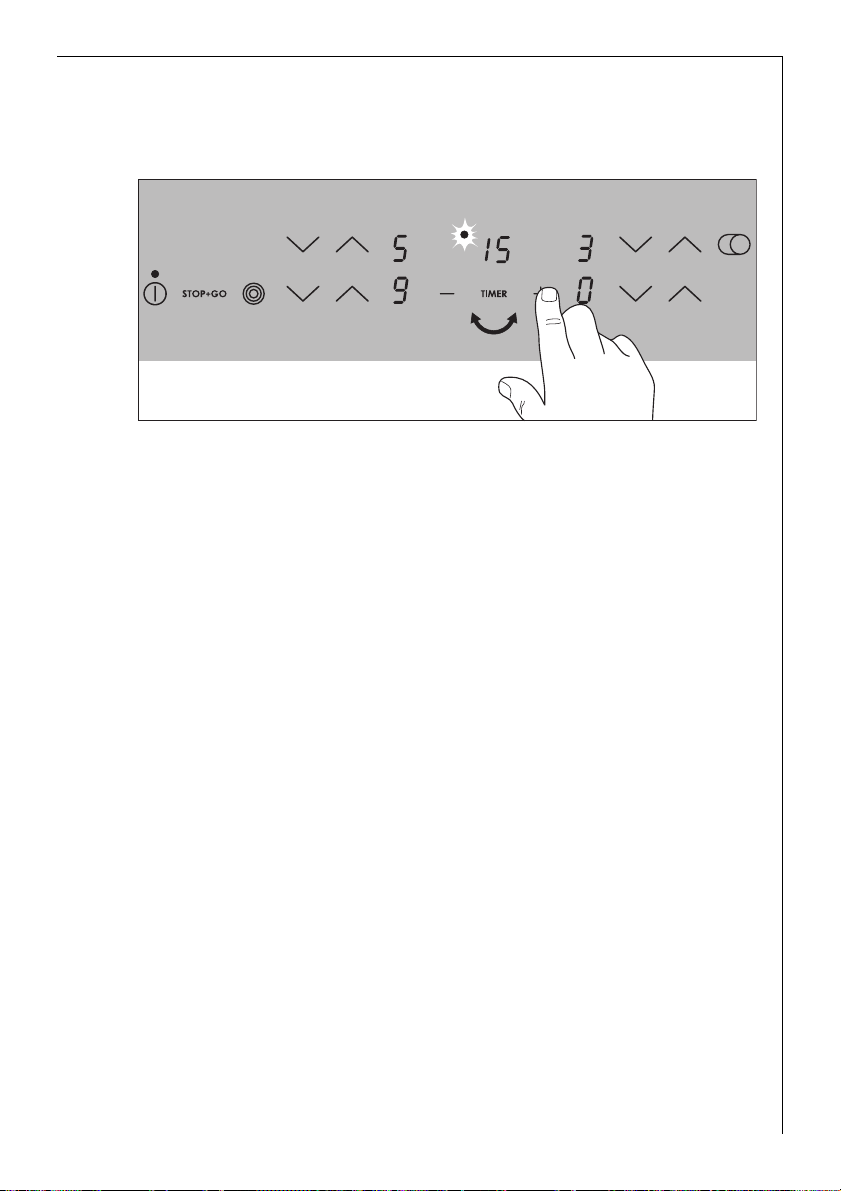
2. While the control lamp is flashing rapidly, use the + or - timersetting
sensor panels to set the desired period of time for this cooking zone up
until the point where it automatically switches itself off (e.g.
15 minutes).
The safety cut-out function will be activated after several minutes
The control lamp will now flash more slowly and the remaining cooking
time will be shown in the display as it elapses. If the safety cut-out
function has been set for more than one cooking zone, the time displayed will be that for the cooking zone with the shortest period of
cooking time remaining. The control lamps for the other cooking zones
for which the safety cut-out function has been set will illuminate. To
display the remaining cooking time for any of these cooking zones, it
must be selected using the timer sensor panel, and the corresponding
control lamp will then flash rapidly.
To reset the remaining cooking time the desired cooking zone must be
selected using the timer sensor panel. The corresponding control lamp
will then flash more rapidly. The settings are reset using the + or -
timer setting sensor panels.
After the set period of cooking time has elapsed the cooking zone automatically switches itself off, an acoustic signal sounds for two minutes and the timer display flashes 00.
3. To switch off the signal, touch the timer sensor panel.
3 To make the setting more quickly, touch any of the + or - timer set-
ting sensor panels until the desired value is reached.
If the - timer setting sensor panel is actuated first, the time setting
will begin at 99 minutes, and if the + timer setting sensor panel is actuated first, the time setting will begin at 1 minute.
19
Page 20

Switching off the safety cut-out function before it
has come to an end
There are two ways to switch off the safety cut-out function before it
has come to an end.
Switch off the cooking zone and timer simultaneously
1. Using the heat setting selector sensor panel, reset the desired cook-
ing zone to zero: the cooking zone and timer will switch themselves
off.
Switch off the timer – the cooking zone remains active
1. Select the desired cooking zone using the timer sensor panel. The corre-
sponding control lamp will then flash more rapidly.
2. Using the - timer setting sensor panel, set the timer to 00:
– only the timer will switch itself off.
– the cooking zone will remain in operation.
Countdown timer
To be able to use the countdown timer the appliance must be switched
on, but all the cooking zones must be switched off.
1. Touch the timer sensor panel.
00 will be shown in the timer display.
2. Set the desired period of time using the + or - timer setting sensor
panels.
The countdown timer function will be activated after several minutes
and the remaining time will be displayed.
To reset the remaining time, touch the timer sensor panel and change
the setting using the + or - sensor panels for setting the timer.
After the set period of time has elapsed an acoustic signal sounds and
the timer display flashes 00.
3. To switch off the signal, touch the timer sensor panel.
20
Page 21
Uses, Tables and Tips
Pans
• You can recognise good pans by their bases. The base should be as
thick and flat as possible.
• Pay particular attention when buying new pans to the diameter of
the base. Manufacturers often give only the diameter of the upper
rim.
• Pots with aluminium or copper bases can cause metallic discolouring
on the ceramic glass surface, which is very difficult or impossible to
remove.
• Do not use cast iron pans or pans with a rough, burred or damaged
base. This can produce permanent scratching if the pan is slid across
the surface.
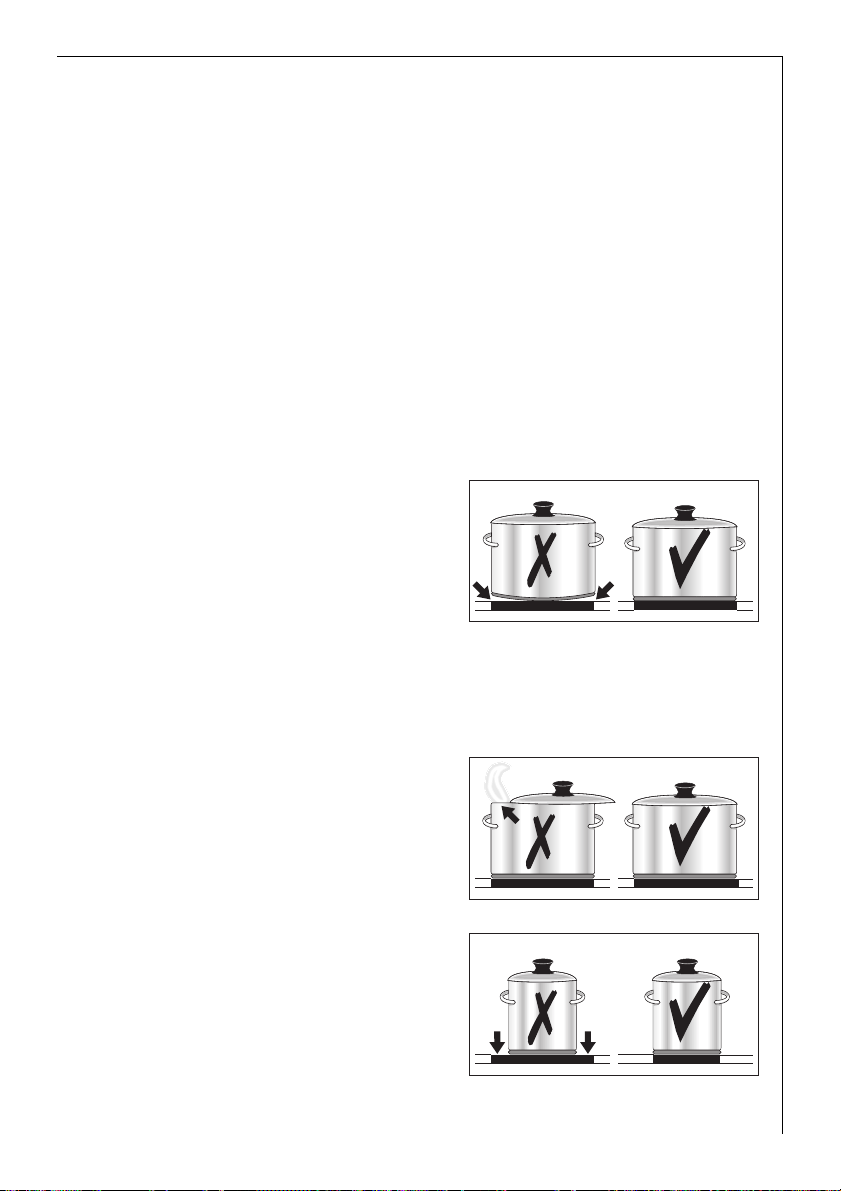
• When cold, pan bases are normal-
ly bowed slightly inwards (concave). They should never be
bowed outwards (convex).
• If you wish to use special types of
pan (e.g. a pressure cooker, simmering pan, wok, etc.), please observe the manufacturer's instructions.
2 Energy saving tips
• Always position pots and pans before switching on the cooking zone.
• Whenever possible always posi-
tion the lids firmly on pots and
pans to cover completely.
• Switch off the cooking zones be-
fore the end of the cooking time
to use the residual heat such as to
keep foods warm or for melting.
• The base of the pan should be the
same size as the cooking zone.
21
Page 22

Advice on Cooking with and without Automatic Warm up
The automatic warm up function is suitable for:
• dishes that start off cold, are heated up at high power and do not
need to be continually watched when cooking on the selected heat
setting,
• dishes that are put in a hot frying pan.
The automatic warm up function is not suitable for:
• goulash, beef olives and similar braised dishes that need continual
turning until browned correctly, have liquid added and are then
braised until cooked,
• dumplings, pasta dishes with large amounts of liquid,
• cooking with pressure cookers,
• very large quantities of soup/stew with more than 2 litres of liquid.
General notes:
• When cooking without the automatic warm up function, we recom-
mend the use of a high heat setting to warm up the food (using the
button) and then leave the dish to finish cooking at an appropriate
lower heat setting.
• Take special note of the results when you first use the appliance! You
can then decide which heat setting is the best for "your dishes" in the
"quantities you are accustomed to preparing" with "your pans". You
will then quickly appreciate the advantages of the automatic function and will feel relaxed about using your new hob.
22
Page 23
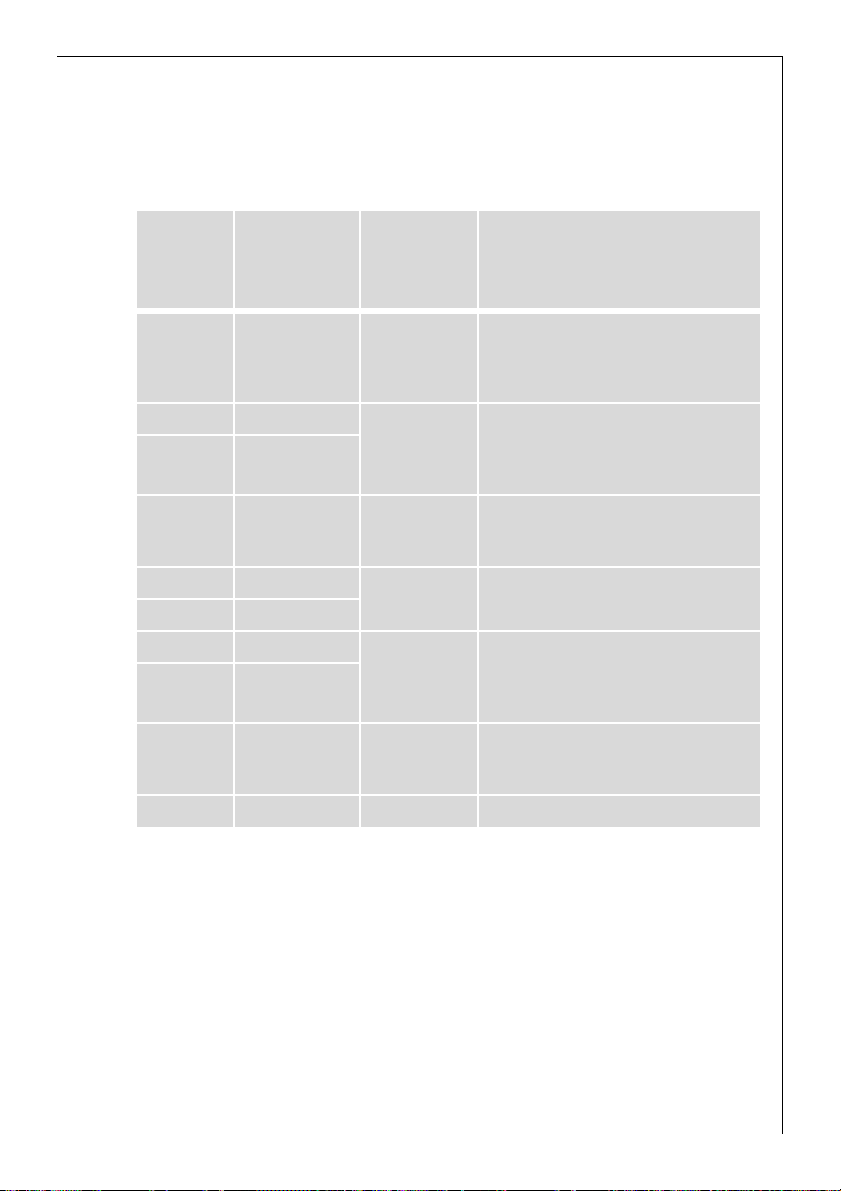
Settings for Cooking on the Zones
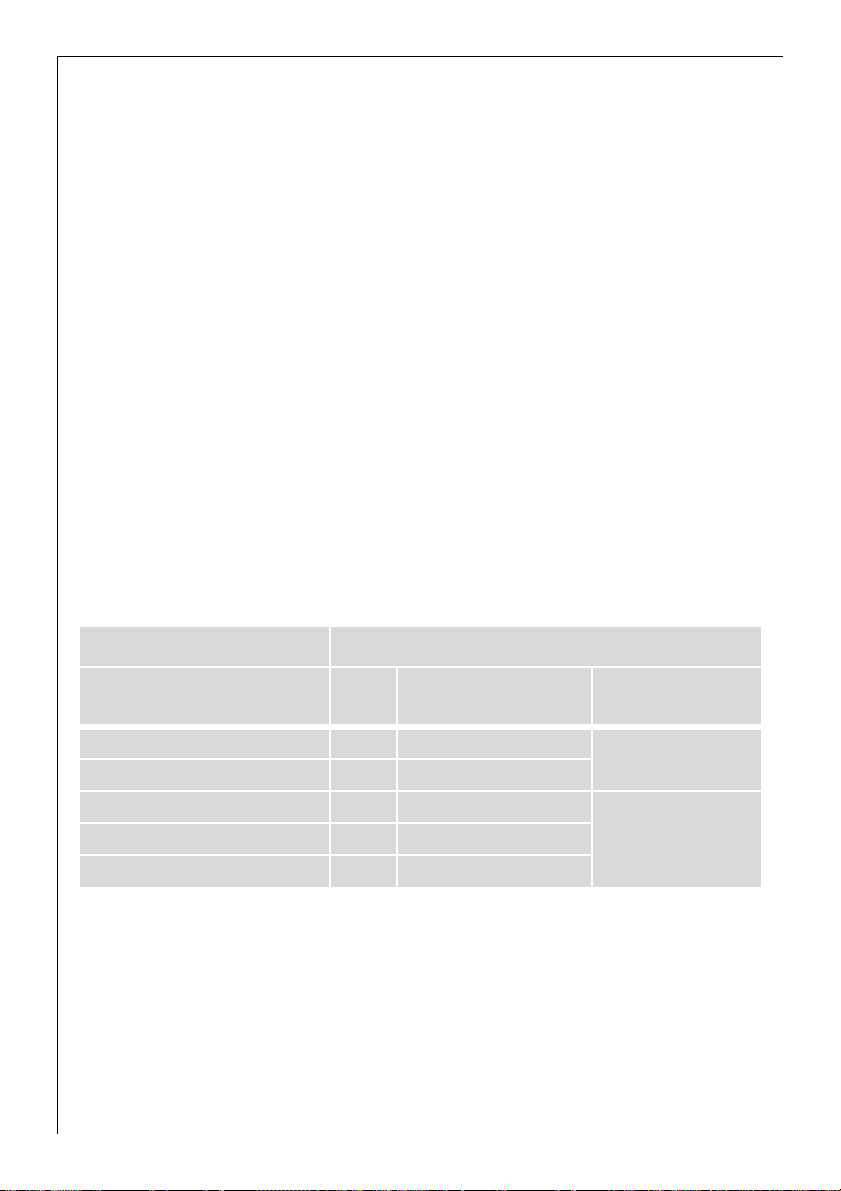
The figures in the following table are benchmark figures. The switch
setting required for a certain cooking method depends on the quality
of the pans and the type and amount of food.
Automatic
Switch
setting
warm up func-
1)
tion
(min.)
Cooking
method
Examples for use
Warming
9
8 4,5
7 3,5
6 2,0 Frying
5 10,2
4 6,5
3 4,8
2 1,7
1 1,0 Melting
u 0,5 Keeping warm Keeping meals warm
1) When cooking without the automatic function the warm up period can be individually selected.
3
Sautéing
Frying
Intensive fry-
ing
Boiling
Steaming
Stewing
Boiling
Warming large amounts of liquid,
boiling noodles,
searing meat,
(browning goulash, braising meat)
Steak, sirloin,
hash browns,
sausages,
pancakes/griddle cakes
Schnitzel/chops,
liver, fish,
rissoles, fried eggs
Cooking up to 1.5 l liquid,
potatoes, vegetables
Steaming and stewing of
small amounts of vegetables,
boiling rice and
milk dishes
Melting butter,
dissolving gelatine,
melting chocolate
3 When warming or sautéing food we recommend that you set the appli-
ance to warm up setting “9” and then, for food which requires a longer
cooking time, switch to the appropriate follow on heat setting to finish
cooking the food.
3 Information on acrylamides
According to the latest scientific knowledge, intensive browning of
food, especially in products containing starch, can constitute a health
risk due to acrylamides. Therefore we recommend cooking at the lowest
possible temperatures and not browning foods too much.
23
Page 24
Cleaning and Care
Take care! Risk of burns from residual heat.
1
Let the appliance cool down.
1 Warning! Sharp objects and abrasive cleaning materials will damage
the appliance. Clean with water and washing up liquid.
1 Warning! Residues from cleaning agents will damage the appliance.
Remove residues with water and washing up liquid.
Cleaning the appliance after each use
1. Wipe the appliance with a damp cloth and a little washing up liquid.
2. Rub the appliance dry using a clean cloth.
Removing deposits
1. Place a scraper on the glass ceramic surface at an angle.
2. Remove residues by sliding the blade over the surface.
3. Wipe the appliance with a damp cloth and a little washing up liquid.
4. Rub the appliance dry using a clean cloth.
Remove
Type of dirt
sugar, food containing sugar yes --plastics, tin foil yes --limescale and water rings --- yes
fat splashes --- yes
shiny metallic discolorations --- yes
*Scrapers and cleaners for glass ceramic and stainless steel can be purchased in specialist shops
immediately
when the appliance has
cooled down
using
a scraper*
cleaner for glass ce-
ramic or stainless
steel*
3 Remove stubborn residues with a cleaner for glass ceramic or stainless
steel.
3 Scratches or dark stains on the glass ceramic that cannot be removed
do not however affect the functioning of the appliance.
24
Page 25

What to do if …
Rectifying faults
It is possible that faults have been caused by a minor error, which you
can correct yourself with the help of the following instructions. Do not
attempt any further repairs if the following instructions do not help in
each specific case.
1 Warning! Repairs to the appliance are only to be carried out by ap-
proved service engineers. Improperly effected repairs may result in considerable risk to the user. If your appliance needs repairing, please
contact your specialist dealer or customer service.
If the ceramic glass hob is broken, please quote the 3-digit number on
the glass hob when contacting customer service.
What to do if …
… the cooking zones are not functioning.
Check whether
– the fuse in the house wiring (fuse box) is intact. If the fuses trip a
number of times, please call an authorised electrician.
– the appliance is properly switched on,
– the control lamps in the control panel are illuminated,
– the relevant cooking zone is switched on,
– the cooking zones are set at the desired settings,
– the cooking zones’ safety switchoff function has been activated (see
“Safety” chapter).
… you cannot switch on the cooking zones.
Check whether
– a period of more than 10 seconds has elapsed between when the On/
Off button was actuated and the desired cooking zone switches on
(see chapter “Switching on the appliance”).
– the sensor panels are partially covered by a damp cloth or liquid.
… the display suddenly disappears except for h for residual
warmth.
Check whether
– the On/Off button was accidentally actuated.
– the sensor panels are partially covered by a damp cloth, liquid or sim-
ilar.
– the safety switchoff function has been activated.
25
Page 26

… after having switched off the cooking zones, no h for residual
warmth is indicated in the display.
Check whether
– the cooking zone was only briefly used and therefore did not become
hot enough.
If the cooking zone is hot, please call customer service.
… a cooking zone will not switch off.
Check whether
– the sensor switches are partially covered by a damp cloth or liquid.
– the Stop+Go function is switched on.
…a cooking zone will not switch on.
Check whether
– the child safety device is swiched on.
– the Stop+Go function is switched on.
…the e display is illuminated?
Check whether the cooking zone has been overheated.
This display illuminates in the event of overheating, errors in the electronic equipment or for reasons related to safety.
… the appliance is not responding when a sensor panel is actuated.
The appliance will not respond to a sensor panel being actuated if you
are simultaneously touching another sensor panel that is not part of a
combination.
If you request a visit from customer service because of an error made in
operating the appliance, a visit from a customer service engineer may
not be free of charge even during the warranty period.
Disposal
Packaging material
2
The packaging materials are environmentally friendly and can be recycled. The plastic components are identified by markings, e.g. >PE<,
>PS<, etc. Please dispose of the packaging materials in the appropriate
container at the community waste disposal facilities.
2 Old appliance
Please dispose of your old appliance in line with the guidelines for disposal in your community.
26
Page 27

Installation Instructions
Safety instructions
The laws, ordinances, directives and standards in force in the country of
use are to be followed (safety regulations, proper recycling in accordance with the regulations, etc.)
Installation may only be carried out by a qualified electrician.
The minimum distances to other appliances are to be observed.
Drawers may only be installed with a with protective board directly
under the appliance.
The cut surfaces of the work top are to be protected against moisture
using a suitable sealant.
The sealant seals the appliance to the work top with no gap.
Do not use silicon sealant between the appliance and the work top.
Avoid installing the appliance next to doors and under windows. Otherwise hot cookware may be knocked off the rings when doors and windows are opened.
1 WARNING!
Risk of injury from electrical current.
• The electrical mains terminal is live.
• Make electrical mains terminal free of voltage.
• Observe connection schematic.
• Observe electrical safety rules.
• Ensure anti-shock protection through correct installation by a quali-
fied electrician.
• The appliance must be connected to the electrical supply by a qualified electrician.
1 IMPORTANT!
Risk of injury from electrical current.
Loose and inappropriate plug and socket connections can make the terminal overheat.
• Have the clamping joints correctedly installed by a qualified electrician.
• Use strain relief clamp on cable.
• In the event of single-phase or two-phase connection, the appropri-
ate mains cable of type H05BB-F Tmax 90° (or higher) must be used.
27
Page 28

• If this appliance’s mains cable is damaged, it must be replaced by a
special cable (type H05BB-F Tmax 90°; or higher). The latter is available from the Customer Care Department.
A device must be provided in the electrical installation which allows the
appliance to be disconnected from the mains at all poles with a contact
opening width of at least 3 mm.
Suitable isolation devices include line protecting cut-outs, fuses (screw
type fuses are to be removed from the holder), earth leakage trips and
contactors.
28
Page 29

Service
In the event of technical faults, please first check whether you can
remedy the problem yourself with the help of the operating instructions (section “What to do if…”).
If you were not able to remedy the problem yourself, please contact the
Customer Care Department or one of our service partners.
In order to be able to assist you
quickly, we require the following
information:
– Model description
– Product number (PNC)
– Serial number (S No.)
(for numbers see rating plate)
– Type of fault
– Any error messages displayed by
the appliance
– three digit letter-number combination for glass ceramic
So that you have the necessary reference numbers from your appliance
at hand, we recommend that you write them in here:
Model description: .....................................
PNC: .....................................
S No: .....................................
29
Page 30

Chère cliente, cher client,
Veuillez lire attentivement la notice d’utilisation dans son intégralité et
la conserver pour pouvoir la consulter ultérieurement.
Veuillez la transmettre à l’éventuel propriétaire ultérieur de l’appareil.
Les symboles suivants sont utilisés dans ce document :
1 Consignes de sécurité
Avertissement : conseils pour votre sécurité personnelle.
Avertissement ! Pour éviter d'endommager l'appareil
3 Conseils généraux et pratiques
2 Informations environnementales
30
Page 31

Sommaire
Notice d'utilisation. . . . . . . . . . . . . . . . . . . . . . . . . . . . . . . . . . . . . . . . . 32
Sécurité . . . . . . . . . . . . . . . . . . . . . . . . . . . . . . . . . . . . . . . . . . . . . . . . . . . . . . . 32
Description de l'appareil. . . . . . . . . . . . . . . . . . . . . . . . . . . . . . . . . . . . . . . . . 34
Equipement de la table de cuisson et de commande. . . . . . . . . . . . . . . . . . . 34
Affichages numériques . . . . . . . . . . . . . . . . . . . . . . . . . . . . . . . . . . . . . . . . . . . 35
Déconnexion de sécurité des zones de cuisson. . . . . . . . . . . . . . . . . . . . . . . . 35
Utilisation de la table de cuisson . . . . . . . . . . . . . . . . . . . . . . . . . . . . . . . . . 36
Touches sensitives . . . . . . . . . . . . . . . . . . . . . . . . . . . . . . . . . . . . . . . . . . . . . . . 36
Mettre l’appareil en fonctionnement . . . . . . . . . . . . . . . . . . . . . . . . . . . . . . . 36
Mettre l'appareil à l'arrêt . . . . . . . . . . . . . . . . . . . . . . . . . . . . . . . . . . . . . . . . . 37
Sélection de la puissance de chauffe. . . . . . . . . . . . . . . . . . . . . . . . . . . . . . . . 37
Position de maintien au chaud. . . . . . . . . . . . . . . . . . . . . . . . . . . . . . . . . . . . . 37
Mettre en fonctionnement et à l'arrêt le foyer à triple zone . . . . . . . . . . . . 38
Mettre en fonctionnement et à l'arrêt la zone de cuisson extensible . . . . . 39
Fonction Stop+Go . . . . . . . . . . . . . . . . . . . . . . . . . . . . . . . . . . . . . . . . . . . . . . . 40
Désactiver les zones de cuisson . . . . . . . . . . . . . . . . . . . . . . . . . . . . . . . . . . . . 40
Indicateur de chaleur restante . . . . . . . . . . . . . . . . . . . . . . . . . . . . . . . . . . . . . 41
Cuisson avec la fonction de saisie automatique. . . . . . . . . . . . . . . . . . . . . . . 41
Cuisson sans la fonction de saisie automatique. . . . . . . . . . . . . . . . . . . . . . . 42
Sécurité enfants. . . . . . . . . . . . . . . . . . . . . . . . . . . . . . . . . . . . . . . . . . . . . . . . . 43
Minuteur. . . . . . . . . . . . . . . . . . . . . . . . . . . . . . . . . . . . . . . . . . . . . . . . . . . . . . . 46
Application, tableaux, conseils . . . . . . . . . . . . . . . . . . . . . . . . . . . . . . . . . . . 49
Récipients de cuisson. . . . . . . . . . . . . . . . . . . . . . . . . . . . . . . . . . . . . . . . . . . . . 49
Cuisson pour cuire avec et sans la fonction de saisie automatique . . . . . . . 50
Valeurs indicatives de cuisson . . . . . . . . . . . . . . . . . . . . . . . . . . . . . . . . . . . . . 51
Nettoyage et entretien . . . . . . . . . . . . . . . . . . . . . . . . . . . . . . . . . . . . . . . . . . 52
Que faire si … . . . . . . . . . . . . . . . . . . . . . . . . . . . . . . . . . . . . . . . . . . . . . . . . . . 53
Protection de l’environnement . . . . . . . . . . . . . . . . . . . . . . . . . . . . . . . . . . . 56
Instructions d'installation . . . . . . . . . . . . . . . . . . . . . . . . . . . . . . . . . 57
Service après-vente . . . . . . . . . . . . . . . . . . . . . . . . . . . . . . . . . . . . . . . . 59
Montage . . . . . . . . . . . . . . . . . . . . . . . . . . . . . . . . . . . . . . . . . . . . . . . . . . . . 89
31
Page 32

Notice d'utilisation
1 Sécurité
Pour ne pas perdre le bénéfice de la garantie en cas de panne, veuillez
3
observer ces recommandations.
5 Cet appareil est conforme aux directives CE suivantes :
– directive 73/23/CEE du 19.02.1973 basse tension
– directive 89/336/CEE du 03.05.1989 relative à la compatibilité élec-
tromagnétique (CEM) y compris la directive de révision 92/31/CEE
– directive 93/68/CEE du 22.07.1993 relative à la certification CE
Utilisation réglementaire
• Cet appareil est uniquement destiné à l’usage domestique habituel et
pour faire cuire et rôtir des aliments.
• L’appareil ne peut en aucun cas servir de plan de travail ou de support.
• Ne pas procéder à des transformations ou à modifications de l’appareil.
• Ne pas placer de liquides susceptibles de brûler, de matériaux facilement inflammables ou d’objets susceptibles de fondre (par ex. du papier aluminium, des matières synthétiques ou de l’aluminium) sur ou
à promité de l’appareil.
32
Sécurité enfants
• Eviter systématiquement que les enfants en bas âge s’approchent de
l’appareil.
• Les enfants plus âgés ne doivent être autorisés à utiliser l’appareil
qu’accompagnés et sous surveillance.
Page 33

Consignes générales de sécurité
• Le montage et le branchement de l’appareil sont du ressort exclusif
de spécialistes agréés.
• Les appareils encastrables ne peuvent être mis en fonctionnement
qu’après avoir été montés dans des armoires et des plans de travail
homologués et adaptés.
• En cas de panne de l’appareil ou de dommages à la vitrocéramique
(cassures, fêlures ou déchirures), mettre l’appareil hors et débranchez-le pour éviter un éventuel choc électrique.
• Le montage et le branchement de l’appareil sont du ressort exclusif
de spécialistes agréés.
Précautions d’utilisation.
• Retirer les étiquettes et les films protecteurs de la vitrocéramique.
• Attention aux risques de brûlures lors de l’utilisation de l’appareil.
• S’assurer que les câbles d’appareils électriques n’entrent pas en con-
tact avec les surfaces brûlantes de l’appareil ou les récipients brûlants.
• Les graisses et les huiles surchauffées peuvent rapidement s’enflammer. Surveiller constamment les mets cuits avec de la graisse ou de
l’huile (par ex. des frites).
• Mettre les foyers hors fonctionnement après chaque utilisation.
Précautions de nettoyage
• Mettre l’appareil hors fonctionnement et le laisser refroidir avant de
le nettoyer.
• Pour des raisons de sécurité, il est interdit de nettoyer l’appareil avec
un jet à vapeur ou un appareil à haute pression.
Comment éviter d’endommager l’appareil
• Des objets peuvent endommager la vitrocéramque en tombant.
• Les plats de cuisson peuvent endommager la vitrocéramique en heur-
tant le bord.
• Les plats de cuisson en fonte ou pourvus d’un fonds abîmé peuvent
érafler la vitrocéramique lorsqu’on les déplace.
• Les objets susceptibles de fondre ou les produits ayant débordé peuvent se consumer sur la vitrocéramique et doivent par conséquent
être immédiatement enlevés.
• Ne pas placer de plats de cuisson vides sur les zones de cuisson et ne
pas mettre ces dernières en fonctionnement sans récipient.
33
Page 34

Description de l'appareil
Equipement de la table de cuisson et de commande
Zone de cuisson
1200W
Zone de extensible
2400W
«Stop+Go»
Touche
« MarcLhe/Arrêt »
34
Foyer à triple zone
2300W
Touche triple zone
Touche
Sélection du niveau
de cuisson
Bandeau de commande
Voyants triple
zone
« Minuteur » avec
voyants de contrôle
Affichage du niveau de cuisson/chaleur résiduelle
Zone de cuisson
1200W
Touche zone extensible
Voyant zone
de cuisson
Sélection du niveau de cuisson
Page 35

Affichages numériques
Les quatre affichages numériques dont sont pourvus les zones de cuisson indiquent :
– ¾ Après la mise en marche,
– u Lors de la sélection de la fonction de maintien au chaud,
– ¿ à Ç, Selon le niveau de cuisson sélectionné,
– 2 à 6 (avec point décimal) pour les niveaux de cuisson intermédiai-
res
– a Pour la fonction de saisie automatique,
– h Pour indiquer la présence de chaleur résiduelle,
– l Lorsque la sécurité enfants est activée
– e En cas d'anomalie de fonctionnement.
1 Déconnexion de sécurité des zones de cuisson
Si vous oubliez d'éteindre les zones de cuisson, celles-ci se mettront
automatiquement hors service après un certain temps.
Lorsque la coupure de sécurité a été activée apparaît dans l'écran d'affichage correspondant à la zone de cuisson si celle-ci n'est pas assez refroidie.
Les zones de cuisson se déconnectent dans les cas suivants :
• Niveau de cuisson u, 1 - 2 déconnexion au bout de 6 heures
environ
• Niveau de cuisson 3 - 4 déconnexion au bout de 5 heures
environs
• Niveau de cuisson 5 déconnexion au bout de 4 heures
environ
• Niveau de cuisson 6 - 9 déconnexion au bout de 1 heure 30
3 Si une ou plusieurs des zones de cuisson se mettent hors service avant
l'expiration des délais indiqués, voir le chapitre " Que faire si… ".
Déconnexion pour d’autres raisons
Si un débordement se répand sur la table de cuisson ou si un récipient,
un torchon mouillé recouvre le bandeau de commande, le système de
sécurité arrête l'appareil automatiquement.
Il vous suffira donc après avoir nettoyé la table de cuisson ou retiré le
récipient ou le torchon, I d'appuyer sur la touche MARCHE / ARRET
pour réutiliser la table de cuisson.
35
Page 36

Utilisation de la table de cuisson
Touches sensitives
Pour activer les touches sensitives, appuyez sur la touche désirée jusqu'à ce que l'indicateur correspondant s'allume ou s'éteigne ou que la
fonction désirée soit activée.
3 Assurez-vous lors de cette action que vous ne touchez qu’une seule
touche sensitive. Si vous écrasez trop votre doigt sur la touche, celle-ci
peut éventuellement ne pas réagir.
Mettre l’appareil en fonctionnement
Pour mettre l'ensemble de l'appareil en fonctionnement, appuyez sur la
touche « Marche/Arrêt » I.
Appuyez sur la touche « Marche/Arrêt » pendant environ 2 secondes.
Les écrans d'affichage indiquent le symbole ¾.
3 Après avoir actionné la touche « Marche/Arrêt » pour mettre l'appareil
en fonctionnement, une des zones de cuisson doit être activée dans les
10 secondes à l'aide des touches de sélection des zones de cuisson. Dans
le cas contraire, l'appareil se met hors service automatiquement pour
des raisons de sécurité.
36
Page 37

Mettre l'appareil à l'arrêt
Pour mettre l'ensemble de l'appareil hors service, appuyez sur la
touche « Marche/Arrêt » I.
Appuyez sur la touche « Marche/Arrêt » pendant environ une seconde.
3 Lorsqu'une seule zone ou l'intégralité de la table de cuisson est mis hors
service, la présence de chaleur résiduelle est signalée par l'indicateur h
dans les écrans d'affichage des zones de cuisson correspondantes.
Sélection de la puissance de chauffe
Sélectionnez ou modifiez la puissance de chauffe (u à Ç) de la zone de
cuisson sélectionnée.
Augmentez le niveau de cuisson à l’aide de la touche sensitive de sélection .
Diminuez le niveau de cuisson à l’aide de la touche sensitive de sélection .
Position de maintien au chaud
La fonction de maintien au chaud u peut être sélectionnée sur les 4
zones de cuisson.
Sélectionnez à l'aide de la touche de sélection la fonction de maintien au chaud u.
37
Page 38

Mettre en fonctionnement et à l'arrêt le foyer à triple
zone
Il est possible, selon la taille du récipient, de sélectionner une zone différente sur ce foyer.
3 Les zones intermédiaire et extérieure ne peuvent être activées que si un
niveau de cuisson a préalablement été sélectionné pour la zone intérieure.
1. Sélectionnez le niveau de cuisson souhaité.
2. Appuyez sur la touche « foyer à triple zone ».
38
La zone intermédiaire s'allume. Le voyant de contrôle inférieur s'allume.
Page 39

3. Appuyez de nouveau sur la touche « foyer à triple zone » pour activer la
zone extérieure. Le voyant de contrôle supérieur s'allume.
4. Pour éteindre la zone extérieure, appuyez sur la touche « foyer à triple
zone » " et la zone extérieure correspondante s'éteint.
Mettre en fonctionnement et à l'arrêt la zone de cuisson
extensible
1. Sélectionnez la zone de cuisson souhaitée.
2. Pour mettre en fonctionnement ou à l'arrêt la zone de cuisson extensi-
ble, appuyez sur la touche « fzone extensible » jusqu'à ce que le voyant
de contrôle s'allume ou s'éteigne.
39
Page 40

Fonction Stop+Go
Lorsque l’on actionne la touche « Stop+Go », ", toutes les zones de cuisson actives basculent simultanément sur la position de maintien au
chaud. Le voyant de contrôle de la touche « Stop+Go » s'allume. La position de maintien au chaud s'affiche sur le bandeau de commande u.
En appuyant de nouveau sur la touche « Stop+Go », ", les niveaux de
cuisson préalablement sélectionnés se réactivent, le voyant de contrôle
s'éteint.
3 La fonction Stop+Go n'a pas d'incidence sur le minuteur.
Si la fonction de saisie automatique a avait été sélectionnée, elle est
désactivée par la fonction Stop+Go puis est repositionnée sur le niveau
de poursuite de cuisson préalablement sélectionné en appuyant de
nouveau sur la touche « Stop+Go ».
Désactiver les zones de cuisson
1. Pour désactiver les zones de cuisson, appuyez simultanément sur les
touches de sélection et appuyez sur la touche de sélection
pour atteindre le niveau O.
40
Page 41

Indicateur de chaleur restante
Après avoir mis à l'arrêt une zone de cuisson ou l'ensemble de la table de cuisson, la présence de chaleur résiduelle est signalée par un h dans l'écran d'affichage
lorsque la surface de la zone de cuisson respective est
assez chaude pour constituer un danger de brûlure..
L'indicateur s'éteint seulement lorsque ce danger n'existe plus.
Cette indication n'est visible que lorsque la zone de cuisson concernée
est à l'arrêt.
2 Vous pouvez utiliser cette chaleur résiduelle pour faire fondre et main-
tenir au chaud des aliments.
1 Attention! Tant que l'indicateur de chaleur restante est allumé, il y a
danger de brûlure.
1 En cas de coupure de courant, l'indicateur de chaleur résiduelle h
s'éteint. Le risque de brûlure est cependant toujours présent. Vous pouvez l'éviter en surveillant de près votre appareil.
Cuisson avec la fonction de saisie automatique
Les zones de cuisson de la table sont réglables sur neuf niveaux de cuisson et sont équipées d'une fonction de saisie automatique. :
– ¿, niveau de cuisson minimum
– Ç, niveau de cuisson maximum
– a fonction de saisie automatique
Après avoir sélectionné le niveau de cuisson souhaité à l'aide de la touche , , la zone de cuisson fonctionne pendant un certain temps en
position maximum et revient ensuite au niveau de cuisson sélectionné
pour la suite de la cuisson.
La durée de saisie automatique de la cuisson dépend de la puissance sélectionnée pour la suite de la cuisson.
1. Appuyez sur la touche de la zone de cuisson désirée pour sélection-
ner un niveau de cuisson entre ¿ et Æ: le niveau de cuisson réglé s'affiche. Après 5 secondes enviro a apparaît dans l'écran d'affichage.
41
Page 42

Après expiration de la durée correspondant à la saisie automatique, le
niveau de cuisson s'affiche à nouveau.
3 Si vous sélectionnez une puissance supérieure pendant la fonction
automatique, par ex. si vous passez de Á et Ã, la durée de démarrage
de la cuisson déjà écoulée est prise en compte. Si vous réduisez la puissance, la fonction de saisie automatique est arrêtée immédiatement. Si
une zone de cuisson encore chaude est utilisée pour une nouvelle cuisson, la commande automatique utilise la chaleur résiduelle. Ceci économise du temps et de l'énergie.
Cuisson sans la fonction de saisie automatique
Pour utiliser une zone de cuisson sans la fonction de saisie automatique, sélectionnez le niveau de cuisson désiré à l'aide de la touche de sélection .
1. Après avoir mis l'appareil en fonctionnement et sélectionné la zone de
cuisson souhaitée avec les touches de sélection des zones de cuisson,
appuyez sur la touche de sélection pour sélectionner un niveau de
cuisson(entre Ç et ¿).
3 Il est possible de modifier à tout moment le niveau de cuisson à l'aide
des touches de sélection et ,tant que la zone de cuisson est sélectionnée.
42
Page 43

Sécurité enfants
La sécurité enfants permet d'éviter l'utilisation non autorisée de la table de cuisson.
Activation de la sécurité enfants
L'activation de la sécurité enfants suppose que l'appareil soit en fonctionnement. En revanche aucune zone de cuisson ne doit fonctionner.
1. Appuyez sur la touche pendant environ trois secondes.
Un signal sonore confirme la manipulation.
2. Appuyez sur la touche d'une zone de cuisson .
Le symbole l s’affiche, la sécurité enfants est activée. L’appareil se déconnecte automatiquement au bout de quelques secondes.
43
Page 44

Brider la sécurité enfants
Pour une unique utilisation de l’appareil (jusqu’à la désactivation), il est
possible de brider la sécurité enfants. Lors de la prochaine mise en marche de l’appareil, la sécurité enfants est de nouveau automatiquement
activée.
1. Mettre l’appareil en marche.
Le symbole l s’affiche si la sécurité enfants est active.
2. Sélectionner au choix deux niveaux de cuisson à l’aide des touches sensitives et .
44
Un signal sonore confirme la manipulation. La sécurité enfants est bridée jusqu’à ce que l’appareil soit désactivé et la plaque de cuisson peut
être utilisée normalement.
Page 45

Désactiver la sécurité enfants
1. Mettez l'appareil en fonctionnement.
Le symbole l s’affiche si la sécurité enfants est active.
2. Appuyez sur la touche pendant environ trois secondes.
Un signal sonore confirme la manipulation.
3. Appuyez sur la touche d'une zone de cuisson..
Les voyants s’éteignent, la sécurité enfants est désactivée. L’appareil se
déconnecte automatiquement au bout de quelques secondes.
45
Page 46

Minuteur
Le minuteur est doté de deux fonctions : :
– une fonction de déconnexion automatique Lorsque la durée de
cuisson sélectionnée pour une zone de cuisson est écoulée, celle-ci
s’éteint automatiquement. Cette fonction peut s’appliquer simultanément à plusieurs zones de cuisson.
– une fonction de minuterie (« sablier ») sans fonction de connexion
après écoulement de la durée sélectionnée, un signal sonore retentit.
3 Le minuteur peut systématiquement être utilisé en même temps qu'une
zone de cuisson.
Déconnexion automatique
La/les zone(s) de cuisson pour lesquelles la déconnexion est prévue
doit(doivent) être activée(s).
1. A l'aide de la touche Minuteur, sélectionnez la zone de cuisson qui doit
être déconnectée automatiquement.
46
En appuyant une fois sur la touche Minuteur on sélectionne une première zone de cuisson et le voyant de contrôle correspondant clignote
rapidement. Par exemple, le voyant de contrôle arrière gauche correspond à la zone de cuisson arrière gauche. L'écran d'affichage du minuteur indique 00
Appuyez une seconde fois sur la touche pour sélectionner la zone de
cuisson suivante.
Page 47

2. Tandis que le voyant de contrôle clignote rapidement, appuyez sur les
touches de réglage Minuteur + et - pour sélectionner la durée après
laquelle cette zone de cuisson se déconnectera automatiquement (par
exemple 15 minutes)..
Au bout de quelques secondes, la déconnexion automatique est activée
Le voyant de contrôle clignote maintenant plus lentement et le temps
de cuisson restant s'affiche sur le bandeau de commande. Si la déconnexion automatique est activée pour plusieurs zones de cuisson, l'affichage correspond au temps de cuisson restant le plus court. Les voyants
de contrôle des autres zones de cuisson dont la déconnexion automatique est activée sont allumés. Pour afficher le temps de cuisson restant
de l'une des zones de cuisson, celle-ci doit être sélectionnée à l'aide de
la touche Minuteur, dans ce cas, le voyant de contrôle correspondant
clignote rapidement.
Pour modifier le temps de cuisson restant pour une zone de cuisson, sélectionnez celle-ci à l'aide de la touche Minuteur. Le voyant de contrôle
correspondant clignote alors plus rapidement. La modification s'effectue à l'aide des touches de réglage Minuteur + et -.
Dès que la durée de la cuisson sélectionnée est écoulée, la zone de cuisson est automatiquement désactivée et un signal sonore retentit pendant deux minutes, l'écran d'affichage du minuteur indique 00.
3. Appuyez sur la touche Minuteur pour désactiver le signal.
3 Pour un réglage plus rapide, appuyez sur l'une des touches Minuteur +
et - jusqu'à ce que la valeur souhaitée soit sélectionnée.
Si la touche de réglage Minuteur - est activée en premier, le décompte
commence à 99 minutes, mais si la touche de réglage du Minuteur +
est activée en premier le réglage commence alors à 1 minute.
47
Page 48

Anticiper la désactivation de la déconnexion automatique
Il existe deux manières d’anticiper la déconnexion automatique :
En déconnectant simultanément la zone de cuisson et le minuteur
1. A l'aide des touches de réglage du niveau de cuisson , affichez
0 pour la zone de cuisson souhaitée: la zone de cuisson et le minuteur
se déconnectent.
En mettant à l'arrêt le minuteur sans désactiver la zone de cuisson
1. A l'aide de la touche Minuteur, sélectionnez la zone de cuisson souhai-
tée. Le voyant de contrôle correspondant se met à clignoter plus rapidement.
2. A l'aide de la touche de réglage Minuteur -, positionnez le minuteur
sur 00 :
– seul le Minuteur se déconnecte.
– la zone de cuisson reste activée.
Minuteur (fonction « sablier »)
L'utilisation du minuteur suppose que l'appareil soit en fonctionnement. En revanche, aucune zone de cuisson ne doit être activée.
1. Appuyez sur la touche Minuteur.
L'écran d'affichage du minuteur indique 00.
2. Sélectionnez à l'aide des touches de réglage du minuteur + et - la
durée souhaitée.
Au bout de quelques secondes, le minuteur est activé et le temps restant s’affiche.
Pour modifier le temps restant, appuyez sur la touche Minuteur et sélectionnez une autre durée à l'aide des touches de réglage + et -.
Lorsque la durée sélectionnée est écoulée, un signal sonore retentit et
l'écran d'affichage du minuteur indique 00.
3. Appuyez sur la touche Minuteur pour désactiver le signal.
48
Page 49

Application, tableaux, conseils
Récipients de cuisson
• Vous reconnaissez les bonnes batteries de cuisine au fond des casse-
roles. Le fond doit être aussi épais et aussi plan que possible.
• Faites attention au diamètre du fond du récipient lors de l'achat de
nouvelles casseroles et poêles. Les fabricants mentionnent souvent le
diamètre du bord du récipient.
• Les récipients à fond en aluminium ou en cuivre peuvent provoquer
des colorations sur la surface vitrocéramique qui ne s'enlèvent que
très difficilement, voire pas du tout.
• N'utilisez pas de casseroles en fonte ou avec un fond endommagé, qui
est rugueux et présente des ébarbures. Cela peut provoquer des rayures lors des déplacements.
• A froid, les fonds de casseroles
sont habituellement légèrement
bombés vers l'intérieur (concaves).
Ils ne peuvent en aucun cas être
bombés vers l'extérieur (convexes).
• Si vous utilisez des récipients de
cuisson spéciaux (p. ex. autocuiseur, casserole avec joint, wok, etc.),
veuillez respecter les indications du fabricant.
2 Conseils pour économiser l'énergie
• Placez toujours les casseroles et poêles sur la zone de cuisson avant
d'enclencher celle-ci.
• Si possible, fermez toujours les
casseroles et poêles avec le
couvercle.
• Coupez les zones de cuisson avant
la fin de la cuisson afin d'utiliser
la chaleur restante, p. ex. pour
maintenir des aliments au chaud
ou pour faire fondre.
• Le diamètre du récipient et de la
zone de cuisson doit être le
même.
49
Page 50

Cuisson pour cuire avec et sans la fonction de saisie
automatique
La fonction de saisie automatique de la cuisson convient pour:
• les aliments froids qui sont chauffés à forte puissance et qui n'ont pas
besoin d'être surveillés pendant qu'ils mijotent,
• les aliments placés dans une poêle chaude.
La fonction de saisie automatique de la cuisson ne convient pas
pour:
• le goulasch, les paupiettes et autres aliments braisés qui doivent être
cuits, arrosés et braisés en les retournant fréquemment pour être bien
dorés,
• les boulettes, les pâtes avec beaucoup de liquide,
• la cuisson avec une cocotte-minute,
• les très grandes quantités de soupe ou de plats uniques avec plus de
2 litres de liquide.
Informations générales:
• ·Pour la cuisson sans la fonction de saisie automatique, nous recom-
mandons d'utiliser, pour lancer la cuisson ou pour saisir une puissance
élevée (avec la touche ) et de terminer la cuisson avec la puissance
de cuisson correspondante.
• Surveillez les premières cuissons! Vous pourrez ainsi déterminer le ni-
veau de cuisson le mieux adapté à "vos plats", dans la "quantité que
vous avez l'habitude de préparer" et avec "vos casseroles". Vous apprendrez alors rapidement à apprécier les avantages de la fonction de
saisie automatique tout en ayant un sentiment de sécurité quant à
votre nouvelle table de cuisson.
50
Page 51

Valeurs indicatives de cuisson
Les valeurs indiquées dans le tableau suivant sont indicatives. Les puissances recommandées dans ce tableau pour la cuisson dépendent de la
nature du récipient et, du type et du volume des aliments à cuire
Durée de
Puissance
cuisson en
automati-
1)
que
(min.)
Type de cuis-
son
Exemples d’utilisation
9 Saisir
8 4,5
7 3,5
6 2,0 Cuisson douce
5 10,2
4 6,5
3 4,8
2 1,7
1 1,0 Faire fondre
u 0,5
1) En cuisson non automatique, la durée peut être sélectionnée séparément.
3
Faire cuire à
feu vif (rous-
sir)
Cuire
Cuissonà la
vapeur
Maintenir au
chaud
Faire bouillir de grandes quantités ,
saisir la viande
Steaks, morceaux de filet,
beignets de pomme de terre
saucisses à griller
crêpes/galettes
Escalopes/côtelettes,
foie, poisson,
boulettes de viande hâchée
(« fricadelles »), œufs au plat
Faire bouillir jusqu’à 1,5 l d’eau
pommes de terre, légumes
Cuisson à la vapeur et à l’étuvée de
petites quantités de légumes,
faire gonfler du riz et
des laitages
Faire fondre du beurre,
de la gélatine,
du chocolat
Maintenir des plats au chaud
3 Nous vous conseillons, pour faire bouillir ou pour saisir des plats, de sé-
lectionner la puissance « 9 » puis de poursuivre la cuisson en choisissant
le niveau de cuisson adéquat.
3 Conseils relatifs à l’acrylamide
Selon les connaissances scientifiques les plus récentes, faire brunir les
aliments de manière intensive, en particulier les produits contenant de
l’amidon, peut provoquer des problèmes de santé dus à l’acrylamide.
C’est pourquoi nous vous recommandons de faire cuire à basse température et de ne pas trop faire brunir les aliments.
51
Page 52

Nettoyage et entretien
Attention ! Risque de brûlure dû à la chaleur résiduelle.
1
Laissez refroidir l’appareil.
1 Attention ! Les produits de nettoyage agressifs ou abrasifs endomma-
gent l’appareil. Nettoyez l’appareil avec de l’eau et de la lessive.
1 Attention ! Les restes de produits de nettoyage endommagent l’appa-
reil. Nettoyez les restes avec de l’eau et un produit de nettoyage.
Nettoyez l’appareil après chaque utilisation
1. Nettoyez l’appareil à l’aide d’un chiffon humide et un peu de produit de
nettoyage.
2. Séchez l’appareil avec un chiffon propre.
Enlever les salissures
1. Placez le grattoir de nettoyage obliquement par rapport à la surface de
la vitrocéramique.
2. Enlevez les salissures en faisant glisser la lame.
3. Nettoyez l’appareil à l’aide d’un chiffon humide et un peu de produit de
nettoyage.
4. Séchez l’appareil avec un chiffon propre.
enlevez
immé-
Type de salissure
Sucre, mets contenant du sucre oui --Matériaux en plastique, feuilles
en aluminium
Bords calcaires et d’eau --- oui
Burette à graisse --- oui
Colorations métalliques luisantes --- oui
*grattoir de nettoyage, produit de nettoyage de vitrocéramique ou d’acier inoxydable sont
disponibles dans les magasins spécialisés.
diate-
ment
oui ---
lorsque l’appareil a
refroidi
avec
Grattoir de
nettoyage*
Produit de nettoyage
de vitrocéramique ou
d’acier inoxydable*
52
Page 53

3 Nettoyez les salissures tenaces à l’aide d’un produit de nettoyage pour
vitrocéramique ou acier inoxydable.
3 Même s’il n’est plus possible de faire disparaître les égratignures ou les
taches sombres sur la vitrocéramique, cela n’a aucune influence sur le
fonctionnement de l’appareil.
Que faire si …
En cas d'anomalie de fonctionnement
En cas de dysfonctionnement, il se peut que l'anomalie constatée ne
soit pas grave et que vous puissiez y remédier vous-même à l'aide des
indications suivantes. N'effectuez aucune intervention si les informations ci-après ne suffisent pas à résoudre vos cas précis.
1 Les réparations sur l'appareil doivent être effectuées uniquement par
des professionnels. Les réparations non effectuées dans les règles peuvent être la source de dangers importants pour l'utilisateur. Pour toute
réparation, adressez-vous au service après vente de votre vendeur.
Si le plan de cuisson en vitrocéramique présente un bris de glace,
veuillez communiquer au service après-vente le numéro à trois chif-
fres qui se trouve sur la plaque de verre.
Que faire si …
... les zones de cuisson ne fonctionnent pas ?
Vérifier que
– le fusible de l'alimentation électrique (disjoncteur) est en bon état. Si
les fusibles sautent plusieurs fois, veuillez contacter un électricien
agréé.
– l’appareil est correctement branché,
– les voyants de contrôle sont allumés sur le bandeau de commande,
– la zone de cuisson adéquate est activée,
– les zones de cuisson sont réglées au niveau de cuisson souhaité,
– la déconnexion de sécurité des zones de cuisson est désactivée (voir
chapitre « sécurité »).
53
Page 54

... il est impossible de mettre en fonctionnement les zones de cuisson ?
Vérifier si
– il s’est écoulé un laps de temps de plus de 10 secondes entre le mo-
ment où la touche Marche/Arrêt a été actionnée et la mise en marche
de la zone de cuisson requise (voir chapitre « mettre l’appareil en
fonctionnement »).
– les zones de commande ne sont pas partiellement recouvertes par un
chiffon humide ou par du liquide.
... l’indicateur de chaleur résiduelle h s'affiche soudainement
Vérifier si
– la touche Marche/Arrêt n’a pas été actionnée par mégarde.
– les zones de commande ne sont pas partiellement recouvertes par un
chiffon humide, par du liquide ou par autre chose.
– la déconnexion de sécurité n’a pas été activée.
... après avoir désactiver les zones de cuisson, aucun indicateur h
de chaleur résiduelle ne s’affiche ?
Vérifier si
– la zone de cuisson n’a été utilisée que très brièvement et qu’elle n’est
par conséquent pas assez chaude.
Si la zone de cuisson est chaude, contactez le service après-vente.
... il s’avère impossible d’éteindre une zone de cuisson ?
Vérifier si
– les zones de commande ne sont pas partiellement recouvertes par un
chiffon humide ou par du liquide.
– la fonction Stop+Go est activée.
54
... il s'avère impossible de mettre en fonctionnement une zone de
cuisson ?
Vérifier si
– la sécurité enfants est activée.
– la fonction Stop+Go est activée.
... le voyant e s’allume ?
Assurez-vous que la zone de cuisson n’est pas surchauffée.
Ce voyant ne s’allume qu’en cas de surchauffe, d’anomalies du système
électronique ou pour des raisons de sécurité.
... l'appareil ne réagit pas à la mise en fonctionnement d'une zone
de commande ?
L’appareil ne réagit pas à l’activation d’une zone de commande si vous
avez simultanément touché une autre zone de commande non prévue
pour une combinaison.
Page 55

En cas de dérangement
Faites appel au service après vente de votre magasin vendeur.
Veuillez toujours indiquer :
• Le numéro de produit (PNC),
• Le numéro de fabrication (F-No ou S-No),
• La désignation du modèle.
en cas de demande de service après vente, de commande de pièces détachées ou d'accessoires et de question technique.
Si vous faites appel au service après vente en cas d'erreurs de manipulation, le déplacement du technicien peut être facturé même pendant
la période de garantie.
55
Page 56

Protection de l’environnement
Elimination du matériel d’emballage
2
Les matériaux d’emballage sont écologiques et recyclables. Les matières
plastiques portent un signe distinctif, par ex. >PE<, >PS<, etc. Eliminez
les matériaux d’emballage en fonction de leur signe distinctif dans les
containeurs prévus à cet effet sur le site de collecte de votre commune.
2 Appareils usagés
Eliminez votre appareil usagé conformément à la réglementation en vigueur dans votre lieu de résidence.
56
Page 57

Instructions d'installation
Sécurité
L’utilisateur est tenu de respecter la législation, la réglementation, les
lignes directrices et les normes en vigueur dans son pays de résidence
(dispositions relatives à la sécurité, recylage conforme et réglementaire,
etc.).
Le montage relève de la compétence exclusive de spécialistes.
Respectez l’espacement minimal requis par rapport aux autres appareils.
Seuls des tiroirs pourvus d’un fond de protection peuvent être installés directement sous l’appareil.
Protégez l’appareil de l’humidité en placant un joint d’étanchéité dans
les rainures du plan de travail.
Le joint comble les fentes entre le plan de travail et l’appareil.
N’utilisez pas de masse d’étanchéité en silicone entre le plan de travail
et l’appareil.
Eviter de monter l’appareil à proximité d’une porte ou sous une fenêtre.
Autrement, l’ouverture d’une porte ou d’un battant de fenêtre peuvent
arracher le plat de cuisson posé sur la plaque de cuisson.
1 Avertissement!
Danger de blessure due au courant électrique.
• La borne de raccordement est sous tension.
• Isolez la borne de raccordement au secteur.
• Respectez le schéma de raccordement.
• Respectez les régles de sécurité électrotechniques.
• Assurez vous lors de l’installation qu’il n’y ait pas de possibilité de
contact.
• Le raccordement électrique relève de la compétence d’un électricien.
57
Page 58

1 ATTENTION!
Le courant électrique peut provoquer des dommages.
Des raccordements mal ajustés ou incorrects peuvent provoquer une
surchauffe de la borne.
• Installez correctement les jonctions par serrage.
• Délestez le câble.
• Pour les raccordements 1 ou 2 phases, utilisez respectivement un câ-
ble approprié de type H05BB-F T de max. 90° (ou de plus grande capacité).
• En cas d’endommagement du câble de raccordement de l’appareil,
remplacez impérativement ce dernier par un câble spécifique (de type
H05BB-F Tmax. 90° ou de plus grande capacité). Ce type de câble est
disponible auprès du service après-vente.
Au niveau de l'installation électrique, prévoir un dispositif qui permette
de couper cet appareil du secteur sur tous les pôles avec une ouverture
des contacts d'au moins 3 mm.
Des dispositifs de protection appropriés sont par exemple les disjoncteurs, les fusibles (les fusibles vissés doivent être retirés de leur socle),
les disjoncteurs différentiels et les contacteurs.
58
Page 59

Service après-vente
En cas de problèmes techniques, vérifiez d’abord s’il ne vous est pas
possible de réparer vous-même le dysfonctionnement à l’aide de la notice d’utilisation (chapitre „Que faire, si...“).
Si vous ne parvenez pas à réparer le dysfonctionnement, veuillez contacter notre Consumer Services.
Pour pouvoir vous dépanner dans les
plus brefs délais, nous nécessitons les
informations suivantes :
– Désignation du modèle
– Numéro du produit (PNC)
– Numéro de série (S-No.)
(ces chiffres se trouvent sur la plaque signalétique)
– Type de dysfonctionnement
– eventuellement le message d’erreur affiché par l’appareil
– Vitrocéramique avec une combinaison de lettres et de trois chiffres
Pour pouvoir accéder rapidement aux numéros d’identification de l’appareil, nous vous recommandons de les consigner à cet endroit.
Désignation du modèle .....................................
PNC : .....................................
S-No : .....................................
59
Page 60

Gentile cliente,
La preghiamo di leggere attentamente queste Istruzioni per l’uso e di
conservarle per una consultazione futura.
Consegni queste Istruzioni per l’uso ad eventuali proprietari successivi
dell’apparecchio.
Nel testo vengono utilizzati i seguenti simboli:
1 Avvertenze di sicurezza
Avvertenza! Avvertenze, per la propria sicurezza personale.
Attenzione! Avvertenze per evitare danni all'apparecchio.
3 Avvertenze e suggerimenti pratici
2 Informazioni sull'ambiente
60
Page 61

Indice
Istruzioni per l'uso . . . . . . . . . . . . . . . . . . . . . . . . . . . . . . . . . . . . . . . . . 62
Avvertenze di sicurezza. . . . . . . . . . . . . . . . . . . . . . . . . . . . . . . . . . . . . . . . . . 62
Descrizione dell'apparecchio . . . . . . . . . . . . . . . . . . . . . . . . . . . . . . . . . . . . . 64
Dotazione zona di cottura e pannello di comando . . . . . . . . . . . . . . . . . . . . 64
Display digitali . . . . . . . . . . . . . . . . . . . . . . . . . . . . . . . . . . . . . . . . . . . . . . . . . . 65
Spegnimento di sicurezza delle zone di cottura. . . . . . . . . . . . . . . . . . . . . . . 65
Comando del piano di cottura. . . . . . . . . . . . . . . . . . . . . . . . . . . . . . . . . . . . 66
Tasti sensore Touch Control . . . . . . . . . . . . . . . . . . . . . . . . . . . . . . . . . . . . . . . 66
Accensione dell'apparecchio. . . . . . . . . . . . . . . . . . . . . . . . . . . . . . . . . . . . . . . 66
Spegnimento dell'apparecchio . . . . . . . . . . . . . . . . . . . . . . . . . . . . . . . . . . . . . 67
Selezione del livello di cottura . . . . . . . . . . . . . . . . . . . . . . . . . . . . . . . . . . . . . 67
Livello di mantenimento in caldo. . . . . . . . . . . . . . . . . . . . . . . . . . . . . . . . . . . 67
Accensione e spegnimento della zona di cottura a tre circuiti. . . . . . . . . . . 68
Accensione e spegnimento della zona di arrostimento . . . . . . . . . . . . . . . . . 69
Funzione Stop+Go . . . . . . . . . . . . . . . . . . . . . . . . . . . . . . . . . . . . . . . . . . . . . . . 70
Spegnimento della zona di cottura . . . . . . . . . . . . . . . . . . . . . . . . . . . . . . . . . 70
Spia del calore residuo . . . . . . . . . . . . . . . . . . . . . . . . . . . . . . . . . . . . . . . . . . . 71
Funzionamento con prima cottura automatica . . . . . . . . . . . . . . . . . . . . . . . 71
Funzionamento senza prima cottura automatica . . . . . . . . . . . . . . . . . . . . . 72
Sicurezza per bambini. . . . . . . . . . . . . . . . . . . . . . . . . . . . . . . . . . . . . . . . . . . . 73
Timer . . . . . . . . . . . . . . . . . . . . . . . . . . . . . . . . . . . . . . . . . . . . . . . . . . . . . . . . . . 76
Applicazione, tabelle e consigli . . . . . . . . . . . . . . . . . . . . . . . . . . . . . . . . . . . 79
Pentole adatte . . . . . . . . . . . . . . . . . . . . . . . . . . . . . . . . . . . . . . . . . . . . . . . . . . 79
Consigli per la cottura con e senza la funzione automatica. . . . . . . . . . . . . 80
Valori di riferimento per cucinare . . . . . . . . . . . . . . . . . . . . . . . . . . . . . . . . . . 81
Pulizia e manutenzione. . . . . . . . . . . . . . . . . . . . . . . . . . . . . . . . . . . . . . . . . . 82
Che cosa fare se …. . . . . . . . . . . . . . . . . . . . . . . . . . . . . . . . . . . . . . . . . . . . . . 84
Come rimediare agli inconvenienti. . . . . . . . . . . . . . . . . . . . . . . . . . . . . . . 84
Smaltimento . . . . . . . . . . . . . . . . . . . . . . . . . . . . . . . . . . . . . . . . . . . . . . . . . . . 85
Istruzioni di montaggio. . . . . . . . . . . . . . . . . . . . . . . . . . . . . . . . . . . . 86
Assistenza . . . . . . . . . . . . . . . . . . . . . . . . . . . . . . . . . . . . . . . . . . . . . . . . . . . 88
Montaggio . . . . . . . . . . . . . . . . . . . . . . . . . . . . . . . . . . . . . . . . . . . . . . . . . . 86
61
Page 62

Istruzioni per l'uso
1 Avvertenze di sicurezza
Siete pregati di osservare questa indicazione, poiché in caso contrario si
3
estingue qualsiasi diritto alla garanzia per i danni insorti.
5 Questo apparecchio è conforme alle seguenti direttive CE:
– 73/23/CEE del 19.02.1973 - Direttiva sulla bassa tensione
– 89/336/CEE del 03.05.1989 Direttiva sulla compatibilità elettroma-
gnetica compreso relativo emendamento 92/31/CEE
– 93/68/CEE del 22.07.1993 in materia di marcatura CE
Impiego conforme allo scopo previsto
• Questo apparecchio deve essere impiegato soltanto per la cottura e
l'arrostimento di pietanze per uso domestico.
• L’apparecchio non deve essere utilizzato come superficie di lavoro o
di appoggio.
• Non sono ammesse trasformazioni o modifiche all’apparecchio.
• Non appoggiate né conservate liquidi infiammabili, materiali facil-
mente incendiabili o oggetti che possono fondersi (ad es. pellicola,
plastica, alluminio) sull'apparecchio o nelle immediate vicinanze.
62
Sicurezza dei bambini
• Tenete i bambini piccoli lontani dall'apparecchio.
• Lasciate avvicinare i bambini più grandicelli all’apparecchio solo sotto
sorveglianza.
Norme di sicurezza generali
• Il montaggio e l'allacciamento dell’apparecchio devono essere effet-
tuati esclusivamente da tecnici qualificati e autorizzati.
• Gli apparecchi da incasso devono essere messi in funzione solo dopo
l’installazione in piani di lavoro e mobili da incasso adeguati e a norma.
• In caso di guasti all’apparecchio o di danni al piano in vetroceramica
(rotture, crepe o fessure) l’apparecchio deve essere spento e staccato
dalla corrente elettrica, per evitare una possibile scossa elettrica.
• Le riparazioni sulla lavastoviglie devono essere effettuate esclusiva-
mente da personale qualificato e autorizzato.
Page 63

Sicurezza durante l'utilizzo
• Rimuovete adesivi e pellicole dal piano in vetroceramica.
• Un impiego disattento dell’apparecchio può comportare il rischio di
bruciature.
• I cavi degli apparecchi elettrici non devono essere posati sulla super-
ficie calda dell’apparecchio o su stoviglie calde.
• Grassi e oli surriscaldati si infiammano rapidamente. Qualora si pre-
parassero pietanze in grasso oppure in olio (ad esempio patatine fritte), non allontanatevi mai dalla cucina.
• Spegnete le zone di cottura dopo ogni utilizzo.
Sicurezza durante la pulizia
• Per pulire l'apparecchio occorre spegnerlo e attendere che si raffred-
di.
• Per motivi di sicurezza è vietata la pulizia dell’apparecchio con idro-
pulitrici a vapore oppure ad alta pressione.
Per evitare danni all’apparecchio
• Il piano in vetroceramica può essere danneggiato dalla caduta di og-
getti.
• Il bordo del piano in vetroceramica può essere danneggiato da urti
con pentole.
• Lo spostamento di pentole in ghisa, alluminio o con basamenti dan-
neggiati può provocare graffi al piano in vetroceramica.
• Oggetti che possono fondere e liquidi traboccati possono bruciare ri-
manendo attaccati al piano in vetroceramica e pertanto devono essere rimossi immediatamente.
• Non mettere in funzione le zone di cottura in assenza di stoviglie o
con stoviglie vuote.
63
Page 64

Descrizione dell'apparecchio
Dotazione zona di cottura e pannello di comando
Zona di cottura singola
1200W
Zona di arrostimento
2400W
Zona di cottura a tre circuiti
Tasto sensore Tre circuiti
Tasto sensore
“Stop+Go”
Tasto sensore
“Ac ceso/Sp ento”
64
2300W
Pannello di comando
Spie di controllo Tre circuiti
Selezione del livello
di cottura
Display per livello di cottura/calore residuo
Tasto sensore Zona di arrostimento
Spia di controllo Zona
“Timer” con
spie di controllo
Zona di cottura singola
1200W
di arrostimento
Selezione del livello
di cottura
Page 65

Display digitali
I quattro display, assegnati alle quattro zone di cottura, visualizzano:
– ¾ dopo l'accensione,
– u in caso di selezione del livello di mantenimento in caldo,
– ¿ fino a Ç, a seconda del livello di cottura desiderato,
– 2 fino a 6 (con punto decimale) per livelli di cottura intermedi,
– a con prima cottura automatica,
– h con calore residuo,
– l con la sicurezza per bambini inserita,
– e in caso di funzionamento difettoso.
1 Spegnimento di sicurezza delle zone di cottura
Se dopo un determinato tempo una delle zone di cottura non viene
spenta o il livello di cottura non viene modificato, la zona di cottura
corrispondente si spegne automaticamente.
Il calore residuo presente viene visualizzato con h (“Heiß”, caldo) nei
display digitali delle zone di cottura corrispondenti.
Le zone di cottura si disattivano:
• Livello di cottura u, 1 - 2 dopo 6 ore
• Livello di cottura 3 - 4 dopo 5 ore
• Livello di cottura 5 dopo 4 ore
• Livello di cottura 6 - 9 dopo 1,5 ore
3 Se una o più zone di cottura dovessero disattivarsi prima del tempo in-
dicato, consultate il paragrafo “Che cosa fare se …”.
Disinserimento per altre cause
Un liquido che trabocca e tracima sul pannello di comando determina
lo spegnimento immediato di tutte le zone di cottura.
Lo stesso effetto si ha se appoggiate un panno bagnato sul pannello di
comando. In entrambi i casi l'apparecchio deve essere acceso di nuovo
con l'interruttore principale I, dopo aver rimosso il liquido o il panno.
65
Page 66

Comando del piano di cottura
Tasti sensore Touch Control
Per utilizzare i tasti sensore Touch Control sfiorate il tasto desiderato
con la punta del dito dall'alto fino all'accensione o allo spegnimento
dei relativi display o fino all'esecuzione della funzione desiderata.
3 Accertarsi di sfiorare solo un tasto sensore durante l'uso. Se il dito viene
appoggiato eccessivamente, scatta il tasto sensore sottostante.
Accensione dell'apparecchio
L'apparecchio completo viene acceso con il tasto sensore “Acceso/
Spento” I.
Premete il tasto sensore “Acceso/Spento” per ca. due secondi.
I display digitali visualizzano ¾.
3 Dopo l'attivazione del tasto sensore “Acceso/Spento” per l’accensione
dell'apparecchio, entro circa 10 secondi occorre impostare un livello di
cottura per una zona di cottura o un tempo con il timer (funzione contaminuti per uova). Per motivi di sicurezza l'apparecchio si spegne di
nuovo.
66
Page 67

Spegnimento dell'apparecchio
Per uno spegnimento completo dell'apparecchio attivate il tasto sensore “Acceso/Spento” I.
Premete il tasto sensore “Acceso/Spento” per ca. un secondo.
3 Dopo la disattivazione di una singola zona di cottura o dell'intero piano
di cottura, il calore residuo presente viene visualizzato con h (“Heiß”,
caldo) nei display digitali delle zone di cottura corrispondenti.
Selezione del livello di cottura
Per impostare o cambiare il livello di cottura (da u a Ç) per la zona di
cottura selezionata.
Con il tasto sensore di selezione del livello di cottura aumentate il livello di cottura.
Con il tasto sensore di selezione del livello di cottura diminuite il livello di cottura.
Livello di mantenimento in caldo
Tutte e quattro le zone di cottura sono dotate di un livello di mantenimento in caldo u.
Con il tasto sensore di selezione del livello di cottura impostate il livello di mantenimento in caldo u.
67
Page 68

Accensione e spegnimento della zona di cottura a tre circuiti
A seconda delle dimensioni della padella o della pentola, nella zona di
cottura a tre circuiti con il tasto sensore “Zona a tre circuiti” oltre alle
zone di cottura più piccole è possibile accendere il circuito di riscaldamento più grande.
3 È possibile accenderlo solo se per il circuito di riscaldamento più piccolo
è già impostato un livello di cottura.
1. Impostate il livello di cottura desiderato.
2. Sfiorate il tasto sensore “Tre circuiti”.
68
Il circuito di riscaldamento intermedio si accende. La spia di controllo
inferiore si illumina.
Page 69

3. Sfiorando nuovamente il tasto sensore “Tre circuiti” si attiva il circuito
di riscaldamento esterno. La spia di controllo superiore si illumina.
4. Per spegnere i circuiti di riscaldamento esterni, sfiorate il tasto sensore
“Tre circuiti”, il circuito di riscaldamento esterno viene disattivato.
Accensione e spegnimento della zona di arrostimento
1. Impostate il livello di cottura desiderato.
2. Per accendere o spegnere la zona di arrostimento appoggiate un dito
sul tasto sensore “Zona di arrostimento” fino all'accensione o allo spegnimento della spia di controllo.
69
Page 70

Funzione Stop+Go
Attivando il tasto sensore “Stop+Go” tutte le zone di cottura accese
vengono riportate automaticamente sul livello di mantenimento in caldo. La spia di controllo del tasto sensore “Stop+Go” si illumina. Il livello
di mantenimento in caldo viene visualizzato nel display con u.
Attivando di nuovo il tasto sensore “Stop+Go” tutte le zone di cottura
selezionate in precedenza vengono nuovamente impostate, la spia di
controllo si spegne.
3 La funzione Stop+Go non arresta il timer.
Se era stata selezionata una prima cottura automatica con la fase di
riscaldamento a, questa viene terminata mediante la funzione
Stop+Go e attivando nuovamente il tasto sensore “Stop+Go” è riportata al livello di cottura selezionato in precedenza.
Spegnimento della zona di cottura
1. Per effettuare lo spegnimento sfiorate contemporaneamente i tasti
sensore di selezione del livello di cottura e oppure riportate il tasto sensore di selezione del livello di cottura sullo zero.
70
Page 71

Spia del calore residuo
Dopo aver spento una singola zona di cottura oppure
l'intero piano di cottura, il calore residuo ancora presente viene visualizzato sul display digitale della rispettiva
zona di cottura da una h (come "HOT", caldo).
Anche dopo il disinserimento della zona di cottura, la
spia del calore residuo si spegne solamente quando la rispettiva zona di
cottura si è completamente raffreddata.
2 Il calore residuo può anche essere sfruttato per fondere o tenere in cal-
do le pietanze.
1 Attenzione! Finché rimane illuminata la spia di controllo, persiste il pe-
ricolo di scottature.
1 Attenzione! In caso di interruzione di corrente, si spegne anche il sim-
bolo h e, quindi, anche l’indicazione di presenza di calore residuo. Ciò
nonostante sussiste ancora il pericolo di scottature. Ciò può essere evitato con un’osservazione attenta delle indicazioni.
Funzionamento con prima cottura automatica
Tutte e quattro le zone di cottura del piano sono regolabili in nove livelli e sono dotate di una prima cottura automatica:
– ¿, livello di cottura minimo
– Ç, livello di cottura massimo
– a, funzione per la prima cottura.
Se selezionate il livello di cottura desiderato mediante il tasto sensore
di selezione del livello di cottura , la zona di cottura funziona per un
certo tempo a piena potenza e ritorna automaticamente al livello impostato di continuazione della cottura.
La durata dell'avvio automatico della prima cottura dipende dal livello
selezionato di continuazione della cottura.
71
Page 72

1. Sfiorate il tasto sensore di selezione del livello di cottura, per impostare
il livello di cottura desiderato da ¿ a Æ. Viene quindi visualizzato il li-
vello di cottura impostato, che appare nel display dopo 5 secondi al posto del livello di cottura a (= prima cottura automatica). Al termine
della prima cottura viene visualizzato di nuovo il livello di cottura.
3 Se durante la funzione automatica, selezionate un livello superiore, ad
es. da Á a Ã, la durata della prima cottura viene adeguata. Se selezionate un livello inferiore, la prima cottura viene terminata immediatamente.
La prima cottura automatica è possibile solo con una zona di cottura
fredda o moderatamente calda. Se all'accensione una zona di cottura è
già calda (display h), non è possibile lavorare con la prima cottura automatica.
Funzionamento senza prima cottura automatica
Se selezionate la zona di cottura senza la prima cottura automatica, selezionate il livello di cottura desiderato con il tasto sensore di selezione
del livello di cottura .
1. Sfiorate il tasto sensore di selezione del livello di cottura per impostare il livello di cottura desiderato da Ç a ¿.
3 Con i tasti sensore di selezione del livello di cottura in ogni momento
72
e è possibile cambiare il livello.
Page 73

Sicurezza per bambini
La sicurezza per bambini consente di proteggere il piano di cottura da
un uso indesiderato.
Inserimento della sicurezza per bambini
Per inserire la sicurezza per bambini l'apparecchio deve essere acceso,
ma non deve essere accesa alcuna zona di cottura.
1. Premete per circa tre secondi il tasto sensore .
Per l'attivazione viene emesso un segnale acustico.
2. Sfiorate un tasto sensore di selezione del livello di cottura a piacere .
Nei display appare l, la protezione per bambini è attivata. Dopo alcuni
secondi l'apparecchio si spegne automaticamente.
73
Page 74

Superamento della sicurezza per bambini
È possibile superare la sicurezza per bambini per un uso singolo dell'apparecchio (fino allo spegnimento successivo). Alla successiva riaccensione la sicurezza per bambini è di nuovo automaticamente attiva.
1. Accendete l'apparecchio.
Con la sicurezza per bambini attiva viene visualizzato l.
2. Sfiorate contemporaneamente due tasti sensore di selezione del livello
di cottura a piacere e .
74
Per l'attivazione viene emesso un segnale acustico. La sicurezza per
bambini viene superata fino allo spegnimento dell'apparecchio, il piano
di cottura può essere utilizzato normalmente.
Page 75

Disinserimento della sicurezza per bambini
1. Accendete l'apparecchio.
Con la sicurezza per bambini attiva viene visualizzato l.
2. Premete per circa tre secondi il tasto sensore .
Per l'attivazione viene emesso un segnale acustico.
3. Sfiorate un tasto sensore di selezione del livello di cottura a piacere .
I display si oscurano, la protezione per bambini è disinserita. Dopo alcuni secondi l'apparecchio si spegne automaticamente.
75
Page 76

Timer
Il timer può essere utilizzato in due modi:
– come spegnimento automatico. Impostate per una zona di cottura
un tempo di cottura, trascorso il quale la zona di cottura si spegne
automaticamente. Questa funzione può essere utilizzata per più zone
di cottura contemporaneamente.
– come cronometro senza funzione di comando (“contaminuti per uo-
va”), al termine del tempo impostato viene emesso un segnale acustico.
3 Il cronometro non può essere utilizzato, se è accesa una zona di cottura.
Spegnimento automatico
La(e) zona(e) di cottura per la(e) quale(i) volete applicare lo spegnimento automatico deve(devono) essere accesa(e).
1. Selezionate con il tasto sensore timer, per quale zona di cottura deve
essere impostato lo spegnimento automatico.
76
Sfiorando una volta il tasto sensore timer viene selezionata in senso
orario la prima zona di cottura attiva, la relativa spia di controllo lampeggia velocemente. Ad es. la spia di controllo posteriore sinistra corrisponde alla zona di cottura posteriore sinistra. Nel display del timer
appare 00.
Sfiorando ripetutamente il tasto sensore timer viene selezionata la successiva zona di cottura attiva.
Page 77

2. Mentre la spia di controllo lampeggia velocemente, con i tasti sensore
di impostazione del timer + o - impostate per questa zona di cottura
il tempo desiderato fino allo spegnimento automatico (es. 15 minuti).
Dopo alcuni secondi viene attivato lo spegnimento automatico.
La spia di controllo ora lampeggia più lentamente e la durata residua
per la cottura viene visualizzata alla fine nel display. Se lo spegnimento
automatico è impostato in più zone di cottura, questo vale per la zona
di cottura con la durata residua minore. Si illuminano le spie di controllo delle restanti zone di cottura con spegnimento automatico impostato. Per visualizzare la durata residua di cottura di una di queste zone,
occorre selezionarla con il tasto sensore Timer, la spia di controllo corrispondente lampeggia velocemente.
Per modificare la durata residua di cottura, selezionate la zona di cottura desiderata con il tasto sensore del timer. La spia di controllo relativa
lampeggia più velocemente. La modifica viene eseguita con i tasti sensore di impostazione del timer + o -.
Una volta terminato il tempo di cottura impostato, la zona di cottura si
spegne automaticamente e per due minuti viene emesso un segnale
acustico, il display del timer lampeggia 00.
3. Sfiorate il tasto sensore Timer, per disattivare il segnale.
3 Per un'impostazione più veloce, sfiorate uno dei tasti sensore di impo-
stazione del timer + o - fino al raggiungimento del valore desiderato.
Se prima viene attivato il tasto sensore di impostazione del timer - ,
l'impostazione del tempo inizia da 99 minuti, se prima viene attivato il
tasto sensore di impostazione del timer +, l'impostazione del tempo
inizia da 1 minuto.
77
Page 78

Interruzione anticipata dello spegnimento automatico
Due sono le possibilità per disattivare anticipatamente lo spegnimento
automatico:
Disattivazione contemporanea della zona di cottura e del timer
1. Con il tasto sensore di selezione del livello di cottura riportate sullo
zero la zona di cottura desiderata: la zona di cottura e il timer si di-
sattivano.
Spegnimento del timer – la zona di cottura resta attiva
1. Selezionate con il tasto sensore timer la zona di cottura desiderata. La
spia di controllo relativa lampeggia più velocemente.
2. Con il tasto sensore di impostazione del timer - impostate il timer sul-
lo 00:
– si disattiva solo il timer.
– La zona di cottura rimane in funzione.
Cronometro
Per l'utilizzo del cronometro l'apparecchio deve essere acceso, ma non
deve essere accesa alcuna zona di cottura.
1. Sfiorate il tasto sensore Timer.
Nel display del timer appare 00.
2. Impostate il tempo desiderato con i tasti sensore di impostazione del
timer + o -.
Dopo alcuni secondi il cronometro viene attivato ed è visualizzata la
durata residua.
Per cambiare il tempo residuo sfiorate il tasto sensore del timer e con i
tasti sensore per l'impostazione del timer + o - modificate l'impostazione.
Una volta terminato il tempo impostato viene emesso un segnale acustico e il display del timer lampeggia 00.
3. Sfiorate il tasto sensore Timer, per disattivare il segnale.
78
Page 79

Applicazione, tabelle e consigli
Pentole adatte
• Una pentola di qualità la si riconosce dal fondo, che deve essere piano
e presentare un forte spessore.
• Quando comprate una pentola nuova, controllate sempre il diametro
sul fondo. Spesso i produttori indicano il diametro del bordo superiore della pentola, e non del fondo.
• Le stoviglie con fondo in alluminio o in rame possono lasciare sulla
superficie in vetroceramica del piano di cottura macchie metallizzate
difficilmente eliminabili.
• Non utilizzate pentole in ghisa o con un fondo danneggiato e ruvido,
poiché spostandole potreste graffiare il piano di cottura.
• A freddo, il fondo delle pentole è
solitamente bombato verso l'interno (concavo). Assicuratevi che
non sia mai bombato verso l'esterno (convesso).
• Se si utilizzano pentole speciali
(ad esempio pentole a vapore, wok
ecc.), occorrerà osservare le istruzioni fornite dal produttore delle
pentole.
2 Consigli per risparmiare energia
• Ponete sempre pentole e tegami sulla zona di cottura prima di accen-
derla.
• Se possibile, coprite sempre le
pentole ed i tegami con il
coperchio.
• Sfruttate sempre il calore residuo
spegnendo la zona di cottura poco
prima della fine della cottura, ad
esempio per tenere in caldo le
pietanze o fondere.
• Il fondo della pentola e la zona di
cottura dovrebbero essere della
stessa misura.
79
Page 80

Consigli per la cottura con e senza la funzione automatica
La prima cottura automatica è adatta per:
• pietanze che vengono riscaldate a freddo ad elevata potenza e che
non necessitano di un continuo controllo durante la cottura,
• pietanze che vengono immesse nella padella già calda.
La prima cottura automatica non è adatta per:
• spezzatini, involtini e simili pietanze a stufare che devono essere gira-
te frequentemente, cosparse di liquidi e cotte sino a raggiungere il
giusto grado di rosolatura.
• canederli, polpettine e pasta contenente molto liquido,
• cottura con pentole a pressione,
• grandi quantità di minestra in brodo/minestrone con più di 2 litri di
liquido.
Avvertenze generali:
• Per la cottura senza funzione automatica si consiglia di regolare
la piastra su un livello di cottura elevato per la prima cottura/arrostimento delle pietanze (con il tasto ) e di terminare la cottura regolando su un livello di continuazione della cottura corrispondente.
• Osservate le prime cotture! In questo modo potrete stabilire quale li-
vello di cottura è adatto ai ”vostri piatti” nella quantità che siete soliti cucinare con le ”vostre pentole”. Ben presto imparerete ad
apprezzare i vantaggi della prima cottura automatica e sarete padroni
del vostro nuovo piano di cottura.
80
Page 81

Valori di riferimento per cucinare
I dati riportati nella tabella seguente sono valori indicativi. La posizione
della manopola necessaria per i diversi tipi di cottura dipende dalla
qualità delle pentole e dal tipo e dalla quantità di alimenti.
Posizione
manopola
9
8 4,5
7 3,5
6 2,0
5 10,2
4 6,5
3 4,8 Cottura a va-
2 1,7
1 1,0 Fusione
u 0,5
1) In caso di cottura senza sistema automatico il tempo della prima cottura viene scelto
individualmente.
Prima cottura
automatica
1)
(min.)
Cottura Esempi per l'applicazione
Per portare ad ebollizione grandi
Prima cottura
Rosolatura
Frittura
Cottura arro-
sto intensa
Cottura arro-
sto
Bollitura
pore
Stufatura
Maceratura
Mantenimen-
to in caldo
quantità di liquidi,
cuocere pasta fresca,
rosolare carne,
(gulasch, stufato)
Bistecche, lombate,
frittelle di patate,
würstel,
omelette/frittatine
Scaloppine/cotolette
fegato, pesce,
polpette, uova al tegamino
Per bollire fino a 1,5 l di liquido,
patate, verdure
Per cuocere a vapore e stufare
piccole quantità di verdure,
per macerare riso e
pietanze a base di latte
Per fondere burro,
sciogliere gelatina,
fondere cioccolato
Per tenere in caldo pietanze
3 Per la prima cottura e la rosolatura si consiglia di regolare la piastra sul
“9” e di ultimare la cottura delle pietanze che necessitano di un tempo
di cottura maggiore su una posizione corrispondente alla continuazione
della cottura.
81
Page 82

3 Avvertenza sull'acrilamide
Secondo le più recenti scoperte scientifiche una cottura intensiva degli
alimenti, in particolare nel caso di prodotti contenenti amido, può rappresentare un rischio per la salute a causa dell'acrilamide. Pertanto vi
raccomandiamo di cucinare possibilmente a basse temperature e di non
rosolare troppo intensamente gli alimenti.
Pulizia e manutenzione
Attenzione! Pericolo di ustioni a causa del calore residuo.
1
Lasciate raffreddare l’apparecchio.
1 Attenzione! Prodotti per la pulizia aggressivi e appuntiti danneggiano
il piano di cottura. Pulite con acqua e detergente.
1 Attenzione! I residui di detergenti danneggiano l’apparecchio. Rimuo-
vete i residui con acqua.
Pulite l’apparecchio dopo ogni impiego
1. Pulite l’apparecchio con un panno umido e un po’ di detergente.
2. Asciugate l’apparecchio con un panno asciutto.
82
Page 83

Come eliminare lo sporco
1. Appoggiate il raschiatore a lama per vetro obliquamente sulla superfi-
cie in vetroceramica.
2. Eliminate lo sporco facendo scorrere delicatamente la lama.
3. Pulite l’apparecchio con un panno umido e un po’ di detergente.
4. Asciugate l’apparecchio con un panno asciutto.
eliminare
imme-
Tipo di sporco
zucchero, alimenti contenenti
zucchero
plastica, pellicole di alluminio sì --aloni d'acqua e di calcare --- sì
spruzzi di unto --- sì
macchie opalescenti --- sì
*Raschiatori a lama, deteregenti per vetroceramica o acciaio inossidabile sono reperibili presso
rivenditori autorizzati.
diatamente
sì ---
con l’apparecchio
freddo
con
raschiatore a lama*
detergenti per accia-
io inossidabile o
vetroceramica*
3 Rimuovete lo sporco ostinato con un detergente per vetroceramica o
acciaio inossidabile.
3 Graffi o macchie scure sulla superficie in vetroceramica, che non è più
possibile eliminare, non compromettono tuttavia il funzionamento
dell’apparecchio.
83
Page 84

Che cosa fare se …
Come rimediare agli inconvenienti
Probabilmente si tratta di un’anomalia di funzionamento di lieve entità
che potrete eliminare da soli seguendo le indicazioni riportate di seguito. Qualora le indicazioni qui riportate non fossero sufficienti per eliminare l’anomalia, non tentate di intervenire di effettuare riparazioni o
altri interventi di vostra iniziativa.
1 Avvertenza! Le riparazioni di questo apparecchio devono essere esegui-
te esclusivamente da elettricisti specializzati. Riparazioni eseguite in
modo non appropriato possono essere fonte di gravi pericoli per l’utente. Pertanto, in caso di anomalie di funzionamento, siete pregati di rivolgervi al vostro rivenditore autorizzato oppure al servizio di
assistenza.
Se il piano di cottura in vetroceramica dovesse presentare una rottura
nel vetro, indicate al centro di assistenza tecnica il numero a tre cifre,
che è riportato sul piano in vetroceramica.
Che cosa fare se ...
… le zone di cottura non funzionano?
Controllate se
– il fusibile dell'impianto domestico (quadro elettrico) è intatto. Se i fu-
sibili scattassero più volte rivolgetevi ad un elettricista autorizzato,
– l'apparecchio è acceso correttamente,
– le spie sul pannello di comando sono illuminate,
– la zona di cottura corrispondente è accesa,
– le zone di cottura sono impostate sul livello di cottura desiderato,
– è scattato lo spegnimento di sicurezza delle zone di cottura (vedere il
paragrafo “Sicurezza”).
84
… le zone di cottura non si accendono?
Controllate se
– fra l'attivazione del tasto Acceso/Spento e l'accensione della zona di
cottura desiderata è trascorso un tempo superiore a 10 secondi (vedere il paragrafo “Accensione dell’apparecchio”).
– i tasti sensore sono parzialmente coperti da un panno umido o da un
liquido.
… il display improvvisamente passa su h per il calore residuo?
Controllate se
– il tasto Acceso/Spento è stato attivato inavvertitamente,
– i tasti sensore sono parzialmente coperti da un panno umido, da un
liquido o da qualcosa di simile,
– è stato attivato lo spegnimento di sicurezza.
Page 85

… dopo lo spegnimento delle zone di cottura nel display non è vi-
sualizzato h per il calore residuo?
Controllate se
– la zona di cottura è stata in funzione solo brevemente e quindi non è
ancora calda a sufficienza.
Se la zona di cottura dovesse essere calda, chiamate il servizio di assistenza.
… una zona di cottura non si spegne?
Controllate se
– i tasti a sfioramento sono parzialmente coperti da un panno umido o
da liquido,
– è inserita la funzione Stop+Go.
... una zona di cottura non si accende?
Controllate se
– la sicurezza per bambini è inserita,
– è inserita la funzione Stop+Go.
…il display e è acceso?
Controllate se la zona di cottura è surriscaldata.
Il display si illumina in caso di surriscaldamento, di anomalie nell’impianto elettronico o per motivi di sicurezza.
… l'apparecchio non reagisce all'attivazione di un tasto sensore?
L'apparecchio non reagisce all’attivazione di un tasto sensore, se contemporaneamente sfiorate un altro tasto sensore non previsto per una
combinazione.
Se in caso di comandi errati vi rivolgete al servizio di assistenza, il tecnico potrebbe esigere il pagamento dell’intervento anche durante il periodo di garanzia.
Smaltimento
Materiale di imballaggio
2
I materiali di imballaggio sono ecologici e riciclabili. Gli elementi in materiale plastico sono contrassegnati ad es. >PE< (polietilene), >PS< (polistirolo espanso), ecc. Smaltite i materiali di imballaggio a seconda del
loro contrassegno conferendoli negli appositi contenitori sistemati
presso le discariche comunali.
2 Vecchio elettrodomestico
Smaltite il vecchio elettrodomestico in conformità alle direttive di
smaltimento vigenti presso il vostro comune di residenza.
85
Page 86

Istruzioni di montaggio
Avvertenze di sicurezza
È necessario rispettare le leggi, le disposizioni, le direttive e le norme vigenti nel paese d'impiego (norme di sicurezza, reciclaggio regolare e
conforme ecc.).
Il montaggio deve essere effettuato esclusivamente da personale specializzato.
È necessario rispettare le distanze minime dagli altri apparecchi.
I cassetti devono essere montati solo con fondo di protezione direttamente sotto l’apparecchio.
Le superfici di taglio nel piano di lavoro devono essere protette
dall’umidità con materiale di tenuta adeguato.
La guarnizione chiude perfettamente lo spazio fra l’apparecchio e il
piano di lavoro.
Non applicate sigillante a base di silicone fra apparecchio e piano di lavoro.
Evitate di montare l'apparecchio direttamente accanto a porte e sotto
finestre. A volte l'apertura improvvisa di porte e finestre può provocare
la rottura di stoviglie calde in seguito alla caduta dalla zona di cottura.
1 Avvertenza!
Rischio di lesioni a causa della corrente elettrica.
• Il morsetto di rete è alimentato con tensione elettrica.
• Togliere tensione al morsetto di rete.
• Osservare lo schema di allacciamento.
• Attenersi alle norme di sicurezza delle installazioni elettriche.
• Assicurarsi una protezione contro il contatto mediante un'installazio-
ne a regola d'arte.
• Fare eseguire il collegamento elettrico da un elettrotecnico specializzato.
1 ATTENZIONE!
Danni a causa della corrente elettrica.
Connessioni allentate e non appropriate possono causare un surriscaldamento dei connettori.
• Eseguire i collegamenti a regola d'arte.
• Scaricare la trazione sui cavi.
• Per il collegamento ad 1 o 2 fasi si deve utilizzare il cavo di allaccia-
mento alla rete adeguato del tipo H05BB-F Tmax 90° (o superiore).
86
Page 87

• Se il cavo di allacciamento alla rete di questo apparecchio è danneggiato, deve essere sostituito da un cavo di allacciamento speciale (tipo H05BB-F Tmax 90°; o superiore). Disponibile presso il servizio
assistenza.
Nell'installazione elettrica si deve prevedere un dispositivo che consenta di separare l'apparecchio dalla rete in modo onnipolare con un'apertura di contatto di almeno 3 mm.
Si considerano sezionatori idonei gli interruttori automatici, i fusibili (i
fusibili a tappo devono essere rimossi dal supporto), gli interruttori per
correnti di guasto ed i relè.
87
Page 88

Assistenza
In caso di problemi tecnici Vi preghiamo di tentare di risolvere direttamente il problema con l'ausilio delle Istruzioni per l'uso (capitolo "Che
cosa fare se...")
Se non riuscite a risolvere il problema, rivolgetevi al servizio assistenza
o ad un nostro tecnico addetto all’assistenza.
Per fornirVi un rapido aiuto, Vi richiediamo le seguenti informazioni:
– Modello
– Numero prodotto (PNC)
– Numero di serie (numero S)
(per i numeri vedere la targhetta di
identificazione)
– Tipo di problema
– Eventuale messaggio d’errore vi-
sualizzato dall'apparecchio
– Combinazione alfanumerica a tre cifre per vetroceramica
Per avere sotto mano i numeri di matricola richiesti del vostro apparec-
chio, vi consigliamo di registrarli di seguito:
88
Modello: .....................................
PNC (numero prodotto): .....................................
Numero S (numero di serie) .....................................
Page 89

Assembly / Montage / Montaggio
89
Page 90

90
Page 91

Rating Plate / Plaque signalétique /
Targhetta di omologazione
91
Page 92

From the Electrolux Group. The world´s No.1 choice.
The Electrolux Group is the world´s largest producer of powered appliances for kitchen, cleaning and outdoor
use. More than 55 million Electrolux Group products (such as refrigerators, cookers, washing machines,
vacuum cleaners, chain saws and lawn mowers) are sold each year to a value of approx. USD 14 billion in more
than 150 countries around the world.
AEG Hausgeräte GmbH
Postfach 1036
D-90327 Nürnberg
http://www.aeg.hausgeraete.de
© Copyright by AEG
822 925 185-A-031104-01
Subject to change without notice
Sous réserve de modifications
Con riserva di modifiche
 Loading...