

AEG 61300M-WR User Manual [nl]

61300M
Ceramic glass hob
Table de cuisson vitrocéramique
Glaskeramische kookplaat
Installation and Operating Instructions
Instructions de montage et mode d’emploi
Montage- en gebruiksaanwijzing

Dear Customer,
Please read these user instructions carefully and keep them to refer to
later.
Please pass the user instructions on to any future owner of the appliance.
The following symbols are used in the text:
1 Safety instructions
Warning! Information that affects your personal safety.
Important! Information that prevents damage to the appliance.
3 Useful tips and hints
2 Environmental information
2

Contents
Operating Instructions. . . . . . . . . . . . . . . . . . . . . . . . . . . . . . . . . . . . . 4
Safety instructions. . . . . . . . . . . . . . . . . . . . . . . . . . . . . . . . . . . . . . . . . . . . . . 4
Description of the Appliance. . . . . . . . . . . . . . . . . . . . . . . . . . . . . . . . . . . . . 6
Cooking surface layout . . . . . . . . . . . . . . . . . . . . . . . . . . . . . . . . . . . . . . . . . . . 6
Residual heat indicator . . . . . . . . . . . . . . . . . . . . . . . . . . . . . . . . . . . . . . . . 7
Operating the hob . . . . . . . . . . . . . . . . . . . . . . . . . . . . . . . . . . . . . . . . . . . . . . 7
Switching the outside ring on and off . . . . . . . . . . . . . . . . . . . . . . . . . . . . . . 7
Tips on Cooking and Frying . . . . . . . . . . . . . . . . . . . . . . . . . . . . . . . . . . . . . . 8
Cookware . . . . . . . . . . . . . . . . . . . . . . . . . . . . . . . . . . . . . . . . . . . . . . . . . . . . . . 8
Energy saving . . . . . . . . . . . . . . . . . . . . . . . . . . . . . . . . . . . . . . . . . . . . . . . . . . . 8
Cleaning and Care . . . . . . . . . . . . . . . . . . . . . . . . . . . . . . . . . . . . . . . . . . . . . . 9
What to do if … . . . . . . . . . . . . . . . . . . . . . . . . . . . . . . . . . . . . . . . . . . . . . . . . 10
Disposal . . . . . . . . . . . . . . . . . . . . . . . . . . . . . . . . . . . . . . . . . . . . . . . . . . . . . . . 10
Installation Instructions . . . . . . . . . . . . . . . . . . . . . . . . . . . . . . . . . . . 11
Service . . . . . . . . . . . . . . . . . . . . . . . . . . . . . . . . . . . . . . . . . . . . . . . . . . . . . . 13
Assembly . . . . . . . . . . . . . . . . . . . . . . . . . . . . . . . . . . . . . . . . . . . . . . . . . . . . 41
3

Operating Instructions
Safety instructions
Please comply with these instructions. If you do not, any damage re-
3
sulting is not covered by the warranty.
5 This appliance conforms with the following EU Directives:
– 73/23/EEC dated 19.02.1973 Low Voltage Directive
– 89/336/EEC dated 03.05.1989 EMC Directive inclusive of Amending
Directive 92/31/EEC
– 93/68/EEC dated 22.07.1993 CE Marking Directive
Correct use
• This appliance should be used only for normal domestic cooking and
frying of food.
• The appliance must not be used as a work surface or as a storage surface.
• Additions or modifications to the appliance are not permitted.
Children’s safety
• Small children must be kept away from the appliance.
• Only let bigger children work on the appliance under supervision.
General safety
• The appliance may only be installed and connected by trained, registered service engineers.
• Built-in appliances may only be used after they have built in to suitable built-in units and work surfaces that meet standards.
• In the event of faults with the appliance or damage to the glass ceramic (cracks, scratches or splits), the appliance must be switched off
and disconnected from the electrical supply.
• Repairs to the appliance must only be carried out by trained registered service engineers.
4

Safety during use
• Remove stickers and film from the glass ceramic.
• There is the risk of burns from the appliance if used carelessly.
• Cables from electrical appliances must not touch the hot surface of
the appliance or hot cookware.
• Overheated fats and oils can ignite quickly. When cooking with fat or
oil (e.g. chips) do not leave the appliance unattended.
• Switch the cooking zones off after each use.
• Do not cover the oven’s steam outlet.
• When the oven is working, there is the danger of scalds from the
steam outlet.
Safety when cleaning
• For cleaning, the appliance must be switched off and cooled down.
• For safety reasons, the cleaning of the appliance with steam jet or
high-pressure cleaning equipment is not permitted.
How to avoid damage to the appliance
• The glass ceramic can be damaged by objects falling onto it.
• The edge of the glass ceramic can be damaged by being knocked by
the cookware.
• Cookware made of cast iron, cast aluminium or with damaged bottoms can scratch the glass ceramic if pushed across the surface.
• Objects that melt and things that boil over can burn onto the glass
ceramic and should be removed straightaway.
• Do not use the cooking zones with empty cookware or without cookware.
5
Description of the Appliance
R
Singl
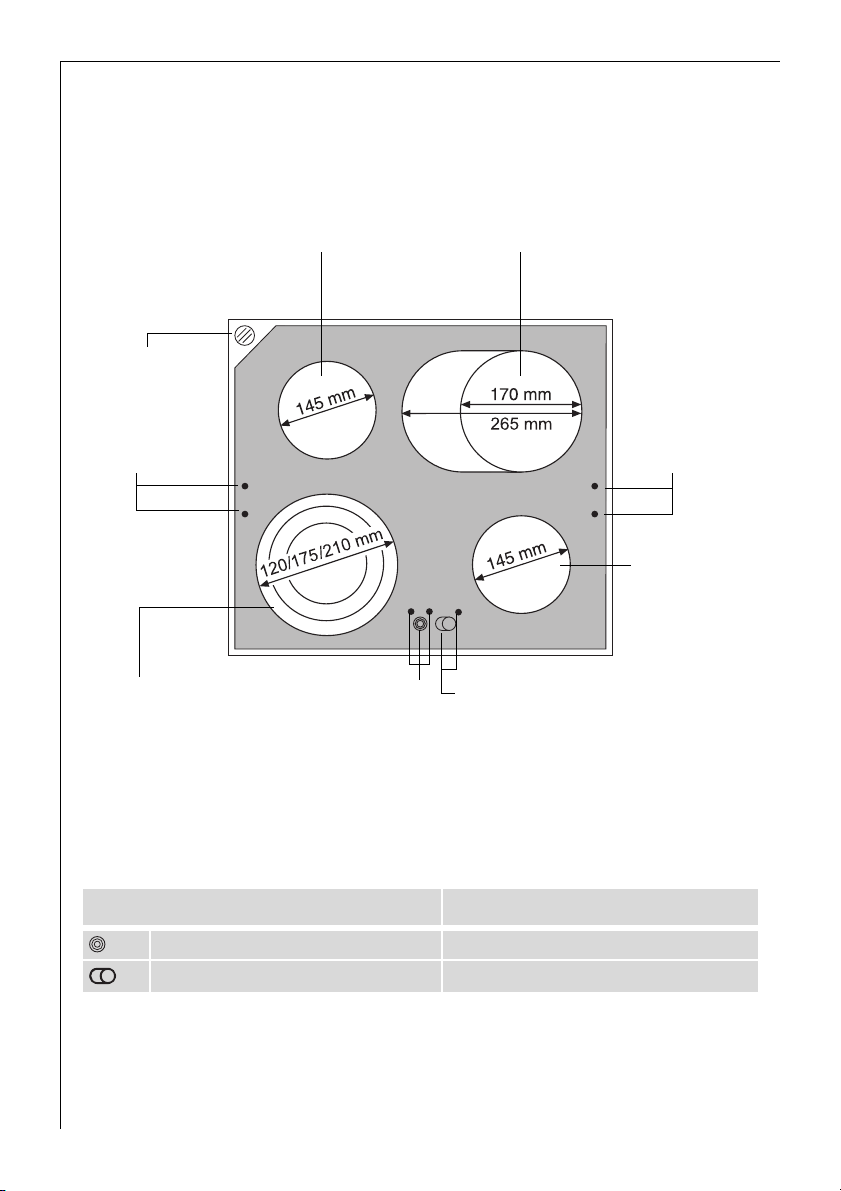
Cooking surface layout
Oven steam outlet
ecooking zone
1200W
oasting zone
1500/2400W
Residual heat
indicator
Triple cooking zone
800/1600 / 2300W
Triple cooking zone
with power indicator
switch
Roasting zone switch
with power indicator
Touch control sensor panels
Outside rings are switched on by touching the Touch Control Sensor
panels.
Sensor panel Function
Triple cooking zone switch Switching the outside ring on and off
Roasting zone switch Switching the outside ring on and off
Residual heat
indicator
Singlecooking
zone
1200W
6
Residual heat indicator
The residual heat indicator lights up, as soon as the corresponding
cooking zone is hot.
1 Danger! Risk of burns from residual heat. After being switched off, the
cooking zones need some time to cool down. Look at the residual heat
indicator.
2 Residual heat can be used for melting and keeping food warm.
Operating the hob
You operate the appliance with the combination appliance’s ring
switches. The operation and the function of the ring switches is described in the Operating Instructions for the combination appliance.
3 When a cooking zone is switched on, it may hum briefly. This is a char-
acteristic of all ceramic glass cooking zones and does not impair either
the function or the life of the appliance.
Switching the outside ring on and off
By switching the outside rings on or off, the effective heating surface
can be matched to the size of the cookware.
3 Before an outside ring can be switched on, the inside ring must be
switched on.
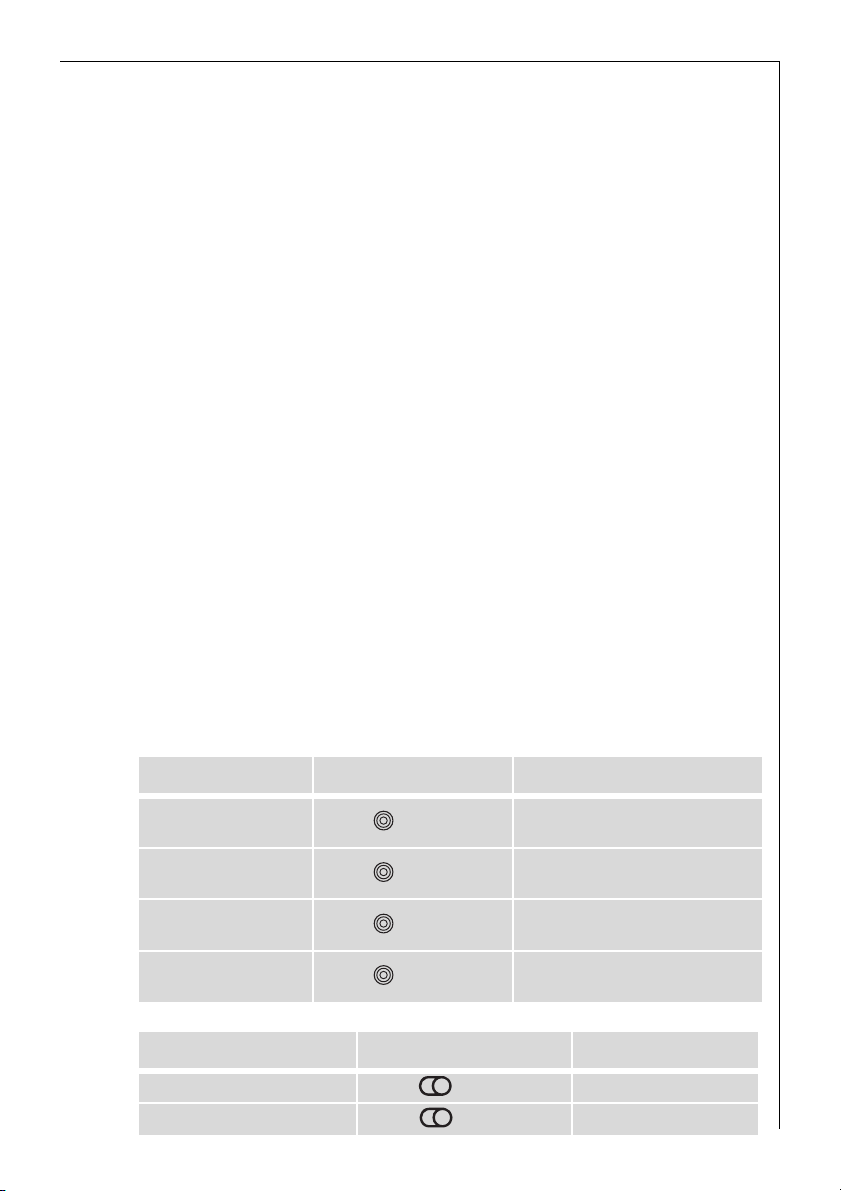
Triple cooking zone Sensor panel Power indicator
To switch on middle
ring
To switch on outside
ring
To switch off outside
ring
To switch off middle
ring
Roasting zone Sensor panel Power indicator
To switch on outside ring Touch for 2 seconds. is lit
To switch off outside ring Touch for 2 seconds. goes out
Touch for 2 seconds. One power indicator is lit.
Touch for 2 seconds. Two power indicators are lit.
Touch for 2 seconds. Second power indicator goes out.
Touch for 2 seconds. First power indicator goes out.
7

Tips on Cooking and Frying
Cookware
• You can recognise good cookware from the bottoms of the pans. The
bottom should be as thick and flat as possible.
• Cookware made of enamelled steel or with aluminium or copper bottoms can leave discolorations on the glass ceramic surface which are
difficult or impossible to remove.
Energy saving
2 Always place cookware on the cook-
ing zone before it is switched on.
2 If possible, always place lids on the
pans.
2 Switch cooking zones off before the
end of the cooking time, to take advantage of residual heat.
2 Bottom of pans and cooking zones
should be the same size.
8

Cleaning and Care
Take care! Risk of burns from residual heat.
1
Let the appliance cool down.
1 Warning! Sharp objects and abrasive cleaning materials will damage
the appliance. Clean with water and washing up liquid.
1 Warning! Residues from cleaning agents will damage the appliance.
Remove residues with water and washing up liquid.
Cleaning the appliance after each use
1. Wipe the appliance with a damp cloth and a little washing up liquid.
2. Rub the appliance dry using a clean cloth.
Removing deposits
1. Place a scraper on the glass ceramic surface at an angle.
2. Remove residues by sliding the blade over the surface.
3. Wipe the appliance with a damp cloth and a little washing up liquid.
4. Rub the appliance dry using a clean cloth.
Remove
Type of dirt
sugar, food containing sugar yes ---
plastics, tin foil yes ---
limescale and water rings --- yes
fat splashes --- yes
shiny metallic discolorations --- yes
*Scrapers and cleaners for glass ceramic and stainless steel can be purchased in specialist shops
immediately
when the appliance has
cooled down
using
a scraper*
cleaner for glass ce-
ramic or stainless
steel*
3 Remove stubborn residues with a cleaner for glass ceramic or stainless
steel.
3 Scratches or dark stains on the glass ceramic that cannot be removed
do not however affect the functioning of the appliance.
9

What to do if …
Problem Possible cause Remedy
The cooking zones are not
functioning.
The residual heat indicator
is not lit.
The outside rings cannot be
switched on.
If you are unable to remedy the problem by following the above
The combination appliance
is not switched on.
The desired heat setting is
not set.
The fuse in the house’s
electrical wiring (fuse box)
has been tripped.
The cooking zone was only
switched on for a short
time.
The inner ring is not
switched on.
Switch on the appliance.
Set the heat setting.
Check the fuse.
If the fuses trip a number
of times, please call an authorised electrician.
If the cooking zone is cold,
there is no fault.
Switch on the inner ring.
suggestions, please contact your dealer or the Customer Care Department.
1 Warning! Repairs to the appliance are only to be carried out by quali-
fied service engineers. Considerable danger to the user may result from
improper repairs.
3 If the appliance has been wrongly operated, the visit from the customer
service technician or dealer may not take place free of charge, even
during the warranty period.
Disposal
2
Packaging material
The packaging materials are environmentally friendly and can be recycled. The plastic components are identified by markings, e.g. >PE<,
>PS<, etc. Please dispose of the packaging materials in the appropriate
container at the community waste disposal facilities.
2 Old appliance
Please dispose of your old appliance in line with the guidelines for disposal in your community.
10

Installation Instructions
Safety instructions
The laws, ordinances, directives and standards in force in the country of
use are to be followed (safety regulations, proper recycling in accordance with the regulations, etc.)
Installation may only be carried out by a qualified electrician.
The minimum distances to other appliances are to be observed.
Drawers may only be installed with a with protective floor directly
under the appliance.
The cut surfaces of the work top are to be protected against moisture
using a suitable sealant.
The sealant seals the appliance to the work top with no gap.
Do not use silicon sealant between the appliance and the work top.
Avoid installing the appliance next to doors and under windows. Otherwise hot cookware may be knocked off the rings when doors and windows are opened.
1 Warning!
Risk of injury from electrical current.
The combination appliance is live.
• Observe electrical safety rules.
• Ensure anti-shock protection through correct installation by a quali-
fied electrician.
• Rated voltage of the combined appliances must match.
1 Important!
Risk of injury from electrical current.
Loose and inappropriate plug and socket connections can lead to
overheating of the plug.
• Fit plug and socket connections together properly.
A device must be provided in the electrical installation which allows the
appliance to be disconnected from the mains at all poles with a contact
opening width of at least 3 mm.
Suitable isolation devices include line protecting cut-outs, fuses (screw
type fuses are to be removed from the holder), earth leakage trips and
contactors.
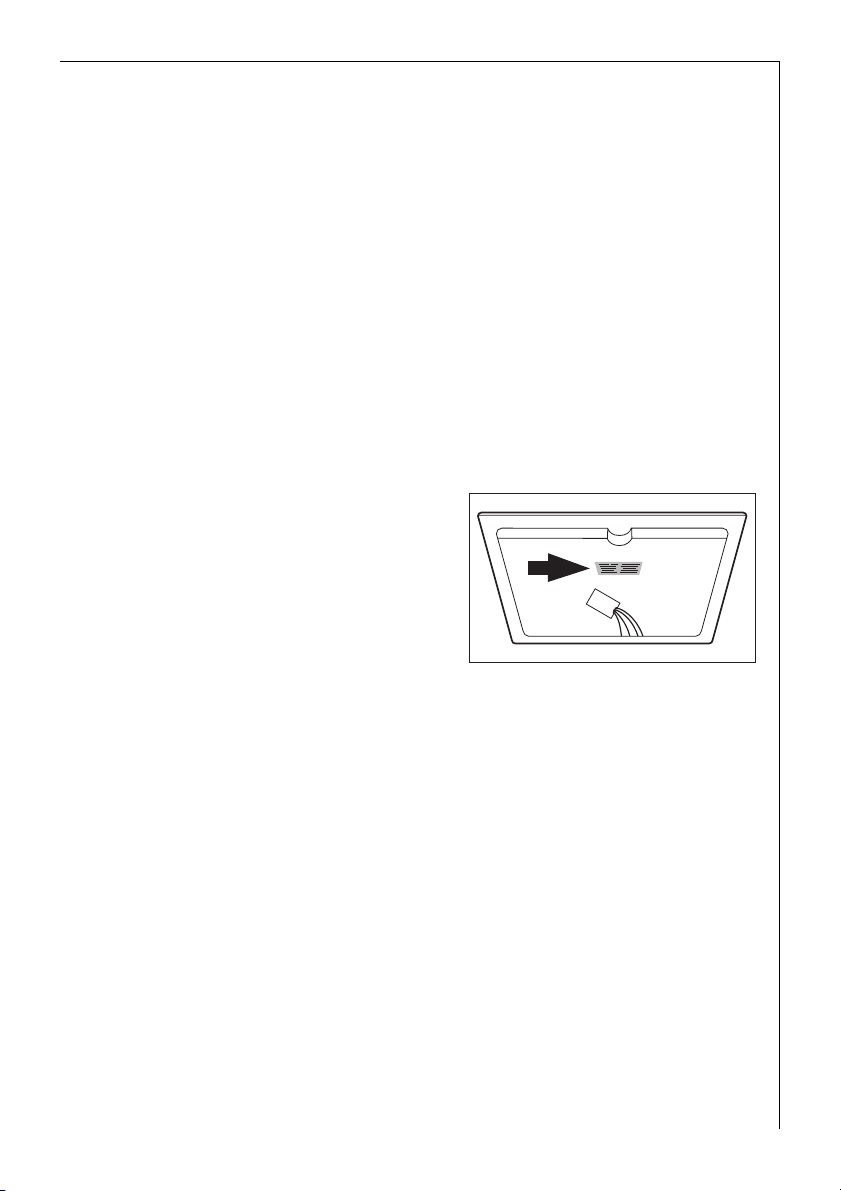
Move the oven steam outlet pipe with a screwdriver to the centre of
the opening in the hob. Then put the outlet connection piece over the
pipe.
1 • Moving the panel ring under pressure can scratch the coated metal
surfaces.
11

Appliance dimensions
Width 576 mm
Depth 506mm
Height 42mm
12
Service
In the “What to do if …” section a number of malfunctions are listed
that you can rectify yourself Look there first if a fault occurs.
Is it a technical fault?
If so, please contact your customer service centre. (You will find addresses and telephone numbers in the section “Customer Service Centres”.)
Always prepare in advance for the discussion. This will make diagnosis
of the problem easier and also make it easier to decide if a customer
service visit is necessary:
Please make a note of the following information as accurately as possible:
• What form does the fault take?
• Under what circumstances does the fault occur?
Prior to the telephone call it is important that you make a note of the
following appliance code numbers
that are given on the rating plate:
• model description,
• PNC code (9 digits),
• S No code (8 digits).
We recommend that you record the
code numbers here so that you always have them to hand:
Model: . . . . . . . . . . .
PNC: . . . . . . . . . . .
S-No: . . . . . . . . . . .
When do you incur costs even during the warranty period?
• if you could have remedied the fault yourself using the fault table
(see section “What to do if …”),
• if the customer service technician has to make several journeys because he was not provided with all the relevant information before
his visit and therefore, forexample, has to fetch spare parts. These
multiple trips can be avoided if you prepare your phone call as described above.
13

Chère cliente, cher client,
Veuillez lire attentivement la notice d’utilisation dans son intéralité et
la conserver pour pouvoir le consulter ultérieurement.
Veuillez la transmettre à l’éventuel propriétaire ultérieur de l’appareil.
Les symboles suivants sont utilisés dans ce document :
1 Consignes de sécurité
Avertissement : conseils pour votre sécurité personnelle.
Avertissement ! Pour éviter d'endommager l'appareil
3 Conseils généraux et pratiques
2 Informations environnementales
14
 Loading...