

Page 1

LAVATHERM 56740
User manual Condenser Dryer
Page 2
Contents
2
Thank you for choosing one of our high-quality products.
To ensure optimal and regular performance of your appliance please read this
instruction manual carefully. It will enable you to navigate all processes perfectly
and most efficiently. To refer to this manual any time you need to, we recommend
you to keep it in a safe plac e. An d p le as e pass it to any future owner of the appliance.
We wish you much joy with your new appliance.
Contents
Operating Instructions 3
Important safety information 3
Product description 6
Control panel 7
Before first use 7
Sorting and preparing laundry 7
Programme overview 9
Daily use 11
Switching machine on / switching light on
11
Opening loading door / loading laundry
11
Selecting the programme 11
DELICATE function 11
LONG ANTI-CREASE function 12
BUZZER function 12
TIME function 12
DELAY START function 13
CHILD LOCK function 13
Starting the programme 14
Changing programme 14
Putting in extra items or taking items out
before end of programme 14
Drying cycle complete / removing laundry
14
Care and cleaning 16
Cleaning fluff filter 16
Cleaning the door seal 17
Emptying the condensate tank 17
Cleaning heat exchanger 18
Cleaning the drum 19
Clean operating screen and housing 19
What to do if ... 20
Troubleshooting by yourself 20
Machine settings 22
Technical data 23
Consumption values 23
Hints for test institutes 23
Installation 24
Appliance positioning 24
Removing transport safety packaging 24
Electrical connection 25
Door reversal 26
Special accessories 26
Environment 26
Environmental tips 27
Service 27
Guarantee/Customer Service 28
GREAT BRITAIN & IRELAND 28
European Guarantee 29
www.electrolux.com 30
Subject to change without notice
Page 3

Important safety information
Operating Instructions
Important safety information
In the interest of your safety and to ensure the correct use, before installing and
first using the appliance, read this user manual carefully, including its hints and
warnings. To avoid unnecessary mistakes and accidents, it is important to ensure
that all people using the appliance are thoroughly familiar with its operation and
safety features. Save these instructions and make sure that they remain with the
appliance if it is moved or sold, so that everyone using it through its life will be
properly informed on appliance use and safety.
General safety
• It is dangerous to alter the specifications or attempt to modify this product in any way.
• This appliance is not intended for use by persons (including children) with reduced
physical, sensory or lack of experience and knowledge, unless they have been given
supervision or instruction concerning use of the appliance by a person responsible for
their safety.
• Make sure that small pets do not climb into the drum. To avoid this, please check into
the drum before using.
• Any objects such as coins, safety pins, nails, screws, stones or any other hard, sharp
material can cause extensive damage and must not be placed into the machine.
• In order to avoid danger of fires caused by excessive drying, do not use appliance to dry
the following items: Cushions, quilts and the like (these items accumulate heat).
• Items such as foam rubber (latex foam), shower caps, waterproof textiles, rubber backed
articles and clothes or pillows fitted with foam rubber pads should not be dried in the
tumble dryer.
• Always unplug the appliance after use, cleaning and maintenance.
• Under no circumstances should you attempt to repair the machine yourself. Repairs
carried out by inexperienced persons may cause injury or serious malfunctioning. Contact
your local Service Centre. Always insist on genuine spare parts.
• Items that have been soiled with substances such as cooking oil acetone, petrol, kerosene,
spot removers, turpentine, waxes and wax removers should be washed in hot water with
an extra amount of detergent before being dried in the tumble dryer.
•
Danger of explosion: Never tumble dry items that have been in contact with inflammable solvents (petrol, methylated spirits, dry cleaning fluid and the like). As these substance are volatile, they could cause an explosion. Only tumble dry items washed with
water.
•
Risk of fire: items that have been spotted or soaked with vegetable or cooking oil
constitute a fire hazard and should not be placed in the tumble dryer.
• If you have washed your laundry with stain remover you must execute an extra rinse
cycle before loading your tumble dryer.
3
Page 4

Important safety information
4
• Please make sure that no gas lighters or matches have accidentally been left in pockets
of garments to be loaded into appliance
WARNING!
Never stop a tumble dry before the end of the drying cycle unless all items are
quickly removed and spread out so that the heat is dissipated. Risk of fire!
•
Risk of electric shock! Do not spray down the appliance with jets of water.
• The final part of a tumble dryer cycle occurs without heat ( cool down cycle ) to ensure
that the items are left at a temperature that ensures that items will not be damaged.
• The tumble dryer is not to be used if industrial chemicals have been used for cleaning.
• Ensure you have good ventilation in the installation room to avoid the back flow of gases
into the room from appliances burning other fuels, including open fires.
Installation
• This appliance is heavy. Care should be taken when moving it.
• When unpacking the appliance, check that it is not damaged. If in doubt, do not use it
and contact the Service Centre.
• All packaging must be removed before use. Serious damage can occur to the product
and to property if this is not adhered to. See relevant section in the user manual.
• Any electrical work required to install this appliance should be carried out by a qualified
electrician or competent person.
• Care must be taken to ensure that the appliance does not stand on the electrical supply
cable.
• If the machine is situated on a carpeted floor, please adjust the feet in order to allow air
to circulate freely under the appliance.
• After having installed the appliance, check that it is not pressing or standing on its
electrical supply cable.
• If the tumble dryer is placed on top of a washing machine, it is compulsory to use the
stacking kit (optional accessory).
Use
• This appliance is designed for domestic use. It must not be used for purposes other than
those for which it was designed.
• Only wash fabrics which are designed to be machine dried. Follow the instructions on
each garment label.
• Do not dry unwashed items in the tumble dryer.
• Do not overload the appliance. See the relevant section in the user manual.
• Clothes which are dripping wet should not be placed in the dryer.
• Garments which have been in contact with volatile petroleum products should not be
machine dried. If volatile cleaning fluids are used, care should be taken to ensure that
the fluid is removed from the garment before placing in the machine.
• Never pull the power supply cable to remove the plug from the socket; always take hold
of the plug itself.
• Never use the tumble dryer if the power supply cable, the control panel, the working
surface or the base are damaged so that the inside of the tumble dryer is accessible.
• Fabric softeners, or similar products should be used as specified by the fabric softener
instructions.
Page 5

Important safety information
•
Caution - hot surface : Do not touch the door light cover surface when the light is
switched on.
(Only dryers equipped with internal drum light)
Child safety
• This machine is not intended for use by young children or infirm persons without su-
pervision.
• Children should be supervised to ensure that they do not play with the appliance.
• The packaging components (e.g. plastic film, polystyrene) can be dangerous to children
- danger of suffocation! Keep them out of children’s reach.
• Keep all detergents in a safe place out of children’s reach.
• Make sure that children or pets do not climb into the drum.
5
Page 6
Product description
6
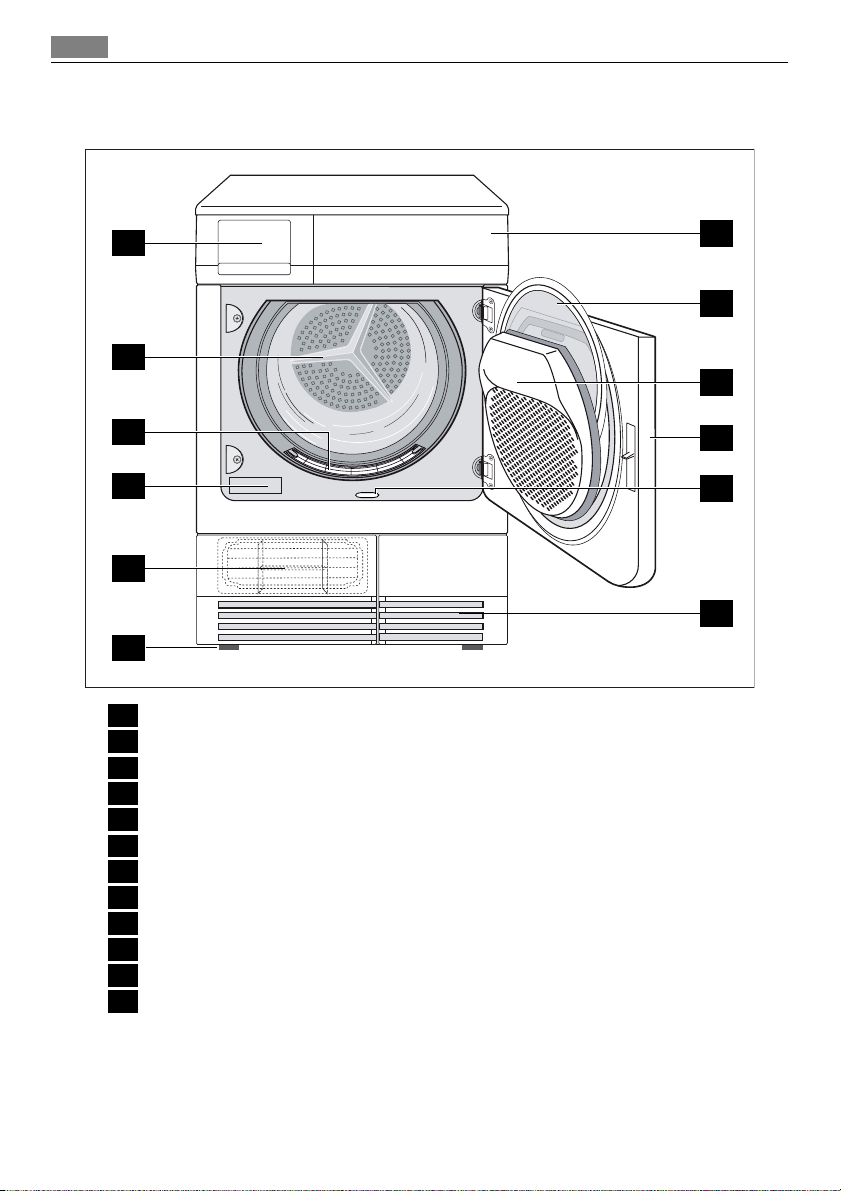
Product description
2
3
6
7
9
12
1 Control panel
2 Water reservoir
3 Drum light
4 Fine fluff filters
5 Course fluff filters
6 Fluff filters
7 Rating plate
8 Loading door (reversible)
9 Heat exchanger door
10 Button for opening door in plinth
11 Ventilation grille
12 Adjustable feet
1
4
5
8
10
11
Page 7
Control panel
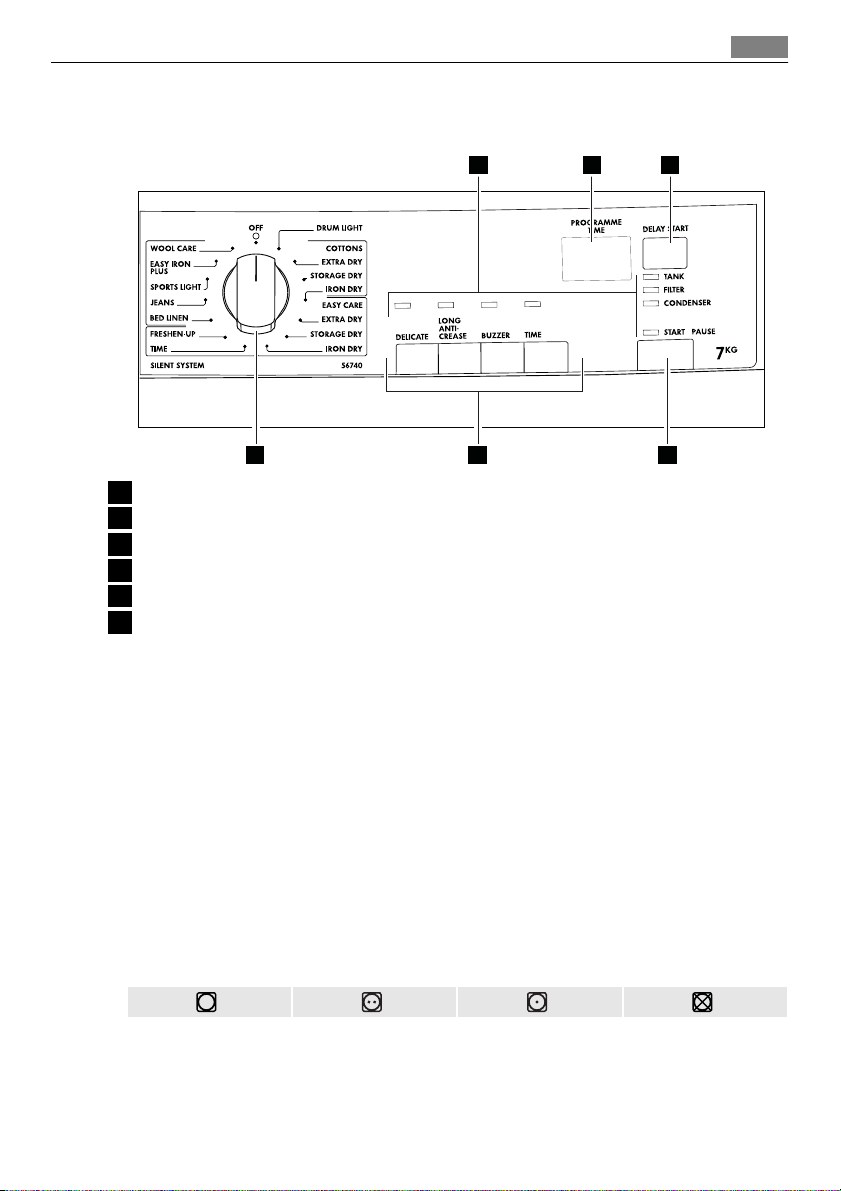
Control panel
7
6
123
1 Programme knob and OFF switch
2 Function buttons
3 START PAUSE button
4 DELAY START button
5 Display
6 Functions and warning leds
Before first use
In order to remove any residues which may have been produced during production, wipe
the dryer drum with a damp cloth or carry out a brief drying cycle (ca. 30 min.) with damp
cloths in the machine.
45
Sorting and preparing laundry
Sorting laundry
• Sort by fabric type:
– Cotton/linen for programmes in COTTONS programme group.
– Mixtures and synthetics for programmes in EASY CARE programme group.
• Sorting by care label. The care labels mean:
Page 8

Sorting and preparing laundry
8
Drying in the tumble
dryer possible in prin-
ciple
Dry at normal tem-
perature
Dry at reduced tem-
perature (press DELI-
CATE button!)
Drying in the tumble
dryer not possible
Do not place in the appliance any wet laundry which is not specified on the care label as
being suitable for tumble-drying.
This appliance can be used for all wet laundry items which are labelled as suitable for
tumble-drying.
• Do not dry new, coloured textiles together with light-coloured laundry items. Textile
colours may bleed.
• Do not dry cotton jersey and knitwear with the EXTRA programme. Items may shrink!
• Do not dry wool in the dryer. May become entangled! After air-drying, wool may be dried
with the WOOL CARE programme.
Preparing laundry
• To avoid laundry becoming tangled: close zips, button up duvet covers and tie loose ties
or ribbons (e.g. of aprons).
• Empty pockets. Remove metal items (paper clips, safety pins, etc).
• Turn items with double-layered fabrics inside out (e.g. with cotton-lined anoraks, the
cotton layer should be outermost). These fabrics will then dry better.
Page 9
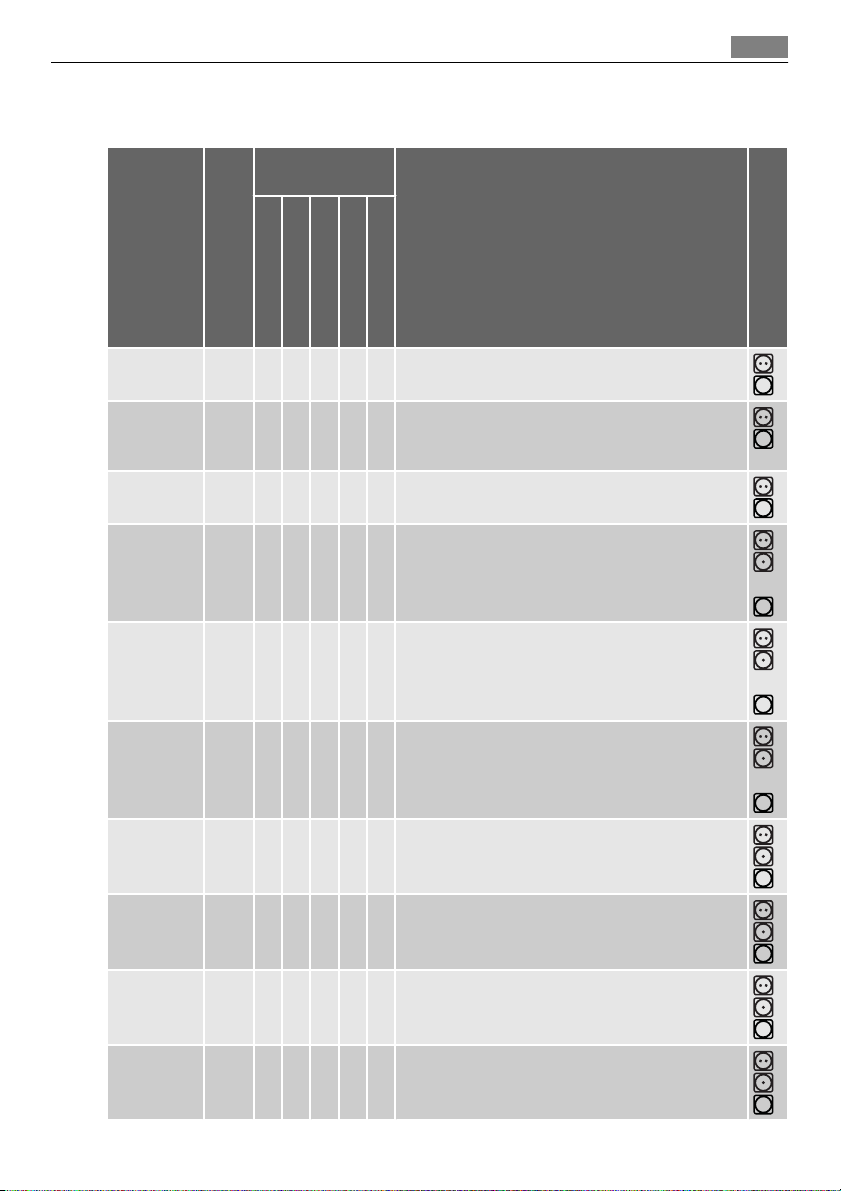
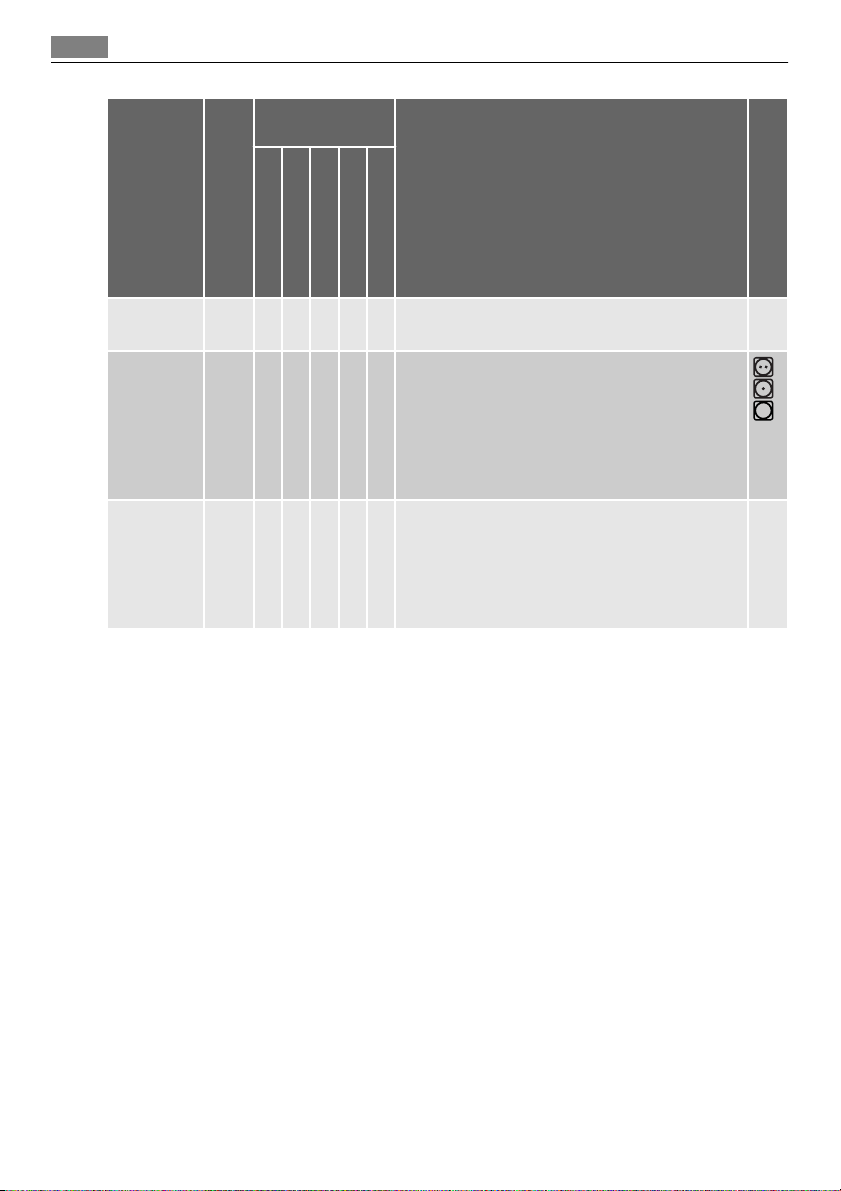
Programme overview
Additional func-
Programmes
COTTONS
EXTRA DRY
COTTONS
STORAGE
DRY
COTTONS
IRON DRY
max. load
(weight when dry)
7 kg • • • - •
7 kg • • • - •
7 kg • • • - •
DELICATE
tions
LONG ANTI-CREASE
Programme overview
Application/properties
TIME
BUZZER
DELAY START
Thorough drying of thick or multi- layered fabrics,
e.g. terry towelling items, bathrobes.
Thorough drying of fabrics of even thicknesses, e.g.
terry towelling items, knitwear, towels.
For normal thickness cotton or linen laundry, e.g.
bedding, table linen.
9
Care mark
EASY CARE
EXTRA DRY
EASY CARE
STORAGE
DRY
EASY CARE
IRON DRY
TIME 7 kg • • • • •
FRESHENUP
BED LINEN 3 kg • • • - •
JEANS 7 kg • • • - •
3 kg • • • - •
3 kg • • • - •
3 kg • • • - •
1 kg • • • - •
Thorough drying of thick or multi-layered fabrics,
e.g. pullovers, bedding, table linen.
For thin fabrics which are not ironed, e.g. easy care
shirts, table linen, baby clothes, socks, lingerie with
bones or wires.
For thin fabrics which are also to be ironed, e.g.
knitwear, shirts.
For further drying of individual items of laundry
or for volumes up to 7 kg.
For refreshing or gently cleaning textiles with
commercially available dry cleaning products.
Bed linen (single and double sheet, pillowcase,
bedspread, duvet cover).
For leisure clothing, such as jeans, sweat-shirts,
etc., of different material thicknesses (e.g. at the
neck, cuffs and seams).
1)
1)
1)
Page 10
Programme overview
10
Programmes
SPORTS
LIGHT
EASY IRON
PLUS
WOOL
CARE
1) select DELICATE
2) set by default
Additional func-
tions
max. load
DELICATE
(weight when dry)
TIME
BUZZER
LONG ANTI-CREASE
•
2 kg
• • - •
2)
1 kg
•
(or 5
shirt
• • - •
2)
s)
1 kg • - • - •
Application/properties
DELAY START
For sportswear, thin fabrics, polyester, which are
not ironed.
Special program with anti-crease mechanism for
easy care fabrics such shirts and blouses; for minimum ironing effort. The results depends on the
type of fabric and its finish. Place fabrics in the
dryer straight after spinning; once dried, immediately remove fabrics and place on a clothes hanger.
Special programme for briefly treating woollens
with warm air, after they have been dried naturally, worn or stored for long periods. Wool fibres
stand up and the wool becomes soft and cosy.
Recommendation: Remove fabrics immediately
after drying.
Care mark
Page 11

Daily use
Switching machine on / switching light on
Turn the programme selector to any programme or turn it to DRUM LIGHT. The machine
has been switched on. When the loading door is opened, the drum is illuminated.
Opening loading door / loading laundry
1. Open loading door:
Use force to push against the loading door
(push point)
2. Load your laundry (do not force it in).
CAUTION!
Do not jam laundry in between the loading
door and rubber seal.
3. Close loading door securely. Lock must
audibly lock.
Selecting the programme
Use the programme selector to set the programme
you require. The estimated time to end of the programme appears in the LCD in h:mm format
(hours:minutes).
During the cycle time elapses by steps of one minute; less than 1 hour the leading zeros are not
shown (ex. “59”, “5”, “0”).
Daily use
11
DELICATE function
For especially gentle drying of sensitive fabrics with the care label and for temperaturesensitive textiles (e.g. acrylic, viscose). Programme is executed with reduced heat.
Delicate function is only suitable for use with loads of up to 3kg.
To activate it:
1. Choose the drying programme.
2. Press DELICATE button - the led above is on.
To deselect function press again DELICATE button.
Led above is off.
Page 12

Daily use
12
LONG ANTI-CREASE function
A long anti-crease phase lengthen the anti-crease phase (30 min.) at the end of the drying
additionally by 60 minutes. The drum rotates at intervals during this phase. This keeps the
laundry loose and free of creases. Phase lasts in total 90 minutes. The laundry can be
removed at any time during the anti-crease phase.
To activate it:
1. Choose the drying programme.
2. Press LONG ANTI-CREASE button - the led
above is on.
To deselect function press again LONG ANTICREASE button. Led above is off.
BUZZER function
The appliance is supplied with the BUZZER function deactivated.
The buzzer sounds or plays a tune when activated during:
– cycle end
– anti-crease phase and when phase starts or ends
– cycle interruption by a warning
–alarm
To activate it:
1. Choose the drying programme.
2. Press BUZZER button - the led above is on.
To deselect function press again BUZZER button.
Led above is off.
TIME function
To select the programme duration after setting the TIME programme. You can select a
programme duration from 10 mins to 3 hrs in 10-minute steps.
1. Turn the programme knob to the TIME programme. The blinking 10' appears in the
display. (corresponding to the COOLING programme).
Page 13

Daily use
2. Press the TIME button repeatedly until the
desired programme duration is shown in
the display, e.g. 20 for a programme of 20
minutes.
If the programme duration is not selected, the
duration is automatically set to 10 mins.
DELAY START function
With the DELAY START button, you can delay the start of a programme by between
30 minutes (30') and a maximum of 20 hours (20h).
1. Select the programme and additional functions if necessary.
2. Press the DELAY START button as many
times as necessary until the required start
delay appears on the display, e.g. 12h if
the programme is to be started in 12
hours.
If the display is showing 20h and you
press the button again, the time delay will
be cancelled. The display will show 0' and
then the duration of the selected programme.
3. To activate the delay timer, press the START PAUSE button. The amount of time re-
maining until the programme is set to start is continuously displayed (e.g. 15h, 14h,
13h, … 30' etc).
The delay time icon
is on.
13
CHILD LOCK function
The child lock can be set to prevent a programme being accidentally started or a programme
in operation being accidentally changed. The child lock function locks all buttons and the
programme knob. The child lock can be activated or deactivated by holding down the
BUZZER and TIME buttons simultaneously for 5 seconds.
– Before programme is started: Appliance cannot be used
– After programme is started: Programme in operation cannot be changed
icon appears in the display to indicate that the child safety device is activated.
The
The child safety device is not deactivated once the programme comes to an end.
If you want to set a new programme, you must first deactivate the child safety device.
Page 14

Daily use
14
Starting the programme
Press the START PAUSE button. Led above stops
flashing, becomes steady. The programme is started. Display shows elapsing cycle time or delay
time if activated.
Changing programme
To change a programme which has been selected by mistake once the programme has
started, first turn the programme selector to OFF and then reset the programme.
The programme can no longer be changed directly once the programme has started. If
nevertheless there is an attempt to change the programme on the programme knob, the
programme progress display and the maintenance indicators flash. If an option button
(excluding the BUZZER button) is pressed, Err appears in the multidisplay. The drying programme is not however affected by this (laundry protection).
Putting in extra items or taking items out before end of programme
1. Open loading door.
WARNING!
Laundry and drum can become hot. Risk of burns!
2. Load or remove laundry items.
3. Close loading securely. Lock must audibly lock.
4. Press the START PAUSE button to continue the drying cycle.
Drying cycle complete / removing laundry
Once the drying cycle is complete, display shows a blinking "0". If the BUZZER button has
been pressed, an acoustic signal sounds intermittently for about one minute.
The drying cycles are automatically followed by an anti-crease phase which lasts around
30 minutes. The drum rotates at intervals during this phase. This keeps the laundry loose
and free of creases. The laundry can be removed at any time during the anti-crease phase.
(The laundry should be taken out towards the end of the anti-crease phase at the latest to
prevent creases from forming.) If LONG ANTI-CREASE function has been selected, the anticrease phase is lengthened by 60 minutes.
1. Open door.
2. Before removing the laundry, remove fluff from the micro-fine filter. It is best to use
a damp hand for this purpose. (See “Care and cleaning” chapter.)
3. Remove laundry.
4.
Turn the programme selector to OFF.
After each drying cycle:
Page 15

- Clean the micro-fine filter and fine filter
- Drain the condensed water container
(See chapter “Care and cleaning”.)
5. Close the door.
Daily use
15
Page 16

Care and cleaning
16
Care and cleaning
Cleaning fluff filter
The filters collect all the fluff which accumulates during drying. To ensure that the dryer
works perfectly, the fluff filters (micro-fine filter and fine strainer) must be cleaned after
every drying cycle.
The warning led is on to remind you this operation.
CAUTION!
Never operate the dryer without fluff filters or with damaged or blocked fluff filters.
1. Open loading door
2. Use a damp hand to clean the micro-
fine filter, which is built into the lower
part of the loading aperture.
3. After a period of time, a patina due to
detergent residue on laundry forms on
the filters. When this occurs, clean the
filters with warm water using a brush.
Remove the filter from the door pulling
it out. It can be positioned with the tooth
facing to the left or to the right).
After cleaning do not forget to put it
back.
4. Push down unlock button on large mesh
filter.
Large mesh filter jumps up.
Page 17

5. Take out fine strainer.
6. Remove fluff from fine strainer. It is best
to use a damp hand for this purpose.
Clean the entire filter area
The strainer area does not have to be
cleaned after every drying cycle, but
should be checked regularly and cleaned
of fluff if necessary.
7. To do this, grip the top of the large mesh
filter and pull it forwards until it comes
loose from the two brackets.
8. Remove fluff from the entire filter area.
It is be st to use a va cu um cl ean er fo r t hi s
purpose.
9. Press both journals of the large mesh
filter into the brackets on the loading
door until they snap into place.
10. Re-insert fine strainer.
11. Press against the large mesh filter until
it locks into the interlock.
Care and cleaning
17
If the fine strainer is not fitted, the large mesh
filter will not snap into place and the loading door
cannot be closed.
Cleaning the door seal
Wipe the door seal with a damp cloth immediately after the drying cycle has finished.
Emptying the condensate tank
Empty condensate tank after every drying cycle.
If the condensate tank is full, an active programme will break off automatically and the
warning led light up. In order to continue the programme, the condensate tank must first
be emptied.
Page 18

Care and cleaning
18
WARNING!
The condensate is not suitable for drinking or for preparing foodstuffs.
1. Take out drawer containing condensed
water container completely 1 and pull up
the condensed water container’s drain-
age pipe as far as it will go 2.
1
2. Pour condensed water out into a basin or
similar receptacle.
3. Slide outlet connections in and refit con-
densate tank.
If the programme has been interrupted as
a result of the condensate tank being full:
Press the START PAUSE button to con-
tinue the drying cycle.
The condensate tank has a volume of approx.
4 litres. This is sufficient for around 7kg of
laundry which has previously been spun at 1000 revolutions/ minute.
The condensate can be used as distilled water, e.g. for steam ironing. However first filter
the condensate (e.g. with a coffee filter) to remove any residue and small pieces of fluff.
Cleaning heat exchanger
If the warning led is lighting, the heat exchanger needs to be cleaned.
CAUTION!
Operating when the heat exchanger is blocked with fluff can damage the dryer. This also
increases energy consumption.
2
1. Open door.
2. Open door in plinth. To do this, press the
release button on the bottom of the door
aperture and open the door in the plinth
to the left.
3. Clean fluff from the inside of the door and
the heat exchanger front chamber. Wipe
the door seal with a damp cloth.
Page 19

Care and cleaning
4. Turn both lock washers inwards.
5. Use the handle to pull the heat exchanger
out of the base and carry it horizontally
to prevent any remaining water from
spilling.
6. To empty the heat exchanger, hold verti-
cally over a washing-up bowl.
CAUTION!
Do not use sharp objects to clean. The heat
exchanger could develop leaks.
7. Clean heat exchanger.
It is best to use a brush or to rinse thoroughly with a hand-held shower.
8. Replace heat exchanger and lock into place (turn both lock washers outwards until they
snap into place).
9. Close door in plinth.
CAUTION!
Never operate the dryer without the heat exchanger.
19
Cleaning the drum
CAUTION!
Do not use abrasives or steel wool to clean the drum.
Lime in the water or cleaning agents may form a barely visible lining on the inside of the
drum. The degree to which the laundry has been dried is then no longer detected reliably.
The laundry is damper than expected when removed from the dryer.
Use a standard domestic cleaner (e.g. vinegar-based cleaner) to wipe down the inside of
the drum and drum ribs.
Clean operating screen and housing
CAUTION!
Do not use furniture cleaners or aggressive cleaning agents to clean the machine.
Use a damp cloth to wipe down the operating screen and housing.
Page 20

What to do if ...
20
What to do if ...
Troubleshooting by yourself
If, during operation, the error code
the machine off and on again. Reset programme. Press the START PAUSE button If the error
is still displayed, please inform your local Service Force Centre and quote the error code.
Problem Possible cause Remedy
Dryer does not work.
Drying results unsatisfactory.
Loading door does not close.
When a button is pressed,
appears on the LCD.
Drum light does not work.
Err
E...
plus number or letter) appears on the LCD: Switch
Mains plug is not plugged in or
fuse is not working correctly.
Loading door is open. Close loading door.
Have you pressed the START
PAUSE button?
Wrong programme selected.
Lint filters clogged. Clean lint filters.
Fluff filter clogged. Clean fluff filter.
Heat exchanger clogged with
lint.
Overloading of laundry.
Ventilation slots in base area
covered up.
Residue on inside surface of
drum or drum ribs.
Conductance of water at installation site differs from
standard setting of machine.
Fine strainer not in place and/
or mesh filter not locked in
place.
Washing protection. After the
start of the programme, the
option can no longer be set.
Programme selector in OFF position.
Defective light bulb.
Plug in at mains socket. Check
fuse in fuse box (domestic installation).
Press the START PAUSE button
again.
Select a different programme
the next time you dry (see “Programme chart” chapter).
Clean heat exchanger.
Observe recommended loading
volumes.
Uncover ventilation slots in
base area.
Clean inside surface of drum
and drum ribs.
Re-programme standard setting for degree of drying (see
‘Programming options’ chapter).
Install fine strainer and/or snap
large mesh filter into place.
Turn the programme knob to
OFF. Set the programme again.
Turn programme selector to
DRUM LIGHT or to any programme.
Replace light bulb (see next
section).
Page 21

What to do if ...
21
Displayed programme time
changes erratically or stays unchanged for a long time.
Programme inactive, empty
water tank warning led is lighting.
Drying cycle ends shortly after
programme starts.
Drying cycle lasts an unusually
long time. Note: After around 5
hours the drying cycle ends automatically (see „Drying cycle
complete ”).
Programme time is corrected
automatically depending on
type and volume of laundry
and level of dampness.
Condensate tank is full.
Not enough washing loaded or
washing loaded is too dry for
selected programme.
Lint filter clogged. Clean lint filter.
Fluff filter clogged. Clean fluff filter.
Load volume too big. Reduce load volume.
Laundry insufficiently spun.
Particularly high room temperature. Temporary switching off
of the compressor to avoid
overload.
Automatic process; this is not a
machine fault.
Empty condensate tank, then
start programme with START
PAUSE button.
Select time programme or
higher drying level (e.g. EXTRA
DRY instead of STORAGE DRY).
Laundry must be adequately
spun.
Automatic process, there is no
fault with the appliance. If possible, lower the room temperature.
Changing the bulb for interior lighting
Only use a special bulb which is designed specially for dryers. The special bulb can be
obtained from your local service centre.
When the appliance is switched on, the interior lighting switches itself off after 4 minutes
when the door is open.
WARNING!
Do not use standard bulbs! These develop too much heat and may damage the machine!
Before replacing the bulb, disconnect the mains plug; with a permanent connection: fully
unscrew or deactivate the fuse.
1. Unscrew cover above the bulb (this can be found directly behind the loading aperture,
at the top; refer to “Description of machine” section.)
2. Replace defective bulb.
3. Screw cover back down.
Check the correct positioning of o-ring gasket before screwing back the door light cover.
Do not operate the dryer when missing o-ring gasket on door light cover.
WARNING!
For safety reasons, the cover must be screwed down tightly. If this is not done, the dryer
must not be operated.
Page 22

Machine settings
22
Machine settings
Setting Implementation
BUZZER permanent off
Water hardness
Water contains, a variable quantity of
limestone and mineral salts of which
quantities vary according to geographical locations thus varying its conductivity values.
Relevant variations of the conductivity
of the water compared to those prefixed
by the factory could slightly influence
the residual humidity of the laundry at
the end of the cycle. Your dryer allows
you to regulate the sensitivity of the
drying sensor based on conductivity
values of the water.
Emptying water tank - warning message permanent off
When using an external drain for the
condensed water.
1. Turn the programme selector to any programme.
2. Press simultaneously the DELICATE and LONG ANTICREASE buttons and hold down for approx. 5 seconds.
3. The buzzer is by default always off. You can use BUZZER button to activate or deactivate sound but machine does not memorize your selection.
1. Turn the programme selector to any programme.
2. Press simultaneously the DELICATE and TIME buttons
and hold down for approx. 5 seconds. The current
setting is on the display:
–
–
–
3. Press the START PAUSE button sequentially until you
set desired level.
4. To memorize setting press simultaneously the DELICATE and TIME buttons or turn knob to OFF position
1. Turn the programme selector to any programme.
2. Press simultaneously the LONG ANTI-CREASE and
TIME buttons and hold down for approx. 5 seconds.
The current setting is on the display:
–
–
By default the warning led is activated and is lighting
always at the end of the drying cycle or during the cycle
if the water container is full.
low conductivity <300 micro S/cm
medium conductivity 300-600 micro S/
cm
high conductivity >600 micro S/cm
- led warning is permanently off
- led warning is activated
Page 23

Technical data
Technical data
This appliance conforms with the following EU Directives:
– 2006/95/EEC dated 12.12.2006 Low Voltage Directive
– 89/336/EEC dated 03.05.1989 EMC Directive inclusive of Amending Directive 92/31/EEC
– 93/68/EEC dated 22.07.1993 CE Marking Directive
Height x width x depth 85 x 60 x 58 cm
Depth with loading door open 109 cm
Height can be adjusted by 1.5 cm
Weight when empty approx. 40 kg
1)
Loading volume (depends on programme)
Energy consumption in accordance with EN
61121 s. e. (7kg of cotton, pre-drained at 1000
rpm, COTTONS STORAGE DRY programme)
Use Domestic
Permissible ambient temperature + 5°C to + 35°C
1) Different loading volume data may be needed in some countries as a result of different measuring methods.
max. 7 kg
4,4 kWh
Consumption values
23
The consumption values have been established under standard conditions. They may deviate
when the machine is operated in domestic circumstances.
Programme Loading volume in kg
COTTONS CUPBOARD DRY
COTTONS IRON DRY
SYNTHETICS CUPBOARD DRY
1) pre-drained at 1000 rpm
2) pre-drained at 1200 rpm
1)
1)
2)
7 4.4
7 3.41
3 1.36
Energy consumption in
Hints for test institutes
Parameters possible to check by the Test Institutes:
• Energy consumption (corrected with final humidity) during the cupboard dry cotton
cycle with nominal load.
• Energy consumption (corrected with final humidity) during the cupboard dry cotton
cycle with half load.
• Final humidity (during cupboard dry cotton, iron dry cotton and cupboard dry easy care)
• Condensation efficiency (corrected with final humidity) during cupboard dry cotton cycle
with nominal and half load
kWh
Page 24

Installation
24
All the cycles have to be checked in accordance with EN 61121 (Tumble dryers for household
use – Methods for measuring the performance).
Installation
Appliance positioning
• It is recommended that, for your convenience, the machine is positioned close to your
washing machine.
• The tumble dryer must be installed in a clean place, where dirt does not build up.
• Air must be able to circulate freely all round the appliance. Do not obstruct the front
ventilation grille or the air intake grilles at the back of the machine.
• To keep vibration and noise to a minimum when the dryer is in use, it should be placed
on a firm, level surface.
• Once in its permanent operating position, check that the dryer is absolutely level with
the aid of a spirit level. If it is not, raise or lower the feet until it is.
• The feet must never be removed. Do not restrict the floor clearance through deeppile
carpets, strips of wood or similar. This might cause heat built-up which would interfere
with the operation of the appliance.
The hot air emitted by the tumble dryer can reach temperatures of up to 60°C. The appliance
must therefore not be installed on floors which are not resistant to high temperatures.
When operating the tumble dryer, the room temperature must not be lower than +5°C and
higher than +35°C, as it may affect the performance of the appliance.
WARNING!
Should the appliance be moved, it must be transported vertically.
WARNING!
The appliance must not be installed behind the lockable door, a sliding door or a door with
a hinge on the opposite side to that of the appliance.
Removing transport safety packaging
CAUTION!
Before use all parts of the transport packaging
must be removed.
1. Open loading door
2. Pull off adhesive strips from inside machine
on top of drum.
Page 25

Installation
3. Remove foil hose and polystyrene pad-
ding from the machine.
Electrical connection
Details on mains voltage, type of current and the fuses required should be taken from the
rating plate. The rating plate is fitted near the loading aperture (see “Product description”
chapter).
Connect the machine to an earthed socket, in accordance with current wiring regulations.
WARNING!
The manufacturer declines any responsibility for damage or injury through failure
to comply with the above safety precautions.
Should the appliance power supply cable need to be replaced, this must be carried
out by our Service Centre.
The appliance is supplied with a 13 amp plug fitted. In the event of having to change the
fuse in the plug supplied, a 13 amp ASTA approved BS 1363/A fuse must be used.
The wires in the mains lead are coloured in accordance with the following code:
1 Blue - Neutral
2 cord clamp
3 Brown - Live
4 Green and Yellow - Earth
The wire coloured green and yellow must be connected to the terminal marked with the letter «E»
or by the earth symbol
or coloured green and
yellow.
The wire coloured blue must be connected to the
terminal «N» or coloured black.
The wire coloured brown must be connected to
the terminal marked «L» or coloured red.
Upon completion there must be no cut, or stray strands of wire present and the cord clamp
must be secure over the outer sheath.
WARNING!
A cut off plug inserted into a 13 amp socket is a serious safety (shock) hazard.
Ensure that the cut off plug is disposed of safely.
4
1
25
3
2
WARNING!
The power supply cable must be accessible after installing the machine.
Page 26

Environment
26
Permanent connection
In the case of permanent connection it is necessary that you install a double pole switch
between the appliance and the electricity supply (mains), with a minimum gap of 3 mm
between the switch contacts and of a type suitable for the required load in compliance
with the current electrical regulations.
The switch must not break the yellow and green earth cable at any point.
Door reversal
To make is easier to load or unload the laundry, the door can be reversed. This operation
must only be carried out by a qualified engineer. Please contact your local service centre.
The engineer will carry out the door reversal at your cost.
Special accessories
Intermediate installation kit for stacked washer and dryer:
Available from your Service Force Centre or your specialist dealer
These intermediate installation kits can be used to arrange the dryer and an automatic AEGElectrolux washing machine (60 cm wide, front loading) as a space-saving washer/dryer
stack. The automatic washing machine is at the bottom and the dryer is at the top.
Version to be supplied:
– with extractable stacker plate 916093151
Read carefully the instructions supplied with the kit.
Installation kit for external condensate drain
Attached to your product
Installation kit 12512251. for direct draining of condensate into a basin, siphon, gully, etc.
The condensate tank then no longer has to be drained, it must however remain in its
intended position in the machine. Refer to the “Machine settings” chapter for how to
deactivate the TANK alert led.
Max. displacement height: 1 m from the base of the dryer; max. displacement length: 2.5
m
Read carefully the instructions supplied with the kit.
Environment
The symbol on the product or on its packaging indicates that this product may not be
treated as household waste. Instead it should be taken to the appropriate collection point
for the recycling of electrical and electronic equipment. By ensuring this product is disposed
of correctly, you will help prevent potential negative consequences for the environment
and human health, which could otherwise be caused by inappropriate waste handling of
this product. For more detailed information about recycling of this product, please contact
your local council, your household waste disposal service or the shop where you purchased
the product.
Page 27

Environment
Packaging material
The packaging materials are environmentally friendly and can be recycled. The plastic components are identified by markings, e.g. >PE<, >PS<, etc. Please dispose of the packaging
materials in the appropriate container at the community waste disposal facilities.
WARNING!
When disposing of old appliances, remove the mains cable and dispose of together with
the plug. Remove the door hook and ensure it is no longer lockable to prevent young
children being trapped inside.
Environmental tips
• In the dryer, laundry becomes fluffy and soft. Fabric softeners are not therefore needed
when washing.
• Your dryer will function most economically if you:
– always keep the ventilation slots on the base of the dryer unobstructed;
– use the loading volumes specified in the programme overview;
– ensure you have good ventilation in the installation room;
– clean the micro-fine filter and fine strainer after each drying cycle;
– spin the laundry well before drying. Example: Consumption data – depending on
spinning speed – for 7 kg of laundry, dried using the COTTONS STORAGE DRY programme.
Pre-draining Drying cycle
Revolutions per mi-
nute
1000 4.20 60 4.40
1200 3.92 56 4.20
1400 3.64 52 3.87
1800 3.15 45 3.40
Residual dampness
in litres as a %
Energy in kWh
27
Service
In the event of technical faults, please first check whether you can remedy the problem
yourself with the help of the operating instructions (Chapter “What to do if…”).
If you were not able to remedy the problem yourself, please contact your local service
centre.
In order to be able to assist you quickly, we require
the following information:
– Model description
– Product number (PNC)
– Serial number (S No.) (for numbers, see rating
plate)
– Type of fault
– Any error messages displayed by the appliance
Page 28

Guarantee/Customer Service
28
So that you have the necessary reference numbers from your appliance at hand, we recommend that you write them in here:
Model description: ................................................................................
PNC: .....................................................................................................
S No.: ...................................................................................................
IE
GB
Guarantee/Customer Service
GREAT BRITAIN & IRELAND
Standard guarantee conditions
We, Electrolux, undertake that if within 12 months of the date of the purchase this Electrolux appliance or any part thereof is proved to be defective by reason only of faulty
workmanship or materials, we will, at our option repair or replace the same FREE OF CHARGE
for labour, materials or carriage on condition that:
• The appliance has been correctly installed and used only on the electricity supply stated
on the rating plate.
• The appliance has been used for normal domestic purposes only, and in accordance with
the manufacturer's instructions.
• The appliance has not been serviced, maintained, repaired, taken apart or tampered with
by any person not authorised by us.
• Electrolux Service Force Centre must undertake all service work under this guarantee
• Any appliance or defective part replaced shall become the Company's property.
• This guarantee is in addition to your statutory and other legal rights.
Exclusions
• Damage or calls resulting from transportation, improper use or neglect, the replacement
of any light bulbs or removable parts of glass or plastic.
• Costs incurred for calls to put right an appliance which is improperly installed or calls
to appliances outside the United Kingdom.
• Appliances found to be in use within a commercial environment, plus those which are
subject to rental agreements.
• Products of Electrolux manufacturer that are not marketed by Electrolux
Service and Spare Parts
In the event of your appliance requiring service, or if you wish to purchase spare parts,
please contact your local Service Force Centre by telephoning
0870 5 929 929
Your telephone call will be automatically routed to the Service Force Centre covering your
postcode area.
For the address of your local Service Force Centre and further information about Service
Force, please visit the website at
www.serviceforce.co.uk
Before calling out an engineer, please ensure you have read the details under the heading
"What to do if..."
When you contact the Service Force Centre you will need to give the following details:
1. Your name, address and postcode.
2. Your telephone number.
Page 29

Guarantee/Customer Service
3. Clear concise details of the fault.
4. The model and Serial number of the appliance (found on the rating plate).
5. The purchase date.
Please note a valid purchase receipt or guarantee documentation is required for in guarantee service calls.
Customer Care
For general enquiries concerning your Electrolux appliance, or for further information on
Electrolux products please contact our Customer Care Department by letter or telephone
at the address below or visit our website at www.electrolux.co.uk
Customer Care Department, Electrolux Major Appliances
Addington Way, Luton
Bedfordshire, LU4 9QQ
Tel:
Electrolux
AEG-Electrolux
Zanussi-Electrolux
1) Calls may be recorded for training purposes
08705 950 950
08705 350 350
08705 727 727
1)
1)
1)
For Customer Service in The Republic of Ireland please contact us at the address below:
Electrolux Group (Irl) Ltd
Long Mile Road, Dublin 12, Republic of Ireland
Tel: +353 (0)1 4090751
Email: service.eid@electrolux.ie
European Guarantee
This appliance is guaranteed by Electrolux
in each of the countries listed at the back
of this user manual, for the period specified
in the appliance guarantee or otherwise by
law. If you move from one of these countries to another of the countries listed, the
appliance guarantee will move with you
subject to the following qualifications:-
• The appliance guarantee starts from the
date you first purchased the appliance
which will be evidenced by production of
a valid purchase document issued by the
seller of the appliance.
• The appliance guarantee is for the same
period and to the same extent for labour
and parts as exists in your new country
of residence for this particular model or
range of appliances.
• The appliance guarantee is personal to
the original purchaser of the appliance
and cannot be transferred to another
user.
• The appliance is installed and used in accordance with instructions issued by
Electrolux and is only used within the
home, i.e. is not used for commercial
purposes.
• The appliance is installed in accordance
with all relevant regulations in force
within your new country of residence.
The provisions of this European Guarantee
do not affect any of the rights granted to
you by law.
29
Page 30

www.electrolux.com
30
www.electrolux.com
Albania +35 5 4 261 450 Rr. Pjeter Bogdani Nr. 7 Tirane
Belgique/België/Belgien +32 2 363 04 44 Bergensesteenweg 719, 1502
Česká republika +420 2 61 12 61 12 Budějovická 3, Praha 4,
Danmark +45 70 11 74 00 Sjællandsgade 2, 7000 Frederi-
Deutschland +49 180 32 26 622 Muggenhofer Str. 135, 90429
Eesti +37 2 66 50 030 Pärnu mnt. 153, 11624
España +34 902 11 63 88 Carretera M-300, Km. 29,900
France www.electrolux.fr
Great Britain +44 8705 929 929 Addington Way, Luton, Bed-
Hellas +30 23 10 56 19 70 4, Limnou Str., 54627 Thessa-
Hrvatska +385 1 63 23 338 Slavonska avenija 3,
Ireland +353 1 40 90 753 Long Mile Road Dublin 12
Italia +39 (0) 434 558500 C.so Lino Zanussi, 26 - 33080
Latvija +371 67313626 Kr. Barona iela 130/2,
Lietuva +370 5 278 06 03 Ozo 10a, LT-08200 Vilnius
Luxembourg +352 42 431 301 Rue de Bitbourg, 7, L-1273
Magyarország +36 1 252 1773 H-1142 Budapest XIV,
Nederland +31 17 24 68 300 Vennootsweg 1, 2404 CG - Al-
Norge +47 81 5 30 222 Risløkkvn. 2 , 0508 Oslo
Österreich +43 18 66 400 Herziggasse 9, 1230 Wien
Polska +48 22 43 47 300 ul. Kolejowa 5/7, Warsza‐
Lembeek
140 21
cia
Nürnberg
Tallinn
Alcalá de Henares Madrid
fordshire LU4 9QQ
loniki
10000 Zagreb
Porcia (PN)
LV-1012, Riga
Hamm
Erzsébet királyné útja 87
phen aan den Rijn
wa
Page 31

31
Portugal +35 12 14 40 39 39 Quinta da Fonte - Edificio Gon-
Romania +40 21 451 20 30 Str. Garii Progresului 2,
Schweiz - Suisse - Svizzera +41 62 88 99 111 Industriestrasse 10, CH-5506
Slovenija +38 61 24 25 731 Gerbičeva ulica 98, 1000
Slovensko +421 2 43 33 43 22 Electrolux Slovakia s.r.o.,
Suomi www.electrolux.fi
Sverige +46 (0)771 76 76 76 Electrolux Service, S:t Görans-
Türkiye +90 21 22 93 10 25 Tarlabaşı caddesi no : 35
Россия +7 495 937 7837 129090 Москва,
Україна +380 44 586 20 60 04074 Київ,
çalves Zarco - Q 35 -2774-518
Paço de Arcos
S4, 040671 RO
Mägenwil
Ljubljana
Electrolux Domáce spotre‐
biče SK, Seberíniho 1, 821
03 Bratislava
gatan 143, S-105 45 Stockholm
Taksim İstanbul
Олимпийский проспект,
16, БЦ "Олимпик"
вул.Автозаводська, 2а,
БЦ "Алкон"
Page 32

www.electrolux.com
To buy accessories, consumables and spare parts at our online shop please visit:
www.aeg-electrolux.co.uk
136905410-00-29022008
 Loading...