

Page 1
11000 M / 31000 M
Indbygnings-komfur
Integrerbara hällar
Innbyggings-toppflater
Built-In Hobs
Brugsanvisning/Installationsvejledning
Bruksanvisning/Installationsanvisning
Bruksanvisning/Installasjonsveiledning
Operating/Installation Instructions
Page 2

Dear Customer!
Please read through this user information carefully. Above all, please
take note of the “Safety Instructions” section.
Please keep this user information for later reference and pass it on to
any subsequent owner.
The warning triangle and/or the specific words (Caution!, Important!)
1
are used to highlight instructions that are important for your safety or
for the function of the appliance. It is imperative that these instructions are observed.
Next to this symbol you will find additional information and practical
3
tips on using the appliance.
Tips and instructions for the economical and environmentally conscious
2
use of the appliance are marked with this symbol.
These user instructions include tips for the correction of possible malfunctions by the user. See the section "What to do when...".
If these instructions are insufficient, our local FACTORY CUSTOMER
SERVICE CENTRE is always available to provide assistance.
In this respect please also take note of the "Service" section.
62
Printed on paper manufactured ecologically.
He who thinks ecologically also acts accordingly ...
Page 3

Contents
CONTENTS
Operating Instructions . . . . . . . . . . . . . . . . . . . . . . . . . . . . . . . . . . . . 64
Safety . . . . . . . . . . . . . . . . . . . . . . . . . . . . . . . . . . . . . . . . . . . . . . . . . . . . . . . . 64
Disposal . . . . . . . . . . . . . . . . . . . . . . . . . . . . . . . . . . . . . . . . . . . . . . . . . . . . . . 66
Appliance Description . . . . . . . . . . . . . . . . . . . . . . . . . . . . . . . . . . . . . . . . . . 67
Cooking Surface Features . . . . . . . . . . . . . . . . . . . . . . . . . . . . . . . . . . . . . . . . 67
Usage, Tips . . . . . . . . . . . . . . . . . . . . . . . . . . . . . . . . . . . . . . . . . . . . . . . . . . . . 68
Pans . . . . . . . . . . . . . . . . . . . . . . . . . . . . . . . . . . . . . . . . . . . . . . . . . . . . . . . . . . 68
Cleaning and Care . . . . . . . . . . . . . . . . . . . . . . . . . . . . . . . . . . . . . . . . . . . . . 69
What to do, if ... . . . . . . . . . . . . . . . . . . . . . . . . . . . . . . . . . . . . . . . . . . . . . . 70
Installation Instructions . . . . . . . . . . . . . . . . . . . . . . . . . . . . . . . . . . . 71
Safety Instructions for the Installer . . . . . . . . . . . . . . . . . . . . . . . . . . . . . 71
Installation in the Kitchen Work Surface . . . . . . . . . . . . . . . . . . . . . . . . . 72
Electrical Connection . . . . . . . . . . . . . . . . . . . . . . . . . . . . . . . . . . . . . . . . . . 77
Technical Data . . . . . . . . . . . . . . . . . . . . . . . . . . . . . . . . . . . . . . . . . . . . . . . . 78
Regulations, Standards, Directives . . . . . . . . . . . . . . . . . . . . . . . . . . . . . . . 79
Service . . . . . . . . . . . . . . . . . . . . . . . . . . . . . . . . . . . . . . . . . . . . . . . . . . . . . . 84
63
Page 4

Operating Instructions
OPERATING INSTRUCTIONS
1 Safety
The safety aspects of this appliance comply with the accepted technical
standards and the German Appliance Safety Law. However, we also consider it our obligation as a manufacturer to make you aware of the following safety information.
Electrical Safety
• Installation and connection of the new appliance is only to be performed by an approved installer.
Please observe this instruction, otherwise the warranty will not cover
any damage that may occur.
• Repairs to the appliance are only to be performed by qualified service
engineers. Improper repairs can give rise to significant hazards. If
your appliance needs repairing, please contact customer service or
your dealer.
• If your appliance malfunctions or fractures, cracks or splits appear:
– switch off all cooking zones,
– switch off the fuse for the cooking surface or remove it.
64
Child Safety
The cooking zones become hot when you are boiling or browning food.
For this reason, always keep children away from the cooking surface.
Safety When Using
• This appliance may only be used for boiling and frying food in the
home.
• Do not use the cooking surface to heat the room.
• Take care when plugging in electrical appliances near the appliance.
Mains leads must not touch the rings when hot.
• Overheated fat and oil can catch fire quickly. You should supervise
cooking when preparing foods in fat or oil (e.g. chips).
• Switch off the cooking zones after use.
Page 5

Operating Instructions
Safety When Cleaning
Cleaning the appliance with a steam or high pressure cleaner is forbidden for safety reasons.
In this way you avoid damaging your appliance
• Do not use the cooking surface as a work surface or for storage.
• Do not operate the cooking zones with empty pans or without pans.
• Do not use cast iron pans or pans with damaged bases that are rough
or burred. Scratching may occur when the pans are slid.
• Do not place any pans on the cooking surface frame. Scratching may
occur or the paint damaged.
• Ensure that liquids containing acids, e.g. vinegar, lemon or scale
remover do not get onto the cooking surface frame because otherwise matt spots will appear.
• If sugar or a dish containing sugar gets onto a hot cooking zone and
then melts, remove it immediately whilst still hot using a scraper. If
the mass cools, damage to the surface may occur on removal.
• If you wish to use special types of pan (e.g. a pressure cooker, simmering pan, wok, etc.), please observe the manufacturer’s instructions.
65
Page 6

Operating Instructions
2 Disposal
Disposing of Packaging Material
• All packaging material can be recycled, sheeting and hard foam parts
are appropriately marked. Please dispose of the packaging material
and any old appliance properly.
• Please observe national and regional regulations, and the markings
on the materials (material separation, waste collection, recycling
depots).
Information on disposal
• The appliance must not be disposed of in the household rubbish.
• You can obtain information about collection dates or public tips from
your local refuse department or council.
• Warning! Please make old appliances unusable prior to disposal. Cut
off the mains cable.
66
Page 7
Appliance Description
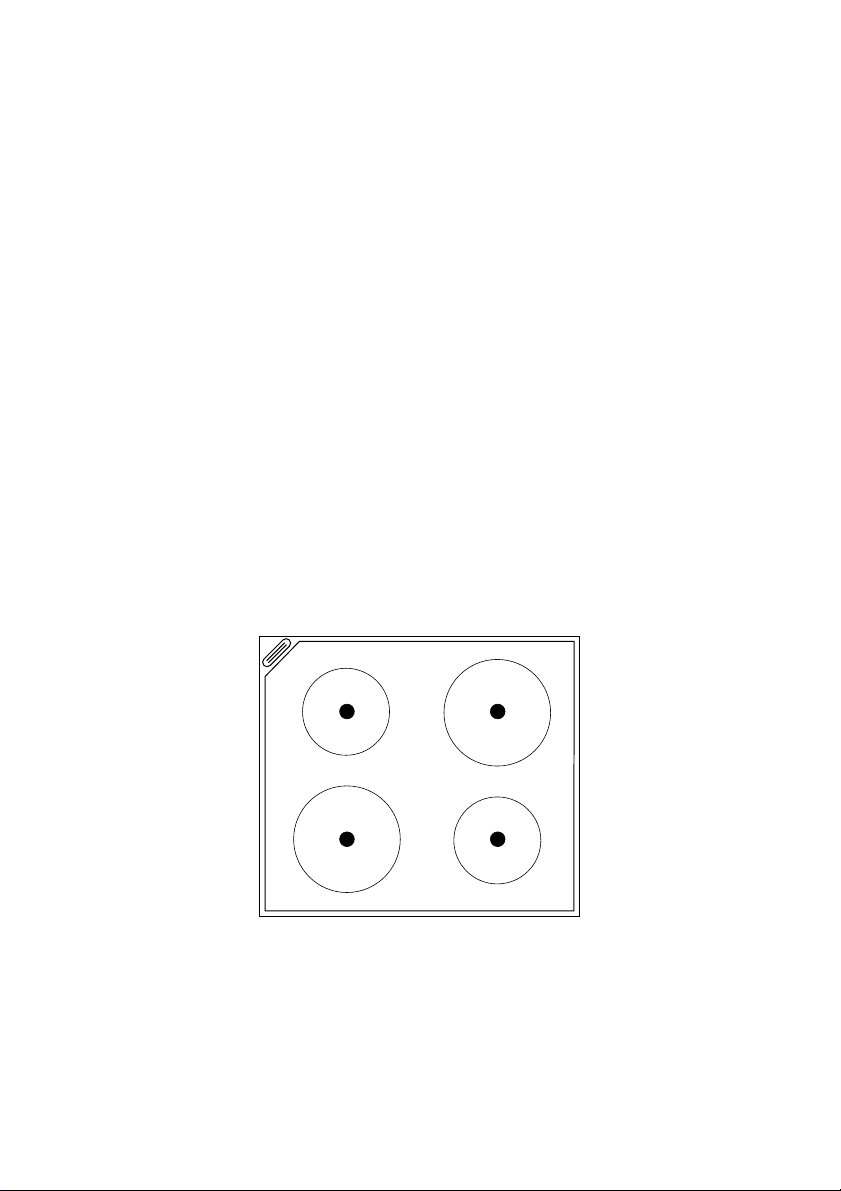
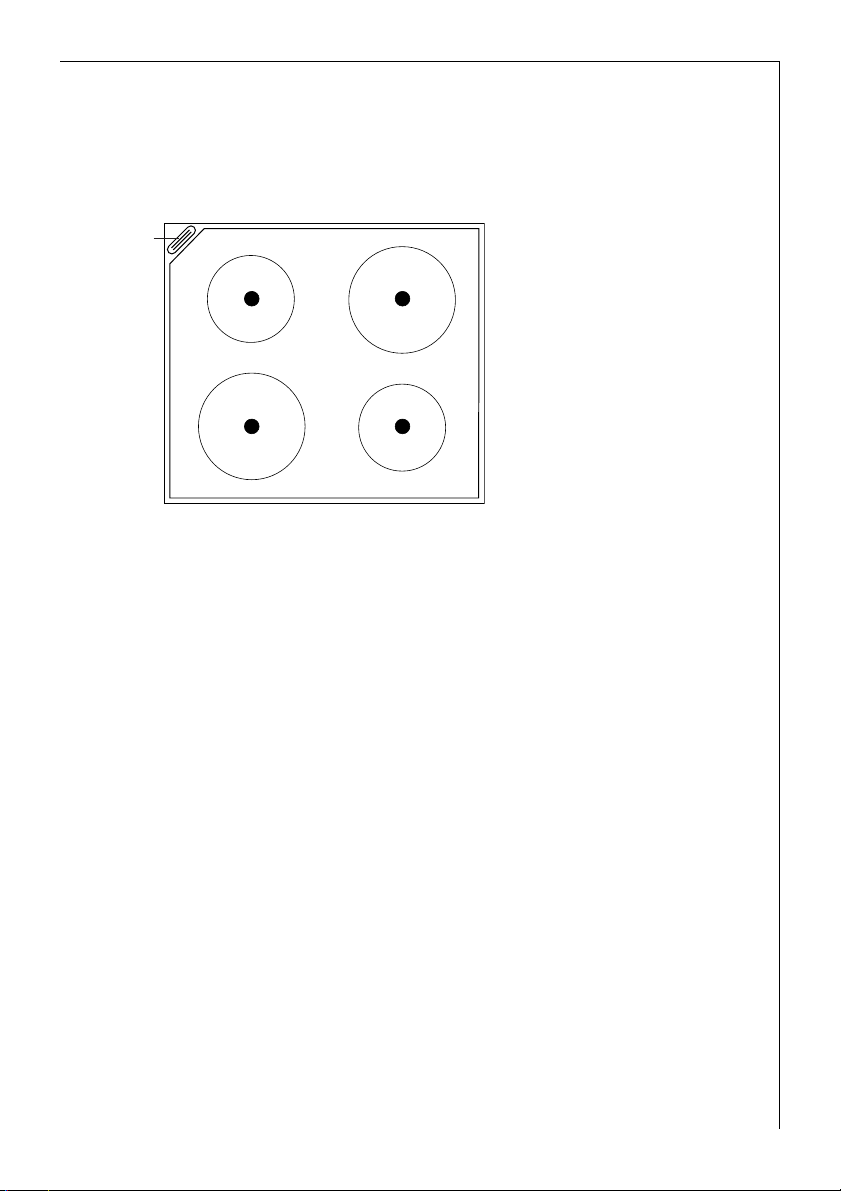
Cooking Surface Features
1
Operating Instructions
3
2
1 Oven Steam Outlet
2/4 Hotplates ø 18.0 cm
3/5 Hotplates ø 14.5 cm
4
5
67
Page 8

Operating Instructions
Usage, Tips
Pans
The better the pan, the better the results.
• You can recognise good pans by their bases. The base should be as
thick and flat as possible.
• Do not use cast iron pans or pans with damaged
bases that are rough or burred. Permanent
scratching may occur when the pans are slid.
When cold, pan bases are normally bowed slightly
inwards (concave). They should under no circumstances be bowed outwards (convex).
Tips on Saving Energy
2
You will save valuable energy if you observe the following tips:
• Always place pans on the cooking zone before switching on.
• Soiled cooking zones and pan bases increase elec-
tricity consumption.
• If possible, always fit pans with a lid.
• Switch off the cooking zones before the end of
cooking to make use of the residual heat, e.g. to
keep food warm or for melting.
• The pan base and cooking zone should be the
same size.
When purchasing pans pay attention to the
diameter of the base. Manufacturers often state
the diameter of the top of the pan.
• Cooking times are reduced by up to 50% when a
pressure cooker is used.
68
Page 9

Operating Instructions
Cleaning and Care
Clean the hob after each use, when it is still warm to the touch or cold.
3
By this means you will avoid spills becoming burnt on.
0 1. Remove heavy soiling with fine scouring sand or a scouring pad.
2. Wipe away residues with a damp cloth.
3. Then warm the hotplate a little and leave to dry.
4. To maintain the hotplate in good condition, occasionally rub a little
sewing machine oil into it and then polish with absorbent paper.
(Do not use butter, bacon fat or similar substances for this purpose!)
Important: Do not use scouring sand or a scouring pad to clean the
1
stainless steel surround on the hob because these cause scratches!
General information
3
• After cleaning, heat the hotplates briefly to dry them.
• Do not place moist or wet items on the hotplates.
• Rub utensils dry before placing them on the hotplates.
• Due to the thermal load during cooking, the stainless steel surround
on the hob may discolour slightly. This is due to physical reasons.
69
Page 10

Operating Instructions
What to do, if ...
... the cooking zones do not work?
0 Check whether
• the corresponding cooking zone is switched on.
• the heat setting is correct.
• the mains fuse (fuse box) has blown.
If this information does not provide you with the necessary assistance, please seek specialist advice.
Warning: Repairs to the appliance are only to be made by qualified
1
service engineers! Improper repairs can give rise to significant hazards
for the user. If your appliance needs repairing, please contact your specialist dealer or customer service.
70
Page 11

Installation Instructions
INSTALLATION INSTRUCTIONS
1 Safety Instructions for the Installer
• The appliance is only to be connected to the mains by a qualified
electrician.
• A device is to be included in the electrical installation that makes it
possible to isolate the appliance from the mains supply with a minimum contact separation of 3 mm.
Suitable isolation devices are e.g. cut-outs, fuses (remove screw type
fuses from the holder), earth leakage trips and circuit breakers.
• In respect of fire protection, this appliance corresponds to type Y
(IEC 335-2-6). Only this type of appliance may be installed with a
high cupboard or wall on one side.
• There must be at least 20 mm clearance under the cooking surface.
• It is not permitted to fit drawers underneath the cooking surface.
• Shock protection must be provided by the installation.
• The stability of the kitchen unit must satisfy DIN 68930.
• Built-in cookers and cooking surfaces are equipped with special con-
nector systems. They are only permitted to be combined with appliances with the matching system.
71
Page 12

Installation Instructions
Installation in the Kitchen Work Surface
Make a note of the serial number on the appliance rating plate prior to
3
installation. This number will be required in the case of requests for service and is no longer accessible after installation as it is on the original
rating plate on the underside of the appliance.
min. 50 mm
max.
100 ˚C
min. 5 mm
72
min. 650 mm
Page 13

Installation Instructions
600
A
X
• The six retaining brackets are inserted in the outer lip on the hob
frame, A, in the positions marked (two on the left and right sides, one
at the front and one at the back). The plastic clip on the bracket must
engage firmly in the rectangular cut-out provided. The brackets must
not be inserted in the cut-outs in the middle of the lip on the protective casing X!
• On tiled work surfaces, the joints in the area where the hob sits must
be completely filled with grout.
• Ensure that the seal is correctly seated in the frame and that it is
seated against the work surface without leaving any gaps. Please do
not apply any additional sealant, this will make removal more difficult in the event of the need for service.
73
Page 14

Installation Instructions
74
Page 15

Installation Instructions
75
Page 16

Installation Instructions
76
Page 17

Installation Instructions
Electrical Connection
• Connect the cable harness with the 12 pole compact connector to
the mating connector from the built-cooker or switch box. Please
ensure that the cooking surface connector is inserted vertically from
above in accordance with the numbers 1 – 2 – 3 – 4 and that it
engages securely. Push the connecting cable to the side on the top of
the oven.
• Following connection to the mains supply, all cooking zones are to be
1
switched on, at the maximum setting, one after the other for approx.
30 seconds to check that they function correctly.
77
Page 18

Installation Instructions
Technical Data
Appliance Dimensions
Width 579 mm
Depth 509 mm
Height 43 mm
Cut-Out Dimensions
Width 560 mm
Depth 490 mm
Corner Radius R5
Power Consumption
Rear left and front right hotplates 1500 W
Front left and rear right hotplates 2000 W
Heater Element Voltage 230 V ~
78
Total Power Max. 7.0 kW
Page 19

Installation Instructions
Regulations, Standards, Directives
This appliance meets the following standards:
• EN 60 335-1 and EN 60 335-2-6
in respect of the safety of electrical appliances for household use and
similar purposes and
• DIN 44546 / 44547 / 44548
in respect of properties of electrical cookers for the household.
• EN 55014-2 / VDE 0875 part 14-2
• EN 55014 / VDE 0875 part 14/12.93
• EN 61000-3-2 / VDE 0838 part 2
• EN 61000-3-3 / VDE 0838 part 3
in respect of basic electromagnetic compatibility (EMC) requirements.
This appliance complies with the following EU Directives:
;
• 73/23/EWG dated 19.02.1973 (Low Voltage Directive)
• 89/336/EWG dated 03./05.1989 (EMC Directive
including Directive Amendment 92/31/EWG).
79
Page 20

SERVICE
The chapter “What to do if ...?” contains a list of some faults which you
can remedy yourself. Look there first if a fault occurs.
Is it a technical malfunction?
If so, please contact your customer service centre. (You will find
addresses and telephone numbers in the “Customer Service Centres”
section.)
Always prepare in advance for the discussion. By this means you will
make diagnosis of the problem easier and also make it easier to decide
if a customer service visit is necessary:
Please determine as accurately as
possible:
• What form does the fault take?
• Under what circumstances does
the fault occur?
Prior to the telephone call it is
imperative that you make a note of
the following appliance code numbers that are given on the rating plate:
• PNC Code (9 digits),
• S No. number (9 digits).
We recommend you to record the code numbers here so that you
always have them at hand:
Service
PNC . . . . . . . . .
S-No. . . . . . . . . .
When do you incur costs even during the warranty period?
• If you could have dealt with the fault yourself with the aid of the
Faults Table (see the section “What to do if ...”),
• if several journeys by the customer service technician are necessary
because, for example, he did not receive all the important information before his visit and must therefore e.g. collect spare parts. These
multiple trips can be avoided if you prepare your phone call as
described above.
83
Page 21

Hier Typschild aufkleben!
(nur für Werk)
AEG Hausgeräte GmbH
Postfach 1036
D-90327 Nürnberg
http://www.aeg.hausgeraete.de
© Copyright by AEG
ANC 822 947 226 - 03 - 0701
 Loading...