

Page 1

FULLY AUTOMATIC
WASHER-DRYER
LAVAMAT 2200 I W-D
Instruction booklet
Subject to alteration
12498.881/^,
11 12/97
AEG
TW/E
AEG
2963
Page 2

Index
Servicing
Page 3- 4
Page 5 Technical specifications
Page 6
Page 7-12
Page 13
Page 14-17 Use of controls
Page 19-20
Page 21-22
Page 23-24
Page 26-28
Page 29-30
Page 31-32 Hints on washing and drying
Page 33-34
Page 35-36
Page 37-39 Door Reversal & Building Under
Page 40-43
Warnings
Your machine
instaiiation instructions
The control panel
The washing and drying programmes
Use of detergent and additives
Washing 4 kg of white cotton at 95°C
Washing 2 kg of delicate synthetic fabrics at 40*^C
Drying 2.25 kg (5 lb) of cotton
Maintenance
Cieaning the filter
Servicing
tn case of any enquiries and fauits, please cali AEG After-Saies Service:
Southern Service Centre
217 Bath Road
SLOUGH
Berkshire
SL1 4AW
Tel: 0753 872506
Scottish Service Centre
Block 11, Unit 1,
Dundyvan Industrial Estate
COATBRIDGE
Lanarkshire ML5 4AQ
Tel: 0236 440387
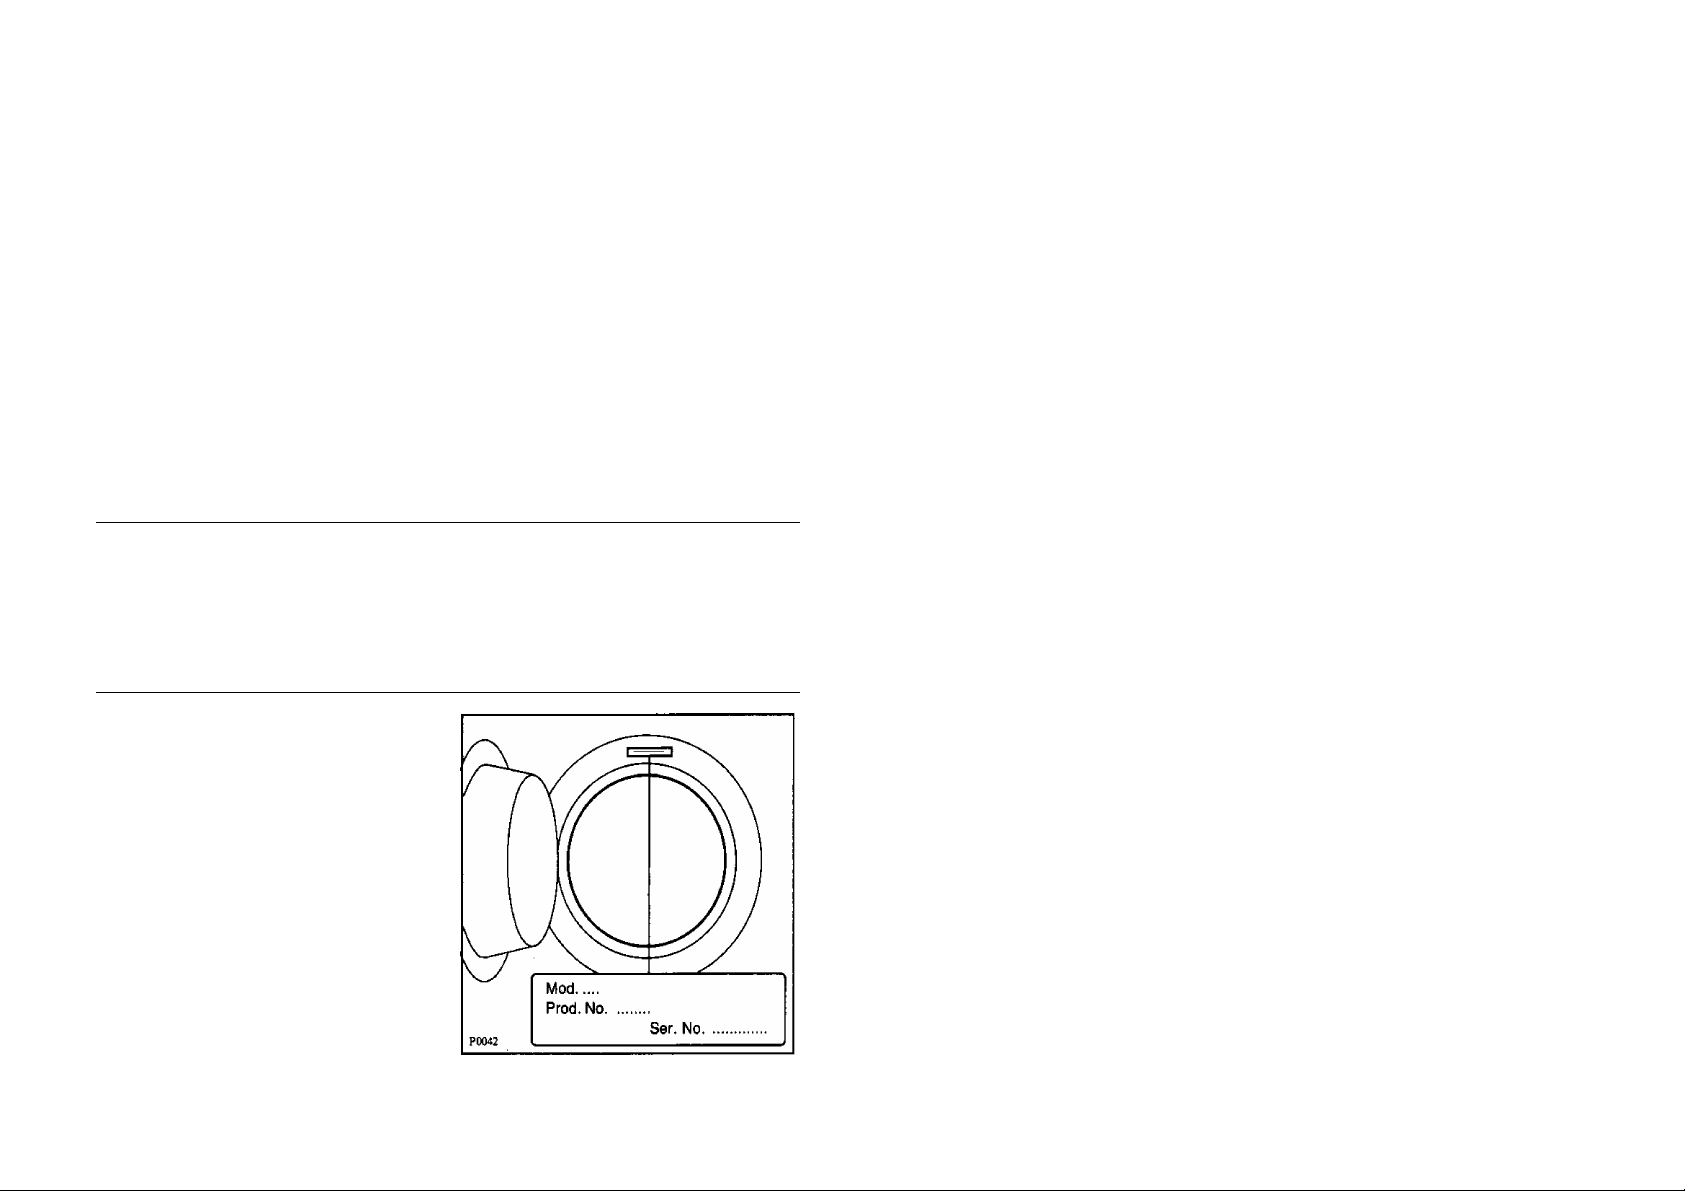
When calling please state the following:
1. The model number
2. The Prod.'No.
3. The Ser.-No.
Northern Service Centre
Unit 20
Haigh Park
Haigh Avenue
STOCKPORT
Gt. Manchester
SK41QR
Tei: 061 487 2205
The manufacturer reserves the right to make alterations in design and colour in
the interests of technical development without prior notice.
43
Page 3
Servicing
■ PROBLEM • CAUSE ► SOLUTION
■ THE MACHINE DOES
NOT DRY
■ THE DOOR DOES NOT
OPEN
If, after the above checks, there is
still a fault, call your nearest AEG
Service Centre.
Please make sure you give the model
and serial number of the appliance.
This information can be found on the
rating plate (see picture), or on the
guarantee certificate.
Original spare parts can be
purchased from AEG Spare Parts on
Slough 0753 872550.
In-guarantee customers should ensure
that the above checks have been
made as the engineer will make a
charge if the fault is not a
mechanical dr electrical breakdown.
Please note that proof of purchase is
required for any in-guarantee service
calls.
• A drying programme
has not been selected
• The cold water tap is ► Turn the tap on
not on
• The drainage filtei' is
clogged page 35)
• The machine is
overloaded
• The drying time Is not ►
adequate
• The safety device has
locked it
• Water in the wash tub
►
Select a drying
programme
► Clean the filter (see
►
Reduce the load
Refer to the programme
chart and set the
correct time (see pages
19-20)
>
Wait 1 - 2 minutes after
the end of the
programme before
opening the door
► Drain the water by
running the draining
programme (15)
Warnings
It is most important that this instruction book should be retained with the
appliance for future reference. Should the appliance be sold or transferred
to another owner, or should you move house and leave the appliance,
always ensure that the book Is supplied with the appliance In order that
the new owner can get to know the functioning of the appliance and the
relevant warnings.
This appliance Is designed to be
operated by adults. Children should
not be allowed to tamper with the
controls or play with the product.
It Is dangerous to alter the
specifications or attempt to modify
this product in any way.
Any electrical work required to install
this appliance should be carried out
by a qualified electrician or
competent person.
Any plumbing work required to Install
this appliance should be carried out
by a qualified plumber or competent
person.
This product should be serviced by an
authorised AEG Service Centre, and
only genuine spare parts should be
used.
Care must be taken to ensure that the
appliance does not stand on the
electrical supply cable.
Always unplug the appliance and turn
off the water after use.
Do not overload the appliance. See
relevant section in Instruction book.
Always look through the glass door to
check if water has drained before
opening the door. If water is present
do not open door before draining the
water. If in doubt, refer to your
instruction book.
This appliance Is heavy. Care should
be taken when moving it.
All packing and transit bolts must be
removed .before use. Serious damage
can occur to the product and to
property if this is not adhered to. See
relevant section in Instructions.
The glass door becomes very hot
during the washing cycle. Keep
children away from the vicinity of the
appliance whilst it is in operation.
Leave the porthole door slightly ajar
between washes to preserve the door
seal. '
Only wash fabrics which are designed
to be machine washed. Follow the
Instructions given on fabric labels
(see chart «Wash code symbols».
Before washing, ensure that all
pockets are empty and buttons and
zips are fastened. Avoid washing
frayed or torn articles and treat stains
such as paint, Ink, rust, and grass
before^washing. Underwired bras
must not be machine washed.
Any objects such as coins, safety
pins, nails, screws, stones or any
other hard, sharp material can cause
extensive damage and must not be
placed into the appjiance.
42
Page 4

Warnings
Servicing
Before selecting a programme or
changing an ongoing programme the
machine must be switched off by
depressing the ON/OFF push-button.
Garments which have been in contact
with volatile petroleum products
should not be machine washed. If
volatile cleaning fluids are used, care
should be taken to ensure that the
fluid is removed from the garment
before placing in the machine.
Wash small items such as socks,
laces, washable belts etc In a
washing bag or pillow case as it Is
possible for such items to slip down
between the tub and the inner drum.
Only use the advised quantities of
fabric softener. Damage to the fabric
can ensue if you over-fill. Refer to the
manufacturer’s recommendations of
quantities.
As some auvets and eiderdowns
should be washed/dried in large
commercial machines because of
their bulk, please check with the
manufacturer of the item before
washing in a domestic machine, even
if the dry weight of the item is within
the limit advised.
Only tumble dry fabrics which are
designed to be tumble dried.
If it is necessary to open the door
during the drying cycle, take care not
to touch the inside of the glass
porthole as this gets very hot.
Never tumble dry items that have had
contact with chemicals such as dry
cleaning fluid. These are of a volatile
nature and could cause an explosion.
Only tumble dry items which have
been washed in water or require
airing.
The users should always check that
they have not left their gas lighters
(disposable or otherwise) in their
clothing.
Before the drying cycle always
remove reusable plastic detergent
dispenser designed to be placed
inside the drum with the clothes as
the plastic used is not designed to
withstand the heat of the drying
cycle.
Pets and children have been known to
climb into washing machines. Please
check your drum before use.
If the machine is situated on a
carpeted floor, please adjust the feet
to ensure that air can circulate freely.
Under no circumstances should you
attempt to repair the machine
yourself. Repairs carried out by
inexperienced persons may cause
injury or more serious malfunctioning.
Contact your local AEG Service
Centre. Always Insist on genuine AEG
spare parts.
■ PROBLEM
■ THE MACHINE DOES
NOT DRAIN OR SPIN
■ THE MACHINE LEAKS
OR OVERFLOWS
■ THE MACHINE
VIBRATES OR IS NOISY
• CAUSE
• You have pressed the
«Rinse Hold» button
• The drain filter is
clogged
• The drain hose is bent
• The drainage system
pipes are blocked
• The drain hose
extension is incorrect
• The wash load
is unbalanced
• Too much washing ► Reduce the quantities
powder
• Unsuitable washing
powder
• The inlet hose ring is ► Tighten the ring (see
loose page 10)
• The detergent dispenser ► Clean the drawer and
drawer or recess are recess (see page 33-34)
clogged
• The end of the drain ► Position the drain hose
hose is not securely correctly
positioned
• The internal packing
has not been removed
• The machine is not Adjust the feet (see
level page 12)
• The machine is in
contact with the wall or
furniture feet
• The washing load is
badly distributed
• The machine is ► Run the draining
overloaded programme (15), reduce
► SOLUTION
► Press this button again
to drain the water
► Clean the filter. Before
doing this see page 35 '
► Straighten the hose out
► Consult a qualified
plumber
^ Consult a qualified
plumber
► Redistribute the clothes
inside the drum to ailow
the machine to spin
of washing powder
► Only use washing
powder suitable for
automatic machines
► Remove internal
packing (see p. 7)
^ Move the machine; it
should rest freely on its
► Remember to shake out
large items (e.g. sheets)
when loading
the load and continue
41
Page 5

Servicing
Technical specifications
Certain problems are due to lack of simple maintenance or oversights and can
be solved easily without having to call the AEG Service Department.
PROBLEM
THE MACHINE DOES
NOT START UP
{with pilot light off)
(with pilot light on)
■ THE MACHINE DOES • The water taps are not on
NOT FILL
CAUSE
The On-Off button is
not pressed
The door is not closed
properly
The appliance is not
plugged in
There is no electric
supply from the wall
socket
The programme selector
is not correctly
positioned
No water is entering the
machine
• The water supply has
been cut off supply is restored
• The inlet hoses are bent
• The water pressure is
too low
• The water inlet filter is
clogged
► SOLUTION
► Press the On-Off button
► Close the door
► Plug the appliance in
► Check the fuse
>
Consult a qualified
electrician
► Turn the programme
selector to the required
programme
^ See solutions to the
problem: THE MACHINE
DOES NOT FILL
►
Turn the taps on
►
Wait until the water
►
Straighten the bend out
►
If this occurs often.
consult a qualified
plumber
►
Clean the filter (see
page 35)
Dimensions
Width
Height
Depth
Electrical connection
Voltage 220/240V - 50Hz
Maximum power
absorbed 2550 W (13A)
Water pressure
Minimum (hot)
Minimum (cold)
Maximum
Maximum recommended
load for washing
Cotton, linen
Synthetics,
delicate fabrics
Wool
Maximum recommended
load for drying
Cotton, linen 2.25 kg (5 lb)
Synthetics 1.5 kg (3 lb)
Spin speed
Maximum
60 cm (23.6”)
82 cm (32.3”)
54 cm (21.3”)
5 psi
7 psi
110 psi
4.5 kg (10 lb)
2 kg (4.5 lb)
1 kg (2.2 lb)
1200 r.p.m.
The washing programme "2" at 60°C and
the drying programme "cupboard dry" are
the references programmes for the Energy
label according to EEC Directive 92/75.
Consumptions to wash and dry a full
capacity wash load (4,5 kg cotton items) at
60°C, degree of drying required "cupboard
dry": 4.40 kWh, 134 litres.
■ THE MACHINE • The end of the drain
EMPTIES AS IT FILLS
40
hose is too low
• The end of the drain
hose is submerged in
water submerged
• Drain pipe without
vent-hole
Position the drain hose
►
at the correct height
(between 60 and 90 cm)
The end of the drain
►
hose must NOT be
►
Consult a qualified
plumber
Page 6
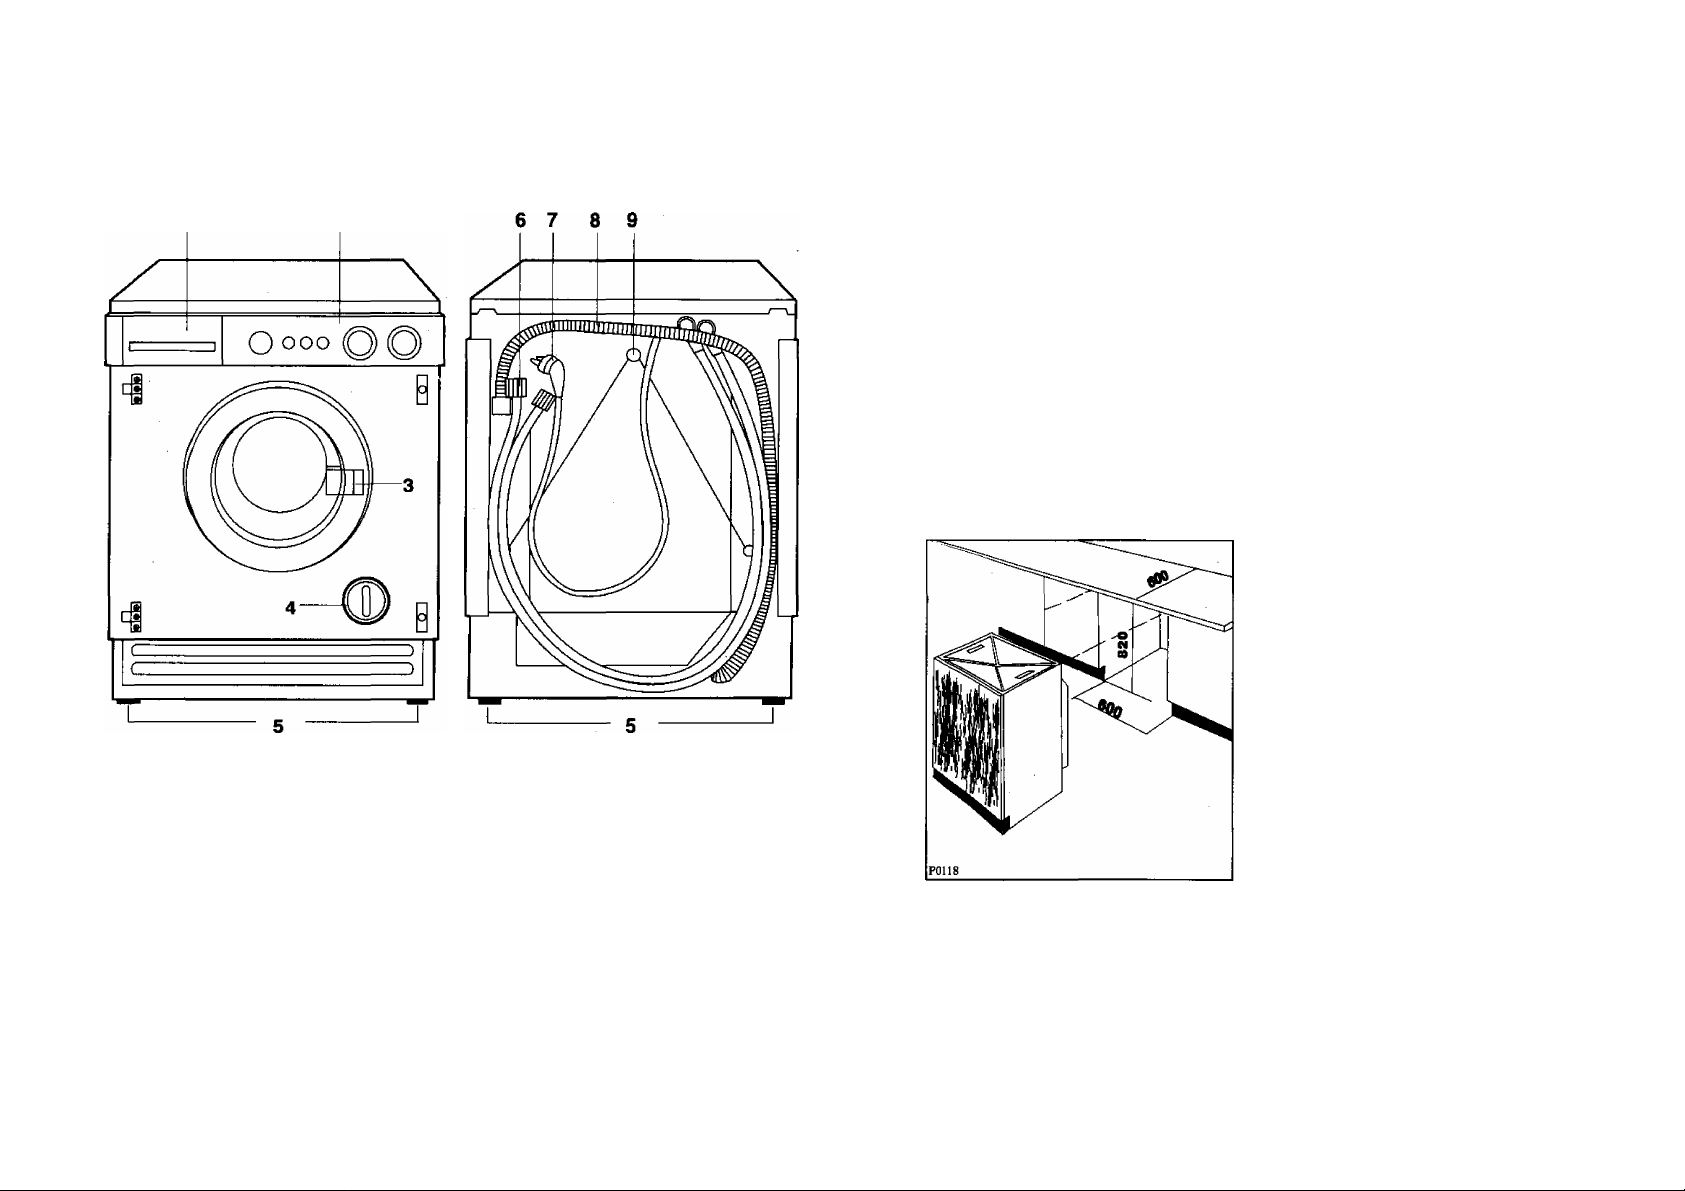
Your machine
Door reversal & building-under
Instructions for building in
under a counter
This appliance is designed to be built
Into a kitchen unit due to its standard
dimensions.
The machine should be inserted into
a recess having the dimensions
shown in the picture, making sure
that the fill and drain hoses are not
bent or kinked in such a way as to
obstruct the normal water flow.
As for water & electricity connection,
please follow the rules given in this
operator's handbook.
Furthermore, we strongly recommend
that the water & electricity supply cut
off controls remain easily accessible.
1 Washing powder dispenser drawer
2 Control panel
3 Door catch
4 Drain Filter
5 Adjustable feet
6 Water inlet hoses
7 Mains lead with plug
8 Drain hose
9 Transport safety screws
39
Page 7
Door reversal & building-under
Installation instructions
Mounting the door
Now fix the hinges to the machine by
means of the M 5 x 8 mm screws. To
compensate for possible uneven
thickness of the door the hinges can
be adjusted horizontaiiy.
To aiign the door perfectiy it may
sometimes be necessary to adjust the
height of the piates {2). This can be
done by ioosening the piastic screw
(3).
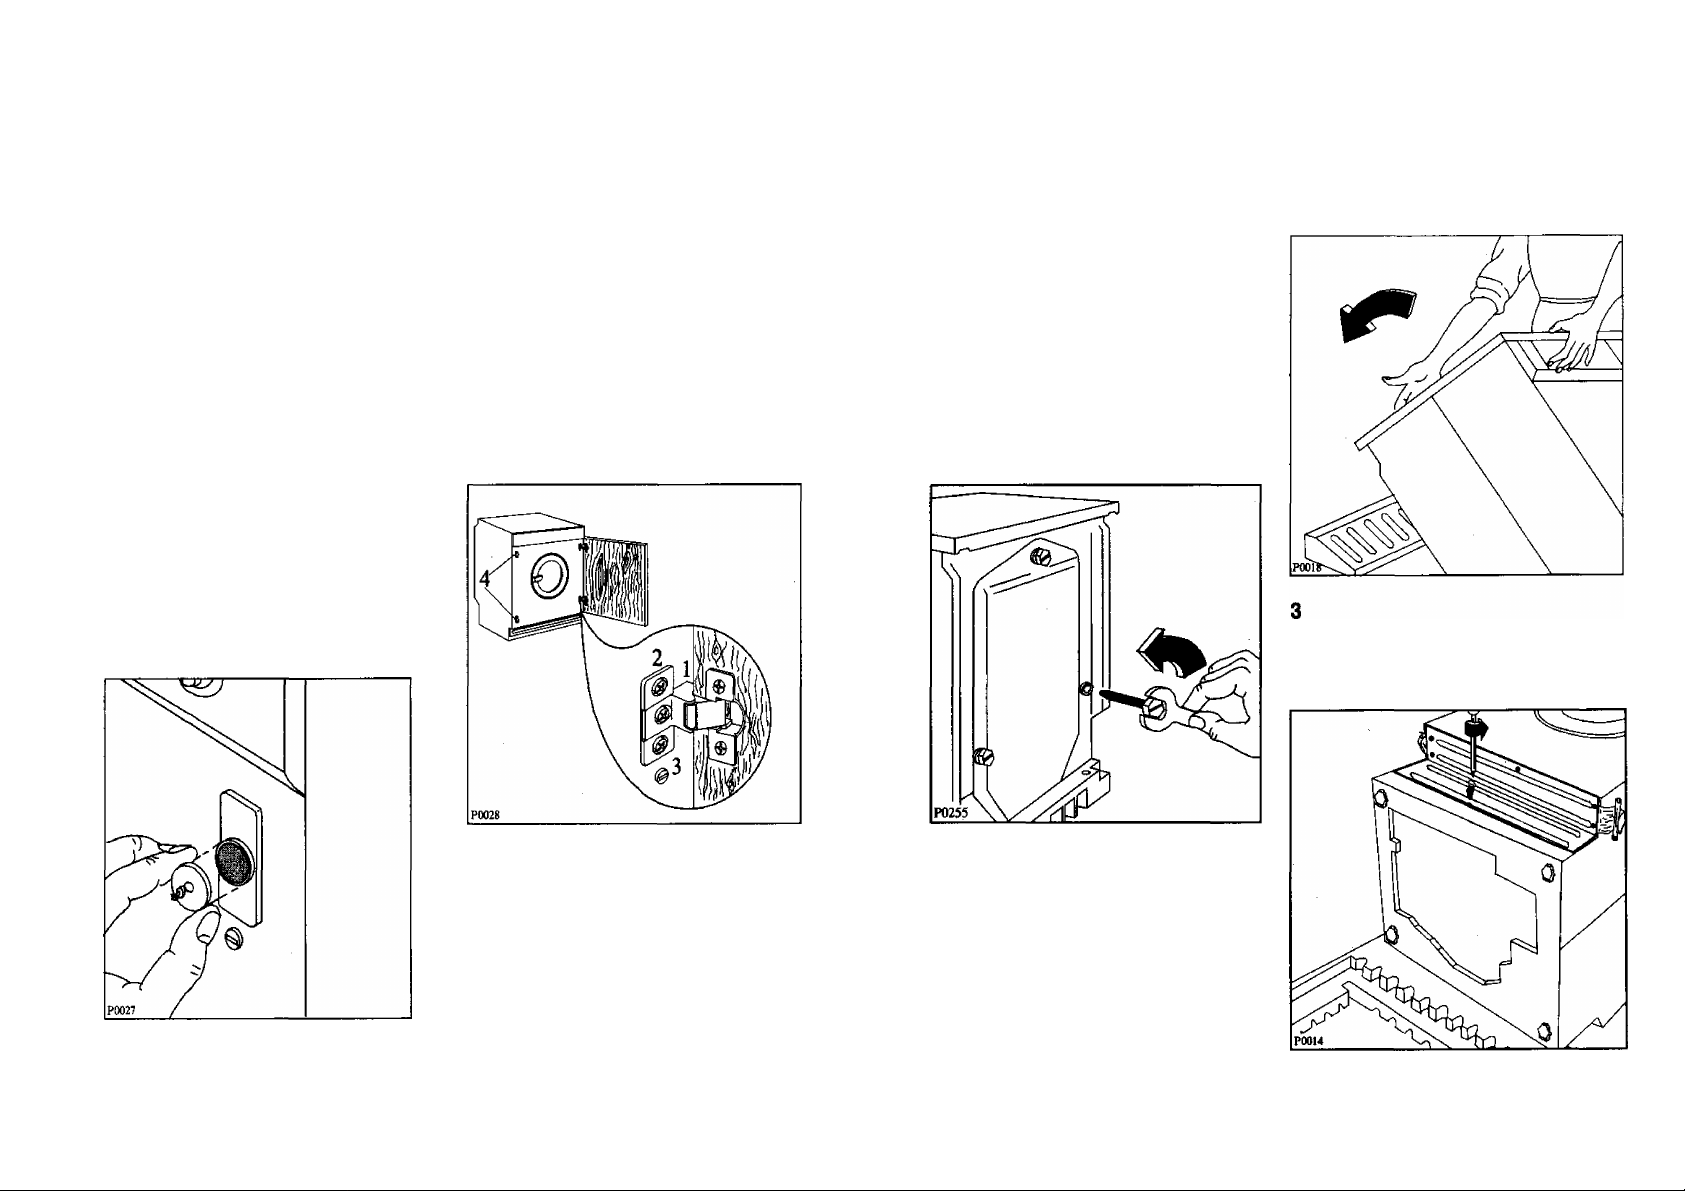
Counter-Magnet (5)
The door is kept ciosed by a
magnetic closure.
To enabie the ciosure to operate a
counter-magnet must be screwed into
the door inner side (steei disk with
rubber ring).
its position must correspond with the
magnet on the appiiance (see
picture).
Change of door opening
direction
Shouid a change of the opening
direction to the left side be required,
operate as foitows:
• Unscrew the door magnet (4) and
the rubber buffer (4) and take out the
plastic inserts.
• Fit the hinge fastening piates (2)
on the right side.
• Fit the magnet, the rubber buffer
and the piastic inserts on the ieft
side.
Caution
Before starting the machine up, the
packing must be removed as follows.
Note
You are advised to keep ali the
packing for re-use in case the
machine has to be transported again.
1
Using a spanner unscrew and remove
the rear right screw.
Lay the machine on its back making
sure that the hoses are not squashed.
Remove the polystyrene base and
take off the bottom panel by
unscrewing the central screw.
38
Page 8

Installation instructions
Door reversal & building-under
Carefully remove the right polythene
bag.
Carefylly remove the central and left
polythene bags.
6
Re-fit the bottom panel using the 4
screws supplied with the booklet and
the previously removed screw.
Set the machine upright and unscrew
the two remaining rear screws.
Preparation and assembiy of
the door
It is possible to change the door
opening side so as to match it
perfectly with the rest of the kitchen
furniture.
The machine is originally pre-arranged
for assembly of a door with right side
opening.
in this case it is sufficient to screw-in
on the door the two hinges (1) and
the oounter-magnet (5) in the right
position.
To mount the hinges on the door it is
necessary to drili 2 holes (dia. 35 mm,
depth 14 mm) on the door’s inner
side.
The distance between the hoies must
be 416 mm.
The dimension (B) (from upper edge
of the door to the center of the hole)
cannot be given, since it depends on
the adjacent cabinets’ dimensions.
The required dimensions are given in
the picture.
The hinges will be fixed to the door
by means of the 4x16 mm screws.
Cabinet’s door
The dimensions of the cabinet’s door
shouid be:
width
thickness
The height (C) cannot be given, since
It depends on the height of the
adjacent furniture, e.g. height of the
kick plate of the kitchen unit.
if necessary, the piastic seaiing
profiles underneath the controi panei
can be removed by unscrewing the
two screws.
595-i-3 mm
16 to 22 mm
37
Page 9

Cleaning the filter
Installation instructions
Warning
When the appliance is in use and
depending on the programme
selected there can be hot water in the
filler. Never remove the filter during a
wash cycle, always wait until the
appliance has finished the cycle, and
is empty. When replacing the filter,
ensure it is securely retightened. This
will prevent leaks and also stop
young children being able to remove
the filter.
The water inlet filters
If your water is very hard or contains
traces of lime deposit, the water inlet
filters may become clogged.
It is therefore a good idea to clean
them from time to time.
Turn off the water taps. Unscrew the
water inlet hoses.
Replace the filters and tighten up the
inlet hoses.
8
Slide out the 3 plastic pins and stop
the holes with the plastic plugs
supplied with the instruction booklet.
Your new AEG washing machine has
been designed to be permanently
plumbed in to your home’s water
supply and drainage system. How
ever, if this is not possible, it may be
connected to suitable existing taps,
with the drain hose discharging into a
sink.
The appliance has two inlet valves,
hot and cold, with female 3/4” BSP
thread connectors. If this connection
size is not compatible with the
plumbing of the existing installation,
a variety of connectors are available
from good hardware stores and
plumbers merchants to suit most
domestic plumbing. Any alterations to
your existing plumbing must be
carried out by a competent person, or
qualified plumber.
10
The inlets on the back of the
appliance are colour coded, blue for
cold, red for hot.
Before connecting the hoses be sure
to fit the mesh filters supplied as per
diagram.
If only a cold water supply is
available, connect the two hoses to a
cold water outlet by means of a «Y»
connection piece.
Installation should comply with local
water authority and building
regulations’ requirements.
The appliance must be given a
separate cold water supply and not
be connected to a mixer tap, a single
outlet water heater or a booster
pump. A minimum water pressure of
7 psi is required for safe operation of
the appliance.
If you cannot make the cold water
connection direct from the rising
mains, you may be able to operate
the appliance from your cold water
storage system.
36
Page 10

Installation instructions
Cleaning the filter
There should be a minimum distance
of 5.02 m (16V2 ft) between the
appliance’s inlet and the bottom of
the tank.
There will be sufficient pressure for
the hot water supply from the hot
water cylinder if the height between
the appliance’s inlet and the bottom
of the cold water storage cistern (not
between the appliance and hot water
cylinder) is at least 2.74 m (9 ft).
11
Set the hose correctly by loosening
the ring nut. After positioning the
Inlet hose, be sure to tighten the ring
nut again to prevent leaks.
12
if you intend the drain hose from the
machine to empty into a sink, make
sure the sink is empty and that the
plug hole is not blocked.
If the machine is permanently
plumbed in, hook the end of the hose
into a standpipe installed for the
purpose.
The standpipe must have an internal
diameter of at least 30 mm (1 Vz in),
in order that there is an air gap
between the drain hose and
standpipe. Make sure, that it is
designed in such a way, that the end
of the drain hose cannot be covered
with water.
Important: Before connecting up the
machine to new pipework or to
pipework that has not been used for
some time, run off a reasonable
amount of water to flush out any
debris that may have collected In the
pipes.
Whether discharging into a sink or a
standpipe check that the end of the
drain hose is neither too high nor too
low. The top of the curve In the
hose’s end should be no more than
90 cm (35.4”) and no less than 60 cfn
(23.6”) above floor level.
The water drain filter
A clean filter is important for correct
functioning of the machine, and
should therefore be cleaned after
every wash.
Place a container underneath to
catch any spillage.
Unscrew the filter.
If the filter is blocked and the
machine is unable to drain you will
need to drain the water from the
machine at this stage.
To do this, unhook the drain hose
from the standpipe or sink and hold
the end of the hose over a bowl on
the floor. The water should drain by
gravity into the bowl. When the bowl
is full, hook the hose back up and
empty the bowl. Repeat the procedure
until the water stops flowing out.
Clean carefully under a fast-running
tap.
10
35
Page 11

Maintenance
Installation instructions
Cleaning the drawer recess
Having removed the drawer, use a
small brush to clean the recess
ensuring that all washing powder
residue is removed from the upper
part of the recess. Replace the
drawer and run programme 4 for a
few minutes and then the drain cycle
15 to clear any residues.
The dangers of freezing
If the machine is exposed to
temperatures below 0°C, certàin
precautions should be taken.
Turn off the water taps and unscrew
the inlet hoses.
Select a wash programme and run for
a few seconds.
Unhook the drain hose from the rear
support and position the end in a
bowl. Run the draining programme for
a few seconds.
When you intend to start the machine
up again, make sure that the room
temperature is above 0°C.
13
Electrical connection
WARNING:
THIS APPLIANCE
MUST BE EARTHED
The manufacturer declines any
liability should this safety measure
not be observed.
If the plug that is fitted to your
appliance is not suitable for your
socket outlet, it must be cut off and
the appropriate plug fitted.
The cut off plug should be disposed
of to prevent the hazard of electric
shocks in case it should be plugged
into a 13 Amp socket in another part
of your home.
Important
The wires in this mains lead are
coloured in accordance with the
following code;
GREEN AND
YELLOW
BLUE
BROWN
If you fit your own plug, the colours
of the wires in the mains lead of your
appliance may not correspond with
the markings identifying the terminals
in your plug, this is what you have to
do:
Connect the green and yellow (earth)
wire to the terminal in the plug which
is marked with the letter «E» or the
earth symbol or coloured green,
or green and yellow.
EARTH
NEUTRAL
LIVE
GtjiMieai me blue (neutral) wire to the
terminal in the plug which is marked
with the letter «N» or coloured black.
Connect the brown (live) wire to the
terminal which is marked with the
letter «L» or coloured red.
The plug moulded on to the cord
incorporates a fuse. For replacement,
use a 13 Amp BS 1362 fuse.
Only ASTA approved fuses should be
used.
The fuse cover/carrier must be
replaced in the event of changing
fuse.
The right fuse cover/carrier colour is
the one shown by the coloured insert
at the base of the plug.
The plug must not be used if the fuse
cover/carrier is lost.
A replacement cover/carrier must be
obtained from AEG Service Agents.
This appliance complies with
a
- 73/23 EEC of 19.2.73 (Low Voltage
- 89 / 336 EEC of 3.5.89 (Electromagnetic
the following E.E.C. Directives:
Directive) and subsequent modifica
tions;
Compatibility Directive) and subse
quent modifications.
34
11
Page 12

Instaltation instructions
Maintenance
14
Level the washing nnachine by
loosening or tightening the feet.
Accurate levelling prevents vibration,
noise and displacement of the
machine during operation. After
levelling the machine, secure the feet
by tightening the ring nuts.
Some vibration is inevitable,
especially if mounted on a wooden
floor.
sprung wooden floors are particularly
susceptible to vibration. For advice,
consult a builder. If possible, always
place the machine on a solid floor.
Note
Please ensure that when the
appliance is installed It is eaSily
accessible for the engineer in the
event of a breakdown.
AM plumbing and efectrical work
required to Install this appliance must
be carried out by competent persons
or qualified plumbers or electricians.
Successful washing and smooth
running of your machine depend on a
series of routine maintenance
operations which should be carried
out from time to time.
Important
Before carrying out any maintenance
or cleaning you MUST disconnect the
appliance from the eiectricity supply.
Décalcification
The water we normally use contains
lime. From time to time, and more
often for hard water, it is a good idea
to use a water softening powder in
the machine. Add this powder
according to the manufacturer’s
instructions. This will prevent the
formation of lime deposits.
After each wash
Leave the door open for a while.
This helps prevent mould and
stagnant smells forming inside the
appliance.
Cleaning the drawer
From time to time the washing
powder and additive dispenser drawer
should be cleaned.
under a tap.
The upper part of the additives
compartment can be removed for
easier cleaning.
12
Externai cieaning
Use soap and water only and then dry
thoroughly.
33
Page 13

Washing hints and drying
Do not leave the damp laundry load
in a heap too long before drying.
Avoid drying dark clothes with light
coloured fluffy items such as towels
as these can attract the fluff.
If you overdry the laundry, besides
wasting energy, any subsequent
ironing may become more difficult
because the fabric couid be heavily
crumpled.
Remove the laundry when the
appliance has finished drying.
To avoid a static charge when drying
is completed, use either a fabric
softener when you are washing the
laundry or a fabric conditioner
specifically for tumble dryers.
For drying, follow the indications
given on the manufacturers’ labels.
Drying at high
e
temperature
Drying at reduced
□
temperature
Do not tumble dry
The controi panei
1
Programme chart (inside the
drawer handle)
2
Dryer indicator light
3
Drying time control
4
«Heavy soil» push button
5
«Rinse hold» push button
6 On/Off-push-button
7
Operating pilot light
8 Thermostat control
9
Programme control
Once you have finished using the
machine, you are advised to unplug it
and turn off the water taps.
32
Symbols
Symbols provided on the control
panel have the following meaning:
LU Prewash compartment
UU Wash compartment
® Softener compartment
13
Page 14

Use of controls
Washing hints and drying
1
Washing powder dispenser
drawer
The washing powder or liquid and
additives must be placed in this
drawer before starting the
programnne.
A pull-out programme chart is
available inside the drawer handle.
Dryer indicator iight
This light will come on when the
machine is drying.
Drying time control
Press the control knob to pop it out.
This control allows you to choose the
desired drying time according to the
type and quantity of the load to be
dried. It can also be adjusted whilst
the machine is in operation to either
increase or reduce the drying time.
The control incorporates two drying
cycles, both of them up to 80 minutes
duration. The
for cotton and linen items is marked
with a solid line, and the low
temperature range for synthetic
fabrics with a hollow line.
high temperature range
Heavy soil button
By pressing the heavy soil button, the
machine will take in cold water only
on programmes with a water
temperature of 60®C and hotter.
These would normally be hot and
cold, or hot fill only.
The water is then gradually heated to
the required temperature.
The effect is to improve the overall
wash performance, particularly on
biological stains such as egg, blood
and grass stains, and heavily soiled
fabrics, since the longer «cool-soak»
phase as the water heats up provides
the right conditions for the powder
and the water temperature to interact,
and achieve the best possible results.
Rinse hold button
Press this button to leave the water
in the wash tub after the wash cycle
is completed.
This works only on mixed fabrics,
wool or delicate/synthetic
programmes.
The clothes are left suspended in
water after the final rinse to prevent
the formation of creases.
Depress the button to drain the water.
Do not overload the machine. Weigh
the laundry the first few times you
use the appliance.
The average weights of the most
common items are listed below as a
guide:
1000 g = 1 kg (2 lb)
sheet
pillow case
tablecloth
serviette
tea towel
linen hand towel
towelling hand towel
towelling bath towel
bath robe
man’s shirt
apron
Load the laundry loosely alternating
large items with small ones.
Sort the laundry according to the type
of fabric, colour-fastness and how
dirty it is.
Avoid washing unhemmed or torn
items as they may unravel.
Before washing, empty all pockets of
small objects which may have been
left inside (coins, keys, screws etc.),
as these could damage the drain
pump.
When washing curtains, remove the
hooks.
Close poppers and zips and fasten
loose buttons.
It is essential to wash new coloured
items separately when washing for
the first time.
700-1000 g
100- 200 g
400- 500 g
50- 100 g
70- 120 g
100- 150 g
150- 250 g
700-1000 g
1000-1500 g
200- 300 g
150- 200 g
When washing fabrics requiring
different wash temperatures together,
always select the lowest temperature.
White items should not be washed
with coloured items.
Very small items (handkerchiefs,
ribbons, socks etc.) should be washed
in a washing bag or a pillow case.
Use a good quality detergent suitable
for automatic washing machines.
Use the correct quantities of
detergent.
For wool, use gentle detergents only
in small quantities.
Bleach is very corrosive; it should be
used with care and kept out of reach
of children.
Some stains such as fruit, wine,
grass, rust etc. are difficult to remove
and should be treated before washing
with specific products which can be
found in most household shops.
In some cases it may help to soak
the stain before washing with a
special pre-soak product or biological
detergent.
Only wool marked «Pure New Wool washable, preshrunk» can be washed
in the machine using the wool
programme: other types of wool
should be washed by hand or dry
cleaned.
When drying always load well spun
laundry. The higher the spin speed
the lower is electric energy
consumption and the shorter is the
drying time.
14
31
Page 15

Drying 2.25 kg (5 tb) of cotton
Select the time
Following indications given in the
programme chart, turn the selector
dial clockwise on the 40 mins {High
Temperature Range).
Start the machine
Switch on the ON-OFF switch.
The pilot lights and
illuminate and the machine will start
to work.
Stopping the machine
At the end of the programme the
machine stops automatically and the
Dryer Indicator Light will go out.
Depress the ON-OFF button, the light
floes out.
If the laundry is still too damp, select
a further brief drying time, bearing in
mind that during the last 8 minutes
the appliance carries out a cooling
and anti-crease phase.
Use of controls
6
On/Off button
By depressing this button the
machine starts operating. When it is
depressed again, the machine stops.
Operating pilot light
This lights up when the ON/OFF
button is depressed and goes out
when the button is pressed again.
8
Adjustable thermostat dial
Press the dial to pop it out and then
turn to the required temperature.
The most suitable temperatures for
all types of laundry are shown In the
programme charts.
The temperatures shown can be
reduced and even a cold wash can be
used (dial to position ^ ) when your
laundry Is only slightly soiled or
particularly delicate.
In this way you will also save
electricity.
Programme control
To select the required programme,
press the knob to pop It out. Turn the
knob clockwise until the marker at
the top of the dial coincides with the
required programme letter.
Press the knob again if you wish to
return it to its original position.
30
15
Page 16

How and when to use the controls
Drying 2.25 kg (5 lb) of cotton
Start
After loading the laundry and placing
the washing powder or liquid and
additives into the appropriate
compartments, before starting up the
machine check that:
— the appliance is plugged in
— the water supply taps are turned
on
— the drain hose is correctly and
securely positioned
— the door and the washing powder
dispenser drawer are closed.
Depress the required pushbutton(s).
Select the washing temperature via
the adjustable thermostat dial.
Select the required programme by
turning the programme dial clockwise.
Set the drying time if you are using
the Wash ’n’ Dry option.
At this stage, press the ON/OFF
button to start the programme up.
The pilot light will come on and the
programme will start.
Stop
When the programme has finished,
the programme dial will be in the «•»
position and the machine will
automatically stop.
If you have depressed the «Rinse
Hold» button, the water remaining In
the wash tub must be drained by
pressing again the same button
before opening the door.
If necessary, stop the machine by
pressing the ON/OFF button again.
At the end of the programme, all the
buttons must be reset to the «rest»
position {not depressed).
The washing programmes
This washing machine has a wide
range of programmes for optimum
washing of all types of fabrics.
The differences between the
programmes are the rotation rhythm
of the drum, the washing
temperature, the water level, use or
not of the spin cycle etc.
Drying
The dryer part of this machine is a
Turbo Condenser Dryer.
During the drying cycle the machine
uses a small amount of water.
The clothes are dried by means of a
continuous flow of hot air which as it
passes through the drum, gradually
reduces the moisture in the laundry.
The moisture is then condensed
within the machine. The condensed
water is then drained away, together
with the cooling water, through the
drain hose. There is no need to
provide special ventilation in the
room in which the machine is
installed.
The duration of the preset drying time
may be shortened or extended during
the drying cycle. Do not extend or
shorten the drying period within the
8-0 minute cycle. During this time
both the machine and the laundry are
cooling off.
During a power failure it is advisable
to remove the laundry from the
machine. After a short mains power
failure the machine will continue with
the selected programme once the
power is restored.
You have for example just machinewashed and spun at 1200 rpm 4.5 kg
(10 lb) of laundry.
They are cotton fabrics of medium
weight which you want to iron as
soon as they are dry.
Switch off the machine.
Then remove the laundry from the
appliance and divide the items to
obtain two loads of approx. 2.25 kg
(5 lb) each.
1
Load the laundry
Load the items you have to dry one at
a time, shaking them out loosely and
close the door.
Select the programme
Turn the programme dial clockwise
until number 6 on the dial coincides
with the grey dot.
16
29
Page 17

Washing 2 kg of synthetic fabrics at 40**С
How and when to use the controls
6
Start up
Check that:
— the appliance is plugged in
— the water taps are on
— the drain hose is correctly
positioned
Then push the ON/OFF- button ®
The pilot light will come on and the
machine will start.
At the end of the programme
The machine automatically stops.
The door Is controlled by a safety
device which releases 1 • 2 minutes
after the end of the progr^me.
Push the ON/OFF-button © again
and the pilot light will go out.
When the programme has finished
you are advised to unplug the
appliance and turn off the water taps.
Important
The washer-dryer operates on the
condensation principle. For this
reason, when drying takes place, the
water tap must be open and the drain
hose must be hooked over the sink If
the machine Is not permanently
plumbed In. The dispenser drawer
must be fully closed.
Only laundry washed in water should
be dried in this machine. In particular,
the following fabrics should not be
loaded into the machine:
Clothes which were dry-cleaned or
cleaned with chemical solvents;
Woollens or mixed woollens which
will shrink with heat;
Extremely delicate fabrics such as
silk and delicate synthetics;
Sponge, rubber and similar items;
Fibre glass items;
Fabrics tending to fray.
Wash ‘n’ dry
It is possible to programme the
machine to run automatically from
the wash programme through to the
drying programme without pausing. In
this case, the wash load must be no
more than 2.25kg (5 lb) for cottons
and a maximum of 1.5kg (2.2 lb) for
synthetics. The drying time should be
selected at the beginning of the wash
programme. This is possible on all
programmes except the Wool, Silk
and Délicates (10-11-12-13-14
programmes).
Drying times
The drying times of all fabrics will
depend on the extent to which they
have been spun as well as the fabric
characteristics. The higher the spin
speed the shorter the drying time.
To alleviate creasing, care should be
taken not to overdry clothes. All
clothes should be removed from the
drum as quickly as possible after
completion of a drying cycle.
Important
Polycottons of less than 70% cotton
should NOT be dried using «High
Temperature» drying.
Only polycottons with more than 70%
cotton content should be dried using
programme 6.
If you are not sure of the cotton
content use «Low Temperature»
drying.
28
17
Page 18

Wash code symbols
Washing 2 kg of synthetic fabrics at 40°C
The familiar wash code symbols
which are found on the care labels in
most clothes will gradually disappear
and a new set of codes will be
introduced. This change Is due to
changes in fabrics and detergents
Old Symbol New Symbol Wash Action Fabric
Ш
yJL é
\Ш
vSU é
yJLy
\Ш
\ш
Ш7
No longer used. White Nylon, Polyester/Cotton mixtures now included in
\Ш
Normal (Maximum) White Cotton or Linen without
Normal (Maximum) Cotton, Linen or Viscose without
Reduced (Medium) Nylon, Polyester/Cotton, Viscose
Normal (Maximum) Cotton, Linen or Viscose
and because people are tending to
use fewer programmes and mix
fabrics in one load. The change will
bring the codes into line with the
labelling used in the rest of Europe.
Special Finishes
Special Finishes
Colourfast at 60° C.
with Special Finishes:.
Cotton/Acrylic Mix.
Colourfast at 40°C but not 60°C.
Measure out the additives
Pour the softener, if required, into the 40®c.
compartment marked ^ ; do not
exceed the MAX level. 5
Close the drawer gently. programme
Select the temperature
Turn the adjustable thermostat dial to
ti/
wZw
\40¥
\Ш
я
\Ш
The new symbols have been used on the Programme Guide of this machine,
and are listed in the Programme Charts on page 19 and 20.
The new wash symbols will also appear on the side of Washing Powder
packets.
18
Ш
No longer used. Silk now included in
printed acetate included in .
No longer used.
Reduced (Medium) Acrylics, Acetate, Triacetate, Wool
mixes, Polyester/wool blends.
Much Reduced Wool, wool mixes. Silks.
(Minimum)
Turn the programme dial clockwise
until number 10 on the dial coincides
with the grey dot.
27
Page 19

Washing 2 kg of synthetic fabrics at 40**C
Programmes for cotton and iinen
Suppose you have 2 kg of synthetic
fabric laundry to wash. They are
rather deiicate fabrics and should not
be washed at a high temperature.
1
Load the iaundry
Open the door by puiiing the catch
outward. Load the items to be
washed one at a time and ciose the
door.
Measure out the washing
powder
Pour the washing powder into
compartment uu , the main wash
compartment.
Washing programmes
Recommended load: max. 4.5 kg (10 lb)
PROGRAMME
\m7
BOILWASH
with prewash
95/ BOILWASH I
HOT
WASH
(*) For an economy wash, if your laundry is not heavily soiled, you can select 60° instead
of 95°C.
Water filling: 40°/50°C programmes • cold water filling; 60°C programmes - hot and cold
filling. 95°C programmes - hot water filling only, unless the heavy soil button is used.
Wash ’n’ Dry Programmes
Recommended load: max. 2.25 kg (5 lb} drying only.
Do NOT use ball dispensers on Wash ’n' Dry programmes. The automatic drying can
be used on programmes 1,2,3,4, Sand 8 by setting the drying time at the beginning
of the wash programme.
DEGREE
SOIL
Heavy
Normal
Normal
COMPARTMENTS
OF
($ if required}
TO USE
u
Ujifi
PROGRAMME
AND TEMP.
DIAL
POSITION
1
95
2
95
T
60
DESCRIPTION
Prewash at 40°C
Wash at 95°C
5 rinses
Spin
Wash at 95°C
5 rinses
Spin
Wash at
5 rinses
Spin
26
Energetic drying programme
Fabric type/ Programme
Spin speed
Cotton and
linen Q
(Long spin at
1200 rpm)
The drying times indicated in this table are for drying cotton towels. By varying the
composition of the load, the drying times indicatecTwill vary.
(0-80 mins ■
Quantity Drying time
2.25 Kg (5 lb)
2.0 Kg (4 lb) 35-45 mins
1.5 Kg (31b) 30-40 mins
1.0 Kg (2 lb) 25-30 mins
■ indicated by continuous line (High Temp.)
Iron dry Cupboard-dry
40-50 mins 60-70 mins
55-65 mins
40-50 mins
35-40 mins
_____________________
19
Page 20

Programmes for synthetics, silk and wool
Washing 4 kg of white cotton at 95**C
Washing programmes
Recommended load: max. 2 kg (4.5 lb); wool max. 1 kg (2.2 lb) washing only.
(*) If the «Rinse Hold» button has been depressed the machine will not proceed
to the spin as indicated, untii the button has been reieased, but wiii have water ieft
in the drum.
PROGRAMME
AND TEMP.
DIAL
POSITION
12
30
13
14
DESCRIPTION
Wash at 30®C
3 rinses
Short spin (*)
3 rinses with
additive if required
Short spin (*)
1 rinse vifith
additive if required
Short spin (*)
PROGRAMME
QUICK
WASH
RINSES
CONDI
TIONER
DEGREE
COMPARTMENTS
OF
SOIL
Light
($ If required)
TO USE
6
Start up
Check that:
— the appliance is plugged in
—• the water taps are on
— the drain hose is correctly
positioned
Then push the ON/OFF- button CD
The pilot light will come on and the
machine will start.
At the end of the programme
The machine automatically stops.
The door is controlled by a safety
device which releases 1 - 2 minutes
after the end of the programme.
Push the ON/OFF-button O again
and the pilot light will go out.
When the programme has finished
you are advised to unplug the
appliance and turn off the water taps.
DRAIN
15
Draining of water
Wash ’n’ Dry Programmes
Automatic drying can be used on programme 7, by setting the drying time at the
beginning of the wash programme.
Delicate Drying Programme (0-80 mins ■ indicated by dotted line (Low Temp).
Fabric type/
Spin speed
Synthetics
(Short spin at
850 rpm)
The drying times given in this table are just an indication of the average drying times.
20
Programme Quantity
9
1.5 Kg (31b)
1.0 Kg (21b)
0.5 Kg (1 lb)
Drying time
Iron dry
Cupboard-dry
75-80 mins
50-60 mins
35-40 mins
25
Page 21

Washing 4 kg of white cotton at 95^C
Use of detergent and additives
Measure out the additives
Pour the softener, if required, into the
compartment marked® ; do not
exceed the MAX levei.
Close the drawer gently.
Seiect the temperature
Turn the adjustable thermostat dial to
95°C.
Select the programme
Choosing the right washing
powder
Always use a low lather powder. This
is important as too much lather
prevents the articles from being
properly cleansed and you may
damage the machine.
Use of washing powder
The washing powder should be
placed in the appropriate
compartments in the washing powder
dispenser drawer before starting the
programme.
How much detergent?
Your washing machine has a unique
water circulation system which runs
continuously. This means that it uses
detergent sparingly.
Initially you are advised to use less
than the quantity specified by the
detergent manufacturer.
Subsequently it is worth
experimenting to see if your laundry
comes out clean with smaller
quantities.
Powder residue left on the clothes at
the end of a wash indicates the use
of too much powder. If the drum is
only half-full, you can obviously use
less detergent.
24
The compartment marked with the
symbol (jj is for the prewash
powder (if required by the
programme).
The compartment marked with the
symbol uu is for the main wash
powder.
Turn the programme dial clockwise
until number 2 on the dial coincides
with the grey dot.
21
Page 22

Use of detergent, and additives
Washing 4 kg of white cotton at 95°C
Use of liquid detergent
Suitable liquid detergent can be used
instead of washing powder.
In this case a progrannme without
prewash must be selected.
Pour the liquid detergent into the
compartment ULI in the dispenser
drawer immediateiy before starting
the programme.
If the detergent has its own dispenser
ball, this should be used according to
the manufacturer’s instructions.
Use of liquid additives
Any liquid additives for softening or
starching the laundry must be poured
into the appropriate compartment of
the washing powder dispenser drawer
before starting the programme.
The compartment marked with the
symbol ^ is for softeners or
starching agents.
Concentrated additives MUST be
diluted before pouring in the
compartment.
Never exceed the MAX ievel.
Important
Before the drying cycle always
remove re-usable plastic detergent
dispensers designed to be placed
inside the drum with the clothes as
the plastic used is not designed to
withstand the heat of the drying
cycle.
Note
Once the dispenser is filled, close it
by pushing it in gently. This is
particularly important if you are using
fabric conditioner because if the
drawer Is slammed it will cause the
conditioner to enter the machine
prematurely.
Suppose you have 4 kg of normally
soiled laundry to wash. It is white
cotton and resistant to high
temperature washing.
Load the iaundry
open the door by pulling the catch
outward. Load the items to be
washed one at a time and close the
door.
Measure out the washing
powder
Pour the washing powder into
compartment Uii , the main wash
compartment.
22
23
 Loading...