

Quick Start Guide
(
(
(
6
9
8
7
(
10
)
)
(
(
(
(
( )
1
56
2
3
4
Congratulations on your purchase of a mini UHD digital camera produced
by AEE!
This Manual provides instructions on how to use this camera and its
accessories. Please read this Manual carefully before use and keep
it handy for future reference. We hope you enjoy your photo shooting
experience with this product!
Due to the difference in product version, the product and its accessories
you have purchased may be slightly different from those described herein.
All items are offered subject to availability.
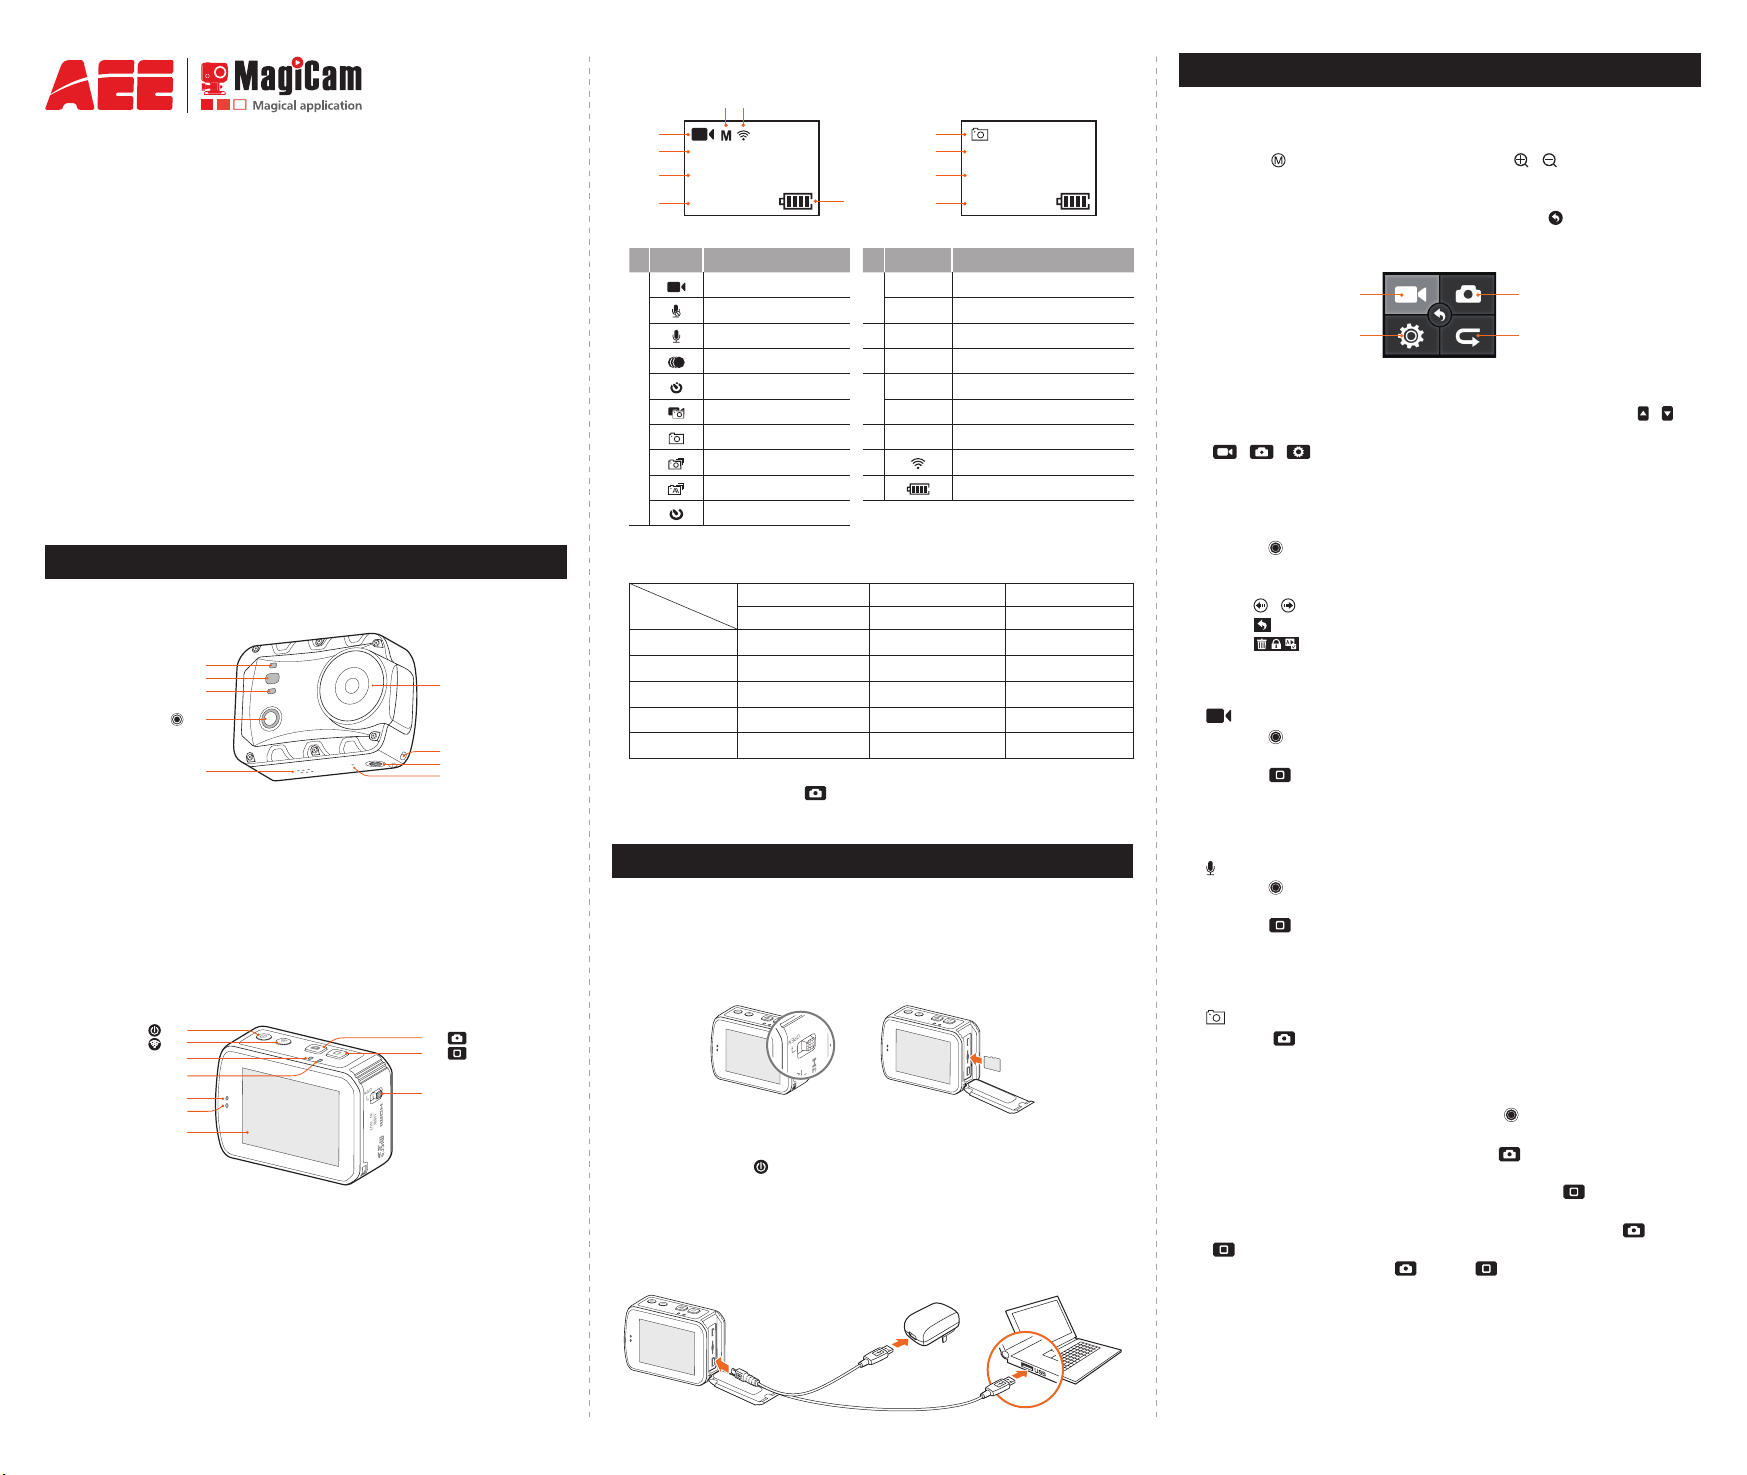
Appearance
L3 )
1
L2 )
2
L1 )
3
4
)
5
> Information on Lattice Screen
1
2
1080P-30
00:00:01
2H30
Icon Functions Icon Functions
Video recording mode
Video-only mode
Voice recording mode
Time lapse mode
1
Auto video mode
Photo in video mode
Single shot mode
Fast shot mode
Continuous mode
Timed shooting mode
7
2
3 00:00:01
4
5 M
6
7
1080P-30
100-0088
2H30
1888
8M
3
100-0088
4
1888
Video resolution
Photo resolution
8M
Recording timer
Number of recorded les
Remaining recordable time
Remaining shots
View angle
Wi-Fi
Battery level
> Description of Indicators
Position
Status
Video recording / Flash slowly /
Audio recording / Flash slowly /
Photo shooting Stay on Flash once /
Charging Flash slowly / /
WiFi on Stay on / Flash slowly
When turn off the screen state, the TFT display indicators will be lit up.
you can long press the " " key to turn on/off the screen.
L1 L2 L3
Red indicator Green indicator Blue indicator
Operations
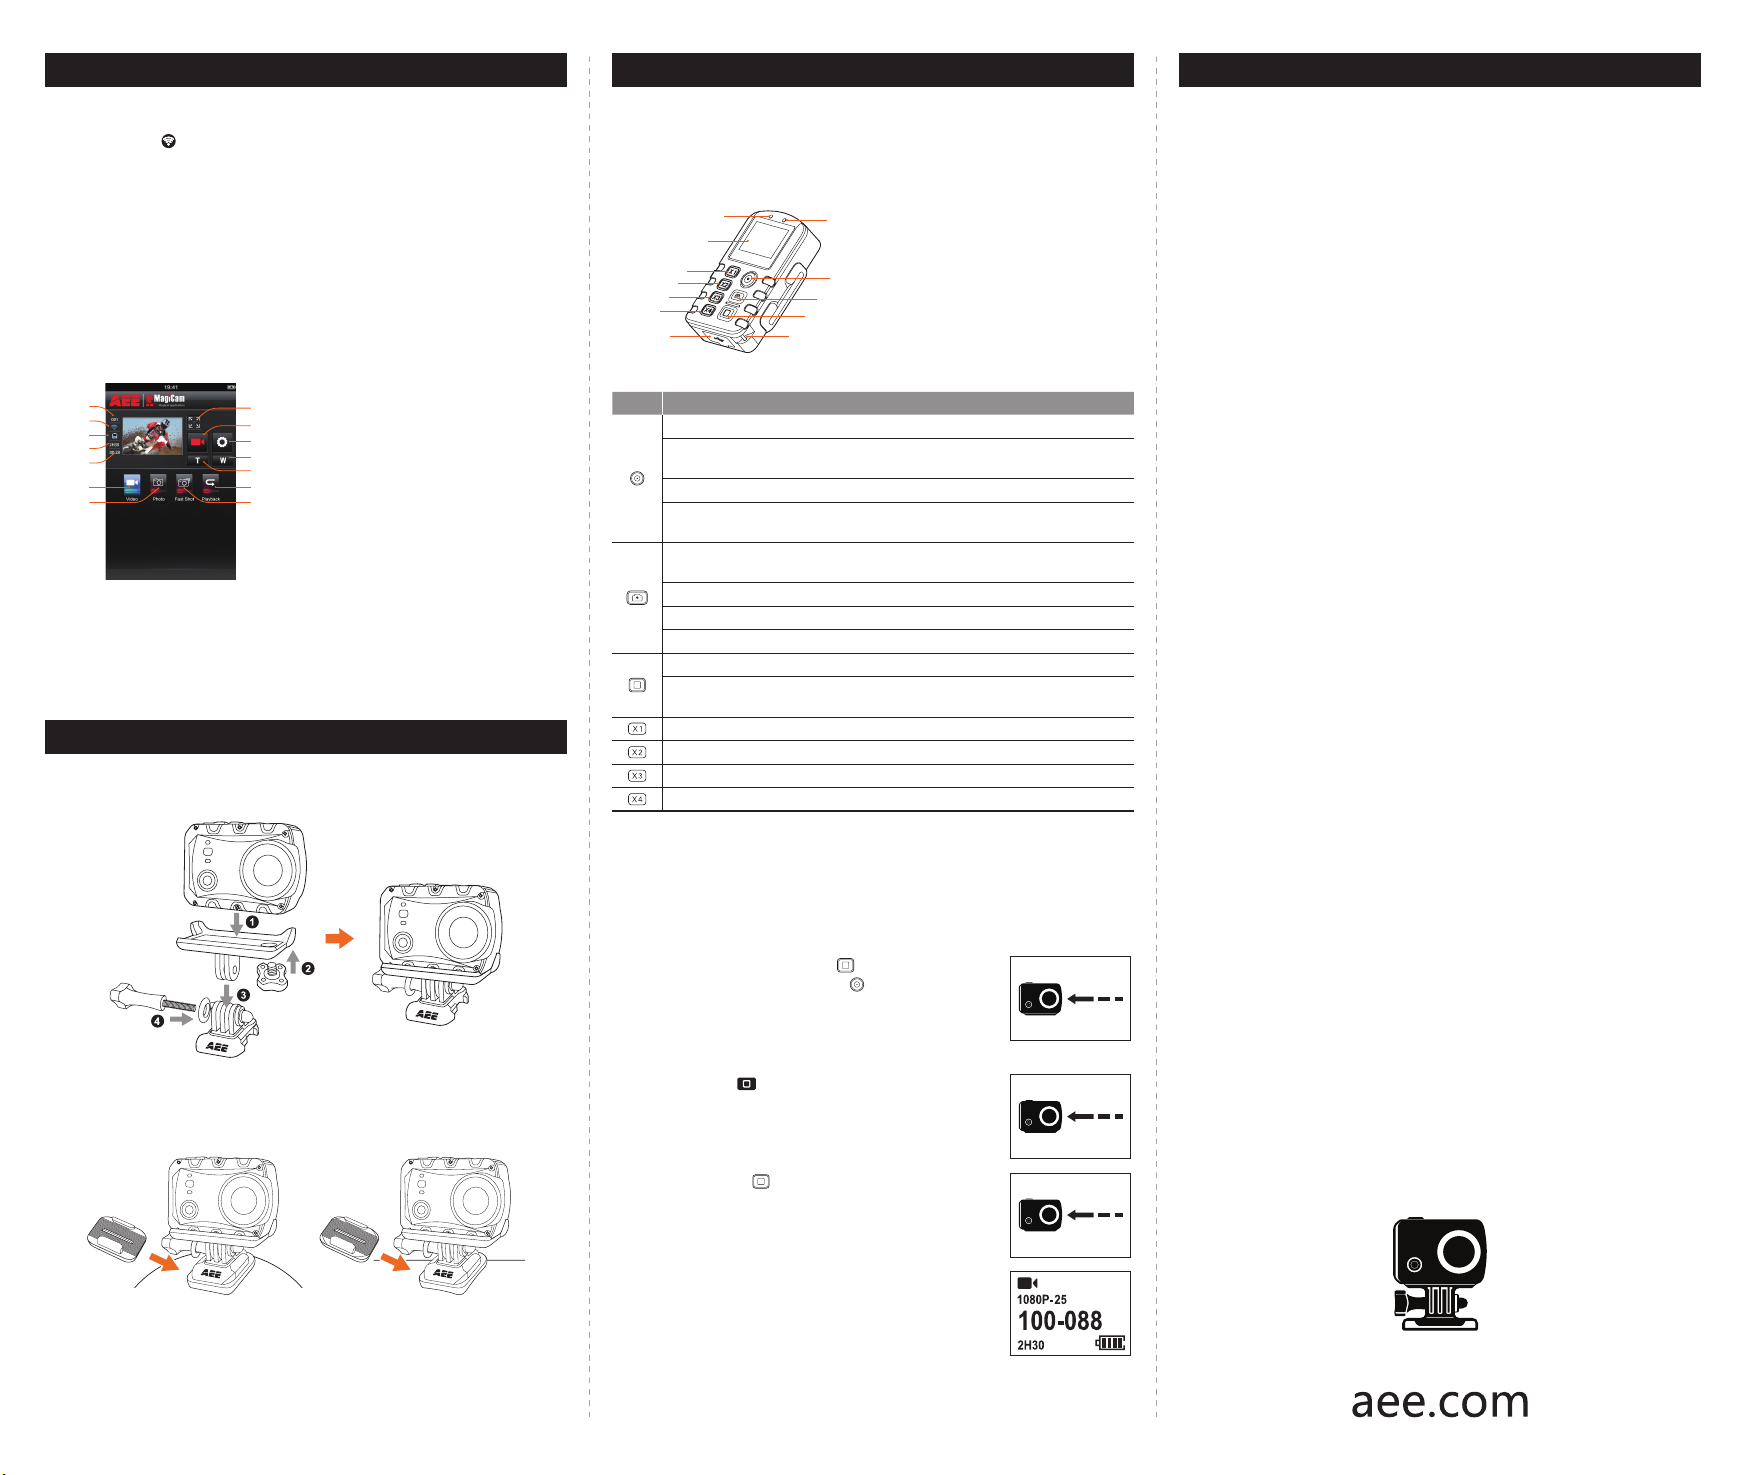
> Basic Operations of Touch Screen
1. Touch the display screen →
Touch " " to enter the main menu and " / " to zoom in/out the
view angle;
2. Main menu →
Tap the main icon to enter the submenu; tap " " to go back to the
Preview interface;
Video Parameters Photo Parameters
Basic Settings Playback
3. Submenu →
Tap the icon to enter the Parameter Settings interface; tap " / " to
nd parameters by paging up / paging down; tap the menu bar icon "
/ / " to go back to the submenu;
4. Parameter Settings interface →
Tap the desired parameter, and the system will automatically return
to the previous step;
5. Playback interface →
Press " " on the main unit to switch the le type (Video les / Photo
les / All les); tap a thumbnail to expand and view the corresponding
le;
Tap " / " to view thumbnails by paging up / paging down;
Tap " " to go back to the Preview interface;
Tap " " to delete le / protect le / automatically play photos.
> Video recording
" " normal video recording mode:
- Press " " once; the system makes a "beep" sound, hinting the start
of video recording;
- Press " " once; the system makes two "beep" sounds, hinting the
end of video recording.
1. Wi-Fi status indicator
2. Recording status indicator
3. Charging status indicator
4. Video/audio recording key
5. Speaker
11
( )
L2 )
12
L1 )
13
L2 )
14
L1 )
15
16
10. Power key
11. Wi-Fi key
12. Recording status indicator
13. Charging status indicator
14. Recording status indicator
6. Lens
7. Strap hole
8. Tripod mount
9. Microphone
15. Charging status indicator
16. TFT touch screen
17. Shutter key
18. Stop key
19. Storage cover
17 (
18 (
19
Preparations before Use
> Memory Card
When the device is off, turn the push key on the storage cover to the
“OPEN” position; then push the storage cover in the direction of arrow.
Insert TF card into the memory card slot in the arrow direction atly to
the end.
> Power on
Long hold the " " key for about 3s; at this moment, the camera
enters the video recording standby mode.
> Charge
To charge the device, use the supplied USB data cable to connect the
camera to power supply or a USB port on your computer.
> Voice recording
" " audio recording mode:
- Press " " once; the system makes a "beep" sound, hinting the start
of audio recording;
- Press " " once; the system makes two "beep" sounds, hinting the
end of audio recording.
> Single shot
" " Single shot mode:
- Press " " once; the system makes a "click" sound, hinting the
completion of photo shooting.
Note
:
1. In the photo modes, you can press the " " key to switch to the last
used video modes.
2. In the video modes, you can press the " " key to switch to the last
used photo modes.
3. In the preview state, you can long press the " " key switch to
voice recording mode.
4. When host in power-on state, you can long press the " " and "
" key simultaneously for 3s to turn off Host. After closing the host,
You can long press the " " and " " key simultaneously for 3s
to turn it on.
Wi-Fi
1
2
3
4
5
6
7
10
12
13
14
1
6
9
> Enable and Connect Wi-Fi
1. Press the " " key to switch on Wi-Fi function;
2. Search for Wi-Fi hot spot on a mobile receiving device, Select "AEE
Magicam" network and connect it (default password: AEE12345).
Then the camera and the mobile device are connected.
:
> APP Control Interface
After connection, you can remotely control your camera with a mobile
device, so as to achieve functions like video recording, photo shooting,
view angle switch, parameter setting, video cutting and sharing.
1. Total number of les
2. Wi-Fi status
3. Battery status
8
4. Remaining recording time or number of
9
shots
5. Recording Duration
11
6. Video recording mode
7. Single shot mode
8. Maximize preview
9. Current state icon /Start / Stop key
10. Parameter settings
11. Zoom out
12. Zoom in
13. Playback mode
14. Fast shot mode
The Wi-Fi App is available on the Apple APP store and Google Play for
free to download.
Use of Accessories
Mount plug bracket components:
Use of Remote Control
you can remotely control your camera with a remote control, so as to
achieve functions like video recording, photo shooting, view angle switch,
parameter setting.
1. Power Indicator
8
2
3
4
5
7
Key Functions
Long press it for about 5s to turn on/off the Wi-Fi based remote control.
Under the photographing mode, press it once to switch the current mode
to the video recording mode.
Under the video recording mode, press it once to start video recording.
After entering the mode selection state, press it to select the option
upwards.
Under the video recording mode, press it once to switch the current mode
to the photographing mode.
Under photographing mode, press it once to take a photo.
Long press it for about 2s to enter the mode selection state.
Select your desired mode, and press it to enter.
During video recording, press it to stop video recording.
After entering the mode selection state, press it to select the option
downwards.
Press it once to switch the viewing angle of the camera to wide angle.
Press it once to switch the viewing angle of the camera to medium angle.
Press it once to switch the viewing angle of the camera to narrow angle.
Press it once to switch the viewing angle of the camera to small angle.
10
11
12
2. Screen
3. Wide view key
4. Medium view key
5. Narrow view key
6. Small view key
7. USB port
8. Wi-Fi indicator
9. Power/Record key
10. Shutter key
11. Stop key
12. Strap hole
Tips
1. When the unit is in used for long period, it is natural that its surface
temperature will rise.
2. If you will not use the unit for long period, it is suggested that you
charge it once every 6th month to maintain the performance of
battery.
3. Use of digital zooming function during shooting will have slight
impact on the image quality.
4. The visual angles under different modes will be slightly different.
5. To smoothly play a high-denition video le, it is suggested to use a
PC or other professional device.
6. If you enable cyclic recording function for long period or frequently
shoot/delete photos, the memory card may have data fragments
so that you may not be able to store or shoot photos. Please back
up the data to external storage medium and perform formatting
operation to the memory card.
7. When the camera works in a high-temperature environment, the
lattice screen may become black, which is a normal phenomenon
and will not affect its function.
8. When the camera is used for a long time, the temperature of the
metal parts near the lens may rise, which is a normal phenomenon;
please do not touch the heated metal parts.
9. Hot plugging is not supported; in case of white screen, please restart
the camera to return to normal.
10.The main unit can be operated normally during charging, but this
may reduce the service life of both the battery and the device.
Use curved adhesive mount and at adhesive mount:
Curved Adhesive Mount Flat Adhesive Mount
> Pairing
Before use of the remote control, please first pair it with the camera
according to the following steps:
1. Turn on the main unit, and enable its Wi-Fi function;
2. First press and hold the " " key on the remote
control; then long press the " " key for about 5s
to turn on the device; when "WAIT HOST PBC"
appears on the remote control screen, release
these two keys;
3. Press the " " key on the main unit once; wait
until the remote control screen shows "PRESS
CONNECT";
4. Press the " " key on the remote control
again; wait until the remote control screen shows
"CONNECT";
5. Pairing is successful when the information on the
remote control screen is consistent with that on the
lattice screen of the main unit.
WAIT HOST PBC
PRESS CONNECT
INFO SYNC
CONNECT
WiFi
WiFi
WiFi

FCC Information and Copyright
This equipment has been tested and found to comply with the limits for a Class B digital device,
pursuant to part 15 of the FCC Rules.
These limits are designed to provide reasonable protection against harmful interference in a residential
installation. This equipment generates,
uses and can radiate radio frequency energy and, if not installed and used in accordance with the
instructions, may cause harmful interference
to radio communications. However, there is no guarantee that interference will not occur in a particular
installation. If this equipment does
cause harmful interference to radio or televi si on rece pt i on , whi ch can be determined by turning the
equipment off and on, the user is
encouraged to try to correct the interference by one or more of the following measures:
—Reorient or relocate the receiving antenna.
—Increase the separation between the equipment and receiver.
—Connect the equipment into an outlet on a circuit different from that to which the receiver is
connected.
—Consult the dealer or an experienced radio/TV technician for help.
15.19 Labelling requirements.
This device complies with part 15 of the FCC Rules. Operation is subject to the
following two conditions:
(1)This device may not cause harmful interference, and
(2) this device must accept any interference received, including interference that may
cause undesired operation.
changes or modifications not expressly approved by the party responsible for compliance could
void the user's authority to operate the equipment.
FCC RF warning statement: the device has been evaluated to meet general RF exposure
requirement , The device can be used in portable exposure condition without restriction.
 Loading...