


Co nt en ts
Preca uti ons............................................................1
Prefa ce...................................................................2
Produ ct Ce rtificat ion.............................................2
Produ ct Ov erview..................................................3
Produ ct Structur e.. ..... ... ........ ... ........ ... ..... ... 4-5
Fun ctions Featur es.......................................6 -7
Insta lla tion.........................................................8-9
Opera tin g Instruct ion s...................................10-13
Par ameter S ett ings.........................................13-16
Opera tio ns......................................................17-28
File S tor age And Play.....................................29-30
Adapt er................................................................31
Stand ard Acces sor ies...........................................32
Optio nal A ccessori es...........................................33
Speci fi C ati ons & Par ameters..............................34
Fcc Notic es.........................................................35
Notic es for Waterpro of Cas ing ...........................36

Precautions
1.This camera is a precision product. Please do
not drop it or hit it physically.
2.Keep the camera away from any object with a
strong magnetic field, like magnet or
electromotor, or any object emitting strong
radio waves, like antenna, as a strong magnetic
field may cause failure to SD20 or cause damage
to image and audio data.
3.Do not expose the camera to high temperature
or sunlight direct.
4.Keep the Micro SD card away from the strong
magnetic field of TV, speaker, or magnet. Do not
put it in any place with potential static, or the
data stored in it may be lost.
5.If the camera overheats, smokes or smell in
charging, please disconnect the power supply
immediately to avoid the risk of fire.
6.Put SD20 beyond the reach of any child for
charging, as the power cord may cause an
accidental suffocation or electric shock to the
child.
7.Please keep this product in a cool, dry, and
dust-free place.
8.R ISK O F EX P LO S IO N I F BA T TE R Y IS R EPL ACE D
BY AN I NCO RR E CT T Y PE .
DIS POS E OF U S ED B A TT E RI E S AC C OR DIN G
TO TH E INS TR U CT I ON S
-1-

Pr ef ac e
Thank s for pur chasing AEE ha nds -free mini
high- def inition digital cam era SD20 . Wit h small
size and integra ted desig n, hand s-free SD20 is
easy to ope rate. S upported by hi gh-de fin ition a nd
dy namic image captu ri ng t echno lo gy, it can
recor d re al scenes and various activi tie s an ytime
anywh ere, s o th at you can sh are wonde rful
re co rd in g e xp eriences with your f am il y a nd
frien ds.
This Ma nua l specifie s how t o use and install
SD20 an d pr ovi des det ailed i nform ati on,inclu din g
the instruct ion s on use, operatio n and installa tio n
as wel l as the techn ica l specifi cat ions. Ple ase read
this Manual c arefully to u nders tan d it bef ore u se
and kee p it we ll for long- ter m refer enc e.
Pr od uc t Ce r ti fi cation
As c ertified by such aut hor itative orga niz ations
as FCC an d CE, thi s product co mplies wit h the
recom men ded st and ards a nd thus gu arantees the
user' s saf ety.
-2-

Pr od uc t Ov er view
As a mu lt ifuncti on al no n-handh el d h ighde fi nitio n d ig it al sports v id eo ca me ra, th is
produ ct c an p erf orm many leading fun cti ons such
as hi gh-de fin ition digital phot ogr aphing, voice
stora ge, rea l-time dis play, v oic e-activa ted vid eo
recor din g, pho to sho oting, ti me dis pla y, rem ote
contr ol, digi tal zoom , TFT color screen, multifunct ion al keys , laser indi catin g, hi gh-speed USB
data tr ans mission, H DMI h igh-d efi nition out put
funct ion , low powe r pro mpt , mem ory card space
promp t and USB chargi ng. Sup plemente d by the
acces sorie s, t his pr odu ct int egrat ing multi ple
paten ted tec hno logies can be used to ph otograph
anyth ing , anytime, a nyw here.
Do not li tte r! Please re cyc le them !
-3-
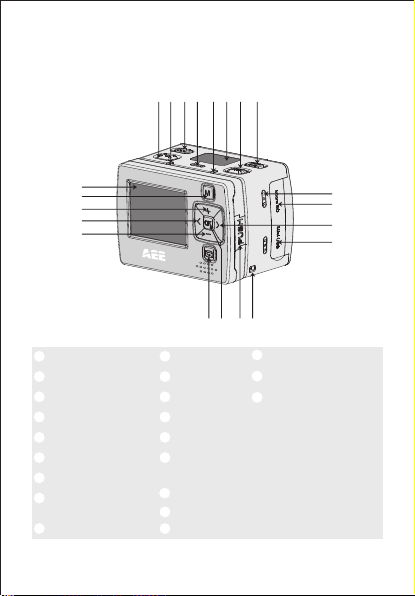
Pr od uc t St ructure ( out lin e dra win g)
16
15 18
192021
17
14
1
2
3
4
5
TF T display s cre en
1.
MENU key
2.
3.
Up key
4.
Left key
5.
Down key
Recall k ey
6.
7.
OK key
Push but ton o f TFT
8.
displa y scr een c lip
Lanyar d hol e
9.
98
7
6
LCD segm ent s cre en
10.
Buzzer
11.
SD card sl ot
12.
Right ke y
USB outp ut in ter fac e
13.
14.
Record
Green in dic ato r of
15.
video/ voi ce re cor ding
Pow er sw itch
16.
Micro phone
17.
Red indicator of working/charging
18.
19.
Shutte r
20.
VOX s wit ch
21.
-4-
10
11
12
13
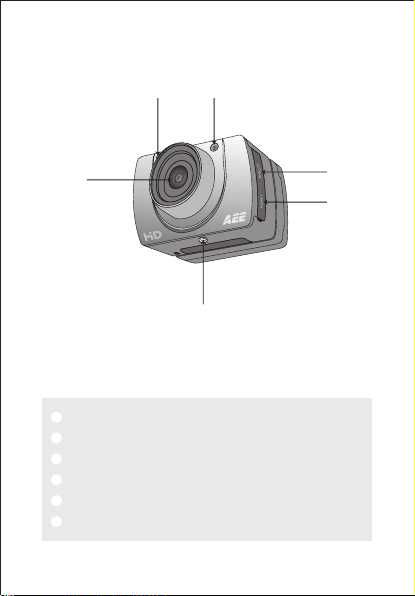
23 24
22
27
.
22
23.
24.
25.
26.
27.
Lens
Camera
Indicator ( red ) of vi deo r eco rdi ng/ sho oti ng
Laser trans mit ter
AV ou tpu t int erf ace
HDMI output inte rfa ce
Thread int erf ace
-5-
25
26

Fu nc ti on s & Featu res
>170°ext ra- lar ge wi de- angl e len s A per tur e f/2.8
> 5. 0 m eg a h ig h- de fi ni tio n c am er a, s upp or ti ng
720P/1 080 P hig h-d efiniti on vi deo r eco rdi ng;
>P ho to sh oo tin g fu nc tio n, s up porti ng a ma xim um
resolu tio n of 32 00x 2400;
>Laser i ndi cat ing f unction;
>4X digi tal z oom f unc tion;
>Laser s ync hro nou s video record ing f unc tio n;
>Video l oop c ove rag e functio n;
>Vo ice r ecordin g fun cti on;
>W ith LCD seg ment scree n a nd spl it TFT m ain s cre en, to
displa y var iou s wor king stat es in r eal t ime;
>W ith w ate rpr oof case, th e wa terproof gr ade is IP 68, the
waterp roo f dept h is up to 60 met ers , and it has two
back cov er de sig ns;
>TFT displa y scr een , to pl ay an d recall vi deo s, an d sho ot;
>Vo ice -activa ted vid eo reco rdi ng func tio n, to s upp ort
voice- act iva ted recording f unc iti on and onl y r ecord t he
select ed vi deo s, su pportin g a lon ger s tan dby t ime;
>W ith b ui lt -i n d is mo un table h igh-cap aci ty l it hi um
batter y, it ca n be re-cha rge d;
>Bette r im age eff ect , th ree vid eo o utp ut m ode s av ail abl e
for your s ele cti on:
108 0P( 192 0x1 080 ) 30fps/s ,
720P (12 80x 720 ) 60f /s,
720P (12 80x 720 ) 30f /s,
WVGA (84 8x4 80) 6 0f/ s,
QVG A (32 0x2 40) 3 0f/ s;
>Batte ry powe r det ect ion and Mic ro SD card fre e space
detect ion ;
>High- spe ed dyn ami c v ide o reco rdi ng, su ppo rting an
instan t res pon se to b right and dark e nvi ron men ts;
; ;
App licab le for 72 0P m ode or b elow
App licab le for 10 80P mod els
App licab le for 10 80P mod els
App licab le for 72 0P m odel s
-6-

Auto exp osu re, a uto w hite bala nce , eas y to op era te;
>
>Delic ate a nd st yli sh exteri or de sig n;
>HDMI h igh -defini tio n interf ace and AV out put i nte rfa ce,
to c onn ect a high-de fin iti on di spl ay devic e or T V to v iew
files;
>Suppo rti ng a Mi cro S D card of 64G m ax. ;
>High- qua lit y co lor fid eli ty, c lea rer and mor e reali sti c
image;
>It can remote c ont rol vide o re cording, st opp ing and
shooti ng of S D20 by usin g wirel ess rem ote con tro l;
unique cod e pai rin g func tio n, avoi din g inte rfe ren ce of
other re mot e con tro l;
>Recor din g MOV vide os, to be dir ect ly played by PC or
upload ed on to vi deo w ebsites ;
>Auto st and by po wer- sav ing funct ion ;
>Suppo rti ng fast forw ard and fast r ewi nd, and skip pin g
of con tents i n th e ne xt s egm ent (wh en c onn ect ing wit h
TF T screen pl aye r);
>S upp orting t ime se tt ing (R TC fu nc tio n) and t ime
superp osi tio n fun ction;
>Suppo rti ng US B2. 0;
>B uilt -i n m ic ro ph on e, fo rm in g h igh- qu al ity v oi ce
record ing e ffe ct;
>Va rio us sport ac ces sor ies, truly r eal izi ng t he v ideo
record ing o f spo rts ;
>Good se ism ic re sis tance;
>Va rio us sh oot ing mod es a vai lable: S ing le sh oot ing ,
three ph oto s con tin uous shootin g, co nti nuo us shooting;
>Setti ngs a uto s avi ng.
-7-
Installation
1:SD20 can be e ith er h and hel d or real ized no n-h and -held
use combi nin g w ith vari ous non- han d-h eld acce sso ries.
The c ame ra can be inst all ed in wher e you want ; or the
camera can be i nst all ed in the wate r b y t he waterpro of
case to ph oto gra ph sc ene in the wa ter .
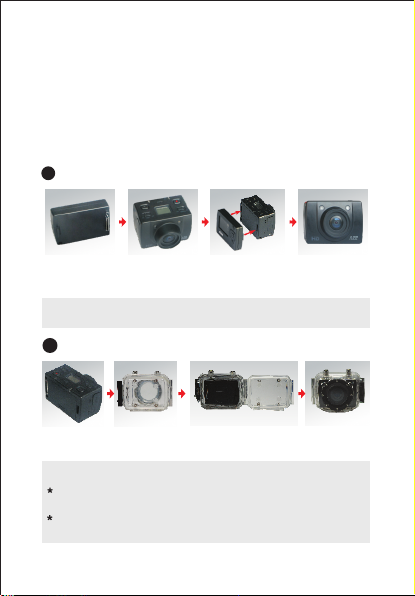
The inst all ati on is s hown as follow s:
1
Installation and removal of TFT display screen and main body
TFT display
screen
Pu ll o ut di sp la y sc re en: Pl ease p ull out th e di sp lay scree n
af te r pr es si ng P us h ke y.
Installation of waterproof case and main body
2
Main body
Note to u se wa terproof c ase
:Handl e wit h car e to av oid damag ing w ate rpr oof
case cau sed b y dro opi ng or physi cal s hoc k.
:Pleas e cle an wi th cl ear water a s qui ckl y as po ssi ble
after us ing a nd dr y out t o avoid rus tin g.
Main body Install TFT
Waterproof
case
display screen
onto the main body
Install main body into
the waterproof case
-8-

2.Inst all ati on of r emote con tro l
Ther e is a sep ara te rem ote co ntrol attache d to SD20.
Please in sta ll t he remote co ntr ol o nto th e correc t
positi on ba sed o n the a ccessor ies b elo w:
Vel cro
1
Clip
2
Bindin g tap e (op tio nal)
3
-9-

Op er at in g In st ructions:
Prepar ati ons b efo re use:
(1)Sta rt up a nd ch eck t he power of S D20
Turn the powe r swi tch to “ON”, the sys tem com es into
play. After the red indica tor is bri ght c ons tan tly , the
corres pon din g i cons on LC D s egment scr een wil l b e
lighte ned t o ent er no rmal prev iew s tat e.
At thi s time, it can view t he followi ng items o n L CD
segmen t scr een :
A. Record mode: The curr ent rec ord mod e can be view ed
on t he t op l eft corn er o f LC D segmen t sc ree n, “ ”
indica tes the video recor din g m ode and “ ” in dicates
the voic e rec ord ing m ode;
B.Phot o s hoo ting pr omp t: The sho oti ng i con “ ” c an be
viewed on t he LC D se gme nt sc ree n. T he ic on w ill twin kle
once whe n sho oti ng on e photo;
C.Powe r ic on: The powe r ic on “ ” c an b e vi ewe d on the
top rig ht c orn er o f LC D se gment sc ree n. T he i con wil l be
bright con sta ntl y af ter the s yst em c omi ng i nto play ; an d
the disapp ear anc e of the ico n me ans SD2 0 is shu t do wn
or enter s the s tan dby s tate;
D.Vide o re cor din g du rat ion : Du rat ion of t he c urr ent vid eo
record ing file is displayed on th e mid dle l ine of LCD
segmen t s cre en, suc h as “ ”. The video r eco rdi ng
durati on will s tar t dis pla yin g whe n pre ssi ng “R eco rd” k ey
once, and it wil l s top when p ressing “ Reco rd” key once
again.
Note:
The vide o rec ord ing d uration r esp ect ive ly on L CD segmen t
screen a nd TF T dis pla y scr een i s display ed sy nch ron ous ly;
-10-

E.Indi cat ion o f bat ter y pow er: T he ba tte ry po wer i con “ ”
can be v iewed on the b ott om left c orn er of LCD segment
screen a nd it w ill i ndi cat e the curre nt ba tte ry po wer a fte r
starti ng u p. M ore bla ck g rid s in dicate t he h igh er p owe r,
and it is lo wer c onv ers ely.
Note:
The battery po wer ind ica tion icon will not dis pla y und er
standb y or sh utd own s tate;
F.USB con nec tio n: The USB mo de icon “ ” ca n be
viewed on th e L CD segment sc ree n a nd it indicat es
whethe r the mach ine is con nec ted with the comp ute r.
The green indicator light on the left twinkles slowly.Th e
icon wi ll be lig hte ned a fte r co nnectin g wi th co mpu ter in
startu p state and it will not be disp lay ed when not
connec tin g wit h com puter;
G.TF car d cap aci ty in dicatio n: Th e TF ca rd ca pac ity icon
“ ” can b e vi ewe d on the b ott om right cor ner of LCD
segmen t s cre en to i ndi cat e the capa city of TF card. Mor e
black g rids ind icate th e hig her s par e cap aci ty, a nd it is
lower c onverse ly. The green indic ato r ligh t on the left
remain s on wh en th e car d is out of mem ory.
At t his tim e, it can vie w th e fol low ing ite ms on TFT dis pla y
screen :
A. Work mode : Th e vi deo rec ord ing ico n “ ” on the
top le ft corn er of TFT display screen in dicates th at it i s i n
video re cor din g sta ndby state;
B.Batt ery p ower: The b attery po wer ic on “ ” o n the
bottom l eft co rne r o f TF T displa y s cre en ind ica tes the
spare po wer o f bat ter y;
C.Reso lut ion o f vid eo re cor din g:1 080P/720P/ WVG A/Q VGA
on t he b ott om l eft c orn er o f TF T di splay sc ree n in dicates
th at t he s ys tem i s i n 10 80 P/ 72 0P /WVG A/ QV GA
resolu tio n vid eo re cording s tan dby s tat e;
-11-

D.Spar e s torage capaci ty: In for mat ion of wh eth er it has
extern al c ard " " and sp are s tor age c apa cit y " " can be
viewed o n the b ott om ri ght corne r of TF T display sc ree n;
E.It canno t respo nd t o opera tio ns o f "< " and ">" unde r th e
previe w sta te;
F. SD20 can be charg ed w ith the a tta che d pow er s upp ly or
USB c abl e. The “R ed Indicato r of Wor king/Ch arg ing”
on the top of the m ach ine will twi nkl e sl owl y in ch arg ing
and i t will b e brig ht consta ntl y afte r fully cha rging. Th e
chargi ng du rat ion i s about 3.5h;
Note:
Before use, ple ase che ck i f th ere is e nou gh b att ery pow er.
In c ase of a low b att ery pow er, pl ease cha rge SD2 0 via the
attach ed p owe r sup ply or US B ca ble . The “Red Ind ica tor o f
Wor kin g/C har ging ” w ill t win kle s low ly in c har gin g and
remain r ed wi th th e bat ter y ico n“ ” di spl ayed on the TFT
displa y scr een a fte r chargin g.
(2)For mat t he Micro SD c ard
Please s ele ct a hi gh- spe ed Mi cro SD card o nly a nd fo rma t
it o n SD 20 b efo re re cor din g an y video a nd v oic e or
shooti ng any photo. I f t he Micr o S D card has ever been
used o n o the r d evices, plea se for mat it o n S D20 before
any oper ati on fo r nor mal usage.
Note:
Please confir m wh ether fi les i n intern al m emory of S D20
and i n Micr o SD card ar e need ed bef ore operat ing ;Lo cked
files of S D20 a lso c an be f ormatted to re mov e;
(3)Set t he da te/ tim e
In p review m ode, pr ess “ M” key t o ent er th e menu
interf ace , pre ss “>” ke y to shift to the s etu p int erf ace “ ”,
press “ -” ke y to select the men u “ Dat e/Time” , and then
press “OK” k ey to e nte r the s etup inte rfa ce of “D ate /Ti me” .
(No te: To pr ess “M” k ey ca n exi t fro m the setup i nte rfa ce)
-12-

The yell ow num ber indi cat es the
curren t cursor po sit ion. To pre ss
“ <” or “ >” ke y can mov e t he
cu rso r and s ele ct da te or ti me.
Press “ OK” key to co nfi rm, an d
this nu mbe r wil l tur n re d and valu e
Then pre ss “ OK” key a gai n to fi nis h; Fi nal ly, move the
cursor to “ ” v ia “ <” or “ >”key and p res s “ OK”
key to con fir m dat e or ti me change d.
of date o r ti me c an b e ch ang ed.
Parameter Settings:
In previ ew mo de, p res s “M” key to ente r the m enu i nte rfa ce,
press “<” or “>” ke y to mo ve t he c urs or l eft and r igh t, a nd
press “ +” o r “-” ke y to mov e the cur sor up a nd d own . Af ter
select ing t he men u, press “ OK” ke y to set the sel ect ed
menu and t o pre ss “M” ke y aga in can exit .
(1)Set tin g of ca mer a paramet er:
a.Vide o ima ge re sol uti on: S ele ct 10 80P,72 0P, WVGA or
QVGA;
(720 P m ode ls d o n ot cont ain the set up opti ons of 1080 P
models )
b.Lase r syn chr ono us sh oot ing : Turn on o r tur n off the l aser
transm itt er;
c.Shoo tin g mod e: Select vid eo reco rdi ng “ ” or voi ce
record ing “ ” ;
Notes:
a.Unde r the vo ice recor din g mode, Pres s “ Reco rd” key
once, the sy ste m st art s re cor din g, v oic e re cor din g
durati on i s d isp lay ed o n t he b ott om o f T FT dis pla y
screen and the gree n i ndi cat or twi nkles slo wly; i f p res s
-13-

“ Reco rd” key aga in, th e syst em wil l stop an d save th e
curren t audi o file re cor ded , the gre en ind ica tor is of f
and the red i ndi cat or re mai ns br igh t (t he co rre spo ndi ng
operat ing pr omp t is o n LCD s egm ent s cre en) , and i t
return s to th e pre vie w mode.
b.The v oice rec ord ing p roc ess o nly resp ond s to o per ations
of “R eco rd”, “Sh utd own” a nd “VOX Swi tch” key; if turn on
“VOX Swi tch” in vo ice r eco rdi ng, t he vo ice r eco rdi ng wi ll
be stopp ed an d the f ile w ill be auto s ave d.
c.The lase r icon will be di spl ayed on the top lef t co rne r of
the p rev iew interfa ce when tur nin g o n the fun ction of
laser syn chronou s s hooting , w hich in dic ates th e sy ste m
is in t his shootin g mode . At thi s t ime , t he las er wil l b e
turned on wh en s tar ting re cording and i t wi ll b e tu rne d
off when s top pin g rec ording.
(2)Set tin g of ca mer a paramet er:
a.Sing le s hoo tin g: T he s hooting mode is auto set in si ngl e
shooti ng w hen startin g up every ti me; To pre ss “S hut ter”
once can t ake o ne ph oto ;
b.Thre e phot os contin uou s shoo tin g: To pres s “ Shu tte r”
once can t ake t hre e pho tos conti nuo usl y;
c . Co n ti n uo u s s h oot ing : Ta ke o ne p h ot o e ve ry
2s/3s/ 5s/ 10s /20 s/30s, t ill to pr ess k ey t o sto p or t he card
is full, o r the p owe r is ru n out;
d.Self -ti mer: Sel ect the s elf -ti mer d ela y tim e (0 s,5 s or1 0s) .
Press “ M” ke y to return t o “Previ ew” sta te af ter sel ecting;
press “Sh utt er” onc e, t he s yst em w ill start th e ti mer and
the se lf- tim er indi cat or twi nkles a t t he end of the dela y
time and i t take s one p hoto. Aft er fi nishing t he self-
timer f or on e tim e, the sy stem wil l aut o rec ove r the
shooti ng mo de to s ing le shooting.
-14-

If the 'S elf -timer Delay T ime” h as b een s et, but the
machin e is rest arted witho ut pres sin g “ Shut ter” key , th e
machin e will aut o s et the 'Se lf-t ime r D ela y T ime ' at the
state of 0 s;
e.Imag e res olu tio n: Select 3 M, 5M o r 8M;
(3)Set tin g of sy ste m paramet er:
a.Key to ne: Tur n on or t urn off the k ey to ne;
Note:
Voi ce of phot o shoo ting and video rec ord ing cannot be
turned off th rough th is it em. I t onl y tur ns off th e key
operat ion voi ce a nd ther e is no swi tch to t urn off voice of
photo s hooting and v ide o rec ord ing i n the m ach ine
system .
b.Time dis pla y: Please set bef ore usi ng; the mach ine wil l
auto r eco rd the shoo tin g d ate and tim e when shooting
image an d dis pla y on th e bottom ri ght c orn er of t he fi le;
c.Loop cov erage: T he video/au dio file wil l be a uto sav ed in
segmen t on ce ev ery 1 5 minute s wh en setti ng “ L oop
Covera ge”; a nd i f it i s not set , the vid eo/audi o fi le wi ll b e
auto sav ed in s egm ent o nce every 3 0 min ute s.
Note:
The c urr ent act ual seg men t file is determi ned by the file
size set , but n ot determi ned b y the t rue t ime , tha t is to s ay,
the f ile will be seg men ted more than 1 5/3 0 m inu tes at a
dark env iro nme nt.
d.Auto sta ndb y: S ele ct t he a uto s tandby time of 0, 2
minute s, 5 min ute s or 10 min ute s. In ca se of no an y
missio n and op eration after s electin g, the system wil l
start tim ing and SD20 wi ll tur n off i npu t a nd outp ut to
enter the st andby mode at the en d of the ti me set. If
there i s an y ope rat ion i n tim ing , th e system w ill r e-
time.I f the v ide o rec ording or s hut ter i s ope rat ed in the
-15-

standb y pro ces s, SD 20 wi ll be waked up. The def ault
standb y t ime is 5 minutes whe n s ele cti ng to res tor e t he
factor y def aul t;
e.TV ou tpu t fo rma t: N TSC or PAL; th e video for mat
output ted to TV can be selec ted . If the s ele cte d format is
change d, p lea se unplu g th e AV c abl e and the n re insert i t
to updat e the p ara met ers;
f.F ormat: Aft er confirm ing th at all fil es recorde d are not
needed t o be sa ved , a ll f ile s ca n b e re mov ed by
format tin g.
Note:I f t here i s n o c ard in serted, the m emo ry o f t he
machin e wi ll b e for mat ted ; af ter inse rti ng c ard , the sys tem
will format the car d i nse rte d, but not form at the memo ry
of the mac hin e;
g.Fact ory d efa ult : The o per ati on re sto res t he pa ram ete r
settin gs to factor y defa ult . Afte r rest ori ng, th e syst em
will set the disp lay mod e o f submenu of the “Me nu” in
Englis h state. P ress “M” key to enter the m enu sele ction,
press “<” o r “>” key t o ent er th e menu “Setup”, press “-“ k ey
to select the option “Lang uag e” , and the n it can set in
Chines e st ate. The s yst em will s et th e ti me at 2011 .01 .01
after re sto rin g fac tory defa ult ;
h.Lang uag e: “En gli sh”, “Sim pli fie d Chine se” or “Trad itional
Chines e” can b e sel ect ed via left o r rig ht ke y;
I. L igh t so urc e fr equency : Se lec t th e light s our ce f req uency
50Hz or 6 0Hz , dep end ing o n local g rid f req uency, in
order t o avo id th e sc reen fli ckering in pr evi ew mo de o r in
video re cor din g;
j. Dat e/Time: Time can be ad jus ted and chan ged. It wil l be
displa yed on th e botto m r ight co rne r of the v ide o fi le or
photo fi le wh en re cor ding or sho oti ng;
Note: To press “M” ke y und er th e sub men u may exit fr om it ;
-16-

Operati ons:
1.Inse rt th e Mic ro SD c ard.
Note:
Please selec t bran ded Mi cro SD ca rd suc h as SD car d of
Tosh iba and Kin gst on
2.Turn th e po wer swi tch to “ON” to turn on SD 20, and t he
red indi cat or will be lig hte ned and SD2 0 wil l ent er the
previe w mod e.
Note:
a.In case of low bat ter y pow er, you wil l fin d the batt ery
icon “ ” and t he me ssa ge “Lo w Powe r” on th e TFT s cre en.
b.If no M icr o SD c ard is in ser ted, you will fin d the Micr o SD
card ico n “ ” on th e TFT s cre en.
3.Vide o rec ord ing :
(1)Man ual r eco rdi ng:
Press “Re cor d” key once in prev iew stat e, t he syst em wil l
start r ecordin g, t he v ide o re cor din g du rat ion wil l be
displa yed on the b ott om right o f TFT disp lay scre en, the
“ G ree n In dic ato r of Video/ Voice R eco rding” and the
fronta l “ Vid eo Reco rdi ng/Shoo tin g Ind ica tor (Re d)” w ill
twinkl e slo wly , and the r eco rdi ng du rat ion o n L CD
se gm en t s cre en is d is pl ayed no rma ll y. The vi deo
record ing pro ces s o nly res pon ds to o per ati ons of zoo m
in (“+” ke y)/zoom out (“ -” ke y) func tio n; if p ress “R eco rd”
key again, t he sy ste m wil l sto p and save the c urrent v ideo
record ing file, t he front al g ree n ind ica tor of v ide o
record ing w ill be o ff, SD 20 will ret urn to the previe w
state, and t he re cor din g dur ati on on LCD s egm ent s cre en
will be st opp ed di spl aying.
Note:
a.Turn t he powe r swi tch to “OFF” in vide o reco rdi ng, the
system will s ave the cur ren t f ile reco rde d a nd the n s hut
down;
-17-

b.If t he b attery p owe r is lo w i n vi deo record ing , t he
system wil l sav e the current fil e rec ord ed and give the
messag e “ Low Bat ter y” o n TF T dis pla y sc ree n un til SD2 0
is turne d off o r aut o ent ers standby mo de;
c.If the memor y spa ce get s full in video rec ord ing , the
system wi ll s ave the curre nt f ile re cor ded, give the
messag e “I nsu ffi cie nt Memo ry” on TFT di spl ay scre en,
and go back to t he preview mode. The vide o r ecording
durati on on LCD se gme nt scr een al so wil l be stopped
displa yin g;
d.In cy cli c rec ord ing mode, th e sy stem wil l auto sa ve a file
e ve ry 1 5 m in ut es a nd t h e c ap ac it y i s a bo ut
500MB( 720 P)/ 650 MB(1080 P)
e.Afte r i t i s f ull y c harged, it ca n conti nuo usl y r eco rd
720P/1 080 P and t he re cor d tim e is ab out 2 h our s and 3 0
minute s; i t c an c ont inu ous ly r ecord WVGA and th e
record time is a bout 3 h ours; it can contin uou sly rec ord
QVGA and the r eco rd ti me is a bou t 3 hours and 30
minute s. The cont inuous voic e recordi ng time is abo ut
3.5 hour s;
f.I n voic e control mode, t he sys tem wi ll sta rt rec ord ing
when the envi ronment al voi ce is hig her than 65dB and
th e g re en ind ic ato r w il l t wi nkl e s lo wly ; i f th e
enviro nme nta l voi ce i s low er than 6 5dB a nd i t las ts fo r 2
minute s, t he sy ste m wil l auto sa ve th e 2-minu te f ile
record ed, the gre en indic ato r wil l be o ff, t he re d
indica tor wil l remain bright (the cor res pon ding record
stoppi ng p rom pt wi ll b e d isplaye d o n L CD segme nt
screen ), an d it re tur ns to the pre vie w sta te;
g.To pr ess “+” or “-” k ey in voice r ecordin g mode c annot
execut e voi ce in cre asing/r edu cin g ope rat ion; howe ver ,
-18-

to pres s “ +” or “ -” key whe n reca lli ng aud io fil e can
execut e voi ce in cre asing/r edu cin g ope rat ion;
h.Conn ect th e mac hin e to hig h-d efi nition dis pla y dev ice
with HD MI cable in previ ew s tat e, th e ba sic o per ati on of
the machi ne c an b e f ini she d o n t he h igh -de fin ition
displa y device ; howeve r, the di git al zo om fu nct ion
cannot b e rea liz ed in 7 20P/108 0P mo de;
4.Phot o sho oti ng
You can se t th e ima ge r esoluti on b efo re sh oot ing
photos . P res s “ M” key to e nte r t he s etu p i nterfac e, pre s
“>”o r “<” key t o move th e cursor to “ ” , sel ect the m enu
“ Ima ge Res olu tio n” , and pre ss “ OK” key to en ter t he
resolu tio n set up me nu. T here are th ree r eso lut ion m odes
availa ble f or yo ur se lection :
3M: P hot o sho oti ng re solutio n of 20 48x 153 6;
5M: P hot o sho oti ng re solutio n of 25 60x 192 0;
8M: P hot o sho oti ng re solutio n of 32 00x 240 0;
a.Manu al sh oot ing :
In pre view mo de, pre ss “ Shutter” on ce t o sh oot a pho to
with a “ Cli ck” so und , a nd the frontal red indi cator wil l
twinkl e o nce (the phot o shoot ing icon on L CD segment
screen will twin kle o nce ) and i t will return to the preview
state.
b.Thre e pho tos c ont inuous shoot ing :
Press “M” key t o enter the c ame ra s etu p in ter fac e, p res s
“>”o r “<” key t o move th e cursor to “ ” , sel ect the m enu
“Th ree Pho tos Cont inu ous Shooting”, a nd press “OK” key
to c onf irm . Pre ss “M” key to ex it th e se tup i nte rfa ce af ter
settin g. Press “ Shu tte r” onc e at this tim e, a nd SD20 wi ll
contin uou sly s hoo t three photos .
-19-

c.Cont inu ous s hoo ting:
Press “M” key to ente r the c amera setup inte rface, press
“ >” key to move the curs or to “ ” , sel ect th e menu
“ Cont inuous Shootin g” , a nd pres s “ OK” k ey to set the
contin uou s shootin g int erval tim e a s 0s, 2s, 3s,5 s,1 0s,
20s,30 s. Press “ M” key to e xit the setu p inte rfa ce after
settin g the i nte rva l tim e. Pr ess “S hut ter” a t thi s tim e, an d
SD20 w ill star t sh oot ing one p hot o e ver y 2s , 3 s,5 s,10s,
20s,30 s, ti ll to p res s “Shutter” k ey ag ain t o sto p.
d.Self -ti mer:
Press “M” key to en ter the cam era set up i nte rface, press
“>” ke y to mo ve the cur sor to “ ”, sel ect the menu “Self-
timer” , an d pr ess “OK” ke y to set th e de lay tim e as 0s, 5s
or 10s . Pre ss “ M” key to exi t the setup int erf ace aft er
settin g th e de lay tim e. P res s “S hut ter” once at thi s ti me,
and SD20 will star t t he tim er and shoo t a photo at the
end of the d ela y tim e.
Note:
a.If the mem ory spa ce gets ful l, the system wil l giv e the
messag e 'In suf fic ien t Mem ory' (viewin g on TFT dis pla y
screen ), an d go ba ck to t he previe w mod e;
b.The se tti ng of s elf-tim er de lay t ime i s in effect ive o nce .
5.Voic e recordi ng
Press “ M” key to ent er t he camer a se tup interfa ce, sel ect
the men u “ Shoo t Mod e” , p res s “ OK” k ey to ente r the
select ion interface, pre ss “<” o r “>” k ey to select “ ”,
press “ OK” key to con firm your selec tio n, and fina lly
press “M” key t o ex it the set up interfa ce. Pres s “ Rec ord”
key to star t re cor din g, and the gree n in dic ato r twink les
slowly , th e TF T scr een display s th e vo ice rec ord ing ico n,
and the ti mer i s sta rte d.
-20-

Note: In case o f re-s tar tin g or the system is waked up, it
will rec ove r to vi deo r ecordin g mod e.
6.File r eca ll
You can view t he audio fi les, v ideo f iles and ph oto fi les on
SD20 . Pres s “ ” key t o ente r the rec all selecti on inte rface
and p ress it again t o exit. Selec t the me nu “AV Fil e” to view
the a udio and video file s or select th e menu “Photo File” t o
view the phot o files. In c ase of many recalling files, time
ente ring the preview interfac e will be e xtend ed.
(1)AV Fi le
Select the men u “AV File” and pres s “O K” k ey t o vi ew t he
record ed audio o r v ide o f ile s. Pre ss “-” k ey to ent er the
thumbn ail p rev iew m ode.
You ca n pre ss “Me nu” ke y to de let e or pr ote ct th em wh en
viewin g vid eo or a udi o files.
Del ete : Del ete t he cu rrent fil e;
Dele te all: De let e all aud io and vid eo files unde r no
protec tio n;
P rot ect : Lo ck files t o pr ote ct them; t he icon “ ” will
appear on th e upp er l eft c orn er of each pro tec ted f ile ;
repeat thi s operat ion to unpro tec t th e pro tec ted fil es;
no o per ati on ca n de lete the p rotecte d fi les e xce pt
format tin g.
a.Audi o fil e
Press “<” or “>” ke y t o s elect a n a udi o file, an d t o p ress
“OK” key c an pl ay/ sto p it. In pl ayi ng, y ou ca n press “+” key
and “ -” key to adj ust the vol ume and press “ ” k ey to
pause/ p lay t he fi le.
Note: N o fun cti on of fas t for war d and fas t rew ind i n au dio
file. In p lay ing v ide o/a udio file s, to p res s “OK” ke y can e nter
file pr evi ew st ate ; at t his time, pr ess “ ” k ey t o exi t fr om
file rec all m ode .
-21-

b.Vide o fil e
When pla yin g a vid eo file, y ou can pre ss the following
keys to ex ecu te op era tions:
“+”: Increa se th e vol ume ;
“-” : Reduce t he vo lum e;
“<”: Fas t rew ind ;
“>”: Fas t for war d;
“ ” : Pre ss it to pause play ing and press it agai n to
resume p lay ing ;
“OK” key: St art /st op pl aying vid eo fi le.
Note: Fa st re wind can be s et as t wof old o r fou rfold
(2)Pho to fi le
Enter th e photo fil e recall in ter fac e, pre ss “ -” key t o
previe w t he pho to f ile thum bna ils , a nd t hen pres s “ OK”
key to vie w the s ele cte d file.
When v iew ing a p hot o file, you can pre ss the fol low ing
keys to ex ecu te op era tions:
“+”: Zoom in th e cur ren t pho to;
“-”: Pre vie w t he phot o f ile thum bna ils or z oom out the
curren t pho to;
“<” : Se lec t th e le ft phot o, o r press it to mov e th e photo
up in zoom -in m ode ;
“>”: Selec t the rig ht ph oto , or pr ess i t to m ove t he ph oto
down in zo om- in mo de;
“O K” key : To p res s “ OK” key a fte r zoomi ng in t he phot o
can m ove th e p hot o ho riz ont all y and v ert ica lly vi a
combin ing w ith “U p”, “Dow n”, “Left” or “Rig ht” ke y.
“ ”: Pre ss it t o exi t the p hot o view inte rfa ce;
Press “ Me nu” key in v iew mo de to exe cut e th e
operat ion s bel ow:
Delete : D elete t he cur ren t photo file (T he d ele tio n
select ion o f “ ” a nd “ ” wil l app ear a fte r pre ssi ng “OK”
key twic e and s ele ct “ ” to d elete) ;
Delete a ll: D ele te al l photo fil es un der n o pro tec tion;
-22-

Protec t: Lo ck fil es to pr ote ct the m; the icon “ " will
appear on th e uppe r left co rne r of each pr ote cte d file;
repeat this ope rat ion to u npr ote ct t he p rot ect ed f ile s; n o
operat ion c an de let e the prote cte d fil es ex cep t formatt ing ;
Auto play : Aut o pla y the pho to files in the folder at an
interv al of 5 s;
DPOF: W hen view ing a p hoto fi le, if yo u p ress “ M” key to
enter t he s etu p interf ace and sel ect t he m enu “DP OF”, t he
icon “ ” wil l app ear o n the u pper left c orn er of t his f ile .
About DP OF
As a s tan dard to re cord the p rint ord ers s ent t o the M icr o
SD card, DPOF (Digital Print Orde r F orm at) is a pplicab le
to t he photo s sh ot by dig ita l cam era s. You can d esi gna te
the pho tos to be printed and the n umb er of the ir co pie s.
The fo llo wing op era tio ns c an be e xec ute d if your digital
camera i s DPO F com pat ible:
Insert the Micr o S D ca rd into a DPOF comp ati ble pri nte r
to outpu t the p hot os as o rdered.
The pr int er c omp ati ble with you r camer a c an foll ow the
DPOF ord ers t o pri nt th e photos.
Note:
(1)The DPO F p rin ting r equ ires a Micr o SD card w ith pres et
DPOF inform ati on. I t wil l fai l if y ou si mpl y sel ect t he
photos f rom t he Mi cro S D card and tr y to pr int t hem .
(2 )So me D POF c ompa tib le pr int ers an d dig ital p hot o
develo pin g s hop s m ay fai l t o p rint the phot os bas ed on
the sp ecific set tings. If t his is the cas e wi th your prin ter,
please refe r to t he Us er Ma nua l att ached to i t. In a not her
case, pl ease c hec k t he DPO F c ompatibili ty with t he
digita l pho to de vel oping sho p.
(3)If the DPOF inf orm ation of the Micr o S D car d has been
set by an oth er ca mer a, pl eas e do n ot in ser t thi s card in to
SD20 to r ese t t he DPOF informat ion , or the DP OF
inform ati on ma y be i nvalid or c ove red . S ome tim es,
specia l pho to typ es make it imp oss ibl e t o set the DPOF
inform ati on.
-23-

7.Remo te co ntr ol
You ca n use t he at tac hed r emote contro l of SD 20 to
contro l the video reco rdi ng, photo sho oti ng, stoppi ng
and l ase r func tio n tur ning o n/o ff. The red indi cat or on
the rem ote con trol wil l tw ink le on ce w hen you pres s an y
of the fol low ing k eys :
Record
Shutte r
Stop
Please foll ow the ste ps bel ow t o c ode the r emo te con trol
before use t o re alize th e cor res pon den ce of remote
contro l and S D20 :
1.Turn off SD 20, pr ess and ho ld “ Reco rd” key , turn th e
power swit ch to “ ON” , a nd then rel eas e ” Record” k ey.
Press bo th “Recor d” and “Stop” key o n the r emo te co ntrol
once wi thi n 3s to fi nis h th e remote con tro l co de pa iri ng
proces s. SD2 0 will tick tw ice af ter co ding the rem ote
contro l suc ces sfu lly.
Note:
a.Use wire less r emo te con tro l t o cont rol SD2 0 c an che ck
whethe r t he c ode pairin g i s s ucc ess ful . T he contr ol
functi ons i ncl ude : Vi deo r eco rding start ing /st opp ing ,
photo s hoo tin g, w aki ng in sta ndb y mo de, a nd l aser
light turni ng on/of f; SD 20 will tick o nce f or ea ch
operat ion . In cas e o f vide o recordi ng stop pin g o r l ase r
light tu rni ng of f, SD20 wil l tic k twi ce;
b.Remo te c ont rol r ang e: R emo te co ntr ol w ith in 15 met ers
in any ang le ho riz ont ally without b arr ier s;
c.To pre ss “ Rec ord” , “Shut ter” or “ Sto p” key on t he r emo te
contro l in st and by mo de can wake u p the s yst em;
lo ng p re ss “S hutt er”
ke y fo r 3s can turn o n an d
t ur n of f the la se r func ti on
-24-

8.Stan dby m ode :
A. Non-voice co ntr ol st and by:
Push the VO X sw itc h to “OF F” a nd t urn the pow er s wit ch
to “ON” , the sys tem wil l star t wor kin g and it will enter
previe w state after fin ishing init ial iza tion. In cas e o f no
any mission an d oper ati on, th e syst em wil l auto en ter
standb y p owe r-sa vin g m ode at the end o f t he a uto
standb y t ime set. Pres s “ Reco rd” o r “ Shut ter” ke y a t t his
time, or rem ote control any key on the remo te cont rol,
the syst em wi ll be w ake d up.
Note:
a:To pres s key s on TFT sc ree n in st and by mo de canno t wake
up the sys tem ;
b:The LC D seg ment scre en do es not d isp lay anyth ing i n
standb y mod e.
B.Voic e control s tan dby :
Push t he V OX s wit ch to “ ON” and tur n th e power swit ch
to “ON” , the sys tem wil l star t wor kin g and it will enter
previe w stat e after fin ishing init ial ization . In cas e o f n o
any mi ssi on a nd oper ati on, and t he envi ron men tal voice
is lo wer th an 65 dB con tin uou sly, th e syst em wil l aut o
enter s tan dby pow er-s avi ng mode at th e en d of the aut o
standb y t ime set. Pres s “ Reco rd” o r “ Shut ter” ke y a t t his
time, or rem ote control any key on the remo te cont rol,
the sys tem wil l be waked up. When the env ironmen tal
voice is high er than 65dB, the system will wak e u p and
enter vi deo r eco rdi ng state.
Note:
a:To pres s key s on TFT sc ree n in st and by mo de canno t wake
up the sys tem ;
b:The LC D seg ment scre en do es not d isp lay anyth ing i n
standb y mod e.
-25-

9.AV out put conne cti on:
In prev iew stat e, conn ect SD2 0 w ith the dis pla y devi ce
with AV cab le, and the n all functio ns of SD2 0 can be
operat ed.
Note:
After connect ing wit h au dio and v ide o di spl ay d evi ce, TFT
screen on SD2 0 a nd the voic e w ill be turn ed off, and the
audio and vid eo will be dis pla yed on the dis pla y dev ice .
L CD seg me nt s cr ee n o n S D20 w il l d is pl ay t he
corres pon din g fun ction operat ion s nor mal ly.
10.HDM I out put c onn ection:
In pre vie w st ate, co nnect SD20 with the h igh-def ini tio n
displa y dev ice wit h HDM I cab le, and the n functio ns of
SD20 can be oper ate d; however, dig ital z oom func tio n
cannot b e ope rat ed in 720P/10 80P m ode .
Note:
a.Afte r con nec tin g with HDMI displa y dev ice , TFT scr een
on SD20 an d th e vo ice wil l be tur ned off , an d th e au dio
and vide o wil l be di spl ayed on the d isp lay d evi ce;
b.SD20 m ay be i n abnormal sta te if t he HDMI cab le is
insert ed or unpl ugg ed impr ope rly whe n con nec ting. It
can be r eco ver ed a fte r re -st art ing a nd L CD s egm ent
sc re en w il l d ispl ay t he c orre sp on di ng f un ctio n
operat ion s nor mal ly.
11.USB c onn ect ion :
a.When the re i s no pre set battery in SD20, u se U SB p owe r
adapte r to co nnect w ith S D20 , al l funct ion s ca n b e
operat ed (m eanwhil e, LC D s egment sc ree n a nd TFT
displa y scre en will disp lay the corr espondi ng operation
prompt s);
-26-

b.In st art up s tate, us e US B ca ble to con nec t wi th the
comput er, data sto red in SD20 mem ory and the Mic ro
SD card can be rea d (at this tim e, LCD seg men t s cre en
will dis pla y the U SB co nnectio n sta te ic on) ;
c.SD20 may be i n ab nor mal s tat e if the USB ca ble i s
insert ed o r u npl ugg ed i mproper ly w hen co nne cting,
and re-s tar t to re cov er.
12.Pro mpt o f key t one
a.Pres s “R eco rd” o r “S hut ter” key once in nor mal usi ng,
SD20 wil l tic k onc e to in dicate th e eff ect ive o per ation;
b.When s top pin g vid eo record ing , SD2 0 wil l tic k twice;
c.SD20 will t ick t wic e to in dic ate t he succe ssf ul code
pairin g;
d.Pres s “Sh utt er” key in v ide o rec ord ing , SD2 0 wil l not giv e
prompt ;
e.When ope rat ing o n TF T di spl ay scree n, p res s “Me nu” key
in pre vie w st ate , p ress “ >” or “<” ke y t o enter the menu
“Se tup”, p res s “+” or “-” key t o sel ect t he me nu “Ke y Tone”,
and then y ou ca n tur n on or t urn off the key to ne;
f.I f the s yst em is i n vid eo re cor ding, press “Stop” k ey on t he
remote con trol onc e, SD 20 w ill t ick twic e to i ndi cat e the
video re cor din g sto pping;
g.If th e sys tem i s in v ide o rec ord ing, pre ss “Shutt er” k ey on
the re mot e co ntr ol once, S D20 and h orn on TFT d isp lay
screen w ill n ot gi ve an y prompt;
h.Pres s any key on th e remote cont rol in st and by state,
SD20 wil l tic k onc e to wa ke up the mai n sys tem ;
-27-

13.Pro mpt o f las er li ght
a.Afte r s tar tin g u p, lon g p res s “ Reco rd” k ey for 3s in any
state, t he sy ste m wil l lighten t he la ser l igh t;
b.Long pr ess “ Rec ord” key for 3s when tu rni ng on las er
light, t he sy ste m wil l turn off th e las er li ght ;
c.The las er lig ht tur nin g on/o ff also can be op era ted in
standb y sta te;
d.The wir ele ss r emo te c ont rol ca n e xec ute la ser li ght
turnin g on/ off o per ation.
Note:
The fu nct ion of l ong pres sin g “ Reco rd” key f or 3s to tur n
on/off laser l ight does no t inte rfe re wit h the set tin g of
turnin g o n “ L aser S ync hro nous S hoo tin g” u nder t he
camera p ara met er se tting.
14.Turn On /Of f TFT D isp lay
a.In a ny stat us, long pres sing Sh utt er key for 3 sec ond to
turn on or o ff TF T dis pla y;
b.TFT d isp lay can’ t be t urn ed o n or o ff by pressin g Sh utt er
key on rem ote c ont rol ;
-28-

File Stor age and P lay
(1)US B Cab le
You can copy or c ut the reco rde d v ideo files to y our
comput er via the USB cabl e, o r remove t he M icr o SD ca rd
and ins ert it in to a card rea der to re ad the video data.
Then, y ou ca n select our s oft war e fro m the att ached CD o r
such re commended s oft wares as M edi a Player a nd KM
Player t o pla y the v ide os.
USB Port
on SD20
Note:
(1) Plea se tu rn of f the S D20 befor e ins ert ing o r unp lugging
the USB ca ble .
(2) Turn the po wer s wit ch to “ OFF ” bef ore c harging
SD20.T he re d ind ica tor will tw ink le sl owl y in ch arging.
(3) You can d irectly c opy o r cut t he re corded fi les t o you r
com put er wh en th e pow er switch i s tur ned t o “ON ”.
USB Cabl e
-29-
USB Port
on PC

②.
HDMI C abl e and AV Ca ble You c an a lso use the HDM I
cable or AV c abl e t o c onn ect SD20 t o a TV or mon ito r
with HDM I int erf ace , in or der t o play the recor ded f ile s .
TV / Mo nitor
AV Int erfac e
on SD 20
AV Int erfac e
AV Cab le
HDM I Inter face
on SD 20
Not e:
(1) Afte r con necti ng SD 20 to the monit or vi a the HDMI cabl e, pl ease
sel ect the inpu t s ourc e fo r t he m onito r t o di splay th e da ta from
SD2 0.
(2) If y ou se lect the AV cabl e, pl ease conne ct ea ch of its termi nals to
the r eleva nt TV or mo nitor t ermin al in the s ame col or.
(3) Pleas e adju st the para mete rs of t he mo nito r to op timi ze the imag e
eff ect.
on TV
HDM I Inter
fac e on TV HDM I Cable
-30-

Adapter
This pr odu ct always co nforms to th e aut henti cat ed
AC adapter. T he ada pter s hould be marked one of
the fol low ing:
NOT ICE:
Whe n usin g the p ower a dapt er, make s ure th e rat ing v olta ge on
it is c ompa tible w ith th at of th e devi ce to av oid p oten tial
dam ages re sulti ng from i ncorr ect usa ge of pow er supp ly.
-31-

Standard Accessories
Main bod y TF T display
Batter y Access ory f or
AV Cable USB Cable Pouch Chain for
Note:
(1):Th e actua l items ma y be di fferent fr om the pi ctu res .
(2):Th e a ctu al a cce sso rie s ma y va ry wit h configur ati on
flat ins tal lat ion
CD User Man ual
Pac kag e is subject to ch ang e wit hou t prior not ice .
listed he re, depend ing on the con fig ura tio n o f t he
produc t you p urc has e.
Remote c ont rol Wat erp roo f
screen
Flat acc ess ory
-32-
case
Bracke t
main unit

Optional Accessories
Por tab le po wer suppl y
(25 00m AH)
Por tab le po wer suppl y
(850mA H)
Access ory f or in sta llation
onto bic ycl e
Access ory f or so ft pl astic
flat ins tal lat ion
Access ory f or in sta llation
onto hel met t op
Access ory f or in sta llation
onto bic ycl e
Clip for m ain u nit
HDMI cab le
-33-

Sp ec if ic atio ns & Parameter s
View Angle 170
Pixel 5.0 Mega CMOS SENSOR (2592*1944)
Battery 1000mAh Lithium Battery
Power Consumption 350mA@ 3.7V (MAX)
Video Recording Duration About 2.5h
Voice Recording Duration About 3h
Voice Control Standby Duration About 250h
Storage Temperature -20°C ~ 60°C
Operating Temperature -10°C ~ 50°C
Operating Humidity 15~85%RH
Memory Card Micro SD/MMC
Charging Duration About 3.5h
Micro SD Card Capacity 64GB SDHC Max.
File Storage Normal: 30 Minutes/Segment;
loop: 15Minutes/Segment
Video Recording , 720P (1280*720),
WVGA (848*480) , QVGA (320*240)
Photo Shooting Resolution Available: 3M, 5M, or 8M JPEG
Video Format MOV
Voice Format WAV
USB Port USB 2.0
Remote Control Range 15 Meters
Operating System Windows XP /Vista or Above/Win 7/ Mac OS
Weight 82g (without screen)/108g (with screen)
Dimension 60mm x 51mm x 42mm
NOTICE:
Specifications are subject to minor change with upgrade and update.
Please base on real object.
°
1080P(1920x1080)
-34-

FC C Not ic es
1. The man ufac turer is not resp ons ible for any rad io or TV
int erfer ence caus ed by una uth orized modi fic ati ons to this
eq uip men t. S uch mo dif ica tio ns c ould vo id t he use r's
aut horit y to oper ate the e quipm ent.
2. This d evice compli es with Par t 15 of the FCC Rul es. (1)
Thi s devi ce ma y not c ause har mful int erf eren ce, an d (2) thi s
dev ice m ust a cce pt a ny inter fer enc e re cei ved, in clu ding
int erfer ence th at may ca use und esire d opera tion.
NOT E: T his eq uipm ent h as b een te sted an d fo und to
com ply w ith the limi ts f or a Cla ss B dig ita l device , pu rsu ant
to par t 15 of the FCC Rules. Th ese lim its are des igne d t o
pro vide reas onabl e pro tect ion a gain st ha rmfu l in ter fer ence
in a r esi dent ial i nstal latio n. Th is equ ipme nt ge ner ate s us es
and can ra diate radio frequ enc y en ergy and , if not inst all ed
and us ed in accor dance wi th the instruc tio ns, ma y cause
har mful i nter feren ce to ra dio c omm uni cati ons . How eve r,
the re i s no gua rantee that int erfe rence wil l not occu r in a
par ticul ar inst allat ion. If t his equ ipmen t does ca use
har mful inte rfe ren ce to radio or t elevi sion r ecept ion, whic h
can be det ermin ed by turn ing the eq uipm ent off and on,
the user is e ncou raged to t ry t o c orrect the inter feren ce by
one o r more of t he foll owing m easur es:
--R eorie nt or rel ocate t he rece iving a nte nna .
--I ncrea se the se parat ion bet ween th e equip men t and
rec eiver.
--C onnec t the equ ipmen t into an o utlet o n a circu it
dif feren t from th at to whi ch the re ceive r is conn ected .
--C onsul t the dea ler or an e xperi enced r adio/ TV tec hnici an
for h elp.
-35-
-36-

S-MSD20G18021R2
 Loading...