

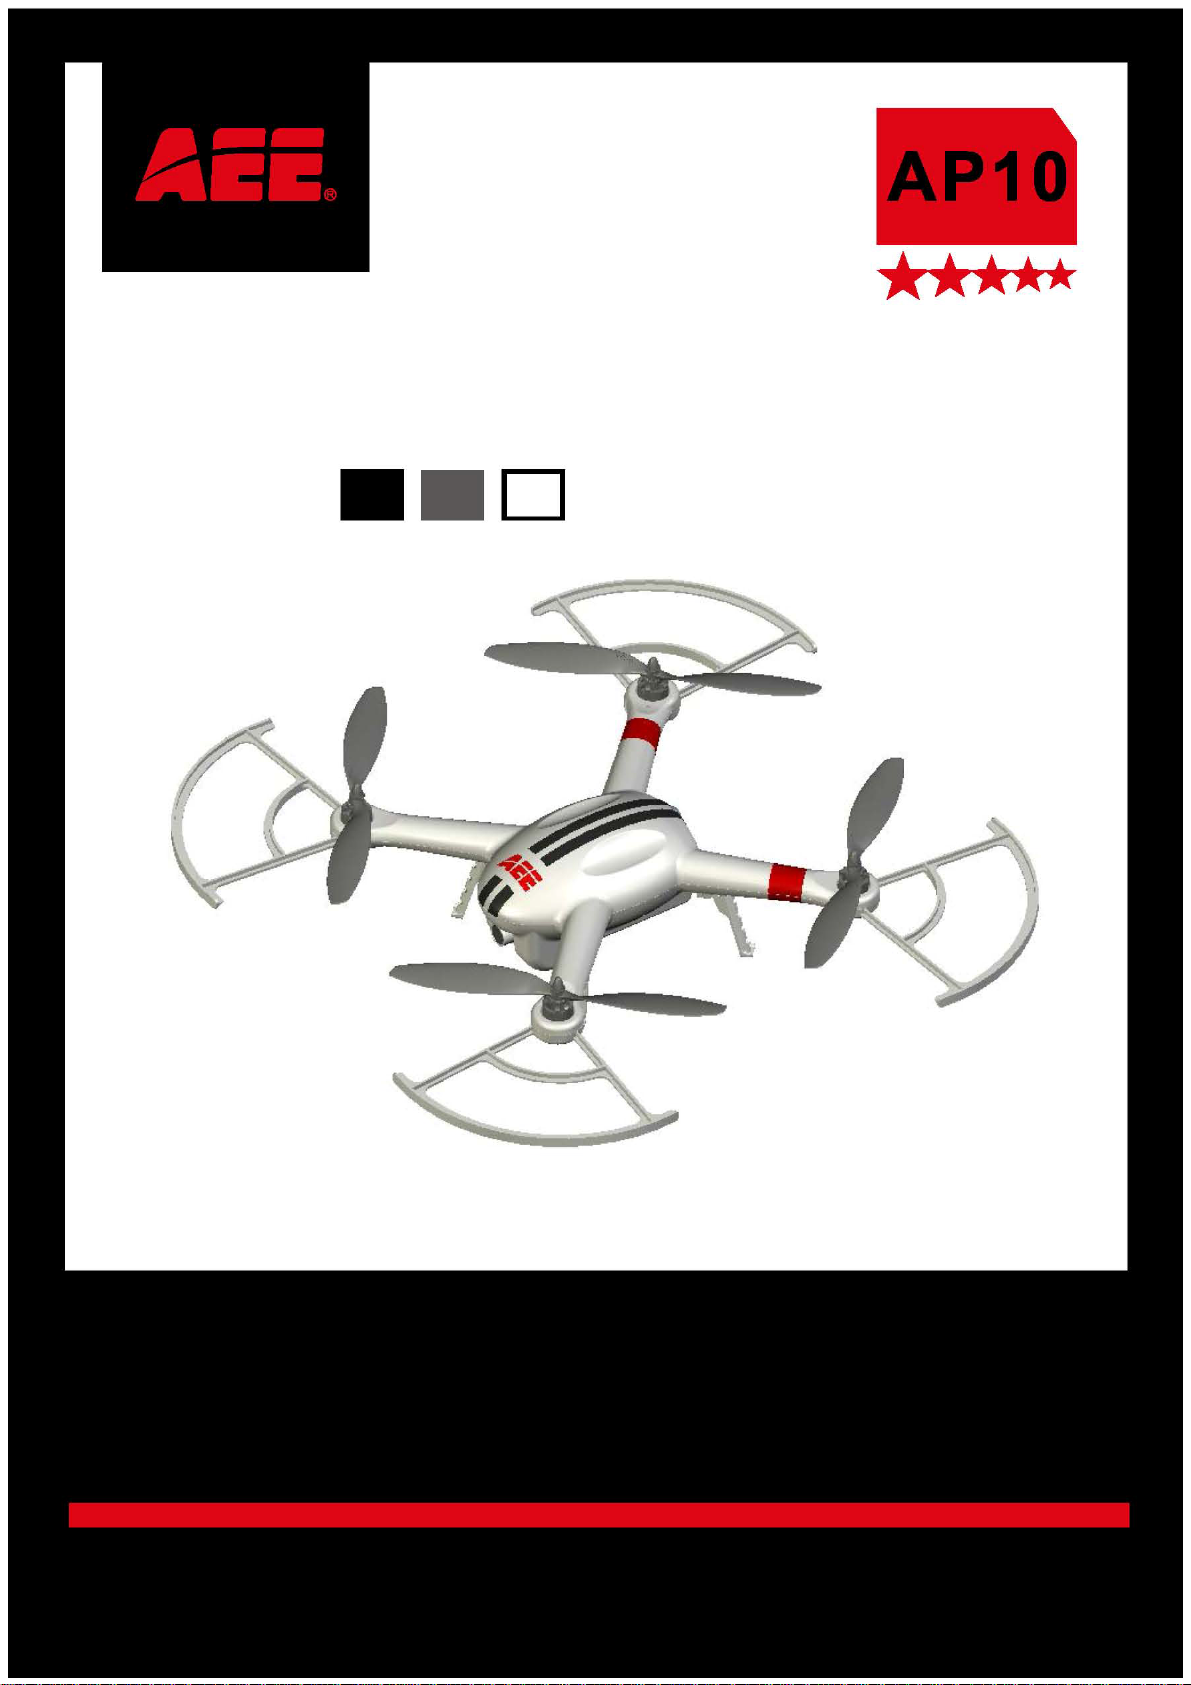
Aerial Photography Equipment
Professional·Advanced
Unprecedented
Technology
User’s Manual
Please read this Manual carefully before use,
and keep it handy for future reference.

CONTENTS
Statement ...................................................................................................................... 1
Product Introduction .................................................................................................... 1
Precautions for Use of Aerial Photography Equipment ........................................... 1
Precautions for Use of Airborne Camera ................................................................... 2
Precautions for Use and Charging of Battery ........................................................... 3
Charging ....................................................................................................................... 3
Connect Battery to Charger ........................................................................................................... 4
List of Components ...................................................................................................... 4
Guide for Components ................................................................................................................... 5
Install Propellers ............................................................................................................................ 6
Install Propeller Guards .................................................................................................................. 8
Install Battery ................................................................................................................................. 8
Preparations before Take-off .......................................................................................................... 9
Control Flight with Remote Control ............................................................................ 9
Guide for Components of Remote Control and Description of Their Functions .............................. 9
Description of Buttons .................................................................................................................. 10
Preparations for Remote Control ................................................................................................. 10
Pairing of Aerial Photography Equipment .................................................................................... 11
Calibration of Aerial Photography Equipment ............................................................................... 11
Start the Aerial Photography Equipment ................................................................. 13
Trial Flight .................................................................................................................................... 14
Direction Control .......................................................................................................................... 16

How to Use Wi-Fi ........................................................................................................ 18
Install App on Mobile Phone ......................................................................................................... 18
Connect App ................................................................................................................... ............. 19
Instructions on How to Operate Wi-Fi Control Interface ............................................................... 19
Instructions on Use of the Repeater ............................................................................................. 20
Alarm Sounds ............................................................................................................. 21
Specification ............................................................................................................... 22
Troubleshooting ......................................................................................................... 22
Protection Mechanism ............................................................................................... 23

AEE Aerial Photography Equipment
Professional·Advanced
Statement
The AEE aerial photography equipment is incorporated with multiple technologies to provide advanced functions.
Improper use of this product will cause serious injuries. Therefore, we hereby make the following statements:
1. Never use this product for any and all illegal activities; or, Shenzhen AEE Aviation Technology Co., Ltd. shall
assume no liability for any consequences resulting therefrom.
2. Never use this product in any and all no-fly zones; or, Shenzhen AEE Aviati on Technology Co., Ltd. shall assume
no liability for any consequences resulting therefrom.
3. For any direct or indirect losses or injuries caused by use of this product, Shenzhen AEE A viation Technology Co.,
Ltd. shall assume no liability.
4. For any direct or indirect losses or injuries caused by any force majeure events (e.g., lightning stroke, hailstones)
taking place during use of this product, Shenzhen AEE Aviation Technology Co., Ltd. shall assume no liability.
Product Introduction
Thanks for choosing the aerial photography equipment manufactured by AEE, a miniature vertical take-off and
landing photography equipment with quad rotors. With the integrated design based on the highest standards in the
world and the professional airborne camera device, it can provide you with excellent flight and photography
experience in low-altitude outdoor space or big indoor space. Stable and reliable, this equipment can be operated
and controlled in a simple and flexible way.
Precautions for Use of Aerial Photography Equipment
* In the initial stage, avoid operating it all by yourself; it is suggested that an experienced person be on site to offer
guidance for flying.
* During flying , please keep away from any unsafe factors such as obstacle, person and high-voltage cable. Make
sure there is no moving person or obstacle within the radius of 5~10m around the take-off and landing positions.
Fly the aerial photography equipment in safety zones away from people, and take care to ensure the safety of your
own and other people as well as the safety in the vicinity.
* In order to avoid dangers, please make sure it flies under a safe take-off weight.
* Please check to confirm that the propellers and the motors are installed properly and securely and that the
clockwise and counter-clockwise propellers are installed in right positions. During inspection, do not approach or
touch any rotating parts to avoid injuries caused by the propellers. In the meantime, keep away from small metal
objects to prevent dangers taking place as the metal objects are attracted.
* Avoid mutual influence or interference between the remote control transmitter and other wireless devices.
* Ensure sufficient power supply to the remote control, the battery and all components.
* Turn on the remote control before starting the aerial photography equipment; upon landing, turn off the remote
control after the aerial photography equipment is disconnected from power supply.
* Check to confirm all components are in good condition; in case of ageing or damage of any component, please do
not start flying.
* Do not start up the aerial photography equipment in case of IMU abnormality (the four arm lights flash quickly and
continuously) or altimeter abnormality (the four arm lights flash slowly and continuously).
* In case of compass abnormality (the front arm lights flash twice at intervals, and the rear arm lights are constantly
on), the equipment can fly in manual control mode. Please do not fly in GPS fly control mode; otherwise, the aerial
photography equipment will lose control, fly to a wrong place, etc..
- 1 -
AEE Aerial Photography Equipment
Professional·Advanced
* Do not use the aerial photography equipment in complex electromagnetic environments, because its
communication will be affected in such environments, further resulting in abnormal Wi-Fi and remote control
communications.
* If a mobile phone is connected for image preview, do not answer any incoming calls whenever possible.
* Keep away from humid environments; prevent water vapor from entering the aerial photography equipment which
may cause damage to electronic components or result in unpredictable consequences.
* Do not use this product in atrocious weather conditions like thundering, raining, gale and sandstorm to ensure
personal safety and equipment safety.
* Keep away from heat sources which may lead to aging, deformation or even melting and damage of thermoplastic
materials of the aerial photography equipment.
* For the sake of safety of your life and property, please use the product strictly in accordance with this User’s
Manual; improper operation, unauthorized disassembly or modification of this aerial photography equipment are all
forbidden.
* For beginners, it is suggested that the undercarriages should be relocated under the motors in order to fully protect
the aerial photography equipment, as shown in the figure below; meanwhile, the flight speed should be controlled
within 3~5m/s when it is a beginner that uses the aerial photography equipment.
Notice: Please strictly comply with the above safety precautions; any consequence resulting from
incompliance shall be on your own account.
Precautions for Use of Airborne Camera
* The device is not allowed to come in contact with or be immersed in water or other liquids. In case that the device
surface is in contact with any liquid or damp air, please use a piece of soft and absorbent dry cloth to wipe it dry.
* Do not use alcohol, benzene, diluter or other combustible agents to clean or maintain the device.
* Do not store the device in a damp or dusty place.
* Do not use or store the device in direct strong sunlight or high temperatures.
- 2 -
AEE Aerial Photography Equipment
* Please stop using the device immediately when smoke or smelly gas comes out of the device.
* When this device is used to shoot important scenes, please perform test shooting several times before actual
shooting, to make sure the device is in normal working condition.
Professional·Advanced
Precautions for Use and Charging of Battery
* Do not immerse the battery into water; store the battery in a dry and cool place if it will not be used for a long time.
* Do not use the battery in combination with batteries of other capacity, model or brand.
* Keep the battery out of the reach of children; if a child accidentally swallows a cell, please call for medical help
immediately.
* Do not use or store the battery near heat sources such as source of ignition and heating furnace.
* Before using the flight battery, make sure the battery has been installed properly.
* Do not directly connect the power battery for flight to devices other than the equipped charger for charging.
* Do not throw the battery in fire or heat the battery.
* Do not transport or store the battery together with necklaces, hairpins or other metal objects.
* Do not strike or hurl the battery, making the battery be subjected to impact by hard objects.
* Do not directly weld battery terminals.
* Do not pierce the battery shell with a nail or other sharp object, or hammer or tread on the battery.
* Do not decompose the battery in any way.
* Do not use or store the battery in extremely hot environments such as direct sunlight or vehicles in hot weather, or
the battery may get overheated, resulting in fire (self-ignition); this will affect the battery performance and shorten
its service life.
* Do not use the battery in places with strong static electricity, or the electronic protection device may get damaged,
resulting in dangers.
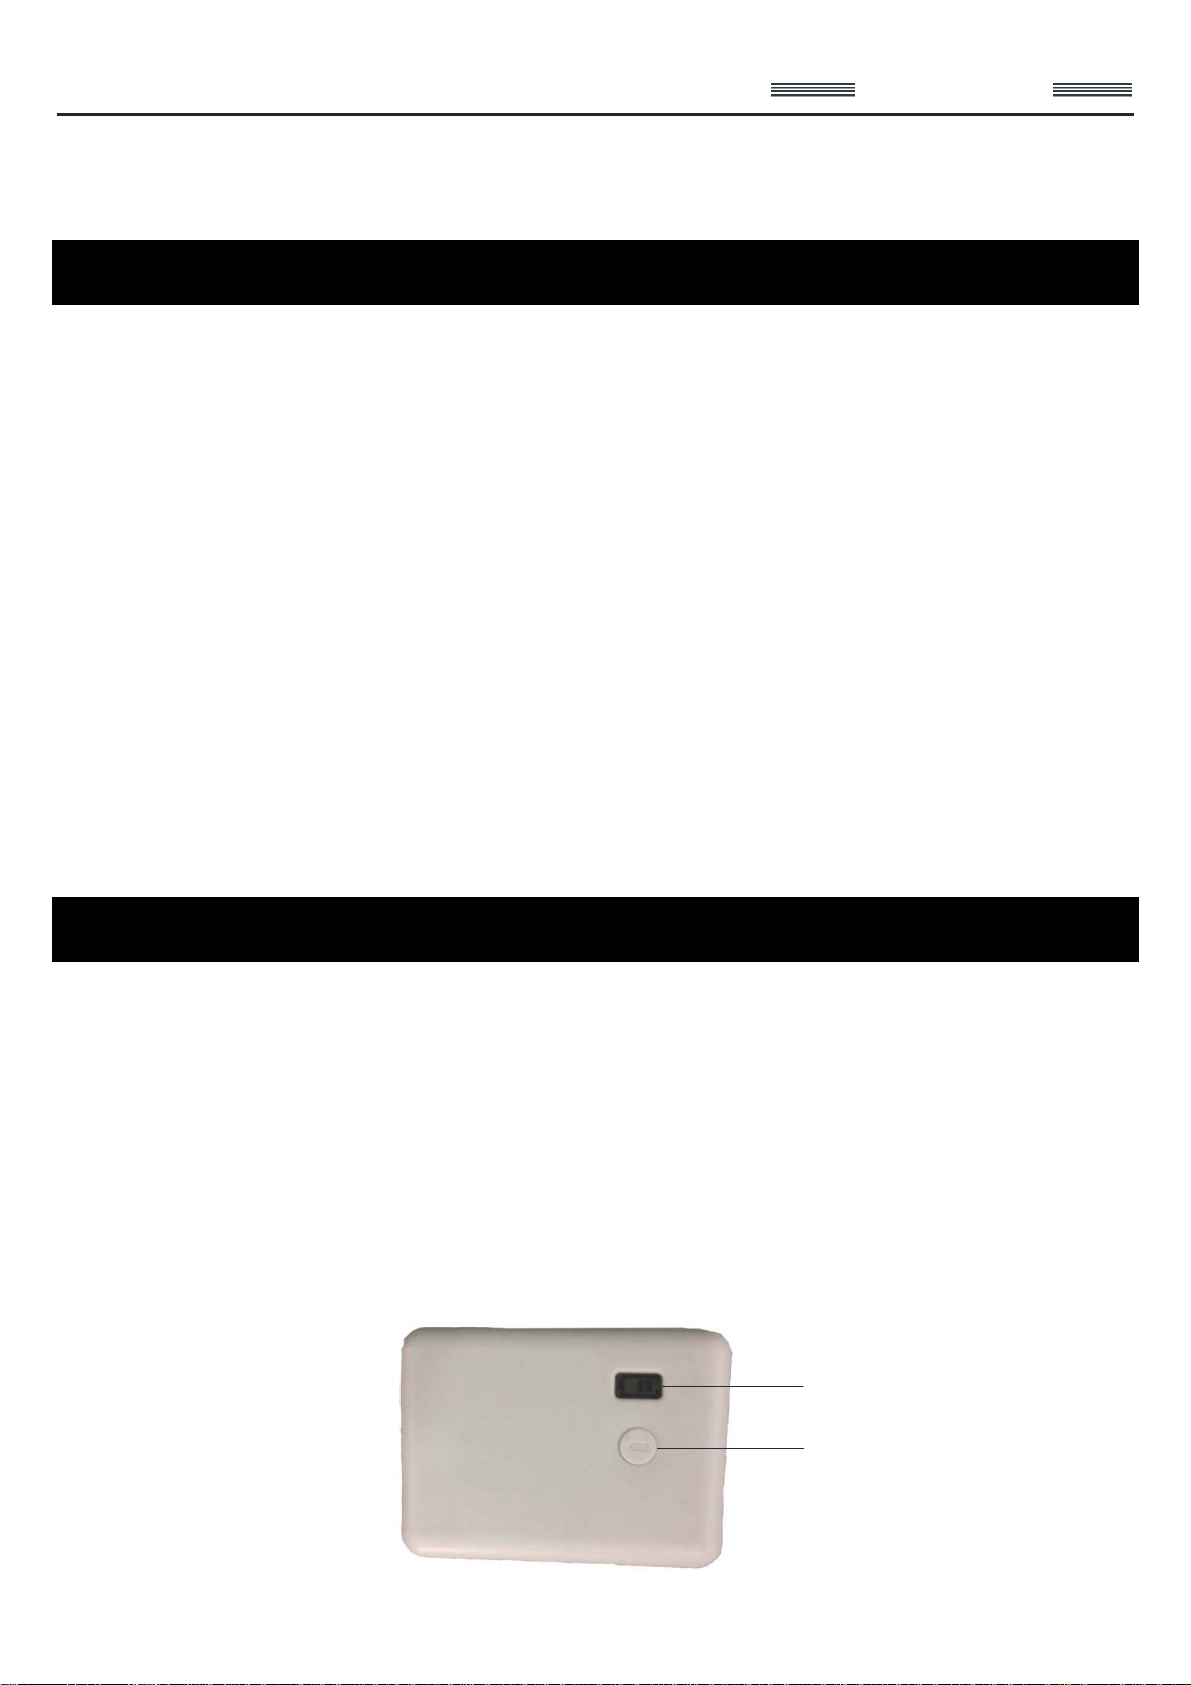
Charging
This product is equipped with a professional battery charger; the input voltage is 12.6V and the output current 3A.
When charging state indicator is constantly on in red, charging is in progress; when it changes to be constantly on in
green, charging is finished.
The battery is a smart battery (capacity: 5300mAh; voltage: 11.1V) with charge and discharge management function.
It shall be charged with the professional charger provided by our company.
When the battery voltage of the aerial photography equipment is less than two bars, please fully charge the battery (if
the battery is not fully charged, the flight time will be reduced).
As shown in the figure below, short press once the white button below the display screen on the external surface of
the battery to display the battery level on the screen. The picture on the screen will last 23s from the time when the
button is pressed, and then disappear; if the button is pressed once again, the picture of battery level will be
displayed for another 23s.
Battery level display
Button
- 3 -

AEE Aerial Photography Equipment
Professional·Advanced
Connect Battery to Charger
Connect the battery to the charger according to the steps shown below:
Step Illustration Description
As shown in the figure, insert the plug
Step 1:
Charging state indicator
Step 2:
at one end of the charger by aligning it
with the battery.
Connect the plug at the other end of
the charger to a 100~240V AC power
outlet; at this moment, the charging
state indicator turns red, indicating
that charging begins.
If the charging state indicator is
Charging state indicator
Step 3:
To avoid short circuit resulting from misoperation, DO NOT pull out the charger wires during charging.
constantly on in green, the battery has
been fully charged. After charging is
finished, please disconnect the
charger from the 100~240V AC power
outlet.
List of Components
The following components are included in the package of this product. Please check carefully at the time of purchase.
In case of any missing component or damage, please feel free to contact us.
Aerial photography equipment:
1set
Remote control: 1 set Charger: 1 set (including
power cable and charger
connecting wires)
5300mAh power battery
case for flight: 1pc
- 4 -
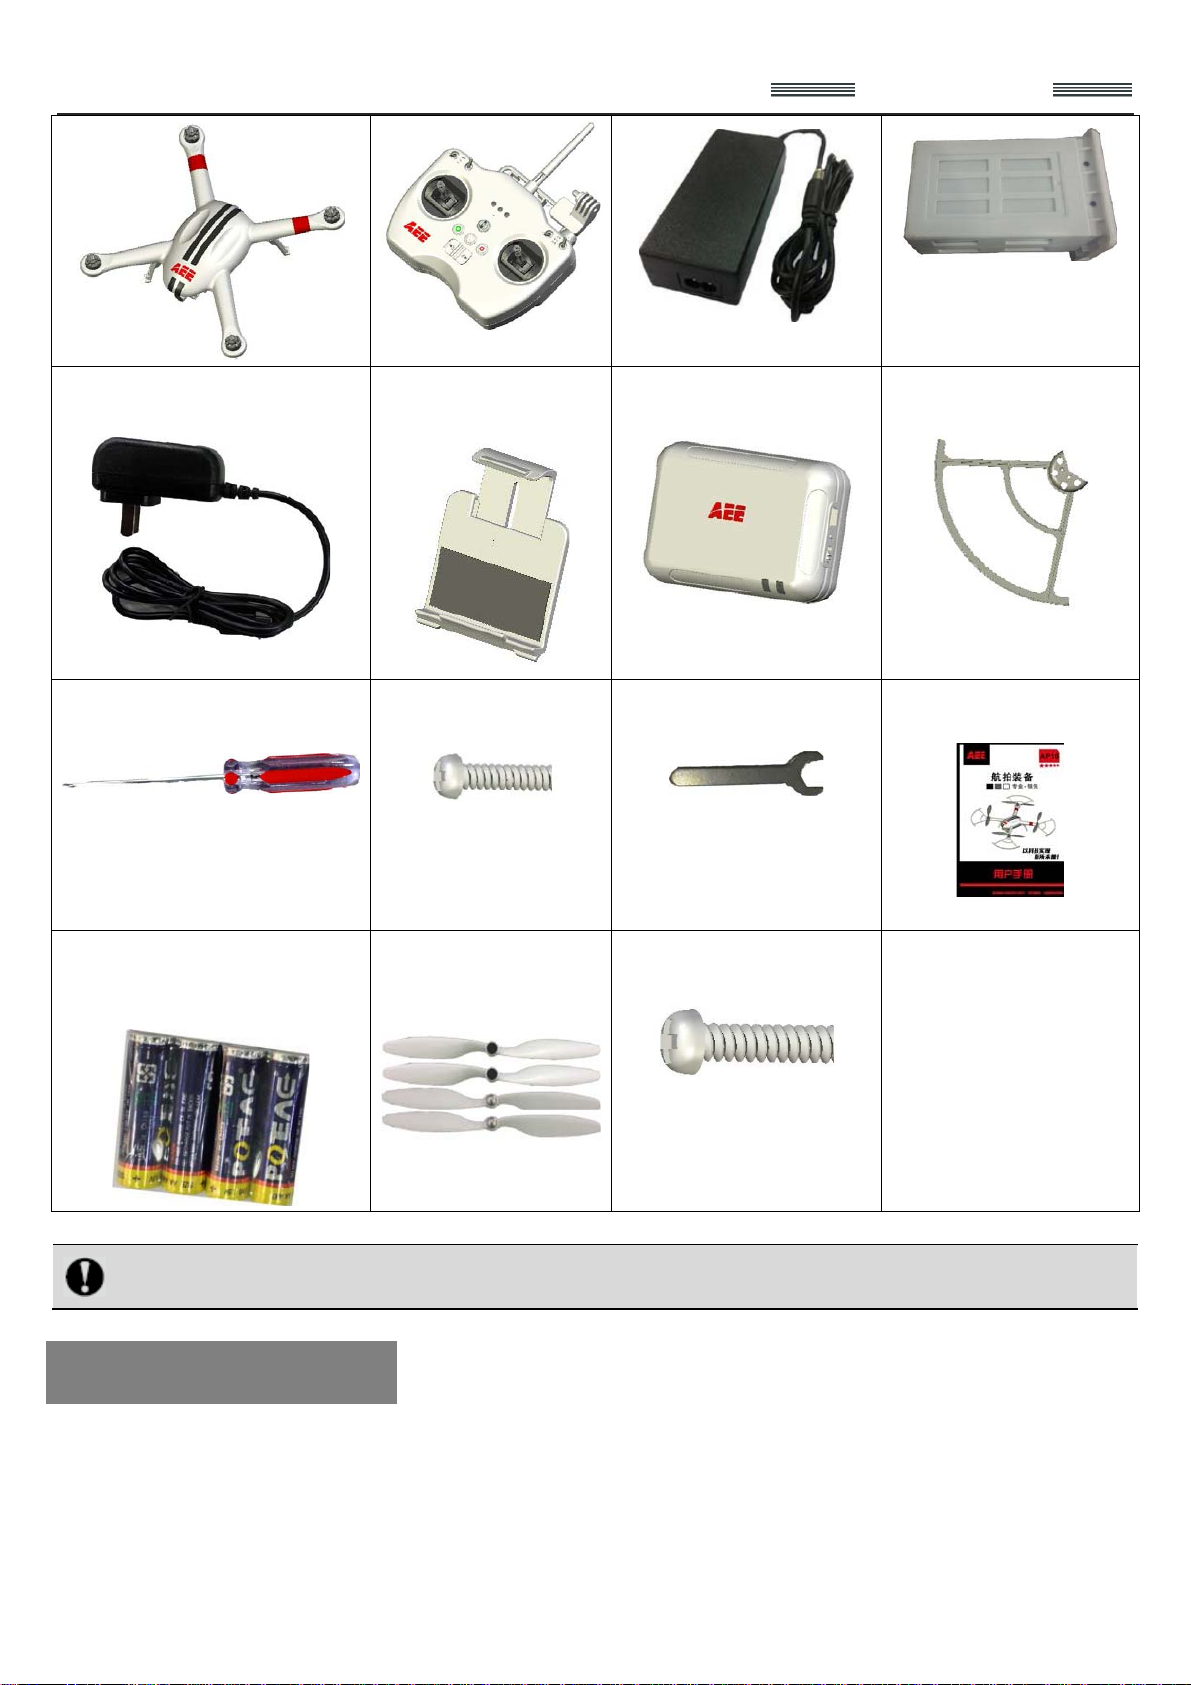
AEE Aerial Photography Equipment
Repeater adapter: 1pc
Mobile phone stand:
1pc
Repeater: 1pc
Professional·Advanced
Propeller guard: 4pcs
Cross-head screwdriver: 1pc M3.0×10 screw: 16pcs
Battery of remote control:
4pcs (AA)
Propeller blade
(4pcs/set): 2 sets
Wrench: 1pc
Long hexagonal screw:
1pc
User’s Manual
Notice: The accessories of actual products may vary slightly, and the above figures are for reference only.
Guide for Components
- 5 -
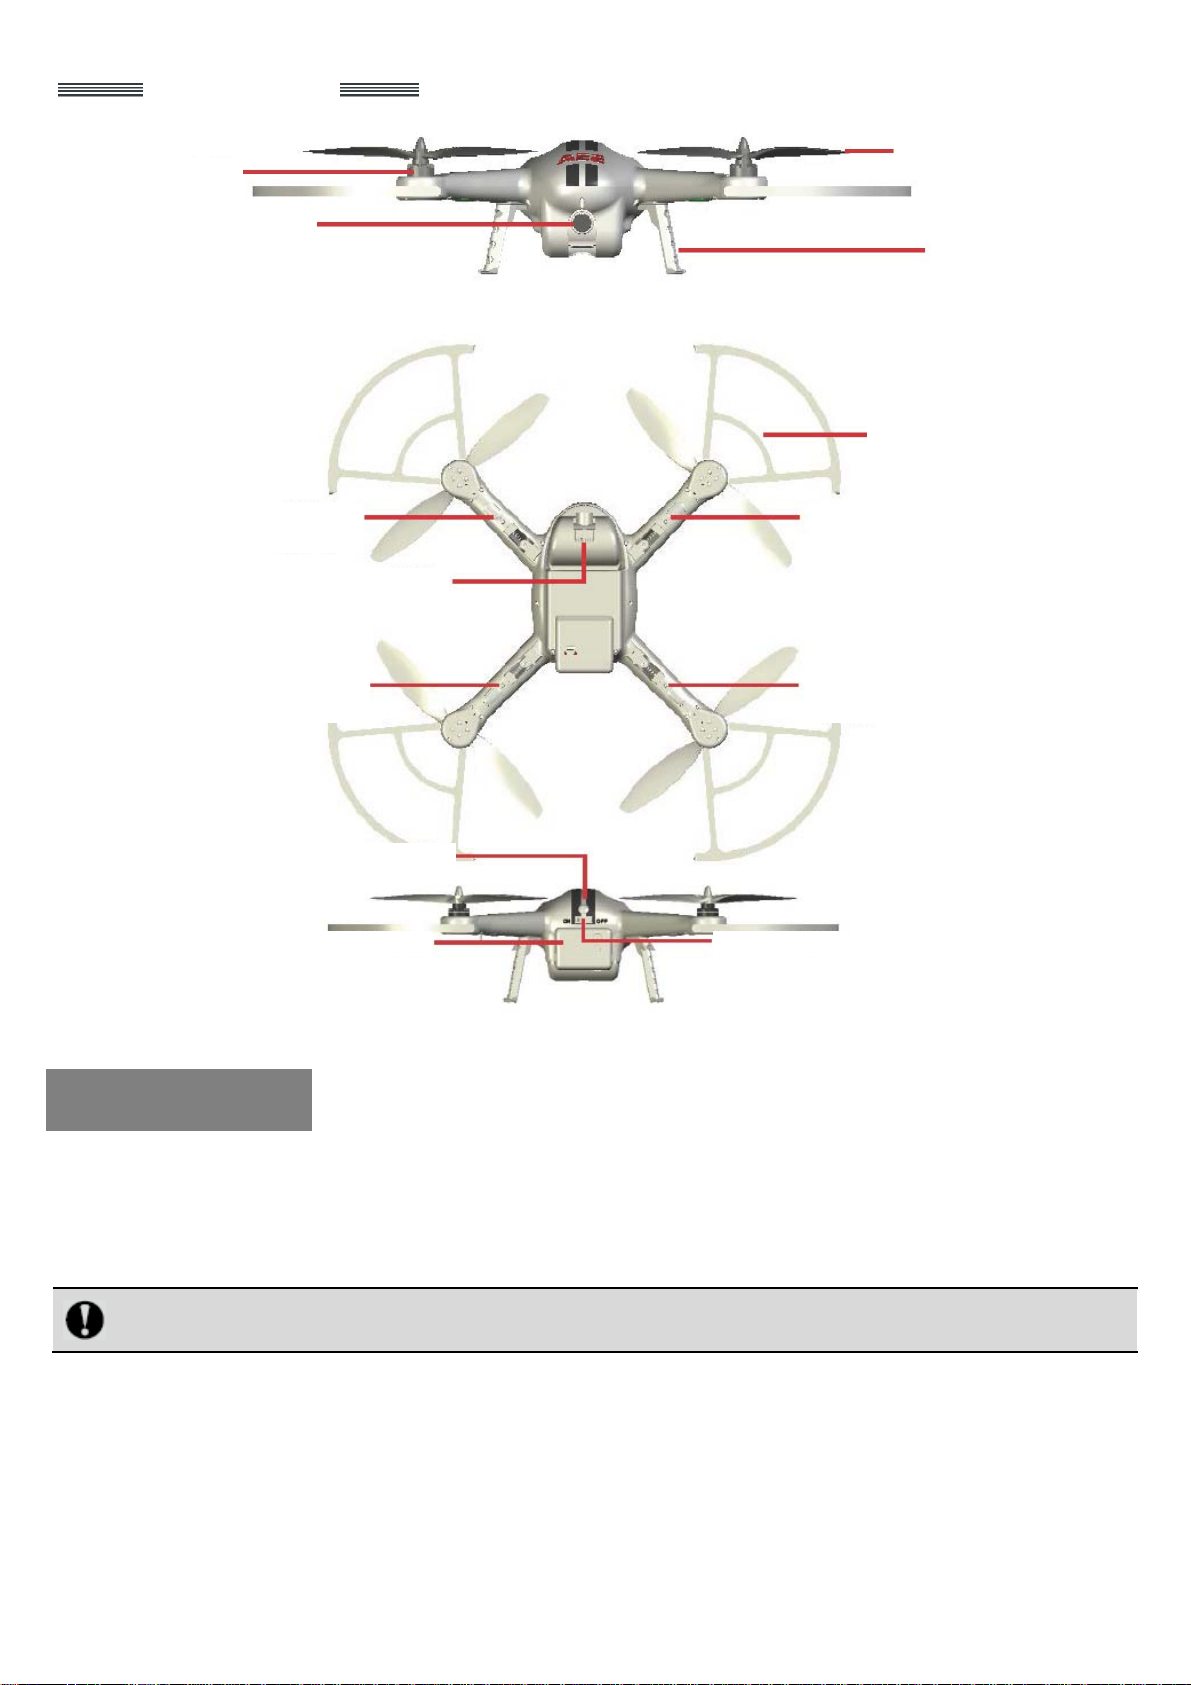
AEE Aerial Photography Equipment
Professional·Advanced
Motor
Airborne camera
Propeller
Undercarriage
Propeller guard
Right front light
(green)
TF card slot
Right rear light
(red)
Tail light (red)
Battery door Power switch
Left front light
(green)
Left rear light
(red)
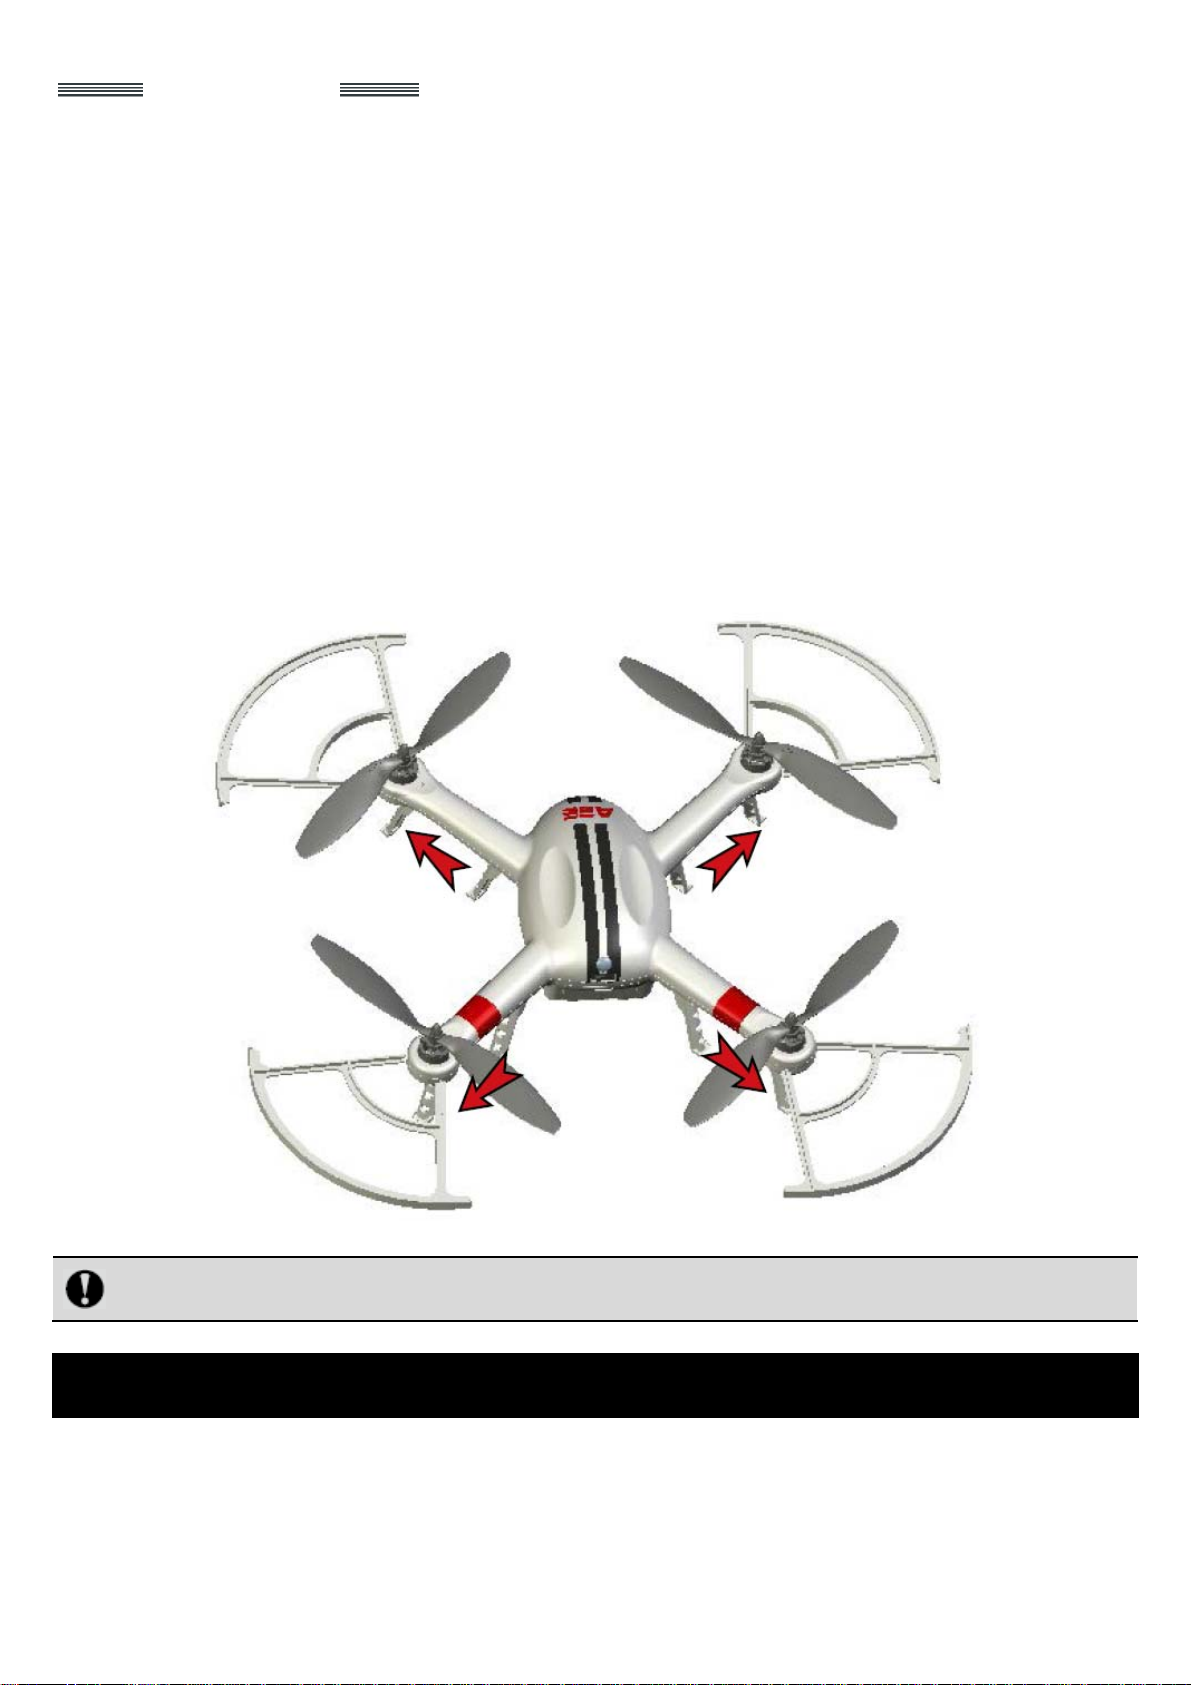
Install Propellers
There are two clockwise propellers and two counter-clockwise propellers. The propeller caps have two colors: black
and silver. Propellers with black caps are clockwise propellers which should be installed on support arms with “P”
mark. The clockwise propellers should be installed on the left front and right rear support arms of the aerial
photography equipment.
Wrong installation of clockwise and counter-clockwise propellers will inevitably result in errors in the lift
system of the aerial photography equipment, further leading to unpredictable consequences.
1. Place the propellers with black caps on the support arms with “P” mark, and tighten the propellers
counter-clockwise; place the propellers with silver caps on the support arms without “P” mark, and tighten the
propellers clockwise.
2. To remove a propeller, use a hand or auxiliary wrench to make the motor seize up (see the figure below) and
stop rotating; grasp the propeller; rotate the propeller with black cap clockwise to remove the propeller; rotate the
propeller with silver cap counter-clockwise to remove the propeller.
- 6 -

AEE Aerial Photography Equipment
Professional·Advanced
Points for attention:
(1) The propellers are designed with automatic tightening function; please do not over-tighten them during
installation, and do not use screw adhesive.
(2) Please make sure the propellers with black and silver caps are installed in right positions.
(3) Since the propeller blades are thin, it is suggested that gloves should be worn during installation in order to avoid
accidental injury.
(4) Please check if the propellers and the motors are properly and firmly installed before each flight.
(5) Please check if all propellers are in good condition before each flight; in case of ageing or damage, please
replace the propeller(s) in question before flight.
(6) Please do not get close to rotating propellers or motors to avoid cutting injury.
A propeller with black cap should be
installed on a support arm with “P” mark.
- 7 -

AEE Aerial Photography Equipment
Professional·Advanced
Install Propeller Guards
Please install the propeller guards according to the steps shown below:
1. Prepare AP10 aerial photography equipment (1 set), propeller guard (4pcs), M3.0×10 screw (8pcs), and
cross-head screwdriver (1pc).
2. Use the screwdriver to remove the two screws (M3.0×6) on the motor, as shown in the ovals in the figure below.
3. Tighten the two screws (M3.0×10) with proper force according to the dash lines shown in the figure below, and
install the four propeller guards. Do not use screw adhesive.
Note: If propeller guards are installed, M3.0×10 screws are used; if propeller guards are not installed, only M3.0×6
screws can be used, because the motors may get damaged if the screws are too long.
Install Battery
First move left the battery lock at the bottom of the aerial photography equipment towards the side with unlocking
design; push the battery case to the bottom by aligning it with the battery compartment; then move right the battery
lock towards the side with locking design.
Notice: Please make sure the power switch is in the OFF state during installation of the battery; after the
battery is installed, the battery lock must be moved to the locking position.
- 8 -

AEE Aerial Photography Equipment
A
r
Turn on the power switch on the aerial photography equipment. At this moment, the 4 arm lights (two red lights, two
green lights) are constantly on; the tail light (red) turns off 5~10s after turning on; meanwhile, the motors make “beep”
sounds.
Professional·Advanced
Preparations before Take-off
Before use of AP10, please first install the propellers. Check the entire equipment to see if it is complete and secure
and if any screw is loosened. Please install the clockwise and counter-clockwise propellers properly, and make sure
the aerial photography equipment and the remote control have sufficient battery level.
Control Flight with Remote Control
The remote control is specially developed for AEE aerial photography equipment to make it convenient for controlling
the flight of the equipment. The remote control can independently control the flight of the aerial photography
equipment and allows you to view real-time videos recorded by the aerial photography equipment on your mobile
phone via Wi-Fi network.
Guide for Components of Remote Control and Description of Their Functions
Antenna
Mobile phone support
Photographing indicator (green)
Slide switch S2
Reserved button
Slide switch S1
Power indicator (red)
Strap hole
Repeate
Slide switch S3
Slide switch S4
Recording indicator (blue)
Left joystick
Airborne recording
button
Power switch
- 9 -
Right joystick
irborne shutter button
Recording stop button

AEE Aerial Photography Equipment
Professional·Advanced
Description of Buttons
Name of button Description of function
Slide switch S1 1. Up (OFF): non-lock normal flight; 2. Middle (CL): course lock; 3. Down (HL): home lock
Slide switch S2
Slide switch S3
Slide switch S4
Left joystick It is used to control course and throttle: left/right for course, up/down for throttle
Right joystick It is used to control pitch and roll: up/down for pitch, left/right for roll
Airborne recording
button
Airborne shutter button A photo is taken when it is pressed once.
Recording stop button The airborne camera stops recording when it is pressed once.
Power switch
Joystick calibration mode:
Turn the slide switch S2 to “ADJ” position, and turn the left and right joysticks clockwise in full scale for two circles;
then turn S2 to “OK” position to complete joystick calibration.
1. Up (OK): normal flight; 2. Middle (NULL): reserved; 3. Down (ADJ): enable joystick
adjustment
1. Up (UP): the airborne camera lens moves up when your hand stays at this position,
and the switch rebounds to the middle position when you move away your hand; 2.
Middle (STOP): stop the airborne camera lens; 3. Down (DOWN): the airborne camera
lens moves down when your hand stays at this position, and the switch rebounds to the
middle position when you move away your hand
1. Up (AC): auto fly (GPS) mode; 2. Middle (MC): manual fly mode; 3. Down (NULL):
reserved
The airborne camera begins video recording when it is pressed once.
ON/OFF indication of the remote control power switch: slide leftwards to turn it OFF; slide
rightwards to turn it ON.
Preparations for Remote Control
Installation of repeater
The installation method is shown in the following figure: insert the repeater by aligning its bottom jack with the
adapter; insert the screw into the round hole, and then use the cross-head screwdriver to tighten it.
Installation of mobile phone stand
The installation method is shown in the following figure: snap in the mobile phone stand by aligning with the slot.
- 10 -

AEE Aerial Photography Equipment
Install the batteries in the remote control; slide the power switch rightwards to turn it ON; at this moment, the left
power indicator (red) turns on, and the right recording indicator (blue) turns off 3s after turning on.
Professional·Advanced
Pairing of Aerial Photography Equipment
The aerial photography equipment has undergone pairing before delivery, so it is unnecessary to carry out pairing
again. If paring is indeed necessary, the steps below can be followed:
1. Turn on the power switch of the aerial photography equipment; at this moment, the aerial photography equipment
is started with two “beep” sounds from the motors.
2. When the aerial photography equipment makes “beep” sounds, quickly turn on the remote control; the power
switch indicator (red) turns on; paring begins about 3s after the recording indicator (blue) turns on.
3. After successful pairing, the tail light (red) of the aerial photography equipment flashes quickly, and the airborne
recording indicator (blue) on the remote control turns off.
4. Turn off the aerial photography equipment and the remote control. For restart, first power on the remote control
and then the aerial photography equipment.
5. In case of pairing failure, please repeat Step 1~4.
Calibration of Aerial Photography Equipment
1. Calibration of accelerometer: Place the aerial photography equipment on a horizontal plane for about 1s; turn the
joysticks to a lower toe-in shape until all LED lights on the four arms turn off, and then loosen the joysticks; when
the LED lights turn on again, the calibration of the first plane is finished; the other five planes of the aerial
photography equipment can be calibrated in the same way.
Turn the left joystick to the lower right corner Turn the right joystick to the lower left corner
- 11 -

AEE Aerial Photography Equipment
Professional·Advanced
The following figure shows the six planes that need to be calibrated:
2. Calibration of gyroscope: Place the aerial photography equipment on a horizontal plane, and keep it away from
vibration sources; at this moment, the front lights (green) turn constantly on. About 1s later, turn the remote
control joysticks to an upper toe-out shape (as shown in the figure) until the rear lights (red) begin to flash, and
then loosen the joysticks; when the rear lights (red) turn on, the calibration is finished.
- 12 -

AEE Aerial Photography Equipment
Turn the left joystick to the upper left corner Turn the right joystick to the upper right corner
3. Calibration of compass: Place the aerial photography equipment on a horizontal plane; at this moment, the rear
lights (red) turn constantly on. Turn the joysticks to an upper toe-in shape (as shown in the figure) until the front
lights (green) begin to flash, and then loosen the joysticks; the aerial photography equipment begins compass
calibration.
Turn the left joystick to the upper right corner Turn the right joystick to the upper left corner
Professional·Advanced
As shown in the figure below, first hold the aerial photography equipment to make it slowly rotate by 360° along the
horizontal plane; then inversely rotate the aerial photography equipment by 360° along the vertical plane of the
equipment; rotate several circles when the green lights are flashing to obtain adequate compass data until the front
lights (green) turn off. Place the aerial photography equipment on a horizontal ground; when the front lights (green) of
the aerial photography equipment turn on, the calibration is finished. During calibration, do not shake or move the
aerial photography equipment.
Start the Aerial Photography Equipment
Fly control modes
The aerial photography equipment has two fly control modes: manual fly control mode (“MC”) and GPS fly control
mode (“AC”).
1. S4 on the remote control is the mode control switch which can realize the switch between “MC” (manual fly
control mode) and “AC” (GPS fly control mode).
2. It is suggested that S4 should be turned to “MC” position before each flight so that the equipment will take off at
- 13 -

AEE Aerial Photography Equipment
Professional·Advanced
“MC” position (manual fly control mode).
3. To switch the fly mode of the aerial photography equipment to GPS mode (if GPS satellite search is normal)
when the flight in manual mode is normal, please first keep the equipment hovering, and then turn S4 to “AC”
position for flight in GPS mode.
Trial Flight
1. First power on the remote control and then the aerial photography equipment; turn the slide switch S1 up to
“OFF”, S2 to “OK”, S3 to “STOP”, and S4 to “MC”; the aerial photography equipment begins to search for
satellites; at this moment, the two front arm lights (green), the two rear arm lights (red), and the tail light (red) turn
on; after successful self-checking, the tail light flashes quickly, and the arm lights are constantly on. When 5
satellites are found, the tail light flashes once every 3s; when 6 satellites are found, the tail light flashes twice
every 3s, and so on and so forth; when 10 or more satellites are found, the tail light flashes six times every 3s.
Satellite search instruction
Number of satellite 5 6 7 8 9 10 or more
Flash frequency of tail light 1 2 3 4 5 6
For outdoor operation of the aerial photography equipment, please do not start the equipment until 6 or more
satellites are found, so as to make sure the aerial photography equipment records the position of HOME point and
prevent the equipment from losing control.
If the aerial photography equipment is forced to take off before 6 satellites are found, the following consequences will
be caused:
1) When it is beyond the operating range, the aerial photography equipment may fail to go back to the take-off
position.
2) When the remote control signals are jammed, the aerial photography equipment may fail to go back to the
take-off position.
3) When switched to the auto fly mode, the aerial ph otography equipment may not hover at the current position;
what’s worse, equipment crash can be caused.
2. For protection, when the aerial photography equipment is powered up, the electronic speed controller will not
start the motors before receiving the control signal. At this moment, unlocking should be carried out first; turn the
joysticks to a lower toe-out shape (as shown in the figure) and loosen them after 3s. The motors must be locked
after the aerial photography equipment lands; turn the joysticks to a lower toe-out shape and loosen them after
3s; then the motors stop running. At this moment, there is no response from the aerial photography equipment
when the joysticks are operated. For restart, also turn the joysticks to a lower toe-out shape to unlock the aerial
photography equipment.
Turn the left joystick to the lower left corner Turn the right joystick to the lower right corner
Motor startup and shutdown
Motor startup: For protection, the motors will not be started up by directly pushing the throttle before take-off. At this
- 14 -

AEE Aerial Photography Equipment
Professional·Advanced
moment, unlocking should be first carried out; turn the joysticks to a lower toe-out shape and loosen them after 3s.
Motor shutdown: The aerial photography equipment has three modes for motor shutdown: motors will be shut down
(immediately) when the joysticks are turned to a lower toe-out shape; motors can be shut down in 3s when the
throttle lever is lower than 5%; motors will automatically stop running 3s after the equipment lands in protected fly
mode (out-of-control return and landing mode, low-battery-level landing mode).
Description Applicable condition Operation method Response speed
Mode 1 Motors will be shut down
(immediately) when the joysticks
are turned to a lower toe-out
shape
Mode 2 Motors can be shut down in 3s
when the throttle lever is lower
than 5%
The aerial photography
equipment lands; the
joysticks are turned to a
lower toe-out shape.
The aerial photography
equipment lands; 3s
after the throttle lever is
Push the joysticks
manually
Push the joysticks
manually
Immediate motor
shutdown
Motor shutdown in
3s
lower than 5%
Mode 3 Motors will automatically stop
running 3s after the equipment
lands in protected mode
(out-of-control return and landing
mode, low-battery-level landing
mode). Also, the slide switch S4
can be used to switch once to exit
3s after the aerial
photography equipment
lands in protected mode
(out-of-control return
and landing mode,
low-battery-level landing
mode).
Complete
automatically
Motor shutdown in
3s
the protected mode, and then
push the lever to stop the motors.
3. Press the left joystick to the lowest position and the turn the right joystick to the middle position; at this moment,
the propellers start to rotate at a low speed, and the aerial photography equipment enters the starting state;
slowly push up the left joystick, and the aerial photography equipment begins to climb up.
Turn up the left joystick slowly Return the right joystick to the middle position
4. Gently push the joysticks in pitch, roll and course directions to check if the moving trend of the aerial photography
equipment is correct (if not correct, please immediately land the aerial photography equipment to find out the
cause of the problem).
5. After the aerial photography equipment lifts off, please always pay attention to the movement of the equipment,
and use the joysticks to properly adjust the movement state of the aerial photography equipment. After reaching
the desired height, loosen the throttle joystick to return it to the middle position. At this moment, the aerial
photography equipment can stay in hover state.
- 15 -

AEE Aerial Photography Equipment
Professional·Advanced
6. In the manual fly mode (MC), when the nose and tail of the aerial photography equipment cannot be
discriminated because the equipment is beyond your sight, the slide switch S4 can be turned up to “AC”; then,
the aerial photography equipment will stay in the auto hover state; if the remote control is turned off, the aerial
photography equipment will automatically go back to the take-off position.
7. The endurance time of the aerial photography equipment is about 25min. For safety’s sake, when the remaining
battery level is 50%, the aerial photography equipment will send a Level 1 alarm, and the arm lights will flash
slowly . When the remaining battery level is 10%, the aerial photography equipment will send a Level 2 alarm, and
the arm lights will flash quickly. After the Level 2 alarm keeps stable for 2s, the aerial photography equipment will
enable low-battery auto landing; at this moment, you can switch to manually control the aerial photography
equipment. For auto landing, the auto fly mode is adopted; if the aerial photography equipment enters auto
landing in the manual mode, first switch to the auto mode and then to the manual mode; if the aerial photography
equipment enters auto landing in the auto mode, you can directly switch to the manual mode to control the aerial
photography equipment.
8. Slowly land the aerial photography equipment; after landing, turn the joysticks to a lower toe-out shape, and the
motors will stop running 3s later. Af ter the flight, please first power off the aerial photography equipment, and then
the remote control.
Direction Control
Directions of the aerial photography equipment are defined in the following figure:
Front
(Nose)
Left Right
Rear
See the following table for details:
Joystick
Attitude of aerial
photography equipment
- 16 -
Illustration

AEE Aerial Photography Equipment
Professional·Advanced
Climb Upwards
The motor speed and the
Rise
propeller speed increase. The
Turn the left joystick forwards, and
keep the right joystick in the original
climbing speed increases with
as the joystick turning angle
increases.
Horizon
position.
Go downwards
The motor speed and the
Turn the left joystick backwards,
and keep the right joystick in the
propeller speed decrease. The
descending speed increases
as the joystick turning angle
increases.
Horizon
Descend
original position.
Turn the left joystick rightwards,
and keep the right joystick in the
original position.
Turn the left joystick leftwards, and
keep the right joystick in the original
position.
Turn the right joystick forwards, and
keep the left joystick in the original
Rotate the nose rightwards
(rotate clockwise)
Rotate the nose leftwards
(rotate counter-clockwise)
Fly forwards
The nose tilts downwards; the
aerial photography equipment
inclines forwards and flies
along the nose direction. At this
moment, it is needed to slightly
push forward the throttle to
adjust the flight altitude so as
Rotate the nose
clockwise
Rotate the nose
counter-clockwise
Fly forwards
(nose direction)
Horizon
Pitch angle
Right view
- 17 -

AEE Aerial Photography Equipment
Professional·Advanced
position. to realize horizontal flight of the
aerial photography equipment.
Fly backwards
The tail tilts downwards; the
aerial photography equipment
inclines backwards and flies
along the tail direction. At this
moment, it is needed to slightly
Turn the right joystick backwards,
and keep the left joystick in the
original position.
push forward the throttle to
adjust the flight altitude so as
to realize horizontal flight of the
aerial photography equipment.
Fly rightwards
The aerial photography
equipment inclines rightwards.
At this moment, it is needed to
slightly push forward the
Turn the right joystick rightwards,
and keep the left joystick in the
original position.
throttle to adjust the flight
altitude so as to realize
horizontal flight of the aerial
photography equipment.
Fly leftwards
The aerial photography
equipment inclines leftwards.
At this moment, it is needed to
slightly push forward the
Turn the right joystick leftwards,
and keep the left joystick in the
original position.
throttle to adjust the flight
altitude so as to realize
horizontal flight of the aerial
photography equipment.
Horizon
Fly backwards
(tail direction)
Horizon
Roll leftwards
Horizon
Pitch angle
Right view
Roll rightwards
Roll angle
Roll angle
How to Use Wi-Fi
AP10 camera device is designed with built-in Wi-Fi. You can connect a smartphone to AP10 airborne camera to
realize remote control over the airborne camera. First of all, please install the app provided by AEE on your mobile
phone.
Install App on Mobile Phone
How to install the app on iPhone:
Enter “APP Store”; type in “AEE” in the Find Bar; find the app icon “ ” among the search results; click on this icon
to enter the installation interface, and finish the installation according to prompts.
Select repeater
1. Power on the aerial photography equipment and the remote control to successfully connect the remote control
with the aerial photography equipment.
2. Turn the power switch of the repeater to “ON” position; the airborne DV and the repeater enter the pairing mode.
3. Wait for about 30s; then the WiFi signal indicator (blue) of the repeater flashes, indicating that the repeater is in
- 18 -

AEE Aerial Photography Equipment
normal working status.
4. Use a needle-like object to press the “RESET” button of the repeater until the WiFi signal indicator turns off; then
loosen the “RESET” button.
5. Wait for about 30s; then the WiFi signal indicator (blue) flashes (indicating the repeater has acquired the SSID
and MAC address of the airborne DV), and the repeater enters the binding state; in case of unsuccessful pairing,
repeat Step 3-5 until pairing is successful.
6. Find the repeater in the WiFi list on the mobile device and connect it; the name of the repeater is DW12, and the
default password is 00000000.
Professional·Advanced
Connect App
Click on the app icon “ ” to enter the app connection interface; click to enter the app control interface.
Note: In case of unsuccessful connection, an error icon will appear; you can click again for reconnection.
(App connection interface) (App control interface)
Remote operation of the camera can be realized by clicking on the corresponding icon in the app control interface.
Instructions on How to Operate Wi-Fi Control Interface
1. Video Recording
Click on the video recording icon “ ”, and the current state icon displayed is “ ”. Click on “ ” to turn on
video recording, and the icon displayed is “ ”. Click on “ ” once again to stop video recording, and the icon
displayed is “ ”. Enter the full screen by clicking on the screen, and e xit the full screen by clicking on the screen
again.
2. Photographing
Click on the photographing icon “ ”, and the current state icon displayed is “ ”. Click on “ ” to take
photos; during photographing, the icon displayed is “ ”; after photographing is finished, the icon displayed is
“ ”.
3. Snapshot
Click on the snapshot icon “ ”, and the current state icon displayed is “ ”. Click on “ ” to take photos;
during photographing, the icon displayed is “ ”; after photographing is finished, the icon displayed is “ ”.
- 19 -

AEE Aerial Photography Equipment
Professional·Advanced
4. Setting
Click on the setting icon “ ” to change the parameters of recording setting, photographing setting and parameter
setting.
(1) Recording setting
Click the “Resolution” option to set the desired video resolution: (PAL system) 1920×1080P 025f, 1280×0960P
048f/025f, 1280×0720P 050f/025f, 0848×0480P 100f/050f; (NTSC system) 1920×1080P 030f, 1280×0960P
048f/030f, 1280×0720P 060f/030f, 0848×0480P 120f/060f.
Click the “Viewing Angle” option to set the desired viewing angle (Wide, Medium, Narrow, Small).
Click the “Bit Rate” option to set the desired bit rate (Normal, High Bit Rate)
(2) Photographing setting
Click the “Resolution” option to set the desired picture resolution (8.0M, 12.0M, 16.0M).
Click the “Snapshot” option to set the desired number of pictures to be taken by snapshot (3PCS, 6PCS, 10PCS).
(3) Parameter setting
Click the “Tone” option to set the desired tone (OFF, Standard).
Click the “Front State Indicator” option to set the desired front state indicator (Full ON, Full OFF).
Click the “Video Content Cyclic Overlay” option to set the corresponding cyclic overlay state (OFF, ON).
Click the “TV Output Format” option to set the desired output format (PAL, NTSC).
Click the “Language” option to set the desired language (10 languages such as Traditional Chinese, Simplified
Chinese and English).
Click the “Date/Time” option to set to the current date/time of the mobile phone.
Click the “Format Memory Card” option to select formatting or not formatting the memory card.
Instructions on Use of the Repeater
1. Product structure and appearance
USB port
Binding button
Power switch
Working indicator
WiFi signal indicator
1.2 Interface definitions:
[1] WiFi signal indicator: It is blue when the connection is normal.
[2] Working indicator: It is green when the device is working after power-on. When the battery is being charged after
power-off, it flashes quickly in red; when the battery is fully charged, it is constantly on in red.
[3] Power switch: It is used to power ON or OFF the device.
[4] Binding button: Binding between the repeater and the camera will be triggered when this button is pressed.
[5] USB port: Charging port.
1.3 Specifications
Battery: 1600mAh
- 20 -

AEE Aerial Photography Equipment
Usable duration: 3.4h
Charging duration: <2h
1.4 Binding between the repeater and the airborne camera
The repeater is a wireless communication device working at 2.4GHz frequency band, which is used to increase the
effective communication distance between the mobile device and the aerial photography equipment. In an open field
without interference, the effective communication distance can reach 300m or more. The effective communication
distance can be affected by the ambient environment, such as tree sheltering, building reflection and other sources
at the same frequency band. Before flight, please make sure the repeater works normally, or the mobile device will
fail to be connected with the airborne camera. Each repeater has its sole MAC address and service set identifier
(SSID) which are printed on the User Manual of the product; the form of SSID is DW12.
I. Turn on the repeater DW12:
1. Fix the repeater to the corresponding position on the remote control according to the User Manual; make sure
the repeater is firmly fixed.
2. Turn the power switch of the repeater to “ON” position to turn on the repeater.
3. Wait for about 30s; then the WiFi signal indicator (blue) flashes, indicating that the repeater is in normal working
status.
II. Steps for binding the repeater DW12 with the airborne camera:
1. Power on the aerial photography equipment and the remote control to successfully connect the remote control
with the equipment.
2. Turn the slide switch S2 of the remote control to the middle position, and the camera enters the paring mode.
3. Power up the repeater DW12.
4. Wait for about 60s; use a needle-like object to press the binding button of the repeater until the WiFi signal
indicator turns off; then loosen the binding button.
5. Wait for about 30s; then the WiFi signal indicator (blue) flashes (indicating the repeater DW12 has acquired the
SSID and MAC address of the camera), and the repeater enters the binding state; in case of unsuccessful
pairing, please repeat the above steps from Step 3.
6. Find the repeater DW12 in the WiFi list on the mobile device and connect it;
Points for attention:
(1) Please fully charge the repeater before its first use.
(2) When the repeater is in the state of low-voltage alarm (the power indicator quickly flashes in red), it may stop
running at any time; please charge it timely. When the repeater is charged after power-off, the power indicator
slowly flashes in red: 1s on, 2s off; the red light is constantly on when the repeater is fully charged.
(3) Before each outdoor use, please fully charge the repeater to ensure its normal use.
(4) After each use, please remember to power off the repeater.
(5) During flight, please try to align the repeater with the aerial photography equipment to obtain the maximum
communication distance.
(6) The SSID of the repeater can be found in the WiFi list on the mobile phone only when both the camera and the
repeater are powered up and work normally.
(7) Please do not press the binding button at random to avoid binding loss.
Remark: Please re-pair before power up the repeater DW12 or the aerial photography equipment, which will be
resolved per updating software in future.
Professional·Advanced
Alarm Sounds
The aerial photography equipment can make the following alarm sounds:
Working status Sound definition (different in interval and length)
Level 2 alarm for low battery of the aerial The arm lights flash quickly with beep sounds: beep beep ---
- 21 -

AEE Aerial Photography Equipment
Professional·Advanced
photography equipment beep beep --- beep beep… continuous
Level 1 alarm for low battery of the aerial
photography equipment
Alarm for low battery of the remote control Beep --- beep beep… continuous
Remark: Upon Level 2 alarm for low battery of the aerial photography equipment, it will automatically land at the
current position rather than go home.
In case of Level 1 alarm for low battery of the aerial photography equipment, please caut iously decide whether flight
can be executed (it is suggested that it shall return for replacement of the battery before flying), to prevent flight
accident that may be caused by low battery of the aerial photography equipment or the remote control! Upon Level 1
alarm for low battery of the aerial photography equipment, it is suggested that the throttle joystick should not be
pushed to the top in order to prolong the flight time. If full-throttle flight is kept long after Level 1 alarm for low battery,
the equipment will enter Level 2 low battery state ahead of time.
The arm lights flash slowly with beep sounds: beep --- beep --beep… continuous
Specification
Description Specification
Flight mode Manual control flight, auto hover, nose orientation lock function
Endurance time About 25min
Maximum cruising speed 25m/s
Maximum remote control range 500m
Flight altitude (relative altitude) 150m
Normal take-off/landing wind speed Below Level 3
Working temperature -20°C ~ +60°C (when it is below 0°C, pay attention to thermal
insulation of the battery; the battery performance is better when
it is above 0°C.)
Working humidity 5% ~ 95%RH
Storage temperature -40°C ~ +85°C
Airborne camera HD 1080P
Net weight of aerial photography equipment 1.2KG
Troubleshooting
Before test flight, please read the “Operation Instruction” first. If normal take-off fails, please perform troubleshooting
according to the table below. If the problem still exists, please contact us immediately. To avoid unnecessary loss,
please do not operate blindly!
Fault Solution
Speeds of the four motors are obviously inconsistent
with each other after startup (some run fast, while
some run slowly)
The aerial photography equipment cannot be started
after successful self-checking
Normal take-off fails when the throttle lever is pushed
forward after the aerial photography equipment is
(1) Make sure the aerial photography equipment is placed
on a flat ground before self-checking
(2) Use the pitch and roll joystick of the remote control to
optimize take-off process.
Check the manual/auto switch of the remote control to
make sure it is in the manual state
(1) Check the four propellers of the aerial photography
equipment to see if they are installed onto the motors
- 22 -

AEE Aerial Photography Equipment
started properly as required
(2) Check the power battery of the aerial photography
equipment to make sure the battery level is high
enough.
Professional·Advanced
Protection Mechanism
1. During flying in the manual mode, when it is beyond the operating range, the aerial photography equipment will
enter the protection mode, and automatically fly back to the take-off position and land.
2. During flying in the manual/auto mode, when the remote control is powered off, the aerial photography
equipment will enter the protection mode, and automatically fly back to the take-off position and land.
3. In case of Level 2 alarm for low battery, the aerial photography equipment will enter the protection mode; at this
moment, the aerial photography equipment will vertically descend to the ground (in case of an emergency, in the
auto fly mode, you can switch to the manual mode to control landing manually; in the manual fly mode, switch to
the auto mode and then to the manual mode to realize manual control of landing).
4. To fly back the aerial photography equipment, the auto and manual modes should be switched back and forth
until the aerial photography equipment can be controlled manually.
- 23 -


Popular in European,
Patented
Technologies
National Hi-tech
Enterprise
Guangdong Famous
Trademark
Shenzhen T op
Brand
American and Asian
Markets with
Self-owned AEE Brand
Please read this Manual carefully before use, and keep it handy for future reference.
AEE Aerial Photography Equipment
Professional·Advanced
Created in China
Made in Shenzhen
Add.: AEE Hi-Tech Park, Yangguang Industrial Area, Xili Town, Nanshan District, Shenzhen, P.R. China
Tel.: 0755-29518998 Fax: 0755-27358999
- 2 -

FCC Information and Copyright
This equipment has been tested and found to comply with the limits for a Class B digital device,
pursuant to part 15 of the FCC Rules.
These limits are designed to provide reasonable protection against harmful interference in a residential
installation. This equipment generates,
uses and can radiate radio frequency energy and, if not installed and used in accordance with the
instructions, may cause harmful interference
to radio communications. However, there is no guarantee that interference will not occur in a particular
installation. If this equipment does
cause harmful interference to radio or televi si on rece pt i on , whi ch can be determined by turning the
equipment off and on, the user is
encouraged to try to correct the interference by one or more of the following measures:
—Reorient or relocate the receiving antenna.
—Increase the separation between the equipment and receiver.
—Connect the equipment into an outlet on a circuit different from that to which the receiver is
connected.
—Consult the dealer or an experienced radio/TV technician for help.
This device complies with part 15 of the FCC Rules. Operation is subject to the
following two conditions:
(1)This device may not cause harmful interference, and
(2) this device must accept any interference received, including interference that may
cause undesired operation.
changes or modifications not expressly approved by the party responsible for compliance could
void the user's authority to operate the equipment.
This equipment complies with FCC radiation exposure limits set forth for an uncontrolled
environment .This equipment should be installed and operated with minimum distance 20cm
between the radiator& your body. This transmitter must not be co-located or operating in
conjunction with any other antenna or transmitter.
 Loading...