

Alpha CAM
User Manual
V1.0
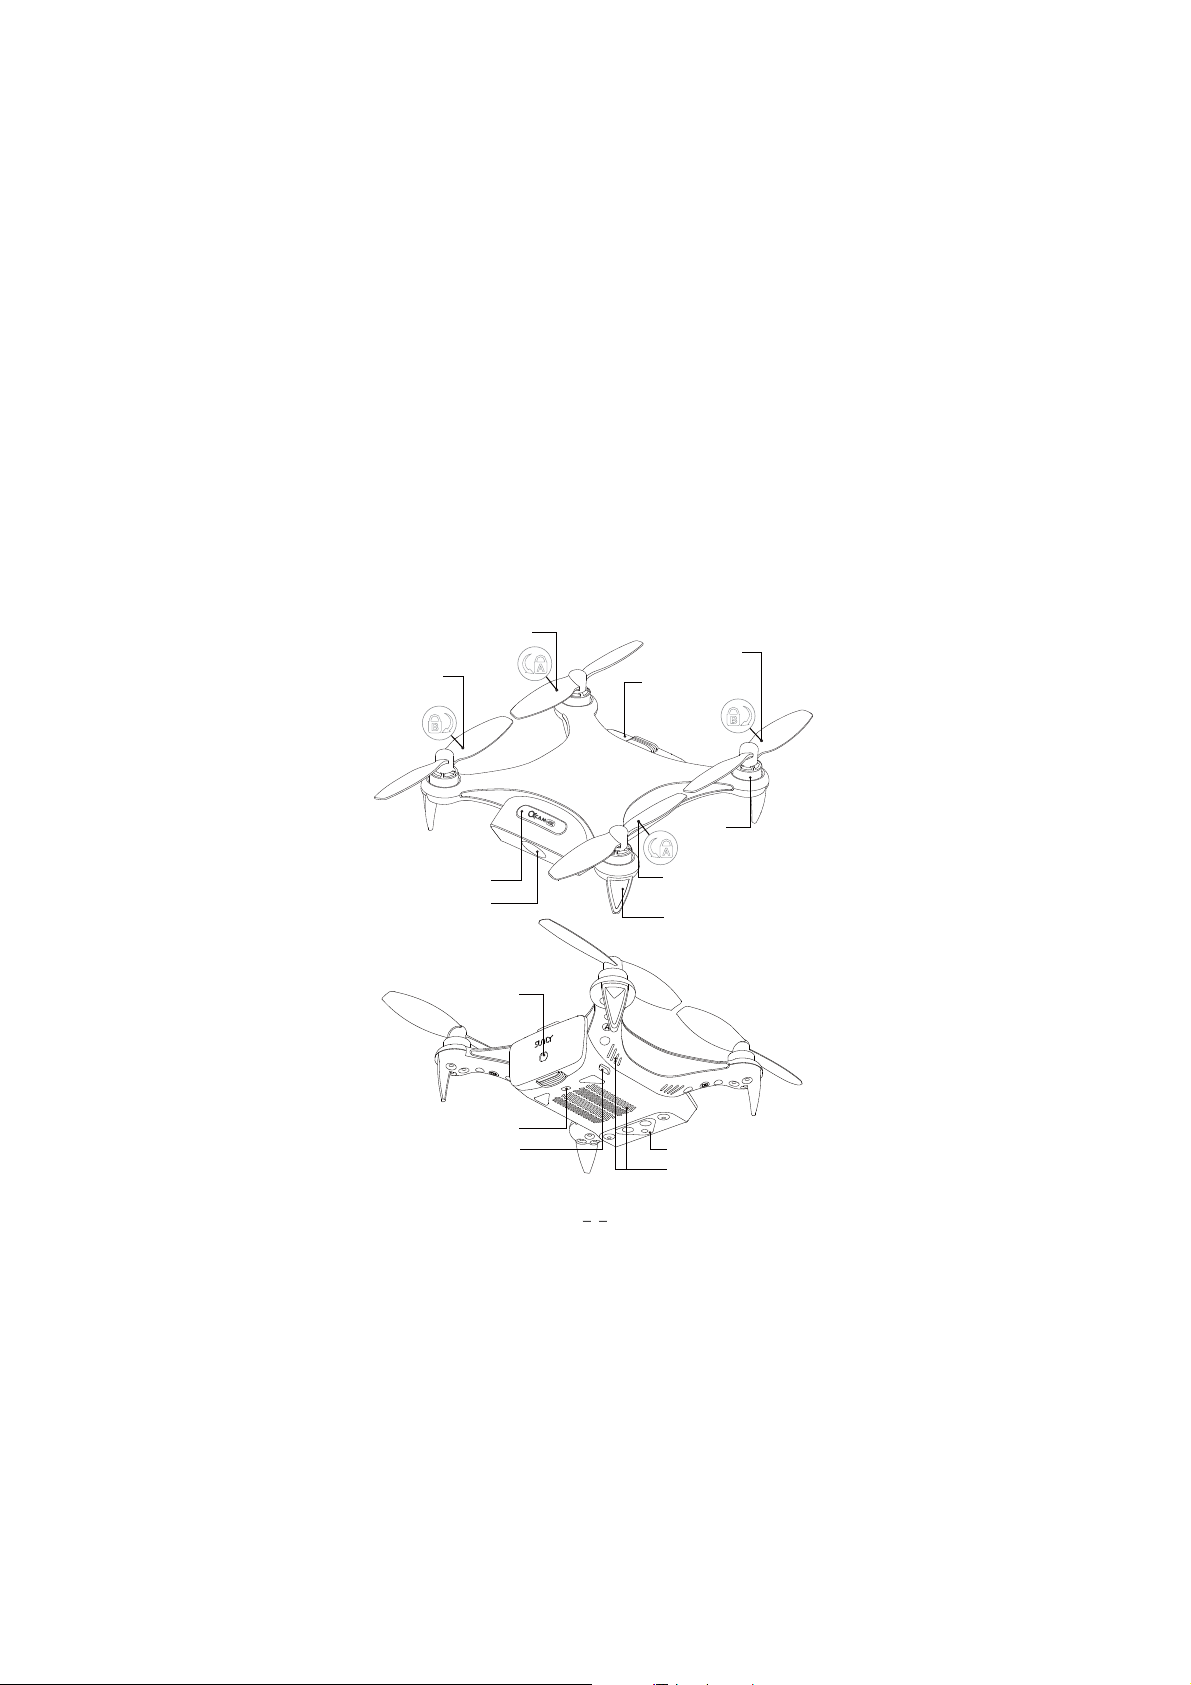
Learn about your Alpha CAM
The Alpha CAMam is SUNLYTECH’s portable smart mini drone that has been specially
designed for selfie-lovers. It is equipped with a high-definition camera for 4K/@30fps and
1080P/@30fps video recording and 13 million pixels photo shooting. Download SUNLY FLY
App(Android/iOS) to control Alpha Cam CAM with your smart phone.
The following is the body structure of Alpha CAM:
Propeller B
Power switch
Propeller A
Camera
Charging Port
Indicator LED
Micro-USB
Propeller B
Battery
Motor
Propeller A
Bracket
Visual positioning module
Heater louver
1

Learn about your App
SUNLY FLY is a smartphone application developed for Alpha CAM. Users can use the SUNLY
FLY App to control the flight and shooting instead of remote controller, and share the
pictures directly to the social network.
SUNLY FLY App Control Interface
Quit
GPS
Battery power
Camera mode
x1
Focal length
Camera settings
Return
Full screen
For the specific use and meaning of the icons in SUNLY FLY App, please refer to the “HELP” button on the
flight interface of APP .
Shooting mode
Optical flow sensor
WiFi
Settings
Shooting/delay
Propellers forced to
stop
Landing
Height status bar
GPS switch
Height sensor
SD card capacity
Help
?
Video recording
Cancel
Take off
2

Use your Alpha CAM
1、Download SUNLY FLY App
Before using this product, please go
to APP store to download and install
SUNLY FLY App.
SUNLY FLY App requires Android 4.3 or higher versions;iOS 8.0 or higher versions.
3、Charging
Insert the original charging cable into the charging port of the battery. The indicator LED
keeps on red when charging. It will turn to green when charging is completed. Unplug the
cable when the LED turns to green.
4、Install battery
Please note the front and back side of the battery to ensure that the battery is correctly
inserted into the fuselage.
Battery tail LOGO font up shows battery installed correctly.
About the battery safe use method, see "Alpha CAM disclaimer and safety guidelines".
5、Preparing to take off
To avoid any danger, please fit on the
propeller before.
2、Watch the introduction and tutor video.
Please scan the two-dimensional code to visit the
official website of SUNLY TECH:
and click the Video Center to view.
Indicator LED
Before flying place the drone horizontally
on the ground and turn the tail of drone to
yourself.
www.sunlytech.com
The working propellers may cause serious
damage to the approaching objects, please
keep more then 2 meters distance from the
drone to ensure safety.
Reading tips:
Instruction
Warning
Default is scenery mode: camera direction is the
head of drone; you can adjust the flight interface
"Shooting mode" button to the selfie
mode: camera direction is the tail of the drone.
3

A、Swith on/off the drone
Long press the power button until the power indicated light flashes to blue . After a few
seconds the “beep” sound comes out, indicates successfully switched on.
Long press the power button of the drone longer than 3 seconds until the power
indicator light goes out. The drone turns off.
B、Ready to fly
Launch the App, click [Enter flight] button, follow the
instructions into settings and connect the device with
drone’s WIFI, then back to the interface of App and
enter flight interface.
Default SSID: AlphaCAM-XXX, password: sunlytech, it can be changed in Settings.
C、Compass calibration
The drone already calibrated in factory, before the first flight, suggest calibrate the compass;
otherwise the drone may not work properly and affect flight safety. Frequent calibration of
the compass can improve the reliability of drone.
How to operate: Select "Calibration - compass calibration" in Settings of the upper right corner of the flight
interface you can start to calibration referring to the prompts.
6、Fly
Take off
click on the "take off" button at the buttom of the screen, slide to the right end,
the drone will take off and rise to 1m altitude and hover.
Landing
during the flight, click on the "landing" button and slide to the right end. The
drone will land in the place.
Return
during the flight in GPS mode,click the "return" button, slide to the right end,
the drone will return to the point of departure.
Propellers forced to stop
during the flight, such as in an emergency, you can click on the “Propellers forced
to stop” button, the drone will force the propeller to stop working. With a certain
risk and destructive, please use caution.
The returning drone will rise to the return altitude of SUNLY FLY App setting (default return altitude is 5
meters), please ensure no obstacle in returning route.A
In the implementation of take-off or landing or return operation, if the button does not slide to the end,
the slider is automatically hidden, the corresponding operation is not executed.
4

7、Control mode
Touch mode
Control the drone by click on the operating button on the screen.
The up/down button of the left side to
control the drone rising/falling. The
left/right button to control left/right
rotation of the drone to adjust the flight
course.
Touch mode is default operating mode, user can adjust the control mode in settings.
Motion mode
Use the gravity sensing system of mobile device to control the drone flying.
Keep pressing on any point on the right
side of the screen while tilting the mobile
device forwards and backwards/rightwards and leftwards, to control the drone
flying to the corresponding direction.
Sensitivity of operation is not same in different mobile devices when motion mode is used.
Joystick mode
Control the drone by dragging the two joysticks on the screen.
Drag the left joystick up/down, to control
the drone rising/falling, and drag the
joystick leftwards/rightwards, to , control
the left and right rotation of the drone to
adjust the flight course.
The up/down button of the right side to
control the drone forwards/backwards,
and the left/right button to control
left/right movement of the drone.
Click the up/down button of operating
lever on the left, to control the drone
rising/falling, and the left/right button to
control the left/right rotation of the drone
to adjust the flight course.
Drag the right joystick up/down, to
control the drone forwards /backwards,
and drag the joystick leftwards/
rightwards, to control the left/right
movement of drone .
In joystick mode, user can adjust the joystick function button in “Settings-Custom joystick” interface
according to the user’s needs.
5

8、Shooting / Video recording
Click the "Camera mode" button at the flight interface, to switch shooting or video
recording.
Change Focus: Click the "focus" button in the upper left corner of the flight interface to
adjust the focus.
Delayed Shooting: Press the "Shutter" button in the upper right corner of the flight
interface to select the delay time.
Shooting:Click the "shutter" button at the flight interface. Each time you click will take
one photo for default. User can modify the photo amount of continuous shooting in “camera
settings” .
Video recording:Click the "Video recording" button to enter in the recording interface.
Click the "Stop video recording" button to stop recording.
9、Appendix Specifications
Drone
Size:
Weight:
Max. Battery Time:
Max. Using Altitude:
Max. Control Distance:
Wind Resistance Level:
Positioning System:
Hover Accuracy:
Wi-Fi Frequency:
Operating temperature:
Camera
Image sensor:
Effective pixels:
Camera lens:
Photo Size:
Video recording:
ISO range:
EV range:
Storage format:
Storage capacity:
USB interface type:
App
App name:
Image Transmission Resolution:
Delay:
Supported mobile device OS:
128x128x43mm (excluding the propeller)
220g
20 minutes
3000m
100m (In the open area without interference)
28km/h
GPS: GPS&GLONASS dual-mode satellite positioning
visual : optical flow + Infrared (illumination >15lux)
Vertical: +/-0.1m (visual positioning) ; +/-0.5m (GPS)
Horizontal: +/-0.3m (visual positioning); +/-1.0m (GPS)
2.4GHz; 5GHz(default frequency)
5-40℃
Battery
6x17
Rated capacity:
Rated energy:
Nominal voltage:
Battery type:
Operating temperature
(charge):
Operating temperature
(discharge):
Max. charge voltage:
SONY1/3.06 inch CMOS
13 Mega Pixels
FOV90°; F2.2; f/2.95mm
4208x3120
1080p@30fps after EIS on 4K@30fps
100-3200
-12; -8; -4; 0; 4; 8; 12
JPG/MP4
16GB (including system file)
Micro-USB
SUNLY FLY
VGA; QVGA (Default Resolution)
160ms (depends on actual environment and mobile device)
Android 4.3 or higher versions; iOS 8.0 or higher versions
2000mAh
15.2Wh
7.6V
LiPo 2S
5-40℃
5-40℃
8.7V

Declaration of Conformity
Hereby Shanghai Sunly Technology Co.,Ltd., Inc declares that this Alpha CAM Drone (Model
No.: SUNLY17A) is in compliance with the essential requirements and other relevant
provisions of Directive 1999/5/EC.
Input Power: 80W
Rating Current: 10A
Ambient Temperature ranges 0~40 ℃
This device must be installed and operated with a minimum distance of 20 cm between the
radiator and user body.
Manufacture
Shanghai Sunly Technology Co.,Ltd.
Address:
D1106.D-1108.Minggu Science&Technology Park,No.7001 Zhongchun Rd.,Shanghai,China
FCC Statement
This device complies with part 15 of the FCC Rules. Operation is subject to the following two
conditions:
(1) This device may not cause harmful interference, and
(2) This device must accept any interference received, including interference that may cause
undesired operation.
Changes or modifications not expressly approved by the party responsible for compliance
could void the user's authority to operate the equipment.

NOTE: This equipment has been tested and found to comply with the limits for a Class B
digital device, pursuant to Part 15 of the FCC Rules. These limits are designed to provide
reasonable protection against harmful interference in a residential installation. This
equipment generates uses and can radiate radio frequency energy and, if not installed and
used in accordance with the instructions, may cause harmful interference to radio
communications. However, there is no guarantee that interference will not occur in a
particular installation. If this equipment does cause harmful interference to radio or
television reception, which can be determined by turning the equipment off and on, the
user is encouraged to try to correct the interference by one or more of the following
measures:
‐‐ Reorient or relocate the receiving antenna.
‐‐ Increase the separation between the equipment and receiver.
‐‐ Connect the equipment into an outlet on a circuit different from that to which the
receiver is connected.
‐‐ Consult the dealer or an experienced radio/TV technician for help.
FCC Radiation Exposure Statement
This device complies with FCC RF radiation exposure limits set forth for an uncontrolled
environment. This transmitter must not be co‐located or operating in conjunction with
any other antenna or transmitter. This device must be installed and operated with a
minimum distance of 20 cm between the radiator and user body.
8

The instruction would be aperiodically updated.
The most recent information please see official website.
www.sunlytech.com
2017 SUNLYTECH All Rights Reserved
©
 Loading...