

POWERCOM PLUS
POWERCOM
LITECOM

PowerCom Plus
PowerCom
Lite-Com
ENG Instruction manual
ESP Instrucciones de uso
FRA Mode d’emploi

PowerCom Plus 462-467 MHz (FRS)
14 channels, 38 sub-channels
FCC and Industry Canada (IC) approved
Model Numbers:
MT53H7A4610 Headband model
MT53H7B4610 Neckband model
MT53H7P3E4610 Slotted hardhat mount model
PowerCom 462-467 MHz (FRS)
14 channels, 38 sub-channels
FCC and Industry Canada (IC) approved
Model Numbers:
MT53H7A4600 Headband model
MT53H7B4600 Neckband model
MT53H7P3E4600 Slotted hardhat mount model
LiteCom 49.830-49.890 MHz
5 channels
FCC and Industry Canada (IC) approved
Model Numbers:
MT53H7A4900 Headband model
MT53H7B4900 Neckband model
MT53H7P3E4900 Slotted hardhat mount model

PELTOR 2-WAY RADIO HEADSETS
THANK-YOU for your purchase of Peltor’s latest self-contained
2-way radio headset product.
PowerCom Plus, PowerCom, and LiteCom all offer reliable, efcient communication between two or more
people in noisy environments.
Although these products are very user-friendly, please take the time to read this instruction manual
carefully to ensure proper set-up and use of all features
• PowerCom Plus and PowerCom are 2-way radio headsets pre-programmed to 22 or 14 channels in
the FRS and/or GMRS frequency band with 38 privacy sub-channels. These units have up to 0.15
watts of transmitting power with a range of 2 km outdoors. The range will vary depending on local
surrounding environmental conditions.
• LiteCom is a 2-way radio headset pre-programmed to 5 channels in the 49 MHz frequency band.
This unit has up to 0.1 watts of transmitting power with a range of 100M outdoors. The range will
vary depending on local surrounding environmental conditions.
• The PowerCom Plus/PowerCom headsets will not communicate with the LiteCom headsets. However,
PowerCom Plus headsets will communicate with PowerCom headsets.
• All models feature advanced ghost voice conrmations of mode and level selections. As an added
bonus, the ghost voices are selectable by the user in every model. Language options are English,
French or Spanish.
Depending on the product purchased, they will communicate with other similar license-free radio
products in the FRS, GMRS and 49 MHz frequencies.
These devises comply with part 15 of the FCC rules and regulations. Operation of these devices are
subject to the following two conditions:
1) These devises may not cause harmful interference, and
2) These devises must accept any interference received, including interference that may cause undesired
operation
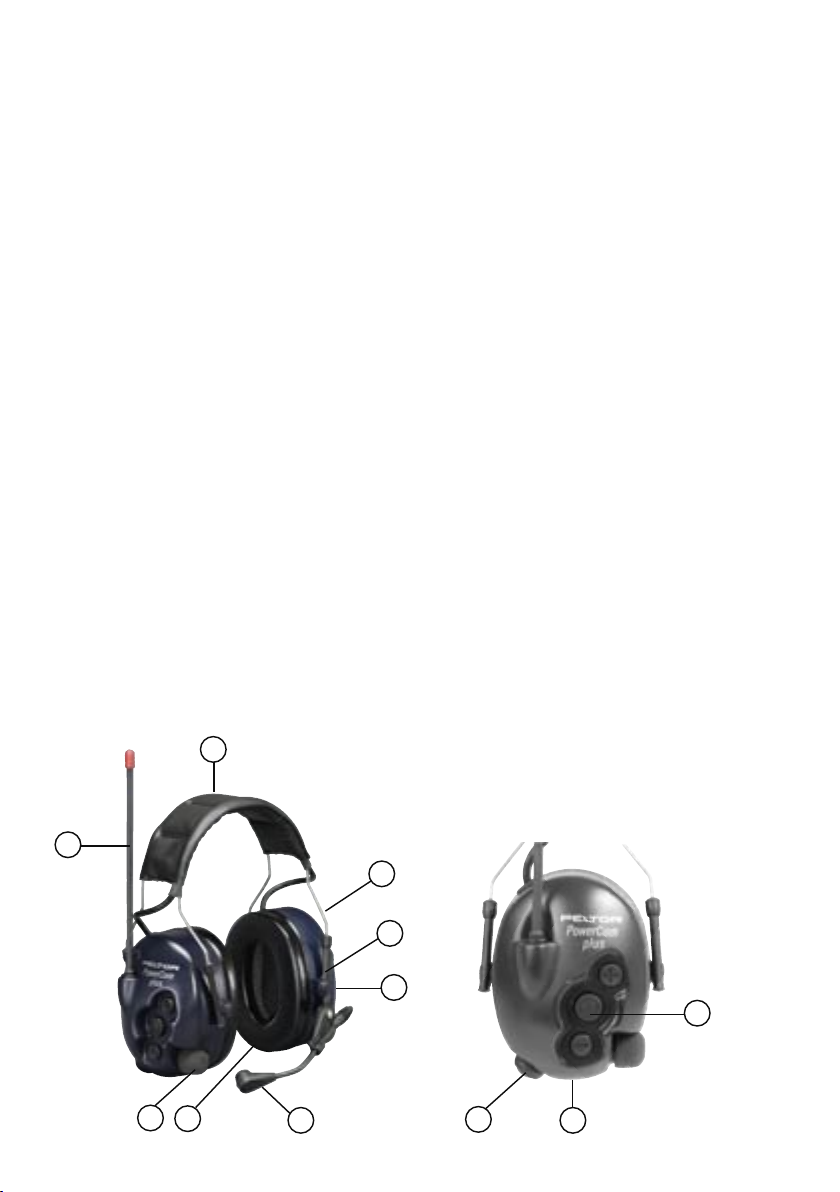
Headset basics….
Refer to gure H.
1. (MT53H7A****) Wide padded headband – for over-the-head use
(MT53H7B****) Neckband - for use under a hardhat
(MT53H7P3E****) Slotted hardhat mount – snaps into slots of hardhats
2. Stainless steel headband wires – special bending processes ensure an even distribution of pressure
around the ears.
3. Guide arms – slide assembly for easy height adjustment.
4. Ear seals – foam with liquid bladder for all day comfort, built-in pressure-relief canals ensure low
pressure and effective sealing. See page 12 for replacements.
5. Antenna – exible with xed mount design and high reception quality
6. Audio jack - for external audio accessories including 2-way radios, cell phones, personal entertainment
devises, see page 13
7. Battery cover – requires 2 standard 1.5-volt AA alkaline batteries, optional rechargeable battery pack
available, see page 12
8. Key pad - for easy changing of modes, settings and levels.
9. Lip microphone – quick positioning metal boom assembly with an electret noise canceling condenser,
see page 12 for replacements.
10. Cup microphones – amplify and reproduce in stereo inside the headset ambient noises and voices
allowing the user to be fully aware of surrounding environment. (Only available with PowerCom Plus
models). See page 12 for foam replacements.
11. Headset Push-To-Talk (PTT) – will key up lip microphone and activate the radio inside headset to start
transmitting.
(H)
1
5
2
3
7
8
10
4
9
11
6
Getting Started…
BATTERIES
Open the battery cover (#7, Fig. H) and place two 1.5 Volt AA size batteries inside the compartment.
Ensure that the + and – poles of the batteries are in the correct positions (refer to gure inside the battery
cover). The headset is polarity protected in the event batteries are incorrectly inserted.
When the batteries get low in power, a voice message saying “low battery” will be heard inside the
headset. This message will be repeated in 2 minute intervals until the batteries are completely depleted,
at which point the headset will have a voice conrmation saying “battery empty” and will shut off.
Note(s):
1) Battery life span/operating time varies greatly depending on the type of batteries and how the
headset is used. For example, with an alkaline battery with at least 2000 mAh, the operating time
in low-power mode is about 30 hours at 10 % transmission, 10 % reception and 80 % stand-by. In
high-power mode, the operating time under the same conditions decreases by about 10 %. At 20 %
transmission, 20 % reception and 60% stand-by, the operating time is about 20 hours.
2) The headset has an automatic shut-off feature to save on batteries. It will turn itself off automatically
after 2 hours if one of the following keys is not activated in that timeframe: (0) (+) (-) (PTT/VOX). A
triple tone signal will be emitted every 30 seconds for 5 minutes prior to nal shut down.
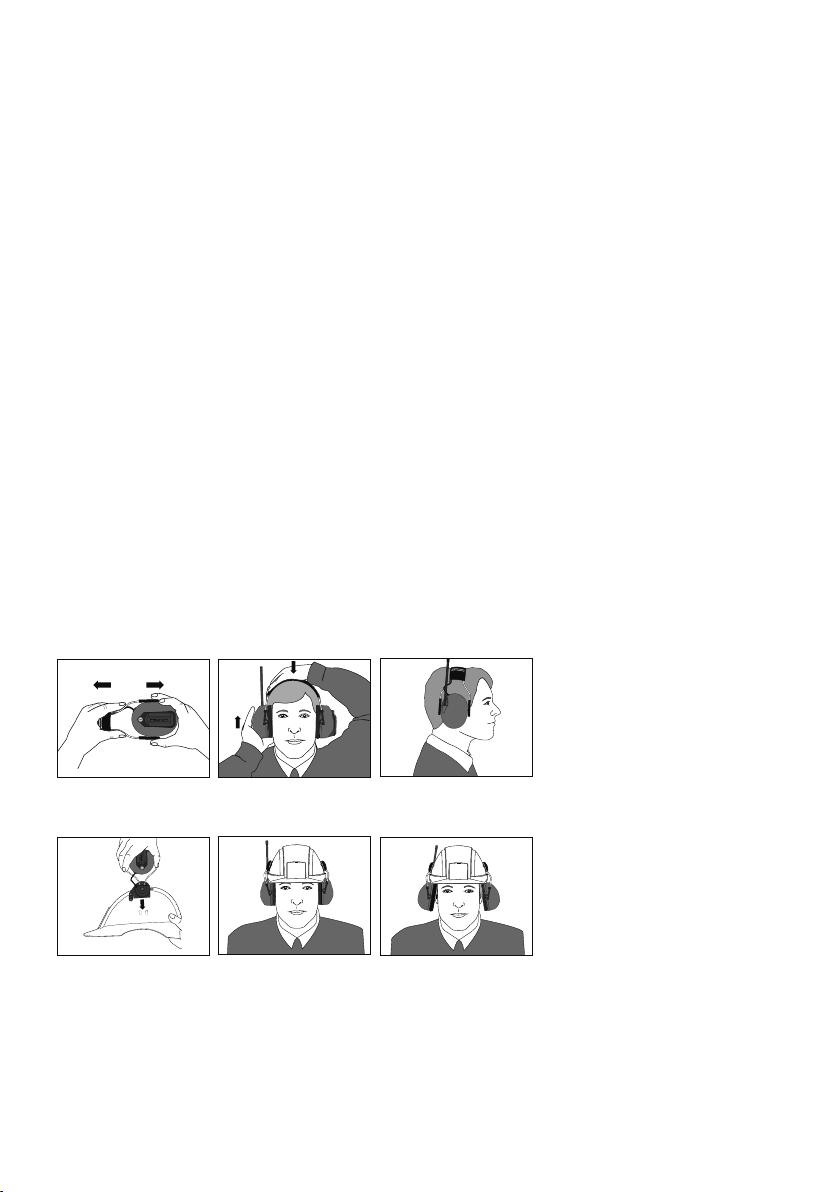
ADJUSTING THE CUPS FOR FIT (Fig. J)
1. The cup guide arms (#3, g H) slide up and down the metal wires.
2. For headband and neckband models, place the headset on your head, with one hand, hold the band
(#1, g H) in place and with the other slowly move the cup up/down the wire arms until they are in
the comfortable and snug t position.
3. For harthat mount position (g. K) snap the headset helmet attachment into the slot of the helmet.
Place the hardhat with headsets in place on your head and refer to 2. above for cup placement
instructions.
(J)
(K)
The hardhat mounted headset can be used in two positions:
working position (1) and ventilation position (2).
When in use, the cups must be placed in working position. Press the headband wires inwards until
you hear a click on both sides. To ensure proper noise attenuation while in the working position do
not press against the lining or edge of the helmet.
Tip: At the end of the day, do not leave the headset in the upright position on top of the helmet, leave
it in the ventilation position allowing the foam on the inside of the cups to dry out.
 Loading...