

Page 1
PowerCom BRS
Page 2

ENG Instruction manual p. 1
FRA Mode d’emploi p. 16
ESP Instrucciones de uso p. 31
PowerCom BRS
Page 3

1
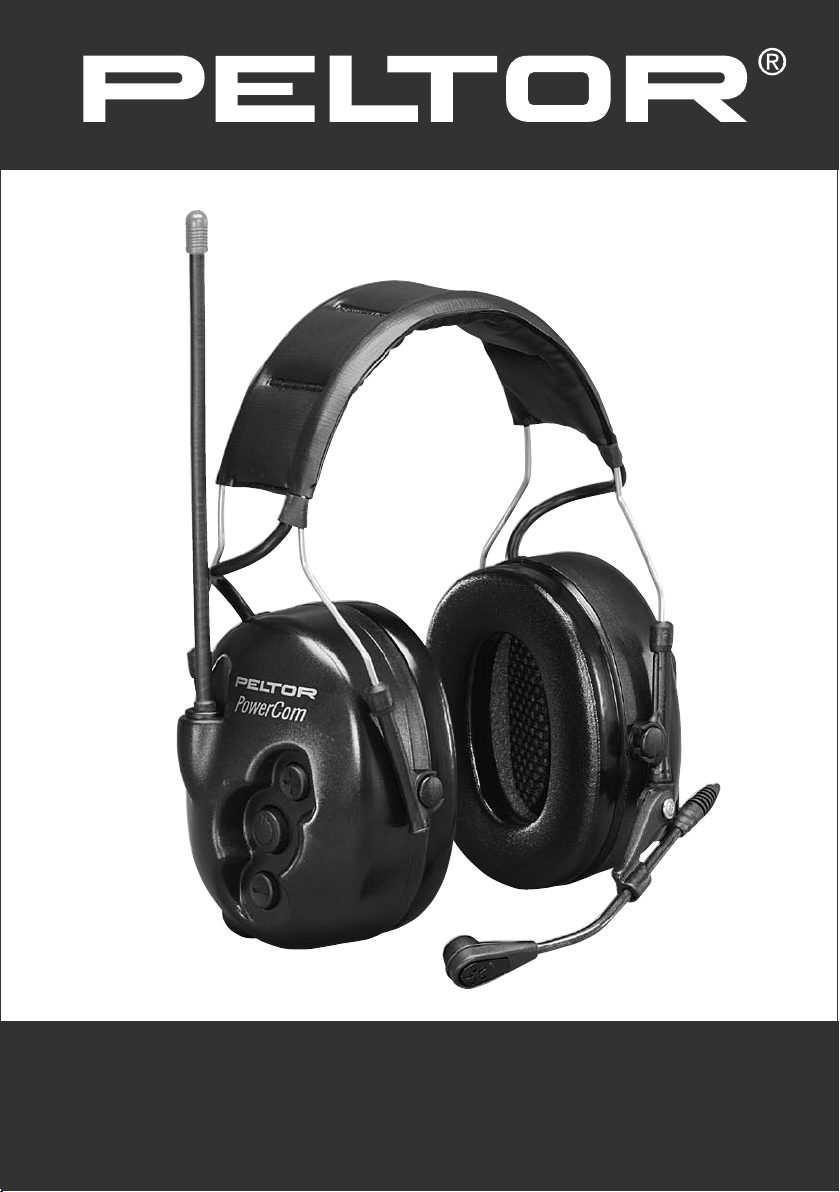
PowerCom BRS 464-467 MHz
BRS 2-Way Radio headsets
8 Channels, 38 sub-channel (privacy codes)
FCC and Industry Canada (IC) approved
Model Numbers:
MT53H7A4604 Headband model
MT53H7B4604 Neckband model
MT53H7P3E4604 Slotted hardhat mount model
Page 4

2
PELTOR 2-WAY RADIO HEADSETS
THANK-YOU for your purchase of Peltor’s latest self-contained
2-way radio headset product.
PowerCom, offer reliable, efficient communication between two or more people in noisy environments.
Although these products are very user-friendly, please take the time to read this instruction manual
carefully to ensure proper set-up and use of all features
• PowerCom is a 2-way radio headsets pre-programmed to 8 channels in the 462 MHz frequency band
with 38 privacy sub-channels. These units have up to 60 mW ERP of transmitting power with a range
of 2 km outdoors. The range will vary depending on local surrounding environmental conditions.
• All models feature advanced ghost voice confirmations of mode and level selections. As an added
bonus, the ghost voices are selectable by the user in every model. Language options are English,
French or Spanish.
These devises comply with part 15 of the FCC rules and regulations. Operation of these devices are
subject to the following two conditions:
1) These devises may not cause harmful interference, and
2) These devises must accept any interference received, including interference that may cause undesired
operation
Page 5
3
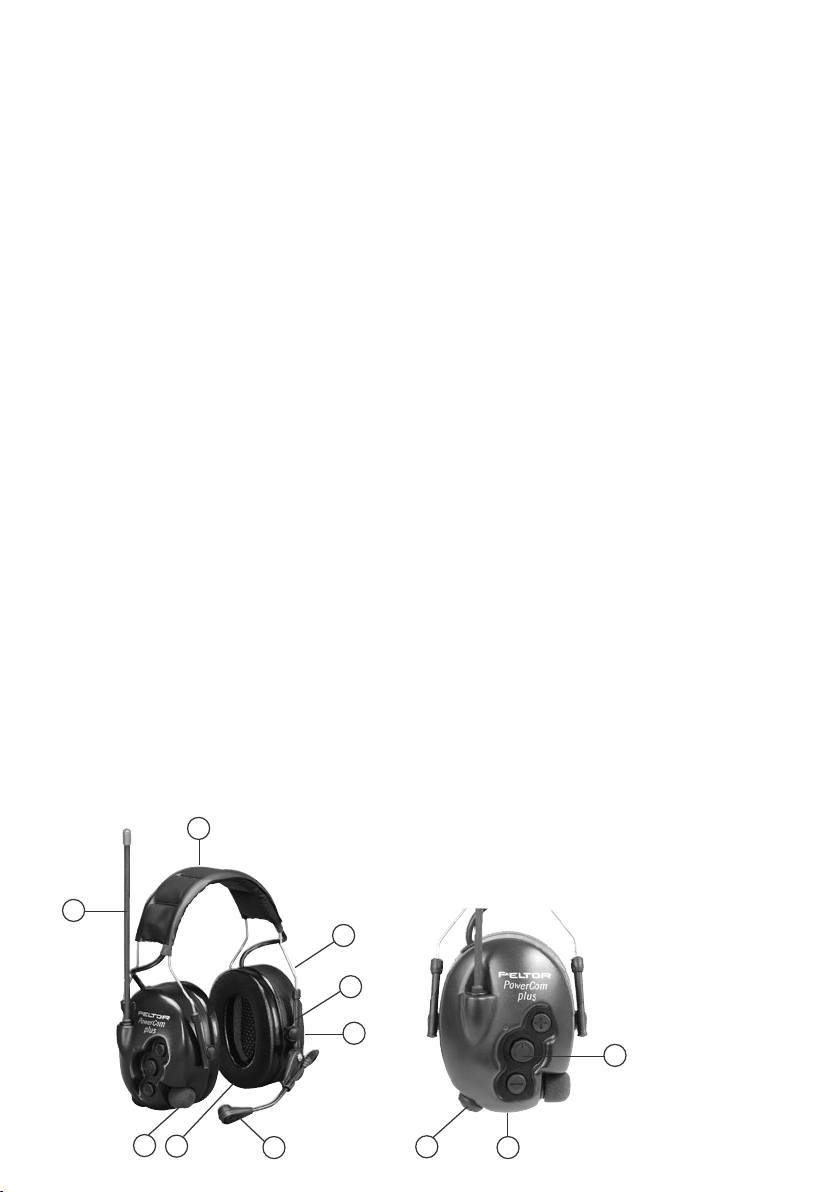
Headset basics….
Refer to figure H.
1. (MT53H7A****)
Wide padded headband – for over-the-head use
(MT53H7B****) Neckband - for use under a hardhat
(MT53H7P3E****) Slotted hardhat mount – snaps into slots of hardhats
2. Stainless steel headband wires – special bending processes ensure an even distribution of pressure
around the ears.
3. Guide arms – slide assembly for easy height adjustment.
4. Ear seals – foam with liquid bladder for all day comfort, built-in pressure-relief canals ensure low
pressure and effective sealing. See page 12 for replacements.
5. Antenna – flexible with fixed mount design and high reception quality
6. Audio jack - for external audio accessories including 2-way radios, cell phones, personal entertainment
devises, see page 13
7. Battery cover – requires 2 standard 1.5-volt AA alkaline batteries, optional rechargeable battery pack
available, see page 12
8. Key pad - for easy changing of modes, settings and levels.
9. Lip microphone – quick positioning metal boom assembly with an electret noise canceling condenser,
see page 12 for replacements.
10. Cup microphones – amplify and reproduce in stereo inside the headset ambient noises and voices
allowing the user to be fully aware of surrounding environment. (Only available with
PowerCom Plus
models). See page 12 for foam replacements.
11. Headset Push-To-Talk (PTT) – will key up lip microphone and activate the radio inside headset to start
transmitting.
(H)
6
1
2
3
4
5
7
11
10
9
8
Page 6
4
Getting Started…
BATTERIES
Open the battery cover (#7, Fig. H) and place two 1.5 Volt AA size batteries inside the compartment.
Ensure that the + and – poles of the batteries are in the correct positions (refer to figure inside the battery
cover). The headset is polarity protected in the event batteries are incorrectly inserted.
When the batteries get low in power, a voice message saying “low battery” will be heard inside the
headset. This message will be repeated in 2 minute intervals until the batteries are completely depleted,
at which point the headset will have a voice confirmation saying “battery empty” and will shut off.
Note(s):
1) Battery life span/operating time varies greatly depending on the type of batteries and how the
headset is used. For example, with an alkaline battery with at least 2000 mAh, the operating time
in low-power mode is about 30 hours at 10 % transmission, 10 % reception and 80 % stand-by. In
high-power mode, the operating time under the same conditions decreases by about 10 %. At 20 %
transmission, 20 % reception and 60% stand-by, the operating time is about 20 hours.
2) The headset has an automatic shut-off feature to save on batteries. It will turn itself off automatically
after 2 hours if one of the following keys is not activated in that timeframe: (0) (+) (-) (PTT/VOX). A
triple tone signal will be emitted every 30 seconds for 5 minutes prior to final shut down.
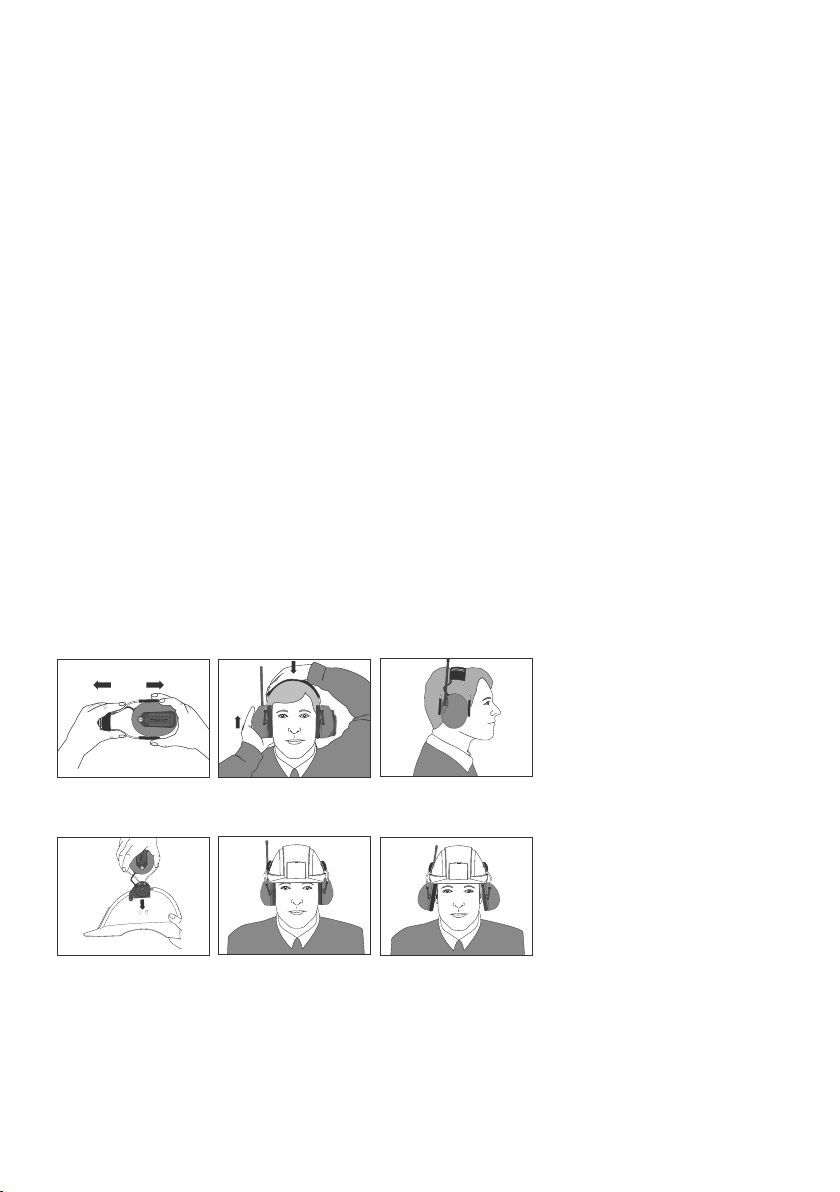
ADJUSTING THE CUPS FOR FIT (Fig. J)
1. The cup guide arms (#3, fig H) slide up and down the metal wires.
2. For headband and neckband models, place the headset on your head, with one hand, hold the band
(#1, fig H) in place and with the other slowly move the cup up/down the wire arms until they are in
the comfortable and snug fit position.
3. For harthat mount position (fig. K) snap the headset helmet attachment into the slot of the helmet.
Place the hardhat with headsets in place on your head and refer to 2. above for cup placement
instructions.
The hardhat mounted headset can be used in two positions:
working position (1) and ventilation position (2).
When in use, the cups must be placed in working position. Press the headband wires inwards until
you hear a click on both sides. To ensure proper noise attenuation while in the working position do
not press against the lining or edge of the helmet.
Tip: At the end of the day, do not leave the headset in the upright position on top of the helmet, leave
it in the ventilation position allowing the foam on the inside of the cups to dry out.
(J)
(K)
(1)
(2)
Page 7

5
Operating Instructions………
PowerCom Plus, PowerCom and LiteCom all operate on the same simple 3 key touch pad configuration
(#8 fig H) and 1 PTT button.
1. On/Off/Mode Selection
(O)
This button will turn the headset on or off by holding it down for more than 2 seconds. Once the
headset is turned on, it reverts to a mode menu selection button, see below for mode menu details.
Step-by-step mode menu selection
Simply press the (O) key and the headset will confirm via a voice message what mode menu has been
selected. Every time the (O) key is pressed it continues onto the next mode menu item followed by a voice
confirmation. Once in the mode of choice, refer to instructions below on the (+) and (-) keys.
Quick step mode menu selection
By pushing (0) key several times in a row, it will quickly scroll down the modes the equivalent number of
times the (0) was pushed, followed by a voice confirmation of the menu item selected.
The headset will revert back to Surround Volume Mode (in PowerCom Plus headsets) and Radio Volume
mode (in PowerCom and LiteCom headsets) if the (0) or (+) (-) keys are not activated within 5 seconds
while making selections. A beep will be heard in the headset indicating mode has automatically
reverted.
2. UP (+) Increases the steps within the mode selected, followed by a voice
confirmation of step selected.
3. DOWN (–) Decreases the steps within the mode selected, followed by a voice
confirmation of step selected.
4. PTT Located on the backside of the right ear cup. The thumb activated push-to-talk button
will key up the lip microphone and activate the radio inside the headset to start
transmitting.
Operating Details…
Turn the unit on by pressing the (O) key for more than 2 seconds and promptly let go, the headset will
emit a raising series of 3 tones confirming the headset is turned on. To turn the unit off, again hold
the (0) button for 2 seconds and promptly let go, the headset will emit a decending series of 3 tones
confirming the headset is off.
Once the headset is on and ready to be used, the (0) key becomes the mode menu selection button:
Mode Menu Selections
SURROUND
Applicable for PowerCom Plus headset models only.
This mode adjusts the volume level of the cup microphones (#10 fig H). Pressing the (+) (-) keys while in
this mode will either increase or decrease the surrounding ambient noise level being reproduced inside
the headset. A voice message confirms each new setting as the (+) (-) keys are pressed. There are 5
volume levels and an off level. Off can be activated by scrolling down to level 1 then hold the (-) key down
for 1 second and release, a voice message confirmation will follow saying “surround off”. To reactivate
push the (+) key once and the mode will revert back to the level 1 surround volume setting.
Page 8

6
VOLUME
This mode adjusts the headset radio incoming receive volume level. By pressing the (+) (-) keys while in
this mode the volume adjusts up and down accordingly. A voice message confirms each new setting as
the (+) (-) keys are pressed. There are 5 volume levels and an off level. Off can be activated by scrolling
down to level 1 then hold the (-) key down for 1 second and release, a voice message confirmation will
follow saying “volume off”. To reactivate push the (+) key once and the mode will revert back to the level
1 volume setting.
CHANNEL
This mode changes the main radio channel selections. By pressing the (+)(-) keys while in this mode the
channels scroll up and down accordingly. A voice message confirms each new channel number selected
as the (+) (-) keys are pressed. The number of channels available in this mode depends on the headset
model purchased (see page 2). The channels are in a rolling configuration, that is, when the top channel
has been reached, pressing (+) again will revert back down to the first channel available, followed by a
voice confirmation.
VOX
This mode will adjust the voice activation (VOX) sensitivity. By pressing the (+)(-) keys while in this mode
the lip microphone is made more or less sensitive to activation via the user’s voice and/or surrounding
noise levels.
Tip(s):
1) Press (+) as the noise becomes louder (therefore making the microphone less sensitive to outside
noise) and viceversa as noise levels drop.
2) Setting 1 is for low noise applications. Setting 5 is for extreme noise applications. Try different
settings until the optimum setting is found.
3) Setting 1 requires minimal voice level to activate the microphone. Setting 5 requires maximum voice
level to activate the microphone.
4) Do not pause when talking during transmissions, VOX will turn off during pauses
5) Ensure lip microphone is no more than 1/4” away from the mouth.
A voice message will confirm each new setting as the (+)(-) keys are pressed. There are 5 VOX sensitivity
levels and an off position. Off can be activated by scrolling down to level 1 then hold the (-) key down for
1 second and release, a voice message confirmation will follow saying “vox off”. To reactivate push the
(+) key once and the mode will revert back to the level 1 vox setting. (i.e. the most sensitive microphone
setting). When in the off position, the headset radio transmit can only be operated via the PTT on the
right earcup (#11, Fig H), or remote finger ptt accessory, see page 13.
SQUELCH
This mode changes the antenna sensitivity level. By pressing the (+)(-) keys while in this mode it will
help filter out unwanted incoming RF noise between transmissions. A voice message confirms each new
setting as the (+)(-) keys are pressed.
Tip(s)
1) Normal mode is 1
2) Level 5 has most filtering
3) Level 1 has least amount of filtering
4) Off level has no filtering with squelch wide open
5) Try different levels in order to settle on the lowest possible setting for the specific application.
There are 5 squelch sensitivity levels and an off squelch position. Off can be activated by scrolling down to level
1 then hold the (-) key down for 1 second and release, a voice message confirmation will follow saying “squelch
off”. To reactivate push the (+) key once and the mode will revert back to the level 1 squelch setting.
Page 9

7
SUB CHANNEL
This mode changes the privacy/sub-channel selections. By pressing the (+)(-) keys while in this mode the
channels scroll up and down accordingly. A voice message confirms each new channel number selected
as the (+) (-) keys are pressed. There are 38 sub channels plus an open 0 channel. The channels are in a
rolling configuration, that is, when the top channel has been reached, pressing (+) again will revert back
down to the first channel available, followed by a voice confirmation.
Tip(s)
1) PowerCom Plus and PowerCom headsets are compatible and will transmit to each other.
2) In order to communicate properly, all headsets in the group must be on the same main channel and
same sub-channel.
POWER
This mode allows the selection of two transmitting power levels. When (+) is pressed, a voice confirmation
will follow and the headset will be in the maximum (high) output power transmitting mode. When the
(-) is pressed, a voice confirmation will follow and the headset will be in the lowest (low) output power
transmitting mode.
Tip(s)
1) This mode can be used as a battery conservation feature
2) Depending on distance transmitting, high power setting is not always required for good coverage.
Evaluate units in environment to be used for optimum setting.
3) The high setting will consume more battery power than the low setting.
LANGUAGE
This mode allows the selection of voice confirmations in the headset to be in one of three languages:
English, French or Spanish. By pressing the (+) (-) keys while in this mode the languages will scroll up
and down accordingly. A voice message will confirm language selected.
Notes:
1) The mode will revert back to Surround Volume Mode (in PowerCom Plus headsets) and Radio Volume
mode (in PowerCom and LiteCom headsets) if the (0) or (+) (-) keys are not activated within 5 seconds
while making selections. A beep will be heard in the headset indicating mode has automatically
reverted.
2) The headsets will also automatically shut-off if one of the following buttons (0) (+) (-) (PTT/VOX) is
not pressed within a span of 2 hours. Three tones are emitted every 30 seconds for 5 minutes prior
to shut down.
PUSH-TO-TALK (PTT) BUTTON FUNCTIONALITY
Located on the backside of the right ear cup, pressing this button keys up the lip microphone and enables
radio transmission manually. The radio will transmit, and the lip microphone will stay open as long as
the button is pressed.
VOX DISABLE FEATURE-Short cut
Double clicking the PTT button quickly will disable the vox feature, confirmed by a long beep signal in
the headset. To reactivate, double click the PTT button again and the vox will be enabled, confirmed by
a short double beep signal in the headset.
Tip: Excellent feature to use if operator moves from low to high noise periodically during the work day.
Page 10

8
ALTERNATE BELT RADIO OR CELL PHONE ACCESSORY USE
Double click on the PTT button prior to plugging in the external 2-way communication accessories (FL6R
+ FL50 belt PTT combination, or FL6S) into the audio jack on the bottom of the headset (#6, fig H,
page 4).
When using this feature, the PTT on the headset will activate the headset radio into transmit mode, and
the FL50 belt PTT will activate the alternate belt radio into transmit mode.
Note, these instructions do not apply when using receive-only accessories. Simply plug in the receive only
accessories into the audio jack (#6, fig H, page 4)
MAINTENANCE
Clean the outside of the headset regularly with soap and warm water.
Note: Do not immerse in fluids.
If the headset is exposed to internal moisture, remove the hygiene kit and let the unit dry out.
Do not store the headset in temperatures exceeding +55°C, for example in on a car dashboard or behind
the windshield.
The ear seals deteriorate over time, inspect them regularly to ensure that there are no cracks. New earseals
ensure optimum comfort and proper noise attenuation. Refer to page 15 for ordering information.
Certain chemical substances may be harmful to this product. Contact the manufacturer for more
information.
When changing batteries, protect the electronics from being damaged by always turning off the unit
manually prior to replacing batteries. Refer to page 5 for proper battery replacement procedure.
Always wear, adjust, clean and maintain the headset according to these instructions. If not, noise
attenuation characteristics and other electronic functions may be compromised.
CAUTION
When set to full gain the earphones can produce an equivalent sound level of up to 87dB(A). This is
considered safe for daily 8-hours use, as long as the time spent in receiving mode does not exceed 2,5
hours. If the time spent listening to the earphones exceeds 2,5 hours per day the gain setting must be
reduced below maximum. One step below maximum gain produces an equivalent sound level of 82
dB(A), considered safe even if used in the listen mode, in noise, for a full 8-hours day. If after wearing
this device, tinnitus (ringing or buzzing in the ears) is heard, or your hearing seems muffled or dulled,
or for any other reason you suspect a hearing problem, the volume levels should be reduced and the fit,
condition, and adequacy of this device should be checked for the noise in which it is being worn. If the
condition persists see an audiologist or physician for a professional review.
Page 11

9
FCC Regulations and Licensing Application Information
Safety information
Your wireless transceiver contains low power transmitter. When the transmitter is activated it sends out
radio frequency (RF) signals. This device is authorized to operate at a duty factor not exceed 50%.Use
only the supplied antenna. Unauthorized antennas, modifications, or attachments could damage the
transmitter and violate FCC regulations
BRS License :
Use of BRS radios within the United States requires a FCC BRS license. An individual 18 years of age or
older, who is not a representative of a foreign government is eligible to apply for a BRS system license.
You will need two forms from the FCC, FCC Form 159 and FCC Form 605 Main Form and Schedule F. You
can find the forms online at http://www.fcc.gov/formpage.html, or call 1-800-418-3676.
NRR
The NRR attenuation data are displayed on page 11.
Improper fit of this device will reduce its effectiveness in attenuating noise. Consult this manual for
proper fitting instructions. For further information, please write Aearo Company, 8001 Woodland Drive,
Indianapolis, Indiana 46278. The level of noise entering a person´s ear, when a hearing protector is worn
as directed, is closely approximated by the difference between the A-weighted environmental niose level
and the NRR.
Page 12

10
Attenuation
17.3
4.0
22.1
2.6
31.9
2.4
37.1
2.4
33.2
2.4
36.1
3.5
MT53H7A4600
PowerCom
38.0
3.4
25
3150
6300
CSA
A
NNR
38.7
2.7
37.4
2.3
19.1
2.6
22.3
2.3
31.7
2.7
34.7
2.4
33.5
2.9
37.9
2.5
MT53H7B4600
PowerCom
40.4
2.9
25
3150
6300
CSA
A
NNR
40.8
3.1
38.8
2.5
18.1
3.1
21.7
2.9
31.5
2.8
35.5
2.7
30.7
2.7
36.8
2.7
MT53H7P3E4600
PowerCom
39.0
2.8
24
3150
6300
CSA
A
NNR
39.7
2.5
38.6
2.1
PowerCom
MT53H7A4604
MT53H7B4604
MT53H7P3E4604
Page 13

11
SPARE PARTS
HY79 Hygiene kit
Consists of two snap-in ear cushions and foam pads. Replace at least twice a year
to ensure proper attenuation, hygiene and comfort. Sold as a pair, enough for one
headset replacement.
HY100A Ear seal comfort pad
A single-use sweat absorbing pad that is placed on the ear seals. Sold in packages
of 100 pair.
HYM1000 Lip microphone hygiene tape
Tape wraps around the lip microphone to protect against moisture and harsh
environmental conditions. Wind and water resistant, great for hygienic purposes
when headsets are shared. Sold in boxes of 5 metres, good for approximately 50
replacements.
M995 Lip microphone foam wind screen
Effective protection from wind noise, also protects against dirt and increases the life
span and of microphone element. One per package.
M60/2 Cup microphone foam windsock (#10, Fig H)
Applicable for PowerCom Plus only products. One pair per package.
1173 SV Battery cover
Replacement battery cover.
MT53-02 Boom microphone assembly
Replacement boom microphone with plug-in connector.
88009-00000 Rechargeable battery pack
Peltor AA rechargeable battery pack includes wall transformer.
Attention: Not an intrinsically safe approved accessory.
TK56 Remote ring finger PTT
Remote finger push-to-talk button with 48” lead cable.
Attention: Not an intrinsically safe approved accessory.
Page 14

12
SPARE PARTS cont.
Audio accessory jack (#6, Fig H) connections
FL6CS Cell phone patch-cord
2.5 mm stereo contact plug assembly for use with cell phones.
FL6CT Listen-only patch-cord
3.5 mm stereo plug, wired in mono for use with personal entertainment devises.
FL6BT Listen-only patch-cord
3.5 mm mono plug, for use with 2-way radios and accessories with a 3.5 mm audio jack
FL6BS Listen-only patch-cord
2.5 mm mono plug, for use with 2-way radios and accessories with a 2.5 mm audio jack
FL6BR – External 2-way radio patch-cord
Cable assembly for adapting PC+, PC, LC to an alternate 2-way radio. Comes with Nexus TP-120 connector
which mates with standard Peltor FL50 radio PTT patchcords (sold separately). For a complete list of
FL50 2-way radio accessory cables, please contact customer service.
Page 15

13
FREQUENCY AND CHANNEL ALLOCATIONS BY PRODUCT
Frequency Radio Service PowerCom
MHz Type Channel Allocation* Color
464.5000 BRS 1 Brown
464.5500 BRS 2 Yellow
467.7625 BRS 3 J
467.8125 BRS 4 K
467.8500 BRS 5 Silver Star
467.8750 BRS 6 Gold Star
467.9000 BRS 7 Red Star
467.9250 BRS 8 Blue Star
*individual channels also have 38 privacy/sub-channels – see next page
Page 16

14
PRIVACY/SUB-CHANNEL FREQUENCY ALLOCATION LIST .
Chart below is only applicable to PowerCom Plus and PowerCom headset models.
Frequency Sub- Frequency Sub- Frequency SubHz Channel Hz Channel Hz Channel
Allocation Allocation Allocation .
67.0 01 107.2 14 167.9 27
71.9 02 110.9 15 173.8 28
74.4 03 114.8 16 179.9 29
77.0 04 118.8 17 186.2 30
79.7 05 123.8 18 192.8 31
82.5 06 127.3 19 203.5 32
85.4 07 131.8 20 210.7 33
88.5 08 136.5 21 218.1 34
91.5 09 141.3 22 225.7 35
94.8 10 146.2 23 233.6 36
97.4 11 151.4 24 241.8 37
100.0 12 156.7 25 250.3 38
103.5 13 162.2 26 off 00
Address information for warranty/repair work:
Please contact customer service prior to returning any products for servicing.
Customer Service Contact Information:
WebSite: www.aearo.com
E-mail peltor_communications@aearo.com
Phone 1-800-665-2942
For Canada:
Peltor Communications
546 Bryne Drive, Unit C
Barrie, ON L4N-9P6
For USA and Mexico:
Aearo Company
Attn: Peltor Warranty Center
90 Mechanic Street
SouthBridge, MA 0155
Page 17

15
PowerCom (BRS) 464–467 MHz
Headsets radio émission/réception BRS
8 canaux, 38 sous-voies (codes personnels)
Homologation FCC et Industry Canada (IC)
Numéros de modèle :
MT53H7A4604 Modèle serre-tête
MT53H7B4604 Modèle serre-nuque
MT53H7P3E4604 Modèle pour assemblage sur casque de sécurité perforé
Page 18

16
CASQUE D’ÉCOUTE RADIO BIDIRECTIONNELLE PELTOR
MERCI d’avoir acheté le plus récent produit de Peltor, le casque d’écoute radio
autonome à bidirectionnelle.
PowerCom offrent tous une communication efficace et fiable entre deux personnes ou plus, dans un
environnement bruyant.
Quoique ces produits soient très conviviaux, veuillez prendre le temps de lire attentivement le manuel
d’utilisation afin d’assurer la mise en place et l’utilisation adéquate de toutes les caractéristiques
techniques.
• PowerCom sont des casques d’écoute radio bidirectionnelle programmée sur 8 canaux dans
la bande de fréquence 462 MHz avec 38 sous-canaux privés. Ces articles ont une puissance
d'émission de plus de 60 mW ERP sur une distance de 2 km à l’extérieur. La distance peut varier
selon les conditions environnementales locales prévalentes.
• Tous les modèles disposent de la caractéristique évoluée des voix fantômes pour la confirmation
des modes et des niveaux. En prime, les voix fantômes sont au choix de l’utilisateur en fonction de
chaque modèle. Les langues disponibles sont l’anglais, le français et l’espagnol.
Ces dispositifs sont conformes à la partie 15 des règlements FCC. Leur fonctionnement est assujetti à
deux conditions que voici :
1) Ces appareils ne doivent pas causer d’interférences nuisibles, et
2) Ces appareils doivent accepter toute interférence reçue, y compris les interférences pouvant causer
un fonctionnement indésirable.
Page 19

17
Accessoires de casques d’écoute...
Voir la figure H.
1. (MT53H7A****) Serre-tête large rembourré : pour le port direct sur la tête
(MT53H7B****) Serre-nuque : pour le port sous le casque de sécurité
(MT53H7P3E****) Assemblage sur casque de sécurité perforé : s’insère dans les perforations du
casque de sécurité
2. Serre-tête à treillis d’acier inoxydable: un procédé particulier de cintrage permet d’assurer une pression
uniforme autour des oreilles.
3. Rampe d’ajustement: faire glisser l’assemblage dans les oreillettes afin d’ajuster la hauteur du casque.
4. Coquilles scellées: mousse avec alvéoles remplies de liquide pour un confort continu, canaux intégrés pour
l’atténuation de la pression permettant une pression peu élevée et un scellage efficace. Voir la page 27 pour
les pièces de remplacement.
5. Antenne: montage fixe de conception flexible et haute qualité de réception
6. Prise audio: pour des accessoires audio externes comprenant des radios bidirectionnelle, des téléphones
cellulaires, des appareils de divertissement personnel, voir à la page 28
7. Couvercle des piles: requiert 2 piles alcalines AA 1,5 V, ensemble facultatif de piles rechargeables
disponible, voir à la page 27
8. Panneau de commandes: permet la configuration de différents modes, réglages et niveaux.
9. Microphone labial: microphone à ajustement rapide sur tige métallique, condensateur à électret avec effet
d’atténuation de bruit. Voir la page 27 pour les pièces de remplacement.
10. Microphone à coupelle: amplifie et reproduit les voix et les bruits ambiants extérieurs en stéréo pour
permettre à l’utilisateur d’avoir connaissance de l’environnement immédiat. (Disponible seulement sur les
modèles PowerCom Plus). Voir la page 27 pour les pièces de remplacement en mousse.
11. Casque d’écoute avec dispositif de touche d’activation par bouton: éveille le microphone labial et actionne
la radio à l’intérieur du casque d’écoute permettant de débuter la transmission.
(H)
6
1
2
3
4
5
7
11
10
9
8
Page 20

18
C’est un début...
PILES
Ouvrez le couvercle des piles (n
o
7, fig. H) et placez deux piles AA 1,5 V à l’intérieur du compartiment.
Assurez-vous que les pôles + et – des piles sont placés convenablement (consultez le schéma à l’intérieur
du couvercle des piles). Le casque d’écoute est protégé contre l’inversion de polarité au cas où les piles
ne seraient pas placées convenablement.
Lorsque les piles sont faibles, un message vocal avertissant que les piles sont faibles sera émis dans
le casque d’écoute. Ce message sera répété à toutes les 2 minutes jusqu’à ce que les piles soient
complètement épuisées; à cette étape, un message vocal avertissant que les piles sont vides se fera
entendre dans le casque d’écoute, qui s’arrêtera de fonctionner.
Remarque(s) :
1) La durée de vie des piles et la durée de fonctionnement varient grandement selon le type de piles
et comment le casque d’écoute est utilisé. Par exemple, avec une pile alcaline d’une capacité de
2000 mAh, la durée de fonctionnement en mode de conservation d’énergie est d’environ 30 heures,
qui sont distribuées comme suit : 10 % de transmission, 10 % de réception et 80 % d’attente.
En mode de haute intensité d’énergie, la durée de fonctionnement, sous les mêmes conditions,
décroît d’environ 10 %. À 20 % de transmission, 20 % de réception et 60 % d’attente, la durée de
fonctionnement est d’environ 20 heures.
2) Le casque d’écoute a un dispositif d’arrêt automatique permettant d’économiser les piles. Il
s’arrêtera de lui-même automatiquement après 2 heures si aucune des touches que voici n’est
actionnée pendant cette période de temps : (O) (+) (-) (touche d’actuation par bouton/touche
d'émission à commande vocale). Un signal en triple tonalité sera émis à toutes les 30 secondes
pendant 5 minutes avant l’arrêt complet des fonctions.
AJUSTEMENT DES COQUILLES (fig. J)
1. Les bras de guidage servant à l’ajustement des coquilles (no 3, fig. H) glissent dans les rampes
métalliques de haut en bas et vice-versa.
2. Pour les modèles serre-tête et serre-nuque, placez le casque d’écoute en position sur votre tête,
avec une main, tenez le serre-tête (no 1, fig. H) en place et avec l’autre main, déplacez lentement
les coquilles verticalement en les glissant le long de la rampe jusqu’à ce que les oreillettes soient
ajustées de manière serrée mais confortable.
3. Pour le modèle pour assemblage sur casque de sécurité perforé (fig. K), insérez l’attache du casque
d’écoute dans une perforation du casque de sécurité. Placer le casque de sécurité avec le casque
d’écoute en position sur votre tête et consultez le no 2 ci-dessus pour savoir comment mettre en place
les
coquilles convenablement.
(J)
(K)
(1)
(2)
Page 21

19
Le modèle pour assemblage sur casque de sécurité perforé peut être porté de deux façons différentes :
position de travail (1) et position de ventilation (2).
Lors de l’utilisation, les
coquilles doivent être placées en position de travail. Appuyez sur les fils
métalliques du serre-tête vers l’intérieur jusqu’à ce qu’un déclic se produise de chaque côté. Afin
de conserver l’effet d’atténuation du bruit pendant le travail, n’appuyez pas sur les bords ou les
côtés du casque de sécurité.
Astuce : Après la journée de travail, ne laissez pas le casque d’écoute en position droite sur le
casque de sécurité, mais laissez-le dans la position de ventilation pour permettre à la mousse à
l’intérieur des
coquilles de sécher.
Consignes d’utilisation...............
PowerCom Plus, PowerCom, et LiteCom fonctionnent tous avec un même panneau configuré de 3 touches
à effleurement simples (no 8, fig. H) et 1 touche d’activation par bouton.
1.
Sélection Marche/Arrêt/Mode (O)
Cette touche mettra en marche ou arrêtera le casque d’écoute lorsqu’elle sera tenue enfoncée pendant
plus de 2 secondes. Une fois le casque d’écoute en marche, la touche retournera à la sélection du menu
mode. Voir ci-dessous pour les détails au sujet du menu mode.
Sélection du menu mode étape par étape
Appuyez simplement sur la touche (O) et le casque d’écoute annoncera par un message vocal quel menu
mode a été sélectionné. Chaque fois que la touche (O) est enfoncée, le mode suivant est sélectionné
et est suivi par un message vocal de confirmation. Une fois le mode désiré sélectionné, consultez les
consignes ci-dessous au sujet des touches (+) et (-).
Sélection rapide du menu mode
En appuyant plusieurs fois sur la touche (O) en succession rapide, les modes défileront un nombre de
fois égal au nombre de fois que la touche a été appuyée et un message vocal confirmera l’item de menu
sélectionné.
Le casque d’écoute retournera au mode de son ambiophonique (offert par le modèle de casque
d’écoute PowerCom Plus) et au mode de réglage du volume du radio (offert par les modèles de casque
d’écoute PowerCom et LiteCom) si les touches (O) (+) (-) ne sont pas actionnées pendant 5 secondes
suivant une sélection. Un bip sera émis dans le casque d’écoute, indiquant que le mode a été changé
automatiquement.
2. HAUT (+) Incrémente les étapes à l’intérieur d’un même mode et un message vocal confirme
la sélection d’une étape.
3. BAS (-) Décrémente les étapes à l’intérieur d’un même mode et un message vocal confirme
la sélection d’une étape.
4.
Touche Située à l’arrière de la coquilles. D’une pression du pouce, l’activation de la
d’actuation touche d’activation par bouton éveille le microphone labial et
par bouton actionne la radio à l’intérieur du casque d’écoute permettant de débuter la
transmission.
Détails au sujet du fonctionnement...
Mettez en marche l’appareil en appuyant sur la touche (O) pendant plus de 2 secondes et relâchez-la
rapidement, le casque d’écoute émettra un son en série de 3 tonalités en augmentation graduelle pour
Page 22

20
confirmer que l’appareil est en marche. Afin d’arrêter l’appareil, appuyez sur la touche (O) pendant pour
2 secondes et relâchez-la immédiatement, le casque d’écoute émettra un son en série de 3 tonalités en
diminution graduelle pour confirmer que l’appareil est arrêté.
Une fois que le casque d’écoute est en marche et prêt à être utilisé, la touche (O) peut être utilisée pour
la sélection du menu mode.
Sélections du menu mode
SON AMBIOPHONIQUE
Offert seulement par les modèles de casque d’écoute PowerCom Plus.
Ce mode permet le réglage du volume du microphone des oreillettes (no 10, fig. H). En appuyant sur les
touches (+) et (-) lorsque ce mode est activé, vous réglerez le volume du son ambiant tel que reproduit
dans les oreillettes, à la hausse ou à la baisse. Un message vocal confirmera chaque nouvelle valeur du
volume à mesure que les touches (+) et (-) seront enfoncées. Il y a 5 niveaux de volume du son et un
niveau d’absence de son. Le niveau d’absence de son peut être actionné en défilant jusqu’au niveau 1
et ensuite en appuyant sur la touche (-) pendant 1 seconde et en la relâchant, et un message vocal de
confirmation mentionnera « son ambiophonique hors tension ». Afin d’actionner de nouveau, appuyez
une fois sur la touche (+) et le mode retournera au niveau 1 de volume du son ambiophonique.
VOLUME
Ce mode permet le réglage du volume du son reçu par la radio du casque d’écoute. En appuyant sur
les touches (+) et (-) lorsque ce mode est activé, vous réglerez le volume du son à la hausse ou à la
baisse, respectivement. Un message vocal confirmera chaque nouvelle valeur du volume à mesure que
les touches (+) et (-) seront enfoncées. Il y a 5 niveaux de volume du son et un niveau d’absence de son.
Le niveau d’absence de son peut être actionné en défilant jusqu’au niveau 1 et ensuite en appuyant sur
la touche (-) pendant 1 seconde et en la relâchant, et un message vocal de confirmation mentionnera
« volume éteint ». Afin d’actionner de nouveau, appuyez une fois sur la touche (+) et le mode retournera
au niveau 1 de volume du son.
CANAL
Ce mode permet de régler la sélection des principaux canaux radio. En appuyant sur les touches (+) et
(-) lorsque ce mode est activé, vous ferez défiler les canaux dans un sens ou dans l’autre. Un message
vocal confirmera chaque nouveau numéro de canal sélectionné à mesure que les touches (+) et (-) seront
enfoncées. Le nombre de canaux disponibles dans ce mode dépend du modèle de casque d’écoute
acheté (voir la page 16). Les canaux défilent sans interruption, c.-à-d. que lorsque le canal le plus
proche est atteint, appuyer une fois de plus sur la touche (+) fera reculer la sélection au premier canal
disponible, et un message vocal s’ensuivra.
ACTIVATION VOCALE
Ce mode règle la sensibilité de l'émission à commande vocale. En appuyant sur les touches (+) et (-) lorsque
ce mode est activé, vous rendrez le microphone labial plus ou moins sensible à la voix de l’utilisateur ou
aux bruits environnants.
Astuce(s) :
1) Appuyez sur la touche (+) lorsque le son s’amplifie (donc, en rendant le microphone moins sensible
aux bruits extérieurs) et vice-versa lorsque le son s’amenuise.
2) Le niveau 1 convient aux applications à faible niveau sonore. Le niveau 5 convient aux applications
à niveau sonore élevé. Essayez différents niveaux jusqu’à ce qu’un niveau optimal de sensibilité soit
identifié.
3) Le niveau 1 requiert un volume de voix minimum afin d’actionner le microphone. Le niveau 5 requiert
un volume de voix maximum afin d’actionner le microphone.
4) Ne faites pas de pause pendant les transmissions. L'émission à commande vocale s’éteint pendant
les pauses.
5) Assurez-vous que le microphone labial n’est pas à plus de 1/4 po de distance de votre bouche.
Page 23

21
Un message vocal confirmera chaque nouvelle valeur à mesure que les touches (+) et (-) seront enfoncées.
Il y a 5 niveaux de sensibilité d'émission à commande vocale et un niveau d’absence de sensibilité. Le
niveau d’absence de sensibilité peut être actionné en défilant jusqu’au niveau 1 et ensuite en appuyant
sur la touche (-) pendant 1 seconde et en la relâchant, et un message vocal de confirmation mentionnera
« activation vocale hors tension ». Afin d’actionner de nouveau, appuyez une fois sur la touche (+) et
le mode retournera au niveau 1 de sensibilité d’émission à commande vocale (c.-à-d. le niveau de
sensibilité du microphone le plus élevé).
Lorsque que la sensibilité d’émission à commande vocale est nulle, la transmission radio du casque
d’écoute peut seulement être actionnée via la touche d’actuation par bouton sur l’oreillette droite (no
11, fig. H), ou via la touche d’actuation par bouton à doigt télécommandé disponible en accessoire, voir
à la page 13.
SQUELCH (SILENCIEUX)
Ce mode permet le réglage du niveau de sensibilité de l’antenne. En appuyant sur les touches (+) et (-)
lorsque ce mode est activé, vous pourrez aider à filtrer les bruits de radiofréquence indésirables entre les
transmissions. Un message vocal confirmera chaque nouvelle valeur à mesure que les touches (+) et (-)
seront enfoncées.
Astuce(s) :
1) Le mode normal est 1
2) Le niveau 5 est celui avec l’intensité de filtration la plus élevée
3) Le niveau 1 est celui avec l’intensité de filtration la moins élevée
4) Le niveau d’absence de filtration correspond au silencieux complètement inactivé.
5) Essayez différents niveaux dans le but de déterminer celui dont le niveau est le moindre en regard
d’une application spécifique.
Il y a 5 niveaux de sensibilité du silencieux et un niveau d’absence de sensibilité. Le niveau d’absence
de sensibilité peut être actionné en défilant jusqu’au niveau 1 et ensuite en appuyant sur la touche (-)
pendant 1 seconde et en la relâchant, et un message vocal de confirmation mentionnera « squelch hors
tension ». Afin d’actionner de nouveau, appuyez une fois sur la touche (+) et le mode retournera au
niveau 1 de sensibilité du silencieux.
SOUS-CANAL
Ce mode permet le réglage du niveau de confidentialité des sous-canaux. En appuyant sur les touches (+)
et (-) lorsque ce mode est activé, vous ferez défiler les canaux dans un sens ou dans l’autre. Un message
vocal confirmera chaque nouveau numéro de canal sélectionné à mesure que les touches (+) et (-) seront
enfoncées. Il y a 38 sous-canaux disponibles et un canal ouvert O. Les canaux défilent sans interruption,
c.-à-d. que lorsque le canal le plus proche est atteint, appuyer une fois de plus sur la touche (+) fera
reculer la sélection au premier canal disponible, et un message vocal s’ensuivra.
Astuce(s) :
1) Les casques d’écoute PowerCom Plus et PowerCom sont compatibles et peuvent communiquer entre eux.
2) Dans le but de communiquer entre eux efficacement, les casques d’écoute d’un même groupe doivent
être sur le même canal principal et le même sous-canal.
PUISSANCE
Ce mode permet la sélection de deux niveaux de puissance de transmission. Appuyez sur la touche (+),
un message vocal s’ensuivra et le casque d’écoute sera au niveau maximum de puissance de transmission
le plus élevé (haut). Appuyez sur la touche (-), un message vocal s’ensuivra et le casque d’écoute sera au
niveau minimum de puissance de transmission le moins élevé (faible).
Page 24

22
Astuce(s) :
1) Ce mode peut être utilisé comme outil de conservation d’énergie des piles.
2) Dépendamment de la distance de transmission, la sélection d’un niveau de puissance élevé n’est pas
toujours requise pour une couverture adéquate. Évaluez les éléments de l’environnement afin d’établir
un niveau de puissance optimal.
3) Le niveau élevé de puissance sera plus énergivore pour les piles que le niveau faible.
LANGUES
Ce mode permet la sélection des messages de confirmation du casque d’écoute dans une des trois
langues disponibles : anglais, français ou espagnol. En appuyant sur les touches (+) et (-) lorsque ce
mode est activé, vous ferez défiler le choix des langues dans un sens ou dans l’autre. Un message vocal
confirmera la langue sélectionnée.
Remarques :
1) Le casque d’écoute retournera au mode de son ambiophonique (offert par le modèle de casque
d’écoute PowerCom Plus) et au mode de réglage du volume du radio (offert par les modèles de casque
d’écoute PowerCom et LiteCom) si les touches (O) (+) (-) ne sont pas actionnées pendant 5 secondes
suivant une sélection. Un bip sera émis dans le casque d’écoute indiquant que le mode a été changé
automatiquement.
2) Les casques d’écoute s’arrêteront d’eux-mêmes automatiquement après 2 heures si aucune des
touches que voici n’est actionnée pendant cette période de temps : (O) (+) (-) (touche d’actuation par
bouton/touche d'émission à commande vocale). Un signal en triple tonalité sera émis à toutes les 30
secondes pendant 5 minutes avant l’arrêt complet des fonctions.
DISPOSITIF DE TOUCHE D’ACTIVATION PAR BOUTON
Située à l’arrière de la coquille droite, l’activation d’une pression de la touche d’activation par bouton
éveille le microphone labial et actionne la transmission radio manuellement. La radio transmettra et le
microphone labial sera ouvert aussi longtemps que la touche sera enfoncée.
DISPOSITIF D’INACTIVATION DE L’ÉMISSION À COMMANDE VOCALE, Raccourci
Double-cliquer rapidement sur la touche d’activation par bouton permettra d’inactiver le dispositif
de l’émission à commande vocale, tel que confirmé par un long bip sonore dans le casque d’écoute.
Afin d’actionner de nouveau, double-cliquez une seconde fois sur la touche d’activation par bouton et
l’émission à commande vocale sera actionnée de nouveau, tel que confirmé par un bip sonore double et
court dans le casque d’écoute.
Astuce : Constitue un excellent dispositif à l’intention de l’utilisateur en déplacement périodique pendant
une journée de travail, et dont l’exposition au bruit varie de faible à élevée.
UTILISATION D’ACCESSOIRES INTERCHANGEABLES : RADIO PORTÉ À LA
CEINTURE OU TÉLÉPHONE CELLULAIRE
Double-cliquez sur la touche d’activation par bouton avant de brancher les accessoires externes de
communication à deux voies (une combinaison de FL6R + FL50 activés par touche d’activation par
bouton et portés à la ceinture, ou le FL6S) dans la prise audio du bas du casque d’écoute (no 6, fig. H,
page 18).
L’emploi de ce dispositif, c.-à-d. la touche d’activation par bouton sur le casque d’écoute, permettra
d’actionner la radio du casque d’écoute en mode de transmission, et la touche d’activation par bouton
Page 25

23
du FL50 porté à la ceinture permettra d’actionner la radio interchangeable portée à la ceinture en mode
de transmission.
Remarquez que ces consignes ne concernent pas les accessoires de réception seule. Branchez simplement
les accessoires de réception seule dans la prise audio (n
o
6, fig. H, page 18).
ENTRETIEN
Nettoyez régulièrement l’extérieur du casque d’écoute avec du savon et de l’eau chaude.
Remarque : Ne pas immerger dans un liquide.
Si l’intérieur du casque d’écoute a été exposé à l’humidité, retirez les dispositifs hygiéniques et laissez
sécher l’appareil.
N’entreposez pas le casque d’écoute à des températures supérieures à +55 ºC, par exemple sur le tableau
de bord de l’auto ou derrière le pare-brise.
Les tampons des coquille se détériorent avec le temps, vérifiez-les régulièrement afin de vous assurer
qu’ils sont exempts de craquelures. De nouveaux tampons d’oreillettes permettent d’obtenir un confort
optimal et l’atténuation du bruit adéquate. Consultez la page 30 pour de plus amples renseignements
sur la façon de passer une commande.
Certaines substances chimiques peuvent nuire à ce produit. Communiquez avec le fabricant pour obtenir
plus de renseignements.
Lors du remplacement des piles, fermez toujours l’appareil manuellement avant de changer les piles afin
de protéger le matériel électronique contre les dommages pouvant survenir. Consultez la page 5 pour la
procédure adéquate de remplacement des piles.
Portez, réglez, nettoyez et maintenez toujours le casque d’écoute dans l’état requis par ces consignes.
Sinon, les mécanismes d’atténuation du bruit et d’autres fonctions électroniques pourraient s’en trouver
affectés.
MISE EN GARDE
Lorsqu’elles sont sollicitées à plein rendement, les coquille peuvent produire un niveau de son équivalant
à près de 87 dB(A). Cela est considéré sécuritaire pour une utilisation journalière de 8 heures, pourvu
que le temps d’utilisation en mode de réception ne dépasse pas 2,5 heures. Si le temps d’écoute dépasse
2,5 heures par jour, le réglage du rendement doit être réduit sous le maximum. Un niveau sous le
rendement maximum produit un niveau sonore équivalant à 82 dB(A), considéré sécuritaire même à
raison de l’écoute constante, dans le bruit et pendant une pleine journée de 8 heures. Si, après avoir
porté cet appareil, des acouphènes (tintement ou bourdonnement) sont perçus, ou votre audition semble
émoussée ou assourdie, ou si pour toute autre raison vous suspectez un problème auditif, les niveaux de
bruit doivent être réduits et l’ajustement, la condition et l’adéquation de cet appareil doivent être vérifiés
au niveau de bruit correspondant duquel l’appareil vous protége. Si le problème persiste, consultez un
audiologiste ou un médecin pour un examen approfondi.
Page 26

24
RÈGLEMENTS FCC ET RENSEIGNEMENTS POUR LES DEMANDES DE LICENCES
Renseignements sur la sécurité
Votre émetteur-récepteur sans-fil contient un microphone de faible puissance. Lorsque le microphone est
activé, il envoie des signaux de radiofréquence (RF). Cet appareil est autorisé à fonctionner selon un facteur
d'utilisation sous les 50 %. Employez seulement l’antenne fournie. Les antennes, les modifications ou les
accessoires peuvent endommager le microphone et enfreindre les règlements du FCC.
Licence du BRS :
L’utilisation des radios BRS aux États-Unis exige une licence BRS du FCC. Une personne âgée de 18 ans
ou plus, qui n’est pas un représentant d’un gouvernement étranger, est admissible pour une demande
d’application à une licence du système BRS. Vous aurez besoin deux formulaires du FCC, soit le formulaire
159 du FCC et le formulaire 605 du FCC, comprenant le formulaire principal et le barème F. Vous pouvez
trouver les formulaires en ligne à http://www.fcc.gov/formpage.html,
ou appeler au 1 800 418-3676.
TRB
Les données sur l’atténuation du bruit du TRB figurent sur la page 26.
L’ajustement inadéquat de cet appareil réduira son efficacité à atténuer le bruit. Consultez ce manuel
pour les consignes d’ajustement adéquat. Pour de plus amples renseignements, veuillez écrire à la
compagnie Aearo, 8001, Woodland Drive, Indianapolis, Indiana 46278. Le niveau de bruit dans l’oreille
d’une personne, alors que la protection auditive est portée comme il se doit, est estimé d’assez près par
la différence entre le niveau de bruit environnemental en pondération A et le TRB.
Page 27

25
Atténuation
1. Fréquence 2. Moyenne de l’atténuation 3. Déviation standard
17.3
4.0
22.1
2.6
31.9
2.4
37.1
2.4
33.2
2.4
36.1
3.5
MT53H7A4600
PowerCom
38.0
3.4
25
3150
6300
CSA
A
NNR
38.7
2.7
37.4
2.3
19.1
2.6
22.3
2.3
31.7
2.7
34.7
2.4
33.5
2.9
37.9
2.5
MT53H7B4600
PowerCom
40.4
2.9
25
3150
6300
CSA
A
NNR
40.8
3.1
38.8
2.5
18.1
3.1
21.7
2.9
31.5
2.8
35.5
2.7
30.7
2.7
36.8
2.7
MT53H7P3E4600
PowerCom
39.0
2.8
24
3150
6300
CSA
A
NNR
39.7
2.5
38.6
2.1
PowerCom
MT53H7A4604
MT53H7B4604
MT53H7P3E4604
Page 28

26
PIÈCES DE REMPLACEMENT
HY79 Dispositifs hygiéniques
Consiste en deux coussinets d’étanchéité à enclenchement rapide et des tampons de
mousse. Remplacer au moins deux fois par année afin d’assurer l’atténuation du bruit,
l’hygiène et le confort approprié. Vendu en paires, suffisant pour le remplacement
d’un casque d’écoute.
HY100A Tampon matelassé
Un tampon absorbant la sueur, à usage unique, posé sur les coussinets d’étanchéité.
Vendu en paquets de 100 paires.
HYM1000 Ruban à microphone labial hygiénique
Du ruban enveloppé autour du microphone labial pour le protéger contre l’humidité et
des conditions environnementales rigoureuses. À l’épreuve du vent et de l’eau, parfait
dans un but hygiénique lors d’échanges de casques d’écoute. Vendu en boîtes de 5
mètres, sert à environ 50 remplacements.
M995 Écran en mousse à l’épreuve du vent pour microphone labial
Protection efficace contre le bruit du vent, protège aussi contre la saleté et augmente
la durée de vie du microphone. Un par paquet.
M60/2 Manche à air en mousse pour coupelle de microphone (no 10, fig. H)
Offert seulement par les modèles de casque d’écoute PowerCom Plus. Une paire par
paquet.
1173 SV Couvercle de piles
Couvercle de piles remplaçable.
MT53-02 Assemblage de microphone à tige
Microphone à tige, de remplacement avec connecteur enfichable.
88009-00000 Paquet de piles rechargeables
Un paquet de piles rechargeables AA Peltor comprenant un transformateur au mur.
Attention: Not an intrinsically safe approved accessory.
TK56 Touche d’actuation par bouton à doigt télécommandé en anneau
Touche d’actuation par bouton à doigt télécommandé avec câble de sortie 48 po.
Attention: Not an intrinsically safe approved accessory.
Page 29

27
PIÈCES DE REMPLACEMENT (suite)
Prises de connexion pour accessoires audio (no 6, fig. H)
FL6CS Fil de raccordement pour téléphone cellulaire
Assemblage de fiche de contact stéréo 2,5 mm pour utilisation
avec téléphone cellulaire
FL6CT Fil de raccordement pour écoute seulement
Fiche stéréo 3,5 mm, filée en mono pour utilisation d’appareils de
divertissement personnel
FL6BT Fil de raccordement pour écoute seulement
Fiche mono 3,5 mm, pour utilisation de radios à deux voies et d’accessoires
avec prise audio 3,5 mm
FL6BS Fil de raccordement pour écoute seulement
Fiche mono 2,5 mm, pour utilisation de radios à deux voies et d’accessoires
avec prise audio 2,5 mm
FL6BR Fil de raccordement externe à bidirectionnelle
Assemblage de câble permettant d’adapter PC+, PC, LC à un radio
bidirectionnelle interchangeable. Vendu avec un connecteur Nexus TP-120
qui s’accouple avec les fils de raccordement de touche d’activation par
bouton de radio Peltor standard FL50 (vendu séparément). Pour obtenir une
liste complète de câbles d’accessoires radio
bidirectionnelle, veuillez appeler
le service à la clientèle.
Page 30

28
FRÉQUENCE ET ATTRIBUTION DE CANAUX PAR PRODUIT
Fréquence Bande PowerCom
MHz licenciée Attribution de canaux* Couleur
464.5000 BRS 1 Marron
464.5500 BRS 2 Jaune
467.7625 BRS 3 J
467.8125 BRS 4 K
467.8500 BRS 5 Étoile argentée
467.8750 BRS 6 Étoile dorée
467.9000 BRS 7 Étoile rouge
467.9250 BRS 8 Étoile bleue
* Les canaux individuels ont aussi 38 sous-canaux/privés, voir page suivante
Page 31

29
LISTE D’ATTRIBUTION DE FRÉQUENCES DES SOUS-CANAUX/PRIVÉS
Le tableau ci-dessous s’applique aussi aux modèles de casques d’écoute PowerCom Plus et PowerCom.
Fréquence Attribution Fréquence Attribution Fréquence Attribution
Hz de sous- Hz de sous- Hz de sous canaux canaux canaux .
67.0 01 107.2 14 167.9 27
71.9 02 110.9 15 173.8 28
74.4 03 114.8 16 179.9 29
77.0 04 118.8 17 186.2 30
79.7 05 123.8 18 192.8 31
82.5 06 127.3 19 203.5 32
85.4 07 131.8 20 210.7 33
88.5 08 136.5 21 218.1 34
91.5 09 141.3 22 225.7 35
94.8 10 146.2 23 233.6 36
97.4 11 151.4 24 241.8 37
100.0 12 156.7 25 250.3 38
103.5 13 162.2 26 Arrêt 00
Renseignements portant sur les adresses de garantie et de réparations :
Veuillez communiquer avec le service à la clientèle avant de retourner tout produit pour l’entretien.
Coordonnées du service à la clientèle :
Site Web: www.aearo.com
Courriel: peltor_communications@aearo.com
Téléphone 1-800-665-2942
Pour le Canada :
Peltor Communications
546 Bryne Drive, Unit C
Barrie (Ontario) L4N 9P6
Pour les États-Unis et le Mexique :
Aearo Company
Attn: Peltor Warranty Center
90 Mechanic Street
SouthBridge, MA 0155
ÉTATS-UNIS
Page 32

30
PowerCom 464–467 MHz
BRS, auriculares con radio de 2 vías.
8 canales, 38 subcanales (códigos de privacidad).
Homologados por FCC e Industry Canada (IC)
Número de modelos:
MT53H7A4604 Modelo de banda para la cabeza
MT53H7B4604 Modelo de banda para el cuello
MT53H7P3E4604 Modelo de montura en casco ranurado
Page 33

31
RADIOTELÉFONOS AURICULARES PELTOR
MUCHAS GRACIAS por la adquisición del radioteléfono auricular autónomo más avanzado de Peltor.
PowerCom ofrecen, todos ellos, una comunicación fiable y eficiente entre dos o más personas, en
ambientes ruidosos.
Aunque estos productos son muy fáciles de usar, le rogamos que dedique un momento para leer
detenidamente este manual de instrucciones, para garantizar el ajuste y el uso correcto de todas las
características.
• PowerCom son radioteléfonos auriculares, previamente programados para 8 canales en la banda
de frecuencia 462 MHz, con 38 subcanales privados. Estas unidades tienen una potencia de
transmisión hasta de 60 mW ERP dentro de un límite al aire libre de 2 km. Este alcance variará
dependiendo de las condiciones ambientales locales imperantes.
• Todos los modelos ofrecen confirmaciones vocales internas avanzadas de la selección de modo y de
nivel. Como característica adicional, el usuario puede escoger los indicadores vocales internos en
todos los modelos. Los idiomas disponibles son: Inglés, francés y castellano.
Estos dispositivos cumplen lo indicado en la parte 15 de las reglas y reglamentos de FCC. El uso de estos
dispositivos está sometido al cumplimiento de las dos condiciones siguientes:
1) Estos dispositivos no deben causar interferencias perjudiciales, y
2) Estos dispositivos deben aceptar toda interferencia externa, incluyendo la interferencia que pueda
causar un funcionamiento no deseado.
Page 34

32
Elementos básicos del auricular
Vea la figura H.
1. (MT53H7A****) Banda ancha y acojinada para la cabeza – Para usarlo sobre la cabeza
(MT53H7B****) Banda para el cuello – Para usarlo bajo un casco
(MT53H7P3E****) Montura en casco ranurado – Encaja en las ranuras de los cascos
2. Alambres de acero inoxidable para la banda de la cabeza – Un proceso especial de doblado garantiza
la distribución uniforme de presión alrededor de los oídos.
3. Brazos de guía – Unidad deslizante que facilita el ajuste de la altura.
4. Almohadillas para los oídos – De espuma con cámara de líquido para usarlos cómodamente todo
el día; los canales integrados para aligerar la presión permiten una cobertura eficiente con poca
presión. Las piezas de repuesto se enumeran en la página 41.
5. Antena – Flexible, con diseño de montura fija y recepción de gran calidad.
6. Enchufe para sonido – Para los accesorios externos de sonido, incluyendo los radioteléfonos, los
teléfonos celulares, los dispositivos personales de entretenimiento, lea la página 42.
7. Cubierta de las baterías – Usa 2 baterías alcalinas comunes, de tamaño AA, de 1.5 voltios. Se
ofrece un paquete opcional de baterías recargables; lea la página 41.
8. Teclado – Para cambiar fácilmente los modos, ajustes y niveles.
9. Micrófono labial – Unidad de brazo de metal que se ubica rápidamente, con un condensador
eléctrico para cancelar el ruido. Las piezas de repuesto se enumeran en la página 41.
10. Micrófonos semicirculares – Amplifican y reproducen estereofónicamente el ruido ambiental y las
voces dentro del auricular, permitiéndole al usuario estar completamente al tanto del ambiente
que lo rodea. (Disponible únicamente en los modelos PowerCom Plus). Las piezas de espuma de
repuesto se enumeran en la página 41.
11. Botón para hablar del auricular (PTT, por sus siglas en inglés) – Al pulsarlo se activan el micrófono
labial y el radio del auricular, para comenzar la transmisión.
6
1
2
3
4
5
7
11
10
9
8
(H)
Page 35

33
Cómo preparar el equipo
BATERÍAS
Abra la cubierta de las baterías (No. 7 en la figura H) y coloque dos baterías de tamaño AA de 1.5 voltios
dentro del compartimiento. Verifique que los polos positivo y negativo de las baterías estén colocados
correctamente (vea el diagrama dentro de la cubierta de las baterías). El auricular tiene protección
contra la inversión de la polaridad, en caso de que se instalen incorrectamente las baterías.
Cuando disminuye la carga de las baterías, se escucha un mensaje vocal dentro del auricular, que dice
"batería baja". Este mensaje se repite en intervalos de 2 minutos, hasta que las baterías se descargan
completamente, momento en el cual el auricular emite un mensaje vocal que dice "batería descargada"
y luego se apaga.
Nota(s):
1) La duración / vida útil de la batería varía mucho dependiendo del tipo de baterías empleadas y de
la forma en que se usa el auricular. Por ejemplo, en el caso de una batería alcalina con al menos
2000 mAh, la vida útil en modo de baja potencia es de unas 30 horas a una transmisión del 10%,
recepción del 10% e inactividad del 80%. En el modo de alta potencia, la vida útil en las mismas
condiciones se reduce en un 10%. En situaciones de transmisión del 20%, de recepción del 20%
e inactividad del 60%, la vida útil es de unas 20 horas.
2) El auricular tiene una característica de apagado automático para ahorrar la carga de las baterías. El
mismo se apagará automáticamente después de 2 horas si una de las siguientes teclas no se activa
durante ese lapso: (0) (+) (-) (PTT / Activación de voz). Se oirá un tono triple cada 30 segundos por
5 minutos antes de que el equipo se apague por completo.
CÓMO AJUSTAR LAS ALMOHADILLAS PARA QUE CALCEN BIEN (Figura J)
1. Los brazos de guía de las almohadillas (No. 3 de la figura H) se deslizan hacia arriba y hacia abajo
sobre los alambres metálicos.
2. Para los modelos de banda para la cabeza y para el cuello, coloque el auricular sobre su cabeza con
una mano, sosteniendo la banda en su sitio (No. 1 de la figura H), y subiendo o bajando lentamente
las almohadillas a lo largo de los brazos del alambre con la otra mano, hasta que se sientan cómodas
y se ajusten bien en su sitio.
3. Para montar los auriculares en el casco (figura K), encaje el accesorio para cascos del auricular en
la ranura del casco. Póngase el casco con los auriculares y consulte las instrucciones para ajustar
las almohadillas, indicadas en el paso 2 anterior.
El auricular montado sobre el casco se puede usar en dos posiciones:
La posición de trabajo (1) y la posición de ventilación (2).
Cuando use el aparato, las almohadillas deben colocarse en posición de trabajo. Oprima los
alambres de la banda para la cabeza hacia dentro, hasta que oiga un "clic" a ambos lados. Para la
atenuación correcta del ruido mientras los auriculares estén en posición de trabajo, no los oprima
contra el revestimiento ni los bordes del casco.
Consejo: Al finalizar el día, no deje los auriculares en posición recta sobre el casco; déjelos en la
posición de ventilación, para que la espuma del interior de las almohadillas se seque.
(J)
(K)
(1)
(2)
Page 36

34
Instrucciones de uso
Tanto PowerCom Plus como PowerCom y LiteCom, todos usan la misma configuración simple de teclado
de tres teclas (No. 8 en la figura H) y de 1 botón PTT.
1. Selección de modo encendido / apagado (0)
Este botón enciende o apaga los auriculares si se mantiene oprimido por más de 2 segundos. Tan pronto
se encienden los auriculares, pasa a ser un botón de selección de menú de modo, lo que se explica en
detalle más adelante.
Selección de menú de modo, paso a paso
Tan sólo oprima la tecla (0) y los auriculares confirmarán mediante un mensaje vocal qué menú de modo
se ha escogido. Cada vez que se oprima la tecla (0), pasará al siguiente punto en el menú de modo,
confirmándose mediante un mensaje vocal. Una vez llegue al modo deseado, lea las instrucciones que
siguen acerca de las teclas (+) y (-).
Selección rápida de menú de modo
Si oprime la tecla (0) varias veces seguidas, pasará rápidamente por los modos, la misma cantidad de
veces que se oprime, seguida por una confirmación vocal del punto del menú escogido.
Los auriculares volverán al modo de volumen de sonido omnidireccional (en los auriculares PowerCom
Plus) o al modo de volumen de radio (en los auriculares PowerCom y LiteCom) si las teclas (0), (+) o (-)
no se activan antes de que pasen 5 segundos mientras se hace la selección. Se escuchará un tono en los
auriculares que indica que el modo ha regresado automáticamente al modo descrito.
2. SUBIR (+) Incrementa los pasos del modo escogido, seguido por una confirmación
vocal del paso escogido.
3. BAJAR (-) Disminuye los pasos del modo escogido, seguido por una confirmación
vocal del paso escogido.
4. PTT Ubicado en la parte posterior de la almohadilla para el oído derecho. El
botón para hablar, que se puede oprimir con el pulgar, activa el micrófono
labial y el radio dentro de los auriculares, para comenzar la transmisión.
Detalles acerca del uso
Encienda la unidad oprimiendo la tecla (0) por más de 2 segundos y, luego, suéltela. Los auriculares
emitirán una serie de 3 tonos en escala ascendente, para confirmar que los auriculares están encendidos.
Para apagar la unidad, vuelva a oprimir el botón (0) por 2 segundos y suéltelo. Los auriculares emitirán
una serie de 3 tonos en escala descendente para confirmar que están apagados.
Tan pronto los auriculares estén encendidos y listos para su uso, la tecla (0) se convierte en el botón de
selección de menú de modo:
Selecciones de menú de modo
SONIDO AMBIENTAL
Sólo corresponde a los modelos de auriculares PowerCom Plus.
Este modo permite ajustar el nivel de volumen de los micrófonos de las almohadillas (No. 10 en la figura
H). Si se oprimen las teclas (+) o (-) en este modo, el nivel de ruido ambiental que se reproduce dentro
de los auriculares aumentará o disminuirá. Un mensaje vocal confirma cada nuevo ajuste a medida que
se oprimen las teclas (+) o (-). Existen cinco niveles de volumen y un nivel de volumen apagado. El
nivel de volumen apagado se puede activar pasando hasta el nivel 1, luego manteniendo oprimida la
tecla (-) por 1 segundo y soltándola. Un mensaje vocal de confirmación dirá "sonido ambiental apagado".
Para volverlo a activar, oprima una vez la tecla (+) y el modo volverá al nivel de volumen de sonido
omnidireccional 1.
Page 37

35
VOLUMEN
Este modo permite ajustar el nivel de volumen de la señal de radio que reciben los auriculares. Al oprimir las
teclas (+) o (-) en este modo, el volumen sube o baja consiguientemente. Un mensaje vocal confirma cada
nuevo nivel a medida que se oprimen las teclas (+) o (-). Existen 5 niveles de volumen y un nivel de volumen
apagado. El nivel de volumen apagado se puede activar pasando hasta el nivel 1, luego manteniendo oprimida
la tecla (-) por 1 segundo y soltándola. Un mensaje vocal de confirmación dirá "volumen apagado". Para
volverlo a activar, oprima una vez la tecla (+) y el modo volverá al nivel de volumen 1.
CANAL
Este modo permite cambiar la selección principal de canal de radio. Al oprimir las teclas (+) o (-) en
este modo, se desplazará por los canales en forma ascendente o descendente, según corresponda. Un
mensaje vocal confirma cada nuevo número de canal escogido a medida que se opriman las teclas (+) o
(-). El número de canales disponible en este modo depende del modelo de auriculares adquirido (lea la
página 31). Los canales están configurados en bucle; es decir, que cuando se llega al canal más alto y se
vuelve a oprimir (+), se pasará al primer canal disponible, seguido por una confirmación vocal.
ACTIVACIÓN DE VOZ (VOX)
Este modo permite ajustar la sensibilidad para la activación de voz (VOX). Si se oprimen las teclas (+)
o (-) en este modo, la sensibilidad del micrófono labial a la activación mediante la voz del usuario o del
nivel de los ruidos ambientales aumentará o disminuirá.
Consejo(s):
1) Oprima (+) a medida que aumente el volumen del ruido (haciendo al micrófono, por consiguiente,
menos sensible al ruido exterior) y viceversa, a medida que se reduzca el volumen del ruido.
2) La posición 1 es para usos con poco ruido. La posición 5 es para usos con mucho ruido. Pruebe
usar distintas posiciones hasta encontrar la posición óptima.
3) Para la posición 1 se requiere un nivel de voz mínimo para activar el micrófono. La posición 5
requiere un nivel vocal máximo para su activación.
4) No haga pausas mientras hable durante las transmisiones. VOX se apagará durante las pausas.
5) Verifique que el micrófono labial no se encuentre a más de 1/4" de distancia de la boca.
Un mensaje vocal confirmará cada nuevo ajuste a medida que se oprimen las teclas (+) o (-). Existen
5 niveles de sensibilidad de VOX y un nivel apagado. El nivel de activación de voz apagada se puede
activar pasando hasta el nivel 1, luego manteniendo oprimida la tecla (-) por 1 segundo y soltándola.
Un mensaje vocal de confirmación dirá "activación de voz apagada". Para volverla a activar, oprima una
vez la tecla (+) y el modo volverá al nivel de activación de voz 1 (es decir, la posición de micrófono más
sensible). Cuando está apagada, el radio de los auriculares sólo puede funcionar mediante el botón PTT
de la almohadilla derecha (No. 11 de la figura H), o por el accesorio de PTT remoto de uso manual que
aparece en la página 13.
SQUELCH (CANCELACIÓN DE RUIDO)
Este modo permite cambiar el nivel de sensibilidad de la antena. Al oprimir las teclas (+) o (-) en este
modo, se podrá filtrar el ruido de RF de entrada, no deseado, entre las transmisiones. Un mensaje vocal
confirmará cada nuevo nivel a medida que se opriman las teclas (+) o (-).
Consejo(s):
1) El modo normal es 1
2) El nivel 5 ofrece el mayor nivel de filtrado
3) El nivel 1 ofrece el menor nivel de filtrado
4) El nivel apagado no filtra el ruido, la cancelación de ruido queda anulada
5) Pruebe usar varios niveles para fijar el nivel más bajo posible para el uso específico.
Existen 5 niveles de sensibilidad para la cancelación de ruido, y un nivel de cancelación apagada. El
nivel apagado se puede activar pasando hasta el nivel 1, luego manteniendo oprimida la tecla (-) por 1
segundo y soltándola. Un mensaje vocal de confirmación dirá "squelch apagado". Para volverla a activar,
oprima una vez la tecla (+) y el modo volverá al nivel de cancelación de ruido 1.
Page 38

36
SUBCANAL
Este modo permite cambiar la selección de canal privado / subcanal. Al oprimir las teclas (+) o (-) en este
modo, los canales se desplazan en orden ascendente o descendente, según corresponda. Un mensaje
vocal confirma cada nuevo número de canal escogido a medida que se oprimen las teclas (+) o (-).
Existen 38 subcanales, además de un canal abierto 0. Los canales están configurados en bucle; es decir,
que cuando se llega al canal más alto y se vuelve a oprimir (+), se pasará al primer canal disponible,
seguido por una confirmación vocal.
Consejo(s):
1) Los auriculares PowerCom Plus y PowerCom son compatibles y pueden comunicarse entre sí.
2) Para poder comunicarse debidamente, todos los auriculares del grupo deben estar ajustados para el
mismo canal principal y el mismo subcanal.
POTENCIA
Este modo permite escoger entre dos niveles de potencia de transmisión. Al oprimir (+), se escucha
una confirmación vocal y los auriculares están en el modo de transmisión de salida con potencia máxima
(alta). Al oprimir (-), se escucha una confirmación vocal y los auriculares pasan al modo de transmisión
de salida de potencia más baja (baja).
Consejo(s):
1) Este modo se puede emplear como una característica para ahorrar la carga de la batería.
2) Según la distancia a la que se transmita, no siempre es necesario usar el modo de potencia alta
para obtener una buena cobertura. Pruebe las unidades en el ambiente donde las va a usar para
ajustarlas al modo adecuado.
3) El modo de alta potencia consume más carga de batería que el modo de baja potencia.
IDIOMA
Este modo permite fijar la confirmación vocal de los auriculares en uno de tres idiomas: Inglés, francés
o espanol. Al oprimir las teclas (+) o (-) en este modo, se desplazará de idioma en idioma según
corresponda. Un mensaje vocal confirmará el idioma escogido.
Notas:
1) El modo volverá a ser modo de volumen de sonido omnidireccional (en los auriculares PowerCom
Plus) y modo de volumen de radio (en los auriculares PowerCom y LiteCom), si las teclas (0), (+) o
(-) no se activan antes de que pasen 5 segundos durante el proceso de selección. Se escuchará un
tono en los auriculares, que indica que el modo ha vuelto al tipo original automáticamente.
2) Los auriculares también se apagarán automáticamente si no se oprime uno de los botones (0),
(+), (-) o (PTT/VOX) durante un período de 2 horas. Antes de que los auriculares se apaguen, se
escucharán 3 tonos cada 30 segundos, por 5 minutos.
FUNCIÓN DEL BOTÓN PARA HABLAR (PTT)
Se ubica en la parte posterior de la almohadilla del oído derecho. Al oprimir este botón, el micrófono
labial se activa y se habilita la transmisión radial manual. El radio transmitirá y el micrófono labial se
mantendrá activado mientras se mantenga oprimido el botón.
CARACTERÍSTICA DE ANULACIÓN DE VOX – Función rápida
Si se oprime rápidamente el botón PTT dos veces, se anulará la característica de VOX, lo que se
confirmará escuchando un tono largo por los auriculares. Para reactivar la característica, vuelva a oprimir
rápidamente el botón PTT dos veces, lo que habilitará la característica VOX, y se confirmará mediante un
breve tono doble que se escuchará en los auriculares.
Consejo: Está función resulta ideal cuando el operador cambia de ambientes con poco ruido a ambientes
ruidosos periódicamente durante su día de trabajo.
Page 39

37
USO ALTERNO DEL ACCESORIO PARA RADIO DE CINTURÓN O
PARA TELÉFONO CELULAR
Oprima dos veces el botón PTT antes de conectar los accesorios externos de comunicación de 2 vías
(combinación PTT para cinturón de FL6R + FL50, o FL6S) al enchufe de sonido en la parte inferior de
los auriculares (No. 6 en la figura H de la página 33).
Cuando use esta característica, el botón PTT de los auriculares activará el radio de los mismos y lo pondrá
en modo de transmisión, y el botón PTT del accesorio para cinturón FL50, activará el radio alterno para
cinturón, poniéndolo en modo de transmisión.
Tenga presente que estas instrucciones no corresponden si se usan accesorios que sólo funcionen como
receptores. Únicamente conecte al enchufe de sonido los accesorios que sólo funcionen como receptores
(No. 6 de la figura H en la página 33).
SERVICIO DE MANTENIMIENTO
Limpie la parte externa de los auriculares regularmente, con jabón y agua tibia.
Nota: No los sumerja en líquidos.
Si se acumula humedad en el interior de los auriculares, retire el juego de higiene y deje que la unidad
se seque.
No guarde los auriculares en sitios cuya temperatura sea mayor que +55º C; por ejemplo, sobre el tablero
de un vehículo o detrás del parabrisas.
Las almohadillas para los oídos se deterioran con el tiempo. Revíselas regularmente para verificar que
no tengan grietas. Las almohadillas nuevas garantizan un nivel óptimo de comodidad y la atenuación
correcta del ruido. Lea la información de pedidos en la página 44.
Ciertas substancias químicas pueden dañar este producto. Comuníquese con el fabricante para obtener
mayor información.
Siempre apague la unidad manualmente antes de cambiar las baterías, para evitar que los componentes
electrónicos se dañen. El procedimiento correcto para cambiar las baterías se indica en la página 34.
Siempre use, ajuste, limpie y dé mantenimiento a los auriculares tal como lo indican estas instrucciones.
De lo contrario, se podrán deteriorar las características de atenuación del ruido y otras funciones
electrónicas.
ADVERTENCIA
Cuando los auriculares se ajustan a un nivel de ganancia completo, pueden producir un nivel de sonido
equivalente de hasta 87 dB(A). Este nivel de uso se considera seguro por un lapso diario de 8 horas,
siempre que el tiempo que transcurra en modo de recepción no sobrepase las 2.5 horas. Si el tiempo
que se emplea para escuchar por los auriculares sobrepasa las 2.5 horas por día, el ajuste de la ganancia
debe reducirse a un nivel inferior al nivel máximo. El nivel de ganancia ajustado a un paso menor que
el nivel máximo, produce un nivel de sonido equivalente de hasta 82 dB(A), que se considera seguro
incluso si se emplea en el modo de escucha, con ruidos, por un día entero de 8 horas. Si después de
utilizar este dispositivo sufre de tinnitus (los oídos le zumban o escucha silbidos), o su capacidad auditiva
disminuye o se atenúa, o sospecha por cualquier motivo que tiene problemas de oído, debe reducir el
nivel del volumen y debe revisar el ajuste, la condición y la idoneidad de este producto para el ambiente
ruidoso en el cual se emplea. Si el trastorno persiste, consulte a un audiólogo o solicite la evaluación
profesional de un médico.
Page 40

38
Reglamentos de FCC e información sobre la solicitud de licencia
Información acerca de la seguridad
Su transmisor-receptor inalámbrico contiene un transmisor de baja potencia. Cuando éste se activa,
envía señales de radiofrecuencia (RF). Se ha aprobado el uso de este dispositivo a un factor de uso
que no sobrepase el 50%. Use únicamente la antena suministrada. El uso de antenas no autorizadas,
así como las modificaciones o los accesorios no aprobados, puede dañar el transmisor e infringir los
reglamentos de FCC.
Licencia de BRS:
Es necesario obtener una licencia de BRS de FCC para usar radios BRS en los Estados Unidos. Las
personas mayores de 18 años de edad, que no representen a gobiernos extranjeros, pueden solicitar
una licencia para utilizar sistemas BRS. Necesitará dos formularios de FCC, el formulario FCC 159 y el
formulario principal FCC 605 y el inciso F. Puede obtener estos formularios en línea, en http://www.fcc.
gov/formpage.html, o llamando al 1-800-418-3676.
NRR
Los datos acerca de la tasa de reducción de ruido (NRR, por sus siglas en inglés) se presentan en la
página 40.
El ajuste incorrecto de este dispositivo reducirá su eficacia para atenuar el ruido. Consulte las instrucciones
para un ajuste correcto en este manual. Para mayor información, sírvase escribir a Aearo Company, 8001
Woodland Drive, Indianapolis, Indiana 46278. El nivel de ruido que percibe el oído de una persona,
cuando usa un protector auditivo tal como se indica, es muy cercano al producto de la diferencia entre
el nivel de ruido ambiental calculado en A, y el NRR.
Page 41

39
Atenuación
1. Frecuencia 1 2. Atenuación media 2 3. Desviación estándar
3
19.1
2.6
22.3
2.3
31.7
2.7
34.7
2.4
33.5
2.9
37.9
2.5
MT53H7B4600
PowerCom
40.4
2.9
25
3150
6300
CSA
A
NNR
40.8
3.1
38.8
2.5
18.1
3.1
21.7
2.9
31.5
2.8
35.5
2.7
30.7
2.7
36.8
2.7
MT53H7P3E4600
PowerCom
39.0
2.8
24
3150
6300
CSA
A
NNR
39.7
2.5
38.6
2.1
PowerCom
17.3
4.0
22.1
2.6
31.9
2.4
37.1
2.4
33.2
2.4
36.1
3.5
MT53H7A4600
PowerCom
38.0
3.4
25
3150
6300
CSA
A
NNR
38.7
2.7
37.4
2.3
MT53H7A4604
MT53H7B4604
MT53H7P3E4604
Page 42

40
HY79 Juego para la higiene
Consiste de dos almohadillas y cojines de espuma de ajuste a presión para los oídos.
Cámbielos al menos dos veces al año para garantizar la atenuación, la higiene y la
comodidad correctas. Vienen en pares, suficientes para reponer las piezas de un
dispositivo auricular una vez.
HY100A Almohadilla para amortiguar el cierre contra el oído
Una almohadilla para absorber el sudor, de un sólo uso, que se coloca sobre los sellos
del oído. Se vende en paquetes de 100 pares.
HYM1000 Cinta higiénica para el micrófono labial
La cinta se envuelve alrededor del micrófono labial para protegerlo contra la humedad
y las condiciones ambientales extremas. Resistente al viento y al agua, es ideal para
mantener la higiene cuando se comparte el uso de los auriculares. Se vende en cajas
de 5 metros, y rinde unos 50 cambios aproximadamente.
M995 Almohadilla y rompeviento del micrófono labial
Protección eficaz contra el ruido del viento. También protege contra la suciedad y
prolonga la vida útil del elemento del micrófono. Una por paquete.
M60/2 Almohadilla rompeviento del micrófono semicircular (No. 10 en la figura H)
Para su uso exclusivo con los productos PowerCom Plus. Un par por paquete.
1173 SV Cubierta de las baterías
Cubierta de repuesto para las baterías.
MT53-02 Unidad del brazo del micrófono
Brazo del micrófono de repuesto, con enchufe conector
88009-00000 Paquete de baterías recargables
Paquete de baterías recargables Peltor, tamaño AA, que incluye un transformador para
tomacorrientes de pared.
¡ADVERTENCIA! Not an intrinsically safe approved accessory.
TK56 Botón PTT remoto manual
Botón remoto para hablar, de uso manual, con cable de guía de 48" de largo.
¡ADVERTENCIA! Not an intrinsically safe approved accessory.
Page 43

41
PIEZAS DE REPUESTO, continuación
Conexiones del enchufe para accesorios de sonido (No. 6 en la figura H)
FL6CS Cable para interconectar un teléfono celular
Unidad con enchufe estereofónico macho de 2.55 mm, para su uso con teléfonos celulares.
FL6CT Cable para interconectar dispositivos receptores únicamente
Enchufe estereofónico macho de 3.5 mm, con cableado monoaural, para su uso con dispositivos
personales de entretenimiento.
FL6BT Cable para interconectar dispositivos receptores únicamente
Enchufe monoaural macho de 3.5 mm, para su uso con radioteléfonos y accesorios con enchufes hembra
de sonido de 3.5 mm.
FL6BS Cable para interconectar dispositivos receptores únicamente
Enchufe monoaural macho de 2.5 mm, para su uso con radioteléfonos y accesorios con enchufes hembra
de sonido de 2.5 mm.
FL6BR – Cable externo de interconexión entre radioteléfonos
Unidad de cable para adaptar PC+, PC y LC a un radioteléfono adicional. Viene con un conector Nexus
TP-120 que se acopla a los cables de interconexión normales de radio de PTT, modelo FL50, de Peltor
(se venden por separado). Comuníquese con el servicio al cliente para obtener una lista completa de
cables para accesorios FL50 para radioteléfonos.
Page 44

42
ASIGNACIÓN DE FRECUENCIAS Y DE CANALES POR PRODUCTO
Frecuencia Tipo de banda PowerCom
MHz autorizada Asignación de canales Color
464.5000 BRS 1 Marrón
464.5500 BRS 2 Amarillo
467.7625 BRS 3 J
467.8125 BRS 4 K
467.8500 BRS 5 Estrella plateada
467.8750 BRS 6 Estrella dorada
467.9000 BRS 7 Estrella roja
467.9250 BRS 8 Estrella azul
* Los canales individuales también tienen 38 canales privados / subcanales; vea la página siguiente
Page 45

43
LISTA DE ASIGNACIÓN DE FRECUENCIAS Y DE CANALES
PRIVADOS / SUBCANALES
La tabla que sigue corresponde únicamente a los auriculares de modelos PowerCom Plus y PowerCom.
Frecuencia Asignación Frecuencia Asignación Frecuencia Asignación
Hz de Hz de Hz de
subcanal subcanal subcanal .
67.0 01 107.2 14 167.9 27
71.9 02 110.9 15 173.8 28
74.4 03 114.8 16 179.9 29
77.0 04 118.8 17 186.2 30
79.7 05 123.8 18 192.8 31
82.5 06 127.3 19 203.5 32
85.4 07 131.8 20 210.7 33
88.5 08 136.5 21 218.1 34
91.5 09 141.3 22 225.7 35
94.8 10 146.2 23 233.6 36
97.4 11 151.4 24 241.8 37
100.0 12 156.7 25 250.3 38
103.5 13 162.2 26 off 00
Información de contacto para trabajos en virtud de la garantía / de reparación:
Sírvase comunicarse con el departamento de servicio al cliente antes de enviar cualquier producto que
requiera servicio.
Información de contacto del departamento de servicio al cliente:
Sitio web: www.aearo.com
E-mail: peltor_communications@aearo.com
Teléfono: 1-800-665-2942
Para Canadá:
Peltor Communications
546 Bryne Drive, Unit C
Barrie, ON L4N-9P6
Para los Estados Unidos y México:
Aearo Company
Atención: Peltor Warranty Center
90 Mechanic Street
SouthBridge, MA 0155
Page 46

44
Page 47

Page 48

For Canada:
Peltor Communications
546 Bryne Drive, Unit C
Barrie, ON L4N-9P6
For USA and Mexico:
Aearo Company
90 Mechanic Street
SouthBridge, MA 0155
FP3581 v.3
 Loading...