

A&D Weighing EK-15KL, EK-30KL Instruction Manual

EK-L Series
Precision Bench Scale
EK-15KL/EK-30KL
INSTRUCTION MANUAL
1WMPD4002971

© 2014 A&D Company, Limited. All rights reserved.
No part of this publication may be reproduced, transmitted, transcribed, or translated into any
language in any form by any means without the written permission of A&D Company, Limited.
The contents of this manual and the specifications of the instrument covered by this manual are
subject to change for improvement without notice.
COMPLIANCE WITH FCC RULES
Please note that this equipment generates, uses and can radiate radio frequency energy. This
equipment has been tested and has been found to comply with the limits of Class A computing
device pursuant to Subpart J of Part 15 of FCC rules. These rules are designed to provide
reasonable protection against interference when the equipment is operated in a commercial
environment. If this unit is operated in a residential area it may cause some interference and under
these circumstances the user would be required to take, at his own expense, whatever measures
are necessary to eliminate the interference.
(FCC = Federal Communications Commission in the U.S.A.)
Note
Under some ambient electromagnetic conditions, this equipment may be affected by the
electromagnetic interference.
This is a hazard alert mark.

CONTENTS
1. INTRODUCTION .............................................................................................................3
2. UNPACKING ...................................................................................................................3
3. PART NAMES AND FUNCTIONS...................................................................................4
4. SETTING UP...................................................................................................................6
4-1. Setting up your scale.................................................................................................6
4-2. Power source.............................................................................................................7
5. OPERATION....................................................................................................................9
5-1. Turning the power ON and OFF ................................................................................9
5-2. Weighing units.........................................................................................................10
5-3. Selecting a weighing unit.........................................................................................10
5-4. Basic operation........................................................................................................11
5-5. Weighing range .......................................................................................................12
5-6. Counting mode (pcs)...............................................................................................13
5-7. Percent mode (%)....................................................................................................15
6. COMPARATOR.............................................................................................................16
6-1. Setting example....................................................................................................... 16
7. CALIBRATION ..............................................................................................................18
7-1. Preparation..............................................................................................................18
7-2. Zero calibration........................................................................................................19
7-3. Calibration using a calibration weight......................................................................19
7-4. Gravity acceleration correction................................................................................20
8. FUNCTIONS..................................................................................................................21
8-1. Key operation ..........................................................................................................21
8-2. Entering the function setting mode..........................................................................21
8-3. Setting example....................................................................................................... 22
8-4. Storing weighing units..............................................................................................23
8-5. Function list .............................................................................................................24
9. RS-232C SERIAL INTERFACE.....................................................................................26
9-1. Interface specifications............................................................................................26
9-2. Data format..............................................................................................................28
9-3. Data output mode....................................................................................................29
9-4. Command mode......................................................................................................29
1

10. ID NUMBER AND GLP................................................................................................30
10-1. Setting the ID number............................................................................................30
10-2. GLP report.............................................................................................................31
11. MAINTENANCE ..........................................................................................................35
11-1. Notes on maintenance...........................................................................................35
11-2. Error codes............................................................................................................35
12. SPECIFICATIONS.......................................................................................................37
12-1. Specifications.........................................................................................................37
12-2. Other weighing units..............................................................................................37
12-3. Option....................................................................................................................37
12-4. External dimensions..............................................................................................38
GRA VITY ACCELERATION MAP.....................................................................................39
2
1. INTRODUCTION
This manual describes how the EK-L series scale works and how to get the most
out of it in terms of performance.
The EK-L series scales have the following features:
The EK-15KL is a high resolution electronic scale having a resolution of 1/150,000.
The EK-30KL is a dual range scale and each range has a resolution of 1/30,000.
The EK-L series scales have a counting function, % function and comparator
function.
The backlight LCD provides ease of use even in dark locations.
RS-232C serial interface is equipped as standard for connection to a printer or
personal computer.
Using the serial interface, Good Laboratory Practice (GLP) data can be output.
The optional sealed lead-acid battery enables use in locations where AC power is
not available.
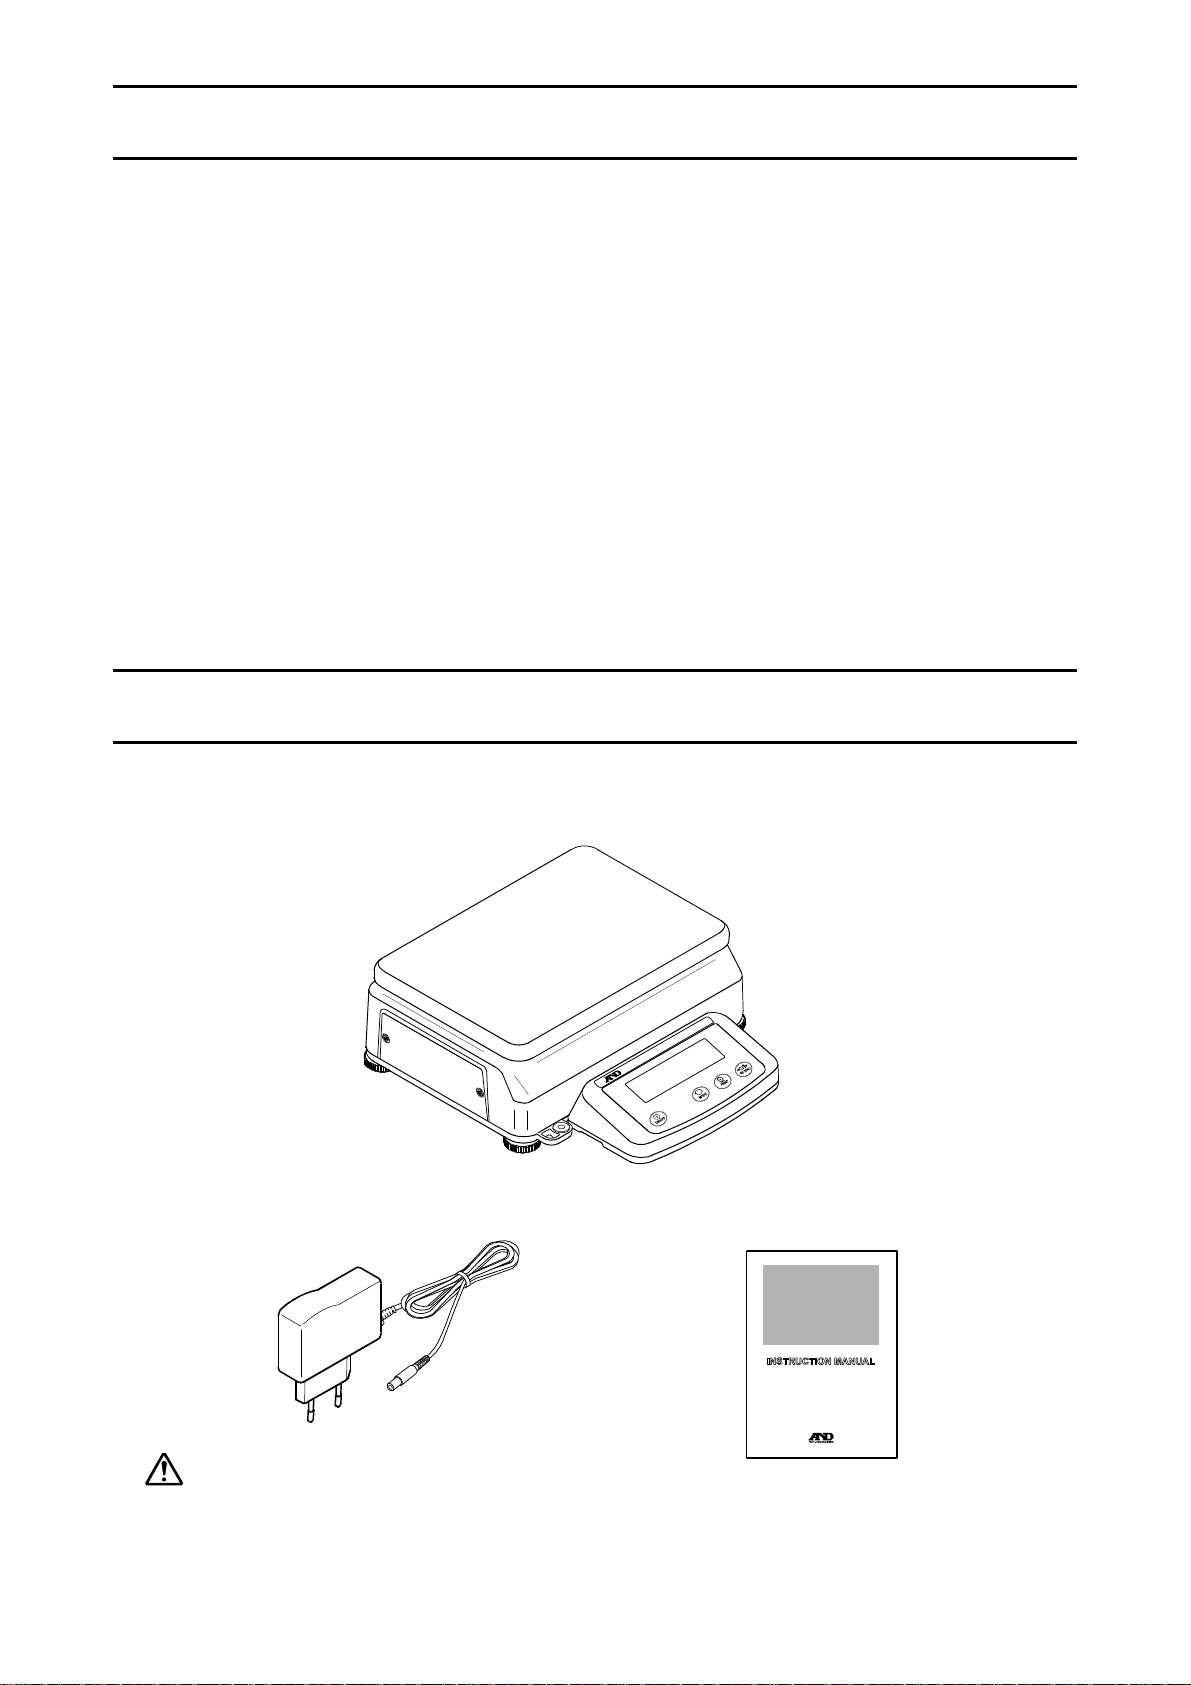
2. UNPACKING
Unpack the package and check that all of the following items are included:
Main unit
AC adapter Instruction manual
EK-L Series
Precision Bench Scale
EK-15KL/EK-30KL
Please confirm that the AC adapter
is correct for your local voltage and
receptacle type.
3
A
Battery cover
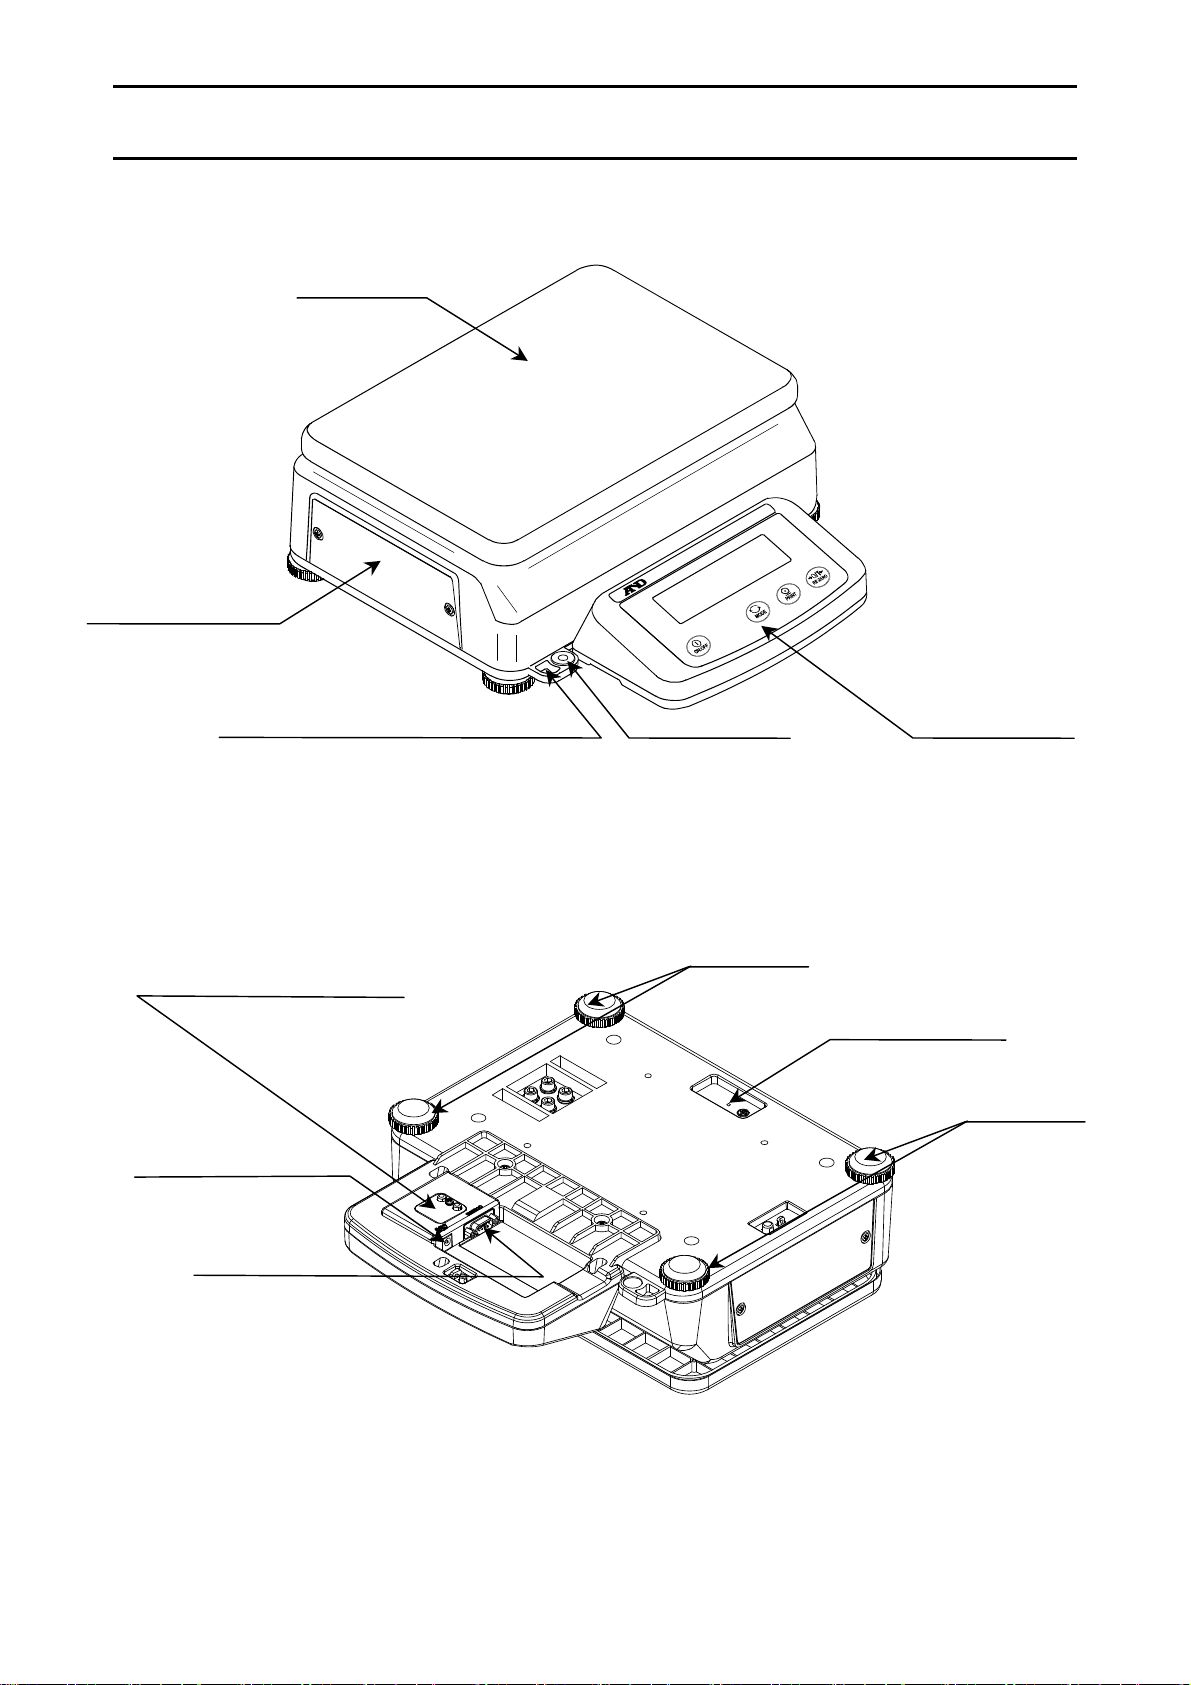
3. PART NAMES AND FUNCTIONS
Weighing pan
Calibration switch cover
AC adapter jack
RS232C terminal
Security slot
security cable is not provided and
must be prepared by the user.
The CAL switch is inside.
Bubble spirit level
Leveling foot
Grounding terminal
Leveling foot
Display
4
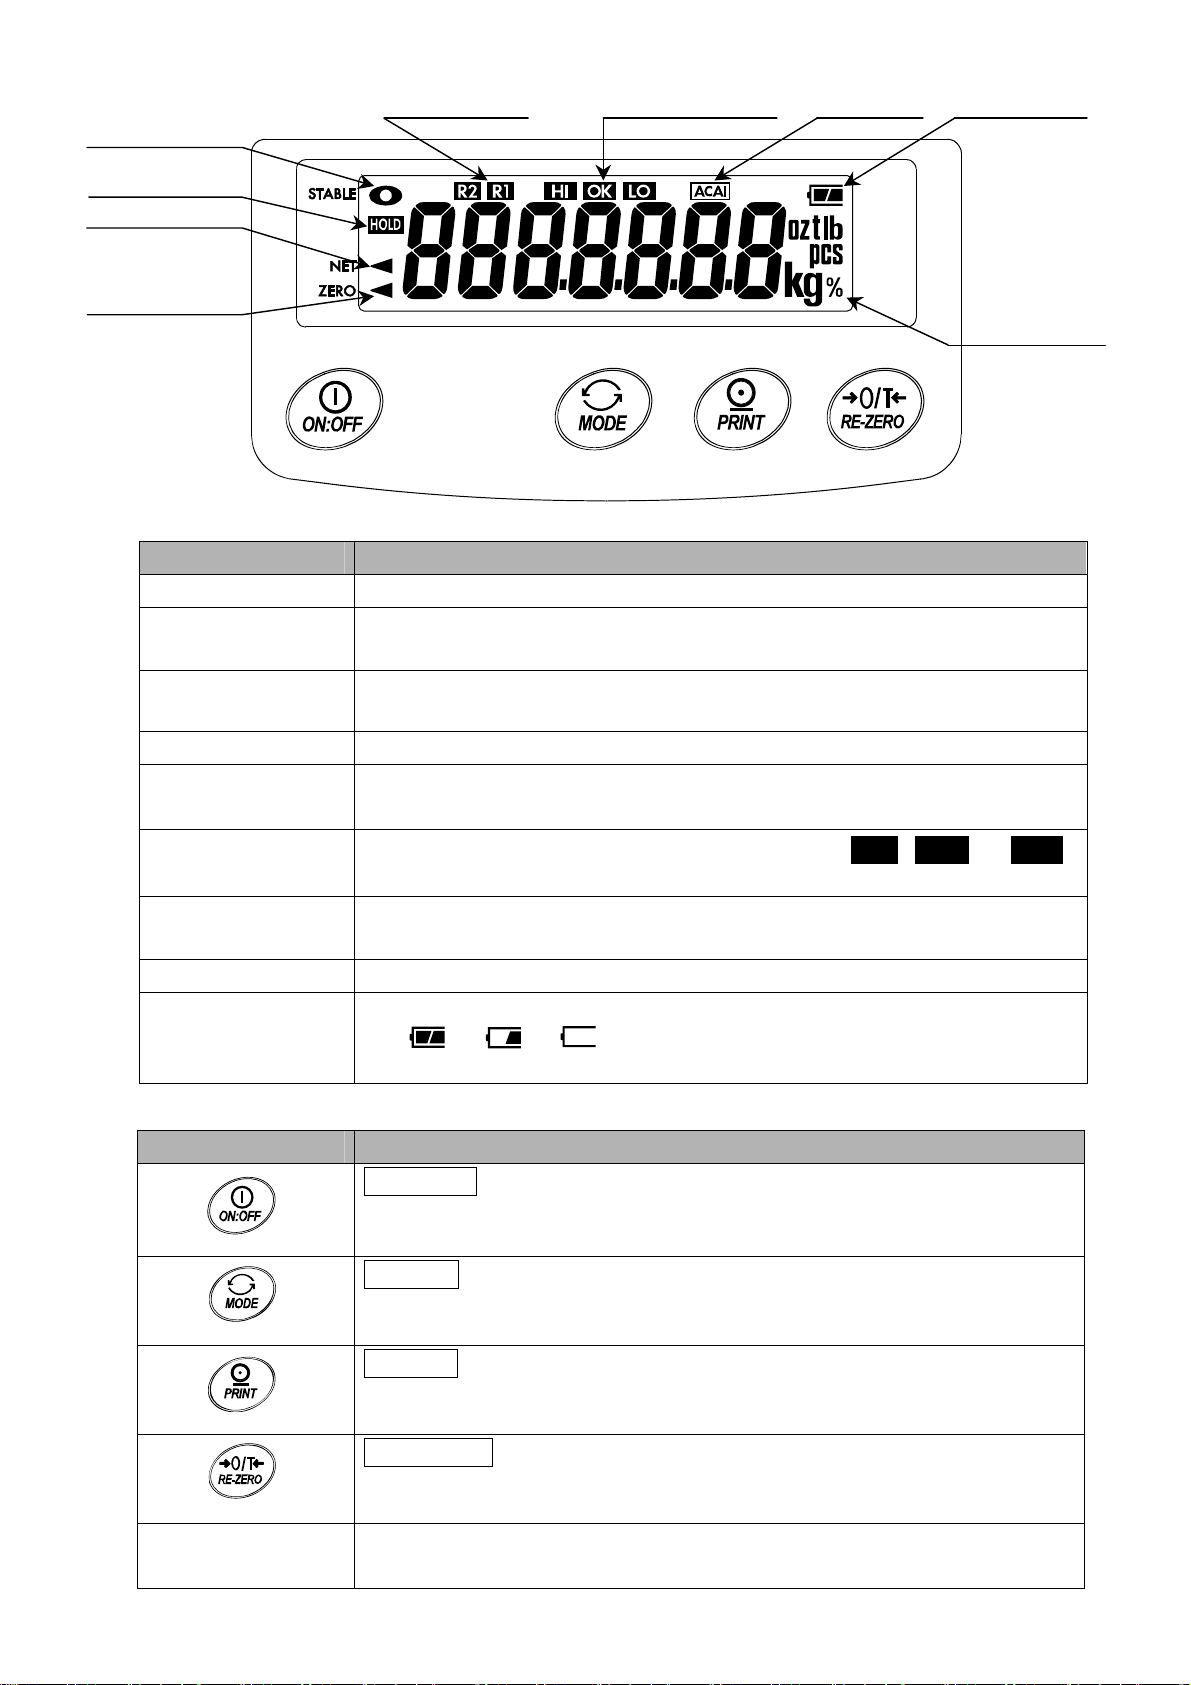
r
STABLE indicator
HOLD indicato
NET indicator
Weighing range
indicators
Comparator results
ACAI indicator
ZERO indicator
Indicator Description
ST ABLE indicator Turns on when the weight value is stable and is ready to be read.
HOLD indicator
Turns on while the display lock is being performed.
Does not turn on when the display lock function is disabled.
Battery indicator
Weighing units
NET indicator
Turns on when the net weight is displayed.
(The tare operation is in progress.)
ZERO indicator Turns on when zero is displayed.
Weighing range
indicators
Comparator results
ACAI indicator
Indicates a weighing range.
Turns on when the automatic range function is selected for the EK-30KL.
Indicates the results of comparison by turning on HI , OK or LO .
Does not turn on when the comparator function is disabled.
Turns on or blinks when the ACAI function is being performed.
Does not turn on when the ACAI function is disabled.
Weighing units The weighing units stored in memory turn on.
Changes as the battery capacity decreases as follows:
Battery indicator
Full → → Recharging required
Does not turn on when the AC adapter is used.
Key Description
1ON/OFF key
Turns the power ON or OFF.
When turned ON, the scale is automatically set to zero. (power-on zero).
1MODE key
Switches the weighing units.
1PRINT key
Outputs the weight data to a printer or personal computer.
1RE-ZERO key
Sets the display to zero.
CAL switch
Located under the calibration switch cover.
Press and hold the switch to enter the calibration mode.
5
4. SETTING UP
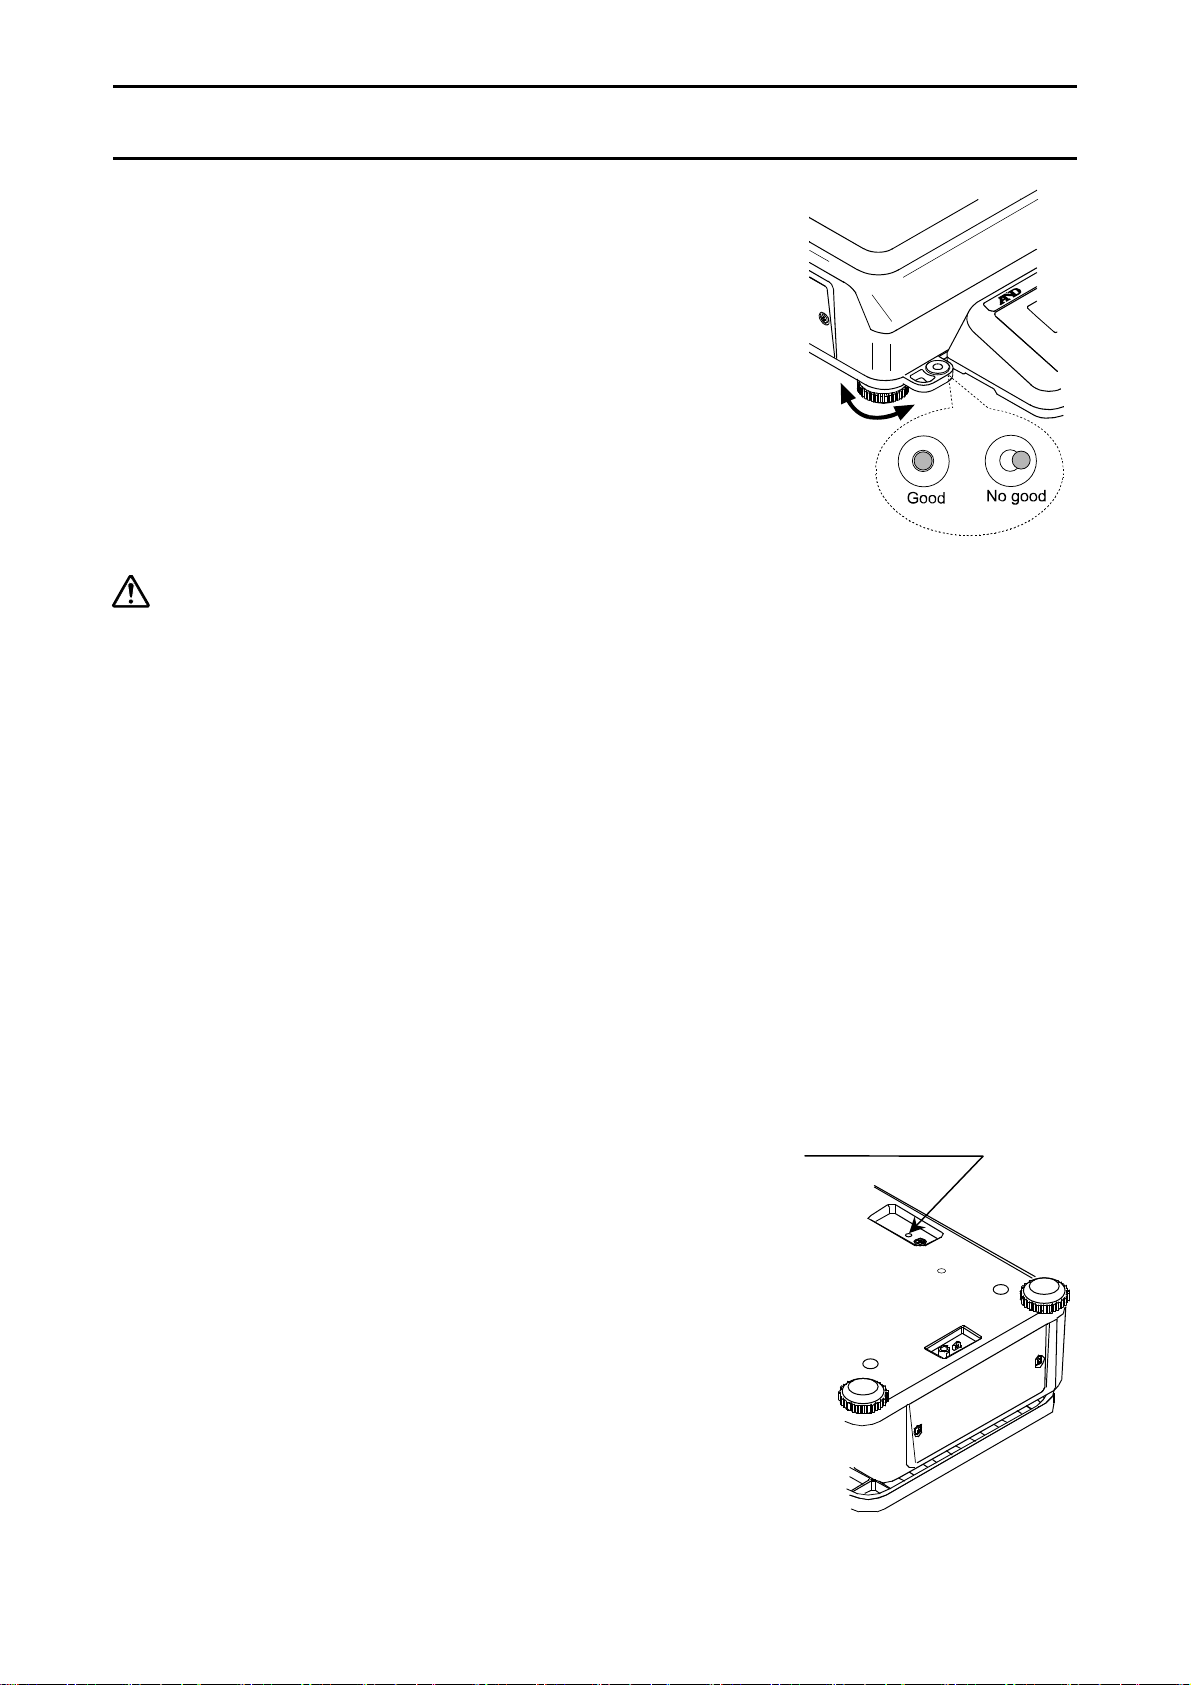
4-1. Setting up your scale
1. Adjust the level of the scale using the leveling
feet. Use the bubble spirit level to confirm.
The bubble should be in the center of the circle.
2. Calibrate the scale before use.
See “7. CALIBRATION.”
Bubble spirit level
Scale location
Observe the following to get the most out of your scale and weigh correctly.
Do not install the scale in locations that are subject to dust, draft, vibration,
excessive temperature changes, condensation, or that may have magnetic
fields.
Install the scale on a solid and level surface.
Do not install the scale in direct sunlight.
Do not install the scale near heaters or air conditioners.
Use a stable AC power source.
Do not install the scale in a place where flammable or corrosive gases present.
Allow the scale to reach equilibrium with the ambient temperature before
use.
T urn the power ON and warm up the scale for at least 30 minutes before use.
When the scale is installed for the first time, or the scale has been moved,
perform calibration as described in “7. CALIBRATION.”
If it seems that the scale is being affected by static electricity, ground the
scale using the grounding terminal to reduce effects of static electricity.
Grounding terminal
6
4-2. Power source
(
)
As the power source, the AC adapter or lead-acid battery is available.
The scale remains powered while the AC adapter is connected, even if nothing is
shown in the display .
T o ensure st able weighing, keep the scale connected to the power supply using
the AC adapter whenever possible.
There are no negative effects to the scale in keeping it connected to the power
supply .
T o ensure accurate weighing, connect the scale to the power supply at least 30
minutes before use.
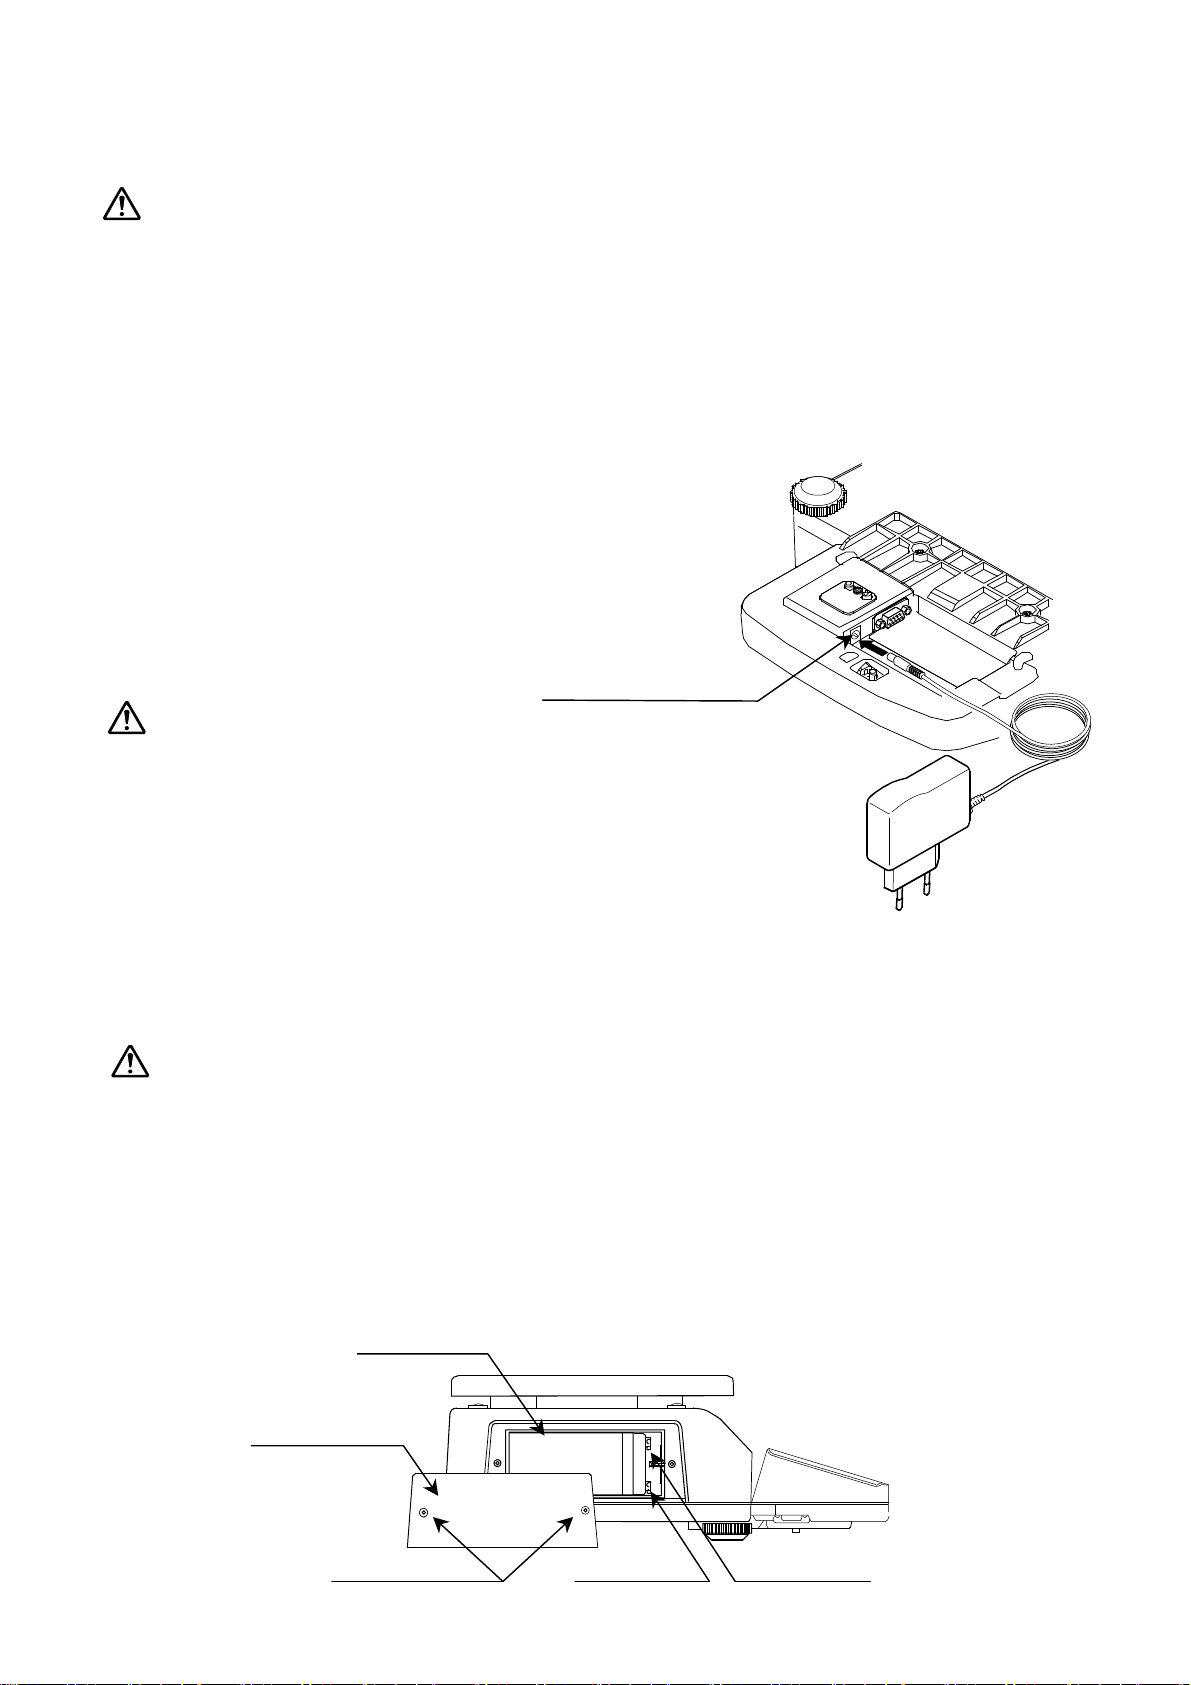
Using the AC adapter
Connect the AC adapter to an electrical
outlet.
Insert the AC adapter plug into the AC
adapter jack located on the underside of
the display.
Use a stable power source.
Use the AC adapter provided
with the scale.
Using the sealed lead-acid battery
A commercially available sealed lead-acid battery can be used to operate the scale.
Use an NP4-6 battery (6V, 4.0Ah) manufactured by Yuasa Battery Inc.
The scale can be operated continually for approximately 100 hours on
a fully charged battery (at 25°C with backlight always off)
When disposing of the battery, inquire to the battery manufacturer,
supplier or industrial waste disposal company for details on how to
correctly dispose of the battery.
The overall operating hours and battery life vary depending on how
the scale is used and the ambient temperature.
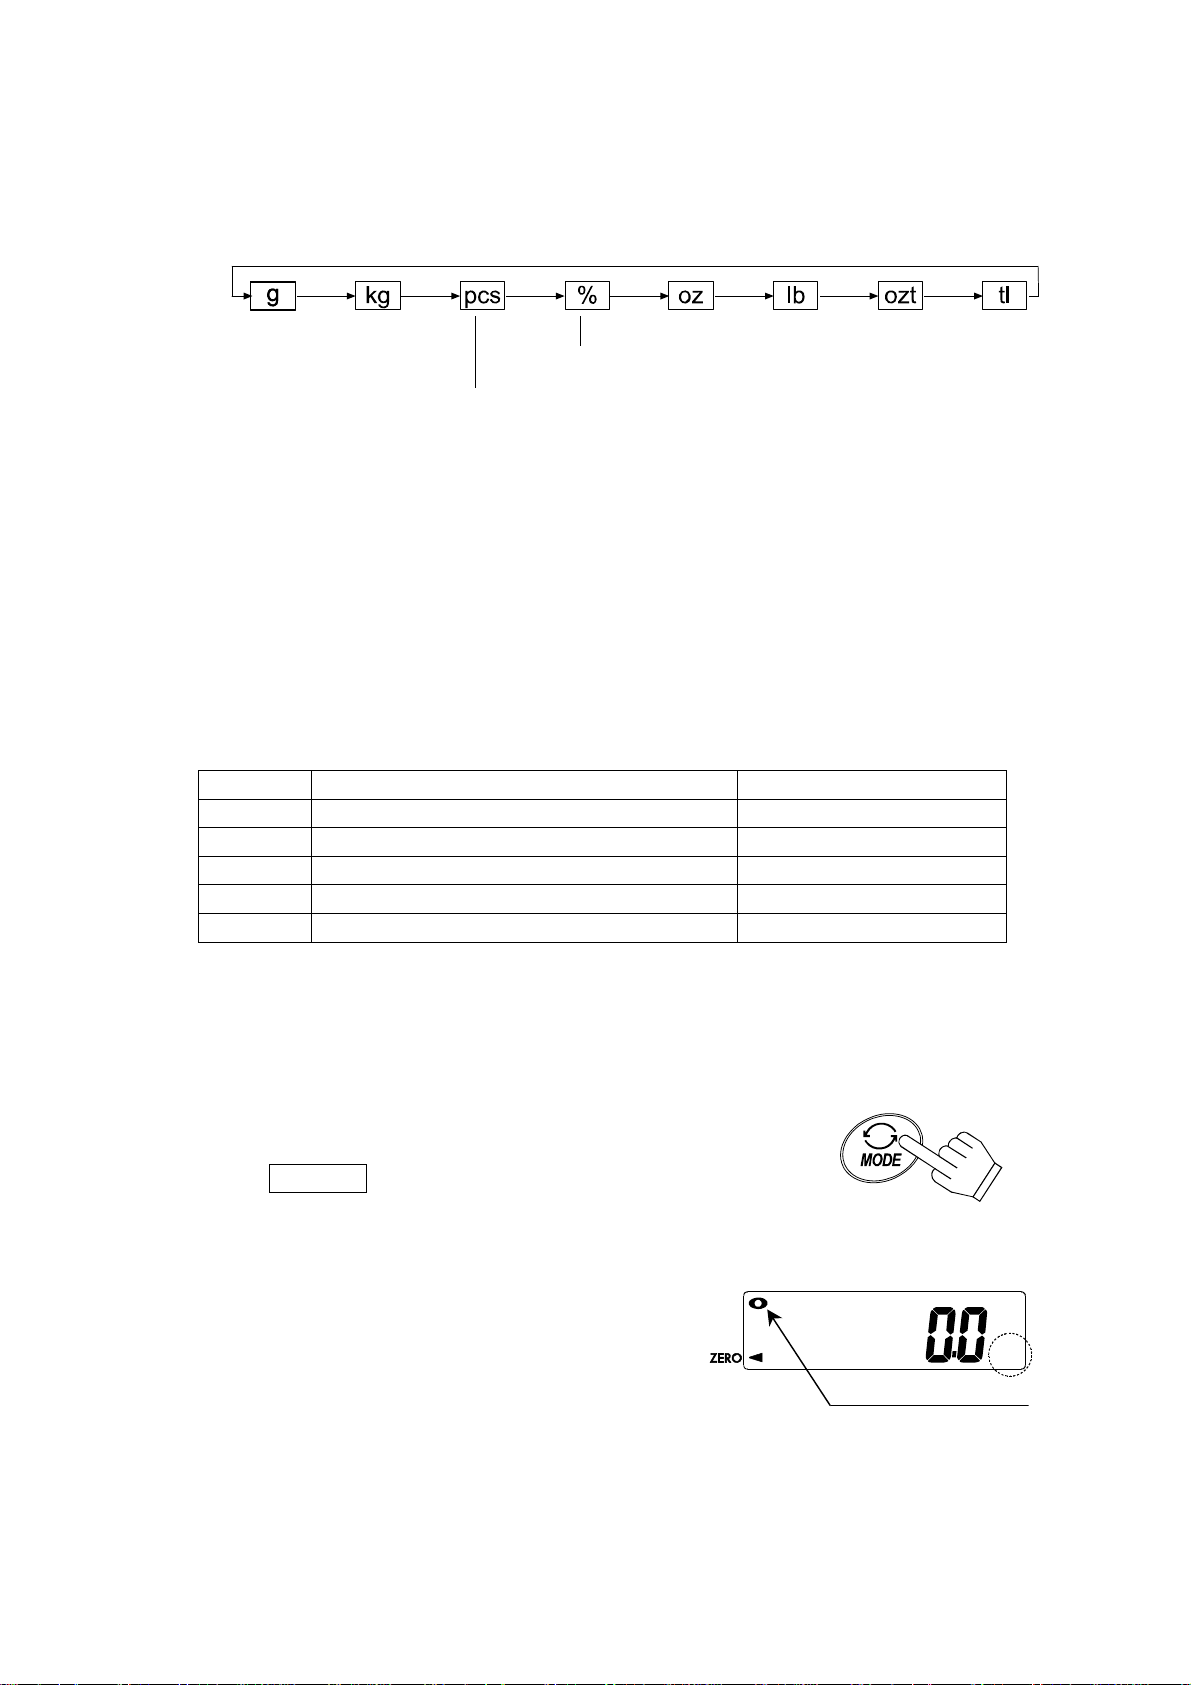
Battery cover
Sealed lead-acid
battery
M3 screws
AC adapter jack
“–“ terminal
black
AC adapter
“+” terminal
(red)
7

1. Remove the AC adapter plug from the AC adapter jack.
2. Loosen the M3 screws that secure the battery cover and remove the battery cover.
3. Connect the cables in the battery compartment to the battery,
the red cable to the + terminal and the black cable to the - terminal.
Connecting the battery incorrectly may cause the battery to leak or
burst, or may cause fire.
4. Install the battery into the battery compartment. Replace the battery cover and
secure it using the M3 screws removed in Step 2.
5. Press the ON/OFF key to turn the power ON and confirm that the scale
operates properly.
The battery indicator is on when the battery is used to operate the scale.
If “lb” appears in the display, the battery has depleted. Recharge the
battery immediately.
Recharging the lead-acid battery
1. Connect the cables in the battery compartment to the battery,
the red cable to the + terminal and the black cable to the - terminal.
2. Connect the AC adapter to an electrical outlet. Insert the AC adapter plug into the
AC adapter jack.
3. Recharging starts automatically.
Recharge the battery periodicall y even if the scale is not used for a
long period of time. The battery needs to be recharged at least every
three to six months. The battery needs to be recharged more
frequently when used in warmer places.
The battery takes approximately 15 hours to fully recharge.
When recharging is complete, remove the AC adapter plug from the
AC adapter jack and wait for several minutes before using the
battery to operate the scale.
The scale can be used while the battery is being recharged. However,
to ensure stable weighing, use the scale after the battery has been fully
recharged.
When using a new battery, fully charge the battery before use.
Only use the AC adapter provided with the scale to recharge the
battery. Using other adapters may prevent the battery from recharging
correctly, and may also cause the battery to leak or bust, or may
cause fire.
Recharge the battery in an environment where the temperature is
between 0°C and 40°C. The ideal temperature range is 5°C to 35°C.
8

5. OPERATION
5-1. Turning the power ON and OFF
1. Press the ON/OFF key to turn the power ON.
All the display symbols appear as shown above.
(As for weighing units: Only the units stored in memory are displayed.)
The display turns off except a weighing unit and a decimal point.
The scale waits for the weight value to become stable, and zero is displayed with
the ZERO indicator (power-on zero).
The range for power-on zero is within ±10% of the weighing capacity around the
calibrated zero point.
If the power is turned ON while there is a load beyond this range, the scale is tared
to zero and the NET and ZERO indicators turn on.
2. Press the ON/OFF key to turn the power OFF.
Auto power-off function
The auto power-off function automatically turns the power OFF when zero
is displayed for approximately 5 minutes.
See “poff” in “8-5. Function list.”
Display lock function
The display lock function locks the display temporarily to make the weight
value easier to read.
See “Hold” in “8-5. Function list.”
LCD backlight function
The LCD backlight turns on when the weight value changes 4d or more (d
= minimum display, so, corresponding to four times as great as the
minimum display) or any key operation is performed. When the weight
value is stable for a certain period of time, the backlight automatically
turns off. The backlight can also be set to remain on or off.
See “ltUp” in “8-5. Function list.”
9
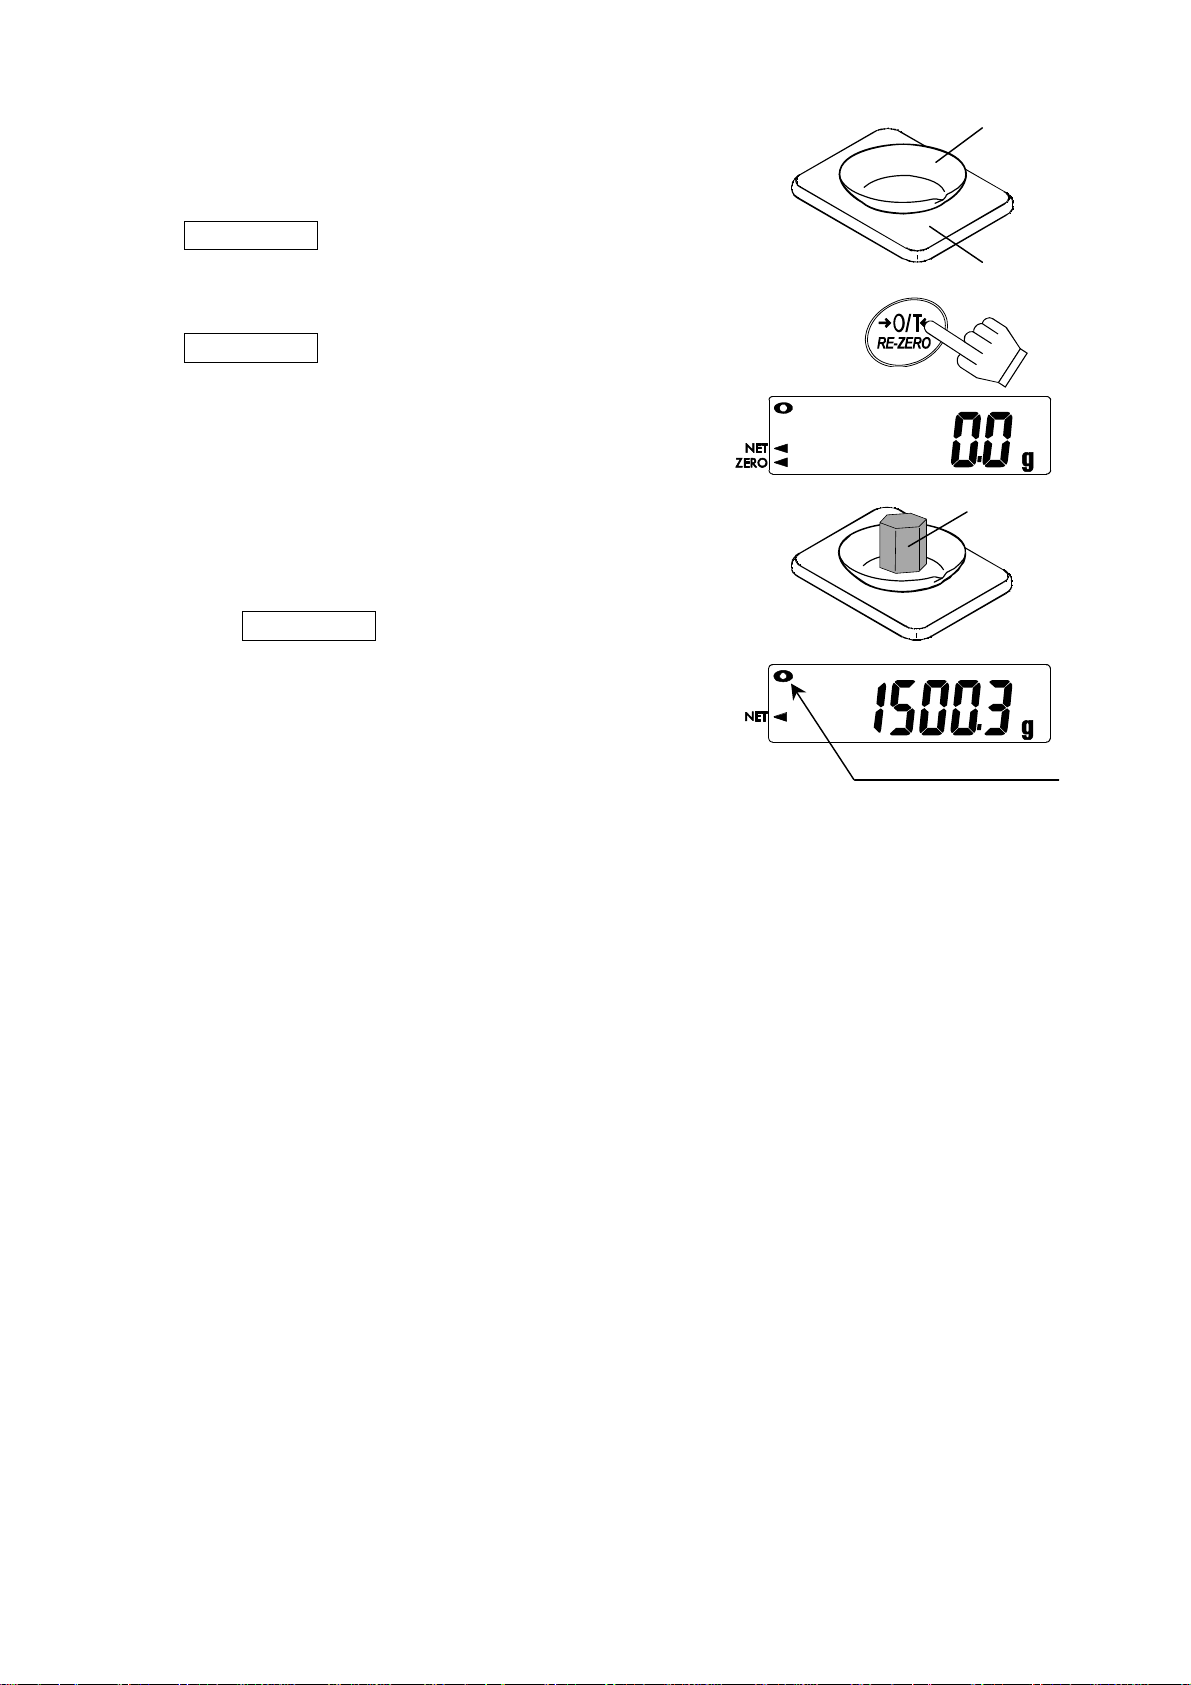
5-2. Weighing units
r
The most common unit of weight used around the world is the gram, but there is often
a need to shift to alternative units specific to the country where the scale is used or to
select modes such as counting or percent.
The units and the order they appear in the display are as follows:
Percent mode
Counting mode
Among the units, those available for the user have been set at the factory before
shipping.
The unit can be selected in the function setting mode. The order of the units available
is the same as above, while skipping the units that are not available.
It is possible to store the weighing units that will be actually used from the
units available. It is also possible to specify the unit that will appear first
when the power is ON.
For details, see “8-4. Storing weighing units.”
Conversion table
Units Name Conversion to gram
kg kilogram 1000 g
oz Ounce (avoir) 28.349523125 g
lb Pound (UK) 453.59237 g
ozt Troy ounce 31.1034768 g
tl Tael (Hong Kong general, Singapore) 37.7994 g
The unit “tl (tael)” is for special versions only.
5-3. Selecting a weighing unit
Press the MODE key to select a weighing unit.
10
Switches the units
available in the order
described above
STABLE indicato
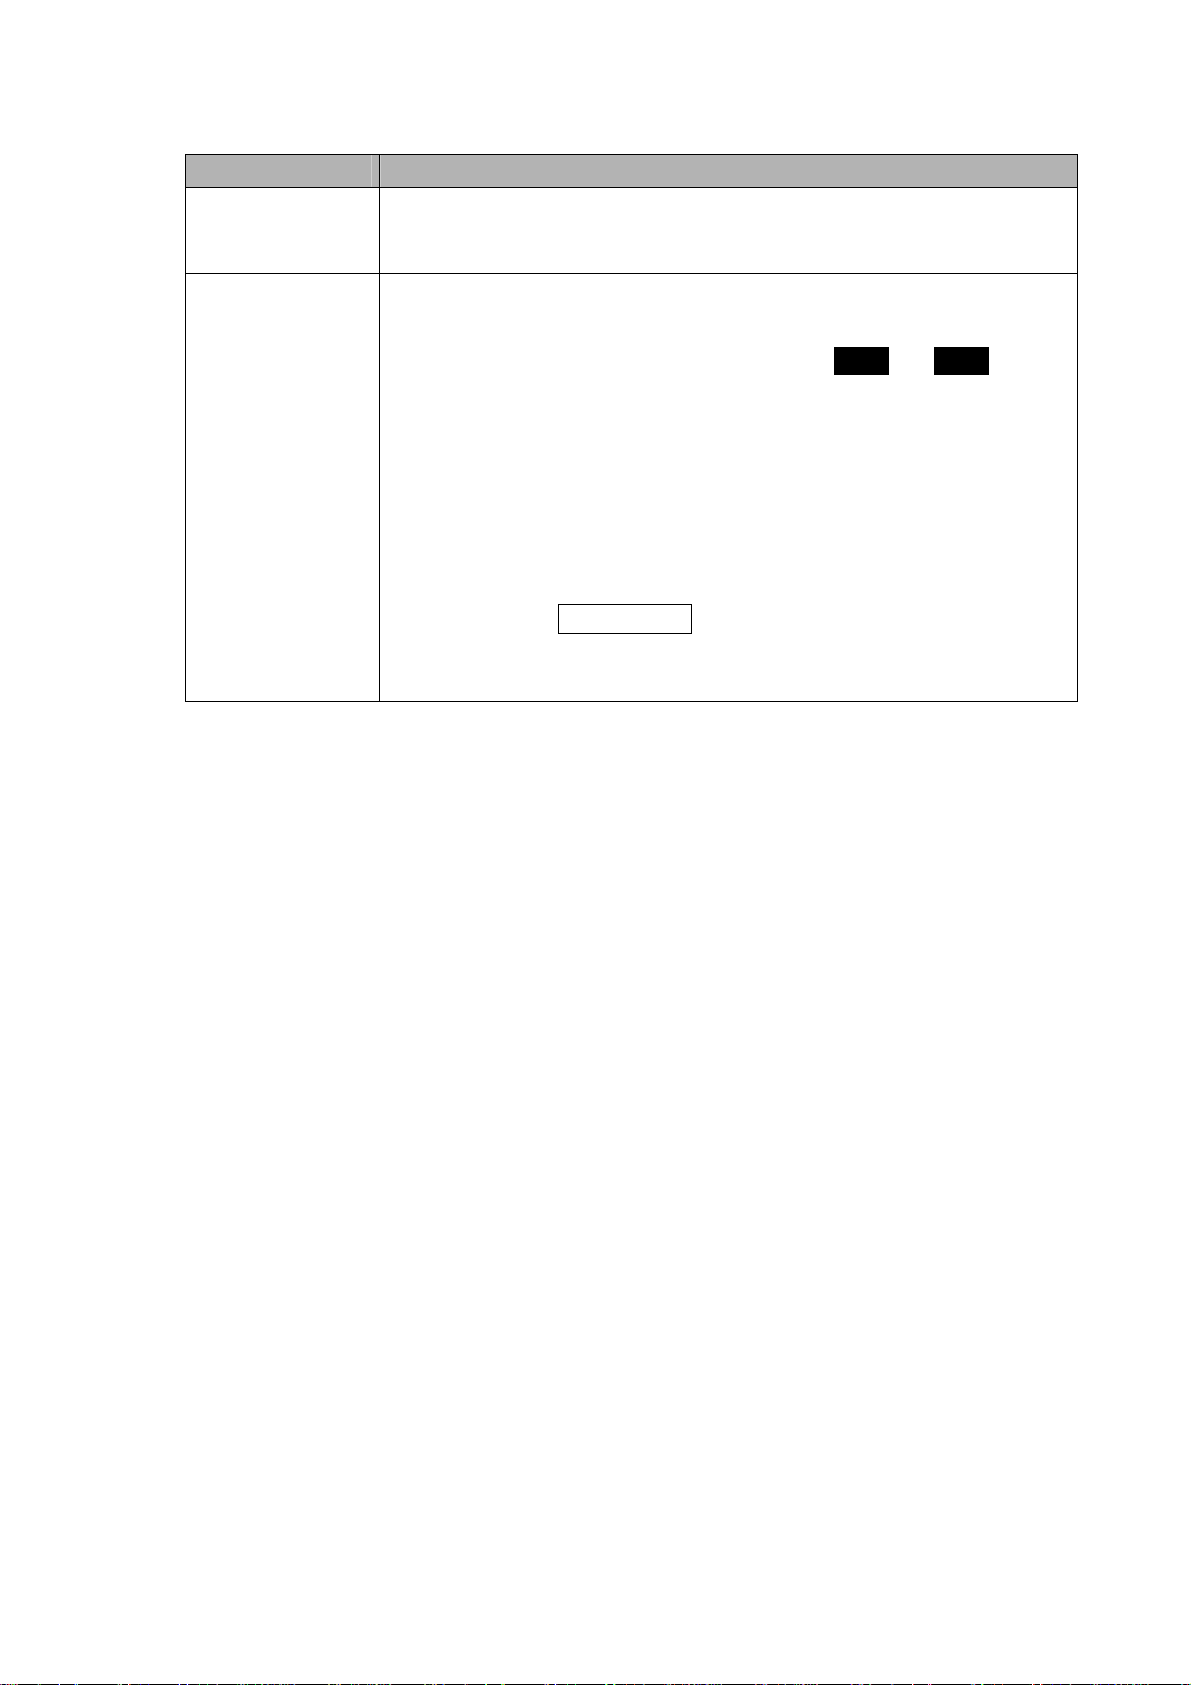
5-4. Basic operation
r
r
1. Select a weighing unit.
2. When the display doesn’t show zero, press the
RE-ZERO key to set the display to zero.
3. When using a tare (container), place the
container on the weighing pan, and press the
RE-ZERO key to set the display to zero.
4. Place the object to be weighed on the pan or in
the container.
Wait for the STABLE indicator ( ) to turn on
and read the value.
5. Remove the object from the pan.
The RE-ZERO key will zero the scale if the
weight value is within ±2% of the weighing
capacity around the power-on zero point. The
ZERO indicator turns on. When the weight
value exceeds +2% of the weighing capacity,
the scale is tared to zero and the ZERO and
NET indicators turn on.
Precautions during operation
Make sure that the STABLE indicator is on whenever reading or storing a
value.
Do not use a sharp instrument such as a pencil to press the keys.
Do not apply a shock or a load to the pan that is beyond the weighing
capacity.
Keep the scale free from foreign objects such as dust or liquid.
Calibrate the scale periodically to ensure accurate weighing.
See ”7. CALIBRATION.”
STABLE indicato
Containe
Weighing pan
Object to
be weighed
11
5-5. Weighing range
Function setting Description
Fixed range
rng 0
rng 1
Fixed to 1/30,000. (R2 range for the EK-30KL)
Automatic range function (Only for the EK-30KL)
The EK-30KL has two weighing ranges when the automatic
range function is selected. The indicator R1 or R2 turns
on to indicate which range the weight value belongs to.
When the weight value exceeds the maximum value of
When there is nothing on the weighing pan and zero is
When the RE-ZERO key is pressed in the R2 range,
the R1 range, the weighing range changes automatically
to the R2 range.
displayed with the ZERO indicator, the weighing range
will automatically be the R1 range.
the scale is tared to zero and the weighing range changes
to the R1 range.
12
 Loading...