

Advocate Meters TD-4223 A/B User Manual
Dear Advocate™ TD-4223 A/B System Owner:
You have chosen one of the best blood glucose
monitoring systems. This manual contains important
information you must know about the system. Please
read it thoroughly and carefully.
The greatest feature of this system is its speaking
function (with a talking symbol on the meter),
which is an acoustic aid for users especially with visual
disability. Please note that this function is optional. If
the meter does not have , it will not provide speaking
function.
Another unique feature is its internal established code.
Not only does it simplify the glucose test, it also provides
you and your doctor with more precise and accurate test
results.
The system is intended for use outside the body (in
vitro diagnostic use). It should be used only for testing
glucose (sugar) and only with fresh capillary whole
blood samples. The system is intended for use in the
home and in clinical settings. It should not be used for
the diagnosis of diabetes or the testing of newborns.
PLEASE NOTE
Before using any product to test your blood glucose, read all
instructions thoroughly and practice the test. Do all quality control
checks as directed and consult with a diabetes healthcare
professional. These recommendations apply to all blood glucose
monitoring systems and are supported by the Diabetes Educator
Section of the Canadian Diabetes Association.

IMPORTANT SAFETY INSTRUCTIONS
READ THIS BEFORE USING
The following basic safety precautions should always be
taken.
1. Close supervision is necessary when the device is
used by, on, or near children, handicapped persons
or invalids.
2. Use the device only for the intended use described in
this manual.
3. Do not use strips and control solutions which are not
supplied by the manufacturer.
4. Do not use the device if it is not working properly, or if
it has suffered any damage.
5. Do not use the device near a mobile phone or microwave
oven, or it may cause inaccurate results.
KEEP THESE INSTRUCTIONS
1

TABLE OF CONTENTS
IMPORTANT SAFETY INSTRUCTIONS 1
IMPORTANT INFORMATION
ABOUT ATERNATIVE SITE TESTING (AST)
INTRODUCTION OF THE SYSTEM 8
Intended Use 8
Principle of Measurement 8
Contents of the System
Appearance and Key Function of the Meter
Meter Display Segments
Speaking Function 12
Appearance of the Test Strip 13
PRERPARATION BEFORE USE 14
Battery Replacement 14
Setting the Meter and Deleting the Memory
BEFORE TESTING
Checking the Display
Calibration
Checking with Advocate™ Control Solution
Important Control Solution Information
Doing a Control Solution Test 26
TESTING YOUR BLOOD
Testing Procedure 30
Expected Test Results 36
10
11
16
21
21
21
23
25
29
4
6
9
2

COMPARING METER AND LABORATORY RESULTS 37
USING THE METER MEMORY 39
Viewing Results on the Meter
Viewing Results on a Personal Computer
39
43
CARING FOR YOUR METER AND TEST STRIPS 45
Cleaning 45
Storage 45
PROBLEM-SOLVING GUIDE 48
Result Indicator 49
Error Message 50
Problem in Operation 51
SPECIFICATIONS
SYMBOL INFORMATION
WARRANTY/CUSTOMER CARE
53
54
55
3

IMPORTANT INFORMATION
Severe dehydration and excessive water loss may cause
false low results. If you believe you are suffering from
severe dehydration, consult a healthcare professional
immediately.
Test results below 60 mg/dL* (3.3 mmol/L) mean low
blood glucose (hypoglycemia). Test results greater
240 mg/dL* (
than
2
13.3 mmol/L) mean high blood
1
glucose (hyperglycemia). If you get results below
60 mg/dL or above
240 mg/dL, and do not have
symptoms, first repeat the test. If you have symptoms
or continue to get results that fall below 60 mg/dL or
above 40 mg/dL, follow the treatment advice of your
healthcare professional.
Apply only capillary whole blood sample to the
absorbent hole. Applying other substances to the
absorbent hole will cause inaccurate results.
If you are experiencing symptoms that are not
consistent with your blood glucose test results and
you have followed all instructions described in this
owner’s manual, call your healthcare professional.
A red blood cell count (hematocrit) that is very high
(above 60%) or very low (below 20%) can cause false
results.
4

The following WILL NOT affect results:
Elevated blood triglyceride, reducing substances
such as uric acid and ascorbic acid when occurring
in expected blood concentration, or acetaminophen,
dopa, methyldopa, L-dopa and tolbutamide occurring
in expected blood concentrations.
feet
This system may be used at altitudes up to 10,742
(3,275 m) without an effect on test results.
*1. Kahn, R., and Weir, G,: Joslin’s Diabetes Mellitus, 13th ed.
Philadelphia: Lea and Febiger (1994), 489.
*2 Krall, L.P. and Beaser, R.S. Joslin Diabetes Manual. Philadelphia:
Lea and Febiger (1989), 261-263.
5
ABOUT ALTERNATIVE SITE TESTING (AST)
Important: There are limitations for doing AST.
Please consult your healthcare professional before
you do AST.
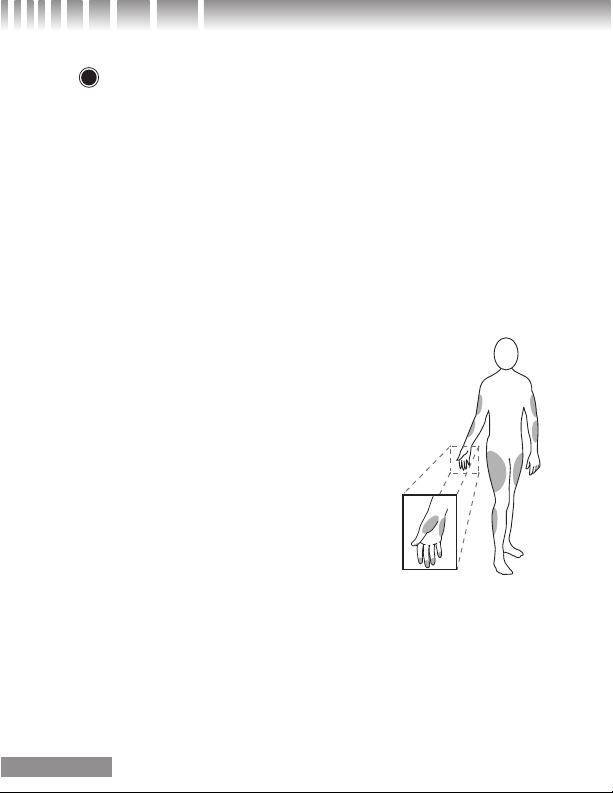
What is AST?
Alternative site testing (AST) means that people use
parts of the body other than fingertips to check their
blood glucose levels. This system provides you to test
on the pam, the forearm, the upper arm, the calf, or the l
thigh with the equivalent results to fingertip testing.
What’s the advantage?
Fingertips feel pain more readily
because they are full of nerve
endings (receptors). At other
body sites, since nerve endings
were not so condensed, you will
not feel as much pain as at the
fingertip.
When to use AST?
Food, medication, illness, stress and exercise can affect
blood glucose levels. Capillary blood at fingertip reflects
these changes faster than capillary blood at other sites.
Therefore when testing blood glucose during or immediately after meal, physical exercise, or any other events,
take blood samples from your finger only.
6

We strongly recommend you do AST ONLY in the fol -
lowing intervals:
In a pre-meal or fasting state (more than 2 hours since
the last meal).
Two hours or more after taking insulin.
Two hours or more after exercise.
Do NOT use AST if:
You think your blood glucose is low.
If you are awareness of being hypoglycemia.
Your AST results do not match the way you feel.
You are testing for hyperglycemia.
Your routine glucose results are often fluctuating.
If you are pregnant.
How to increase the accuracy?
Stimulating blood perfusion by rubbing the puncture site
prior to blood extraction has a significant influence on
the glucose value obtained. Blood from the site without
rubbing exhibits a measurably different glucose concen tration than blood from the finger. When the puncture
site was rubbed prior to blood extraction, the difference
was significantly reduced.
If you would like to obtain blood from sites other than the
finger, replace the lancet device cap with the clear cap. The
clear cap for AST is an optional accessory, please contact
your local customer service.
NOTE: We suggest that before getting a drop of blood rub
the pucture site about 20 seconds before penetration.
7

INTRODUCTION OF THE SYSTEM
Intended Use
The system is intended for use outside the body (in
vitro diagnostic use). It should be used only for testing
glucose (sugar) and only with fresh capillary whole
blood samples. The system is intended for use in the
home and in clinical settings. It should not be used for
the diagnosis of diabetes or for the testing of newborns.
Principle of Measurement
The test is based on the measurement of electrical
current generated by the reaction of glucose with the
reagent of the strip. The meter measures the current
and displays the corresponding blood glucose level.
The strength of the current produced by the reaction
depends on the amount of glucose in the blood sample.
8
Contents of the System
The system should be used with three main products:
the blood glucose meter, test strips, and a control
solution. These products have been designed, tested,
and proven to work together as a system to produce
accurate blood glucose test results. Use only the Advocate
test strips and Advocate control solution with your
Advocate TD-4223 A/B Monitor.
TM
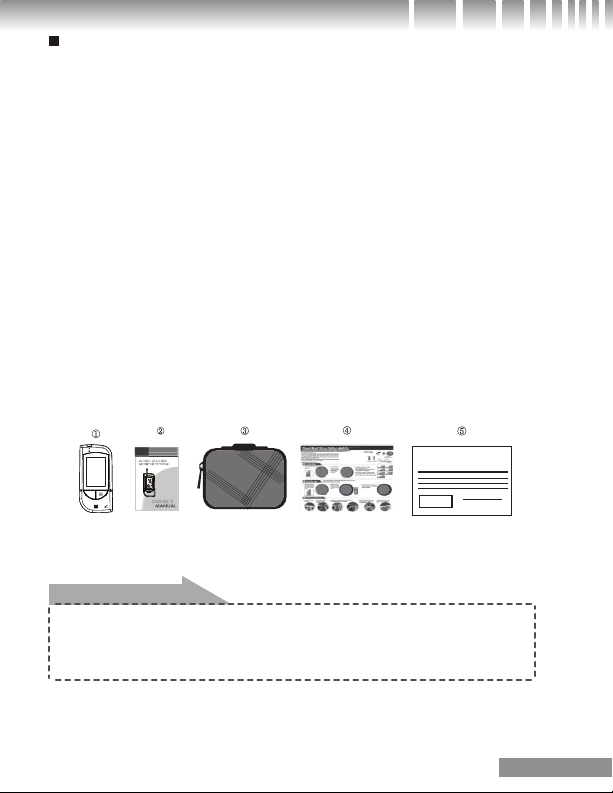
Your system includes:
1. A Meter
2. Owner’s manual
3. Sporty carrying case
4. Quick reference guide
5. Warranty Card
TM
TM
TD-4223
TD-4
CODE
CODE
PLEASE NOTE
Check your system to be sure that it is unopened prior to use and
that it contains all parts listed above. If either of these conditions
occurred, please return your system to the place of purchase.
Advocate Glucose Meter
W
ARRANTY CARD
9
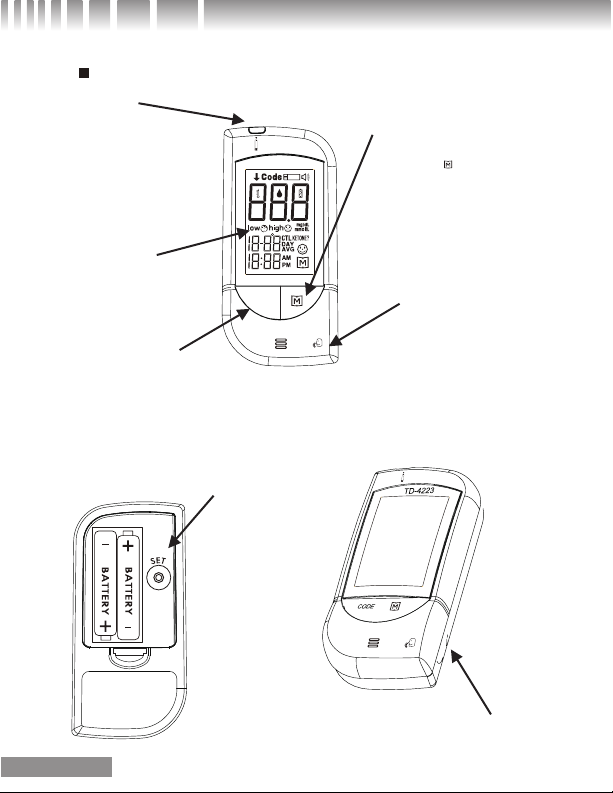
Appearance and Key Function of the Meter
TEST SLOT
Is where you insert the
test strip. The meter will
turn on automatically
after insertion.
LCD DISPLAY
Guides you though the
test using symbols and
simple messages.
CODE BUTTOM
Located in front of the
meter, is for code selection.
TD-4223
CODE
SET BUTTON
(in the back)
located in the
battery compartmen, is used
to set up the
meter.
MAIN BUTTOM
Located in front of the
meter with “ ” on it, is
used to turn on the meter,
enter the memory mode
and control steps of
setting.
m
TALKING SYMBOL
Indicate that the meter
contains speaking
function.
10
DATA PORT
Located at the side, is for
cable connection.
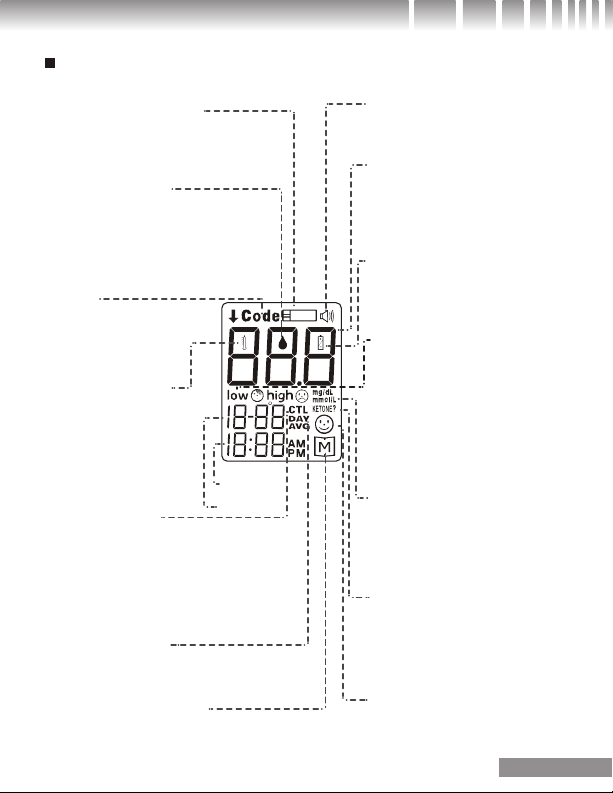
Meter Display Segments
TEST STRIP SYMBOL
Appears when the meter
is turned on.
BLOOD DRO P
SYMBOL
Flashes when it is
ready to apply the
sample.
CODE
Appears with the
code number cur rently in use.
TEMPERATURE
SYMBOL
Appears when ambi ent temperature is
outside operating
temperature .
CTL SYMBOL
Appears when doing a
control test and indicates
that the result will not be
stored in the memory .
DAY AVERAGE
Indicates that the displayed
test result is an average .
MEMOR Y SYMBOL
Appears when you review the
memor y.
TIME
DATE
VOICE SYMBOL
Indicates speaking
function is on/o ff.
TEST RESU LT AREA
Displays glucose results.
A decimal point appears
when the measurement
unit is mmol/L .
LOW BA TTER Y
SYMBOL
Appears when the bat-
tery power is lo w.
FACE SYMBOL
LOW/HIGH SYM BOL
Both are result indicators. They appear
together with the test
result which exceeds
the reference range .
MEASUREMENT
UNI T
Appears with the test
result either in mmol/L
or in mg/dL.
KET ONE W ARNING
Appears when the
test result is equal or
higher than 240mg/dL
(13.3mmol/ L).
SMILE SYMBOL
Appears when the test
result is within reference range.
11

Speaking Function
When a talking symbol
is on the meter, it means that the meter
provides speaking function. It “speaks” step by step and leads you
through a blood glucose test. The following table tells you when and
what the meter “speaks”. Those messages can also be found in the
end section of this manual “SUMMARY OF OPERATION”.
WHEN
does the meter speak?
When meter is turned on
When room temperature
is detected.
When room temperature is
outside operating range.
After inserting test strip and
completing code selection.
When the meter is ready to
test. ( “ ” symbol appears on
display)
When the test is completed.
(The result appears on display)
When the test result is outside
measurement range, which is
20-600 mg/dL.
When turn off the meter.
12
WHAT
does the meter speak?
A welcome music plays.
Thank you for using this
product. Please relax during
measurement .
The room temperature is
(number) degree Celsius/
Fahrenheit.
Room temperature out of
range, unable to measure.
The code number is (number)
Please apply blood into the
strip.
The blood glucose is (number)
Milligram Per Deciliter/
Millimole Per Liter.
The blood glucose out of range,
unable to measure.
An ending music plays.
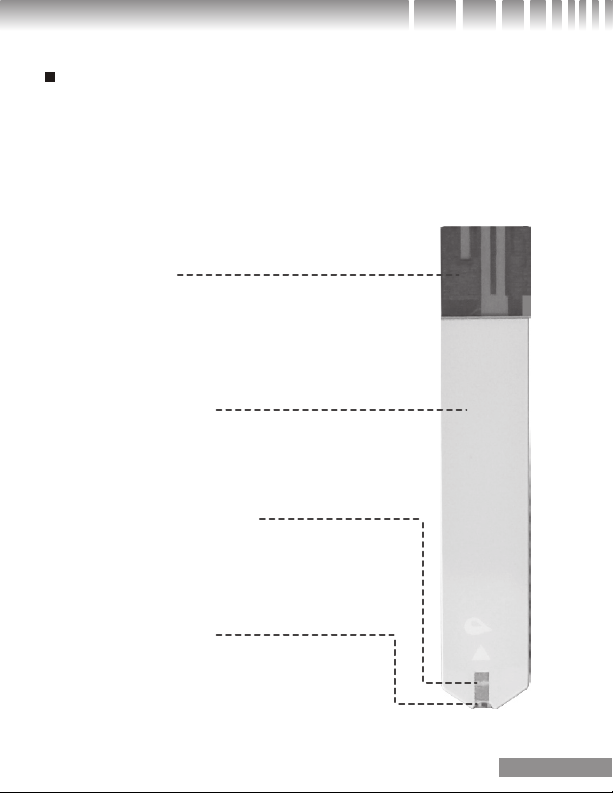
Appearance of the Test Strip
Your system measures the amount of sugar (glucose) in
whole blood. Blood is applied to the absorbent hole of
the test strip and is automatically drawn into the reaction
cell where the reaction takes place.
The test strip consists of the following
parts:
Contact Bars
Insert this end of the test strip into the
meter.
Push it in firmly until it will go no further.
Test Strip Handle
Hold this part to insert the test strip into the
slot.
Confirmation Window
This is where you confirm if enough blood
has been applied to the absorbent hole of
the strip.
Absorbent Hole
Apply a drop of blood here,
The blood will be sucked in automatically.
Please see pages 29-35, “Testing Your Blood”, for complete instructions.
13
PREPARATION BEFORE USE
Battery Replacement
Your meter comes with two 1.5V AAA size alkaline
batteries.
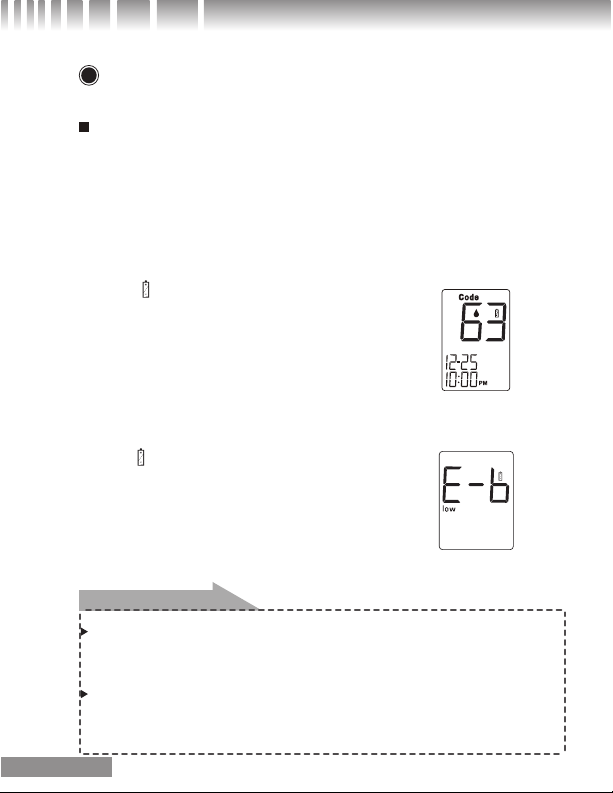
The meter will alert you when the power is getting low
by displaying two different messages:
1. The
symbol appears together
with other display messages: the
meter is functional and the result
remains accurate, but it is time
to change the batteries.
2. The symbol appears with the E-b
symbol and “low”: the batteries
can not provide enough power to
do a test. You must change the
batteries immediately.
PLEASE NOTE
Replacing the batteries does not affect the meter’s memory (previ -
ous test results stored in memory). However, the time and date
settings may need to be updated.
Batteries might leak chemicals if not used for a long time. Remove
the battery if you are not going to use the device for an extended
period (i.e., months or more)
14
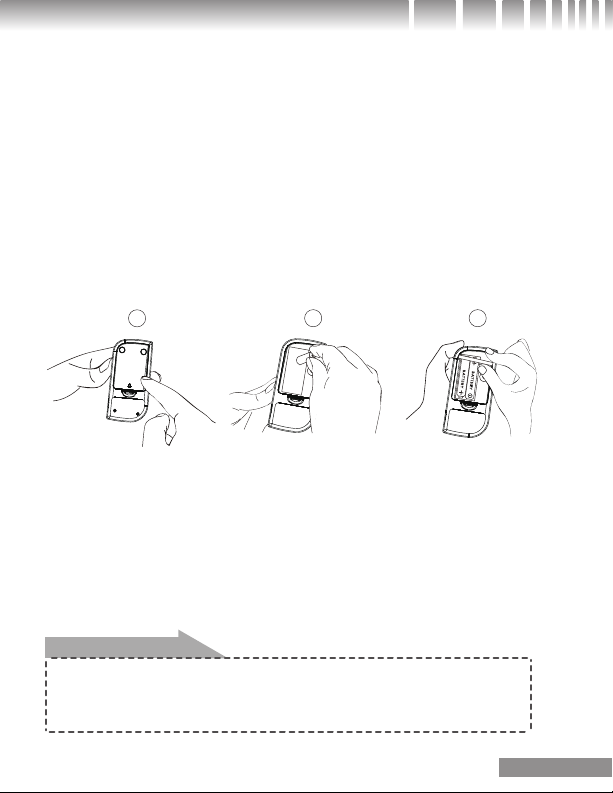
To replace the batteries, make sure that the meter is
turned off.
1. Press the edge of the battery cover and lift it up to
remove.
2. Remove the old batteries and replace with two
1.5V AAA size alkaline batteries. Make sure that the
positive “+” side is facing up.
3. Close the battery cover. If the batteries are inserted
correctly, you will hear a "beep".
1
WARNING
As with all small batteries, the batteries should be kept away from
small children who still put things in their mouths. If they are swal -
lowed, promptly see a doctor for help.
2
3
15

Setting the Meter and Deleting the Memory
Your meter comes with the time, date, unit of measurement
and unit of temperature preset. However if you replace
the batteries, you may need to reset the setting of the
meter.
Start with the meter off. Then
press the Set button located
in the battery compartment.
The meter is now in the
setting mode. You can start
setting up the meter.
STEP 1. Set the Year
The year will appear first, with
the year setting flashing. Press
and release the button to
advance one year. To move
faster, keep pressing the
button until the desired number
appears. With the correct year
on the display, press the Set
button and then the month
segment flashes.
16
 Loading...