

Page 1
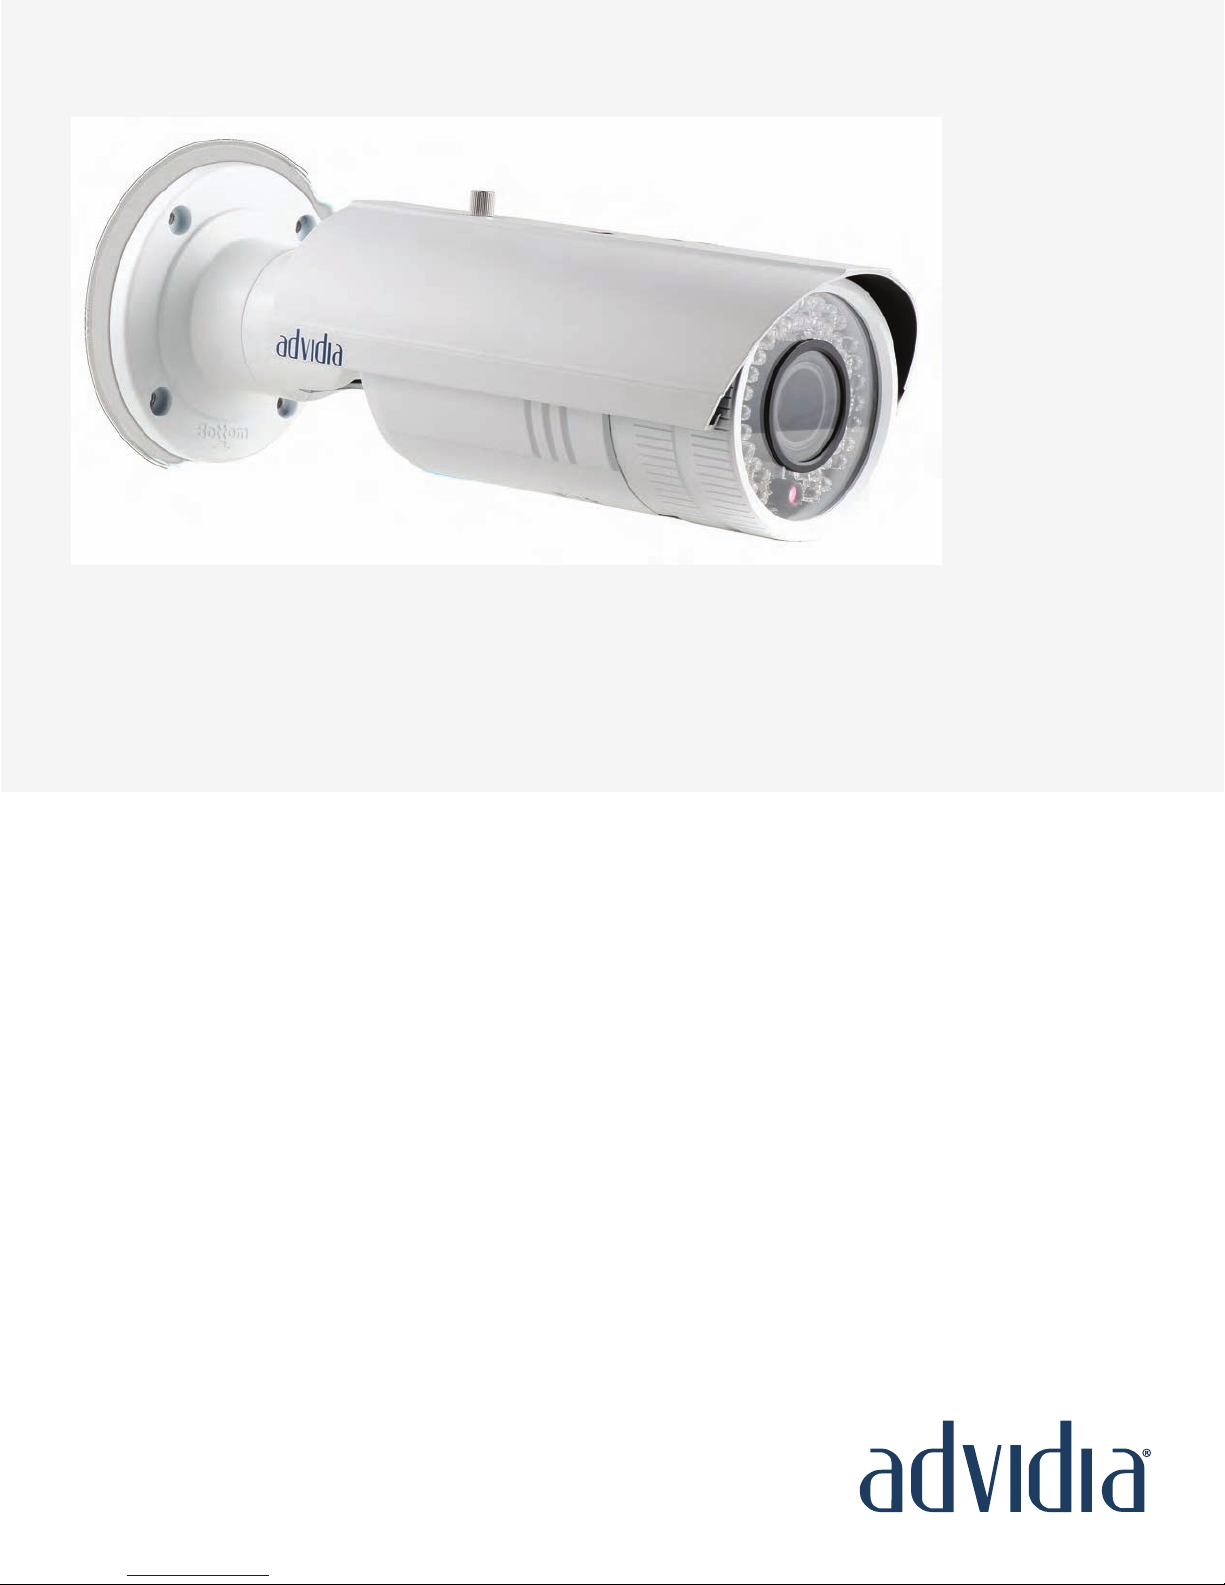
A-45 Quick Setup Guide
www.advidia.com
Page 2

A-45 Bullet Camera
Table of Contents
A. Physical Camera Description ................................................................................................... 3
B. Installation .............................................................................................................................. 5
C. Search and Modify IP ............................................................................................................ 8
D. Preview via Web Browser ......................................................................................................11
E. Web Interface Configuration ...................................................................................................14
Channel Parameters > DisplaySetting ....................................................................................14
Channel Parameters > Video Settings ....................................................................................15
Channel Parameters > Motion Detection Setting .....................................................................16
Channel Parameters > Text Overlay Setting ..............................................................................16
Channel Parameters > Front Para Config .................................................................................17
Network Parameters > Network Setting ....................................................................................17
Network Parameters > NTP Setting ..........................................................................................18
Network Parameters > E-mail Setting .......................................................................................18
Alarm Parameters > Alarm Input Setting .................................................................................19
Alarm Parameters > Alarm Output Setting ..............................................................................19
Alarm Deployment Time .........................................................................................................19
User Management ...............................................................................................................20
Add User .................................................................................................................................20
Modify User ..............................................................................................................................20
F. Adding Camera to Monitor Station ..........................................................................................21
Page 2Page 2
Page 3
A-45 Bullet Camera
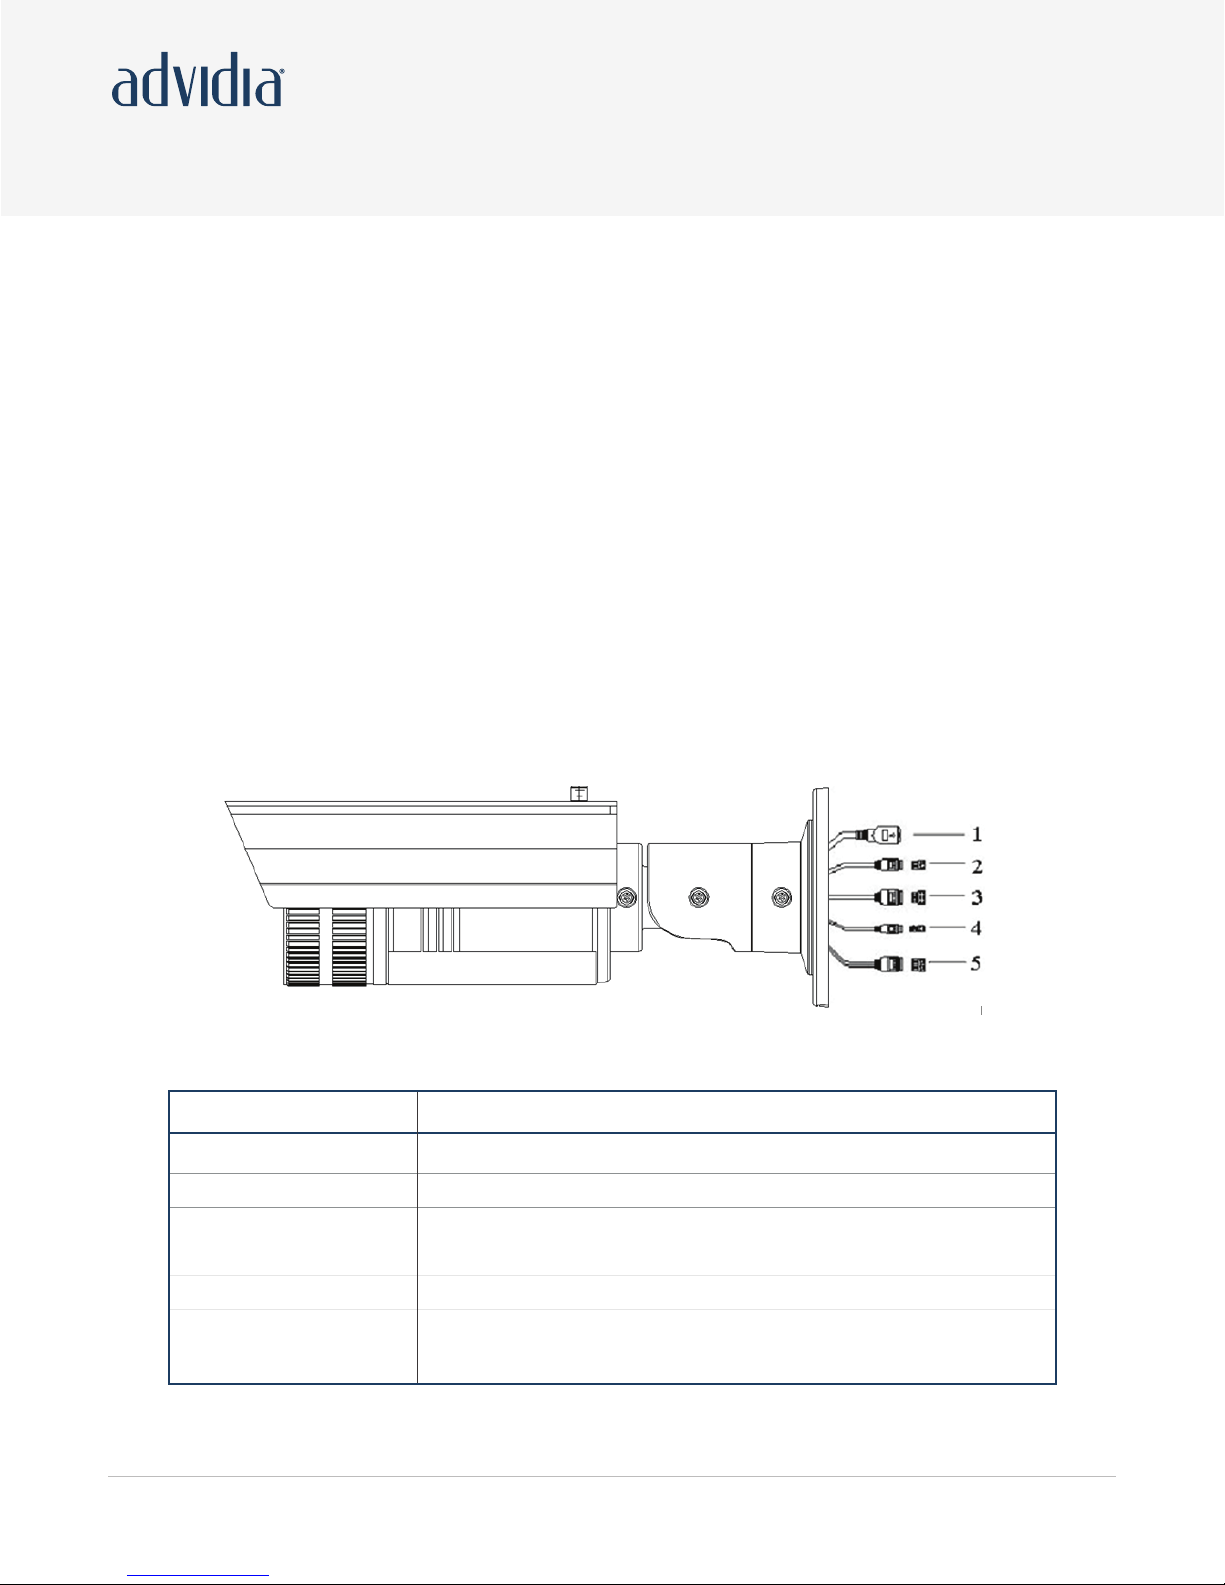
A. Physical Camera Description
Note: There are two types of these cameras’ interface as shown in figure 1.1 and figure 1.2. Please
choose the right figure as your camera’s reference.
Serial NO. Description
1 10M/100M self-adaptive Ethernet interface
2 Power supply
3
4 D+, D-: RS-485 interface
5
IN, G: Alarm input interface
1A, 1B: Alarm output interface
AUDIO IN, G: Audio input interface
AUDIO OUT, G: Audio output interface
Page 3
Page 4

A-45 Bullet Camera
Figure 1.3
Page 4
Page 5

A-45 Bullet Camera
B. Installation
√ Please check if all the items on the package list have been included with your camera.
√ Read the following contents carefully before the installation.
√ Make sure that all the related equipment is power-off during the installation.
√ Check the power supply to prevent any damage caused by mismatching problems.
√ Do not place the camera in extremely hot or damp environment. To avoid heat accumulation, good
ventilation is required for a proper operating environment.
√ If the product does not operate properly, please contact your dealer or the nearest service center.
Never attempt to disassemble the camera yourself. Users are responsible for any problem caused
by modification or repairing without authorization.
Bullet camera can be fixed in both wall and ceiling, customers can choose different ways to install the
camera according to their specific needs. The following section introduces the wall mounting, and the
ceiling mounting methods:
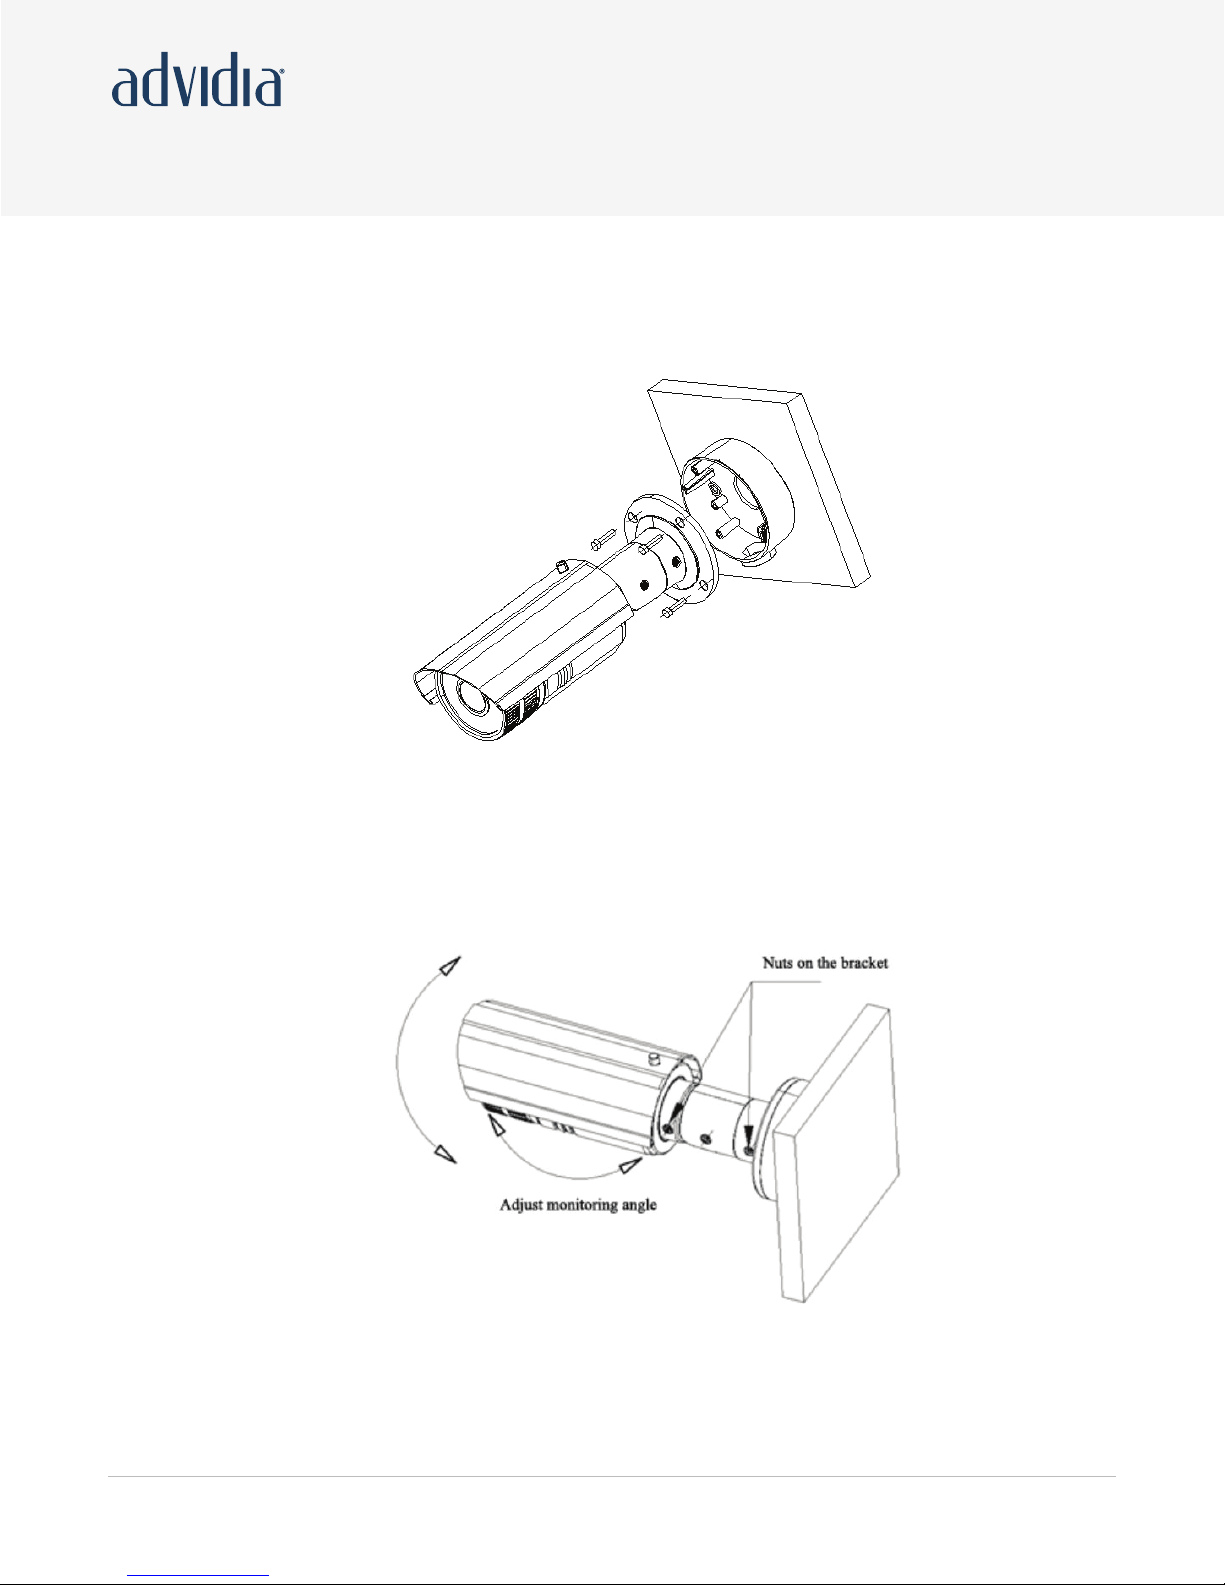
Step 1: Fix the camera wire hidden
box to the wall.
Figure 2.1 Fix camera wire hidden box
If it is cement wall, you need to fix the expand bolt (note: the mounting hole of the expand bolt should
align with the wire hidden box) before fixing wire hidden box as shown in Figure 2.1. If the wall
surface is wooden, you can use the self-tapping screw to fix the wire hidden box directly. Please note
that the wall on which the camera is fixed should be able to bear at least three times the weight of the
bracket and the camera.
Page 5
Page 6
A-45 Bullet Camera
Step 2: Use screws to fix the mounting bracket with camera main body to wire hidden box as shown
in Figure 2.2.
Step 3: Adjust the camera to the desired monitoring location and finally tighten the nuts on bracket to
fix the camera.
Page 6
Page 7
A-45 Bullet Camera
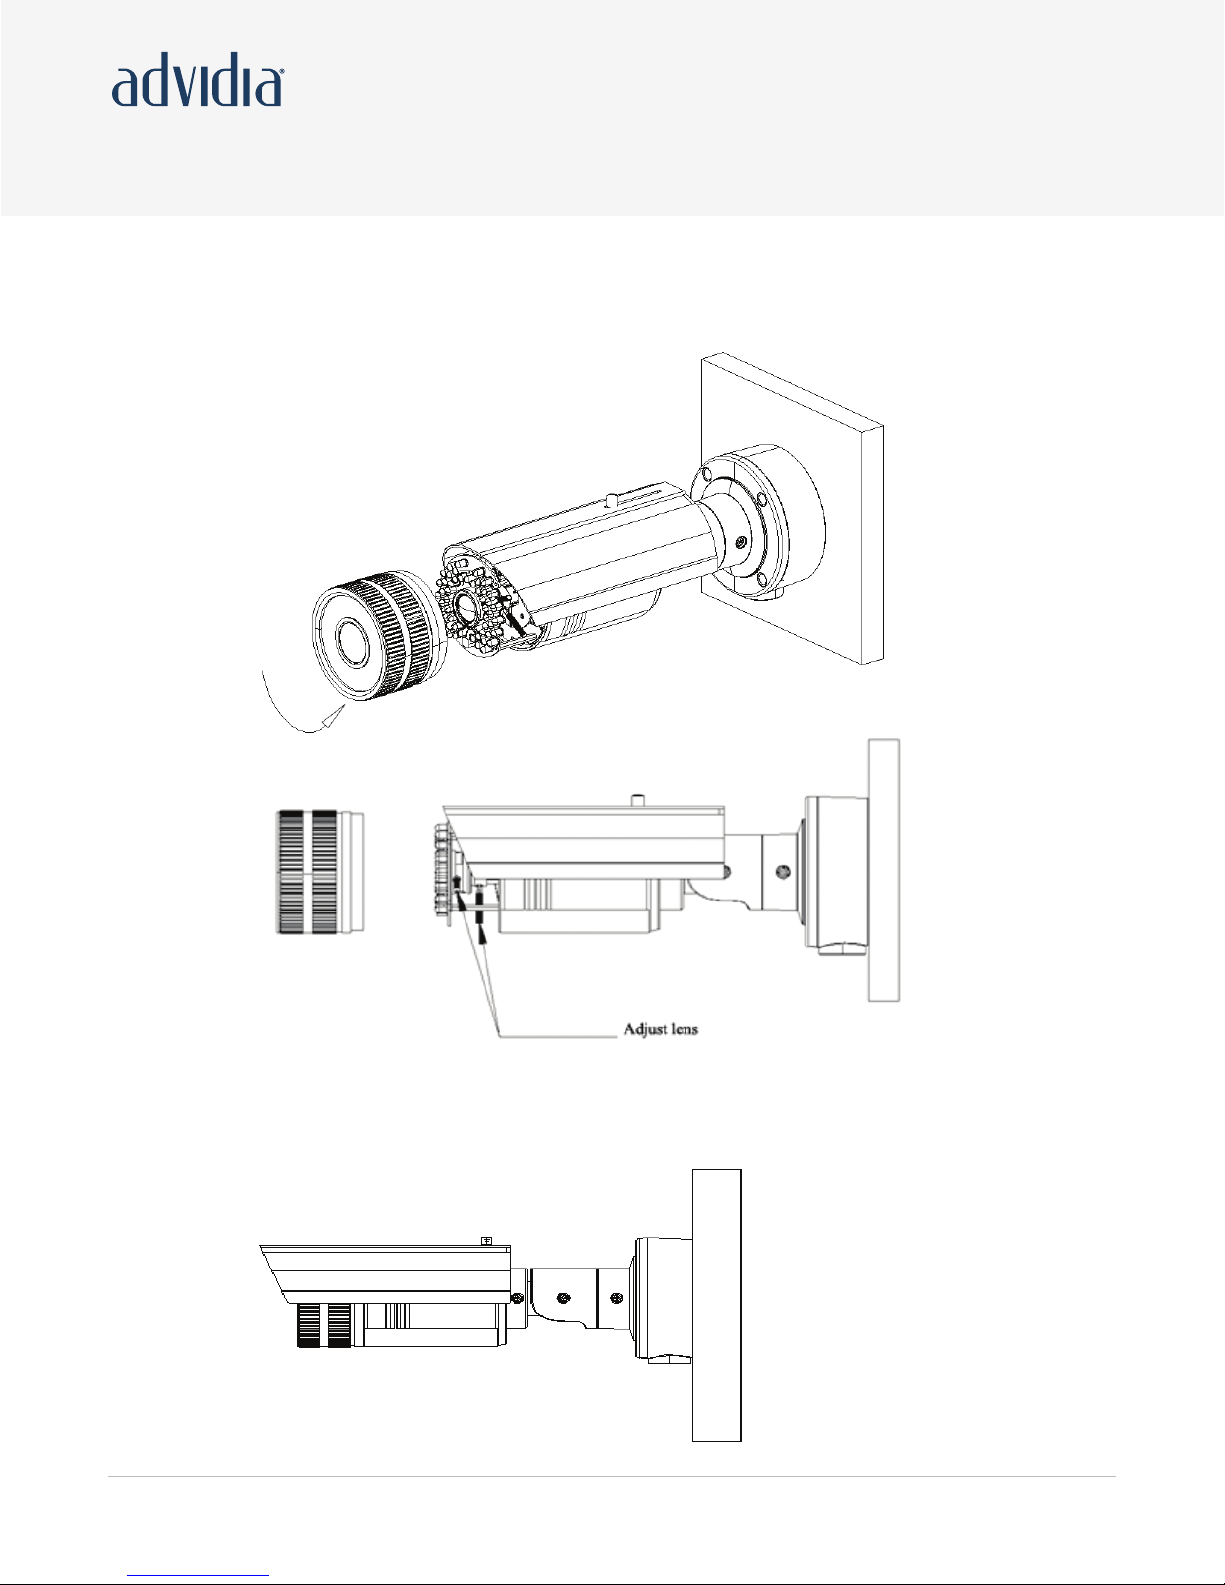
Step 4: Twist-off front cover from the camera, and then adjust the lens as shown in Figure 2.4 and
Figure 2.5.
Figure 2.4
Figure 2.5 Adjust lens
Step 5: fix the lens and front cover as shown in Figure 2.6.
Figure 2.6.
Page 7
Page 8

A-45 Bullet Camera
C. Search and Modify IP
SADP (Search Active Devices Protocol) software can automatically search the IP address of network
cameras in the same local area network (LAN) with connection diagram as following:
Page 8
Page 9

A-45 Bullet Camera
The operation of searching and modifying IP address
is described as following:
1. Install the SADP software, and then run the “sadpdlg.exe”.
2. Search IP address
Page 9
Page 10

A-45 Bullet Camera
3. Modify IP address.
Page 10
Page 11

A-45 Bullet Camera
D. Preview via Web Browser
Note: The default IP of network cameras is ‘192.0.0.64’ with ‘admin’ as the administrator, ‘12345’ as
the password, and ‘8000’ as the default port.
For monitoring camera images, a computer running the Microsoft Windows Operating System and
Internet Explorer (Version 6.0 or later) are required. In this manual, we take Windows XP and IE 6.0
for example.
Page 11
Page 12

A-45 Bullet Camera
1. Open the IE browser, set the security level to [Medium] in [Tools/InternetOptions/Security/Custom
Level…]
2. Input the IP address of the camera and press [Enter], and then click the dialog box that pops up.
Page 12
Page 13
A-45 Bullet Camera
3. Click [Run] to install the ActiveX control.
4. Input “Username” (Default: admin), “Password” (Default: 12345) and “Port” (Default: 8000) of the
camera, then click [Login]
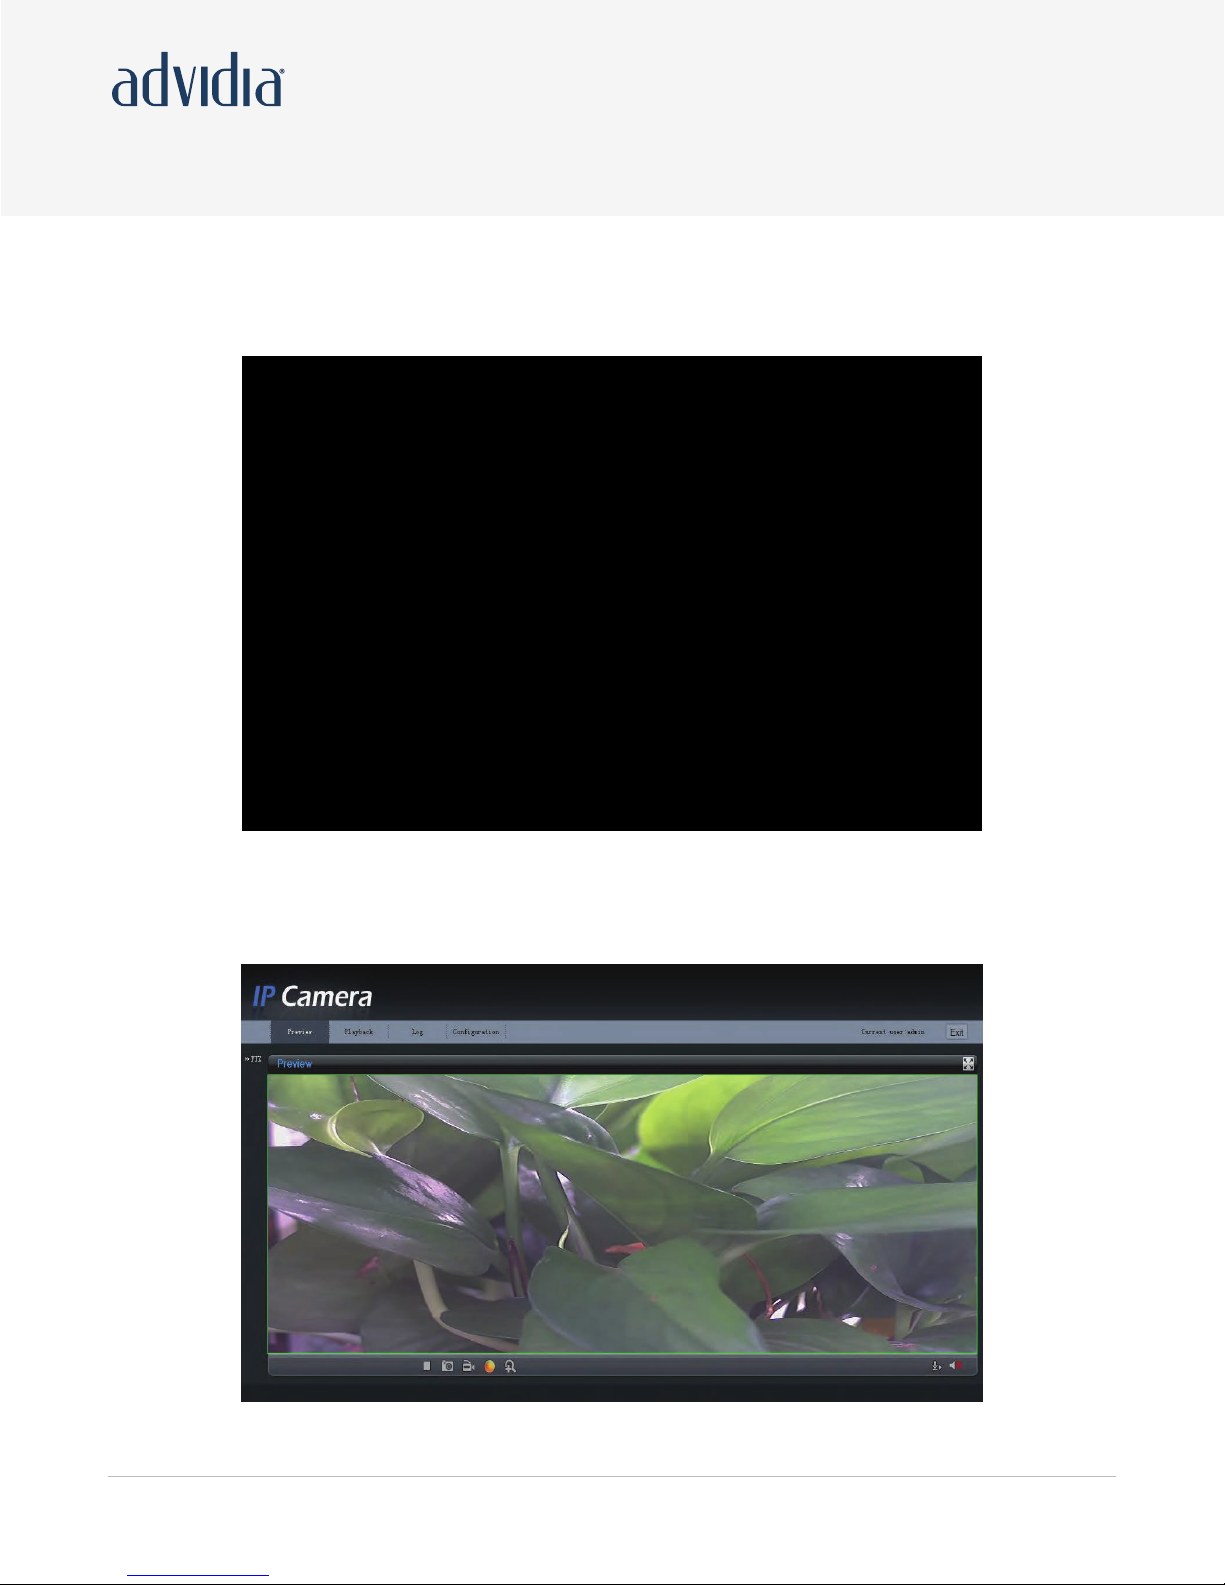
5. View the image
Page 13
Page 14

A-45 Bullet Camera
E. Web Interface Configuration
Channel Parameters > Display Setting
According to different requirements, enable the display of Date&Time and Week by clicking
the checkbox.
Different date formats can be selected.
There are two Time format: 24 hour and 12 hour.
The OSD Status can be set to transparent & flickering, transparent & un-flickering, nontransparent &
flickering, or nontransparent & un-flickering.
Page 14
Page 15

A-45 Bullet Camera
Channel Parameters > Video Settings
Parameter Description
Channel Name Input the channel name for your need
Encode Parameters Main stream or Sub stream optional
Stream Type Video & Audio or Video optional
Resolution Select the resolution for your need
Image Quality Highest, Higher, Medium, Low, Lower or Lowest optional
Image Quality Constant bitrate or Variable bitrate optional
Max. Bitrate Select or customize a bitrate according to the resolution
Frame Rate
Multicast Address
RTSP Port
Select the frame rate for your need
Set the multicast address, with the default multicast of 0.0.0.0
Set the RTSP port, with the default RTSP port of 554
Page 15
Page 16

A-45 Bullet Camera
Video Encode Type | Select the video encode type for your need
Channel Parameters >
Motion Detection Setting
Select the checkbox of Enable motion detection to
enable this function.
Zone Settings: Click Start draw button to draw
motion detection zone by clicking and dragging
the mouse in the live video image.
User is allowed to draw multiple motion detection
zones in the same picture. When all zones have
been set, click Stop draw to finish drawing.
Sensitivity: The sensitivity level can be set to 0, 1, 2, 3, 4 and 5. When it is set to 0,
the sensitivity is disabled.
Linkage: The Linkage method can be selected to either Email link, Trigger recording
or Trigger alarm output.
Click "Save" button to save
the modified parameters.
Channel Parameters >Text
Overlay Setting
Input the characters in the Text Information box
and define the OSD location in the image by setting
the XPosition and YPosition, and then select the
checkbox of OSD Text. After clicking Save to finish the settings, the defined title will be displayed
on the image.
Note: The values of XPosition and YPositon are relative to the upper left corner origin of the image.
Page 16
Page 17
A-45 Bullet Camera
Channel Parameters >
Front Para Config
In this page, user can adjust the parameters like
brightness, contrast, saturation, sharpness, etc.
Shutter: User can set the shutter time according
to the different camera models.
IrisMode: There are two modes: IrisFirst and
manual optional.
Power Mode: There are two modes: 50Hz and
60Hz optional.
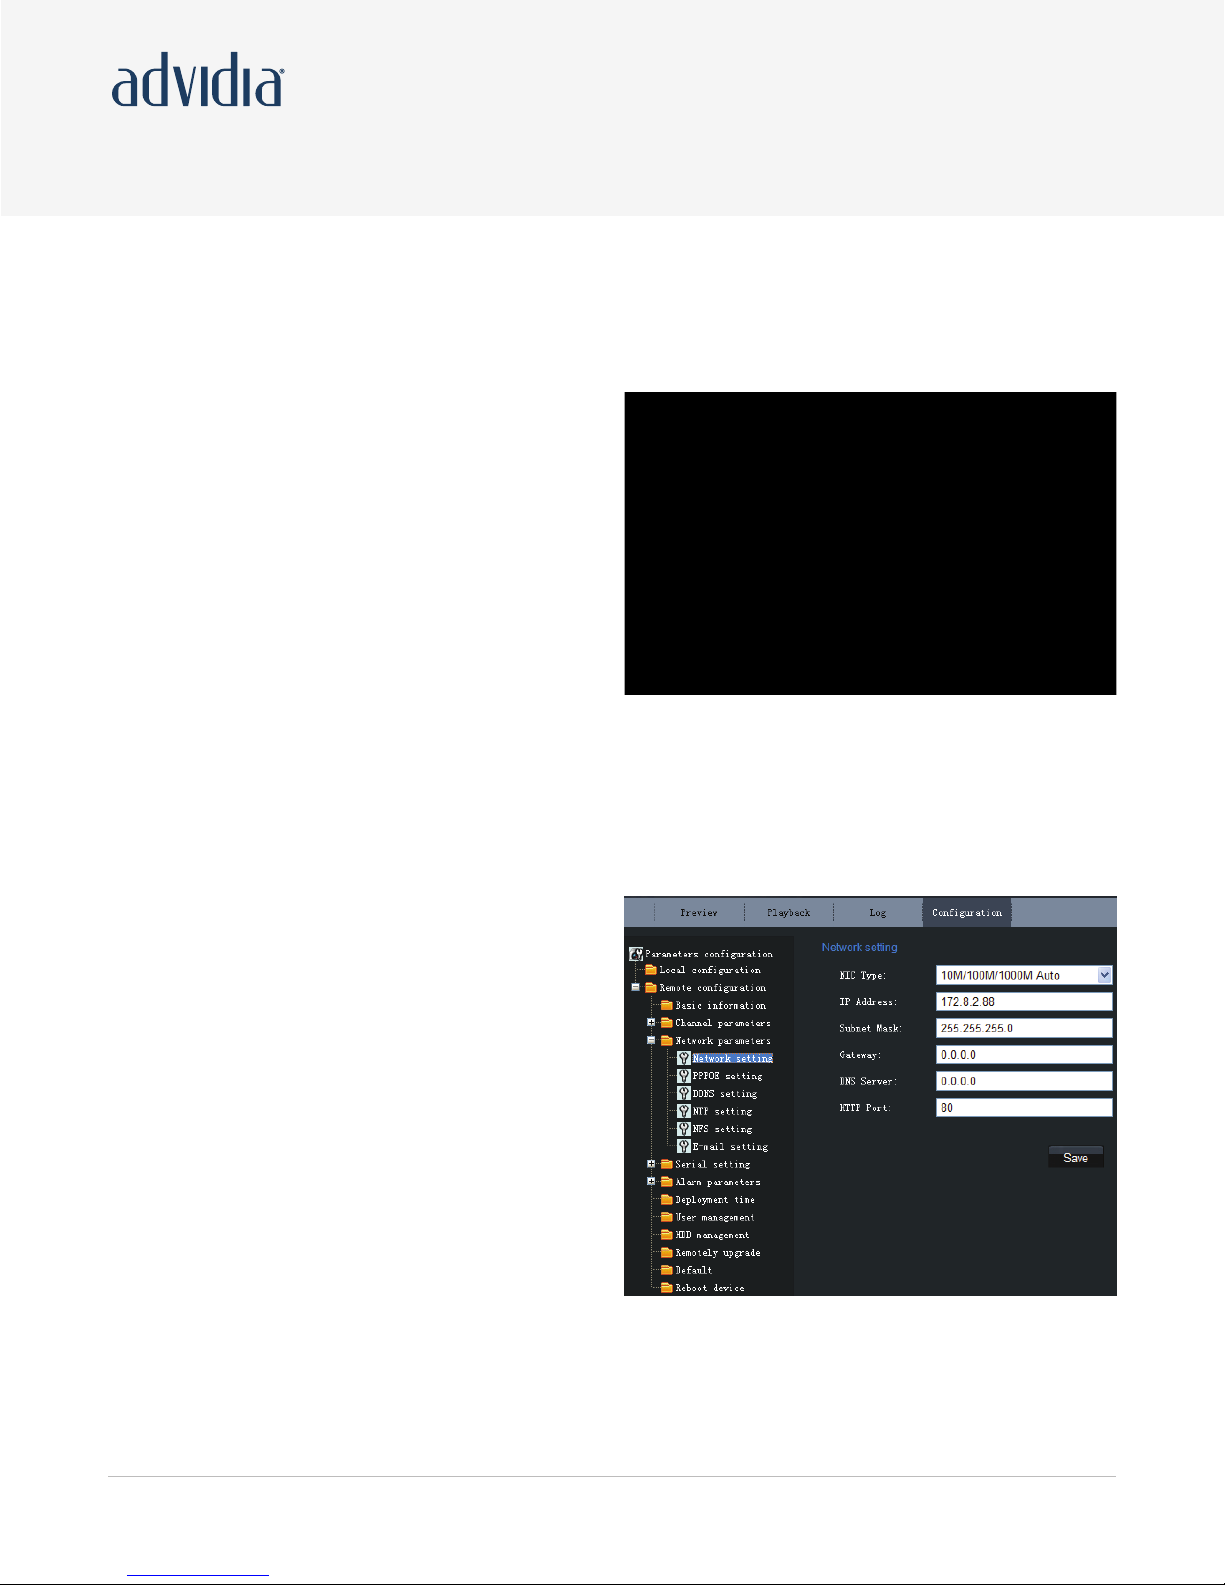
Network Parameters >
Network Setting
Set the NIC Type, IP Address, Subnet Mask,
Gateway and DNS Server of the network camera.
Click "Save" button to save the modified
parameters.
Note: Please reboot the network camera to
validate the modified parameters.
Page 17
Page 18
A-45 Bullet Camera
Network Parameters > NTP Setting
Click the checkbox of Enable NTP to enable this
function. Input the Server Address and Port of
NTP.
If the public network is applied, please input the
NTP Server Address with provision of time sync
service, e.g., 210.72.145.44.
In the private network is applied, the NTP software
can be used to establish NTP server to achieve
time synchronization.
Click "Save" button to
Note: Please reboot the network camera to validate the modified parameters.
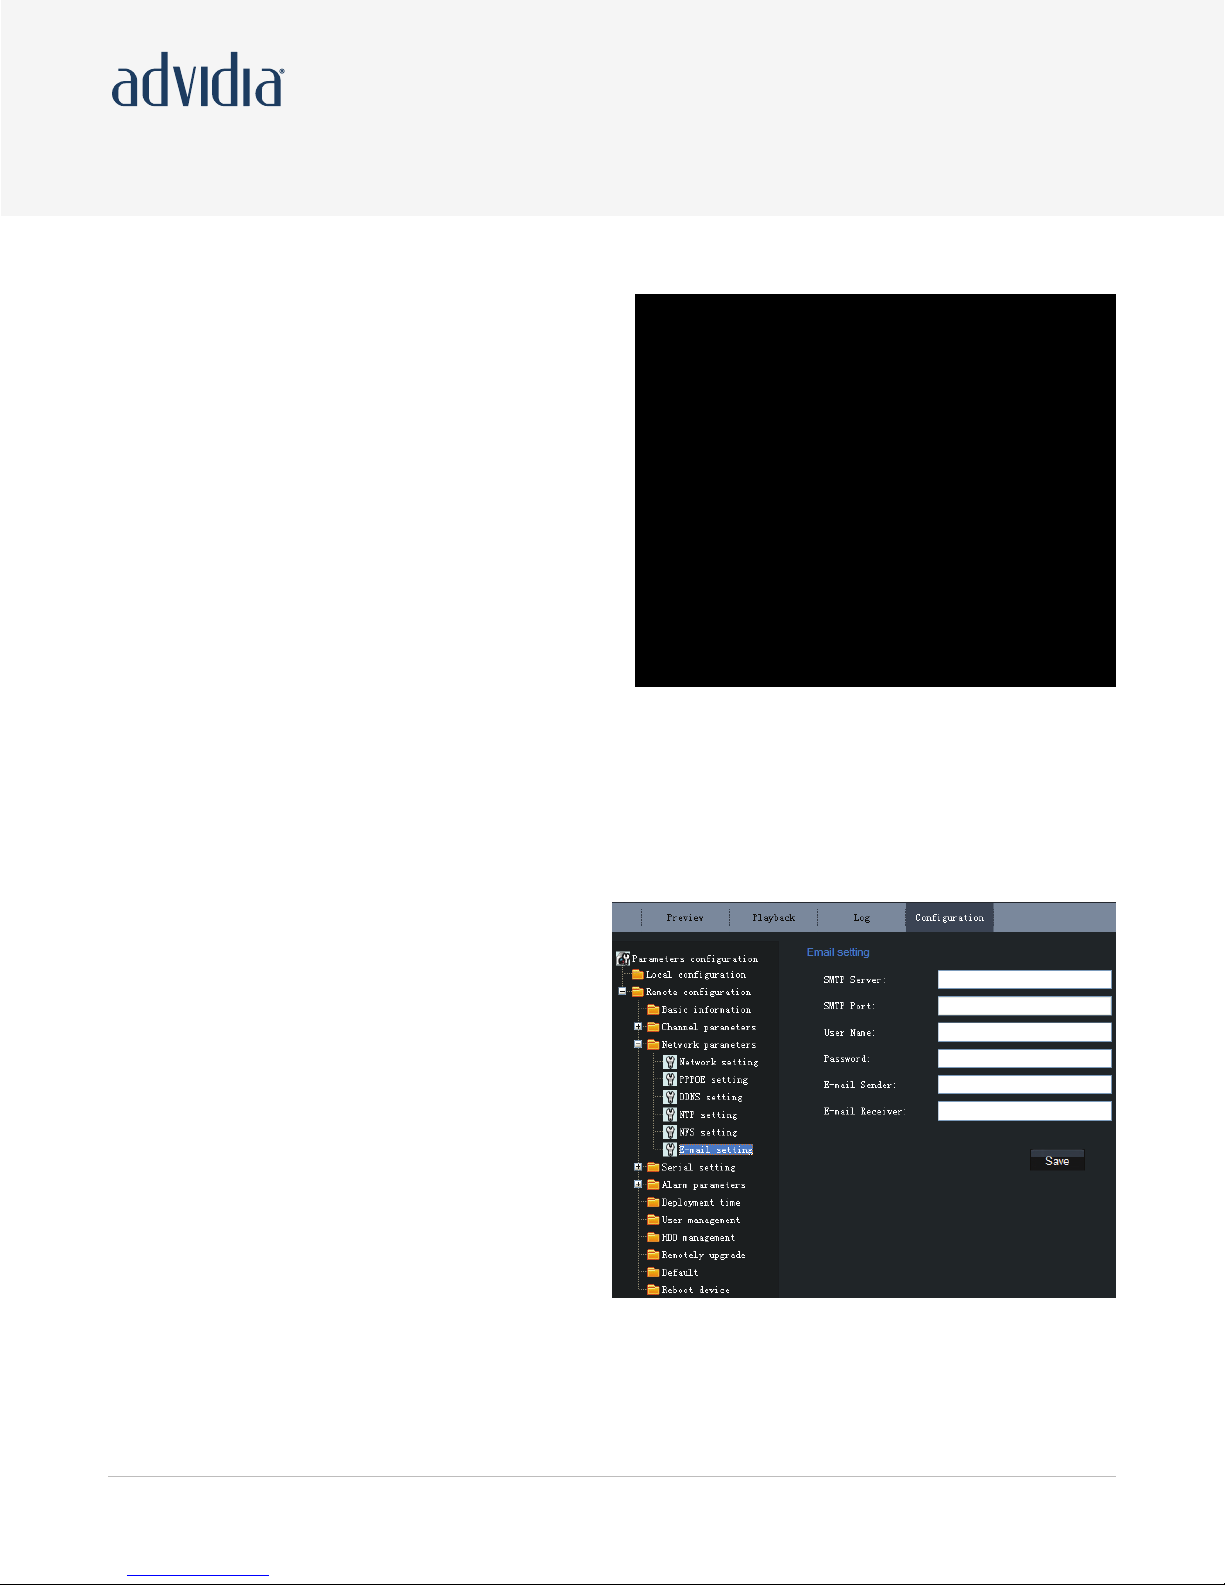
Network Parameters > E-mail Setting
Through E-mail settings, the alarm message can
be sent to the designated E-mail address when
alarm event occurs.
Input the SMTP server, SMTP port, user name,
password, E-mail sender and receiver.
Click "Save" button to save the modified
parameters.
Note: Please reboot the network camera to
validate the modified parameters.
Page 18
Page 19
A-45 Bullet Camera
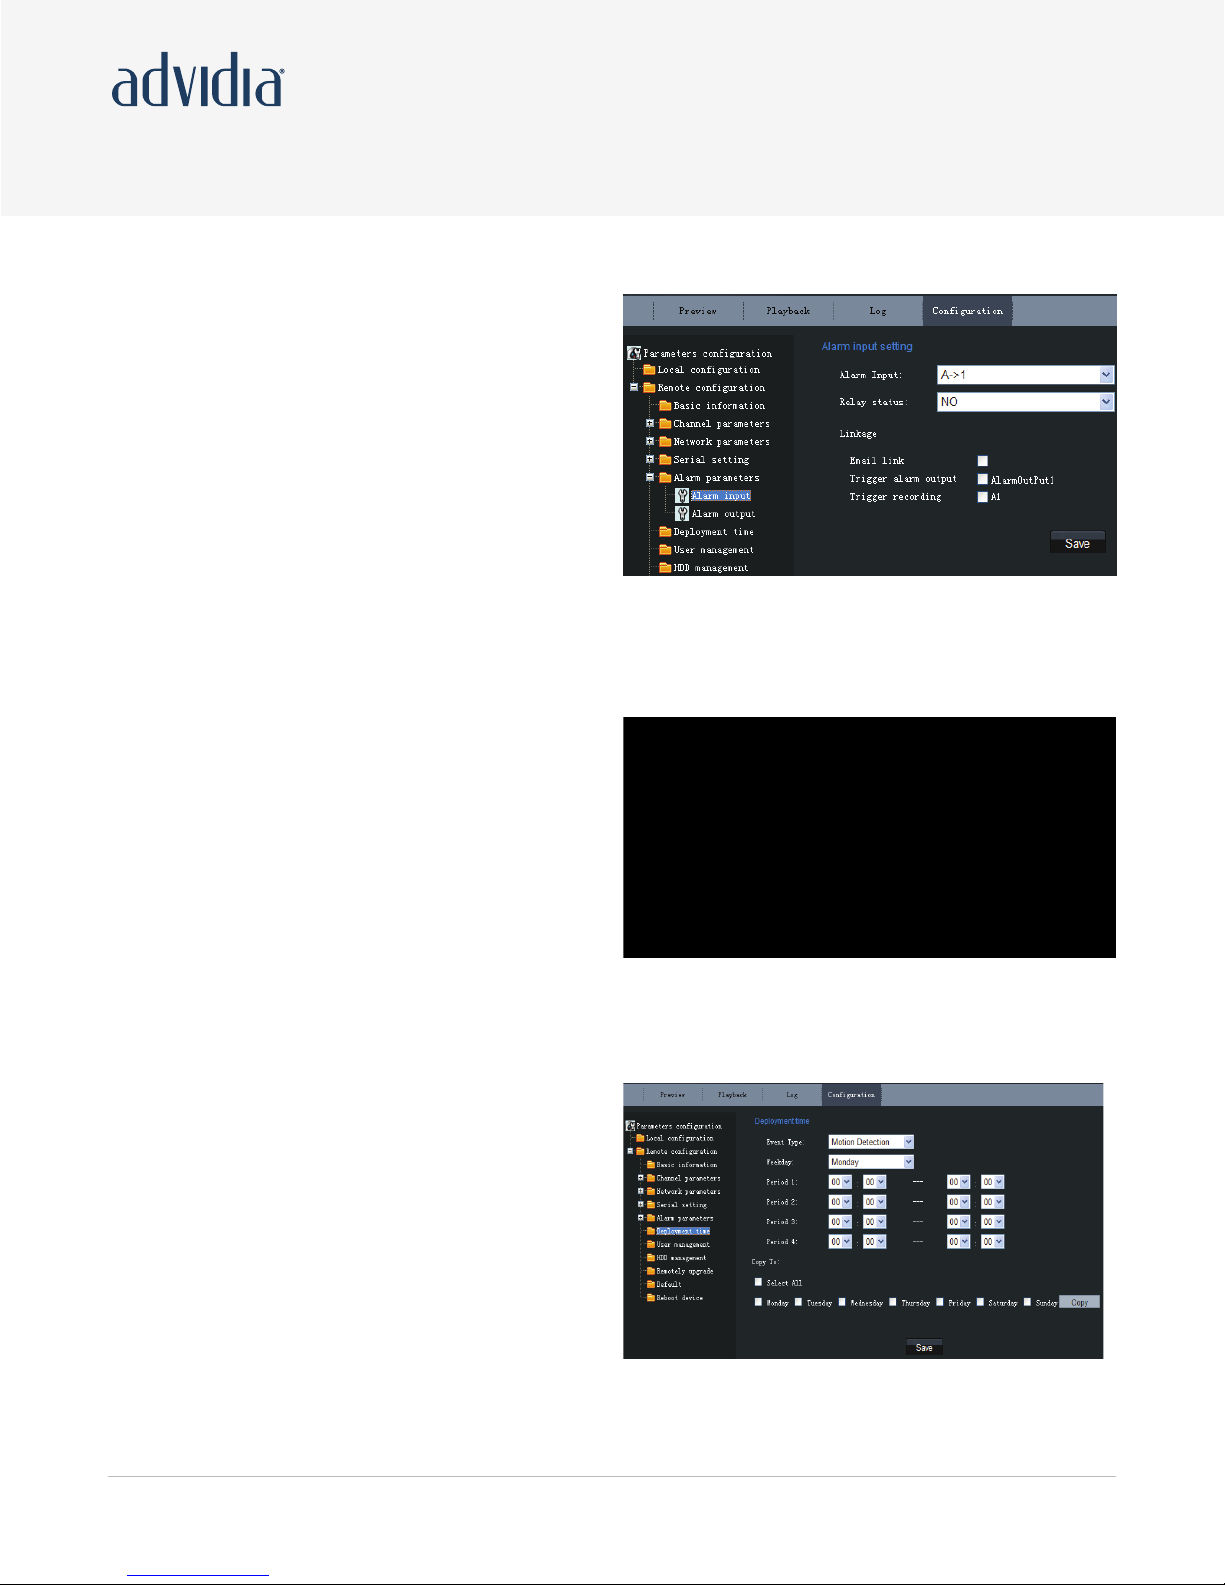
Alarm Parameters > Alarm Input
Setting
Set the type of Relay Status to NC or NO.
Note: Please reboot the network camera to
validate the modified parameters.
The Linkage can be selected to E-mail link,
Trigger alarm output or Trigger recording.
Click "Save" button to save the modified
parameters.
Alarm Parameters > Alarm Output
Setting
The Output Delay refers to the length of time
that the relay remains in effect after alarm occurs.
The output delay time can be set to 5sec, 10sec,
30sec, 1min, 2min, 5min, 10min or Manual
(manually disable).
Click "Save" button to save the modified
parameters.
Alarm Deployment Time
The Deployment time can be set to several days
a week or to all week, with only four period
configurable for each day.
Note: The alarm deployment time setting is valid
only when the camera has already been
configured with the motion detection, alarm input
and alarm output functions.
Click "Save" button to save the modified
parameters.
Page 19
Page 20
A-45 Bullet Camera
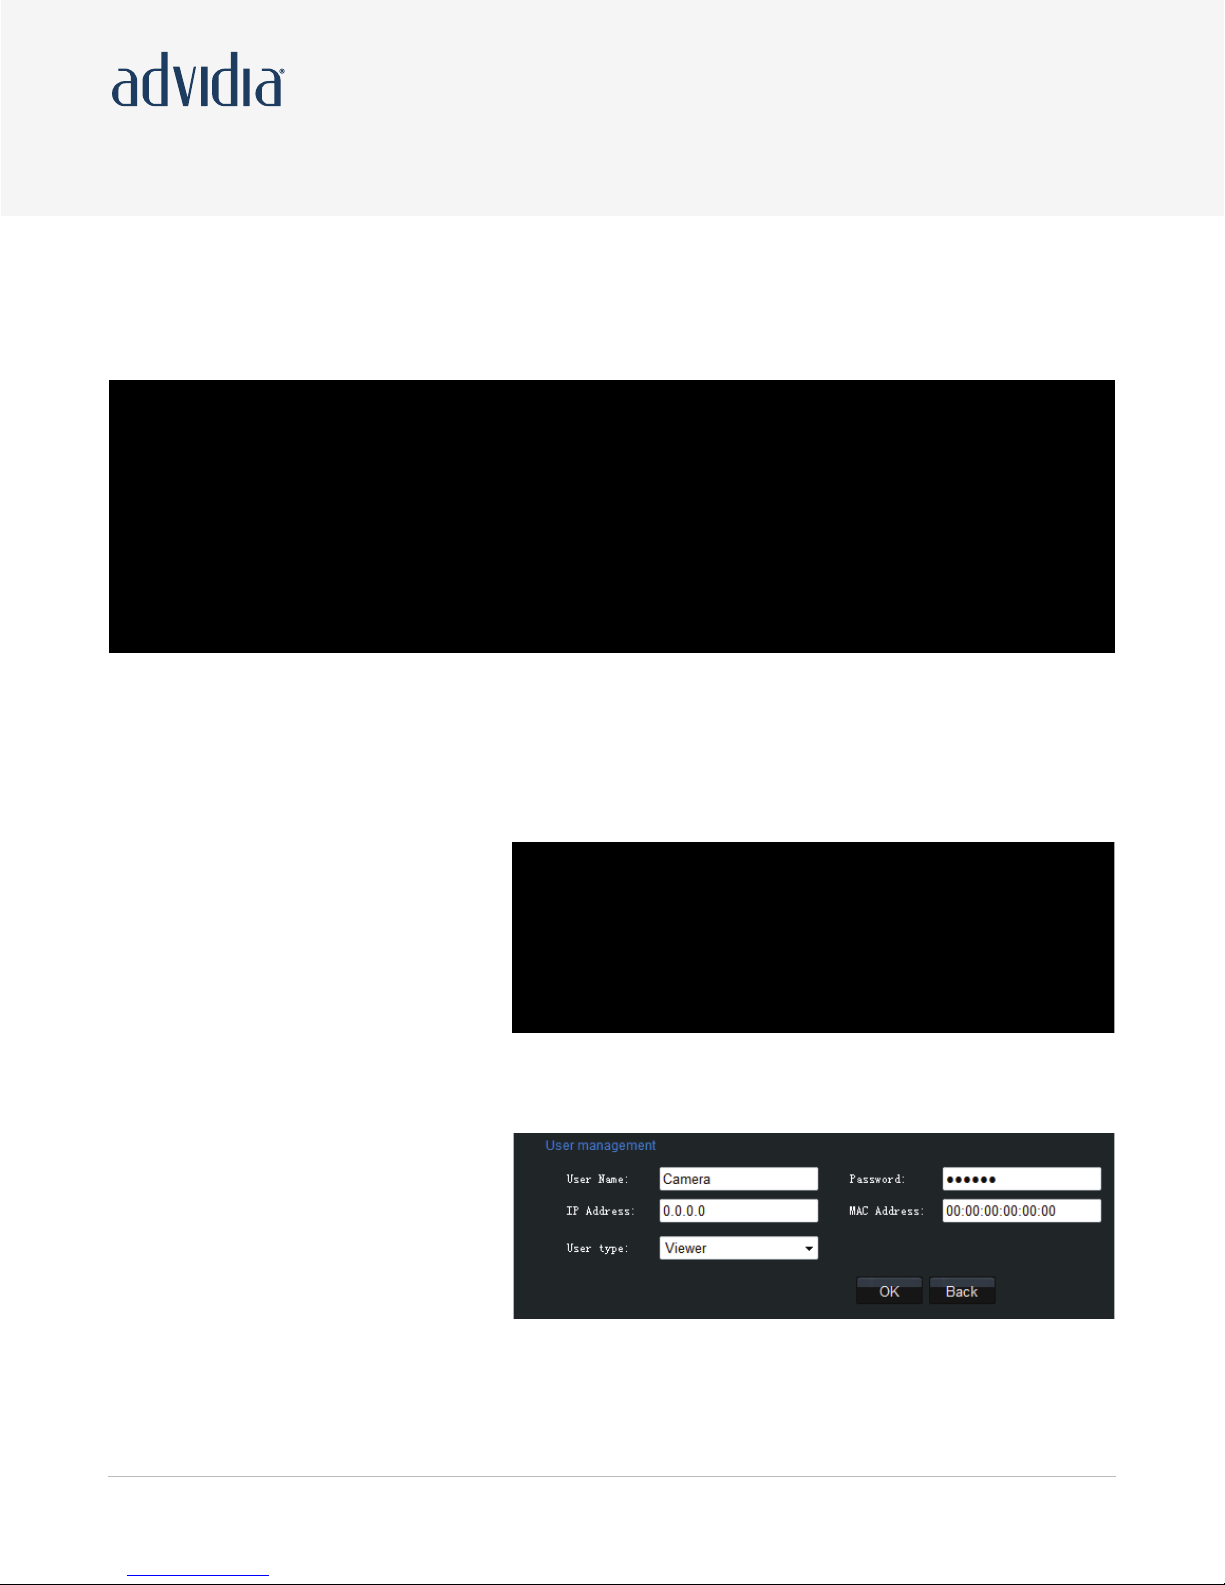
User Management
When the current login user is admin, it is allowed to create other users. Up to 15 users can be
created.
Add User
Click Add to enter the settings
interface as shown here.
Input the user name, password,
IP address, MAC address, and
then select user type. Finally,
click OK to finish the user addition.
Modify User
Click Modify to enter the settings
interface as shown here.
It is allowed to modify the
user name, password, IP address,
MAC address, and then select user
type. Finally, click OK to finish the user
modification.
Note: Only the password of the user admin can be modified.
Page 20
Page 21

A-45 Bullet Camera
F. Adding Camera to Monitor Station
Using Auto discovery, enter the
default credentials described
above and click Start.
Using Manual add on, choose to
add a camera and select the
following from the dropdown:
Page 21
 Loading...