

Page 1
For more information on this and other Advantech
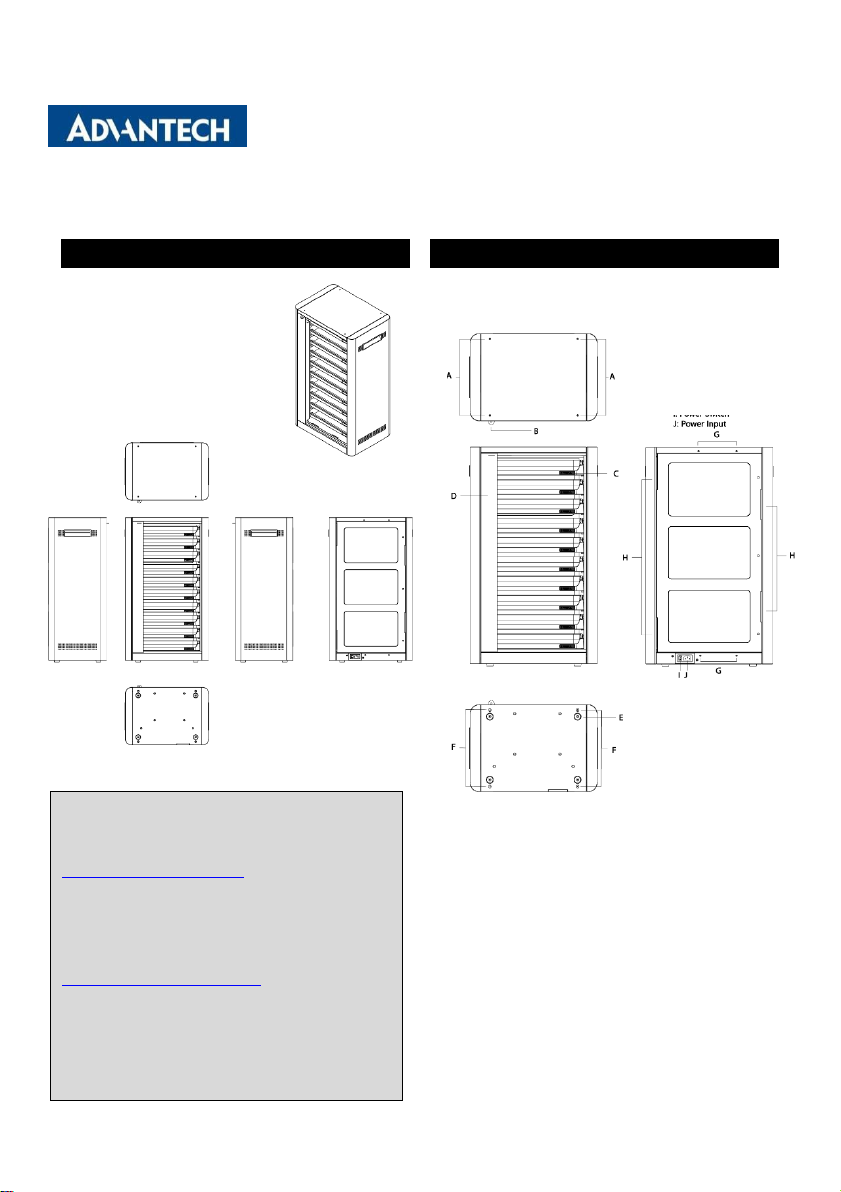
AIM-P707B0
J: Power Input
AIM-P707B0
Startup Manual
AIM-P707B0 Appearance
I/O Ports
A: Pin Hole for Stacking
B: Pad Lock
C: LED Indicator
D: Security Door
E: Rubber Foot
F: Anchoring Hol e for Stack ing
G: Fixture Hole f or Stacki ng
H: Reser ved space for Wall Mount
I: Power Switch
products, please visit our website at:
http://www.advantech.com
For technical support and service, or download full
user manual, please visit our support website at:
http://support.advantech.com
Search keywords AIM-37AC
This manual is for AIM-37AC Series.
1
Edition
st
1
AIM-P707B0 Startup Manual 1
Page 2

Indicator Error
Charging Standby
Situation
Red Blue1 Blue2 Blue3 Blue4 Green
1 X X X X X X
2
*** *** *** *** *** ***
3 X X X X X V
4 X X X X X
*
5 X
*
X X X V
6 X V
*
X X V
7 X V V
*
X V
8 X V V V
*
V
9 X V V V V V
10 V X X X X X
11
*
X X X X X
Power Bar
Situation
RD Description User D e scrip tion
1
Not powered on Not plugged
2
When each charging tray is powered on and
initializes, all 7 L EDS will flash three t imes.
Startup check. When it is plugged in, the system
will execute the startup check. All LEDs will
flash three times.
3
Charging tray
has powered up with no bumper
jacket, the green light re mains on.
Standby state. It
is plugged with no bumper
jacket and no LED signal.
4
Blinking green represents bumper
jacket has been
attached with its electric charge unknown. The
gre en light flashes once a sec ond until next phas e.
The light
turns
green when the bumper jacket is
attached. Wait 2 ~ 4 seconds for the light to turn
blue.
5
Bumper jacket is attached with electric charge
less than ( not including equal to) 25%.
Bumper Jacket is attached. Wait 2~4 seconds for
electric quantity checking and blue light will be
on. A t le ast one blue light will be on.
6
Bumper jacket is attached with electric charge
greater than or equal to 25% but less than (not
including equal to) 50%.
7
Bumper jacket is attached with electric charge
gre ater than 50% but less tha n (not including equal
to) 70%.
8
Bumper jacket is attached with electric charge
gre ater than 75% but less tha n (not including equal
to) 100%.
9
Bumper
jacket is attached with electric charge
equal to 100%.
10
Red
light means problems have occured during
charging. Please verify FOD, other system errors
and other status that caused charging failure.
Once t he red light is on, the cha rging will s top.
When the red light remains on, please pick up the
bumper jacket and replace it when the red light
goes off (approximately 10 sec onds).
11
The LED monitors the charging tray. When
communication between LED board and the
charging tray fails, the red light will flash.
When the red light flashes, please shut down and
then resta rt the charging st ation.
Symbol
Description
V
On
X Off
* B linking(Once a sec ond)
2
Page 3

Easy Setup Safety Instructions
1.
Check the charging station is turn on.( please
charge more than 20 hours for the first time).
2.
When the bumper jacket is correctly connected to
the charging station (Please check the indicator
light status.)
3.
When the AIM-707A0 device is fully charged,
remove it from the wireless charger. (Check the
charging icon displayed on the charging station
front LED for the charging status)
4.
Please read these safety
instructions carefully and follow
these instructions for use. Repair
of the device may only be carried
by trained service personnel.
Advantech recommends that a
service contact be obtained with
Advantech service and that all
repairs also be carried out by
them; otherwise the correct
functioning of the device may be
compromised.
WARNING! Because of the danger of electrical shock,
Use a damp cloth to clean the equipment and do not spray
detergent on the surface. Disconnect the equipment from
any AC outlet before cleaning.
If one of the following situations arises, have the
equipment checked by service personnel:
•
The AC power adapter is damaged.
•
The equipment does not power up even after charging.
•
The equipment has obvious signs of breakage.
CAUTION! Do not replace the battery yourself. Please
never remove the cover of a device while it is
in operation or connected to a power outlet.
contact a qualified technician or your retailer.
There is a danger of explosion if battery is
incorrectly replaced. Replace only with same
or equivalent type recommended by the
manufacturer.
FCC Compliance S t atement
15.105
This equipment has been tested and found to comply with the limits for a Class B digital device, pursuant to
part 15 of the FCC Rules.
These limits are designed to provide reasonable protection against harmful i nterference in a residential
installation. This equipment generates, uses and can radiate radio frequency energy and, if not installed and
3
Page 4

used in accordance with the instructions, may cause harmful interference to radio communications. However,
there is no guarantee that interference will not occur in a particular installation. If this equipment does cause
harmful interference to radio or televisi on reception, which can be deter mined by turning the eq uipme nt off
and on, the user is encouraged to try to correct the interference by one or more of the following measures:
• Reorient or relocate the receiving antenna.
• Increase the separation between the equipment and receiver.
• Connect the equipment into an outlet on a circuit different from that to which the receiver is connected.
• Consult the dealer or an experienced radio/TV technician for help.
To assure continued compliance, any changes or modifications not expressly approved by the party
responsible for compliance could voi d the user's authority to operate this equipment. (Example: use only
shielded interface cables when connecting to computer or peripheral devices).
Any changes or modifications not expressly approved by the party responsible for compliance could
void the authority to operate equipment.
This device and its antenna must not be co-located or operating in conjunction with any other antenna or
transmitter.
End-users and installers must be provided with antenna installation instructions and transmitter operating
conditions for satisfying RF exposure compliance.
FCC Radiation Exposure Statement
This equipment complies with FCC radiation exposure limits set forth for an uncontrolled environment. This
equipment should be installed and operated with minimum distance 20cm between the radiator & your
body.
4
Page 5

NCC Warning Stat e me nt
Article 12
Without permission, any company, firm or user shall not alter the frequency, increase the power, or change the
characteristics and functions of the original design of the certified lower power frequency electric machinery.
Article 14
The application of low power frequency electric machineries shall not affect the navigation safety nor interfere
a legal communication, if an interference is found, the service will be suspended until improvement is made
and the interference no longer exists.
Safety Instructions
1. Read these safety instructions carefully.
2. Keep this user manual for later reference.
3. Disconnect this equipment from AC outlet before cleaning. Do not use liquid or spray detergents
for cleaning.
4. Keep this equipment away from hazard locations.
5. Put this equipment on a reliable surface during installation. Dropping it or letting it fall
could cause damage.
6. Do not leave this equipment in an environment unconditioned where the storage
temperature under -10C or above 60C, it may damage the equipment.
7. Make sure the voltage of the power source is correct before connecting the equipment to the
power outlet.
8. Place the AC power adapter such a way that people cannot step on it. Do not place anything
over the power adapter.
9. All cautions and warnings on the equipment should be noted.
10. If the equipment is not used for long time, disconnect it from the power source to avoid
being damaged by transient over-voltage.
11. Never pour any liquid into MSR/IC Card reader slots of the
AIM-37AC-MXXXXXXXXXXXXXX Series. This could cause fire or electrical shock.
12. Never open or disassemble the equipment. For safety reasons, the equipment should be
opened only by qualified service personnel.
13. If any of the following situations arises, get the equipment checked by service personnel:
a. The power adapter plug is damaged.
b. Liquid has penetrated into the equipment.
5
Page 6

c. The equipment has been exposed to moisture.
d. The equipment does not work well or you cannot get it to work according to user manual.
e. The equipment has obvious signs of breakage.
14. This product is intended to be supplied by a Listed Power Adapter or DC power source, rated
5Vdc, 3A minimum and Tma 50 degree C, if need further assistance, please contact Advantech
for further information
Battery Safety
RISK OF EXPLOSION IF BATTERY IS REPLACED BY AN INCORRECT TYPE.
Mistreat the battery used in this device may present a risk of fire or chemical burn. Do not attempt to
disassemble the computer or its accessories.
Only qualified personal is allowed to replace the battery.
Do not dispose batteries in a fire and check with local authorities for disposal instructions.
AIM-37AC can only be equipped with standard battery pack with TCL PR-396698G 7,900 mAH Polymer
Lithium Ion Battery. Use of another battery may present a risk of fire or explosion.
Battery Charge Notice
It is important to consider the environment temperature whenever you are charging the Lithium-Ion battery pack.
The process is more efficient at normal room temperature or slightly cooler. It is essential that you charge
batteries within the stated range of 0°C to 40°C. Charging batteries outside of the specified range could damage
the batteries and shorten their charging life cycle.
Storage and Safety Notice
Altho ugh c harg e Li thi um-Ion batte ries may be left unused for several months, their capacit y may be depleted
due to the buildup of internal resistance. If this happe ns they will require recharging prior to use. Lithium Ion
batteries may be stored at temperatures between -10°C to 60°C, however they may be depleted more rapidly at
the high end of this range. It is recommended to store AIM-37AC within normal room temperature ranges.
6
Page 7

WEEE
EN
Following information is only for EU-member states:
The use of the symbol indicates that this product may not be treated as household waste. By ensuring this product is
disposed of correctly, you will help prevent potential negative consequences for the environment and human health,
which could otherwise be caused by inappropriate waste handling of this product. For more information about recycling
of this product, please contact your local city office, your household waste disposal service or the shop where you
purchased the product
ENERGY STAR
An ENERGY STAR qualified computer delivers substantial savings over a conventional computer. Desktop,
integrated desktop, and notebook (laptop) computers, workstations, small-scale servers, and thin clients are
all eligible to earn the ENERGY STAR, and those that do are now more efficient than ever.
It is an honor for Advantech to provide you such products.
What is ENERGY STAR?
ENERGY STAR is a U.S. Environmental Protection Agency (EPA) voluntary program that helps
businesses and individuals save money and protect our climate through superior energy efficiency.
The ENERGY STAR program was established by EPA in 1992, under the authority of the Clean Air Act
Section 103(g). Section103(g) of the Clean Air Act directs the Administrator to "conduct a basic
engineering research and technology program to develop, evaluate, and demonstrate non–regulatory
strategies and technologies for reducing air pollution."
In 2005, Congress enacted the Energy Policy Act. Section 131 of the Act amends Section 324 (42 USC
6294) of the Energy Policy and Conservation Act, and "established at the Department of Energy and the
Environmental Protection Agency a voluntary program to identify and promote energy–efficient products and
7
Page 8

buildings in order to reduce energy consumption, improve energy security, and reduce pollution through
Balanced
Idle 4 min. closes screen, 10 min. enters sleep mode.
High
Never idle and never enters sleep mode.
voluntary labeling of or other forms of communication about products and buildings that meet the highest
energy efficiency standards."
For more information, please visit www.energystar.gov
The product is to enter display sleep mode after 4 minutes and computer sleep mode after 10 minutes in
default, to wake it from sleep mode, simply press the power button on the back cover, while under sleep
mode it allows the device to save 80% or more energy.
Power Management System:
Default mode is on balanced, after idle for 4 minutes, it will automatically shuts its Monitor and enter sleep
mode if idle for more than 10 minutes.
Lists of default power management systems:
(Default)
performance
8
 Loading...