

Page 1
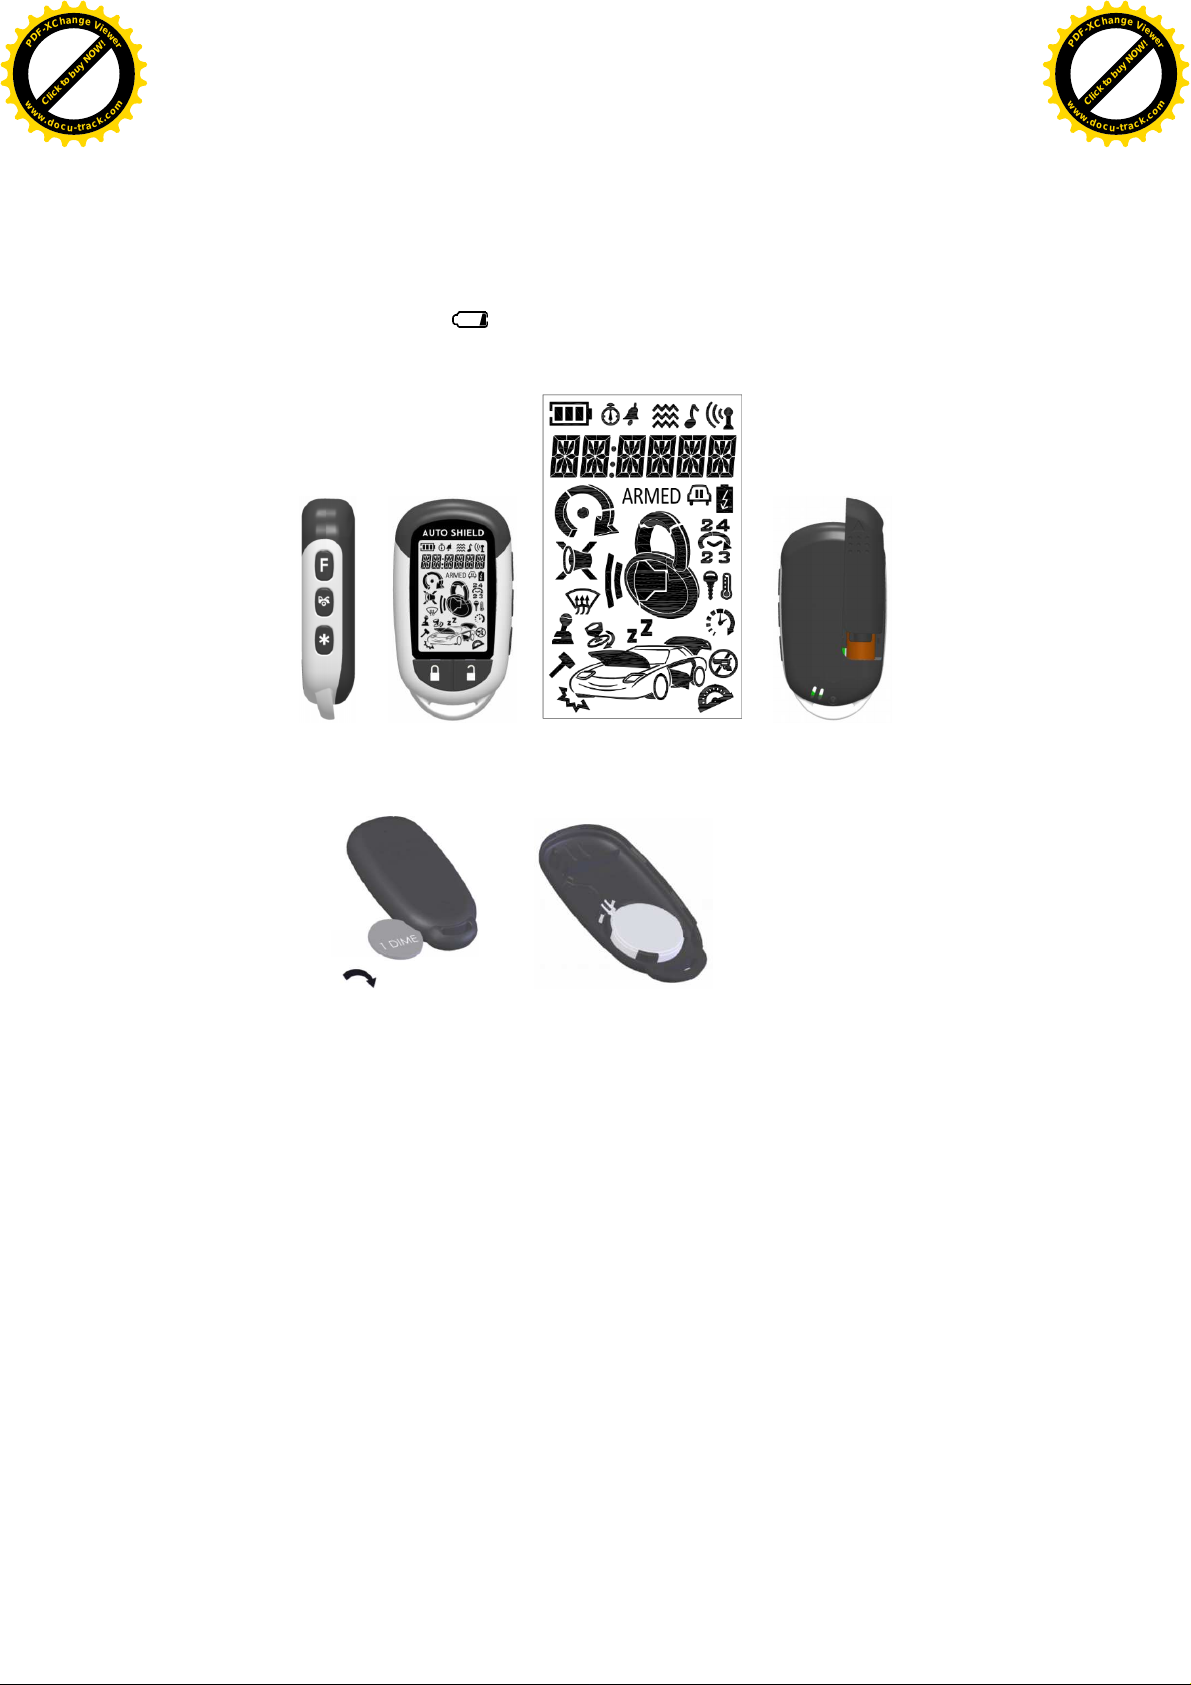
A. CHANGING THE BATTERY
1
Click to buy NOW!
P
D
F
-
X
C
h
a
n
g
e
V
i
e
w
e
r
w
w
w
.
d
o
c
u
-
t
r
a
c
k
.
c
o
m
Click to buy NOW!
P
D
F
-
X
C
h
a
n
g
e
V
i
e
w
e
r
w
w
w
.
d
o
c
u
-
t
r
a
c
k
.
c
o
m
The Two-Wayremote transmitter is powered by one “AAA” Battery. When the power of
the battery weakens A icon shall be displayed on the LCD screen. When the old
battery is replaced, there will be beep sounds to indicate the power is back up on the
transmitter
The One-way remote is powered by one CR2032Battery. To replace battery use a coin or
small flatbladescrewdrivertocarefullypryapartcase.
Page 2
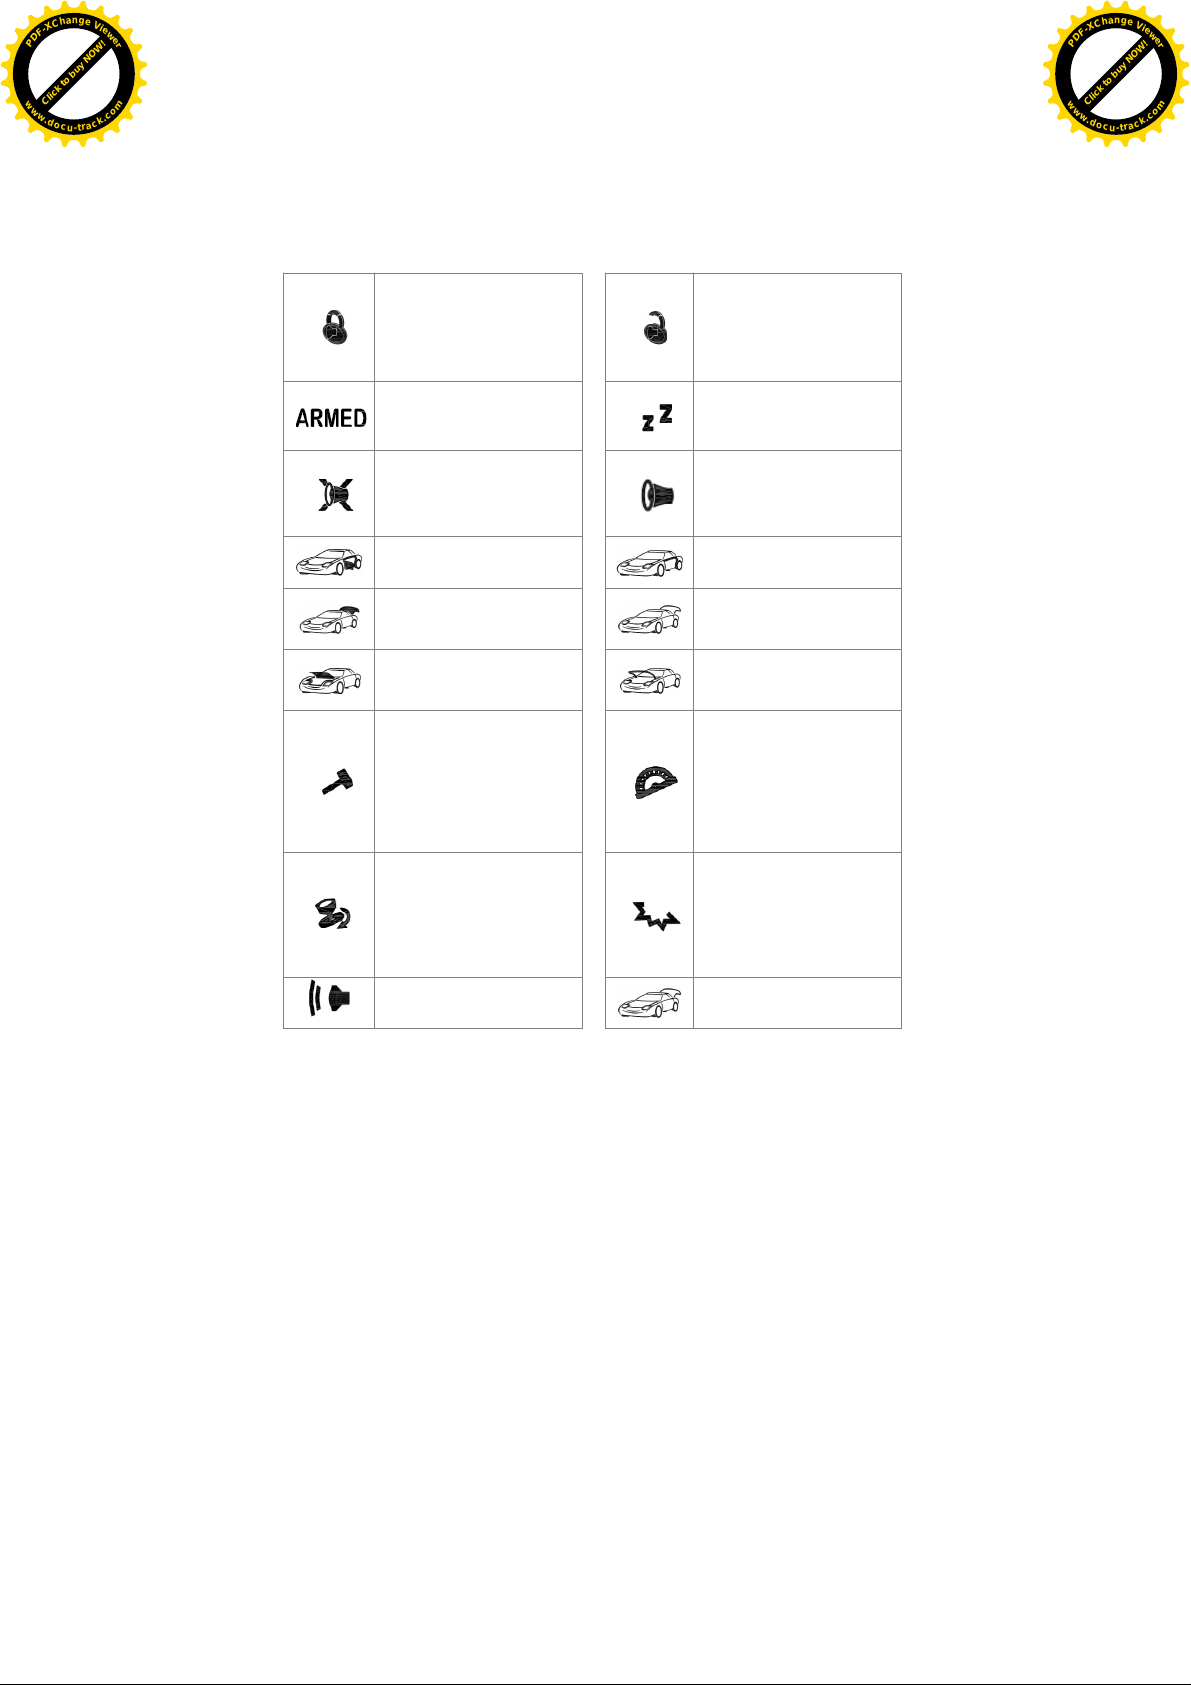
B. STANDARD LCD ICON CONFIGURATIONS:
Click to buy NOW!
P
D
F
-
X
C
h
a
n
g
e
V
i
e
w
e
r
w
w
w
.
d
o
c
u
-
t
r
a
c
k
.
c
o
m
Click to buy NOW!
P
D
F
-
X
C
h
a
n
g
e
V
i
e
w
e
r
w
w
w
.
d
o
c
u
-
t
r
a
c
k
.
c
o
m
Door Lock
The lock icon will be
displayed when the door are
locked.
System Armed
Hidden Alarm Mode
The security system arm
with hidden alarm function
(silent alarm)
Door Trigger (Zone 1)
Door is illegally opened
Trunk Trigger (Zone 2)
Trunk is illegally opened
Hood Trigger (Zone 3)
Hood is illegally opened.
Shock Sensor Trigger
(Zone 4)
No Icon = Shock Bypass
With Icon = With Shock
Sensor
Icon Flashing = Shock
trigger
Ignition Trigger (Zone 6)
Ignition switch was illegally
turned on.
displayed when the door are
you have left a door lid ajar
With Icon = With Tilt Sensor
Icon Flashing = Tilt Sensor
No Icon =Warn-away Bypass
With Icon = With Warn-away
Icon Flashing = Warn-away
Door Unlock and
Disarmed
The unlock icon will be
unlocked and disarmed
Valet Mode
All the function shall be
temporally on hold.
The system has been
triggered
Door Ajar
Trunk Ajar
you have left a trunk lid
ajar
Hood Ajar
you have left a hood lid
ajar
Tilt Sensor Trigger
(Zone 5)
No Icon = Tilt Bypass
trigger
Warn Away Trigger
trigger
System Trigger or Panic
mode
Trunk Release
2
Page 3

Engine Cranking
Click to buy NOW!
P
D
F
-
X
C
h
a
n
g
e
V
i
e
w
e
r
w
w
w
.
d
o
c
u
-
t
r
a
c
k
.
c
o
m
Click to buy NOW!
P
D
F
-
X
C
h
a
n
g
e
V
i
e
w
e
r
w
w
w
.
d
o
c
u
-
t
r
a
c
k
.
c
o
m
Your vehicle engine
cranking by remote control.
Engine Running
Your vehicle’s engine is
running
Timer Control Start
Engine starts
automatically every 2 or 3
hours
Control Start
Engine starts automatically
every 2 or 3hours, it will start
at a specified temperature at
the end of the timed cycle.
24 hour repeat with cold
Timer with Temperature
starting
Monitor the temperature
24 hours. and start if it is at
or below the preset cold
Daily timer Start
Start at the predetermined
time of the next day
start temperature
Interior Temperature
Display The Vehicle Interior
Temperature
Defogger
Manual Transmission
Mode (MTS)
Driver Pager (Icon flash)
2nd Car Operation Button Lock
Remote Transmission
You are transmitting the
signal to control unit.
In-Range Indicator
You are within the range of
the remote control.
Low Battery Power Save
Tone Mode Vibrating Mode
Parking Meter
Alarm Clock
Reminder when time is up
for parking
3
Page 4

C. REMOTE TRANSMITTER OPERATION:
Button
System
Function
Remark
Click to buy NOW!
P
D
F
-
X
C
h
a
n
g
e
V
i
e
w
e
r
w
w
w
.
d
o
c
u
-
t
r
a
c
k
.
c
o
m
Click to buy NOW!
P
D
F
-
X
C
h
a
n
g
e
V
i
e
w
e
r
w
w
w
.
d
o
c
u
-
t
r
a
c
k
.
c
o
m
-
- -
- 2.0 sec.
-
-
-
Arm & Lock Doors
Press the Lockbutton for a half
second
Silent Arm & Lock Doors Press and holdfor 1.0 seconds
Press and holdfor 3 seconds to
Panic Function
Activate or Deactivate panic
function
Arm and Warn-Away
Bypass
Arm and Warn-Away &
Shock Sensor Bypass
Arm and All Sensors Bypass
Press Twice within
3 seconds.
Press 3 times within
3 seconds.
Press 2 times and hold the
second times for2.0 seconds
Arm and TiltSensor Bypass
Press the button first then
press button
Arm and Hidden Alarm
Function
Disarm & Unlock Doors
Silent Disarm & Unlock
Doors
Press the button first then
press button
Press the Unlockbutton for a
half second
Press and holdfor 1.0 seconds
Passive Arming Bypass Press and hold for3 seconds
Disarm & Two Steps Door
Unlock (optional)
Press twice within3 seconds
Trunk Release Press and hold for2 seconds
-
+
Car Finder
Switch Code for2nd Car
Operation
Press Twice within
3 seconds.
Press and hold for 2 seconds
4
Page 5

Button
System
Function
Remark
Activate or Deactivate the
-
-
Click to buy NOW!
P
D
F
-
X
C
h
a
n
g
e
V
i
e
w
e
r
w
w
w
.
d
o
c
u
-
t
r
a
c
k
.
c
o
m
Click to buy NOW!
P
D
F
-
X
C
h
a
n
g
e
V
i
e
w
e
r
w
w
w
.
d
o
c
u
-
t
r
a
c
k
.
c
o
m
Remote Start
Press button once.
Press - button if set to
start safety mode.
Runtime Reset Pressand hold for2 seconds
1.5 sec.
+
+
+
+
+
+
+
+
F
Timer Start
24 hour repeat with cold
starting
Turbo Mode
Press the button first then
press button.
Press the button first then
press and hold button 1.5
seconds
Press and hold bothbuttons for
2 seconds
Aux 1 Timer Output Press together &release
Aux 2 Timer Output Press together & release.
Aux 3 Timer Output Press together & release.
Aux 4 Timer Output Press together &release
Aux 5 Timer Output Press together & release.
Aux 6 Timer Output Press together & release.
Shutdown Diagnostic Press and hold for 2 seconds
Level / Move The Setting.
Light up he LCD indicator
LCD Remote Program
Setting
PressFbutton once
Press and holdfor 1 second
Press and hold for3 seconds
5
Page 6

D. LCD REMOTE CONTROL:
F
x
1
Level
1
F
x
2
Level
2
F
x
3
Level
3
.
Click to buy NOW!
P
D
F
-
X
C
h
a
n
g
e
V
i
e
w
e
r
w
w
w
.
d
o
c
u
-
t
r
a
c
k
.
c
o
m
Click to buy NOW!
P
D
F
-
X
C
h
a
n
g
e
V
i
e
w
e
r
w
w
w
.
d
o
c
u
-
t
r
a
c
k
.
c
o
m
1. Press the Fbutton the number of times corresponding tothe Level you wish to
select; the LCD will display LEVEL number ( )
2. Press the button while LEVEL number text isstill on to perform the command.
Button
1 sec
Tone / Vibrating
Mode
Vehicle’s Status
Check /Alarm
Button Beeper
Voltage Check
Button Lock
LCD Backlight
5 sec./ 10 sec. /
Report
Remote Valet Power SaveMode Aux 5
Aux 1 Aux 2 Aux 3
Timer Start
Daily Timer
Start
24 hour repeat
with cold starting
Off
F x 4 Level 4
Car 1 / Car 2
operation
Temperature
Check
Aux 6
Aux 4
Defogger
Tone / Vibrating Mode: Press Fbutton first then press button to enter Tone /
Vibrating Mode, Under this mode press button toselect Tone Mode ( icon and
text will display) or Vibrating Mode ( icon and text will
display) or both( & icon and will display).
Button Beeper: Press F button
times first then press button toenter Button
2
Beeper Mode, Under this mode press button to turnon the button beep
or turn off the button beep .
Button Lock Mode: Press F button 3 times first then press button to enter Button
Lock Mode, Under this mode press button to select or
, the remote control will beep/vibrate 2 times and icon
and will display when a button is pressed indicating itis
locked.
6
Page 7

Second Vehicle Security Operation: Press Fbutton 4 times first then press
Click to buy NOW!
P
D
F
-
X
C
h
a
n
g
e
V
i
e
w
e
r
w
w
w
.
d
o
c
u
-
t
r
a
c
k
.
c
o
m
Click to buy NOW!
P
D
F
-
X
C
h
a
n
g
e
V
i
e
w
e
r
w
w
w
.
d
o
c
u
-
t
r
a
c
k
.
c
o
m
button to enter Second Vehicle Security Mode, Under this mode press button to
select CAR 2 operation ( icon and text will display) orCAR 1
operation and text will display.
Vehicle’s Status Check /Alarm Report: Press F button 1 times first then press and
hold buttons for 1 second until the beep confirms and then release the button.
The LCD remote willdisplay the current statusof the vehicle.(Include trigger
condition)
Voltage Check: Press F button 2 times first then press and hold buttons for 1
second until the beep confirms andthen release thebutton. The LCD remote will
display the current voltage ofthe vehicle and text will display.
LCD Backlight: Press Fbutton
times first then press and hold button for1.0
3
seconds until thebeep confirms and thenrelease the button to enter LCD Backlight
time Mode, then keep press button toselect LCD Backlight time
/ or .
Temperature Check: Press Fbutton 4 times first then press and hold buttons for
1 second, until thebeep confirms and then release the button. The LCD remote will
display the current Temperature of the vehicle and text will display.
Power Saver Mode: Press Fbutton
times first then press buttons to enter Power
2
Saver Mode, Under this mode press button to enable power saver mode and
icon will display or disable power save mode and
icon will display Whilein Power SaveMode the LCD remote
will not look for any incoming signals from the main unit until a button is pressed.
EXIT: Wait10 seconds, or press theother buttons to leave the setting except the F
button.
7
Page 8

E. CHIRP INDICATORS PARKING LIGHT
Click to buy NOW!
P
D
F
-
X
C
h
a
n
g
e
V
i
e
w
e
r
w
w
w
.
d
o
c
u
-
t
r
a
c
k
.
c
o
m
Click to buy NOW!
P
D
F
-
X
C
h
a
n
g
e
V
i
e
w
e
r
w
w
w
.
d
o
c
u
-
t
r
a
c
k
.
c
o
m
Chirp Function
Parking
light
Function
1 Chirp Arm 1 Flash Arm
2 Chirps Disarm 2 Flashes Disarm
3 Chirps Defective Reminder 3 Flashes
4 Chirps
6 Chirps Car Finder
Disarm / Triggered
Warning
12 Flashes Car Finder
Constant
On
Disarm / Triggered
Warning
Under Remote Start
F. ALARM OPERATING CONDITION
LED On
Duty
Arming
Disarming
Trigger Alarming Flashes
Hidden
Alarm
Passive
Arming
Panic Alarming Flashes Flashes
Car Finder 6 Chirps
Siren /
Horn
1 or 3
Chirps
2 or 4
Chirps
Parking
Light
1 Flash
2 or 3
Flashes
Flashes
12
Flashes
LED Doors Starter Dome Light
Slow
Flash
Locking Disable
OFF Unlocking
Flash
Pause
Slow
Flash
Disable Flashes
Disable Flashes
Fast
Flash
Locking
Turns on
for
30-Second
s
8
Page 9

G. TABLE OF ZONE /
Situation
Situation
LEDOnDuty
Click to buy NOW!
P
D
F
-
X
C
h
a
n
g
e
V
i
e
w
e
r
w
w
w
.
d
o
c
u
-
t
r
a
c
k
.
c
o
m
Click to buy NOW!
P
D
F
-
X
C
h
a
n
g
e
V
i
e
w
e
r
w
w
w
.
d
o
c
u
-
t
r
a
c
k
.
c
o
m
ALARM DIAGNOTICS
Zone 1 (Door Triggered) 1 flashes, break, then repeat
Zone 2 (Trunk Triggered) 2 flashes, break, then repeat
Zone 3 (Hood Triggered) 3 flashes, break, then repeat
Zone 4 (Shock Triggered) 4 flashes, break, then repeat
Zone 5 (Tilt Triggered) 5 flashes, break, then repeat
Zone 6 (Ignition Triggered) 6 flashes, break, then repeat
H. ACTIVE ARMING – LOCK &ARM
Press the button on the transmitter. The alarm arms, doors lock (if connected),
and the siren chirps and parking lightsflash once. The
text and beeps play to confirm. If Valet Mode* is ON, the
ARMED icons, the
+
+
icons, the text and tone play on the LCD transceiver. Exit ValetMode to
arm the alarmnormally.
DEFECTIVE SENSOR REMINDER: Ifthe siren sounds3 chirps and the defective
/ / icon, text will displayon the LCD
screen, then youhave left a door, trunk, or hood lid ajar. (See feature bank 1-06)
SILENT ARMING: Press and hold the buttons for 1.0 second and the
text t will display on the LCD screen. This will arm your security
system. No chirp sound will be heard and the arm confirmation will be through the
vehicles parking lights only.
WARN-AWAY BY-PASS: Press button twice will arm the security system and
bypass the warn-away and the warn-away icon will disappear and
text and tone play on the LCD transceiver.
Note: The bypass feature isprogrammed to activate for one arming cycle only. The
security system will return to normal operation during the next arming cycle.
Page 10

Federal Communication Commission Interference Statement
This equipment has been tested and found to comply with the limits for a Class B
digital device, pursuant to Part 15 of the FCC Rules. These limits are designed to
provide reasonable protection against harmful interference in a residential installation.
This equipment generates, uses and can radiate radio frequency energy and, if not
installed and used in accordance with the instructions, may cause harmful interference
to radio communications. However, there is no guarantee that interference will not
occur in a particular installation. If this equipment does cause harmful interference to
radio or television reception, which can be determined by turning the equipment off
and on, the user is encouraged to try to correct the interference by one of the
following measures:
. Reorient or relocate the receiving antenna.
. Increase the separation between the equipment and receiver.
. Connect the equipment into an outlet on a circuit different from that to which the
receiver is connected.
. Consult the dealer or an experienced radio/TV technician for help.
FCC Caution: To assure continued compliance, any changes or modifications not
expressly approved by the party responsible for compliance could void the user's
authority to operate this equipment. (Example - use only shielded interface cables
when connecting to computer or peripheral devices).
FCC Radiation Exposure Statement
This equipment complies with FCC RF radiation exposure limits set forth for an
uncontrolled environment. This equipment should be installed and operated with a
minimum distance of 0.5 centimeters between the radiator and your body.
This transmitter must not be co-located or operating in conjunction with any other
antenna or transmitter.
The antennas used for this transmitter must be installed to provide a separation
distance of at least 0.5 cm from all persons and must not be co-located or operating in
conjunction with any other antenna or transmitter.
This device complies with Part 15 of the FCC Rules. Operation is subject to the
following two conditions:
(1) This device may not cause harmful interference, and (2) This device must accept
any interference received, including interference that may cause undesired operation.
 Loading...