

Page 1
Model PA-920C
Owners Manual
ARMING THE SYSTEM - ACTIVE
1. Turn off the engine, exit the vehicle, and close all doors,
hood lid and trunk lid.
2. Press and release Lock/Arm button on the keychain transmitter.
The dash mounted LED begins to flash slowly . Parking Lights
flash one time.
Siren sounds one chirp.
If the siren/horn
hood lid ajar. Simply close the opened entry point to provide full protection. If the siren "chirped" three times, sometime after arming, the
exclusive, patented, delayed dome light learn circuit has been programmed and the
system detected a open entry point after the learned delay expired. Again, closing the
hood, trunk, or doors will correct the problem and you do not need to disarm the system
to make the correction. If the siren/horn did not sound when arming, then the chirps
have been turned off and you should refer to the section titled "ELIMINA TING THE ARM/
DISARM CHIRPS" in this manual.
NOTE: If selectable feature 9, Chirp Delete From Transmitter, was set to the on position
during installation, then you can selectively defeat the arm & disarm chirps by holding
the transmitters Lock or Unlock button for about 2 seconds.
NOTE: If Passive Arm Mode was selected on during installation, then 30 seconds after
the last vehicle door is closed, the unit will arm automatically.
sounds 3 chirps, then you have left a door, trunk, or
PROTECTION WHILE THE SYSTEM IS ARMED
Opening any protected door, hood or trunk lid will cause the alarm to immediately sound. The
alarm will continue to sound for 30 seconds, then stop and continue to monitor all protected entry
points. If the thief left a door opened, the alarm will sound for six 30 second cycles, remain armed
and ignore that triggered zone.
Whenever the system is armed, the LED indicator will slowly flash. This serves as a visual
deterrent to the potential thief. The LED is a very low current bulb and will not cause the vehicle’s
battery to drain, even when left unattended for extended periods.
Whenever the system is triggered, the vehicle’s parking lights will flash for the full 30 second
alarm cycle, attracting visual attention to the vehicle.
Optional - Whenever the system is armed, the vehicle’s starting circuit will be prevented. If the thief
should choose to ignore the siren, the vehicle can not be started.
Any mild impact to the vehicle’s glass will cause the alarm to sound a short series of warning
tones.
Any strong impact to the vehicle’s glass will cause the alarm to trigger for the full 30 second alarm
cycle.
NOTE: If the optional interior illumination circuit was installed, the interior light will flash as well
for the full 30 second alarm cycle.
DISARMING THE SYSTEM
1. As you approach the vehicle, press and release the Unlock/Disarm button on the keychain
transmitter. The siren or horn chirps twice, the parking lights flash twice, and the LED turns off.
Page 1
128-9103
1 of 26
Page 2

If passive arming is selected on, the LED will start flashing rapidly, indicating that the system is
re-arming automatically. Open any door to suspend the automatic arming. If the siren chirps 4
times and the parking lights flashed three times, then the alarm was triggered in your
absence.
If the siren did not sound when disarming, then the chirps have been turned off and you
should refer to the section titled “ELIMINATING THE ARM / DISARM CHIRPS“ in this manual.
Doors Unlock - Optional
NOTE: If the optional Interior illumination feature has been added as an added convenience, the
system will turn on the interior lights when the system is disarmed.
WHILE THE SYSTEM IS SOUNDING
If during a triggered state, you wish to shut off the siren without disarming your security system,
simply press and release any transmitter button other than the Unlock/Disarm button. This action
will turn off the siren yet leave the vehicle fully armed and protected. This feature is particularly
useful if you are aware of children playing near your vehicle that may accidently trigger your security
system. In this case you can cancel the siren sounding without disarming your alarm.
INTRUSION WARNING SIGNALS
This system will inform you if an intrusion attempt has occurred while you were away from the
vehicle. If an intrusion attempt has occurred, the siren will chirp 4 times and the parking lights
will flash 3 times when disarming the system. Enter the vehicle and observe the red LED to
identify which zone was triggered.
If the LED is flashing one time...pause...one time...pause...etc., then an intrusion attempt
was made to the shock sensor, or an accessory triggering device that may have been added
to the system.
If the LED is flashing two times...pause...two times...pause...etc., then an intrusion
attempt was made to a hood or trunk pin switch that was added to the system.
If the LED is flashing three times...pause...three times...pause...etc., then an intrusion
attempt was made through one of the vehicle’s doors.
These intrusion warning indicators are stored in the system’s memory and will only be erased
when the ignition key is turned on.
VALET SWITCH
The valet switch allows you to temporarily bypass all alarm functions, eliminating the need to
hand your transmitter to parking attendants or garage mechanics. When the system is in valet
mode, all alarm functions are bypassed, however the remote panic feature and remote door
locks will remain operational. In addition, the parking lights will flash to indicate locking and
unlocking. To use the valet mode, the system must first be disarmed either by using your
keychain transmitter or by use of the the manual override switch.
1. Enter the vehicle and turn the ignition key to the on position.
2. Press and hold the valet pushbutton switch until the LED turns on solid.
3. To return to normal operation, press and release the pushbutton switch any time the
ignition is on.
NOTE: Always remember to return the system to normal operation. This will ensure that the
vehicle remains protected at all times.
Page 2
128-9103
2 of 26
Page 3

Disarming Without The Use Of The Transmitter:
USING THE VALET SWITCH MANUAL OVERRIDE
Y our Security System can be disarmed without the use of the keychain transmitter . This is necessary , since
you will need the ability to operate your vehicle if the transmitter is lost or its battery fails. If your system has
been selected for Valet Switch manual override, then to bypass the alarm system follow the steps below.
1. Open the vehicle door. The alarm will sound.
2. Turn the ignition key to the on position.
3. Within 5 seconds, press and release the valet pushbutton switch.
The alarm system will stop sounding and enter the (bypass) mode. You can now start and
operate the vehicle normally.
Typically this override mode is used only if the transmitter has become inoperative.
PROGRAMMING YOUR CUSTOM OVERRIDE CODE:
Unlike override switches easily found, and defeated, this security system allows the consumer to program
a personal override code, offering a higher level of security. To take advantage of this option, programmable feature # 10 must be selected for the Custom Code Option. Consult your installation center to learn
if this feature is turned on. The system comes from the factory with a pre-programmed override code of 11.
To change this default override code, do the following:
1. Disarm the system by use of the transmitter or by use of the valet/override sequence.
2. Turn the ignition switch to the on position.
3. Within 10 seconds, press and release the valet/override switch, 3 times.
3. Within 10 seconds turn the ignition switch off, on, off, on, off, on. (The siren or horn will beep
and the lights will flash one time with each ignition switch cycle.)
4. Within 10 seconds, begin to enter your chosen 10ths digit by pressing and releasing the
pushbutton switch from 1 up to 9 times.
5. Within 10 seconds of the last entered 10ths digit, turn the ignition switch off then on.
6. Within 10 seconds, begin to enter your chosen units digit by pressing and releasing the
pushbutton switch from 1 up to 9 times.
7. Finish by turning the ignition switch to the off position.
If the new code was accepted, the unit will report back the newly entered code, by flashing the
LED, first indicating the 10ths digit, pause and then the units digit. The unit will report the new
code three times with a one second pause between each code, then the system will begin
arming. If the LED flash pattern reports the previously stored code, the new code was not entered
correctly. Please repeat steps 1 through 7 above considering the following.
NOTE: Acceptable digits 10ths or units are 1 through 9. The unit will not recognize a 0
(Zero), or no digit entered in any place, units or tenths.
NOTE: If 15 seconds of inactivity expire or if the ignition switch is turned off for more then 5
seconds during any of the above steps, the unit will revert back to the last successfully
stored code.
Custom Code Programming Example:
To Change the code from the factory pre-assigned code of 11 to “52” you would do the following:
1. Disarm the system by use of the transmitter or by use of the emergency override sequence.
2. Turn the ignition switch to the on position.
3. Within 10 seconds, press and release the valet/override switch, 3 times.
4. Within 10 seconds turn the ignition switch off, on, off, on, off, on. (The siren or horn will beep
and the lights will flash one time.)
5. Within 10 seconds, begin to press and release the pushbutton switch to set the tenths digit.
Page 3
128-9103
3 of 26
Page 4

(As per the example, press and release 5 times to set the tenths digit to 5)
6. Within 10 seconds of the last press of the pushbutton, turn the ignition switch off then on.
7. Within 10 seconds, begin to press and release the pushbutton switch to set the units digit.
(As per the example, press and release 2 times to set the units digit to 2).
8. Turn the ignition switch to the off position. Immediately observe the LED flash pattern.
You will note the LED flashing five times, pause, and then flash two times, pause. This pattern
will be repeated three times indicating the new code (52) has been accepted and stored in
memory.
NOTE: If after step 7, the LED flashes a code other than what was just entered, this indicates
that the code has not been changed. You will have to repeat steps 1 through 7 above
being certain to note the following:
Acceptable digits 10ths or units are 1 through 9. The unit will not recognize a 0 (Zero), or no digit
entered in any place, units or tenths.
NOTE: If 15 seconds of inactivity expire, or if the ignition switch is turned off for more then 5
seconds during any of the above steps, the unit will revert back to the last successfully
stored code.
MANUALL Y OVERRIDING YOUR SYSTEM:
USING THE CUSTOM CODE OVERRIDE
Assuming the override code programmed has not been changed, and the default override
code of 11 is in the system's memory.
1. Enter the vehicle and turn the ignition switch to the on position.
NOTE: The siren will sound.
2. Within 5 seconds, press and release the pushbutton switch 1 time.
3. Within 5 seconds, turn the ignition switch off then on.
4. Within 5 seconds, press and release the pushbutton switch 1 time.
5. Turn the ignition switch off then on and start the vehicle.
NOTE: If you have changed the programmed override code then substitute your new code
tenths for step 2 above, and units for step 4 above.
PUSHBUTTON V ALET/SAFETY CONTROL/PROGRAM SWITCH
The Push-Button valet safety control switch allows you to temporarily disable the remote starting function of the system. This is recommended whenever the vehicle is being serviced. To
place the system in the service/temporary disabled mode:
1) With the system disarmed/unlocked, and the ignition switch off Press and Hold the PushButton Switch on.
2) Turn the ignition switch on, off, on, off, on, off.
3) The LED begins to flash two short flashes followed by one long flashes and continues
this pattern until returned to normal mode of operation.
This puts the unit into the R/S Override mode indicating that the remote start system is in the
service/temporary disabled mode and will not start from RF or any other input Telematic
input or otherwise.
T o Exit R/S Override Mode
1) With the system disarmed, Press and Hold the Push-Button Switch on.
2) Turn the ignition switch on, off, on, off, on, off.
3) The LED turns off indicating that the R/S unit is fully functional one again.
Page 4
128-9103
4 of 26
Page 5

REMOTE CAR FINDER/P ANIC
The Lock or Unlock buttons are also used to access the car finder/panic mode. This feature is
particularly useful in a crowded parking lot where finding your car may be difficult to locate, or if
there are suspicious characters hanging about your vehicle. To access this mode, while within
range of your car, simply press and hold either the lock or unlock button of your transmitter for
three seconds. The parking lights will begin to flash, the siren will sound, and if connected,
the vehicle horn will beep making your vehicle audible as well as more visible. The lights,
siren and or horn will stop automatically after 30 seconds. If you wish to turn off this mode
prior to the expiration of the 30 second timer, press and hold for three seconds either the lock
or unlock buttons a second time, or press and release the Trunk/Start button one time.
REMOTE TRUNK RELEASE
If you have electric trunk release in your vehicle and the remote trunk release option was
added, simply press and hold the Key/Trunk button of your keychain transmitter for 3
seconds or until the electric trunk of your vehicle opens.
REMOTE ST ARTING THE VEHICLE
This unit will not start the vehicle if any one of the following situations exists;
The vehicle's hood lid is opened. The gear shift selector is not in Park.
The brake pedal is depressed. The system is in the remote start override mode.
1. To start the vehicle, press and release the Key/Trunk button two times within 2 seconds. The
vehicle will start and remain running for the pre-programmed 5,10,15,20 minute run cycle.
As a visual indication, the parking lights will flash or remain on depending on the setting by
your installation center.
2. When you arrive at the vehicle, turn the ignition key to the ON position (not the spring loaded
start position), then step on the brake pedal to disengage the remote starter. The vehicle will
continue to run, but now on it's own power.
NOTE: The engine will stop running before the pre-programmed run cycle has expired if you
perform any one of the following functions;
Press and release Key/Trunk button on the keychain transmitter two times within 2 seconds.-
Depress the brake pedal. - Open the vehicle's hood -Place the unit in the safety control
disabled mode.
THE OPTION BUTTON of your transmitter may or may not be used with your system but may
be used with a second similar Audiovox Model system that may be installed on a second
vehicle in your family.
OPERATING ON AUTOMA TIC ST ART UP TIMER MODE
Your system has the ability to automatically start the vehicle every 2 or 4 hours over a 48 hour
period. This feature is especially useful in cold climates where the only means to keep the
engine and engine fluids warm is to periodically start the engine.
WARNING! Be certain that the vehicle is outdoors before using this or any remote vehicle
starting device. A running engine produces dangerous carbon monoxide fumes which can be
harmful or fatal if prolonged exposure occurs. DO NOT remote start the vehicle if it is garaged.
TO BEGIN THE AUT OMATIC ST ART UP TIMER
1. Turn the ignition key on then off.
2. Within 10 seconds, activate the RF start command two times. (Push the
programmed channel button of your keychain transmitter 4 times).
The parking lights will flash and the siren will chirp 2 or 4 times indicating the timed start mode
is activated.
Page 5
128-9103
5 of 26
Page 6

The vehicle, on a 2 or 4 hour interval basis, dependent on the number of chirps heard
when activated as described above will automatically start, run for the pre-programmed
time (5,10,15 or 20 minutes), and then shut off. This will continue for 48 hours.
NOTE: The automatic start up timer can also be initiated from the keychain transmitter.
To do this:
1. Start the vehicle using the keychain transmitter by pressing and releasing the
second channel transmitter button 2 times.
2. Shut off the vehicle using the keychain transmitter by pressing and releasing the second
channel transmitter button 2 times.
3. Within 10 seconds of step 2, activate the RF start command two times.
(Push the second channel button of your keychain transmitter 4 times).
The parking lights will flash and the siren will chirp 2 or 4 times indicating the timed start
mode is activated.
CANCELING THE AUTOMA TIC ST ART UP TIMER
To cancel the automatic start up timer do one of the following;
1. Start the vehicle manually with the use of the ignition key and depress the brake pedal.
2. Remote start the vehicle using your keychain RF transmitter.
ELIMINATING THE NORMAL ARM / DISARM CHIRPS
As explained earlier in the manual, you can eliminate the chirps selectively any time you arm or
disarm the system, if the feature has been activated, simply by holding the ARM or DISARM
button for two seconds. If you find the normal arming and disarming chirps annoying, they can
be turned off permanently , eliminating the need to hold the ARM / DISARM button for 2 seconds.
To do this:
1. Turn the ignition key on then off.
2. Within 10 seconds, press and release valet switch three times.
3. If the chirps were on before you started, then you will hear two chirps indicating they have
been turned off.
If the chirps were off before you started, then you will hear one chirp indicating they have been
turned on.
NOTE: Whenever the chirps are bypassed, the 4-chirp intrusion indicator and 3 chirp
defective zone indicator will always operate. Since these are important warnings to you
that something has happened, they cannot be eliminated.
NOTE: Your system must be programmed by the installation center to enable this feature.
RF SHOCK SENSOR MODE SELECTION
The way in which your alarm system reacts to threatening vibrations, created by attempts to
enter the vehicle by breaking a window, is adjustable by the transmitter immediately after arming.
There are 4 modes of operation that can be selected by the operator:
1. Normal Operation (default mode) In this mode, any strong vibrations will cause the siren
to sound (full detect) for 30 seconds. Any lesser vibration will cause the siren to emit 6
short warn away chirps, (pre-detect).
2. Stage 1 (Omit pre-detect) In this mode, the warn away chirps created by the lesser vibration
will be deleted. If strong vibration occurs, the siren will sound.
3. Stage 2 (Omit pre & full detect) In this mode, both the pre-detect stage and the full trigger
stage of the sensor are defeated. The unit will not react to vibration of any magnitude.
4. Stage 3 (City Mode) In this mode, the pre-detect chirps will change from six pre-warning
tones to a full 10 seconds of warning chirps. The full detect trigger duration will be reduced
from 30 seconds to 15 seconds.
Page 6
128-9103
6 of 26
Page 7

NOTE: Setting the stage of the shock sensor will be effective for one arming cycle only. Once
the system has been disarmed, the very next arming cycle will cause the sensor to
default to the normal operation stage.
To change or adjust the shock sensor, press and release the ARM button of you keychain
transmitter.
1.Within 2 seconds of arming, press and release the ARM button 1 time, to
defeat the pre-detect stage of the shock sensor. (The lights will flash and the
siren will chirp twice.)
2.Within 2 seconds of step 1, press and release the ARM button 2 times, to
defeat the pre and full detect stages of the shock sensor. (The lights will
flash and the siren will chirp three times.)
3.Within 2 seconds of step 1, press and release the ARM button 3 times to
enter the "City Mode" of operation. (The lights will flash and the siren will chirp four times.)
While under control of the remote starter, the system can be programmed to allow you to inhibit
the shock sensor by use of the transmitter. If the system has been programmed during
installation, simply press the lock button of your keychain transmitter anytime during the remote
start cycle. The shock sensor will be inhibited, for one run cycle and will resume normal
operation after the remote start unit shuts off.
Check with your installation center to determine if this feature has been programmed into your
system.
OPTIONAL DEVICE OUTPUT ( CHANNEL 3 )
Controlled By: Trunk/Key Button
Other Transmitter button configurations are also available. Consult your installation center for
other configurations not listed above that may have been programmed to operate a specific
feature of your system.
This security system is equipped with an output which will activate when the appropriate
transmitter button is depressed for 3 seconds. Although this output is intended to activate the
trunk release option, any other optional devices may be connected to this channel. Consult
your installation center for more information about this output.
ADDITIONAL REMOTE FUNCTION ( CHANNEL 4 )
Controlled By: Option Button
Other Transmitter button configurations are also available. Consult your installation center for
other configurations not listed above that may have been programmed to operate a specific
feature of your system.
This security system has an additional feature that can be connected to a number of different
optional accessories. Some of the more common uses for this channel are;
a) Remote Window Closure, b) Remote Garage Door Interface, To remotely operate
the device indicated, momentarily press, or press and hold the appropriate transmitter button(s) as indicated above.
TURBO TIMER MODE
This system provides a means to cool down the vehicles turbo charger, if so equipped, by
allowing the vehicle to continue to run for a prescribed period of time every time the vehicle's
engine is turned off. This feature requires the system to be set up for turbo timer during
installation. Consult with your installation center to be certain this feature was activated and
Page 7
128-9103
7 of 26
Page 8

how long the vehicle will continue to run, 3, 5, or 10 minutes after the ignition switch is
turned off.
To activate the turbo timer:
Anytime the engine is running for more than 15 seconds:
1) Place the gear selector in park.
2) Set the parking, (hand), brake.
3) Be certain your foot is off the brake pedal.
4) Press the program/Push-Button switch 2 times within 5 seconds of step1.
The parking lights will flash two times indicating the mode was successfully entered.
If your parking lights flashed four times, this indicates the turbo mode was on and is now
turned off.
With the turbo timer mode selected on, after you've arrived at your destination, while the
engine is still running, set the parking brake, pause 2 seconds, then turn the ignition
switch to the off position. The engine will continue to run the allotted time according to the
selection during installation.
If you do not want the vehicle to continue to run for one cycle, simply step on the vehicle's
brake, or release the parking brake, or activate the transmitter's start button two times in
succession. Any of these will cause the engine to turn off.
PROGRAMMING TRANSMITTERS:
At times it may become necessary to program replacement or additional transmitters
for use with your system. To do this:
1) With the system unlocked or disarmed, turn the ignition key to the on position.
2) Press and release the pushbutton switch three times
The unit will flash the parking lights and or beep the horn once to indicate that the
system is in the transmitter program mode. The LED will also flash one time pause,
one time pause, etc... indicating that you are in the transmitter program mode of the
unit’s channel 1 or single button program mode.
3) Press and hold the lock button of each additional transmitter you wish to operate
your system.
NOTE: The unit is capable of storing up to 4 transmitters. If a fifth transmitter is added,
the first transmitter programmed will be bumped out.
Once all transmitter have been programmed, turn the ignition switch off to exit the
program mode.
By completing the above, all three buttons of the transmitters are programmed into their
default location.
Lock = Lock / Arm, & Panic
Unlock = Unlock / Disarm & Panic
Trunk = Trunk Release & Panic Cancel, Press & Hold 2.5 seconds to release
trunk, Press while Panic Sounding to
cancel panic immediately.
Second Vehicle Operation:
Press the Trunk/Key button + the Option button for 2 seconds, the LED flashes 2 times.
Release the buttons, then press any transmitter to select 2nd vehicle mode.
While in the 2nd car mode, press the Trunk/Key button + Option button for 2 seconds,
the LED flashes 1 time to indicate the primary vehicle operation.
Page 8
128-9103
8 of 26
Page 9

DELETING TRANSMITTERS FROM YOUR SYSTEM:
It may be necessary to delete a lost transmitter or to reprioritize a transmitter that is programmed to your system. To remove a transmitter that has been programmed in your
system:
1) Enter the transmitter program mode of channel 1 as indicated above.
2) Press and hold any transmitter button that has not been programmed into channel 1 until
you hear a chirp, then release and immediately press the same button a second time until
you hear a long chirp followed by a short chirp. This action erases the transmitter.
If the transmitter you wish to erase has been lost or stolen then following the information
below will successfully remove the transmitter.
NOTE: For this procedure, you must have all transmitters you wish to remain programmed in
your system available.
1) Enter the transmitter program mode of channel 1 as indicated above.
2) Press and hold the lock button of each transmitter you wish to operate the lock function of
your unit making sure you occupy all 4 transmitter slots. In other words, you have three
transmitters you wish to remain programmed. Press and hold the lock button of transmitter
one until a long chirp is heard, then press and hold the lock button of transmitter two, then
press and hold the lock button of transmitter three, followed by pressing and holding the lock
button of transmitter one again. This action fills all 4 receiver slots.
3) Advance to receiver channel 2 by pressing the pushbutton switch one time.
4) Press and hold the unlock button of each transmitter you wish to operate the unlock
function of your vehicle, again making sure all 4 transmitter slots are filled.
4) Advance to receiver channel 3 by pressing the pushbutton switch one time.
5) Press and hold the unlock button of each transmitter you wish to operate the start function
of your vehicle, again making sure all 4 transmitter slots are filled.
If you are uncomfortable about the programming of additional transmitters as outlined in the
processes above please contact your installation center or call the technical service number
listed on the back of the transmitter for help.
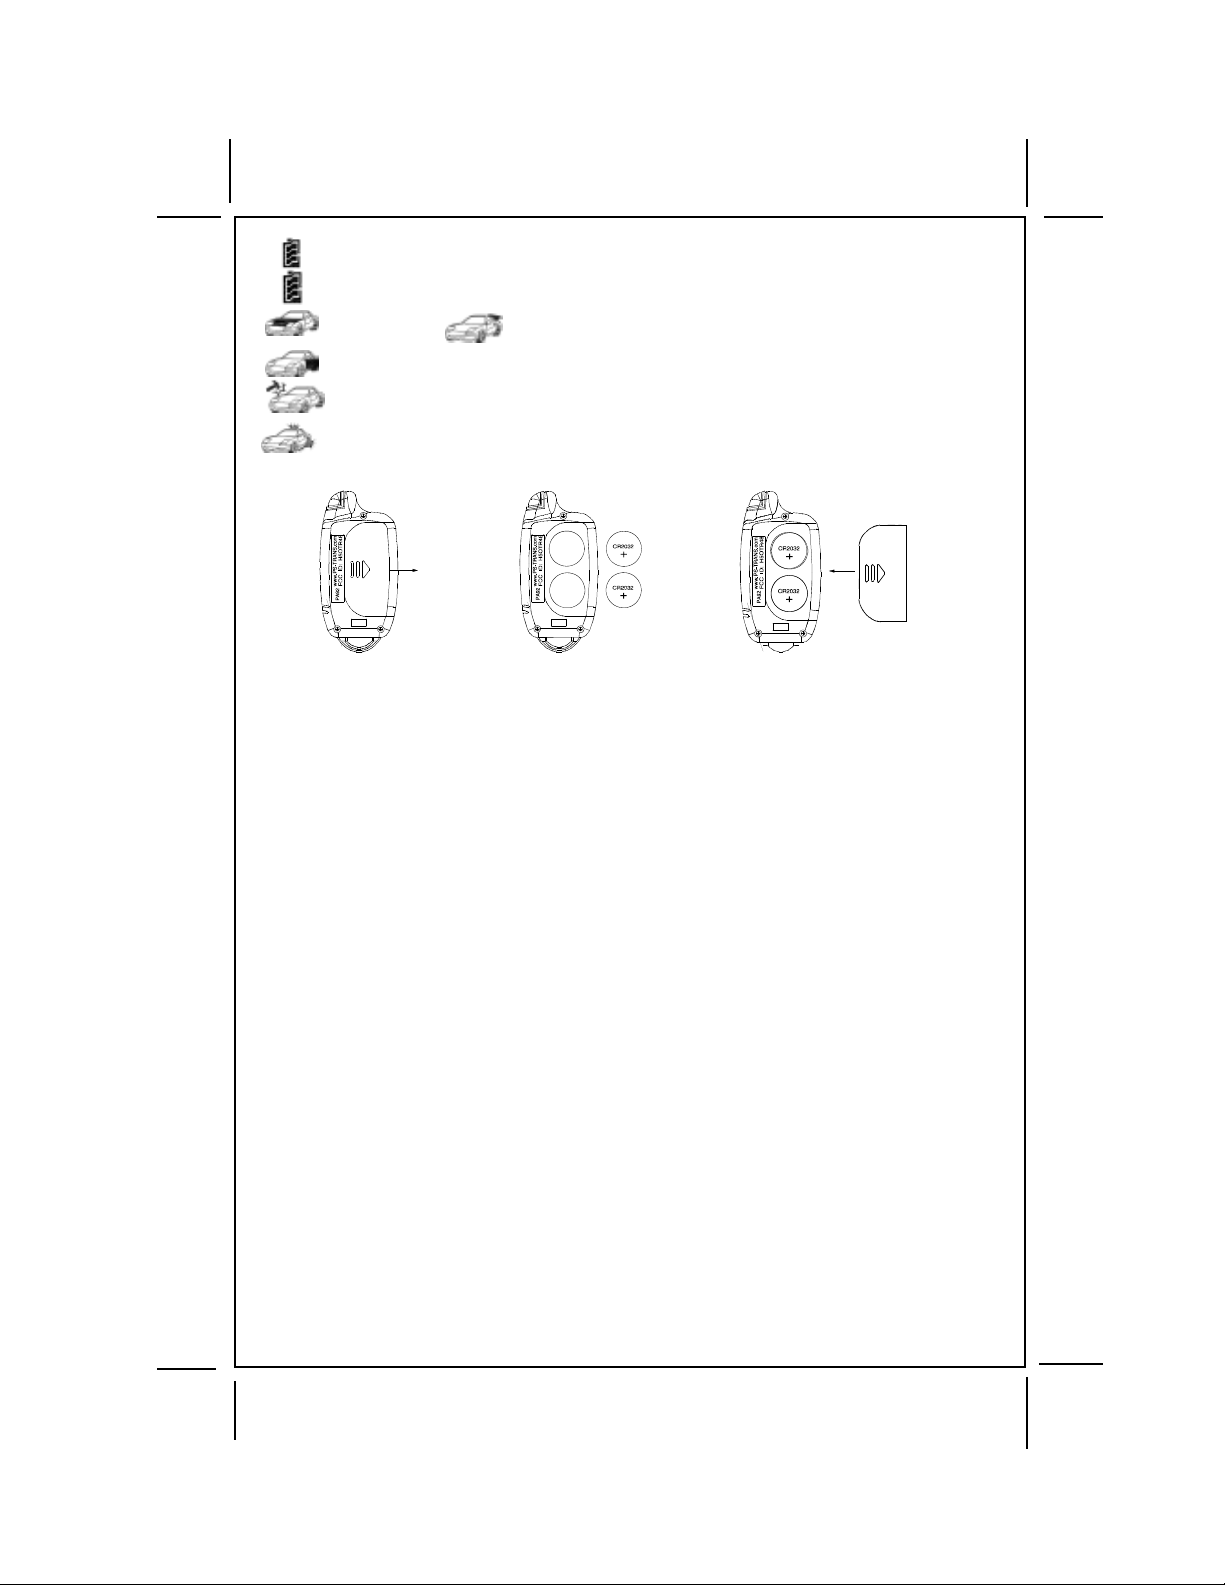
BA TTERY REPLACEMENT
PA91 Uses 2 x CR2016 Lithium Battery
The transmitter incorporates a small LED visible through the case
which is used to indicate battery condition. You will notice a decrease in transmitter range as the battery condition deteriorates.
Transmitter battery replacement is recommended at least every 10 to
12 months, depending upon how frequently the transmitter is used.
To replace the battery in the PR91 Transmitter
1) Carefully Separate apart the case using the edge of a coin as
shown.
2) Remove the rear cover to access the discharged battery
paying attention to the proper polarity orientation.
3) Carefully remove and properly dispose of the discharged battery.
4) Insert the new battery, than carefully snap closed the transmitter
case.
5) If you accidently dislodge the circuit board from the transmitter
housing, be certain that the rubber membrane is seated properly,
case, then insert the circuit board, and return to step #4.
and the buttons are properly exposed from the front view of the
Page 9
128-9103
9 of 26
Page 10

Operating Your Two Way Remote Control:
Press the Trunk/Key + Option buttons of your remote simultaneously until 1 beep is
heard to toggle the back lighting control on for 2 seconds or 5 seconds.
Press the Trunk/Key + Option buttons of your remote control simultaneously until 2
beeps are heard to access the features of your remote control.
Clock setting hours will be flashing, use the trunk/key button to increase, and the
option button to decrease. Use the lock button to save and move to the minutes
setting, use the trunk key button to increase and the option button to decrease. Use
the lock button to save and move to the next function.
Alarm Clock, Alarm Clock hours will be flashing, use the trunk/key button to
increase, and the option button to decrease. Use the lock button to save and move
to the Alarm Clock minutes setting, use the trunk key button to increase and the
option button to decrease. Use the lock button to save and move to the Alarm Clock
On/Off Setting use the Trunk/Key to turn on and the Option button to turn off, use
the lock button to save and move to the next function.
Count Down Timer, Count Down Time hours will be flashing, use the trunk/key
button to increase, and the option button to decrease. Use the lock button to save
and move to the Count Down Timer minutes setting, use the trunk key button to
increase and the option button to decrease. Use the lock button to save and move
to the Count Down Timer On/Off Setting use the Trunk/Key to turn on and the
Press and Hold Trunk/Key + Option Buttons or allow 5 seconds of inactivity to exit feature setting mode.
Additional Remote Control Settings:
Battery Save Mode: Press Trunk/Key + Option until 3 beep tones are heard = Battery Save Mode. The
unit will remain in the battery save mode, indicated by the battery icon flashing, until any button is pressed.
Button Lock Mode: Press the Trunk/Key + Option Buttons simultaneously until 1 beep tone is heard then
press the Lock button = Button Lock Mode, repeat to unlock the buttons.
Melody, Vibrate, Melody w/Vibrate Selection: Press the Trunk/Key + Option Buttons simultaneously
until 1 beep tone is heard then press the Unlock button = Melody, a second time = Vibrate, a third = Melody
w/Vibrate.
Pre-set 10 Minute Count Down Timer: Press the Trunk/Key + Option Buttons simultaneously until 1
beep tone is heard then press the Trunl/Key Button starts the 10 minute count down timer. Once the timer
expires the unit will beep 10 times.
Turn Off Transmitter's Button Beep Tones: Press the Trunk/Key + Option Buttons simultaneously until
1 beep tone is heard then press the Option button toggles the transmitters button beep tones on and off.
2nd Car Operation: Press the Trunk/Key + Option Buttons simultaneously until 1 beep tone is heard then
press the Lock + Unlock buttons simultaneously this toggles on and off the 2nd car mode. When in the
second car mode, you can program the transmitter to a second vehicle which may have a similar Panther
Alarm system installed allowing full functional control of both vehicles.
ICONS AND SYMBOLS FOUND ON YOUR TWO WAY TRANSMITTER:
Doors are locked Icon.
Option button to turn off, use the lock button to save.
Doors Unlocked Icon.
Valet Mode.
When Transmitting, any button activated.
Within Range Indicator.
Timed Start Activated.
Someone Paging You From Your Vehicle.
Vibrate or Tone Mode Is On. Toggle either feature on and off by pressing Trunk/Key + Option
until beep is heard, then press the Unlock Button Once.
Vehicle as Been Started By Remote Control.
Vehicle Is Running Under Control of The Remote Start Unit.
Page 10
128-9103
10 of 26
Page 11
Battery Save Mode Icon Full Bar Flashing.
Battery Level Indicator, Shown Full.
Hood Or Trunk Input Was Activated.
Door Input Was Activated.
Vibration Sensor Was Activated.
Pre Detect Stage Of Sensor Was Activated.
Battery Replacement PA92: Use CR2032 X 2 or equivalent.
Intrusion & Warning Signals
LED
Rapid Flashing = Arming
Slow Flash = Armed
Off = Desarmed
On Solid = Valet Mode
Flash 1X Pause, etc,,, = Shock Sensor
Flash 2X Pause, etc,,, = Hood or Trunk
Flash 3X Pause, etc,,, = Doors
Siren Chirp Patterns
1Chirp* = Arm
2 Chirps* = Disarm
3 Chirps = Arm With Zone Active
4 Chirps = Disarm After Intrusion
* These Chirps are selectable in feature program mode.
Light Flash Indication
1 Flash = Arm
2 Flash = Disarm
3 Flash = Disarm After Intrusion
This device complies with FCC Rules Part 15 Operation is subject to the following two conditions
(1) This device may not cause harmful interference and
(2) This device must accept any interference that may be received, including interference that may
cause undesired operation.
NOTE:The manufacturer is not responsible for any radio or TV interference caused by unauthorized
modifications to this equipment. Such modifications could void the user’s authority to operate the
equipment
To purchase replacement transmitters or to get additional product information go to:
© 2012 Audiovox Electronics Corp., 150 Marcus Blvd., Hauppauge, NY, 11788 128-9103
ww w.prestigecarsecurity.com
Page 11
128-9103
11 of 26
Page 12

Modelo PA-920C
Manual del propietario
ACTIV ACIÓN DEL SISTEMA - ACTIVO:
1. Apague el motor, salga del vehículo y cierre todas las
puertas, tapa del capó y el baúl.
2. Presione y suelte el bloqueo y armar botón del
transmisor de llavero.
La antena LED del receptor comenzar a parpadear
lentamente, las luces de estacionamiento parpadean una
vez, y la sirena emita un pitido.
Si la sirena o cuerno emite 3 suena, entonces ha dejado una
puerta, baul o capó abierto. Simplemente cierre el punto de entrada
abierto proporcionará una protección completa. Si la sirena suena
tres veces, poco tiempo después de la activación, luego el exclusivo
patentado, retraso de cúpula iluminación aprender circuito ha sido programado y el
sistema ha detectado un punto de entrada abierto después de el retraso programado
ha expirado. Una vez más, el cierre del capó, baúl o puertas corregirá el problema.
No es necesario desbloquear y desarmar el sistema para realizar la corrección.
Si la sirena o cuerno no emite pitidos cuando usted bloqueo y armado de la alarma
luego los suena han sido apagados. Por favor consulte la sección titulada
"Eliminando el armar y desarmar suena" se encuentran en este manual.
Nota: Si seleccionable función 9, "un pitido eliminar desde el transmisor", puso en la
posición on durante la instalación, y luego selectivamente puede derrotar el armar &
desarmar chirridos manteniendo los transmisores bloquear o desbloquear el botón
durante 2 segundos.
Nota: Si el modo pasivo de brazo fue seleccionado en durante la instalación, luego
de 30 segundos después de haber cerrado la última puerta del vehículo, la unidad
se activará automáticamente. .
PROTECCIÓN MIENTRAS EL SISTEMA ESTÁ ARMADO:
Abrir cualquier puerta, tapa de campana o baul hará el alarma inmediatamente sonido .
La alarma continuará sonando durante 30 segundos, luego parar y seguir vigilando todos los
puntos de entrada protegida. Si el ladrón dejó una puerta abierta, la alarma sonará durante
seis ciclos de 30 segundos, permanecen armada e ignorar esa abierta zona.
Cuando el sistema está armado, el indicador de LED parpadeará lentamente. Esto sirve
como un disuasivo visual para cualquier ladrón potencial.
El LED es una bombilla corriente muy baja y no causa la batería del vehículo drenar, incluso
cuando desatendido durante períodos prolongados de tiempo.
Cuando el sistema es alarmante, las luces de estacionamiento del vehículo destellarán
durante el ciclo completo de 30 segundos, atrayendo atención visual hacia el vehículo.
Opcional - cuando el sistema está armado, circuito de arranque del vehículo será
prevenido. Si el ladrón debe decide ignorar la sirena, el vehículo, es no capaz del
comienzo.
Page 12
128-9103
12 of 26
Page 13

Cualquier impacto suave al vidrio del vehículo hará que la alarma para que suene una corta
serie de tonos de aviso. Todo impacto fuerte sobre los vidrios del vehículo causa que la
alarma de sonido para un total de 30 segundos.
Nota: Si su vehículo ha instalación de la el circuito opcional de iluminacion interior, la luz
interior parpadeara durante todo el ciclo de alarmante.
DESACTIVACIÓN DEL SISTEMA:
1. Al acercarse el vehículo, oprima y suelte el botón de desbloqueo y disarm transmisor.
La sirena o bocina chirridos dos veces y el LED se apaga.
Si se selecciona la función de activación pasiva, el LED comenzará a parpadear
rápidamente, indicando que el sistema sera automáticamente se reinicio.
Abra cualquier puerta para suspender la reactivación automática.
Si las luces de estacionamiento destellaran cuatro veces cuando desarmado, la
alarma fue disparada mientras estabas lejos.
Si la sirena o bocina no emite pitidos cuando usted desbloqueo y desarmado de la alarma
luego los chirridos han sido apagados. Por favor consulte la sección titulada “Eliminando el
armar y desarmar chirridos" se encuentran en este manual.
Electronica desbloqueo de la puerta es una característica opcional
Si se ha anadido la funcion opcional de iluminacion interior, como una mayor
Nota:
comodidad, el sistema se enciende en las luces interiores cuando el sistema esta
desarmado.
MIENTRAS EL SISTEMA ESTÁ SONANDO:
Si durante un estado alarmante, usted desea apagar la sirena sin desarmar su sistema de
seguridad, simplemente presione y suelte cualquier botón del transmisor que no sea el botón
Desbloquear y desarmar.
Esta acción se apagar la sirena pero deje el vehículo completamente armado y protegido.
Esta característica es particularmente útil si usted sabe de niños jugando cerca de su vehículo
que puede gatillo accidentalmente su sistema de seguridad. En este caso puede cancelar sin
desarmar la alarma que suene la sirena.
ISEÑALES DE ADVERTENCIA DE INTRUSIÓN:
Este sistema le informará si se ha producido un intento de intrusión mientras estabas lejos
del vehículo. Si se ha producido un intento de intrusión, la sirena sonará 4 veces y las
luces de estacionamiento destellarán 3 veces al desactivar el sistema.
Entrar al vehículo y observe el LED para identificar la zona que fue activado.
Si el LED destella una vez... pausa... una vez... pausa... etc., entonces hubo un intento
de intrusión a romper una ventana o un accesorio de activación de dispositivos que se han
agregado al sistema de alarma.
Si el LED parpadea dos veces... pausa... dos veces... pausa etc., entonces hubo un
intento de intrusión a una capo o baul.
Page 13
128-9103
13 of 26
Page 14

Si el LED parpadea tres veces... pausa... tres veces... pausa etc., entonces hubo un
intento de intrusión a través de una de las puertas del vehículo.
Estos indicadores de advertencia de intrusión están almacenados en la memoria del sistema
y sólo se borrarán cuando se encienda la llave de ignición.
INTERRUPTOR V ALET :
El interruptor valet le permite omitir temporalmente todas las funciones de alarma, eliminando
la necesidad de dar su transmisor a los asistentes de un estacionamiento o un mecánico del
vehículo. Cuando el sistema está en el modo valet, se omiten todas las funciones de alarma,
sin embargo, la función de pánico remoto y cerraduras remoto permanecerá operativas.
Las luces de estacionamiento todavía destellarán para indicar bloqueo y desbloqueo...
Para utilizar el modo valet, el sistema primero debe ser desarmado mediante el transmisor
de llavero o por el uso de la el interruptor de anulación manual.
1. Entrar en el vehículo y gire la llave de ignición a la posición de encendido.
2. Mantenga pulsado el interruptor pulsador valet hasta que el LED se enciende
sólido.
3. Para volver al funcionamiento normal, presione y suelte el interruptor del valet
pulsador en cualquier momento el encendido está conectado.
Nota: Siempre Recuerde devolver el sistema a su funcionamiento normal. Esto asegurará
que el vehículo queda protegido en todo momento.
DESARMAR EL SISTEMA SIN UN TRANSMISOR:
Su sistema de seguridad puede ser desarmado sin el uso del transmisor de llavero.
Esto es necesario, porque si el emisor se pierde o falla de la batería, usted tendría que operar su
vehículo.
Si su sistema ha sido seleccionado para anulación manual interruptor Valet, para saltar la alarma
sistema siga los pasos abajo.
1. Abra la puerta del vehículo. La alarma sonará.
2. Gire la llave de ignición a la posición de encendido.
3. Dentro de 5 segundos, oprima y suelte el interruptor pulsador valet.
El sistema de alarma dejará de alarmante y entrar en el modo (by-pass). Ahora puede iniciar
y manejar el vehículo normalmente.
Normalmente se utiliza este modo de anulación sólo si el emisor ha vuelto inoperante.
PROGRAMACIÓN DE SU CÓDIGO DE ANULACIÓN PERSONALIZADO:
A diferencia de los conmutadores de anulación fácilmente encontrado y derrotado, este sistema de
seguridad permite al consumidor a programar un código de anulación personal, ofreciendo un mayor
nivel de seguridad. Para tomar ventaja de esta opción, debe seleccionarse la función programable #
10 para la opción de código personalizado. Consulte a su centro de instalación para saber si esta
función está activada.
El sistema viene de fábrica con un código de anulación preprogramados de 1-1.
Para cambiar este código de anulación, haga lo siguiente:
1. Desarmar el sistema usando el transmisor desbloquear el botón, o por uso del valet,
interruptor, luego encienda el interruptor de encendido apagado luego.
2. Dentro de 10 segundos, pulsar y soltar al valet interruptor, 3 veces.
Page 14
128-9103
14 of 26
Page 15

3. Dentro de 10 segundos, gire el interruptor de encendido apagado, despues en, 3 veces.
(La sirena o bocina sonará y las luces parpadean una vez con cada ciclo del interruptor de
encendido).
4. Dentro de 10 segundos, comenzar a entrar el dígito elegido 10ths presionando y soltando
el botón valet cambiar de 1 arriba a 9 veces.
5. Dentro de 10 segundos el último dígito introducido 10ths, encienda el interruptor de
encendido apagado luego.
6. Dentro de 10 segundos, comenzar a introducir su elegido uno's dígito pulsando y soltando
el interruptor pulsador desde 1 hasta 9 veces.
7. Acabado girando el interruptor de encendido a la posición de apagado.
Si se acepta el nuevo código, la unidad informará el código recién ingresado, haciendo
parpadear el LED, indicando primero el dígito 10ths, pausa y luego los uno's dígitos.
La unidad informará el código de nuevo tres veces con una segunda pausa entre cada código
y, a continuación, el sistema empezará a conjunto.
Si el patrón de iluminación LED informa el código previamente almacenado, el nuevo código
no se ingresó correctamente. Por favor, repita los pasos 1 a 7 arriba teniendo en cuenta lo
siguiente.
Cifras aceptables del décimo o de uno son de 1 a 9. Al menos 1 dígito debe introducirse
en el décimo y el uno lugar. El módulo no reconocerá un 0 (cero).
Nota: Si transcurridos 15 segundos de inactividad, o si el interruptor de encendido esté
apagado para más luego de 5 segundos durante cualquiera de los pasos anteriores,
la unidad volverá nuevamente al último código almacenado correctamente.
Ejemplo de programación de código personalizado:
Para cambiar la fábrica preajustada código de "11" a "52" siga los pasos que se indican a
continuación.
1. Desarmar el sistema mediante el transmisor o el valet, interruptor de anulación.
2. Gire el interruptor de ignición a la posición de encendido
3. Dentro de 10 segundos, pulsar y soltar al valet, anulación el interruptor, 3 veces.
4. Dentro de 10 segundos, gire el interruptor de encendido apagado, entonces en, apagado,
entonces en, apagado, entonces en. (La sirena o bocina sonará y las luces parpadean
una vez con cada ciclo del interruptor de encendido).
5. Dentro de 10 segundos, empiezan a Pulse y suelte el interruptor pulsador para ajustar el
dígito de décimas.(Según el ejemplo, pulse y suelte 5 veces para ajustar el dígito de
décimas a 5).
6. Dentro de los 10 segundos de la última presión del pulsador, encienda el interruptor de
encendido, apagado, entonces en.
7. Dentro de 10 segundos, empiezan a Pulse y suelte el interruptor pulsador para definir las
unidades de dígito.
(Según el ejemplo, pulse y suelte 2 veces para ajustar el dígito de las unidades a 2).
8. Gire el interruptor de ignición a la posición de apagado, inmediatamente observar el patrón
de iluminación LED.
Usted notará que el LED parpadea cinco veces, pausa y luego parpadea dos veces, hacer una
pausa.
Este patrón se repetirá tres veces para indicar que el nuevo código (52) ha sido aceptado y
almacenado en la memoria, a continuación, el sistema empezará a conjunto.
Si el patrón de iluminación LED informa el código previamente almacenado, el nuevo código
Page 15
128-9103
15 of 26
Page 16

no se ingresó correctamente. Por favor, repita los pasos 1 a 7 arriba teniendo en cuenta lo
siguiente.
Cifras aceptables del décimo o de uno son de 1 a 9. Al menos 1 dígito debe introducirse en el
décimo y el uno lugar. El módulo no reconocerá un 0 (cero).
NOTA: Si transcurridos 15 segundos de inactividad, o si el interruptor de encendido esté
apagado para más luego de 5 segundos durante cualquiera de los pasos anteriores,la unidad
volverá nuevamente al último código almacenado correctamente.
DESARMAR EL SISTEMA SIN EL TRANSMISOR.
UTILIZANDO EL CÓDIGO PERSONALIZADO
Suponiendo que el código de Original de fábrica no ha cambiado, y el código de anulación de
11 por defecto está en la memoria del sistema.
1. Entrar en el vehículo y gire el interruptor de ignición a la posición de encendido.
Nota: La Sirena Sonara
2. Dentro de 5 segundos, oprima y suelte el interruptor pulsador valet uno vez.
3. Dentro de 5 segundos, apague el interruptor de encendido a continuacion en.
4. Dentro de 5 segundos, oprima y suelte el interruptor pulsador valet uno vez.
5. Encienda el interruptor de encendido apagado luego y arrancar el vehículo.
Nota: Si ha cambiado el codigo de reemplazo originales de fabrica, luego sustituir su neuvo
codigo decimo paso 2 arriba y uno para el paso 4 anterior.
PULSADOR BOTON V ALET , SEGURIDAD y CONTROL, INTERRUPT OR DE PROGRAMA
La pulsador valet, seguridad, interruptor de control le permite desactivar temporalmente la
función de arranque remota del sistema. Esto se recomienda siempre que el vehículo esté en
servicio por un mecánico.
Para colocar el sistema en el modo de servicio mecánico:
1) Con el sistema desarmado y desbloqueado y el encendido apagar, presione y mantenga
presionado el interruptor pulsador.
2) Mientras sujeta el interruptor pulsador, gire la llave en luego apagado tres veces.
3) El LED empieza a parpadear dos destellos cortos, seguidos por un destellos
prolongados y sigue este patrón hasta que vuelve al modo normal de operación.
Esto pone la unidad en el modo "Remote Start Override" indicando que el sistema de
arranque remoto está en el modo de servicio y no se iniciará desde el transmisor o
cualquier otro dispositivo de entrada, telemático o de otra manera.
Para salir del modo de anulación de arranque remoto:
1) Con el sistema desarmado y desbloqueado y el encendido apagar, presione y mantenga
presionado el interruptor pulsador.
2) Mientras sujeta el interruptor pulsador, gire la llave en luego apagado tres veces.
3) El LED se apaga indicando que la unidad de arranque remoto es totalmente funcional
nuevamente.
REMOTO CAR FINDER O FUNCIÓN PÁNICO:
La los botones de bloqueo o desbloqueo transmisor también se utilizan para acceder al modo
de pánico/buscador de coche.
Esta característica es particularmente útil en un concurrido estacionamiento donde encontrar
tu coche puede ser difícil, o si hay personajes sospechosos colgando sobre su vehículo.
Para acceder a este modo, mientras que dentro de la gama de su coche, simplemente
Page 16
128-9103
16 of 26
Page 17

presione y sostenga bien el bloqueo o desbloqueo el botón del transmisor durante tres
segundos.
Las luces de estacionamiento comenzará a parpadear, la sirena sonará, también si está
conectado, sonará la bocina del vehículo, haciendo su vehículo audible y visible.
Las luces, sirena, y bocina se detendrá automáticamente después de 30 segundos
Si desea desactivar este modo antes del vencimiento de los 30 segundo temporizador, presione
y sostenga durante tres segundos o el bloqueo o de desbloqueo boton mientras el sistema
está parpadeando y sonido, o presione y suelte el botón de opción, iniciar, o tronco boton una
vez.
CONTROL REMOTO DEL BAÚL:
Si tienes maletero eléctrico suelte en su vehículo y se agregó la opción de desbloqueo
remoto tronco, simplemente pulse y mantenga pulsado el botón de la llave/tronco de su
transmisor de llavero por 3 segundos, o hasta que se abra el maletero eléctrico de su
vehículo.
ARRANQUE REMOTO DEL VEHÍCULO:
Esta unidad no arranca el vehículo si existe alguno de las siguientes situaciones es presentes;
a) Se abre el capó del vehículo. b) El selector de cambio de velocidades no es en el parque.
c) El pedal del freno es presiona. d) El sistema está en el modo de anulación de arranque
remoto.
1. Para arrancar el vehículo, oprima y suelte la tecla / tronco boton dos veces en 2 segundos.
El vehículo arrancará y seguir funcionando para el tiempo de funcionamiento programado
de 5, 10, 15 ó 20 minutos.
Como indicación visual, las luces de estacionamiento permanecerá constante, o destellos,
dependiendo de la configuración de su centro de instalación.
2. Cuando llega al vehículo, gire la llave de ignición a la posición de encendido (no en la
posición de inicio de resorte) y, a continuación, pise el pedal de freno para desenganchar el
arrancador remoto. El vehículo seguirá funcionando, pero ahora bajo su propio poder.
Nota: El motor no funcionará todo el ciclo preprogramado si realiza alguna de las siguientes
funciones;
a) Se abre el capó del vehículo. b) El selector de cambio de velocidades no es en el parque.
c) El pedal del freno es presiona. d) El sistema está en el modo de anulación de arranque
remoto.
Si el opcion botón del emisor no puede utilizarse con su vehículo, esto depende de las
características requeridas por la marca del vehículo y el modelo, puede programarse para
operar un segundo vehículo, proporcionando que el segundo vehículo tiene una alarma de
modelo Audiovox similar instalado.
FUNCIONAMIENTO EN MODO DE ARRANQUE DE TEMPORIZADOR AUTOMÁTICO:
El sistema tiene la capacidad para iniciar automáticamente el vehículo cada 2 o 4 horas por
un período de 48 horas.
Esta característica es especialmente útil en climas fríos donde es el único medio para
mantener caliente el motor y fluidos del motor periódicamente, arrancar la el motor.
Advertencia! Asegúrese de que el vehículo está al aire libre antes de usar este o cualquier
arranque remoto del vehículo.
Un motor en funcionamiento produce humos peligrosos de monóxido de carbono que
pueden ser dañino o fatal si se produce una exposición prolongada. No arranque el
vehículo si es en un garaje cerrado.
Page 17
128-9103
17 of 26
Page 18

P ARA INICIAR EL TEMPORIZADOR DE ARRANQUE AUTOMÁTICO:
1. Gire la llave de ignición en luego apagado
2. Dentro de 10 segundos, activar el comando de la arranque RF dos veces.
(Pulse el botón de tronco clave de su transmisor de llavero 4 veces).
Las luces de estacionamiento destellarán y la sirena sonará 2 o 4 veces para indicar que el
modo de inicio programado se activa. el vehículo arrancará en un intervalo de 2 o 4 horas
basen sobre el número de chirridos escuchado como se describió anteriormente. El
vehículo seguirá ejecutar el tiempo predeterminado de 5, 10, 15, oe 20 minutos y luego se
apagará. Esto continuará durante 48 horas.
Nota: El temporizador de arranque automático también puede iniciarse desde el transmisor
de llavero.Para hacer esto:
1. Arranque el vehículo usando el transmisor de llavero apretando y soltando el botón del
transmisor de tronco/tecla 2 veces.
2. Apague el vehículo usando el transmisor de llavero apretando y soltando el botón del
transmisor de tronco/tecla 2 veces.
3. Dentro de 10 segundos del paso 2 control remoto de arranque el vehículo pulsando de el
botón tronco/clave del transmisor 4 veces.
Las luces de estacionamiento destellarán y la bocina sonará dos veces para indicar una
secuencia de inicio de dos horas o cuatro veces para indicar una secuencia de inicio de
cuatro horas.
La secuencia el arranque de dos o cuatro horas está seleccionada en el momento de la
instalación durante el modo de ajuste de la función.
Por favor consulte a su centro de instalación si desea que la secuencia de 2 o 4 horas
cambió.
CANCELAR EL TEMPORIZADOR DE ARRANQUE AUTOMÁTICO:
para cancelar el temporizador de arranque automático, realice uno de los siguientes.
1. Arranque el vehículo por el uso de la llave y luego pise el pedal del freno.
2. Control remoto arranque el vehículo usando el transmisor de llavero.
ELIMINACIÓN DE LOS NORMALES DE ACTIV ACIÓN y DESACTIV ACIÓN CHIRRIDOS:
Como se explicó anteriormente en el manual, puede eliminar los chirrido selectivamente cada
vez que armar o desarma el sistema. Si se ha activado la característica, simplemente presione
y mantenga presionado el botón de bloqueo/armar o desbloquear/disarm durante dos
segundos.
Si encuentras los chirridos el de activación y desactivación el molestos, puede desactivarse
permanentemente, eliminando la necesidad de que mantenga presionado los botones de
bloqueo y el armar o desbloquear/desarmar durante 2 segundos.
Para hacer esto:
1. Gire el interruptor de encendido en luego apagado.
2. Dentro de 10 segundos, presione y suelte el interruptor valet tres veces.
3. Si los chirridos estaban habilitados antes de empezar, entonces escuchará dos pitidos
indicando que se hayan deshabilitado.
Si los chirridos estaban deshabilitado antes de empezar, entonces escuchará un pitido
indicando que se hayan habilitado
Nota: Cuando de activación / desactivación chirridos son discapacitados, la intrusión, 4-
chirrido y la defectuosa zona, 3 chirridos indicadores seguirá funcionando.
Page 18
128-9103
18 of 26
Page 19

Estas son las señales de advertencias importantes que algo puede haber pasado a
su vehículo y no pueden eliminarse.
SELECCIÓN DEL MODO DE SENSOR DE CHOQUE DE RF:
La manera en que reacciona su sistema de alarma amenazando vibraciones, creadas por
intentos de entrar en el vehículo por romper una ventana, es ajustable por el transmisor
inmediatamente después de la activación.
Hay cuatro modos de funcionamiento que pueden ser seleccionadas por el operador:
1. Funcionamiento, (modo predeterminado), en este modo, cualquier vibración fuerte hará
que la sirena sonido (full detectar) durante 30 segundos.
Cualquier menor vibración hará que la sirena emita seis corta distancia advierten chirridos,
(pre-detect).
2. Etapa 1 (omitir pre-detect). En este modo, se eliminarán los chirridos de warn creados por
la vibración menor. Si se produce una vibración fuerte, la sirena sonará.
3. Etapa 2 (omitir pre & completo detectar). Tanto el pre y completo detectan etapas del sensor
de choque son derrotadas. La unidad no reacciona a la vibración de cualquier magnitud.
4. Etapa 3 (modo de ciudad). En este modo, los seis, pre-detect tonos cambiará a un total de
diez segundos de aviso de tonos. La duración de gatillo detección completa se reducirá desde
30 segundos a 15 segundos.
Nota: Preparando el escenario del sensor de choque será ser eficaz para un ciclo de activación
sólo. Una vez que el sistema ha sido desarmando, el ciclo de activación muy próximo
hará que el sensor, de forma predeterminada, para la etapa de operación normal.
Para cambiar o ajustar el sensor de choque, presione y suelte el botón de bloqueo y armar del
transmisor de llavero.
1. Dentro de 2 segundos de activacion, presione y suelte el botón de bloqueo y armar 1 vez,
para derrotar a la etapa de pre-warn del sensor de choque. (Las luces parpadean y la sirena
sonará dos veces).
2. Dentro de 2 segundos del paso 1, presione y suelte el botón de bloqueo 2 veces, para
derrotar a la pre y completo detectar etapas del sensor de choque. (Las luces parpadean y la
sirena sonará tres veces).
3. Within 2 seconds of step 1, press and release the ARM button 3 times to
enter the "City Mode" of operation. (The lights will flash and the siren will chirp four times.)
Bajo control del arrancador remoto, el sistema puede programarse para que pueda inhibir el
sensor de choque por el uso del transmisor. Si el sistema ha sido programado durante la
instalación, simplemente presione el botón de bloqueo de su transmisor de llavero en cualquier
momento durante el ciclo de arranque remoto. El sensor de choque se inhibida para un ciclo
de ejecución y reanudará el funcionamiento normal después de la unidad de arranque remoto
se apaga.
Confirmar con su la centro de instalación para determinar si esta función ha sido programada
en su sistema.
DE DISPOSITIVO OPCIONAL SALIDA (CANAL 3):
Operado por: El botón del transmisor tronco / clave
Esta salida activará cuando el tronco / clave transmisor botón es presionado durante 3
segundos. Aunque esta salida está diseñada para operar la opción del baúl eléctrico de
vehículos, otros dispositivos opcionales pueden conectarse a este canal. Consulte a su
centro de instalación para obtener más información acerca de esta salida.
Page 19
128-9103
19 of 26
Page 20

FUNCIÓN REMOT A ADICIONAL (CANAL 4):
Operado por: El botón de "opción" de transmisores
Este sistema tiene una función adicional que puede ser conectada a una serie de distintos
accesorios opcionales. Algunos de los usos más comunes para este canal son;
a) Remota cierre de ventana, b) Operación remota de la puerta del garaje.
Para hacer funcionar remotamente el dispositivo indicado, momentáneamente
prensa y aliviar el botón de "opción" del transmisor.
MODO DE TEMPORIZADOR DE TURBOCOMPRESOR:
Este sistema proporciona un medio para enfriar los Turboalimente vehículos, si así está
equipado, permitiendo que el vehículo continúe funcionando, para un período determinado de
tiempo, cada vez que el motor del vehículo está convertido apagado.
Esta característica requiere que el sistema esté configurado para el temporizador del
turbocompresor durante la instalación.
Consulte con su centro de instalación para estar seguro de que esta función se activa, y por
cuánto tiempo el vehículo seguirá funcionando, 3, 5 o 10 minutos después el interruptor de
encendido esté apagado.
Para activar el turbo timer, en cualquier momento el motor ha estado funcionando durante más
de 15 segundos:
1) Coloque el selector de velocidades en posición de estacionamiento.
2) Establecer el estacionamiento, (mano), freno.
3) Asegúrese de que el pie no está en el pedal del freno.
4) Pulse el pulsador de programa 2 veces dentro de 5 segundos de paso 1.
Las luces parpadearán dos veces para indicar que el modo fue introducido con éxito.
Si las luces de estacionamiento destellaran cuatro veces, esto indica el modo de aparato de
turbocompresor estaba en y ahora está apagado.
Con el turbo modo seleccionado temporizador , después de que has llegado a su destino,
mientras el motor sigue funcionando, coloque el freno de estacionamiento, 2 segundos de
pausa y, a continuación, gire el interruptor de ignición a la posición de apagado.
El motor seguirá funcionando la hora programada, según la selección durante la instalación.
Si no desea que el vehículo continúe funcionando durante un ciclo, simplemente pise el freno,
el establecer del aparcamiento (mano), freno, o activar el botón de inicio el transmisor dos
veces en sucesión. Cualquiera de estos hará que el motor se apague.
PROGRAMACIÓN DE LOS TRANSMISORES:
A veces puede ser necesario a cambio de programa o transmisores adicionales para su
uso con el sistema, para hacerlo:
1) Con el sistema desbloqueado o desarmado, gire la llave a la posición de encendido.
2) Presione y suelte el interruptor de botón valet tres veces.
Parpadean las luces de estacionamiento y la bocina suena una vez para indicar que la
unidad está en el modo de programación del transmisor.
El LED parpadeará una pausa de tiempo, una pausa de tiempo, etc. Esto indica que el
módulo está en el modo de programación del canal 1, y modo de programación del botón
único.
3) Presione y mantenga presionado el botón de bloqueo de cada transmisor adicional que
desee operar el sistema, hasta que escuche la bocina sonido, o ver las luces de flash.
Nota: La unidad es capaz de almacenar hasta 4 transmisores. Si se agrega un quinto
transmisor, se empujará el primer transmisor programado afuera.
Page 20
128-9103
20 of 26
Page 21

Una vez que el transmisor todas han sido programados, apague el interruptor de encendido
para salir del modo de programa.
Al completar el paso anterior, los tres botones de los transmisores quedarán programados
con sus ubicaciones predeterminadas.
bloquero = bloqueo, armado y urgencia
desbloquero = desbloqueo, desarme y urgencia
baul = liberación del baúl y cancelación del modo urgencia; mantenga
presionado 2,5 segundos para liberar el baúl; presione mientras
Opcion = Consulte a su centro de instalación para obtener
ELIMINACIÓN DE TRANSMISORES DEL SISTEMA:
Puede ser necesario para eliminar un transmisor perdido o para priorizar un transmisor
que está programados para su sistema.
Para borrar un transmisor que se ha programado en su sistema:
1) entrar en el modo de programación del transmissor que se muestra en la siguiente
página.
2) Mantenga pulsado cualquier botón del transmisor que no ha sido programado en el
canal 1 hasta escuchar un chirrido, entonces soltar e inmediatamente presione el mismo
botón una segunda vez hasta que oiga un chirrido largo seguido de un pitido corto. Esta
acción borra ese transmisor.
Si has perdido o robado transmisores, siguiendo la siguiente información con seguridad
eliminará todos los transmisores programados para su sistema.
Nota: Para este procedimiento, debe tener todos los transmisores que desee han operar
su sistema disponible.
1) Entrar en el modo de programa del transmisor del canal 1 como se indicó anteriormente
Presione y sostenga el botón de bloqueo, uno por uno, de cada transmisor que desee
operar el sistema, asegurándose de que ocupas todas las ranuras de transmisor 4.
En otras palabras, tiene tres transmisores que usted desea seguir programado. Presione y
mantenga presionado el botón de bloqueo de transmisor uno hasta que se oye un chirrido
largo, luego presione y mantenga presionado el botón de bloqueo del transmisor dos,
luego presione y sostenga el botón de bloqueo de transmisor tres, siguió presionando y
sosteniendo el botón de bloqueo de transmisor uno un secundo tiempo.
Esta acción llena todas las ranuras del receptor 4 y ahora cualquier transmisores perdidos
o robados no funcionará el sistema.
Si estás incómodo sobre la programación de los transmisores adicionales como se indica
en los procesos anteriores, por favor póngase en contacto la centro de la instalación, o
utilizar el sitio web que aparece en la parte posterior del transmisor para obtener ayuda.
se cancela el sonido de urgencia.
información sobre esta función.
Transmisores incluidos con este kit:
Los transmisores son programables y en algunos casos podría ser necesario reemplazar
los transmisores si se rompen o son hurtados. En tal caso, yendo a
ww w.prestigecarsecurity.com
Los transmisores que se suministran con este kit son PA91 y PA92.
Segunda operación de vehículo:
Pulse el botón de baul /key + el botón de opcion por durante 2 segundos,,,, LED parpadea 2
veces. Suelte los botones y, a continuación, presione cualquier transmisor boton para
seleccionar segundo modo de vehículo.
Cuando en el segundo modo de coche, pulse el botón de baul/key + el botón de opción
Page 21
128-9103
21 of 26
Page 22

durante 2 segundos, el LED parpadea 1 vez para regresar a la operación del vehículo
principal.
Reemplazo de batería: Use CR2016 X 2 o similar.
REEMPLAZO DE LA BA TERÍA P A91
1) Usando una moneda palanca aparte el caso donde
indicado por la flecha
2) Separe, cuidadosamente, la parte superior de la inferior.
3) Quite cautelosamente las baterías descargadas de
debajo el clip.
4) Deseche la batería descargada como corresponde.
5) substituya por dos nuevas baterías CR2016.
6) cuidadosamente alinee el caso superior e inferior y
presione juntos hasta que los casos se cierra firmemente
Usando el Remote Control:
Funcionamiento el mando de dos vías:
Pulse simultáneamente los botones de opción de su control remoto +
tronco clave hasta que 1 pitido para alternar el control de la iluminación
posterior en 2 segundos o 5 segundos.
Pulse simultáneamente los botones de opción de su control remoto +
tronco clave hasta oír 2 tonos para acceder a las funciones de su control
remoto.
Reloj: Ajuste las horas estará parpadeando, utilice de tronco/clave el
botón, para aumentar y el botón de opción para disminuir.
Utilice el botón de bloqueo para guardar y mover para los ajuste, de los
minutos, use la tecla de tronco para aumentar y el botón de opción para
disminuir. Utilice el botón de bloqueo para guardar y pasar a la siguiente
función, alarma reloj.
Alarma reloj: De alarma parpadea horas, utilice el botón de tronco/clave
para aumentar y el botón de opción para disminuir. Utilice el botón de bloqueo para guardar
y pasar a los minutos del reloj de alarma configuración, utilice el botón del tronco/clave
para aumentar y el botón de opción para disminuir. Utilice el botón de bloqueo para guardar
y mover a la Cuenta regresiva temporizador ajuste.
Temporizador de cuenta regresiva: Horas de conteo hacia abajo temporizador parpadea,
utilice el botón de tronco/clave para aumentar y el botón de opción para disminuir. Utilice el
botón de bloqueo para guardar y mover para los ajustes de los minutos count down
temporizador, utilice de tronco/clave para aumentar y el botón de opción para disminuir.
Utilice el botón de bloqueo para guardar y mover para seleccionar el temporizador de
cuenta regresiva activado o desactivado. Utilice la tronco/clave boton de uso para
encender, utilice la opción boton apagar.
Presione y sostenga tronco/clave + botones de opción, o espere 5 segundos de inactividad,
hará que el transmisor salir del modo de ajuste de la función.
Configuración de Control remoto adicional:
Batería modo de ahorro: Presione tronco/clave + opción hasta oír 3 tonos de sonido =
modo de ahorro de batería. La unidad permanecerá en la batería modo, indicado por la
batería icono parpadeando, hasta que se pulsa cualquier botón.
Page 22
128-9103
22 of 26
Page 23

Modo de bloqueo de botones: Pulse los botones de opción + tronco clave simultáneamente
hasta escuchar uno tono de sonido, Presione el botón de bloqueo = modo de bloqueo de
botón, repetir para desbloquear los botones.
Melodía, vibrar, melodía w/vibración selección: Presione los botones de opción + tronco/
clave simultáneamente hasta escuchar un tono de sonido 1 Pulse el botón de desbloqueo =
melodía, una segunda vez = vibrar, un tercer = melodía w/vibración.
Programar el temporizador de 10 minutos Count Down: Pulse la tronco de clave + opción
botones simultáneamente hasta 1 pitido es escuchar , y pulse el botón de T ronco/clave comienza
a los 10 minutos Temporizador de cuenta regresiva. El transmisor emitirá 10 veces una vez
expira el temporizador.
Transmisor botón pitidos tonos en o apagado: Pulse la tecla de tronco + opción botones
simultáneamente hasta 1 pitido es escuchar y pulse el botón de opción para alterna los
tonos de sonido transmisores botón encendido y apagado.
Segunda operación de vehículo: Presione los botones de opción + baul clave simultáneamente hasta
1 pitido se escucha a continuación, presione el bloqueo + botones de desbloqueo simultáneamente
permite activar y desactivar el modo secundo auto. Cuando en el segundo modo de auto, usted puede
programar el transmisor a un segundo vehículo que puede tener un similar Panther alarma sistema
instalado permitiendo completo control funcional de ambos vehículos.
ICONOS Y SÍMBOLOS QUE AP ARECEN EN SU TRANSMISOR DE DOS VÍAS:
Las puertas están bloqueado icono.
Las puertas están desbloqueado icono.
Icono de modo de valet.
Icono cuando transmite, indica cualquier botón activo.
Icono para indicar cuando el transmisor está dentro del alcance.
Icono de tiempo modo de inicio
Formulario dentro de su vehículo, alguien te está llamando
Vibrar y o modo de tono está activado.
Vehículo se ha iniciado por Control remoto.
Vehículo está funcionando bajo el control del icono de la unidad de arranque
remoto.
Modo bar completo de parpadear el icono de ahorro de batería.
Icono de indicador de nivel de batería, que se muestra completa
Page 23
128-9103
23 of 26
Page 24

Campana o baul entrada había sido activado.
la puerta del vehículo había sido abierto icono
El sensor de choque fue desencadenada icono.
Se activo la pre avisar etapa al la sensor de choque.
Reemplazo de la batería para el PA92 uso 2 X CR2032 o equivalente
Funciones del sistema de un vistazo
INDICACIONES DE LOS LED
Parpadeo rapido = activacion pasiva
Parpadeo lento = armado
Apagado = desactivado
En solido = modo de valet
1 destello con pausa etc,,, = sensor de choque activado
2 destellos con pausa etc,,, = capo o baul activado
3 destellos con pausa etc,,, = puertas activadas
INDICACIONES DE CHIRRIDOS
1 Pitido* = armar
2 Pitidos* = desarmar
3 Pitidos = armar con zona activa
4 Pitidos = desarmar despues de intrusion
*Estos pitidos pueden ser desactivados en programacion or con el transmisor
INDICACIONES DE DESTELLOS
1 Destello = armar
2 Destello = desarmar
3 Destello = desarmar despues de intrusion
ADVERTENCIA: GAS DE MONÓXIDO DE CARBONO PUEDE PROVOCAR LESIONES GRAVES E INCLUSO LA
MUERTE.
Es responsabilidad exclusiva del usuario para operar el vehículo que este sistema fue instalado de forma segura.Este
dispositivo no utilizado en un espacio cerrado como un garaje, conectada o desconectada de cualquier áreas
parcialmente cerradas, puerto de coche o una casa. También este aparato debe colocarse en el modo de servicio
cuando salga del vehículo para el servicio, para evitar lesiones al técnico de servicio.
Este dispositivo cumple con la reglas de FCC parte 15 funcionamiento está sujeto a las dos condiciones siguientes
(1) Este dispositivo no puede causar interferencias dañinas y
(2) Este dispositivo debe aceptar cualquier interferencia que puede ser recibida, incluyendo interferencia que pueda
causar un funcionamiento no deseado.
Nota: el fabricante no es responsable de cualquier interferencia de radio o TV causada por modificaciones no
autorizadas en este equipo. Estas modificaciones podrían anular la autoridad del usuario para operar el equipo
Para comprar transmisores del reemplazo o
conseguir la información de producto
adicional va: www.prestigecarsecurity.com
© 2012 Audiovox Electronics Corporation 150 Marcus Blvd. Hauppauge N.Y. 11788 128-9103
Page 24
128-9103
24 of 26
 Loading...