

Page 1

User Manual
MAA502AM
WiFi Internet Melody Station
Page 2

Copyright
The contents of this publication may not be reproduced in any part or as a whole, stored,
transcribed in an information retrieval system, translated into any language, or transmitted in any
form or by any means, mechanical, magnetic, electronic, optical, photocopying, manual, or
otherwise, without the prior written permission.
Trademarks
All products, company, brand names are trademarks or registered trademarks of their respective
companies. They are used for identification purpose only. Specifications are subject to be changed
without prior notice.
FCC Interference St atement
This equipment has been tested and found to comply with the limits for a Class B digital device
pursuant to Part 15 of the FCC Rules. These limits are designed to provide reasonable protection
against radio interference in a commercial environment. This equip ment can generate, use and
radiate radio frequency energy and, if not installed and used in accordance with the instructions in
this manual, may cause harmful interference to radio communications. Operation of this
equipment in a residential area is likely to cause interference, in which case the user, at his own
expense, will be required to take whatever measures are necessary to correct the interference.
CE Declaration of Conformity
This equipment complies with the requirements relating to electromagnetic compatibility, EN
55022/A1 Class B.
Page 3

Table of contents
Chapter 1 Introduction.............................................................4
1.1 Package List.....................................................................4
1.2 Hardware Installation....................................................... 4
Chapter 2 Getting Start............................................................6
2.1 How to operate.................................................................6
2.1.1 Easy Wizard....................................................................6
2.1.2 Function configuration..................................................7
Chapter 3 Making Configuration...........................................13
3.1 Network Setup................................................................13
3.1.1 Basic Requirement ......................................................13
3.2 Software Installation......................................................24
3.3 Listen to Music...............................................................32
3.4 Setup the Alarm .............................................................38
3.5 Setup the Clock..............................................................39
3.6 Setup RSS....................................................................... 40
3.7 Miscellaneous Setup .....................................................42
Chapter 4 Troubleshooting..................................................... 45
Page 4

Chapter 1 Introduction
Congratulations on your purchase of this outstanding MAA502 Wireless Melody Station. This product is
specifically designed for Home entertainment needs. It provides music resource for Internet Radio, FM,
UPnP media server and USB MP3 player, it is easy to configure and operate even for non-technical users.
Instructions for installing and configuring this product can be found in this manual. Before you install and
use this product, please read this manual for fully exploiting the functions of this product.
1.1 Package List
items Description Contents Quantity
1
Wireless Melody Station
1
2
3
4
5
Power adapter
CD
Remote Controller
QIG
1.2 Hardware Installation
Hardware configuration
Internal PIFA
antenna
1
1
1
1
USB port
Vol +/- Play/pause
Back key Option key
Power
on/off
Power jack
Reset
WPS
Earphone
RCA jack
FM antenna
RJ45
Page 5
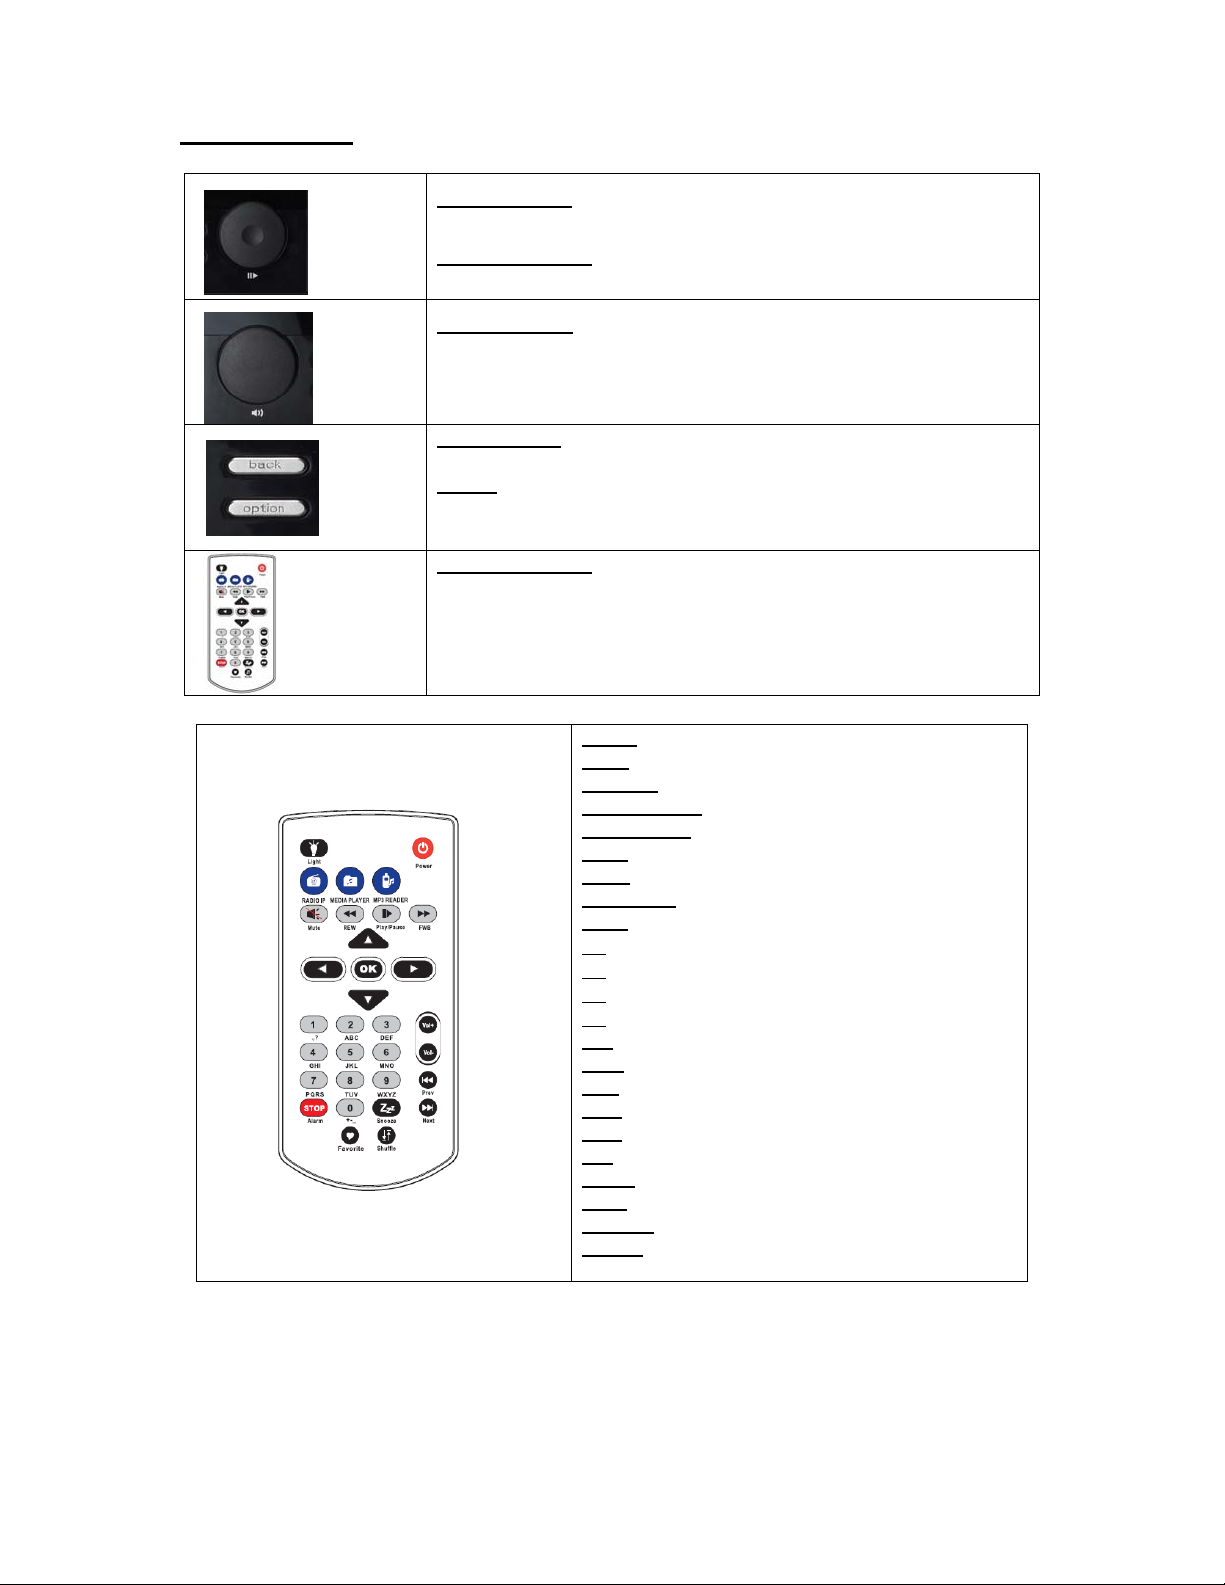
How to operate :
Function select
function, and press it once you want to select the function you choose.
Play /Pause music
or one station.
Volume control
change the volume.
Back last page – You can press ‘back’ key once you want to go back last
page.
Option
– This key designs for specific use, such as Stop playing music,
go to favorite etc.
Remote controller – You can use the remote controller to select the
function you want to choose. (see below Fig. 1)
– You can scroll this rotary wheel to change the
– You can press this button once you select one song
– You can scroll this rotary wheel when you want to
Power – standby/ power on
Light
– light dimming
Radio IP – Go to Internet Radio
Media Player – Go to Media Server
MP3 Reader
Mute – Mute
REW – backward
Play/Pause
FWB – forward
– Go to MP3 player
– Play/Pause
–up
–down
– left
–right
– OK
OK
– Volume up
Vol+
Vol-
– Volume down
Prev
– Prev song
Next – Next song
1~0
– Numeric or alphabet input
STOP
– Stop playing music
ZZZ – Snooze
Favorite
Shuffle
Fig. 1: Remote controller
– add to My favorite
– shuffle music
Page 6
Chapter 2 Getting Start
2.1 How to operate
Please prepare 1 router (Wire / Wi-Fi function) before you setup this Wi-Fi Melody Station, you can
follow the steps as below to setup this machine once you get ready.
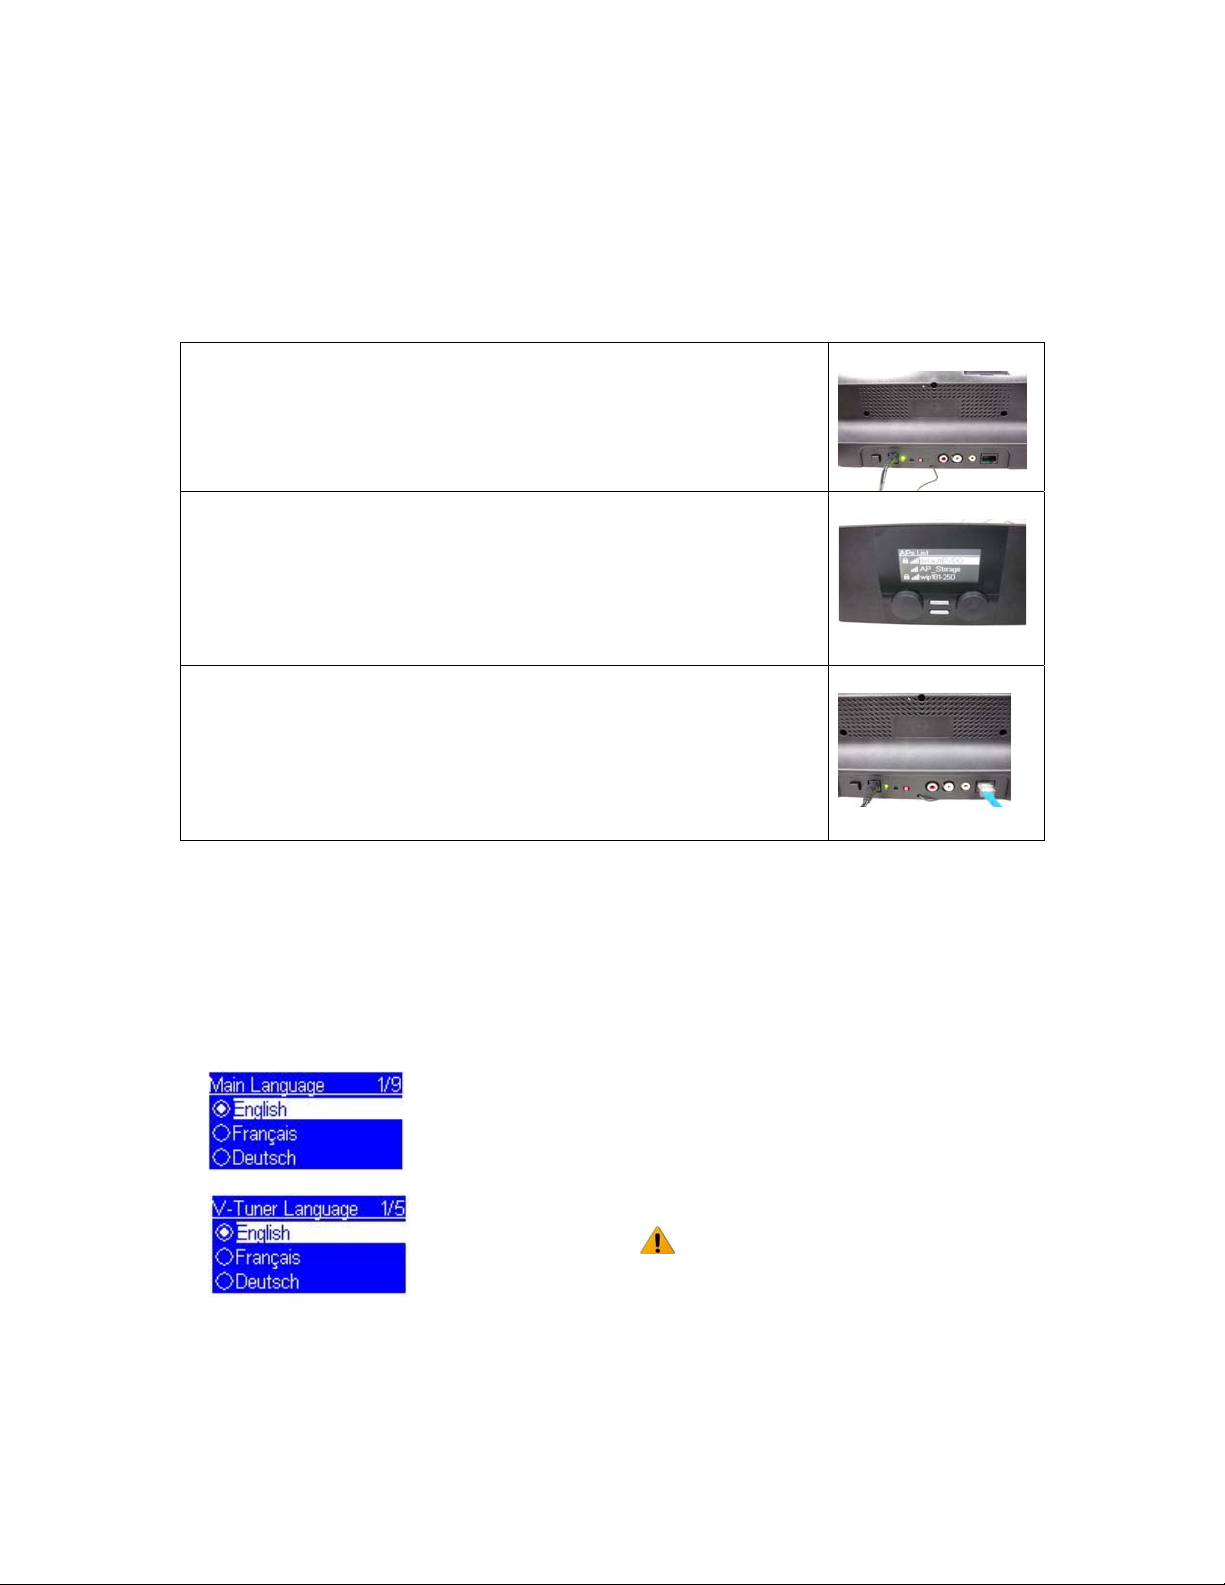
Step 1. Power on:
Plug in power adapter and press the power switch on to activate this
machine.
Step 2. Connect to Wi-Fi Router from AP lists
If you have a router with Wi-Fi function, this Wi-Fi Internet Melody
Station will automatically find the available AP lists for you to select.
(See Chapter 2.1.1 to do the detailed setup)
Step 3. Connect to wired Router
If you want to connect with your router (AP) by a RJ45 cable, you can
go ‘Setup’ to change advance setting / configure network to wired
client/ AP mode. (See Chapter 2.1.1 to do the detailed setup)
2.1.1 Easy Wizard
When you power on Wireless Melody Station, it will lead you to choose the main language and
V-Tuner language (see as Fig. 1-1)
Main language:
Internet Radio (v-Tuner) language:
Note: Please note that all screens we captured
are for your reference. Only if you find any
inconsistency in this document, please follow
Fig. 1-1
It will auto run and detect AP list s after fi nishing the la nguage setting, if you sel ect the AP witho ut
encryption, press ‘ok’ to continue. (see as Fig. 1-2), if you select the AP with key, then it will auto
detect the type of encryption, then key-in the password, press ‘ok’ to continue. (See as Fig. 1-3)
the MMI on machine.
Page 7
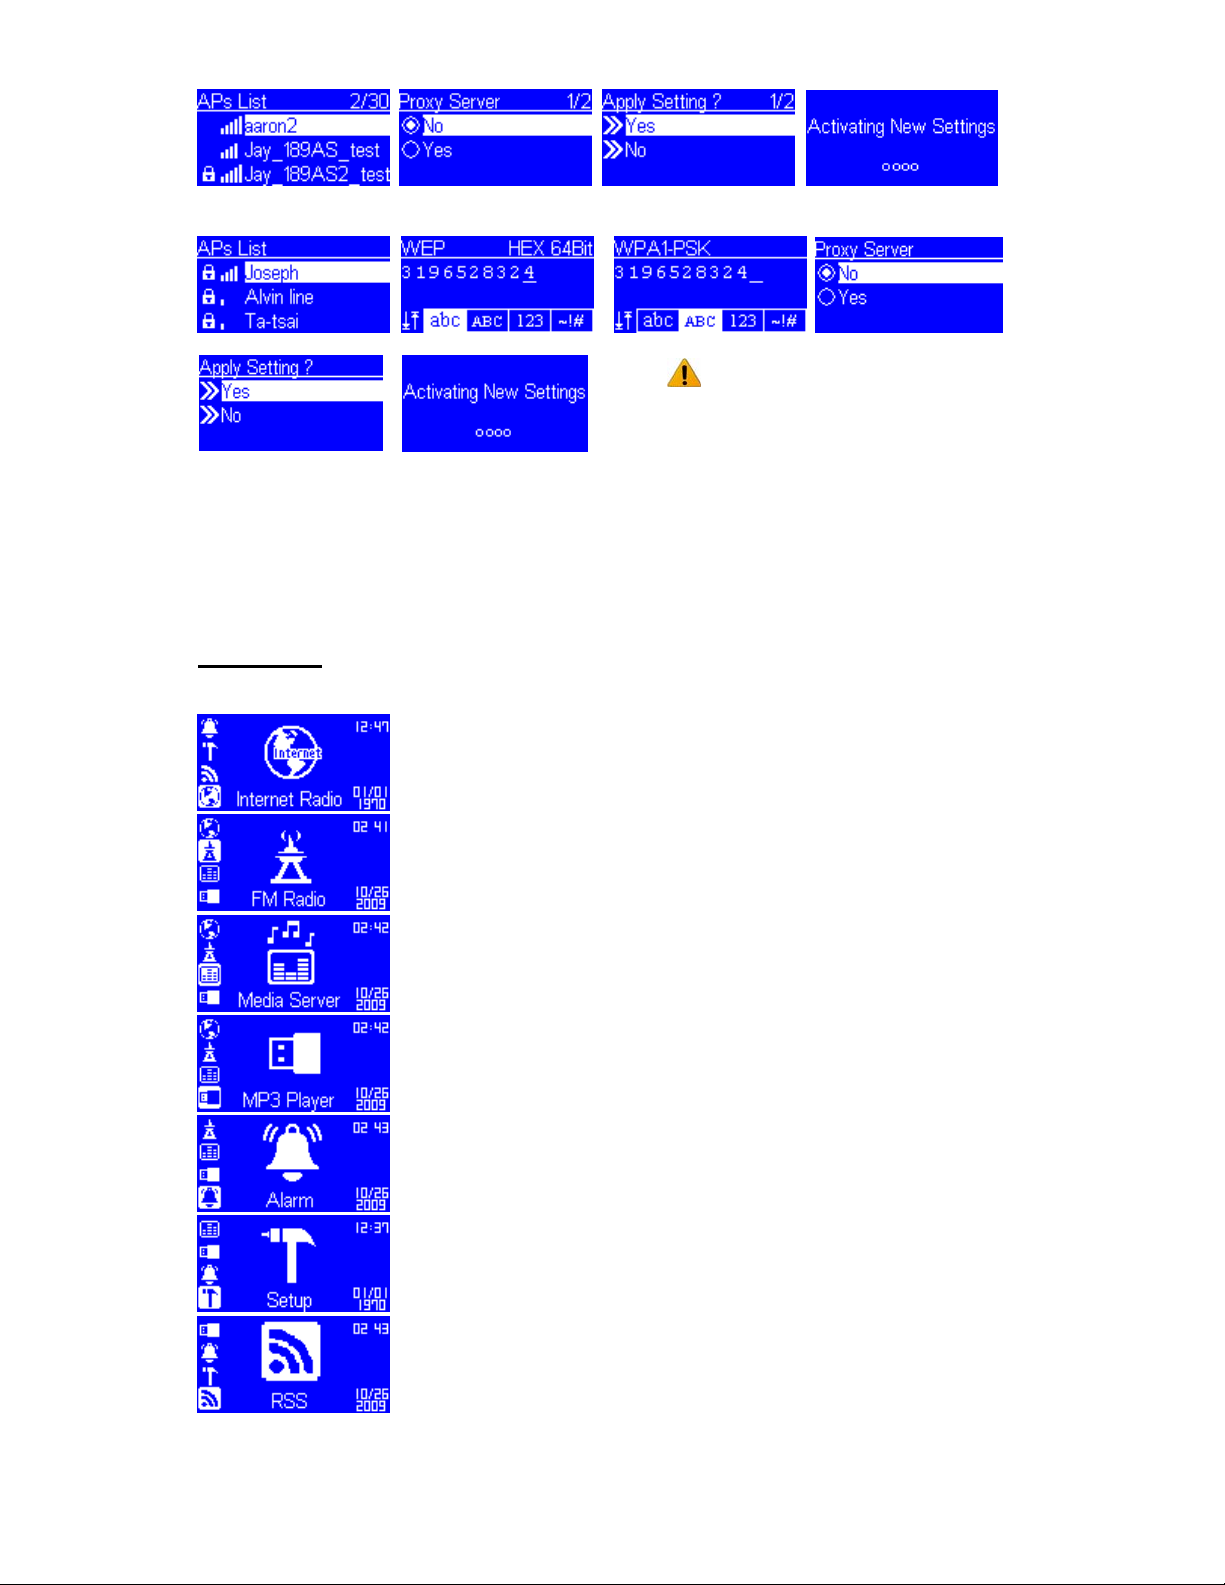
Fig. 1-2
Fig. 1-3
Note: You can use the numeric/
alphabet keypad on remote controller
to input the WEP key, or you can use
the option button to change the
abc/ABC/123/~!# input. ( See
Chapter 3 for detail operation)
2.1.2 Function configuration
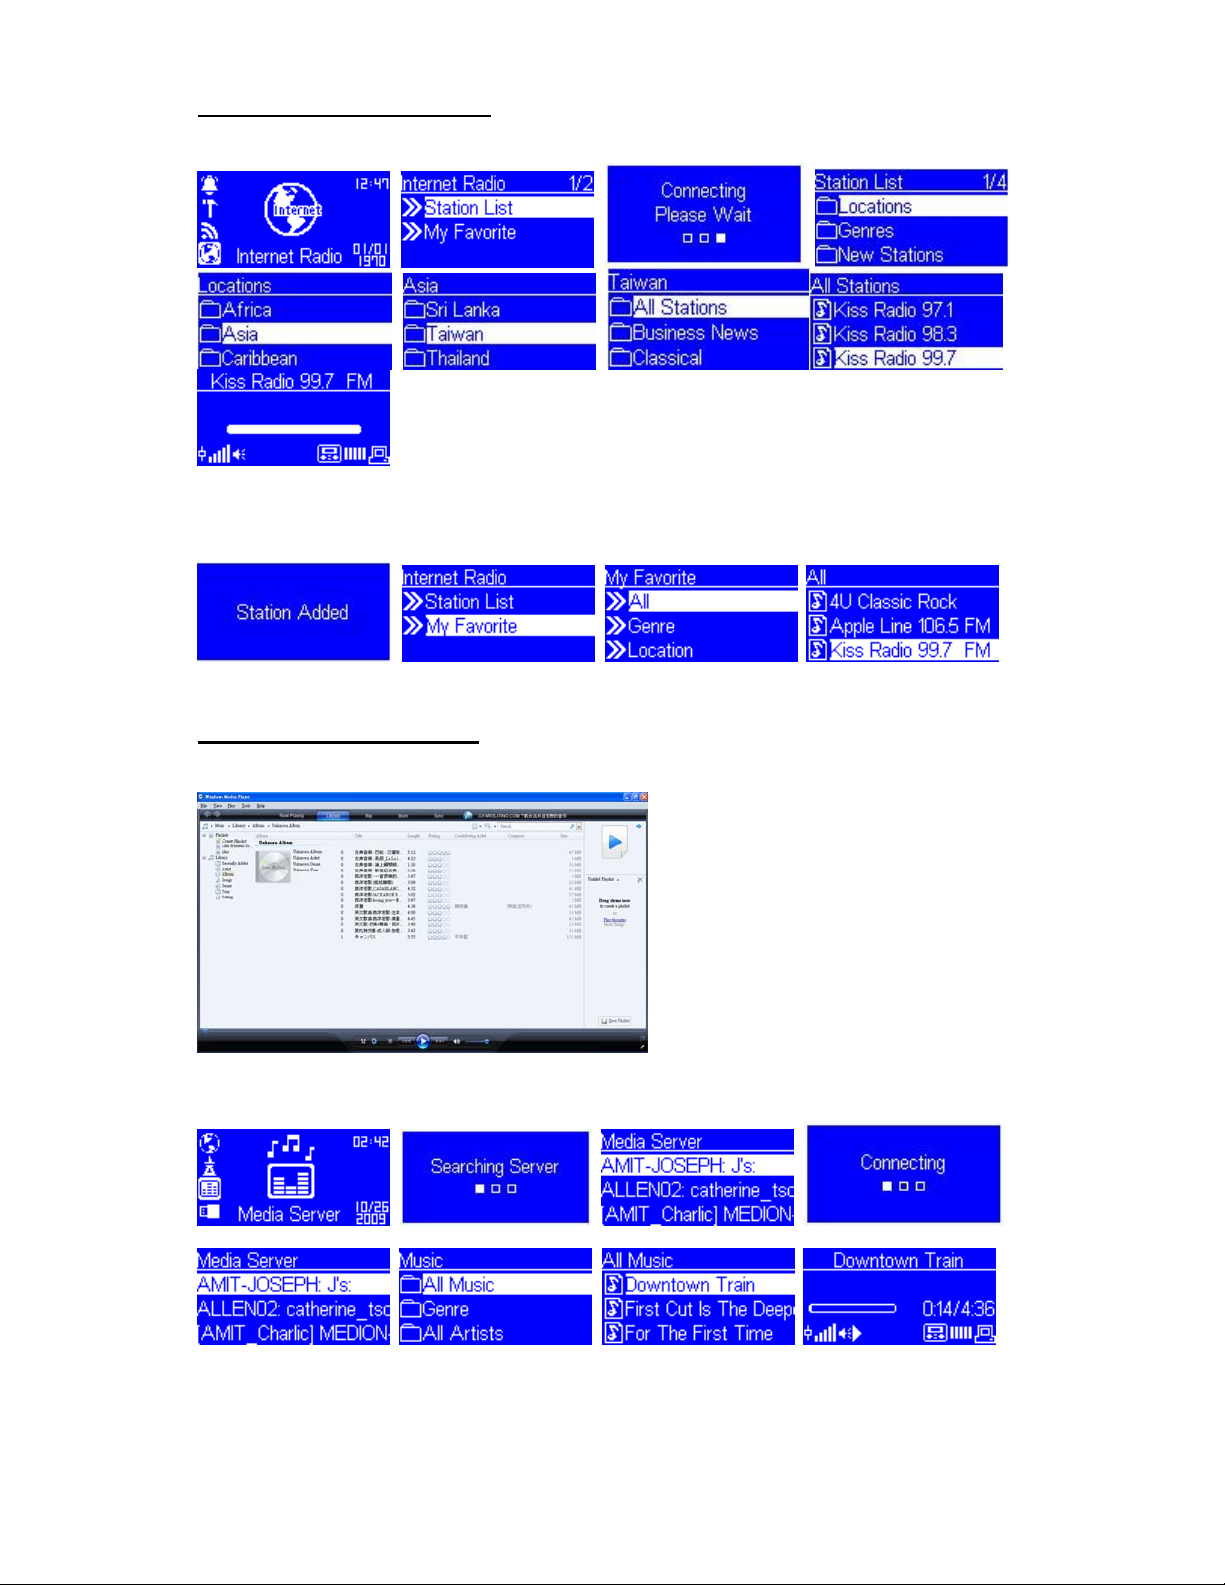
Main Menu
To use and button on remote controller to chose which item you want to enter, then press
‘ok’ to enter it.
Item 1: Internet Radio
Item 2: FM Radio
Item 3: Media Server
Item 4: MP3 Player
Item 5: Alarm / Clock
Item 6: Setup
Item 7: RSS
Page 8
How to run Internet Radio
When you enter Internet Radio, you can go to the stations by locations or genres, please see as
below Fig. 2-1.
Fig. 2-1
If you want to add one station to Favorite, you can press ‘favorite’ button on remote controller to
store.
How to run Media Server
You have to run Microsoft Media Player on your PC (see as Fig. 2-2), or other UPnP servers on
the same network (see Chapter 3 for more configuration.)
Fig. 2-2 Windows Media Player 11
Press the Media Server icon, and then connect the server you want to enter (see as Fig. 2-3)
Fig. 2-3
Page 9
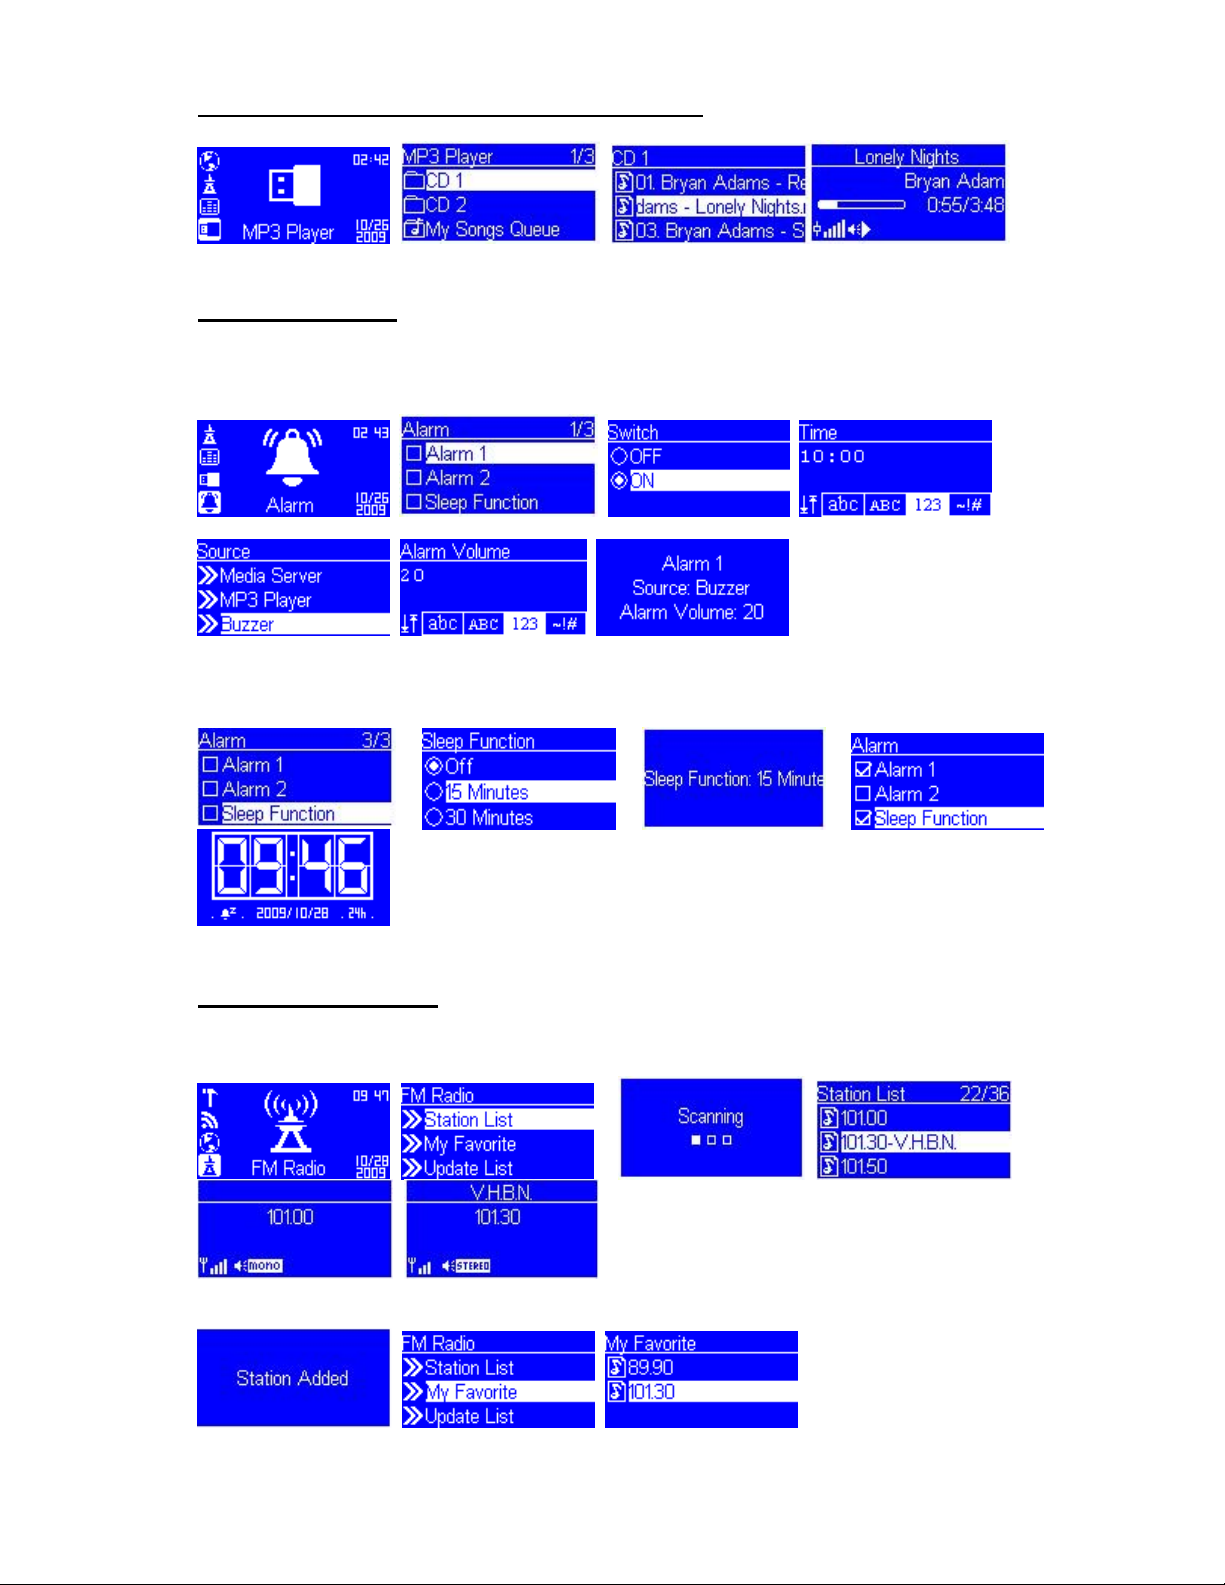
How to run MP3 player – USB porFig. device
Plug in USB drive (only support FAT-16/32 file system) and you can enjoy it, see as Fig. 2-4
Fig. 2-4
How to run Alarm
When you need to set this unit to be an alarm, you can enter the Alarm page, and follow the
procedure to set Alarm. You can chose the music source of Internet radio, FM Radio, Media
Server, MP3 player or buzzer to alarm you when time is up. (Note: press ‘stop’ on remote
controller to stop alarm) (See Fig. 2-5)
Fig. 2-5
This alarm system also support sleep function, you can set it to sleep af ter playing music 15mins ,
30mins, 45mins, 60mins. (see Fig. 2-6)
Fig. 2-6
How to run FM Radio
When you enter FM Radio first time, you can go Station List to scan the list at your location (see
Fig. 2-7), if you want to add one station to Favorite, you can press ‘favorite’ button on remote
controller to store.(see Fig. 2-8)
Fig. 2-7
Add to My Favorite
Fig. 2-8
Page 10
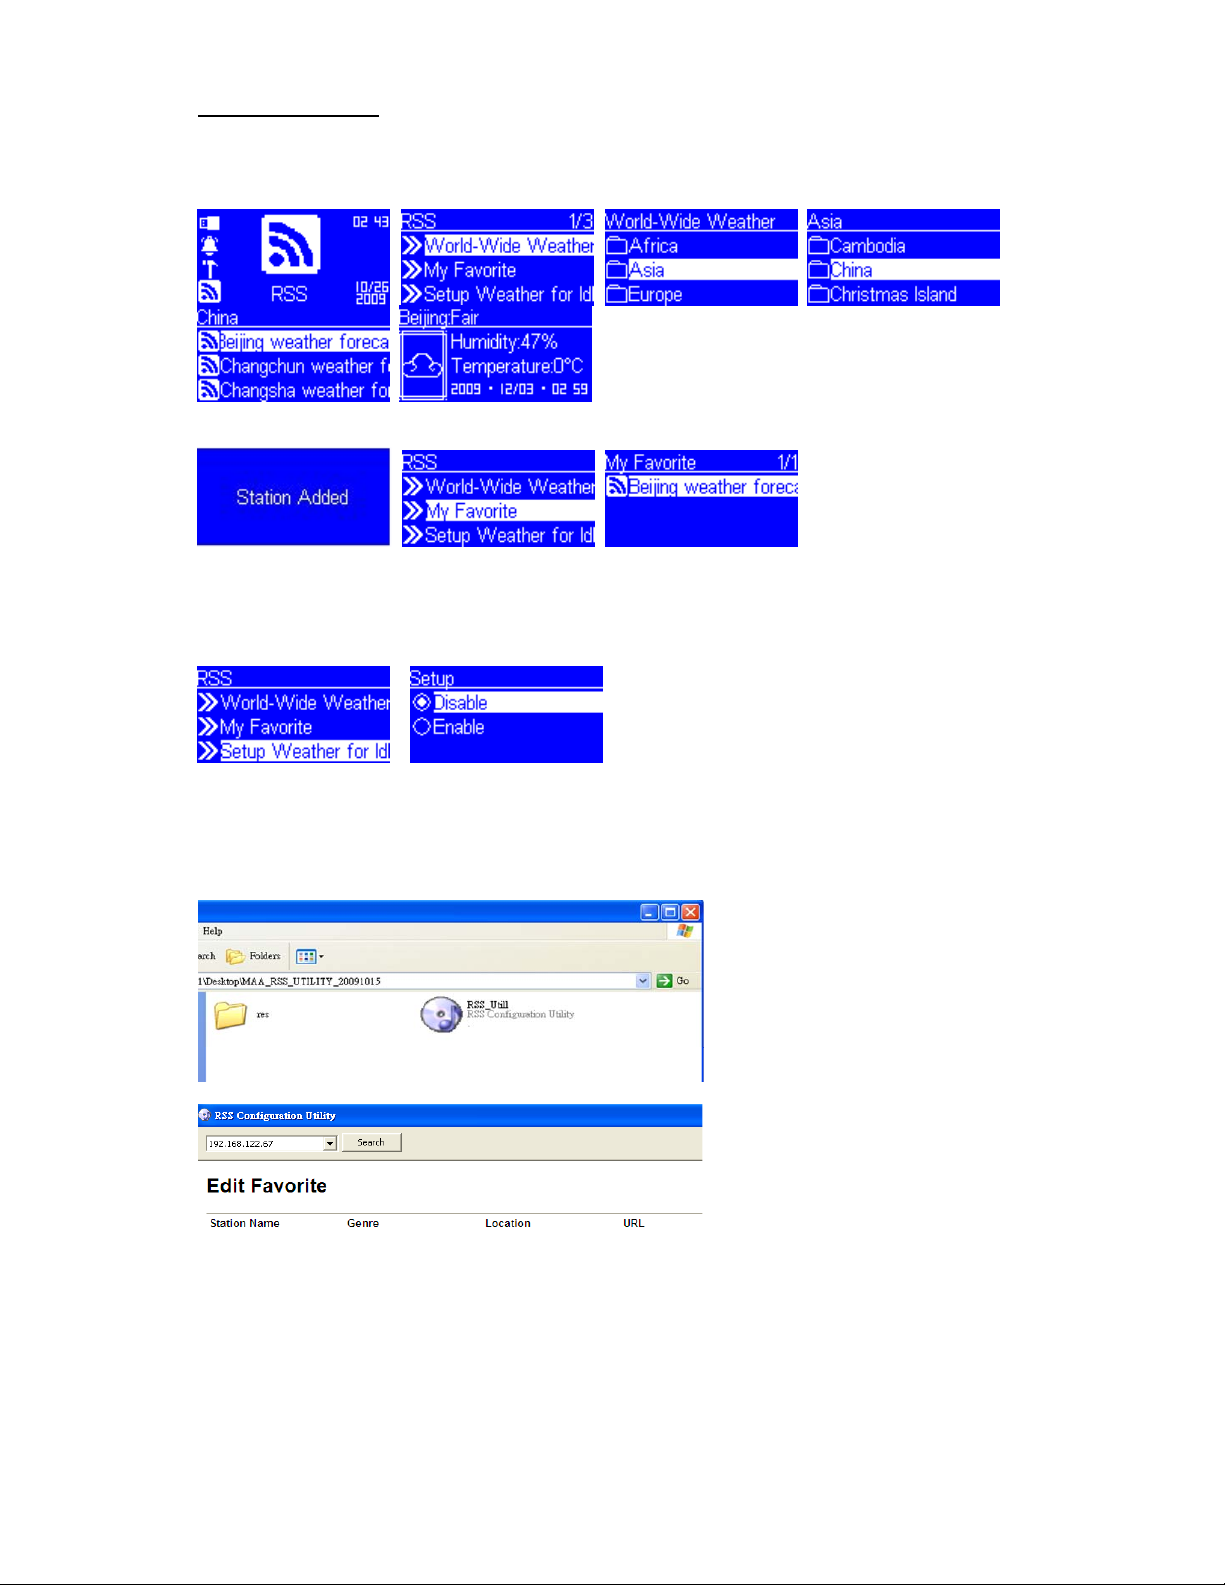
How to run RSS
When you enter RSS, you can go World-Wide We ather to select the RSS weathe r of the city you
live, or you can select 10 different cities from list and check the weather daily. If you want to add
to Favorite, you can press ‘favorite’ button on remote controll er to store.
Add to My Favorite, so that you can check the weather easily. (see Fig. 2-9)
Fig. 2-9
Once you add the city weather to my favorite, this machine will automatically show the daily
weather when this machine is in the idle mode. However, you can disable this function by
following setup. (see Fig. 2-10)
Fig. 2-10
Also, this machine can allow you to subscribe other RSS URL.(see Fig. 2-11)
You can insert the CD into PC, make sure your PC and this machine is under the same network,
and execute the Utility to search the IP address of this machine automatically. ( see ‘How to
setup’ to check IP address )
Fig. 2-11
For example, if you want to subscribe CNN RSS into this machine, please find the correct
information from CNN website, copy the Station Name, Genre, Location and URL, and then cli ck
“Add Station” to subscribe it. (see Fig. 2-12)
Page 11
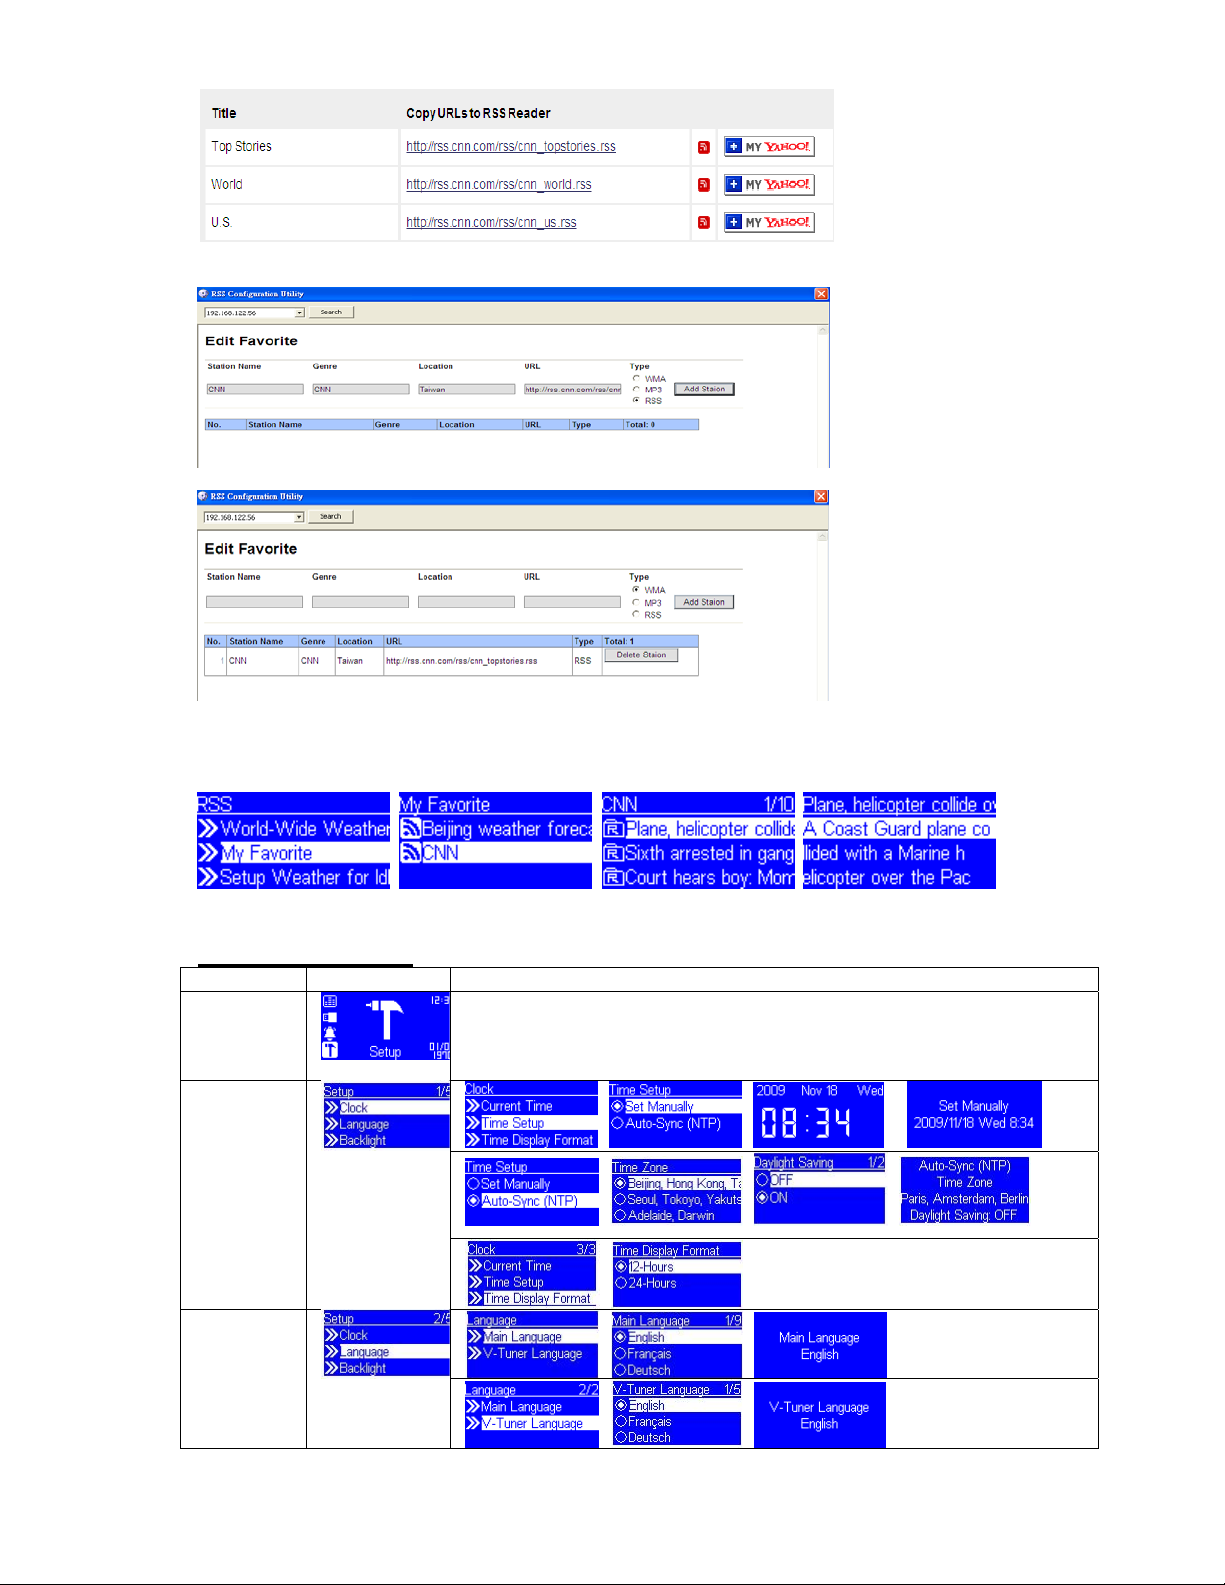
(Refer to http://www.cnn.com/services/rss/)
Fig. 2-12
Once you successfully add RSS station, you will see the RSS URL which you subscribed on this
machine, and you can read the headlines daily. (see Fig. 2-13)
Fig.2-13
How to use SETUP
Item Menu Steps
Setup
Time setting
Language
Page 12
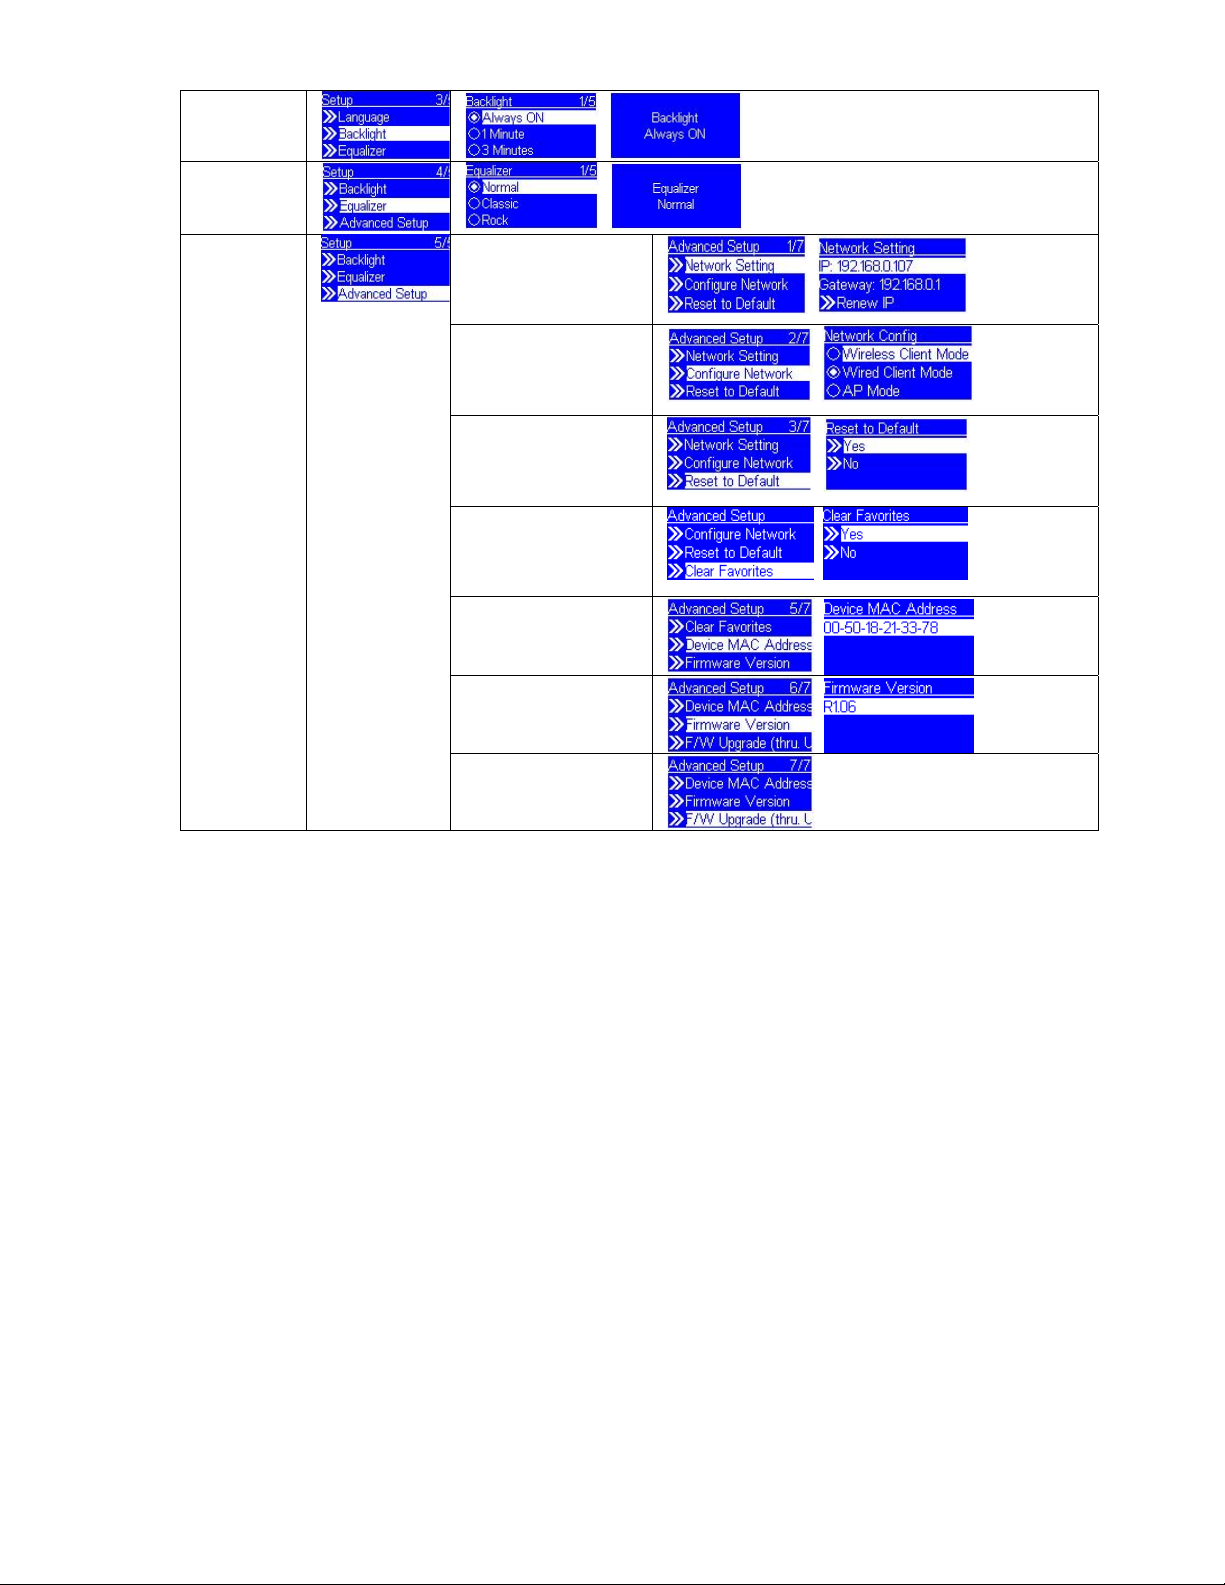
Backlight
Adjustment
Advance
setting
*Network Setting
**Configure Network
Reset to Default
Clear Favorite
Device MAC Address
Firmware Version
F/W Upgrade (thru
USB)
*/**Remark: If you need advanced Network Setting, please check User Manual for reference.
Page 13

Chapter 3 Making Configuration
3.1 Network Setup
3.1.1 Basic Requirement
To make the Wireless Music Player device work properly under your network en vironment, your
network must have the following basic capability:
You must have a router device with DHCP server function enabled, so that it
can automatically assign IP address to your computers or other network
devices.
If you already have a router device in your home, there will be no big trouble to setup the Music
Player device with your existed network environment, but if you don’t have or don’t know what you
have in your home network., the following paragraph will help you to find out if there is any
problem to be resolved prior you start to operate the Music Player device.
Please answer the question: How does your computer or Notebook PC access the internet?
The answer might be one of the following:
Case I. I have to plug an Ethernet cable to the computer, and
I.1 I have to execute a dial-up program from my computer to link to the ISP
service, and after that I can access the internet.
Î You need to purchase a (wireless) broadba nd router.
I.2 No extra dial-up program is executed in my computer , but I set a fixed IP
address in my computer.
Î
I.3 No extra dial-up program is executed in my computer, and I set the dynamic
IP address in my computer.
Î There is a router device in your home. You can configure the Music Player
device as wired client mode to work in your home network.
Case II. I use the wireless connection, and
II.1 I have to execute a dial-up program from my computer to link to the ISP
service, and then I can access the internet.
Î There is no router device in your home. You have to purchase a new router
device to upgrade your home network.
II.2 No extra dial-up program is executed in my computer, but I set a fixed IP
address in my computer.
Î If the IP address is provided by your ISP supplier, there seemed to be no DHCP
service in your home network. You have to buy a new router device.
If the IP address is a virtual IP, like 192.168.xxx.xxx, you should have a router
device. So, the Music Player device can work in your home network.
II.3 No extra dial-up program is executed in my computer, and I set the dynamic
IP address in my computer.
Î
There is a wireless router device in your home, The Music Player device can
work well in your home network
Page 14
Configure as a Wireless Client
There are three modes of network configuration for the Music Player device. It can be a simple
wireless client, a wired client, or even a wireless access point (AP).
The factory default mode is the client Mode. According to the availability of an Ethernet cable, the
device will automatically select a suitable client mode to operate. Besides, user can also manually
change the setting of network configuration through the Setup menu “Setup/Advanced
Setup/Configure Network”.
If there is already 802.11b/g wireless network in your home, this mode is the simplest and straight
forward mode to connect the Music Player device to the existence network.
User just have to power on the device, with no Ethernet cable plugged, the device will
automatically get into the wireless client mode. And try to find out all the available wireless APs
(Access Points). For the first time to get into the wireless client mode, you have to further
determine which AP to connect and set the encryption key properly. Once the setting is finished,
the device will remember the related settings and try to connect to the designated AP when it is
power on. However, if there is something trouble in connecting to the designated AP, the device
will show the AP list screen for user to configure again.
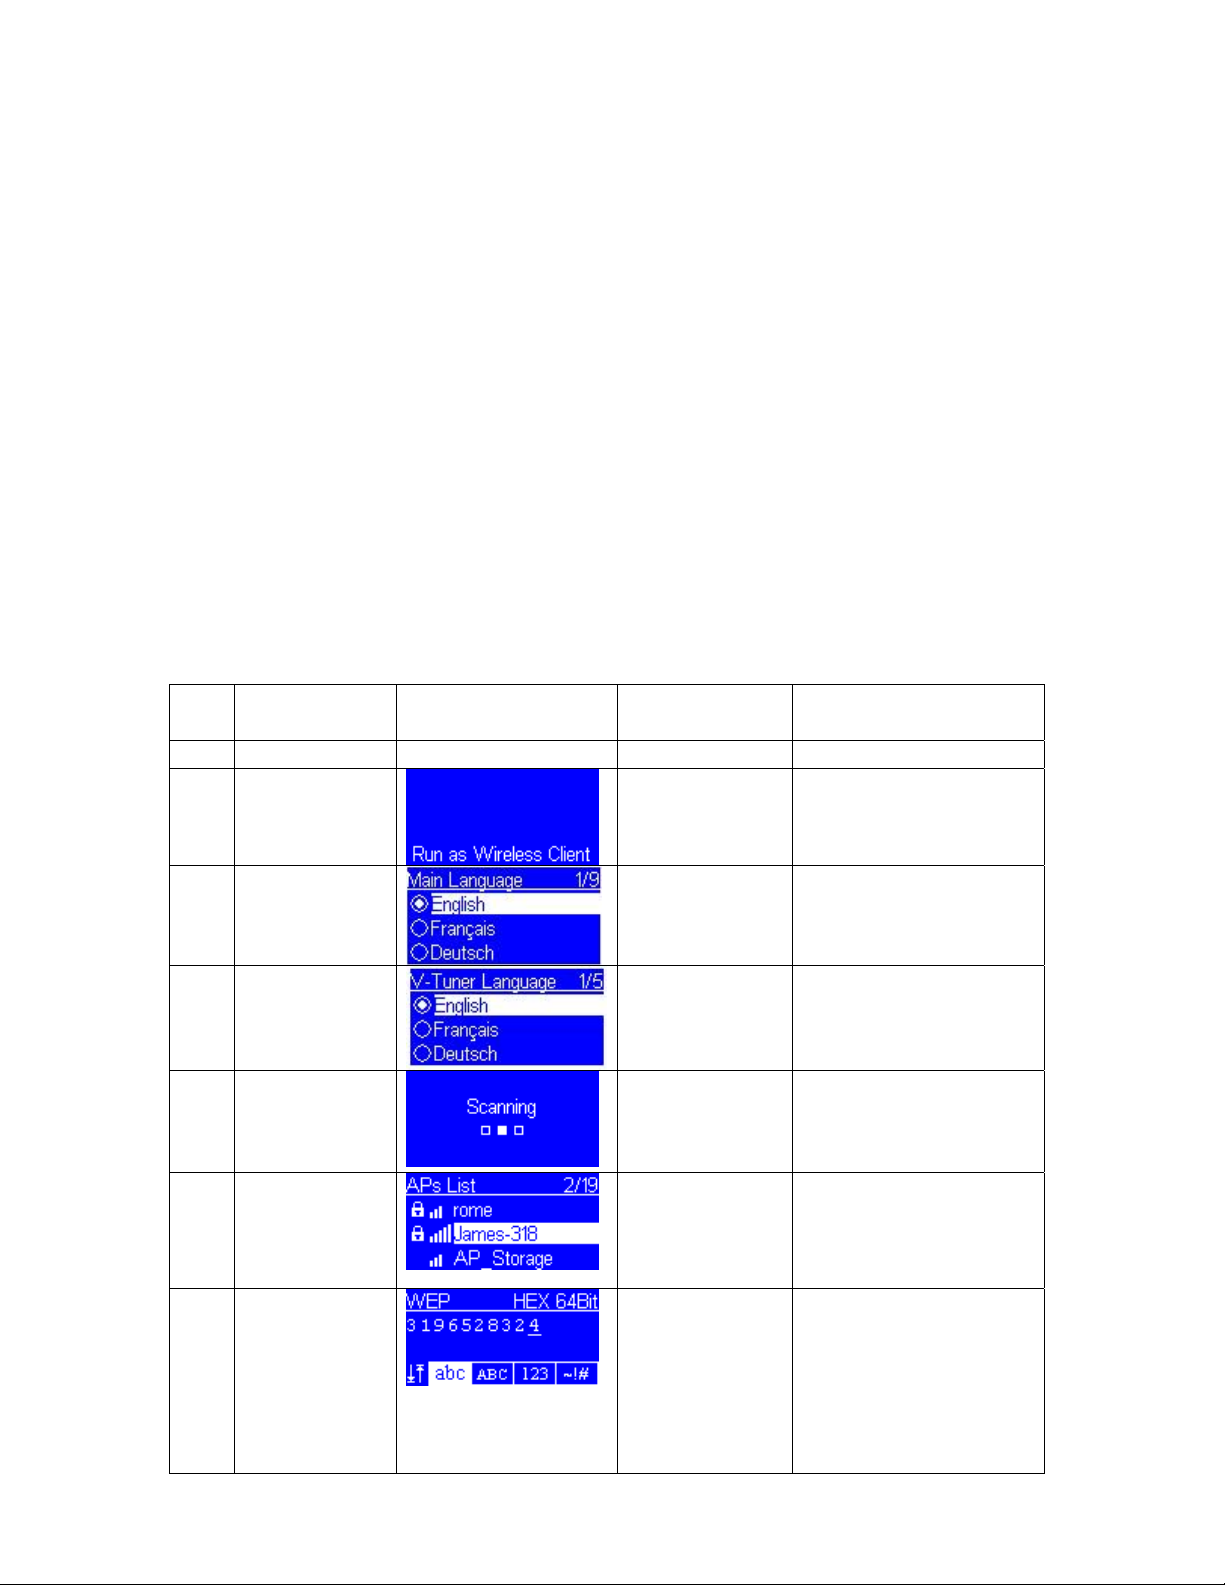
(A) Device first time using, without any Ethernet cable plugged:
to screen on
the right
1
2
3
4
“” button or
“” button or
“” button or
Screen shot to next screen Comment
“Company Logo”
Initial screen
Device runs as a Wireless
“OK” button or
press the right
rotary wheel.
“OK” button or
press the right
rotary wheel.
“OK” button or
press the right
rotary wheel.
Client.
Select the MMI language.
Select the internet radio
menu language.
5
6
7
Scanning for available
APs.
“” button
(1 times) or
rotate right
rotary wheel
clockwise.
Numeric key
pads
“” button or
“OK” button or
press the right
rotary wheel.
“OK” button or
press the right
rotary wheel.
Select the AP that you
can connect to your router
device.
You can use the numeric/
alphabet keypad on
remote controller to input
the WEP key, or you can
use the option button to
change the
abc/ABC/123/~!# input.
Page 15
8
9
10
11
“” button or
“OK” button or
press the right
rotary wheel.
“” button or
“OK” button or
press the right
rotary wheel.
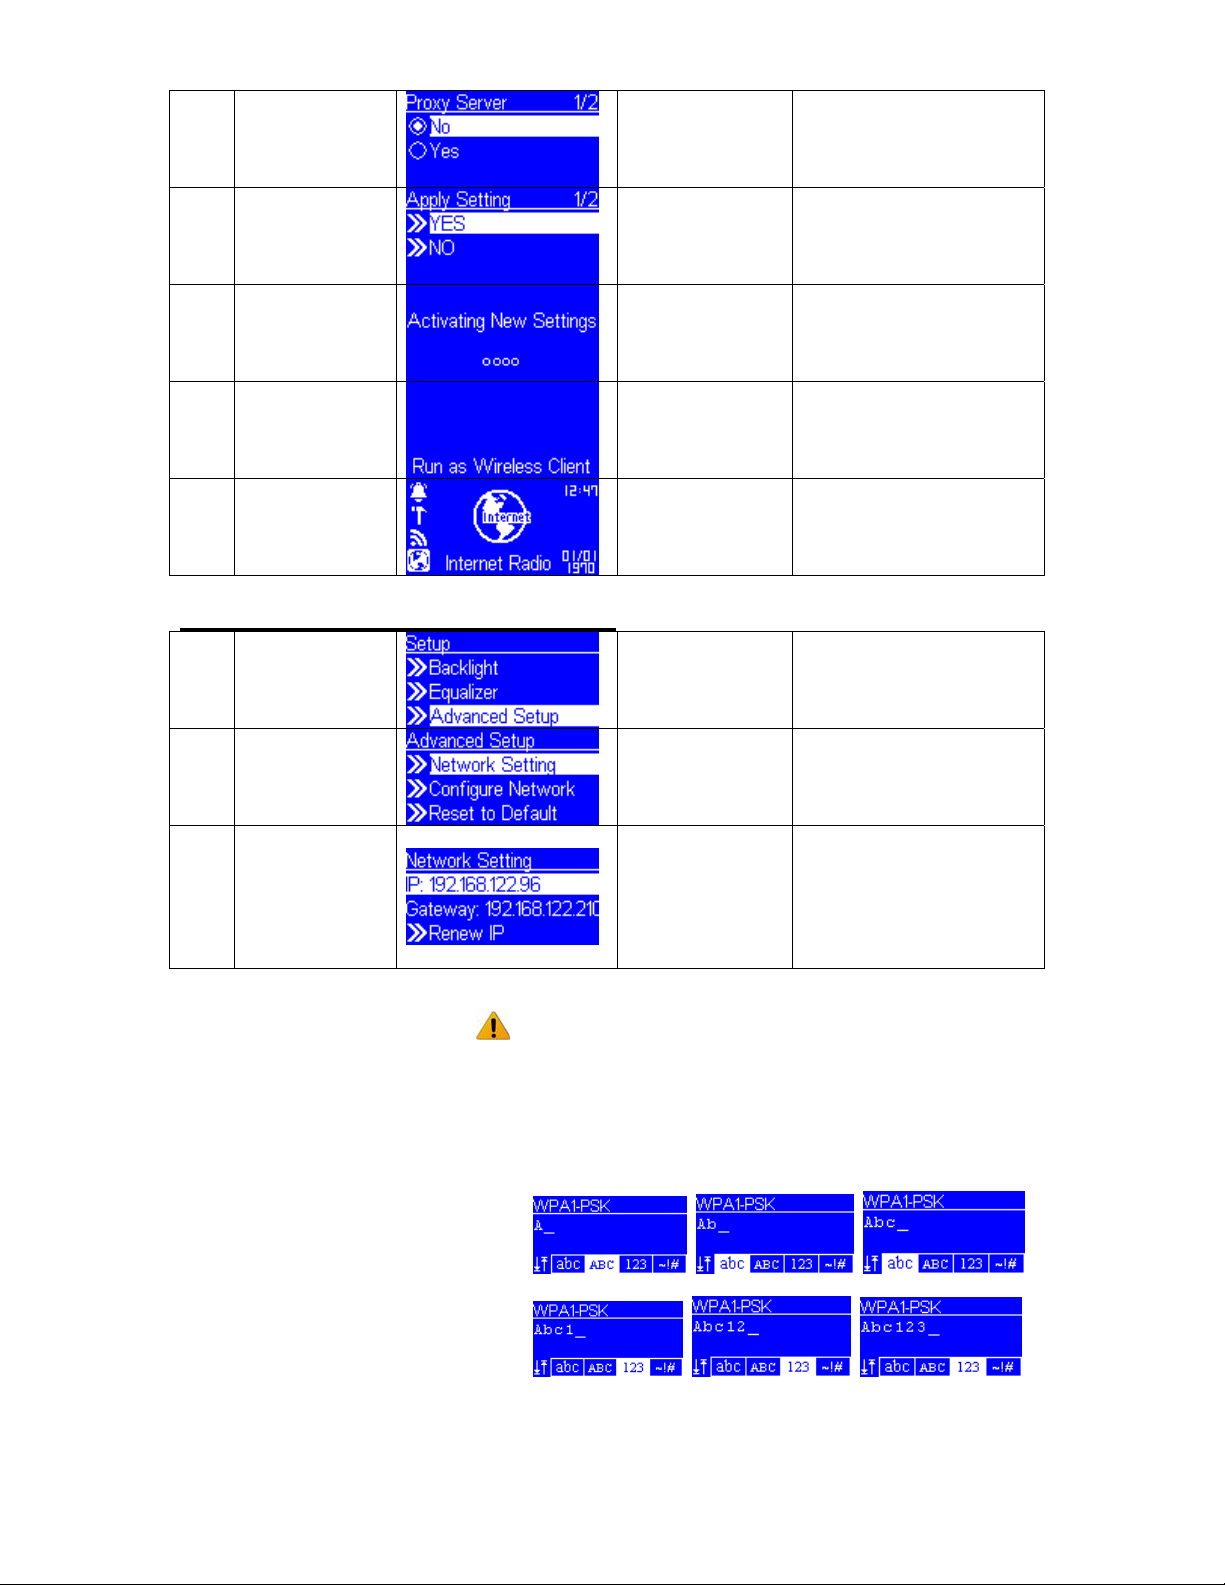
Apply new settings.
Confirm to the settings
above.
12
How to check if connect with Internet
Example :
If you do not use remote control to enter your numeric/
alphabet key, you can use rotary wheel to select
abc/ABC/123/~!# on screen.
Ex. WPA key = Abc123
1. Use ‘option’ button to switch to abc/ABC/123/~!#
2. Use ‘ function’ rotary wheel to scroll the number or
alphabet letter you need
3. It will go next digit automatically after you select one
The device already
connected to your
network.
Go to Setup/ Advanced
Setup/ Network Setting to
see if you do get an IP.
If you find an IP address
under network setting, it
means it is successful to
connect with AP.
Page 16

(B) Manually configured as the Wireless Client Mode:
to screen on
Screen shot to next screen Comment
the right
1
“OK” button or
press the right
rotary wheel.
Initial screen
2
3
4
5
6
7
“” button
(4 times) or
rotate right
rotary wheel
clockwise.
“” button
(1 times) or
rotate right
rotary wheel
clockwise.
“” button or
Scanning for available
Please select WPS
“” button
(1 times) or
rotate right
rotary wheel
clockwise.
Numeric key
pads
8
9
“” button or
“OK” button or
press the right
rotary wheel.
“” button or
“OK” button or
press the right
rotary wheel.
“OK” button or
press the right
rotary wheel.
“” button or
“OK” button or
press the right
rotary wheel.
“OK” button or
press the right
rotary wheel.
“” button or
“OK” button or
press the right
rotary wheel.
Apply new settings.
Manually select the
wireless client mode.
APs.
Disable if your router has
no this function.
Select the AP that you
can connect to your
router device.
You can use the numeric
/ alphabet keypad on
remote controller to input
the WEP key, or you can
use the option button to
change the
abc/ABC/123/~!# input.
Confirm to the settings
above.
10
11
The device is in wireless
client mode now.
The device already
connected to your
network.
Page 17

(C) WPS button for Wireless Client Mode:
You can use WPS button on the back of this device to connect with a Router which
has a WPS button wirelessly, please follow the steps as below to connect.
to screen on
Screen shot to next screen Comment
the right
1
2
This device will process
Press the WPS button
on the back of the
machine, and also
press the WPS button
on your Router.
WPS connection with
Router automatically.
3
4
5
6
This device will show
‘successful’ on screen.
Then Rebooting.
The device is in
wireless client mode
now.
The device already
connected to your
network.
Fail to connect.
If you can’t connect with AP by WPS button, we
suggest you should check the following,
1. It should be distanced at least 30cm
between router and client device.
2. It may have another WPS been triggered
when you connect, please try again.
Page 18

Configure as an Wired Client
If there is no any 802.11b/g wireless network in your home, and only wired 802.3 network is
available, the Music Player device can also connect to the wired network through an Ethernet
cable.
In this situation, prior to power on the device, you have to plug the Ethernet cable into the RJ45
connector. And then power on the device. The device will automatically get into the wired client
mode when it detects a link status through the Ethernet connection during device is up.
(A) Device first time using, with an Ethernet cable plugged:
to screen on
the right
1 “Company Logo”
2
3
Screen shot to next screen Comment
Initial screen
“” button or
“OK” button or
press the right
rotary wheel.
“” button or
“OK” button or
press the right
rotary wheel.
Select the MMI language.
Select the internet radio
menu language.
4
5
6
7
8
9
“” button
(5 times) or
rotate right
rotary wheel
clockwise.
“” button
(4 times) or
rotate right
rotary wheel
clockwise.
“” button
(1 times) or
rotate right
rotary wheel
clockwise.
Press STOP on
remote controller
“OK” button or
press the right
rotary wheel.
“” button or
“OK” button or
press the right
rotary wheel.
“” button or
“OK” button or
press the right
rotary wheel.
Page 19

10
“” button
(1 times) or
rotate right
rotary wheel
clockwise.
11
12
13
14
15
“” button or
“OK” button or
press the right
rotary wheel.
“” button or
“OK” button or
press the right
rotary wheel.
“” button or
“OK” button or
press the right
rotary wheel.
“” button or
“OK” button or
press the right
rotary wheel.
The device is in wired
Device runs as a Wired
client mode now.
It already connected to
your network.
Client.
16
B) Manually configured as the Wired Client Mode:
to screen on
Screen shot to next screen Comment
the right
1
2
3
4
“” button
(4 times) or
rotate right
rotary wheel
clockwise.
“” button
(1 times) or
rotate right
rotary wheel
clockwise.
“” button
(1 times) or
rotate right
rotary wheel
clockwise.
“OK” button or
press the right
rotary wheel.
“” button or
“OK” button or
press the right
rotary wheel.
“” button or
“OK” button or
press the right
rotary wheel.
“” button or
“OK” button or
press the right
rotary wheel.
Initial screen
Manually select the wired
client mode.
Page 20

5
6
“” button
(1 times) or
rotate right
rotary wheel
clockwise.
“” button or
7
“” button or
“OK” button or
press the right
rotary wheel.
“OK” button or
press the right
rotary wheel.
Apply new settings.
Select the DHCP for auto
configured IP address.
Confirm to the settings
above.
8
9
The device is in wired
client mode now.
The device already
connected to your
network
Page 21

Configure as an Wireless Access Point (AP)
If user wants to extend his wireless network coverage range, he has to add new access points to
specific locations in his home. Then other wireless notebook PC, and network devices can have
access to the extended wireless network. The Music Player device can also be configured as a
wireless AP. With such feature, user can easily extend his wireless coverage without purchasing
another AP.
To configure the Music Player device as an AP, you have to manually setup the device through
selecting the MMI menu “Setup/Advanced Setup/Configure Network/AP mode”. And then further
setup the IP address scheme, SSID, channel number and the encryption key of the AP. Once the
setting is finished, the device will reboot automatically and function as an AP.
Manually configured as the Wireless AP Mode:
to screen on
the right
1
Screen shot to next screen Comment
“OK” button or
press the right
rotary wheel.
Initial screen
2
3
4
5
6
7
“” button
(4 times) or
rotate right
rotary wheel
clockwise.
“” button
(1 times) or
rotate right
rotary wheel
clockwise.
“” button
(2 times) or
rotate right
rotary wheel
clockwise.
“” button
(1 times) or
rotate right
rotary wheel
clockwise.
Numeric key
pads
Numeric key
pads
“” button or
“OK” button or
press the right
rotary wheel.
“” button or
“OK” button or
press the right
rotary wheel.
“” button or
“OK” button or
press the right
rotary wheel.
“” button or
“OK” button or
press the right
rotary wheel.
“OK” button or
press the right
rotary wheel.
“OK” button or
press the right
rotary wheel.
Manually select the AP
mode.
Select the DHCP for auto
configured IP address.
You can use the numeric/
alphabet keypad on
remote controller to input
the SSID, or you can use
the option button to
change the
abc/ABC/123/~!# input.
You can use the numeric/
alphabet keypad on
remote controller to input
the Channel, or you can
use the option button to
change the
abc/ABC/123/~!# input.
Page 22

8
9
10
“” button
(1 times) or
rotate right
rotary wheel
clockwise.
Numeric key
pads
“” button or
11
12
13
“” button or
“OK” button or
press the right
rotary wheel.
“OK” button or
press the right
rotary wheel.
“OK” button or
press the right
rotary wheel.
“” button or
“OK” button or
press the right
rotary wheel.
“” button or
“OK” button or
press the right
rotary wheel.
Apply new settings.
Select one of the security
schemes.
You can use the numeric/
alphabet keypad on
remote controller to input
the WEP key, or you can
use the option button to
change the
abc/ABC/123/~!# input.
Confirm to the settings
above.
14
15
The device is in wireless
AP mode now.
The device already
connected to your
network and can work
now.
(B) WPS button for AP Mode:
Once you select this device as AP mode, you also can allow other client devices with
a WPS button to connect wirelessly.
to screen on
Screen shot to next screen Comment
the right
1
2
This device will process
Press the WPS button
on the back of the
machine, and also
press the WPS button
on your client device.
WPS connection with
Router automatically.
Page 23

3
This device will show
‘successful’ on screen.
4
5
The device already
connected to your
network.
It shows ‘Time-Out’ if
connect failed.
Page 24

3.2 Software Installation
To operate the Wi-Fi Internet Melody Station device, basically, it can work well as a stand-alone
device. You can use it to listen to internet radio, FM radio, and external USB storage / MP3 players.
No computer is needed to exhibit above features. But there is one kind of situation that you need a
computer operated simultaneously. When you want to listen to the digital music files that stored in
your computer disks, you have to installed some streaming server software in that computer so
that the Wi-Fi Internet Melody Station device can request the streaming service from that server ,
and finally playback the streamed music at the Wi-Fi Internet Melody Station device.
The Wi-Fi Internet Melody Station device is compliant to the UPnP protocol, therefore, you can
install any UPnP-based server software on your computer, and the Wi-Fi Internet Melody Station
shall work well with it. Currently, there is some popular software in the market; most of them are
free of charge such as Microsoft Media Player 11 (WMP11), Microsoft Media Connect 2.0
(WMC2.0), and Music match Jukebox. So you can downl oad the server sof twa re from intern et and
install it to manage your music files and also provide the stream service for the Wi-Fi Internet
Melody Statio n device.
In this manual, we will show you how to install the WMP11 and WMC 2.0.
Install & Connect to Windows Media Player 11
Please follow the steps below:
Step 0. Download the WMP11.
Please download the Windows Media Player 11 (WMP11) installation file, e.g.,
wmp11-windowsxp-x86-enu.exe, from Microsoft web site.
Install the wmp11-windowsxp-x86-enu.exe without any changes needed. Just click on
‘next’ to finish the installation.
Step 1. Activate the Media Player.
Find out the “Windows Media Player” icon from the Program list,
and click on this program to activate it.
Step2. Click “Library” to manage the content and share your media.
Page 25

Step 3 Add your Media content to WMP11 media library.
Click on the “Library” tab and then select the item “Add to Library” to add your media files
to the WMP11 media library,
You will see the following view:
Click “Add” and select the media folder in your computer, and then click the “OK”
Page 26

For example, I put all the music files in the directory D:\Music, so I just have to add the
folder to the share list.
You will see that the specified folder has already been included in the WMP11 monitor
folder lists. Then press the OK button, a pop-up window will appear and show you the
WMP11 is searching for the media files. When it finished, click on the “Close” button.
Now, you can browse and manage your media content with the WMP11 Library
manager.
Page 27

Step 4. Share the WMP11 media library.
Similar to Step 3, click on the “Media Sharing” item to activate the media sha rin g
function.
The following dialog windows will appear.
Select “Share my media” then click “OK” to continue.
The WMP11 try to discover the available network devices in your LAN.
The following display showed that no any device is found at this moment.
Page 28

If the Wi-Fi Internet Melody St ation device has already conn ected to your home network,
you might see the following display that WMP11 found a network device named as
“MAA502”.
Step 5. Manage the setting of sharing media. Click on the “Settings” button, and specify the
name of the WMP11 server to be displayed on your Wi-Fi Internet Melody Station
device.
Then, press OK to exit.
Step 6. Authorize the access from your Wi-Fi Internet Melody Station device.
The WMP1 1 provides sim ple access control setting. When WMP 11 detects new network
device (as the final screen in St ep 4), you have to decide whether you want to allow or
deny the requests from that device.
Please select the device icon and then click on the “Allow” button to grant further
streaming requests from that device.
You will see that the device icon state changed consequently.
Then, press OK button to apply the setting.
Besides, there is another alternative approach to manage the access for your network
devices.
There will be a small icon
WMP11 found network devices.
appeared on the Windows XP status bar to alert you
Page 29

You can then double click on it to manage the access for the devices.
Press “Allow”.
Step 7. Establish the connection between Wi-Fi Internet Melody Station device and WMP11
server.
from the main menu (or press the hot key “Media Player” on the remote controller) and
then the Wi-Fi Internet Melody S t ation device will start the server discovery process. Af ter
a few seconds, it will find out the server like “PC_Hostname: Server Name”.
From the Wi-Fi Internet Melody Station device, select the “Media Server” function
This is the WPM11 server that you installed.
Then press the ‘OK’ button to try to connect to the server. You will see the Wi-Fi Internet
Melody Station screen shows “Connecting.” and finally shows the following list:
You can browse the “Music” list and playback the music you want.
For the details, please refer to Section 3.3, Listen to the music in your computer.
Install & Connect to Windo ws Media Connect V2.0
Please follow the steps:
Step 0. Download the WMC server.
Please download the Windows Media Connect (WMC) installation file, wmcsetup.exe,
from Microsoft web site.
Install the wmcsetup.exe without any changes needed. Just click on ‘next’ to finish the
installation.
Step 1. Activate the WMC.
You can find a new installed file icon “Windows Media Conn ect” from the Windows XP
Program list…
Click on this program to activate the WMC.
Page 30

Step 2. You will see a pop-up window, asking for “select the device you want to allow access to
your computer”.
Just skip it by press the ‘next’ button.
Step 3. Then, you will be asked to select the folders you want to share with your devices.
Select the proper one for your computer.
Finally, press ‘Finish’ to finish the setup of the Windows media connect.
You can see there is a small icon on the lower right corner of the startup bar.
Page 31

Step 4. Establish the connection between Wi-Fi Internet Melody Station and WMC server.
From the Wi-Fi Internet Melody Station device, select the “Media Server” function from
the main menu (or press the hot key “Media Player” on the remote controller) and then
the Wi-Fi Internet Melody Station
few seconds, it will find out the server like
“PC_Hostname: 1: Windows Media Connect”
This is the WMC server that you installed.
Then press the ‘OK’ button to try to connect to the server.
device will start the server discovery process. After a
You will see the Wi-Fi Internet Melody Station
over and over. In the same time, you will see the following prompt in your PC:
It means that the WMC detected an un-authorized device trying to access the content of
the WMC server.
You just double click on the WMC icon to allow the access from the device.
screen shows “Connecting…”, and repeat
Select the device and then click on the ‘Allow’ button
Then, press the ‘close’ button to finish the authorization proce ss.
At this moment, the Wi-Fi Internet Melody Station
WMC server.
refer to Section 3.3, Listen to the music in your computer.
You can browse the list and playback the music you want. For the details, please
can get the contents or service from the
Page 32

3.3 Listen to Music
The Wi-Fi Internet Melody Station device is a powerful audio player that can bring you the music
from different kind of sources. You can use it to listen to the internet radio all over the world, the
local FM broadcasting service, the music files in your computers, and even the music files in your
porFig. MP3 players.
The following sections will guide you how to listen to the music with the Wi-Fi Internet Melody
Station device.
Listen to Internet Radio
To listen the music or broadcast programs from Internet radio stations, please select the “Internet
Radio” function from the main menu and then press the OK button to switch get activate the
Internet Radio function.
The first screen of Internet Radio function shows 2 items for you to select:
“Station List”: Retrieve the internet radio station lists from the internet server.
“Favorite Stations”: Retrieve the favorite station lists that stored in the device.
Press “OK” button to retrieve the Station List.
At this moment, the device will try to connect to the internet radio server to retrieve the well
organized internet radio stations for further playback. Normally, you will see the following screen:
It takes few seconds to get the list from internet. And you will see the next screen.
It means the Wi-Fi Internet Melody Station
and got the information from the server .
However, if you see the fol lowing screen instead, it means that the device has encounter trou ble in
retrieving the list from internet server.
already successfully connected to the internet server
Please refer to the troubleshooting chapter to identify the problem and resolve it step by step.
Page 33

The following screen shots illustrate the sequence to browse to a specific ratio station “4U Classic
Rock” in France and start to playback the music from it.
to screen on
the right
1
“OK” button or
Screen shot to next screen Comment
Initial screen
press the right
rotary wheel.
2
3
4
5
6
7
8
“” button or
“OK” button or
press the right
rotary wheel.
“” button or
“OK” button or
press the right
rotary wheel.
“” button
(4 times) or
rotate right
rotary wheel
clockwise.
“” button
(15 times) or
rotate right
rotary wheel
clockwise.
“” button or
“” button
(9 times) or
rotate right
rotary wheel
clockwise.
Try to connect to the
“” button or
“OK” button or
press the right
rotary wheel.
“” button or
“OK” button or
press the right
rotary wheel.
“OK” button or
press the right
rotary wheel.
“” button or
“OK” button or
press the right
rotary wheel.
Press “<” button on the
remote controller or
press option button on
the machine to add
current station to
favorite list.
radio station.
9
10
Start buffering the
music from the radio
station.
Music started…
Page 34

Listen to FM Radio
To listen the music or broadcast programs from local FM radio stations, please select the “FM
Radio” function from the main menu and then press the OK button to switch get activate the FM
Radio function.
The first screen of FM Radio function shows 4 items for you to select:
“Station List”: Retrieve the tuned radio station lists from the device.
“Favorite Stations”: Retrieve the favorite station lists that stored in the device.
“Update List”: Activate the auto scan procedure to discover all the available FM stations, and
keeps the tuned stations in the device memory.
“Direct Access”: Allow you to fine tune the frequency of the station or tune to previous / next FM
station manually.
For first time to use the FM Radio function stretching out the antenna cable as possible a s you can.
After the antenna cable is placed properly, activate the “Update List” function first to make a
complete scan for pre-setting the available FM stations. It takes few seconds to perform the scan
operation. Af ter that, you can easily tune to the stations.
The following screen shots illustrate the sequence to pre-set the F M st ation s and tune to a specific
ratio station 98.70 MHz and start to listen the broadcast prog ram from it.
to screen on
Screen shot to next screen Comment
the right
1
“OK” button or
press the right
rotary wheel.
Initial screen
2
3
4
5
6
7
“” button or
“OK” button or
press the right
rotary wheel.
“” button
(2 times) or
rotate right
rotary wheel
clockwise.
Pre-setting the FM
There are 15 station
“” button
(8 times) or
rotate right
rotary wheel
clockwise.
Tuned to station and
“” button or
“OK” button or
press the right
rotary wheel.
“” button or
“OK” button or
press the right
rotary wheel.
station list depends on
the signal reception
quality.
been tuned.
Press “<” button on the
remote controller or
press option button on
the machine to add
current station to
favorite list.
music started.
Page 35

Listen to the music in your computers
To listen to the music from your own computers, you have to install and activate the media server
utility for the computer which your digital music files reside. Please refer to the Installation of Media
Server.
After you installed and activated the media server, you can enjoy listening to the streaming music
in front of the Wi-Fi Internet Melody Station
the main menu and then press the OK button to switch activate the streaming from Media Server
function.
device. Please select the “Media Server” function from
Then, the following message will be displayed during discovering all the available media servers i n
your network. It takes few seconds to finish.
Finally, the screen will list all available media servers for you to select.
At this moment, if there is no server found, the list will be empty.
Please check if you had already activated the media server on your computer. If the problem still
exists for no any media server in the list, please refer to the troubleshooting chapter to identify the
problem and resolve it step by step.
The following screen shots illustrate the sequence to connect to a media server “AMIT-Joseph:J’s”,
whose service is provided by Windows Media Player 11. And browsing to the Musi c album “Beat it”
to play the songs in this album.
Page 36

to screen on
the right
1
Screen shot to next screen Comment
“OK” button or
press the right
rotary wheel.
Initial screen
2
3
4
5
6
“” button
(4 times) or rotate
right rotary wheel
clockwise.
“” button or
“” button or
“” button
(10 times) or
rotate right rotary
wheel clockwise.
“” button or
7
“” button or
“OK” button or
press the right
rotary wheel.
“OK” button or
press the right
rotary wheel.
“OK” button or
press the right
rotary wheel.
“” button or
“OK” button or
press the right
rotary wheel.
“OK” button or
press the right
rotary wheel.
Wait till end of
song, or press “”
to next song.
Press “<” button on
the remote controller
or press option button
on the machine to
add current station to
favorite list.
Music started.
8
Once the music starts, you can freely control the song playback through the playback buttons, just
like you are controlling a traditional stereo or CD player.
Next song started.
Listen to the music by an UPnP control point
This device provides an UPnP renderer function, if you use a cell phone or any other device/
software with an UPnP control point function to control this device, you can stream the music
wirelessly.
Page 37

Listen to the Music in you USB drive
Listen to the music with your USB drive. MP3 player, please plug in the USB drive into the USB
connector of the Wi-Fi Internet Melody Station device. Then select the “MP3 Player” function from
the main menu and then press the OK button to activate the MP3 player function.
The first screen of MP3 Player function shows the root folder content of the attached USB drive.
If you see the following screen “NO DEVICE” instead, there could be some trouble during
accessing the USB device. Please unplug it and then re-plug again.
To playback the songs stored in the USB drive, you just need to browse into the folder of music
album and then play it.
The following screen shots illustrate the sequence to listen the music folder “Diamonds Love
Song” in the attached USB drive.
to screen on
Screen shot to next screen Comment
the right
1
2
“OK” button or
press the right
rotary wheel.
Initial screen
3
4
“” button
(2 times) or
rotate right
rotary wheel
clockwise.
“” button
(1 times) or
rotate right
rotary wheel
clockwise.
5
“” button or
“OK” button or
press the right
rotary wheel.
“” button or
“OK” button or
press the right
rotary wheel.
“” button or
“OK” button or
press the right
rotary wheel.
Select the music folder
to browse and
playback.
6
Page 38

The Playback Screen
When the music starts, you can see the screen shows related playback information. It includ es the
title of the song / station, the album & artist information, and the playback progression of the music.
Besides, there is a status line in the bottom of the screen. It reflects the actual states of the
wireless signal strength, the connection quality, the connection status, and the playback status.
Based on the status information, it can help to troubleshoot if you get in troubles when listening to
the music.
Alarm Setting
In addition to the music playback function, the Wi-Fi Internet Melody Station Device also provides
easy alarm function for you. There are two individual alarms, one can wake you up in the morning,
and the other one can be used to remind you for the important moment.
3.4 Setup the Alarm
To enable an alarm setting, you have to setup the time and alarm music properly. The following
procedure illustrates a typical alarm setting operation. It sets Alarm 1 to generate alarm (play
music) at 7:00 AM, and choose a specific internet radio station “4U Classical Rock” as the source
of alarm music.
to screen on
Screen shot to next screen Comment
the right
1
2
3
“” button
(1 times) or
rotate right
rotary wheel
clockwise.
4
5
6
“” button
(1 times) or
rotate right
rotary wheel
clockwise.
“OK” button or
press the right
rotary wheel.
“” button or
“OK” button or
press the right
rotary wheel.
“” button or
“OK” button or
press the right
rotary wheel.
“” button or
“OK” button or
press the right
rotary wheel.
“” button or
“OK” button or
press the right
rotary wheel.
“” button or
“OK” button or
press the right
rotary wheel.
Initial screen
Enable the alarm 1.
Use the 4 direction
buttons and Numeric
key pads to set the
time.
Set internet radio as
alarm source.
Select the specific
station you’re your
Favorites.
Page 39

7
8
9
“” button or
“OK” button or
press the right
rotary wheel.
“” button or
“OK” button or
press the right
rotary wheel.
“” button or
“OK” button or
press the right
rotary wheel.
10
After you set and enabled the alarm, you will see there is a bell icon on the clock screen.
Use the 4 direction
buttons and Numeric
key pads to set
Volume from 00~15.
3.5 Setup the Clock
to screen on
the right
1
2
3
4
“” button
(1 times) or
rotate right
rotary wheel
clockwise.
“” button or
Screen shot to next screen Comment
Initial screen
without NTP time
sync.
“OK” button or
press the right
rotary wheel.
“” button or
“OK” button or
press the right
rotary wheel.
“” button or
“OK” button or
press the right
rotary wheel.
Set Manually
“OK” button or
press the right
rotary wheel.
You can follow the
steps to set up clock.
Set the clock of the
Wi-Fi Internet Melody
Station device.
The first item “Clock” is
for the date and time
setting.
The second item is for
you to manually or
automatically set the
date and time.
5
Use the four directional
buttons, Numeric key
pads to set the time.
Page 40

Auto-Sync(NTP)
6
“” button
(1 times) or
rotate right
rotary wheel
clockwise.
7
“” button or
“OK” button or
press the right
rotary wheel.
“” button or
“OK” button or
press the right
rotary wheel.
Or click “Auto– sync”
function, the device will
synchronize with the
server to keep the
precise time even for
long use. It is
recommended.
The default setting of
Time Zone is Paris.
However, you can also
sync the time by
selecting Time Zone of
the place that you live
in. After selecting your
Time Zone, it needs
about 5 seconds to get
Time Synchronized.
3.6 Setup RSS
How to run RSS
When you enter RSS, you can go World-Wide W eather to select the RSS weather of the city you
live, or you can select 10 different cities from list and check th e weather daily. If you want to add to
Favorite, you can press ‘favorite’ button on remote co ntroller to store.
to screen on
the right
1
Screen shot to next screen Comment
“OK” button or
press the right
rotary wheel.
Initial screen
2
3
4
“” button
(1 times) or
rotate right
rotary wheel
clockwise.
“” button
(8 times) or
rotate right
rotary wheel
clockwise.
5
6
“” button or
“” button or
“OK” button or
press the right
rotary wheel.
“” button or
“OK” button or
press the right
rotary wheel.
“” button or
“OK” button or
press the right
rotary wheel.
“” button or
“OK” button or
press the right
rotary wheel.
“OK” button or
press the right
rotary wheel.
Press “<” button on the
remote controller to add
it to My Favorite.
Page 41

7
Add to My Favorite, so
that you can check the
weather easily.
12
“” button
(1 times) or
rotate right
rotary wheel
clockwise.
13
14
15
16
“” button
(1 times) or
rotate right
rotary wheel
clockwise.
17
“” button or
“OK” button or
press the right
rotary wheel.
“” button or
“OK” button or
press the right
rotary wheel.
“” button or back
button to go
previous screen.
“” button or
“OK” button or
press the right
rotary wheel.
Once you add the city
weather to My Favorite,
it will show the daily
weather automatically
when this machine is
under idle mode.
See more detailed setting
in (3.8)
“” button or
“OK” button or
press the right
rotary wheel.
You can disable or
enable this function from
here.
How to subscribe RSS by Utility
Also, this machine can allow you to subscribe other RSS URL. (see Fig. 3.7.1)
You can insert the CD into PC, make sure your PC and this machine is under the same network,
and execute the Utility to search the IP address of this machine automatically. (See ‘How to
setup’ to check IP address)
Fig. 3.7.1
Page 42

For example, if you want to subscribe CNN RSS into this machine, please find the correct
information from CNN website, copy the Station Name, Genre, Location and URL, and then cli ck
“Add Station” to subscribe it. (See Fig. 3.7.2)
(Refer to http://www.cnn.com/services/rss/)
Fig. 3.7.2
Once you successfully add RSS station, you will see the RSS URL which you subscribed on this
machine, and you can read the headlines daily. (see Fig. 3.7.3)
Fig.3.7.3
3.7 Miscellaneous Setup
Idle Screen
This device can show a clock as Fig.3.8.1 when device is idle for 5 minutes.
(Fig 3.8.1)
This device also can show RSS weather report when device is idl e for 5 minute s that mean s if you
add different weather report into my favorite, it will automatically cycle the daily report on screen.
Î Î Î
(Fig3.8.2)
Page 43

There are some other useful setup functions can help you to operate the device properly.
Backlight Setting
You can adjust the backlight ON / OFF settings as you wish. The default setting is Always ON. You
can set the backlight to be turned OFF once the device is idle (no any key pressed) after a specific
time elapsed.
Î
Equalizer Setting
Î
Reset to Factory Defaults
When you reset the device setting to its factory defaults, your favorites setting of internet radio and
FM radio will be kept in the device.
Î
Clear Favorites
Be careful! This is not recommended.
Î
Check the Firmware Version
Î
Page 44

Upgrade the Firmware
You can check the supplier’s website to check whether there is new firmware for this device to
upgrade or not. If there is any new firmware released, please download it to follow the upgrade
procedure below to upgrade the firmware of your device.
Î
Steps to Upgrade the Firmware in your Device
Step 1. Please uncompress the new F/W file (e.g. the file “20061018_ShrekW_R102b3.zip”) and
copy the uncompressed file “ShrekW.BIN” to the ROOT folder of a USB key or USB MP3
player.
(Note: Please DON’T rename it!, otherwise the Wi-Fi Internet Melody Station can’t find
the new F/W)
Step 2. Turn on the Wi-Fi Internet Melody Station and then plug-in the USB key into the front
USB port of the Melody Station.
Step 3. Operate the Wi-Fi Internet Melody Station to get into the F/W upgrade menu
(“Setup\Advanced Setup\ F/W Upgrade (thru. USB)”), then press the OK button to
activate the F/W Upgrade function.
Normally, you can see the following messages “F/W Upgrading”, and “Don’t Power
OFF!!” After few seconds, when the upgrade operation is completed, the device will
reboot automatically.
Step 4. You can check if the F/W already upgraded into the Wi-Fi Internet Melody Station via
check the F/W version at the menu “Setup\Advanced Setup\Firmware Version”. In this
case, the version should be R1.02b3. If you saw other version number, there must be
something wrong during the upgrade.
Please check if the file “ShrekW.bin” in the USB key is the correct one.
Page 45

Chapter 4 Troubleshooting
This Chapter provides solutions to problems for the installation and operation of the Wi-Fi Internet
Melody Station. You can refer to the following if you are having problems.
A. Wired Mode
1. Why can’t I find anything in my Station List when I access Internet Radio?
I. Check if you have plugged RJ45 in it.
II. Go to setup→ Advanced setup→ Network Setting to see if you get an IP.
III. If you didn’t get it, please restart it or select Renew IP to refresh.
IV. If it still doesn’t work, you may need to reset it to default.
2. Why can’t I access Media Server?
I. Check if you have plugged RJ45 in it.
II. Go to setup→ Advanced setup→ Network Setting to see if you get an IP.
III. Make sure you are executing the right version of Windows Media Player (WMP 11), and
then restart it.
IV. If it still doesn’t work, you may need to reset it to default.
B. Wireless Mode
1. What can I do if my wireless client can not access the Internet?
I. Out of range: Put the router closer to your client.
II. Wrong SSID or Encryption Key: Check the SSID or Encryption setting.
III. Connect with wrong AP: Ensure that the client is connected with the correct Access
Point.
2. Can’t setup a wireless connection?
I. Ensure that the SSID and the encryption settings are exactly the same to the Clients.
II. Move the Wi-Fi Internet Melody Station and the wireless client into the same room, and
then test the wireless connection.
III. Ensure that the LEDs are indicating normally. If no, make sure that the AC power and
Ethernet cables are firmly connected.
IV. If you are using other wireless device, home security systems or ceiling fans, lights in
your home, your wireless connection may degrade dramatically. Keep your product away
from electrical devices that generate RF noise such as microwaves, monitors, electric
motors.
3. Why can’t I find anything in my Station List when I access Internet Radio?
I. Make sure you have connected with an AP accurately.
II. Go to setup→ Advanced setup→ Network Setting to see if you get an IP.
III. If you didn’t get it, please restart it or select Renew IP to refresh.
IV. If it still doesn’t work, you may need to reset it to default.
Page 46

4. Why can’t I access Media Server?
I. Make sure you have connected with an AP accurately.
II. Go to setup→ Advanced setup→ Network Setting to see if you get an IP.
III. Make sure you are executing the right version of Windows Media Player (WMP 11), and
then restart it.
IV. If it still doesn’t work, you may need to reset it to default.
C. AP Mode
1. What can I do if my wireless client can not access the Internet?
I. Out of range: Put the router closer to your client.
II. Wrong SSID or Encryption Key: Check the SSID or Encryption setting.
III. Connect with wrong AP: Ensure that the client is connected with the correct Access
Point.
2. Can’t setup a wireless connection?
I. Ensure that the SSID and the encryption settings are exactly the same to the Clients.
II. Move the Wi-Fi Internet Melody Station and the wireless client into the same room, and
then test the wireless connection.
III. Ensure that the LEDs are indicating normally. If no, make sure that the AC power and
Ethernet cables are firmly connected.
IV. If you are using other wireless device, home security systems or ceiling fans, lights in
your home, your wireless connection may degrade dramatically. Keep your product away
from electrical devices that generate RF noise such as microwaves, monitors, electric
motors.
3. What to do if I forgot the encryption key?
I. Go to advanced setup→Configure Network→AP Mode to set up your Encryption key
again.
II. Reset the Wi-Fi Internet Melody Station to default setting.
4. . Why can’t I find anything in my Station List when I access Internet Radio?
I. Check if you have plugged RJ45 in it.
II. Go to setup→ Advanced setup→ Network Setting to see if you get an IP.
III. If you didn’t get it, please restart it or select Renew IP to refresh.
IV. If it still doesn’t work, you may need to reset it to default.
5. Why can’t I access Media Server?
I. Check if you have plugged RJ45 in it.
II. Go to setup→ Advanced setup→ Network Setting to see if you get an IP.
III. Make sure you are executing the right version of Windows Media Player (WMP 11), and
then restart it.
IV. If it still doesn’t work, you may need to reset it to default.
Page 47

D. Why can’t I find anything in my Station List when I
access FM Radio?
1. Stretching out the antenna cable as possible as you can.
2. Try different antenna orientations.
3. After the antenna cable is placed properly, activate the “Update List” function again to check it.
E. what can I do if MP3 Player function doesn’t work even
the MP3 device is plugged?
1. Check if there is any music file in your MP3 Player.
2. There might be some trouble during accessing the USB device. Please unplug it and then
re-plug it again.
F. Why can’t I find anything in RSS World-Wide Weather?
1. You may lose the connection with Internet. First, you can check the wired/wireless connection.
2. Go to setup→ Advanced setup→ Network Setting to see if you get an IP.
3. If you didn’t get it, please restart it or select Renew IP to refresh.
4. If it still doesn’t work, you may need to reset it to default.
G. Why can’t I subscribe RSS by Utility?
1. You may insert a wrong RSS URL or get a wrong IP in the Utility.
2. Click “search” to make sure you get the right IP of it.
3. Make sure you insert a right RSS URL in the Utility.
4. Then, click “Add Station” to subscribe it again.
H. How to reset to default?
1. Ensure the Wi-Fi Internet Melody Station is powered on.
2. Find the Reset button on the back side.
3. Press the Reset button for 8 seconds and then release to go back Default Setting.
4. Or go to Setup→Advanced Setup→Reset to Default to go back Default Setting.
5. After the Wi-Fi Internet Melody Station reboots, it has back to the factory default settings
Page 48

Page 49

 Loading...