

Page 1
TM
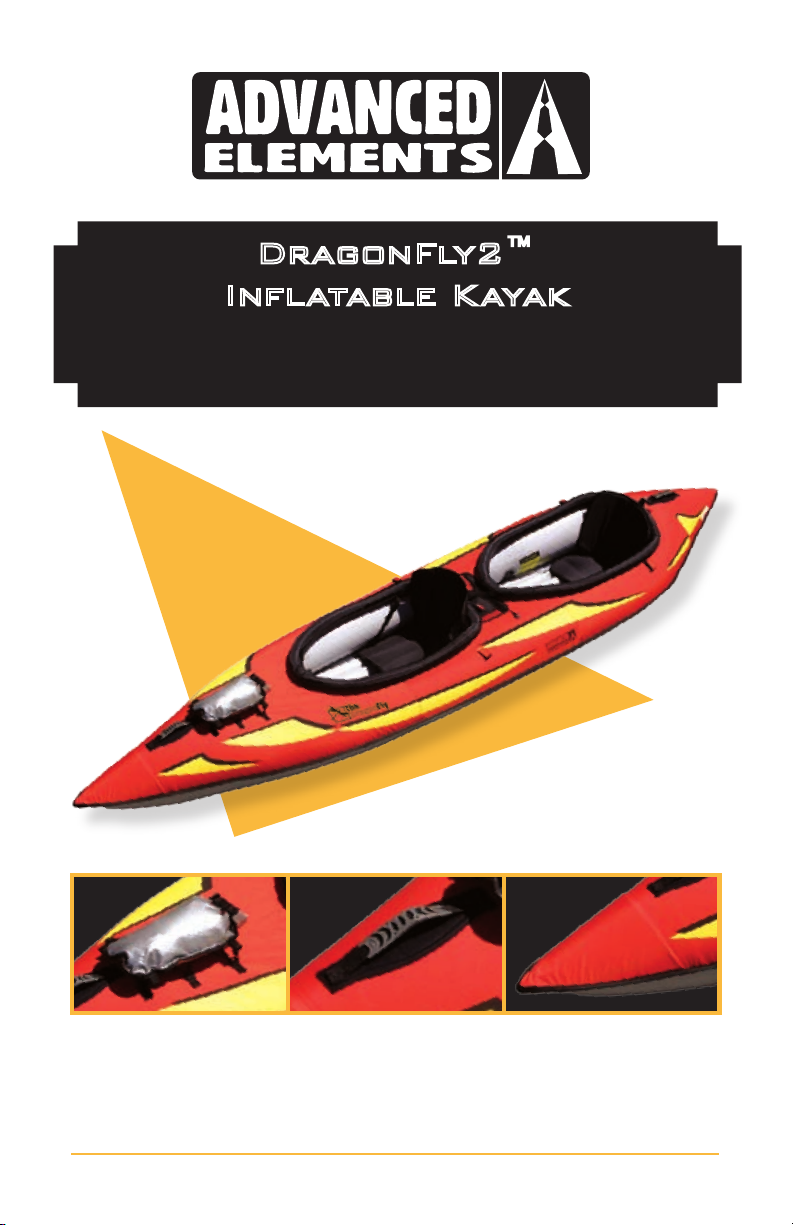
DragonFly2™
Inflatable Kayak
Owner’s Manual
MODEL AE1003
PATENTED
1OR 2 PERSON KAYAK
IMPORTANT!
PLEASE READ THIS MANUAL CAREFULLY BEFORE PROCEEDING. AFTER READING
THIS MANUAL, SAVE THESE INSTRUCTIONS FOR FUTURE REFERENCE.
ADVANCED ELEMENTS, INC. 2006 REV 06-001
Page 2

inflatable
kayaks with cutting
edge
t e c h n o l o g y
TM
INTRODUCTION
It is our goal, at Advanced Elements, to develop new and unique paddles-
ports products that enhance our customers’ outdoor experience. Our focus
is on designing and manufacturing “Inatable kayaks with cuing edge
technology”. Our kayaks incorporate many dierent materials and compo-
nents and deliver high performance at a very reasonable price. We are the
makers of the AdvancedFrame™ Inatable kayaks, DragonFly™ Inatable
kayaks and StraitEdge™ Canoe and Kayaks. The AdvancedFrame™ Kayaks
are a hybrid of a folding frame kayak and an inatable kayak. Its bow slices
through water like a knife and rivals the tracking of hard-shell kayaks. The
stern acts as a skeg increasing the tracking performance. The DragonFly™
kayaks are durable and lightweight. They have built-in rigid forms that in-
crease the performance once it is fully inated. You can take our inatables
with you anywhere in the world and no roof rack is needed! Keep it in the
trunk of your car and paddle whenever you want or pack it into a remote
wilderness area and paddle where no one has paddled before. Simply inate
with a foot pump and hit the water in minutes. Please visit our website for
more information on our products or to nd a dealer near you.
Page 3

TABLE OF CONTENTS
1. Caution/Safety .................................................................. 4
1.1 Boating Safety ........................................................
2. Specification ...................................................................... 6
2.1 Capacity .................................................................
2.2 Features ..................................................................
3. Assembly/Inflating/Deflation Instruction ....................7
3.1 Assembly ...............................................................
3.2 Understanding Your Valves
3.3 Inflating ..................................................................
3.4 Over Inflation ........................................................
3.5 Deflation .................................................................
3.6 Folding .................................................................
4. Guidelines for Usage .....................................................10
5. Proper Care and Storage ...............................................11
6. Repairs ............................................................................. 11
6.1 Repairing Small Punctures and Cuts ...............
6.2 Repairing Pinholes .............................................
7. Troubleshooting .............................................................
8. Statement of Origin .......................................................
9. Declaration of Conformity ...........................................
10. Warranty and Registration ...........................................
................................ 8
10
11
11
12
13
14
15
5
6
7
7
9
9
9
3
Page 4
TM
1. CAUTION - SAFETY WARNING
Users of this product agree by their use to accept the inherent risks involved in this paddlesports
activity and agree to follow all instructions, cautions, and warnings carefully before using this
Kayak.
(PLEASE READ CAUTION STATEMENT CAREFULLY)
CAUTION
SAFETY WARNING
PADDLESPORTS CAN BE VERY DANGEROUS AND PHYSICALLY DEMAND-
ING. THE USER OF THIS PRODUCT SHOULD UNDERSTAND THAT PARTICI-
PATION IN PADDLESPORTS MAY INVOLVE SERIOUS INJURY OR DEATH.
OBSERVE THE FOLLOWING SAFETY STANDARDS WHENEVER USING THIS
PRODUCT.
· GET PADDLESPORTS INSTRUCTIONS SPECIFIC TO THIS TYPE OF CRAFT.
· OBTAIN CERTIFIED FIRST AID TRAINING AND CARRY FIRST AID AND
RESCUE/SAFETY EQUIPMENT.
· ALWAYS WEAR A NATIONALLY APPROVED PERSONAL FLOTATION DEVICE.
· ALWAYS WEAR A HELMET WHERE APPROPRIATE.
· DRESS APPROPRIATELY FOR WEATHER CONDITIONS; COLD WATER AND/OR COLD
WEATHER CAN RESULT IN HYPOTHERMIA. CHECK YOUR EQUIPMENT PRIOR TO
EACH USE FOR SIGNS OF WEAR OR FAILURE.
· NEVER PADDLE ALONE.
· DO NOT PADDLE IN FLOOD CONDITIONS.
· BE AWARE OF APPROPRIATE RIVER WATER LEVELS, TIDAL CHANGES, DANGEROUS
CURRENTS, WEATHER CHANGES, AND STRONG OFF SHORE WINDS.
· SCOUT UNFAMILIAR WATER; PORTAGE WHERE APPROPRIATE.
· DO NOT EXCEED YOUR PADDLING ABILITY; BE HONEST WITH YOURSELF.
· CONSULT YOUR PHYSICIAN PRIOR TO BEGINNING YOUR PADDLESPORTS TRAINING.
· YOU MUST NOT USE ALCOHOL OR MIND ALTERING DRUGS PRIOR TO USING THIS
PRODUCT.
· FOLLOW THE MANUFACTURER’S RECOMMENDATIONS FOR THE USE OF THIS
PRODUCT.
· IF ADDITIONAL OUTFITTING IS REQUIRED, USE MANUFACTURER’S APPROVED
MATERIALS ONLY; DO NOT IMPAIR ENTRY OR EXIT ACCESS.
· READ OWNER’S INFORMATION PACKET PRIOR TO USING THIS PRODUCT.
THE USER OF THIS PRODUCT ACKNOWLEDGES BOTH AN UNDERSTANDING AND AN
ASSUMPTION OF THE RISK INVOLVED IN PADDLESPORTS.
ADVANCED ELEMENTS, INC.
TOLL FREE 866-262-9076
Please read this entire manual for additional safety information. Please pay close aention to items
marked DANGER, WARNING, CAUTION, IMPORTANT, NOTICE, NEVER, and ALWAYS.
4
Page 5
1.1 Boating Safety
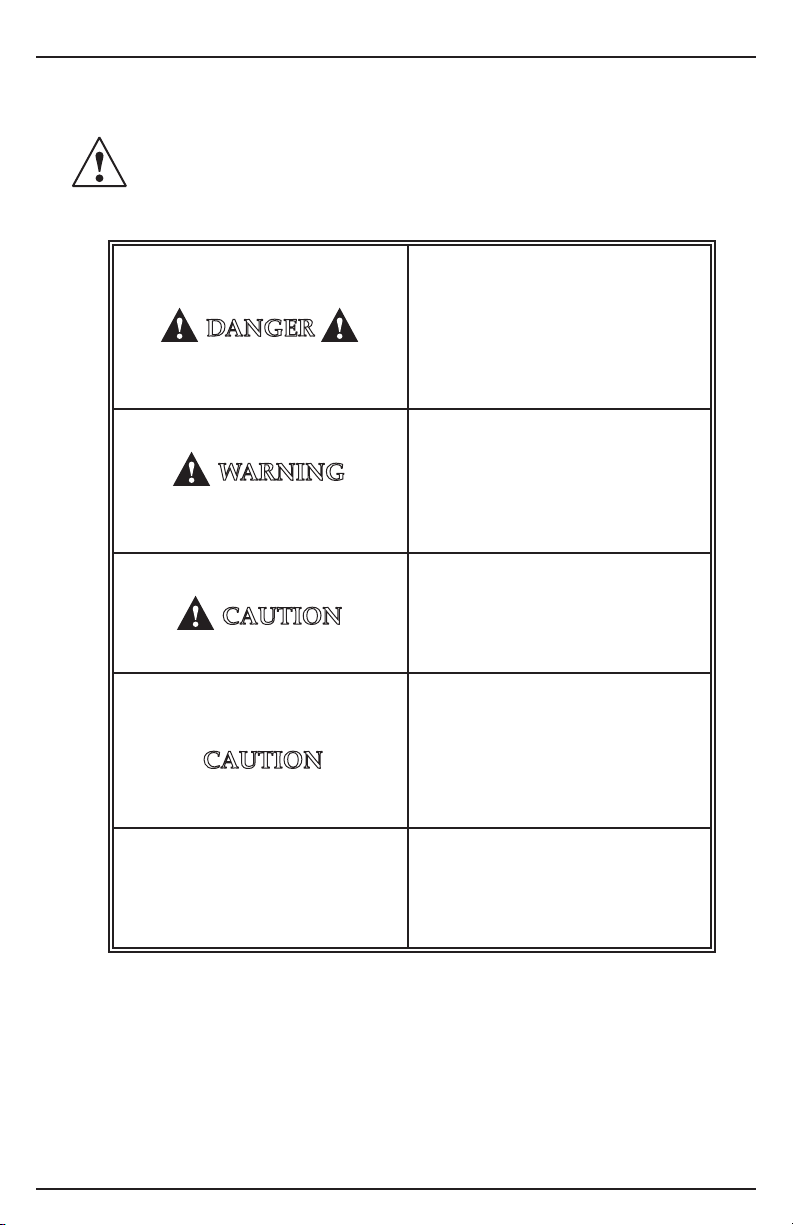
This is the safety alert symbol. It is used to alert you to potential personal injury
hazards. Obey all safety messages that follow this symbol to avoid possible injury or
death.
WARNING
CAUTION
DANGER
DragonFly2™ Inatable Kayak Owner’s Manual
Indicates an imminently hazardous
situation which, if not avoided, will
result in death or serious injury or
substantial property damage.
Indicates a potentially hazardous
situation which, if not avoided, could
result in death or serious injury or
property damage.
Indicates a potentially hazardous
situation which, if not avoided, may
result in property damage.
Used without the safety alert symbol
indicates a potentially hazardous
CAUTION
NOTICE
The precautions listed in this manual and on the cra are not all-inclusive. If a procedure,
method, tool or part is not specically recommended, you must satisfy yourself that it is safe
for you and others, and that the cra will not be damaged or made unsafe as a result of your
decision. REMEMBER - always use common sense when paddling YOUR KAYAK!
situation, which, if not avoided, may
result in property damage.
Indicates installation, operation or
maintenance information which is
important but not hazard-related.
5
Page 6
TM
2. SPECIFICATION
Dimensions:
Length: 12’
Width: 35”
Weight: 29 lbs (13 kg)
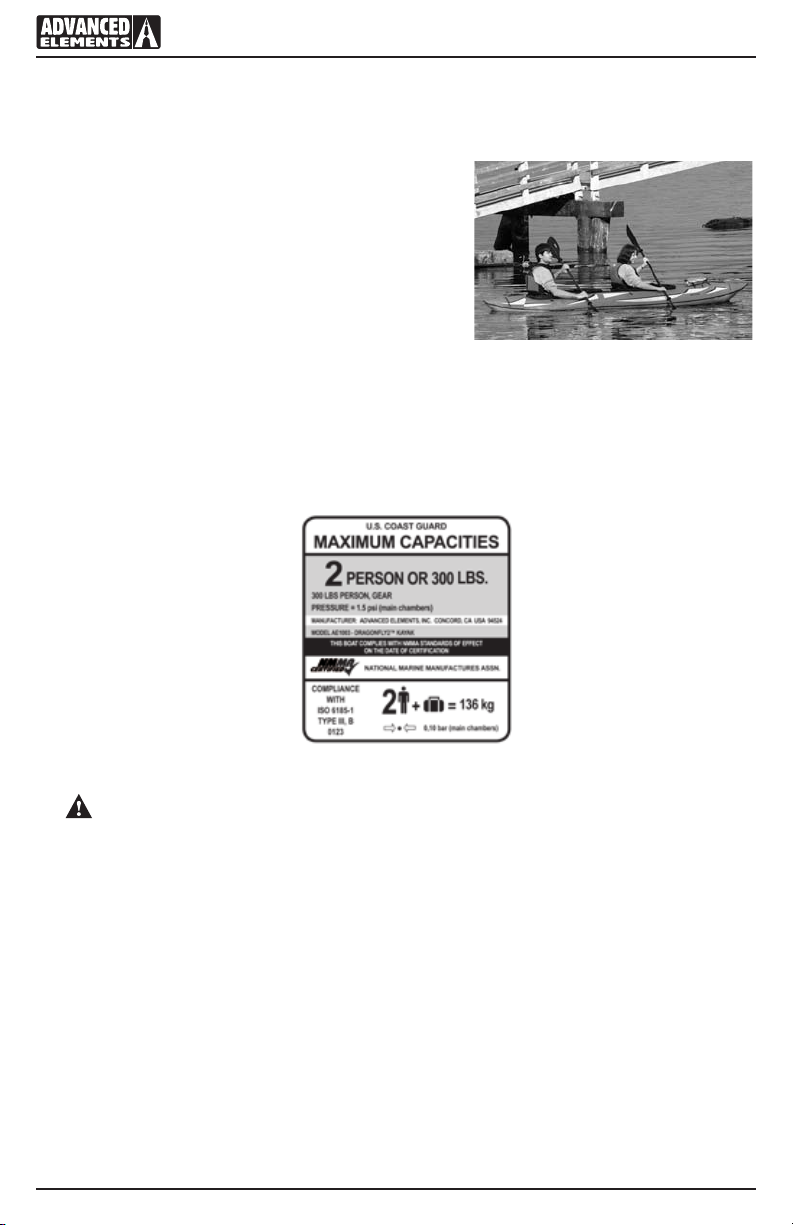
Max. Person Capacity: 300 lbs (136 kg)
Max. Persons & Gear Capacity: 300 lbs (136 kg)
Recommended Pressure:
Main chambers: 1.5 psi (0.10 bar)
Floor chamber: 1.0 psi (0.07 bar)
2.1 Capacity
The person/load capacity is determined by the availability of proper seating on the kayak.
Acceptable seating determines the number of passengers, not the overall load capacity.
DragonFly2™ Kayak Capacity Label
WARNING: Do not exceed the certied maximum capacities under any circumstances.
Overloading will reduce freeboard and increase the likelihood of swamping, especially in heavy
seas. Overloading causes handling to become sluggish, making it dicult to react quickly.
6
Page 7
DragonFly2™ Inatable Kayak Owner’s Manual
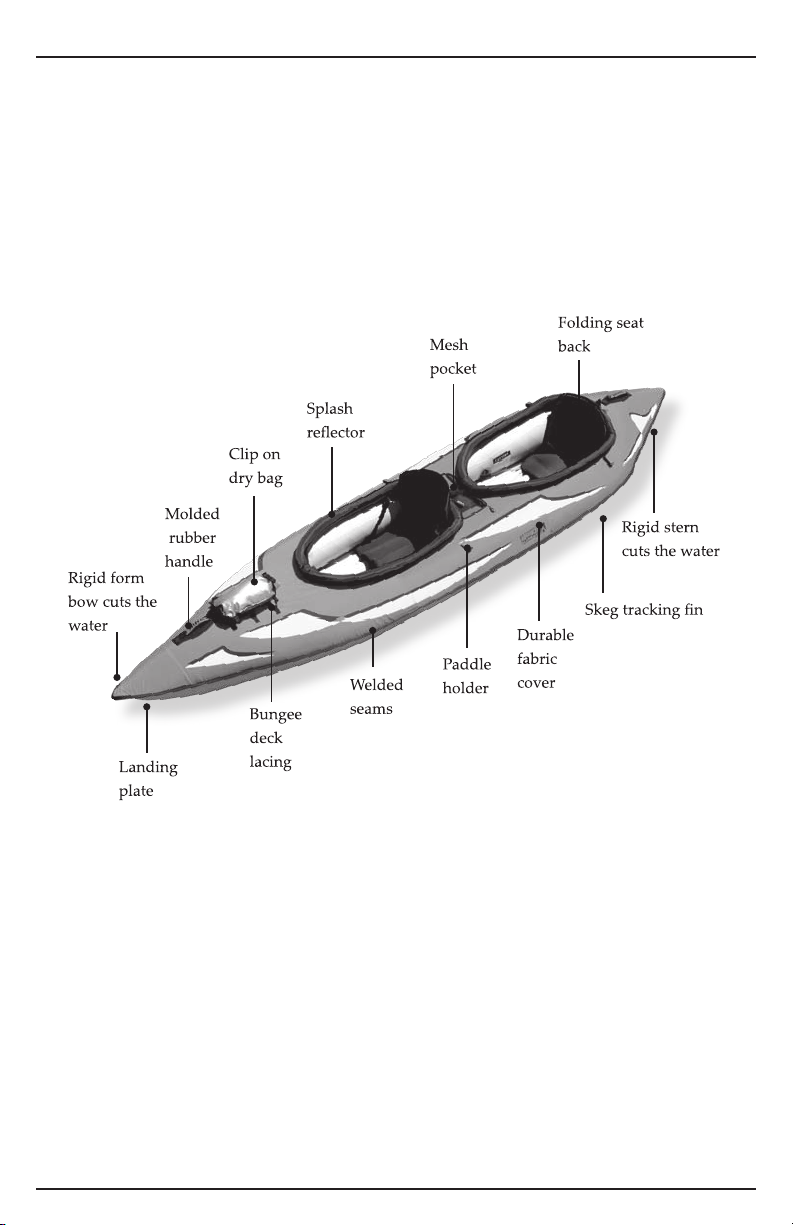
2.2 Features
SPECIAL FEATURES:
Rigid Bow and Stern: Built-in rigid panels dene the bow and stern and improve tracking.
Durable and Light: Unique outer cover provides durability in a lightweight design.
Easy to Set Up: New Twist valves and high ow Spring valves allow for quick setup time.
Comfortable: High support seat provides comfort for hours of paddling.
Hull Design: Landing plate and tracking n improve performance.
3. ASSEMBLY/INFLATING/DEFLATION INSTRUCTION
The DragonFly2™ Kayak has a rigid bow and stern that enhances its performance.
3.1 Assembly
Your kayak comes from the factory pre-assembled. The only assembly you should need to do is
aach the adjustable seats.
7
Page 8
TM
3.2 Understanding Your Valves
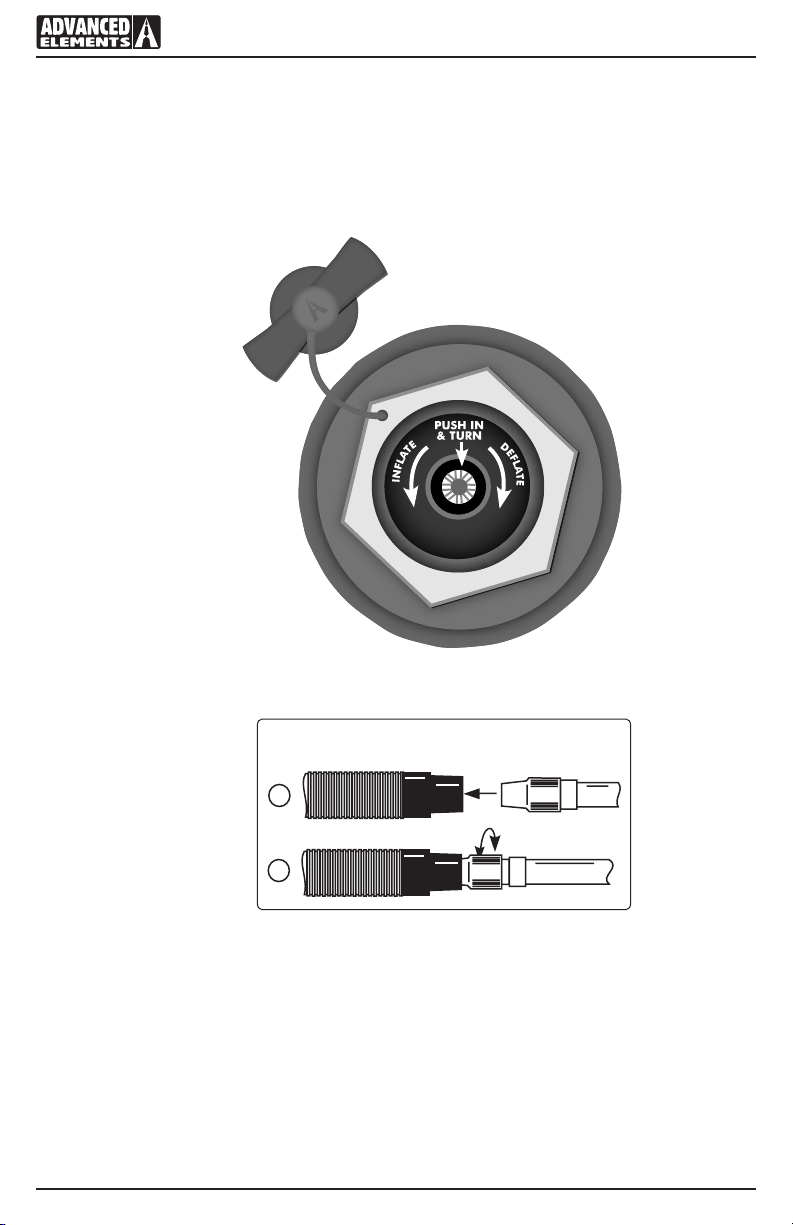
Advanced Elements DragonFly2™ kayak uses the following valves. The Advanced Elements
spring valve has the function and durability of other military type valves and is compatible with
most standard pumps. The lock nut holds the valve in place with the cover for easy ination.
The following gures will have details on how to operate the valves.
NOTE:
Deate - Push-in center stem and
rotate clockwise to the locked position.
Valve stem should be pushed-in.
Inate - Push-in center stem and
rotate counter-clockwise to the locked
position. Valve stem should be pushed out.
Figure 1. Inate/Deate Spring Valve
OPERATING THE “TWIST” VALVES
TWIST TO OPEN / INFLATE / THEN CLOSE
INSERT
1
PUMP HOSE
TWIST VALVE
2
Figure 2. Inate/Deate Twist Valve
To begin inating your kayak, you will need a Bellows Foot Pump or a Double Action Hand
Pump. Never use compressors, CO2 or compressed air as they may damage you kayak.
8
Page 9
DragonFly2™ Inatable Kayak Owner’s Manual
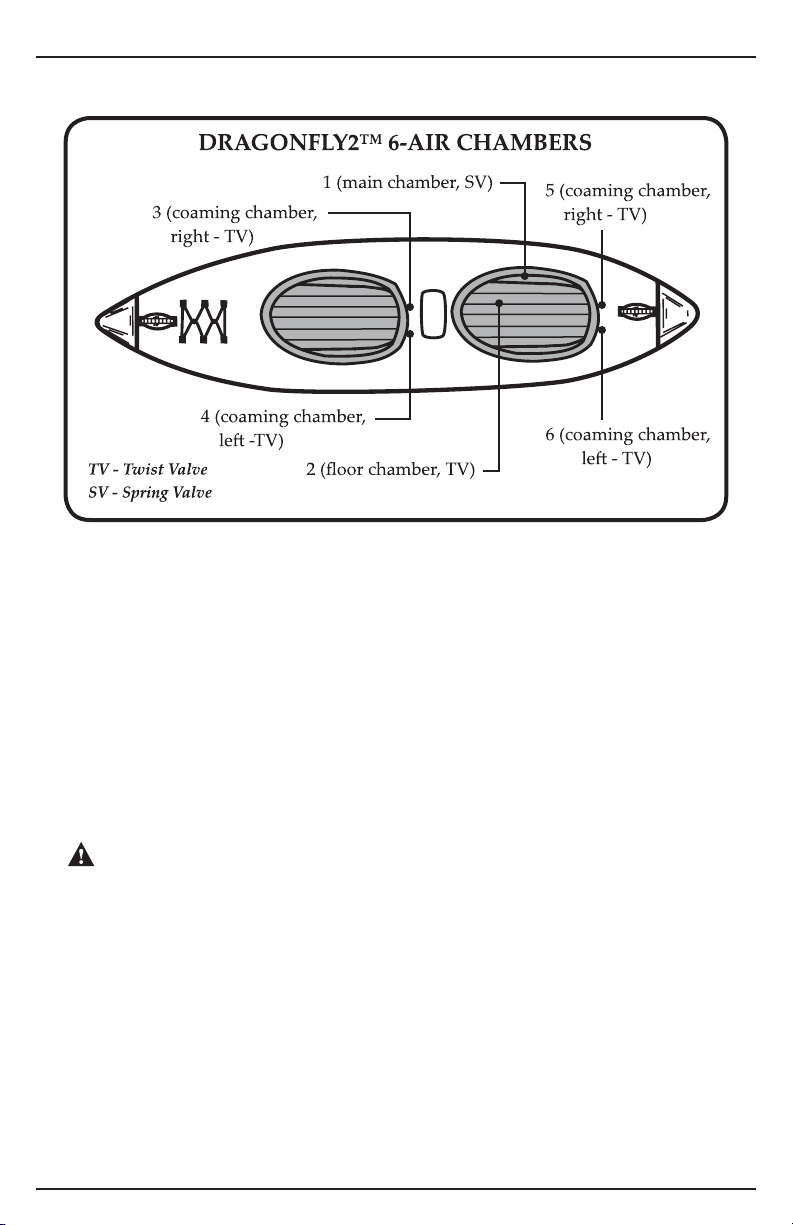
Diagram of Ination Chambers
3.3 Inating
IMPORTANT: Inate your kayak in the following order. Failure to follow these instructions
maycausedamagetoyourkayak.Donotoverinate.When fully inated, the width of the
seating area should be between 15” to 16” at the widest point.
1. Inate chamber 1 “main” until the kayak feels rm to the touch. Neverover-inate!
2. Inate chamber 2 “oor” (using appropriate ing) until rm (1.0 psi ONLY).
3. Inate chamber 3, 4, 5 and 6 “wave deectors” (using the appropriate ing) until rm.
4. Make sure all valves are closed tightly and properly.
3.4 OverInation
CAUTION: Water temperature and weather will aect the air pressure of the kayak. In cold
weather and water your kayak will lose some pressure. If this occurs, you may want to add a
bit more air to the kayak to improve performance. In hot weather or prolonged sunlight, the air
inside the kayak will expand. You must let some air out of the appropriate chambers to prevent
the kayak from failing due to overpressure. You should avoid exposing your kayak to extreme
temperatures (hot or cold).
3.5 Deation
1. Remove the cap from chamber 1.
2. Push stem inward and rotate to deate position.
3. Twist the valve bodies open on chambers 2, 3, 4, 5 and 6.
4. Once the chambers are deated you can use your pump to vacuum out any additional air for
improved folding.
9
Page 10
TM
3.6 Folding
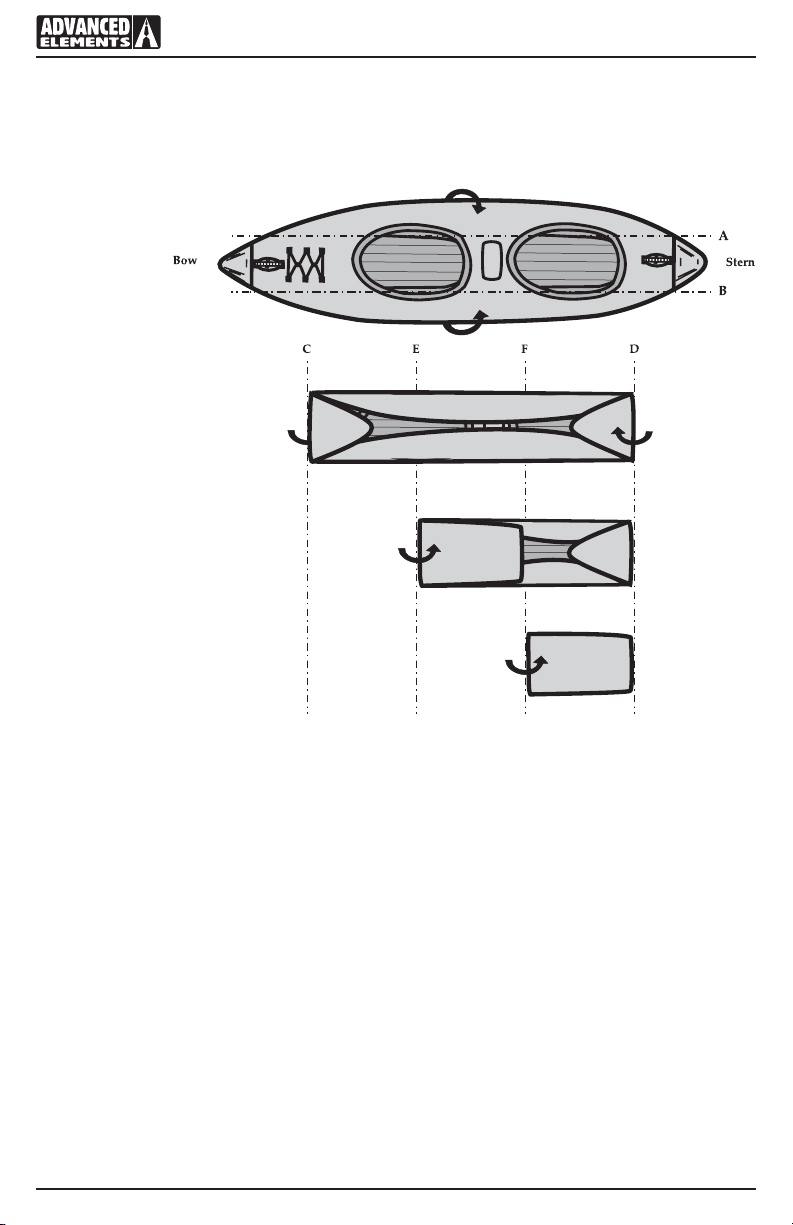
NOTICE: Reverse your pump to completely deate all chambers.
1. Completely deate all air chambers and thoroughly dry the kayak and remove the seat.
2. Fold sides A and B inward.
3. Fold Bow and Stern
sections inward
(C and D).
4. Fold Bow section
again in the same
direction (E).
5. Fold again at line (F).
6. Place into duel bag.
4. GUIDELINES FOR USAGE
Paddlesports can be very dangerous and physically demanding. The user of this product should
understand that participation in paddlesports may involve serious injury or death. Observe the
following safety standards whenever using this product. The user of this product acknowledges
both an understanding and an assumption of the risk involved in paddlesports.
Aer you have inated your kayak and before you put it in the water, inspect your equipment
for obvious signs of wear or failure. Review local rules and regulations and read again the
“CAUTION” statement.
Most areas have local laws and regulations about the use and equipment of small boats. Usually
a phone call to the local authorities will provide you with the needed information. Some areas
may require that you register and display a registration number on the front of your kayak.
Once you have been issued a number, it is best to ax it to the kayak by printing it on the
material with a permanent ink marker. If you are required to display a sticker or vinyl leers, an
inatable boat ID kit can be purchased at most marine stores.
10
Page 11

DragonFly2™ Inatable Kayak Owner’s Manual
Your kayak is designed to be paddled with a double bladed kayak paddle. Paddle with short
and even strokes. Keep the blade close to the kayak and the paddle almost vertical. Pull with
your lower hand and push with your upper hand. To reduce the amount of swaying at the
front of the kayak, ease o on the force of your stroke. Paddling with a backward stroke can
sometimes oer quick maneuverability.
ALWAYS practice safety and take the time to learn about the area where you are paddling. Get
ocial information about the local tides and currents before paddling there. Be careful that
you do not over estimate your strength, your endurance or your skill. Be careful never to under
estimate weather conditions. Be aware of the dangers before you begin. Be aware of your skill
level. Be sure you understand and accept the risk of these dangers. There are many paddling
clubs all over the world. These can be a great source of information on places to paddle, people
to paddle with and most importantly, continued safety practices.
5. PROPER CARE AND STORAGE
Your inatable kayak is made of very durable materials. However, like anything else, proper
use and care will increase the life of your kayak. Before storing your kayak, make sure it is both
CLEAN and DRY. You may clean your kayak with a mild soap and water. NEVER use strong
solvents to clean your kayak as they will destroy the material.
If your kayak has been used in salt water, rinse it o with fresh water and allow it to dry before
storing. Use a dry towel to wipe up all moisture. It should be deated and kept out of direct
sunlight when stored. Avoid exposure to extreme temperatures (hot or cold). If your boat is
exposed to freezing temperatures while storing, allow it to warm up before unfolding.
6. REPAIRS
All kayaks come with a repair kit that includes glue and several patches. This should remain
with the kayak in the event that you may need it. If service is required for your kayak, please call
866-262-9076 for assistance.
6.1 Repairing Small Punctures and Cuts
1. Cut a rounded patch at least ¼” or ½” larger than the hole or cut.
2. Clean the area where the patch will be placed with water and/or mild soap.
3. Make sure all surfaces are dry.
4. In a well ventilated area, spread a thin layer of glue on both the patch and on the
damaged area. Let it sit for three to ve minutes or until tacky.
6.2 Repairing Pinholes
1. Inate the PVC tube. Locate the pinhole by sponging soapy water over the tube until
you see air bubbles. Mark the location of the pinhole.
2. Deate the tube and dry the aected area. Apply a drop of glue to the pinhole
3. Allow glue to dry completely.
4. Do not inate the kayak for at least twelve hours.
11
Page 12
TM
7. TROUBLESHOOTING
PROBLEM
Does not hold air while
inating
The kayak is sagging.
The kayak will not hold
full pressure for more
than couple of hours.
The kayak still loses air.
The tube is kinked or
bent.
The kayak is too tight.
SOLUTION
The spring valve uses a plunger system. The only time the plunger
should be in the open position is when you are deating. Make sure
that the plunger is closed to inate. Push the plunger in and rotate
counter-clockwise.
Be sure that the right pump is being used. You need a bellows foot
pump or a double action hand pump. A 12-V electric does not supply
enough pressure to fully inate the kayak. The 12-V can be used to par-
tially inate the kayak but one of the other pumps is needed to top it o.
Make sure that the plunger is in the closed position. It should only
be open when deating. If it is open, the only seal is the black rubber
gasket inside the cap. Even then, a lile air may still leak out.
If you have checked all the previous possible reasons for the kayak los-
ing air, then there may be a pinhole or hole somewhere on the tube. Pull
tube from outer covers. Inate. If you cannot see or hear where a leak
may be, take a clean rag with soapy water and begin rubbing the tube.
If a hole is present, bubbles will continually form. Repair using repair
kit. If it is a very small pinhole, a dab of the glue may be sucient.
The tube just needs to be adjusted. When kayak is fully deated try
adjusting the position of the tube inside of the outer shell.
This is more than likely due to the fact that the kayak is over inated.
The widest point should be no less than fourteen inches across.
Thenisbent.
Theoorhasformeda
large bubble.
There is water in the
kayak.
Thekayakdristoone
side.
12
Aer inating the kayak, turn upside down and leave out in sun for ap-
proximately ten minutes. Fin will conform to its original shape. Even if
it is slightly bent, it will not aect the kayaks performance.
If two of the ridges in the oor have formed one large one, the I-beam
has come apart. This is caused by over ination. It cannot be xed. You
need a new tube.
Water will drip into the kayak o of your paddle. Do not be alarmed.
Simply dry it o before puing kayak away. You can also get a spray
skirt from our accessories list from a dealer. This will help keep the
inside of the kayak dry as well as you.
A kayak will always head in the direction of your last stroke. If the tube
is not aligned inside of the cover, this will also cause dri.
Page 13

Note: If your state requires this document of licensing your boat, please contact Advanced Elements Customer
Service Department for completion, or for more information.
MANUFACTURER’S STATEMENT OF ORIGIN
FOR A VESSEL SOLD IN THE STATE OF_____________________________________
The undersigned manufacturer hereby certies that the new boat described below, the property of
said manufacturer, has been transferred this _________day of _____________________, 20_________on
Invoice# _________________to:
Owner’s/Dealer’s Name_____________________________________________________________
Address___________________________________________________________________________
City, State, Zip______________________________________________________________________
Model Name Model Year Manufacturer’s Hull Identication#
m DragonFly2™ Kayak (AE1003) __________ HIN# ___________________________
Type: Kayak Hull Material: PVC/Polyester
Length Overall: 12’ Beam: 35”
U. S. Coast Guard Capacity Plate Information (where applicable):
Maximum persons capacity in whole persons: 300 lbs (136 kg)
Maximum weight capacity (persons & gear): 300 lbs (136 kg)
The manufacturer further certies that this was the rst transfer of such new boat and that all
information given herein is true and accurate to the best of their knowledge
TM
P.O. Box 5128 Concord, CA 94524
Signature_________________________________________________________________________________
FIRST ASSIGNMENT
FOR VALUE RECEIVED, in the amount of $ __________________________________________________,
the undersigned hereby transfers the Certicate of Origin and the boat described therein
to _______________________________________________________________________________________
Address __________________________________________________________________________________
and certies that the boat is new and has not been registered in this or any other state; Advanced
Elements, Inc. also warrants the title of said boat at time of delivery, subject only to the liens and
encumbrances as set out below:
Amount of Lien Date To whom Due Address
___________________ __________ __________________ ___________________________________
Dates___________________________ 20 _________, at _____________________ ____________________
___________________________ By:___________________________________________________________
Transferrer (Firm name) Sign Here ___________________________________________________________
Before me personally appeared _____________________________ who by me being duty sworn under
oath says the statements set forth above are true and correct. Subscribed and sworn to me before
this __________ day of _____________________________ 20 ___________.
___________________________________Notary Public Date commission expires_______________
(SEAL)
Page 14

Declaration of Conformity
(according to ISO/IEC Guide 22 and EN 45014)
Manufacturer’s Name: Advanced Elements, Inc.
Manufacturer’s Address: P.O. Box 5128
Concord, CA 94524
declares, that the product:
Product Name: DragonFly2™ Kayak
Model Number (s): AE1003
to which this declaration relates, meets the essential health and safety
requirements and is in conformity with the relevant EU Directives listed below:
General Product Safety Directive
using the relevant section of the following EU standards and other normative
documents:
EN / USI 6185-1 : 2006
ABYC H28-76
Date: January 1, 2006
Clay Haller, President
This product complies with European directives for recreational vessels as
published by the International Organization for Standardization (ISO).
14
Page 15
LIMITED WARRANTY
Advanced Elements, Inc. warrants this product to be free from defects in material or workmanship for a period of
one year from the date of purchase. Products that prove to be defective under conditions of normal and proper use
during the warranty period because of defective workmanship or faulty material will be replaced or repaired without
charge. For warranty service, contact Advanced Elements, Inc.
Advanced Elements, Inc shall inspect all warranty claims and in the event of a defect, repair or replace the defective
part or entire item, at its option. The purchaser must, before return of a defective product, obtain from Advanced
Elements, Inc, a return authorization number and return center address. Please write or call as listed below. Once an
authorization number is obtained, the purchaser must ship the product, POSTAGE PREPAID, to Advanced Elements,
Inc for repair. Do not ship to P.O. Box address as it may be sent back.
This warranty does NOT cover:
Products used for rental, for hire or in professionally guided tours and other uses not considered normal recreational
purposes; and punctures, cuts and abrasions sustained in normal use; and items involved in accidents; and items
damaged in white water mishaps, and other unreasonable uses or improper storage.
Advanced Elements, Inc shall within (30) days from receipt of an authorized return from purchaser, perform its responsibilities in conformance with this warranty.
THERE ARE NO WARRANTIES WHICH EXTEND BEYOND THE DESCRIPTION OF THE FACE HEREOF. ADVANCED ELEMENTS SHALL NOT BE HELD LIABLE FOR INCIDENTAL AND CONSEQUENTIAL DAMAGES.
THIS WARRANTY IS INCLUSIVE IN LIEU OF ALL OTHER WARRANTIES.
This warranty gives you specific legal rights, and you may also have other rights that vary from state to state.
Advanced Elements, Inc.
P.O. Box 5128, Concord, CA 94524
Toll Free - 866-262-9076 - email [email protected] - www.advancedelements.com
(cut along line)
ADVANCED ELEMENTS WARRANTY REGISTRATION
(PLEASE TYPE OR PRINT CLEARLY)
Please complete and mail card to Advanced Elements within 10 days. It will register your product.
Mail to: Advanced Elements, Inc.
P.O. Box 5128, Concord, CA 94524
An:WarrantyDepartment
Owner’s Name _______________________________________________________________
Address _____________________________________________________ Apt.____________
City _________________________________________ State _____________ Zip __________
Model __________________________HULL (12 characters) # ________________________
Purchase Date _______________________________________
Store Name ___________________________________________________________
Store Address _________________________________________________________________
City __________________________________________State ____________ Zip __________
Thank you for responding to the following.......
1. How did you rst learn of this product?
m Dealer m Friend m Magazine m Radio m TV m Catalog m Other
2. What most inuenced your decision to purchase this product?
m Price m Features m Style m Quality m Other
Page 16
IMPORTANT!
PLEASE READ THIS MANUAL CAREFULLY BEFORE PROCEEDING.
AFTER READING THIS MANUAL, SAVE THESE INSTRUCTIONS
FOR FUTURE REFERENCE.
If you would like a catalog of our latest products please
visit our website at
www.advancedelements.com
or call Toll Free 866-262-9076
PLEASE COMPLETE THE OTHER SIDE OF THIS
WARRANTY REGISTRATION CARD AND RETURN TO ADVANCED ELEMENTS, INC.
PLACE
STAMP
HERE
TM
P.O. Box 5128
Concord, CA 94524
1-866-262-9076
www.advancedelements.com
Email: [email protected]
 Loading...