

Page 1
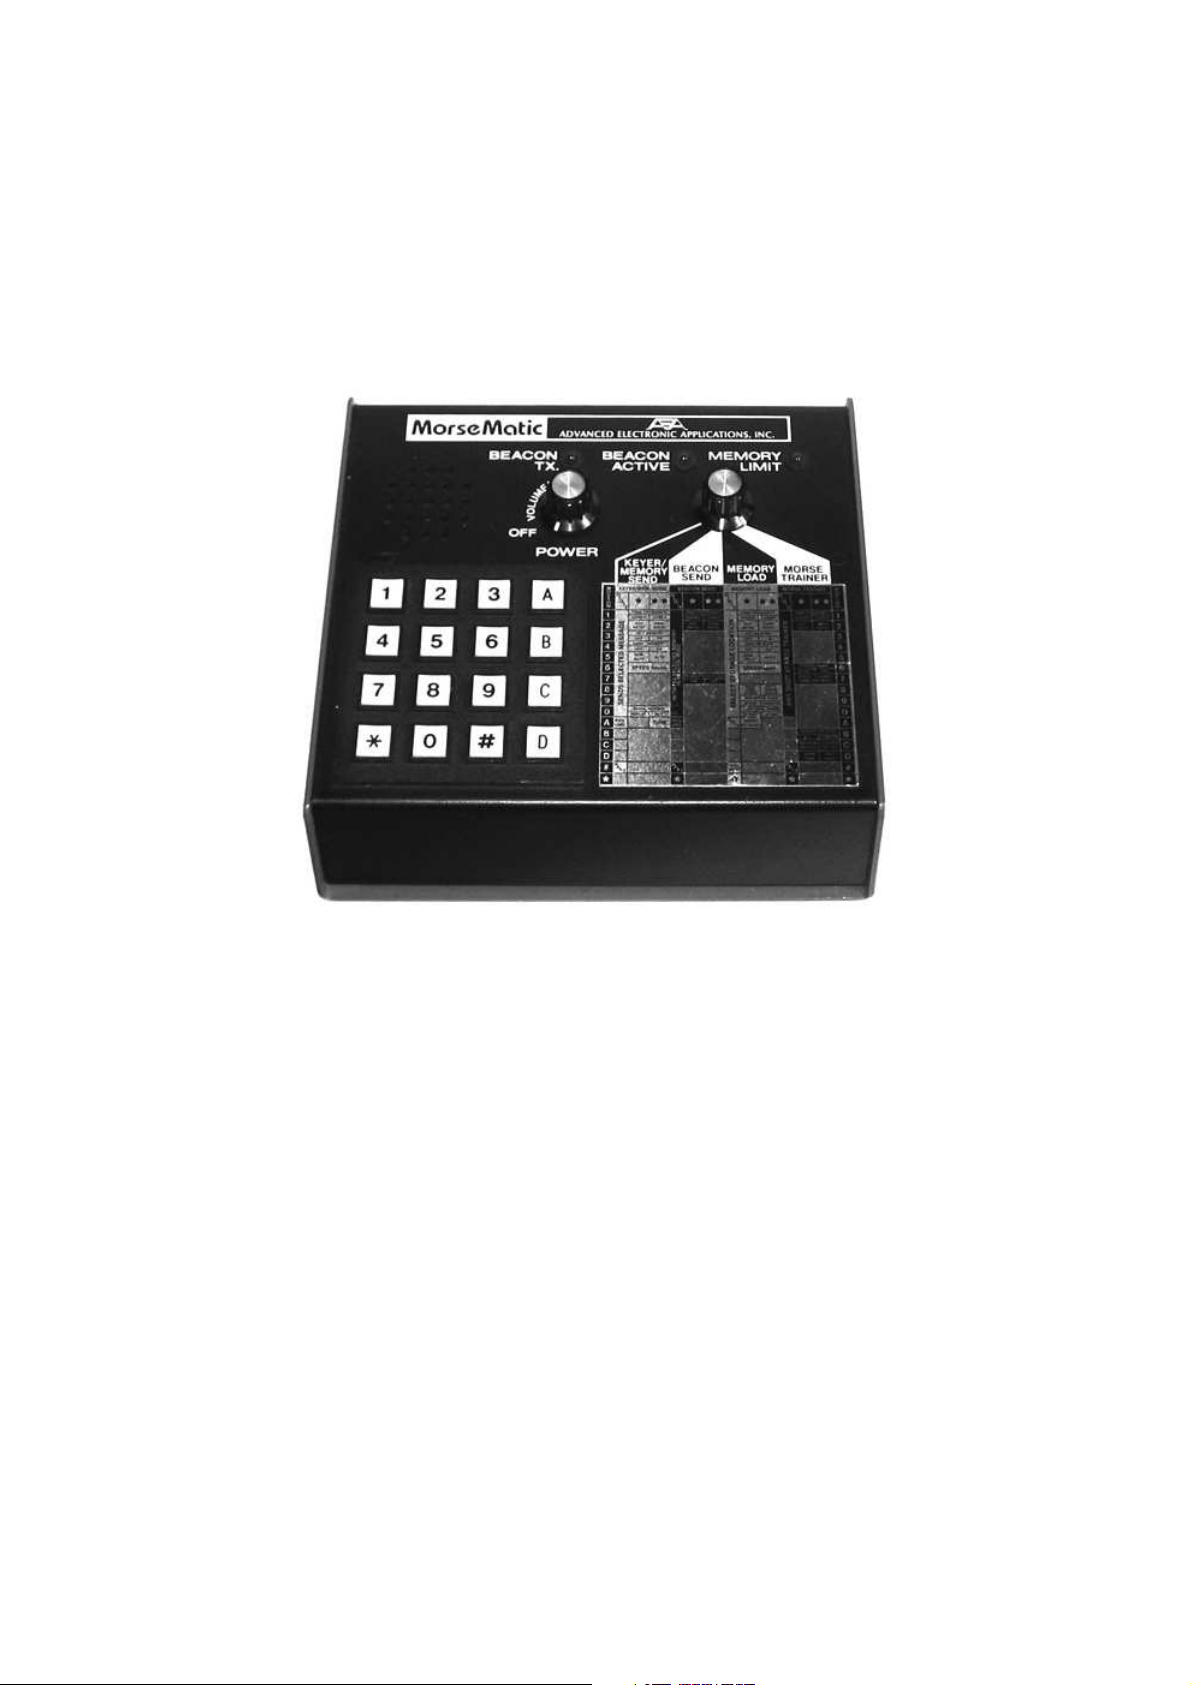
Instruction Manual
AEA MORSEMATIC
MODEL MM-1
1
Page 2

Instruction Manual
AEA MORSEMATIC
MODEL MM-1
Congratulation on your decision to purchase the versatile AEA MorseMatic™. You will find
it is truly a gem for CW operation.
The MorseMatic has four basic modes of operation. With the Mode Selector Switch, you
may choose between a keyer, a memory keyer, a beacon and a Morse trainer. Control for
each mode is then transferred to the keypad for full feature programming.
Once you have read the directions in full, you will be able to send any one of up to ten preprogrammed messages at the touch of a button. The memory includes a flexible automatic
serial number generator. You will also have a fully programmable trainer with an incredible
range of features for learning or teaching Morse code. You will be able to use the Beacon
mode with programmable send and receive times – ideal for scatter, moonbounce and tropospheric scheduling. And last but not least, you will have a programmable keyer with selectable speed, tone, dot-dash ratios and automatic and semi-automatic (bug) capabilities.
There's a lot more and the possibilities are endless! Just look in the pages that follow and
learn how to perform your own MorseMatic magic!
*MorseMatic is a trademark of Advanced Electronic Applications, Inc.
2
Page 3

TABLE OF CONTENTS
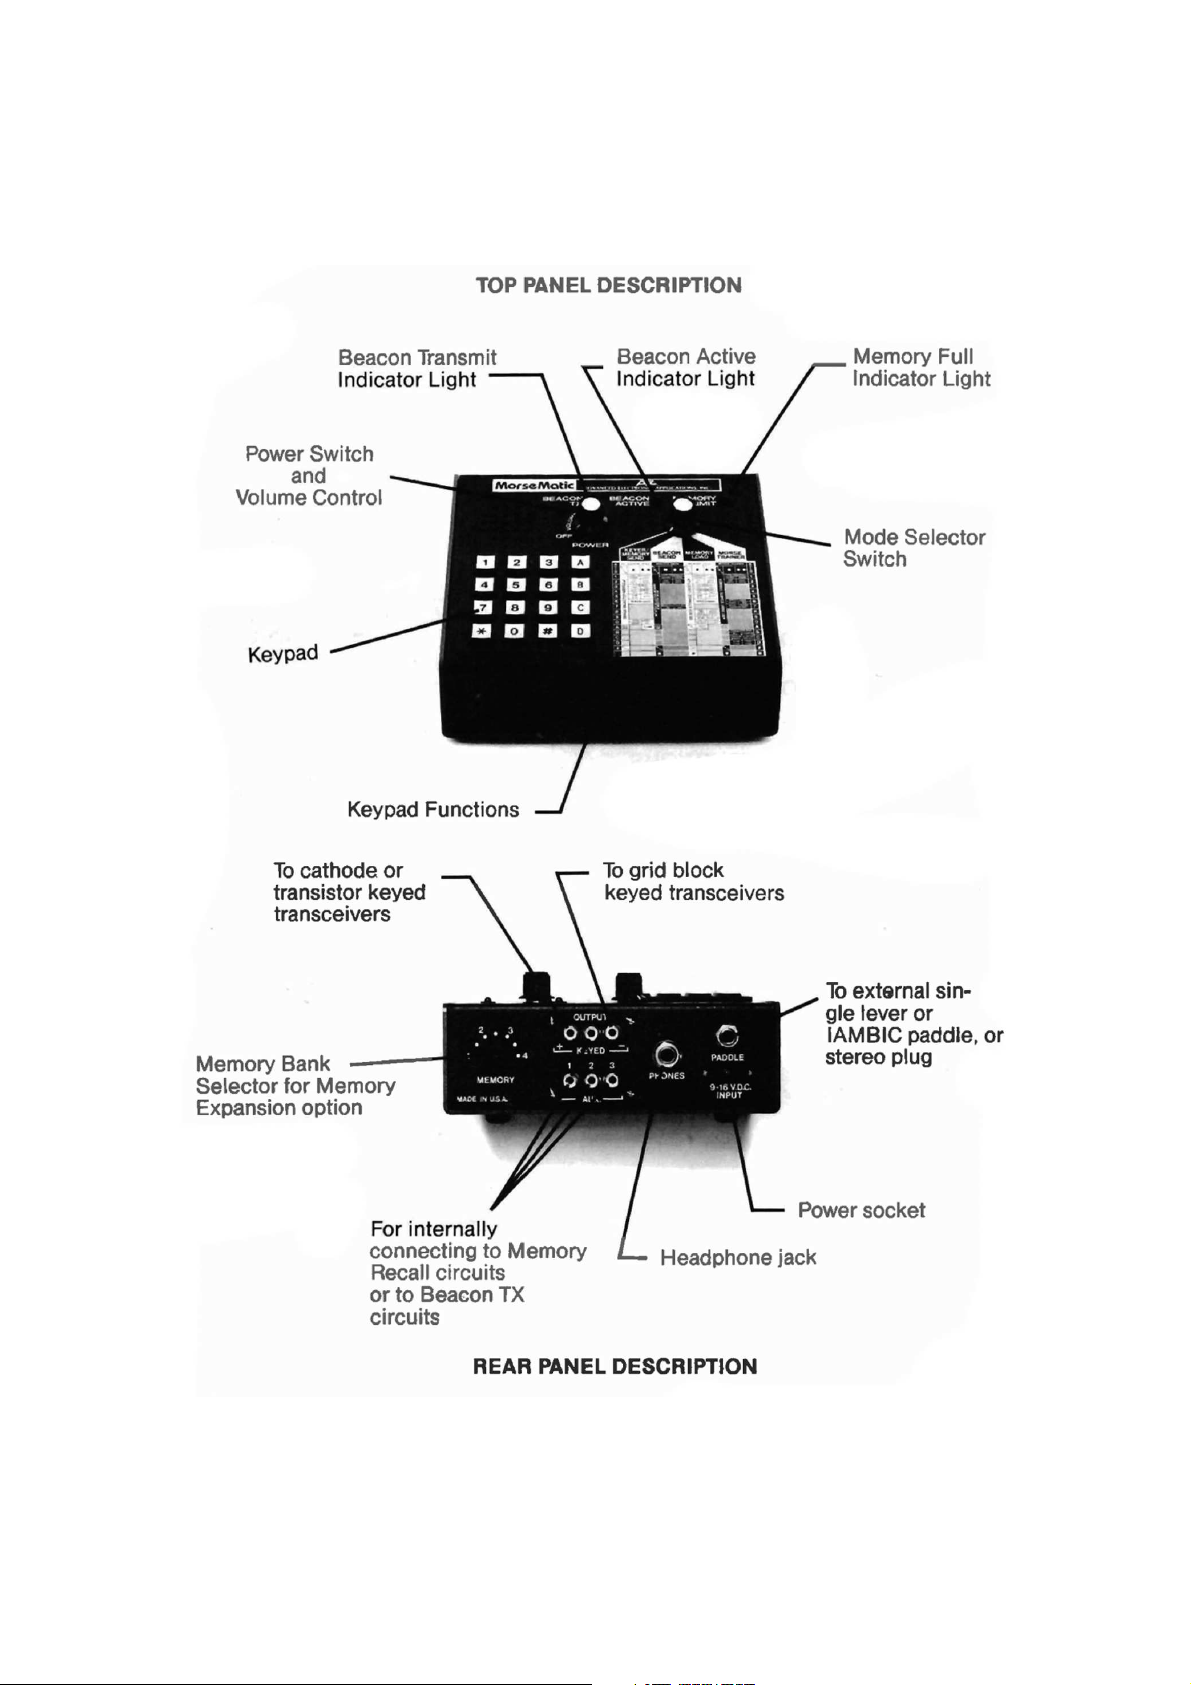
TOP PANEL DESCRIPTION ................................................................................ 5
REAR PANEL DESCRIPTION ..............................................................................5
HOOK-UP INSTRUCTIONS
1. POWER ..................................................................................................... 6
2. PADDLE ..................................................................................................... 6
3. STRAIGHT KEY ......................................................................................... 6
4. HEADPHONES .......................................................................................... 6
5. TRANSMITTER ..........................................................................................6
CHECK-OUT PROCEDURE
KEYER SEND MODE ...........................................................................................7
MEMORY LOAD MODE ....................................................................................... 8
BEACON SEND MODE ........................................................................................9
MORSE TRAINER MODE .................................................................................... 9
OPERATING INSTRUCTIONS
KEYER OPERATION ............................................................................................10
1. SPEED SET ............................................................................................... 10
2. SIDETONE CHANGE .................................................................................10
3. AUTOMATIC AND SEMI-AUTOMATIC OPERATION ................................ 10
4. DOT-DASH RATIO ..................................................................................... 10
5. DOT-DASH MEMORY ................................................................................11
6. TRANSMITTER TUNING ........................................................................... 11
7. CLEARING ENTRIES .................................................................................11
8. UNACCEPTABLE ENTRIES ...................................................................... 11
MEMORY KEYER PROGRAMMING ................................................................... 12
1. MEMORY LOCATIONS ............................................................................. 12
2. AUTOMATIC MEMORY LOAD .................................................................. 12
3. REAL-TIME MEMORY LOAD .................................................................... 12
4. MESSAGE ENTRY .................................................................................... 12
5. MAXIMUM LOADING SPEED ................................................................... 12
6. SERIAL NUMBER USE ............................................................................. 12
7. PAUSE IN AUTOMATIC LOAD .................................................................. 13
8. ERASING ................................................................................................... 13
9. EDITING .....................................................................................................13
10. MEMORY FULL ..........................................................................................13
11. SEMIAUTOMATIC (BUG) MEMORY LOAD .............................................. 13
12. BATTERY LIFE .......................................................................................... 13
MEMORY KEYER OPERATION .......................................................................... 14
1. SENDING A MESSAGE ............................................................................ 14
2. INTERRUPTING AND RESTARTING A MESSAGE ................................. 14
3. EDITING .................................................................................................... 14
4. SERIAL NUMBER CHANGE OR REPEAT ............................................... 14
BEACON SEND OPERATION ............................................................................. 15
1. BEACON ON AND OFF TIMES ................................................................ 15
2. SERIAL NUMBERS IN BEACON MODE .................................................. 15
3. INITIATING BEACON MODE .................................................................... 15
4. INTERRUPTING BEACON MODE ............................................................ 15
5. RESTARTING OR RESUMING BEACON MODE ..................................... 15
6. TRANSMITTER SEND-RECEIVE OUTPUT ............................................. 15
3
Page 4

MORSE TRAINER OPERATION .......................................................................... 16
1. TRAINER STARTING SPEED ................................................................... 16
2. TRAINER FINISHING SPEED ................................................................... 16
3. TRAINER SPEED INCREASE DURATION ............................................... 16
4. INITIATING TRAINER MODE .................................................................... 16
5. TERMINATING TRAINER MODE .............................................................. 16
6. FAST (FARNSWORTH) OR SLOW CODE MODE .................................... 16
7. FIVE-CHARACTER OR RANDOM CODE SPACING ................................ 17
8. COMMON CHARACTERS OR ALL CHARACTERS ................................. 17
DISABLING CW SIDETONE OR KEYPAD FEEDBACK TONE ........................... 17
REMOTE MEMORY RECALL .............................................................................. 17
APPENDIX A ........................................................................................................ 18
APPENDIX B ........................................................................................................ 19
ABBREVIATED INSTRUCTIONS ........................................................................ 20
PARTS PICTORIAL .............................................................................................. 22
SCHEMATIC ......................................................................................................... 23
PARTS LIST ......................................................................................................... 24
TECHNICAL SPECIFICATIONS .......................................................................... 25
MATRIX DIAGRAM ............................................................................................... 26
4
Page 5
5
Page 6
HOOK-UP INSTRUCTIONS
1. Power
To perform the Check-Out Procedures in the following section and familiarize yourself with the
MM-1, it is first necessary to apply 12 Volts to the power input jack on the Rear Panel of the
MM-1. This may be easily accomplished by connecting the cord attached to the optional AC-1
or AC-2 wall adapter to the power socket on the Rear Panel of the MM-1.
If you do not have one of the optional power supply units, it is necessary to supply 12 volts DC
(±3 Volts) to the MM-1 from any external 12 volt source (including batteries) capable of delivering at least 350 ma (600 ma. for the MM-1 with ME-1). Use the mating power connecter supplied for interfacing the MM-1 and the power source. BE SURE TO OBSERVE PROPER POLARITY. The center pin is positive.
The MM-1 may be used in an automobile by using the optional DC-1 power cord.
2. Paddle
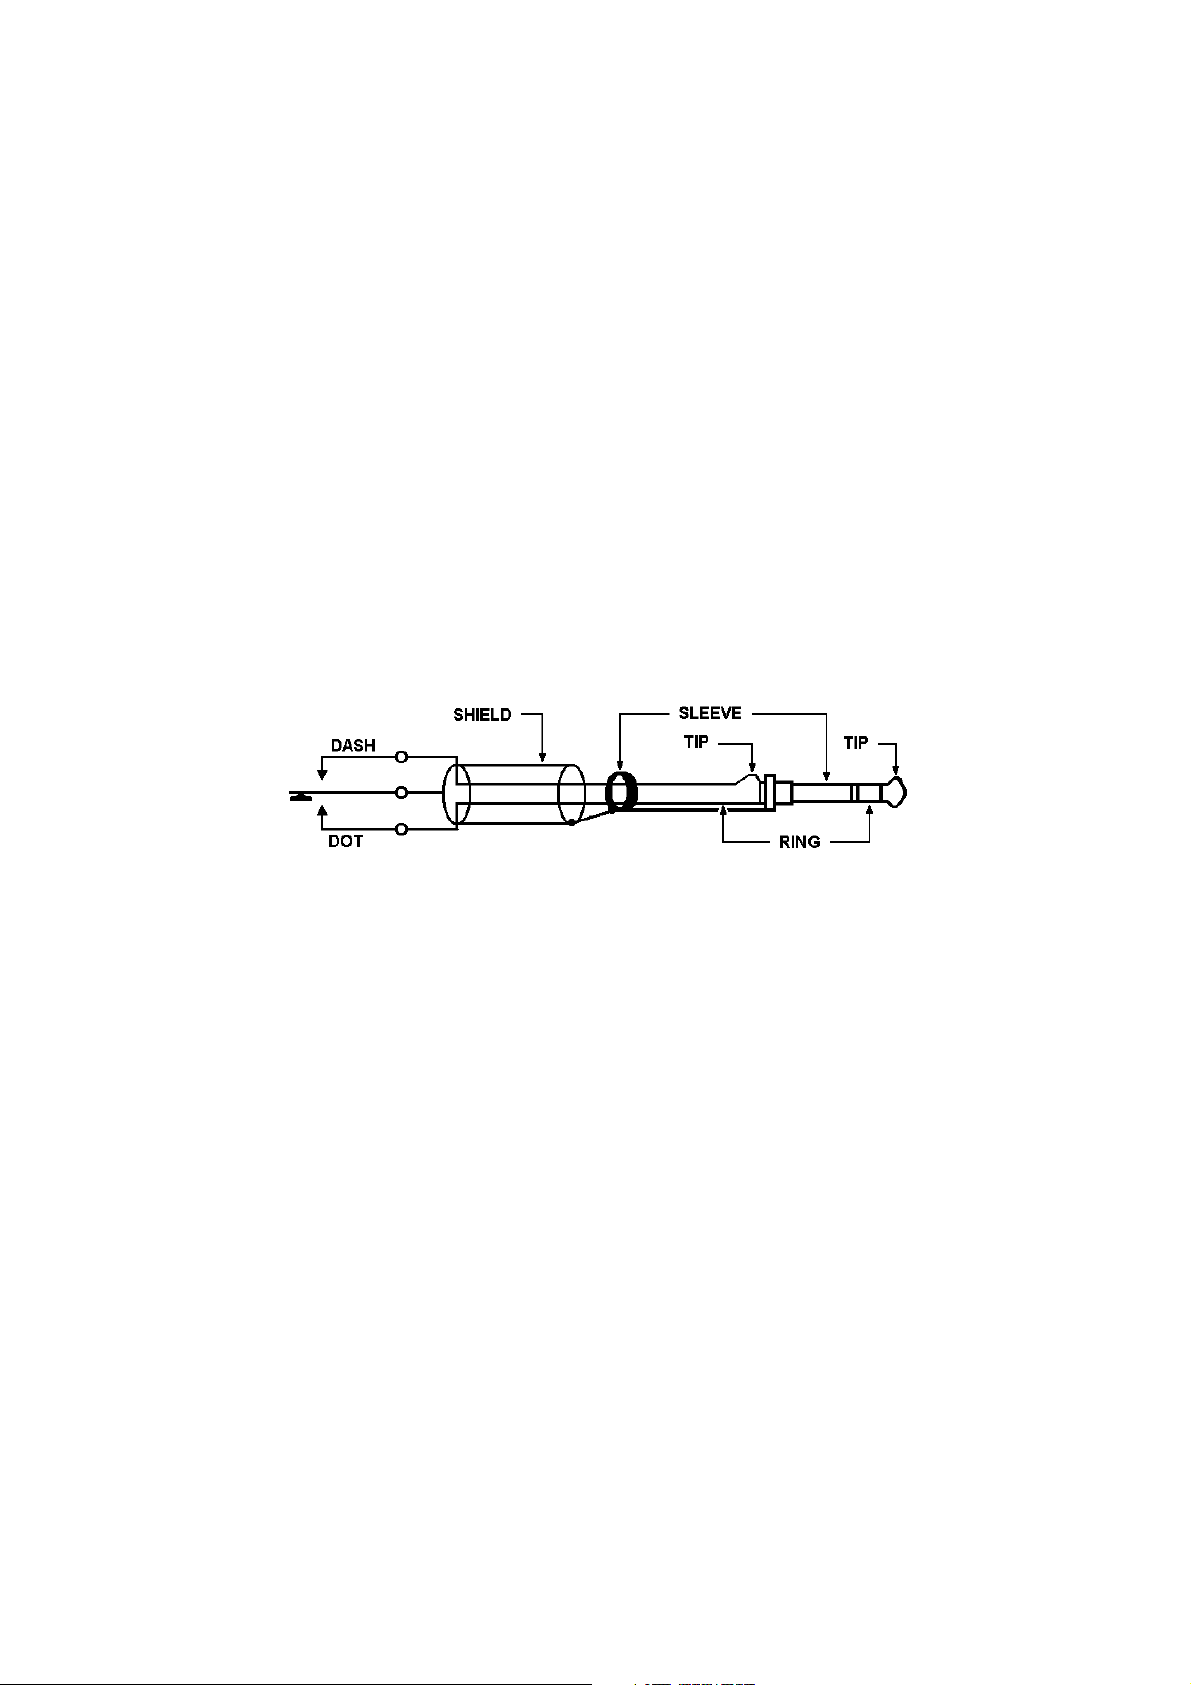
Wire your external keyer paddle to a stereo phone plug (not supplied) using two conductor plus
shield cable (available from any Radio Shack store). Connect the shield to paddle common and
the other wires to the dot and dash contacts. By convention, for right-handed operators, the
thumb should activate the dot contact and the index and middle fingers should operate the
dash contact.
3. Straight Key
A straight key may be used for sending, but cannot be used for memory operations. Use a
three conductor stereo plug with the key across the tip (dash) terminal and the sleeve (common) terminal. The MM-1 must be programmed for Semiautomatic mode.. It is not possible to
load memory with a straight key.
4. Headphones
The headphone jack will drive low, medium or high impedance headphones. A standard 1/4
inch two conductor headphone plug is necessary.
5. Transmitter
The MorseMatic will key virtually any modern amateur radio transmitter. There are two output
jacks which are diode protected against inadvertent hook-up to the wrong keying polarity. The
ground side of the RCA phone jack (keyer output) should be connected to the transmitter chassis ground on the key input jack. The center conductor of the MM-1 keyed output jack should
be connected to the "hot" terminal of the transmitter key input jack. Use a shielded coaxial cable for best R.F. immunity. Use the + keyed output jack to key cathode keyed and most keyed
transmitters. Use the – keyed output jack to key grid-block keyed and some transistor keyed
transmitters. If you connect your transmitter key input to the wrong MM-1 keyed output, either
the transmitter will not key, or it will be keyed continuously. To correct the situation, simply plug
the output line into the other output jack. No damage should occur to either the transmitter or
the MM-1 if you connect to the wrong keyed output jack!
The extra RCA phone auxiliary jacks are provided for such things as bringing out connections
for external Memory Recall switches. (See Schematic diagram for example.)
6
Page 7

CHECK-OUT PROCEDURE
We recommend that you perform the following functions to quickly acquaint yourself with the MorseMatic and to ensure the unit is operating properly.
KEYER SEND MODE
1. Turn the power switch on. The three LED lights will each blink momentarily and extinguish.
2. On the keypad, press and release [*], then hold your finger on [1]. The monitor tone will in-
crease in frequency.
3. Press [*][*] and hold [1]. The monitor tone will decrease in frequency.
4. Send a series of letters with the external paddle to "get a feel" for the perfect code the MM-1
produces.
5. Press [*][2][0][#] and send more Morse characters. Note that the length of the dots has short-
ened by one half.
6. Press [*][*][2][4][#][0] and send more Morse characters. Note that the length of the dashes has
increased by four-thirds.
7. Turn the power switch off and back on. The monitor tone will return to 500 Hz and the dot and
dash ratios will return to perfect 1:1 and 3:1 respectively.
8. Press [*][6][0][2] and note that the speed has slowed to 2 WPM.
9. Press the dot paddle and very quickly (before the dot has finished sending) press the dash pad-
dle and then let up quickly. After the dot has finished and a proper intracharacter space inserted, a dash will automatically be sent. This is called Dash Memory.
10. Similar to step 9, press the dash paddle quickly and then press the dot paddle momentarily.
After the dash is finished and an intracharacter space is inserted (automatically), the Keyer will
send a dot automatically This is called Dot Memory or automatic dot insertion.
11. Press [*][3] and repeat step 10. Note that the Dot Memory is no longer present.
12. Press [*][4] and repeat step 9. Note that the Dash Memory is no longer present.
13. Press [*][*][3] and then [*][*][4]. Note that both Dot and Dash Memories are re-enabled.
14. Enter [*][6] and a two digit number corresponding to a sending speed you feel comfortable with.
(If less than 10 WPM use 0 as the first digit.) Practice sending at that speed for about a minute.
Because the MorseMatic has almost perfect dot and dash ratios and spacing, many operators
feel the speed calibration is low. Actually the MM-1 probably has the best speed calibration on
the market. It is calibrated using the FCC definition of "PARIS" being the standard word. (See
Appendix B.) You might also note that many practice code tapes are actually faster than the advertised speed.
15. Press [*][5] and note that a tone will appear as long as you hold the dash paddle. This is called
Semiautomatic or "Bug" mode. Press [*][*][5] and the Keyer will return to fully automatic operation.
16. Press [*][*][A] and very quickly release the [A] button before the feedback tone stops. The MM-
1 should then key continuously until you press any keypad button or touch either paddle. This is
the Automatic Tune feature. The Tune feature operates only in the KEYER/MEMORY SEND
mode. (If you hold the A button down, the MM-1 will not go into the Tune mode.)
7
Page 8

MEMORY LOAD MODE
1. All of the steps you went through in the KEYER SEND mode could be repeated in MEMORY
LOAD mode (except for the Automatic Tune. It is not necessary!)
2. Press [1][#], [2}]#], [3][#], [4][#], [5][#], [6][#], [7][#], [8][#], [9][#], [0][#]. This will clear all the
memory locations. Verify this by turning the Mode Selector Switch to MEMORY SEND. Press
any numbered button on the keypad. Nothing but a feedback tone should result, indicating the
storage location is empty.
3. Return the Mode Switch to MEMORY LOAD. Press 1 and send a short message, one word at a
time, with the paddle. Upon completion of the message, press the [#] button which terminates
message loading.
4. Return the Mode Switch to MEMORY LOAD and press [1]. Immediately upon release of [1] the
message you recorded will be sent. You may change speeds if you like and repeat the message again by pressing [1].
5. Press [1] and play back the message again. Between words in the message playback, press
the dot paddle and hold momentarily. The message will halt without inserting an extra dot. Now
you may send anything with the paddle. By pressing [A], the message will resume sending from
where you interrupted the message. This is a very useful feature for inserting a signal report,
for example, in the middle of a message.
6. Return the Mode Switch to MEMORY LOAD and press [2]. With the paddle, key in the word
"test" and press [*][9][*][9][*][9]. Again, with the paddle, send "test" and then press [*][9][*][9].
Now send "test" again with the paddle and press [*][9]. Send "test" one more time, followed by
the letter "K" with the paddle. Press [#] to terminate the message.
7. Return the Mode Switch to MEMORY SEND and press [2] on the keypad. The message should
play back a series of the word "test" with progressively shorter spaces between words.
8. Return the Mode Switch to MEMORY LOAD and press [*][8][3]. Now pause for a short while
and send a message, one word at a time, with the paddle. Terminate the message by pressing
[#].
9. Return the Mode Switch to MEMORY SEND mode and press [3]. Immediately, upon release of
[3], the message will commence playing back with the exact same pauses as were present between words during the loading operation. This is called the REAL TIME SPACE Loading
Mode. The other (AUTO WORD SPACE) loading mode will insert a maximum of one word
space between characters unless you use the [*][9] or [*][*][9] instruction in the loading operation.
10. Return the Mode Switch to MEMORY LOAD and press [*][*][8]. Now press [4] and send "NR"
with the paddle and press [*][A] which inserts the Serial Number Generator at this point in the
message. Now send "K" with the paddle and terminate the message by pressing [#] on the keypad.
11. Return the Mode Switch to MEMORY SEND and press [4]. The Keyer should play back: NR 01
K. Press [4] again and the Keyer should play back NR 02 K. Now press [*][0] and then [4]. The
Keyer should now play back NR 02 K again (It repeated the same serial number.) Now press
[*][*][0][1][6][1][#] and then press [4] again. Now the message should read NR 161 K.
12. Press [4] again and press the dot paddle between 162 and K to halt the message (right after
the serial number).
13. Return the Mode Switch to MEMORY LOAD and press [A] (for Edit). Now, with the paddle,
send DE K1XX K. Press [#] to terminate the message loading.
14. Return the Mode Switch to MEMORY SEND and press [4]. The message should now read "NR
162 DE K1XX K". You have just edited your old message!
8
Page 9

BEACON SEND MODE
1. Turn the Mode Switch to MEMORY LOAD and press [1][#]. (This erases the old message
stored in location 1.) Press [1] again and send a message into memory for about 15 seconds.
Terminate the message by pressing [#].
2. Return the Mode Switch to BEACON SEND. Press [*][7][3][0][#] and [*][*][7][1][5][#]. Now press
[1] and hold your finger down until your sweep second hand on your watch comes up to the top
of a minute. At that precise time, release your finger from the keypad button. The message
should play back for 30 seconds (at about half the speed you loaded in). Note that the BEACON ACTIVE light should be continuously lit. There should be a 15 second pause and then the
message will be automatically replayed. One second before the message is replayed, the BEACON TX light will come on and extinguish after the message is completed.
3. Halt the sequence by pressing [#] the button on the keypad or by pressing either paddle. Press
[*][7][1][5][#] and [*][*][7][3][0][#]. Now press and release [1] and note that the speed should
double and the pause between transmissions will be twice as long. NOTE: If you want a message to be transmitted at a given speed in the BEACON SEND mode, play the message in
MEMORY SEND mode at the desired speed and time the EXACT length of time it takes to play
the message at that speed. Use this time to program the BEACON CYCLE ON time in the
BEACON SEND mode.
MORSE TRAINER MODE
1. Turn the Mode Switch to MORSE TRAINER mode Press [*][6][0][5] and [*][*][6][2][0] for a start-
ing speed of 5 WPM and an ending speed of 20 WPM. Press [*][7][0][#][5] for a practice duration of 0.5 minutes.
2. Press [A] and the Keyer should start sending code at a 20 WPM character speed with space
between characters such that the beginning word speed is only 5 WPM. The space between
characters will shorten during the half minute until the spacing is proper for 20 WPM. The Trainer will now continue to send until you halt it by pressing the [#] button and hold it through at
least one character. The Trainer may continue to send a couple of characters before final termination.
3. Press [*][B] and then [A]. The Trainer should repeat sending as in step 2 except that difficult
characters will be included. Press and hold to terminate.
4. Press [*][*][B] and [*][C]. Now press [A] and notice that the difficult characters have disap-
peared, but that the Trainer is sending random word lengths and not continuous five-letter code
groups. Press and hold [#] to terminate.
5. Press [*][*][C] and [*][D]. Pressing [A] will now start slow code in five letter code groups The
slow characters will gradually speed up to 20 WPM in 0.5 minutes.
This concludes the check-out of your MorseMatic unit. If all these features operate properly, your
MM-1 is in good operational condition. If not, please reread the instructions and if necessary, start
over from the beginning. Providing you still have difficulties, contact the AEA Sales Department at
206-775-7373 for advice.
9
Page 10

OPERATING INSTRUCTIONS
The MorseMatic™ has four fully programmable modes of operation: KEYER/MEMORY SEND,
BEACON SEND, MEMORY LOAD and MORSETRAINER. Each mode is enabled through the
Mode Selector Switch.
Keyer Operation
(Switch Mode Selector to KEYER/MEMORY SEND)
1. Speed Set
When you first turn on your MM-1, it is programmed to begin at 20 WPM, with a tone of 500 Hz
in the Automatic Keyer mode. To change the speed, push [*][6] and enter the new speed as
two digits, eg. 15. If the new speed is less than 10 WPM, the first digit must be zero. The range
of speed is from 02 to 99 WPM.
Example: To enter 40 WPM, press [*][6][4][0].
To enter 7 WPM, press [*][6][0][7].
2. Sidetone Change
To raise the sidetone, press [*][1] and hold the key until the desired tone is reached. The tone
may be lowered by pressing [*] twice and holding the [1] key, i.e. [*][*][1]. (The keypad tone will
be slightly lower than the CW monitor tone.)
3. Automatic and Semiautomatic Operation
On turn-on the Keyer is set to Automatic Keyer operation. The Keyer may be operated in the
Semiautomatic mode by pressing [*][5]. The Keyer now behaves as a "bug". To return to full Automatic mode, press [*][*][5].
4. Dot-Dash Ratio
"Perfect" Morse code is sent with the time for a dot equal to the time for a character space (a
dot-space ratio of 1.0) and the time for a dash equal to 3 space times (a dash-space ratio of
3.0).
The dot-space ratio is adjustable from 0.5 to 1.5 in 0.1 increments and is set to 1.0 on turn-on.
To adjust the dot-space ratio, press [*][2] and enter the dot ratio with the pound [#] sign as a
decimal.
Example: To enter a dot ratio of 0.7, press [*][2][0][#][7] or [*][2][*][7].
To enter a ratio of 1.3, press [*][2][1][#][3].
If the dot-space ratio entered exceeds 1.5 or is less than 0.5, the ratio will be set to 1.0.
The dash space ratio is set to 3.0 on turn-on and is adjustable from 2.0 to 4.0 in 0.1 increments.
To change the dash ratio, enter [*][*][2] and the new dash ratio.
Example: Dash ratio of 3.5 is desired; press [*][*][2][3][#][5].
If the dash-space ratio entered exceeds 4.0 or is less than 2.0, the ratio will be set to 3.0.
The code speed is automatically adjusted for other than "perfect" dot and dash, ratios and is
based on the word "PARIS".
1
1
See Appendix B, page 18
10
Page 11
5. Dot-Dash Memory
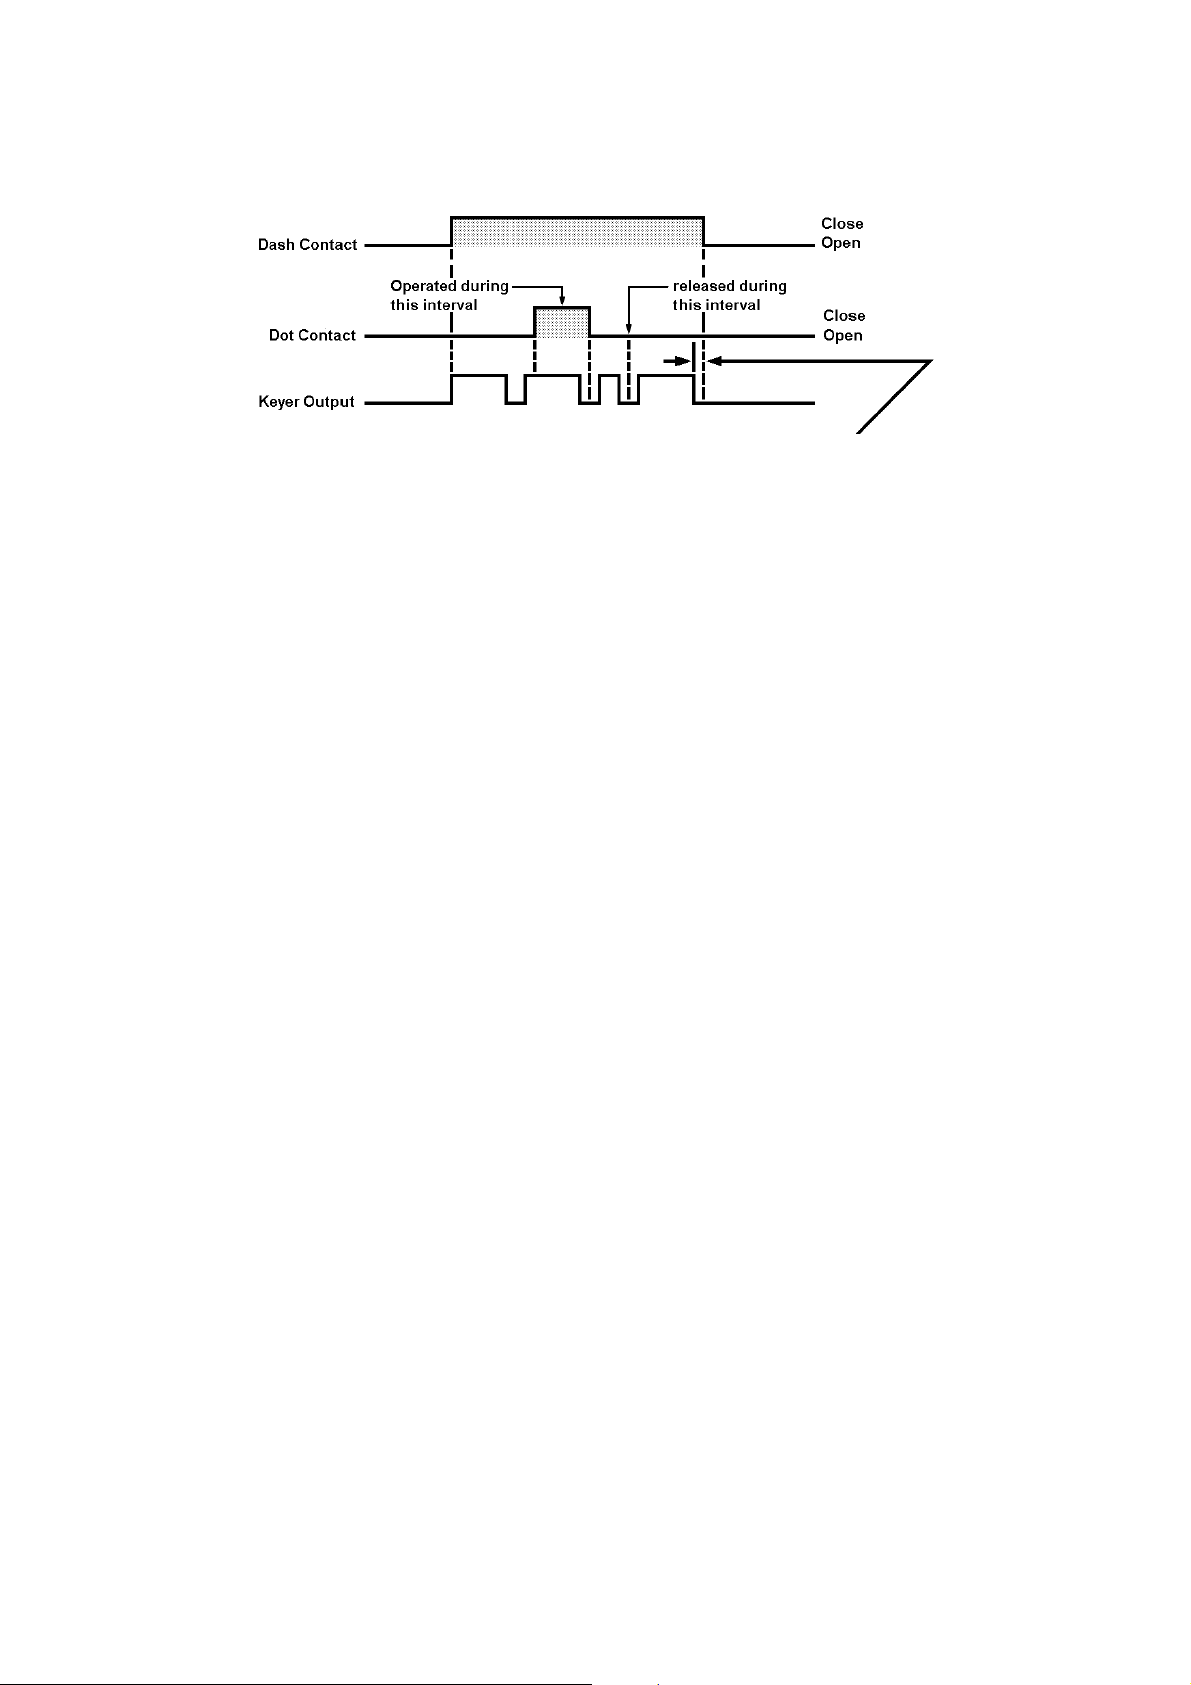
The selectable Dot and Dash Memories are enabled on turn-on. The Dot Memory allows insertion of a dot during a string of dashes. For example, the letter "Q"could be sent as follows:
Dot contact made after dash has
started but before space time has
expired, will give proper dot.
Dot contact does not have to be proper
Less than one
space time, otherwise
another dash
will occur.
duration.
The Dash Memory operates in the same fashion, allowing the insertion of a dash in a string of
dots. With both dot and dash memory enabled, holding both dot and dash contacts closed will
result in alternating dots and dashes. This feature is useful for generating characters like the
period and the letter "C".
To disable the Dot Memory, press [*][3].
To enable the Dot Memory, press [*][*][3].
To disable the Dash Memory, press [*][4].
To enable the Dash Memory, press [*][*][4].
6. Transmitter Tuning
To allow transmitter tuning, the Keyer output transistor is operated by pressing [*][*][A]. The [A]
key must be released quickly before the end of the feedback tone. Tuning will be terminated by
pressing any pad button or touching the dot or dash key paddle. The Tune feature only operates in the KEYER/MEMORY SEND mode.
7. Clearing Entries
If an error in programming occurs and the programming was not completed, it may be cleared
by pressing [#][#]. If the entry was completed, repeat with the correct programming.
8. Unacceptable Entries
Unacceptable entries will be ignored. For example, if a speed change is entered [*][6][2][A], the
result will be no speed change.
11
Page 12

MEMORY KEYER PROGRAMMING
(Switch Mode Selector to MEMORY LOAD)
IMPORTANT NOTE: When the MorseMatic has 12 V or battery keep-alive power applied, the
memory locations must all be cleared by pressing each storage location number followed by [#] as
follows: [1][#], [2}]#], [3][#], [4][#], [5][#], [6][#], [7][#], [8][#], [9][#], [0][#]. Remember: Memory will
never be lost as long as 12 V is supplied (even though the top panel power switch is turned off) or
keep-alive batteries are used when power is removed. Memory will be lost if 12 V power is removed and no keep-alive batteries are used.
1. Memory Locations
The MorseMatic has ten separate memory locations (0 through 9) that may be loaded with any
length message up to approximately 500 characters total. You will be able to load about 487
characters if the word "PARIS" is repeatedly loaded. If you load longer characters such as 5's,
you cannot load as many. One memory location can store all 500 characters or they may be allocated as desired. For instance, one location can store 50 characters, another 300 and another 150, etc. An optional Memory Expansion for 2,000 characters is available.
Two memory loading options are available, the Real-Time Load and the Automatic Memory
Load. In both modes, memory loading does not begin until the first character is loaded (i.e.,
there will be no pause when starting the Memory Send).
2. Automatic Memory Load
In Automatic Memory Load, a pause in loading that lasts longer then two dot times records a
character space. If the pause is longer than five dot times, a word space is recorded. In this
mode you may make a long pause between words without using additional memory. The MorseMatic is set to Automatic Memory Load during turn-on.
3. Real-Time Memory Load
To select Real-Time Memory Load, press [*][8]. In the Real-Time Memory Load, all pauses in
sending will be recorded as sent. To reselect Automatic Memory Load, press [*][*][8].
4. Message Entry
To enter a message into the memory, press the number of the desired storage location, key in
the message with the paddle and terminate the message with [#].
Example: To store a message in memory 5, press [5].
Now enter the message with the key.
IMPORTANT: After the message is entered, press [#].
5. Maximum Loading Speed
The maximum loading speed is normally 20 WPM. However, faster loading (up to 40 WPM) is
permissible if the memory is loaded in sequence (0, 1, 2, etc.). This means that to load a given
memory at 40 WPM (say memory 3), all higher memories (4, 5, 6, etc.) must be empty or contain relatively short messages. When the MorseMatic is first turned on, the memories contain
random characters (garbage). These must be cleared prior to high-speed, sequential loading by
performing the clearing operation, as in the important note above.
If the maximum loading speed is exceeded, loading errors will be present in the memory being
loaded. Other memories will not be affected.
6. Serial Number Use
An automatically incremented serial number (01 to 9,999) may be inserted anywhere in any of
the ten messages. It may also be inserted as many times as desired within a message. (The
serial number automatically increases by one, only after a message is completed.)
To insert the Automatic Serial Number Generator during the loading of a message, press [*][A].
12
Page 13

On turn-on, the serial number is set to 01. In the Memory Load mode, a different starting serial
number may be loaded by pressing *0nnn#. Do not change the number during message loading.
Examples: To start at serial number 57, press [*][0][5][7][#].
To start at serial number 4234, press [*][0][4][2][3][4][#].
The serial number may be reset to 01 by pressing [*][*][0] in the Memory Load mode.
7. Pause in Automatic Load
An extra pause, or dead time, may be loaded in memory. A character space (equal to three dot
times) may be inserted in a message by pressing [*][*][9]. A word space (equal to seven dot
times) is loaded by pressing [*][9].
8. Erasing
If continuous power is supplied by a 12 V DC power source and/or back-up batteries, turning
the MorseMatic power switch to OFF will not erase the memory. If the 12 V power source is interrupted and no back-up batteries are used, the memory will be lost and on turn-on will fill with
random characters (garbage). If a complete memory loss occurs, the reset instructions on page
11, under *IMPORTANT NOTE, must be followed before reprogramming.
If individual messages are to be erased, simply press the message number [N] and [#]. The entire message in that location will be erased.
Example: To erase messages 3 and 7, press [3][#] and [7][#] or [7][#] and [3][#].
If long messages are to be entered, unused or undesired messages should be erased.
9. Editing
If in MEMORY SEND (see MEMORY SEND section), a message is halted before it is completed, the remainder may be terminated or changed at that point. Switch to MEMORY LOAD.
To change the remainder of the message, press [A], enter the new part of the message normally, and finish with [#]. If the remainder of the original message was to be erased, press
[A][#].
10. Memory Full
The Memory Full warning light is illuminated when approximately 22 characters remain. When
the sidetone changes, all memory is full and loading is automatically terminated. If further loading is desired to complete the current message, one of the other messages must be erased or
shortened. (Use the edit mode for reducing a previous message and then continue the current
message.) If further loading is repeatedly initiated before clearing space, all messages will be
lost. It will then be necessary to clear and reset all storage locations according to the instructions in the IMPORTANT NOTE at the beginning of the section on Memory Keyer Programming, page 14. In addition, it will be necessary to momentarily disconnect the power plug (and
back-up batteries if used).
11. Semiautomatic (Bug) Memory Load
Messages may be entered in the Semiautomatic (bug) mode. In the MEMORY SEND, they will
be sent with the selected dot and dash ratio. Some paddles require a 1 µF capacitor across the
dash contacts to prevent multiple dash loading due to contact bounce.
12. Battery Life
The two internal size C batteries (not supplied) are intended for short term memory retention
only. The batteries are used only when 12 V power is removed from the unit. In continuous use
the batteries will only last about 10–24 hours. For longer life, see the CMOS memory Option on
the MorseMatic Accessories page of the Manual.
13
Page 14

MEMORY KEYER OPERATION
(Switch Mode Selector to KEYER/MEMORY SEND
The messages stored in any of the ten memory locations may be sent at any speed between 2 and
99 WPM, regardless of their loading speed.
1. Sending a message
To start a message, press the number of the desired message. The message will start when
the button is released.
Example: To send messages 6, press [6], release.
2. Interrupting and Restarting a Message
A message may be interrupted by either pressing the [#] button or tapping either of the key paddles. The MorseMatic then enters normal keyer operation. The message may either be restarted by pressing the message number or resumed from the point of interruption by pressing
[A]. Once a message is finished, pressing [A] will start the next message in the series 0–9.
(This does not return the Keyer to 0 from 9.)
3. Editing.
See page 13, #9
4. Serial Number Change or Repeat
One serial number may be entered in a message as many times as desired. Serial numbers automatically increase by one only after a message has been completed.
It is common in contests for a station to ask for a repeat of the serial number only. We recommend that you load one message location N with:
N "NR" (keyed in with paddle) [*][A] [*][A] "K" (keyed in with paddle) [#].
Now in MEMORY SEND mode press [*][0] and then [N] for the serial number alone to repeated
twice. This can also be used to verify your last serial number. Each time [*][0] is pressed, the
serial number will be reduced by one.
In the KEYER/MEMORY SEND mode, a new serial number may be entered by pressing
[*][*][0][N][N][N][N][[#].
Example: To reset the serial number to 285, press [*][*][0][2][5][8][#].
Note that leading zeros are not necessary.
If a message with a serial number was sent and the contact was not completed, press [*][0] prior to making your next contact and the previously sent serial number will be reused for the new
contact.
14
Page 15
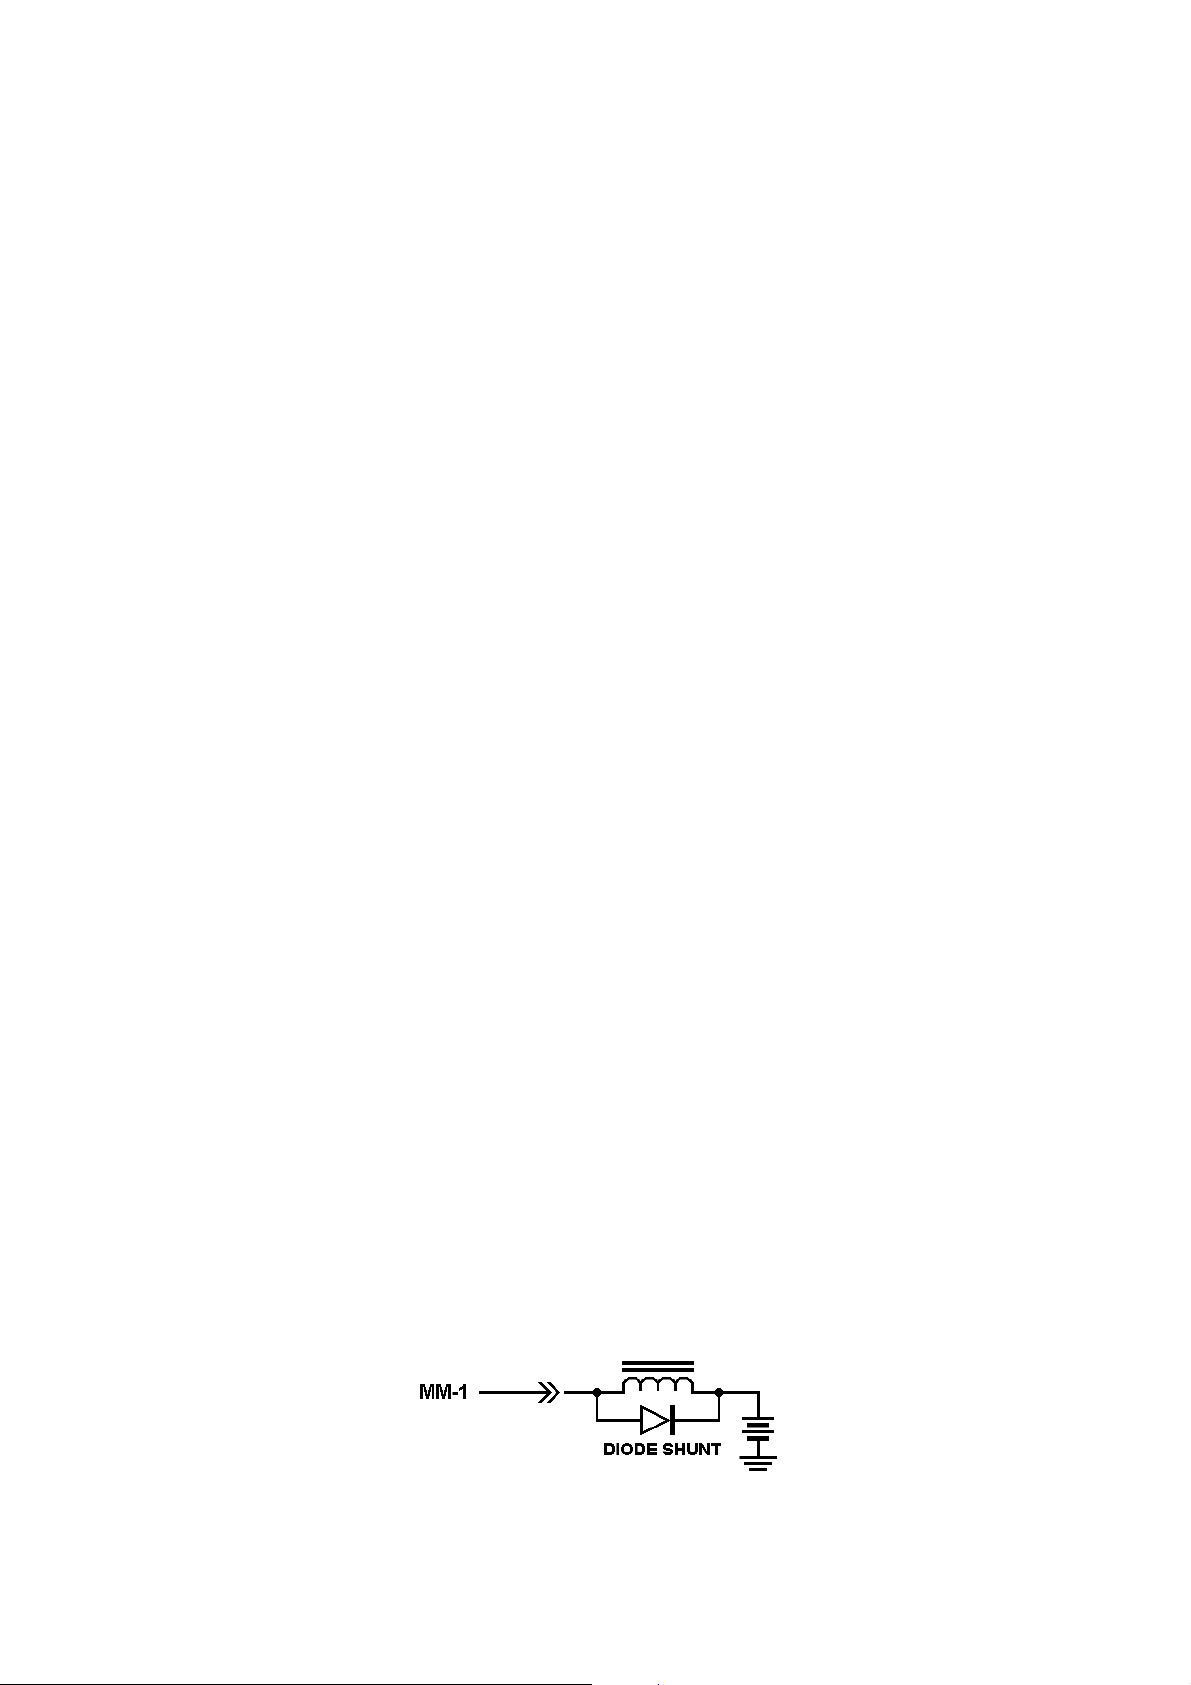
BEACON SEND OPERATION
(Switch Mode Selector to BEACON SEND)
In certain areas of communications such as moonbounce, tropospheric and meteor scatter, it is desirable to transmit a message during a fixed time and then receive for another fixed time.
The MorseMatic does this by sending any of the ten memory messages in a selected time by adjusting the code speed.
1. Beacon On and Off Times
To set the Beacon Off time, first load a short message in any one of the memory locations; a
single dot or dash is sufficient. Then, switch to Beacon operation and load the duration or Off
time normally. (It is the loading operation that clears one of the internal registers. Just having
something loaded in the memory is not sufficient.)
The range of Beacon On and Beacon Off times is from one second to 999 seconds in one second increments. The line entry must be terminated with the pound sign [#].
Example: A message is to be sent lasting 15 seconds and then the receiver is to be acti-
vated for 45 seconds. Load the Beacon On time for 15 seconds by pressing
[*][7][1][5][#]. Load the Beacon Off time (receive time) for 45 seconds by pressing [*][*][7][4][5][#].
2. Serial Numbers in Beacon Mode
Serial numbers may be included in a Beacon message. However, because some numbers take
longer to send than others, the "Beacon On" time may vary slightly from one number to the
next.
3. Initiating Beacon Mode
To start the Beacon, press the digit that stores the desired message. The message is started
when the button is released. The Beacon On Indicator Light will remain on while the Beacon is
cycling.
4. Interrupting Beacon Mode
As in the MEMORY SEND mode, the Beacon may be interrupted by pressing the # button or
touching either of the key paddles. After interrupting, KEYER mode is entered.
5. Restarting or Resuming Beacon Mode
As in the MEMORY SEND mode, the Beacon may be restarted by pressing the number of the
desired message or the Beacon message may be resumed by pressing [A].
6. Transmitter Send-Receive Output
An accessory output is available on the MorseMatic to operate a transmitter send-receive
switch from one second before the Beacon starts sending until the Beacon message is completed. The first time the Beacon message is sent, the accessory output is not operated. This
allows a test of the message speed before operating the transmitter. The accessory output may
be connected to one of the auxiliary jacks. (See Schematic.) The Beacon Transmit Light will indicate when this output is activated. This feature allows manual transmitter switching, if desired.
If this is used to key a relay, an inductive "kick" diode shunt must be used as shown below.
15
Page 16

MORSE TRAINER OPERATION
(Switch Mode Selector to MORSE TRAINER)
The MORSE TRAINER sends randomly selected Morse characters at an increasing speed for a
programmable duration. The random characters are preprogrammed into one of the custom microcomputers using a pseudo random generator. Several modes of operation are possible.
1. Trainer Starting Speed
The starting speed is set to 05 WPM on turn-on in the Fast (Farnsworth) mode. In the Farnsworth mode, the starting speed is the word speed. To change the starting speed, press [*][6]
and enter the two digit speed desired.
Example: For 07 WPM starting speed. press [*][6][0][7].
2. Trainer Finishing Speed
In the Farnsworth mode, the finishing speed is the character speed. The finishing speed is set
to 15 WPM on turn-on. To change the finishing speed, press [*][*][6] and your desired speed using 2 digits.
Example: For a finishing speed of 20 WPM: [*][*][6][2][0].
The finishing speed must be at least one WPM higher than the starting speed.
3. Trainer Speed Increase Duration
To set the duration, first load a short message in any one of the memory locations; a single dot
or dash is sufficient. Then, switch to the Trainer or Beacon operation and load the duration or
Off time normally. (It is the loading operation that clears one of the internal registers. Just having something loaded in the memory is not sufficient.)
On turn-on, the Trainer practice duration is set for 10.0 minutes. The duration is entered in minutes and tenths of minutes with the # (pound) key used as a decimal. The digit following the
decimal [#] concludes the entry and is necessary. The range is from 0.1 minute to 59.9 minutes.
Example: 15 min. 0 sec., press [*][7][1][5][#][0].
At the end of the speed increase duration, the Trainer will continue to send at the finish speed.
4. Initiating Trainer Mode
After the various Trainer options have been selected, the Trainer may be started by pressing
any of the digits or the A button. Each digit will send its own unique character sequence and
your copy may be compared with the published Answer Booklet. If you find that you are memorizing the characters sets, press the A button for a random start. There will be a delay in the
start of the Trainer after the button is released.
5. Terminating Trainer Mode
To stop the Trainer press and hold the # button until the Trainer quits sending. After the key is
released, a few additional dots and dashes may follow. The key paddle may be used in place of
the [#] button.
6. Fast (Farnsworth) or Slow Code Mode
Many people find learning code take far less time if the character are sent at speeds greater
than 12 to 15 WPM, but with the spaces between characters much longer than normal for these
speeds. This is referred to as the Fast Code or Farnsworth Method. In this mode, the characters are send at the finishing speed, but the space between letters is adjusted to make the code
speed equal to the starting speed. The extra space is gradually shortened until the code is sent
at the finishing speed.
16
Page 17

Slower Code sends code with the proper intracharacter spacing during the speed increase. Unless you can copy code at speeds greater then 12 WPM, we strongly recommend use the Fast
Code method. During turn-on the Fast Code mode is selected. To select Slow Code, press
[*][D]. Fast Code is reselected by pressing [*][*][D].
7. Five-Character or Random Code Spacing
On turn-on, the Trainer is set to transmit five-character code groups. If desired, random spacing
may be selected by pressing [*][C].
8. Common Characters or All Characters.
For the advanced code student, additional Uncommon Characters may be selected by pressing
[*][B]. Tables of both Common and Uncommon Characters are listed in Appendix A on page 17.
DISABLING CW SIDETONE OR KEYPAD FEEDBACK TONE
If diode D1 is removed, the CW sidetone is disabled. It is recommended that one end of the diode
be clipped and the diode by pushed away from the lead.
Diode D2 supplies the keypad feedback tone and may be disabled in the same manner.
The Tune warning tone is supplied by both D1 and D2.
REMOTE MEMORY RECALL
Two memory locations, o and 1, may be remotely activated. Connect pads 31 and 32 to the auxiliary jacks as shown in the Schematic and install diodes D17, 18, 19, 20. Then, in addition to the
keypad, momentary grounding of the respective auxiliary jack will start the MEMORY SEND feature in location 0 or 1.
17
Page 18
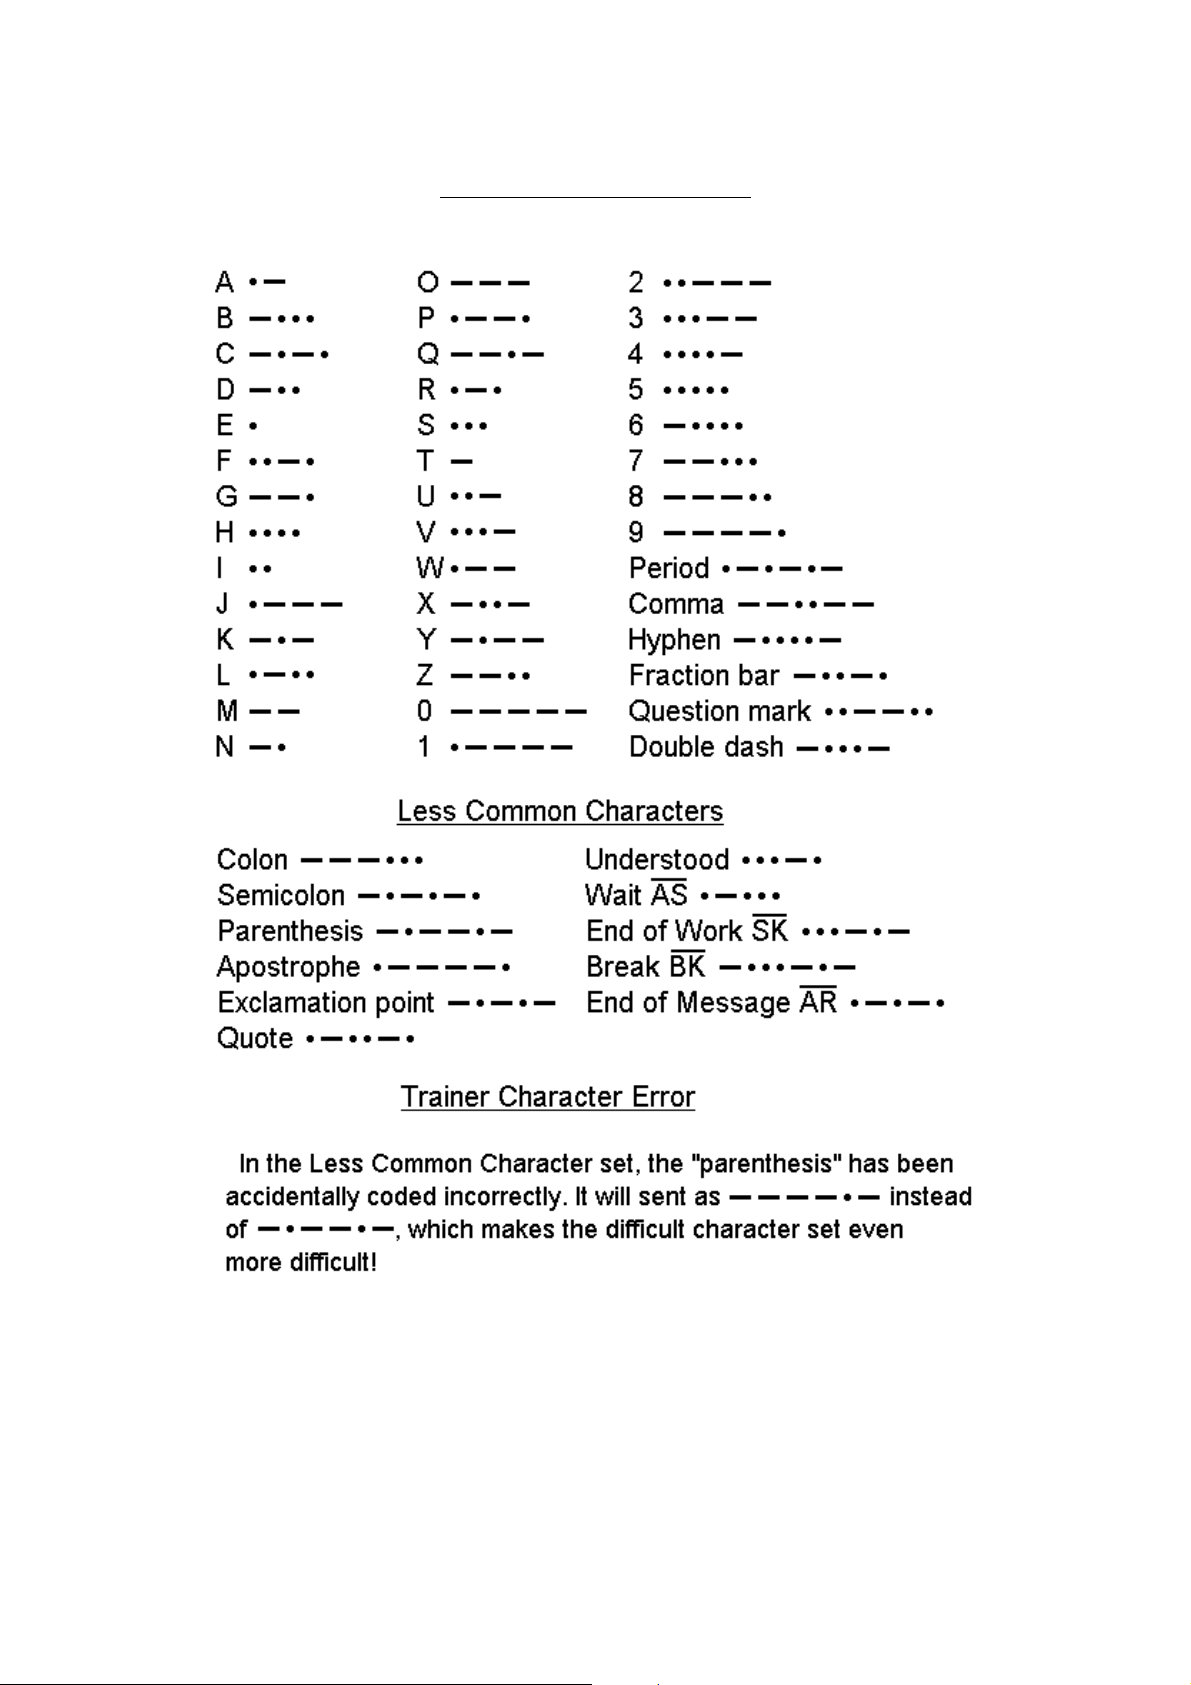
APPENDIX A
Common Character Set
18
Page 19

APPENDIX B
CODE SPEED
The International Morse Code speed is defined by the word "PARIS". It has 10 dots, 4 dashes, 9 intracharacter spaces, 4 intracharacter spaces,and one word space for a total equivalent of 50 code
elements (dot or space time). To adjust code speed for various dot-space and dash-space ratios,
the number of code elements in the word "PARIS" is used as a reference so that with any allowable
dot-space and dash-space ratios, the code speed is correct for the reference word "PARIS".
An old rule of thumb says that to calculate code speed in words per minute, divide the total number
of characters sent in one minute, by five. That can be quite misleading!!! This method does not accurately take into account the variable length of individual characters.
Quite often, when the speed of the MM-1 is compared against tape recordings of certain speeds,
the MM-1 appears to be sending too slowly, but many tapes on the market are actually sent faster
than the labeled speed! Suffice it to say that it is the opinion of AEA that the MM-1 has the most accurate speed calibration of any keyer, trainer, or code tape on the market.
19
Page 20
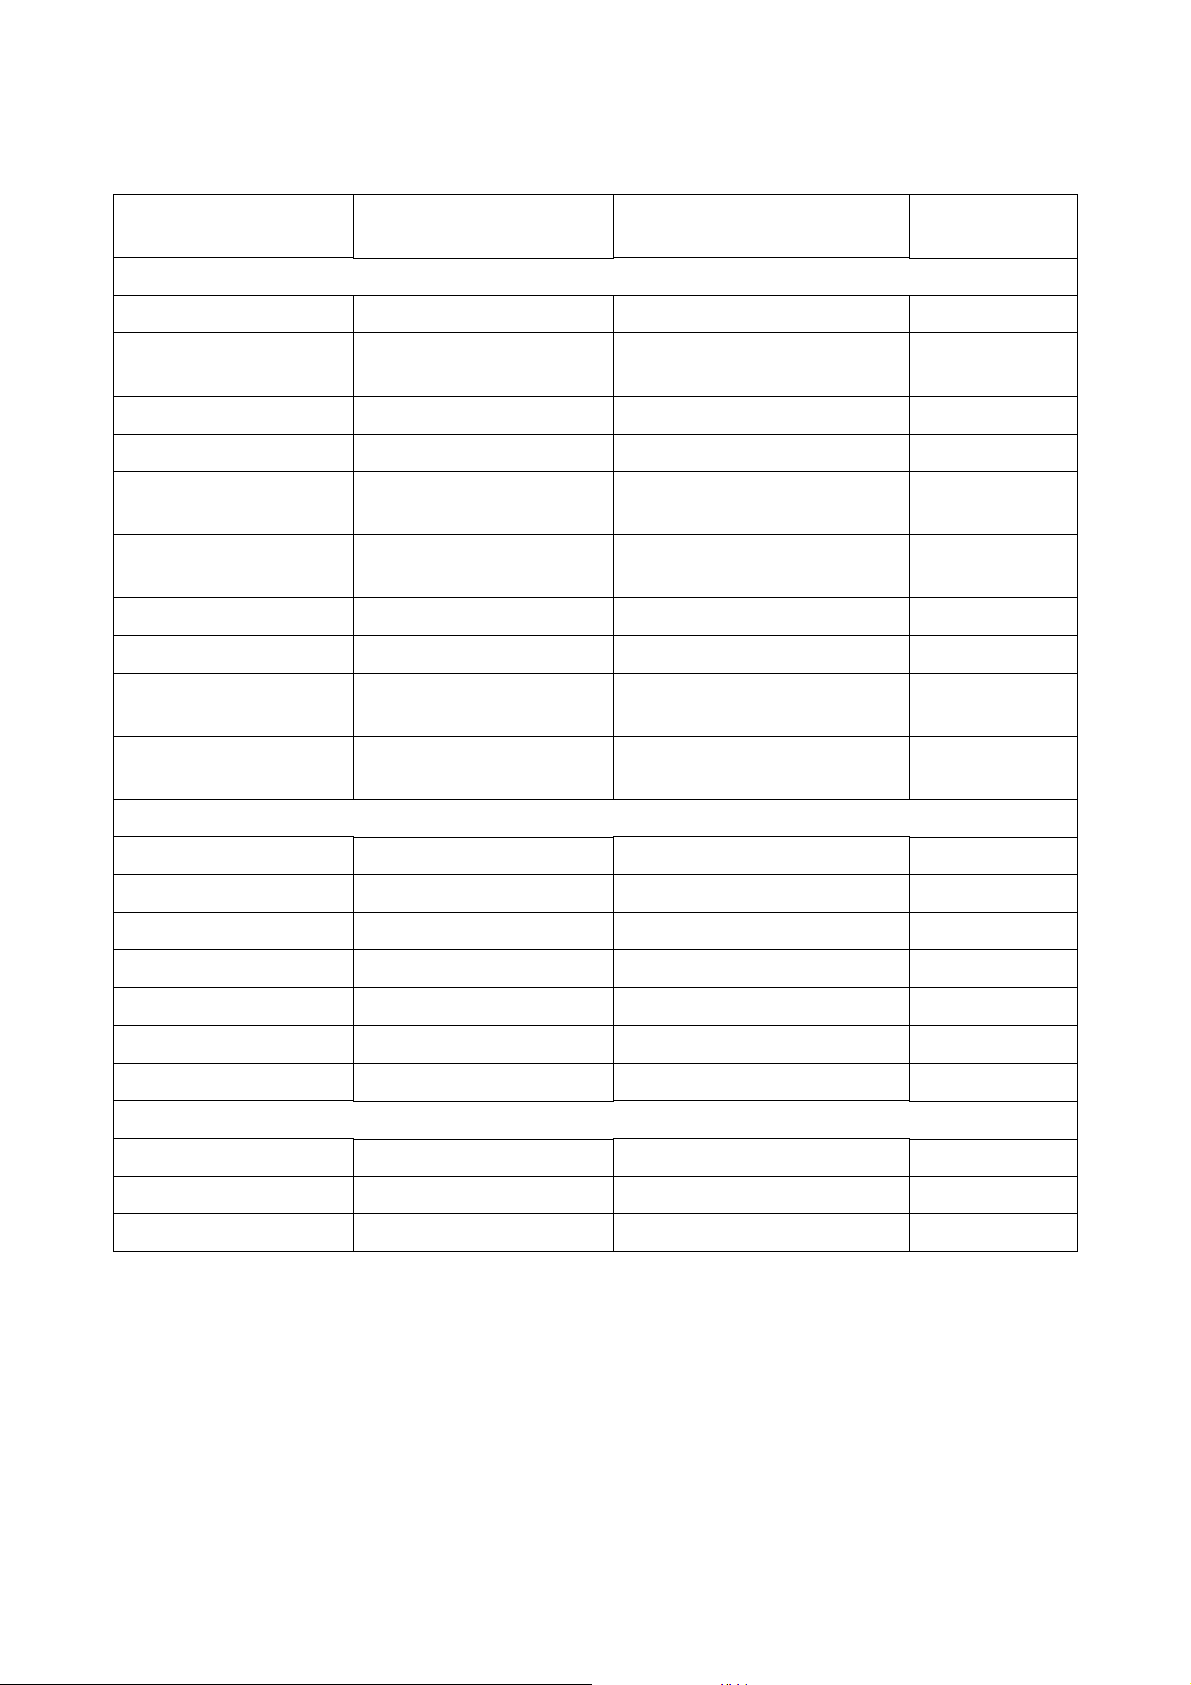
ABBREVIATED INSTRUCTIONS
MODE INSTRUCTION
KEYER:
Code Speed [*][6[]N][N] 02–99 in 1 WPM increments 20 WPM
Tone
Dot-Space Ratio [*][2][N][#][N] 0.5–1.5 in 0.1 increments 1.0
Dash-Space Ratio [*][*][2][N][#][N] 2.0–4.0 in 0.1 increments 3.0
Dot Memory
Dash-Memory
Semiautomatic (Bug) [*][5] N/A Off
Automatic [*][*][5] N/A On
Tune
SerialNumber
Increase
Decrease
On
Off
On
Off
On
Off
Repeat
Set
[*][1]
[*][*][1]
[*][*][3]
[*][3]
[*][*][4]
[*][4]
[*][*][A]
Any button or key paddle N/A Off
[*][0]
[*][*][0][N][N][N][N][#]
100 Hz to 2500 Hz 500 Hz
N/A On
N/A On
N/A 01
LIMITS/
COMMENTS
AT TURN ON
MEMORY LOAD:
Load [N] message [#] N/A N/A
Erase [N][#] N/A N/A
Serial Num. Insertion [*][A] N/A N/A
Serial Num. Reset to 0 [*][*][0] N/A N/A
Serial Number Set [*][0][N][N][N][N][#] [1][#] to [9][9][9][9][#] 01
Auto Space Load [*][*][8] N/A On
Real Time Load [*][8] N/A Off
KEYER:
Additional Spaces:
Character (3) [*][*][9] N/A N/A
Word (7) [*][9] N/A N/A
20
Page 21
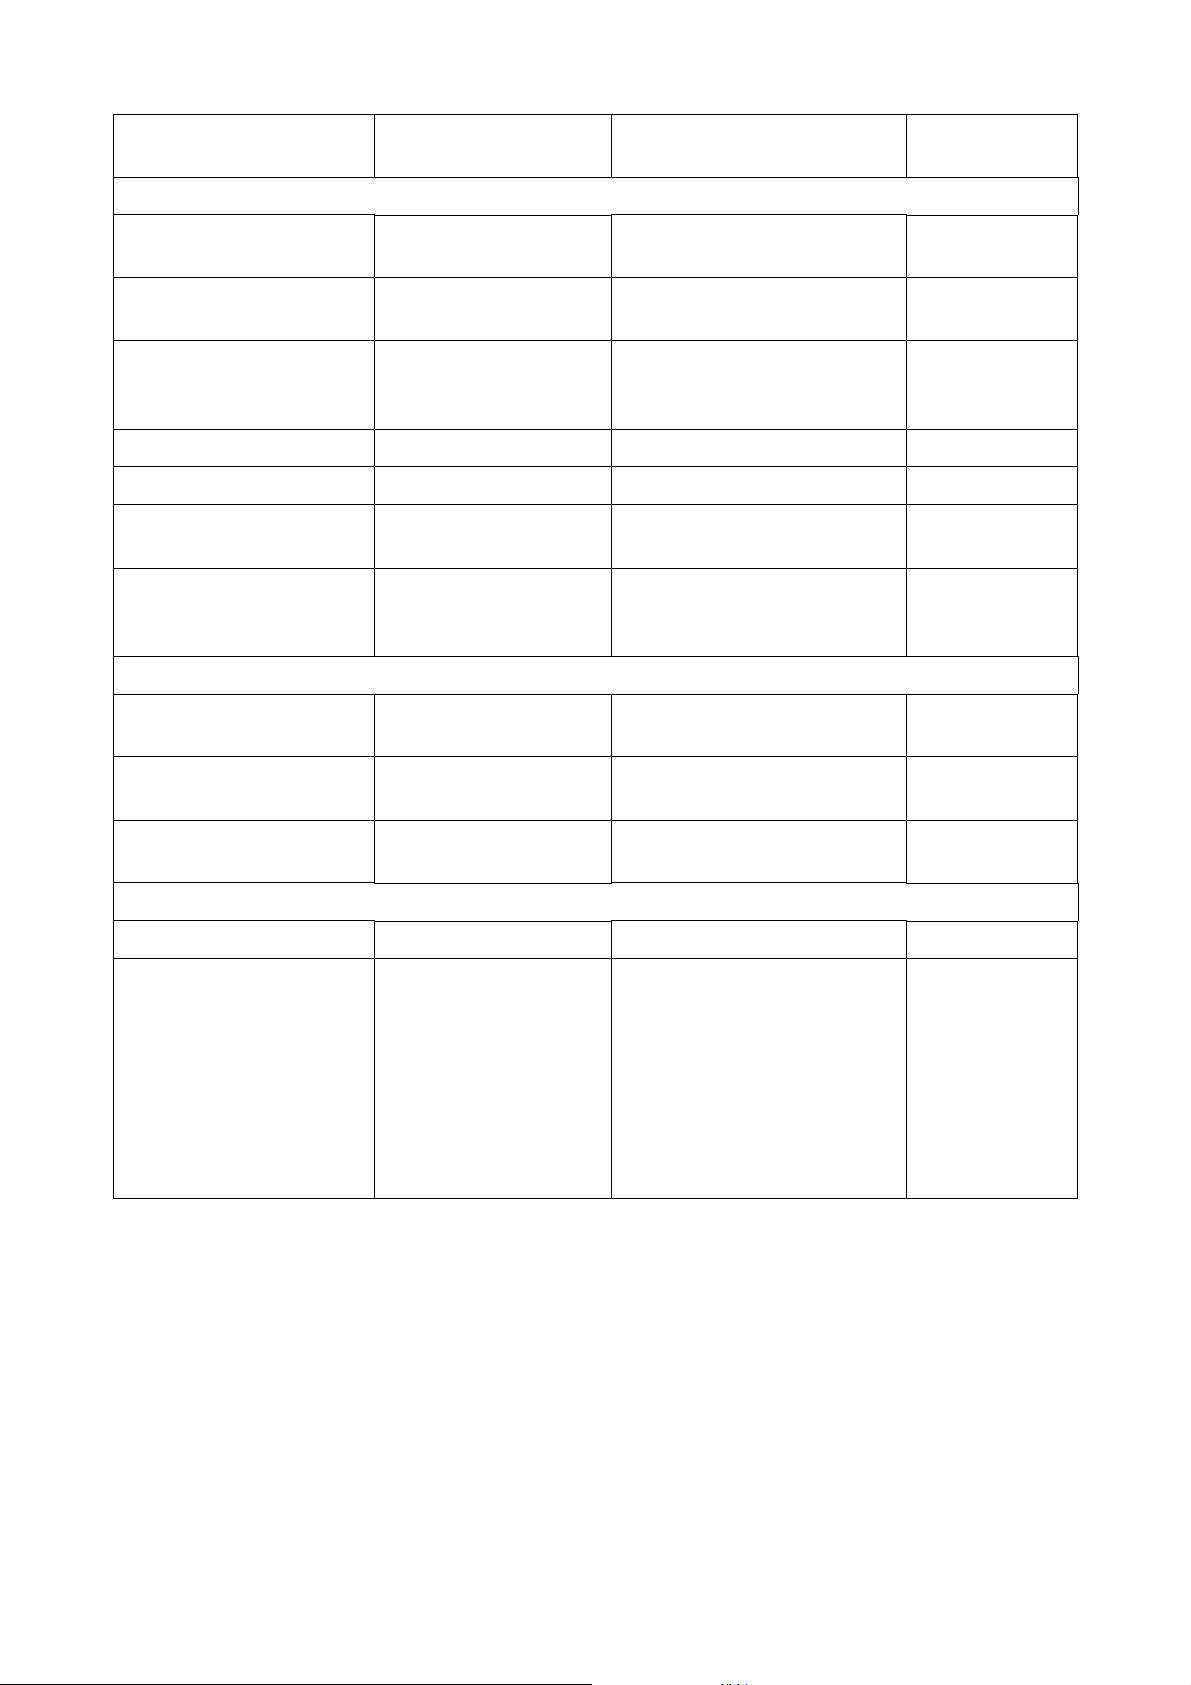
MODE INSTRUCTION
MORSE TRAINER:
LIMITS/
COMMENTS
AT TURN ON
Start Speed Set
(Farnsworth word speed)
Finish Speed Set
(Farnsworth char. speed)
Duration of Speed
Increase
(Set minutes and tenths)
[*][6][N][N] 02–99 in 1 WPM increments 5 WPM
[*][*][6][N][N] 02–99 in 1 WPM increments 15 WPM
[*][7][N][N][#][N]
00.1 to 59.9 in 0.1 min.
increments
10 Min.
Fast Code Method [*][*][D] N/A On
Slow Code Method [*][D] N/A Off
Characters
Common
+ Uncomm.
[*][*][B]
[*][B]
N/A Common
Character Groups:
5 Character Groups
Random Char. Groups
[*][*][C]
[*][C]
N/A 5 Char. Groups
BEACON SEND:
Beacon Transmission
(Time Set seconds)
Beacon Receive
(Time Set seconds)
[*][7][N][N][N][#] 1 to 999 1 sec. increments 30 sec.
[*][*][7][N][N][N][#] 1 to 999 1 sec. increments 30 sec.
Beacon Start [N] Message (starts on
button release)
N/A N/A
MEMORY SEND:
Select Message [N] Storage location 0–9 N/A
Will automatically send next
higher message number.
(Will not go from 9 back to
To Select Next Higher
Message Locaton
[A]
0.) Be sure to allow for word
space at last of preceding
message before pressing
N/A
[A], or the next message will
not begin without pressing
[A] again.
NOTE: [N] = one of the numbered buttons.
21
Page 22
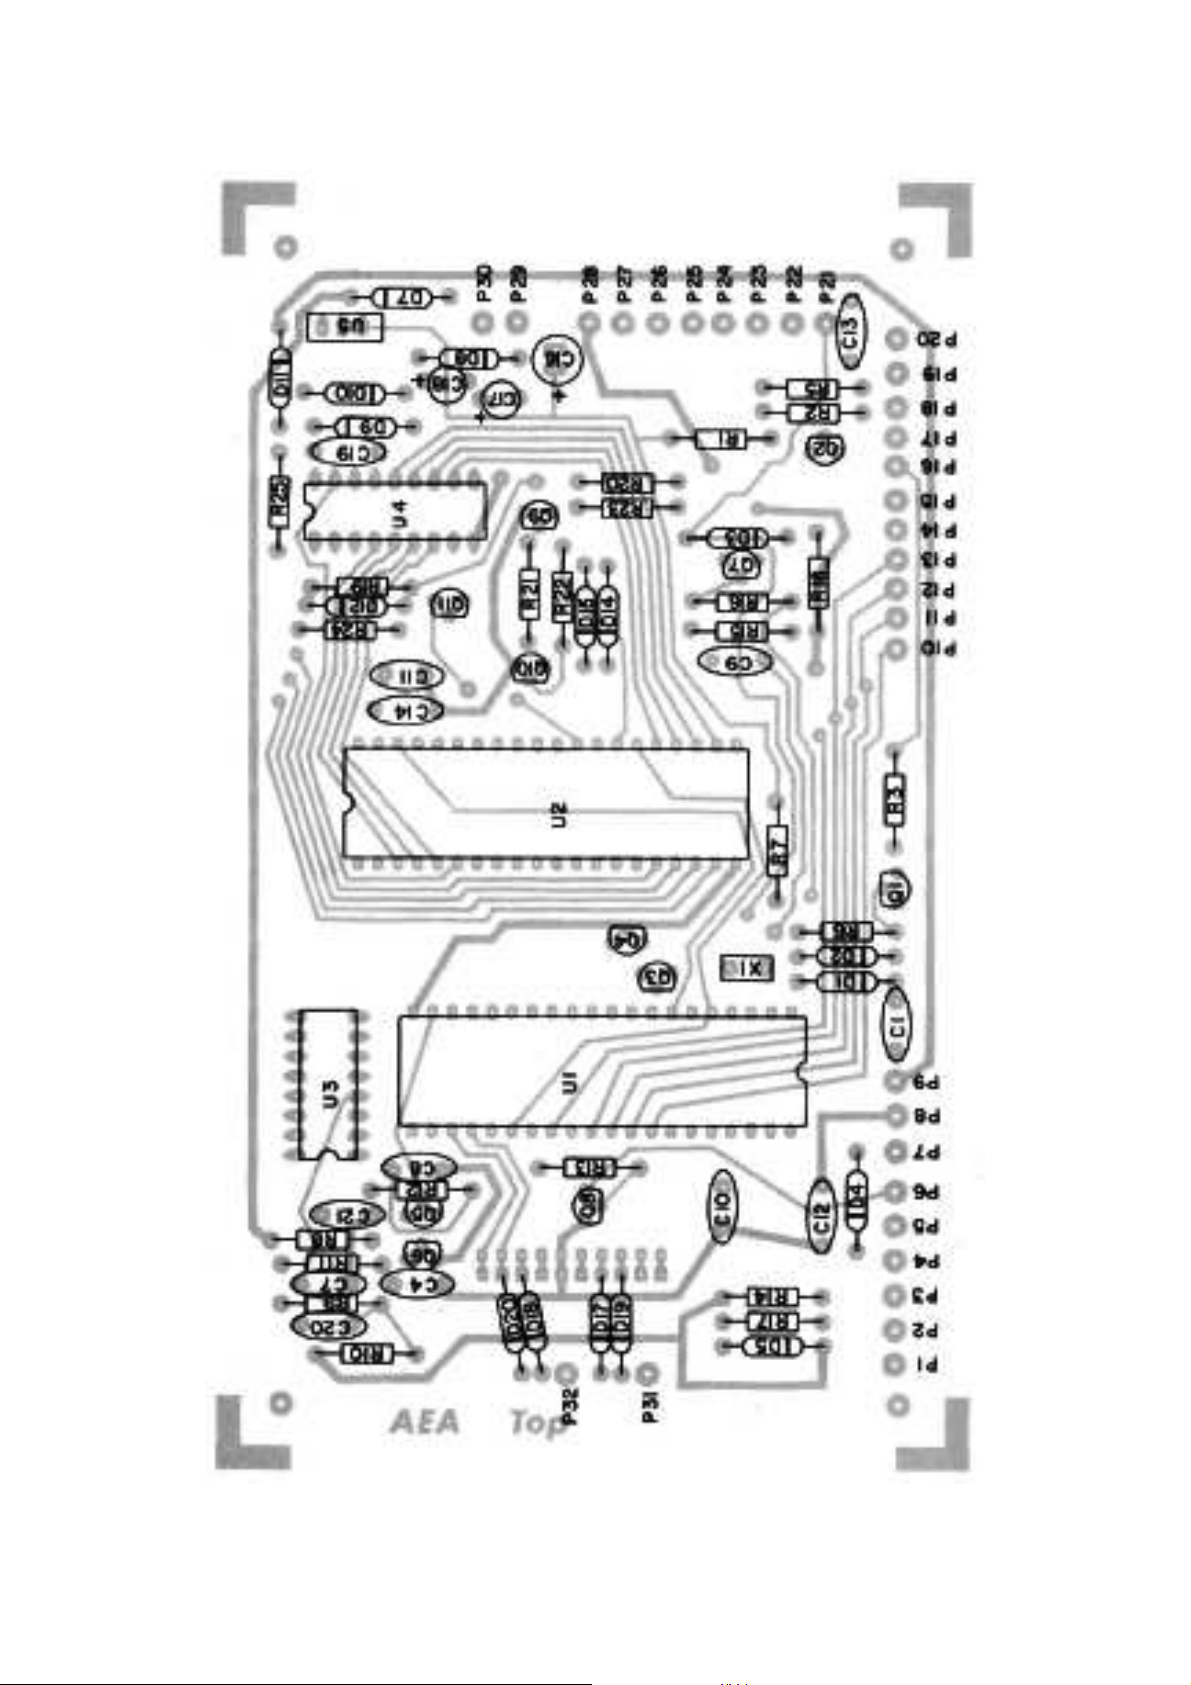
PARTS PICTORIAL
22
Page 23
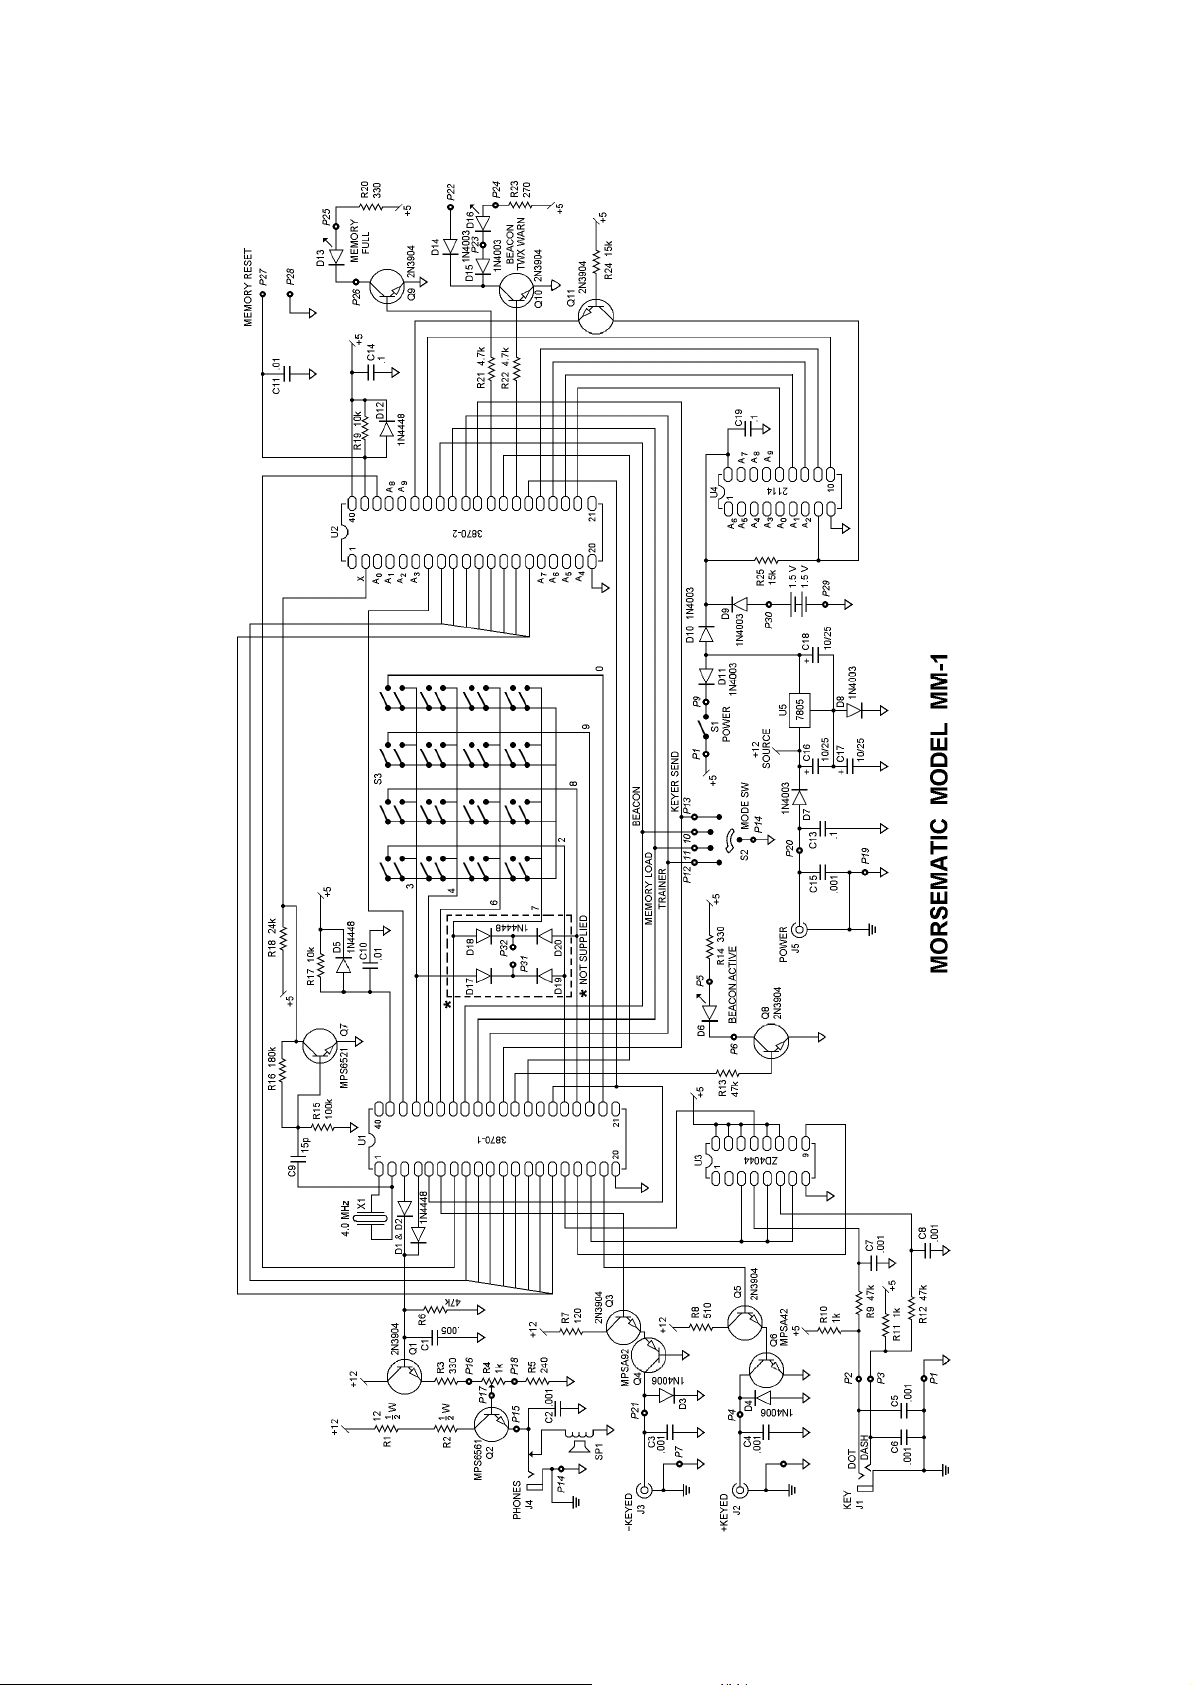
SCHEMATIC
23
Page 24

PARTS LIST
C1 .0047 µF 50 V disc cer
C2, 7, 8, 20, 21 .001 µF 500 V disc cer
C3, 4, 5, 6, 12, 13, 14, 15 19 .1 µF 50 V disc cer
C9 33 pF 500 V disc cer
C10, 11 .01 µF 50 V disc cer
D1, 2, 5, 12, 17, 18, 19, 20 1N4448 or 1N4148
D3, 4 1N4006
D6, 13, 16 MV5025 LED
D7, 8, 9, 10, 11, 14, 15 1N4003
Q1, 3, 5, 8, 9, 10, 11 2N3904
Q2 MPS6561
Q4 MPSA92
Q5 MPSA42
Q7 MPS6521
R1, 2 12 Ohm ½W 5% Carbon Comp
R3, 14, 20 330 Ohm ¼W 5% Carbon Comp
R4 1 kOhm Audio taper pot w/switch
R5 240 Ohm ¼W 5% Carbon Comp
R6, 9, 12 47 kOhm ¼W 5% Carbon Comp
R7 120 Ohm ¼W 5% Carbon Comp
R8 510 Ohm ¼W 5% Carbon Comp
R10, 11 1 kOhm ¼W 5% Carbon Comp
R13, 21, 22 4.7 kOhm ¼W 5% Carbon Comp
R15 100 kOhm ¼W 5% Carbon Comp
R16 180 kOhm ¼W 5% Carbon Comp
R17, 19 10 kOhm ¼W 5% Carbon Comp
R18 2.4 kOhm ¼W 5% Carbon Comp
R23 270 Ohm ¼W 5% Carbon Comp
R24, 25 15 kOhm ¼W 5% Carbon Comp
U1 AEA 197901
U2 AEA 197902
U3 CD4044B or MC14044B
U4 2114 Memory
U5 7805 TO-220 regulator
S1 Part of R4
S2 1P4T wafer switch
S3 16 button keypad
SP1 2¼" or 2½" 8 Ohm speaker
X1 4.000 MHz Xtal
24
Page 25

TECHNICAL SPECIFICATIONS
Keyer and Trainer speed range: 2 to 99 WPM
Memory: 4096 bits (approximately 500 Morse characters)
Option to 16,384 bits
Keying output: grid block –300 V max., 30 mA max.
Cathode/transistor +300 V max., 200 mA max.
Serial number range: 01 to 9,999
Beacon send time range: 1 to 999 seconds
Beacon receive time range: 1 to 999 seconds
Trainer increasing speed duration: 0.1 to 59.9 minutes
Dot memory On/Off: program selectable
Dash memory On/Off: program selectable
Dot-space ratio: 0.5 to 1.5
Dash-space ratio: 2.0 to 4.0
Semiautomatic (Bug) mode: program selectable
Memory keep-alive: holder for two size C batteries for up to 24 hours of memory
retention. Batteries are automatically switched on only upon
removal of external 12 Volt source.
Trainer modes: program common or all characters. Program slow or fast
(Farnsworth) speed increase. Program random length or five
letter word length.
Power required: 9–16 VDC at 350 ma. (600 ma. with Memory Expansion
option)
Weight: 1 lb. 12 oz.
Dimensions: 6" deep × 6" wide × 3½" high
Options: 2000 character Memory Expansion board and switch. CMOS
(battery saver) memory
25
Page 26
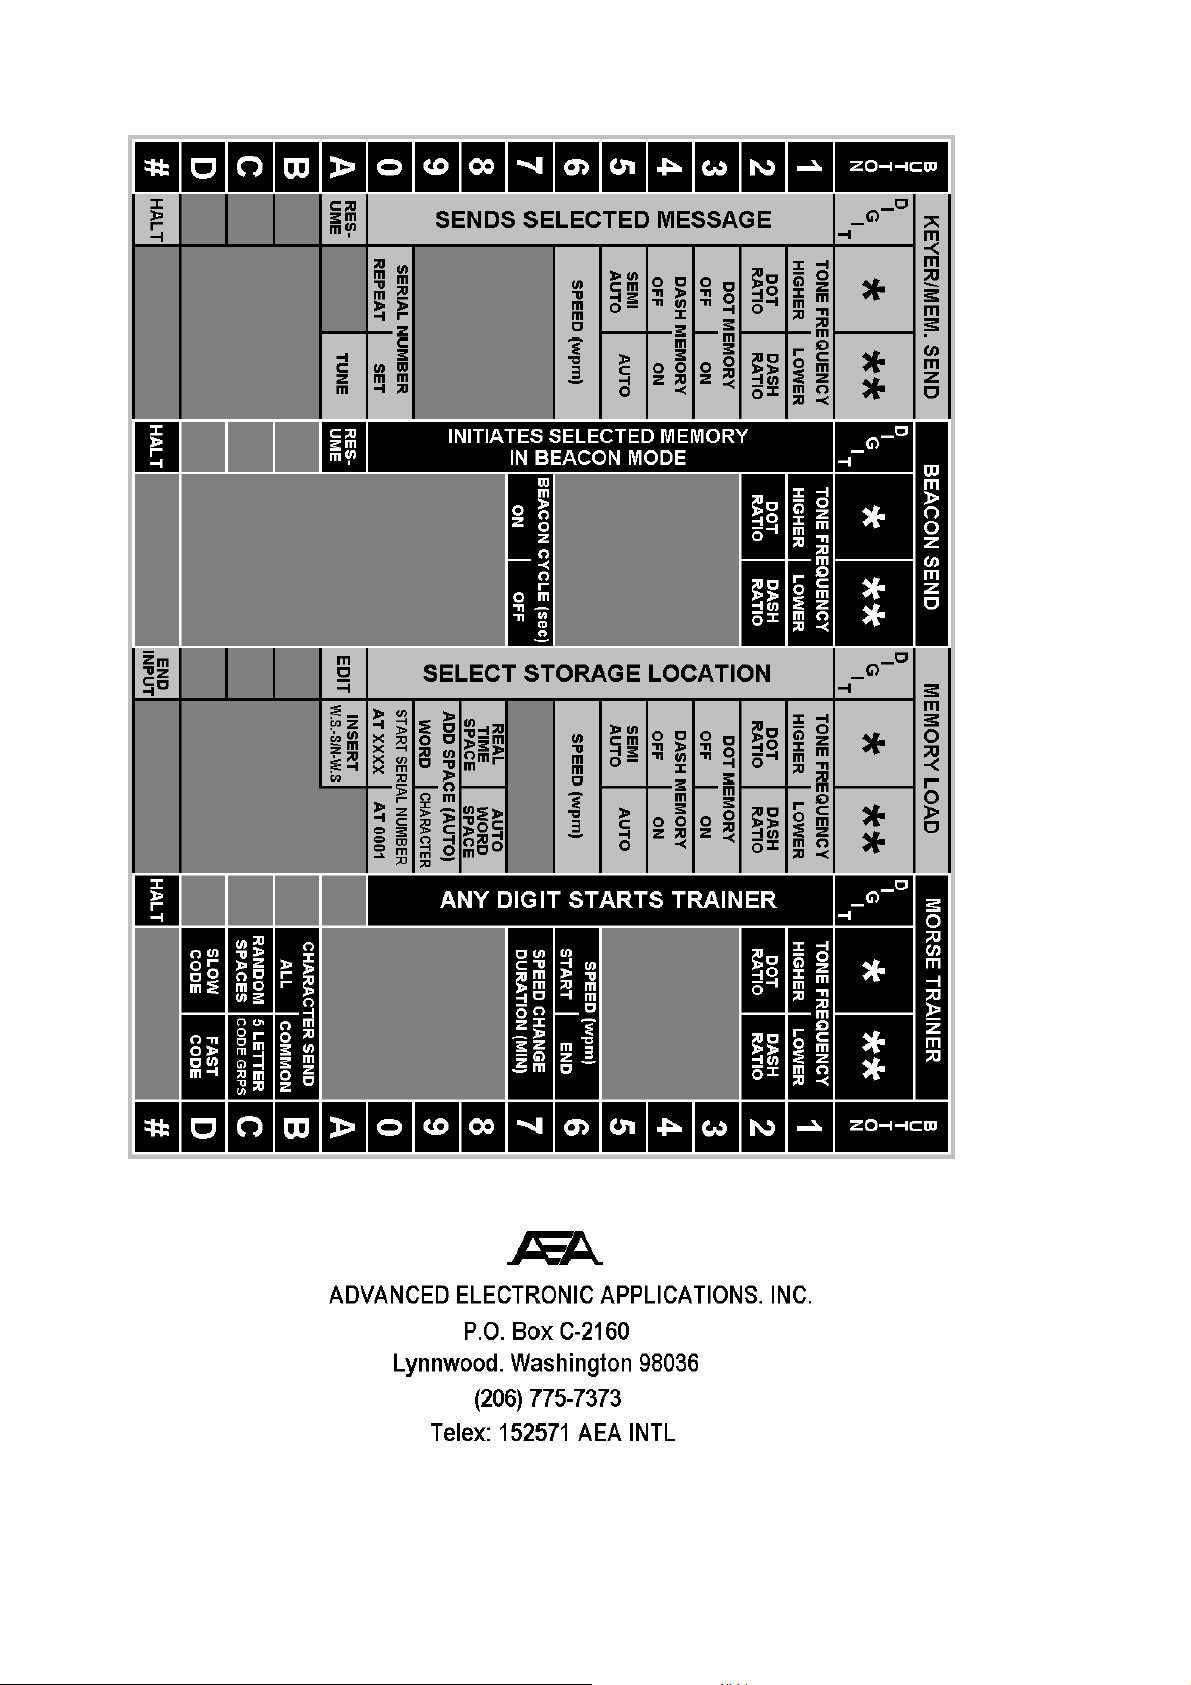
26
 Loading...