

Page 1
Home Pro
ZTW100
RF Home Automation
Radio Frequency Controlled, 120 VAC,
Wall Mounted Transmitter
Decorator trim plate included
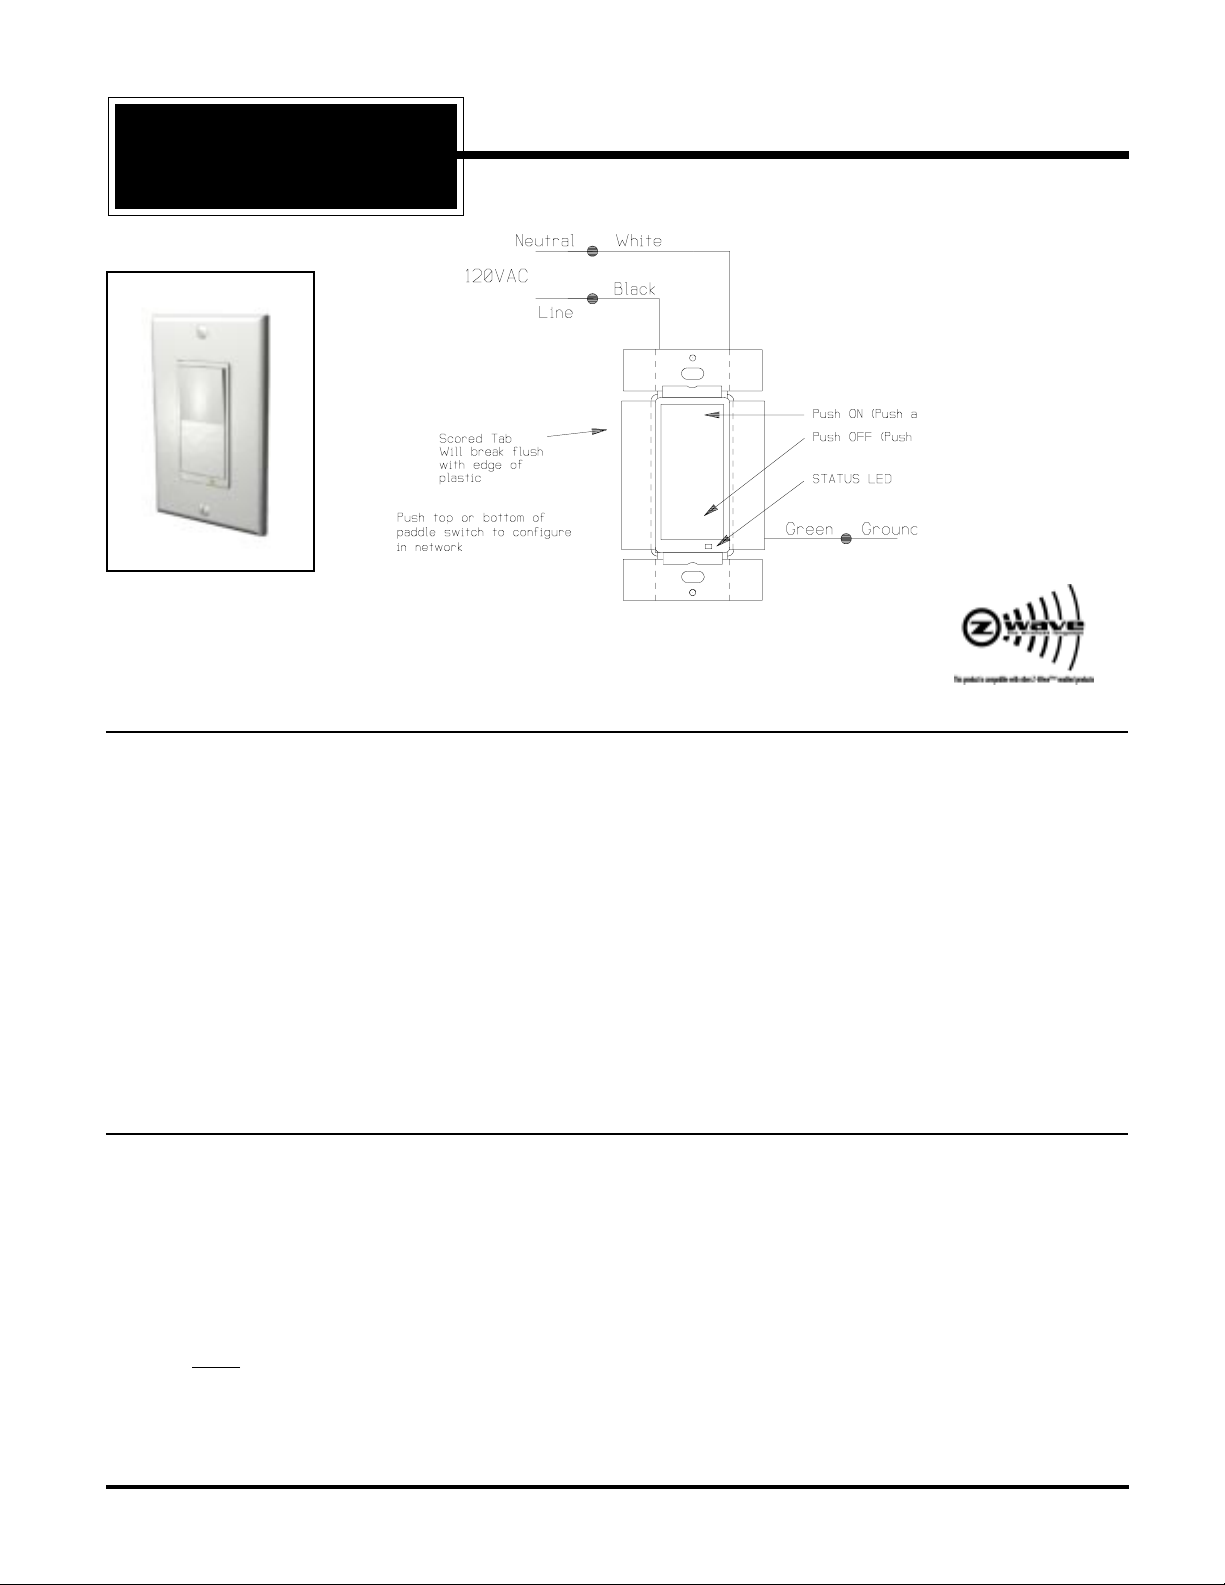
ZTW100 WALL MOUNTED TRANSMITTER
The ZTW100 Wall Mounted Transmitter is a component of the HomePro lighting control system. Install the ZTW100
Wall Mounted Transmitter like a standard wall switch (it does not wire to a load) and program it from a Controller to
operate loads. Inclusion of this Wall Mounted Transmitter on a Controller menu allows programming of the ZTW100
to provide remote control of ON/OFF and DIM/BRIGHT of lamps connected to Z-Wave devices (or nodes).
This Wall Mounted Transmitter is designed to work with HomePro and other Z-Wave controlled lamp and appliance
devices. As part of a HomePro network, the ZTW100 will also act as a wireless repeater to insure that commands
intended for another device in the network are received. This is useful when the device would otherwise be out of
the radio range of the controller.
There are no field repairable assemblies on this unit. If service is needed, the unit must be returned where purchased.
DANGER! SHOCK HAZARD. Read and understand these instructions before installing. This device is intended for
installation in accordance with the National Electric code and local regulations in the United States, or the Canadian
Electrical Code and local regulations in Canada. It is recommended that a qualified electrician perform this installation.
For indoor use only. Retain these instructions for future use.
INSTALLATION
Wire this Wall Mounted Transmitter similar to a wall switch according to the diagram above. Refer to your Controller
operating instructions for instructions on how to add this module to the RF network.
Adding Transmitter to Network
1. Setup the Controller you are using to add the ZTW100 Wall Mounted Transmitter to the network, to a state
where it will be ready to include a Z-Wave device.
2. Tap either the top or bottom of the switch paddle on the ZTW100 4 times rapidly.
3. You should see an indication on your Controller that the “device” (ZTW100) was added to the network.
Note: On some Controllers you may see “DEVICE NOT SUPPORTED”. This means that you cannot
control the device (ZTW100) with the Controller, however the device has been added to the network.
This Wall Mounted Transmitter controls no load itself, but communicates with HomePro modules (or other
Z-Wave enabled devices) to turn a load ON or OFF and DIM or BRIGHTEN a lamp.
HomePro
by ADVANCED CONTROL TECHNOLOGIES, INC.
0690-01
1
ZTW100 Instructions
P/D 050205
Page 2

Removing Device from Network
WARNING: Removing the device from the network will also erase all group information that was
configured in the ZTW100
1. Setup the controller you are using to remove a device to network to a state where it will be ready to
exclude (or remove) the node.
2. Tap either the top or the bottom of the switch on the ZTW100 4 times rapidly.
3. You should see an indication on your controller that the device was removed from the network.
CONTROLLING Z-WAVE DEVICES
Remember: You must have added the ZTW100 Wall Mounted Transmitter to the Z-Wave network prior to this.
To assign control of Z-Wave devices to the ZTW100 Wall Transmitter refer to your controller instructions.
In the process, the controller may ask you to include or press the button on the “source node”, or the
“controlling node”. If so, tap the top
While the ZTW100 Wall Mounted Transmitter can control up to 15 Z-Wave devices, it can control only one
device that is greater than 100 feet away . If you want to control a device greater than 100 feet from any
other device, that device can only be placed into Group 1. This is very important...it has to be the first
device placed into Group 1 on the ZTW100 Wall Mounted Transmitter.
LED indication (indicator for Group 1 only)
The LED is ON when the ZTW100 has sent an ON command to group 1 and has received an
acknowledgement from at least one device in the group.
The LED is OFF when the ZTW100 has sent an OFF command to group 1 and has received an
acknowledgement from at least one device in the group.
or bottom of the switch on the ZTW100 four (4) times rapidly .
Controlling a Dimming Device
If a group contains one or more dimming devices, one of the dimming devices should be the first device
placed into the group
Control of the Three Groups
Three (3) groups are available on the ZTW100 to add the Z-Wave devices you want to control. The
groups are identifiied as Group 1, Group 2 and Group 3. A Z-Wave device may be included in more than
one group on the ZTW100, however no more than 5 devices per group are allowed. The same Z-Wave
device may also be controlled from any other Controller, individually or in one of that Controllers groups.
If you placed a node into Group 1 it can be controlled by tapping the transmitter switch once. If you want
to DIM or BRIGHTEN a Z-Wave device you have placed in group 1, simply press and hold the top or
bottom of the switch instead of tapping.
If you placed a node into Group 2 it can be controlled by tapping the transmitter switch twice. If you want
to DIM or BRIGHTEN a Z-Wave device you have placed in group 2, you simply tap and release either the
top or bottom of the switch once and then press and hold the top or bottom of the switch the second time
instead of tapping. This could be thought of as “tap...press and hold”
If you placed a node into Group 3 it can be controlled by tapping the transmitter three times. If you want to
DIM or BRIGHTEN a Z-Wave device you have placed in group 3, you simply tap and release either the top
or bottom of the switch two times and then press and hold the top (brighten) or bottom (dim) of the switch
the third time instead of tapping. This could be thought of as “tap...tap...press and hold”
Removing Z-wave devices (nodes) from the ZTW100
Follow the instructions that came with your particular controller .
Sending BASIC ON/OFF Commands from the ZTW100
Tap the top of the transmitter switch to send a BASIC ON command.
Tap the bottom of the transmitter switch to send a BASIC OFF command.
Dimming and Brightening from the ZTW100
Press and hold the top of the transmitter switch to BRIGHTEN.
Press and hold the bottom of the transmitter switch to DIM.
ZTW100 Instructions
P/D 050205
0690-01
2
by ADVANCED CONTROL TECHNOLOGIES, INC.
HomePro
Page 3

WARRANTY
For warranty and general product information visit our web site at www.act-solutions.com
ABOUT ZTW100’S CERTIFICATION
The ZTW100 has been thoroughly tested by the ETL SEMCO
division of Intertek, a nationally recognized testing laboratory. This
product was found to be in compliance with safety standard ANSI/UL
STD 244A and CAN/CSA C22.2 No. 177.
In addition to compliance with product safety standards, the ZTW100
is also certified to comply with applicable FCC and IC rules and
regulations governing RF and EMI emissions.
This device complies with part 15 of the FCC Rules. Operation is subject to the following two conditions: (1) This device may
not cause harmful interference, and (2) This device must accept any interference received, including interference that may
cause undesired operation.
FCC NOTICE
Note: This equipment has been tested and found to comply with the limits for a Class B digital device, pursuant to p art
15 of the FCC Rules. These limits are designed to provide reasonable protection against harmful interference in a
residential installation. This equipment generates, uses, and can radiate radio frequency energy and, if not installed
and used in accordance with the instructions may cause harmful interference to radio communications. However, there
is no guarantee that interference will not occur in a particular installation. If this equipment does cause harmful interference to radio or television reception, which can be determined by turning the equipment off and on, the user is encouraged to try to correct the interference by one or more of the following measures:
- Increase the separation between the equipment and receiver.
- Consult the dealer or an experienced radio/TV technician for help.
IC NOTICE
This Class B digital apparatus complies with Canadian ICES-003.
Cet appareil numérique de la classe B est conforme à la norme NMB-003 du Canada.
Operation is subject to the following two conditions: (1) this device may not cause interference, and (2) this device must
accept any interference, including interference that may cause undesired operation of the device.
Power 120 VAC, 60 Hz
Signal (Frequency) 908.42 MHz
Range Up to 100 feet line of sight between the Controller and /or the
HomePro
by ADVANCED CONTROL TECHNOLOGIES, INC.
closest HomePro Reciever Module
0690-01
3
ZTW100 Instructions
P/D 050205
 Loading...