

Page 1
SA4120
120 VAC StandAlone LED Lamps Installation Instructions
Figure 1 - Six lamp fixture (maximum) installation example.
BEFORE YOU BEGIN...
READ THESE INSTRUCTIONS ENTIRELY
You may need several short lengths of extra wire per fixture to complete the transition to LED lamps. Use
18 AWG solid wire and appropriate size wire nuts. Check the package contents which should include:
1. SA4120 LED Lamp
2. Fluorescent fixture LED retrofit label
3. Installation Instructions
** IMPORTANT SAFETY INSTRUCTIONS **
PREPARATION FOR INSTALLATION OF LED LAMPS
DANGER
RISK OF SHOCK - DISCONNECT POWER BEFORE INSTALLATION
1. Turn off the power to the light fixture at the breaker panel.
2. Open (or remove) the diffuser from the light fixture.
3. Remove the fluorescent lamps. Please dispose of these items properly as they contain mercury.
4. Remove the wiring cover to expose the fluorescent ballast. See Figure 2, next page.
ADVANCED CONTROL TECHNOLOGIES, INC.
Indianapolis, Indiana 46250
120 VAC SA4120 LED Lamps Installation Instructions
1
P/D 111510
Page 2
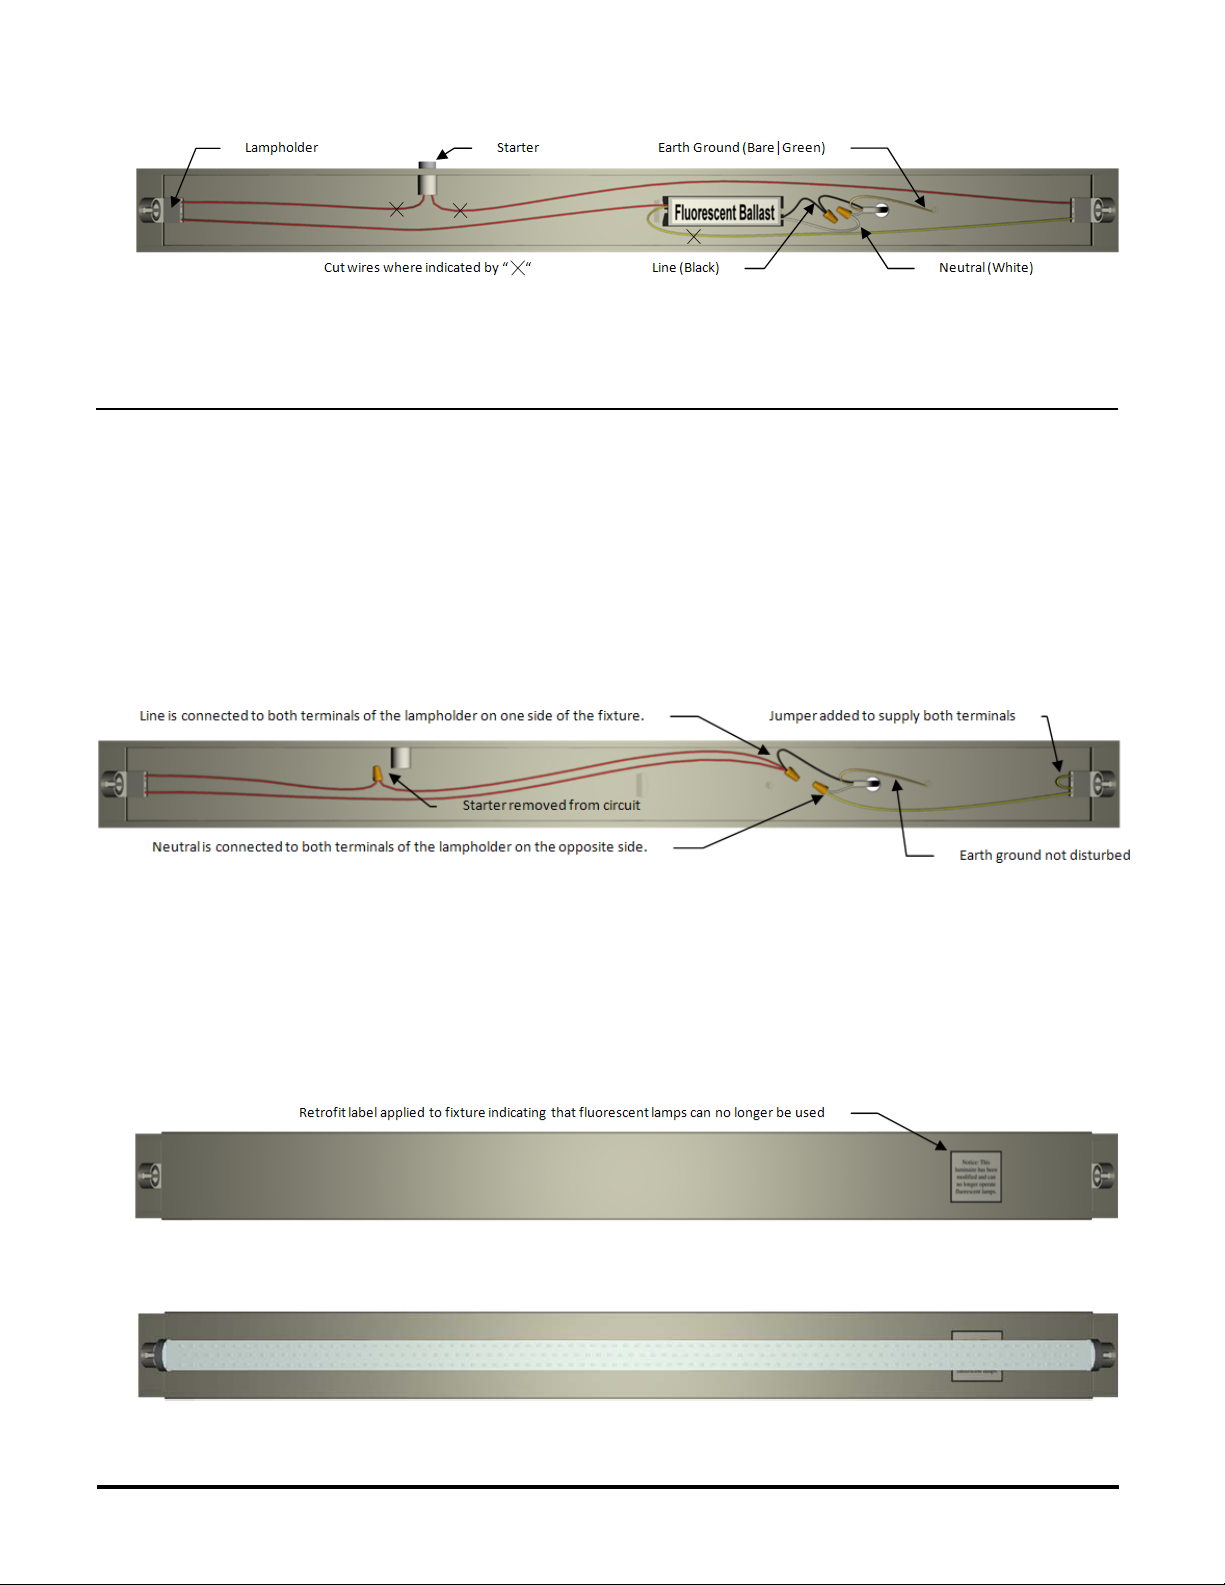
Figure 2.
5. Disconnect the line and neutral wires to the ballast, but leave the bare (or green) ground wire connected to
the fixture. Cut the wires from the ballast to the lamp holders.
6. Ballast can remain in place. Check local regulations.
INSTALLATION
WARNING
To prevent wiring damage or abrasion, do not expose wiring to edges of sheet metal or other sharp
objects. Do not make or alter any open holes in an enclosure of wiring or electrical components during
kit installation.
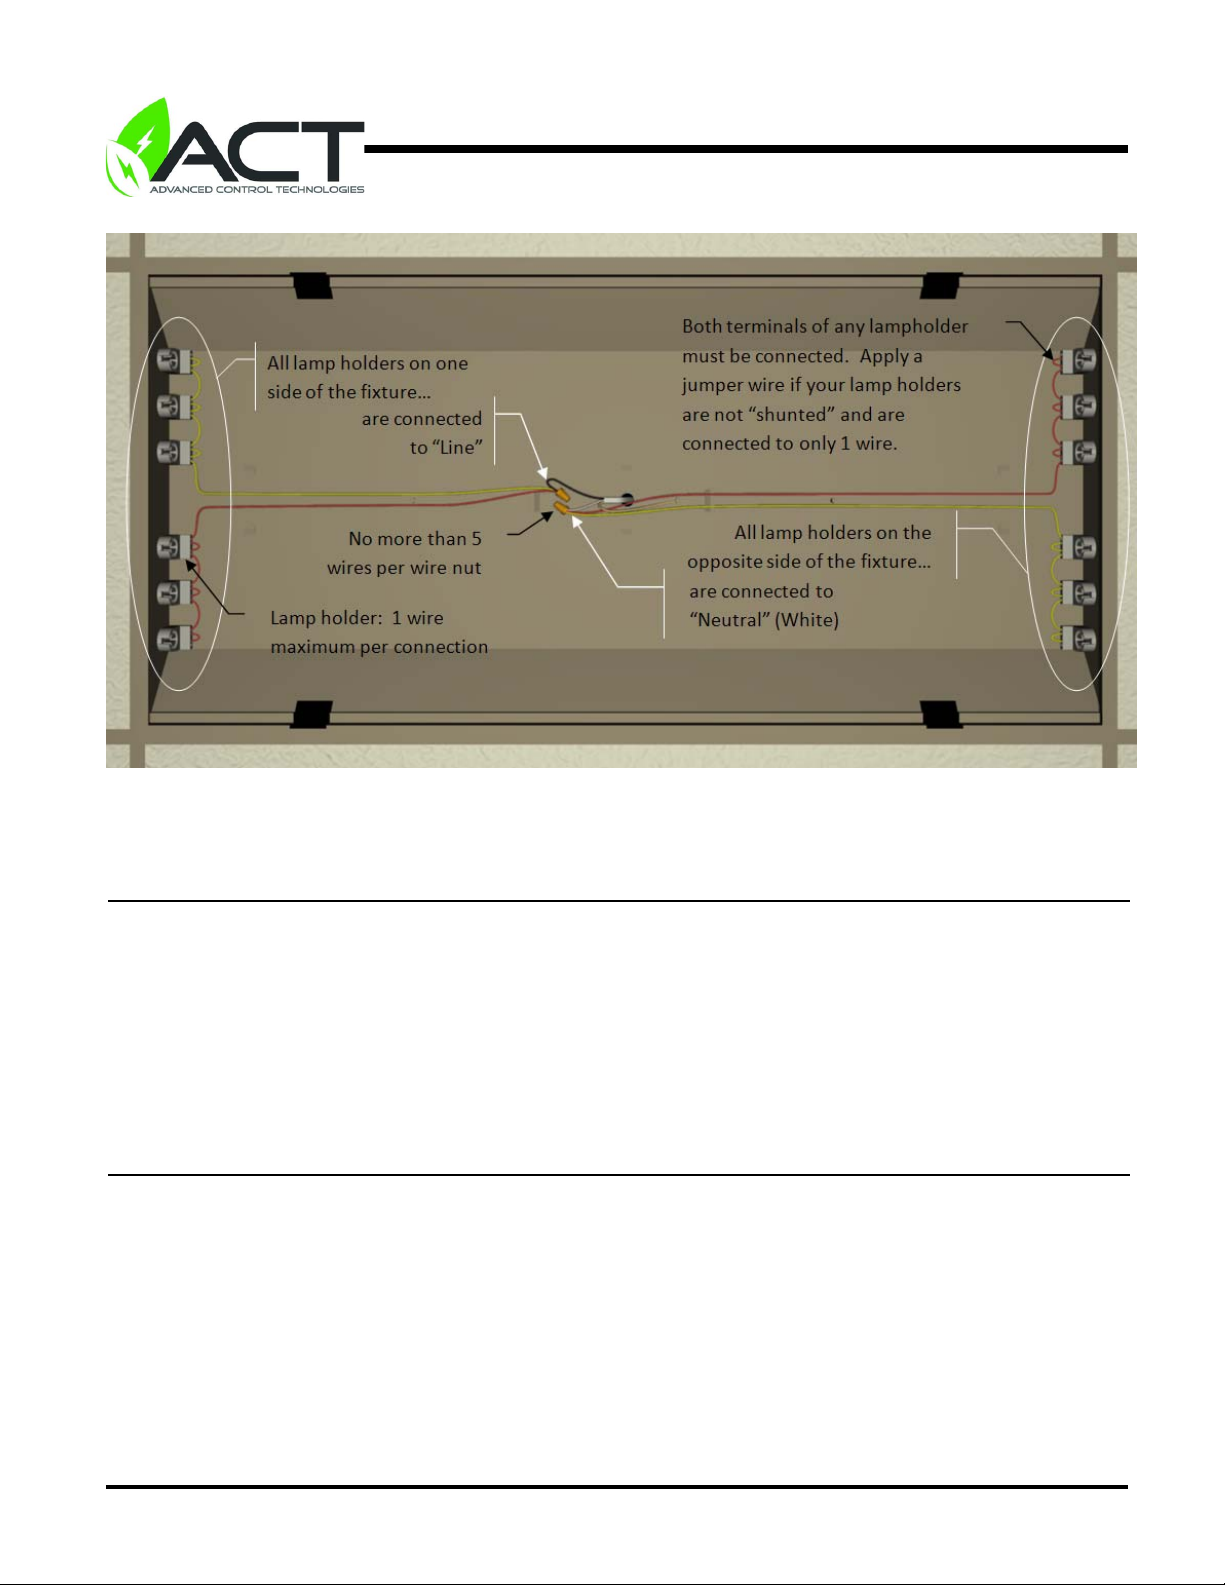
NOTE: Connect no more than 5 wires per wire nut.
8. Connect the Neutral wire (usually white) to the wires emerging from the lamp holder on one end of the
fixture using a wire nut (you may need extra wire - use 18 AWG solid wire). See Figure 3.
9. Connect the Line wire (usually black) to the wires emerging from the lamp holder on the opposite end of the
fixture using a wire nut (you may need extra wire - use 18 AWG solid wire). See Figure 3.
Figure 3.
NOTE: Connect no more than 1 wire per lamp-holder terminal. Lamp-holders typically have 4 terminals.
The jumper in figure 3 is only required if the lamp-holder does not have two wires connected or if the
maximum of 5 wires per wire nut would be exceeded. If your fixture does not have a starter, then all
references to "starter" in these instructions may be ignored.
10. Replace the cover over the wiring channel. See Figure 4.
11. IMPORTANT: Install the label provided that states "this fixture has been modified for LED lamps",
inside the fixture in an easily visible location to anyone changing lamps, possibly on the cover over
the wiring channel. See Figure 4.
Figure 4.
12. Install the LED lamps as shown in Figure 5.
Figure 5.
13. Close (or replace) the diffuser.
14. After all LED lamps retrofit is completed, restore the power at the circuit breaker and turn the lights on.
120 VAC SA4120 LED Lamps Installation Instructions
P/D 111510
ADVANCED CONTROL TECHNOLOGIES, INC.
2
Indianapolis, Indiana 46250
Page 3

WARNING
Risk of fire or electric shock. The electrical rating of these products are 120 VAC for model SA4120. The
installer must determine whether they have 120 VAC at the luminary before installation.
Retrofit kit installation requires knowledge of fluorescent lighting luminaires electrical systems. If not
qualified, do not attempt installation. Contact a qualified electrician.
Install this kit only in the luminaires that have the construction features and dimensions shown in the
photographs and/or drawings.
CAUTION
Risk of electric shock - Use In dry locations only. This device is not intended for use with emergency
exit fixtures or emergency exit lights. Not for use in Luminaires controlled by a dimmer.
WARNING
THIS PRODUCT MUST BE INSTALLED IN ACCORDANCE WITH THE APPLICABLE INSTALLATION
CODE BY A PERSON FAMILIAR WITH THE CONSTRUCTION AND OPERATION OF THE PRODUCT AND
THE HAZARDS INVOLVED.
THE RETROFIT ASSEMBLY IS ACCEPTED AS A COMPONENT OF A FLUORESCENT RECESSED
LUMINARY WHERE THE SUITABILITY OF THE COMBINATION SHALL BE DETERMINED BY CSA OR
AUTHORITIES HAVING JURISDICTION.
For use only with UL and C-UL Listed Surface, type IC recessed, type Non-IC Recessed Mount or surface
mount Fluorescent Luminaires with or without Diffuser which can fit up to 6 lamps.
The end retrofit luminary has been modified and can no longer operate the originally intended lamp.
WARRANTY
Five year warranty subject to limitations. See Warranty/RoHS Info link on the main page of our web site at
www.act-solutions.com.
SA4120 Lamp Replacement - If lamps are still under warranty contact:
Advanced Control Technologies, Inc.
6805 Hillsdale Court
Indianapolis, IN 46250
Tel: 317) 806-2750
(800) 886-2281
Fax: (317) 806-2770
Email: ACT_CustServ@act-solutions.com.
ABOUT SA4120'S CERTIFICATION
Federal Communications Commission
This device complies with CFR 48 Part 18 of the FCC rules.
Canadian Radio Interference Regulations
This digital apparatus does not exceed the Class B limits for radio noise emissions from a digital apparatus as
set out in the interference-causing equipment standard entitled “Digital Apparatus,” ICES-003 of the
Industry Canada.
ADVANCED CONTROL TECHNOLOGIES, INC.
Indianapolis, Indiana 46250
120 VAC SA4120 LED Lamps Installation Instructions
3
P/D 111510
 Loading...