

Page 1

ADVANCE ADAPTERS, INC. P/N: 50-9305
P.O. Box 247, 4320 Aerotech Center Way New Kit: (11/06)
Paso Robles, CA 93447 PAGE: 1 OF 3
Telephone: (800) 350-2223 Fax: (805) 238-4201 Page Rev. Date: 08-05-11
GM 4L60E TO ATLAS 4 SPEED
TRANSFER CASE-SHORT 23SPL
KIT CONSISTS OF:
No. Qty Part No. Description
1. 1 51-9305 ADAPTER
2. 1 52-9300 4L60E OUTPUT SHAFT
3. 1 716090 CROSSMEMBER
4. 1 716520 O-RING SEAL
5. 1 716654 TRANSMISSION MOUNT
6. 6 720011 10mm-1.5 HEX NUT
7. 4 720093 10mm-1.5 x 50mm STUDS
8. 2 720094 10mm-1.5 x 40mm STUDS
9. 6 723728 3/8"-16 x 2-1/4" S.H.C.S.
10. 2 724314 7/16-20 X 1.25" SHCS (X-MEMBER)
11. 6 911003 10mm STAR WASHER
12. 1 300617 RELUCTOR
13. 3 300617A RELUCTOR SET SCREW
14. 1 300619 SENSOR
15. 4 720095 8mm-1.25x 20mm (used on NP231 T/C only)
left drop 4sp case 4 degrees
right drop 4sp case flat and 7degees
KIT OVERVIEW:
This kit is designed to make the shortest 4L60E possible when bolting to a NP231 or an Atlas 4sp. This kit only works with
the 1997 & newer removable bell housing, 6 bolt rear 4L60E transmission. When bolting up to a NP231 transfer case, the
NP231 will require some modifications shown on the next page. This kit is designed to work with the standard length Atlas
input stick out, it will not work on the short transfer case inputs.
This kit includes a new mainshaft that must be installed into the transmission. This shaft is a billet 400M shaft with a 23 spline
end for the transfer case. Having a reputable automatic transmission shop install this shaft is recommended. We can also
supply a complete transmission with this shaft installed. A special crossmember foot & mount are included in this kit.
ASSEMBLY INSTRUCTIONS:
1. Have the 52-9300 4L60E mainshaft installed into your transmission.
2. Clean the threads in the rear of the transmission case making sure that all oil is removed. Apply Blue Loctite to the 10mm-
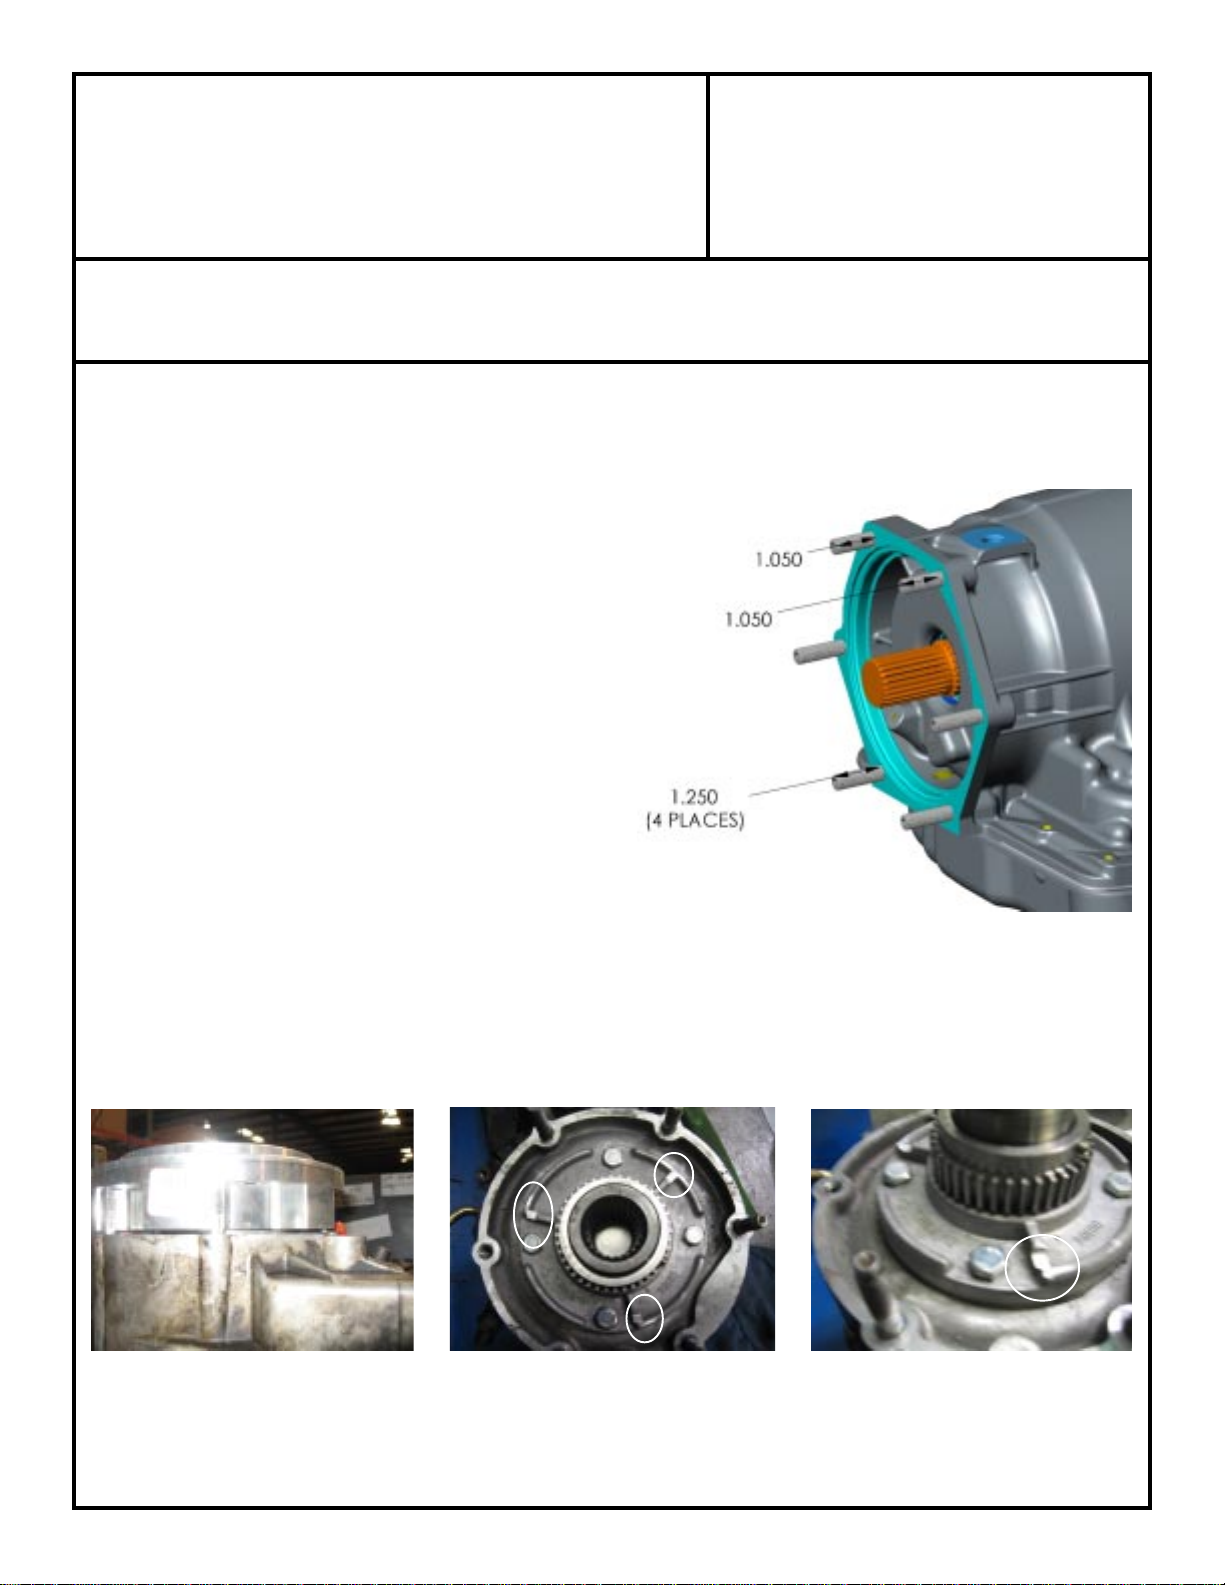
1.5 studs. Thread the studs into the rear of the transmission to the specified depth using an Allen wrench. (See photo
for stud depth).
3. Install the adapter housing to the Atlas using the 6 allen head bolts, these bolts when oriented onto the Atlas will determine
the front drop of the Atlas. Once the clocking is determined clean the threads of the bolts and loctite into position.
4. Put the Atlas transfer case into low or high range (not neutral). This helps the assembly.
5. Refer to the shifter instructions for any steps required before transfer case installation.
6. Install the reluctor on the Atlas front input aligning the sensor hole in the adapter with the center of the reluctor ring and
then lock in place with blue loclite on the 3 set screw and retaining compound loctite 609 . Install the sensor in the adapter
and check the air gap between the ring and sensor which should be .010" to .012".
SPECIAL NOTE: The components packaged in this kit have been assembled and machined for specific types of conversions. Modifications to any of the
components will void any possible warranty or return privileges. If you do not fully understand the modifications or changes that will be required to complete
your conversion, we strongly recommend that you contact our sales department for more information. This Instruction Sheet is only to be used for the assembly
of Advance Adapter components. We recommend that a service manual pertaining to your vehicle be obtained for specific torque vales, wiring diagrams and
other related equipment. These manuals are normally available at automotive dealerships and parts stores.
Page 2
ADVANCE ADAPTERS, INC. P/N: 50-9305
P.O. Box 247, 4320 Aerotech Center Way New Kit: (11/06)
Paso Robles, CA 93447 PAGE: 2 OF 3
Telephone: (800) 350-2223 Fax: (805) 238-4201 Page Rev. Date: 10-11-13
GM 4L60E TO ATLAS 4 SPEED
TRANSFER CASE-SHORT 23SPL
7. Install the o-ring onto the transmission side of the adapter. Place a small bead of silicone around the mating surface of
the adapter and the transmission.
8. Slide Atlas transfer case over the transmission output shaft, rotating the output yoke as needed to align the splines
between the tranny and transfer case. Next, align the holes of the adapter to the studs in the
transmission and push the Atlas completely onto the transmission. Make
sure there is no gap between the Atlas and the transmission before
installing the nuts.
9. Install the top two lock washers and nuts onto the top two 4L60E
studs and tighten hand tight.
10. Slide the crossmember foot mount over the bottom 4 transmission
studs. Install the remaining washers and the nuts.
11. Tighten all 6 transmission-to-transfer case nuts to approximately
30 ft./lbs.
12. The crossmember foot is threaded to accept transmission
mount Part #716654 or equivalent. Crossmember fabrication
will most likely be needed to mount the transmission mount to the
crossmember.
13. Refer to the shifter instruction sheet again and finish remaining items. Also refer to the Atlas
manual for other guidelines including oil and operation.
NP231 MODIFICATION:
the adapter to fit properly. With a grinder, grind down the 3 ribs that protrude up to high shown in the photo or test fit the adapter
to identify these cast ribs. The four bolts on the front retainer must also be replaced for clearance. By doing these modifications
it will allow the adapter to bolt up flush.
There are three cast ribs on the front of the NP231 transfer case that must be modified to allow
Adapter Fit before modifications to
transfer case.
SPECIAL NOTE: The components packaged in this kit have been assembled and machined for specific types of conversions. Modifications to any of the
components will void any possible warranty or return privileges. If you do not fully understand the modifications or changes that will be required to complete
your conversion, we strongly recommend that you contact our sales department for more information. This Instruction Sheet is only to be used for the assembly
of Advance Adapter components. We recommend that a service manual pertaining to your vehicle be obtained for specific torque vales, wiring diagrams and
other related equipment. These manuals are normally available at automotive dealerships and parts stores.
Page 3

ADVANCE ADAPTERS, INC. P/N: 50-9305
P.O. Box 247, 4320 Aerotech Center Way New Kit: (11/06)
Paso Robles, CA 93447 PAGE: 3 OF 3
Telephone: (800) 350-2223 Fax: (805) 238-4201 Page Rev. Date: 05-14-07
GM 4L60E TO ATLAS 4 SPEED
TRANSFER CASE SHORT-23SPL
Adapter Exploded View
SPECIAL NOTE: The components packaged in this kit have been assembled and machined for specific types of conversions. Modifications to any of the
components will void any possible warranty or return privileges. If you do not fully understand the modifications or changes that will be required to complete
your conversion, we strongly recommend that you contact our sales department for more information. This Instruction Sheet is only to be used for the assembly
of Advance Adapter components. We recommend that a service manual pertaining to your vehicle be obtained for specific torque vales, wiring diagrams and
other related equipment. These manuals are normally available at automotive dealerships and parts stores.
 Loading...