

Page 1
ADVANCE ADAPTERS INC. P/N: 50-3601
P.O. Box 247, 4320 Aerotech Center Way New Item: (08-08)
Paso Robles, CA 93447 PAGE 1 OF 2
Telephone: (800) 350-2223 Fax: (805) 238-4201 Page Rev . Date: 08-28-08
TH400 TO BRONCO DANA 20 TRANSFER CASE
KIT CONSISTS OF:
No. Qty Part No. Description
1. 1 51-0209 CASTING - NV4500 TO BRONCO DANA 20
2. 1 51-6401 ADAPTER HOUSING (Ref: 711164-SS)
3. 1 52-0209 SPUD SHAFT - NV4500/BRONCO DANA 20
4. 1 52-6401 TH400 OUTPUT SHAFT (23-SPL)
5. 1 715541 SHIFTER LINKAGE BRACKET
6. 1 716223 BEARING RETAINER
7. 1 716312 BEARING
8. 1 716455 SNAP RING
9. 1 716510 GASKET (GM #8624709)
10. 1 716513 T/C GASKET
11. 1 716517 GASKET- NP208 T/C
12. 1 716713 SEAL
13. 1 716714 O-RING FOR INDEX RETAINER
14. 1 716729 SEAL (NAT #456057)
15. 6 723701 NUT 3/8"-16 PLATED
16. 6 723704 LOCK WASHER 3/8" PLATED
17. 6 723711 STUD BOLT 3/8"-16 x 2" LG
18. 6 723740 3/8"-16 x 1-1/2" S.H.C.S.
SPECIAL INSTRUCTIONS:
This adapter kit is designed for exclusive use with a GM TH400 transmission. Since
this application is for a Ford Early Bronco Model 20 transfer case, you will need to
consider how to couple the TH400 to the Ford engine. We offer P/N 712588.
NOTENOTE
::
NOTE
:
NOTENOTE
::
This adapter will only work with
the "T" style shifter. If your
vehicle has a "J" style, it will
need to be replaced
Optional items:
Part# 712588
(GM Trans x Ford Small Block)
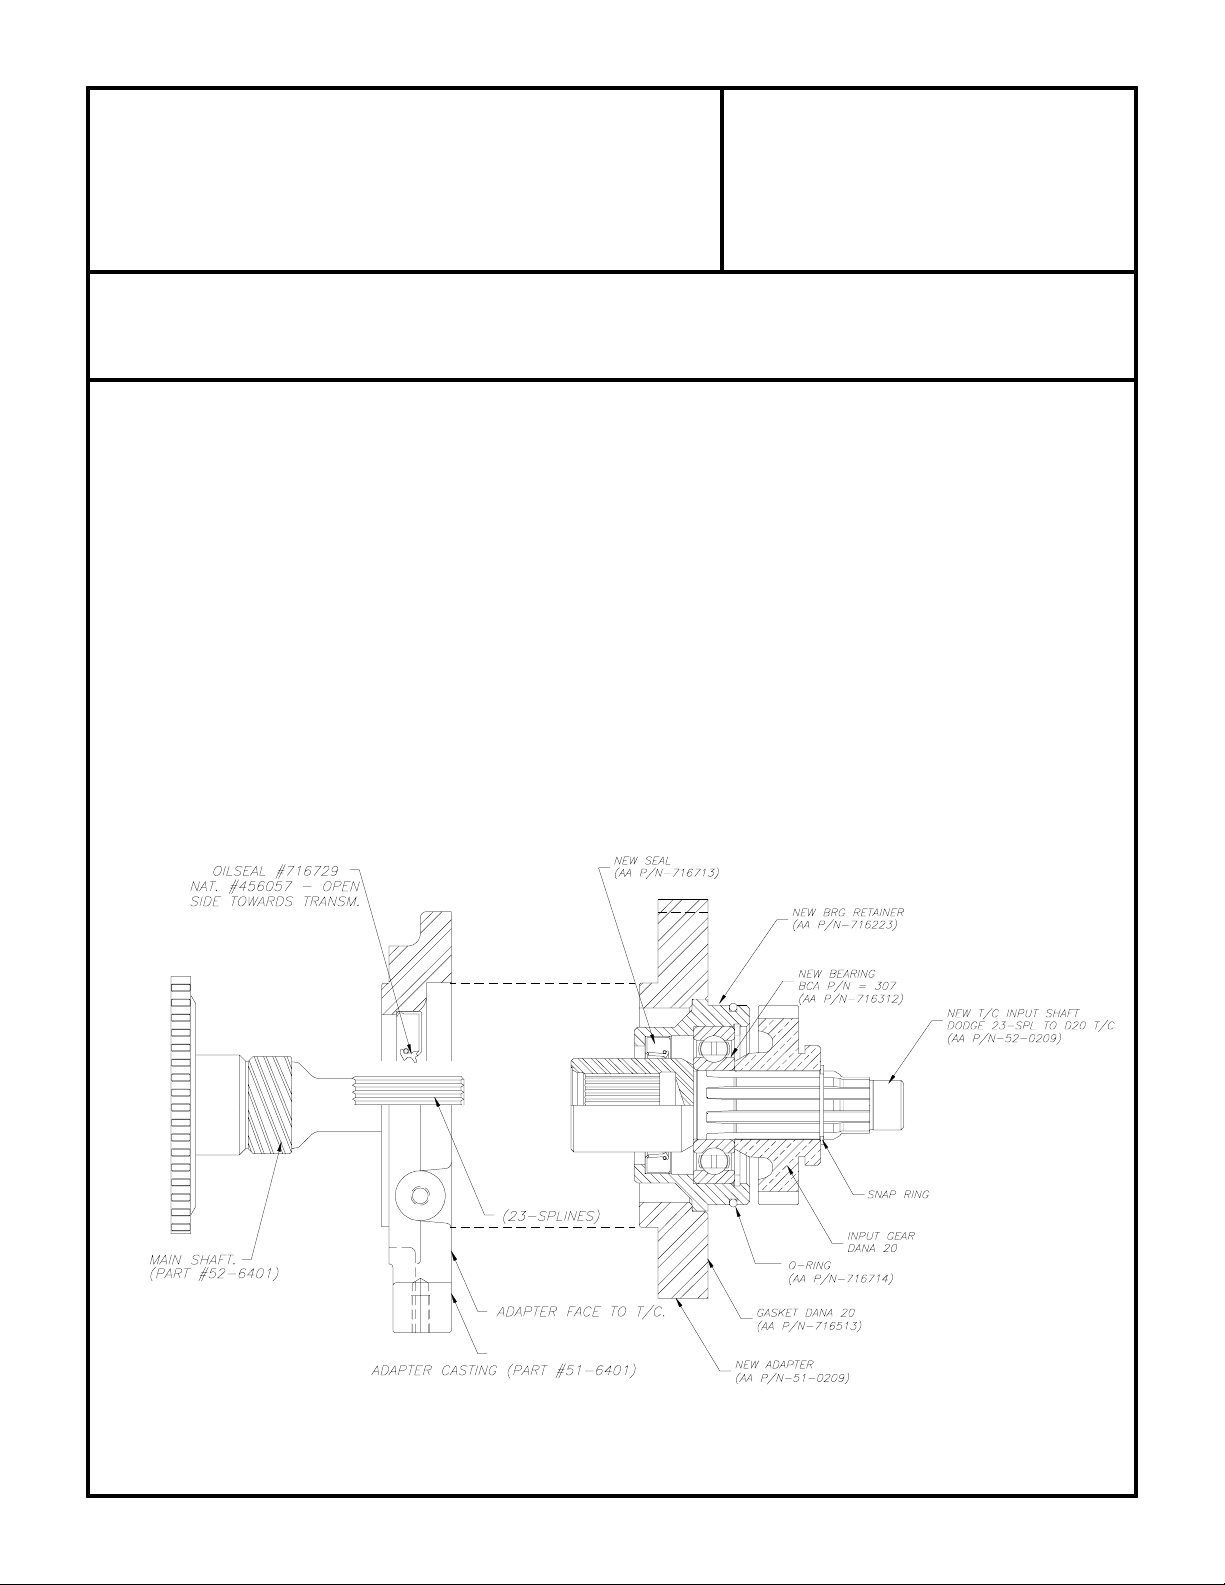
This kit is supplied with a new spud shaft, bearing, and seal. These components will
need to be installed into our alignment retainer, along with the stock Bronco Dana
drive gear. Make sure all snap rings are in place. Install the O-ring on the retainer
along with a small amount of R.T.V. Blue silicone, then install the retainer to your
transfer case. Bolt the adapter ring to the Dana 20 using the (6) S.H.C.S. bolts.
Rotate the spud shaft to check for proper installation.
When assembling the transmission to the transfer case, DO NOT FORCE the two
gear boxes together. If the shaft is too long, there is the possibility of pre-loading the transmission bearings, causing
premature failure. Take the extra time to make sure that the shafts do not bottom out internally. If there is any
interference problem, it may be necessary to grind the end of the new output shaft to obtain the proper length.
A shifter bracket has been provided for a "T" style T/C shifter handle. Before installing your transmission/transfer
case assembly in your vehicle, check the fit of this linkage bracket. The mounting hardware for the transfer case
linkage has been left out due to the various "T" style linkages being used.
SPECIAL NOTE: The components packaged in this kit have been assembled and machined for specific type of conversions. Modifications to any of the components will
void any possible warranty or return privileges. If you do not fully understand modifications or changes that will be required to complete your conversion, we strongly recommend
that you contact our sales department for more information. This instruction sheet is only to be used for the assembly of Advance Adapter components. We recommend that a
service manual pertaining to your vehicle be obtained for specific torque values, wiring diagrams and other related equipment. These manuals are normally available at automotive
dealerships and parts stores.
Page 2
ADVANCE ADAPTERS INC. P/N: 50-3601
P.O. Box 247, 4320 Aerotech Center Way New Item: (08/08)
Paso Robles, CA 93447 PAGE 2 OF 2
Telephone: (800) 350-2223 Fax: (805) 238-4201 Page Rev . Date: 08-28-08
TH400 TO BRONCO DANA 20 TRANSFER CASE
ASSEMBLY INSTRUCTIONS for the TH400 adapter: All fasteners should be secured with green Loctite
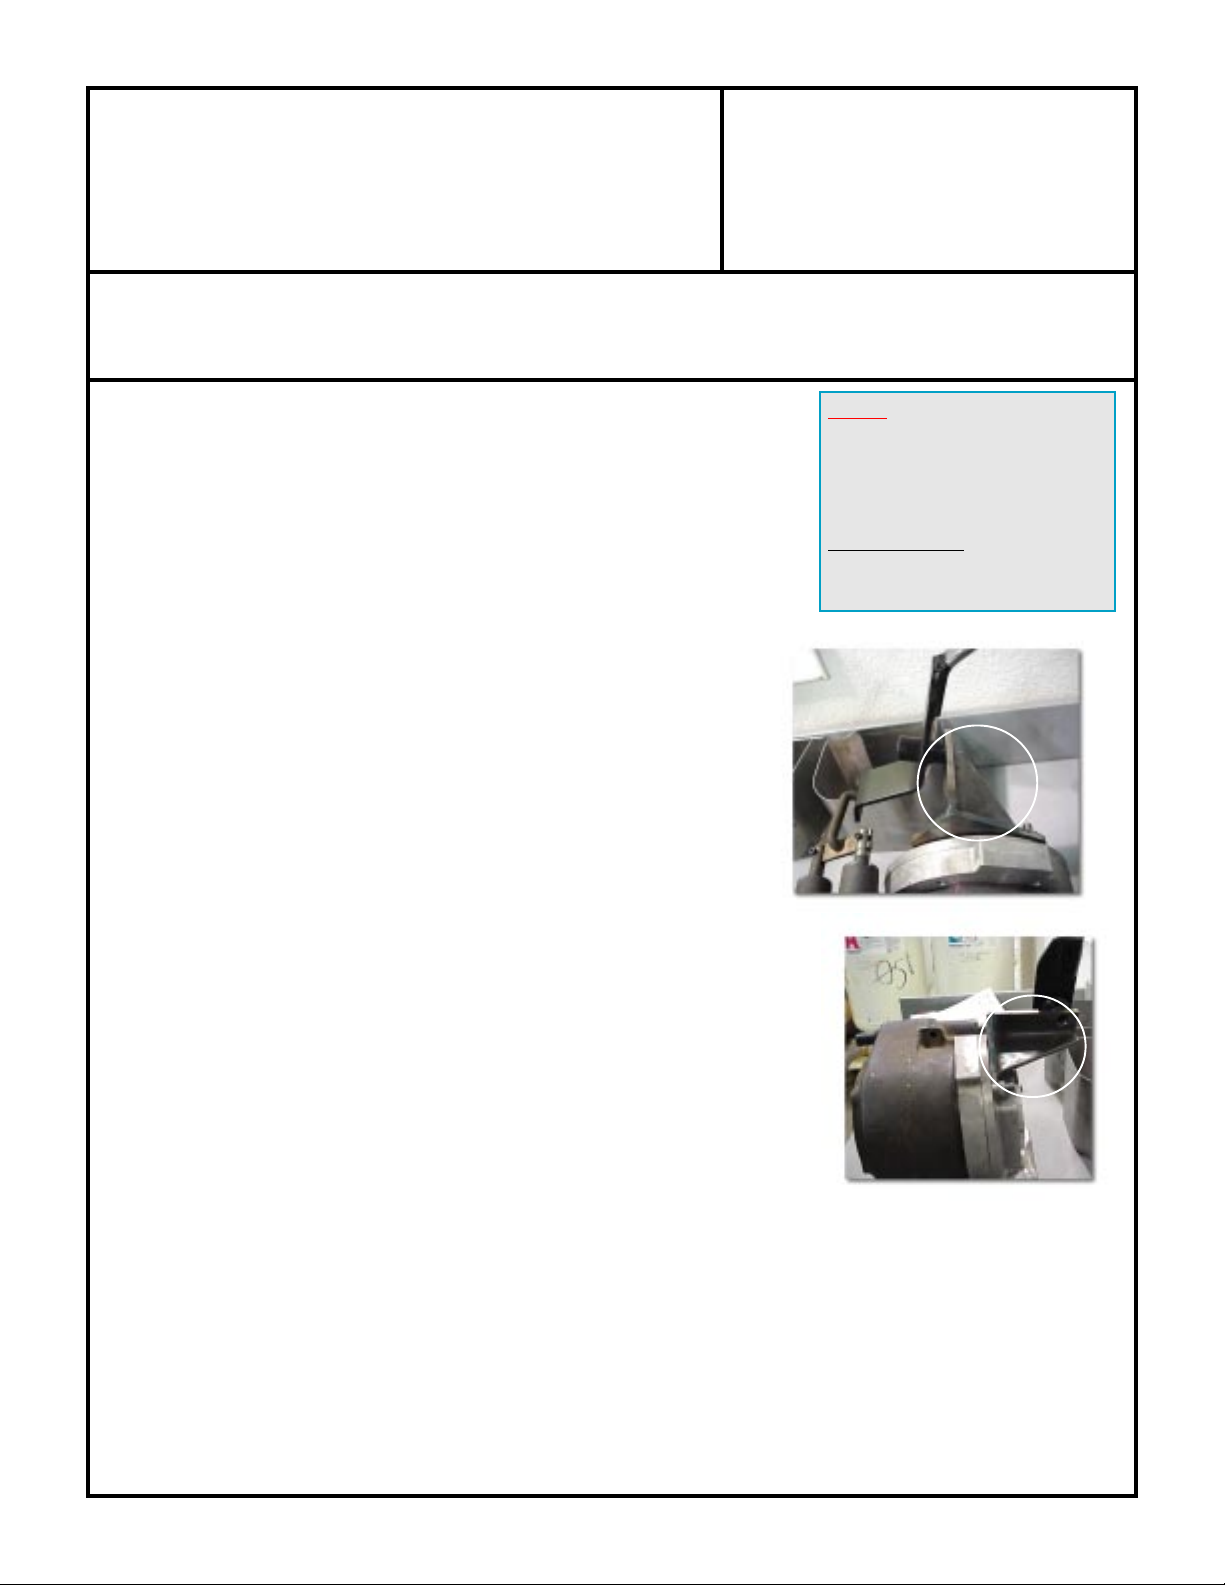
1. Trial fit the adapter against the TH400. If it will not fit flush against the transmission, then grind a small portion around
the speedometer gear housing.
2. Install the new output shaft provided by Advance Adapters. This should be done by an experienced transmission
technician.
3. Apply silicone sealant to the TH400 to adapter gasket. Assemble the adapter to the transmission with the six 3/8"-16
x 1-1/2" socket head cap screws.
4. Check the stickout length of the output shaft with reference to the adapter housing. It should not stick out more than
1/4" (.250 in.).
5. Trial fit the transfer case to the adapter casting.
SEVERE DAMAGE WILL OCCUR . The input gear on the transfer case should have enough pocket to accept a 1/4"
(.250 in.) stickout.
6. Install the seal into the casting with open side of the seal facing the transmission.
7. Apply a thin coat of silicone sealant to the transfer case gasket. Install the transfer case and secure it with Loctite,
nuts and lockwashers.
DO NOT "SUCK-UP" THE TRANSFER CASE WITH THE STUDS!
SPECIAL NOTE: The components packaged in this kit have been assembled and machined for specific type of conversions. Modifications to any of the components will
void any possible warranty or return privileges. If you do not fully understand modifications or changes that will be required to complete your conversion, we strongly recommend
that you contact our sales department for more information. This instruction sheet is only to be used for the assembly of Advance Adapter components. We recommend that a
service manual pertaining to your vehicle be obtained for specific torque values, wiring diagrams and other related equipment. These manuals are normally available at automotive
dealerships and parts stores.
 Loading...