

Page 1

ADV ANCE ADAPTERS INC. P/N: 303020A
P.O. Box 247, 4320 Aerotech Center Way New Item: (2/08)
Paso Robles, CA 93447 PAGE 1 OF 9
Telephone: (800) 350-2223 Fax: (805) 238-4201 Page Rev . Date: 06-7-13
ATLAS T/C JEEP TJ & (XJ 84-01)
CABLE SHIFTER
KIT CONSISTS OF:
No. Qty Part No. Description
1 1 302051-RLE BASE- TWIN STICK MOUNT 42RLE
2 1 302080 STUD BOLT 1/2"-13 X 7 (XJ)
3 1 303120 SERRATED LOCK NUT 1/2" X 13"
4 1 303121 NUT- 1/2"-13 PLATED
5 1 303303 RETAINER- SHIFTER BODY BARREL
6 2 303305 BARREL- TWIN STICK CABLE
7 1 303307 ATLAS CABLE BRACKET
8 2 303309 CABLE-ATLAS SHIFTER 48" LENGTH 1" TRAVEL
9 4 303312 BUSHING- IGUS 3/8"
10 2 303313 HEIM JOINT- FEMALE 1/4"-28
11 2 303316 OUTER NUT- CABLE RETAINER
12 2 303317 NUT- CABLE SHIFTER- JAM 1/4-28
13 1 **303318 BLOCK- CABLE ADAPTER 42RLE ATLAS
14 1 **303319 NUT- RETAINING CABLE 42RLE ATLAS
15 1 **303321 REATAINING RING-5/8X.050 ROTO CLIP(SHR-62)
16 1 303325 TUBE- ATLAS SHIFTER EXTENSION 4.25"
17 1 303330 BOX- TJ CABLE SHIFTER ATLAS
18 1 303331 TJ CABLE SHIFTER HANDLE RIGHT
19 1 303332 LEVER- ATLAS CABLE SHIFTER TJ LEFT
20 2 303333 MOUNT- ATLAS CABLE SHIFTER TJ PIVOT
21 1 303334 TJ CABLE SHIFTER BOTTOM COVER
22 2 303335 KNOB MOUNT-CABLE SHIFTER TJ
23 1 303336 ALUMINUM KNOB TJ CABLE FRONT
24 1 303337 ALUMINUM KNOB TJ CABLE REAR
25 6 303339 BOLT- 1/4"-28 x .75" F.H.C.S.
26 2 303342 SET SCREW-#6-40 X 3/16" C.P.S.S.
27 2 303343 Access plug
28 1 303344 Pivot Dowel Pin (Ground) 2.25"
29 15 303345 Sealant - Butyl Tape
30 4 303346 BOLT- 1/4"-28 X 5/8" S.H.C.S.
31 6 340615 BOLT- 1/4"-20 X 5/8" B.H.C.S.
32 2 723729 S.H.C.S. 3/8"-16 X 1-3/4"
33 3 723731 S.H.C.S. 3/8"-16 X 1" ZINC
** ASSEMBLE COMPONENTS
42RLE Transmissions note:
42RLE Transmissions have some
clearance issues with the tailhousing
on one of the new shifter cables. If
you have the 42RLE transmission,
you will need to use the upper cable
support hole on bracket 303307.
This cable support hole moves the
inside cable away from the transmission tailhousing gives you the
needed clearance. We have included a shift rail link bar that provides the correct alinement of the
Atlas shift rail to the new cable
location on the 303307. The Atlas
base mount 302051-RLE has been
modified to clear the new link bar
assembly. If you are using the link
bar assembly, see the last page of
this instruction sheet.
Page 2
ADV ANCE ADAPTERS INC. P/N: 303020A
P.O. Box 247, 4320 Aerotech Center Way New Item: (2/08)
Paso Robles, CA 93447 PAGE 2 OF 9
Telephone: (800) 350-2223 Fax: (805) 238-4201 Page Rev . Date: 04-24-12
ATLAS T/C JEEP TJ & (XJ 84-01)
CABLE SHIFTER
NOTE ON SHIFTING: The Atlas Transfer case is a synchronized unit. The transfer case shifts best when the shafts are spinning.
Note that when the transfer case is shifted when not in motion, the teeth may or may not be aligned. If the teeth are aligned, then the
unit will slip into gear easily. If the unit does not slip into gear easily, then no amount of pulling on the handle will cause the unit to
shift. The transfer case must be spun slightly and then it will shift.
*Note: The first cable shifters used an shift rail adapter on the shift rail for coupling the cables to the Atlas. The shift rails were
changed 7-1-07. This new style of rail is drilled and tapped to directly accept the threaded cable end and eliminate the shift rail
adapter. We switched back to the adapters fittings 8-16-10 for ease of installation of the cable to the Atlas. Some shift rails still
have the thread hole on the end of the shift rail. 3/15/12 newest shift rail to work with the new cable connection parts has a drilled
clearance hole in shift rail. (see photo next page)
This kit includes the latest version components for the shift rails that are drilled out. If you have the drilled and tapped shift rails,
you can install the cables into the rails directly or you can use a 7/32" drill and clearance the threads to use the new connection
pieces (aprox. .600" deep). The new connection pieces are the easiest to install without the potential to damage the cable.
This shifter will not fit the Allison transmission due to cable interferance with the stock adapter housing.
Jeep XJ's may require a bit of trimming on the console bezel insert.
NOTE: We recommend temporarly protecting the shifter cables with rubber hose or duct tape when routing
through the shifter floor hole as this will prevent damaging the outer cable housing.
SPECIAL NOTE: The components packaged in this kit have been assembled and machined for specific type of conversions. Modifications to any of the components
will void any possible warranty or return privileges. If you do not fully understand modifications or changes that will be required to complete your conversion, we strongly
recommend that you contact our sales department for more information. This instruction sheet is only to be used for the assembly of Advance Adapter components. We
recommend that a service manual pertaining to your vehicle be obtained for specific torque values, wiring diagrams and other related equipment. These manuals are normally
available at automotive dealerships and parts stores.
Page 3
ADV ANCE ADAPTERS INC. P/N: 303020A
P.O. Box 247, 4320 Aerotech Center Way New Item: (2/08)
Paso Robles, CA 93447 PAGE 3 OF 9
Telephone: (800) 350-2223 Fax: (805) 238-4201 Page Rev . Date: 04-24-12
ATLAS TRANSFER CASE JEEP TJ
CABLE SHIFTER
NOTE: Refer to factory service manual for detailed disassembly instructions
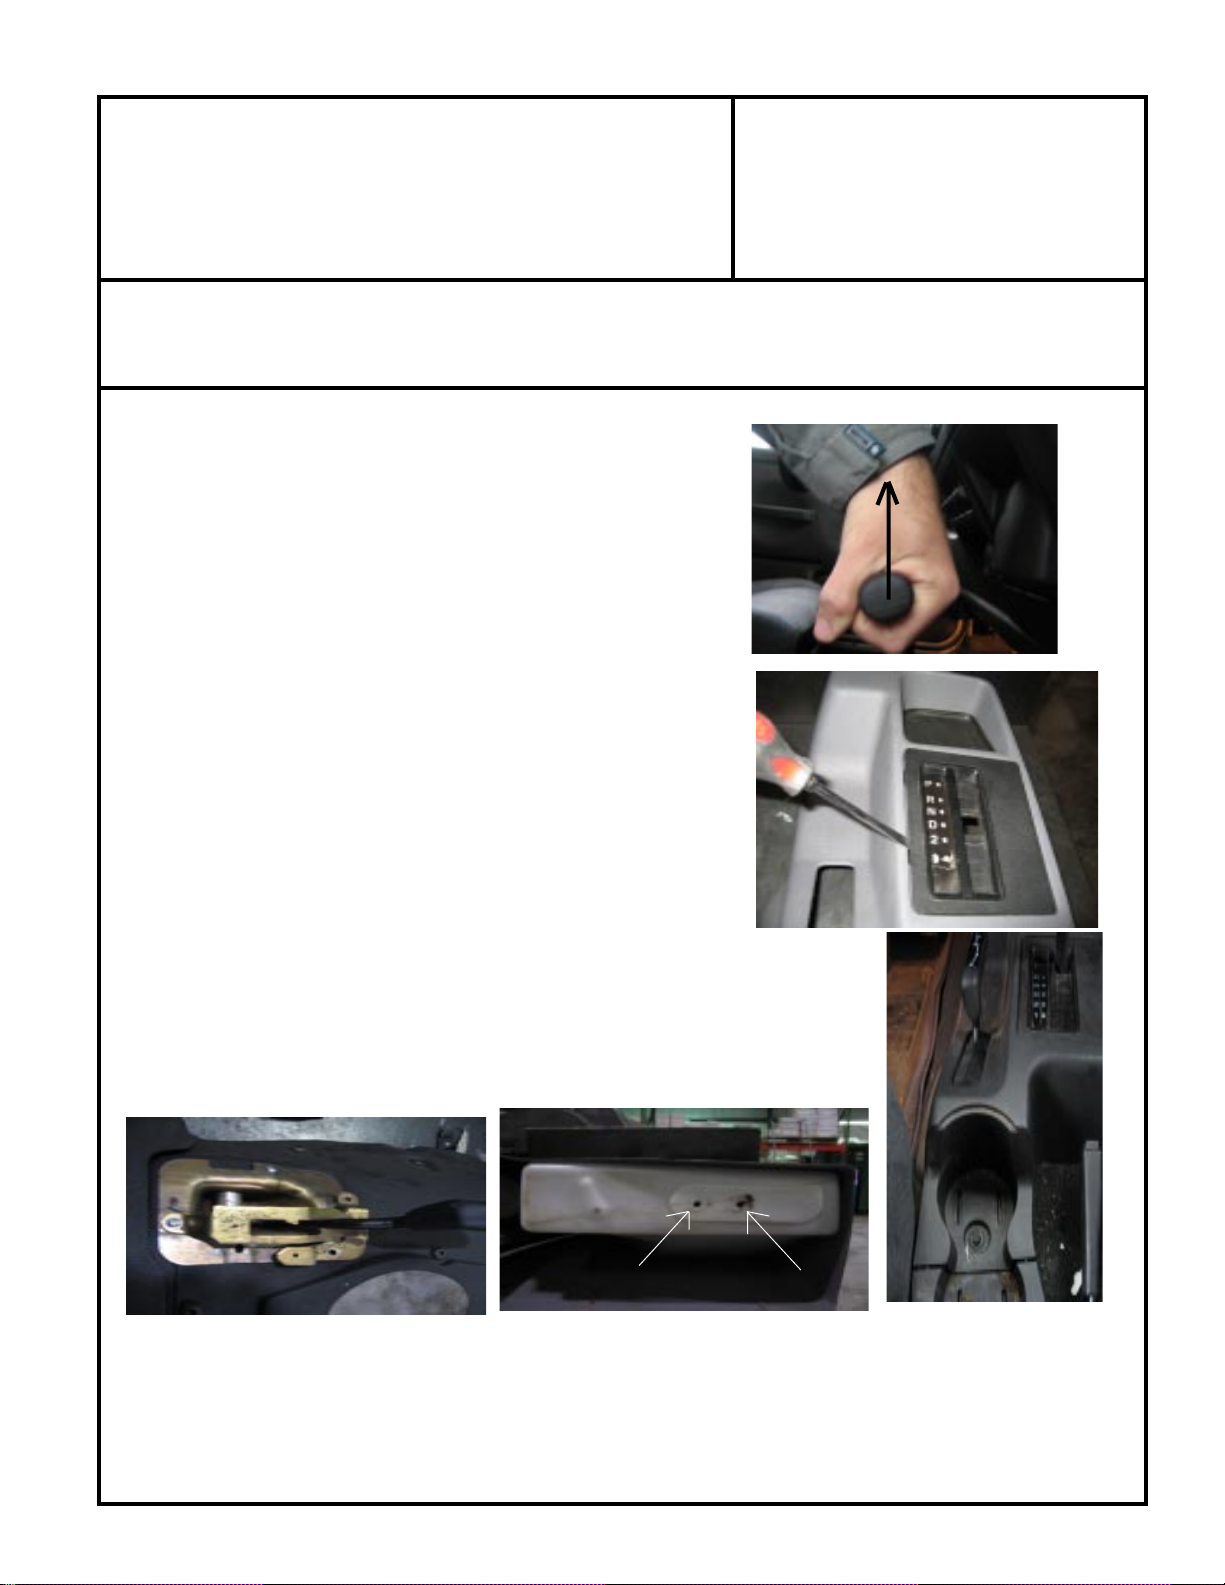
1. For Jeeps with factory automatic transmission the first
step is to remove the shift buttom/spring detent assembly from the shifter handle. This can be done by using
a small flat head screw driver to "pry off" the shift
button end cap. To remove the handle, firmly grab and
pull up until it releases from the shift lever.
2. Using the same flat head screw driver, remove the
factory shift indicator assembly from the console.
Carefully remove indicator light bulb assembly and set
aside.
3. Depending on console style, you may have up to five
bolts securing the console. Two piece consoles only
require removal of two or possibly three bolts. One is
located in the front cup holder possibly under the rubber
insert. The second is found just to the right of the
transmission shift lever. Although uncommon, a third
bolt or plastic push pin is sometimes found on the front
of the console under the carpet.
4. Maneuver the console so that the stock transfer case
shift lever slips through the slot in the console. Remove
console and set aside for later.
5. Remove five mounting bolts securing the stock transfer
case shifter mount and save for later. These bolts will
sometimes be hard to remove because of corrosion in
the threads. Prior to removal, spray threads with a
thread lubricant. This step will ensure that the threads
of the factory "nut-serts" remain undamaged for installation of new shifter assembly.
6. With the five mounting bolts removed, pull the shifter
assembly out of the floor far enough to access the nut.
NOTE: If the stock shifter bolts are missing or have been discarded. Replace with five 10-32" X .625" bolts
or screws and washers.
SPECIAL NOTE: The components packaged in this kit have been assembled and machined for specific type of conversions. Modifications to any of the components
will void any possible warranty or return privileges. If you do not fully understand modifications or changes that will be required to complete your conversion, we strongly
recommend that you contact our sales department for more information. This instruction sheet is only to be used for the assembly of Advance Adapter components. We
recommend that a service manual pertaining to your vehicle be obtained for specific torque values, wiring diagrams and other related equipment. These manuals are normally
available at automotive dealerships and parts stores.
Page 4

ADV ANCE ADAPTERS INC. P/N: 303020A
P.O. Box 247, 4320 Aerotech Center Way New Item: (2/08)
Paso Robles, CA 93447 PAGE 4 OF 9
Telephone: (800) 350-2223 Fax: (805) 238-4201 Page Rev . Date: 04-24-12
ATLAS T/C JEEP TJ & (XJ 84-01)
CABLE SHIFTER
ASSEMBLY
Transfer Case End: (see photo next pages)
Bolt the twin stick base to the transfer case with the 3/8"-16 socket
head cap screws. Thread the 1/2"-13 all thread completely into the twin
stick base. Install the 1/2"-13 jam nut. Tighten the jam nut against the
twin stick base. Slide the extension tube and the extension tube
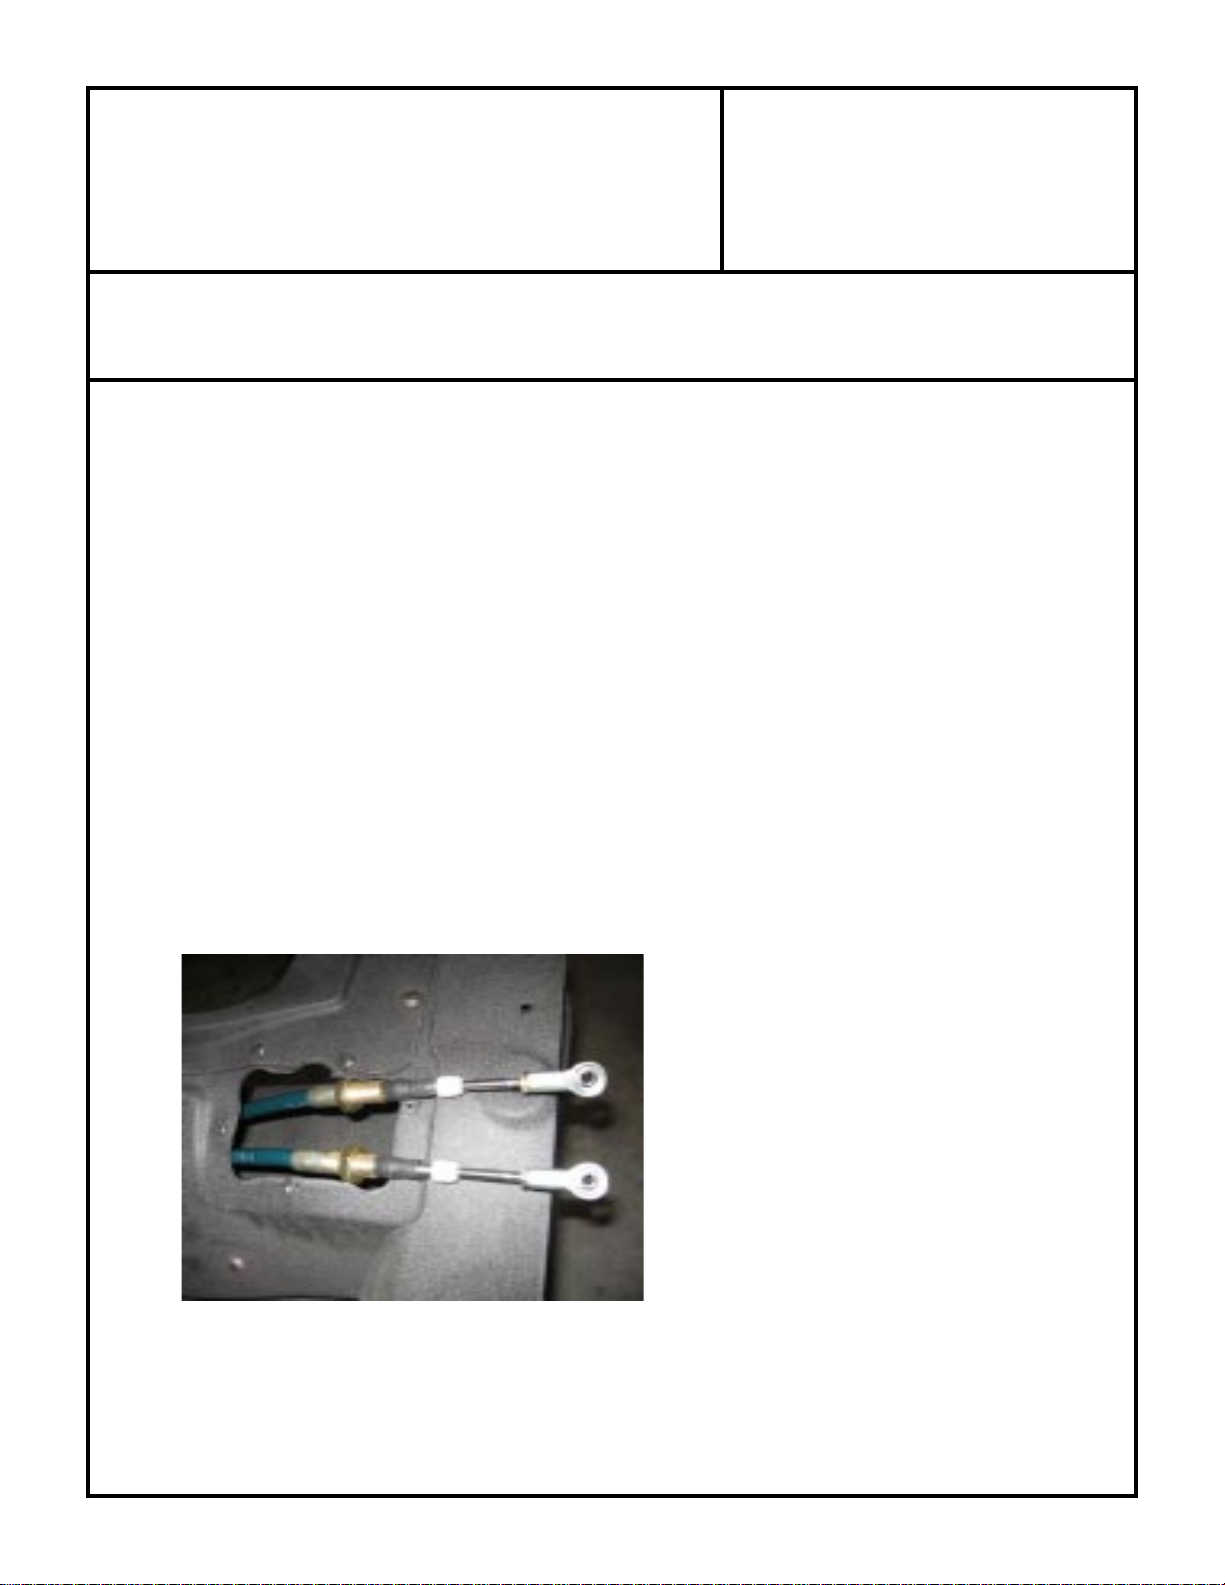
bracket over the all thread and fasten with the 1/2"-13 serrated lock nut.
Remove one of the 5/8” jam nuts and slide the cable through the
extension tube bracket. Loosely re-install the 5/8” jam nut to hold the
cable in place. Remove the ¼” nut from the cable end and discard. Slip
the 303316 outer nut cap over the cable end and then thread the 303317
cable nut on to the 1/4-28 cable end. The cable nut must be set at a
distance that when the cable end is inserted into the Atlas shift rail,
thecable end bottoms out in the shift rail. The nutis then adjusted to
the front face of the shift rail. Once the cable nut is adjusted correctly,
slip the nut cap over the cable nut and onto the Atlas shift rail. Tighten
the cap nut to retain the cable end to the Atlas shift rail. Use caution
when turning the cap nut, making sure it does not turn the inner cable
nut. Once the assembly is fastened together you should only see about
¼” of the ¼-28 threads coming out of the nut cap. Repeat this step on
the second cable.
New shift rails with clearance holes drilled
Once both cables are connected, the cable outer housing needs to be
set to the cable mount bracket. Shift the transfer case into low range
for this adjustment. The easiest way is to use a long punch and a dead
blow hammer, set the punch (flat tip) on the nut cap and tap the punch
lightly with the hammer. It should pop into the low gear ratio. Turning
the yoke can confirm that you’re in low gear. Once both shift rails are
in low gear you can adjust the outer cable housing.
Loosen the large jam nuts on the cable. Apply some force on the outer
housing of the cable pulling away from the transfer case. The cable is
a 1” travel and the Atlas shift rail is .960". With the Atlas in low range
and the outer housing of the cable extended entirely the other direction, you can now set the jam nuts to the extension tube bracket
knowing that the travel of both components is correct. Repeat this on
the second cable.
Shift the Atlas back into neutral so when you get to the shifter box
assembly and handle orientation, it is easy to see the correct alignment.
support tube and bracket installed
Cable being installed through the bracket
Page 5

ADV ANCE ADAPTERS INC. P/N: 303020A
P.O. Box 247, 4320 Aerotech Center Way New Item: (2/08)
Paso Robles, CA 93447 PAGE 5 OF 9
Telephone: (800) 350-2223 Fax: (805) 238-4201 Page Rev . Date: 04-24-12
ATLAS T/C JEEP TJ & (XJ 84-01)
CABLE SHIFTER
Remove the 1/4" jam nut and
install the nut cap over the cable.
Once the cable nut has been adjusted, slide the nut cap over the shift rail
and tighten to retain the cable to the shift rail. Shift the transfer case into
low range (shift rail pushed inward) to set the outer cable housing.
Install the cable nut on the cable
threads.
The cable should bottom out in
the shift rail and the cable nut
should be flush against the face of
the shift rail.
The outer cable housing now needs
to be set. Pull the outer housing
away from the transfer case. The inner cable should be fully extended.
With the cable fully extended in this direction you will now
need to secure the 5/8" jam nuts to the bracket of the transfer
case. Since the cable has a bit more travel than the Atlas
needs, we recommend to thread on (circled) nut first to the
bracket and then give it one addition full turn which will pull the outer cable housing back slightly. Then snug the
front nut. Once both nuts are snug to the bracket, tighten them with a wrench. Before moving up to the shifter box,
shift transfer case back to neutral.
Page 6

ADV ANCE ADAPTERS INC. P/N: 303020A
P.O. Box 247, 4320 Aerotech Center Way New Item: (2/08)
Paso Robles, CA 93447 PAGE 6 OF 9
Telephone: (800) 350-2223 Fax: (805) 238-4201 Page Rev . Date: 04-24-12
ATLAS T/C JEEP TJ & (XJ 84-01)
CABLE SHIFTER
SShifter End:
1. Remove 1 of the 5/8" jam nuts and the lock washer from each cable and discard.
2. Slide the Barrel Retainer plate over both shifter cables, then thread both cable barrels onto the shift
cables.
3. Now thread the heim joints onto the shift cables inner rod and tighten the jam nuts. (This should look
like the photos to the right.)
4. Using a mallet, hammer the pivot bushings into the shifter
handles. Start the bushing into the handle, hold the handle with
the bushing side down on the table, hit the top side of the handle
with the dead blow hammer to install the bushing. Repeat for the
remaining bushings.
5. Assemble the shifter body. See the last two pages for help on
this.
6. Slide the heim joint to meet the tapped hole in the shift handle and
insert the bolt from the bottom of the shifter box to secure the
handles to the cables.
7. Slide the cable barrel retainer plate up the shifter body and fasten
it with the 1/4"-20 button head cap screws (Note: Do not fully
tighten these cap screws).
8. With the transfer case in neutral and the shifter box
assembled, you will need to adjust the handles in the shifter
box. Make sure the 5/8" jam nut is not tight against the cable
barrel. By turning the cable barrel with a set of pliers it will
move the outer cable housing inward or outward and thus
move the handle forward or backwards in the shifter box.
Since the cables are set correctly down at the transfer case
and the transfer case in now in natural. The goal is, the
handles should be adjusted to create a 90 degree angle with
the orientation of the handles to the top of the shifter box. When the shifter is adjusted properly, tighten
the jam nuts and the cable barrel retainer plate screws.
9. Once adjusted install the bottom cover using the supplied button head cap screws and apply a bead of
RTV silicone to seal the two.
10. Apply Butyl tape to bottom side of shifter box flange and slide the assembled shifter box down into the
floor and secure using the stock bolts removed earlier.
Page 7

ADV ANCE ADAPTERS INC. P/N: 303020A
P.O. Box 247, 4320 Aerotech Center Way New Item: (2/08)
Paso Robles, CA 93447 PAGE 7 OF 9
Telephone: (800) 350-2223 Fax: (805) 238-4201 Page Rev . Date: 04-24-12
ATLAS T/C JEEP TJ & (XJ 84-01)
CABLE SHIFTER
***NOTE: Due to slight variations in the stock floor, the shifter box mounting holes may require enlarging
to get everything aligned correctly.
11. If test shifting was successful, install one shift knob mounts onto the passenger handle and secure using
the 1/4"-28 x 3/4" flat head cap screws
and then reinstall the center console.
12. Install the second shift knob
mount followed by the two 3/
8"-16 x 1.5" shift knob studs
(ALLEN END DOWN).
13. The aluminum shift knobs can
be adjusted by tightening or
loosening the studs with an
allen wrench from the access
hole.
NOTE: Butyl tape applied to flange
Shifter Box
303330
Link bar installation: The link bar provides the option of moving the shifter cable connection point on the Atlas
shift rail. Some transmissions are extremely tight on the tailhousing clearance to the rear output shifter rail of the
Atlas. This block allow an off set of .500". The installation on the cable is basically the same as mentioned in the
assembly instructions, with just a few exceptions. One each of the nut cap and cable nuts will not be used.
The link bar
consist of 3 parts
and should be
come assembled.
The front mount in the shifter kit has been machined
for clearance on the link bar, and the 303307 cable
support needs to be mounted like the photo shown.
The cable is installed into the upper hole.
The link bar
should be
installed on the
cable. Install so
that approx. 1/4"
of threads are
past the brass
nut (see photo).
This cable length should match the other cable on the front
output. Thread the brass nut onto the shift rail and then follow the
adjustment procedures on page 3 & 4.
Page 8

ADV ANCE ADAPTERS INC. P/N: 303020A
P.O. Box 247, 4320 Aerotech Center Way New Item: (2/08)
Paso Robles, CA 93447 PAGE 8 OF 9
Telephone: (800) 350-2223 Fax: (805) 238-4201 Page Rev . Date: 04-24-12
ATLAS TRANSFER CASE JEEP TJ
CABLE SHIFTER
Shift Knob Mount
303335
Handle Mount
303332
Pivot Mount
303333
SPECIAL NOTE: The components packaged in this kit have been assembled and machined for specific type of conversions. Modifications to any of the components
will void any possible warranty or return privileges. If you do not fully understand modifications or changes that will be required to complete your conversion, we strongly
recommend that you contact our sales department for more information. This instruction sheet is only to be used for the assembly of Advance Adapter components. We
recommend that a service manual pertaining to your vehicle be obtained for specific torque values, wiring diagrams and other related equipment. These manuals are normally
available at automotive dealerships and parts stores.
Page 9

ADV ANCE ADAPTERS INC. P/N: 303020
P.O. Box 247, 4320 Aerotech Center Way New Item: (2/08)
Paso Robles, CA 93447 PAGE 9 OF 9
Telephone: (800) 350-2223 Fax: (805) 238-4201 Page Rev . Date: 06-07-13
ATLAS T/C JEEP TJ & (XJ 84-01)
CABLE SHIFTER
The Igus bushings must be pressed into the shift handle. A arbor press or a light hand with a hammer works well. Once the
bushings are installed the pivot pin gets installed through the handle.
Install the pin mounts. (note these photos show a assembly of a simular kit that uses the same mounting hardware but
different handles)
Once both pivot pin mounts are installed, use the #6 set screws to lock them to the pivot pin. The pivot pin should be
flush with the outside edge of the pin mounts. Install the handle assembly into the shifter housing making sure the
handles are pointing forward or in the same direction as where the cable will be mounted (see photo). Secure the pivot pin
mounts to the shifter housing using 3 of the B.H.C.S and the one S.H.C.S.
 Loading...