

Page 1

ADV ANCE ADAPTERS INC. P/N: 303009A
P.O. Box 247, 4320 Aerotech Center Way New Item: (05/04)
Paso Robles, CA 93447 PAGE 1 OF 5
Telephone: (800) 350-2223 Fax: (805) 238-4201 Page Rev . Date: 12-12-12
A TLAS TRANSFER CASE CABLE SHIFTER
SOLD WITHOUT AN ATLAS
KIT CONSISTS OF:
No. Qty Part No. Description
1. 1 302051 TWIN STICK BASE MOUNT
2. 1 302060 TWIN STICK SHIFT BOOT
3. 1 302061 FRONT SHIFT KNOB
4. 1 302062 REAR SHIFT KNOB
5. 1 302063 BOOT RING
6. 1 302080 1/2"-13 x 7" ALL THREAD
7. 1 303120 1/2"-13 SERRATED LOCK NUT
8. 3 303121 1/2"-13 JAM NUT
9. 1 303301 SHIFTER BODY
10. 1 303303 BARREL RETAINER PLATE
11. 2 303304 SHIFTER HANDLE
12. 2 303305 CABLE BARREL
13. 2 303306 SHIFT RAIL ADAPTER
14. 1 303307 EXTENSION TUBE BRACKET
(THIS BRACKET HAS 3 CABLE SUPPORT HOLES, USE THE TWO THAT ARE IN LINE WITH THE MOUNTING STUD HOLE)
15. 1 303308 EXTENSION TUBE 4.85" LONG
16. 2 303309 SHIFTER CABLE - 48" LONG
17. 1 303310A PIVOT SHOULDER BOLT- 5/16" x 3"
18. 4 303312 HANDLE PIVOT BUSHINGS
19. 2 303313 1/4" FEMALE HEIM JOINT
20. 3 340615 1/4"-20 x 5/8" BUTTON HEAD CAP SCREW
21. 1 722523 1/4" FLAT WASHER
22. 4 722546 #10 x 1" SELF TAPPING SCREWS
23. 1 723141 5/16"-18 LOCKNUT
24. 3 723731 3/8"-16 x 1" SOCKET HEAD CAP SCREW
25. 2 340617 1/4-28 X 1" SHCS (HANDLE TO HEIM BOLTS)
The shifter body, handles, and pivot
bolt were updated 11-10-11. These items
retained the same part numbers, but will
not fit as replacement parts for older
shifter units. If a replacement handle or
body is needed then you will need the
new style components. The old pivot
bolt can be obtained from McMaster
Carr.
SPECIAL NOTE: The components packaged in this kit have been assembled and machined for specific type of conversions. Modifications to any of the components
will void any possible warranty or return privileges. If you do not fully understand modifications or changes that will be required to complete your conversion, we strongly
recommend that you contact our sales department for more information. This instruction sheet is only to be used for the assembly of Advance Adapter components. We
recommend that a service manual pertaining to your vehicle be obtained for specific torque values, wiring diagrams and other related equipment. These manuals are normally
available at automotive dealerships and parts stores.
Page 2
ADV ANCE ADAPTERS INC. P/N: 303009A
P.O. Box 247, 4320 Aerotech Center Way New Item: (05/04)
Paso Robles, CA 93447 PAGE 2 OF 5
Telephone: (800) 350-2223 Fax: (805) 238-4201 Page Rev . Date: 11-10-1 1
A TLAS TRANSFER CASE CABLE SHIFTER
SOLD WITHOUT AN ATLAS
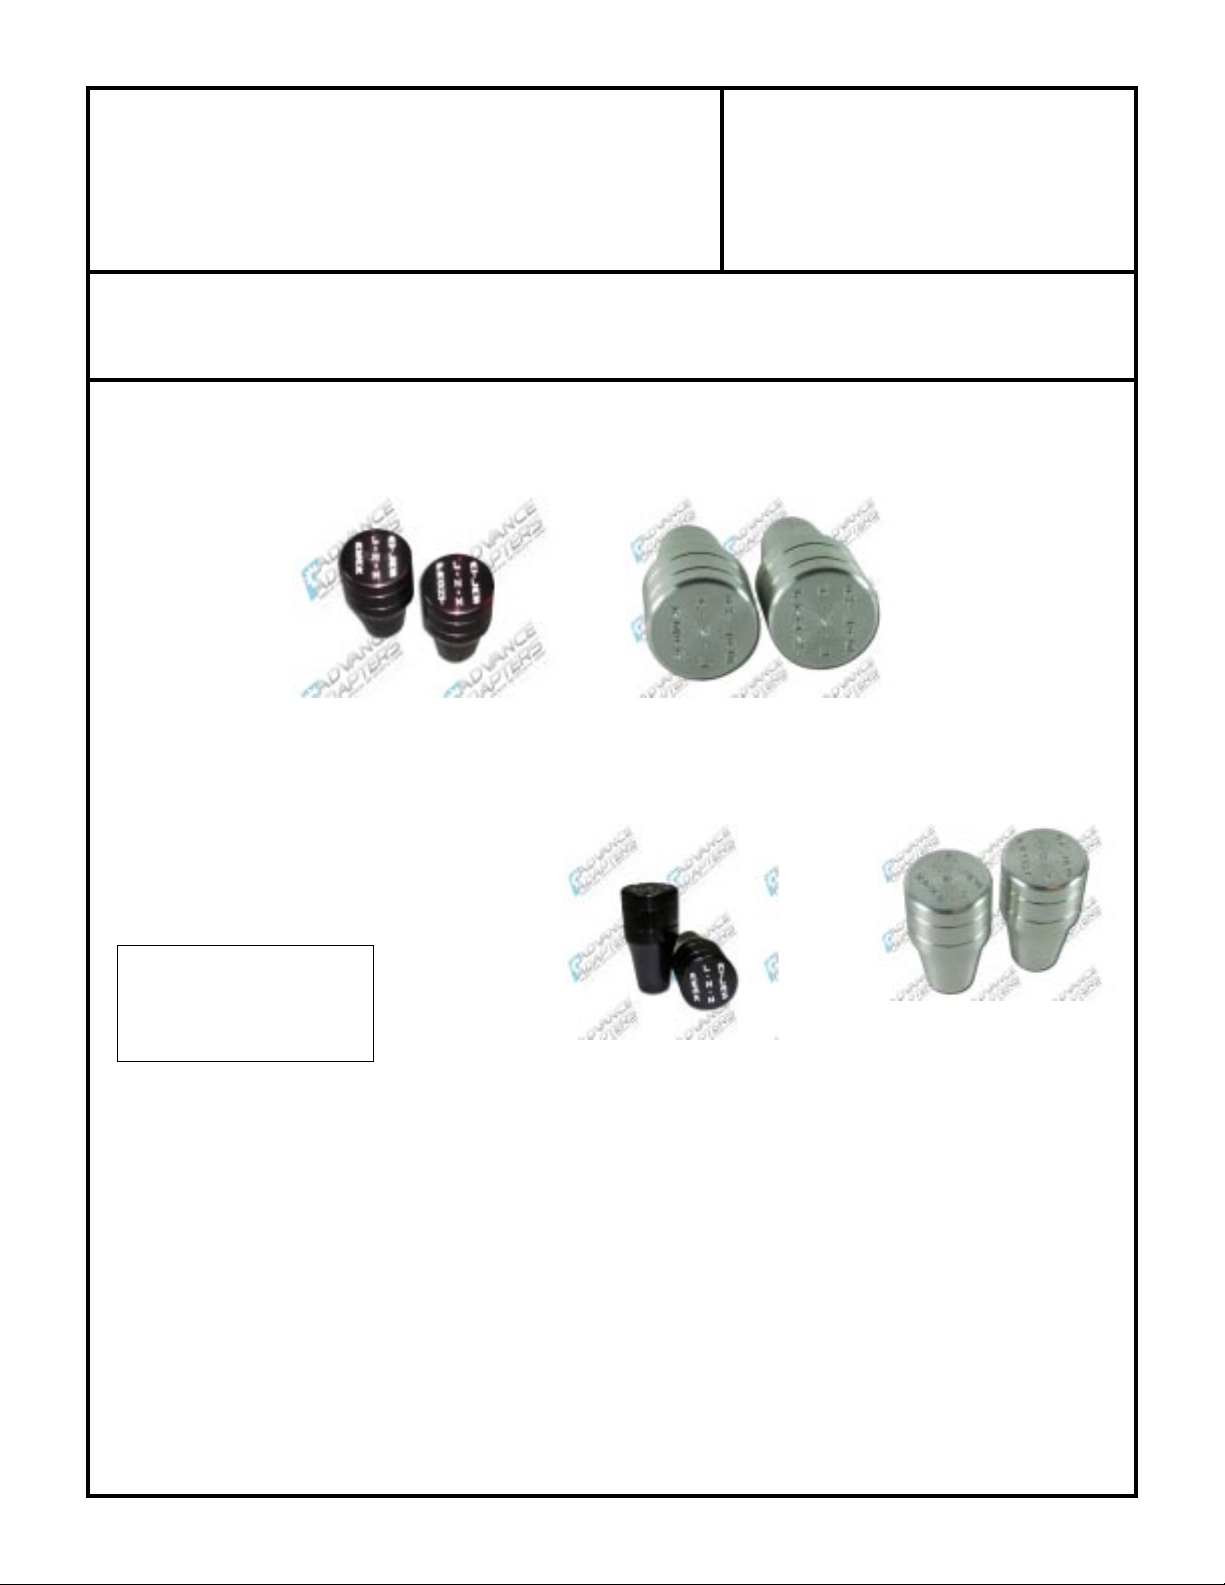
Depending on the orientation of the shifter housing in the vehicle, the black shift knobs may be labeled backwards. Unfortunately,
we are unable to get a small quantity of the black knobs with a shift pattern labeled opposite compared to the knobs included in
this kit. We can offer a set of aluminum knobs which are labeled either way.
P/N 303152AA $42.95 set
reverse pattern
This shifter will not fit the
Allison transmission due to
cable interferance with the
stock adapter housing.
P/N 303150AA $42.95 each
NOTE ON THIS KIT: This kit is a universal-type cable shifter assembly. Mounting the shifter is left to the installer. The shifter
can be mounted flush with the floor so that the cables exit underneath the floor, and the shift boot flange is bolted directly to the floor.
Otherwise, the shift cables will need to be routed through the floor and the shifter bolted wherever you desire.
NOTE ON SHIFTING: The Atlas Transfer case is a synchronized unit. The transfer case shifts best when the shafts are spinning.
Note that when the transfer case is shifted when not in motion, the teeth may or may not be aligned. If the teeth are aligned, then the
unit will slip into gear easily. If the unit does not slip into gear easily, then no amount of pulling on the handle will cause the unit to
shift. The transfer case must be spun slightly and then it will shift.
P/N 303152 $42.95 set
P/N 303150 $42.95 each
standard pattern
SPECIAL NOTE: The components packaged in this kit have been assembled and machined for specific type of conversions. Modifications to any of the
components will void any possible warranty or return privileges. If you do not fully understand modifications or changes that will be required to complete your conversion,
we strongly recommend that you contact our sales department for more information. This instruction sheet is only to be used for the assembly of Advance Adapter
components. We recommend that a service manual pertaining to your vehicle be obtained for specific torque values, wiring diagrams and other related equipment.
These manuals are normally available at automotive dealerships and parts stores.
Page 3

ADV ANCE ADAPTERS INC. P/N: 303009A
P.O. Box 247, 4320 Aerotech Center Way New Item: (05/04)
Paso Robles, CA 93447 PAGE 3 OF 5
Telephone: (800) 350-2223 Fax: (805) 238-4201 Page Rev . Date: 06-29-11
A TLAS TRANSFER CASE CABLE SHIFTER
SOLD WITHOUT AN ATLAS
ASSEMBLY
Transfer Case End:
1. Bolt the twin stick base to the transfer case with the 3/
8"-16 socket head cap screws.
2. Thread the 1/2"-13 all thread completely into the twin
stick base. Install the 1/2"-13 jam nut. Tighten the jam
nut against the twin stick base.
2A.Thread the shift rail adapters completely onto the shift
rails
3. Slide the extension tube and the extension tube bracket
over the all thread and fasten with the 1/2"-13 serrated
lock nut.
4. Insert the shift cable through the extension tube bracket
and fasten by sandwiching the bracket between the two
jam nuts. Repeat for second cable.
5. Thread the cable's inner rod completely into the threaded
adapter that fits on the shift rails. Tighten the jam nut.
Repeat for second cable.
Shifter End:
1. Remove 1 of the 5/8" jam nuts and the lock washer from
each cable and discard.
2. Slide the Barrel Retainer plate over both shifter cables.
Then thread both cable barrels onto the shift cables.
3. Now thread the heim joints onto the shift cables inner
rod , and tighten the jam nuts. (This should look like the
photo to the right.)
4. Using a mallet, hammer the pivot bushings into the
shifter handles. Start the bushing into the handle, hold
the handle with the bushing side down on the table, hit
the top side of the handle with the dead blow hammer to
install the bushing. Repeat for the remaining bushings.
extension tube
extension tube
bracket
pull cable housing
away from bracket
Adjustments *IMPORTANT STEP: Shift the Atlas into low range.
Next loosen the 1/2"-13 jam nuts to the far thread ends of the cable
assembly. Pull the cable housing away from the Altas. The forward
nut should have an INITIAL GAP of 1/8" (SEE FIGURE BELOW).
Next tighten the same nut up until it contacts the plate. With the
nut flush against the plate, tighten 1/2 turn more. Then tighten the
rear nut against the opposite side of the plate (REPEAT PROCESS
FOR BOTH CABLES). NOTE: If step this not completed properly
the Atlas will not fully shift into gear.
SPECIAL NOTE: The components packaged in this kit have been assembled and machined for specific type of conversions. Modifications to any of the components
will void any possible warranty or return privileges. If you do not fully understand modifications or changes that will be required to complete your conversion, we strongly
recommend that you contact our sales department for more information. This instruction sheet is only to be used for the assembly of Advance Adapter components. We
recommend that a service manual pertaining to your vehicle be obtained for specific torque values, wiring diagrams and other related equipment. These manuals are normally
available at automotive dealerships and parts stores.
Page 4

ADV ANCE ADAPTERS INC. P/N: 303009A
P.O. Box 247, 4320 Aerotech Center Way New Item: (05/04)
Paso Robles, CA 93447 PAGE 4 OF 5
Telephone: (800) 350-2223 Fax: (805) 238-4201 Page Rev . Date: 06-29-11
A TLAS TRANSFER CASE CABLE SHIFTER
SOLD WITHOUT AN ATLAS
5. Slide the cables into the back of the shifter body.
6. Orient the shifter handles so they bend away from each other, and slide the handles into the top of the
shifter body.
7. Insert the pivot shoulder bolt through the shifter body and the shifter handles. Fasten with the 1/4" flat
washer and the 5/16" locknut.
8. Slide the heim joint meet the tapped hole in the shift handle and insert the bolt from the bottom of the shifter
box to secure the handles to the cables.
9. Slide the cable barrel retainer plate up the shifter body and fasten it with the 1/4"-20 button head cap
screws.
9. First adjust the cables with the adjustment on the transfer case end by changing the position of the two
5/8" jam nuts. Fine tuning of the adjustment can be done from the passenger compartment of the vehicle
with the shifter assembled in the following manner. Loosen the cable barrel retainer plate and the shift
cable 5/8" jam nuts. By rotating the cable barrel in either direction, the cable adjustment will change. The
twin stick handles should be straight up and down within the shifter body while the Atlas is in neutral.
When the shifter is adjusted properly, tighten the jam nuts and the cable barrel retainer plate screws.
10. Slide the shift boot over the handles and
stretch it over the shifter body. Depending
on how the shifter is mounted, you may want
to bolt the shift boot through the shifter
body. If the shifter will be flush mounted in
the floor, you may bolt through the shift
boot, shifter body, and the floor with one set
of bolts.
12. Once the boot is in place, thread the 1/2"-13
jam nuts, and then thread the shift knobs
onto the shifter handles.
SPECIAL NOTE: The components packaged in this kit have been assembled and machined for specific type of conversions. Modifications to any of the
components will void any possible warranty or return privileges. If you do not fully understand modifications or changes that will be required to complete your conversion,
we strongly recommend that you contact our sales department for more information. This instruction sheet is only to be used for the assembly of Advance Adapter
components. We recommend that a service manual pertaining to your vehicle be obtained for specific torque values, wiring diagrams and other related equipment.
These manuals are normally available at automotive dealerships and parts stores.
*Note: The first cable shifters used an shift rail adapter on the
shift rail for coupling the cables to the Atlas. The shift rails
were changed 7-1-07. This new style of rail is drilled and
tapped to directly accept the threaded cable end and eliminate
the shift rail adapter. We switched back to the adapters
fittings 8-16-10 for ease of installation of the cable to the
Atlas. Some shift rails still have the thread on the end of the
shift rail.
Page 5

ADV ANCE ADAPTERS INC. P/N: 303009A
P.O. Box 247, 4320 Aerotech Center Way New Item: (05/04)
Paso Robles, CA 93447 PAGE 5 OF 5
Telephone: (800) 350-2223 Fax: (805) 238-4201 Page Rev . Date: 10-13-11
A TLAS TRANSFER CASE CABLE SHIFTER
SOLD WITHOUT AN ATLAS
Exploded View
SPECIAL NOTE: The components packaged in this kit have been assembled and machined for specific type of conversions. Modifications to any of the components
will void any possible warranty or return privileges. If you do not fully understand modifications or changes that will be required to complete your conversion, we strongly
recommend that you contact our sales department for more information. This instruction sheet is only to be used for the assembly of Advance Adapter components. We
recommend that a service manual pertaining to your vehicle be obtained for specific torque values, wiring diagrams and other related equipment. These manuals are normally
available at automotive dealerships and parts stores.
 Loading...