

Page 1

Table of Contents
Express XR/XRT
128 kbps ISDN Modem
Quick Start Guide
1200153L1 Express XR, Data Only
1200153L2 Express XRT, Two Phone Ports
3360.9VU01 Express XR Power Supply, 9.0 V DC Output
336048VUR-2 Express XRT Power Supply, 48 V DC Output
61200.153L1-13E
September 1996
Page 2

Table of Contents
Trademarks
Express XR, Express XRT, and Express Configuration Wizard are trademarks of
ADTRAN, Inc.
Hayes is a registered trademark of Hayes Microcomputer Products, Inc.
HyperACCESS is a registered trademark of Hilgraeve Inc.
MicroPhone Pro is a trademark of Software Ventures Corporation.
PROCOMM PLUS is a registered trademark of Datastorm Technologies, Inc.
ReachOut is a registered trademark of Stac Electronics.
Windows is a registered trademark and Windows NT is a trademark of
Microsoft Corporation.
pcANYWHERE is a trademark of Symantec Corporation.
The Express XR and Express XRT incorporate Synchronous Data Compression based on either IBM or Stac Electronics proprietary intellectual property
depending on the time of manufacture. The following trademarks and
copyrights are applicable:
Stacker LZS Compression
Copyright (c) 1989 Carnegie Mellon University.
All rights reserved.
Redistribution and use in source and binary forms are permitted provided
that the above copyright notice and this paragraph are duplicated in all such
forms and that any documentation, advertising materials, and other materials related to such distribution and use acknowledge that the software was
developed by Carnegie Mellon University. The name of the University may
not be used to endorse or promote products derived from this software
without specific prior written permission. This software is provided "as is"
and without any express or implied warranties, including, without limitation, the implied warranties of merchantability and fitness for a particular
901 Explorer Boulevard
P.O. Box 070020
Huntsville, AL 35807
Phone: (800) 8-ADTRAN
© 1996 ADTRAN, Inc.
All rights reserved.
Printed in USA.
Page 3

Table of Contents
FCC regulations require that the following information be provided to the customer
in this manual.
1. If your telephone equipment (Express XR/XRT) causes harm to the telephone
network, the Telephone Company may discontinue your service temporarily.
If possible, they will notify you in advance. But if advance notice isn’t practical,
you will be notified as soon as possible. You will be advised of your right to file
a complaint with the FCC.
2. Your telephone company may make changes in its facilities, equipment,
operations, or procedures that could affect the proper operation of your
equipment. If they do, you will be given advance notice so as to give you an
opportunity to maintain uninterrupted service.
3. If you experience trouble with this equipment (Express XR/XRT), please
contact ADTRAN (see inside back cover) for repair/warranty information. The
telephone company may ask you to disconnect this equipment from the
network until the problem has been corrected, or until you are sure the
equipment is not malfunctioning.
4. This unit contains no user-serviceable parts.
FEDERAL COMMUNICATIONS COMMISSION
RADIO FREQUENCY INTERFERENCE STATEMENT
This equipment has been tested and found to comply with the limits for a
Class B digital device, pursuant to Part 15 of the FCC Rules. These limits are
designed to provide reasonable protection against harmful interference in a
residential environment. This equipment generates, uses, and can radiate
radio frequency energy and, if not installed and used in accordance with the
instructions, may cause harmful interference to radio or TV reception,
which can be determined by turning the equipment off and on. The user is
encouraged to try to correct the interference by one or more of the following
measures:
• Reorient or relocate the receiving antenna.
• Increase the separation between the equipment and receiver.
• Connect the equipment into an outlet on a circuit different from
that to which the receiver is connected.
• Consult the dealer or an experienced radio/TV technician for help.
Changes or modifications not expressly approved by
ADTRAN will void the user’s authority to operate this
equipment.
Page 4

CANADIAN EMISSIONS REQUIREMENTS
This digital apparatus does not exceed the Class B limits for radio noise
emissions from digital apparatus as set out in the interference-causing
equipment standard entitled "Digital Apparatus," ICES-003 of the Department of Communications.
Cet appareil nuerique respecte les limites de bruits radioelectriques
applicables aux appareils numeriques de Class B prescrites dans la norme
sur le materiel brouilleur: "Appareils Numeriques," NMB-003 edictee par le
ministre des Communications.
CANADIAN EQUIPMENT LIMITATIONS
Notice: The Canadian Industry and Science Canada label identifies
certified equipment. This certification means that the equipment meets
certain telecommunications network protective, operational, and safety
requirements. The Department does not guarantee the equipment will
operate to the user’s satisfaction.
Before installing this equipment, users should ensure that it is permissible to be connected to the facilities of the local telecommunications
company. The equipment must also be installed using an acceptable
method of connection. In some cases, the company’s inside wiring
associated with a single line individual service may be extended by
means of a certified connector assembly (telephone extension cord). The
customer should be aware that compliance with the above conditions
may not prevent degradation of service in some situations.
Repairs to certified equipment should be made by an authorized Canadian maintenance facility designated by the supplier. Any repairs or
alterations made by the user to this equipment, or equipment malfunctions, may give the telecommunications company cause to request the
user to disconnect the equipment.
Users should ensure for their own protection that the electrical ground
connections of the power utility, telephone lines and internal metallic
water pipe system, if present, are connected together. This precaution
may be particularly important in rural areas.
Caution: Users should not attempt to make such connections themselves, but should contact the appropriate electric inspection authority,
or an electrician, as appropriate.
The Load Number (LN) assigned to each terminal device denotes the
percentage of the total load to be connected to a telephone loop which is
used by the device, to prevent overloading. The termination on a loop
may consist of any combination of devices subject only to the requirement that the total of the Load Numbers of all devices does not exceed
100.
Page 5

WARRANTY: ADTRAN warrants that items manufactured by ADTRAN
and supplied under Buyer’s order shall be free from defects in materials and
workmanship and will conform to applicable specifications and drawings.
ADTRAN’s liability herein, whether based upon breach of warranty or
contract or negligence in manufacture, shall be limited to replacement or
repair at ADTRAN’s election of all such defective or nonconforming items,
provided that this warranty shall apply only where Buyer has given
ADTRAN written notice of such defects or nonconformity within five (5)
years* after delivery by ADTRAN of such items to Buyer. ADTRAN shall
have the right prior to return to inspect at Buyer’s plant any items claimed to
be defective or nonconforming.
*Note: The following items carry warranty period as shown.
1. Items not of ADTRAN manufacture will carry the remaining
warranty and related terms and conditions of the original
manufacturer.
2. Encapsulated U-Repeater and Encapsulated DDS Repeater - 2
years.
The foregoing constitutes the sole and exclusive remedy of the Buyer and
exclusive liability of ADTRAN AND IS IN LIEU OF ANY AND ALL OTHER
WARRANTIES EXPRESSED OR IMPLIED OR STATUTORY AS TO MERCHANTABILITY, FITNESS FOR PURPOSE SOLD, DESCRIPTION, QUALITY, PRODUCTIVENESS OR ANY OTHER MATTER. Without limiting the
foregoing, in no event shall ADTRAN be liable for the loss of use or profit or
other collateral, special or consequential damages.
RETURNS: Return authorization must be obtained from ADTRAN prior to
return of any items, including those for repair. Buyer’s right to repair or
replacement are governed by this Warranty. Issuance of credit for returned
items shall be made at ADTRAN’s discretion upon Buyer’s request. All
returns for credit accepted by ADTRAN are subject to a restocking fee.
SHIPPING: The cost of shipping the equipment from Buyer’s facility back to
ADTRAN shall be paid by the Buyer. The cost for return shipping of the
equipment by surface carrier shall be paid by ADTRAN. ADTRAN will
utilize other means of express shipment at the request of the Buyer. The cost
of shipping shall be paid by the Buyer if express shipment is requested. Inwarranty equipment returned for repair that is found not defective will carry
a nominal charge to cover handling cost.
OUT OF WARRANTY: The cost of out-of-warranty repairs including return
shipment are subject to a charge as quoted by ADTRAN. The cost of the
Page 6

Table of Contents
repair will be invoiced and the return of the item will be made using the
most economical shipment means available. ADTRAN will use other means
of express shipment at the request of the Buyer. In this case, the cost of
shipping shall be paid by the Buyer.
ALTERATION TO EQUIPMENT PURCHASED: Modification or alteration to purchased
equipment by Buyer, other than that specifically authorized by this Agreement or by
ADTRAN, shall VOID AND NULLIFY, in its entirety, all warranty conditions as set forth
in Warranty paragraph.
ENGINEERING CHANGES: ADTRAN reserves the right to make progress and design
changes in standard product items ordered without prior approval or notification to
Buyer and without incurring any obligations or liability to make the same changes in
items previously manufactured.
DATA RIGHTS: Rights to any intellectual property residing in the products or any data
furnished hereunder are not granted except by specific written permission by an
authorized representative of ADTRAN. Buyer shall have no right to copy or reproduce
in whole or part any data furnished hereunder without the prior written consent of
ADTRAN.
PATENT AND COPYRIGHT INDEMNITY: ADTRAN warrants that the equipment and
documentation furnished under this Agreement shall be free and clear of infringement
of any patent or copyright covering the structure or composition of such articles or
documentation. In the event of a claim, suit or action against Buyer alleging such
infringement, ADTRAN shall save Buyer and its affiliates, agents or customers harmless
from liability as finally determined by a court of competent jurisdiction, for such
infringement, provided that Buyer gives ADTRAN notice promptly of such claim, suit or
action, and shall have given ADTRAN full and exclusive control of the defense thereof,
and that ADTRAN shall have sole right to settle or compromise such claim, suit or action.
In the event of a claim, suit or action against ADTRAN alleging infringement by the use
of any such equipment or documentation, furnished under this Agreement, in combination
with other articles or in carrying out any process covered by a patent owned or controlled
by any other person, in which independent use of the equipment under this Agreement
would not be an infringement. Buyer shall save ADTRAN harmless from Iiability, as
finally determined by a court of competent jurisdiction, for such infringement, provided
that ADTRAN shall have given Buyer full and exclusive control of the defense thereof,
and that Buyer shall have the sole right to settle claim, suit or action.
Except as here in provided in this indemnity paragraph, neither Buyer nor ADTRAN
makes any warranty to the other with respect to any claim, suit or action of any third party
by way of infringement and neither party shall be responsible to the other for any loss,
cost or damages consequential or otherwise, that may be suffered by the other as a
result of any such claim, suit or action.
Page 7

Telephone Company Contacts for ISDN Service
Ameritech ISDN Repair 1-800-TEAMDATA
Bell Atlantic 1-800-204-7332
Bell South 1-800-247-2020
Cincinnati Bell 1-513-566-1611
NYNEX 1-800-NYT-FAST (
New York Area)
1-800-650-ISDN (New England Area)
Pac Bell 811-8081*
Rochester Tel 1-716-777-1811
Southwestern Bell 1-214-841-7799 (Dallas area)
1-800-286-8313 (Houston area)
1-800-344-6357 (Austin area)
1-314-571-2200 (St. Louis area)
US West 1-800-223-7508
*all Pac Bell customers may call this number with no need for area code
Table of Contents
Page 8

Table of Contents
Page 9

Table of Contents
Table of Contents
Chapter 1. Introduction
Express XR/XRT Overview ................................................................................... 1
Getting Started ......................................................................................................... 1
Minimum Requirements......................................................................................... 2
What You Provide ............................................................................................ 2
Basic Rate ISDN Line ................................................................................ 2
What ADTRAN Provides................................................................................ 3
Chapter 2. Installation
Installing the ADTRAN Express XR/XRT ........................................................... 5
Verify Switch Settings...................................................................................... 5
Connecting the Express XR/XRT................................................................... 6
Express XR/XRT Software Installation......................................................... 7
Microsoft Windows 95 and Windows NT 4.0 ....................................... 8
Windows 95 Plug and Play............................................................... 8
Win 95/NT4.0 Control Panel Modem Installation ........................ 8
Express Configuration Wizard Installation........................................... 9
Microsoft Windows 95 and Windows NT 4.0 ................................ 9
Microsoft Windows 3.1 and Windows NT 3.51 .................................. 10
Windows NT 3.51 INF File Installation ........................................ 11
Express Configuration Wizard Installation......................................... 11
Microsoft Windows 3.1 and Windows NT 3.51 ........................... 11
Basic Telephon Service .................................................................................. 12
Supplementary Voice Services ..................................................................... 12
Call Waiting ............................................................................................. 12
Conference Calling.................................................................................. 13
Automatic Redial..................................................................................... 13
Phone Number Allocation ............................................................................ 13
Single Phone Number Operation................................................................. 13
Using the Express Configuration Wizard................................................... 14
Auto-Detect SPIDs/Switch Type ................................................................. 17
Using the Express Configuration Wizard Help ......................................... 17
Express Configuration Wizard Tray Tool................................................... 18
Express Configuration Tray Tool Menu ..................................................... 21
Installing Windows 95 Dial-Up Networking ............................................. 22
Macintosh Configuration ..................................................................................... 23
VT 100 Terminal Emulation ................................................................................. 23
VT 100 Configuration..................................................................................... 24
VT 100 Terminal Status Buffer...................................................................... 24
61200.153L1-13 Express XR/XRT Quick Start Guide i
Page 10

Table of Contents
Chapter 3. Installing an Analog Modem
External Analog Modem Application ................................................................. 27
Connecting an External Analog Modem..................................................... 28
Installing a New External Analog Modem ................................................. 29
Configuring an External Analog Modem ................................................... 30
Required External Analog Modem Settings........................................ 30
Controlling an External Analog Modem .................................................... 31
Express Configuration Wizard Modem Enable.................................. 31
Express Configuration Wizard Modem Disable................................. 33
Terminal Emulation Modem Enable .................................................... 34
Terminal Emulation Modem Disable ................................................... 36
Internal Modem Application ............................................................................... 37
Connecting an Internal Analog Modem ..................................................... 38
Chapter 4. Application Configuration
Factory Default Configuration............................................................................. 39
Profile Configurations........................................................................................... 40
Express Configuration Wizard ............................................................................ 41
Sarting the Express Configuration Wizard Software ................................ 41
Internet and Remote Access.......................................................................... 41
Creating a Custom Profile...................................................................... 42
Defining a User Button ........................................................................... 42
BBS Applications ............................................................................................ 44
Defining a Custom HyperACCESS Session ........................................ 44
Chapter 4. Troubleshooting Guidelines
Troubleshooting Guidelines ................................................................................. 47
Power/Line LED is Off.................................................................................. 47
Power/Line LED Flashes and B1 and B2 LEDs are Off............................ 47
Power/Line LED, B1, and B2 LEDs Flash Green....................................... 48
Dial-Up Connection Problems...................................................................... 48
Auto-detect Switch/SPIDs Remains at Link Down .................................. 48
Express XR/XRT Not Detected .................................................................... 48
External Analog Modem Not Detected....................................................... 50
Dial-Up Networking Difficulty .................................................................... 50
Appendix A. AT Commands and S-Registers
AT Commands ....................................................................................................... 51
S-Register List......................................................................................................... 57
Appendix B. LEDs
LEDs ........................................................................................................................ 63
Appendix C. Status Messages 65
ii
Express XR/XRT Quick Start Guide 61200.153L1-13
Page 11

Table of Contents
Appendix D. Loop Status Messages 75
Appendix E. Connector Pinouts 77
List of Tables
Table B-A Express XR/XRT LEDs.................................................................... 63
Table E-A RS-232 Interface ................................................................................ 77
Table E-B Modem Interface .............................................................................. 78
Table E-C RJ-11 POTS Port Interfaces.............................................................. 79
Table E-D RJ-45 ISDN Line Interface ............................................................... 79
List of Figures
Figure 1-1 Express XR/XRT Contents ............................................................... 3
Figure 2-1 Dip Switches on Rear Panel .............................................................. 6
Figure 2-2 Standard ISDN Internet/Remote Access Application.................. 7
Figure 2-3 Installation Options ......................................................................... 10
Figure 2-4 ADTRAN Express Configuration Screen ..................................... 14
Figure 2-5 Unable to Auto-Detect ...................................................................... 15
Figure 2-6 Express Configuration Wizard Connection Tab .......................... 16
Figure 2-7 Express Configuration Wizard Tray Tool ..................................... 18
Figure 2-8 Preferences Tab ................................................................................. 19
Figure 2-9 Express XRT Disabled, External Analog Modem Enabled ........ 20
Figure 2-10 Express XR/XRT Enabled, External Analog Modem Disabled. 20
Figure 2-11 Unknown State ................................................................................. 20
Figure 2-12 Express Configuration Tray Tool Menu........................................ 21
Figure 2-13 VT 100 Terminal Configuration Menu.......................................... 24
Figure 2-14 VT 100 Terminal Status Buffer Menu ............................................ 25
Figure 3-1 External Analog Modem Application ........................................... 28
Figure 3-2 Express Configuration Wizard: Connect an External Modem . 32
Figure 3-3 No Modem Attached Error Message............................................. 32
Figure 3-4 HyperACCESS: Verifying External Modem Connection .......... 34
Figure 3-5 HyperACCESS: Enabling an External Analog Modem ............. 35
Figure 3-6 HyperACCESS: Disabling an External Analog Modem............ 36
Figure 3-7 Internal Analog Modem Application............................................ 37
Figure B-1 Front Panel LEDs ............................................................................. 63
Figure E-1 RS-232 Interface ................................................................................ 77
Figure E-2 Modem Interface .............................................................................. 78
Figure E-3 Ground Pinouts ................................................................................ 79
Page 12

Table of Contents
Page 13

EXPRESS XR/XRT OVERVIEW
The Express XR/XRT provides high speed network access for
Internet and remote office connectivity using ISDN. The unit
includes ISDN terminal adapter and network termination (NT1)
functionality, eliminating the need for an external NT1 device.
The Express XR™ and the Express XRT™ provide the following
features:
Chapter 1. Introduction
Chapter 1
Introduction
• Data rates up to 230.4 kbps - over eight times faster than
analog modems
• Simple setup with the Express Configuration Wizard™
• Automatic SPID and Switch Detection (patent pending)
• Stac® LZS™ compression up to 230.4 kbps
• Remote configuration
• HyperACCESS® data communications software
• Windows® Plug and Play compatibility
The Express XRT provides the following additional features:
• Connections for two analog devices
• External analog modem support - no additional COM port
required (patent pending)
• Custom calling features and Caller ID support
GETTING STARTED
This Quick Start guide describes how to install, operate, and
troubleshoot the Express XR and Express XRT ISDN modems,
referred to throughout this guide as Express XR/XRT.
61200.0153L1-13 Express XR/XRT Quick Start Guide 1
Page 14

Chapter 1. Introduction
Before getting started, review the section Minimum Requirements
in this chapter to ensure your computer is compatible. In
addition, examine the contents of the box to ensure everything
has been received undamaged and gather the required setup
information provided by your telephone company.
MINIMUM REQUIREMENTS
What You Provide
In order to operate the Express XR/XRT the following is required:
• A computer (386 or higher PC, or Macintosh)
• Windows 3.1 or higher for PC
• 16550 UART high speed serial port (16650 UART required for
data speed of 230.4 kbps)
• RS-232 serial cable with a DB-25 connector for the Express XR/
XRT and the other end matching the COM port on the computer (Do not use a null modem cable)
• One Basic Rate ISDN line (Two ISDN phone numbers, sometimes referred to as local directory numbers)
Single ISDN phone number and point-to-point lines are not recommended for use with the XRT.
Basic Rate ISDN Line
When ordering your ISDN line from the telephone company,
request EZ-ISDN 1 (Capability Package U) to ensure it is set up
properly. EZ-ISDN 1 is recommended by the industry for most
home office/small business applications. If EZ-ISDN is not
available from your service provider order Generic Data M. For
more information regarding ordering ISDN, see the ADTRAN
document Ordering ISDN Service User Guide part number
60000.015-8, or contact the telephone company for alternative
line configurations. The Ordering ISDN Service User Guide is
available on the ADTRAN home page at http://www.adtran.com
(under the Information Desk) or by calling ADTRAN.
2
Express XR/XRT Quick Start Guide 61200.0153L1-13
Page 15
Chapter 1. Introduction
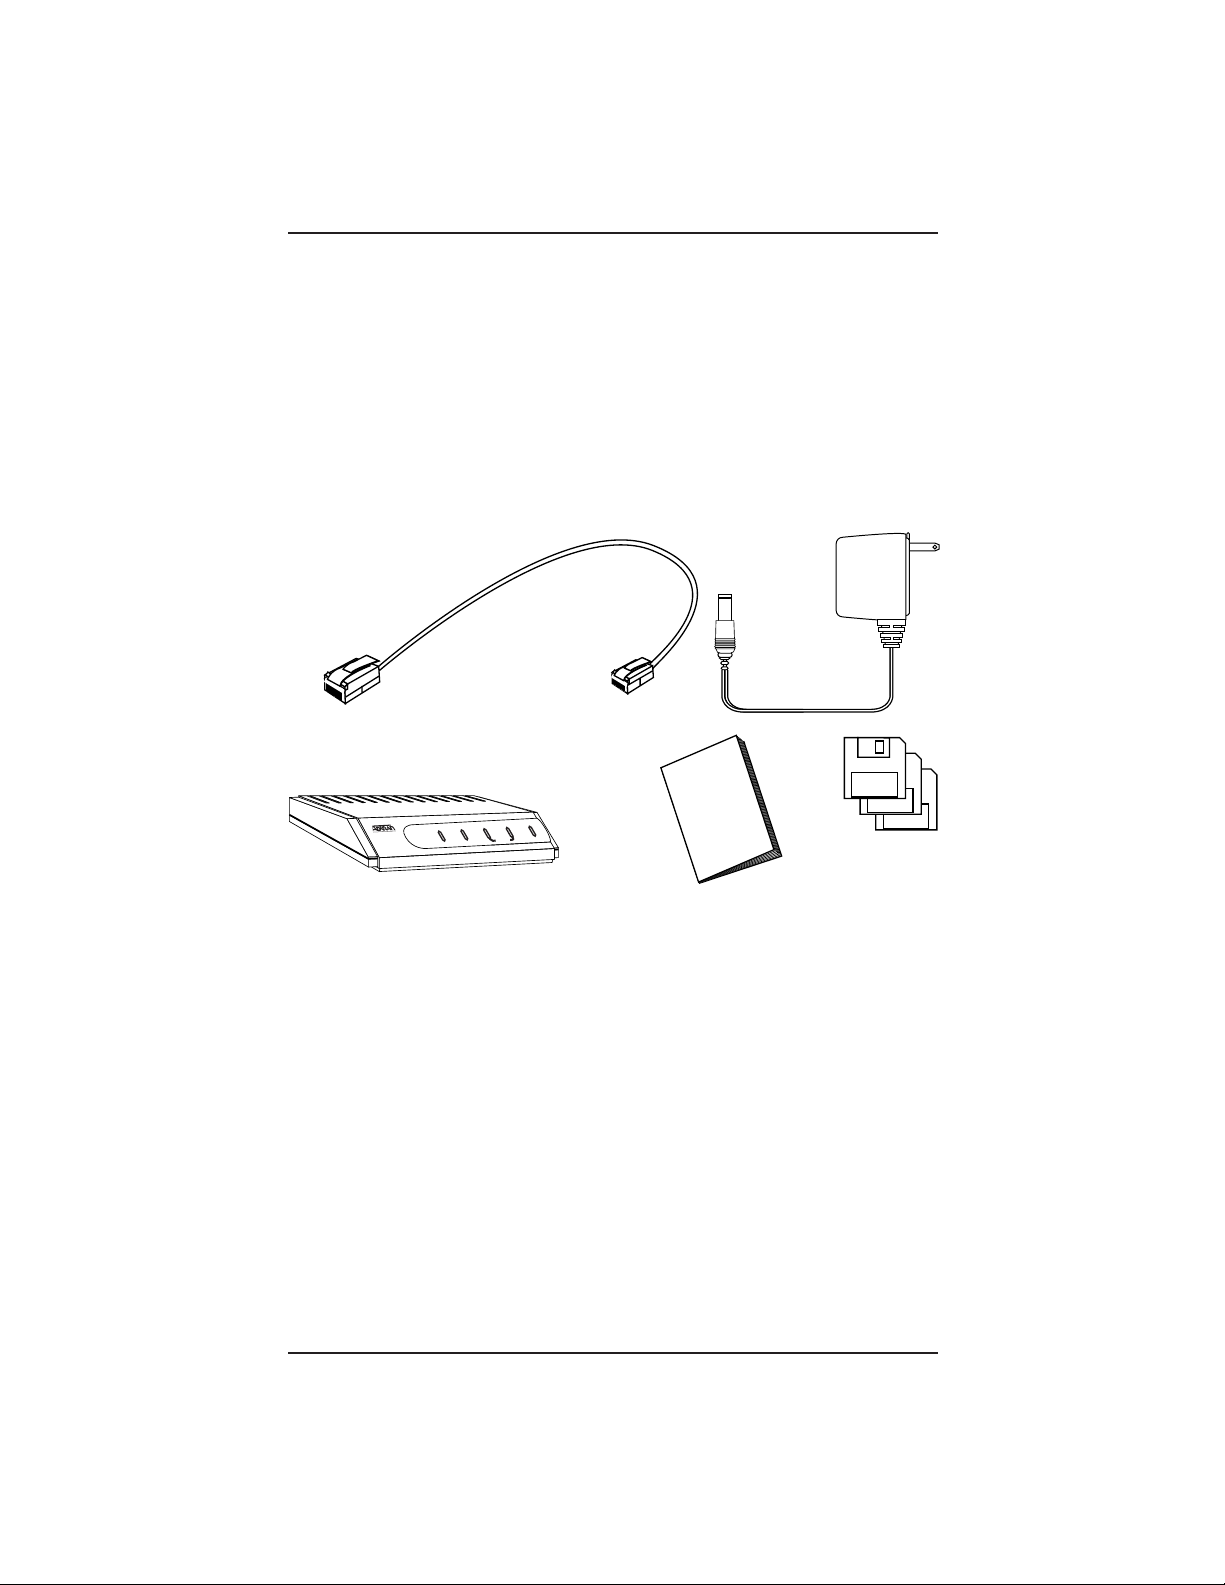
What ADTRAN Provides
The ADTRAN Express XR/XRT is packaged with the following
contents (see Figure 1-1):
• Express XR or Express XRT
• ADTRAN Express XR/XRT Quick Start Guide
• ADTRAN Express Configuration Wizard software (2 disks)
• HyperACCESS® communications software (1 disk)
• AC power supply
• RJ-45 to RJ-11 telephone cable
RJ-45 to
RJ-11
telephone cable
RJ-45
EXPRESS XRT
RD B1 B2 PWR
TD
LINE
TEST
Express XR or XRT
RJ-11
Quick Start Guide
AC power supply
Diskettes
Figure 1-1
Express XR/XRT Contents
61200.0153L1-13 Express XR/XRT Quick Start Guide 3
Page 16

Chapter 1. Introduction
4
Express XR/XRT Quick Start Guide 61200.0153L1-13
Page 17

Chapter 2. Installation
INSTALLING THE ADTRAN EXPRESS XR/XRT
This section describes how to connect the Express XR/XRT to a
PC and how to install the Express Configuration Wizard software.
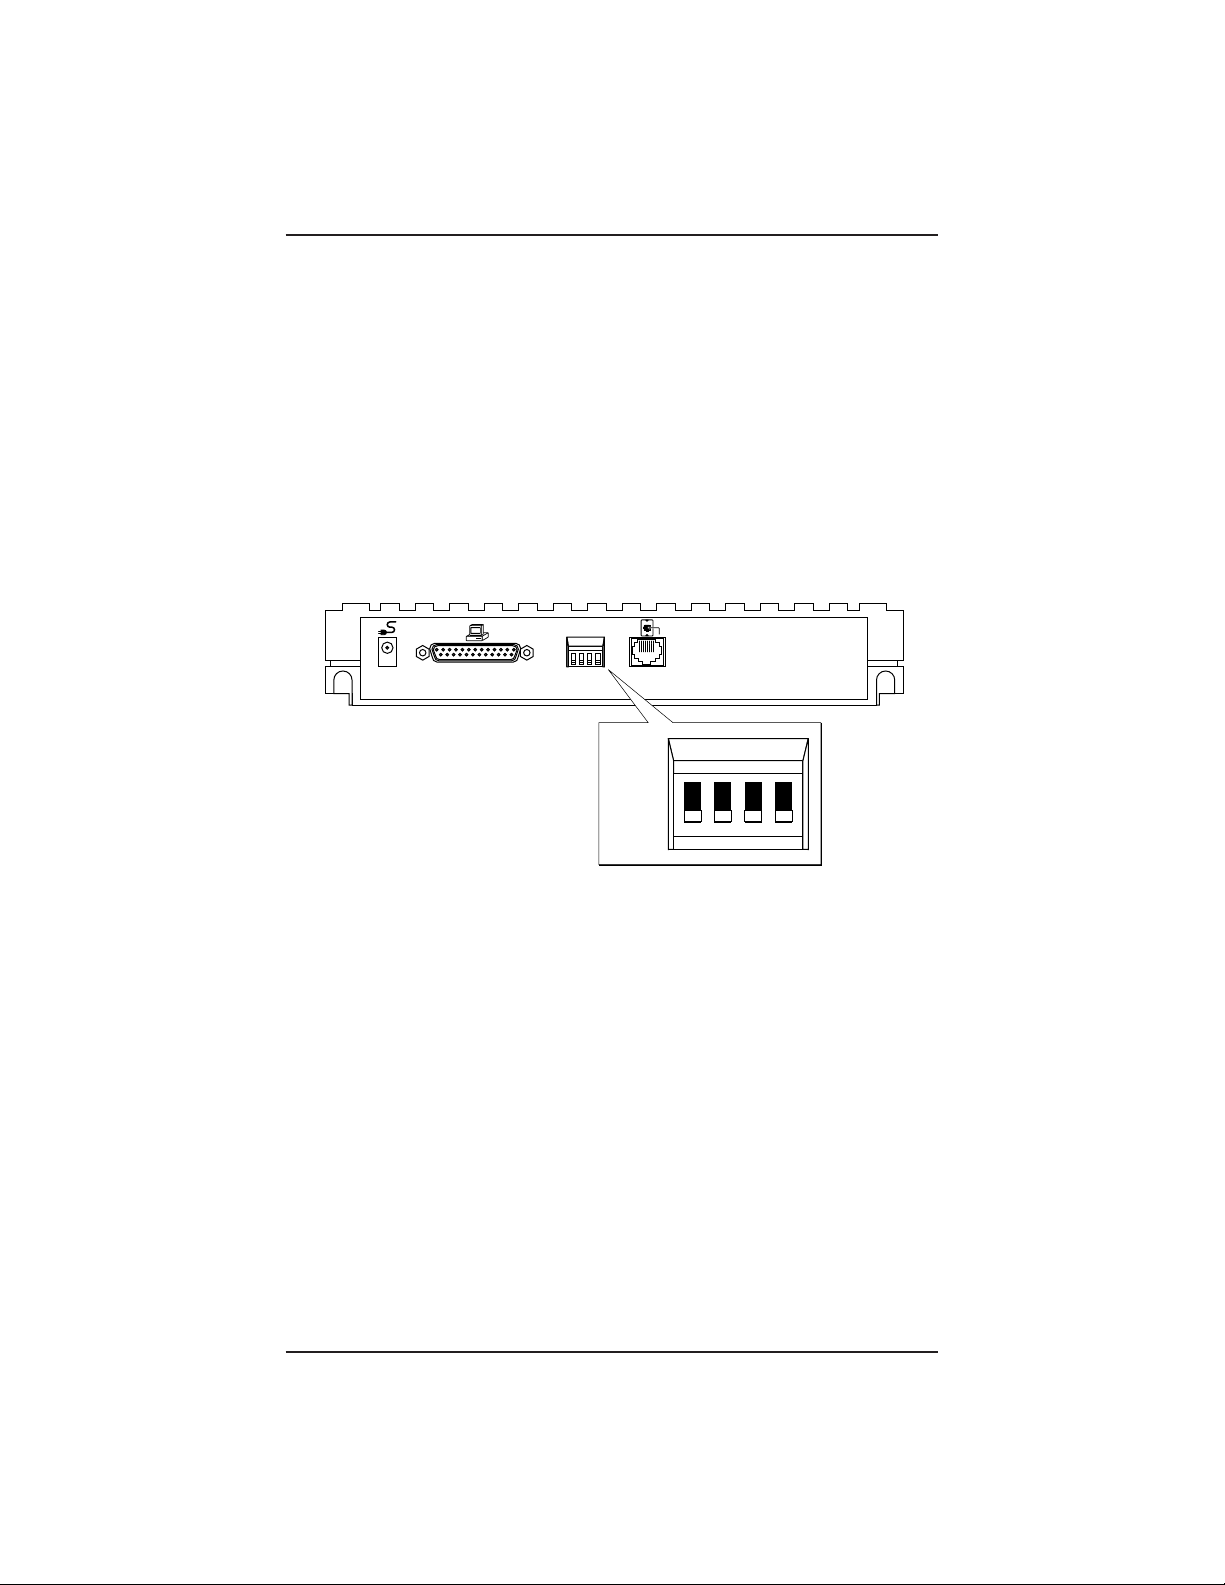
Verify Switch Settings
Dip switches 1 and 2 located on the rear panel of the Express
XR/XRT allow certain settings to be physically configured.
Figure 2-1 shows the location of the dip switches on the rear
panel of the unit.
Chapter 2
Installation
The factory default position for all switches is down (On) during initial
installation.
SW 1: Off (Up) = 230.4 kbps
On (Down) = Autobaud (speeds up to 115.2 kbps)
If switch 1 is set to the Off position, the unit is set to operate at a
DTE speed of 230.4 kbps. A special serial COM port using a
16650 UART is required while in this mode. If switch 1 is set to
the On position, the unit will automatically adapt to the DTE
rate (up to 115.2 kbps).
In order to configure the Express XR/XRT to operate at 230.4 kbps
with Windows 95 or Windows NT 4.0 Dial-Up Networking, a new
modem must be added from the Modems icon in the Control Panel.
Enter the name for this new connection and select ADTRAN Express
XR or XRT 230.4 Kbps & 16650 UAR T. See the section Installing
Windows 95 Dial-Up Networking.
61200.153L1-13 Express XR/XRT Quick Start Guide 5
Page 18
Chapter 2. Installation
SW 2: Off (Up) = Factory Default
On (Down) = Normal (previous settings saved)
If Switch 2 is set to the Off position, the unit continues to use the
factory default settings until Switch 2 is set to the On position.
Also, area code, phone numbers, SPIDS, and stored numbers are
cleared.
Express XRT Only:
SW 3: Off (Up) = Phone Volume Loud
On (Down) = Phone Volume Normal
SW 4: Reserved for future use.
OFF
ON
RS232POWER
1234
ISDN
OFF
ON
1234
Figure 2-1
Dip Switches on Rear Panel
Connecting the Express XR/XRT
1. Turn the computer off.
2. Using an RS-232 cable, (see the section Minimum Require-
ments) connect the end with the DB-25 connector to the port
labeled RS232 on the Express XR/XRT rear panel.
3. Connect the other end of the RS-232 cable to an available
serial COM port on the PC.
4. Plug the small round end of the AC power cord into the jack
labeled POWER on the Express XR/XRT rear panel.
5. Place the AC power cord plug into a 120 VAC electrical
outlet. The Express XR/XRT is now powered on.
6. Plug the RJ-45 connector (large end) of the RJ-45 to RJ-11
telephone cable into the jack labeled ISDN on the rear of the
Express XR/XRT.
6 Express XR/XRT Quick Start Guide 61200.153L1-13
Page 19

Chapter 2. Installation
7. Plug the RJ-11 connector (small end) of the RJ-45 to RJ-11
telephone cable into the ISDN telephone wall jack. At this
time the Express XR/XRT is powered on and the PWR LED
should either be flashing or on solid. See the section LEDs
for more information.
8. Power on the computer.
9. Go to the Express XR/XRT Software Installation procedure.
COM
Port
Rear View of PC
AC Outlet
RS-232 Cable
Telephone Cable
OFF
ON
1234
21
MODEMRS232POWER
ISDNU
Express XRT
AnalogTelephone
FAX Machine
Standard ISDN Internet/Remote Access Application
Express XR/XRT Software Installation
The installation procedure varies according to the PC operating
system. If the PC is not already on, power on the PC, start
Microsoft Windows and use the following installation procedure
that applies to your operating system.
RJ-45 to RJ-11
ISDN Telephone
Wall Jack
Figure 2-2
61200.153L1-13 Express XR/XRT Quick Start Guide 7
Page 20

Chapter 2. Installation
Microsoft Windows 95 and Windows NT 4.0
Windows 95 Plug and Play
1. During the Windows 95 boot process, if the New Hardware
Found screen appears indicating Unknown Device, select
Driver from disk provided by hardware manufacturer. If
the Windows 95 New Hardware Found screen does not
appear, skip the rest of this section and go to the Win 95/NT
4.0 Control Panel Modem Installation section.
2. Insert the disk labeled Windows 95 and Windows NT into
the 3.5" floppy disk drive.
3. Click OK. The Install From Disk screen should appear.
4. Click OK or use Browse to locate the correct disk drive.
5. Select ADTRAN Express XR or XRT from the Drivers list.
6. Click OK. Windows installs the INF file and a modem
labeled ADTRAN XR or XRT on the COM port to which the
unit is connected.
7. Check for the device. From Start, choose Settings, then
Control Panel, then double click Modems.
8. The ADTRAN Express XR or XRT should be listed under the
General tab in the Modems Properties dialog box.
If the computer does not have a 16650 UART (or you are not sure
it has a 16650 UART), select the ADTRAN Express XR or XRT,
click on Properties ,and change the Maximum speed from 230400
to 115200.
9. Click OK.
10. Click Close.
11. Go to the Express Configuration Wizard Installation section.
Win 95/NT 4.0 Control Panel Modem Installation
For Windows NT 4.0, you must be a member of the administrator
group to install a new modem.
1. From the Start button, choose Settings, then choose Control
Panel, then double click Modems.
2. If a modem has not been installed on the computer previously, the modem installation process begins immediately.
From this menu, choose Add to begin installation of the
Express XR/XRT.
3. In the Install New Modem dialog box, check Don't detect
my modem; I will select it from a list.
8 Express XR/XRT Quick Start Guide 61200.153L1-13
Page 21

Chapter 2. Installation
4. Click NEXT.
5. Click the Have Disk button.
6. Insert the disk labeled Windows 95 and Windows NT into
the 3.5" floppy disk drive.
7. Click OK.
8. Select ADTRAN Express XR or XRT from the Drivers list.
9. Click NEXT.
10. Choose the COM port to which the Express XR/XRT is
attached from the list of available COM ports.
11. Click NEXT. The modem.INF file is now installed.
12. Continue the installation by providing country, area code,
and outside line access information as prompted.
13. Click NEXT.
14. Click Finish to complete the modem installation process.
15. Select Close.
16. Go to the Express Configuration Wizard Installation section.
Express Configuration Wizard Installation
The Express Configuration Wizard is a graphical user interface
which allows you to configure and test the Express XR/XRT
with ease. Follow the installation procedure that applies to the
operating system.
Microsoft Windows 95 and Windows NT 4.0
1. From the Start button, choose Settings, then Control Panel,
then double click Add/Remove Programs.
2. From the Install/Uninstall tab select the Install button.
3. Insert the disk labeled Windows 95 and Windows NT.
4. Click NEXT.
5. If the disk is found click Finish, otherwise use Browse to
first locate the disk. The Express Configuration Wizard
begins installation.
6. Follow the step-by-step screen instructions throughout the
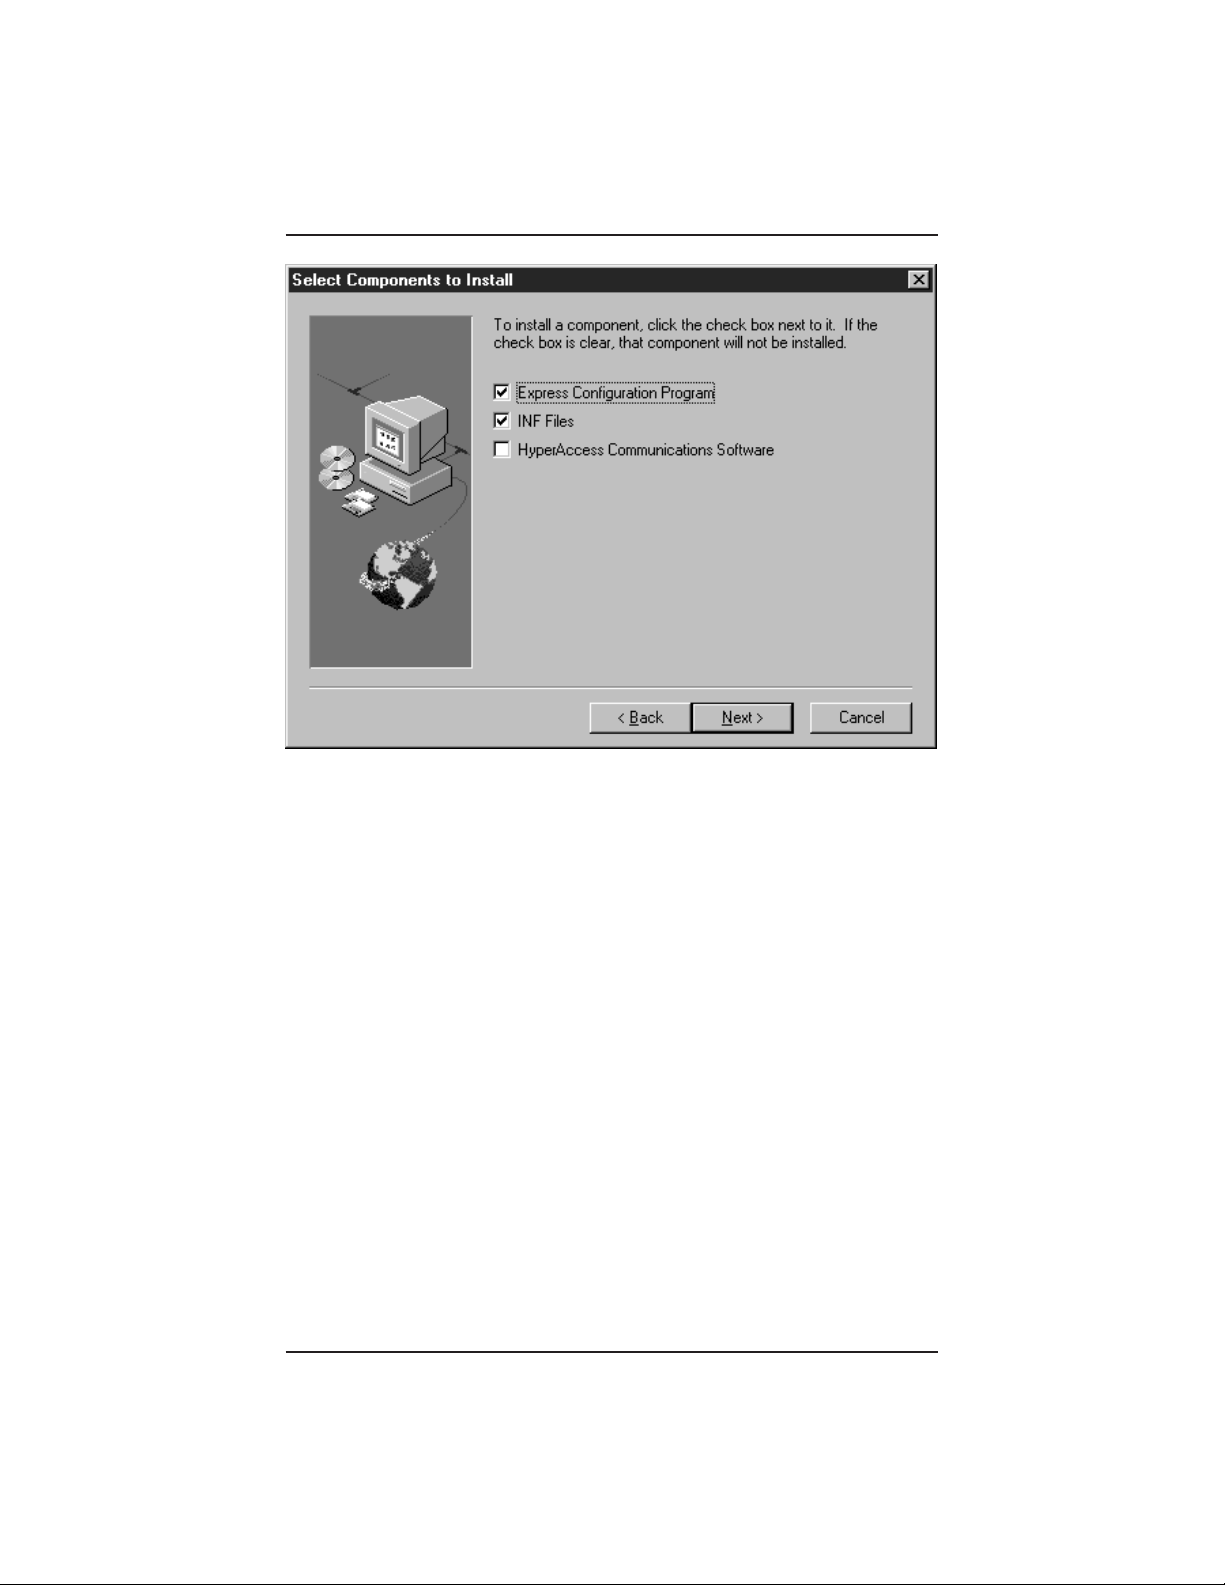
installation process. Three options are available for installation during the Express Configuration Wizard installation:
Express Configuration Program, INF Files, and
HyperACCESS Communications Software. Figure 2-3
illustrates the three options.
61200.153L1-13 Express XR/XRT Quick Start Guide 9
Page 22
Chapter 2. Installation
Figure 2-3
Installation Options
By default, the Express Configuration Wizard and INF files are
installed. Click on the box labeled HyperAccess Communica-
tions Software if you wish to use HyperACCESS as your
communications software. Otherwise, leave the box unchecked.
Once installation is complete, an ADTRAN group is created and
placed in the Programs menu on the Start button. The software
can be started by choosing the Express Configuration Wizard
icon or it can also be started by double clicking on the ADTRAN
Express Configuration icon located on the control panel.
Get On With It!
Go to the section Using the Express Configuration Wizard.
Microsoft Windows 3.1 and Windows NT 3.51
If running Windows 3.1, or version 1.2 or later of the Express
Configuration Wizard, skip the Windows NT 3.51 INF File Installa-
tion section and go to Express Configuration Wizard Installation
section.
10 Express XR/XRT Quick Start Guide 61200.153L1-13
Page 23

Chapter 2. Installation
If running Windows NT 3.51, install remote access service before
following the INF file installation procedure.
Windows NT 3.51 INF File Installation
To install an ADTRAN Express XR/XRT use the following
procedure:
1. Locate the modem.inf file. This file is normally located in
the c:\winnt35\system32\ras directory. See the Windows
NT documentation for instructions on installing the Remote
Access Service.
2. In order to recover in case of a user mistake, create a backup
of the modem.inf file.
3. Using Notepad or another text editor, open the adtran.inf
file on the Express Configuration Wizard disk labeled
Windows 95 and W indows NT.
4. Copy the contents of the adtran.inf file to the Windows
clipboard.
5. Open the modem.inf file.
6. Paste the contents of the clipboard (adtran.inf) to the end of
the modem.inf file.
7. Save the altered modem.inf file.
8. Close the modem.inf file.
9. Restart the system.
10. Go to the section Express Configuration Wizard Installation.
The Express XR/XRT can now be configured for use with the
Remote Access Service.
Express Configuration Wizard Installation
Microsoft Windows 3.1 and Windows NT 3.51
The Express Configuration Wizard is a graphical user interface
which allows you to configure and test the Express XR/XRT
with ease. Follow the installation procedure that applies to the
operating system.
1. For Windows 3.1 operating systems, insert the ADTRAN
Express Configuration Wizard disk labeled Windows 3.1
into your 3.5" disk drive. For Windows NT 3.51, insert the
disk labeled Windows 95, Windows NT into your 3.5" disk
drive.
2. In Windows Program Manager, select the Run... option
under the File menu.
61200.153L1-13 Express XR/XRT Quick Start Guide 11
Page 24

Chapter 2. Installation
3. In the command line, type a:\setup (where a is the disk
drive where the ADTRAN Express Configuration Wizard
disk was inserted).
4. Follow the screen prompts and insert disk(s) as requested.
Once installation is complete, an ADTRAN program group is
created and placed in the Program Manager. The Express
Configuration Wizard software can be started by double clicking
on the Express Configuration icon in the ADTRAN program
group. The ADTRAN Express Configuration Wizard software
can also be started by double clicking on the Express Configura-
tion icon on the Control Panel.
Get On With It!
Go to the section Using the Express Configuration Wizard.
Basic Telephone Service
In addition to the computer connection, two analog devices such
as a telephone, FAX, modem, answering machine, or caller ID
box can be connected using the two POTS interfaces on the rear
panel (RJ-11 jacks labeled 1 and 2 with a diagram of a telephone
above the jack).
Supplementary Voice Services
Supplementary services such as call forwarding, caller ID, call
return, call holding, three- or six-way conference, call transfer,
and call waiting are fully supported by the Express XR/XRT on a
touch-tone telephone. These services are available only if included in the ISDN line configuration and are implemented
using the standard commands provided by the telephone
company.
Call Waiting
Call Waiting permits one voice call to be placed on hold while
answering another voice call. Use the flash-hook to place the
active call on hold and answer an incoming call. Hanging up
terminates both calls. The call waiting tone can be disabled and
enabled using a touch-tone phone as follows:
Disable call waiting: Press ** 0
Enable call waiting: Press ** 1
12 Express XR/XRT Quick Start Guide 61200.153L1-13
Page 25

Chapter 2. Installation
Conference Calling
Conference Calling (also known as three-way calling) permits a
conversation between three parties, each at different locations.
During a voice call, the call waiting tone signals a second incoming call. Flash-hook to place the first call on hold and answer the
incoming call. Flash-hook again to retrieve the first caller. A
third flash-hook conferences all three parties.
Automatic Redial
Automatic redial dials the last number dialed. This can be
accomplished using a touch-tone phone as follows:
Redial last number: Press ** 5
When connecting to a National ISDN 1 switch, call conferencing and
call transferring are assigned a unique feature identifier number. This
number may not be the same in all areas. S-registers 90 and 91 contain
the feature identifier numbers for conference and transfer. If these
features do not work, contact your ISDN provider.
Phone Number Allocation
The Express XRT allocates ISDN phone number 1 to POTS port
1. Connect the primary telephone to POTS port 1 as shown in
Figure 2-2.
ISDN phone number 2 is shared by the RS-232 port and POTS
port 2, therefore only one can be used at a time.
ISDN data calls and external modem applications must be placed to
ISDN phone number 2.
Single Phone Number Operation
For AT&T 5ESS point-to-point lines and other lines with a single
phone number, incoming voice calls are routed to POTS port 2 to
allow for use of either a modem or a telephone. Service on POTS
port 1 is not available.
61200.153L1-13 Express XR/XRT Quick Start Guide 13
Page 26
Chapter 2. Installation
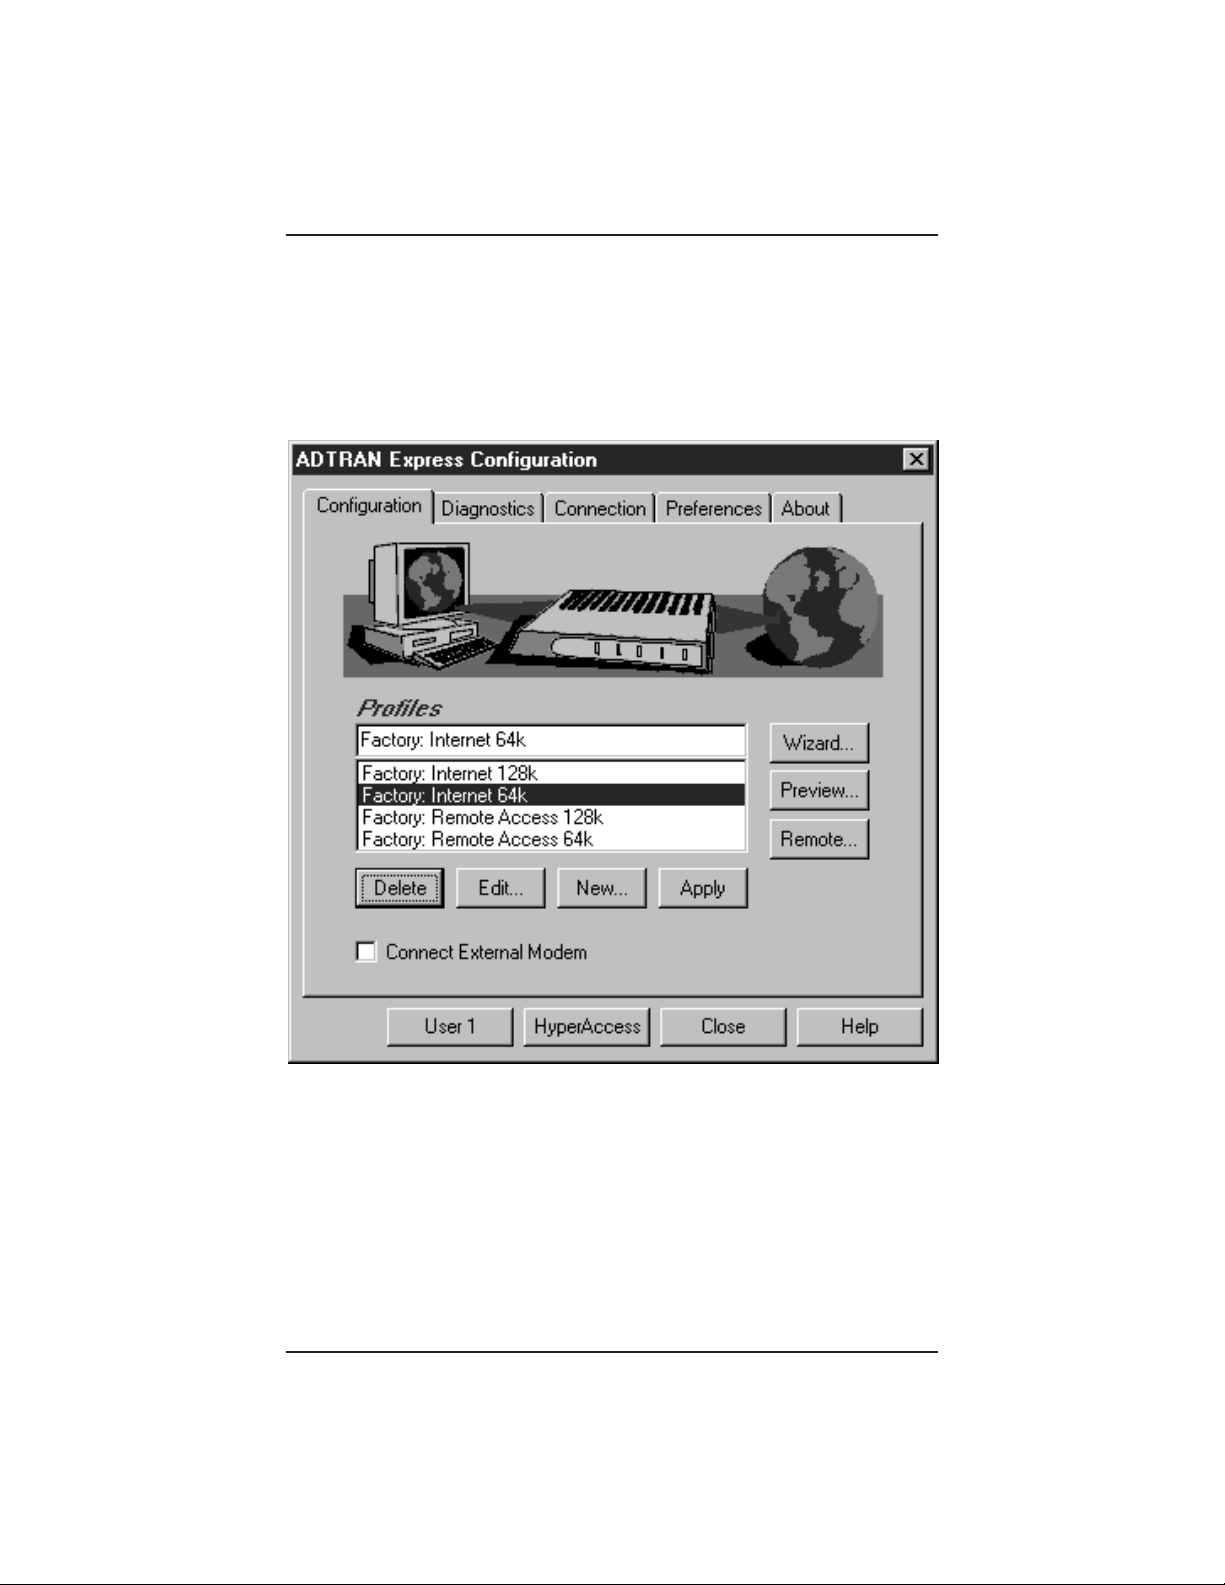
Using the Express Configuration Wizard
1. From the Start button, choose Programs, then ADTRAN,
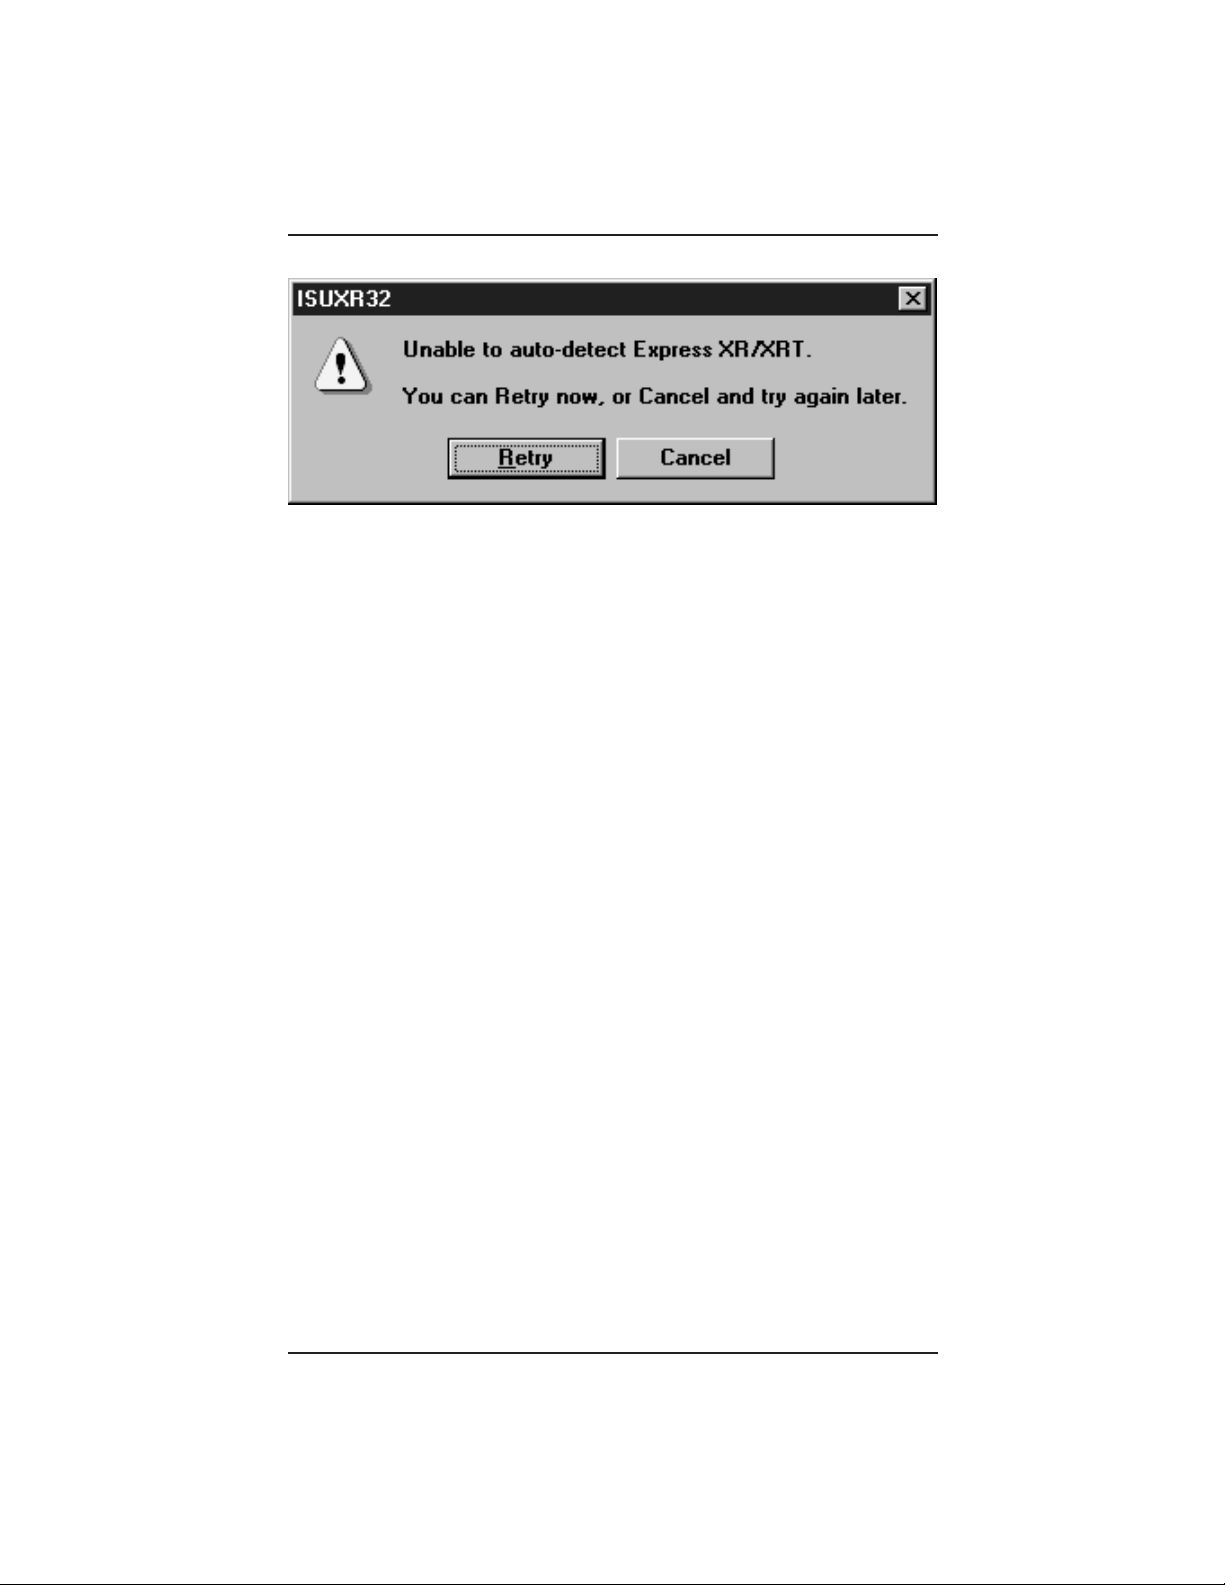
then double click Express Configuration. After autodetection, the screen shown in Figure 2-4 is displayed; skip
to Step 5. If the Express XR/XRT cannot be auto-detected
the error message shown in Figure 2-5 is displayed.
Figure 2-4
ADTRAN Express Configuration Screen
14 Express XR/XRT Quick Start Guide 61200.153L1-13
Page 27
Chapter 2. Installation
Figure 2-5
Unable to Auto-Detect
2. If the error message shown in Figure 2-5 is displayed, click
Cancel. The screen shown in Figure 2-4 is displayed.
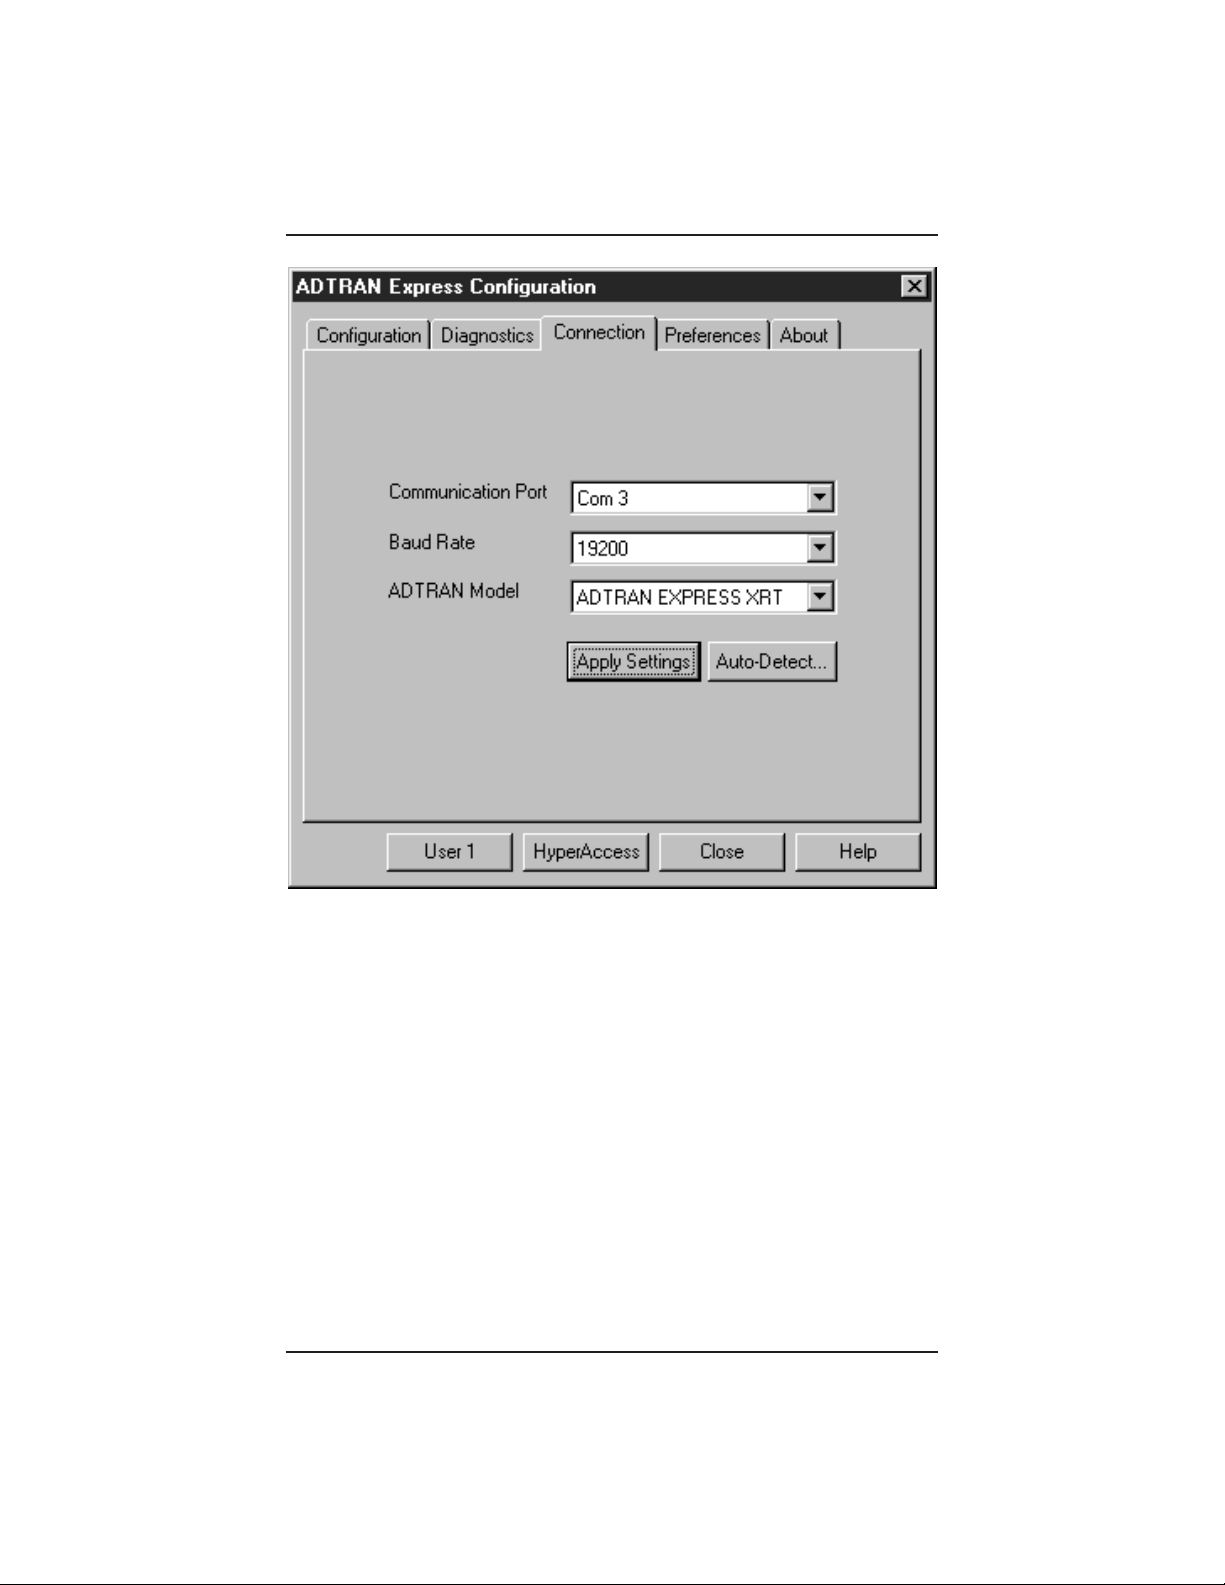
3. Select the Connection tab. The screen shown in Figure 2-6
is displayed.
61200.153L1-13 Express XR/XRT Quick Start Guide 15
Page 28
Chapter 2. Installation
Figure 2-6
Express Configuration Wizard Connection Tab
4. Check the power and the cable connections then select the
Auto-Detect button. If the error message shown in
Figure 2-5 is displayed again, see the chapter Troubleshooting.
5. Choose Wizard under the Configuration tab.
6. Read the screen instructions and click NEXT.
7. Verify the unit information and the COM port to which it is
connected are shown correctly; choose NEXT.
8. Enter the area code and ISDN phone numbers provided by
the ISDN service provider. Since the ADTRAN Express XR/
XRT supports an Automatic SPID and Switch Detection
algorithm, this is all the information required.
9. Click NEXT.
16 Express XR/XRT Quick Start Guide 61200.153L1-13
Page 29

10. Click NEXT to use Automatic SPID and Switch Detection
or enter the Switch Type and service profile IDs (SPIDs)
provided by the telephone company.
11. Check the Auto-detect SPIDs/Switch Types option.
12. Click NEXT.
13. Choose the factory profile closest to your particular application. The Preview button can be used to view these settings.
14. Click NEXT.
15. To change the profile name for future reference select the
Change Profile name option and enter a new name. Otherwise, the default name shown on the screen is used. Ensure
the telephone cable between the Express XR/XRT ISDN
connector and the walljack is connected before proceeding.
16. Click Finish. The Auto-Detecting Service Profile IDs
screen is displayed while the Automatic SPID and Switch
algorithm executes.
After installation is complete the Express XR/XRT is ready for
use. If any error screens are encountered or the unit remains at
Link Down for longer than 15 minutes, see the chapter Trouble-
shooting.
Auto-Detect SPIDs/Switch Type
Chapter 2. Installation
Auto-detection of SPIDs and Switch Type greatly reduces the
likelihood of time-consuming problems occurring during
installation of the Express XR/XRT. It evaluates common SPID
formats based on the area code and phone numbers and reports
success after placing a test call.
After installation is complete, the Express XR/XRT resets the ISDN
line for a clean start. Therefore, the PWR/LINE LED may not be on
solid (indicating link up) for a few more seconds.
In the few cases where the procedure does not succeed, the
nonstandard SPIDs may be entered at Step 10 of the preceding
procedure (Using the Express Configuration Wizard).
Using the Express Configuration Wizard Help
On-line help is available by clicking the Help button displayed
in the Configuration screen. On-line help provides detailed
information regarding such features as creating a custom profile,
defining a user button, remote configuration, and testing.
61200.153L1-13 Express XR/XRT Quick Start Guide 17
Page 30

Chapter 2. Installation
Express Configuration Wizard Tray Tool
The Tray Tool is used for quick access to the Express Configuration Wizard and to enable or disable the external analog modem
when used with an Express XRT.
The Express Configuration Wizard Tray Tool is provided only with the
Windows 95 and Windows NT 4.0 versions of the Express Configuration Wizard.
To enable the Express Configuration Wizard Tray Tool, use the
following procedure:
1. Run the Express Configuration Wizard. See the section
Using the Express Configuration Wizard.
2. Close the Express Configuration Wizard.
3. Once the Express Configuration Wizard is closed, the
Windows 95 or Windows NT 4.0 taskbar will have a new
icon in the Tray Tool. Figure 2-7 illustrates the new taskbar
with the new icon in the Tray Tool.
Figure 2-7
Express Configuration Wizard Tray Tool
18 Express XR/XRT Quick Start Guide 61200.153L1-13
Page 31

Chapter 2. Installation
To prevent the Express Configuration Wizard Tray Tool from
launching once the Express Configuration Wizard software is
closed, uncheck the box labeled Add tray icon under the Preferences tab in the Express Configuration Wizard software (shown
in Figure 2-8).
Figure 2-8
Preferences Tab
Three icons appear in the Tool Tray at different times representing three different states of the Express Configuration Wizard
Tray Tool.
The icon illustrated in Figure 2-9 indicates the external analog
modem is connected to the Express XRT and is enabled. Double
clicking on this icon causes the Express Configuration Wizard
Tray Tool to disable the external analog modem.
61200.153L1-13 Express XR/XRT Quick Start Guide 19
Page 32

Chapter 2. Installation
This icon is not available when using an Express XR. Double
clicking on this icon, when using an Express XRT, enables the
external analog modem.
The icon illustrated in Figure 2-10 indicates the external analog
modem is not connected and/or not enabled.
Double clicking on this icon enables the external modem when
connected to an Express XRT. This is the default icon when in
use with the Express XR.
Figure 2-9
Express XRT Disabled, External Analog Modem Enabled
Figure 2-10
Express XR/XRT Enabled, External Analog Modem Disabled
The icon illustrated in Figure 2-11 indicates the Express Configuration Wizard Tray Tool is in an unknown state. This icon may
appear if the Express XRT is not connected to a COM port on the
PC. Double clicking on this icon instructs the Express Configuration Tray Tool to refresh the connection status.
Figure 2-11
Unknown State
20 Express XR/XRT Quick Start Guide 61200.153L1-13
Page 33

Express Configuration Tray Tool Menu
When using the Express Configuration Wizard Tray Tool with
the Express XRT, use the right mouse button and click on the
icon. The menu in Figure 2-12 appears.
Chapter 2. Installation
Figure 2-12
Express Configuration Wizard Tray Tool Menu
If the Express Configuration Wizard Tray Tool is used with an
Express XR, a slightly different menu appears.
Enable/Disable Modem
Enable or Disable the external analog modem. This option is
only available when connected to an Express XRT. See the
chapter Installing an Analog Modem for more information.
Properties
Launches the Express Configuration Wizard software.
Refresh
Instructs the Express Configuration Wizard Tray Tool to refresh
the icon status.
61200.153L1-13 Express XR/XRT Quick Start Guide 21
Page 34

Chapter 2. Installation
About
Displays version information.
Exit
Exits the Tray Tool.
Installing Windows 95 Dial-Up Networking
Dial-Up Networking for Windows 95 is most commonly used for
connections to Internet Service Providers or other networks.
Use the following procedure to install Windows 95 Dial-Up
Networking:
1. From Start, choose Settings, then Control Panel, then
double click Add/Remove Programs.
2. Double click on the Communications option under the
Windows Setup tab.
3. If not already selected, check Dial-Up Networking.
4. Click OK to select these changes.
5. Click OK to begin installation of Dial-Up Networking.
6. Restart the computer.
7. Once Windows boots, from Start, choose Settings, then
Control Panel, then double click Network.
8. From the Network list, verify the following components are
installed: Dial-Up Adapter and TCP/IP for Dial-Up
Adapter. If you intend to use your Express XR/XRT for
Internet access, these should be the only components
needed. Verify the software setup from your Internet
Service Provider or network administrator to ensure the
networking components are set up properly.
9. Click OK once you have verified these components are
installed.
10. To create a Dial-Up Networking connection select My
Computer, then choose Dial-Up Networking. The first time
Dial-Up Networking has been used, the Welcome to Dial-
Up Networking menu appears.
11. Click NEXT.
12. Enter the name for this connection and select the ADTRAN
Express XR or XRT from the modem list. You may configure DTE speed and server information by choosing the
Configure button next to the selected modem.
13. Click NEXT.
22 Express XR/XRT Quick Start Guide 61200.153L1-13
Page 35

14. In the Make a New Connection menu, enter the number to
dial.
15. Click NEXT.
16. Click Finish to complete the new connection setup.
17. To use this connection, select it from My Computer, Dial-Up
Networking. Windows dials the number using the modem
and properties as configured. When using the connection
the first time, network log in information such as the user
name and password must be entered. This information
should be provided from the Internet Service Provider.
MACINTOSH CONFIGURATION
A Macintosh can be used to configure the Express XR/XRT by
using a terminal emulation package such as MicroPhone Pro™
and following the VT 100 configuration directions.
VT 100 TERMINAL EMULATION
The Express XR/XRT can be configured using any communications package supporting VT 100 terminal emulation. To enter
into the menus, type AT!V Enter. To go to a particular menu,
press the hot key sequence for that menu. The main branches of
the menu tree and their hot keys are as follows:
Chapter 2. Installation
STATUS (Ctrl + V)
TEST (Ctrl + T)
CONFIG (Ctrl + C)
DIAL (Ctrl + D)
Ensure that the communications package is configured to pass these
Control Sequences through to the Express XR/XRT.
To exit the menus, press Ctrl + X. The Ctrl + X command also
places the unit back on-line if a call is connected.
Some features in the Express XR/XRT do not immediately take
effect upon selection. This prevents unintentional
reconfiguration of the Express XR/XRT during an active call.
Items such as Protocol and Call Type take effect only at the
beginning of a new call.
61200.153L1-13 Express XR/XRT Quick Start Guide 23
Page 36

Chapter 2. Installation
VT 100 Configuration
1. After connecting a VT 100 terminal enter the command
AT!V followed by Enter. The Configuration screen is the
first screen displayed. An illustration of this screen is
shown in Figure 2-13.
2. Enter the area code.
3. Enter ISDN phone number 1.
4. Enter ISDN phone number 2.
5. Enable Auto-Detect SPIDs/Switch.
6. View the status by using the key sequence Ctrl+V. An
illustration of the status screen is shown in Figure 2-14.
Figure 2-13
VT 100 Terminal Configuration Menu
24 Express XR/XRT Quick Start Guide 61200.153L1-13
Page 37

VT 100 Terminal Status Buffer
The status buffer can be displayed at any time after entering the
menu structure. Pressing Ctrl + V displays the Express XR/XRT
Status menu. The last 20 status messages generated during the
operation of the unit are displayed with relevant status items.
See Figure 2-14. Status messages provide information about call
progress, ISDN link status and error conditions. The most recent
status message appears as Status 1 with the remaining status
messages appearing in descending order. The status buffer
messages and their descriptions are listed in the appendix Status
Buffer Messages.
Press Ctrl + C to return to the Configuration menu.
Chapter 2. Installation
Figure 2-14
VT 100 Terminal Status Buffer Menu
61200.153L1-13 Express XR/XRT Quick Start Guide 25
Page 38

Chapter 2. Installation
26 Express XR/XRT Quick Start Guide 61200.153L1-13
Page 39

Chapter 3. Installing an Analog Modem
Chapter 3
Installing an Analog Modem
An external or internal analog modem can be connected to the
Express XRT to access an Internet provider, BBS, or host server
that does not support ISDN.
EXTERNAL ANALOG MODEM APPLICATION
In order to connect an external analog modem to the Express
XRT, the following items are necessary:
• External analog modem
• RS-232 serial cable
• RJ-11 to RJ-11 telephone cable
Incoming calls must use ISDN phone number 2 for external analog
applications.
In addition to the RS-232 cable connecting the Express XRT to the
PC, a separate RS-232 cable is required to connect an external
analog modem to the Express XRT. This RS-232 cable is not
supplied.
Figure 3-1 illustrates an external analog modem connected to the
Express XRT. This setup requires only one PC COM port, and
supports DTE rates of up to 115.2 kbps.
61200.153L1-13 Express XR/XRT Quick Start Guide 27
Page 40

Chapter 3. Installing an Analog Modem
Rear View of PC
COM Ports
AC Outlet
External
RS-232 Cable
RS-232 Cable
OFF
ON
MODEMRS232POWER
RJ-11 to RJ-11
telephone cable
1234
21
RJ-45 to RJ-11
Telephone Cable
ISDNU
Express XRT
Analog
Modem
Dial Line Jack
Analog Telephone
External Analog Modem Application
Connecting an External Analog Modem
To connect an external analog modem to the Express XRT use
the following procedure:
ISDN Telephone
Wall Jack
Figure 3-1
1. Ensure the Express XRT is connected to the PC. See the
section Connecting the Express XR/XRT for detailed instruc-
tions.
2. Ensure the modem power is OFF before connecting it to the
Express XRT.
3. Connect one end of the RS-232 serial cable to the external
analog modem.
4. Connect the other end of the same RS-232 serial cable to the
Express XRT port labeled MODEM. An illustration of a
modem is positioned above the modem port.
5. Connect one end of the RJ-11 to RJ-11 telephone cable to the
telephone jack labeled 2 on the Express XRT. Positioned
28 Express XR/XRT Quick Start Guide 61200.153L1-13
Page 41

Chapter 3. Installing an Analog Modem
above the jack is an illustration of a telephone above a
modem.
6. Connect the other end of the RJ-11 to RJ-11 telephone cable
to the Dial Line or Line jack on the external analog modem.
See the documentation with the external analog modem to
determine which jack on the external analog modem is the
Dial Line or Line jack.
7. Power ON the external analog modem.
The external analog modem is now connected to the Express
XRT. In order to configure the external analog modem for use,
set up the communications software to use the same COM port
to which the Express XRT is connected.
If you are connecting a modem to the Express XRT that has
already been in use by Windows 95, you are ready to use the
external analog modem. The external analog modem can be
enabled either through the Express Configuration Wizard or by
using a VT 100 terminal emulation package. See the section
Express Configuration Tray Tool Menu for more information on
enabling and disabling an analog modem.
If you are connecting an external analog modem that has not
been previously in use by Windows 95 see the section Installing a
New External Analog Modem.
Installing a New External Analog Modem
1. Start the Express Configuration Wizard.
2. Click Connect External Modem.
3. Click Close.
4. From Start, select Setting, then Control Panel, and double
click Modems.
5. Click Add.
6. Select Don't detect my modem; I will select it from a list.
7. Click NEXT.
8. Select the manufacturer and model of your modem. If your
modem is not listed, or if you have an installation disk, click
Have Disk.
9. Click NEXT.
10. Select the COM port to use with this modem. This will be
the same COM port that is used by the Express XRT.
11. Click NEXT.
12. Click FINISH.
61200.153L1-13 Express XR/XRT Quick Start Guide 29
Page 42

Chapter 3. Installing an Analog Modem
13. Click Close.
14. The external analog modem may now be used, or you may
restart the Express Configuration Wizard and deselect the
Connect External Modem option to enable the Express XRT.
Configuring an External Analog Modem
If the modem does not support 230.4 kbps, Switch 1 on the back
panel of the Express XRT must be On (down) to install and use
an external modem with the Express XRT. This limits the DTE
speed to 115.2 kbps when using the Express XRT with an external modem. To re-enable the 230.4 kbps operation for ISDN
connections, set Switch 1 to the On position.
When using applications supporting Express XRT operation at
230.4 kbps with an external analog modem that does not support
230.4 kbps, attach the Express XRT to the high speed 16650
UART COM port and connect the external modem to a separate
COM port. This allows the Express XRT to operate at 230.4kbps
and the external modem to operate at the reduced speed.
Required External Analog Modem Settings
There is one setting in the external modem that is required
before trying to enable the modem with the Express Configuration Wizard. The Carrier Detect signal from the modem should
be set to Normal (track the CD signal). This can be accomplished by using the AT command AT&C1. AT commands can
be entered into the modem using the following procedure:
<cr> indicates to press the Enter key on the keyboard.
1. Open a terminal emulation session using HyperACCESS or
HyperTerminal.
2. Type AT_L1 <cr>
3. Type AT <cr>
4. Type ATI <cr>
5. Type AT &C1 <cr>
6. Type AT&W <cr>
7. Type AT_L0 <cr>
30 Express XR/XRT Quick Start Guide 61200.153L1-13
Page 43

Chapter 3. Installing an Analog Modem
Controlling an External Analog Modem
There are three options for enabling and disabling an external
modem: the Express Configuration Wizard, the WIN 95/NT 4.0
Tool Tray Icon, or a terminal emulation package. See the section
Express Configuration Wizard Tray Tool for more information on
enabling and disabling a modem.
Once the external analog modem is enabled, all further COM
activity is transmitted to the external analog modem connected
to the Express XRT modem port. The external analog modem
RTS and CTS lines are switched over to the PC COM port
directly when the Express XRT is commanded to enable the
external modem port. This allows the external analog modem to
provide flow control as normal.
When the external analog modem is disabled, all further COM
port activity is processed by the ISDN terminal adapter within
the Express XRT.
Express Configuration Wizard Modem Enable
Run the Express Configuration Wizard and select the Connect
External Modem option under the Configuration tab. Figure 3-2
illustrates the Express Configuration Wizard Connect External
Modem option.
See the section Express Configuration Wizard Tray Tool for more
information on enabling a modem.
61200.153L1-13 Express XR/XRT Quick Start Guide 31
Page 44

Chapter 3. Installing an Analog Modem
Figure 3-2
Express Configuration Wizard: Connecting an External Modem
If the Express Configuration Wizard software cannot detect the
external analog modem, the error message shown in Figure 3-3 is
displayed. Ensure the external analog modem and the Express
XRT are powered On and the external analog modem is properly
connected to the Express XRT.
32 Express XR/XRT Quick Start Guide 61200.153L1-13
Page 45

Chapter 3. Installing an Analog Modem
No Modem Attached Error Message
Express Configuration Wizard Modem Disable
The external analog modem is disabled using the Express
Configuration Wizard by deselecting the Connect External
Modem option. Figure 3-2 illustrates the Connect External
Modem option.
See the section Express Configuration Wizard Tray Tool for more
information on disabling a modem.
Figure 3-3
61200.153L1-13 Express XR/XRT Quick Start Guide 33
Page 46

Chapter 3. Installing an Analog Modem
Terminal Emulation Modem Enable
An alternative method is to use a terminal emulation package
such as HyperACCESS. In order to determine if an external
analog modem is properly connected to the Express XRT, issue
the A T command AT!Z (followed by Enter). If an external
analog modem is properly connected to the Express XRT, the
Express XRT responds with the message MODEM FOUND
(shown in Figure 3-4).
The AT!Z command is directed to the Express XRT not the
analog modem itself. An ERROR occurs if the command is sent
while the external analog modem is enabled.
If the external analog modem is not properly connected to the
Express XRT, the Express XRT responds with the message NO
MODEM FOUND.
Figure 3-4
HyperACCESS: Verifying External Modem Connection
34 Express XR/XRT Quick Start Guide 61200.153L1-13
Page 47

Chapter 3. Installing an Analog Modem
To enable an external analog modem, issue the AT command
AT_L1 (followed by Enter). Figure 3-5 illustrates a
HyperACCESS session enabling an external analog modem.
Figure 3-5
HyperACCESS: Enabling an External Analog Modem
61200.153L1-13 Express XR/XRT Quick Start Guide 35
Page 48

Chapter 3. Installing an Analog Modem
Terminal Emulation Modem Disable
When using HyperACCESS or other terminal emulation package
issue the AT command AT_L0 (followed by Enter). Figure 3-6
illustrates a HyperACCESS session disabling an external analog
modem.
Figure 3-6
HyperACCESS: Disabling an External Analog Modem
If carrier detect (CD) is active (a call is connected) on the external
analog modem when attempting to disable it, the Express XRT will not
switch control from the modem port. The call must be hung-up
(disconnected) to deactivate CD.
36 Express XR/XRT Quick Start Guide 61200.153L1-13
Page 49

Chapter 3. Installing an Analog Modem
INTERNAL ANALOG MODEM APPLICATION
In order to connect an internal analog modem to the Express
XRT the following items are necessary:
• Internal analog modem
• RJ-11 to RJ-11 telephone cable
Figure 3-7 shows how to connect an internal modem to the
Express XRT.
AC Outlet
COM
Port
RS-232 Cable
RJ-11 to RJ-11
Telephone Cable
Dial Line Jack
MODEMRS232POWER
Rear View
of PC
Internal Analog Modem
OFF
ON
1234
21
RJ-11 to RJ-11
Telephone Cable
ISDNU
ISDN Telephone
RJ-45 to RJ-11
Telephone Cable
Wall Jack
AnalogTelephone
Figure 3-7
Internal Analog Modem Application
When using an internal analog modem and the Express XRT,
two COM ports are assigned on the PC. Both COM ports are
configured independently. See the manufacturer's documentation for internal analog modem configuration.
61200.153L1-13 Express XR/XRT Quick Start Guide 37
Page 50

Chapter 3. Installing an Analog Modem
Connecting an Internal Analog Modem
To connect an internal analog modem to the Express XRT use
the following procedure:
1. Ensure the Express XRT is connected to the PC. See the
section Connecting the Express XR/XRT for detailed instruc-
tions.
2. Connect one end of the RJ-11 to RJ-11 telephone cable to the
telephone jack labeled 2 on the Express XRT. Positioned
above the jack is an illustration of a telephone above a
modem.
3. Connect the other end of the RJ-11 to RJ-11 telephone cable
to the Dial Line or Line jack on the internal analog modem.
See the documentation for the internal analog modem to
determine which jack on the internal analog modem is the
Dial Line or Line jack.
38 Express XR/XRT Quick Start Guide 61200.153L1-13
Page 51

Chapter 4. Application Configuration
Chapter 4
Application Configuration
There are three methods available for configuring the Express
XR/XRT: Express Configuration Wizard, VT 100 terminal, or AT
Commands.
Before configuring the Express XR/XRT for any application, the
Express XR/XRT should be connected correctly for the application as described in the chapter Installation.
Some features in the Express XR/XRT do not take effect upon
selection. This prevents unintentional reconfiguration of the
Express XR/XRT during an active call. Items such as Bit Rate,
Protocol, and Call Type take effect only at the beginning of a new
call.
Technical notes, documents and scripts can be found on the
ADTRAN web home page at http://www.adtran.com under the
Information Desk. These provide information on how to use
ADTRAN products in specific applications on PC and Macintosh
platforms.
FACTORY DEFAULT CONFIGURATION
The Express XR/XRT is shipped configured as follows:
Auto-Detect SPIDs/Switch .................................................. Disabled
Switch Type .............................................................. National ISDN 1
Call Type ................................................................................ Data 64K
Auto Answer........................................................................... Enabled
Call Screening ................................................................. Answer Any
Call Routing ................... Speech/Audio calls to POTS (XRT Only)
DTR Options ..................................................................... Ignore DTR
Flow Control ..............................................................Hardware Flow
Protocol .................................................................................... Fallback
61200.153L1-13 Express XR/XRT Quick Start Guide 39
Page 52

Chapter 4. Application Configuration
The Express XR/XRT can be reset to the factory default settings
by setting switch 2 to the Off (Up) position. See the section
Switch Settings in the chapter Installation for more information.
PROFILE CONFIGURATIONS
Some common configurations are preset in the Express XR/XRT
software as profiles. Most Internet service providers supporting
ISDN also support PPP protocol. If connecting to an Internet
service provider using one B-channel, select Factory: Internet
64k which sets the protocol to PPP. If arrangements have been
made with the Internet service provider to use two B-channels,
select Factory: Internet 128k, which uses multilink PPP proto-
col.
Loading a factory profile has no effect on any SPID(s), ISDN
Phone Number(s), or Switch Type settings already configured.
The settings that are altered when applying a profile are shown
as follows:
Factory: Internet 64k
Call Type ..................................................... Data 64kbps
Auto Answer ......................................................Enabled
DTR Options ............................................... Ignore DTR
Flow Control .................................................. Hardware
Protocol Type ............................................................PPP
PPP Mode .............................................. Single-link PPP
Factory: Internet 128k
Call Type .................................................... Data 64kbps
Auto Answer ......................................................Enabled
DTR Options ............................................... Ignore DTR
Flow Control .................................................. Hardware
Protocol Type ............................................................PPP
PPP Mode ................................................ Multilink PPP
Factory: Remote Access 64k
Call Type ..................................................... Data 64kbps
Auto Answer ......................................................Enabled
DTR Option ................................................. Ignore DTR
Flow Control .................................................. Hardware
Protocol Type .............................................CCITT V.120
40 Express XR/XRT Quick Start Guide 61200.153L1-13
Page 53

Chapter 4. Application Configuration
Factory: Remote Access 128k
Call Type ..................................................... Data 64kbps
Auto Answer......................................................Enabled
DTR Options ............................................... Ignore DTR
Flow Control .................................................. Hardware
Protocol Type ................................... Async BONDING
EXPRESS CONFIGURATION WIZARD
This section describes how to use the Express Configuration
Wizard software to configure the Express XR/XRT for three
common applications: Internet access, remote access, and
bulletin board service (BBS) access.
The Express Configuration Wizard software and the application
software such as Chameleon™ for Internet™ access or
ShivaRemote for remote access should be installed on the
computer.
The following procedures have been written for Windows 3.1 operating
systems. Other operating systems may vary.
Starting the Express Configuration Wizard Software
After installing the Express Configuration Wizard Software, use
the following procedure to launch the software:
1. In the Windows Program Manager, open ADTRAN program
group.
2. Double click on the icon labeled Express Configuration.
The ADTRAN Express Configuration Wizard window is
displayed.
Internet and Remote Access
Chameleon by NetManage is a Microsoft Windows software
package commonly used for Internet access.
ShivaRemote is a software package developed by Shiva Corporation for remote access.
Use the following procedure to configure the Express XR/XRT
for Internet access using Chameleon or remote access using
ShivaRemote.
61200.153L1-13 Express XR/XRT Quick Start Guide 41
Page 54

Chapter 4. Application Configuration
Creating a Custom Profile
1. In the ADTRAN Express Configuration window, create a
New profile by choosing the New button and continuing
through the steps in this procedure or choose the Wizard
button and let the Express Configuration Wizard guide you
through the setup (skip the rest of this procedure).
2. Select an existing profile on which to base a new profile. To
view the settings for a profile, click on the name of the
profile and choose the Preview button.
3. Once the setup parameters are displayed under the ISDN
Line Setup tab, select the text in the Name of Profile box
and enter a new name for the profile. For example: Joe's
Internet Connection.
4. Enter the following information (under the ISDN Line
Setup tab) as provided by your telephone company:
Switch Type
Area Code
ISDN Phone Number(s)
Service Profile Identification Number(s)
If the service profile identifiers (SPIDs) and switch type are
unknown, check the box labeled Auto-detect SPIDs/Switch and
they are determined automatically once the OK button is selected.
5. After completing the parameters in the ISDN Line Setup
window, click on the Protocol tab.
6. The Call Type should only be changed to Data 56 kbps if
Data 64 kbps is not available in your area.
7. Select PPP protocol if configuring for Internet access using
Chameleon (or other Internet access package), or select
Async BONDING protocol if configuring for remote access
using ShivaRemote.
8. Choose the OK button. The new profile, now appears
alphabetically in the profiles list of the ADTRAN Express
Configuration Wizard window.
42 Express XR/XRT Quick Start Guide 61200.153L1-13
Page 55

Chapter 4. Application Configuration
Defining a User Program Button
A button can be added to the ADTRAN Express Configuration
Wizard window to automatically launch an application like
Chameleon, ShivaRemote, or other data communications packages.
ADTRAN has developed a variety of technical support notes and
modem scripts for popular data communication packages such as
Procomm Plus®, pcANYWHERE™, ReachOut® and more. These can
be found on the ADTRAN home page (http://www.adtran.com) under
the ISDN Information Desk.
The following procedure explains how to create a button for the
profile created in the previous procedure:
1. Select the profile from the profile list in the ADTRAN
Express Configuration Wizard window.
2. Choose the Edit button.
3. Choose the Advanced tab.
4. Choose either the User Program 1... or User Program 2...
button.
5. Choose the Change Program... button.
6. Use the Drives and Directories fields to navigate to the
executable file. The executable file for Chameleon is
custom.exe and the default location is
c:\netmanag\custom. The executable file for ShivaRemote
is connectw.exe and the default location is
c:\shiva\connectw.exe.
7. Once the executable file has been selected, choose the OK
button in the Open window.
8. The User Program window is displayed again and the name
field can be changed to give the button being created a
different name. If no name is entered, a button is created
with a default name of the executable file.
9. Choose the OK button to update the profile settings.
The User Program button previously selected is updated in the
ADTRAN Express Configuration Wizard window to reflect the
new profile name. To launch the application, choose this button
61200.153L1-13 Express XR/XRT Quick Start Guide 43
Page 56

Chapter 4. Application Configuration
and follow the application documentation for complete setup
information.
BBS Applications
To access a bulletin board service a new profile will need to be
created and the protocol of the bulletin board service must be
known. HyperACCESS is a Microsoft windows communications
package, included with the ADTRAN Express Configuration
Wizard software, for use in accessing bulletin board services. To
define a custom HyperACCESS session use the following
procedure:
Defining a Custom HyperACCESS Session
The following procedure explains how to create a custom
HyperACCESS session that can be launched using an icon in the
HyperACCESS Phonebook menu.
1. Choose the HyperAccess button in the ADTRAN Express
Configuration Wizard window. The Phonebook window is
displayed.
2. Press the New button in the Phonebook window. The
Description window is displayed.
3. Type in a name for the session in the System Name box.
4. Choose an icon for the session in the Icon box.
5. Choose the OK button.
6. Verify and enter the following settings:
Phone Number to Dial
Baud Rate
COM Port
Modem
7. Choose the OK button.
8. Choose the Establish a Connection button on the tool bar
(the first button on the left). Once connection is established,
Connected is displayed at the bottom of the Session window.
9. When the session is complete, disconnect the call by choosing the Break a Connection button on the tool bar (second
44 Express XR/XRT Quick Start Guide 61200.153L1-13
Page 57

Chapter 4. Application Configuration
button from the left). Disconnected is displayed at the
bottom of the Session window.
10. Save the file by selecting Save in the File menu.
11. Select Close in the File menu.
This custom session can now be used by double-clicking on the
new icon just created.
61200.153L1-13 Express XR/XRT Quick Start Guide 45
Page 58

Chapter 4. Application Configuration
46 Express XR/XRT Quick Start Guide 61200.153L1-13
Page 59

TROUBLESHOOTING GUIDELINES
This section provides troubleshooting techniques to possible
problems that may be encountered while operating the Express
XR/XRT. If problems persist contact ADTRAN technical support
for assistance (see the back cover of this manual).
Power/Line LED is Off
Indicates a problem with the power to the unit. Verify the power
cord is connected to the Express XR/XRT and is plugged into a
known working 120 volt AC electrical outlet.
Chapter 5. Troubleshooting
Chapter 5
Troubleshooting
Power/Line LED Flashes and B1 and B2 LEDs are Off
This indicates a problem with the physical connection of the
ISDN line from the local telephone company to the Express XR/
XRT.
1. Verify the large end of the RJ-45 to RJ-11 telephone cable
(included with the Express XR/XRT) is connected to the
ISDN connector on the rear panel of the Express XR/XRT.
2. Verify the small end of the RJ-45 to RJ-11 telephone cable is
connected to the ISDN telephone wall jack installed with
Basic Rate ISDN.
3. Contact the local telephone service provider.
61200.153L1-13 Express XR/XRT Quick Start Guide 47
Page 60

Chapter 5. Troubleshooting
Power/Line LED, B1, and B2 LEDs Flash Green
This indicates a configuration problem. Verify the following
information is correct:
• Switch Type
• Service Profile Identifiers (SPIDs)
• ISDN Phone Numbers
This information can be viewed by choosing the Status Register
button under the Diagnostics tab of the ADTRAN Express
Configuration Wizard window or the Configuration Screen in
the VT 100 menu system. The Link Status should indicate Link
Up if all configuration information is correct and the unit is
properly connected. If the link status is good and calls still can
not be placed, review the section for Dial-Up Connection Problems.
Auto-Detect can be used under the Wizard button in the ADTRAN Express Configuration software (or by using the Auto-
Detect SPIDs/Switch option in the Configuration screen of the
VT 100 menus) to automatically detect the SPIDs and the Switch
Type.
Look for the following with the COM port setup:
• IRQ conflicts.
• Wrong DTE speed.
• Use Microsoft diagnostics (msd.exe) to verify the COM port
has 16550 UART (for speeds of 115.2 kbps and below) or a
16650 UART (for speeds up to 230.4 kbps).
• Proper COM driver is installed (not provided) to support DTE
speeds above 19.2 kbps.
Verify the correct protocol is selected:
• PPP or V.120 generally for Internet applications
• V.120 or Async BONDING for work-at-home
Dial-Up Connection Problems
Many connection problems can be diagnosed by viewing the
status buffer message returned from the ISDN network and the
Express XR/XRT. These messages are accessed by choosing the
Status Buffer button in the Diagnostics tab of the ADTRAN
Express Configuration window.
48 Express XR/XRT Quick Start Guide 61200.153L1-13
Page 61

Chapter 5. Troubleshooting
The Status buffer can also be accessed using the key sequence
Ctrl+V in the VT 100 menu system. Issue the AT command
AT!V from a terminal emulation package such as HyperACCESS
to invoke the VT100 menu system.
Auto-detect Switch/SPIDs Remains at Link Down
The Link Down condition persisting for longer than 15 minutes
indicates a problem with the ISDN line provided from the
telephone company. The ISDN physical layer device has not
been able to synchronize to the network. Ensure the RJ-45 to RJ11 telephone cable is correctly installed between the Express XRT
and the ISDN wall jack and that the Express XR/XRT is powered
on. If the wall jack does not have ISDN installed on the two
middle pins (tip, ring), the Express XR/XRT will never synchronize to the telephone switching equipment. Call the local
telephone company and have them check the ISDN line for
correct operation.
Express XR/XRT Not Detected
If the Express Configuration Wizard cannot detect the Express
XR/XRT verify the following:
1. The Express XR/XRT is powered on.
2. No other Windows applications are running that could be
using the COM port to which the Express XR/XRT is
attached. A Windows application does not have to be active
to tie up a COM port, be sure to check the Windows 95
Taskbar for any suspended applications (such as
HyperTerminal and HyperACCESS) that may be using the
COM port. If any are minimized, these must be closed
before starting the Express Configuration Wizard.
3. If you are operating the Express XR/XRT at 230.4 kbps,
ensure that switch 1 on the rear panel is off. This is required
for operation at 230.4 kbps. Also, confirm that the computer
has a 16650 UART.
61200.153L1-13 Express XR/XRT Quick Start Guide 49
Page 62

Chapter 5. Troubleshooting
External Analog Modem Not Detected
If the Express Configuration Wizard cannot detect the external
analog mode verify the following:
1. The external analog modem is powered on.
2. The external analog modem is properly installed and
configured for use with the Express Configuration Wizard.
See Configuring an External Modem for more details on the
required settings.
Difficulty with 230.4 kbps Operation
If the Express XR/XRT does not work when the DTE rate is set
to 230.4 kbps inside Windows, verify the following:
1. Verify that switch 1 on the back of the Express XR/XRT is
set to off (up).
2. Verify that a high speed serial card with a 16650 UART is
being used and the software drivers to support the extended
baud rate tables are installed.
Dial-Up Networking Difficulty
If Windows 95 Dial-Up Networking cannot talk to the Express
XR/XRT, check the modem configuration for the Express XR/
XRT. Ensure the bit rate for the DTE is set correctly. If the PC is
not equipped with a 16650 UART then the fastest DTE operation
speed is 115.2 kbps. Ensure the speed is not higher than the PC
and modem can support.
50 Express XR/XRT Quick Start Guide 61200.153L1-13
Page 63

AT Commands
While a call is not established, the DTE port accepts AT commands. During this time, the CD signal is inactive. When a call
is established, the port is used for data. This data mode is
indicated by the CD signal active. The Express XR/XRT can be
configured and controlled with AT commands from a serial port
similarly to analog modems.
To exit data mode and enter command mode, the serial port
must transmit a proper escape sequence to the Express XR/XRT.
A specified time delay must occur between the last data character and the first escape sequence character. This is the guard
time delay, and it can be changed by writing a value to the S12
register. The default value for the guard time is one second. For
a valid escape sequence to occur, the DTE must transmit the
escape code character three times in succession with delay
between each character being less than the guard time. The
default escape sequence is +++.
Appendix A. AT Commands and S-Registers
Appendix A
AT Commands and S-Registers
Once command mode is entered, AT commands can be transmitted to the Express XR/XRT to configure most of the options, dial
remote Express XR/XRTs, or initiate tests to check both the
Express XR/XRT and the network connections. All command
lines must begin with the AT character set in either capital or
lower case letters. To return an active call to the on-line state
type ATO.
The command line may contain a single command or a series of
commands after the AT attention code. AT commands _L1 and
_L0 are exceptions and must be on a separate line followed by
Enter. When a series of commands are used, the individual
61200.153L1-13 Express XR/XRT Quick Start Guide 51
Page 64

Appendix A. AT Commands and S-Registers
commands may be separated with spaces for readability. The
maximum length for a command line is 40 characters. Each
command line is executed by the Express XR/XRT upon receipt
of a terminating character. The default terminating character is a
carriage return (ASCII 013), but it can be changed by writing a
different value to register S3. Before the terminating character is
transmitted, the command line can be edited by using the
backspace character (ASCII 008) to erase errors so the proper
commands can be entered.
Using an AT Command
Type AT followed by the letter of the command and numeric
value of the setting desired and then press Enter. The following
command returns the software version of the unit:
Using S-Registers
The configuration of the Express XR/XRT can be changed or
reviewed with S-registers. See the section S-Register List in this
chapter for a description of each S-register and its corresponding
range of values.
ATI1
Reading an S-Register
Type ATS followed by the number of the S-register to be read
followed by a question mark and press Enter.
ATS0?
Reading an S-Register String
The Express XR/XRT uses S-register strings to store strings of
digits for stored phone numbers, SPIDs, etc. Type ATSS followed by the number of the string S-register to be read followed
by a question mark and press Enter.
ATSS80?
52 Express XR/XRT Quick Start Guide 61200.153L1-13
Page 65

Appendix A. AT Commands and S-Registers
Changing an S-Register
Type ATS followed by the number of the S-register to be
changed, an equal sign, the numeric value to be assigned to the
register, then press Enter.
ATS0=2
Changing a String S-Register
Type ATSS followed by the number of the string S-register to be
changed, an equal sign, the numeric string to be assigned to the
register, then press Enter.
ATSS80=5551212
Dialing a Call using the AT Command Processor
To dial a call using the DTE terminal and AT commands type
ATD, ATDT, or ATDP and the telephone number on one line
and press Enter.
A TD5551212
To end an active call with the AT command processor press the
break in key sequence +++ or the redefined key then type ATH
and press Enter to hang up the line.
61200.153L1-13 Express XR/XRT Quick Start Guide 53
Page 66

Appendix A. AT Commands and S-Registers
Command Function
A Answer. Places the Express XR/XRT in answer mode.
AT!S Displays Status Buffer.
AT!S1 Displays Link Status
AT!V Configuration Menu.
AT!Z Detect a modem connected to the Express XRT.
D Dial. Precedes the telephone access number
[ATD5551212].
H Hang up. Disconnects the current call.
I0 Identify unit. Commands the unit to display model
number.
I1 Identify software. Commands the unit to display
software version.
O On-line. Commands the unit to go back on line.
S S Register.
SS S String register.
Z Reset. Resets the AT command processor.
&W Save. Save current configuration to EEPROM.
+++ Break in. Break in AT command processor during an
active call. The break in key is defined in S2.
Carrier Detect (CD) Control Line Options
&C0 CD forced on.
&C1 CD normal.
&C2 CD off with local disconnect (LOCD).
&C3 CD off with link down.
Data Terminal Ready (DTR Control Line Options)
&D0 Ignore DTR.
&D1 DTR off forces command.
&D2 Idle when off. DTR off forces idle (On allows auto
answer).
54 Express XR/XRT Quick Start Guide 61200.153L1-13
Page 67

Appendix A. AT Commands and S-Registers
Command Function
Generic Unit Configurations
&F0 Factory Default (fallback auto-protocol detect)
&F1 Internet 64K
&F2 Internet 128K
&F3 Remote access 64K
&F4 Remote access 128K
&F7 Configures unit for Dial 57.6k async
&F8 Configures unit for Dial 115.2k async
&F11 Configures unit for FALLBACK
Calling Number Identifiers
&N0 Number 1. Read far-end phone number 1 if service
subscribed from telephone company.
&N1 Number 2. Read far-end phone number 2 if service
subscribed from telephone company.
Clear-To-Send (CTS) Control Line Options
&R0 Follows RTS
&R1 Forced CTS
Data Set Ready (DSR) Control Line Options
&S0 DSR forced on
&S1 DSR if call up
&S2 DSR off if link down
Accessing Stored numbers for Dialing Options*
&Z0 Stored number 0
&Z1 Stored number 1
&Z2 Stored number 2
&Z3 Stored number 3
&Z4 Stored number 4
&Z5 Stored number 5
&Z6 Stored number 6
&Z7 Stored number 7
&Z8 Stored number 8
&Z9 Stored number 9
*These presets are invoked by &Z0 through &Z9 AT commands.
They access the stored numbers used for dialing.
61200.153L1-13 Express XR/XRT Quick Start Guide 55
Page 68

Appendix A. AT Commands and S-Registers
Command Function
Local Echo Options
E0 Echo off. Does not allow command characters typed to
be displayed on the screen.
E1 Echo on. Allows the command characters typed to be
displayed on the screen.
AT Command Response Message Options
Q0 Response messages on
Q1 Response messages off
AT Command Response Message Types
V0 Numeric response messages
V1 Verbal response messages
AT Command Connect Message Options
X0 Simple connect message
X1-7 Connect messages with bit rate
Ready-To-Send (RTS) Control Line Options
_D0 1 mS delay
_D1 18 mS delay
ISDN Switch Type Options
_S0 5ESS
_S1 DMS-100
_S2 National ISDN-1
Data Flow Control Options
\Q0 No flow control
\Q1 Software flow control (XON/XOFF)
\Q2 CTS only
\Q3 Hardware flow control (RTS/CTS) factory default
\Q4 Software from DCE only
DTE and Modem Interface Selection
_L0 Disable external analog modem connected to the Express
XR/XRT modem port.
_L1 Enable external analog modem connected to the Express
XR/XRT modem port.
56 Express XR/XRT Quick Start Guide 61200.153L1-13
Page 69

Appendix A. AT Commands and S-Registers
S-REGISTER LIST
S0..... AUTO ANSWER Determines how the Express XR/XRT answers
an incoming call.
0 = Disable (Express XR/XRT does not
answer call).
1 = Enable (Express XR/XRT answers all
calls).
2 = Dump all calls.
S2..... ESCAPE............... Determines which key or character (in
CHARACTER ASCII code) defines the escape command. The
standard escape character is a plus (+) sign
(ASCII value of 43 decimal). To change the
character set, set S2 to the desired ASCII value.
Range = 0 to 127
S3..... END OF LINE .... Determines which key or character (in
CHARACTER ASCII code) ends a command line. The stan-
dard end-of-line character is the carriage return
(ASCII value of 13 decimal).
Range = 0 to 127
S4..... LINE FEED ......... Determines which key or character (in
CHARACTER ASCII code) advances the cursor to the next line
after ending a command line or after an Express
XR/XRT message. The standard character is the
line feed (ASCII value of 10 decimal).
Range = 0 to 127
S5..... BACK SPACE .... Determines which key moves the cursor back
CHARACTER one space to erase a character. The standard
character is the backspace (ASCII value of 8
decimal).
Range = 0 to 127
S7..... CONNECT ......... Determines how long the Express XR/XRT waits
TIME for an outgoing call to be answered.
15 = 15 seconds
30 = 30 seconds
60 = 1 minute
120 = 2 minutes
240 = 4 minutes
S12... ESCAPE TIME ... Determines the delay required immediately
before and after entering the escape command
for the Express XR/XRT to recognize and
61200.153L1-13 Express XR/XRT Quick Start Guide 57
Page 70

Appendix A. AT Commands and S-Registers
execute the command.
Range = 0 to 127
S14... MISC BITS ......... Miscellaneous bits (bit 8 is most significant bit).
Bit 2 = 1: Enables on screen echo of AT commands.
Bit 2 = 0: Disables on screen echo of AT
commands.
Bit 3 = 0: Enables AT responses from the
Express XR/XRT.
Bit 3 = 1: Disables AT responses from the
Express XR/XRT.
Bit 4 = 1: Enables AT responses to be displayed
in text form.
Bit 4 = 0: Enables AT responses to be displayed
in numeric form.
Bit 7 = 1: Disable PPP ACCM spoofing.
Bit 7 = 0: Enable PPP ACCM spoofing.
Bit 8 = 1: Ring indicator uses cadence.
Bit 8 = 0: Ring indicator remains on.
S15... ASYNC ................ Asynchronous BONDING method.
BONDING 0 = ADTRAN revision 0 (default)
1 = Multi-vender option
S22... MSG BITS .......... Miscellaneous message bits (bit 8 is most
significant bit).
Bit 5 = Bit 6 = Bit 7 = 1 Allows connect mes-
sage with baud rate.
Bit 5 = Bit 6 = Bit 7 = 0 Connect message
without baud rate.
S25... DTR DETECT .... Determines time, in hundredths of a second, that
TIME must elapse before the Express XR/XRT recog-
nizes a change in DTR.
Range = 0 to 255
S27... PPP MODE ......... Value determines whether or not PPP will be a
single-link or multilink connection.
0 = Single-link operation (default)
1 = Multilink operation
2 = Use compression
S30... DTE CTS ............. Controls the operation of the DTE connector
CTS line.
0 = Follows RTS
1 = Force CTS
S31... DTE RTS ............. Controls operation of the RTS line.
58 Express XR/XRT Quick Start Guide 61200.153L1-13
Page 71

Appendix A. AT Commands and S-Registers
0 = 1 ms delay
17 = 18 ms delay
S32... DTE DSR ............ Controls the operation of the Data Set Ready
signal on the DTE connectors.
0 = Force DSR on always
1 = DSR off OOS + Test
2 = DSR off Link Down
S33... DTE CD............... Controls the operation of the Carrier Detect line
on the DTE connectors.
0 = Force CD on always
1 = CD is active during a call (Normal
Operation)
2 = Off with LOCD
3 = Off link down
S34... DTE DTR ............ Determines how the Express XR/XRT responds
to changes in DTR. This is a bit-mapped register.
0 = Ignore DTR
1 = Force AT command mode when DTR is off
2 = Dump incoming call when DTR is off
4 = Hang up incoming call when DTR is off
8 = Hang up outgoing call when DTR is off
16 = Answer incoming call when DTR is on
28 = Idle when off
32 = Dial SN0 when DTR is on
64 = Dial SN0 when DTR transitions from off to
on
S40... BOND TXINIT .. Specifies the number of seconds the originating
endpoint attempts to detect the Async BONDING negotiation pattern from the answering
endpoint before deciding the Async BONDING
call has failed.
0 to 255, 10 sec is default.
S41... BOND TXFA ...... Specifies the number of seconds both endpoints
attempt to detect the async BONDING frame
pattern when a call is connected before deciding
the async BONDING call has failed. When
operating with other manufacturer's async
BONDING equipment it may be necessary to
lengthen this timer so that it matches TXADD01.
0 to 255, 10 sec is default.
61200.153L1-13 Express XR/XRT Quick Start Guide 59
Page 72

Appendix A. AT Commands and S-Registers
S42... BOND.................. The number of seconds both endpoints wait for
TXADD01 the additional call to be connected at the end of
negotiation before deciding the async BONDING call has failed. When dialing overseas it
may be necessary to lengthen this timer to allow
for slower call routing.
0 to 255, 50 sec is default
S43... BOND TXDEQ .. The number of seconds both endpoints attempt
to equalize the network delay between the
bearer channels before deciding the Async
BONDING call has failed.
0 to 255, 50 sec is default
S44... BOND TANULL The number of seconds the answering endpoint
attempts to detect the Async BONDING negotiation pattern from the originating endpoint
before aborting to clear channel mode. It may
be necessary to shorten this timer if the DTE
equipment connected to the Express XR/XRT
also has timer constraints for completing nonBONDING parameter negotiation.
0 to 255, 10 sec is default
S45... BOND TCID ...... The number of seconds both endpoints attempt
to negotiate agreeable values for bearer channels
and channel capacities before deciding the async
BONDING call has failed.
0 to 255, 5 sec is default
S52... SWITCH TYPE .. Selects the network switch type for dial service.
0 = AT&T 5ESS
1 = Northern Telecom DMS-100
2 = National ISDN-1
S53... CALL TYPE ........ Call type (Dial service only).
0 = Speech
1 = Audio
2 = 56 Kbps data
3 = 64 Kbps data
S54... PROTOCOL ....... Rate adaption protocol type.
TYPE 2 = Async BONDING
6 = V.120
11 = FALLBACK
12 = PPP async-to sync conversion
60 Express XR/XRT Quick Start Guide 61200.153L1-13
Page 73

Appendix A. AT Commands and S-Registers
S58... CALL ................... Allows the Express XR/XRT to screen incoming
SCREENING calls.
0 = Answer any call
1 = Answer only calls from numbers matching
those stored in SN0 through SN9.
SS60 SPID1 LOC......... SPID string location.
SS61 SPID2 LOC......... SPID string location.
SS62 LDN1 LOC.......... ISDN phone number string location.
SS63 LDN2 LOC.......... ISDN phone number string location.
S65... AUTOSPID ........ Sets the AutoSpid determination feature.
0 = Disable (default)
1 = Enable
SS67 AREA CODE...... Area code location.
S71... DTE RATE .......... Selects the DTE connector bit rate.
3 = 1200
6 = 2400
8 = 4800
11 = 9600
15 = 19200
17 = 38400
20 = 57600
23 = 115200
25 = 230400
S72... DATA BITS ........ Selects the number of asynchronous data bits.
0 = 8 bits
1 = 7 bits
S73... DTE PARITY...... Selects the number of asynchronous parity bits.
0 = None
1 = Odd
2 = Even
S74... DTE STOP .......... Selects the number of asynchronous stop bits.
0 = 1 stop bit
1 = 1.5 stop bits
2 = 2 stops bits
S75... DTE FLOW ......... Selects asynchronous flow control.
0 = None
1 = XON/OFF from DTE controls DCE
2 = XON/OFF from DCE controls DTE
61200.153L1-13 Express XR/XRT Quick Start Guide 61
Page 74

Appendix A. AT Commands and S-Registers
3 = Hardware
12 = Software
SS77 REMOTE............. Numeric password string for remote
NUMERIC configuration.
PASSWORD
The following are the string locations for stored numbers 0 - 9:
SS80 SN0 LOC............. Stored number 0 string
SS81 SN1 LOC............. Stored number 1 string. Used for second
number dialed in a multilink connection.
SS82 SN2 LOC............. Stored number 2 string
SS83 SN3 LOC............. Stored number 3 string
SS84 SN4 LOC............. Stored number 4 string
SS85 SN5 LOC............. Stored number 5 string
SS86 SN6 LOC............. Stored number 6 string
SS87 SN7 LOC............. Stored number 7 string
SS88 SN8 LOC............. Stored number 8 string
SS89 SN9 LOC............. Stored number 9 string
S90... CONFERENCE .. NI-1 feature identification number for
ID conferencing. See the ISDN service provider for
this ID.
S91... TRANSFER ID .. NI-1 feature identification number for transfer-
ring. See the ISDN service provider for this ID.
S93... CALL TYPE ........ Determines how incoming call is routed when
ROUTING connected to a point-to-point ISDN line.
0 = Route all call types to DTE
(XRT ONLY) 1 = Route Speech call types to POTS
2 = Route Speech and Audio call types to
POTS
S94... LOCAL TONES . Forces the POTS interface to generate all tones.
Bit 0 = 0: In-band tones from ISDN switch
(when available)
Bit 0 = 1:All tones generated locally
Bit 1 = 0:Warnings to POTS when unavailable
Bit 1 = 1:Disable all warnings to POTS
S118. CHAP Enable ..... 32 = CHAP enabled
0 = CHAP disabled (Windows 95 setting)
62 Express XR/XRT Quick Start Guide 61200.153L1-13
Page 75

LEDs
p
(
g
p
Appendix B. LEDs
Appendix B
LEDs
The Express XR/XRT front panel contains five LEDs associated
with the DTE port and the ISDN interface as shown in Figure B-1
and described in Table B-A.
TD RD
Express XRT
LED Color Description
B1 or B2 Slow Green Flash Attempting SPID registration.
Fast Green Flash Attempting TEI registration.
Off Ready. No data traffic.
Solid Green B channel passing data (in-use).
Solid Amber Loo
Amber Flash Remote test ori
PWR/Line Green (On Solid) Link established.
Off No Power.
Flashing Link is not established.
TD Green Transmit Data (TxD).
RD Green Received Data (RxD).
B1 B2
TEST
back protocol test
one or both channels).
Calls can be placed.
Calls cannot be
PWR
LINE
Front Panel LEDs
Express XR/XRT LEDs
inate.
laced.
Figure B-1
Table B-A
61200.153L1-13 Express XR/XRT Quick Start Guide 63
Page 76

Appendix B. LEDs
64 Express XR/XRT Quick Start Guide 61200.153L1-13
Page 77

Appendix C. Status Buffer Messages
Appendix C
Status Buffer Messages
2047 BERT orig
Test remote originated 2047 BERT (bit error rate test) pattern.
2047 loopbk ansr
Test remote answered 2047 BERT pattern.
Answer
The EXPRESS XR answered a call on either the first or second
channel. The calling phone number is displayed if available.
ACCESS_INFO_DISCARDED
The network was unable to deliver access information to the far
end.
Area Code Req'd
Area code required for Auto Spid determination.
AutoSpid Active
Unit is attempting automatic detection of switch type and SPID
numbers.
AutoSpid Disable
The user has stopped the automatic SPID detection process.
AutoSpid Failed
Automatic determination of switch type and SPID numbers
failed.
AutoSpid Passed
Automatic determination of switch type and SPID numbers
succeeded.
61200.153L1-1 Express XR/XRT Quick Start Guide 65
Page 78

Appendix C. Status Buffer Messages
AutoSwitch YYY
Switch type YYY detected during AutoSpid determination.
(YYY can be DMS, NI-1, or AT&T)
Back to online
Express XR went back on line.
Bad async BPS
The Bonding protocol determined that the selected asynchronous bit rate is not supported.
Bad AT numeric
User issued an AT command with an argument that was out of
range.
Bad call type
Express XR placed a call with an improper call type.
Bad DTE Baud
The DTE bit rate does not match a valid bit rate for the protocol
selected.
66
BAD_INFO_ELEM
Call control error.
Bad phone number
Express XR/XRT attempted to call an invalid phone number.
BEAR_CAP_NOT_AVAIL
The bearer channel requested is not available.
BEARER_CAP_NOT_AUTH
Bearer capability requested is not authorized.
Bearer Mode?
Incoming call is not of a type the Express XR/XRT can accept.
Bearer Info Cap?
Incoming call information transfer capability is not known.
BONDING (+/-XXX)
The amount of bytes or corrected delay between the B2 and B1
Bearer channels (XXX can range from -8000 to +8128).
Express XR/XRT Quick Start Guide 61200.153L1-1
Page 79

Appendix C. Status Buffer Messages
BPS mismatch
Bonding negotiation found a bit rate mismatch.
Break to AT cmd
User issued a break-in request.
Break ignored
User issued an extra break-in request.
BUSY
The called number is busy.
B-X disconnected
B-channel disconnected. X can be 1 or 2 representing the appropriate B-channel.
CallID 1 in use
The Express XR/XRT tried to place a call using SPID 1 when
SPID 1 was already in use.
CallID 2 in use
The Express XR tried to place a call using SPID 2 when SPID 2
was already in use.
Call lost
Held call could not be retrieved.
Call not ringing
User executed an answer command (ATA) but there was not a
call present.
CALL_REJECTED
The call has been rejected by the ISDN network.
Can't go online
Express XR/XRT cannot go back on line. Unknown AT command user issued an unknown AT command.
CHAN_DOES_NOT_EXIST
The user asked for a bearer channel that is not present.
CHAN_NOT_IMPLEMENTED
The network or far end does not support the bearer capability
requested.
61200.153L1-1 Express XR/XRT Quick Start Guide 67
Page 80

Appendix C. Status Buffer Messages
CHANNEL_UNACCEPTABLE
The channel requested has not been subscribed.
CID>0 rcvd
Received an incoming call from a third party during negotiations
with a far-end BONDING unit on the use of the second Bearer
channel.
Connect Timeout
Call attempt does not connect in x amount of time.
DEST NOT ISDN
The number called is not ISDN (warning only).
DEST_OUT_OF_ORDER
The called number is out of order.
Dial
The Express XR/XRT placed a call on either the first or second
channel. The number called is displayed following the message.
Disconnect
The call on either the first or second channel was disconnected
from the network. The far-end phone number is displayed if
available. Ensure flow control setting match on both terminal
adapters.
68
Disconnect Req
Far-end unit disconnected during BONDING negotiation.
DTR not up
Express XR/XRT tried to place a call in a dialing mode that
requires DTR to be in an active state, but it is not.
Dump call
The Express XR/XRT could not accept an incoming call because
it was already involved in a call.
Dump
An incoming call on either the first or second channel was
discarded by the Express XR/XRT. The calling number is
displayed if available.
Express XR/XRT Quick Start Guide 61200.153L1-1
Page 81

Appendix C. Status Buffer Messages
FACILITY_NOT_IMPLEMENT
The network does not support the requested supplementary
service.
FACILITY_NOT_SUBSCRIBED
The channel type requested has not been subscribed.
FACILITY_REJECTED
A facility requested by the user cannot be provided by the
network.
Factory Reset 0
Unit defaulted to factory configuration.
FlowCtl mismatch
Bonding negotiation determined a flow control mismatch.
FlowCtl required
Bonding negotiation determined that flow control needs to be
optioned on.
Hangup
The call on either the first or second channel was disconnected
by the Express XR/XRT. The far-end phone number is also
displayed.
Hold
Voice call is on hold.
ID = XXXX
Calling party number.
INCOMING_CALL_BARRED
The network will not allow an incoming call.
INCOMPATIBLE_DEST
The called number cannot accept the type of call that has been
placed.
INTERWORKING_UNSPEC
A non-ISDN network sent an unspecified message.
Inv Password
Remote configuration failed due to incorrect password.
61200.153L1-1 Express XR/XRT Quick Start Guide 69
Page 82

Appendix C. Status Buffer Messages
INVALID_CALL_REF
Call control error.
INVALID_ELEM_CONTENTS
Call control error.
INVALID_MSG_UNSPEC
Invalid message: protocol error.
INVALID_NUMBER_FORMAT
The dialed number has an invalid format.
L1 not up
The network interface is not active.
L2 not up
The data link layer interface is not active.
L3 not up
The call control interface is not active.
L2 #2 not up
The data link layer interface for a second call (BONDING) is not
active.
70
L3 #2 not up
The call control layer interface for a second call (BONDING) is
not active.
LDN TOO LONG
The local directory number entered has too many digits.
Login failed
Unable to connect to remote unit on remote configuration
attempt.
MANDATORY_IE_LEN_ERR
Mandatory information element length error.
MANDATORY_IE_MISSING
Mandatory information element missing.
MULTILINK PPP UP
Unit connected with Multilink PPP.
Express XR/XRT Quick Start Guide 61200.153L1-1
Page 83

Appendix C. Status Buffer Messages
Need 64K call
The BONDING protocol requires the Express XR/XRT to be
configured for 64K data call types.
NETWORK BUSY
The ISDN switch is busy and unable to process a call.
NETWORK_CONGESTION
The phone network is currently congested.
NETWORK_OUT_OF_ORDER
The phone network is out of order.
No calling ID
Calling party number not provided.
NO_CIRCUIT_AVAILABLE
The requested bearer channel is not available.
NONEXISTENT_MSG
Nonexistent/undefined message received from network.
NO_ROUTE
NO_ROUTE_DEST
The phone network was unable to find a route to the destination
number.
No Sreg number
Attempted to change an S-register but did not specify a specific
S-register (example: ATS=1).
No Sreg value
Attempted to change an S-register but did not specify a value
(example: ATS= ).
No String Space
Stored number string space is full.
NO_USER_RESPONDING
The dialed number is not responding.
NORMAL_CLEARING
The network is disconnecting the current call.
61200.153L1-1 Express XR/XRT Quick Start Guide 71
Page 84

Appendix C. Status Buffer Messages
NOT end2end ISDN
The path that the call was routed over is not ISDN from end-toend (warning only).
NUMBER_CHANGED
The number dialed has been changed.
OUTGOING_CALL_BARRED
The network will not allow the outgoing call to be placed.
Phone # Req'd
Phone number required for AutoSpid determination.
PPP COMPRESSION UP
Unit connected with compression.
PPP LINK LOOPBACK
Network link is looped backed.
PPP Timeout
PPP negotiation failed.
PROTOCOL_ERROR
Call control error.
72
PUMPIO: dpump-quit
Rate adaption stopped due to DTE error.
Rcv Cause XXX
Undefined cause message received.
REQ_CHANNEL_NOT_AVAIL
The channel type requested is currently not available.
Remote not ISU
Bonding negotiation determined the far-end unit is not another
ISU product.
RESOURCE_UNAVAIL
The requested resource is unavailable.
RESP_TO_STAT_ENQ
Response to status enquiry.
Express XR/XRT Quick Start Guide 61200.153L1-1
Page 85

Appendix C. Status Buffer Messages
Restarting Rate
Unit restarts DTE rate.
Retrieve
Voice call is retrieved from a holding state.
Ring
An incoming call on either the first or second channel (third
channel if call waiting) entered the Ring state. The calling
phone number is displayed if available.
S cmd not = or ?
Proper syntax not used.
SERVICE_NOT_AVAIL
The requested service is not available.
SOURCE NOT ISDN
The incoming calling party is not ISDN (warning only).
TANULL expired
Bonding timer TANULL expired. Received call from nonBONDING equipment.
TEMPORARY_FAILURE
The network has temporarily failed, try the call again.
TIMER_EXPIRY
Call control error.
TXADD01 expired
Bonding timer TXADD01 expired.
TXDEQ expired
B-channel delay equalization during bonding failed.
TXFA1 expired
Bonding timer TXFA1 expired.
TXFA2 expired
Bonding timer TXFA2 expired.
TXINIT expired
Bonding timer TXINIT expired; called non-BONDING equipment.
61200.153L1-1 Express XR/XRT Quick Start Guide 73
Page 86

Appendix C. Status Buffer Messages
UNASSIGNED_NUMBER
The phone number dialed does not exist.
Unknown AT cmd
User issued an unknown AT command.
USER_ALERT_NO_ANS
Ringing call is not answered.
USER_BUSY
The dialed number is busy.
V120 connected
The V.120 rate adaption successfully connected to the far-end
unit.
V120 Timeout
V.120 negotiation failed.
WRONG_MESSAGE
Call control error.
74
WRONG_MSG_FOR_STATE
Call control error.
Express XR/XRT Quick Start Guide 61200.153L1-1
Page 87

Appendix D. Loop Status Messages
Appendix D
Loop Status Messages
This appendix lists the status line messages and their definitions.
Messages shown entirely in capital letters are generated by the
ISDN network. Messages with lower case letters are generated
by the Express XR/XRT.
AutoSpid X
The SPID is being attempted by the AutoSpid determination. X
starts at 0 and counts up for each SPID tried.
Call Connect B1
Bearer channel 1 is connected and is active.
Call Connect B2
Bearer channel 2 is connected and is active.
Call Connect B1/B2
Bearer channels 1 and 2 are active.
Disconnecting
The current phone call is being disconnected (hung up).
Getting TEI #1
The Express XR/XRT is receiving its first TEI from the network.
Getting TEI #2
The Express XR/XRT is receiving its second TEI from the
network.
Link Down
The network interface is not in sync.
Network Loopback
The Express XR/XRT has been commanded to perform an ISDN
loopback toward the network.
61200.153L1-13 Express XR/XRT Quick Start Guide 75
Page 88

Appendix D. Loop Status Messages
Ready
The unit is ready to make or accept a call.
Register SPID #1
The Express XR/XRT is registering its first SPID with the network.
Register SPID #2
The Express XR/XRT is registering its second SPID with the
network.
Ringing
The phone number just dialed is ringing.
xxxxx nnnn
A rate adaption is running at the bit rate specified by nnnn.
xxxxx Quitting
A rate adaption protocol is turning off.
xxxxx Ready
A rate adaption protocol is ready.
76
xxxxx Setup
A rate adaption protocol is setting up.
YYYY
ISDN switch-type selected.
xxxxx can be any of the following:
Bonding
Bandwidth on demand industry users group protocol.
PPP
Point-to-point rate adaption protocol.
V120
V.120 rate adaption protocol.
Express XR/XRT Quick Start Guide 61200.153L1-13
Page 89

PIN 13
Appendix E. Connector Pinouts
Appendix E
Connector Pinouts
PIN 1
FEMALE
PIN 25
Pin Name I/O Description
1 ......... Shield ....................I/O............................ Shield for cable
2 ............ TD.........................I.............................. Transmitted Data
3 ............RD .......................O............................. Received Data
4 ...........RTS .......................I.............................. Request to Send
5 ...........CTS ......................O............................. Clear To Send
6 .......... DSR ......................O ............................. Data Set Ready
7 ............SG ...................... I/O............................ Signal Ground
8 ............CD .......................O............................. Carrier Detect
20 .........DTR .......................I.............................. Data Terminal Ready
22 .......... RI ........................O ............................. Ring Indicator
I = Input O = Output
PIN 14
Figure E-1
RS-232 Interface
Table E-A
RS-232 Interface
61200.153L1-1 Express XR/XRT Quick Start Guide 77
Page 90

Appendix E. Connector Pinouts
PIN 1
PIN 13
MALE
PIN 14
PIN 25
Modem Interface
Modem Interface
Pin Name I/O Description
1 ......... Shield ....................I/O ............................ Shield for cable
2 ............RD ....................... O............................. Received Data
3 ............ TD.........................I.............................. Transmitted Data
4 ...........RTS ...................... O............................. Request to Send
5 ...........CTS .......................I.............................. Clear To Send
7 ............SG ...................... I/O............................ Signal Ground
8 ............CD ........................I.............................. Carrier Detect
20 .........DTR ......................O............................. Data Terminal Ready
I = Input O = Output
Figure E-2
Table E-B
78
Express XR/XRT Quick Start Guide 61200.153L1-1
Page 91

Appendix E. Connector Pinouts
The RJ-11 POTS ports apply to the Express XRT only.
RJ-11 POTS Port Interfaces
POTS 1 Interface Pin 1
PIN 1 PIN 6
POTS 2 Interface Pin 1
PIN 1 PIN 6
Table E-C
Pin 2
Pin 3 R1
Pin 4 T1
Pin 5
Pin 6
Pin 2
Pin 3 R2
Pin 4 T2
Pin 5
Pin 6
Table E-D
RJ-45 ISDN Line Interface
PIN 1 PIN 8
ISDN
GND
GND
61200.153L1-1 Express XR/XRT Quick Start Guide 79
-
-
+
9v (XR)
+
48v (XRT)
Express XR and XRT Ground Pinouts
Pin 4 Ring
Pin 5 Tip
Figure E-3
Page 92

Appendix E. Connector Pinouts
80
Express XR/XRT Quick Start Guide 61200.153L1-1
Page 93

fold
Register now to be included in our
Preferred Customer Database!
You'll receive new product information and
product updates. Take a few minutes to fill out
this registration card-postage is paid.
Thank you!
ADTRAN provides a broad line of end-user equipment that supports a wide
range of business applications for host and remote sites including: ISDN
terminal adapters, inverse multiplexers, NT1s, 56k DDS DSU/CSUs, T1 DSU/
CSUs, and multiplexers. ADTRAN is also a leading supplier of DDS, ISDN,
and T1/HDSL digital loop products for the telephone operating companies
and many well known OEMs. For more information, select the appropri-
ate box.
End-User Equipment Telephone Company Equipment
ISDN ISDN
DDS DDS
T1 T1/HDSL
Wireless
Registration form continued inside.
Page 94

Express XR/XRT™ Warranty Registration Card
Date Purchased: _________________________________
Part Number: ____________________________________
Model purchased: XR XRT
Serial Number: __________________________________
Where did you purchase: ________________________
Where do you use a computer: (check all that apply)
Office Home On the Road
Where will this ISDN modem be used:
Business Home
Home business Elementary School
High School College/University
Federal Government State/Local Government
What is the primary business of your company:
Business services/Legal/Other services
Finance/Real Estate/Insurance
Manufacturing
Agriculture/Mining/Construction
Transportation/Utilities/Communications
Retail trade Wholesale trade
Health Government
Education Disability service
Other
What Primary application will this product be
used for: (check all that apply)
Internet Access Work at home
Modem Replacement
Other
How many employees are located at your
company:
1-19 20-49
50-99 100-499
500-999 1,000 or more
What operating system do you use:
OS/2 DOS
Windows 3.1 Windows 95
Windows NT Mac OS
Other
What type of computer do you use:
Apple Gateway
Packard-Bell AST
HP Toshiba
Compaq IBM
Dell NEC
Other
Number of ADTRAN products you own or use:
Which products: _________________________________
How did you learn about ADTRAN:
Advertisement
Article/review
Value Added Reseller
Catalog
Friend/colleagues
ADTRAN Home Page
Retail Store
Other
Did you use the Quick Start Guide for:
Installation Yes No
Configuration Yes No
Applications Yes No
Troubleshooting Yes No
Was the Quick Start Guide easy
to use: Yes No
Do you own a CD ROM drive: Ye s No
Did shipping container arrive in
good condition: Ye s No
Did equipment arrive in good
condition: Ye s No
Did you receive all the accessories: Ye s N o
Did the equipment operate
properly: Ye s No
First try: Ye s No
Successive attempts: Ye s N o
Which features do you like: _____________________
__________________________________________________
__________________________________________________
__________________________________________________
__________________________________________________
Which features do you dislike: __________________
__________________________________________________
__________________________________________________
__________________________________________________
 Loading...