

Page 1

TRACER 6000 SERIES
Integrated System Manual
12806410L2A TRACER 6410 2.4 GHz (High Power) System (Plan A)
12806410L2B TRACER 6410 2.4 GHz (High Power) System (Plan B)
12806420L1A TRACER 6420 5.8 GHz System (Plan A)
12806420L1B TRACER 6420 5.8 GHz System (Plan B)
12806420L2A TRACER 6420 5.8 GHz (High Power) System (Plan A)
12806420L2B TRACER 6420 5.8 GHz (High Power) System (Plan B)
612806420L1-1E
November 2005
Page 2

Trademarks TRACER 6000 Series Integrated System Manual
Trademarks
Any brand names and product names included in this manual are trademarks, registered trademarks, or
trade names of their respective holders.
To the Holder of the Manual
The contents of this manual are current as of th e date of publication. ADTRAN reserves the right to change
the contents without prior notice.
In no event will ADTRAN be liable for any special, incidental, or consequential damages or for
commercial losses even if ADTRAN has been advised thereof as a result of issue of this publication.
About this Manual
This manual provides a complete description of the TRACER 64x0 systems (TRACER 6410 and 6420)
and system software. The purpose of this manual is to provide the technician, system administrator, and
manager with general and specific information related to the planning, installation, operation, and
maintenance of the TRACER 64x0 systems. This manual is arranged so that needed information can be
quickly and easily found.
901 Explorer Boulevard
P.O. Box 140000
Huntsville, AL 35814-4000
Phone: (256) 963-8000
Copyright © 2005 ADTRAN, Inc.
All Rights Reserved.
Printed in U.S.A.
2 Copyright © 2005 ADTRAN, Inc. 612806420L1-1E
Page 3
TRACER 6000 Series Integrated System Manual Revision History
Revision History
Document
Revision
A December 2004 Initial release of manual to include the TRACER 6420 (5.8 GHz
B March 2005 Include E1 and E1 breakout panel inform ation and add ne w RF link
C June 2005 Added new real-time power reporting and support for new
D September 2005 Include information for new product offering (TRACER 6410
E November 2005 Include information for new product offering (TRACER 6420
Date Description of Changes
integrated system) and the Quad T1 and Ethernet Switch modules.
management bridge functionality. Update the Troubleshooting
Guide to include E1 information.
Quad E1 (120Ω) module.
2.4 GHz (High Power) system). Update the User Iinterface Guide
and MIB sections to include new fan and temperature alarm
information. Made minor corrections to calculations in the
Microwave Path Engineering section.
5.8 GHz (High Power) system).
Notes provide additional useful information.
Cautions signify information that could prevent service interruption or damage to
equipment.
Warnings provide information that could prevent endangerment to human life.
612806420L1-1E Copyright © 2005 ADTRAN, Inc. 3
Page 4

Safety Instructions TRACER 6000 Series Integrated System Manual
Safety Instructions
When using your telephone equipment, please follow these basic safety precautions to reduce the risk of
fire, electrical shock, or personal injury:
1. Do not use this product near water, such as a bathtub, wash bowl, kitchen sink, laundry tub, in a
wet basement, or near a swimming pool.
2. Avoid using a telephone (other than a cordless-type) during an electrical storm. There is a remote
risk of shock from lightning.
3. Do not use the telephone to report a gas leak in the vicinity of the leak.
4. Use only the power cord, power supply, and/or batteries indicated in the manual. Do not dispose of
batteries in a fire. They may explode. Check with local codes for special disposal instructions.
Save These Important Safety Instructions
4 Copyright © 2005 ADTRAN, Inc. 612806420L1-1E
Page 5
TRACER 6000 Series Integrated System Manual FCC-Required Information
FCC-Required Information
Federal Communications Commission Radio Frequency Interference Statement
This equipment has been tested and found to comply with the limits for a Class A digital device, pursuant
to Part 15 of the FCC Rules. These limits are designed to provide reasonable protection against harmful
interference when the equipment is operated in a commercial environment. This equipment generates,
uses, and can radiate radio frequency energy and, if not installed and used in accordance with the
instruction manual, may cause harmful interference to radio frequencies. Operation of this equipment in a
residential area is likely to cause harmful interference, in which case the user will be required to correct the
interference at his own expense.
Shielded cables must be used with this unit to ensure compliance with Class A FCC limits.
Changes or modifications to this unit not expressly approved by the party
responsible for compliance could void the user’s authority to operate the equipment.
Radio Frequency Interface Statement
This equipment has been tested and found to comply with the limits for an intentional radiator, p ursuant to
Part 15, Subpart C of the FCC Rules. This equipment generates, uses, and can radiate radio frequency
energy. If not installed and used in accordance with the instructions, it may cause interference to radio
communications.
The limits are designed to provide reasonable protection against such interference in a residential situation.
However, there is no guarantee that interference will not occur in a particular installation. If this equipment
does cause interference to radio or television reception, which can be determined by turning the equipment
on and off, the user is encouraged to try to correct the interference by one or more of the following
measures:
• Reorient or relocate the receiving antenna of the affected radio or television.
• Increase the separation between the equipment and the affected receiver.
• Connect the equipment and the affected receiver to power outlets on separate circuits.
• Consult the dealer or an experienced radio/TV technician for help.
Changes or modifications not expressly approved by ADTRAN could void the user’s
authority to operate the equipment.
612806420L1-1E Copyright © 2005 ADTRAN, Inc. 5
Page 6

FCC-Required Information TRACER 6000 Series Integrated System Manual
FCC Output Power Restrictions
The FCC does not require licensing to implement this device. License-free operation in the industrial,
scientific, and medical band is documented in FCC Rules Part 15.247. It is the responsibility of the
individuals designing and implementing the radio system to ensure compliance with any pertinent FCC
Rules and Regulations. This device must be professionally installed.
The FCC specifies the maximum transmitter power used for antennae of a given gain. FCC Rules Part 15,
Subpart 247 allow for a maximum power of 1 watt (30 dBm) into antennae of a gain less than or equal to 6
dBi. At 2.4 GHz (TRACER 6410), the 1-watt maximum transmitter power must be reduced by 1 dB for
every 3 dB of antenna gain over 6 dBi. This rule is shown in Table 5 on page 20. For the 5.8 GHz band
(TRACER 6420), the maximum output power is 1 watt (30 dBm) regardless of the gain of the attached
antenna. Since the TRACER 6420 L1 and L2 maximum transmit power is 100 milliwatts and
250 milliwatts, respectively, there is no reduction in transmitter output power required.
Exposure to Radio Frequency Fields
The TRACER 6410 is designed to operate at 2.4 GHz with 500 mW maximum transmit power, the
TRACER 6420L1 is designed to operate at 5.8 GHz with 100 mW maximum transmit power, and the
TRACER 6420L2 is designed to operate at 5.8 GHz with 250 mW maximum transmit power.
This level of RF energy is below the Maximum Permissible Exposure (MPE) levels specified in FCC OET
65:97-01. The installation of high gain antenna equipment in the system configuration may create the
opportunity for exposure to levels higher than recommended for the general population at a distance less
than 24 feet (7.3 meters) from the center of the antenna. The following precautions must be taken
during installation of this equipment:
Verify the antenna installation meets all regulations specified in the National Electric
Code (NEC) Article 810 with particular attention to clearances from power and lighting
conductors, mounting, grounding, and antenna discharge unit.
• The installed antenna must not be located in a manner that allows exposure of the general population to
the direct beam path of the antenna at a distance less than 24 feet (7.3 meters). Installation on towers,
masts, or rooftops not accessible to the general population is recommended; or
• Mount the antenna in a manner that prevents any personnel from entering the area within 24 feet
(7.3 meters) from the front of the antenna.
• It is recommended that the installer place radio frequency hazard warnings signs on the barrier that
prevents access to the antenna.
• Prior to installing the antenna to the TRACER output, make sure the power is adjusted to the settings
specified in Section 2 of this manual.
• During antenna installation, be sure that power to the TRACER equipment is turned off in order to
prevent the presence of microwave energy on the coaxial connector.
• During installation and alignment of the antenna, do not stand in front of the antenna assembly.
• During installation and alignment of the antenna, do not handle or touch the front of the antenna.
Per Industry Canada RSS210: “The installer of this radio equipment must ensure that the antenna is located
or pointed such that it does not emit RF field in excess of Health Canada limits for the general population;
consult Safety Code 6, obtainable from Health Canada’s website at www.hc-sc.gc.ca/rpb.These simple
precautions must be taken to prevent general population and installation personnel from exposure to RF
energy in excess of specified MPE levels.
6 Copyright © 2005 ADTRAN, Inc. 612806420L1-1E
Page 7

TRACER 6000 Series Integrated System Manual Warranty and Customer Service Information
Warranty, Customer Service, Product Support Information, and T raining
ADTRAN will repair and return this product within the warranty period if it does not meet its published
specifications or fails while in service. Warranty information can be found at www.adtran.com/warranty.
A return material authorization (RMA) is required prior to returning equipment to ADTRAN. For service,
RMA requests, training, or more information, use the contact information given below.
Repair and Return
If you determine that a repair is needed, please contact our Customer and Product Service (CaPS)
department to have an RMA number issued. CaPS should also be contacted to obtain information
regarding equipment currently in house or possible fees associated with repair.
CaPS Department (256) 963-8722
Identify the RMA number clearly on the package (below address), and return to the following address:
ADTRAN Customer and Product Service
901 Explorer Blvd. (East Tower)
Huntsville, Alabama 35806
RMA # _____________
Pre-Sales Inquiries and Applications Support
Your reseller should serve as the first point of contact for support. If additional pre-sales support is needed,
the ADTRAN Support website provides a variety of support services such as a searchable knowledge base,
latest product documentation, application briefs, case studies, and a link to submit a question to an
Applications Engineer. All of this, and more, is available at:
http://support.adtran.com
When needed, further pre-sales assistance is available by calling our Applications Engineering
Department.
Applications Engineering (800) 615-1176
612806420L1-1E Copyright © 2005 ADTRAN, Inc. 7
Page 8

Warranty and Customer Service Information TRACER 6000 Series Integrated System Manual
Post-Sale Support
Your reseller should serve as the first point of contact for support. If additional support is needed, the
ADTRAN Support website provides a variety of support services such as a searchable knowledge base,
updated firmware releases, latest product documentation, service request ticket generation and
trouble-shooting tools. All of this, and more, is available at:
http://support.adtran.com
When needed, further post-sales assistance is available by calling our Technical Support Center. Please
have your unit serial number available when you call.
Technical Support (888) 4ADTRAN
Training
The Enterprise Network (EN) Technical Training Department offers training on our most popular
products. These courses include overviews on product features and functions while covering applications
of ADTRAN's product lines. ADTRAN provides a variety of training op tions, including customized
training and courses taught at our facilities or at your site. For more information about training, please
contact your Territory Manager or the Enterprise Training Coordinator.
Training Phone (800) 615-1176, ext. 7500
Training Fax (256) 963-6700
Training Email training@adtran.com
8 Copyright © 2005 ADTRAN, Inc. 612806420L1-1E
Page 9

TRACER 6000 Series Integrated System Manual Table of Contents
Table of Contents
Section 1 System Description . . . . . . . . . . . . . . . . . . . . . . . . . . . . . . . . . . . . . . . . 11
This section of ADTRAN’s TRACER 6000 Series Integrated System Manual is designed for
use by network engineers, planners, and designers for overview information about the
TRACER 64x0 systems.
Section 2 Microwave Path Engineering Basics . . . . . . . . . . . . . . . . . . . . . . . . . . 15
Explains the basics of analyzing a wireless microwave link or path. Defines significant
parameters and makes several installation recommendations.
Section 3 Engineering Guidelines. . . . . . . . . . . . . . . . . . . . . . . . . . . . . . . . . . . . . 29
Provides information to assist network designers with incorporating the TRACER 64x0 system
into their networks.
Section 4 Network Turnup Procedure. . . . . . . . . . . . . . . . . . . . . . . . . . . . . . . . . . 43
Provides shipment contents list, grounding instructions, mounting options, and specifics of
supplying power to the unit.
Section 5 User Interface Guide . . . . . . . . . . . . . . . . . . . . . . . . . . . . . . . . . . . . . . . 53
Provides detailed descriptions of all menu options and configuration parameters available for
the TRACER 64x0.
Section 6 Detail Level Procedures. . . . . . . . . . . . . . . . . . . . . . . . . . . . . . . . . . . . . 89
Provides detailed instructions on performing common system tasks such as connecting to the
system and upgrading firmware.
DLP-1 Connecting a VT100 Terminal or PC to the CRAFT Port . . . . . . . . . . . . . . . . . . . . . . 91
DLP-2 Logging into the TRACER 64x0 . . . . . . . . . . . . . . . . . . . . . . . . . . . . . . . . . . . . . . . . . 93
DLP-3 Setting IP Parameters for the TRACER 64x0. . . . . . . . . . . . . . . . . . . . . . . . . . . . . . . . 95
DLP-4 Verifying Communications Over an IP LAN . . . . . . . . . . . . . . . . . . . . . . . . . . . . . . . . 99
DLP-5 Updating the Firmware Using TFTP. . . . . . . . . . . . . . . . . . . . . . . . . . . . . . . . . . . . . . 103
DLP-6 Updating the Firmware Using XMODEM . . . . . . . . . . . . . . . . . . . . . . . . . . . . . . . . . 107
Section 7 MIBs. . . . . . . . . . . . . . . . . . . . . . . . . . . . . . . . . . . . . . . . . . . . . . . . . . . . 109
Provides a listing of SNMP Management Information Bases (MIBs) supported by the
TRACER 64x0. This section also lists traps supported for each MIB.
Section 8 Troubleshooting Guide . . . . . . . . . . . . . . . . . . . . . . . . . . . . . . . . . . . . 125
Provides helpful information for troubleshooting common configuration problems for the
TRACER 64x0.
612806420L1-1E Copyright © 2005 ADTRAN, Inc. 9
Page 10

Table of Contents TRACER 6000 Series Integrated System Manual
10 Copyright © 2005 ADTRAN, Inc. 612806420L1-1E
Page 11

SYSTEM DESCRIPTION
This section of ADTRAN’s TRACER 6000 Series Integrated System Manual is designed for use by
network engineers, planners, and designers for overview information about the TRACER 64x0 systems.
It contains general information and describes physical and operational concepts, network relationships,
provisioning, testing, alarm status, and system monitoring. This section should be used in conjunction with
Section 3, Engineering Guidelines, of this manual.
CONTENTS
System Overview . . . . . . . . . . . . . . . . . . . . . . . . . . . . . . . . . . . . . . . . . . . . . . . . . . . . . . . . . . . . . . . 12
Features and Benefits . . . . . . . . . . . . . . . . . . . . . . . . . . . . . . . . . . . . . . . . . . . . . . . . . . . . . . . . . . . 12
Configuration and Management . . . . . . . . . . . . . . . . . . . . . . . . . . . . . . . . . . . . . . . . . . . . . . . . . 12
Operational . . . . . . . . . . . . . . . . . . . . . . . . . . . . . . . . . . . . . . . . . . . . . . . . . . . . . . . . . . . . . . . . . 12
Available Interface Modules . . . . . . . . . . . . . . . . . . . . . . . . . . . . . . . . . . . . . . . . . . . . . . . . . . . . 13
E1 Network Module with 120Ω Interface. . . . . . . . . . . . . . . . . . . . . . . . . . . . . . . . . . . . . . . . . . . 13
E1 Network Module with 75Ω Interface. . . . . . . . . . . . . . . . . . . . . . . . . . . . . . . . . . . . . . . . . . . . 13
T1 Network Module. . . . . . . . . . . . . . . . . . . . . . . . . . . . . . . . . . . . . . . . . . . . . . . . . . . . . . . . . . . 13
Quad Ethernet Switch Module . . . . . . . . . . . . . . . . . . . . . . . . . . . . . . . . . . . . . . . . . . . . . . . . . . 13
612806420L1-1E Copyright © 2005 ADTRAN, Inc. 11
Page 12

Section 1 System Description TRACER 6000 Series Integrated System Manual
1. SYSTEM OVERVIEW
The TRACER 64x0 provides license-free scalable connectivity for service providers and corporate
networks. These radios feature two modular network interface ports tha t c an accommodate various
combinations of T1, E1, and Ethernet option cards up to 8xT1/E1 (16.384 Mbps). This flexibility provides
customized time division multiplexed (TDM) and packet solutions for voice and data applications in a
single platform. The TRACER 6410 and TRACER 6420 (L1 and L2) provide carrier class point-to-point
connectivity up to thirty miles in the 2.4 GHz and 5.8 GHz license-free Industrial, Scientific, and Medical
(ISM) bands, respectively.
Complete network management is supported via simple network management protocol (SNMP), Telnet
access, and a VT100 terminal interface (
T1/E1/Ethernet alarm conditions, enabling remote installations to report outages without requiring a truck
roll to diagnose problems. Version 2 standard management information bases (MIBs) are supported for all
interface cards, while an enterprise-specific MIB is provided for radio functionality. Triple-DES (3DES)
security provides additional protection from unauthorized access without requiring any additional external
security appliances. Encryption can also be disabled altogether. Future upgrades and e nhan cemen ts ca n be
added through FLASH firmware downloads via trivial file transfer protocol (TFTP) (on the Ethernet
interface) or XMODEM on the
CRAFT port.
Receive sensitivity is optimized through the use of extensive forward error correction and
high-performance receiver design techniques. Dynamic receive sensitivity allows the user to increase
receiver performance by decreasing the delivered bandwidth and increasing forward error correction. This
feature maximizes link performance by customizing the delivered bandwidth to the specific needs of the
installation. Three software selectable channel plans are supported to simplify frequency coordination at
co-located sites. Channel plans are easily changed via any of the software management interfaces without
the added expense of hardware upgrades or spare filter assemblies.
CRAFT port). SNMP traps are implemented for all RF link and
TRACER 64x0 wireless solutions maximize equipment density through the combination of compact size
(only 1U rack space required), low power consumption, and high thermal transfer. TRACER 64x0 systems
can be deployed at twice the density of other available wireless products.
2. FEATURES AND BENEFITS
The following is a brief list of the TRACER 64x0 features and benefits:
Configuration and Management
• Easy-to-use VT100 control port (RS-232 interface) for configuration and monitoring
• End-to-end management bridging for forwarding management traffic across the RF link management
channel
• Remote configuration of both ends of the wireless link, from each end of the link
Operational
• No license required per FCC Rules Part 15.247
• Dual module slots for network connectivity
• Up to 8xT1 or E1 bandwidth (16.384 Mbps) using two 4xT1 or 4xE1 network modules
• TRACER 6410 Frequency: 2.400 to 2.483 GHz
• TRACER 6420 (L1 and L2) Frequency: 5.725 to 5.850 GHz
12 Copyright © 2005 ADTRAN, Inc. 612806420L1-1E
Page 13

TRACER 6000 Series Integrated System Manual Section 1 System Description
• Point-to-point transmission, up to 30 miles
• 1U high unit for easy rack mounting
Available Interface Modules
• Quad T1 Module (P/N 1280040L1)
• Quad E1 Module with 120Ω Interface (P/N 1280044L1)
• Quad E1 Module with 75Ω Interface (P/N 1280044L2)
• Quad Ethernet Switch Module (P/N 1280050L1)
E1 Network Module with 120Ω Interface
• Four E1 circuits provided through four RJ-45 connectors
• Complies with CCITT G.703, G.704, and G.823 standards
• E1 circuit alarm reporting capability
• Testing support through local and remote line and link loopbacks
E1 Network Module with 75Ω Interface
• Four E1 circuits provided through a single DB-25, 75Ω connector
• Complies with CCITT G.703, G.704, and G.823 standards (with the BNC breakout panel)
• E1 circuit alarm reporting capability
• Testing support through local and remote line and link loopbacks
•75Ω E1 breakout panel (P/N 1280060L1) provides BNC interfaces for E1 connections
T1 Network Module
• Four T1 circuits provided through four RJ-45 connectors
• Complies with ANSI T1.403 and AT&T 54016 and 62411
• T1 circuit alarm reporting capability
• Testing support through local and remote line and link loopbacks
Quad Ethernet Switch Module
• Four 10/100BaseT/TX interfaces provided through four RJ-45 connectors
• Auto MDI/MDIX crossover on all interfaces
• Back-pressure flow control on all half-duplex interfaces
• Pause-frame flow control on all full-duplex interfaces
612806420L1-1E Copyright © 2005 ADTRAN, Inc. 13
Page 14

Section 1 System Description TRACER 6000 Series Integrated System Manual
14 Copyright © 2005 ADTRAN, Inc. 612806420L1-1E
Page 15

MICROWAVE PATH ENGINEERING BASICS
Explains the basics of analyzing a wireless microwave link or path. Defines significant parame ters and
makes several installation recommendations.
CONTENTS
Line-of-Sight . . . . . . . . . . . . . . . . . . . . . . . . . . . . . . . . . . . . . . . . . . . . . . . . . . . . . . . . . . . . . . . . . . . 16
Terminology . . . . . . . . . . . . . . . . . . . . . . . . . . . . . . . . . . . . . . . . . . . . . . . . . . . . . . . . . . . . . . . . 16
Decibels . . . . . . . . . . . . . . . . . . . . . . . . . . . . . . . . . . . . . . . . . . . . . . . . . . . . . . . . . . . . . . . . . . . . . . . 16
Calculating the Fade Margin . . . . . . . . . . . . . . . . . . . . . . . . . . . . . . . . . . . . . . . . . . . . . . . . . . . . . . 16
Receiver Power . . . . . . . . . . . . . . . . . . . . . . . . . . . . . . . . . . . . . . . . . . . . . . . . . . . . . . . . . . . . . . . . . 17
Antenna Gain . . . . . . . . . . . . . . . . . . . . . . . . . . . . . . . . . . . . . . . . . . . . . . . . . . . . . . . . . . . . . . . 18
Transmitted Power (PT) . . . . . . . . . . . . . . . . . . . . . . . . . . . . . . . . . . . . . . . . . . . . . . . . . . . . . . . 20
Carrier Wavelength (l). . . . . . . . . . . . . . . . . . . . . . . . . . . . . . . . . . . . . . . . . . . . . . . . . . . . . . . . . 20
Path Distance (d) . . . . . . . . . . . . . . . . . . . . . . . . . . . . . . . . . . . . . . . . . . . . . . . . . . . . . . . . . . . . 21
System Losses (L) . . . . . . . . . . . . . . . . . . . . . . . . . . . . . . . . . . . . . . . . . . . . . . . . . . . . . . . . . . . 21
Path Loss (LP) . . . . . . . . . . . . . . . . . . . . . . . . . . . . . . . . . . . . . . . . . . . . . . . . . . . . . . . . . . . . . . 22
Receiver Sensitivity . . . . . . . . . . . . . . . . . . . . . . . . . . . . . . . . . . . . . . . . . . . . . . . . . . . . . . . . . . . . . 23
Antenna Information . . . . . . . . . . . . . . . . . . . . . . . . . . . . . . . . . . . . . . . . . . . . . . . . . . . . . . . . . . . . 24
Antenna Alignment . . . . . . . . . . . . . . . . . . . . . . . . . . . . . . . . . . . . . . . . . . . . . . . . . . . . . . . . . . . 24
TRACER RSSI Test Points. . . . . . . . . . . . . . . . . . . . . . . . . . . . . . . . . . . . . . . . . . . . . . . . . . . . . 24
Real-time Signal Values . . . . . . . . . . . . . . . . . . . . . . . . . . . . . . . . . . . . . . . . . . . . . . . . . . . . . . . 24
Antenna Beam Patterns . . . . . . . . . . . . . . . . . . . . . . . . . . . . . . . . . . . . . . . . . . . . . . . . . . . . . . . 25
Fresnel Zones, Earth Curvature, and Antenna Heights . . . . . . . . . . . . . . . . . . . . . . . . . . . . . . . 25
Other Considerations . . . . . . . . . . . . . . . . . . . . . . . . . . . . . . . . . . . . . . . . . . . . . . . . . . . . . . . . . . . . 27
Path Availability. . . . . . . . . . . . . . . . . . . . . . . . . . . . . . . . . . . . . . . . . . . . . . . . . . . . . . . . . . . . . . 27
FIGURES
Figure 1. Example Microwave Path with Parameters . . . . . . . . . . . . . . . . . . . . . . . . . . . . . . . . . . 18
Figure 2. Typical Antenna Beam Pattern . . . . . . . . . . . . . . . . . . . . . . . . . . . . . . . . . . . . . . . . . . . 25
TABLES
Table 1. Antenna Gain for Given Dish Diameters with k = 0.55 (Standard) . . . . . . . . . . . . . . . . . 19
Table 2. Antenna Gain for Given Dish Diameters with k = 0.55 (Metric) . . . . . . . . . . . . . . . . . . . 19
Table 3. Antenna Gain for Given Dish Diameters with k = 0.40 (Standard) . . . . . . . . . . . . . . . . . 19
Table 4. Antenna Gain for Given Dish Diameters with k = 0.40 (Metric) . . . . . . . . . . . . . . . . . . . 19
Table 5. Transmit Power Reduction for Various Antennae Gains . . . . . . . . . . . . . . . . . . . . . . . . . 20
Table 6. Typical Coaxial Loss for Common Cable Types . . . . . . . . . . . . . . . . . . . . . . . . . . . . . . . 21
Table 7. Path Loss for Given Path Lengths (miles) . . . . . . . . . . . . . . . . . . . . . . . . . . . . . . . . . . . . 22
Table 8. Path Loss for Given Path Lengths (kilometers) . . . . . . . . . . . . . . . . . . . . . . . . . . . . . . . . 23
Table 9. Receiver Sensitivity for the TRACER 64x0 . . . . . . . . . . . . . . . . . . . . . . . . . . . . . . . . . . . 23
Table 10. Minimum Antenna Height for Given Path Lengths (miles and ft) . . . . . . . . . . . . . . . . . . 26
Table 11. Minimum Antenna Height for Given Path Lengths (km and m) . . . . . . . . . . . . . . . . . . . . 27
612806420L1-1E Copyright © 2005 ADTRAN, Inc. 15
Page 16
Section 2 Microwave Path Engineering Basics TRACER 6000 Series Integrated System Manual
1. LINE-OF-SIGHT
The TRACER 6410 and TRACER 6420 systems are designed for operation in the license-free 2.400 to
2.483 GHz and 5.725 GHz to 5.850 GHz industrial, scientific, and medical (ISM) bands, respectively.
Radio wave propagation in these bands exhibits microwave characteristics which are ideally suited for
point-to-point, line-of-sight communications. Line-of-sight requires that the transmitting antenna and
receiving antenna are able to “see” each other, and that the straight-line path between the two antennas is
free of obstructions such as buildings, trees, mountains, and in longer paths, even the curvature of the
earth. For maximum signal strength, the area around the visual line-of-sight where microwave signals
reflect (Fresnel zone) must also be free of obstructions. Fresnel zones are discussed in more detail on
page 25.
Terminology
Point-to-Point Wireless communication from a single site to another individual
site. Contrast with point-to-multipoint.
Line-of-Sight An unobstructed, direct path exists between the transmitting and
the receiving antennas.
2. DECIBELS
Understanding the decibel (dB) format is key when discussing microwave path engineering because the
received signal power is often expressed in decibel format. In general, any quantity can be expressed in
decibels. If the quantity x is a power level (in watts), the decibel equivalent is defined as
x
dB
10 log10x()
⋅
=
(dB)
If the quantity x, expressed in milliwatts (mW), is referenced to a mW, then the decibel-milliwatt (dBm) is
used instead of a generic decibel.
x
dBm
=
10 log
⋅
⎛⎞
------------ -
10
⎝⎠
1mW
(dBm)
x
Using the decibel format simplifies power calculations by reducing multiplication and division operations
into addition and subtraction operations.
3. CALCULATING THE FADE MARGIN
It is imperative to determine whether the proposed microwave path is suitable (at a
minimum) for ideal, nondistorted signals before attempting installation.
The fade margin (F ) is a value in decibels (dB) that represents the amount of signal reduction that can be
tolerated before the link exceeds the specified bit error rate (BER). Fade margin is simply the difference
between the available signal power at the receiver (P
FP
16 Copyright © 2005 ADTRAN, Inc. 612806420L1-1E
–=
RPsens
= PT + GT + GR - L - LP - P
) and the receiver sensitivity (P
R
sens
(dB)
sens
).
Page 17

TRACER 6000 Series Integrated System Manual Section 2 Microwave Path Engineering Basics
where the variables in the equations are defined as
P
P
P
G
G
R
sens
T
T
R
received power (dBm)
receiver sensitivity (dBm)
transmitted power (adjustable up to 20, 24, or 27 dBm maximum – depending on product)
transmit antenna gain (decibels referenced to an isotropic source – dBi)
receive antenna gain (dBi)
L other losses (RF coaxial cable, etc. – dB)
L
P
path loss (dB)
Higher levels of fade margin indicate stronger protection against signal fading and a more reliable link . For
most applications, 20 to 30 dB of fade margin should ensure a reliable link. ADTRAN provides a free
wireless link planner tool on the ADTRAN website (www.adtran.com
– see Service/Support > Tec hnical
Support > TRACER Products).
The following sections further discuss the necessary power calculations and their components.
4. RECEIVER POWER
The viability of a particular microwave path is determined by the power of the transmitted microwave
signal, the transmit and receive antenna gain, distance, and accumulated system losses (such as RF coaxial
cable losses and path loss).
The equation relating received signal power to the other microwave parameters is
2
PTGTG
P
------------------------------=
R
()2d2L
4
λ
R
π
or (in decibel notation)
P
= PT + GT + GR - L - L
R
where the variables in the equations are defined as
P
R
P
T
G
T
G
R
received power (dBm)
transmitted power (adjustable up to 20, 24, or 27 dBm maximum – depending on product)
transmit antenna gain (decibels referenced to an isotropic source – dBi)
receive antenna gain (dBi)
λ carrier wavelength (meters)
d path distance (meters)
L other losses (RF coaxial cable, etc. – dB)
L
P
path loss (dB)
When using decibel notation, all quantities must be individually converted to decibels
prior to performing addition and subtraction.
(watts, W)
(decibels referenced to a milliwatt, dBm)
P
612806420L1-1E Copyright © 2005 ADTRAN, Inc. 17
Page 18
Section 2 Microwave Path Engineering Basics TRACER 6000 Series Integrated System Manual
P
L
L
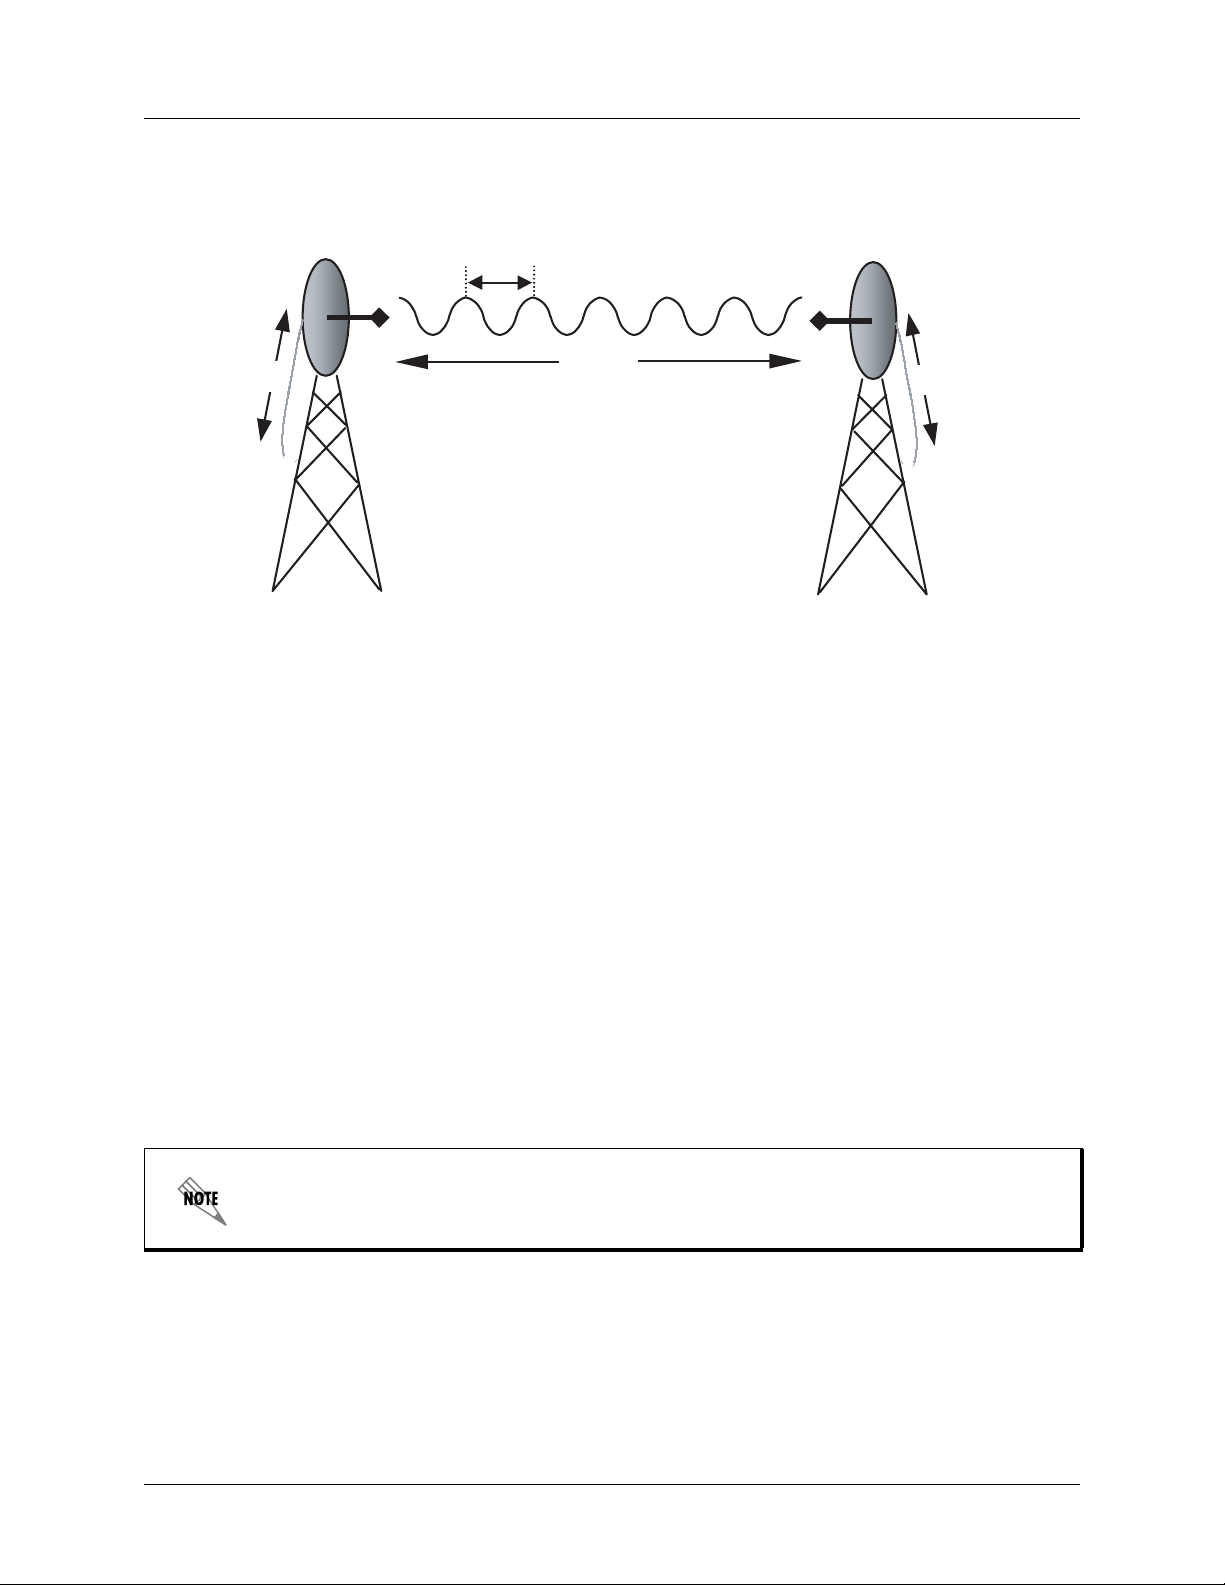
Figure 1 illustrates a wireless link configuration containing all the parameters necessary for the power
budget analysis.
λ
G
T
d, L
P
G
R
T
Figure 1. Example Microwave Path with Parameters
The following sections further discuss the power budget analysis and its components.
P
R
Antenna Gain
Actual transmit and receive antenna gain values depend strictly upon the physical characteristics of the
antennas installed for each link. In other words, the size of the dish determines the antenna gain. Using a
parabolic dish antenna results in the best performance. Antenna gains are specified in terms of decibels of
gain referenced to an isotropic source (dBi). An isotropic source is a hypothetical antenna having equal
radiation in all directions. The equation for calculating gain over isotropic radiation is
G 10 log k
where
⎛⎞
⎛⎞
⋅=
⋅
⎜⎟
⎝⎠
⎝⎠
π D⋅
----------- -
λ
2
(dBi)
k dish efficiency factor (usually 0.55)
λ carrier wavelength (c / f)
D dish diameter
The carrier wavelength (λ) and dish diameter (D) can be metric or standard units of
measure. Use the same unit of measure for both variables. For example, a carrier
wavelength of 0.124 meters requires a dish diamet er in meters as well.
The dish efficiency factor (k) is used to estimate how efficiently the dish reflector passes energy to the
feedhorn. The “standard” factor is 0.55 (measured performance of prime-focus dishes with a pyrimidal
waveguide feedhorn with no aperture blockage). Other dishes and feedhorn designs may have better or
worse efficiency. Table 1 on page 19 (standard) an d Table 2 on page 19 (metric) provide gains using a 0.55
dish efficiency factor. Table 3 on page 19 (standard) and Table 4 on page 19 (metric) provide gains using a
0.40 dish efficiency factor. Dish manufacturers can provide gains for specific types of antennas.
18 Copyright © 2005 ADTRAN, Inc. 612806420L1-1E
Page 19

TRACER 6000 Series Integrated System Manual Section 2 Microwave Path Engineering Basics
Table 1. Antenna Gain for Given Dish Diameters with k = 0.55 (Standard)
Dish Diameter
(in feet)
Gain at 2.4 GHz
(in dBi)
Gain at 5.8 GHz
(in dBi)
2 21.1 28.8
4 27.2 34.8
6 31.7 38.3
8 33.2 40.8
10 35.2 42.7
12 36.7 44.3
Table 2. Antenna Gain for Given Dish Diameters with k = 0.55 (Metric)
Dish Diameter
(in meters)
Gain at 2.4 GHz
(in dBi)
Gain at 5.8 GHz
(in dBi)
0.6 21.0 28.6
0.8 23.5 31.1
1.0 25.5 33.1
1.2 27.1 34.7
1.5 28.9 36.6
1.8 30.6 38.2
2.0 31.5 39.1
Table 3. Antenna Gain for Given Dish Diameters with k = 0.40 (Standard)
Dish Diameter
(in feet)
Gain at 2.4 GHz
(in dBi)
Gain at 5.8 GHz
(in dBi)
2 19.8 27.4
4 25.8 33.4
6 29.3 36.9
8 31.8 39.4
10 33.8 41.4
12 35.3 42.9
Table 4. Antenna Gain for Given Dish Diameters with k = 0.40 (Metric)
Dish Diameter
(in meters)
Gain at 2.4 GHz
(in dBi)
Gain at 5.8 GHz
(in dBi)
0.6 19.7 27.2
0.8 22.2 29.7
1.0 24.1 31.1
1.2 25.7 33.3
1.5 27.6 35.2
1.8 29.2 36.8
2.0 30.1 37.7
612806420L1-1E Copyright © 2005 ADTRAN, Inc. 19
Page 20

Section 2 Microwave Path Engineering Basics TRACER 6000 Series Integrated System Manual
Transmitted Power (PT)
The FCC specifies the maximum transmitter power used for antennae of a given gain. FCC Rules Part 15,
Subpart 247 allow for a maximum power of 1 watt (30 dBm) into antennae of a gain less than or equal to
6 dBi. At 2.4 GHz (TRACER 6410), the 1-watt maximum transmitter power must be reduced by 1 dB for
every 3 dB of antenna gain over 6 dBi. This rule is shown in Table 5.
Table 5. Transmit Power Reduction for Various Antennae Gains
Output Power
(dBm)
27 15 42
26 18 44
25 21 46
24 24 48
23 27 50
22 30 52
21 33 54
20 36 56
Maximum
Antenna Gain
(dBi)
Maximum EIRP
(dBm)
For the 5.8 GHz band (TRACER 6420 L1 and L2), the maximum output power is 1 watt (30 dBm) regardless
of the gain of the attached antenna. Since the TRACER 6420 L1 and L2 maximum transmit powers are
100 milliwatts and 250 milliwatts, respectively, there is no reduction in transmitter output power required.
Carrier Wavelength (λ)
The carrier wavelength is the physical wavelength of the main RF carrier being used for communication, and
is usually approximated at the center frequency of the band (which is 2421.7 MHz for TRACER 6410 and
5787.5 MHz for the TRACER 6420). The carrier wavelength calculations follow.
λ = c / f (meters)
where
c = speed of light (in meters)
f = frequency (in Hz)
resulting in the following carrier wavelengths
TRACER 6410
λ = 3.00 x 10⁸ / 2421.7 x 10
6
= 0.124 m or 12.4 cm
= 4.88 in
20 Copyright © 2005 ADTRAN, Inc. 612806420L1-1E
TRACER 6420
λ = 3.00 x 10⁸ / 5787.5 x 10
= 0.0518 m or 5.18 cm
= 2.04 in
6
Page 21
TRACER 6000 Series Integrated System Manual Section 2 Microwave Path Engineering Basics
Path Distance (d)
The path distance is the physical distance between the transmit and receive antennas. For the
TRACER 64x0, these distances can range up to 30 miles (48.27 kilometers).
System Losses (L)
System losses are defined by RF coaxial cable loss, connector losses, and losses added from any additional
lightning protection devices for the power budget an alysis. Coaxial cable is required to attach the TRACER
64x0 to the antenna. The length of the cable varies from a few feet to hundreds of feet, depending upon
your application and the proximity of the TRACER 64x0 to the antenna. Various grades of coaxial cable
will work sufficiently for connecting the TRACER 64x0 unit to the antenna. A low-loss coaxial cable will
minimize cable losses.
One end of the coaxial cable requires an N-type male connector (plug) to mate with the TRACER 64x0
unit. The other end of the coaxial cable requires a connector compatible with the antenna chosen for the
installation (usually an N-type male connector). Additionally, ADTRAN recommends that the outdoor
connector on the coaxial cable be weatherproofed to prevent corrosion and electrical shorting.
In areas wher e lightning strikes are frequent, a lightning arrestor should be installed
directly on the antenna coaxial cable. Installing lightning arrestors helps protect the
RF electronics (including the TRACER 64x0 unit) in the downstream path from
damaging voltages and currents.
Table 6 gives typical loss figures for some of the more common coaxial cable types (per 100 feet).
Table 6. Typical Coaxial Loss for Common Cable Types
Cable Type 2.4 GHz Loss/100 ft (in dB) 5.8 GHz Loss/100 ft (in dB)
RG58 80 Not recommended
RG8 (air) 20 Not recommended
RG8 (foam) 9 Not recommended
1/4-inch Coax 5.91 11.36
3/8-inch Coax 5.76 9.65
1/2-inch Coax 3.83 6.49
5/8-inch Coax 2.98 4.90
7/8-inch Coax 2.2 Not suitable
1 1/4-inch Coax 1.62 Not suitable
1 5/8-inch Coax 1.41 Not suitable
5.8 GHz Elliptical Waveguide Not suitable 1.23
612806420L1-1E Copyright © 2005 ADTRAN, Inc. 21
Page 22

Section 2 Microwave Path Engineering Basics TRACER 6000 Series Integrated System Manual
Path Loss (LP)
Path loss is the estimated attenuation between the transmit and receive antennas caused by signal
separation and scattering. The path loss is considered basic transmission loss over the microwave link. The
following expression calculates path loss:
4πd
⎛⎞
L
P
20 log
⋅=
--------- -
⎝⎠
λ
where
f carrier frequency (Hz)
λ carrier wavelength (c / f) (meters)
d path distance (meters)
c speed of light, free-space (meters)
or
L
P
+=
96.6 20 log10d() 20·log+
where d is expressed in miles and f in GHz.
(dB)
⋅
10
f()
(dB)
Path loss, as shown here, increases rapidly as either the path length increases or the carrier wavelength
decreases (which happens as the carrier frequency increases). Therefore, longer microwave paths naturally
experience more path loss than shorter paths. Likewise, higher frequency microwave communication
experiences more path loss than lower frequency microwave communication.
The path loss values for various path lengths for the TRACER 64x0 2.4 and 5.8 GHz systems are listed in
T able 7 (miles) and Table 8 on page 23 (kilometers).Values not listed in the tables can be interpolated from
those listed.
Table 7. Path Loss for Given Path Lengths (miles)
Path Length
(miles)
1104112
2110118
3114121
4116124
5118126
10 124 132
15 128 135
20 130 138
25 132 140
30 134 141
35 135 143
Path Loss (dB)
at 2.4 GHz
Path Loss (dB)
at 5.8 GHz
22 Copyright © 2005 ADTRAN, Inc. 612806420L1-1E
Page 23
TRACER 6000 Series Integrated System Manual Section 2 Microwave Path Engineering Basics
Table 8. Path Loss for Given Path Lengths (kilometers)
Path Length
(kilometers)
1 100 108
2 106 114
3 110 117
4 112 120
5 114 122
10 120 128
15 124 131
20 126 134
25 128 136
30 130 137
35 131 139
Path Loss (dB)
at 2.4 GHz
Path Loss (dB)
at 5.8 GHz
5. RECEIVER SENSITIVITY
Receiver sensitivity is a value expressed in decibels referenced to one milliwatt (dBm) that corresponds to
the minimum amount of signal power needed at the receiver to achieve a given bit error rate (BER).
Receiver sensitivity is usually a negative number of decibels, and smaller receiver sensitivity (higher
quantity negative number) is better for a given BER. Several factors affect receiver sensitivity, including
the data bandwidth of the wireless link and the amount of additional signal degradation introduced in the
receiver electronics.
Receiver sensitivity of the TRACER 64x0 is dynamic as a function of the desired bandwidth; receiver
sensitivity improves as delivered bandwidth decreases. TRACER bandwidth is provided in the form of
eight channels available for mapping to the support modules. For T1 and E1 modules, each channel
mapped represents a single T1 or E1 interface. For Quad Ethernet Switch modules, each channel mapped
represents 2 Mb of Ethernet data delivered to the module. In situations where eight-channel connectivity is
not required, the delivered bandwidth can be decreased to four or two channels, and the receiver sensitivity
improves as follows:
Table 9. Receiver Sensitivity for the TRACER 64x0
Receiver Sensitivity
Delivered Bandwidth
8xT1 -86 dBm -85 dBm
4xT1 -90 dBm -89 dBm
2xT1 -93 dBm -92 dBm
8xE1 or 16 Mbps Ethernet -84 dBm -83 dBm
4xE1 or 8 Mbps Ethernet -88 dBm -87 dBm
2xE1 or 4 Mbps Ethernet -91 dBm -90 dBm
TRACER 6410 TRACER 6420
Should an interferer be present nearby, three software-selectable band plans are provided
for frequency agility. Changing the TRACER 64x0 band plan does not require additional
components or opening of the radio. See > RF Link Configuration > RF Band Plan on
page 64 for additional details.
612806420L1-1E Copyright © 2005 ADTRAN, Inc. 23
Page 24
Section 2 Microwave Path Engineering Basics TRACER 6000 Series Integrated System Manual
6. ANTENNA INFORMATION
The overall wireless system is directly affected by the antenna selection and installation, discussed in the
following sections.
Verify the antenna installation meets all regulations specified in the National Electric
Code (NEC) Article 810 with particular attention to clearances from power and lighting
conductors, mounting, grounding, and antenna discharge unit.
Antenna Alignment
With line-of-sight microwave communications, optimum system performance requires that the
transmitting and receiving antennas are properly aligned. This ensures maximum received signal power at
each receiver. Antenna alignment must be achieved in both azimuth (along a horizontal plane) and
elevation (along a vertical plane). By ensuring maximum received signal strength, a received signal
strength indicator (RSSI) helps the equipment installer determine when alignment is maximized.
TRACER RSSI Test Points
RSSI for the TRACER 64x0 system is provided through the VT100 terminal menus accessed through the
RS-232 interface, and it is presented as a series of bars indicating signal strength. More bars means more
RSSI, which ensures greater received signal strength and better link performance.
If both the local and remote end of the system are operational, the remote TRACER 64x0 receive power
can be viewed from the local TRACER 64x0 VT100 terminal menu interface.
An RSSI test point located on the front panel provides a DC voltage level (relative to the
GND test point)
that corresponds to the amount of signal being received from the far end’s transmitter. The voltage at this
test point can vary from approximately 0 to 5 VDC. An RSSI calibration sheet is shipped with the system
to provide the installer a cross-reference between actual received signal level (in dBm) and RSSI voltage.
This sheet is useful for verifying link budget calculations and ensuring proper equipment installation.
Real-time Signal Values
The TRACER 64x0 system displays real-time signal values for RX QUALITY, RX POWER, and TX POWER
(for both the local and remote units).
with 0 corresponding to poor signal quality and 100 corresponding to exceptional signal quality.
RX POWER values are displayed in dBm within ±5 dBm accuracy and can vary with extreme temperatures.
TX POWER values are displayed in dBm within ±1 dBm accuracy.
Real-time signal values are not supported on all TRACER 64x0 systems. Systems must be
ADTRAN calibrated to provide readings for Rx or Tx Power signal levels.
RX QUALITY values are displayed as a numerical value from 0 to 100,
24 Copyright © 2005 ADTRAN, Inc. 612806420L1-1E
Page 25
TRACER 6000 Series Integrated System Manual Section 2 Microwave Path Engineering Basics
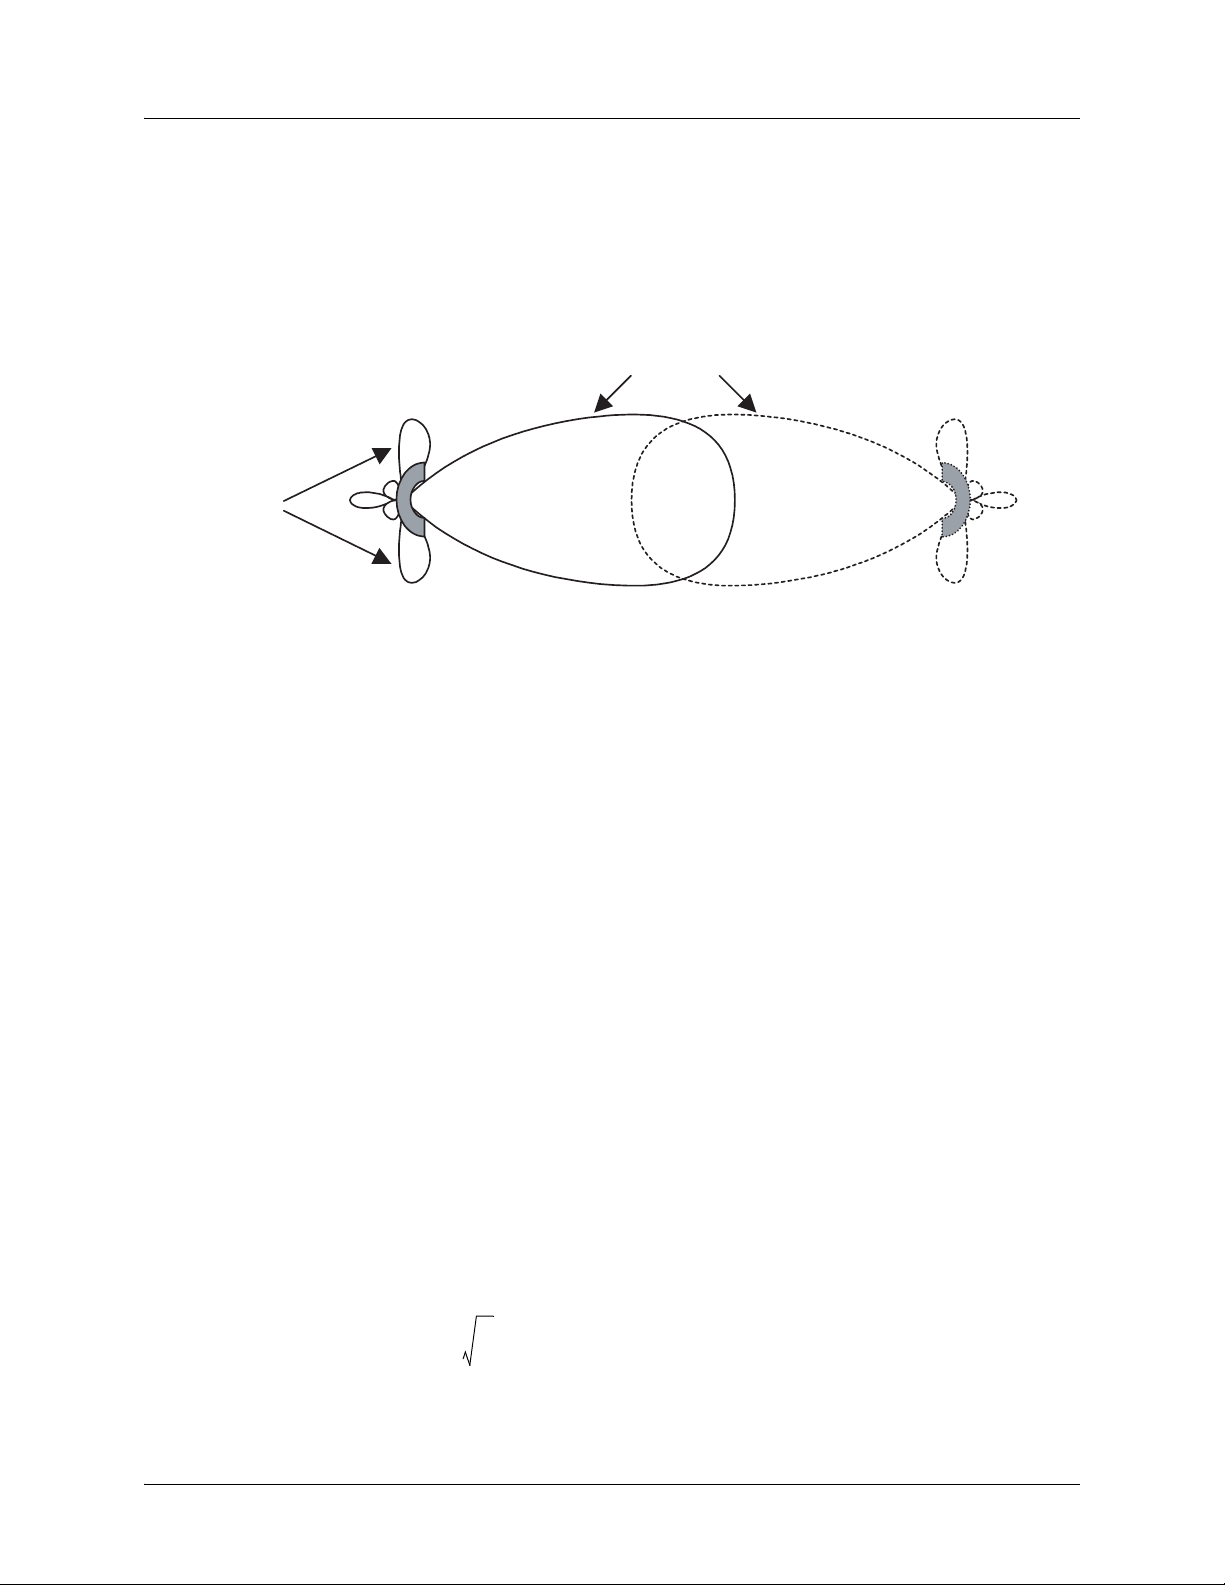
Antenna Beam Patterns
Antennas used with the TRACER 64x0 system have a particular beam shape, determined in part by the
physical construction and geometry of the antenna. The antenna beam patterns are characterized by a
dominant main lobe, which is the preferred lobe to use for point-to-point communications, and several side
lobes, as shown in Figure 2. When setting up a microwave link, antenna alignment is nothing more than
steering the main lobes of both antennas until the main lobe of one transmitter is centered on the receiving
element of the receiving antenna.
main lobe
side lobes
Figure 2. Typical Antenna Beam Pattern
Antennas are also designed to radiate RF energy efficiently for a specific range of frequencies. Please
consult the data sheet for your particular antenna make and model to ensure that it is specified to operate in
the 2400 MHz to 2483.5 MHz (TRACER 6410) or 5725 MHz to 5850 MHz (TRACER 6420) frequency
bands for your TRACER 64x0 system.
Fresnel Zones, Earth Curvature, and Antenna Heights
Fresnel zones correspond to regions in the microwave path where reflections of the intended signal occur
and combine in both constructive and destructive manners with the main signal, thereby either enhancing
or reducing the net power at the receiver.
In general, the odd numbered Fresnel zones (1, 3, 5, ...) add constructively at the receiver, while the even
numbered Fresnel zones (2, 4, 6, ...) add destructively at the receiver.
The first Fresnel zone corresponds to the main lobe, 60 percent of which must be free of physical
obstructions for the path calculations to be valid. Since the main lobe contains the vast majority of the
microwave energy, this zone is typically used to determine proper antenna heights when placing antennas
on towers or buildings.
The curvature of the Earth becomes a legitimate obstruction for path lengths of 7 miles (11 kilometers) or
greater, and must also be accounted for when determining minimum antenna heights.
The aggregate expression for minimum antenna height that incorporates both the 60 percent first Fresnel
zone and the Earth’s curvature is given by
d
h72.1
612806420L1-1E Copyright © 2005 ADTRAN, Inc. 25
---- 4f
0.125d
+=
2
(feet)
Page 26

Section 2 Microwave Path Engineering Basics TRACER 6000 Series Integrated System Manual
where f is in GHz and d is in miles or
h 21.975
d
------------ -
6.436f
0.0147d
+=
2
(meters)
where f is in GHz and d is in kilometers.
The minimum antenna heights for given path lengths are displayed in Table 10 (feet/miles) and Table 11
on page 27 (kilometers/meters).
Table 10. Minimum Antenna Height for Given Path Lengths (miles and ft)
Min. Antenna Height
Path Length
(miles)
2 33 22
4 48 32
6 61 41
8 73 50
10 85 60
14 111 81
16 124 92
18 138 104
20 153 117
22 169 131
24 185 145
26 202 161
28 220 177
30 239 194
32 259 213
34 279 232
36 300 252
at 2.4 GHz
(ft)
Min. Antenna Height
at 5.8 GHz
(ft)
26 Copyright © 2005 ADTRAN, Inc. 612806420L1-1E
Page 27

TRACER 6000 Series Integrated System Manual Section 2 Microwave Path Engineering Basics
Table 11. Minimum Antenna Height for Given Path Lengths (km and m)
Min. Antenna Height
Path Length
(kilometers)
2 8.0 5.1
4 11.4 7.4
6 14.2 9.3
8 16.8 11.1
10 19.2 12.8
14 23.8 16.3
16 26.1 18.2
18 28.5 20.0
20 30.9 22.0
22 33.3 24.0
24 35.9 26.1
26 38.4 28.3
28 41.1 30.6
30 43.9 32.9
32 46.7 35.4
34 49.6 38.0
36 52.6 40.6
at 2.4 GHz
(meters)
Min. Antenna Height
at 5.8 GHz
(meters)
7. OTHER CONSIDERATIONS Path Availability
The path availability of a wireless link is a metric that expresses the fractional amount of time a link is
available over some fixed amount of time, and depends on several factors. Path availability is expressed as
A12.510
=
()abfd310
where the parameters are
a terrain factor
b climate factor
f carrier frequency (GHz)
d path length (miles)
F fade margin (dB)
or
A1
=
6.00 10
()abfd310
6–
×
7–
×
F10
⁄
–
()–[]100%
F10
–
()–[]100%
×
⁄
×
(%)
(%)
612806420L1-1E Copyright © 2005 ADTRAN, Inc. 27
Page 28

Section 2 Microwave Path Engineering Basics TRACER 6000 Series Integrated System Manual
where the parameters are
a terrain factor
b climate factor
f carrier frequency (GHz)
d path length (kilometers)
F fade margin (dB)
Terrain Factor (a)
The terrain factor is a quantity that compensates the link availability for different types of terrain.
Generally speaking, the smoother an area’s terrain, the less availability a wireless link running over that
terrain will have, primarily due to multipath reflections. In contrast, secondary microwave signals will be
randomly dispersed over rough terrain and will not interfere with the main signal lobe as badly as in the
smooth terrain case. The terrain factor values normally used are listed below:
Terrain Terrain Factor Description
Smooth 4 water, flat desert
Average 1 moderate roughness
Mountainous 1/4 very rough, mountainous
Climate Factor (b)
The climate factor is a quantity that compensates the link availability for different types of climates
(weather). In general, microwave links operating in areas with high humidity will have less availability
than those in arid areas, primarily because water is a dispersive mechanism to microwave energy and
causes the main signal lobe to refract and disperse away from the receiver location. The climate factor
values normally used are listed below:
Climate Climate Factor Description
Very Dry 1/8 desert regions
Temperate 1/4 mainland, interior region
Humid 1/2 humid and coastal regions
28 Copyright © 2005 ADTRAN, Inc. 612806420L1-1E
Page 29

ENGINEERING GUIDELINES
Provides information to assist network designers with incorporating the TRACER 64x0 system into their
networks.
CONTENTS
Equipment Dimensions . . . . . . . . . . . . . . . . . . . . . . . . . . . . . . . . . . . . . . . . . . . . . . . . . . . . . . . . . . 30
Power Requirements . . . . . . . . . . . . . . . . . . . . . . . . . . . . . . . . . . . . . . . . . . . . . . . . . . . . . . . . . . . . 30
Reviewing the Front Panel Design . . . . . . . . . . . . . . . . . . . . . . . . . . . . . . . . . . . . . . . . . . . . . . . . . 30
RSSI Monitoring Interface. . . . . . . . . . . . . . . . . . . . . . . . . . . . . . . . . . . . . . . . . . . . . . . . . . . . . . 31
Front Panel LEDs . . . . . . . . . . . . . . . . . . . . . . . . . . . . . . . . . . . . . . . . . . . . . . . . . . . . . . . . . . . . 31
AUX RS232 Interface (RJ-45). . . . . . . . . . . . . . . . . . . . . . . . . . . . . . . . . . . . . . . . . . . . . . . . . . . 32
CRAFT Port (DB-9). . . . . . . . . . . . . . . . . . . . . . . . . . . . . . . . . . . . . . . . . . . . . . . . . . . . . . . . . . . 33
Reviewing the TRACER 64x0 Rear Panel Design . . . . . . . . . . . . . . . . . . . . . . . . . . . . . . . . . . . . . 33
MGMT 10/100BaseT/TX Connection (RJ-48C) . . . . . . . . . . . . . . . . . . . . . . . . . . . . . . . . . . . . . 34
DC Power Connection (Plug-In Terminal Block). . . . . . . . . . . . . . . . . . . . . . . . . . . . . . . . . . . . . 35
Fuse . . . . . . . . . . . . . . . . . . . . . . . . . . . . . . . . . . . . . . . . . . . . . . . . . . . . . . . . . . . . . . . . . . . . . . 35
Alarm Contacts (Plug-In Terminal Block) . . . . . . . . . . . . . . . . . . . . . . . . . . . . . . . . . . . . . . . . . . 35
Antenna Interface (N-Type Connector). . . . . . . . . . . . . . . . . . . . . . . . . . . . . . . . . . . . . . . . . . . . 35
Network Module Interfaces . . . . . . . . . . . . . . . . . . . . . . . . . . . . . . . . . . . . . . . . . . . . . . . . . . . . . . . 37
4xT1 Module . . . . . . . . . . . . . . . . . . . . . . . . . . . . . . . . . . . . . . . . . . . . . . . . . . . . . . . . . . . . . . . . 37
Quad Ethernet Switch Module . . . . . . . . . . . . . . . . . . . . . . . . . . . . . . . . . . . . . . . . . . . . . . . . . . 37
4xE1 Module with 120Ω Interface. . . . . . . . . . . . . . . . . . . . . . . . . . . . . . . . . . . . . . . . . . . . . . . . 38
4xE1 Module with 75Ω Interface. . . . . . . . . . . . . . . . . . . . . . . . . . . . . . . . . . . . . . . . . . . . . . . . . 38
At-A-Glance Specifications . . . . . . . . . . . . . . . . . . . . . . . . . . . . . . . . . . . . . . . . . . . . . . . . . . . . . . . 40
LIST OF FIGURES
Figure 1. TRACER 6410 and TRACER 6420 (L2) Front Panel Layout. . . . . . . . . . . . . . . . . . . . . 30
Figure 2. TRACER 6420 (L1) Front Panel Layout. . . . . . . . . . . . . . . . . . . . . . . . . . . . . . . . . . . . . 30
Figure 3. TRACER 64x0 Rear Panel. . . . . . . . . . . . . . . . . . . . . . . . . . . . . . . . . . . . . . . . . . . . . . . 34
Figure 4. E1 Breakout Panel . . . . . . . . . . . . . . . . . . . . . . . . . . . . . . . . . . . . . . . . . . . . . . . . . . . . . 40
LIST OF TABLES
Table 1. TRACER 64x0 Front Panel Description . . . . . . . . . . . . . . . . . . . . . . . . . . . . . . . . . . . . . 31
Table 2. TRACER 64x0 LEDs . . . . . . . . . . . . . . . . . . . . . . . . . . . . . . . . . . . . . . . . . . . . . . . . . . . .31
Table 3. AUX RS232 Pinout . . . . . . . . . . . . . . . . . . . . . . . . . . . . . . . . . . . . . . . . . . . . . . . . . . . . . 32
Table 4. CRAFT Pinout . . . . . . . . . . . . . . . . . . . . . . . . . . . . . . . . . . . . . . . . . . . . . . . . . . . . . . . . . 33
Table 5. Null-Modem Pinout . . . . . . . . . . . . . . . . . . . . . . . . . . . . . . . . . . . . . . . . . . . . . . . . . . . . . 33
Table 6. Rear Panel Description . . . . . . . . . . . . . . . . . . . . . . . . . . . . . . . . . . . . . . . . . . . . . . . . . . 34
Table 7. MGMT 10/100BaseT/TX Interface Pinout . . . . . . . . . . . . . . . . . . . . . . . . . . . . . . . . . . . . 34
Table 8. DC Power Connector Pinout . . . . . . . . . . . . . . . . . . . . . . . . . . . . . . . . . . . . . . . . . . . . . . 35
Table 9. Alarm Contact Connector Pinout . . . . . . . . . . . . . . . . . . . . . . . . . . . . . . . . . . . . . . . . . . . 35
Table 10. 4xT1 Module RJ-45 Connector Pinout . . . . . . . . . . . . . . . . . . . . . . . . . . . . . . . . . . . . . . 37
Table 11. Quad Ethernet Switch RJ-45 Connector Pinout . . . . . . . . . . . . . . . . . . . . . . . . . . . . . . . 37
Table 12. 4xE1 Module with 120 Ω Interface RJ-45 Connector Pinout . . . . . . . . . . . . . . . . . . . . . . 38
Table 13. 4xE1 Module with 75Ω Interface DB-25 Connector Pinout . . . . . . . . . . . . . . . . . . . . . . . 39
Table 14. DB-25 to 75Ω Unbalanced Cable Pinout . . . . . . . . . . . . . . . . . . . . . . . . . . . . . . . . . . . . 39
Table 15. At-A-Glance Specifications . . . . . . . . . . . . . . . . . . . . . . . . . . . . . . . . . . . . . . . . . . . . . . .40
612806420L1-1E Copyright © 2005 ADTRAN, Inc. 29
Page 30
Section 3 Engineering Guidelines TRACER 6000 Series Integrated System Manual
1. EQUIPMENT DIMENSIONS
The TRACER 64x0 integrated radio is 17.2 inch (43.7 cm) W, 11.4 inch (28.9 cm) D, and
1.7 inch (4.4 cm) H, weighs 7 pounds (3.18 kg), and can be used in rackmount configurations.
2. POWER REQUIREMENTS
The TRACER 64x0 radio has a maximum power consumption of 25 W and a maximum current draw of
1.1 A (at 21 VDC).
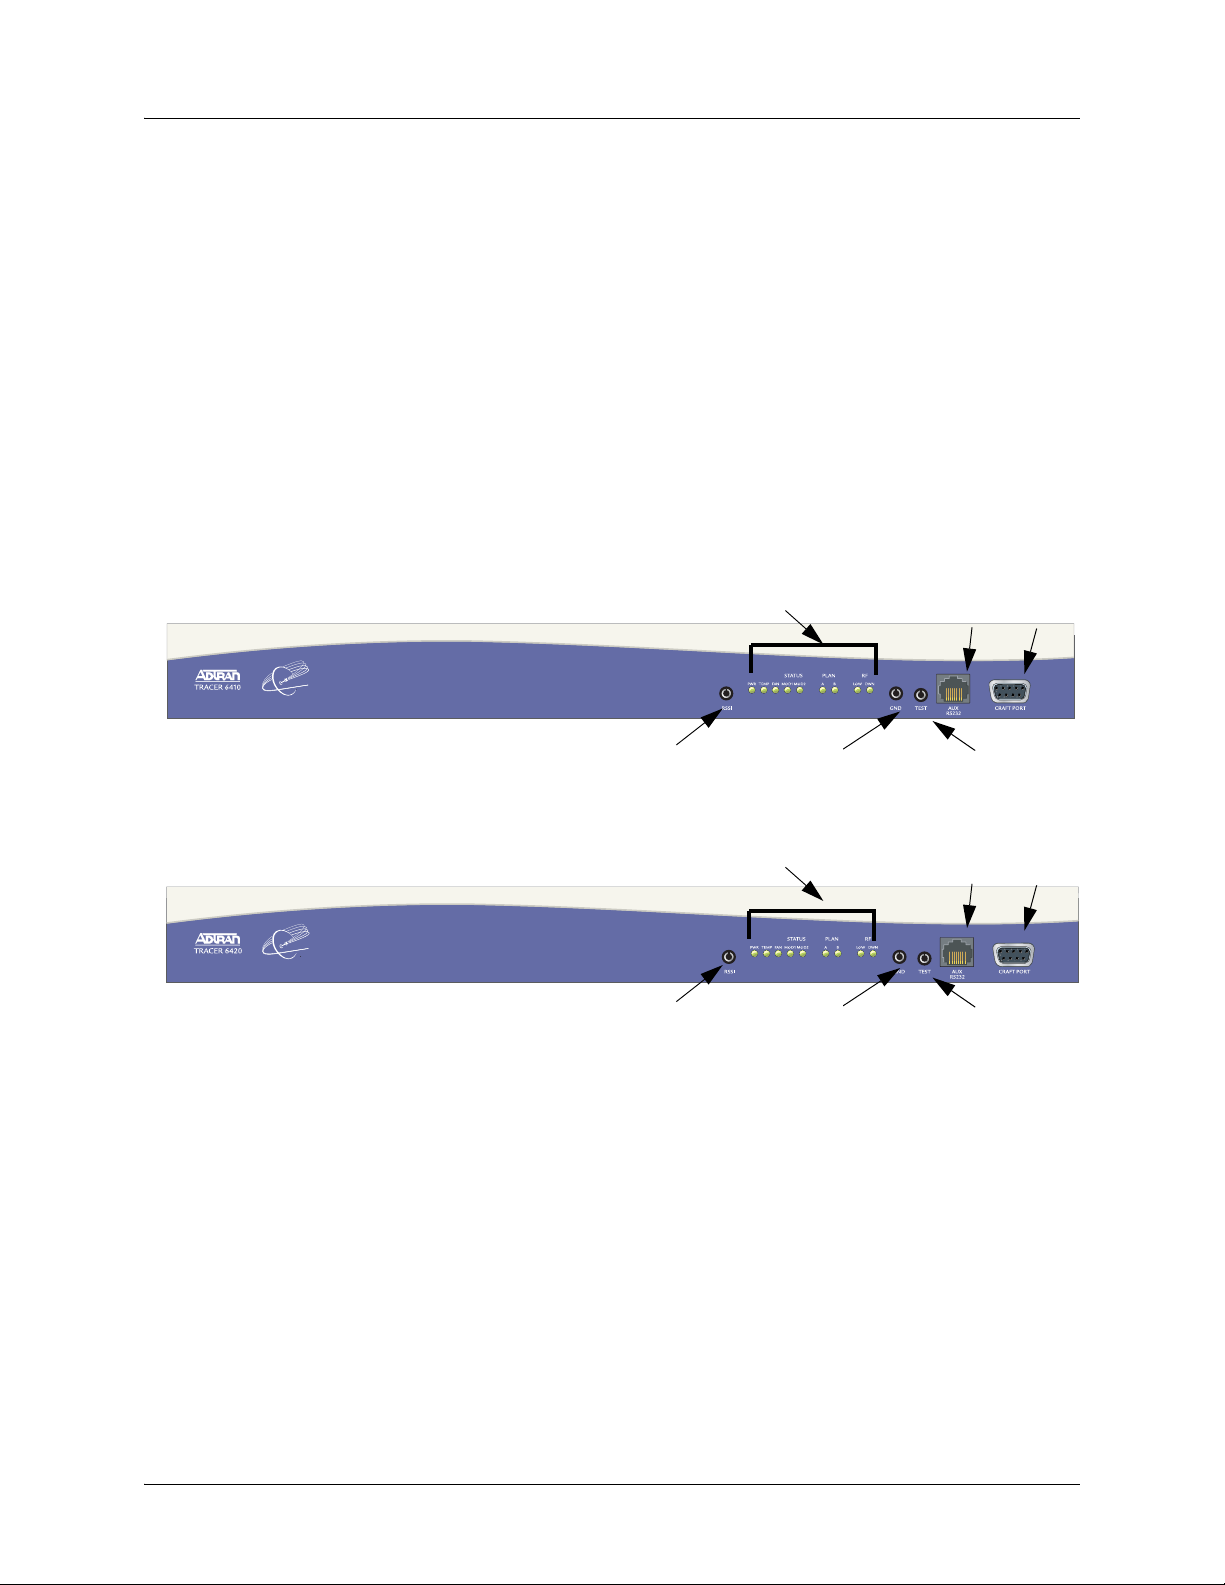
3. REVIEWING THE FRONT PANEL DESIGN
The front panel contains an RSSI monitoring interface, a GND interface for reference with RSSI, a TEST
interface for factory use only, a DB-9
interface (RJ-45) that provides an end-to-end serial port interface (at 9600 bps), and status LEDs to provide
visual information about the TRACER 64x0 system. Figure 1 identifies the various interfaces and LEDs for
the TRACER 6410 and TRACER 6420 (L2). Figure 2 identifies the various interfaces and the LEDs for the
TRACER 6420 L1. Table 1 on page 31 provides a brief description of each interface.
CRAFT PORT for management and configuration, an AUX RS232
B
A
Figure 1. TRACER 6410 and TRACER 6420 (L2) Front Panel Layout
C
B
A
Figure 2. TRACER 6420 (L1) Front Panel Layout
C
E
E
F
D
F
D
30 Copyright © 2005 ADTRAN, Inc. 612806420L1-1E
Page 31

TRACER 6000 Series Integrated System Manual Section 3 Engineering Guidelines
Table 1. TRACER 64x0 Front Panel Description1
Name Connector Description
A
RSSI bantam DC voltage indicating strength of the received signal at
the antenna
B
Status LEDs N/A Visual status information about the system
C
GND bantam Ground reference for the RSSI interface
D
TEST 3.5 mm mini-jack Factory use only
E
AUX RS232 RJ-45 Serial interface for a 9600 bps connection between the
local and remote systems over the RF link
F
CRAFT PORT DB-9 RS-232 interface for connection to a VT100 terminal or
PC with terminal emulation software
1 Detailed discussions (including pinouts) of front panel components (where applicable) follow the table.
RSSI Monitoring Interface
The RSSI voltage is a function of the signal strength at the receiver and is used to measure the received
signal strength. RSSI varies from approximately 0 to 5 VDC. An RSSI calibration sheet is shipped with the
system to provide the installer a cross-reference between actual received signal level (in dBm) and RSSI
voltage. This sheet is useful for verifying link budget calculations and ensuring proper equipment
installation.
Front Panel LEDs
With the TRACER powered-on, the front panel LEDs provide visual information about the status of the
system. Table 2 describes the LEDs.
Table 2. TRACER 64x0 LEDs
For these LEDs... This color light... Indicates that...
PWR Green (solid) the TRACER is connected to a power source.
Off the TRACER is not currently powered up.
TEMP
*TRACER 64x0 high
power system only
FAN
*TRACER 64x0 high
power system only
TST
*TRACER 6420 (L1) only
Green (solid) the TRACER 64x0 high power system temperature is within
normal range.
Red (solid) the TRACER 64x0 high power system has an active temperature
alarm.
Green (solid) the TRACER 64x0 high power system fans are working properly.
Red (solid) the TRACER 64x0 high power system fans are not functioning.
Amber (flashes once) powe r-up self-test is in progress. If the LED continuously flashes
or remains on (solid) after 10 seconds, the unit has failed
self-test.
612806420L1-1E Copyright © 2005 ADTRAN, Inc. 31
Page 32

Section 3 Engineering Guidelines TRACER 6000 Series Integrated System Manual
Table 2. TRACER 64x0 LEDs (Continued)
For these LEDs... This color light... Indicates that...
STATUS
MOD1 and MOD2
PLAN A
PLAN B
RF LO Red (solid)
RF DWN Red (solid)
Green the module is installed and functioning properl y.
Red (solid) a port on the installed module is currently in alarm.
Off no module occupies the slot.
Green (solid) the TRACER is transmitting on Frequency Plan A.
Off the TRACER is not transmitting on Frequency Plan A.
Green (solid) the TRACER is transmitting on Frequency Plan B.
Off the TRACER is not transmitting on Frequency Plan B.
the RSSI level is below suggested minimum threshold
(approximately 10 dBm above the minimum receive sensitivity).
there is a communication problem between the local and remote
TRACERs.
AUX RS232 Interface (RJ-45)
The AUX RS232 interface provides a female RJ-45 terminal connection (wired as a DCE interface), used
for a 9600 bps point-to-point connection between the local and remote systems (over the RF link). Ta ble 3
shows the pinout.
Table 3. AUX RS232 Pinout
Pin Name Source Description
1 GND Common Signal ground
2 RTS Attached Equipment Request to send (unused)
3 TXDATA Attached Equipment Transmit data (from attached equipment)
4 DSR TRACER Data set ready
5 RXDATA TRACER Received data (to attached equipment)
6 CTS TRACER Clear to send
7 DTR Attached Equipment Data terminal ready (unused)
8 CD TRACER Carrier detect
32 Copyright © 2005 ADTRAN, Inc. 612806420L1-1E
Page 33

TRACER 6000 Series Integrated System Manual Section 3 Engineering Guidelines
CRAFT Port (DB-9)
The CRAFT connector provides a female DB-9 terminal connection (wired as a DCE interface), used for
terminal access to the TRACER system. Table 4 shows the pinout. A null modem cable is necessary for
connecting the
modem cable.
CRAFT port to a modem for remote dial-up access. Table 5 shows the pinout for a null
Table 4. CRAFT Pinout
Pin
1CD
2RXDATA
3 TXDATA Attached Equipment Transmit data (from attached equipment)
4 DTR Attached Equipment Data terminal ready (unused)
5 GND Common Signal ground
6DSR
7 RTS Attached Equipment Request to send (unused)
8CTS
9RI
Name
Source Description
TRACER Carrier detect
TRACER Received data (to attached equipment)
TRACER Data set ready
TRACER Clear to send
TRACER Ring indicator (unused)
Table 5. Null-Modem Pinout
Modem
Pin
1 (CD) Unconnected
2 (RXD) 3 (TXD)
3 (TXD) 2 (RXD)
4 (DTR) 6 (DSR)
5 (GND) 5 (GND)
6 (DSR) 4 (DTR)
TRACER 64x0
Pin
7 (RTS) 8 (CTS)
8 (CTS) 7 (RTS)
9 (RI) Unconnected
4. REVIEWING THE TRACER 64X0 REAR PANEL DESIGN
Figure 3 on page 34 identifies the features of the TRACER rear panel, an d Table 6 on page 34 provides a
brief description of each interface.
612806420L1-1E Copyright © 2005 ADTRAN, Inc. 33
Page 34

Section 3 Engineering Guidelines TRACER 6000 Series Integrated System Manual
A
Network
Module Slots
B
Ethernet
Interface
Figure 3. TRACER 64x0 Rear Panel
Table 6. Rear Panel Description
Name Connector Description
A Network Module
Slots
B
C DC Power Terminal block 21 to 60 VDC power source connection (either polarity
D Fuse N/A 2A, 250 V, 2-inch slo-blo fuse
E Alarm Terminal blo ck External alarm monitoring system connection
F Antenna N-type (female) Antenna feedline cable connection
G Ground Lug N/A Earth ground connection
MGMT RJ-45
N/A Dual network module slots for system flexibility (shown
with a single 4xT1 module and a Quad Ethernet Switch
module installed)
10/100BaseT/TX Ethernet interface for SNMP, TFTP, and
Telnet access
referenced to ground)
C
DC Power
Connection
D
Fuse
E
Alarm
Contacts
1
F
Antenna
Connector
G
Ground
Lug
1 Detailed discussions (including pinouts) of rear panel components (where applicable) follow the table.
MGMT 10/100BaseT/TX Connection (RJ-48C)
The physical Ethernet interface is provided by a single RJ-48C jack (labeled MGMT) that delivers
10/100BaseT/TX for LAN connectivity. The
is not a router interface. The
MGMT port has a green LINK LED to indicate a valid link and an amber ACT
LED that flashes with data activity on the interface. Table 7 shows the pinout.
Table 7. MGMT 10/100BaseT/TX Interface Pinout
Pin Name Description
1
2 TX2 Transmit negative
3 RX1 Receive positive
4,5 — Unused
6 RX2 Receive negative
7, 8 — Unused
34 Copyright © 2005 ADTRAN, Inc. 612806420L1-1E
TX1 Transmit positive
MGMT port is used for Telnet, SNMP, and TFTP access and
Page 35

TRACER 6000 Series Integrated System Manual Section 3 Engineering Guidelines
DC Power Connection (Plug-In Terminal Block)
The TRACER 64x0 can operate from a supply between 21 and 60 VDC, with either polarity referenced to
ground, and consumes less than 25 W. Power supplies should be able to provide up to 25 W at the selected
voltage. Current required (in amps) is determined by dividing the power consumed (in watts) by the applied
voltage (in volts). For example, at 48 V, TRACER 64x0 would draw approximately 0.52 A
(25 W/48 V). Table 8 shows the DC power connection pinout.
Applying power to the radio without a 50Ω load attached to the antenna interface can
damage the system. Verify the 50
When using a power source that has the positive terminal or the negative terminal
connected to earth ground, the grounded terminal must be attached to the TRACER 64x0
power input that is identified with the ground symbol. Otherwise, equipment damage will
occur. When using a power source that has neither terminal connected with earth ground
(floating), either terminal may be connected to the TRACER 64x0 power input identified
with the ground symbol.
Table 8. DC Power Connector Pinout
Ω
load is attached before powering the radio.
Pin Name Description
1 +/– Voltage
2 GND Ground
Fuse
The fuse holder, accessible from the rear panel of the TRACER 64x0, accepts a generic 2 A, 250 V, 2-inch
slow-blo fuse.
Alarm Contacts (Plug-In Terminal Block)
An RF link down condition is indicated with both normally open (NO) and normally closed (NC) alarm
contacts on the rear panel of the TRACER 64x0 system. In normal operation, the NC contact is electrically
connected to the common contact (COM) and the NO contact is isolated. When the RF link drops, the NC
contact becomes isolated and the NO is electrically connected to COM. This allows RF down conditions to
be reported to external alarm monitoring systems. Table 9 provides the alarm contact pinout.
Table 9. Alarm Contact Connector Pinout
Pin Name Description
1 COM Common Contact
2 NO Norm ally- O pe n Co ntact
3 NC Normally-Closed Contact
Antenna Interface (N-Type Connector)
The ANTENNA interface (N-type connector) connects to the customer-supplied antenna using standard
antenna feedline cable. When determining the cable specifications for your application, refer to Section 2,
Microwave Path Engineering Basics (System Losses (L) on page 21) for a discussion on cable length and
612806420L1-1E Copyright © 2005 ADTRAN, Inc. 35
Page 36

Section 3 Engineering Guidelines TRACER 6000 Series Integrated System Manual
loss factors.
Applying power to the radio without a 50Ω load attached to the antenna interface can
damage the system. Verify the 50
Ω
load is attached before powering the radio.
36 Copyright © 2005 ADTRAN, Inc. 612806420L1-1E
Page 37

TRACER 6000 Series Integrated System Manual Section 3 Engineering Guidelines
5. NETWORK MODULE INTERFACES 4xT1 Module
The 4xT1 network module has four T1 interfaces (through four RJ-45 ports) that provide the following
functions:
®
• ANSI T1.403 and AT&T
• AMI or B8ZS coding
• Extended Super Frame (ESF) and Super Frame (SF) framing support
• Manual line build out
• Network performance monitoring and reporting
• Test loopbacks (both line and link)
Table 10 provides the RJ-45 interface pinout for the 4xT1 network module.
Table 10. 4xT1 Module RJ-45 Connector Pinout
Pin Name Description
1 R Transmit data (ring) towards the network
54016 and 62411 compliant
2 T Transmit data (tip) towards the network
3, 6-8 UNUSED —
4 R1 Receive data (ring) toward the network
5 T1 Receive data (tip) from the network
Quad Ethernet Switch Module
The Quad Ethernet Switch module has four 10/100BaseTX interfaces (through four RJ-45 ports) that
provide the following functions:
• IEEE 802.3 and 802.3u compliant
• Auto MDI/MDIX crossover
• Back-pressure flow control on all full-duplex interfaces
• Link and activity LEDs for each port
Table 11 provides the RJ-45 interface pinout for the Quad Ethernet Switch module.
Table 11. Quad Ethernet Switch RJ-45 Connector Pinout
Pin Name Source Description
1 RX1 Attached Equipment Receive Positive 2 RX2 Attached Equipment Receive Negative 3 TX1 Module Transmit Positive 4, 5 Unused N/A — 6 TX2 Module Transmit Negative 7, 8 Unused N/A —
612806420L1-1E Copyright © 2005 ADTRAN, Inc. 37
Page 38

Section 3 Engineering Guidelines TRACER 6000 Series Integrated System Manual
4xE1 Module with 120Ω Interface
The 4xE1 network module provides four E1 interfaces (through four RJ-45 connec tors) that provide the
following functions:
• AMI or HDB3 coding
• Framed, multi-framed, and unframed framing support
• Network performance monitoring and reporting
• Test loopbacks (both line and link)
Table 12 provides the RJ-45 interface pinout for the 4xE1 network module.
Table 12. 4xE1 Module with 120Ω Interface RJ-45 Connector Pinout
Pin Name Description
1 TX Tip Transmit signal (Tip)
2 TX Ring Transmit signal (Ring)
3Unused—
4 RX Tip Receive signal (Tip)
5 RX Ring Receive signal (Ring)
6–8 Unused —
4xE1 Module with 75Ω Interface
The 4xE1 network module provides four E1 interfaces (through a si ngl e DB-25 interface) that provide the
following functions:
• AMI or HDB3 coding
• Framed, multi-framed, and unframed framing support
• Network performance monitoring and reporting
• Test loopbacks (both line and link)
Table 13 on page 39 provides the DB-25 interface pinout for the 4xE1 network module. A separate
breakout panel is available to provide 75Ω BNC unbalanced interfaces (see Table 14 on page 39 for the
pinout of the 75Ω cable). Figure 4 displays the E1 breakout panel.
38 Copyright © 2005 ADTRAN, Inc. 612806420L1-1E
Page 39

TRACER 6000 Series Integrated System Manual Section 3 Engineering Guidelines
Table 13. 4xE1 Module with 75Ω Interface DB-25 Connector Pinout
Pin Name Description
1 E1D RX Receive signal for E1 D interface
2 E1D TX Output signal for E1 D interface
3 GND Ground
4 E1C RX Receive signal for E1 C interface
5 E1C TX Output signal for E1 C interface
6 GND Ground
7 E1B RX Receive signal for E1 B interface
8 E1B TX Output signal for E1 B interface
9 GND Ground
10 E1A RX Receive signal for E1 A interface
11 E1A TX Output signal for E1 A interface
12-25 GND Ground
Table 14. DB-25 to 75Ω Unbalanced Cable Pinout
E1 Cable Interface
DB-25 Male
(TRACER Side)
DB-25 Male
(Breakout Panel)
Channel 1 Input 10 14
Channel 1 Output 11 3
Channel 2 Input 7 17
Channel 2 Output 8 6
Channel 3 Input 4 20
Channel 3 Output 5 9
Channel 4 Input 1 23
Channel 4 Output 2 12
Ground All other pins All other pins
612806420L1-1E Copyright © 2005 ADTRAN, Inc. 39
Page 40

Section 3 Engineering Guidelines TRACER 6000 Series Integrated System Manual
Figure 4. E1 Breakout Panel
6. AT-A-GLANCE SPECIFICATIONS
Table 15 on page 40 contains a list of specifications for the TRACER 64x0 system.
Table 15. At-A-Glance Specifications
Hardware Description Specification
Transmitter
Output Power +27 dBm, maximum (TRACER 6410 L2)
+20 dBm, maximum (TRACER 6420 L1)
+24 dBm, maximum (TRACER 6420 L2)
Frequency Range 2400 to 2483.5 MHz (TRACER 6410 L2)
5725 to 5850 MHz (TRACER 6420 L1 and L2)
Receiver
Receive Level,
Minimum
Receive Level, Maximum -30 dBm
Receive Level, Nominal -55 dBm
TRACER 6410
-86 dBm @ 8xT1
-90 dBm @ 4xT1
-93 dBm @ 2xT1
TRACER 6420
-85 dBm @ 8xT1
-89 dBm @ 4xT1
-92 dBm @ 2xT1
-84 dBm @ 8xE1/16Mbps Ethernet
-88 dBm @ 4xE1/8 Mbps Ethernet
-91 dBm @ 2xE1/4 Mbps Ethernet
-83 dBm @ 8xE1/16Mbps Ethernet
-87 dBm @ 4xE1/8 Mbps Ethernet
-90 dBm @ 2xE1/4 Mbps Ethernet
40 Copyright © 2005 ADTRAN, Inc. 612806420L1-1E
Page 41

TRACER 6000 Series Integrated System Manual Section 3 Engineering Guidelines
Table 15. At-A-Glance Specifications (Continued)
Hardware Description Specification
Frequency Plan
Channel Plan
Data Encryption
User Interface
1
Plan A
Plan B
Encryption Type
Panel Alarm LEDs
Diagnostics RF link diagnostics and error history, transmit and receive packets
Symmetric Triple-DES (3DES)
history, real-time signal levels
2
3
Channel Plan
1
2
3
Tx 2.419 GHz, Rx 2.459 GHz (TRACER 6410)
Tx 5.744 GHz, Rx 5.824 GHz (TRACER 6420)
Tx 2.422 GHz, Rx 2.462 GHz (TRACER 6410)
Tx 5.747 GHz, Rx 5.827 GHz (TRACER 6420)
Tx 2.425 GHz, Rx 2.465 GHz (TRACER 6410)
Tx 5.751 GHz, Rx 5.831 GHz (TRACER 6420)
Tx 2.459 GHz, Rx 2.419 GHz (TRACER 6410)
Tx 5.824 GHz, Rx 5.744 GHz (TRACER 6420)
Tx 2.462 GHz, Rx 2.422 GHz (TRACER 6410)
Tx 5.827 GHz, Rx 5.747 GHz (TRACER 6420)
Tx 2.465 GHz, Rx 2.425 GHz (TRACER 6410)
Tx 5.831 GHz, Rx 5.751 GHz (TRACER 6420)
Test Points RSSI and Ground (GND)
Alarms Normally Open (NO) and Normally Closed (NC)
VT100 Terminal Menu-driven user interface, control of the remote end, event history
Telnet Access Menu-driven user interface, control of the remote end, event history
SNMP Standard MIB support (T1/E1 and Ether-like MIBs); Enterprise MIB
VT100 Terminal Interface
Data Rate 9600, 19200, 38400, 57600, 115200 bps
Data Bits 8
Parity None
Stop Bits 1
Terminal Emulation VT100
support (ADTRAN TRACER)
612806420L1-1E Copyright © 2005 ADTRAN, Inc. 41
Page 42

Section 3 Engineering Guidelines TRACER 6000 Series Integrated System Manual
Table 15. At-A-Glance Specifications (Continued)
Hardware Description Specification
Mechanical and Environmental
Operating Temperature -25°C to 65°C
1.7 inch (4.4 cm) H
Size
Humidity 95 percent, noncondensing
Weight 7 lbs (3.18 kg)
Power
Input Voltage 21 to 60 VDC, either polarity referenced to ground
Power Consumption < 25 W
Connector 2-pin terminal block (DC)
Fuse 2 A, 250 V slow-blo fuse (2-inch)
Network Modules
17.2 inch (43.7 cm) W
11.4 inch (28.9 cm) D
Quad T1 Module
Quad Ethernet
Switch Module
Quad E1 Module
(120Ω Interface)
Quad E1 Module
(75Ω Interface)
Connection Four RJ-45 interfaces
Capacity
Line Code B8ZS (default), AMI
Alarms AIS, Red, Yellow, BPVs, LOS
Connection Four RJ-45 interfaces
Interface Type Four 10BaseT/100BaseTX interfaces with auto MDI/MIDX
Flow Control Back-pressure flow control on half-duplex interfaces
Connection Four RJ-45 interfaces
Capacity 4x E1 (CCITT G.703)
Line Code HDB3 (default), AMI
Alarms LOS, LCV, AIS, RMT, OOF, CRC
Loopbacks Local and remote line and link
Connection Single DB-25 connector on module; 75Ω unbalanced interface
Capacity 4x E1 (CCITT G.703)
Line Code HDB3 (default), AMI
4xT1 (ANSI T1.403, AT&T® 54016 and 62411)
crossover
Pause-frame flow control on full-duplex interfaces
available using BNC breakout panel
Alarms LOS, LCV, AIS, RMT, OOF, CRC
Loopbacks Local and remote line and link
42 Copyright © 2005 ADTRAN, Inc. 612806420L1-1E
Page 43

NETWORK TURNUP PROCEDURE
Provides shipment contents list, grounding instructions, mounting options, and specifics of supplying
power to the unit.
CONTENTS
Introduction . . . . . . . . . . . . . . . . . . . . . . . . . . . . . . . . . . . . . . . . . . . . . . . . . . . . . . . . . . . . . . . . . . . . 44
Tools Required . . . . . . . . . . . . . . . . . . . . . . . . . . . . . . . . . . . . . . . . . . . . . . . . . . . . . . . . . . . . . . . . . 44
Unpack and Inspect the System . . . . . . . . . . . . . . . . . . . . . . . . . . . . . . . . . . . . . . . . . . . . . . . . . . . 44
Contents of Shipment . . . . . . . . . . . . . . . . . . . . . . . . . . . . . . . . . . . . . . . . . . . . . . . . . . . . . . . . . 44
Customer Provides . . . . . . . . . . . . . . . . . . . . . . . . . . . . . . . . . . . . . . . . . . . . . . . . . . . . . . . . . . . 45
Channel Selection . . . . . . . . . . . . . . . . . . . . . . . . . . . . . . . . . . . . . . . . . . . . . . . . . . . . . . . . . . . . . . 46
Grounding Instructions . . . . . . . . . . . . . . . . . . . . . . . . . . . . . . . . . . . . . . . . . . . . . . . . . . . . . . . . . . 47
Supplying Power to the Unit . . . . . . . . . . . . . . . . . . . . . . . . . . . . . . . . . . . . . . . . . . . . . . . . . . . . . . 48
Mounting Options . . . . . . . . . . . . . . . . . . . . . . . . . . . . . . . . . . . . . . . . . . . . . . . . . . . . . . . . . . . . . . . 48
Installing Modules . . . . . . . . . . . . . . . . . . . . . . . . . . . . . . . . . . . . . . . . . . . . . . . . . . . . . . . . . . . . . . 50
Instructions for Installing Network Modules. . . . . . . . . . . . . . . . . . . . . . . . . . . . . . . . . . . . . . . . . 50
Connecting the Module Interfaces . . . . . . . . . . . . . . . . . . . . . . . . . . . . . . . . . . . . . . . . . . . . . . . . . 51
Quad T1 Module Interfaces. . . . . . . . . . . . . . . . . . . . . . . . . . . . . . . . . . . . . . . . . . . . . . . . . . . . . 51
Quad Ethernet Switch Module . . . . . . . . . . . . . . . . . . . . . . . . . . . . . . . . . . . . . . . . . . . . . . . . . . 51
Quad E1 (120Ω) Module Interfaces . . . . . . . . . . . . . . . . . . . . . . . . . . . . . . . . . . . . . . . . . . . . . . 51
Quad E1 (75Ω) Module Interfaces . . . . . . . . . . . . . . . . . . . . . . . . . . . . . . . . . . . . . . . . . . . . . . . 51
FIGURES
Figure 1. 2.4 GHz Bandwidth Division. . . . . . . . . . . . . . . . . . . . . . . . . . . . . . . . . . . . . . . . . . . . . . 46
Figure 2. 5.8 GHz Bandwidth Division. . . . . . . . . . . . . . . . . . . . . . . . . . . . . . . . . . . . . . . . . . . . . . 46
Figure 3. 19-inch Rackmount Illustration. . . . . . . . . . . . . . . . . . . . . . . . . . . . . . . . . . . . . . . . . . . . 49
Figure 4. 23-inch Rackmount Illustration. . . . . . . . . . . . . . . . . . . . . . . . . . . . . . . . . . . . . . . . . . . . 49
Figure 5. TRACER 64x0 Network Module Slot Designation . . . . . . . . . . . . . . . . . . . . . . . . . . . . . 50
Figure 6. E1 Connection with Breakout Panel. . . . . . . . . . . . . . . . . . . . . . . . . . . . . . . . . . . . . . . . 52
612806420L1-1E Copyright © 2005 ADTRAN, Inc. 43
Page 44

Section 4 Network Turnup Procedure TRACER 6000 Series Integrated System Manual
1. INTRODUCTION
This section discusses TRACER 64x0 system installation.
Changes or modifications not expressly approved by ADTRAN could void the user’s
authority to operate the equipment.
2. TOOLS REQUIRED
The tools required for TRACER 64x0 installation are:
• VT100 terminal or PC with terminal emulation software
• RS-232 (DB-9 male for TRACER 64x0) cable for connecting to terminal
T o pr event electrical shock, do not install equipment in a wet location or during a lightning
storm.
3. UNPACK AND INSPECT THE SYSTEM
This system MUST be installed by qualified service personnel in a Restricted Access
Location.
Each TRACER 64x0 is shipped in its own cardboard shipping carton. Open each carton carefully and
avoid deep penetration into the carton with sharp objects.
After unpacking the unit, inspect it for possible shipping damage. If the equipment has been damaged in
transit, immediately file a claim with the carrier; then contact ADTRAN Customer Service (see Warranty,
Customer Service, Product Support Information, and Training information in the front of this manual).
Contents of Shipment
Your shipment of the base unit includes the following items:
• TRACER 64x0 unit
• RJ-45 to DB-9 connector (ADTRAN P/N 3196ADPT001) for connection to the AUX RS232 port
• 6-foot silver satin cable for connection to the AUX RS232 port
• Rackmount brackets
• Power and Alarm connectors
• Spare fuse
• ADTRAN received signal power versus RSSI reference sheet
• TRACER 64x0 Documentation CD
44 Copyright © 2005 ADTRAN, Inc. 612806420L1-1E
Page 45

TRACER 6000 Series Integrated System Manual Section 4 Network Turnup Procedure
Your Quad T1 module shipment includes the following items:
• Quad T1 module
• Quad T1 module quick start guide
Your Quad Ethernet Switch module shipment includes the following items:
• Quad Ethernet Switch module
• Quad Ethernet Switch module quick start guide
Your Quad E1 module (120Ω interface) shipment includes the following items:
• Quad E1 module
• Quad E1 module quick start guide
Your Quad E1 module (75Ω interface) shipment includes the following items:
• Quad E1 module
• Quad E1 module quick start guide
• DB-25 to DB-25 cable for connecting to the 75Ω BNC breakout panel
Your Octal 75Ω E1 Breakout Panel shipment includes the following items:
•Octal 75Ω E1 Breakout Panel
• 23-inch rack mounting brackets (ADTN P/N 3265622@A)
•Octal 75Ω E1 Breakout Panel quick start guide
Customer Provides
Base System
The following items are necessary to install the TRACER 64x0 system and are not provided:
• 21 to 60 VDC power source with either polarity referenced to ground
• DB-9 cable for VT100 access
• Ethernet cable (for Telnet, SNMP, or TFTP access)
Quad T1 Module
• T1 cables for connecting external equipment to the T1 interfaces (Quad T1 module only)
Quad Ethernet Switch Module
• Ethernet cables for connected external equipment for the switch interfaces (Quad Ethernet Switch
module only)
Quad E1 (120Ω)Module
• E1 cables for connecting the Quad E1 module to external E1 devices
Quad E1 (75Ω)Module
• BNC cables for connecting the 75Ω E1 Breakout Panel to external devices
612806420L1-1E Copyright © 2005 ADTRAN, Inc. 45
Page 46

Section 4 Network Turnup Procedure TRACER 6000 Series Integrated System Manual
4. CHANNEL SELECTION
The FCC has allocated 83.5 MHz of spectrum in the 2.4 GHz band where the TRACER 6410 operates, and
125 MHz of spectrum in the 5.8 GHz band where the TRACER 6420 operates. Figure 1 and Figure 2
illustrates the bandwidth division.
Channel A
2419 2441.752422 24252400 MHz 2483.5 MHz
Bandplan 1
Bandplan 3
Bandplan 2
Bandplan 1
Channel B
2459 2462 2465
Bandplan 3
Bandplan 2
Figure 1. 2.4 GHz Bandwidth Division
Frequency Plan A
Band plan 3Band plan 2Band plan 1
57445725 5787 58505747 5751MHz MHz
Frequency Plan B
Band plan 3Band plan 2Band plan 1
5824 5827 5831
Figure 2. 5.8 GHz Bandwidth Division
To designat e the utilization of the Industrial, Scientific, and Medical (ISM) bandwidth, there are two
different frequency plans, labeled A and B. The letter of each frequency plan setting is preset by the factory
and refers to the physical configuration of the diplexer filter inside the chassis. Each frequency plan is then
divided into three band plans (1, 2, or 3). The band plans must be the same for the local and remote
TRACER 64x0. For example, the transmitter at one end of the link will transmit in band plan 1 of frequency
plan A (the lower portion of the spectrum) and receive in band plan 1 of frequency pla n B (the upper
portion). Consequently, the receiver at the other end should receive in band plan 1 of frequency plan A (the
lower portion) and transmit in band plan 1 of frequency plan B (the upper portion).
The letter of the frequency plan (A or B) must be different on both ends, and the number of the band plan (1,
2, or 3) must be the same on both ends. The default band plan configuration for the TRACER 64x0 is b and
plan 1.
The frequency plan (A or B) of the unit may be changed in the field, if necessary, by rewiring the internal
diplexer. Contact Technical Support (see Warranty, Customer Service, Product Support Information, and
Training on page 7) for more information on this procedure.
46 Copyright © 2005 ADTRAN, Inc. 612806420L1-1E
Page 47

TRACER 6000 Series Integrated System Manual Section 4 Network Turnup Procedure
5. GROUNDING INSTRUCTIONS
The following paragraphs provide grounding instruction information from the Underwriters’ Laboratory
UL60950 Standard for Safety of Information Technology Equipment Including Electrical Business
Equipment, with revisions dated March 15, 2002.
An equipment grounding conductor that is not smaller in size than the ungrounded branch-circuit supply
conductors is to be installed as part of the circuit that supplies the product or system. Bare, covered, or
insulated grounding conductors are acceptable. Individually covered or insulated equipment grounding
conductors shall have a continuous outer finish that is either green, or green with one or more yellow stripes.
The equipment grounding conductor is to be connected to ground at the service equipment.
The attachment-plug receptacles in the vicinity of the product or system are all to be of a grounding type, and
the equipment grounding conductors serving these receptacles are to be connected to earth ground at the
service equipment.
A supplementary equipment grounding conductor shall be installed between the product or system and
ground that is in addition to the equipment grounding conductor in the power supply cord.
The supplementary equipment grounding co nductor shall not be smaller in size than the ungrounded
branch-circuit supply conductors. The supplementary equipment grounding conductor shall be connected to
the product at the terminal provided, and shall be connected to ground in a manner that will retain the ground
connection when the product is unplugged from the receptacle. The connection to ground of the
supplementary equipment grounding conductor shal l be in compliance with the rules for terminating bonding
jumpers at Part K or Article 250 of the National Electrical Code, ANSI/NFPA 70. Termination of the
supplementary equipment grounding conductor is permitted to be made to building steel, to a metal electrical
raceway system, or to any grounded item that is permanently and reliably connected to the electrical service
equipment ground.
The supplemental grounding conductor shall be connected to the equipment using a number 8 ring terminal
and should be fastened to the grounding lug provided on the rear panel of the equipment. The ring terminal
should be installed using the appropriate crimping tool (AMP P/N 59250 T-EAD Crimping Tool or
equivalent).
The supplemental equipment grounding terminal is located on the rear panel of the
TRACER 64x0.
When using a power source that has the positive terminal or the negative terminal
connected to earth ground, the grounded terminal must be attached to the TRACER 64x0
power input that is identified with the ground symbol. Otherwise, equipment damage will
occur. When using a power source that has neither terminal connected with earth ground
(floating), either terminal may be connected to the TRACER 64x0 power input identified
with the ground symbol.
612806420L1-1E Copyright © 2005 ADTRAN, Inc. 47
Page 48

Section 4 Network Turnup Procedure TRACER 6000 Series Integrated System Manual
6. SUPPLYING POWER TO THE UNIT
The TRACER 64x0 can operate from an LPS or Class 2 power source between 21 and 60 VDC and a
minimum output current rating of 1.2 A, with either polarity referenced to ground. Power supplies should
be able to provide up to 25 W at the selected voltage and be suitable for operation at a 50° C ambient
temperature. A dual pin terminal plug accepts power at the rear panel of the unit, providing a voltage (
and ground (
GND) reference point.
+/–)
• Power to the TRACER 64x0 DC system must be from a reliably grounded
21 to 60 VDC UL Listed Power Supply with outputs meeting LPS requirements.
• A readily accessible disconnect device that is suitably approved and rated shall be
incorporated in the field wiring.
7. MOUNTING OPTIONS
Install the TRACER 64x0 in a location that requires minimal antenna feedline length (the loss in this cable
directly affects overall system performance). The TRACER 64x0 is designed to be mounted in a rack. If
multiple units are installed in one location, one-half inch of spacing is recommended above and below the
unit.
The TRACER 64x0 systems are 1U high, rack-mountable units which can be installed into 19-inch (see
Figure 3 on page 49) or 23-inch (see Figure 4 on page 49) equipment racks using the supplied rackmount
brackets (3265498@B). Follow these steps to mount the TRACER 64x0 into a rack:
Instructions for Rack Mounting the TRACER 64x0
1. Position the TRACER 64x0 in a stationary equipment rack. This unit takes up 1U of
space. To allow proper grounding, scrape the paint from the rack around the
mounting holes where the TRACER 64x0 will be positioned.
2. Have an assistant hold the unit in position as you install two mountin g bolts through
the unit’s brackets and into the equipment rack using a #2 phillips-head
screwdriver.
Be careful not to compromise the stability of the equipment mounting rack when installing
this product.
48 Copyright © 2005 ADTRAN, Inc. 612806420L1-1E
Page 49

TRACER 6000 Series Integrated System Manual Section 4 Network Turnup Procedure
TRACER 6420
Figure 3. 19-inch Rackmount Illustration
0
2
4
6
R
E
C
A
R
T
Figure 4. 23-inch Rackmount Illustration
612806420L1-1E Copyright © 2005 ADTRAN, Inc. 49
Page 50

Section 4 Network Turnup Procedure TRACER 6000 Series Integrated System Manual
8. INSTALLING MODULES
Figure 5 shows the slot numbering designation as viewed from the rear of the TRACER 64x0. The
functionally identical option slots only accept TRACER 6000 Series modules.
MODULE 1 MODULE 2
Figure 5. TRACER 64x0 Network Module Slot Designation
Access modules are intended to be serviced by qualified service personnel only.
TRACER 64x0 modules are not hot swappable. Remove power from the system before
installing or removing the module.
Electronic modu les can be damaged by static electrical discharge. Before handling
modules, put on an antistatic discharge wrist strap to prevent damage to electronic
components. Place modules in antistatic packing material when transporting or storing.
When working on modules, always place them on an approved antistatic mat that is
electrically grounded.
Instructions for Installing Network Modules
Individual access modules insert in the back of the chassis. Two phillips-head screws hold the modules in
place for added security. To install network modules, follow the steps outlined in the following table.
For proper airflow through the system to avoid elevated temperature levels, leave filler
plates on any unused slots.
50 Copyright © 2005 ADTRAN, Inc. 612806420L1-1E
Page 51

TRACER 6000 Series Integrated System Manual Section 4 Network Turnup Procedure
Instructions for Installing Network Modules
1. Remove power from the unit.
2. Remove the blank panel plate (if necessary).
3. Slide the network module into the network slot until the module is firmly seated
against the front of the chassis.
4. Secure the screws at both edges of the module.
5. Install the optional hardware components (when necessary). For example, for
the E1 network module, an optional BNC breakout panel is available.
6. Connect the cables to the ass oc i at ed dev ice( s) .
7. Restore power to the unit.
9. CONNECTING THE MODULE INTERFACES Quad T1 Module Interfaces
The physical T1 interfaces are provided using four RJ-45 ports located on the module. Straight-through T1
interface cables can be used to interface to any standard T1 DTE device (not supplied).
T1 crossover cables are needed when connecting two TRACER 64x0 T1 ports in
back-to-back operation.
Quad Ethernet Switch Module
The physical Ethernet interfaces are provided using four RJ-45 jacks. Ethernet cables are not supplied with
your shipment. Connect any standard Ethernet device to one of the switch ports located on the rear of the
unit.
Quad E1 (120Ω) Module Interfaces
The physical E1 interfaces are provided using four RJ-45 ports located on the module. Straight-through E1
interface cables can be used to interface to any standard E1 DTE device (not supplied).
E1 crossover cables are needed whe n connecting two TRACER 64x0 E1 ports in
back-to-back operation.
Quad E1 (75Ω) Module Interfaces
The physical E1 interfaces are provided using a single DB-25 interface, an adapter cable, and a BNC
breakout panel. Connect one end of the adapter cable (labeled
connector, and then attach the other end of the cable (labeled
75Ω unbalanced interfaces provided by the breakout panel are available for connection to standard E1
DTE devices (see Figure 6 on page 52).
TO RADIO) to the module’s DB-25
T O PANEL) to the BNC breakout panel. T he
612806420L1-1E Copyright © 2005 ADTRAN, Inc. 51
Page 52

Section 4 Network Turnup Procedure TRACER 6000 Series Integrated System Manual
1
2
Figure 6. E1 Connection with Breakout Panel
52 Copyright © 2005 ADTRAN, Inc. 612806420L1-1E
Page 53

USER INTERFACE GUIDE
Provides detailed descriptions of all menu options and configuration parameters available for the
TRACER 64x0.
This section of the TRACER 6000 Series Integrated System Manual is designed for use by network
administrators and others who will configure and provision the system. It contains information about
navigating the VT100 user interface, configuration information, and menu descriptions.
CONTENTS
Navigating the Terminal Menu . . . . . . . . . . . . . . . . . . . . . . . . . . . . . . . . . . . . . . . . . . . . . . . . . . . . 55
Terminal Menu Window . . . . . . . . . . . . . . . . . . . . . . . . . . . . . . . . . . . . . . . . . . . . . . . . . . . . . . . 55
Navigating using the Keyboard Keys . . . . . . . . . . . . . . . . . . . . . . . . . . . . . . . . . . . . . . . . . . . . . 56
Menu and System Control . . . . . . . . . . . . . . . . . . . . . . . . . . . . . . . . . . . . . . . . . . . . . . . . . . . . . . . . 56
Password Protection. . . . . . . . . . . . . . . . . . . . . . . . . . . . . . . . . . . . . . . . . . . . . . . . . . . . . . . . . . 56
Menu Descriptions . . . . . . . . . . . . . . . . . . . . . . . . . . . . . . . . . . . . . . . . . . . . . . . . . . . . . . . . . . . . . . 57
> System Status . . . . . . . . . . . . . . . . . . . . . . . . . . . . . . . . . . . . . . . . . . . . . . . . . . . . . . . . . . . . . 57
> Main Menu. . . . . . . . . . . . . . . . . . . . . . . . . . . . . . . . . . . . . . . . . . . . . . . . . . . . . . . . . . . . . . . . 59
> System Configuration. . . . . . . . . . . . . . . . . . . . . . . . . . . . . . . . . . . . . . . . . . . . . . . . . . . . . . . . 60
> RF Link Configuration . . . . . . . . . . . . . . . . . . . . . . . . . . . . . . . . . . . . . . . . . . . . . . . . . . . . . . . 63
> RF Link Performance History (Main Screen) . . . . . . . . . . . . . . . . . . . . . . . . . . . . . . . . . . . . . . 65
> RF Link Error History . . . . . . . . . . . . . . . . . . . . . . . . . . . . . . . . . . . . . . . . . . . . . . . . . . . . . . . . 66
> RF Link Max/Min Received Power History. . . . . . . . . . . . . . . . . . . . . . . . . . . . . . . . . . . . . . . . 66
> RF Link Min/Max Received Signal Quality History. . . . . . . . . . . . . . . . . . . . . . . . . . . . . . . . . . 67
> Datapath Provisioning . . . . . . . . . . . . . . . . . . . . . . . . . . . . . . . . . . . . . . . . . . . . . . . . . . . . . . . 69
> 4xE1 Module Configuration/Status/History (Main Screen). . . . . . . . . . . . . . . . . . . . . . . . . . . . 70
> E1x Status/Configuration/Loopback. . . . . . . . . . . . . . . . . . . . . . . . . . . . . . . . . . . . . . . . . . . . . 70
> E1x Performance History. . . . . . . . . . . . . . . . . . . . . . . . . . . . . . . . . . . . . . . . . . . . . . . . . . . . . 73
> T1 Module Configuration/Status/History (Main Screen). . . . . . . . . . . . . . . . . . . . . . . . . . . . . . 74
> T1x Status/Configuration/Loopback. . . . . . . . . . . . . . . . . . . . . . . . . . . . . . . . . . . . . . . . . . . . . 74
> Ethernet Switch Module Configuration/Status/History (Main Screen) . . . . . . . . . . . . . . . . . . . 78
> Ethernet Switch Configuration . . . . . . . . . . . . . . . . . . . . . . . . . . . . . . . . . . . . . . . . . . . . . . . . . 78
> Ethernet Switch Status. . . . . . . . . . . . . . . . . . . . . . . . . . . . . . . . . . . . . . . . . . . . . . . . . . . . . . . 79
> Management/Utilities (Main Screen) . . . . . . . . . . . . . . . . . . . . . . . . . . . . . . . . . . . . . . . . . . . . 80
> Ping Utility . . . . . . . . . . . . . . . . . . . . . . . . . . . . . . . . . . . . . . . . . . . . . . . . . . . . . . . . . . . . . . . . 82
> Firmware Upgrade Utility . . . . . . . . . . . . . . . . . . . . . . . . . . . . . . . . . . . . . . . . . . . . . . . . . . . . . 84
> RF Link Management Bridge Configuration. . . . . . . . . . . . . . . . . . . . . . . . . . . . . . . . . . . . . . . 86
> System Alarms. . . . . . . . . . . . . . . . . . . . . . . . . . . . . . . . . . . . . . . . . . . . . . . . . . . . . . . . . . . . . 87
FIGURES
Figure 1. Main Menu Screen. . . . . . . . . . . . . . . . . . . . . . . . . . . . . . . . . . . . . . . . . . . . . . . . . . . . . 55
Figure 2. TRACER 64x0 System Status . . . . . . . . . . . . . . . . . . . . . . . . . . . . . . . . . . . . . . . . . . . . 57
Figure 3. TRACER 64x0 Main Menu. . . . . . . . . . . . . . . . . . . . . . . . . . . . . . . . . . . . . . . . . . . . . . . 60
Figure 4. TRACER 64x0 System Configuration . . . . . . . . . . . . . . . . . . . . . . . . . . . . . . . . . . . . . . 61
Figure 5. RF Link Configuration . . . . . . . . . . . . . . . . . . . . . . . . . . . . . . . . . . . . . . . . . . . . . . . . . . 63
Figure 6. 2.4 GHz Bandwidth Division. . . . . . . . . . . . . . . . . . . . . . . . . . . . . . . . . . . . . . . . . . . . . . 64
Figure 7. 5.8 GHz Bandwidth Division. . . . . . . . . . . . . . . . . . . . . . . . . . . . . . . . . . . . . . . . . . . . . . 64
Figure 8. RF Link Performance History (Main Screen) . . . . . . . . . . . . . . . . . . . . . . . . . . . . . . . . . 65
612806420L1-1E Copyright © 2005 ADTRAN, Inc. 53
Page 54

Section 5 User Interface Guide TRACER 6000 Series Integrated System Manual
Figure 9. RF Link Error History . . . . . . . . . . . . . . . . . . . . . . . . . . . . . . . . . . . . . . . . . . . . . . . . . . . 66
Figure 10. RF Link Max/Min Received Power History. . . . . . . . . . . . . . . . . . . . . . . . . . . . . . . . . . . 67
Figure 11. RF Link Min/Max Received Signal Quality History. . . . . . . . . . . . . . . . . . . . . . . . . . . . . 68
Figure 12. Datapath Provisioning . . . . . . . . . . . . . . . . . . . . . . . . . . . . . . . . . . . . . . . . . . . . . . . . . . 69
Figure 13. E1 Module Configuration/Status/History (Main Screen). . . . . . . . . . . . . . . . . . . . . . . . . 70
Figure 14. E1x Status/Configuration/Loopback. . . . . . . . . . . . . . . . . . . . . . . . . . . . . . . . . . . . . . . . 70
Figure 15. E1 Local Link Loopback. . . . . . . . . . . . . . . . . . . . . . . . . . . . . . . . . . . . . . . . . . . . . . . . . 72
Figure 16. E1 Remote Link Loopback. . . . . . . . . . . . . . . . . . . . . . . . . . . . . . . . . . . . . . . . . . . . . . . 72
Figure 17. E1 Local Line Loopback. . . . . . . . . . . . . . . . . . . . . . . . . . . . . . . . . . . . . . . . . . . . . . . . . 72
Figure 18. E1 Remote Line Loopback. . . . . . . . . . . . . . . . . . . . . . . . . . . . . . . . . . . . . . . . . . . . . . . 73
Figure 19. E1x Link Performance History . . . . . . . . . . . . . . . . . . . . . . . . . . . . . . . . . . . . . . . . . . . . 73
Figure 20. T1 Module Configuration/Status/History (Main Screen). . . . . . . . . . . . . . . . . . . . . . . . . 74
Figure 21. T1x Status/Configuration/Loopback. . . . . . . . . . . . . . . . . . . . . . . . . . . . . . . . . . . . . . . . 74
Figure 22. T1 Local Link Loopback. . . . . . . . . . . . . . . . . . . . . . . . . . . . . . . . . . . . . . . . . . . . . . . . . 76
Figure 23. T1 Remote Link Loopback . . . . . . . . . . . . . . . . . . . . . . . . . . . . . . . . . . . . . . . . . . . . . . . 76
Figure 24. T1 Local Line Loopback. . . . . . . . . . . . . . . . . . . . . . . . . . . . . . . . . . . . . . . . . . . . . . . . . 76
Figure 25. T1 Remote Line Loopback. . . . . . . . . . . . . . . . . . . . . . . . . . . . . . . . . . . . . . . . . . . . . . . 76
Figure 26. T1x Link Performance History . . . . . . . . . . . . . . . . . . . . . . . . . . . . . . . . . . . . . . . . . . . . 77
Figure 27. Ethernet Switch Module Configuration/Status/History (Main Screen) . . . . . . . . . . . . . . 78
Figure 28. Ethernet Switch Module Configuration. . . . . . . . . . . . . . . . . . . . . . . . . . . . . . . . . . . . . . 78
Figure 29. Ethernet Switch Module Status . . . . . . . . . . . . . . . . . . . . . . . . . . . . . . . . . . . . . . . . . . . 79
Figure 30. Management/Utilities (Main Screen) . . . . . . . . . . . . . . . . . . . . . . . . . . . . . . . . . . . . . . . 80
Figure 31. Management/SNMP Port Configuration. . . . . . . . . . . . . . . . . . . . . . . . . . . . . . . . . . . . . 81
Figure 32. Ping Utility . . . . . . . . . . . . . . . . . . . . . . . . . . . . . . . . . . . . . . . . . . . . . . . . . . . . . . . . . . . 82
Figure 33. Firmware Upgrade Utility . . . . . . . . . . . . . . . . . . . . . . . . . . . . . . . . . . . . . . . . . . . . . . . . 84
Figure 34. RF Link Management Bridge Configuration. . . . . . . . . . . . . . . . . . . . . . . . . . . . . . . . . . 86
Figure 35. System Alarms. . . . . . . . . . . . . . . . . . . . . . . . . . . . . . . . . . . . . . . . . . . . . . . . . . . . . . . . 87
Figure 36. Active Fan Alarm . . . . . . . . . . . . . . . . . . . . . . . . . . . . . . . . . . . . . . . . . . . . . . . . . . . . . . 88
54 Copyright © 2005 ADTRAN, Inc. 612806420L1-1E
Page 55

TRACER 6000 Series Integrated System Manual Section 5 User Interface Guide
1. NAVIGATING THE TERMINAL MENU
The TRACER 64x0 menu system can be accessed with a VT100 compatible terminal that is connected to
CRAFT PORT (located on the front of the unit) and set to 9600 bits per second (default), 8 data bits,
the
1 stop bit, and no parity. Flow control on the serial interface should be configured to
NONE for proper
operation. Once a terminal is connected, press <Enter> until the login screen appears. The default
password for the TRACER 64x0 is password.
All TRACER 64x0 passwords are case-sensitive.
Terminal Menu Window
The TRACER 64x0 uses a series of menu pages and a single Main menu page to access its many features.
The Main menu page (see Figure 1) provides a link to all available configuration/status pages.
After connecting a VT100 terminal to the TRACER 64x0, press <Ctrl + l> or <Ctrl + r> to
redraw the current screen.
Figure 1. Main Menu Screen
612806420L1-1E Copyright © 2005 ADTRAN, Inc. 55
Page 56

Section 5 User Interface Guide TRACER 6000 Series Integrated System Manual
Navigating using the Keyboard Keys
You can use various keystrokes to move through the terminal menu, to manage a terminal menu session,
and to configure the system.
Moving Through the Menus
To do this... Press this key...
Activate the Login screen (upon initial connectio n) Ente r (t wice )
Refresh the screen <Ctrl + l>
<Ctrl + r>
Exit the menu system and return to the login screen <Ctrl + z>
Close the Telnet session (or toggle the modem signalling to hang up an
attached modem)
Move up to select items Up Arrow
Move down to select items Down Arrow
Edit a selected menu item Enter
Scroll through configuration parameters for a menu item Spacebar
Cancel an edit Escape
Return to Main menu page m
Back out to previous menu page b
Go to System Status menu page s
<Ctrl + z> (twice)
p (Previous)
n (Next)
Spacebar
Left/Right Arrows
p or n (Prev/Next)
Left Arrow
2. MENU AND SYSTEM CONTROL Password Protection
The TRACER 64x0 provides password protection for the menu interface (via Terminal or Telnet access).
All TRACER 64x0 systems are shipped with a default password of password. (Passwords
are case-sensitive.)
56 Copyright © 2005 ADTRAN, Inc. 612806420L1-1E
Page 57

TRACER 6000 Series Integrated System Manual Section 5 User Interface Guide
3. MENU DESCRIPTIONS
The remainder of this section describes the TRACER 64x0 menus and submenus.
The menu structure of the TRACER 64x0 system is depicted below as follows:
> MENU PAGE
> MENU PAGE > MENU SELECTION
> MENU PAGE > MENU SELECTION > SUB-MENU
> SYSTEM STATUS
Figure 2 shows the TRACER 64x0 System Status menu page. The status of major system components for
both sides of the RF link are displayed, but no configuration can be performed from this view.
A
Elapsed
Time
B
Module Status
D
Remote
TRACER
Status
F
Alarm Status
G
Frequency
Plan
H
Rx Quality
I
Rx Power
J
Tx Power
Module Status
E
Local
TRACER
Status
F
Alarm Status
G
Frequency
Plan
H
Rx Quality
I
Rx Power
J
Tx Power
B
C
RF Status
Real-Time
Signal Values
L
Navigation Reminders
K
Figure 2. TRACER 64x0 System Status
A. Elapsed Time
The top of the TRACER 64x0 System Status menu page displays the elapsed time the TRACER 64x0
system has been operational since the last power reset.
B. Module Status
A visual status of the current installed modules. The modules are listed in the order they are installed
(Module 1 on top and Module 2 on the bottom).
4XT1 MODULE
A visual status of current errors/alarms on the T1 interfaces (for both the local and remote
systems) is provided on the TRACER 6420 System Status menu page. The four available T1
interfaces on the module (
DATAPATH PROVISIONING; a – is displayed for inactive, unmapped interfaces. The interface
A through D) are only displayed if the interface is mapped in the
displayed in reverse highlight indicates an active error or alarm condition on the specified
interface (
A through D). Individual T1 status pages (accessible from the Main menu) provide
detailed T1 information.
612806420L1-1E Copyright © 2005 ADTRAN, Inc. 57
Page 58

Section 5 User Interface Guide TRACER 6000 Series Integrated System Manual
QUAD ETHERNET SWITCH MODULE
A visual status of current errors/alarms on the Ethernet interfaces (for both the local and
remote systems) is provided on the TRACER 6420 System Status menu page. The
configured data rate (on the Datapath Provisioning page) is displayed. Individual status
notations for the available Ethernet interfaces are available through the Quad Ethernet
Switch Module Status page.
4XE1 MODULES
A visual status of current errors/alarms on the E1 interfaces (for both the local and remote
systems) is provided on the System Status menu page. The four available E1 interfaces on
the module (
P
ROVISIONING; a – is displayed for inactive, unmapped interfaces. The interface displayed in
reverse highlight indicates an active error or alarm condition on the specified interface (
through
A through D) are only displayed if the interface is mapped in the DATAP ATH
A
D). Individual E1 status pages (accessible from the Main menu) provide detailed E1
information.
C. RF Status
A graphical indicator of the RF links is located beneath the Elapsed Time display. The status of the
received radio link is indicated as
corresponds to the
RF DWN LED on the front of the unit.
RF UP or RF DOWN for each direction. This RF status display
D. Remote System Status
The right portion of the TRACER 64x0 System Status menu page reports the status of the remote
TRACER 64x0 (the system across the wireless link from the active terminal). If the RF link is down in
either direction,
E. Local System Status
DATA NOT AVAILABLE is displayed in place of the remote system status information.
The left portion of the TRACER 64x0 System Status menu page reports the status of the local
TRACER 64x0 (the system where the active terminal is attached).
F. System Alarm Status
Indicates whether there are active system alarms (temperature, fan, or link) for the TRACER 64x0
unit. During alarm conditions,
the current system alarm is found on the
G. Frequency Plan
SYSTEM ALARM is displayed in reverse highlighted text. More details on
SYSTEM ALARMS page.
Displays the frequency plan (A or B) for the TRACER 64x0 unit. For an operational TRACER 64x0
system, you should have one A and one B frequency plan.
H. Rx Quality
Displays an indicator of receive signal quality that is not necessarily related to receive signal level (for
both the local and remote units) using a series of symbols (
#) displayed, the better the signal quality. This indicator is related to signal-to-noise ratio and features
(
a colon (:) marker to indicate 10
-6
bit error rate. This indicator is useful as a diagnostic tool to help
#) and a numeric value. The more symbols
identify interference, as the system may have high receive signal level and poor signal quality in
situations where interference is an issue.
58 Copyright © 2005 ADTRAN, Inc. 612806420L1-1E
Page 59

TRACER 6000 Series Integrated System Manual Section 5 User Interface Guide
I. Rx Power
Displays the approximate receiver levels (for both the local and remote units) using a series of symbols
(
#) and the actual real-time value (in dBm). The more symbols (#) displayed, the stronger the signal. If
the link is down in either direction and remote end data is unavailable,
displayed in place of the symbols (
J. Tx Power
#).
DATA NOT AVAILABLE is
Displays both an approximate transmitter levels (for both the local and remote units) using a series of
symbols (
signal. If the link is down in either direction and remote end data is unavailable,
is displayed in place of the symbols (
K. Navigation Reminders
#) and the actual real-time value (in dBm). The more symbols (#) displayed, the stronger the
DATA NOT AVAILABLE
#).
Displays system navigation reminders. For more details on system navigation, refer to Navigating the
Terminal Menu on page 55.
L. Real-Time Signal Values
Displays real-time signal values for Rx Quality, Rx Power, and Tx Power (for both the local and
remote units).
Real-time signal values are not supported on all TRACER 64x0 systems. Systems must be
ADTRAN calibrated to provide readings for Rx or Tx Power signal levels.
> MAIN MENU
The TRACER 64x0 Main menu page provides access to all other configuration/status pages. Figure 3 on
page 60 shows the TRACER 64x0 Main menu page.
Installed network modules are displayed as menu options 5 (slot 1) and 6 (slot 2). Menu
options for empty slots are not displayed.
612806420L1-1E Copyright © 2005 ADTRAN, Inc. 59
Page 60

Section 5 User Interface Guide TRACER 6000 Series Integrated System Manual
TRACER 64x0
High Power
Systems Only
Figure 3. TRACER 64x0 Main Menu
From the keyboard, use the up and down arrow keys to scroll through the available pages, or enter the
number or letter of the selected page (to highlight the menu page) and press <Enter>.
Press <m> from any menu in the TRACER 64x0 menu structure to access the
TRACER 64x0 Main menu page.
> SYSTEM CONFIGURATION
Figure 4 on page 61 shows the TRACER 64x0 System Configuration menu page. System configuration
parameters for both the local and remote TRACER 64x0 units are available through this menu page.
60 Copyright © 2005 ADTRAN, Inc. 612806420L1-1E
Page 61

TRACER 6000 Series Integrated System Manual Section 5 User Interface Guide
Figure 4. TRACER 64x0 System Configuration
Press <1> from any menu in the TRACER 64x0 menu structure to access the System
Configuration menu page.
> SYSTEM CONFIGURATION > SITE NAME
Provides a user-defined alphanumeric description (up to 25 characters) for the TRACER 64x0 system.
> SYSTEM CONFIGURATION > SERIAL NUMBER
Displays the serial number for the unit. The serial number of the TRACER 64x0 automatically displays in
this field.
> SYSTEM CONFIGURATION > SYSTEM TIME
Displays the current time, including seconds. To edit this field, place the cursor on the field and press
<Enter>. Then, enter the time in a 24-hour format (such as 23:00:00 for 11:00 p.m.). Press <Enter> when
you are finished to accept the change.
> SYSTEM CONFIGURATION > SYSTEM DATE
Displays the current date. To edit this field, place the cursor on the field and press <Enter>. Then, enter the
date in mm-dd-yyyy format (for example, 10-30-1998). Press <Enter> when you are finished to accept the
change.
> SYSTEM CONFIGURATION > ELAPSED TIME
Displays the length of time the TRACER 64x0 system has been running. Each time you reset the system, this
value resets to 0 days, 0 hours, 0 min, and 0 secs.
612806420L1-1E Copyright © 2005 ADTRAN, Inc. 61
Page 62

Section 5 User Interface Guide TRACER 6000 Series Integrated System Manual
> SYSTEM CONFIGURATION > CRAFT PORT BAUD
Specifies the baud rate of the port. Select either 9600 (default), 19200, 38400, 57600, or 115200 bps. If
you are using the
CRAFT port for modem access, ensure that the CRAFT port rate matches the modem
baud rate.
> SYSTEM CONFIGURATION > INACTIVITY LOGOUT
This option defines the amount of time in minutes the user can stay connected without any activity on the
CRAFT port before the user is automatically logged out of the system. Select one of the following: 5 MIN,
10 MIN (default), 15 MIN, 30 MIN, 45 MIN, 60 MIN, or OFF.
Changes to the INACTIVITY LOGOUT setting do not apply to the current session. All changes
take affect at the next login to the system menus.
> SYSTEM CONFIGURATION > PASSWORD
Sets the password for password protection of the TRACER 64x0 terminal interface. Enter up to eight
alphanumeric characters. The system password is case sensitive.
The default password for the TRACER 64x0 is password .
> SYSTEM CONFIGURATION > PERFORMANCE STATS (CLEAR)
Resets all system error counters for the TRACER 64x0.
> SYSTEM CONFIGURATION > FACTORY DEFAULTS
Resets the system to the factory default settings. The configured IP ADDRESS, SUBNET MASK, and DEFAULT
ATEWAY are not defaulted during a factory default. When you select this command, the following
G
confirmation message appears:
Are you sure you want to restore factory Defaults? Y or N
Y to restore factory defaults or N to cancel this command.
Press
The TOTAL ACTIVE CHANNELS parameter (on the Datapath Provisioning menu page) is
reset to the factory default value (
than eight active channels results in an RF link loss.
8). Performing a factory default on any system with less
62 Copyright © 2005 ADTRAN, Inc. 612806420L1-1E
Page 63

TRACER 6000 Series Integrated System Manual Section 5 User Interface Guide
> RF LINK CONFIGURATION
Figure 5 shows the TRACER 64x0 RF Link Configuration menu page, which conta i ns the transmit and
receive power settings and band plan configuration for both the local and remote units.
Figure 5. RF Link Configuration
> RF LINK CONFIGURATION > RX POWER
Displays the real-time receiver levels (for both the local and remote units) in dBm and a visual
approximation using a series of symbols (
#). The more symbols (#) displayed, the stronger the signal.
Real-time receiver levels are displayed within ±5 dBm accuracy and can vary with extreme temperatures.
If the link is down in either direction and remote end data is unavailable,
place of the symbols (
#). This parameter is display only.
DATA NOT AVAILABLE display s in
> RF LINK CONFIGURATION > TX POWER
Allows the transmitter levels (for both the local and remote units) to be adjusted. The current transmitter
level is displayed in dBm or a visual approximation using a series of symbols (
displayed, the stronger the signal. Real-time receiver levels are displayed within ±1 dBm accuracy. If the
link is down and remote end data is unavailable,
Pressing (+) on this field sets the
TX POWER to full strength; pressing (-) reduces the TX POWER to the
DATA NOT AVAILABLE displays in place of the symbols (#).
minimum.
Reducing the transmitter power of the remote TRACER 64x0 could cause the RF link to
drop, requiring a technician to increase the transmit power by using the menu system at
the remote site.
#). The more symbols (#)
612806420L1-1E Copyright © 2005 ADTRAN, Inc. 63
Page 64

Section 5 User Interface Guide TRACER 6000 Series Integrated System Manual
> RF LINK CONFIGURATION > RF BAND PLAN
When changing RF band plans on installed links, change the remote end first. If the local
end is changed first, remote configuration capability is lost. In the event the local end is
changed first and the link is dropped, reset the local end to the previous setting to restore
the link.
Sets the band plan for the TRACER 64x0. Each frequency plan is divided into three band plans (1, 2, or 3).
Both local and remote TRACER 64x0 systems must be configured with the same band plan (1, 2, or 3) but
different frequency plans (A or B). For example, the transmitter at one end of the link will transmit in band
plan 1 of frequency plan A (the lower portion of the spectrum) and receive in band plan 1 of frequency
plan B (the upper portion). Consequently, the receiver at the other end should receive in band plan 1 of
frequency plan A (the lower portion) and transmit in band plan 1 of frequency plan B (the upper portion).
(Refer to Figure 6 (TRACER 6410) Figure 7 (TRACER 6420) for the divisions.) The TRACER 64x0
comes factory programmed with RF band plan set to Band 1.
Channel A
2419 2441.752422 24252400 MHz 2483.5 MHz
Bandplan 3Bandplan 1
Figure 6. 2.4 GHz Bandwidth Division
2459 2462 2465
Frequency Plan A
Band plan 3Band plan 2Band plan 1
Channel B
Bandplan 3Bandplan 1
Frequency Plan B
Band plan 3Band plan 2Band plan 1
57445725 5787 58505747 5751MHz MHz
Figure 7. 5.8 GHz Bandwidth Division
64 Copyright © 2005 ADTRAN, Inc. 612806420L1-1E
5824 5827 5831
Page 65

TRACER 6000 Series Integrated System Manual Section 5 User Interface Guide
> RF LINK CONFIGURATION > LINK ENCRYPTION
The TRACER 64x0 provides triple-DES (3DES) encryption of the data passed over the RF Link. When
LINK ENCRYPTION is set to ENABLED, the TRACER 64x0 sequentially applies the three keys entered in the
SUBKEY 0, 1, and 2 fields to each 64-bit block of data transmitted over the RF link. The remote
TRACER 64x0 uses the same keys to decrypt each block. (The keys entered in the local and remote
systems must be identical.)
> RF LINK CONFIGURATION > SUBKEY (0-2)
The TRACER 64x0 provides 3DES encryption of the data passed over the RF Link. When LINK
E
NCRYPTION is set to ENABLED, the TRACER 64x0 sequentially applies the three keys entered in the
SUBKEY 0, 1, and 2 fields to each 64-bit block of data transmitted over the RF link. The remote
TRACER 64x0 uses the same keys to decrypt each block. (The keys entered in the local and remote
systems must be identical.) Valid entries are numbers
0 through 9 and letters a through f.
> RF LINK PERFORMANCE HISTORY (MAIN SCREEN)
Figure 8 shows the TRACER 64x0 RF Link Performance History main screen, which contains the tr ansmit
and receive power settings and band plan configuration for both the local and remote units.
Figure 8. RF Link Performance History (Main Screen)
612806420L1-1E Copyright © 2005 ADTRAN, Inc. 65
Page 66

Section 5 User Interface Guide TRACER 6000 Series Integrated System Manual
> RF LINK ERROR HISTORY
Figure 9 shows the TRACER 64x0 main RF Link Error History menu page, which displays detailed error
statistics for the RF link (from both the local and remote TRACER 64x0 units) in 15-minute and 24-hour
increments.
7
Days
24
Hours
(8 hours
displayed
at a time)
Figure 9. RF Link Error History
Link errors (LNK) represent errored seconds across the wireless link, and are generally an indication of
path or interference problems.
The link error count and minimum received signal level for the most recent 24 hours are recorded in
15-minute increments and displayed on the right side of the page. The left side of the page displays the 24
hour totals for the most recent 7 days.
Press <n> to view the next 8-hour segment of 15-minute totals and <p> to view the
previous 8-hour segment.
> RF LINK MAX/MIN RECEIVED POWER HISTORY
Figure 10 on page 67 shows the TRACER 64x0 RF Link Max/Min Received Power History page, which
displays the available received power statistics from the system. Minimum and maximum received signal
levels for the RF link (from both the local and remote TRACER 64x0 units) in 15-minute and 24-hour
increments are found on this screen.
66 Copyright © 2005 ADTRAN, Inc. 612806420L1-1E
Page 67

TRACER 6000 Series Integrated System Manual Section 5 User Interface Guide
7
Days
24
Hours
(8 hours
displayed
at a time)
Figure 10. RF Link Max/Min Received Power History
The received power level (MIN and MAX) represents the minimum and maximum values of received signal
levels in 24-hour or 15-minute increments, and is displayed as a numerical value in dBm.
Real-time signal values are not supported on all TRACER 64x0 systems. Systems must be
ADTRAN calibrated to provide readings for Rx or Tx Power signal levels. For
uncalibrated systems, the received power level is displayed as a numerical value from 0 to
100 where 0 corresponds to 0V RSSI and 100 corresponds to 5V RSSI.
The minimum receive power level is recorded to aid in troubleshooting problem RF links.
Radio links with high
experiencing interference, while links with low
paths or excess system losses. A system with
MIN numbers and intermittent performance are probably
MIN numbers have improperly engineered
MIN numbers varying widely could indicate
fading, reflections, or an intermittent installation problem such as loose connectors,
damaged coax or lightning arrestors, or water contaminated feedlines.
Press <n> to view the next 8-hour segment of 15-minute totals and <p> to view the
previous 8-hour segment.
> RF LINK MIN/MAX RECEIVED SIGNAL QUALITY HISTORY
Figure 10 on page 67 shows the TRACER 64x0 RF Link Min/Max Received Signal Quality History menu
page, which displays the available received signal quality statistics from the system. Minimum and
maximum received signal quality levels for the RF link (from both the local and remote TRACER 64x0
units) in 15-minute and 24-hour increments are found on this menu page.
612806420L1-1E Copyright © 2005 ADTRAN, Inc. 67
Page 68

Section 5 User Interface Guide TRACER 6000 Series Integrated System Manual
7
Days
24
Hours
(8 hours
displayed
at a time)
Figure 11. RF Link Min/Max Received Signal Quality History
The received power quality level (MIN and MAX) represents the minimum and maximum values of
received signal quality levels in 24-hour or 15-minute increments, and is displayed as a numerical value
from 0 to 100, with 0 corresponding to poor signal quality and 100 corresponding to exceptional signal
quality.
Radio links with consistently high MIN and MAX numbers should not experience
interference. Radio links with a large difference between
MIN and MAX numbers could be
experiencing fading, reflections, or intermittent interference or installation problems such
as loose connectors, damaged coax cable, water contaminated feedlines, or damaged
lightning arrestors. Radio links with consistently low
MIN and MAX numbers may be
experiencing interference, low receive levels, or installation problems. If this is the case,
examine the
RF LINK MIN/MAX RECEIVED POWER HISTORY. High received power numbers
with low received signal quality numbers indicate interference, while low received power
numbers with low received signal quality numbers indicate low receive levels or
installation problems.
Press <n> to view the next 8-hour segment of 15-minute totals and <p> to view the
previous 8-hour segment.
68 Copyright © 2005 ADTRAN, Inc. 612806420L1-1E
Page 69

TRACER 6000 Series Integrated System Manual Section 5 User Interface Guide
> DATAPATH PROVISIONING
Figure 12 shows the Datapath Provisioning menu page, which displays the active network interfaces for the
installed modules (from both the local and remote TRACER 64x0 units).
Figure 12. Datapath Provisioning
> DATAPATH PROVISIONING > TOTAL ACTIVE CHANNELS
Defines the total number of channels active on the installed modules. Specify 2, 4, or 8 total active channels.
After defining the total number of active channels, specify the actual active channels using the
S
ELECTION menu.
CHANNEL
> DATAPATH PROVISIONING > MODULE 1/MODULE 2 CHANNELS
(Read Only) Displays the total number of active channels on the installed module.
The number of active channels and the channel configuration on both the local and remote
systems must match for the RF link to function properly. A discrepancy between the systems
can result in unpredictable operation.
> DATAPATH PROVISIONING > CHANNEL SELECTION
Defines the active channels (A, B, C, D) on each installed T1 module or the bandwidth dedicated to the Quad
Ethernet Switch module (in 2 Mbps steps). To activate a channel, press <Enter> and use the spacebar or
arrow keys to cycle through the available channel combinations until the desired combination displays. Press
<Enter> again to make the channel combination change. If the specified channel selection is not valid, the
TRACER 64x0 automatically corrects the configuration and populates the field with a valid selection.
The number of active channels and the channel configuration on both the local and remote
systems must match for the RF link to function properly. A discrepancy between the systems
can result in unpredictable operation.
612806420L1-1E Copyright © 2005 ADTRAN, Inc. 69
Page 70

Section 5 User Interface Guide TRACER 6000 Series Integrated System Manual
> 4XE1 MODULE CONFIGURATION/STATUS/HISTORY (MAIN SCREEN)
Figure 13 shows the TRACER 64x0 E1 Module Configuration main screen, which contains access to the
status, configuration, testing, and performance history parameters for the selected E1 module.
Figure 13. E1 Module Configuration/Status/History (Main Screen)
> E1X STATUS/CONFIGURATION/LOOPBACK
The following menus for the E1X STATUS/CONFIGURATION/LOOPBACK apply to all four
available E1 interfaces (
Figure 14 shows the E1x Status/Configuration/Loopback menu page, which displays a real-time graphical
representation for the E1x link using data from both the local and remote TRACER 64x0 units. E1x
operational configuration parameters and testing functions are configured from this menu.
A through D).
Figure 14. E1x Status/Configuration/Loopback
70 Copyright © 2005 ADTRAN, Inc. 612806420L1-1E
Page 71

TRACER 6000 Series Integrated System Manual Section 5 User Interface Guide
> E1X STATUS/CONFIGURATION/LOOPBACK > E1X INTERFACE ALARMS
Displays any active alarms on the E1 link (reported from both the local and remote TRACER 64x0 units).
These alarms include AIS, CRC, LCV, LOS, OOF, and RMT. Table 1 briefly describes these alarms. See
Section 8, Troubleshooting Guide, on page 125 for more information on these alarms.
Table 1. E1 Interface Alarms
AIS (Alarm Indication Signal) Activates when an incoming remote al arm is received from a
connected E1 device. An AIS signal is an unframed all one signal that re places the normal
traffic signal.
CRC (Loss of CRC-4 Framing) The receiver is unable to synchronize to the CRC-4 frame
pattern of the received signal.
LCV (Line Code Violations) Activates when the incoming E1 stream presents line coding
violations.
LOS (Loss of Signal) Activates when no E1 signal is present from the connected E1 equipment.
LOS is activated after receiving 192 consecutive zeros.
OOF (Out of Frame) The receiver is unable to synchronize to the FAS framing pattern of the
received signal.
RMT (Received Remote Alarm) Activates when an incoming remote alarm is received from the
E1 device, indicating that a failure has occurred in the received direction.
> E1X STATUS/CONFIGURATION/LOOPBACK > INTERFACE TYPE
(Read Only) Displays the current interface type of the E1 module as either 75 OHM or 120 OHM.
> E1X STATUS/CONFIGURATION/LOOPBACK > ALARM REPORTING
Determines whether the TRACER 64x0 unit will report active alarms. If set to DISABLED, no alarms will be
displayed on this menu page. The
and remote TRACER 64x0 units. When set to
via SNMP, the
reporting is set to
CRAFT port, alarm contacts, menu screens, or LEDs on the front panel. By default, alarm
ENABLED.
ALARM REPORTING parameter is independently configured for the local
DISABLED, the TRACER 64x0 does not report active alarms
> E1X STATUS/CONFIGURATION/LOOPBACK > CRC4 DETECTION
When ENABLED, the receiver detects the CRC-4 checksum bits in the outgoing E1 data stream and checks
the received signal for errors.
> E1X STATUS/CONFIGURATION/LOOPBACK > SIGNALING
Configures the framing format for the E1 link. The TRACER 64x0 transports E1 data across the link (as
long as the E1 signal is properly timed). Configure the framing format (using the
enable the TRACER 64x0 to monitor incoming framing error events and indicate problems with the
attached metallic service. The TRACER 64x0 supports
data stream with no framing sequence bits), and
FRAMED.
MULTIFRAMED (also known as CAS), UNFRAMED (all
FRAMED (also known as CCS). The default value is
SIGNALING menu) to
612806420L1-1E Copyright © 2005 ADTRAN, Inc. 71
Page 72

Section 5 User Interface Guide TRACER 6000 Series Integrated System Manual
> E1X STATUS/CONFIGURATION/LOOPBACK > LINE CODE
Sets the line coding for the E1 link. The TRACER 64x0 supports high-density bipolar 3 substitution
HDB3) and alternate mark inversion (AMI) line coding. HDB3 coding does not allow more than three
(
consecutive zeros in a transmitted bit stream and is the standard coding method on public networks.
> E1X STATUS/CONFIGURATION/LOOPBACK > LOOP/NORMAL STATE
Controls the loop status of the E1 link. Activates/deactivates loopback conditions for testing purposes.
> E1X STATUS/CONFIGURATION/LOOPBACK > LOOP/NORMAL STATE > NORMAL
Defines the E1 link as normal data transport mode; there are no active loopbacks.
> E1X STATUS/CONFIGURATION/LOOPBACK > LOOP/NORMAL STATE > LINK [LOCAL]
Activates a loopback at the local TRACER 64x0 E1 framer towards the remote end of the wireless link
(see Figure 15). Use the local
back across the radio link to the remote end of the link. This loopback tests the integrity of the radio link
and all the associated digital and RF hardware.
LINK loopback to loop the data transmitted from the remote end of the link
Figure 15. E1 Local Link Loopback
> E1X STATUS/CONFIGURATION/LOOPBACK > LOOP/NORMAL STATE > LINK [REMOTE]
Activates a loopback at the remote TRACER 64x0 E1 framer towards the local end of the wireless link
(see Figure 16). Use the remote
LINK loopback to loop the data transmitted from the local end of the link
across the radio link to the local end of the link. This loopback tests the integrity of the radio link and all
the associated digital and RF hardware.
Figure 16. E1 Remote Link Loopback
> E1X STATUS/CONFIGURATION/LOOPBACK > LOOP/NORMAL STATE > LINE [LOCAL]
Activates a loopback at the local TRACER 64x0 E1 framer towards the locally connected E1 equipment
(see Figure 17). Use the local
the connected E1 equipment.
LINE loopback to test data path integrity from the local TRACER 64x0 unit to
Figure 17. E1 Local Line Loopback
72 Copyright © 2005 ADTRAN, Inc. 612806420L1-1E
Page 73

TRACER 6000 Series Integrated System Manual Section 5 User Interface Guide
> E1X STATUS/CONFIGURATION/LOOPBACK > LOOP/NORMAL STATE > LINE [REMOTE]
Activates a loopback at the remote TRACER 64x0 E1 framer towards the connected E1 equipment at the
remote end of the link (see Figure 18). Use the remote
LINE loopback to test data path integrity from the
remote TRACER 64x0 unit to the E1 equipment connected at the remote end of the link.
Figure 18. E1 Remote Line Loopback
> E1X PERFORMANCE HISTORY
The following menus for the E1X PERFORMANCE HISTORY apply to all four available E1
interfaces (
Figure 19 shows the E1x Performance History menu page, which displays detailed error statistics for the
E1 link (from both the local and remote TRACER 64x0 units) in 15-minute and 24-hour increments.
A through D).
7
Days
24
Hours
(8 Hours
displayed
at a time)
Figure 19. E1x Link Performance History
E1 performance data is presented as Errored Seconds (ES) and Severely Errored Seconds (SES) on the E1
interface. The following events qualify as an ES: LOS, OOF, LCV, or CRC error. An SES is caused by a
loss of signal or an out-of-frame event.
The error count for the most recent 24 hours are recorded in 15-minute increments and displayed on the
right side of the page. The left side of the page displays the 24-hour totals for the most recent 7 days.
Press <n> to view the next 8-hour segment of 15-minute totals and <p> to view the
previous 8-hour segment.
612806420L1-1E Copyright © 2005 ADTRAN, Inc. 73
Page 74

Section 5 User Interface Guide TRACER 6000 Series Integrated System Manual
> T1 MODULE CONFIGURATION/STATUS/HISTORY (MAIN SCREEN)
Figure 20 shows the TRACER 64x0 4xT1 Module Configuration main screen, which contains access to
the status, configuration, testing, and performance history parameters for the selected T1 module.
Figure 20. T1 Module Configuration/Status/History (Main Screen)
> T1X STATUS/CONFIGURATION/LOOPBACK
The following menus for the T1X STATUS/CONFIGURATION/LOOPBACK apply to all four
available T1 interfaces (
Figure 21 shows the T1x Status/Configuration/Loopback menu page, which displays a real-time graphical
representation for the T1x link using data from both the local and remote TRACER 64x0 units. T1x
operational configuration parameters and testing functions are configured from this menu.
A through D).
Figure 21. T1x Status/Configuration/Loopback
74 Copyright © 2005 ADTRAN, Inc. 612806420L1-1E
Page 75

TRACER 6000 Series Integrated System Manual Section 5 User Interface Guide
>T1X STATUS/CONFIGURATION/LOOPBACK > T1X INTERFACE ALARMS
Displays any active alarms on the T1 link (reported from both the local and remote TRACER 64x0 units).
These alarms include Red, Blue/AIS, Yellow, LOS, and bipolar violations (BPV). Table 2 briefly
describes these alarms. See Section 8, Troubleshooting Guide, on page 125 for more information on these
alarms.
Table 2. T1 Interface Alarms
RED Activates when no T1 signal is present from the connected T1 equipment. LOS is
activated after receiving 192 consecutive zeros.
BLUE/AIS (Alarm Indication Signal) Activates when an incoming remote alarm is received from a
connected T1 device. An AIS signal is an unframed all one signal th at replaces the normal
traffic signal.
YEL (Yellow Alarm) Activates when an incoming remote alarm is received from the T1 device
indicating that a failure has occurred in the received direction.
LOS (Loss of Sync) Occurs when the TRACER system cannot synchronize to the incoming T1
data stream.
BPV (Bipolar Violations) Activates when the incoming T1 stream presents BPVs. BPVs occur
when two one bits are received back-to-back with the same polarity.
> T1X STATUS/CONFIGURATION/LOOPBACK > ALARM REPORTING
Determines whether the TRACER 64x0 unit will report active alarms. If set to DISABLED, no alarms will be
displayed on this menu page. The
and remote TRACER 64x0 units. When set to
via SNMP or the
CRAFT port, and the status LEDs are off. By default, alarm reporting is set to ENABLED.
ALARM REPORTING parameter is independently configured for the local
DISABLED, the TRACER 64x0 does not report active alarms
>T1X STATUS/CONFIGURATION/LOOPBACK > T1X LINE BUILD OUT
Configures the T1 for the appropriate line build out, based on the distance to the T1 equipment. By default,
the line build out for the TRACER 64x0 is
0 dB/133 FT.
> T1X STATUS/CONFIGURATION/LOOPBACK > SIGNALING
Configures the framing format for the T1 link for both the local and remote TRACER 64x0 units. The
TRACER 64x0 transports T1 data across the link (as long as the T1 signal is properly timed). Configure
the framing format (using the
SIGNALING menu) to enable the TRACER 64x0 to monitor incoming framing
error events and indicate problems with the attached metallic service. The TRACER 64x0 supports both
extended superframe (
to
ESF.
ESF) and superframe (D4) framing formats. By default, the signaling method is set
> T1X STATUS/CONFIGURATION/LOOPBACK > LINE CODE
Sets the line coding for the T1 link. The TRACER 64x0 supports bipolar eight-zero substitution (B8ZS)
and alternate mark inversion (AMI) line coding. By default, the line code is set to B8ZS.
> T1X STATUS/CONFIGURATION/LOOPBACK > LOOP/NORMAL STATE
Controls the loop status of the T1 link. Activates/deactivates loopback conditions for testing purposes.
612806420L1-1E Copyright © 2005 ADTRAN, Inc. 75
Page 76

Section 5 User Interface Guide TRACER 6000 Series Integrated System Manual
> T1X STATUS/CONFIGURATION/LOOPBACK > LOOP/NORMAL STATE > NORMAL
Defines the T1 link as normal data transport mode; there are no active loopbacks.
> T1X STATUS/CONFIGURATION/LOOPBACK > LOOP/NORMAL STATE > LINK [L OCAL]
Activates a loopback at the local TRACER 64x0 T1 framer towards the remote end of the wireless link
(see Figure 22). Use the local
LINK loopback to loop the data transmitted from the remote end of the link
back across the radio link to the remote end of the link. This loopback tests the integrity of the radio link
and all the associated digital and RF hardware.
Figure 22. T1 Local Link Loopback
> T1X STATUS/CONFIGURATION/LOOPBACK > LOOP/NORMAL STATE > LINK [REMOTE]
Activates a loopback at the remote TRACER 64x0 T1 framer towards the local end of the wireless link
(see Figure 23). Use the remote
across the radio link to the local end of the link. This loopback tests the integrity of the radio link and all
the associated digital and RF hardware.
LINK loopback to loop the data transmitted from the local end of the link
Figure 23. T1 Remote Link Loopback
> T1X STATUS/CONFIGURATION/LOOPBACK > LOOP/NORMAL STATE > LINE [LOCAL]
Activates a loopback at the local TRACER 64x0 T1 framer towards the connected T1 equipment (see
Figure 24). Use the local
LINE loopback to test data path integrity from the local TRACER 64x0 unit to the
connected T1 equipment.
Figure 24. T1 Local Line Loopback
> T1X STATUS/CONFIGURATION/LOOPBACK > LOOP/NORMAL STATE > LINE [REMOTE]
Activates a loopback at the remote TRACER 64x0 T1 framer towards the connected T1 equipment at the
remote end of the link (see Figure 25). Use the remote
remote TRACER 64x0 unit to the T1 equipment connected at the remote end of the link.
Figure 25. T1 Remote Line Loopback
LINE loopback to test data path integrity from the
76 Copyright © 2005 ADTRAN, Inc. 612806420L1-1E
Page 77

TRACER 6000 Series Integrated System Manual Section 5 User Interface Guide
> T1X PERFORMANCE HISTORY
The following menus for the T1x Performance History apply to all four available T1
interfaces (A through D).
Figure 26 shows the T1x Performance History menu page, which displays detailed error statistics for the T1
link (from both the local and remote TRACER 64x0 units) in 15-minute and 24-hour increments.
7
Days
24
Hours
(8 hours
displayed
at a time)
Figure 26. T1x Link Performance History
T1 performance data is presented as Errored Seconds (ES) and Severely Errored Seconds (SES) on the T1
interface. The following events qualify as an ES: AIS, LOS or LOF alarm second, a single BPV, excessive
zero event, or a single parity bit. An SES is caused by an AIS, LOS or LOF alarm second, excessive BPVs,
or framed parity-bit errors causing a line bit error rate (BER) of 10
-6
.
The error counts for the most recent 24 hours are recorded in 15-minute increments and displayed on the
right side of the page. The left side of the page displays the 24-hour totals for the most recent 7 days.
Press <n> to view the next 8-hour segment of 15-minute totals and <p> to view the
previous 8-hour segment.
612806420L1-1E Copyright © 2005 ADTRAN, Inc. 77
Page 78

Section 5 User Interface Guide TRACER 6000 Series Integrated System Manual
> ETHERNET SWITCH MODULE CONFIGURATION/STATUS/HISTORY (MAIN SCREEN)
Figure 27 shows the Ethernet Switch Module Configuration/Status/History main screen, which contains
access to the status, configuration, testing, and performance history parameters for the selected Ethernet
Switch module.
Figure 27. Ethernet Switch Module Configuration/Status/History (Main Screen)
> ETHERNET SWITCH CONFIGURATION
Figure 28 shows the Ethernet Switch Module Configuration screen, which contains access to the port
configuration options for the available Ethernet interfaces on the selected module.
The following menus for the ETHERNET SWITCH CONFIGURATION apply to all four available
Ethernet interfaces (
1 through 4).
Figure 28. Ethernet Switch Module Configuration
78 Copyright © 2005 ADTRAN, Inc. 612806420L1-1E
Page 79

TRACER 6000 Series Integrated System Manual Section 5 User Interface Guide
>ETHERNET SWITCH CONFIGURATION > PORT X
The Quad Ethernet Switch module provides the capability to individually disable interfaces on the module.
Selecting
DISABLE from the PORT X menu disables the port, stopping all data passing through the interface.
>ETHERNET SWITCH CONFIGURATION > SPEED/DUPLEX
Defines the speed and duplex for the selected Ethernet interface. Available options are: 100/FDX (100
Mbps with full-duplex operation),
with full-duplex operation), and
100/HDX (100 Mbps with half-duplex operation), 10/FDX (10 Mbps
10/HDX (10 Mbps with half-duplex operation), and AUTO (automatically
detects speed and duplex of the connection). The speed and duplex settings of the TRACER Ethernet port
and the attached Ethernet equipment should be identical; if the TRACER is set to auto-negotiation, the
attached equipment should also be set for auto-negotiation.When the
SPEED/DUPLEX is manually set,
802.3u auto-negotiation is disabled; the Ethernet equipment connected to the manual port must be
manually set to the same speed/duplex settings. When set to
AUTO, the actual negotiated speed and duplex
of the system can be displayed on the Ethernet Switch Status page.
> ETHERNET SWITCH STATUS
Figure 29 shows the Ethernet Switch Status menu page, which displays the current speed and duplex
operation for each switch interface (on both the local and remote TRACER 64x0 systems) as well as
transmit and receive data statistics for the Ethernet interface (from both the local and remote TRACER
64x0 systems) and RF link.
Figure 29. Ethernet Switch Module Status
>ETHERNET SWITCH STATUS > TX PACKETS
Displays a counter of all data packets transmitted out the local and remote TRACER 64x0 Ethernet
interfaces. Use this data as an indicator for how many packets are being transmitted between the four
Ethernet interfaces versus over the wireless link (WAN stats). The WAN statistics (Ethernet packets
transmitted over the RF link) provide a quick way to determine Ethernet packet loss over the wireless link;
RX PACKETS on the local system should match the TX PACKETS on the remote side (and vice versa).
the
>ETHERNET SWITCH STATUS > TX PACKETS DROPPED
Displays a counter of all transmit data packets that were unable to be transmitted out the individual
Ethernet interfaces (for both the local and remote TRACER 64x0 units). Use this data as an indicator of
congestion on the Ethernet network segments. Dropped packets on the WAN interface can indicate that the
provisioned bandwidth for the switch module is insufficient.
612806420L1-1E Copyright © 2005 ADTRAN, Inc. 79
Page 80

Section 5 User Interface Guide TRACER 6000 Series Integrated System Manual
>ETHERNET SWITCH STATUS > RX PACKETS
Displays a counter of all data packets received on the local and remote TRACER 64x0 Ethernet interfaces
and WAN (RF link). Use this data as an indicator of how many packets are being received on the four
Ethernet interfaces versus being received over the wireless link.
>ETHERNET SWITCH STATUS > RX PACKETS DROPPED
Displays a counter of all received data packets that were unable to be processed due to congestion inside
the TRACER 64x0 switch (for both the local and remote TRACER 64x0 units). Use this data as an
indicator of congestion inside the TRACER 64x0 switch.
>ETHERNET SWITCH STATUS > RX PACKET ERRORS
Displays a counter of all received data packets that are greater than or equal to 64 bytes in length and have
either an FCS error or an alignment error (for both the local and remote TRACER 64x0 units).
E
RRORS on the WAN interface (RF link) could indicate link degradation (due to interference, fading, etc.).
If the RF link goes down, some packet errors may display. Once the TRACER 64x0 system
recognizes the link is down (an active RF Low alarm), packet errors will NOT increment.
RX PACKET
> MANAGEMENT/UTILITIES (MAIN SCREEN)
Figure 30 shows the TRACER 64x0 Management/Utilities main screen, which contains access to the
SNMP configuration, firmware upgrade options, and a ping utility for Ethernet testing.
Figure 30. Management/Utilities (Main Screen)
80 Copyright © 2005 ADTRAN, Inc. 612806420L1-1E
Page 81

TRACER 6000 Series Integrated System Manual Section 5 User Interface Guide
> MANAGEMENT/SNMP PORT CONFIGURATION
Figure 31 shows the Management/SNMP Port Configuration menu page, which contains the configuration
parameters for the 10/100BaseT/TX
both the local and remote TRACER 64x0 units).
MGMT Ethernet interface and SNMP configuration parameters (from
Figure 31. Management/SNMP Port Configuration
> MANAGEMENT/SNMP PORT CONFIGURATION > IP ADDRESS
Lists the address assigned to the 10/100BaseT/TX MGMT Ethernet port. This address is in dotted decimal
notation (four decimal numbers, each in the range of 0 to 255, separated by periods). This value is set to
192.168.0.10 by default. Obtain the correct IP address from your LAN administrator.
> MANAGEMENT/SNMP PORT CONFIGURATION > NET MASK
Defines which part of a destination IP address contains the network number. This address is in dotted
decimal notation (four decimal numbers, each in the range of 0 to 255, separated by periods). This value
is set to
255.255.255.0 by default. This part of the destination IP address is used along with the
TRACER 64x0 IP address to determine which nodes must be reached through the default IP gateway.
> MANAGEMENT/SNMP PORT CONFIGURATION > DEFAULT GATEWAY
Defines or changes the default gateway. You will need a default gateway if the LAN contains multiple
segments. This address is in dotted decimal notation (four decimal numbers, each in the range of 0 to 255,
separated by periods). This value is set to
192.168.0.254 by default. Contact your LAN administrator for
the appropriate address.
> MANAGEMENT/SNMP PORT CONFIGURATION > MAC ADDRESS
(Read Only) Displays the system Ethernet Media Access Control (MAC) address.
> MANAGEMENT/SNMP PORT CONFIGURATION > SNMP MANAGEMENT
Controls SNMP management in the TRACER system. When set to DISABLED, the TRACER system does
not send SNMP traps. When set to
management systems.
612806420L1-1E Copyright © 2005 ADTRAN, Inc. 81
ENABLED, the TRACER system sends SNMP traps to configured
Page 82

Section 5 User Interface Guide TRACER 6000 Series Integrated System Manual
> MANAGEMENT/SNMP PORT CONFIGURATION > SNMP GET COMMUNITY
Defines the community name for Get access (to poll the TRACER 64x0 for status information). This value
must match the Get name defined on the network management stations (NMS). Get access is read only
access. The default name is public.
> MANAGEMENT/SNMP PORT CONFIGURATION > SNMP PUT COMMUNITY
Defines the community name for Set access (to change TRACER 64x0 configuration parameters through
SNMP). This value must match the Get or Set name defined on the NMS. The default name is private.
> MANAGEMENT/SNMP PORT CONFIGURATION > SNMP TRAP COMMUNITY
Defines the community name for trap destinations. This name must match the community name defined on
the NMS. The default name is SNMP_trap.
> MANAGEMENT/SNMP PORT CONFIGURATION > SNMP TRAP HOST #0 - #4
Identifies the IP address in dotted decimal notation of the NMS for the TRACER 64x0 to send SNMP traps
to. Up to five trap destinations can be entered.
> PING UTILITY
Figure 32 shows the Ping Utility menu page, which contains the parameters for performing a ping test out
of the 10/100BaseT/TX
MGMT Ethernet interface.
Figure 32. Ping Utility
> PING UTILITY > PING ADDRESS
Specifies the IP address to ping (in dotted decimal notation).
82 Copyright © 2005 ADTRAN, Inc. 612806420L1-1E
Page 83

TRACER 6000 Series Integrated System Manual Section 5 User Interface Guide
> PING UTILITY > NUMBER OF PACKETS
Specifies the number of ping packets to send to the IP address specified in the PING ADDRESS field. The
default value is 4, and the maximum value is 99.
> PING UTILITY > PACKET SIZE (BYTES)
Specifies the size (in bytes) of the data portion of the ping request. The default value is 64 bytes, and the
maximum size is 1472 bytes.
> PING UTILITY > TIMEOUT (MS)
Specifies the time (in milliseconds) to wait for a ping reply before timing out. The default timeout is
3 seconds (3000 milliseconds), and the maximum value is 10 seconds (10000 milliseconds).
> PING UTILITY > PING COMMAND
Use this field to manually start (START) or stop (ABORT) a ping request, reset the ping statistics (RESET
S
TATS), or return the ping configuration parameters to their default values (DEFAULT VALUES).
> PING UTILITY > DELAY
(Read Only) Displays the round trip time (in milliseconds) of the ping request/reply of the current set of
pings and provides the following information:
MINIMUM
The minimum round trip time of the ping request/reply for the
current set of pings.
MAXIMUM
The maximum round trip time of the ping request/reply for the
current set of pings.
AVERAGE
The average round trip time of the ping request/reply for the
current set of pings.
>PING UTILITY > PACKETS
(Read Only) Displays the packet statistics for the ping request/reply of the current set of pings and provides
the following information:
TX
RX
LOST
The number of ping requests transmitted.
The number of ping replies received.
The number of ping requests that did not receive replies.
612806420L1-1E Copyright © 2005 ADTRAN, Inc. 83
Page 84

Section 5 User Interface Guide TRACER 6000 Series Integrated System Manual
> FIRMWARE UPGRADE UTILITY
Figure 33 shows the Firmware Upgrade Utility menu page, which contains the parameters for performing a
firmware upgrade for the local and remote systems.
Figure 33. Firmware Upgrade Utility
> FIRMWARE UPGRADE UTILITY > FILE XFER METHOD
Lists the available transfer methods for updating the TRACER 64x0 system. The following selections are
available:
TFTP LOCAL MGMT PORT
Upgrade the firmware using a trivial file transfer protocol (TFTP)
server that is located on the same Ethernet network as the local
system. TFTP transfers files by specifying an appropriate server
address and filename.
TFTP REMOTE MGMT PORT
Upgrade the firmware using a TFTP server that is located on the same
Ethernet network as the remote system. TFTP transfers files by
specifying an appropriate server address and filename.
XMODEM
Upgrade the firmware using XMODEM software on a terminal or PC
that is connected to the
CRAFT interface of the local system.
> FIRMWARE UPGRADE UTILITY > TFTP SERVER
(Available for TFTP transfers only.) Configures the IP address of the TFTP server on which the update file
resides. The TRACER 64x0 uses this field to locate the network TFTP server and request the file transfer.
> FIRMWARE UPGRADE UTILITY > TFTP FILENAME
(Available for TFTP transfers only.) Specifies the name of the update file to retrieve from the TFTP server.
Enter the full filename for the file. Some TFTP servers require the full path name for any file not located in
the default directory. Refer to the TFTP software documentation for more details.
84 Copyright © 2005 ADTRAN, Inc. 612806420L1-1E
Page 85

TRACER 6000 Series Integrated System Manual Section 5 User Interface Guide
> FIRMWARE UPGRADE UTILITY > UPGRADE DESTINATION
Specify the unit to upgrade. The following options are available:
LOCAL IDU
REMOTE IDU
Upgrade the local system.
Upgrade the remote system. When upgrading the remote system, the
upgrade file is first loaded into the local system and then transferred
over the wireless link to the remote system. The actual upgrade
process is not started on the remote system until the entire upgrade
file has been received.
> FIRMWARE UPGRADE UTILITY > COMMAND
Use this command to start (START) or stop (ABORT) a firmware upgrade. For XMODEM updates, cancel
the process via the terminal emulation software (consult your documentation for instructions on how to do
this). For TFTP updates, you can cancel the process by selecting
ABORT from this field.
> FIRMWARE UPGRADE UTILITY > LOCAL CURRENT STATUS
(Available for TFTP updates only.) Indicates progress or problems encountered during the current upgrade
of the local unit. The field displays
IDLE if no update is in progress or when the update is successfully
completed. At the end of a successful update, the contents of this field are copied into the Local Previous
Status. For a detailed listing of these messages, please refer to DLP-5, Updating the Firmwar e Using
TFTP, on page 103.
> FIRMWARE UPGRADE UTILITY > LOCAL PREVIOUS STATUS
(Available for T FTP updates only.) Displays the status of the previous update of the local unit. Following a
successful update, this field reads
appropriate error message displays. Refer to DLP-5, Updating the Firmware Using TFTP, on page 103 for
more details on available error messages.
UPGRADE FINISHED SUCCESSFULLY. If an update was unsuccessful, the
> FIRMWARE UPGRADE UTILITY > REMOTE CURRENT STATUS
(Available for TFTP updates only.) Indicates progress or problems encountered during the current upgrade
of the remote unit. The field displays
IDLE if no update is in progress or when the update is successfully
completed. At the end of a successful update, the contents of this field are copied into the Local Previous
Status. For a detailed listing of these messages, please refer to DLP-5, Updating the Firmwar e Using
TFTP, on page 103.
> FIRMWARE UPGRADE UTILITY > REMOTE PREVIOUS STATUS
(Available for TFTP updates only.) Displays the status of the previous update of the remote unit. Following
a successful update, this field reads
appropriate error message displays. Refer to DLP-5, Updating the Firmware Using TFTP, on page 103 for
more details on available error messages.
612806420L1-1E Copyright © 2005 ADTRAN, Inc. 85
UPGRADE FINISHED SUCCESSFULLY. If an update was unsuccessful, the
Page 86

Section 5 User Interface Guide TRACER 6000 Series Integrated System Manual
> RF LINK MANAGEMENT BRIDGE CONFIGURATION
Figure 34 shows the RF Link Bridge Configuration menu page, which contains the parameters for enabling
and configuring the TRACER 64x0 management bridge for passing inform ation from the management
port across the RF link to the remote end.
Figure 34. RF Link Management Bridge Configuration
>RF LINK MANAGEMENT BRIDGE CONFIGURATION > BRIDGE OPERATION
The TRACER 64x0 has the capability to pass management information received on the local management
MGMT) across the RF link to the remote end. This feature allows units to operate in a daisy-chain
port (
fashion, providing the user with configuration, management, and monitoring functions for all TRACER
systems in the chain as well as any other Ethernet-capable device located on the same network segment as
the TRACER systems. The TRACER 64x0 takes Ethernet traffic received on the local management port
and determines (using a MAC bridge functionality) whether the traffic is intended for the local TRACER
system or a system located over the RF link. If the
received on the MGMT interface for a remote TRACER system, the TRACER 64x0 bridges the data over
the RF link. The RF Link Management Bridge feature is
The RF Link Management Bridge feature should be used only to pass TRACER
management information from one TRACER to another over the RF link. It is important to
employ an IP addressing scheme that allows for independent networks at the local and all
remote sites in the daisy-chain because the TRACER 64x0 will bridge all Ethernet traffic
bound for a remote network over the RF link. Excessive bridge traffic can impede proper
management operation; it is recommended that bridge traffic be limited to configuration,
management, and monitoring functions.
BRIDGE OPERATION is ENABLED and Ethernet traffic is
ENABLED by default.
86 Copyright © 2005 ADTRAN, Inc. 612806420L1-1E
Page 87

TRACER 6000 Series Integrated System Manual Section 5 User Interface Guide
>RF LINK MANAGEMENT BRIDGE CONFIGURATION > INACTIVITY TIMEOUT
Defines the amount of time that an Ethernet address is maintained in the bridge table. A shorter time
produces a more dynamic bridge table, allowing addresses to change network segments without causing
extra forwarded traffic. A longer time reduces the amount of unnecessarily forwarded traffic (due to
unknown Ethernet addresses), but causes the bridge table to respond more slowly to a MAC address
switching network segments. Valid choices are:
5 SEC (default), 15 SEC, 30 SEC, 1 MIN, and 5 MIN.
> SYSTEM ALARMS
Figure 35 shows the System Alarms menu page, which displays system alarm information for the link, fans,
and temperature of the local and remote systems.
System Alarm information is only available for the TRACER 64x0 high power systems.
Figure 35. System Alarms
> SYSTEM ALARMS > LINK ALARM
Indicates the current status of the RF link between the local and remote TRACER 64x0 high power systems.
LINK UP indicates that the system detects a valid RF link and LINK DOWN indicates that the system does not
detect a valid RF link.
> SYSTEM ALARMS > FAN ALARMS
Displays operational alarms for the system fans. An alarm is indicated when the system detects that the
fan(s) rotational speed is below nominal operation and when the fan(s) is not functioning properly. A
S
PEED ALARM could indicate a physical blockage or an intermittent fan problem. The FAN SPEED ALARM
612806420L1-1E Copyright © 2005 ADTRAN, Inc. 87
FAN
Page 88

Section 5 User Interface Guide TRACER 6000 Series Integrated System Manual
displays only during an active alarm condition. Once the condition has cleared, the speed alarm is cleared
from the display. A
and is declared as bad and should be replaced. The
from the system (using the
FAN HAS FAILED display indicates that the fan has reported a low speed consistently
FAN HAS FAILED alarm displays until manually cleared
PERSISTENT ALARMS menu). Figure 36 on page 88 provides an example fan
alarms.
Figure 36. Active Fan Alarm
> SYSTEM ALARMS > TEMP ALARMS
Displays temperature alarm information for the system. A TEMPERATURE ALARM is indicated when the
system detects that the internal system temperature is elevated above normal operation. The
A
LARM displays only during an active alarm condition. Once the condition has cleared, the alarm is cleared
from the display. The
occurred after the last manual alarm clear. The
cleared from the system (using the
TEMPERATURE ALARM RECORDED display indicates that a TEMPERATURE ALARM has
TEMPERATURE ALARM RECORDED displays until manually
PERSISTENT ALARMS menu). The TRANSMITTER SHUTDOWN failure
TEMPERATURE
indicates that the transmitter is shutting down do to an unresolved temperature failure, or a temperature
failure coupled with both fans failing.
from the system (using the
PERSISTENT ALARMS menu).
TRANSMITTER SHUTDOWN failures display until manually cleared
A TRANSMITTER SHUTDOWN failure activates the main alarm relay on the TRACER 64x0
system.
> SYSTEM ALARMS > PERSISTENT ALARMS
Clears all alarms listed on the SYSTEM ALARMS page that must be cleared manually (such as the FAN HAS
F
AILED, TEMPERATURE ALARM RECORDED, and TRANSMITTER SHUTDOWN failures).
88 Copyright © 2005 ADTRAN, Inc. 612806420L1-1E
Page 89

DETAIL LEVEL PROCEDURES
Provides detailed instructions on performing common system tasks such as connecting to the system and
upgrading firmware.
CONTENTS
DLP-1 Connecting a VT100 Terminal or PC to the CRAFT Port. . . . . . . . . . . . . . . . . . . . . . . . . . . . 91
DLP-2 Logging into the TRACER 64x0. . . . . . . . . . . . . . . . . . . . . . . . . . . . . . . . . . . . . . . . . . . . . . . 93
DLP-3 Setting IP Parameters for the TRACER 64x0 . . . . . . . . . . . . . . . . . . . . . . . . . . . . . . . . . . . . 95
DLP-4 Verifying Communications Over an IP LAN . . . . . . . . . . . . . . . . . . . . . . . . . . . . . . . . . . . . . . 99
DLP-5 Updating the Firmware Using TFTP. . . . . . . . . . . . . . . . . . . . . . . . . . . . . . . . . . . . . . . . . . . 103
DLP-6 Updating the Firmware Using XMODEM . . . . . . . . . . . . . . . . . . . . . . . . . . . . . . . . . . . . . . . 107
612806420L1-1E Copyright © 2005 ADTRAN, Inc. 89
Page 90

Section 6 Detail Level Procedures TRACER 6000 Series Integrated System Manual
90 Copyright © 2005 ADTRAN, Inc. 612806420L1-1E
Page 91

DLP-1 Connecting a VT100 Terminal or PC to the CRAFT Port
Introduction
TRACER 64x0 management and provisioning are facilitated by a series of intuitive menus that are
accessible on a computer screen. Connecting either a VT100 terminal or a PC with terminal emulation
software to the
management features. This section specifies how to connect the VT100 terminal or PC to the TRACER
64x0.
Prerequisite Procedures
The TRACER 64x0 must be powered up for terminal communication to function.
Tools and Materials Required
• A VT100 compatible terminal or PC with terminal emulation software
• An appropriate cable to connect the TRACER 64x0 to a terminal
CRAFT interface (DB-9) on the front of the unit allows access to TRACER menus and
To prevent electrical shock, do not install equipment in a wet location or during a
lightning storm.
Electronic equipment can be damaged by static electrical discharge. Before handling it,
put on an antistatic discharge wrist strap to prevent damage to electronic components.
Place equipment in antistatic packing material when transporting or storing. When
working on equipment, always place it on an approved antistatic mat that is electrically
grounded.
612806420L1-1E Copyright © 2005 ADTRAN, Inc. 91
Page 92

Section 6 DLP-1 TRACER 6000 Series Integrated System Manual
Perform one of the following steps:
1. Connecting a VT100 terminal to the TRACER 64x0:
• Set the parameters of the VT100 terminal or PC to match the default settings on the
TRACER 64x0:
– 9600 baud rate
– 8 data bits
– No parity
– 1 stop bit
– No flow control
• If the terminal has a parallel setting, disable this setting and use the serial port.
Using the CRAFT Port
• Plug the DB-9 male end of the data cable into the TRACER 64x0 CRAFT port on the fron t
of the unit. Make the connection to the VT100 terminal as appropriate for your equipment.
2. Connecting a PC emulating a VT100 terminal to the TRACER 64 x0 :
Most PCs or laptops can run communications softwar e th at em u lat es a VT10 0 term inal. Examples
include Windows programs such as Terminal
adequate, commercially available software packages which will allow your PC or laptop to emulate a
VT100 terminal.
® or Hyperterminal®. However, there are many other
• Set the parameters of the communications software to match the default settings on the
TRACER 64x0:
– 9600 baud rate
– 8 data bits
– No parity
– 1 stop bit
– No flow control
• Set the PC for direct connect (instead of dial up connection) on the appropriate com port.
Using the CRAFT Port
• Plug the DB-9 male end of the data cable into the TRACER 64x0 CRAFT port on the front
of the unit. Make connection to the PC or laptop as appropriate for your equipment.
Y ou a re now ready to log in to the TRACER 64x0 as descri bed in DLP-2, Logging into the TRACER 64x0, on
page 93.
92 Copyright © 2005 ADTRAN, Inc. 612806420L1-1E
Page 93

DLP-2 Logging into the TRACER 64x0
Introduction
Once you are connected to the TRACER 64x0, you must log into the system to gain access to the
management and provisioning functions. This DLP assumes you are connected to the TRACER 64x0 and
provides specific steps for logging into the system.
Prerequisite Procedures
Complete DLP-1, Connecting a VT100 Terminal or PC to the CRAFT Port, on page 91.
To prevent electrical shock, do not install equipment in a wet location or during a
lightning storm.
Electronic equipment can be damaged by static electrical discharge. Before handling it,
put on an antistatic discharge wrist strap to prevent damage to electronic components.
Place equipment in antistatic packing material when transporting or storing. When
working on equipment, always place it on an approved antistatic mat that is electrically
grounded.
see
After the IP parameters have been provisioned (see DLP-3, Setting IP Parameters for the
TRACER 64x0, on page 95), you can also log in via Telnet.
612806420L1-1E Copyright © 2005 ADTRAN, Inc. 93
Page 94

Section 6 DLP-2 TRACER 6000 Series Integrated System Manual
Perform the steps below in the order listed.
1. After connecting to the system, press any key to display the LOGIN screen shown here. The flashing
cursor at the L
OGIN field indicates that a password must be entered.
2. Enter the password for the TRACER 64x0 at the LOGIN field. The manufacturer’s default password for
the TRACER 64x0 system is password in lowercase letters.
3. Upon entering the correct password, the TRACER 64x0 S
YSTEM STATUS page is displayed as shown
below.
4. You are now logged in to the TRACER 64x0 menu system.
94 Copyright © 2005 ADTRAN, Inc. 612806420L1-1E
Page 95

DLP-3 Setting IP Parameters for the TRACER 64x0
Introduction
If the TRACER 64x0 is connected to an IP network for Telnet, TFTP, or SNMP management, several IP
parameters must be set for the unit to communicate with the network. These parameters are described in
this DLP along with the procedures for setting them.
Please see your Network Administrator for the proper assignment of the following
parameters:
Prerequisite Procedures
This procedure assumes that the TRACER 64x0 unit is connected to an IP network and is powered up.
To prevent electrical shock, do not install equipment in a wet location or during a
lightning storm.
IP ADDRESS, SUBNET MASK, and DEFAULT GATEWAY.
Electronic equipment can be damaged by static electrical discharge. Before handling it,
put on an antistatic discharge wrist strap to prevent damage to electronic components.
Place equipment in antistatic packing material when transporting or storing. When
working on equipment, always place it on an approved antistatic mat that is electrically
grounded.
612806420L1-1E Copyright © 2005 ADTRAN, Inc. 95
Page 96

Section 6 DLP-3 TRACER 6000 Series Integrated System Manual
Perform the steps below in the order listed.
1. Log into the system with maximum rights (details are in DLP-2, Logging into the TRACER 64x0, on
page 93).
2. Press m to activate the Main menu page. From the Main menu page, press 7 to select
M
ANAGEMENT/UTILITIES.
3. From the M
and press <Enter>.
ANAGEMENT/UTILITIES page, select the MANAGEMENT/SNMP PORT CONFIGURATION option
96 Copyright © 2005 ADTRAN, Inc. 612806420L1-1E
Page 97

TRACER 6000 Series Integrated System Manual Section 6 DLP-3
4. From the MANAGEMENT/SNMP CONFIGURATION menu page, select the IP ADDRESS field and press
<Enter>. Type the IP address provid ed by your network manager and press <Enter> to accept the
change. Repeat the process for the S
UBNET MASK and DEFAULT GATEWAY options.
The TRACER 64x0 is now available for Telnet access. Complete the steps outlined in DLP-4, Verifying
Communications Over an IP LAN, on page 99.
612806420L1-1E Copyright © 2005 ADTRAN, Inc. 97
Page 98

Section 6 DLP-3 TRACER 6000 Series Integrated System Manual
98 Copyright © 2005 ADTRAN, Inc. 612806420L1-1E
Page 99

DLP-4 Verifying Communications Over an IP LAN
Introduction
When the 10/100BaseT/TX MGMT port is connected to a local area network (LAN), test steps must be
performed on the TRACER 64x0 to ensure that the unit is communicating properly over the network. This
procedure outlines those steps.
Prerequisite Procedures
Before beginning this procedure, the unit should be physically connected to the LAN and the provisioning
tasks detailed in DLP-3, Setting IP Parameters for the TRACER 64x0, on page 95 should be complete.
Tools and Materials Required
• Access to a PC or other computer connected to the LAN
To prevent electrical shock, do not install equipment in a wet location or during a
lightning storm.
Electronic equipment can be damaged by static electrical discharge. Before handling it,
put on an antistatic discharge wrist strap to prevent damage to electronic components.
Place equipment in antistatic packing material when transporting or storing. When
working on equipment, always place it on an approved antistatic mat that is electrically
grounded.
612806420L1-1E 99
Page 100

Section 6 DLP-4 TRACER 6000 Series Integrated System Manual
Perform the following steps in the order listed.
1. Verify the TRACER 64x0 IP address.
If you do not already have the IP Address for the TRACER 64x0, obtain it from the network
administrator or manually check for the address on the M
(Access the M
page.)
2. Ping the TRACER 64x0 unit from a remote computer on the network.
Using a remote computer system connected to the LAN, perform an ICMP ping on the IP address of
the TRACER 64x0. V eri fy that the unit respo nds prop erly. If the TRACER 64x0 fails to respond, try the
following:
• Verify that the proper IP Address, subnet mask, and default gateway are provisioned in the unit (see
DLP-3, Setting IP Parameters for the TRACER 64x0, on page 95, for details).
• Verify that the TRACER 64x0 is properly cabled into the LAN and that the Ethernet cable is properly
seated in the RJ-45 jack on the rear of the unit.
• If the TRACER 64x0 is connected to a hub or other network device that provides a carrier sense
light for each port, verify that the carrier sense light for the port to which the TRACER 64x0 is
connected is lit. If this light is not lit, check the cabling between the hub and the shelf. The
connection may also be verified using the activity LED loca te d on the rear of th e un it (p ar t of the
10/100BaseT/TX MGMT RJ-45 connector).
ANAGEMENT/SNMP CONFIGURATION page by pressing 7 and then 1 from the Main menu
ANAGEMENT/SNMP CONFIGURATION page.
• Verify the IP address, subnet mask, and default gateway on the remote computer system.
• If these steps fail, contact the LAN Administrator for assistance.
Refer to the computer system’s documentation if you are unsure how to perform a ping
command. Most computers running a networked version of Microsoft W indows™ or UNIX
allow a ping to be performed by typing ping <IP Address> at a command line prompt.
Typically, the ping program responds by indicating that the remote IP Address has
responded in a certain amount of time or that no response was received.
Some versions of ping continue running until you explicitly tell them to stop. If the
program does not terminate on its own, type <Ctrl+c> to stop the program.
100 612806420L1-1E
 Loading...