

Page 1
NetVanta 950 IAD
Quick Configuration Guide
The NetVanta 950 IAD system is inte nded to be installed, maintained, and serviced by
qualified service personnel only.
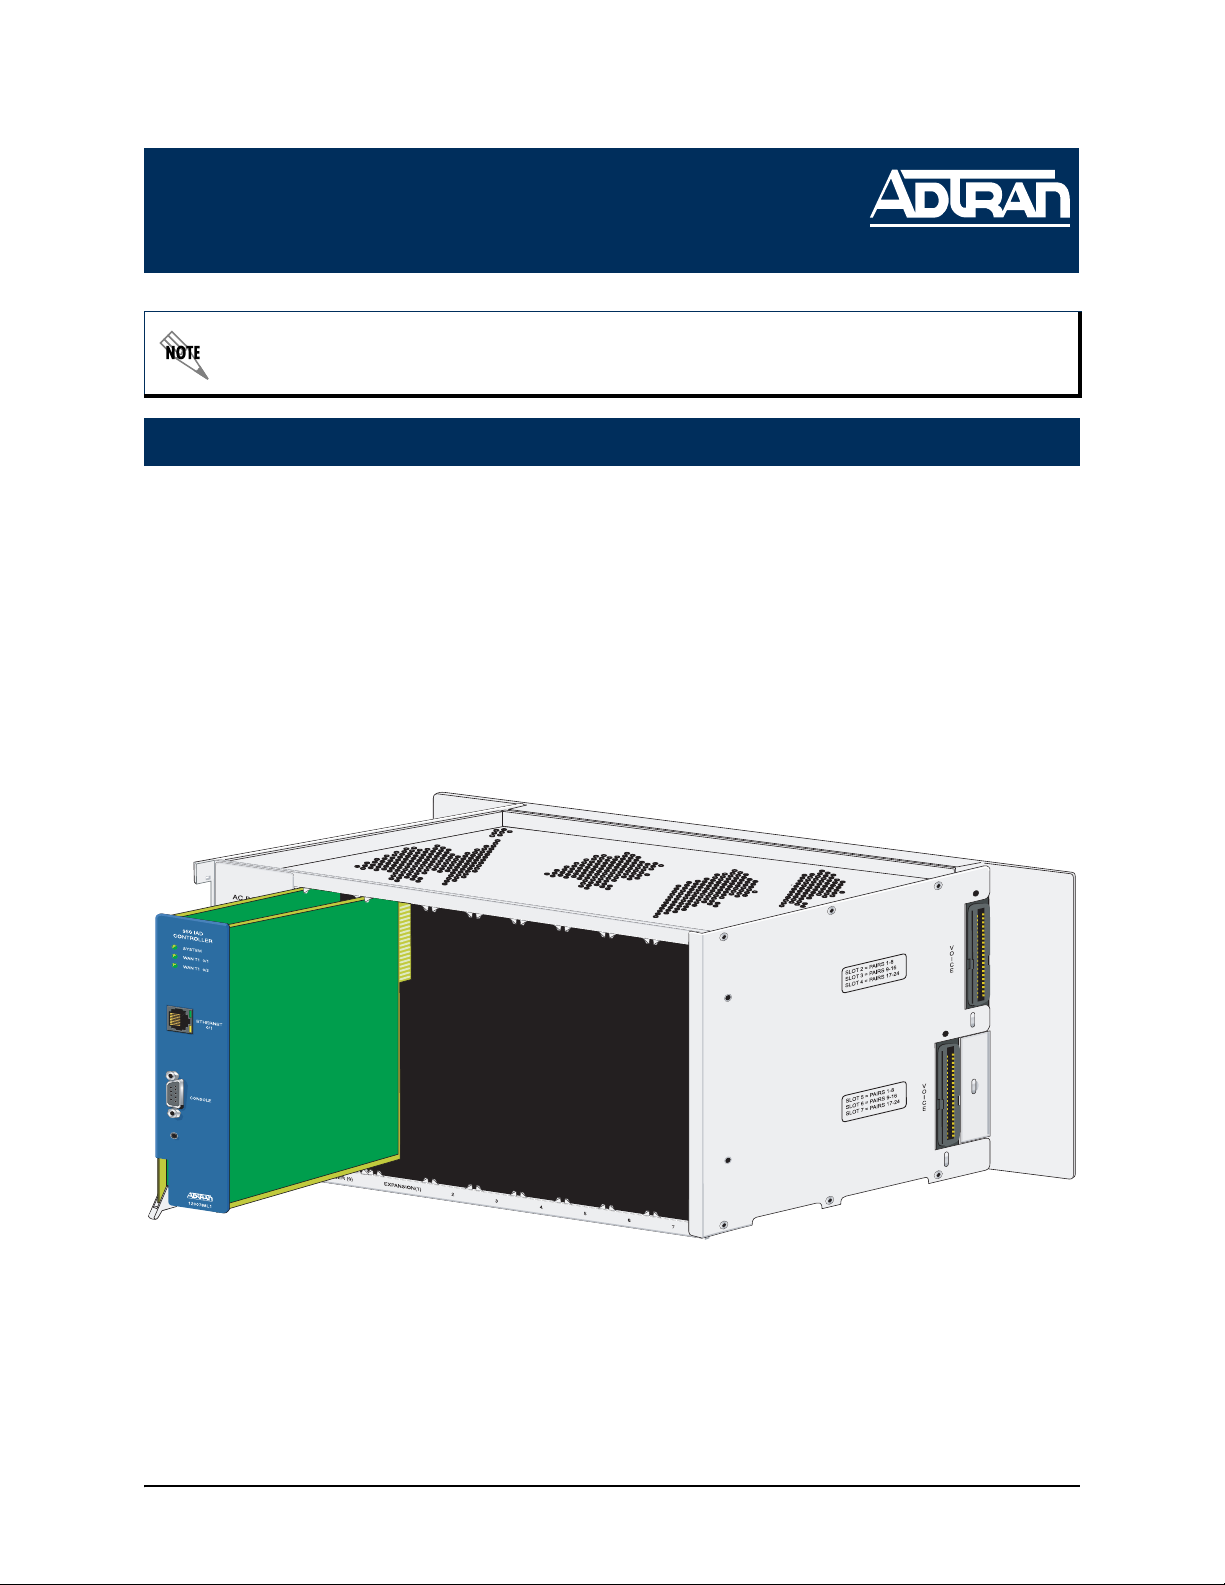
Install the NetVanta 950 IAD Controller
1
1. Use a screwdriver to remove the locking bar from the chassis.
2. Remove Blank Panel if installed.
3. Slide the Controller into the Controller Slot (Slot 0) until the module is firmly
positioned against the back of the chassis. Press firmly on the top and bottom of the
faceplate to ensure a proper fit.
4. Replace the locking bar and secure it with a screwdriver. The locking bar must be
attached at all times.
5. Connect the cables to the associated device(s).
6. Complete the system installation as specified in the Hardware Installation Guide
(P/N 61200788L1-34).
61200786L1-42A July 2004
Technical Support 1-888-4ADTRAN (1-888-423-8726)
Page 2
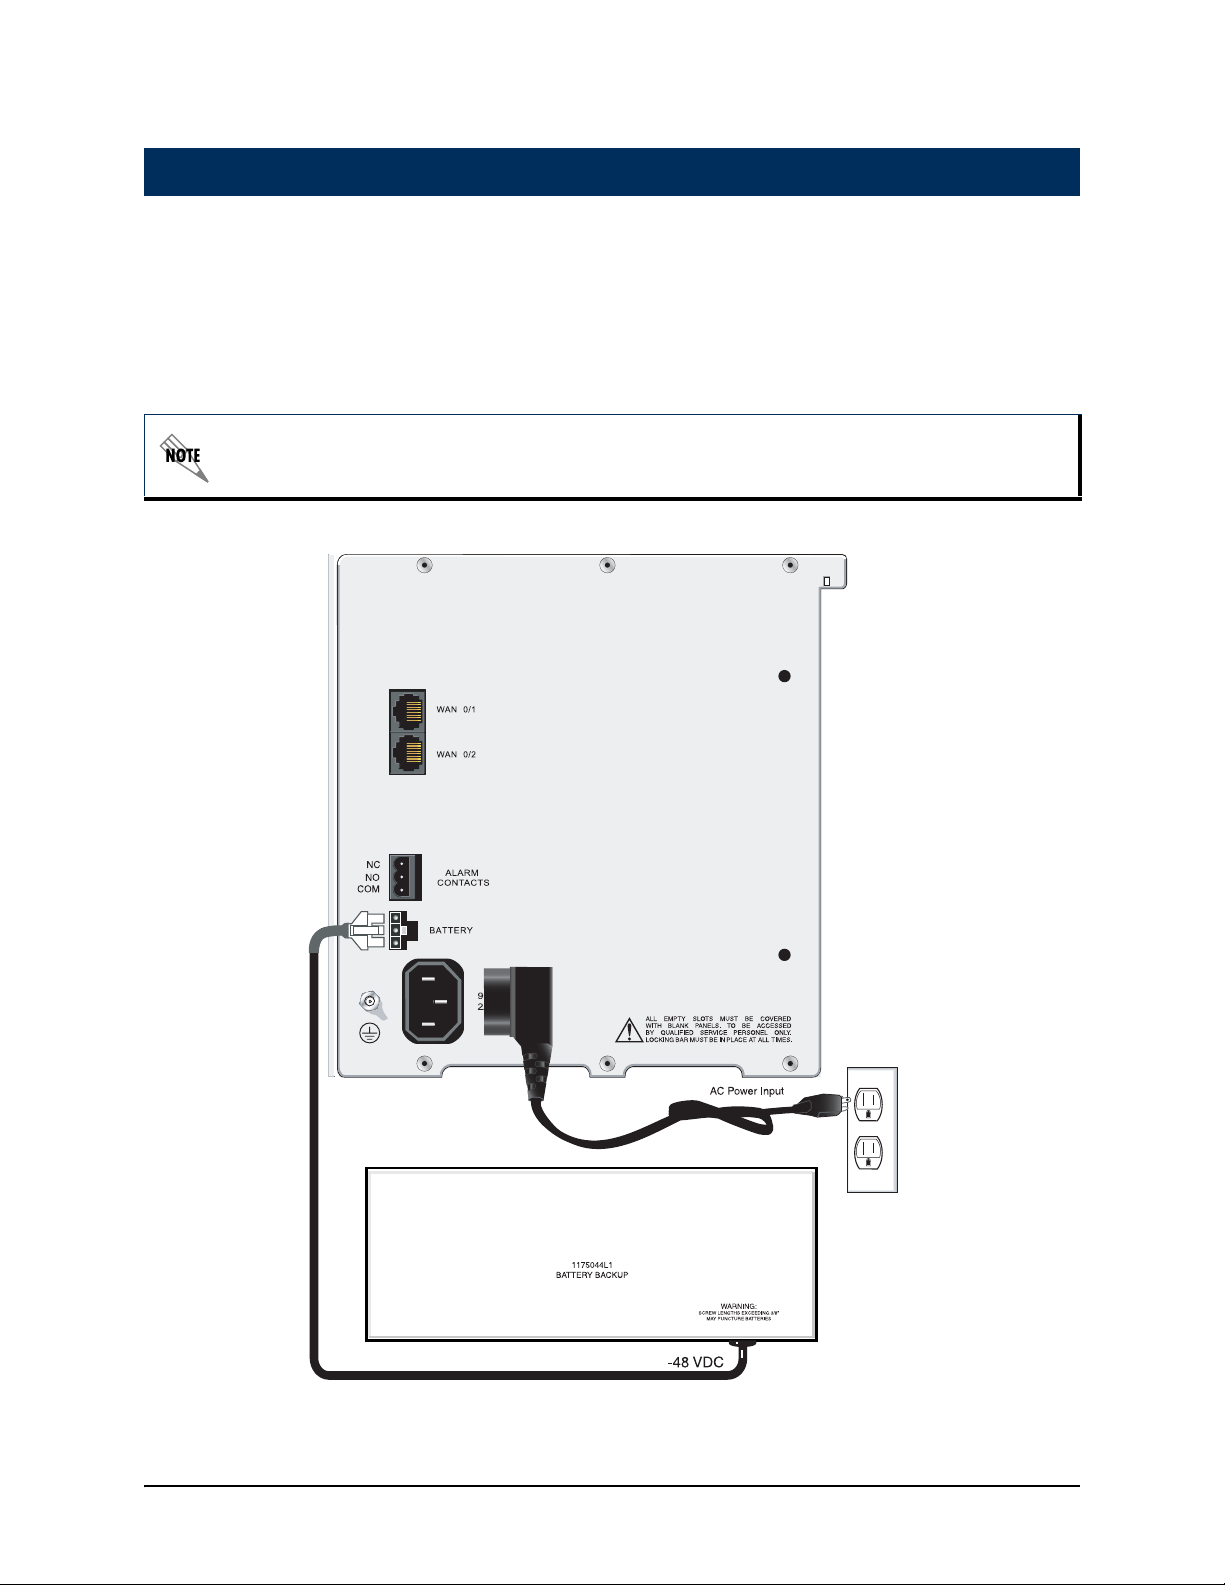
Connect the Power Supply
2
1. Insert the provided AC power plug into the AC POWER interface on the left side of
the chassis.
2. Connect the loose end of the power cord into a properly grounded 120 VAC, 60 Hz
electrical outlet.
3. (Optional) When using the Battery Backup, connect the loose end to the BATTERY
interface on the left side of the chassis.
The Battery Backup connection below is optional.
2 Technical Support 1-888-4ADTRAN (1-888-423-8726) 61200786L1-42A
Page 3
Configure Your Application
3
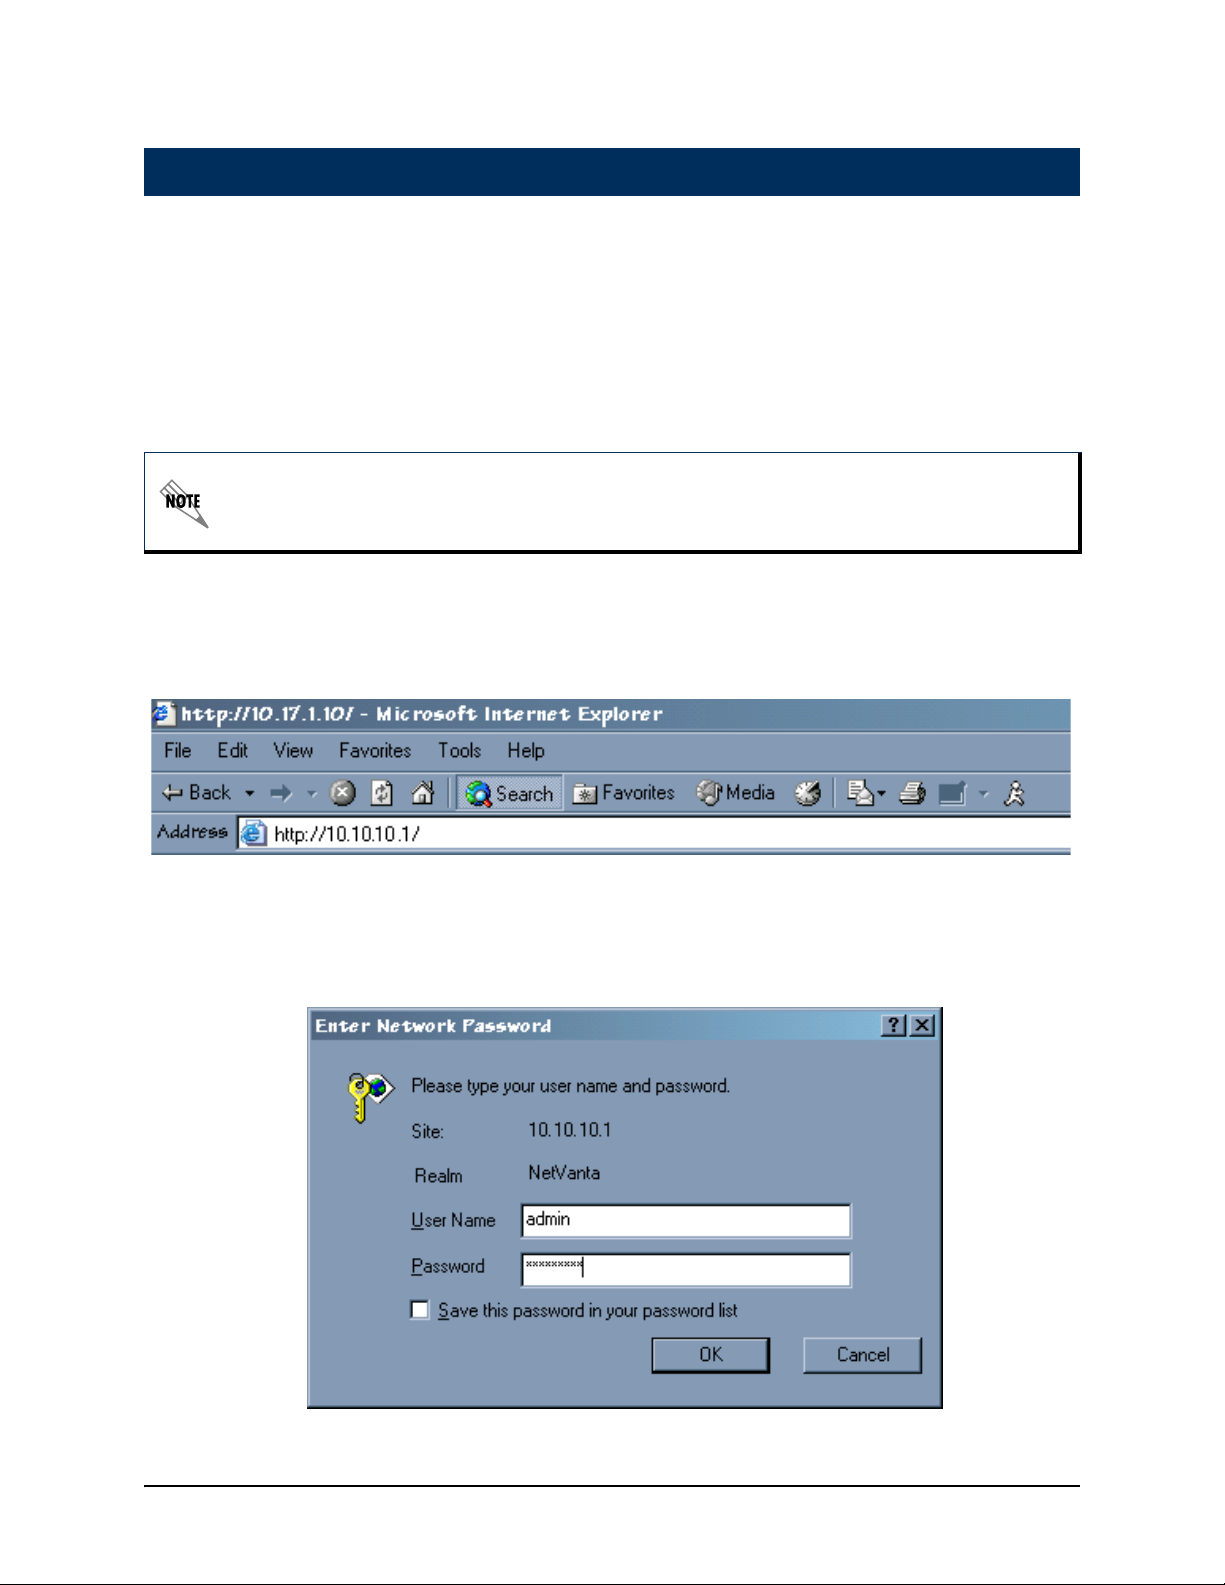
You may access the web-based GUI from any web browser on your network by following these steps:
1. Connect the NetVanta 950 to your PC using the ETHERNET 0/1 port on the
NetVanta 950 Controller.
2. Change the IP address of your PC to 10.10.10.2. If you cannot change the PC’s IP
address, see the note below.
If you cannot change the PC’s IP address, change the unit’s IP address to correspond to
your network setup. This is done via the AOS Command Line Interface. See step 4 on
page 5 and step 5 on page 6 for further instruction.
3. Enter the unit’s IP address in your browser address line (see example below). The
default IP address is 10.10.10.1.
4. You will then be prompted for the username and password (the default settings are
admin and password).
61200786L1-42A Technical Support 1-888-4ADTRAN (1-888-423-8726) 3
Page 4

5. The initial GUI screen appears.
The web-based GUI lets you configure the main settings and provides online guidance
and explanations for each setting. However, use of the AOS CLI may be necessary for
more advanced configurations. Access the CLI via the CONSOLE port (see step 4 on
page 5) or a Telnet session (see step 5 on page 6). For mo re details on CLI access, refer
to the AOS Command Reference Guide and other documents on your AOS
Documentation CD (included in shipment).
The following documents are available on the CD (and also available at www.adtran.com):
• NetVanta 950 IAD Hardware Installation Guide
• Module Quick Start Guides (available for each Module)
• AOS Command Reference Guide
• Configuration Guides
4 Technical Support 1-888-4ADTRAN (1-888-423-8726) 61200786L1-42A
Page 5

Connect the CONSOLE Interface
4
To establish a connection to the NetVanta 950’s CONSOLE interface, you need the following items:
• VT100 terminal or PC (with VT100 terminal emulation software)
• Straight-through serial cable with a DB-9 (male) connector on one end and the
appropriate interface for your terminal or PC communication port on the other end
1. Connect the DB-9 (male) connector of your serial cable to the CONSOLE port on
the front panel of the NetVanta 950 Controller. (Refer to the illustration.)
2. Connect the other end of the serial cable to the terminal or PC.
3. Open a VT100 terminal session using the following settings: 9600 baud, 8 data bits,
no parity bits, and 1 stop bit.
4. Press <Enter> to activate the ADTRAN Operating System Command Line Interface
(AOS CLI).
61200786L1-42A Technical Support 1-888-4ADTRAN (1-888-423-8726) 5
Page 6

Configure the Unit’s IP Address
5
1. Configure the IP address and subnet mask by following these steps. If you are not
sure what IP address to assign, please contact your network administrator.
2. Enter enable to activate the Enable command security mode.
3. When prompted, enter the enable password (the default password is password).
4. Enter config terminal to activate the Global configuration mode.
5. Enter interface vlan 1 to access the configuration parame ters for the VLAN (virtual
LAN) interface.
6. Enter ip address 10.26.12.12
mask to the VLAN interface. Depending on your network configuration, you may
need to set a default gateway as well.
*Note: These are example entries only. Modify them to match your configuration.
7. Enter no shutdown to activate the virtual interface to pass data.
8. Enter end to return to the Global configuration mode.
9. Enter copy running-config st artup-config to save the run ning configuration to the
unit’s non-volatile memory (NVRAM).
Configure a Telnet Session
6
255.255.255.0* to assign an IP address and subnet
1. Verify that the prompt of your unit displays (config) #.
2. Enter line telnet 0 to activate the configuration parameters for the Telnet session.
3. Enter password word
the underlined word
4. Enter exit to return to the Global configuration mode.
An enable security mode password must be defined before configur ed Telnet sessions are
activated. See the following step for information on password configuration.
Set the Enable Security Mode Password
7
1. Verify that the prompt of your unit displays (config)#.
2. Enter enable password word
or
3. Enter enable password md5 word
encryption.
The enable command security level passwords are case se nsitive. Replace the underlined
word
with a password of your choosing.
to create a login password for the Telnet sessions. Replace
with a password of your choosing.
to set the enable security mode password.
to encrypt the enable password using MD5
6 Technical Support 1-888-4ADTRAN (1-888-423-8726) 61200786L1-42A
Page 7

Complete the Installation
8
Complete the installation of your NetVanta 950 by connecting to the appropriate network connection and interface. For more information, please refer to the appropriate
Option Module Quick Start Guide and the Hardware Installation Guide provided on the
AOS Documentation CD. (These documents are also available at www.adtran.com.)
61200786L1-42A Technical Support 1-888-4ADTRAN (1-888-423-8726) 7
 Loading...