

Page 1
NetVanta 2000
Series
Quick Start Guide
61200361L2-13B May 2002
About this guide...
Before you begin...
Tools Required
• Category 5 - UTP cable for connecting the system to the existing network
• A PC with an internet browser (IE 5.0 or greater) for configuring the unit
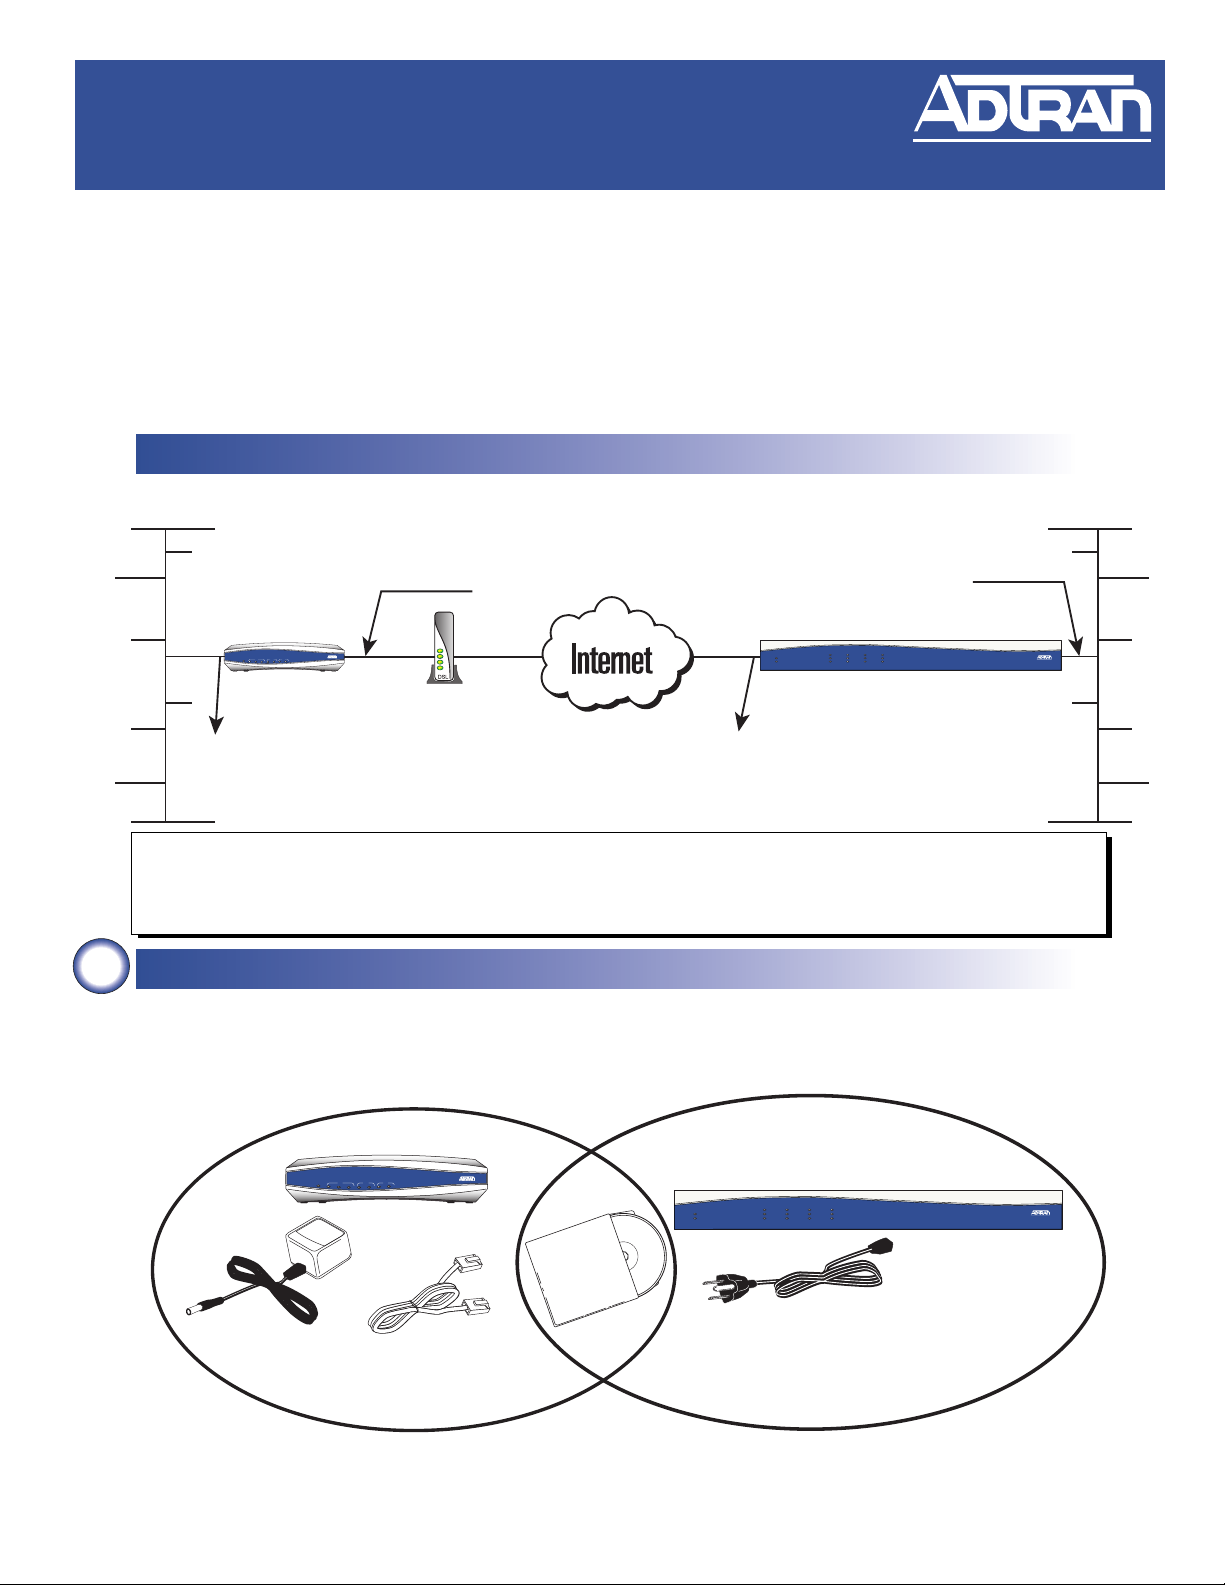
Network Diagram
SoHo CORP HQ
WAN:
NetVanta 2100
NetVanta 2100
NetVanta 2100
WAN LAN
VPN
WAN LAN
VPN
PWR
PWR
RD
RD
STAT
STAT
TD
TD
TD
RD
TD
TD
RD
RD
Static Addressing
10.200.1.140/16
DSL/
Cable Modem
LAN IP: 190.72.22.40/24
VPN
WAN
LAN
DMZ
TD
TD
TD
STATUS
POWER
NetVanta 2300
TD
RD
RD
RD
RD
LNK
LNK
LNK
ACT
NetVanta 2300
LAN IP: 10.10.20.7/24
WAN: Static Addressing
172.29.50.61/16
STEPS 2-2f — Provide the stateful inspection firewall configuration.
STEPS 2g-3 — Configures a VPN connection between the NetVanta 2100 at the Corporate office
(for the the above network diagram).
Unpacking and Inspecting the System
1
Each NetVanta 2000 series unit is shipped in its own cardboard shipping carton. Open each carton carefully and
avoid deep penetration into the carton with sharp objects.
a
t
2
1
0
0
VPN
TD
RD
ACT
Unit
WAN
LAN
TD
RD
LNK
DMZ
TD
TD
RD
RD
LNK
LNK
NetVanta 2100
NetVanta 2100
RD
RD
STATUS
POWER
User
Manual
CD
Power
Cable
N
Power
Supply
e
n
a
V
t
Unit
VPN
VPN
WAN LAN
WAN LAN
PWR
PWR
STAT
STAT
TD
RD
TD
TD
TD
TD
RD
RD
Crossover
Ethernet
Cable
NetVanta 2300
N
e
t
V
a
n
2
a
t
3
0
0
1
Page 2
Configuring the System
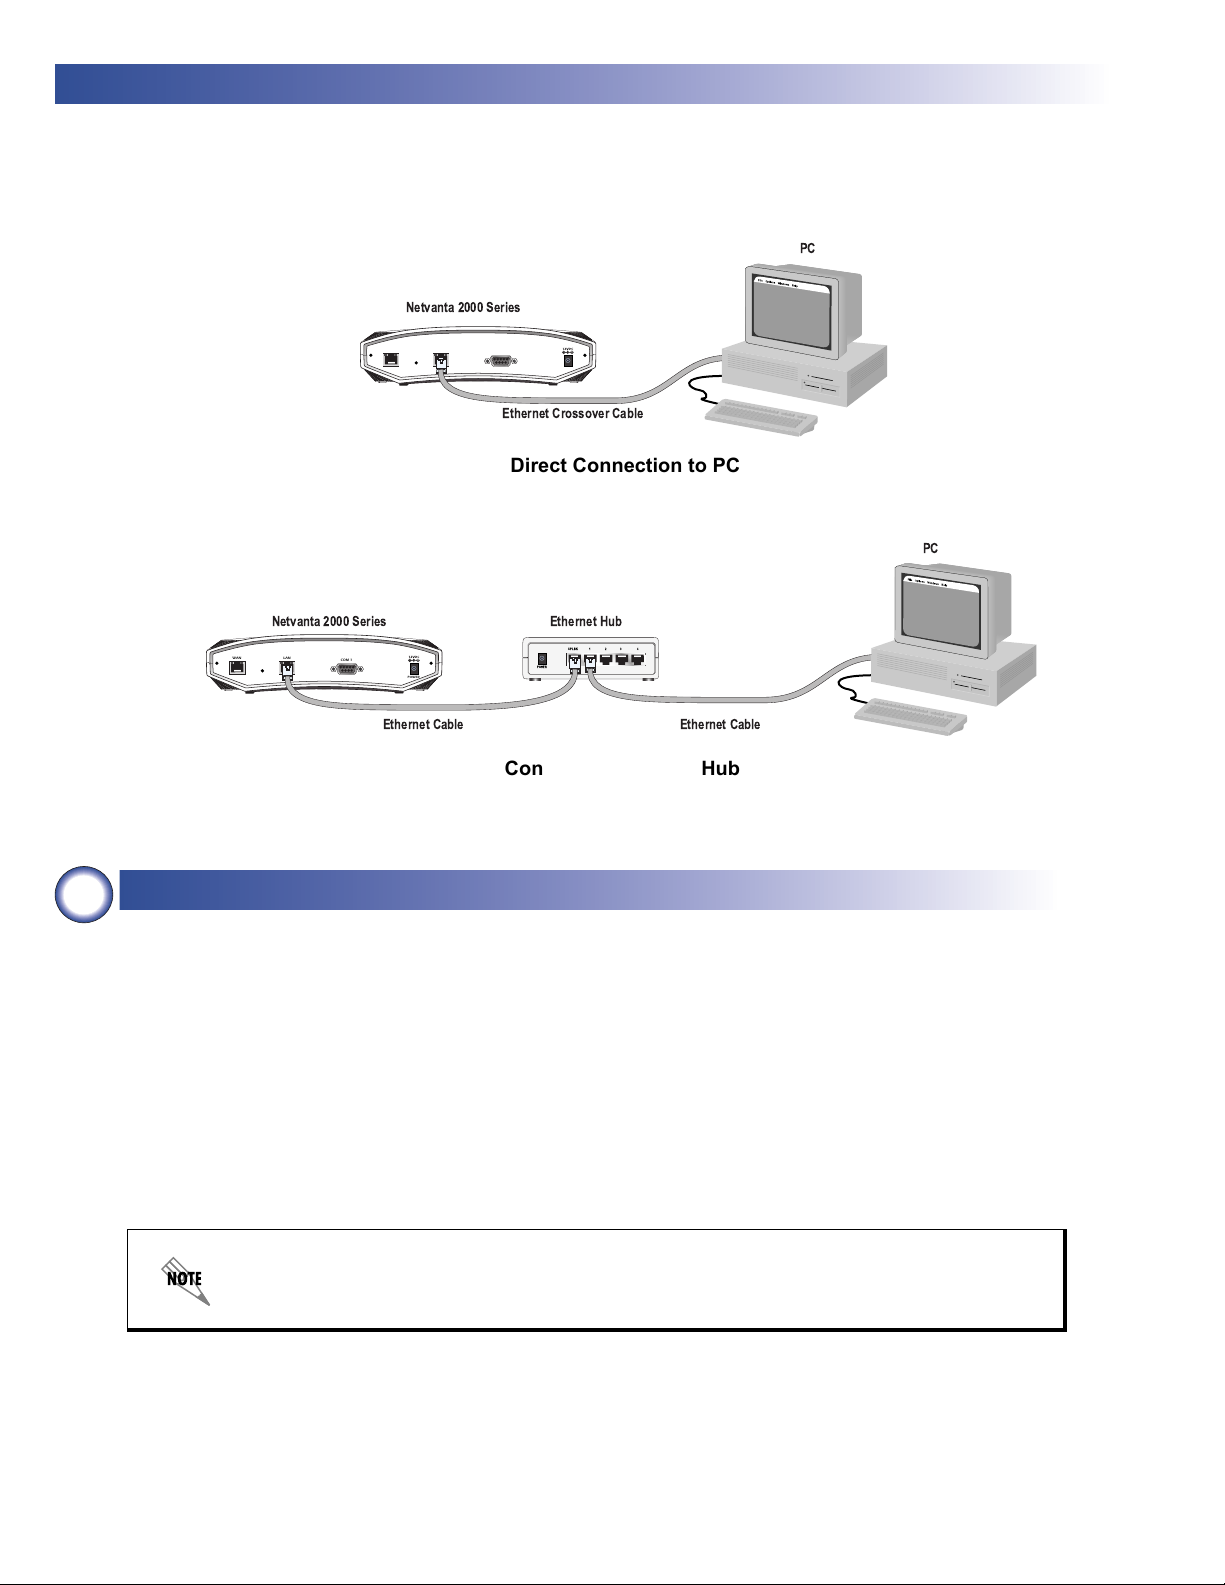
The NetVanta 2000 series products can be accessed and managed via the LAN interface using an ethernet
crossover cable (provided with the NetVanta 2100). Alternately, the NetVanta 2000 series may be accessed
using a hub and two ethernet cables (one for the PC and one for the NetVanta). Using a PC with an installed
browser (Internet Explorer 5.0 for optimal viewing), the NetVanta can be configured using the web GUI.
PC
Netvanta 2000 Series
Netvanta 2000 Series
WAN LAN
Connecting to the NetVanta
2
COM 1
WAN LAN
COM 1
POWER
Ethernet Crossover Cable
Direct Connection to PC
Ethernet Hub
UPLINK 1 2 3 4
POWER
Ethernet Cable Ethernet Cable
POWER
Connection through Hub
PC
1. Connect the NetVanta 2000 series LAN interface to the PC using the appropriate ethernet cable.
2. Supply power to the PC and the NetVanta unit and begin the operating system boot up process.
During the boot up process, the PC will obtain an IP address from the NetVanta 2000 series DHCP
server. Alternately, complete the process for releasing and renewing captured IP addresses to
obtain a new IP address from the NetVanta 2000 series DHCP server. Please refer to your
specific PC operating system documentation for details on that process.
3. Open your installed browser and in the URL field enter 10.10.10.1. The NetVanta 2000 series login
screen will appear.
4. Enter your username and password and click the login button. When connecting to the NetVanta
2000 series for the first time, the username is admin and there is no set password.
ADTRAN strongly recommends immediately changing the admin password for security
purposes. Refer to DLP-002 in the NetVanta 2000 series System Manual (PN 61200361L1-
1) for details.
5. After logging in to the NetVanta 2000 series, the welcome screen will appear.
2
Page 3
3
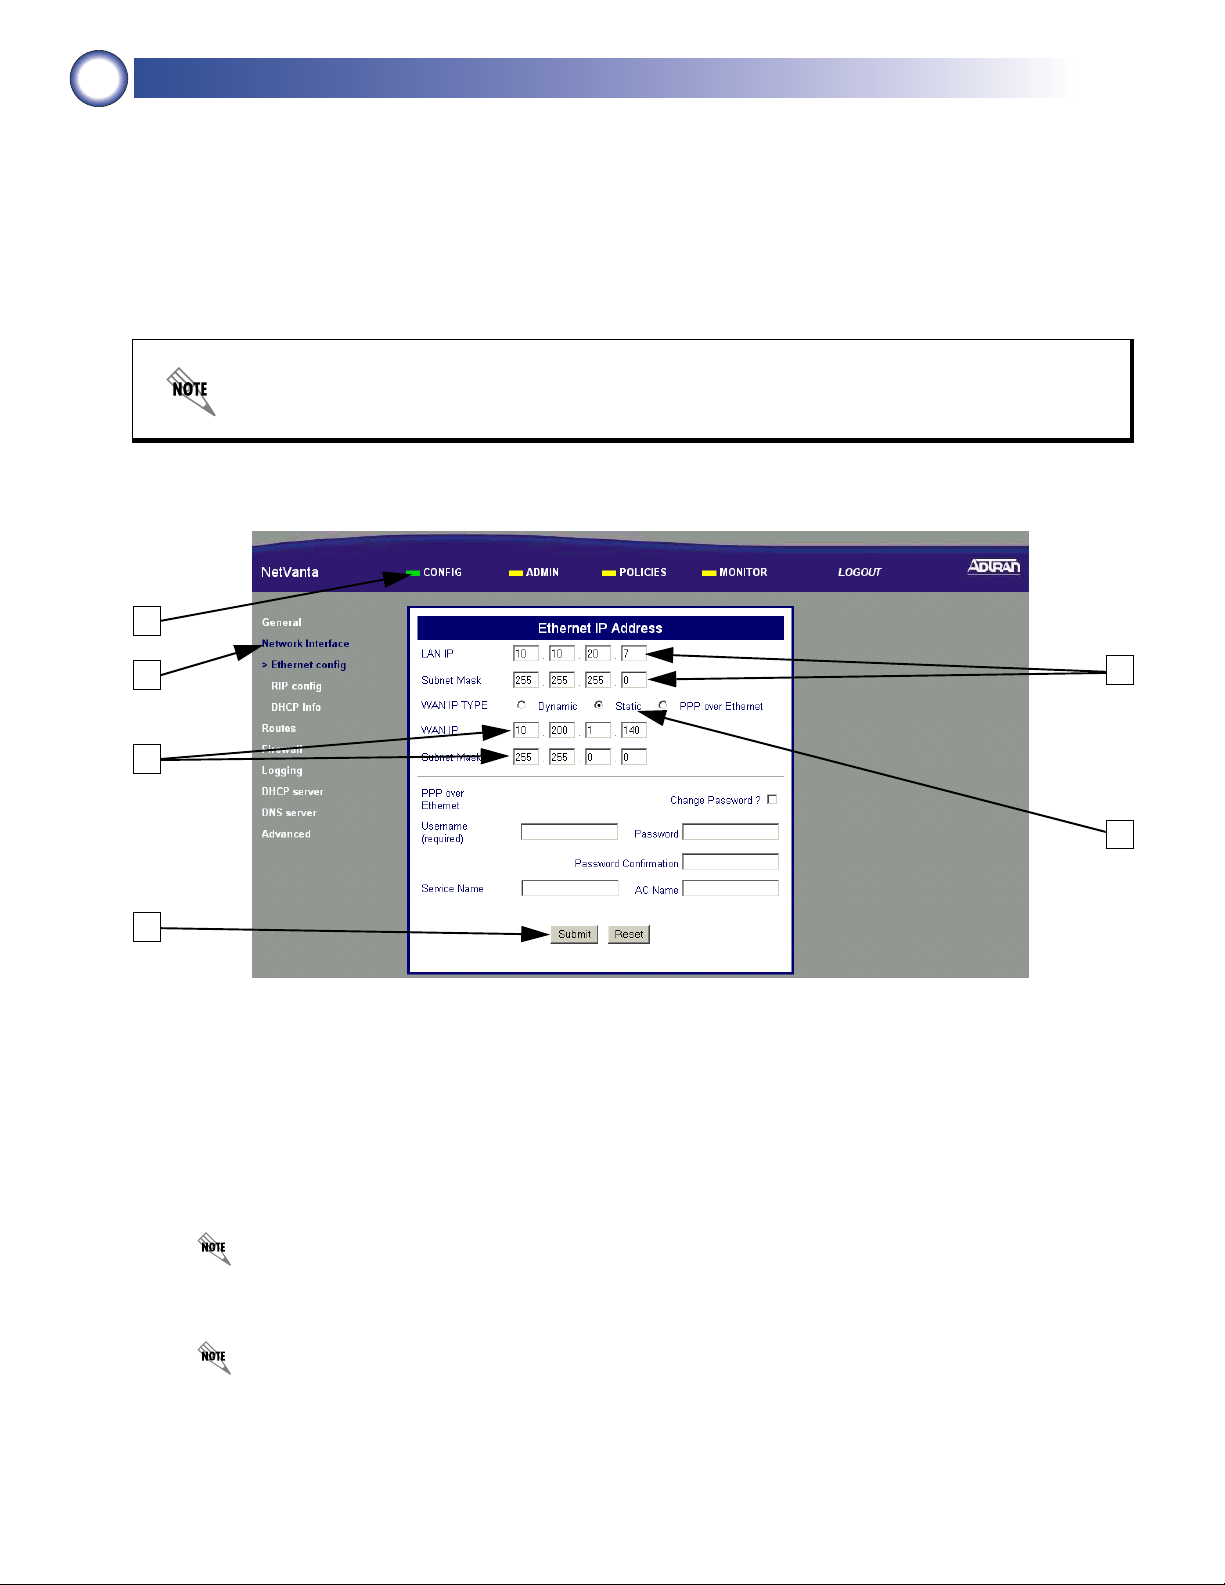
Configuring the LAN and WAN IP Parameters
The NetVanta 2000 series units come factory programmed with a LAN IP address ot 10.10.10.1 (24-bit subnet
mask) and no pre-programmed WAN IP address. The procedures outlined in this step include changing both the
LAN and WAN IP parameters.
The NetVanta 2000 series supports three types of WAN IP address: Dynamic, Static, and PPPoE (PPP over
Ethernet). The IP parameters for your WAN interface must be supplied by your Internet Service Provider (ISP). If
your ISP is performing DHCP for IP address assignment, configure the NetVanta 2000 series unit for Dynamic
addressing. Use PPP over Ethernet when your ISP has supplied you with the configuration parameters for PPPoE
(including a username and password).
Changing the LAN IP parameters through the LAN interface will result in a loss of management
connectivity. Follow the procedure in Step 2c to change the IP address of the managing PC to
match the new NetVanta LAN IP parameters.
1
2
5
6
1. Select Config
2. Select Network Interface
3. Enter the Assigned LAN IP address and associated subnet mask
4. Select the Static radio button for static addressing
Your WAN IP address scheme will be supplied by your provider. Static addressing used above
is an example only.
3
4
5. Enter the assigned WAN IP address and associated subnet mask
The WAN IP parameters are set by the service provider. Contact your ISP before configuring
the unit.
6. Click Submit to register the changes
3
Page 4
3b
Changing the IP address to your PC
Alternately, complete the process for releasing and renewing captured IP addresses to obtain a new IP
address from the
NetVanta 2000 series
to 2000. Please refer to your specific operating system documentation for details on that process.
DHCP server. The following screen applies to Microsoft Windows 95
3c
3
1. Click Start on the Windows task bar
2. Choose Run, then type WINIPCFG in the text field
3. Click Release to reset all IP parameters
4. Click Renew to obtain new IP parameters
4
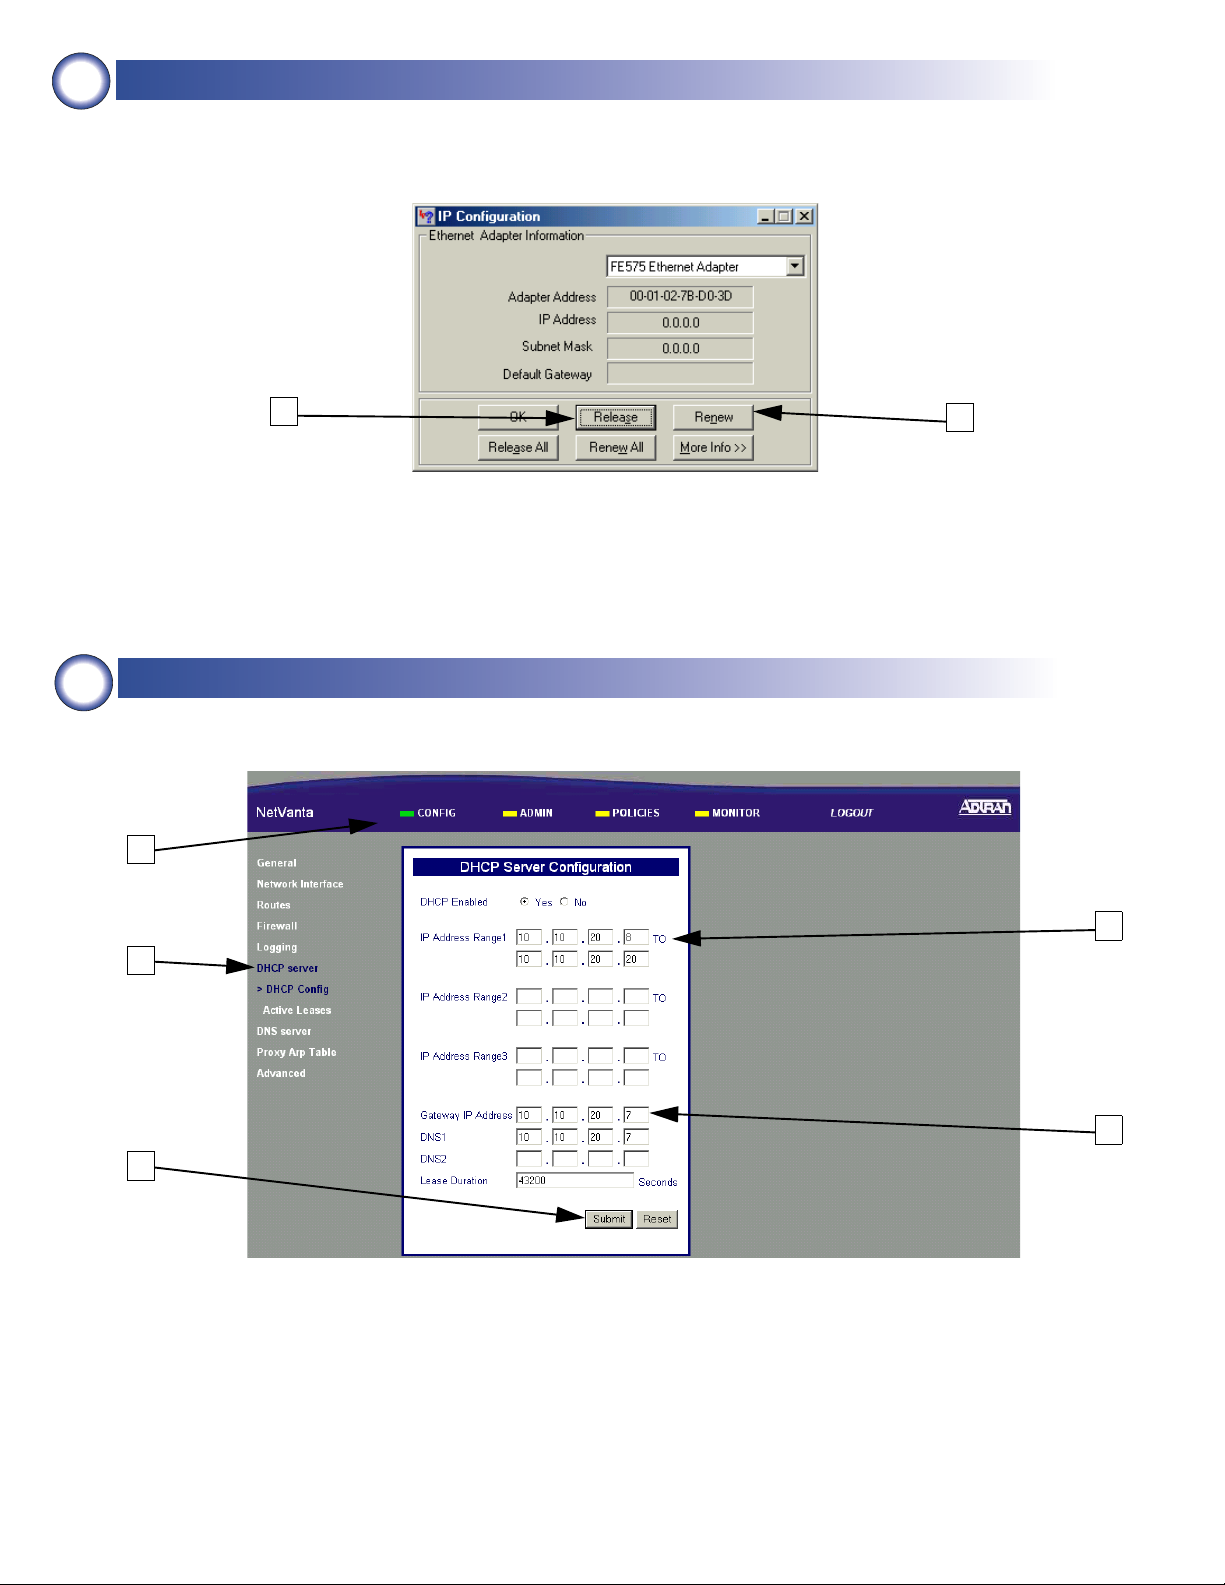
Configuring the DHCP Server IP Parameters - Optional
The NetVanta 2000 series will automatically populate the DHCP IP address range 1 with ten addresses based on
your assigned LAN network address.
4
3
2
5
1. Select CONFIG
2. Select DHCP Server
3. Enter an IP address range that is on the same subnet as the assigned LAN IP address of the unit
4. Enter the assigned LAN IP address of the unit
5 Click Submit to register the changes
4
4
Page 5
2e
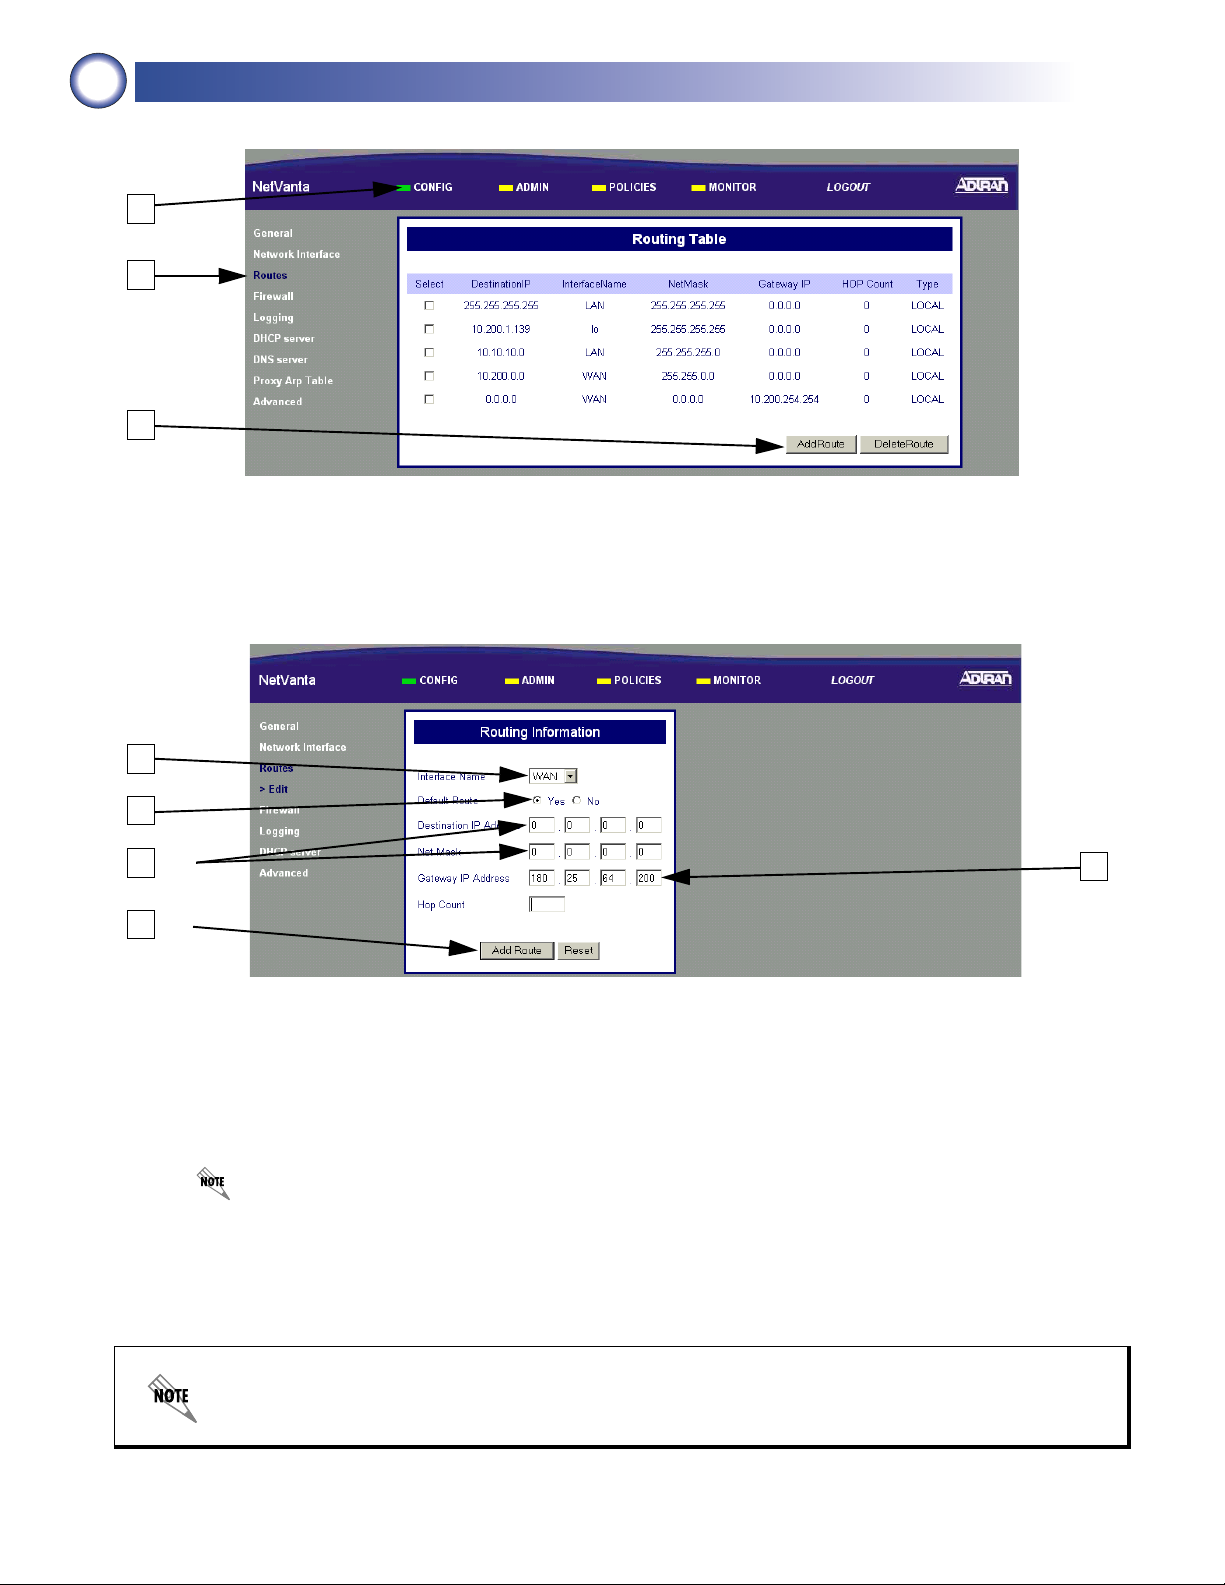
Adding a Default Route
Skip this step when configuring the NetVanta for dynamic addressing on the WAN interface.
1
2
3
1. Select CONFIG
2. Select Routes
3. Select AddRoute
1
2
3
5
1. Select WAN to associate this default route with the WAN interface
2. Select Yes to configure this as the default
3. Enter all zeros
4. Enter the next hop IP address
This is supplied by your provider
5 Click Add Route to submit this route to the route table
4
The NetVanta is now configured for use as a Stateful inspection firewall. To configure VPN, please
proceed to Step 2f. If VPN is not desired, proceed to Step 3.
5
Page 6

2f
Saving the Settings
1
2
3
1. Select ADMIN
2. Select Save Settings
3. Select Yes to Confirm
2g
Defining a VPN Policy
IKE Policy Configuration
1
2
3
4
1. Select POLICIES
2. Select VPN
3. Select IKE
4. Click the Add button
6
Page 7

IKE Policy Configuration (continued)
1
2
4
7
7
7
7
8
12
13
1. Enter an alphanumeric string (spaces are not valid characters) used to identify this policy
2. Select BOTH DIRECTIONS to allow IKE to be initiated by either the local or remote NetVanta
3. Select MAINMODE exchange type
4. Use the Fully Qualified Domain Name (FQDN) for the local NetVanta unit and enter the identification data
5 Use the FQDN for the remote users and enter the identification data
6 Enter the local NetVanta unit's assigned WAN IP address
7 Enter the remote NetVanta unit's assigned WAN IP address
8 Select 3DES to invoke Triple DES encryption
9 Select SHA to use the Secure Hash authentication Algorithm No. 1
8
10
11
Select Pre-SharedKey and enter a 12 character alphanumeric string (spaces are not a valid character)
10
This key MUST be the same for both the local and remote units.
1800 is the ADTRAN suggested value
11
When determining the appropriate value for your application, typical usage contains a 3:1 ratio
between the IKE and IPSec key lifetime
values. This ratio provides for key negotiation overhead.
Select Group 2 to invoke Diffie-Hellman Group 2
12
13 Click SUBMIT to register the changes
7
Page 8

IPSec Policy Configuration
1
2
1. Select POLICIES
2. Select VPN
3. Click the Auto button
3
8
Page 9

1
2
3
5
7
10
12
13
14
1. Enter an alphanumeric string (spaces are not valid characters) to identify this policy
2. Select ENABLE to configure this as an active policy
3. Select OTHER and enter the local NetVanta unit's assigned LAN IP address and associated subnet mask
here
4
6
8
9
11
4. Select OTHER and enter the remote NetVanta unit's assigned LAN IP address and associated subnet
mask here
5 Select ANY to apply this policy to all data ports
6 Select ALL to apply this policy to all data protocols
7 Enter the remote NetVanta unit's assigned WAN IP address
If the remote NetVanta unit is configured for dynamic addressing on the WAN interface, enter
0.0.0.0 here.
8 Select Group2
9 Select ESP WITH AUTH
10 Select SHA1 to invoke Secure Hash Algorithm No. 1
11 Select 3DES to use Triple-DES encryption algorithm
12 600 is the ADTRAN suggested value
When determining the appropriate value for your application, typical usage contains a 3:1 ratio
between the IKE and IPSec key lifetime values. This ratio provides minimal key negotiation
overhead.
13 Select LAST TRANSFORM
14 Click the Add button to register this policy
9
Page 10

2h
Defining LAN Access Policies
To LAN Access Policy Configuration (Inbound Traffic)
1
2
3
1. Select POLICIES
2. Select Access Policies: To LAN (Incoming traffic)
3. Select Beginning to place the new access policy at the beginning of the table
4 Click Submit to begin the policy configuration
4
10
Page 11

To LAN Access Policy Configuration (continued)
1
5
2
3
4
7
8
1. Select OTHER and enter the remote unit's assigned LAN IP address and associated mask bits here
2. Select OTHER and enter the local NetVanta unit's assigned LAN IP address and associated
3. Select ANY to forward all TCP/UDP ports or select OTHER and enter the port (or port range) below
6
9
4 Select ALL to forward all data protocols or select OTHER and enter the protocol value (using decimal
notation) in the field below
5 Select PERMIT to configure this policy to permit only the specified data
6 Set Enable Log to No
7 Select No
8 Select Yes to configure the NetVanta to perform security check when the policy is submitted
The security check ensures that all inbound data covered by this access policy has an associated
VPN policy as well
9 Click Submit to register this policy
11
Page 12

From LAN Access Policy Configuration (Outbound Traffic)
1
2
3
1. Select POLICIES
2. Select Access Policies: From LAN
3. Select Beginning to place the new access policy at the beginning of the table
4 Click Submit to begin the policy configuration
4
12
Page 13

From LAN Access Policy Configuration (continued)
1
4
2
3
7
8
1. Select OTHER and enter the local NetVanta unit's assigned LAN IP address and associated mask bits here
2. Select OTHER and enter the remote NetVanta unit's assigned LAN IP address and associated mask bits here
5
6
9
3. Select ANY to forward all TCP/UDP ports or select OTHER and enter the port (or port range) below
4 Select ALL to forward all data protocols or select OTHER and enter the protocol value (using decimal nota-
tion) in the field below
5 Select PERMIT to configure this policy to permit only the specified data
6 Select No
7 Select No
8 Select Yes to configure the NetVanta to perform security check when the policy is submitted
The security check ensures that all inbound data covered by this access policy has an associated
VPN policy as well
9 Click Submit to register this policy
13
Page 14

3
Saving the Settings
1
2
3
1. Select ADMIN
2. Select Save Settings
3. Select Yes to Confirm
14
Page 15

15
 Loading...