

Page 1
®
MX410/MX412 System Manual
Document Number: 61189500L1-1B
August 2005
PRELIMINARY
Page 2

MX410/MX412 System Manual
Front Matter
Trademarks
Any brand names and product names included in this manual are trademarks, registered
trademarks, or trade names of their respective holders.
To the Holder of the Manual
The contents of this publication are current as of the date of publication. ADTRAN® reserves
the right to change the contents without prior notice.
In no event will ADTRAN be liable for any special, incidental, or consequential damages or
for commercial losses even if ADTRAN has been advised thereof as a result of issue of this
publication.
®
901 Explorer Boulevard
P.O. Box 140000
Huntsville, AL 35814-4000
(256) 963-8000
©2005 ADTRAN, Inc.
All Rights Reserved.
ii PRELIMINARY 61189500L1-1B
Page 3

MX410/MX412 System Manual
Revision History
Revision Date Description of Changes
A June 2005 Initial release
B August 2005 PPP and MX412 information added
Conventions
The following typographical conventions are used in this document:
This font indicates a cross-reference link. First-time references to tables and figures are
shown in this font.
This font indicates screen menus, fields, and parameters.
THIS FONT indicates keyboard keys (ENTER, ESC, ALT). Keys that are to be pressed simultaneously
are shown with a plus sign (
same time
).
ALT+X indicates that the ALT key and X key should be pressed at the
This font indicates references to other documentation and is also used for emphasis.
This font indicates on-screen messages and prompts.
This font indicates text to be typed exactly as shown.
This font indicates silkscreen labels or other system label items.
This font is used for strong emphasis.
NOTE
Notes inform the user of additional, but essential, information or
features.
CAUTION
Cautions inform the user of potential damage, malfunction, or disruption to equipment, software, or environment.
WARNING
Warnings inform the user of potential bodily pain, injury, or death.
61189500L1-1B PRELIMINARY iii
Page 4

MX410/MX412 System Manual
Compliance
The MX410 (P/N 1189500L1) and MX412 (P/N 1189512L1) comply with the requirements
covered under UL 60950 and NEBS Level 3. The MX410 and MX412 are intended to be
installed in a restricted access area only.
The MX410 and MX412 devices comply with Part 15 of the FCC Rules. Operation is subject to
the following two conditions:
1. The device may not cause harmful interference.
2. The device must accept any interference received, including interference that may cause
undesired operation.
Changes and modifications not expressly approved by ADTRAN could void the user’s authority
to operate this equipment.
WARNING
The V.35, Ethernet, terminal server, craft port, and FXS port (if
present) interfaces are not to be connected to outside plant (OSP)
facilities.
CAUTION
Per GR-1089-CORE October 2002, Section 9, this system is
designed and intended only for installation in a DC-C (common)
Bonding and Grounding system. It is not intended or designed for
installation in a DC-I (isolated) Bonding and Grounding system.
The ground wire must be of equal or greater ampacity than the wire
connected to the VDC return.
The Compliance Codes for the MX410/MX412 units and the MX410 Power Supply Unit (PSU)
are provided in the following tables.
Table 1. MX410 and MX412 Compliance Codes
Code Input Output
Power Code (PC) F C
Telecommunication Code (TC) X X
Installation Code (IC) A –
Table 2. MX410 Power Supply Unit Compliance Codes
Code Input Output
Power Code (PC) F C
Telecommunication Code (TC) – –
Installation Code (IC) A –
iv PRELIMINARY 61189500L1-1B
Page 5

MX410/MX412 System Manual
Training
ADTRAN offers training courses on our products. These courses include overviews on product
features and functions while covering applications of ADTRAN’s product lines. ADTRAN
provides a variety of training options, including customized training and courses taught at our
facilities or at customer sites.
For inquiries concerning training, contact ADTRAN:
Training Phone: 800-615-1176, ext. 7500
Training Fax: 256-963-6700
Training Email: training@adtran.com
61189500L1-1B PRELIMINARY v
Page 6

This page is intentionally blank.
MX410/MX412 System Manual
vi PRELIMINARY 61189500L1-1B
Page 7

MX410/MX412 System Manual
Contents
Section 1
Introduction . . . . . . . . . . . . . . . . . . . . . . . . . . . . . . . . . . . . . . . . . . . . . . . . . . . . . . . . . . . . . . . . . . . . 1-1
Product Overview . . . . . . . . . . . . . . . . . . . . . . . . . . . . . . . . . . . . . . . . . . . . . . . . . . . . . . . . . . . . . . . . . . . . . 1-1
Section 2
Engineering Guidelines. . . . . . . . . . . . . . . . . . . . . . . . . . . . . . . . . . . . . . . . . . . . . . . . . . . . . . . . . . . 2-1
General . . . . . . . . . . . . . . . . . . . . . . . . . . . . . . . . . . . . . . . . . . . . . . . . . . . . . . . . . . . . . . . . . . . . . . . . . . . . . . 2-1
Power Requirements. . . . . . . . . . . . . . . . . . . . . . . . . . . . . . . . . . . . . . . . . . . . . . . . . . . . . . . . . . . . . . . . . . . 2-1
Power Dissipation . . . . . . . . . . . . . . . . . . . . . . . . . . . . . . . . . . . . . . . . . . . . . . . . . . . . . . . . . . . . . . . . . . . . . 2-2
Section 3
Application Guidelines . . . . . . . . . . . . . . . . . . . . . . . . . . . . . . . . . . . . . . . . . . . . . . . . . . . . . . . . . . . 3-1
Introduction . . . . . . . . . . . . . . . . . . . . . . . . . . . . . . . . . . . . . . . . . . . . . . . . . . . . . . . . . . . . . . . . . . . . . . . . . . 3-1
MX410 Data Path Block Diagram . . . . . . . . . . . . . . . . . . . . . . . . . . . . . . . . . . . . . . . . . . . . . . . . . . . . . . . . . 3-2
Drop and Continue Application . . . . . . . . . . . . . . . . . . . . . . . . . . . . . . . . . . . . . . . . . . . . . . . . . . . . . . . 3-3
Setup . . . . . . . . . . . . . . . . . . . . . . . . . . . . . . . . . . . . . . . . . . . . . . . . . . . . . . . . . . . . . . . . . . . . . . . . 3-4
Drop and Insert Application . . . . . . . . . . . . . . . . . . . . . . . . . . . . . . . . . . . . . . . . . . . . . . . . . . . . . . . . . . 3-7
Setup . . . . . . . . . . . . . . . . . . . . . . . . . . . . . . . . . . . . . . . . . . . . . . . . . . . . . . . . . . . . . . . . . . . . . . . . 3-8
Integrated Wireless Access Device or DS0 Grooming . . . . . . . . . . . . . . . . . . . . . . . . . . . . . . . . . . . . . 3-12
Setup . . . . . . . . . . . . . . . . . . . . . . . . . . . . . . . . . . . . . . . . . . . . . . . . . . . . . . . . . . . . . . . . . . . . . . . 3-14
Remote Management of Other Systems using Terminal Server Ports and Ethernet Connectivity . . . 3-18
Setup . . . . . . . . . . . . . . . . . . . . . . . . . . . . . . . . . . . . . . . . . . . . . . . . . . . . . . . . . . . . . . . . . . . . . . . 3-19
Section 4
Installation . . . . . . . . . . . . . . . . . . . . . . . . . . . . . . . . . . . . . . . . . . . . . . . . . . . . . . . . . . . . . . . . . . . . . 4-1
General . . . . . . . . . . . . . . . . . . . . . . . . . . . . . . . . . . . . . . . . . . . . . . . . . . . . . . . . . . . . . . . . . . . . . . . . . . . . . . 4-1
Receiving Inspection. . . . . . . . . . . . . . . . . . . . . . . . . . . . . . . . . . . . . . . . . . . . . . . . . . . . . . . . . . . . . . . . . . . 4-1
ADTRAN Shipping Contents . . . . . . . . . . . . . . . . . . . . . . . . . . . . . . . . . . . . . . . . . . . . . . . . . . . . . . . . . . . . 4-1
Rackmount . . . . . . . . . . . . . . . . . . . . . . . . . . . . . . . . . . . . . . . . . . . . . . . . . . . . . . . . . . . . . . . . . . . . . . . . . . . 4-2
Wallmount . . . . . . . . . . . . . . . . . . . . . . . . . . . . . . . . . . . . . . . . . . . . . . . . . . . . . . . . . . . . . . . . . . . . . . . . . . . 4-2
Rear Panel . . . . . . . . . . . . . . . . . . . . . . . . . . . . . . . . . . . . . . . . . . . . . . . . . . . . . . . . . . . . . . . . . . . . . . . . . . . 4-3
Power Connection . . . . . . . . . . . . . . . . . . . . . . . . . . . . . . . . . . . . . . . . . . . . . . . . . . . . . . . . . . . . . . . . . 4-3
Alarm Contacts/AUX Inputs . . . . . . . . . . . . . . . . . . . . . . . . . . . . . . . . . . . . . . . . . . . . . . . . . . . . . . . . . . 4-4
61189500L1-1B PRELIMINARY vii
Page 8

MX410/MX412 System Manual
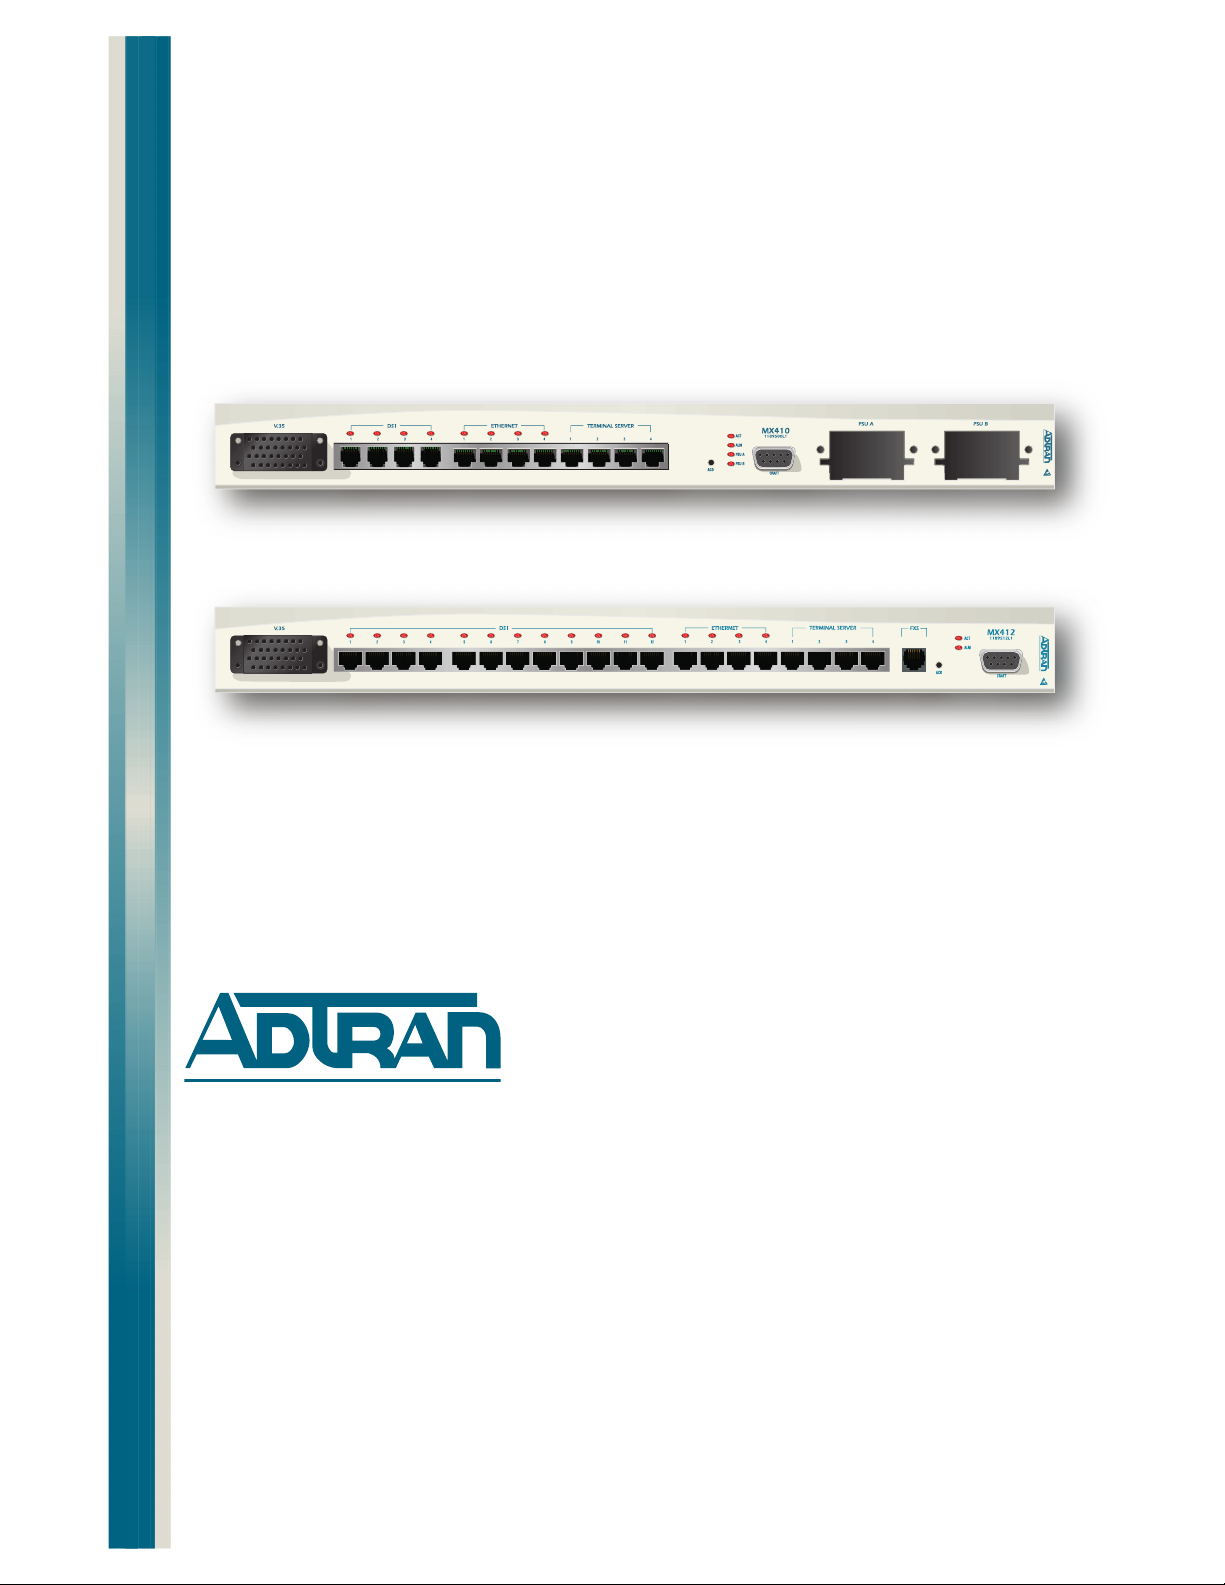
Front Panel. . . . . . . . . . . . . . . . . . . . . . . . . . . . . . . . . . . . . . . . . . . . . . . . . . . . . . . . . . . . . . . . . . . . . . . . . . . 4-5
MX410 . . . . . . . . . . . . . . . . . . . . . . . . . . . . . . . . . . . . . . . . . . . . . . . . . . . . . . . . . . . . . . . . . . . . . . . . . . 4-5
MX412 . . . . . . . . . . . . . . . . . . . . . . . . . . . . . . . . . . . . . . . . . . . . . . . . . . . . . . . . . . . . . . . . . . . . . . . . . . 4-5
V.35 Port . . . . . . . . . . . . . . . . . . . . . . . . . . . . . . . . . . . . . . . . . . . . . . . . . . . . . . . . . . . . . . . . . . . . . . . . 4-6
DS1 Ports . . . . . . . . . . . . . . . . . . . . . . . . . . . . . . . . . . . . . . . . . . . . . . . . . . . . . . . . . . . . . . . . . . . . . . . . 4-6
Ethernet Ports . . . . . . . . . . . . . . . . . . . . . . . . . . . . . . . . . . . . . . . . . . . . . . . . . . . . . . . . . . . . . . . . . . . . 4-7
Terminal Server Ports . . . . . . . . . . . . . . . . . . . . . . . . . . . . . . . . . . . . . . . . . . . . . . . . . . . . . . . . . . . . . . 4-8
ACO Switch . . . . . . . . . . . . . . . . . . . . . . . . . . . . . . . . . . . . . . . . . . . . . . . . . . . . . . . . . . . . . . . . . . . . . . 4-8
Craft Port . . . . . . . . . . . . . . . . . . . . . . . . . . . . . . . . . . . . . . . . . . . . . . . . . . . . . . . . . . . . . . . . . . . . . . . . 4-8
FXS Port . . . . . . . . . . . . . . . . . . . . . . . . . . . . . . . . . . . . . . . . . . . . . . . . . . . . . . . . . . . . . . . . . . . . . . . . . 4-9
PSU Slots . . . . . . . . . . . . . . . . . . . . . . . . . . . . . . . . . . . . . . . . . . . . . . . . . . . . . . . . . . . . . . . . . . . . . . . . 4-9
LED Indicators . . . . . . . . . . . . . . . . . . . . . . . . . . . . . . . . . . . . . . . . . . . . . . . . . . . . . . . . . . . . . . . . . . . 4-10
Turn-up . . . . . . . . . . . . . . . . . . . . . . . . . . . . . . . . . . . . . . . . . . . . . . . . . . . . . . . . . . . . . . . . . . . . . . . . . . . . . 4-11
Power Up . . . . . . . . . . . . . . . . . . . . . . . . . . . . . . . . . . . . . . . . . . . . . . . . . . . . . . . . . . . . . . . . . . . . . . . 4-11
Section 5
User Interface. . . . . . . . . . . . . . . . . . . . . . . . . . . . . . . . . . . . . . . . . . . . . . . . . . . . . . . . . . . . . . . . . . . 5-1
Introduction . . . . . . . . . . . . . . . . . . . . . . . . . . . . . . . . . . . . . . . . . . . . . . . . . . . . . . . . . . . . . . . . . . . . . . . . . . 5-1
System Management. . . . . . . . . . . . . . . . . . . . . . . . . . . . . . . . . . . . . . . . . . . . . . . . . . . . . . . . . . . . . . . . . . . 5-1
Craft Interface . . . . . . . . . . . . . . . . . . . . . . . . . . . . . . . . . . . . . . . . . . . . . . . . . . . . . . . . . . . . . . . . . . . . 5-1
Telnet Session . . . . . . . . . . . . . . . . . . . . . . . . . . . . . . . . . . . . . . . . . . . . . . . . . . . . . . . . . . . . . . . . . . . . 5-2
Logging in to the MX410/MX412. . . . . . . . . . . . . . . . . . . . . . . . . . . . . . . . . . . . . . . . . . . . . . . . . . . . . . . . . . 5-2
Menu Structure . . . . . . . . . . . . . . . . . . . . . . . . . . . . . . . . . . . . . . . . . . . . . . . . . . . . . . . . . . . . . . . . . . . . . . . 5-3
Menu . . . . . . . . . . . . . . . . . . . . . . . . . . . . . . . . . . . . . . . . . . . . . . . . . . . . . . . . . . . . . . . . . . . . . . . . . . . 5-3
Screen . . . . . . . . . . . . . . . . . . . . . . . . . . . . . . . . . . . . . . . . . . . . . . . . . . . . . . . . . . . . . . . . . . . . . . . . . . 5-3
Menu Layout and Navigation . . . . . . . . . . . . . . . . . . . . . . . . . . . . . . . . . . . . . . . . . . . . . . . . . . . . . . . . . . . .5-4
Menu Tree. . . . . . . . . . . . . . . . . . . . . . . . . . . . . . . . . . . . . . . . . . . . . . . . . . . . . . . . . . . . . . . . . . . . . . . . . . . . 5-5
Menu Descriptions . . . . . . . . . . . . . . . . . . . . . . . . . . . . . . . . . . . . . . . . . . . . . . . . . . . . . . . . . . . . . . . . . . . 5-11
Configuration Screen . . . . . . . . . . . . . . . . . . . . . . . . . . . . . . . . . . . . . . . . . . . . . . . . . . . . . . . . . . . . . . 5-12
Provisioning Menu . . . . . . . . . . . . . . . . . . . . . . . . . . . . . . . . . . . . . . . . . . . . . . . . . . . . . . . . . . . . . . . . 5-14
DS1 Ports Menu . . . . . . . . . . . . . . . . . . . . . . . . . . . . . . . . . . . . . . . . . . . . . . . . . . . . . . . . . . . . . . 5-16
DS1 Provisioning Menu . . . . . . . . . . . . . . . . . . . . . . . . . . . . . . . . . . . . . . . . . . . . . . . . . . . . . . 5-18
Primary Timing Mode Menu . . . . . . . . . . . . . . . . . . . . . . . . . . . . . . . . . . . . . . . . . . . . . . . . . . 5-20
Secondary Timing Mode Menu . . . . . . . . . . . . . . . . . . . . . . . . . . . . . . . . . . . . . . . . . . . . . . . . 5-21
V.35 Port Menu . . . . . . . . . . . . . . . . . . . . . . . . . . . . . . . . . . . . . . . . . . . . . . . . . . . . . . . . . . . . . . . 5-22
Cross-Connect Mapping Menu . . . . . . . . . . . . . . . . . . . . . . . . . . . . . . . . . . . . . . . . . . . . . . . . . . . 5-23
Terminal Server Ports Menu . . . . . . . . . . . . . . . . . . . . . . . . . . . . . . . . . . . . . . . . . . . . . . . . . . . . . 5-25
Terminal Server Port (1 - 4) Menu . . . . . . . . . . . . . . . . . . . . . . . . . . . . . . . . . . . . . . . . . . . . . 5-26
General Provisioning Menu . . . . . . . . . . . . . . . . . . . . . . . . . . . . . . . . . . . . . . . . . . . . . . . . . . . . . . 5-27
Network Management Menu . . . . . . . . . . . . . . . . . . . . . . . . . . . . . . . . . . . . . . . . . . . . . . . . . . . . . 5-29
Ethernet Menu . . . . . . . . . . . . . . . . . . . . . . . . . . . . . . . . . . . . . . . . . . . . . . . . . . . . . . . . . . . . . 5-30
PPP BCP/IPCP Menu . . . . . . . . . . . . . . . . . . . . . . . . . . . . . . . . . . . . . . . . . . . . . . . . . . . . . . . 5-32
DHCP Server Menu . . . . . . . . . . . . . . . . . . . . . . . . . . . . . . . . . . . . . . . . . . . . . . . . . . . . . . . . 5-34
SNMP Menu . . . . . . . . . . . . . . . . . . . . . . . . . . . . . . . . . . . . . . . . . . . . . . . . . . . . . . . . . . . . . . . . . 5-35
SCA Update Menu . . . . . . . . . . . . . . . . . . . . . . . . . . . . . . . . . . . . . . . . . . . . . . . . . . . . . . . . . . . . 5-37
Quick Setup Menu . . . . . . . . . . . . . . . . . . . . . . . . . . . . . . . . . . . . . . . . . . . . . . . . . . . . . . . . . . . . . . . . 5-38
Status Screen . . . . . . . . . . . . . . . . . . . . . . . . . . . . . . . . . . . . . . . . . . . . . . . . . . . . . . . . . . . . . . . . . . . . 5-40
Test Menu . . . . . . . . . . . . . . . . . . . . . . . . . . . . . . . . . . . . . . . . . . . . . . . . . . . . . . . . . . . . . . . . . . . . . . 5-42
DS1 (Port #) Menu . . . . . . . . . . . . . . . . . . . . . . . . . . . . . . . . . . . . . . . . . . . . . . . . . . . . . . . . . . . . . 5-43
Port (#) Test Menu . . . . . . . . . . . . . . . . . . . . . . . . . . . . . . . . . . . . . . . . . . . . . . . . . . . . . . . . . . . . . 5-44
viii PRELIMINARY 61189500L1-1B
Page 9

Contents
DS1 Test Pattern Menu . . . . . . . . . . . . . . . . . . . . . . . . . . . . . . . . . . . . . . . . . . . . . . . . . . . . . . . . . 5-45
Performance Monitoring Menu . . . . . . . . . . . . . . . . . . . . . . . . . . . . . . . . . . . . . . . . . . . . . . . . . . . . . . . 5-46
Daily Performance Monitoring Screen . . . . . . . . . . . . . . . . . . . . . . . . . . . . . . . . . . . . . . . . . . . . . . 5-48
Quarter Hour Performance Monitoring Screen . . . . . . . . . . . . . . . . . . . . . . . . . . . . . . . . . . . . . . . 5-48
Daily PM Thresholds Menu . . . . . . . . . . . . . . . . . . . . . . . . . . . . . . . . . . . . . . . . . . . . . . . . . . . . . . 5-49
Quarter Hour PM Thresholds Menu . . . . . . . . . . . . . . . . . . . . . . . . . . . . . . . . . . . . . . . . . . . . . . . 5-51
Clear PM Data Menu . . . . . . . . . . . . . . . . . . . . . . . . . . . . . . . . . . . . . . . . . . . . . . . . . . . . . . . . . . . 5-52
System Alarms Menu . . . . . . . . . . . . . . . . . . . . . . . . . . . . . . . . . . . . . . . . . . . . . . . . . . . . . . . . . . . . . . 5-53
Master Log Menu . . . . . . . . . . . . . . . . . . . . . . . . . . . . . . . . . . . . . . . . . . . . . . . . . . . . . . . . . . . . . . 5-54
Code Download Method Menu . . . . . . . . . . . . . . . . . . . . . . . . . . . . . . . . . . . . . . . . . . . . . . . . . . . . . . . 5-55
Appendix A
Warranty . . . . . . . . . . . . . . . . . . . . . . . . . . . . . . . . . . . . . . . . . . . . . . . . . . . . . . . . . . . . . . . . . . . . . . . A-1
Warranty and Customer Service . . . . . . . . . . . . . . . . . . . . . . . . . . . . . . . . . . . . . . . . . . . . . . . . . . . . . . . . A-1
ADTRAN Sales . . . . . . . . . . . . . . . . . . . . . . . . . . . . . . . . . . . . . . . . . . . . . . . . . . . . . . . . . . . . . . . . . . . A-1
ADTRAN Technical Support . . . . . . . . . . . . . . . . . . . . . . . . . . . . . . . . . . . . . . . . . . . . . . . . . . . . . . . . . A-1
ADTRAN Repair/CAPS . . . . . . . . . . . . . . . . . . . . . . . . . . . . . . . . . . . . . . . . . . . . . . . . . . . . . . . . . . . . . A-1
Repair and Return Address . . . . . . . . . . . . . . . . . . . . . . . . . . . . . . . . . . . . . . . . . . . . . . . . . . . . . . . . . . A-1
61189500L1-1B PRELIMINARY ix
Page 10

MX410/MX412 System Manual
Figures
Figure 1-1. MX410 Overview . . . . . . . . . . . . . . . . . . . . . . . . . . . . . . . . . . . . . . . . . . . . . . . . . . . . . . . 1-1
Figure 1-2. MX412 Overview . . . . . . . . . . . . . . . . . . . . . . . . . . . . . . . . . . . . . . . . . . . . . . . . . . . . . . . 1-3
Figure 3-1. MX410 Data Path Block Diagram . . . . . . . . . . . . . . . . . . . . . . . . . . . . . . . . . . . . . . . . . . 3-2
Figure 3-2. Drop and Continue Application Diagram . . . . . . . . . . . . . . . . . . . . . . . . . . . . . . . . . . . . .3-3
Figure 3-3. Quick Setup Menu . . . . . . . . . . . . . . . . . . . . . . . . . . . . . . . . . . . . . . . . . . . . . . . . . . . . . . 3-4
Figure 3-4. Drop and Continue Quick Setup Example . . . . . . . . . . . . . . . . . . . . . . . . . . . . . . . . . . . . 3-5
Figure 3-5. Drop and Continue Cross-Connect Mapping Example 1 . . . . . . . . . . . . . . . . . . . . . . . . . 3-5
Figure 3-6. Drop and Continue Cross-Connect Mapping Example 2 . . . . . . . . . . . . . . . . . . . . . . . . . 3-6
Figure 3-7. Drop and Insert Application Diagram . . . . . . . . . . . . . . . . . . . . . . . . . . . . . . . . . . . . . . . . 3-7
Figure 3-8. Quick Setup Menu . . . . . . . . . . . . . . . . . . . . . . . . . . . . . . . . . . . . . . . . . . . . . . . . . . . . . . 3-8
Figure 3-9. Drop and Insert Quick Setup Example . . . . . . . . . . . . . . . . . . . . . . . . . . . . . . . . . . . . . . .3-9
Figure 3-10. Drop and Insert Cross-Connect Mapping Example 1 . . . . . . . . . . . . . . . . . . . . . . . . . . . .3-9
Figure 3-11. Drop and Insert Cross-Connect Mapping Example 2 . . . . . . . . . . . . . . . . . . . . . . . . . . .3-10
Figure 3-12. Drop and Insert Cross-Connect Mapping Example 3 . . . . . . . . . . . . . . . . . . . . . . . . . . .3-10
Figure 3-13. Drop and Insert Cross-Connect Mapping Example 4 . . . . . . . . . . . . . . . . . . . . . . . . . . .3-11
Figure 3-14. Integrated Wireless Access Device Diagram . . . . . . . . . . . . . . . . . . . . . . . . . . . . . . . . . 3-12
Figure 3-15. Bandwidth Efficiency with DS0 Grooming Diagram . . . . . . . . . . . . . . . . . . . . . . . . . . . .3-13
Figure 3-16. Quick Setup Menu . . . . . . . . . . . . . . . . . . . . . . . . . . . . . . . . . . . . . . . . . . . . . . . . . . . . . 3-14
Figure 3-17. Integrated Wireless Access Device Quick Setup Example . . . . . . . . . . . . . . . . . . . . . . 3-15
Figure 3-18. Integrated Wireless Access Device Cross-Connect Map Example 1 . . . . . . . . . . . . . . . 3-15
Figure 3-19. Integrated Wireless Access Device Cross-Connect Map Example 2 . . . . . . . . . . . . . . . 3-16
Figure 3-20. Integrated Wireless Access Device Cross-Connect Map Example 3 . . . . . . . . . . . . . . . 3-16
Figure 3-21. Integrated Wireless Access Device Cross-Connect Map Example 4 . . . . . . . . . . . . . . . 3-17
Figure 3-22. Integrated Wireless Access Device Cross-Connect Map Example 5 . . . . . . . . . . . . . . . 3-17
Figure 3-23. MX410 Remote Management of Other Systems . . . . . . . . . . . . . . . . . . . . . . . . . . . . . . 3-18
Figure 4-1. Rackmount and Wallmount Orientation . . . . . . . . . . . . . . . . . . . . . . . . . . . . . . . . . . . . . . 4-2
Figure 4-2. MX410/MX412 Rear View . . . . . . . . . . . . . . . . . . . . . . . . . . . . . . . . . . . . . . . . . . . . . . . .4-3
Figure 4-3. DC Power Connections . . . . . . . . . . . . . . . . . . . . . . . . . . . . . . . . . . . . . . . . . . . . . . . . . . 4-3
Figure 4-4. Alarm Contacts and AUX Inputs . . . . . . . . . . . . . . . . . . . . . . . . . . . . . . . . . . . . . . . . . . . 4-4
Figure 4-5. MX410 Front Panel . . . . . . . . . . . . . . . . . . . . . . . . . . . . . . . . . . . . . . . . . . . . . . . . . . . . .4-5
Figure 4-6. MX412 Front Panel . . . . . . . . . . . . . . . . . . . . . . . . . . . . . . . . . . . . . . . . . . . . . . . . . . . . .4-5
Figure 5-1. MX410/MX412 Menu Layout . . . . . . . . . . . . . . . . . . . . . . . . . . . . . . . . . . . . . . . . . . . . . .5-4
Figure 5-2. MX410/MX412 Menu Tree . . . . . . . . . . . . . . . . . . . . . . . . . . . . . . . . . . . . . . . . . . . . . . . .5-6
Figure 5-3. MX410/MX412 Menu Tree (Continued) . . . . . . . . . . . . . . . . . . . . . . . . . . . . . . . . . . . . . 5-10
Figure 5-4. MX410/MX412 Main Menu . . . . . . . . . . . . . . . . . . . . . . . . . . . . . . . . . . . . . . . . . . . . . . .5-11
Figure 5-5. Configuration Screen . . . . . . . . . . . . . . . . . . . . . . . . . . . . . . . . . . . . . . . . . . . . . . . . . . . 5-12
Figure 5-6. Provisioning Menu . . . . . . . . . . . . . . . . . . . . . . . . . . . . . . . . . . . . . . . . . . . . . . . . . . . . .5-14
Figure 5-7. DS1 Ports Menu . . . . . . . . . . . . . . . . . . . . . . . . . . . . . . . . . . . . . . . . . . . . . . . . . . . . . . . 5-16
Figure 5-8. DS1 Ports Menu - Toggled . . . . . . . . . . . . . . . . . . . . . . . . . . . . . . . . . . . . . . . . . . . . . . .5-16
Figure 5-9. DS1 Provisioning Menu . . . . . . . . . . . . . . . . . . . . . . . . . . . . . . . . . . . . . . . . . . . . . . . . .5-18
Figure 5-10. Primary Timing Mode Menu . . . . . . . . . . . . . . . . . . . . . . . . . . . . . . . . . . . . . . . . . . . . . .5-21
Figure 5-11. Secondary Timing Mode Menu . . . . . . . . . . . . . . . . . . . . . . . . . . . . . . . . . . . . . . . . . . . 5-22
Figure 5-12. V.35 Port Menu . . . . . . . . . . . . . . . . . . . . . . . . . . . . . . . . . . . . . . . . . . . . . . . . . . . . . . .5-23
Figure 5-13. Cross-Connect Mapping Menu . . . . . . . . . . . . . . . . . . . . . . . . . . . . . . . . . . . . . . . . . . . 5-24
Figure 5-14. Cross-Connect Mapping - Ports Menu . . . . . . . . . . . . . . . . . . . . . . . . . . . . . . . . . . . . . . 5-24
Figure 5-15. Terminal Server Ports Menu . . . . . . . . . . . . . . . . . . . . . . . . . . . . . . . . . . . . . . . . . . . . .5-27
Figure 5-16. Terminal Server Port 1 Menu . . . . . . . . . . . . . . . . . . . . . . . . . . . . . . . . . . . . . . . . . . . . .5-28
Figure 5-17. General Provisioning Menu . . . . . . . . . . . . . . . . . . . . . . . . . . . . . . . . . . . . . . . . . . . . . . 5-29
x PRELIMINARY 61189500L1-1B
Page 11

Contents
Figure 5-18. Network Management Menu . . . . . . . . . . . . . . . . . . . . . . . . . . . . . . . . . . . . . . . . . . . . . 5-31
Figure 5-19. Ethernet Menu . . . . . . . . . . . . . . . . . . . . . . . . . . . . . . . . . . . . . . . . . . . . . . . . . . . . . . . . 5-32
Figure 5-20. PPP BCP/IPCP Menu . . . . . . . . . . . . . . . . . . . . . . . . . . . . . . . . . . . . . . . . . . . . . . . . . .5-34
Figure 5-21. DHCP Server Menu . . . . . . . . . . . . . . . . . . . . . . . . . . . . . . . . . . . . . . . . . . . . . . . . . . . . 5-35
Figure 5-22. SNMP Menu . . . . . . . . . . . . . . . . . . . . . . . . . . . . . . . . . . . . . . . . . . . . . . . . . . . . . . . . . . 5-36
Figure 5-23. SCA Update Menu . . . . . . . . . . . . . . . . . . . . . . . . . . . . . . . . . . . . . . . . . . . . . . . . . . . . .5-37
Figure 5-24. Quick Setup Menu . . . . . . . . . . . . . . . . . . . . . . . . . . . . . . . . . . . . . . . . . . . . . . . . . . . . . 5-38
Figure 5-25. Status Menu . . . . . . . . . . . . . . . . . . . . . . . . . . . . . . . . . . . . . . . . . . . . . . . . . . . . . . . . . .5-40
Figure 5-26. Test Menu . . . . . . . . . . . . . . . . . . . . . . . . . . . . . . . . . . . . . . . . . . . . . . . . . . . . . . . . . . . 5-42
Figure 5-27. DS1 (Port #) Menu . . . . . . . . . . . . . . . . . . . . . . . . . . . . . . . . . . . . . . . . . . . . . . . . . . . . .5-43
Figure 5-28. Port (#) Test Menu . . . . . . . . . . . . . . . . . . . . . . . . . . . . . . . . . . . . . . . . . . . . . . . . . . . . . 5-44
Figure 5-29. DS1 Test Pattern Menu . . . . . . . . . . . . . . . . . . . . . . . . . . . . . . . . . . . . . . . . . . . . . . . . . 5-45
Figure 5-30. Performance Monitoring Menu . . . . . . . . . . . . . . . . . . . . . . . . . . . . . . . . . . . . . . . . . . . . 5-46
Figure 5-31. Daily Performance Monitoring Screen . . . . . . . . . . . . . . . . . . . . . . . . . . . . . . . . . . . . . . 5-48
Figure 5-32. Quarter Hour Performance Monitoring Screen . . . . . . . . . . . . . . . . . . . . . . . . . . . . . . . 5-48
Figure 5-33. Daily PM Thresholds Menu . . . . . . . . . . . . . . . . . . . . . . . . . . . . . . . . . . . . . . . . . . . . . .5-49
Figure 5-34. Quarter Hour PM Thresholds Menu . . . . . . . . . . . . . . . . . . . . . . . . . . . . . . . . . . . . . . . . 5-50
Figure 5-35. System Alarms Menu . . . . . . . . . . . . . . . . . . . . . . . . . . . . . . . . . . . . . . . . . . . . . . . . . . . 5-51
Figure 5-36. Master Log Menu . . . . . . . . . . . . . . . . . . . . . . . . . . . . . . . . . . . . . . . . . . . . . . . . . . . . . .5-52
Figure 5-37. Code Download Method Menu . . . . . . . . . . . . . . . . . . . . . . . . . . . . . . . . . . . . . . . . . . . . 5-53
Tables
Table 1. MX410 and MX412 Compliance Codes . . . . . . . . . . . . . . . . . . . . . . . . . . . . . . . . . . . . . . . iv
Table 2. MX410 Power Supply Unit Compliance Codes . . . . . . . . . . . . . . . . . . . . . . . . . . . . . . . . . iv
Table 2-1. Current Draw at –48 VDC and ±24 VDC . . . . . . . . . . . . . . . . . . . . . . . . . . . . . . . . . . . . . 2-1
Table 2-2. Fuse Recommendations . . . . . . . . . . . . . . . . . . . . . . . . . . . . . . . . . . . . . . . . . . . . . . . . .2-1
Table 2-3. Heat Dissipation at –48 VDC and ±24 VDC . . . . . . . . . . . . . . . . . . . . . . . . . . . . . . . . . . .2-2
Table 3-1. Drop and Continue Application - Required Equipment . . . . . . . . . . . . . . . . . . . . . . . . . . 3-3
Table 3-2. Drop and Insert Application - Required Equipment . . . . . . . . . . . . . . . . . . . . . . . . . . . . .3-7
Table 3-3. Integrated Wireless Access Device Application - Required Equipment . . . . . . . . . . . . . 3-13
Table 3-4. Remote Management Application - Required Equipment . . . . . . . . . . . . . . . . . . . . . . . 3-18
Table 4-1. AUX Inputs 1-9 Pin List . . . . . . . . . . . . . . . . . . . . . . . . . . . . . . . . . . . . . . . . . . . . . . . . . .4-4
Table 4-2. V.35 Port Pin List . . . . . . . . . . . . . . . . . . . . . . . . . . . . . . . . . . . . . . . . . . . . . . . . . . . . . . .4-6
Table 4-3. RJ-48 Connector Pin List . . . . . . . . . . . . . . . . . . . . . . . . . . . . . . . . . . . . . . . . . . . . . . . . . 4-6
Table 4-4. Ethernet Port Pin List . . . . . . . . . . . . . . . . . . . . . . . . . . . . . . . . . . . . . . . . . . . . . . . . . . . .4-7
Table 4-5. Terminal Server Port Pin List . . . . . . . . . . . . . . . . . . . . . . . . . . . . . . . . . . . . . . . . . . . . . . 4-8
Table 4-6. FXS Options . . . . . . . . . . . . . . . . . . . . . . . . . . . . . . . . . . . . . . . . . . . . . . . . . . . . . . . . . . . 4-9
Table 4-7. LED Indication . . . . . . . . . . . . . . . . . . . . . . . . . . . . . . . . . . . . . . . . . . . . . . . . . . . . . . . . 4-10
Table 5-1. MX410/MX412 Keyboard Commands . . . . . . . . . . . . . . . . . . . . . . . . . . . . . . . . . . . . . . .5-5
Table 5-2. MX410/MX412 Main Menu Options . . . . . . . . . . . . . . . . . . . . . . . . . . . . . . . . . . . . . . . . 5-11
Table 5-3. MX410/MX412 Configuration Screen Fields . . . . . . . . . . . . . . . . . . . . . . . . . . . . . . . . . 5-13
Table 5-4. Provisioning Menu Options . . . . . . . . . . . . . . . . . . . . . . . . . . . . . . . . . . . . . . . . . . . . . .5-15
Table 5-5. DS1 Ports Menu Options . . . . . . . . . . . . . . . . . . . . . . . . . . . . . . . . . . . . . . . . . . . . . . . .5-17
Table 5-6. DS1 Provisioning Menu Options . . . . . . . . . . . . . . . . . . . . . . . . . . . . . . . . . . . . . . . . . . 5-19
Table 5-7. Primary Timing Mode Menu Options . . . . . . . . . . . . . . . . . . . . . . . . . . . . . . . . . . . . . . . 5-21
Table 5-8. Secondary Timing Mode Menu Options . . . . . . . . . . . . . . . . . . . . . . . . . . . . . . . . . . . . .5-22
Table 5-9. V.35 Port Menu Options . . . . . . . . . . . . . . . . . . . . . . . . . . . . . . . . . . . . . . . . . . . . . . . . . 5-23
61189500L1-1B PRELIMINARY xi
Page 12

MX410/MX412 System Manual
Table 5-10. Cross-Connect Mapping Menu Options . . . . . . . . . . . . . . . . . . . . . . . . . . . . . . . . . . . . . 5-25
Table 5-11. Performance Monitoring Definitions . . . . . . . . . . . . . . . . . . . . . . . . . . . . . . . . . . . . . . . . 5-46
xii PRELIMINARY 61189500L1-1B
Page 13
Section 1
Introduction
PRODUCT OVERVIEW
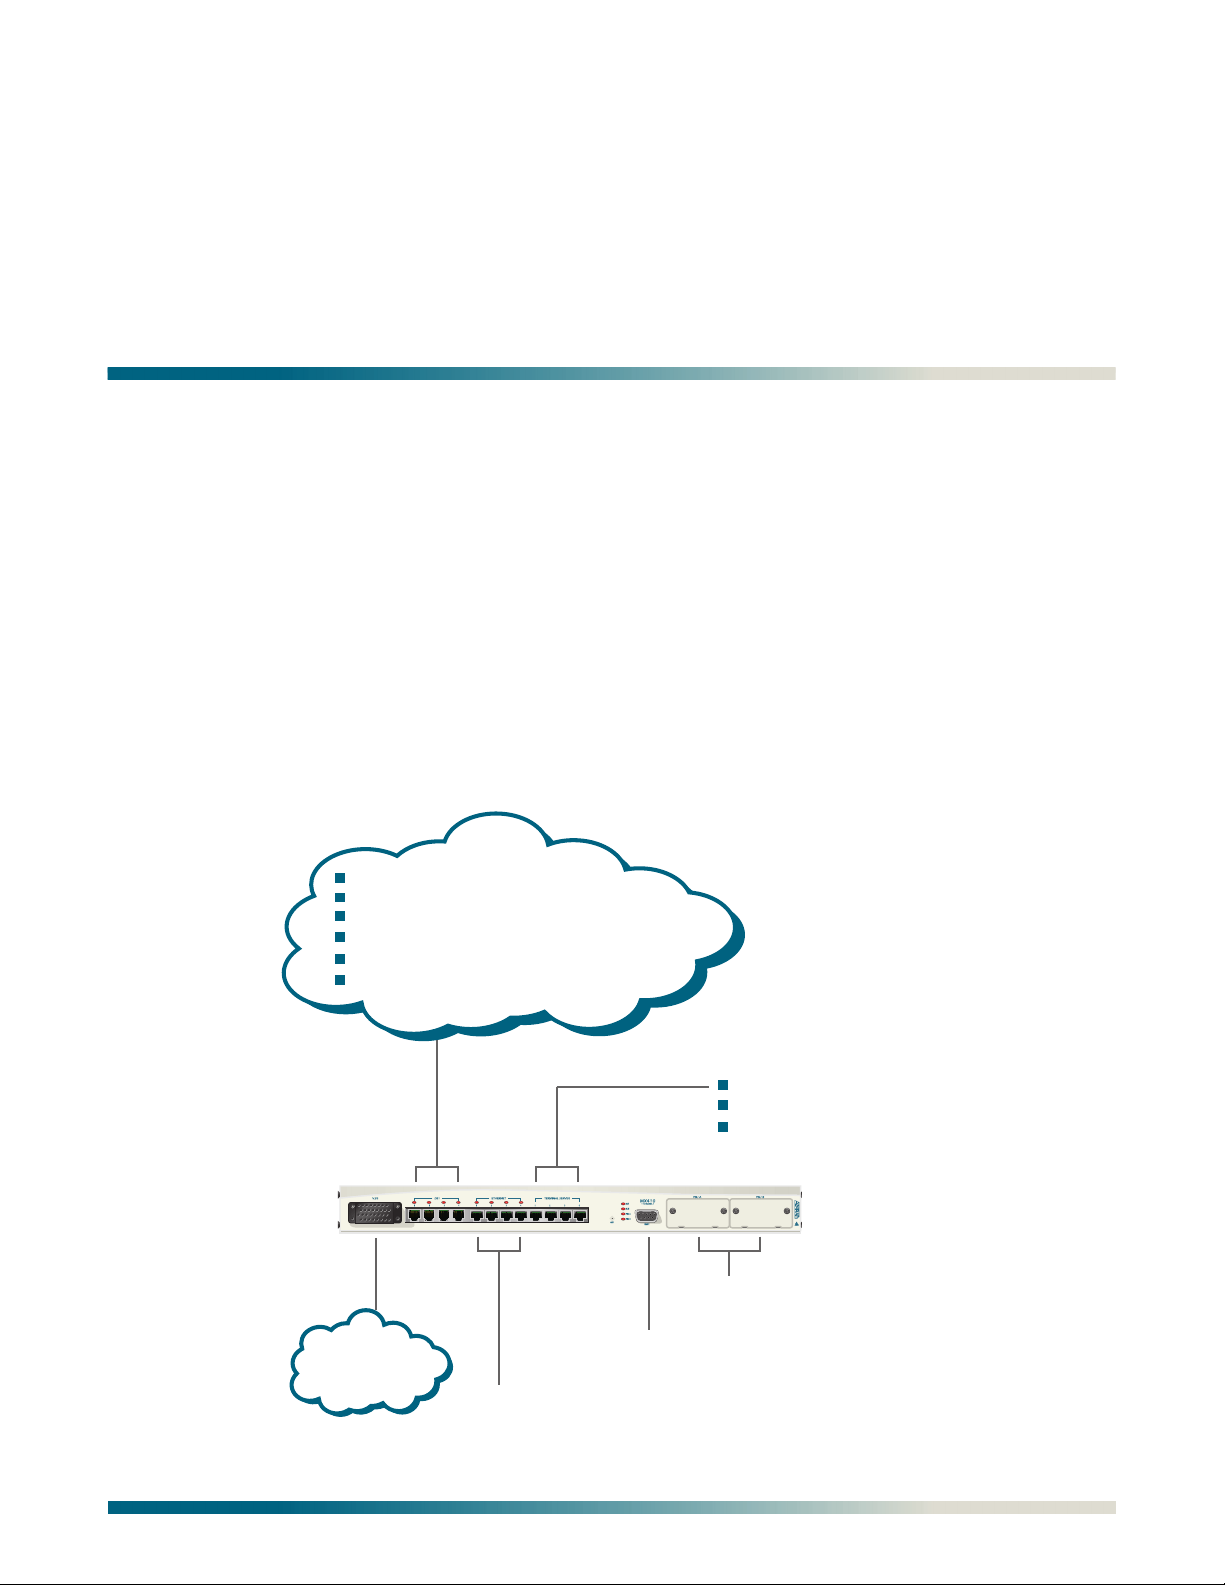
The MX410/MX412 delivers full DS0 control to service locations, allowing carriers full utilization of DS1 bandwidth. The MX410 interfaces to four long-haul outside plant protected
DS1s via RJ-48 connectors, while the MX412 interfaces to 12 DS1s. Data and management on
the DS1s can be cross connected on a non-blocking per-DS0 basis to any DS1, V.35 port, and
four PPP ports. Data Ethernet connectivity is provided via four PPP connections used for
Ethernet network extension throughout the network and Telnet-based terminal server ports.
The MX410 houses up to two hot-swappable Power Supply Units (PSU) that provide power
redundancy when two units are deployed. At least one MX410 PSU (P/N 1189501L1) must be
inserted into the MX410 for the MX410 to function. The MX412 has an internal PSU.
See Figure 1-1 and Figure 1-2 on page 1-3 for overview diagrams.
Digital Radios Data
Analog Radios Data
Grooming of DS0S
LAN Extension over PPP for Remote Management
Star Configuration of Backhaul
Backhaul
4 x DS1
(I/O)
V.35
E911, etc.
4 x 10/100 Ethernet
4 x RS-232
DB-9 Craft Interface
Figure 1-1. MX410 Overview
Battery Backup
HVAC
Backhaul Radio Management
Redundant Power
Capability
61189500L1-1B PRELIMINARY 1-1
Page 14

Product Overview MX410/MX412 System Manual
The major features of the MX410/MX412 are as follows:
• 19-inch wall mounting or rack mounting, one rack unit high
• Front panel data connections
•One V.35 port
• Four RJ-45 long-haul DS1 connections (12 on the MX412) with outside plant protection
• A four-port Ethernet switch
• Non-Blocking DS0 cross connect between all DS1 interfaces and the V.35 port
• RJ-45 10Base-T Ethernet connection
• Terminal server functionality
• FXS port (MX412 only)
• DB-9 craft interface for access to Provisioning, Status, Test, and Alarm menus
• Management via Telnet over Ethernet connection or VT100 through a local RS-232, DB-9,
craft port
• End-to-end Ethernet extension over multiple T1s
• Robbed Bit Signaling (RBS) supported on a per DS0 basis
• Hot-swappable PSUs with 1:1 redundancy (MX410 only)
• Independent power feeds with separate returns
• Accepts redundant ±60 to ±22 VDC inputs
• Wire-wrap pins for alarms
• Manual and remote initiated loopback modes
• Meets NEBS Level 3
• Comprehensive test features
1-2 PRELIMINARY 61189500L1-1B
Page 15
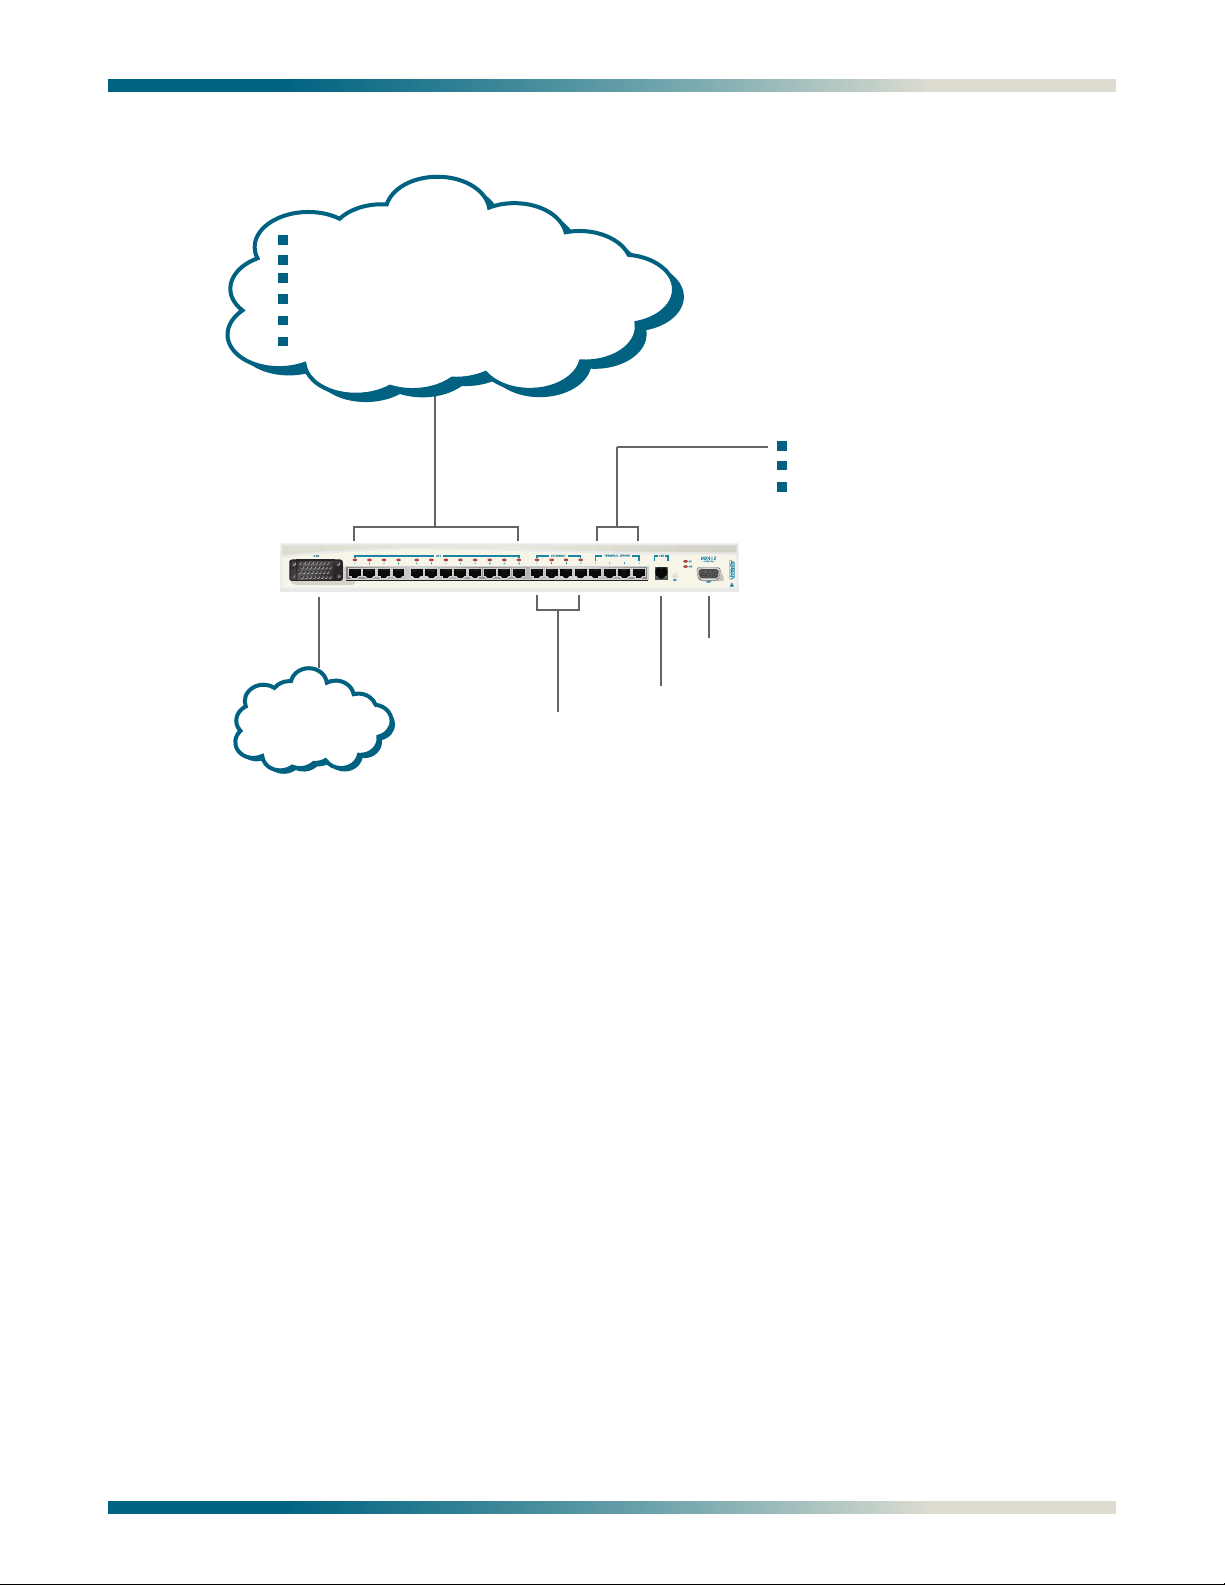
MX410/MX412 System Manual Product Overview
Digital Radios Data
Analog Radios Data
Grooming of DS0S
LAN Extension over PPP for Remote Management
Star Configuration of Backhaul
Backhaul
V.35
E911, etc.
12 x T1
(I/O)
4 x 10/100 Ethernet
4 x RS-232
DB-9 Craft Interface
FXS
Figure 1-2. MX412 Overview
Battery Backup
HVAC
Backhaul Radio Management
61189500L1-1B PRELIMINARY 1-3
Page 16

Product Overview MX410/MX412 System Manual
This page is intentionally blank.
1-4 PRELIMINARY 61189500L1-1B
Page 17

Section 2
Engineering Guidelines
GENERAL
This section provides engineering guidelines for network designers who are incorporating an
MX410 or MX412 system into their network.
POWER REQUIREMENTS
Table 2-1 provides the current draw at –48 VDC (operating range of –42 VDC to –60 VDC) and
±24 VDC (operating range of ±22 VDC to ±27 VDC) with redundant PSUs installed.
Table 2-1. Current Draw at –48 VDC and ±24 VDC
Part Number Equipment Maximum Current Draw
at –48 VDC
1189500L1 MX410 0.23 amps 0.41 amps
1189512L1 MX412 0.36 amps 0.76 amps
Table 2-2 provides data for determining the recommended fuse for the fuse and alarm panel
that services the MX410/MX412.
Table 2-2. Fuse Recommendations
System Voltage Recommended Fuse
–48 VDC 2 amps, slow-blow
±24 VDC 2 amps, slow-blow
Maximum Current Draw
at ±24 VDC
61189500L1-1B PRELIMINARY 2-1
Page 18

Power Dissipation MX410/MX412 System Manual
POWER DISSIPATION
Table 2-3 provides the heat dissipation data at –48 VDC (operating range of –42 VDC to
–60 VDC) and ±24 VDC (operating range of ±22 VDC to ±27 VDC) with redundant PSUs
installed (MX410 only).
Table 2-3. Heat Dissipation at –48 VDC and ±24 VDC
Part Number Equipment Heat Dissipation
at –48 VDC
1189500L1 MX410 11.8 watts 10.5 watts
1189512L1 MX412 17.3 watts 18.2 watts
Heat Dissipation
at ±24 VDC
2-2 PRELIMINARY 61189500L1-1B
Page 19

Section 3
Application Guidelines
INTRODUCTION
This section describes several applications for the MX410/MX412 system. For each application there is a figure illustrating the application, a list of the equipment needed, and an
explanation of the basic setup. The MX410 block diagram shows the data path of an MX410
system that implements the following applications:
• “Drop and Continue Application” on page 3-3
• “Drop and Insert Application” on page 3-7
• “Integrated Wireless Access Device or DS0 Grooming” on page 3-12
• “Remote Management of Other Systems using Terminal Server Ports and Ethernet
Connectivity” on page 3-18
61189500L1-1B PRELIMINARY 3-1
Page 20
MX410/MX412 System Manual
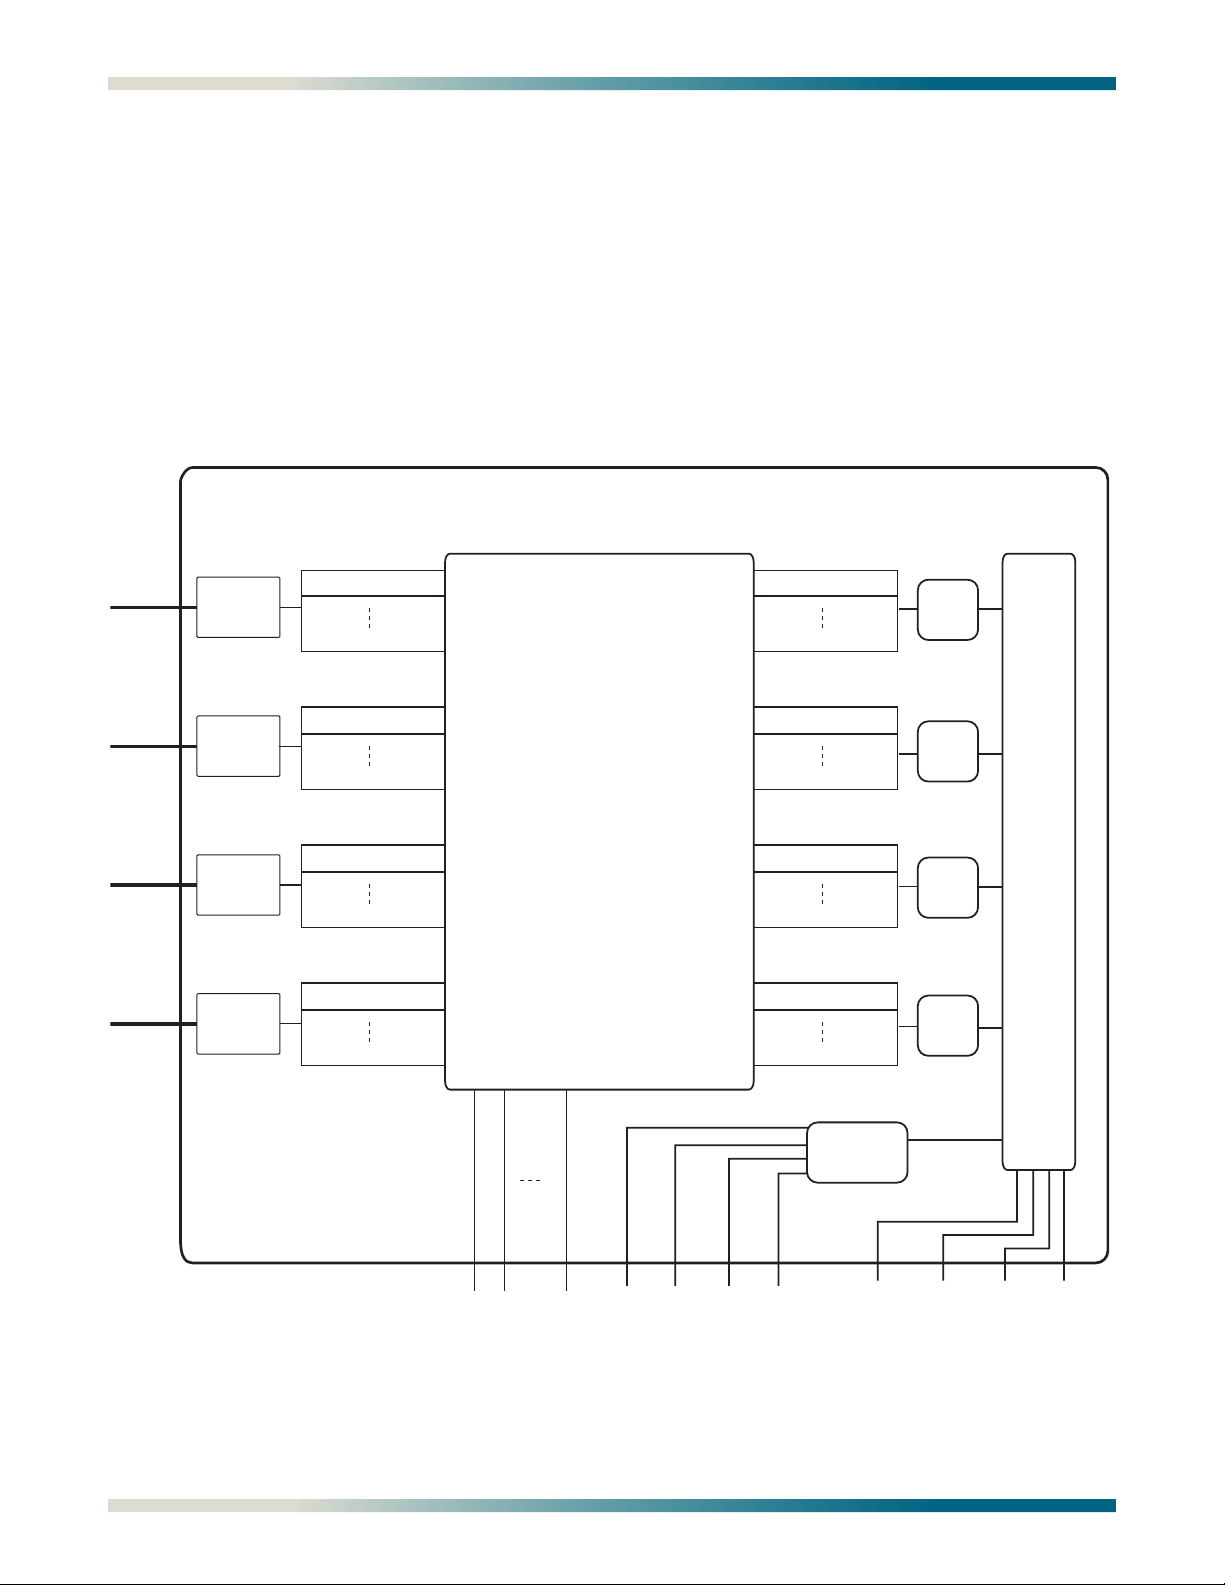
MX410 DATA PATH BLOCK DIAGRAM
As shown in Figure 3-1, the MX410/MX412 contains a 1/0 cross connect that allows DS0s to
be mapped between four DS1s (12 DS1s on the MX412), four PPP ports, and a V.35 port. Refer
to “PPP BCP/IPCP Menu” on page 5-32 for more information about using PPP.
Any DS0 in DS1 1 can be mapped to any DS0 in DS1 1-4, or any PPP port, or the V.35 port.
Any unmapped DS0 in a DS1 is filled with all ones. Therefore, if an entire T1 is unmapped,
framed all ones are sent.
The default mapping of the 1/0 cross connect is for all the DS1s to be unmapped and transmitting framed all ones. No DS0s are dropped to the PPP or V.35 ports.
MX410
DS1 1
DS1 2
DS1 3
DS1 4
DS1
Framer
DS1
Framer
DS1
Framer
DS1
Framer
DS1 1 DS0 # 1
DS1 1 DS0 # 2
DS1 1 DS0 # 24
DS1 2 DS0 # 1
DS1 2 DS0 # 2
DS1 2 DS0 # 24
DS1 3 DS0 # 1
DS1 3 DS0 # 2
DS1 3 DS0 # 24
DS1 4 DS0 # 1
DS1 4 DS0 # 2
DS1 4 DS0 # 24
1/0 Cross Connect
PPP 1 DS0 # 1
PPP 1 DS0 # 2
PPP 1
PPP 1 DS0 # 24
PPP 2 DS0 # 1
PPP 2 DS0 # 2
PPP 2
PPP 2 DS0 # 24
PPP 3 DS0 # 1
PPP 3 DS0 # 2
PPP 3
PPP 3 DS0 # 24
Ethernet Switch
PPP 4 DS0 # 1
PPP 4 DS0 # 2
PPP 4
PPP 4 DS0 # 24
MX410 IP
V.35 Port DS0 # 1
V.35 Port DS0 # 2
V.35 Port TS 1 TS 2 TS 3 TS 4 ETH 1 ETH 2 ETH 3 ETH 4
V.35 Port DS0 # 24
Figure 3-1. MX410 Data Path Block Diagram
3-2 PRELIMINARY 61189500L1-1B
Page 21
MX410/MX412 System Manual Drop and Continue Application
Drop and Continue Application
The following applies to Remote Site #1 shown in Figure 3-2. In the Drop and Continue Application, any combination of DS0s from one DS1 can be dropped out the other DS1 ports with
the remaining DS0s continuing through to the other DS1 interface. This enables the
bandwidth of one DS1 to deliver DS0s to several sites using one MX410 at each site.
Central
Site
24 DS0s
from Central Site
DS1
µ Wave/
Leased
DS1
Remote
Site #1
MX410
DS1
DS1
Drop DS0s
to Local
Equipment
Switch
V.35
DS1 DS1 DS1DS1 DS1
ETH1
Drop DS0s
to PPP to
Control
Local
Equipment
via Ethernet
Original DS0s
Continue
Downstream;
All Ones in
Unmapped DS0s
DS1
µ Wave/
Leased
DS1
MX410
DS1
DS1
Drop DS0s
to Local
Equipment
Remote
Site #2
V.35
Switch
ETH1
Drop DS0s
to PPP to
Control
Local
Equipment
via Ethernet
Original DS0s
Continue
Downstream;
All Ones in
Unmapped DS0s
DS1
µ Wave/
Leased
DS1
Figure 3-2. Drop and Continue Application Diagram
The equipment needed for a Drop and Continue application is shown in Table 3-1.
Table 3-1. Drop and Continue Application - Required Equipment
Part Number Equipment Quantity
1189500L1
or
1189512L1
1189501L1 MX410 PSU (MX410 only) 1 (2 for redundancy)
61189500L1-1B PRELIMINARY 3-3
MX410
MX412
1
1
Page 22

Drop and Continue Application MX410/MX412 System Manual
Setup
Connect the incoming DS1 (the DS1 from which the DS0s are dropped) to the DS1 1 RJ.
Connect the outgoing DS1 to the DS1 2 RJ. Connect the other DS1s using the RJ connector
on the front panel. For more information, refer to “DS1 Ports” on page 4-6.
Starting from the default blank mapping, the DS0s can be dropped using the Quick Setup
menu to the PPP and V.35 ports (see Figure 3-3). Select each port (PPP1-4, V.35) to which a
DS0 needs to be dropped from the incoming DS1. For each port, select the range of DS0s in
DS1 1 to be dropped to that port. To drop DS0s to the other DS1 ports, use the Quick Setup
menu to navigate to the Cross-Connect Mapping menu. Select the Map Multiple DS0’s option
and then select the range of DS0 and DS1 1 to be dropped to DS1 2 and enable Robbed Bit
Signaling if applicable.
Any un-mapped DS0s from the incoming DS1 will transmit All Ones. The incoming DS1 does
not have to be DS1 1, but is used only as an example.
The following four figures show an example of setting up a drop and continue application.
Figure 3-3 shows the Quick Setup menu before any DS0s have been dropped.
MX410 MM/DD/YY HH:MM
Active Alarms: CRITICAL MINOR ID: MX410
Quick Setup
Ports
1 - PPPs
PPP 1 = DS1 4 DS0 #1
2 - V.35 =
System
3 - System ID
4 - IP Address : 192.168.100.1
Subnet Mask : 255.255.0.0
5 - Default Gateway : 192.168.1.1
6 - Date
7 - Time 8 - Cross-Connect Mapping
Selection : '?' - System Help Screen
Figure 3-3. Quick Setup Menu
3-4 PRELIMINARY 61189500L1-1B
Page 23

MX410/MX412 System Manual Drop and Continue Application
Figure 3-4 shows the Quick Setup menu after DS0s 21-22 have been dropped from DS1 1 to
PPP1, DS0s 23-24 have been dropped from DS1 1 to the V.35 port.
MX410 MM/DD/YY HH:MM
Active Alarms: CRITICAL MINOR ID: MX410
Quick Setup
Ports
1 - PPPs
PPP 1 = DS1 4 DS0 #1
2 - V.35 =
System
3 - System ID
4 - IP Address : 192.168.100.1
Subnet Mask : 255.255.0.0
5 - Default Gateway : 192.168.1.1
6 - Date
7 - Time 8 - Cross-Connect Mapping
Selection : '?' - System Help Screen
Figure 3-4. Drop and Continue Quick Setup Example
Figure 3-5 shows the DS1 1 Cross-Connect Mapping menu after the PPP1 and V.35 interface
have been mapped.
MX410 MM/DD/YY HH:MM
Active Alarms: CRITICAL ID: MX410
Cross-Connect Mapping
DS1 1
1 - DS0 #1 = 13 - DS0 #13 =
2 - DS0 #2 = 14 - DS0 #14 =
3 - DS0 #3 = 15 - DS0 #15 =
4 - DS0 #4 = 16 - DS0 #16 =
5 - DS0 #5 = 17 - DS0 #17 =
6 - DS0 #6 = 18 - DS0 #18 =
7 - DS0 #7 = 19 - DS0 #19 =
8 - DS0 #8 = 20 - DS0 #20 =
9 - DS0 #9 = 21 - DS0 #21 = PPP 1
10 - DS0 #10 = 22 - DS0 #22 = PPP 1
11 - DS0 #11 = 23 - DS0 #23 = V.35
12 - DS0 #12 = 24 - DS0 #24 = V.35
(T)oggle View (DS1 2, DS1 3, DS1 4, Ports) 25 - Map Multiple DS0's
Selection : '?' - System Help Screen
Figure 3-5. Drop and Continue Cross-Connect Mapping Example 1
61189500L1-1B PRELIMINARY 3-5
Page 24

Drop and Continue Application MX410/MX412 System Manual
Figure 3-6 shows the Cross-Connect Mapping menu after the remaining DS0s have been
continued to DS1 2 as well as 4 DS0s (13-16) dropped to DS1 3 (1-4) and four other DS0s
(17-20) dropped to DS1 4 (1-4).
MX410 MM/DD/YY HH:MM
Active Alarms: CRITICAL MINOR ID: MX410
Cross-Connect Mapping
DS1 1
1 - DS0 #1 = DS1 2 DS0 #1 13 - DS0 #13 = DS1 3 DS0 #1
2 - DS0 #2 = DS1 2 DS0 #2 14 - DS0 #14 = DS1 3 DS0 #2
3 - DS0 #3 = DS1 2 DS0 #3 15 - DS0 #15 = DS1 3 DS0 #3
4 - DS0 #4 = DS1 2 DS0 #4 16 - DS0 #16 = DS1 3 DS0 #4
5 - DS0 #5 = DS1 2 DS0 #5 17 - DS0 #17 = DS1 4 DS0 #1
6 - DS0 #6 = DS1 2 DS0 #6 18 - DS0 #18 = DS1 4 DS0 #2
7 - DS0 #7 = DS1 2 DS0 #7 19 - DS0 #19 = DS1 4 DS0 #3
8 - DS0 #8 = DS1 2 DS0 #8 20 - DS0 #20 = DS1 4 DS0 #4
9 - DS0 #9 = DS1 2 DS0 #9 21 - DS0 #21 = PPP 1
10 - DS0 #10 = DS1 2 DS0 #10 22 - DS0 #22 = PPP 1
11 - DS0 #11 = DS1 2 DS0 #11 23 - DS0 #23 = V.35
12 - DS0 #12 = DS1 2 DS0 #12 24 - DS0 #24 = V.35
(T)oggle View (DS1 2, DS1 3, DS1 4, Ports) 25 - Map Multiple DS0's
Selection : '?' - System Help Screen
Figure 3-6. Drop and Continue Cross-Connect Mapping Example 2
3-6 PRELIMINARY 61189500L1-1B
Page 25
MX410/MX412 System Manual Drop and Insert Application
Drop and Insert Application
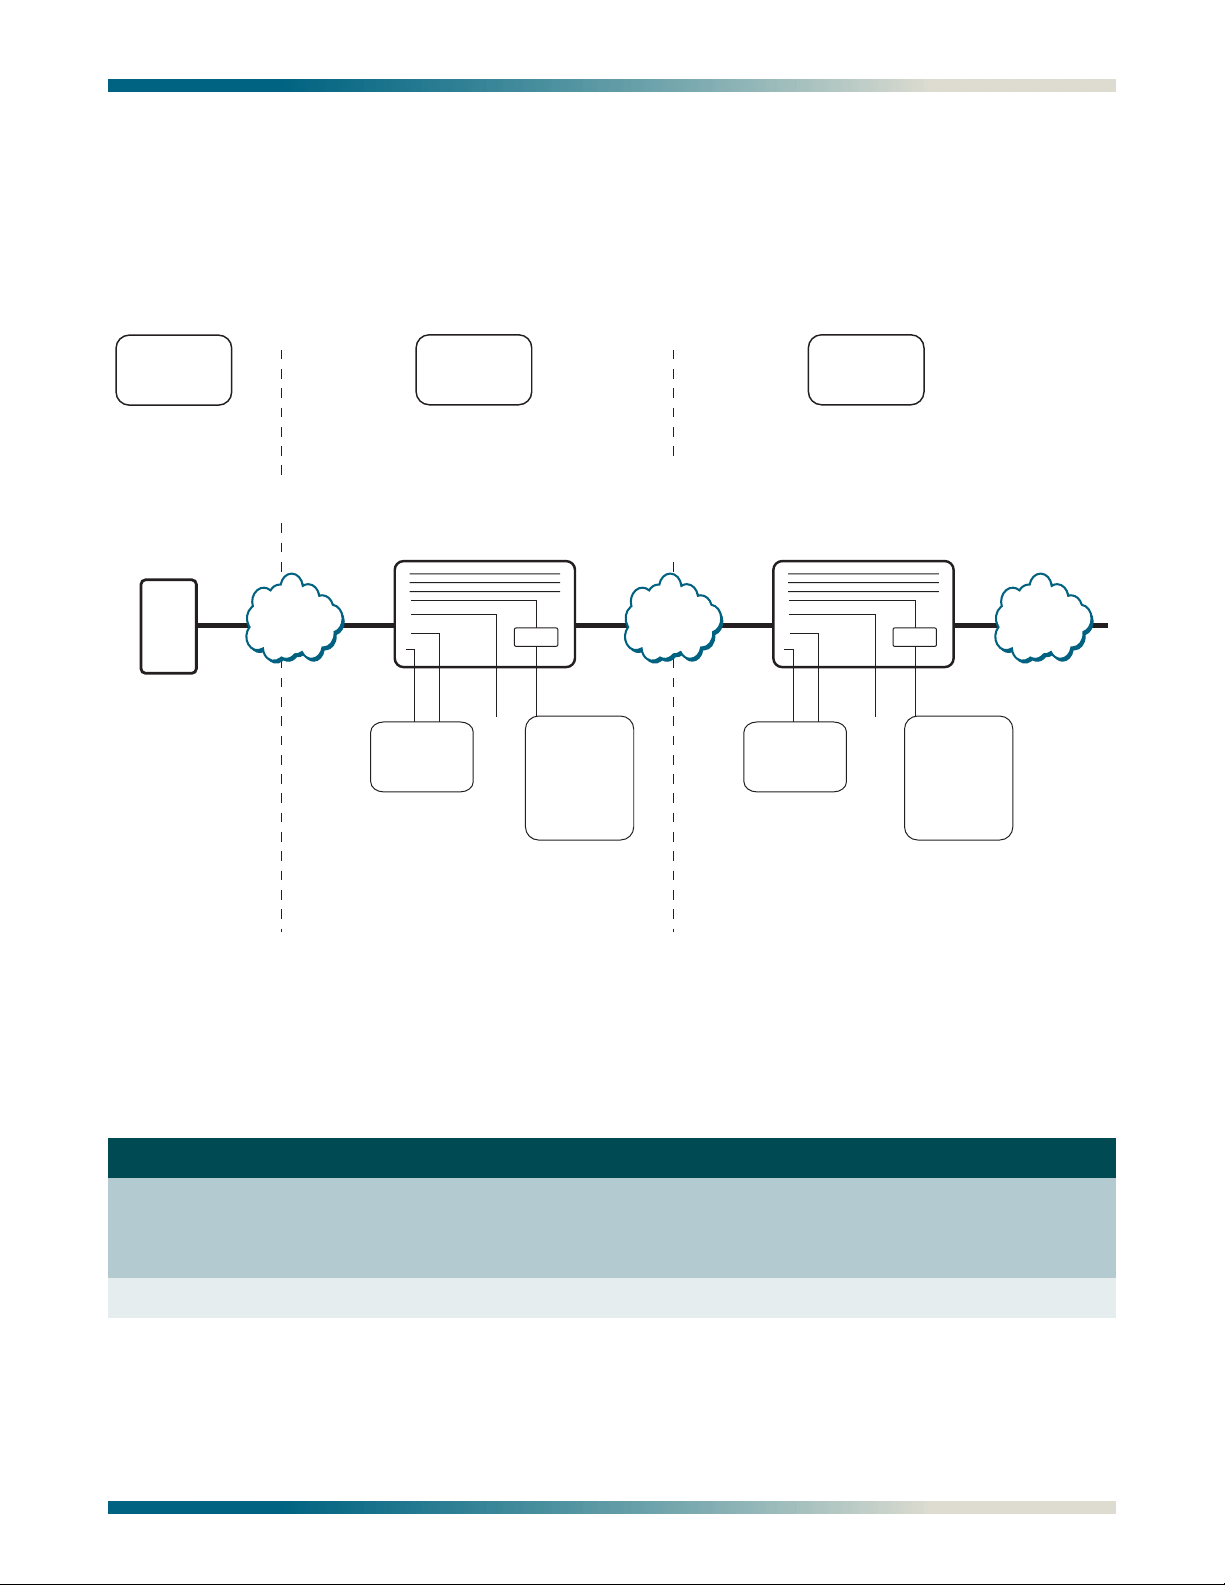
The following applies to Remote Site #1 shown in Figure 3-7. In the Drop and Insert Application DS0s from one DS1 can be dropped out to the other DS1 ports. Then, DS0s from the
other DS1 ports can be inserted into the corresponding DS0s in the other DS1. In the example
shown, any DS0 not dropped will be mapped to continue on from one DS1 to another. This
allows a DS1 to be used to transport DS0s between several sites.
Central
Site
24 DS0s
from Central Site
DS1
µ Wave/
Leased
DS1
to/from Local
Equipment
Figure 3-7. Drop and Insert Application Diagram
DS0s
Remote
Site #1
MX410
DS1
DS1
Switch
ETH1
V.35
Drop DS0s
to PPP to
Control
Local
Equipment
via Ethernet
Insert DS0s
from
PPP to Continue
Ethernet Path
Conserving
Bandwidth
Original DS0s
Continue
Downstream;
All Ones in
Unmapped DS0s
DS1
DS1 DS1 DS1DS1 DS1
µ Wave/
Leased
DS1
MX410
DS1
DS1
DS0s
to/from Local
Equipment
Remote
Site #2
V.35
Switch
ETH1
Drop DS0s
to PPP to
Control
Local
Equipment
via Ethernet
Insert DS0s
from
PPP to Continue
Ethernet Path
Conserving
Bandwidth
Original DS0s
Continue
Downstream;
All Ones in
Unmapped DS0s
DS1
µ Wave/
Leased
DS1
The equipment needed for a Drop and Insert application is shown in Table 3-2.
Table 3-2. Drop and Insert Application - Required Equipment
Part # Equipment Quantity
1189500L1
or
1189512L1
1189501L1 MX410 PSU (MX410 only) 1 (2 for redundancy)
61189500L1-1B PRELIMINARY 3-7
MX410
MX412
1
1
Page 26

Drop and Insert Application MX410/MX412 System Manual
Setup
Connect the DS1 from which the DS0s will be dropped to the DS1 1 RJ. Connect the other
DS1 to which the DS0s will be inserted to the DS1 2 RJ. Connect the other DS1s using the
other RJ connectors on the front panel. For more information, refer to “DS1 Ports” on page 4-6
Starting from the default mapping the DS0s can be dropped and inserted using the Quick
Setup menu (see Figure 5-24 on page 5-38). Select each port (1-5) to which a DS0 needs to be
dropped from the incoming DS1. For each port select the DS0(s) in DS1 1 to be dropped to
that port. Then, select each port and DS0 that needs to be inserted into the other DS1. For
each DS0 to be inserted select the DS0 in DS1 2 to insert that DS0. Using the Cross-Connect
Mapping menu, select each DS0 that is to be dropped to other DS1 ports as well. Select the
Map Multiple DS0’s option and then select the range of DS0 and DS1 1 to be dropped to DS1
2 and enable Robbed Bit Signaling if applicable.
For each DS0 dropped out of the incoming DS1 (DS1 1 in this example), that does not have a
DS0 dropped or inserted into the corresponding DS0 in the other DS1 (DS1 2 in this example),
map the remaining DS0s to continue the data downstream. Any unmapped DS0 will transmit
all ones.
The following six figures show an example of setting up a drop and insert application. Figure
3-8 shows the Quick Setup menu before any DS0s have been dropped.
MX410 MM/DD/YY HH:MM
Active Alarms: CRITICAL MINOR ID: MX410
Quick Setup
Ports
1 - PPPs
PPP 1 = DS1 4 DS0 #1
2 - V.35 =
System
3 - System ID
4 - IP Address : 192.168.100.1
Subnet Mask : 255.255.0.0
5 - Default Gateway : 192.168.1.1
6 - Date
7 - Time 8 - Cross-Connect Mapping
Selection : '?' - System Help Screen
Figure 3-8. Quick Setup Menu
3-8 PRELIMINARY 61189500L1-1B
Page 27

MX410/MX412 System Manual Drop and Insert Application
Figure 3-9 shows the Quick Setup menu after DS0s 23-24 have been dropped from DS1 1 to
PPP1 and PPP 2 has been inserted into DS0s 23-24 in DS1 2.
MX410 MM/DD/YY HH:MM
Active Alarms: CRITICAL MINOR ID: MX410
Quick Setup
Ports
1 - PPPs
PPP 1 = DS1 1 DS0 #23-24
PPP 2 = DS1 2 DS0 #23-24
2 - V.35 = DS1 1 DS0 #23-24
System
3 - System ID
4 - IP Address : 192.168.100.1
Subnet Mask : 255.255.0.0
5 - Default Gateway : 192.168.1.1
6 - Date
7 - Time 8 - Cross-Connect Mapping
Selection : '?' - System Help Screen
Figure 3-9. Drop and Insert Quick Setup Example
Figure 3-10 shows the Cross-Connect Mapping menu for DS1 1 after mapping the PPPs but
prior to mapping the remaining DS0s to be dropped and continued.
MX410 MM/DD/YY HH:MM
Active Alarms: CRITICAL MINOR ID: MX410
Cross-Connect Mapping
DS1 1
1 - DS0 #1 = 13 - DS0 #13 =
2 - DS0 #2 = 14 - DS0 #14 =
3 - DS0 #3 = 15 - DS0 #15 =
4 - DS0 #4 = 16 - DS0 #16 =
5 - DS0 #5 = 17 - DS0 #17 =
6 - DS0 #6 = 18 - DS0 #18 =
7 - DS0 #7 = 19 - DS0 #19 =
8 - DS0 #8 = 20 - DS0 #20 =
9 - DS0 #9 = 21 - DS0 #21 =
10 - DS0 #10 = 22 - DS0 #22 =
11 - DS0 #11 = 23 - DS0 #23 = PPP 1
12 - DS0 #12 = 24 - DS0 #24 = PPP 1
(T)oggle View (DS1 2, DS1 3, DS1 4, Ports) 25 - Map Multiple DS0's
Selection : '?' - System Help Screen
Figure 3-10. Drop and Insert Cross-Connect Mapping Example 1
61189500L1-1B PRELIMINARY 3-9
Page 28

Drop and Insert Application MX410/MX412 System Manual
Figure 3-11 shows the Cross-Connect Mapping menu after DS0s 1-12 are continued through
from DS1 1 to DS1 2 and DS0s 13-23 are dropped from DS1 1 to DS1 3.
MX410 MM/DD/YY HH:MM
Active Alarms: CRITICAL MINOR ID: MX410
Cross-Connect Mapping
DS1 1
1 - DS0 #1 = DS1 2 DS0 #1 13 - DS0 #13 = DS1 3 DS0 #1
2 - DS0 #2 = DS1 2 DS0 #2 14 - DS0 #14 = DS1 3 DS0 #2
3 - DS0 #3 = DS1 2 DS0 #3 15 - DS0 #15 = DS1 3 DS0 #3
4 - DS0 #4 = DS1 2 DS0 #4 16 - DS0 #16 = DS1 3 DS0 #4
5 - DS0 #5 = DS1 2 DS0 #5 17 - DS0 #17 = DS1 3 DS0 #5
6 - DS0 #6 = DS1 2 DS0 #6 18 - DS0 #18 = DS1 3 DS0 #6
7 - DS0 #7 = DS1 2 DS0 #7 19 - DS0 #19 = DS1 3 DS0 #7
8 - DS0 #8 = DS1 2 DS0 #8 20 - DS0 #20 = DS1 3 DS0 #8
9 - DS0 #9 = DS1 2 DS0 #9 21 - DS0 #21 = DS1 3 DS0 #9
10 - DS0 #10 = DS1 2 DS0 #10 22 - DS0 #22 = DS1 3 DS0 #10
11 - DS0 #11 = DS1 2 DS0 #11 23 - DS0 #23 = PPP 1
12 - DS0 #12 = DS1 2 DS0 #12 24 - DS0 #24 = PPP 1
(T)oggle View (DS1 2, DS1 3, DS1 4, Ports) 25 - Map Multiple DS0's
Selection : '?' - System Help Screen
Figure 3-11. Drop and Insert Cross-Connect Mapping Example 2
Figure 3-12 shows the Cross-Connect Mapping menu for DS1 2 after all ports are dropped
and continued from DS1 1.
MX410 MM/DD/YY HH:MM
Active Alarms: CRITICAL MINOR ID: MX410
Cross-Connect Mapping
DS1 2
1 - DS0 #1 = DS1 1 DS0 #1 13 - DS0 #13 =
2 - DS0 #2 = DS1 1 DS0 #2 14 - DS0 #14 =
3 - DS0 #3 = DS1 1 DS0 #3 15 - DS0 #15 =
4 - DS0 #4 = DS1 1 DS0 #4 16 - DS0 #16 =
5 - DS0 #5 = DS1 1 DS0 #5 17 - DS0 #17 =
6 - DS0 #6 = DS1 1 DS0 #6 18 - DS0 #18 =
7 - DS0 #7 = DS1 1 DS0 #7 19 - DS0 #19 =
8 - DS0 #8 = DS1 1 DS0 #8 20 - DS0 #20 =
9 - DS0 #9 = DS1 1 DS0 #9 21 - DS0 #21 =
10 - DS0 #10 = DS1 1 DS0 #10 22 - DS0 #22 =
11 - DS0 #11 = DS1 1 DS0 #11 23 - DS0 #23 = PPP 2
12 - DS0 #12 = DS1 1 DS0 #12 24 - DS0 #24 = PPP 2
(T)oggle View (DS1 3, DS1 4, Ports, DS1 1) 25 - Map Multiple DS0's
Selection : '?' - System Help Screen
Figure 3-12. Drop and Insert Cross-Connect Mapping Example 3
3-10 PRELIMINARY 61189500L1-1B
Page 29

MX410/MX412 System Manual Drop and Insert Application
Figure 3-13 the Cross-Connect Mapping menu after DS0s 13-23 are inserted in DS1 2 from
DS1 4. Any unmapped DS0s will be filled with all ones.
MX410 MM/DD/YY HH:MM
Active Alarms: CRITICAL MINOR ID: MX410
Cross-Connect Mapping
DS1 2
1 - DS0 #1 = DS1 1 DS0 #1 13 - DS0 #13 = DS1 4 DS0 #1
2 - DS0 #2 = DS1 1 DS0 #2 14 - DS0 #14 = DS1 4 DS0 #2
3 - DS0 #3 = DS1 1 DS0 #3 15 - DS0 #15 = DS1 4 DS0 #3
4 - DS0 #4 = DS1 1 DS0 #4 16 - DS0 #16 = DS1 4 DS0 #4
5 - DS0 #5 = DS1 1 DS0 #5 17 - DS0 #17 = DS1 4 DS0 #5
6 - DS0 #6 = DS1 1 DS0 #6 18 - DS0 #18 = DS1 4 DS0 #6
7 - DS0 #7 = DS1 1 DS0 #7 19 - DS0 #19 = DS1 4 DS0 #7
8 - DS0 #8 = DS1 1 DS0 #8 20 - DS0 #20 = DS1 4 DS0 #8
9 - DS0 #9 = DS1 1 DS0 #9 21 - DS0 #21 = DS1 4 DS0 #9
10 - DS0 #10 = DS1 1 DS0 #10 22 - DS0 #22 = DS1 4 DS0 #10
11 - DS0 #11 = DS1 1 DS0 #11 23 - DS0 #23 = PPP 2
12 - DS0 #12 = DS1 1 DS0 #12 24 - DS0 #24 = PPP 2
(T)oggle View (DS1 3, DS1 4, Ports, DS1 1) 25 - Map Multiple DS0's
Selection : '?' - System Help Screen
Figure 3-13. Drop and Insert Cross-Connect Mapping Example 4
61189500L1-1B PRELIMINARY 3-11
Page 30
Integrated Wireless Access Device or DS0 Grooming MX410/MX412 System Manual
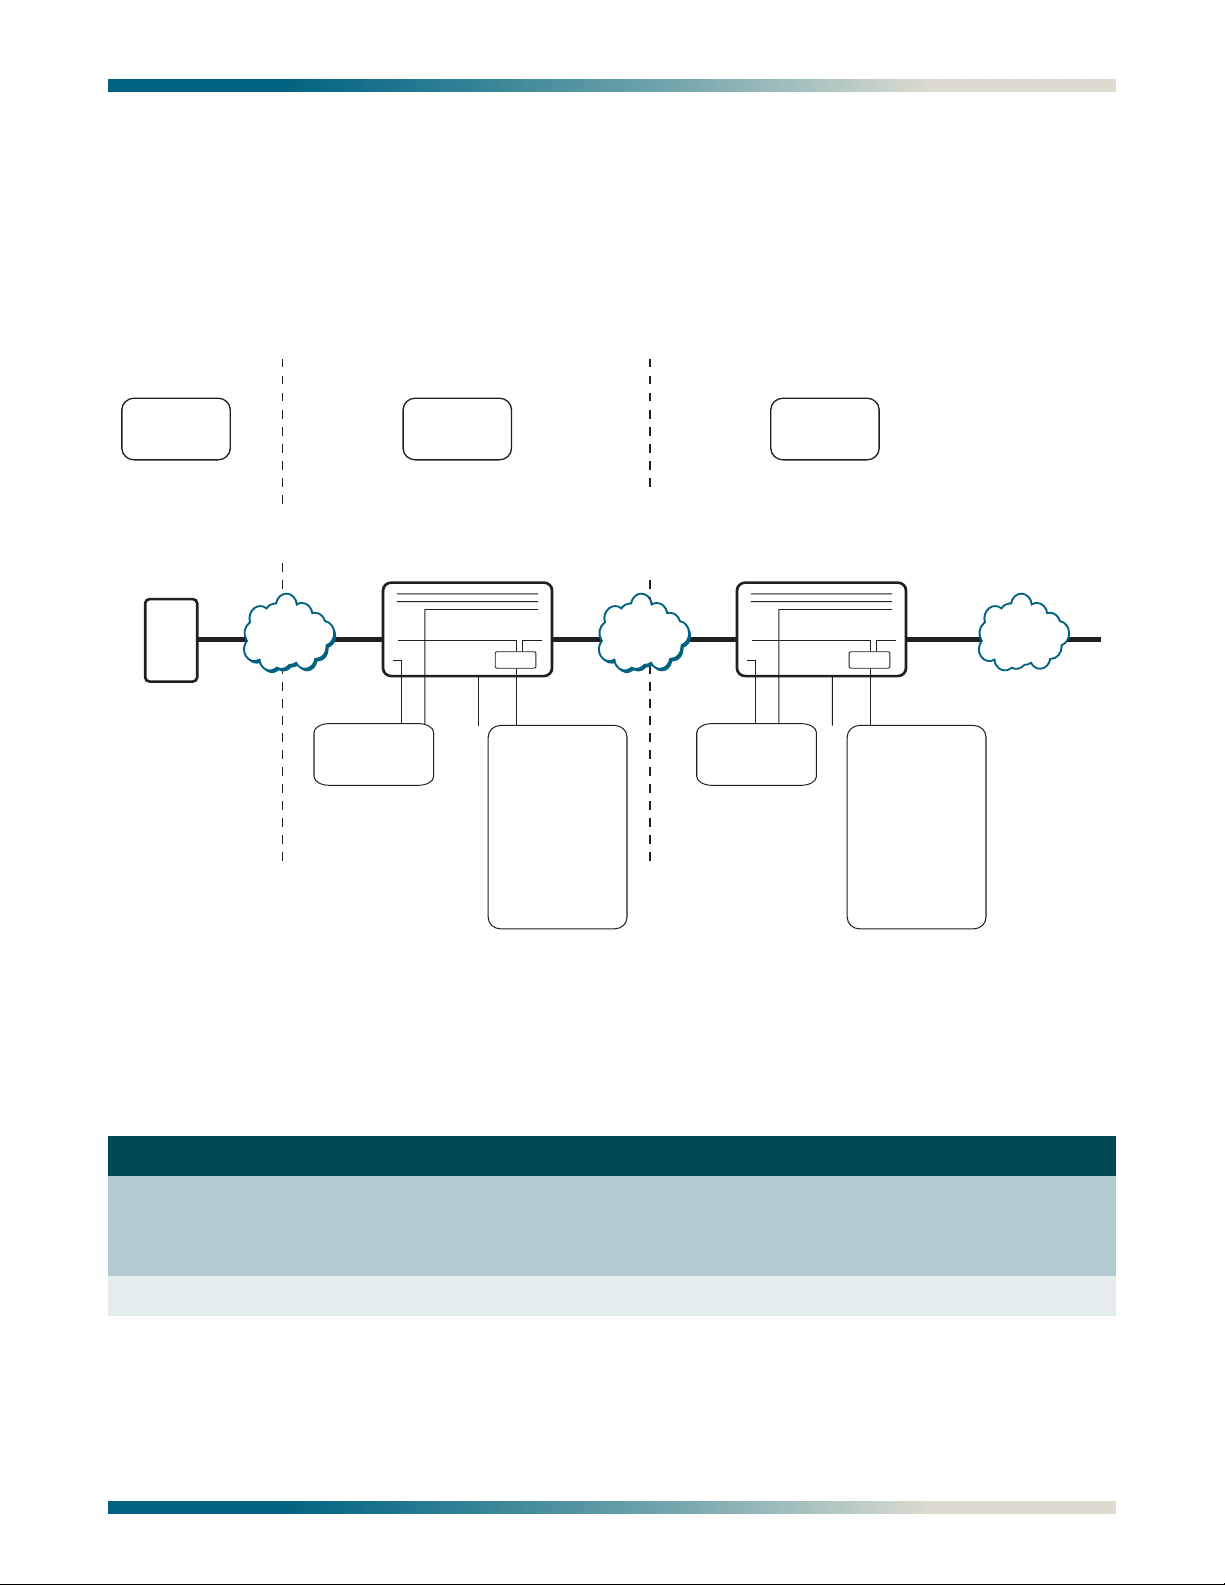
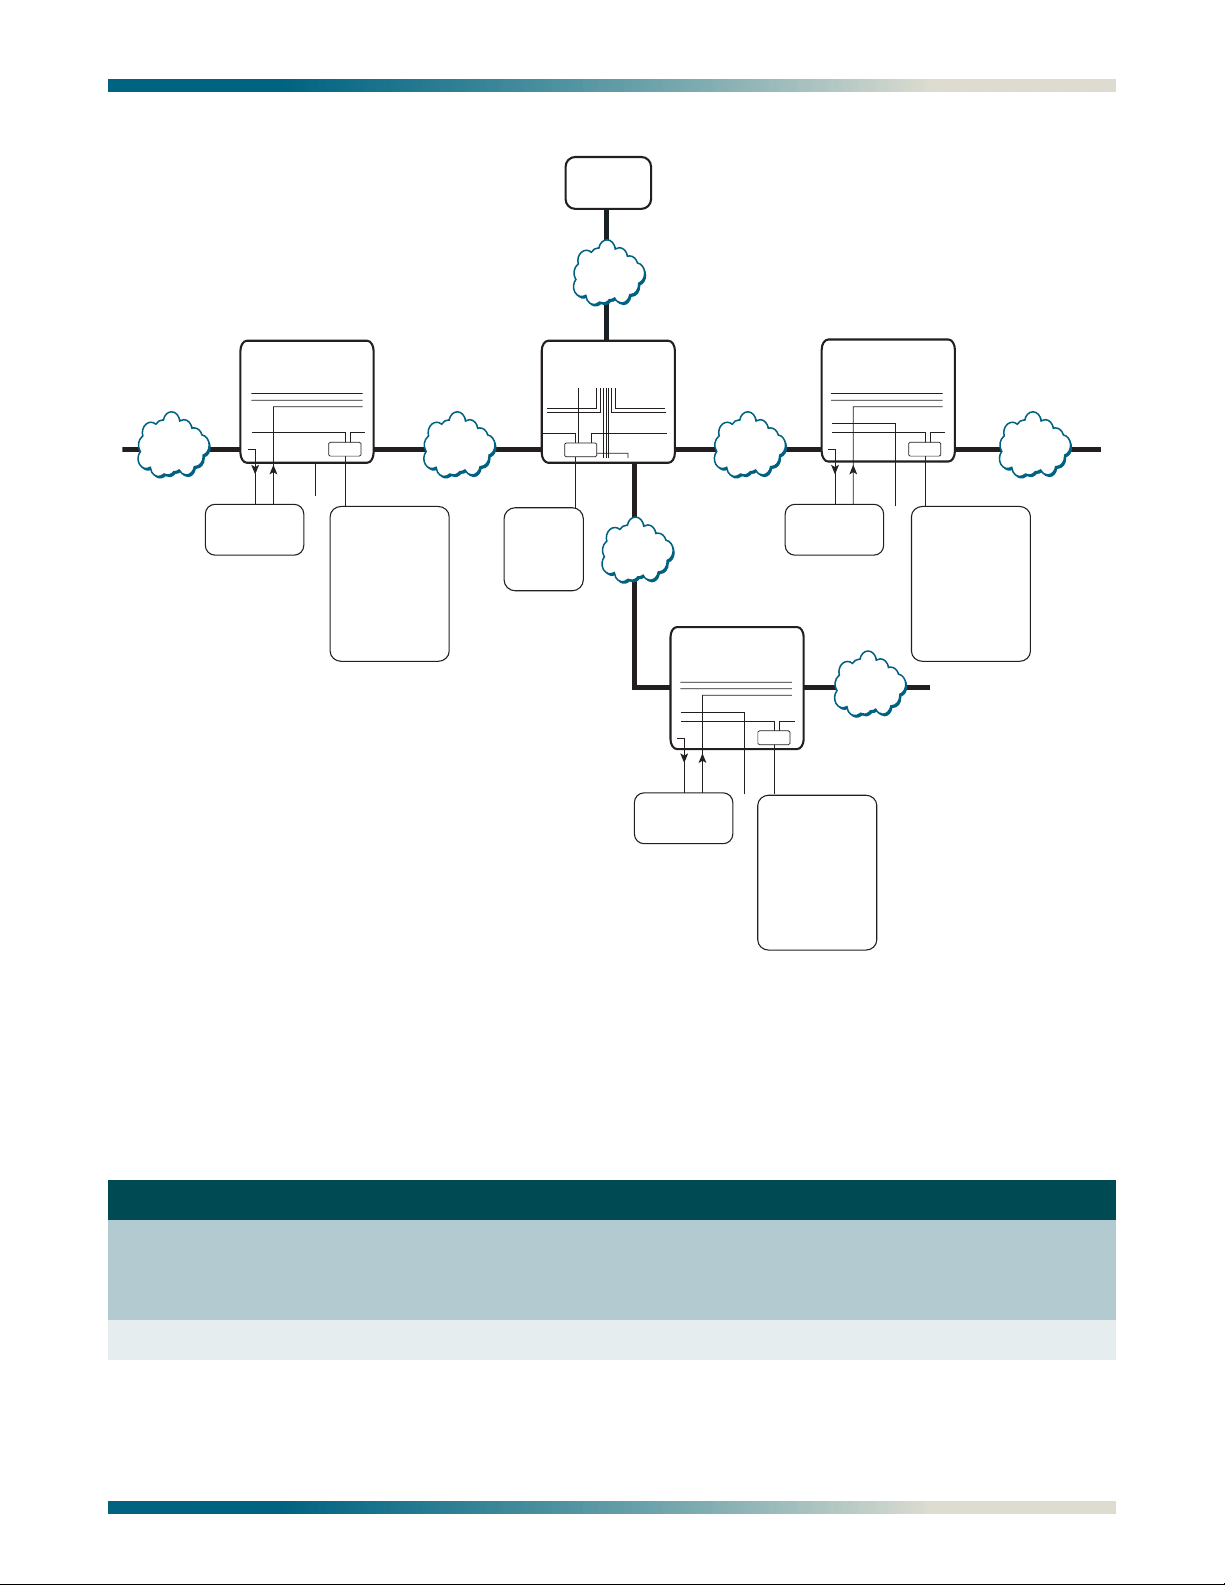
Integrated Wireless Access Device or DS0 Grooming
The following applies to Remote Site #1 shown in Figure 3-14 and Figure 3-15. In the
Integrated Wireless Access Device Application, bandwidth is conserved by using the MX410 to
groom multiple fractional T1s into a single T1. This allows the MX410 to be used as an
integrated wireless access device (see Figure 3-14) or to transport DS0s between several sites
(see Figure 3-15). Refer to “PPP BCP/IPCP Menu” on page 5-32 for more information about
using PPP. and refer to “Alarm Pass Thru” on page 5-19 for information about visibility
through the cross connect.
Central
Site
DS1
Other systems
currently managed by
the MX410 through
an Ethernet port
to Ethernet port
connection
Remote Site #1
ETH1
Switch
ETH2
DS1 #2
DS1
µ Wave/
Leased
DS1
MX410
24 DS0s
from Central Site
DS1 #1
V.35
TSR1
DS1 #3
DS1 #4
E911
Battery
Charger
Digital
Base Station
Transceiver
Digital
Base Station
Transceiver
Analog
Base Station
Transceiver
Figure 3-14. Integrated Wireless Access Device Diagram
3-12 PRELIMINARY 61189500L1-1B
Page 31
MX410/MX412 System Manual Integrated Wireless Access Device or DS0 Grooming
Central
Site
DS1
DS1
DS1 DS1
µ Wave/
Leased
24 DS0s
from Central Site
DS1DS1
Original DS0s
DS1
DS1
Unmapped DS0s
Remote Site #3
DS1
Drop DS0s
to/from Local
Equipment
Downstream;
Original DS0s
Continue
Downstream;
All Ones in
Unmapped DS0s
DS1
µ Wave/
DS1 DS1
Leased
DS1
Continue
All Ones in
MX410
Switch
DS1
ETH1
V.35
Drop DS0s
to PPP to
Control
Equipment
via Ethernet.
Insert DS0s from
PPP to Continue
Ethernet Path
Conserving
Bandwidth
Remote Site #2
DS1
DS1
Drop DS0s
to/from Local
Equipment
DS1
µ Wave/
DS1
Leased
DS1
Original DS0s
Continue
Downstream;
All Ones in
Unmapped DS0s
Local
MX410
V.3 5
Unmapped DS0s
Switch
ETH1
Drop DS0s
to PPP to
Control
Local
Equipment
via Ethernet.
Insert DS0s from
PPP to Continue
Ethernet Path
Conserving
Bandwidth
Original DS0s
Continue
Downstream;
All Ones in
DS1
µ Wave/
Leased
DS1
Original DS0s
Continue
Downstream;
All Ones in
Unmapped DS0s
DS1
µ Wave/
Leased
DS1
MX410
Remote Site #4
DS1
DS1
Drop DS0s
to/from Local
Equipment
Switch
V.35
ETH1
Drop DS0s
to PPP to
Control
Equipment
via Ethernet.
Insert DS0s from
PPP to Continue
Ethernet Path
Conserving
Bandwidth
µ Wave/
Leased
Original DS0s
Continue
Downstream;
All Ones in
Unmapped DS0s
DS1
µ Wave/
DS1DS1 DS1
Local
Leased
DS1
DS1
Drop DS0s
to PPP to
Control
Equipment
via Ethernet
MX410
Remote Site #1
Switch
ETH1
Local
Figure 3-15. Bandwidth Efficiency with DS0 Grooming Diagram
The equipment needed for an Integrated Wireless Access Device or Bandwidth Efficiency with
DS0 Grooming application is shown in Table 3-3.
Table 3-3. Integrated Wireless Access Device Application - Required Equipment
Part Number Equipment Quantity
1189500L1
or
1189512L1
1189501L1 MX410 PSU (MX410 only) 1 (2 for redundancy)
61189500L1-1B PRELIMINARY 3-13
MX410
MX412
1
1
Page 32

Integrated Wireless Access Device or DS0 Grooming MX410/MX412 System Manual
Setup
Connect the DS1 from which the DS0s will be dropped to the DS1 1 RJ. Connect the other
DS1s to DS1 2, 3 and 4 RJ. For more information, refer to “DS1 Ports” on page 4-6.
Starting from the default mapping the DS0s can be mapped using the Quick Setup menu
shown in Figure 3-16. Select each port to which a DS0 needs to be dropped from the
incoming DS1. For each port select the DS0(s) in DS1 1 to be dropped to that port. Using the
Cross-Connect Mapping menu, select each DS0 that are to be mapped from other DS1 ports
as well. Select the Map Multiple DS0’s option and then select the range of DS0 and DS1 1 to
be dropped to DS1 2 and enable Robbed Bit Signaling if applicable.
For an integrated wireless access device application, map DS0s to the corresponding DS0 in
the other DS1 (DS1 2, 3, and 4 in this example). For a grooming application, each DS0
dropped out of the incoming DS1 (DS1 1 in this example), that does not have a DS0 dropped
or inserted into the corresponding DS0 in the other DS1 (DS1 2,3 and 4 in this example), map
the groomed DS0s to continue the data downstream. Any unmapped DS0 will transmit all
ones.
The following six figures show an example of setting up an integrated wireless access device or
grooming application. Figure 3-16 shows the Quick Setup menu before any DS0s have been
dropped.
MX410 MM/DD/YY HH:MM
Active Alarms: CRITICAL MINOR ID: MX410
Quick Setup
Ports
1 - PPPs
2 - V.35 =
System
3 - System ID
4 - IP Address : 192.168.100.1
Subnet Mask : 255.255.0.0
5 - Default Gateway : 192.168.1.1
6 - Date
7 - Time 8 - Cross-Connect Mapping
Selection : '?' - System Help Screen
Figure 3-16. Quick Setup Menu
3-14 PRELIMINARY 61189500L1-1B
Page 33

MX410/MX412 System Manual Integrated Wireless Access Device or DS0 Grooming
Figure 3-17 shows the Quick Setup menu after DS0s 23-24 have been dropped from DS1 1 to
PPP1, and PPP 2, 3, and 4 have been inserted into DS0s 23-24 in DS1 2, 3 and 4 respectively.
PPP 2, 3, and 4 are typically not used in this fashion for the integrated wireless access device
application.
MX410 MM/DD/YY HH:MM
Active Alarms: CRITICAL MINOR ID: MX410
Quick Setup
Ports
1 - PPPs
PPP 1 = DS1 1 DS0 #23-24
PPP 2 = DS1 2 DS0 #23-24
PPP 3 = DS1 3 DS0 #23-24
PPP 4 = DS1 4 DS0 #23-24
2 - V.35 =
System
3 - System ID
4 - IP Address : 192.168.100.1
Subnet Mask : 255.255.0.0
5 - Default Gateway : 192.168.1.1
6 - Date
7 - Time 8 - Cross-Connect Mapping
Selection : '?' - System Help Screen
Figure 3-17. Integrated Wireless Access Device Quick Setup Example
Figure 3-18 shows the Cross-Connect Mapping menu for DS1 1 after mapping the PPPs but
prior to mapping the remaining DS0s to be mapped.
MX410 MM/DD/YY HH:MM
Active Alarms: CRITICAL MINOR ID: MX410
Cross-Connect Mapping
DS1 1
1 - DS0 #1 = 13 - DS0 #13 =
2 - DS0 #2 = 14 - DS0 #14 =
3 - DS0 #3 = 15 - DS0 #15 =
4 - DS0 #4 = 16 - DS0 #16 =
5 - DS0 #5 = 17 - DS0 #17 =
6 - DS0 #6 = 18 - DS0 #18 =
7 - DS0 #7 = 19 - DS0 #19 =
8 - DS0 #8 = 20 - DS0 #20 =
9 - DS0 #9 = 21 - DS0 #21 =
10 - DS0 #10 = 22 - DS0 #22 =
11 - DS0 #11 = 23 - DS0 #23 = PPP 1
12 - DS0 #12 = 24 - DS0 #24 = PPP 1
(T)oggle View (DS1 2, DS1 3, DS1 4, Ports) 25 - Map Multiple DS0's
Selection : '?' - System Help Screen
Figure 3-18. Integrated Wireless Access Device Cross-Connect Map Example 1
61189500L1-1B PRELIMINARY 3-15
Page 34

Integrated Wireless Access Device or DS0 Grooming MX410/MX412 System Manual
Figure 3-19 shows the Cross-Connect Mapping menu after DS0s 1-7 are mapped from DS1 1
to DS1 2, DS0s 8-15 are mapped from DS1 1 to DS1 3, and DS0s 15-22 are mapped from DS1
1 to DS1 4.
MX410 MM/DD/YY HH:MM
Active Alarms: CRITICAL MINOR ID: MX410
Cross-Connect Mapping
DS1 1
1 - DS0 #1 = DS1 2 DS0 #1 13 - DS0 #13 = DS1 3 DS0 #6
2 - DS0 #2 = DS1 2 DS0 #2 14 - DS0 #14 = DS1 3 DS0 #7
3 - DS0 #3 = DS1 2 DS0 #3 15 - DS0 #15 = DS1 4 DS0 #1
4 - DS0 #4 = DS1 2 DS0 #4 16 - DS0 #16 = DS1 4 DS0 #2
5 - DS0 #5 = DS1 2 DS0 #5 17 - DS0 #17 = DS1 4 DS0 #3
6 - DS0 #6 = DS1 2 DS0 #6 18 - DS0 #18 = DS1 4 DS0 #4
7 - DS0 #7 = DS1 2 DS0 #7 19 - DS0 #19 = DS1 4 DS0 #5
8 - DS0 #8 = DS1 3 DS0 #1 20 - DS0 #20 = DS1 4 DS0 #6
9 - DS0 #9 = DS1 3 DS0 #2 21 - DS0 #21 = DS1 4 DS0 #7
10 - DS0 #10 = DS1 3 DS0 #3 22 11 - DS0 #11 = DS1 3 DS0 #4 23 - DS0 #23 = PPP 1
12 - DS0 #12 = DS1 3 DS0 #5 24 - DS0 #24 = PPP 1
(T)oggle View (DS1 2, DS1 3, DS1 4, Ports) 25 - Map Multiple DS0's
Selection : '?' - System Help Screen
Figure 3-19. Integrated Wireless Access Device Cross-Connect Map Example 2
Figure 3-20 shows the Cross-Connect Mapping menu for DS1 2 after all ports are mapped
from DS1 1.
MX410 MM/DD/YY HH:MM
Active Alarms: CRITICAL MINOR ID: MX410
Cross-Connect Mapping
DS1 2
1 - DS0 #1 = DS1 1 DS0 #1 13 - DS0 #13 =
2 - DS0 #2 = DS1 1 DS0 #2 14 - DS0 #14 =
3 - DS0 #3 = DS1 1 DS0 #3 15 - DS0 #15 =
4 - DS0 #4 = DS1 1 DS0 #4 16 - DS0 #16 =
5 - DS0 #5 = DS1 1 DS0 #5 17 - DS0 #17 =
6 - DS0 #6 = DS1 1 DS0 #6 18 - DS0 #18 =
7 - DS0 #7 = DS1 1 DS0 #7 19 - DS0 #19 =
8 - DS0 #8 = 20 - DS0 #20 =
9 - DS0 #9 = 21 - DS0 #21 =
10 - DS0 #10 = 22 - DS0 #22 =
11 - DS0 #11 = 23 - DS0 #23 = PPP 2
12 - DS0 #12 = 24 - DS0 #24 = PPP 2
(T)oggle View (DS1 3, DS1 4, Ports, DS1 1) 25 - Map Multiple DS0's
Selection : '?' - System Help Screen
Figure 3-20. Integrated Wireless Access Device Cross-Connect Map Example 3
3-16 PRELIMINARY 61189500L1-1B
Page 35

MX410/MX412 System Manual Integrated Wireless Access Device or DS0 Grooming
Figure 3-21 shows the Cross-Connect Mapping menu for DS1 3.
MX410 MM/DD/YY HH:MM
Active Alarms: CRITICAL MINOR ID: MX410
Cross-Connect Mapping
DS1 3
1 - DS0 #1 = DS1 1 DS0 #8 13 - DS0 #13 =
2 - DS0 #2 = DS1 1 DS0 #9 14 - DS0 #14 =
3 - DS0 #3 = DS1 1 DS0 #10 15 - DS0 #15 =
4 - DS0 #4 = DS1 1 DS0 #11 16 - DS0 #16 =
5 - DS0 #5 = DS1 1 DS0 #12 17 - DS0 #17 =
6 - DS0 #6 = DS1 1 DS0 #13 18 - DS0 #18 =
7 - DS0 #7 = DS1 1 DS0 #14 19 - DS0 #19 =
8 - DS0 #8 = 20 - DS0 #20 =
9 - DS0 #9 = 21 - DS0 #21 =
10 - DS0 #10 = 22 - DS0 #22 =
11 - DS0 #11 = 23 - DS0 #23 = PPP 3
12 - DS0 #12 = 24 - DS0 #24 = PPP 3
(T)oggle View (DS1 4, Ports, DS1 1, DS1 2) 25 - Map Multiple DS0's
Selection : '?' - System Help Screen
Figure 3-21. Integrated Wireless Access Device Cross-Connect Map Example 4
Figure 3-22 shows the Cross-Connect Mapping menu for DS1 4. Any unmapped DS0s are
filled with all ones.
MX410 MM/DD/YY HH:MM
Active Alarms: CRITICAL MINOR ID: MX410
Cross-Connect Mapping
DS1 4
1 - DS0 #1 = DS1 1 DS0 #15 13 - DS0 #13 =
2 - DS0 #2 = DS1 1 DS0 #16 14 - DS0 #14 =
3 - DS0 #3 = DS1 1 DS0 #17 15 - DS0 #15 =
4 - DS0 #4 = DS1 1 DS0 #18 16 - DS0 #16 =
5 - DS0 #5 = DS1 1 DS0 #19 17 - DS0 #17 =
6 - DS0 #6 = DS1 1 DS0 #20 18 - DS0 #18 =
7 - DS0 #7 = DS1 1 DS0 #21 19 - DS0 #19 =
8 - DS0 #8 = 20 - DS0 #20 =
9 - DS0 #9 = 21 - DS0 #21 =
10 - DS0 #10 = 22 - DS0 #22 =
11 - DS0 #11 = 23 - DS0 #23 = PPP 4
12 - DS0 #12 = 24 - DS0 #24 = PPP 4
(T)oggle View (Ports, DS1 1, DS1 2, DS1 3) 25 - Map Multiple DS0's
Selection : '?' - System Help Screen
Figure 3-22. Integrated Wireless Access Device Cross-Connect Map Example 5
61189500L1-1B PRELIMINARY 3-17
Page 36

Remote Management of Other Systems using Terminal Server Ports and Ethernet Connectivity MX410/MX412 System Manual
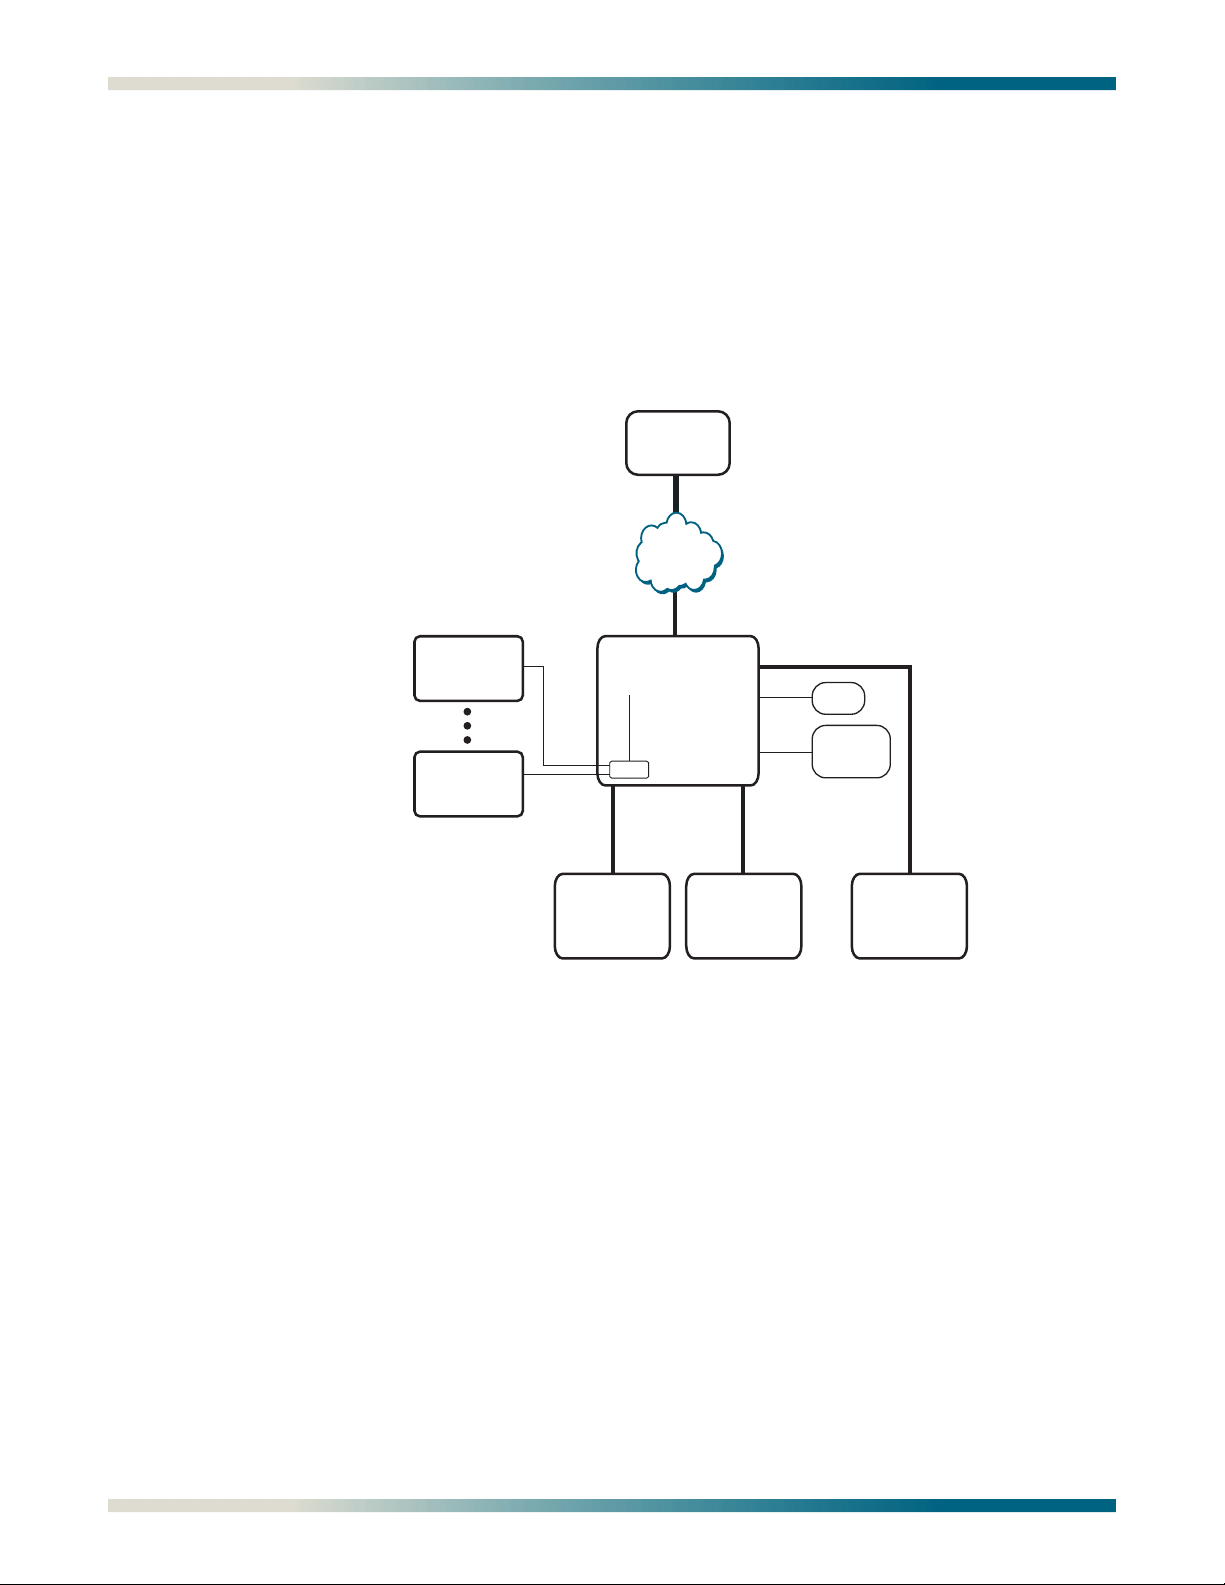
Remote Management of Other Systems using Terminal Server
Ports and Ethernet Connectivity
In this application the Terminal Server ports on the MX410 are used to provide remote
management of other non-Ethernet based equipment at the same site. This requires
connecting the RS-232 craft ports of the other equipment to the Terminal Server ports of the
MX410. Establishing a Telnet session to the MX410 Terminal Server ports establishes access
to the other equipment. Up to four external devices can be accessed in this way.
The Ethernet ports on the MX410 are used to provide remote management of the other
Ethernet based equipment. This requires connecting the Ethernet ports of the other
equipment to the Ethernet ports on the MX410 (see Figure 3-23). Refer to “PPP BCP/IPCP
Menu” on page 5-32 for more information about PPP and IP.
Original DS0s
Continue
Downstream;
All Ones in
Unmapped DS0s
DS1
µ Wave/
Leased
DS1
Terminal Server Ports
RS-232 Ports
MX410
MX410
IP
Other Systems
Currently Managed
by the MX410 via
Terminal Server Port
to RS-232 Craft Port
Connections
Ethernet
Switch
Ethernet Ports
Ethernet Ports
Original DS0s
Continue
Downstream;
All Ones in
Unmapped DS0s
DS1
DS1 DS1DS1 DS1
µ Wave/
Leased
DS1
Technician
Manages All
MX410 Units
and Other Systems
from Any Cell Site
Other Systems
Currently Managed
by the MX410 via
Ethernet Port to
Ethernet Port
Connections
Figure 3-23. MX410 Remote Management of Other Systems
The equipment needed for a Remote Management application is shown in Table 3-4.
Table 3-4. Remote Management Application - Required Equipment
Part Number Equipment Quantity
1189500L1
or
1189512L1
1189501L1 MX410 PSU (MX410 only) 1 (2 for redundancy)
3-18 PRELIMINARY 61189500L1-1B
MX410
MX412
1
1
Page 37

MX410/MX412 System Manual Remote Management of Other Systems using Terminal Server Ports and Ethernet Connectivity
Setup
First, connect the RS-232 craft port on the other equipment to the MX410 terminal server
port. The pin assignments for each of the RS-232 interfaces are listed in the PORT 1-4
Terminal Server port pin list in Table 4-5 on page 4-8.
The default settings for the terminal server ports are 9600 bps 8 data bits with no parity.
These settings must match the craft port settings of the other equipment for the application to
work. Baud Rate can be changed in the MX410 Terminal Server menus under Provisioning.
Refer to “Terminal Server Ports Menu” on page 5-25 for more information.
Then, establish a Telnet session to the MX410 with the port number for the particular port to
access the other equipment. The default IP address for the MX410 is 192.168.100.1 with a
subnet mask of 255.255.0.0. The port numbers default to 2023, 2024, 2025, and 2026
respectively, for each of the four ports. Once the session is established the default username
for each port is “port #” (where # is the number of the port) and the default password is
“password”.
For Ethernet based devices, simply assign a static IP address to the other equipment (or
enable the DHCP server to provide one) and connect its Ethernet port to one of the four switch
ports (Ethernet 1 - 4) on the front panel for the MX410. Refer to “DHCP Server Menu” on
page 5-34 for more information about DHCP servers.
61189500L1-1B PRELIMINARY 3-19
Page 38

Remote Management of Other Systems using Terminal Server Ports and Ethernet Connectivity MX410/MX412 System Manual
This page is intentionally blank.
3-20 PRELIMINARY 61189500L1-1B
Page 39

Section 4
Installation
GENERAL
The first three tasks for installing and operating the MX410/MX412 are to unpack, inspect,
and install. Those tasks are detailed in this section of the manual, as well as information for
mounting the MX410/MX412 into an equipment rack or to a wall, making the proper connections to the front and back panels, identifying the front panel indicators, and adding or
removing a Power Supply Unit (PSU) (MX410 only).
RECEIVING INSPECTION
Inspect the MX410/MX412 for any damage that might have occurred in shipment. If damage
is suspected, file a claim immediately with the carrier, keep the original packaging for damage
verification and/or returning the unit, and contact ADTRAN Customer Service. For warranty
information, refer to “Appendix A, Warranty”.
ADTRAN SHIPPING CONTENTS
After unpacking the MX410 or MX412 but before an initial power up, be sure that the
following items are present:
• MX410 and MX410 PSU
or
MX412
• Mounting brackets and screws for 19-inch rack or wall installation
– Ground lug with nut and lock washer
– Wire-wrap post cover and screw
– Power connector
– Blank PSU cover (MX410 only)
61189500L1-1B PRELIMINARY 4-1
Page 40

Rackmount MX410/MX412 System Manual
RACKMOUNT
For a rackmount installation, perform the following steps:
1. Ensure the mounting brackets to the MX410/MX412 are attached using the two screws
provided for each bracket.
• For 19-inch rack applications, attach the brackets with the short flange parallel with the
front of the chassis (see Figure 4-1).
• For 23-inch rack applications, attach the brackets with the short flange parallel with the
front of the chassis and obtain 23-inch adapter mounting hardware.
2. Connect the frame ground from the frame ground lug on the upper right rear panel of the
MX410/MX412 to the equipment rack grounding screw or other appropriate grounding
connection before mounting.
3. Use the appropriate rack type screws to mount the MX410/MX412 into the rack.
CAUTION
Care should be taken to not upset the stability of the equipment
rack after installation is complete.
NOTE
The unit must be installed in accordance with the requirements of
NEC NFPA 70. When mounting the MX410/MX412 in a rack,
multiple chassis can be mounted in adjacent rack slots.
WALLMOUNT
For a wallmount installation, perform the following steps:
1. Ensure the mounting brackets to the MX410/MX412 are attached using the two screws
provided for each bracket. Attach the brackets with the short flange parallel with the
bottom of the MX410/MX412 chassis (see Figure 4-1).
2. Connect the frame ground from the frame ground lug on the upper right rear panel of the
MX410/MX412 to an appropriate grounding connection.
3. Mount the MX410/MX412 vertically with the front panel facing to the left or right side.
Figure 4-1. Rackmount and Wallmount Orientation
4-2 PRELIMINARY 61189500L1-1B
Page 41

MX410/MX412 System Manual Rear Panel
REAR PANEL
The MX410/MX412 rear panel is equipped with wire-wrap pins for external auxiliary inputs,
wire-wrap pins for alarms (critical, major, and minor), a frame ground lug, and a single power
connector for both DC power feeds (A and B). Figure 4-2 illustrates the rear panel.
Figure 4-2. MX410/MX412 Rear View
WARNING
The Alarm interfaces and AUX inputs must not be metallically
connected to interfaces which connect to the Outside Plant or its
wiring. These interfaces are designed for use as intra-building
interfaces only. The addition of Primary Protectors is not sufficient
protection in order to connect these interfaces metallically to OSP
wiring.
Power Connection
Figure 4-3 illustrates the DC power pins and power connector. Refer to “Power Up” on page 4-
11 for more power information.
Power Connector
Figure 4-3. DC Power Connections
61189500L1-1B PRELIMINARY 4-3
Page 42

Rear Panel MX410/MX412 System Manual
Alarm Contacts/AUX Inputs
The alarm contacts and auxiliary (AUX) inputs are shown in Figure 4-4.
Figure 4-4. Alarm Contacts and AUX Inputs
The alarm interfaces connect to the nine Form C type relays on the MX410/MX412 labeled
CRIT, MAJOR, and MINOR. Both NC (Normally Closed) and NO (Normally Open) contacts are
provided. Connect the
panel to the
C (Common) and NO or NC wire-wrap terminals on the MX410/MX412 rear panel
CRIT (Critical), MAJOR, and MINOR alarm leads from the fuse and alarm
as required.
Auxiliary alarms 1-4 connect to the MX410/MX412
AUX INPUTS labeled 1-9. These pins detect
open and closed relay contacts and are not polarity sensitive. Table 4-1 shows the pin assignments for the
AUX INPUTS.
Table 4-1. AUX Inputs 1-9 Pin List
AUX INPUT Function Default Severity Level
1, 2 Alarm 1 Critical
3, 4 Alarm 2 Major
5, 6 Alarm 3 Minor
7, 8 Alarm 4 Alert
9 No Connect N/A
The alarm severity level can be changed in the Environmental Alarms menu.
After the alarm contact and AUX input connections have been made, install the protective
cover over the wire-wrap headers.
4-4 PRELIMINARY 61189500L1-1B
Page 43

MX410/MX412 System Manual Front Panel
FRONT PANEL
The front panels for the MX410 and MX412 are described below.
MX410
The MX410 front panel (see Figure 4-5) is equipped with the following:
• One V.35 Port (refer to “V.35 Port” on page 4-6)
• Four DS1 ports (refer to “DS1 Ports” on page 4-6)
• Four Ethernet ports (refer to “Ethernet Ports” on page 4-7)
• Four Terminal Server ports (refer to “Terminal Server Ports” on page 4-8)
• One ACO switch (refer to “ACO Switch” on page 4-8)
• One Craft port (refer to “Craft Port” on page 4-8)
• Two PSU slots (refer to “PSU Slots” on page 4-9)
• LED indicators (refer to “LED Indicators” on page 4-10)
Figure 4-5. MX410 Front Panel
MX412
The MX412 front panel (see Figure 4-6) is equipped with the following:
• One V.35 Port (refer to “V.35 Port” on page 4-6)
• Twelve DS1 ports (refer to “DS1 Ports” on page 4-6)
• Four Ethernet ports (refer to “Ethernet Ports” on page 4-7)
• Four Terminal Server ports (refer to “Terminal Server Ports” on page 4-8)
• One ACO switch (refer to “ACO Switch” on page 4-8)
• One Craft port (refer to “Craft Port” on page 4-8)
• One FXS port (refer to “FXS Port” on page 4-9)
• LED indicators (refer to “LED Indicators” on page 4-10)
Figure 4-6. MX412 Front Panel
61189500L1-1B PRELIMINARY 4-5
Page 44

Front Panel MX410/MX412 System Manual
V. 3 5 P o r t
The V.35 port is a Nx64k serial interface (up to 1.536 Mbps) with a CCITT V.35, 34-pin
connector. The V.35 connector pin list is shown in Table 4-2.
Table 4-2. V.35 Port Pin List
Pin Function Pin Function
A Digital Ground R Receive Data to DTE - A1
B Digital Ground S Transmit Data from DTE - B1
C Request To Send (RTS) T Receive Data to DTE - B1
D Clear To Send (CTS) U No Connect
E Data Set Ready (DSR) V Receive Clock to DTE - A1
F Data Carrier Detect (DCD) W No Connect
H Data Terminal Ready (DTR) X Receive Clock to DTE - B1
J Ring Y Transmit Clock to DTE - A1
K No Connect AA Transmit Clock to DTE - B1
L No Connect BB No Connect
N No Connect NN No Connect
P Transmit Data from Data Terminal Equipment
(DTE) - A1
DS1 Ports
The DS1 interfaces located on the front panel of the MX410/MX412 are RJ-48 connectors.
The DS1 connector pin list is shown in Table 4-3.
Table 4-3. RJ-48 Connector Pin List
Pin Function
1 RX Ring
2 RX Tip
3 No Connect
4 TX Ring
5 TX Tip
6 No Connect
7 No Connect
8 No Connect
4-6 PRELIMINARY 61189500L1-1B
Page 45

MX410/MX412 System Manual Front Panel
Ethernet Ports
The four Ethernet jacks labeled ETHERNET located on the MX410/MX412 front panel provide
LAN access to the Network. From these ports, devices located on the local area network can be
remotely managed. The Ethernet ports have automatic rate detection and perform MDI/MDI-X
crossover detection eliminating the need for a crossover cable. The Ethernet ports can be
accessed using standard CAT 5 cable with an RJ-45 connector. The pin assignments for the
RJ-45 connector are listed in Table 4-4.
WARNING
The Ethernet and Terminal Server Port 1-4 interfaces must not be
metallically connected to interfaces which connect to the OSP or its
wiring. These interfaces are designed for use as intra-building
interfaces only. The addition of Primary Protectors is not sufficient
protection in order to connect these interfaces metallically to OSP
wiring.
Table 4-4. Ethernet Port Pin List
Pin Function
1 TX+
2 TX–
3 RX+
4 No Connect
5 No Connect
6 RX–
7 No Connect
8 No Connect
61189500L1-1B PRELIMINARY 4-7
Page 46

Front Panel MX410/MX412 System Manual
Terminal Server Ports
The four Terminal Server port RS-232 interfaces located on the front panel are used to
remotely connect to RS-232 managed devices.
CAUTION
The 8-pin modular Terminal Server Port 1-4 jacks should never be
connected to a telecommunications network and are intended for
connection to RS-232 data interfaces only.
The Terminal Server ports are accessed by establishing a Telnet session to the MX410/MX412
with the TCP Port Number of the particular port. The pin assignments for each of the RS-232
interfaces are listed in Table 4-5.
Table 4-5. Terminal Server Port Pin List
Pin Function
1 GND
2 No Connect
3 TXD
4 No Connect
5 RXD
6 No Connect
7 No Connect
8 No Connect
ACO Switch
The Alarm Cutoff (ACO) Switch turns off audible and visual alarms connected to the alarm
relays. Pressing the ACO Switch acknowledges alarms.
Craft Port
The DB-9 (RS-232) CRAFT port is used to login and provision the MX410/MX412 through a
VT100 terminal or VT100 terminal emulation software such as HyperTerminal or ProComm
Plus.
4-8 PRELIMINARY 61189500L1-1B
Page 47

MX410/MX412 System Manual Front Panel
FXS Port
The FXS port (MX412 only) provides a 2-wire analog interface between a Voice Frequency (VF)
transmission and a signaling facility. The FXS interface provides for simultaneous signaling in
each direction for use with 2-wire off-premises station lines, carrier extended PBX trunks, or
subscriber line foreign exchanges using a loop start signaling system. FXS options are shown
in Table 4-6.
Table 4-6. FXS Options
Mode Description
Loop Start Selects ANSI T1.403 FXS Loop Start mode of operation
PLAR D4 Selects Private Line Automatic Ringdown where onhook = 00.
Signaling must match the PLAR unit at the distant end.
PLAR D3 Selects Private Line Automatic Ringdown where onhook = 11.
Signaling must match the PLAR unit at the distant end.
FX Ringdown PLAR mode of operation that allows for an FXS Loop Start unit on the
distant end.
WARNING
The FXS Port interface must not be metallically connected to interfaces which connect to the OSP or its wiring. The FXS interface is
designed for use as an intra-building interface only. The addition of
Primary Protectors is not sufficient protection in order to connect
the FXS interface metallically to OSP wiring.
PSU Slots
The MX410 houses up to two hot-swappable PSUs that can provide power redundancy. At
least one MX410 PSU (P/N 1189501L1) must be inserted into the MX410 for the MX410 to
function. To remove a PSU, remove the screws that hold it in place and carefully pull the PSU
straight out of the MX410. A blank PSU cover (P/N 1189502L1) should be used to cover an
unused PSU slot. Refer to “LED Indicators” on page 4-10 after power is applied and a PSU is
inserted for the MX410 status.
The MX412 contains an internal power supply.
61189500L1-1B PRELIMINARY 4-9
Page 48

Front Panel MX410/MX412 System Manual
LED Indicators
The LEDs on the front panel of the MX410/MX412 indicate the status of the power, DS1,
Ethernet, and alarm interfaces. See Table 4-7 for a listing of the LEDs and their indications.
Table 4-7. LED Indication
Label Status Description
ACT
Green/Amber (Alternating) Normal operation and console session is open
Red/Amber (Alternating) Self-test failed and console session is open
Flashing Red Unit failure
ALM
Flashing Amber Active acknowledged critical alarm
Green Normal operation
Amber Software transfer in progress
Red Self-test failed
Green No critical, major, or minor alarms
Amber Active acknowledged non-critical alarm
Red Major or minor alarm in progress
PSU (A/B)
(MX410 only)
DS1
(1-4) MX410
(1-12) MX412
ETHERNET
(1-4)
Flashing Red Critical alarm in progress
Green Normal operation
Red PSU failure
Off Port disabled
Green Enabled and normal operation
Amber Locally originated test in progress
Flashing Amber Remotely originated test in progress
Red Non-critical DS1 alarm in progress (for example, AIS)
Flashing Red DS1 LOS (critical DS1 alarm; non-critical system alarm)
1 Second Flashing Red Single code violation or burst of code violations just
occurred
Off Link not established
Green Link established
Green/Amber (Alternating) Activity on the line
4-10 PRELIMINARY 61189500L1-1B
Page 49

MX410/MX412 System Manual Turn-up
TURN-UP
The following sections provide turn-up steps for applying power and logging in to the MX410/
MX412.
Power Up
To power up the MX410/MX412, perform the following steps:
1. Connect the MX410/MX412 to a reliably grounded –48 VDC or ±24 VDC source, which is
electrically isolated from the AC source.
NOTE
A readily accessible disconnect device, such as a rackmount fuse
and alarm panel that is suitably approved and rated should be
incorporated into the fixed wiring.
The branch circuit overcurrent protection should be a slow-blow
fuse or circuit breaker rated 2 amps or greater.
a. Determine which fuse pairs are to supply power to the chassis.
b. Remove the fuses from the A and B slots for the pair.
c. Pull the power connector straight out from the back of the MX410/MX412.
2. Apply power and check voltages.
a. Install appropriate fuses (2 amp slow-blow) in the slots in the fuse and alarm panel that
services the MX410/MX412.
b. Using a voltmeter, verify that the operating voltage is within the specifications for A or
B power feeds.
The A and B input voltage power feeds specifications are as follows:
• –48 VDC systems: –42 VDC to –60 VDC
• –24 VDC systems: –22 VDC to –27 VDC
• +24 VDC systems: +22 VDC to +27 VDC
Place the common (normally black) lead of the voltmeter on the
power terminal block and the DC volts (normally red) lead on the
RET A post of the DC
PWR A post of the DC
power terminal block.
c. Repeat step 2 for the
RET B/PWR B connections.
WARNING
Installing the power connector at this stage provides power to the
MX410/MX412. The pins and connectors on the rear panel and
inside the chassis are powered. Exercise caution to avoid electrical
shock.
61189500L1-1B PRELIMINARY 4-11
Page 50

Turn-up MX410/MX412 System Manual
3. Install the power connector for DC power feeds A and B by connecting RET A, PWR A, RET
B
, and PWR B to the power connector. PWR refers to respective –48 VDC or ±24 VDC power
sources, while
RET refers to respective returns.
a. Insert the power wires into the power connector and tighten the hold-down screws on
the top of the power connector.
b. Insert the power connector into the MX410/MX412 and tighten the two screws on the
front of the power connector.
4. Install at least one PSU into the MX410 front panel
PSU A or PSU B slot.
a. Line up the PSU with the guide grooves and carefully insert the unit into the MX410
until it seats all the way into the PSU slot of the MX410.
b. Tighten the thumb screws to secure the PSU in place.
To remove a PSU, remove the thumb screws that hold the PSU in place and carefully pull the
PSU straight out of the MX410.
Refer to “LED Indicators” on page 4-10 for LED indication of successful power turn-up.
4-12 PRELIMINARY 61189500L1-1B
Page 51

Section 5
User Interface
INTRODUCTION
This section provides detailed information on the following:
• “System Management” on page 5-1
• “Logging in to the MX410/MX412” on page 5-2
• “Menu Structure” on page 5-3
• “Menu Layout and Navigation” on page 5-4
• “Menu Tree” on page 5-5
• “Menu Descriptions” on page 5-11
SYSTEM MANAGEMENT
MX410/MX412 management and provisioning is facilitated by a series of intuitive menus that
are accessible on a computer screen. The MX410/MX412 provides two methods for
management access:
• “Craft Interface” on page 5-1
• “Telnet Session” on page 5-2
Craft Interface
Connection to the MX410/MX412 menus can be made through the DB-9 connector, labeled
CRAFT, on the front of the MX410/MX412. A DB-9 straight cable is required.
Most personal computers or laptops can run communications software that will emulate a
VT100 terminal. Windows programs such as Terminal or HyperTerminal are two such
examples in the Windows format, but there are many other adequate, commercially available
software packages, virtually all of which allow the PC or laptop to emulate a VT100 terminal.
Certain configuration items must be set on a PC or laptop to act as a VT100 terminal for the
MX410/MX412 as follows:
1. Set the parameters of the communications software to the following settings:
• Data Rate: 115200 bps
• Asynchronous Data Format as follows:
– Eight data bits
61189500L1-1B PRELIMINARY 5-1
Page 52

Logging in to the MX410/MX412 MX410/MX412 System Manual
– no parity (none)
–one stop bit
– no flow control
2. Set the PC for direct connect on the appropriate communications port (as opposed to dial
up connection).
3. Plug the male end of the data cable into the MX410/MX412. Make connection to the PC or
laptop as appropriate for the equipment.
Telnet Session
To access the MX410/MX412, use an appropriate Telnet client to access the management
interface of the MX410/MX412 at the configured IP address.
LOGGING IN TO THE MX410/MX412
To logon to the MX410/MX412, perform the following steps:
1. Establish the physical connection to the MX410/MX412 using a craft port session or
enter the default IP address “192.168.100.1” with a subnet mask of “255.255.0.0.” to
establish a Telnet session.
2. Enter the default username “ADMIN” in all capital letters, and press
3. Enter the default password “PASSWORD” in all capital letters, and press
NOTE
Login username and password fields are case sensitive. The default
values are all uppercase.
ENTER.
ENTER.
5-2 PRELIMINARY 61189500L1-1B
Page 53

MX410/MX412 System Manual Menu Structure
MENU STRUCTURE
The menu structure for the MX410/MX412 is a layered menu tree. Each layer of the menu
tree is displayed as a menu or a screen. This section defines the terminology used in
conjunction with the MX410/MX412 menu system.
NOTE
To view the MX410/MX412 menu tree, refer to “Menu Tree” on
page 5-5.
Menu
A menu is a display that provides numbered selections that are used to navigate to related
menus, modify provisioning information, or display information screens. A menu can contain
the following objects:
• Menu Option: A menu option is indicated by a number, which when selected navigates the
display to another menu layer or is used to change the option setting.
• Read-only Field: A read-only field displays information that cannot be changed. The
information displayed in a read-only field can be static or can be automatically updated by
the MX410/MX412.
• Read-write Field: A read-write field displays information that when selected can be
modified.
Screen
A screen is a display that usually indicates the end of a menu tree path. A screen can contain
the following objects:
• Read-only Field: A read-only field displays information that cannot be changed. The
information displayed in a read-only field can be static or can be automatically updated by
the MX410/MX412.
• Read-write Field: A read-write field displays information that when selected can be
modified.
• Keyboard Commands: A keyboard command is a key or combination of keys that are
assigned to a function (see Table 5-1). Keyboard commands are indicated by the required
key(s) and a brief description (i.e.,
CTRL+A - acknowledge all alarms).
61189500L1-1B PRELIMINARY 5-3
Page 54

Menu Layout and Navigation MX410/MX412 System Manual
MENU LAYOUT AND NAVIGATION
Figure 5-1 illustrates the basic menu layout used in the MX410/MX412 menu system. The
MX410/MX412 Menu Layout figure is general in nature, and not all menus contain all of the
elements shown in the figure.
MX410 04/10/05 01:25
Active Alarms: CRITICAL MAJOR MINOR ALERT ID: MX410
2
Menu Title
1 - Option : current selection
2 - Option
3 - Option
4 - Option
5 - Option
6 - Option
(T)oggle
Selection : '?' - System Help Screen
5
4
3
1
Figure 5-1. MX410/MX412 Menu Layout
1. Current Date and Time: displays the factory set date and time. The date and time can be
set from the Quick Setup menu or the General Provisioning menu.
2. Alarm Banner: displays a summary of the currently active alarms. If there are any active
Critical Alarms that have not been acknowledged, a flashing reverse video CRITICAL
appears in the alarm banner. If there are no active unacknowledged Critical alarms but
there are currently active acknowledged critical alarms, a solid reverse video CRITICAL
appears in the alarm banner. If there are no active Critical Alarms, nothing will be
displayed for CRITICAL in the alarm banner. Major, Minor, and Alert alarm severities are
displayed in the same manner. Alarm severities are (in descending order): Critical, Major,
Minor, Alert, and Info. Info alarms are not displayed in the menu alarm banner.
3. System ID: A 20-character field that displays the system ID, which can be set from the
Quick Setup menu or the General Provisioning menu.
4. Toggle: pressing the
T key toggles between interfaces or shows more information.
5. Selection: An echo field that displays user input. Selection values are applied by pressing
ENTER. Selection values are cleared by pressing the ESC or BACKSPACE key.
Basic menu navigation is accomplished by selecting the desired option number and then
pressing
Help screen can be accessed from any MX410/MX412 screen or menu by pressing “
ENTER. To work backward through the menus press the ESC (escape) key. The System
?”.
5-4 PRELIMINARY 61189500L1-1B
Page 55

MX410/MX412 System Manual Menu Tree
Table 5-1 shows the general keyboard commands for the MX410/MX412.
Table 5-1. MX410/MX412 Keyboard Commands
Keyboard Command Description
BACKSPACE This keyboard command is used to delete the character to left of
the cursor during keyboard input.
ENTER (or Return) This keyboard command is used to terminate input.
ESC This keyboard command is used to clear partial input data, or if
none, return to previous menu.
CTRL+A (Control and a) This keyboard command is used to acknowledge all alarms.
CTRL+C or D (Control and c or d) This keyboard command is used to logout and disconnect.
CTRL+R (Control and r) This keyboard command is used to refresh the display.
MENU TREE
Menu trees are maps that can be used to locate provisioning options with ease. This
subsection provides a detailed set of menu trees for the MX410/MX412. Some of the menu
trees span multiple pages, signified by the “(Continued)” at the end of the illustration title.
61189500L1-1B PRELIMINARY 5-5
Page 56

Menu Tree MX410/MX412 System Manual
Main Menu
1. Configuration
2. Provisioning
Unit Name
CLEI Code
Part Number
Serial Number
Product Revision
MAC Address
Code Version
Code Checksum
Boot Version
Boot Checksum
1. DS1 Ports
1. DS1 Provisioning - Port #1
2. DS1 Provisioning - Port #2
3. DS1 Provisioning - Port #3
4. DS1 Provisioning - Port #4
(MX412 Only)
12. DS1 Provisioning - Port #12
5. Primary TX Timing
6. Secondary TX Timing
1. Line Legnth
2. Line Coding
3. Loopback Detection
4. Framing
5. SNMP Line Status Trap
6. SNMP Link Status Trap
7. Circuit ID
8. Interface State
9. Alarm Pass Thru
1. Internal
2. DS1 1
3. DS1 2
4. DS1 3
5. DS1 4
(MX412 Only)
13. DS1 12
1. 0 - 133 ft
2. 133 - 266 ft
3. 266 - 399 ft
4. 399 - 533 ft
5. 533 - 655 ft
6. - 22.5 dB
7. - 15 dB
8. - 7.5 dB
9. - 0 dB
1. B8ZS
2. AMI
1. Enabled
2. Disabled
1. ESF
2. SF
1. Enabled
2. Disabled
1. Enabled
2. Disabled
User Input
1. Enabled
2. Disabled
1. Enabled
2. Disabled
Execute (Y, N)
1. Forced On
2. Normal
1. Forced On
2. Normal
1. Forced On
2. Normal
1. Choose TO Group
2. Choose TO DS0
3. Robbed Bit Signaling
4. Apply Cross-Connect
1. PPPs
2. V.35
(MX412 Only)
3. FXS
1. DS1 1
2. DS1 2
3. DS1 3
4. DS1 4
(MX412 Only)
12. DS1 12
Enter to DS0
1. Enabled
2. Disabled
1. Choose FROM PPP
2. Choose TO Group
3. Choose TO DS0 Range
4. Apply Cross-Connect
1. Choose TO Group
2. Choose TO DS0 Range
3. Apply Cross-Connect
1. Choose TO Group
2. Choose TO DS0
3. Mode
4. Apply Cross Connect
1. Loop Start
2. PLAR D4
3. PLAR D3
4. FX Ringdown
2. V.35 Port
3. Cross-Connect Mapping
Bold text indicates default
B
1. CTS
2. DCD
3. DSR
DS1 1 (DS0 1 - 24)
DS1 2 (DS0 1 - 24)
DS1 3 (DS0 1 - 24)
DS1 4 (DS0 1 - 24)
(MX412 Only)
DS1 12 (DS0 1 - 24)
Ports
A
Figure 5-2. MX410/MX412 Menu Tree
5-6 PRELIMINARY 61189500L1-1B
Page 57

MX410/MX412 System Manual Menu Tree
B
4. Terminal Server
5. General
1. Port 1
2. Port 2
3. Port 3
4. Port 4
1. Craft Port Baud Rate
2. Date
3. Time
4. System ID
1. Terminal State
2. Baud Rate
3. Telnet Port Number
4. Security
5. Username
6. Password
1. 9600
2. 19200
3. 38400
4. 57600
5. 115200
Enter Date (MM/DD/YYYY)
Enter Time (HH:MM:SS)
Enter Name
1. Enabled
2. Disabled
1. 9600
2. 19200
3. 38400
4. 57600
5. 115200
New Port Number
1. Enabled
2. Disabled
New Username
New Password
C
Bold text indicates default
5. Auto-Logoff Inactivity Time
6. Card Reset
7. Reset to Factory Defaults
8. Security Administration
1. 120 Minutes
2. 90 Minutes
3. 60 Minutes
4. 30 Minutes
5. 15 Minutes
6. 10 Minutes
7. 5 Minutes
8. Disabled
Execute <Y,N>
1. Reset All DS1 Provisioning
2. Reset All V.35 Provisioning
3. Reset All 1/0 Mapping
4. Reset All Terminal Server Provisioning
5. Reset All General Provisioning
6. Reset All Network Management Provisioning
7. Reset All SNMP Provisioning
8. Reset ALL Factory Defaults
1. Edit User Accounts
2. Create New User Account
3. Restore to Default Accounts
4. Access Tech Support Account
1. User ID
2. Password
3. Apply
1. Yes
2. No
Challenge Key
Enter Response Key
Figure 5-2. MX410/MX412 Menu Tree (Continued)
61189500L1-1B PRELIMINARY 5-7
Page 58

Menu Tree MX410/MX412 System Manual
C
6. Network Management
7. SNMP
8. System Configuration Archive (SCA)
9. Save Provisioning
10. Auto Save
Bold text indicates default
1. Ethernet
2. PPP BCP/IPCP
3. DHCP
1. SNMP State
2. Trap Host 1 IP
3. Trap Host 2 IP
4. Trap Host 3 IP
5. Trap Host 4 IP
6. SNMP Traps
7. System Name
8. System Location
9. System Contact
10. Read Community
11. Write Community
1. SCA TFTP Server
2. Remote Filename
3. All/Data Path Only
4. Perform SCA Save
5. Perform SCA Restore
6. Auto Save Time
7. Auto Save
1. IP Address
Subnet Mask
2. Gateway
MAC Address
Eth (1 - 4)
3. Link Speed & Duplex
Functional Link Speed & Duplex
Link Status
1. BCP/IPCP
PPP (1 - 4)
2. IP Address
Subnet Mask
Far End IP Address
3. SNMP Link Status Trap
LCP Status
BCP/IPCP Status
1. State
2. Network
3. Default Router
4. DNS Router
5. Address Range
6. Lease Time
1. Enabled
2. Disabled
1. Trap Host IP
2. Trap Host Method
3. Trap Host Status
1. Enabled
2. Disabled
New System ID
New Location
New Contact
New Community
New Community
Enter SCA TFTP Server
Enter Remote SCA Filename
1. All
2. Data Path Only
Enter Auto Save Time (Day HH:MM)
1. Enabled
2. Disabled
1. IP Address
2. Subnet Mask
3. Apply Settings
New Gateway
1. Auto
2. 10 Mbps, Half Duplex
3. 10 Mbps, Full Duplex
4. 100 Mbps, Half Duplex
5. 100 Mbps, Full Duplex
1. BCP
2. IPCP
1. IP Address
2. Subnet Mask
3. Apply Settings
1. Enabled
2. Disabled
1. Enabled
2. Disabled
New Network / Mask
New Default Router
New DNS Router
New Range (begin-end)
New Lease Time (d:h:m)
New IP Address
New Subnet Mask
New IP Address
New Subnet Mask
Figure 5-2. MX410/MX412 Menu Tree (Continued)
5-8 PRELIMINARY 61189500L1-1B
Page 59

MX410/MX412 System Manual Menu Tree
A
3. Quick Setup
4. Status
1. PPPs
2. V.35
3. FXS
(MX412 Only)
3. System ID
4. IP Address / Subnet Mask
5. Default Gateway
6. Date
7. Time
8. Cross-Connect Setup
1. Choose FROM PPP
2. Choose TO Group
3. Choose TO DS0 Range
4. Apply Cross-Connect
1. Choose TO Group
2. Choose TO DS0 Range
3. Apply Cross-Connect
1. Choose TO Group
2. Choose TO DS0
3. Mode
4. Apply Cross Connect
New System Name
1. IP Address
2. Subnet Mask
3. Apply Settings
New Gateway
Enter Date (MM/DD/YYYY)
Enter Time (HH:MM:SS)
DS1 1 (DS0 1 - 24)
DS1 2 (DS0 1 - 24)
DS1 3 (DS0 1 - 24)
DS1 4 (DS0 1 - 24)
(MX412 Only)
DS1 12 (DS0 1 - 24)
Ports
1. Loop Start
2. PLAR D4
3. PLAR D3
4. FX Ringdown
New IP Address
New Subnet Mask
1. Choose TO Group
2. Choose TO DS0
3. Robbed Bit Signaling
4. Apply Cross-Connect
1. PPPs
2. V.35
3. FXS
(MX412 Only)
1. DS1 1
2. DS1 2
3. DS1 3
4. DS1 4
(MX412 Only)
12. DS1 12
Enter to DS0
1. Enabled
2. Disabled
1. Choose FROM PPP
2. Choose TO Group
3. Choose TO DS0 Range
4. Apply Cross-Connect
1. Choose TO Group
2. Choose TO DS0 Range
3. Apply Cross-Connect
1. Choose TO Group
2. Choose TO DS0
3. Mode
4. Apply Cross Connect
1. Loop Start
2. PLAR D4
3. PLAR D3
4. FX Ringdown
D
Bold text indicates default
Figure 5-2. MX410/MX412 Menu Tree (Continued)
61189500L1-1B PRELIMINARY 5-9
Page 60

Menu Tree MX410/MX412 System Manual
D
DS1 Ports
5. Test
6. Performance Monitoring
7. System Alarms
8. Code Download
9. Logoff
Bold text indicates default
1. #1
2. #2
3. #3
4. #4
5. Reset ALL Tests
6. Loopback Timeout
1. Daily PM Table
2. Quarter Hour PM Table
3. Daily PM Thresholds
4. Quarter Hour PM Thresholds
5. Clear PM Data
1. Master Log
2. Environmental Alarms
3. Alarm Chronology
1. X-MODEM
2. TFTP
1. Loopback
Pattern
DS1 x Status
1. 120 Minutes
2. 90 Minutes
3. 60 Minutes
4. 30 Minutes
5. 15 Minutes
6. 10 Minutes
7. 5 Minutes
8. Disabled
1. ES-L Threshold
2. CV-P Threshold (ESF mode)
3. CV-P Threshold (SF mode)
4. ES-P Threshold
5. SES-P Threshold
6. SES-P Threshold
7. CSS-P Threshold
8. UAS-P Threshold
1. Aux #1 Input
2. Aux #2 Input
3. Aux #3 Input
4. Aux #4 Input
5. Power Feed A
6. Power Feed B
(MX410 Only)
7. PSU A
8. PSU B (MX410 Only)
1. Ascending
2. Descending
1. Initiate Transfer
2. Card Reset
1. TFTP Server
2. Remote Filename
3. Initiate Transfer
4. Card Reset
1. Data Mode
2. Payload
3. Line
4. Inward
5. Dual
6. Remote FDL Line
7. Remote Inband Line (CSU)
8. Remote FDL Payload
9. Pattern Test
1. Value
2. Enable/Disable
1. Severity
2. Description
Execute <Y,N>
Enter TFTP Server
Enter Remote Filename
Execute <Y,N>
Execute (Y, N)
1. QRSS
2. All Ones
3. All Zeros
4. 511
5. 2047
6. 2^15-1
7. 2^20-1
Execute (Y, N)
Figure 5-3. MX410/MX412 Menu Tree (Continued)
5-10 PRELIMINARY 61189500L1-1B
Page 61

MX410/MX412 System Manual Menu Descriptions
MENU DESCRIPTIONS
The MX410/MX412 Main Menu (see Figure 5-4) is the access point to all other operations.
Each Main menu item has several functions and submenus that identify and provide access to
specific operations and parameters.
MX410 MM/DD/YY HH:MM
Active Alarms: CRITICAL MAJOR MINOR ID: MX410
Main Menu
1 - Configuration
2 - Provisioning
3 - Quick Setup
4 - Status
5 - Test
6 - Performance Monitoring
7 - System Alarms
8 - Code Download
9 - Logoff
Selection : '?' - System Help Screen
Figure 5-4. MX410/MX412 Main Menu
The MX410/MX412 Main Menu options are shown in Table 5-2.
Table 5-2. MX410/MX412 Main Menu Options
Option Description Function
1 Configuration This option displays the “Configuration Screen” on page 5-12.
2 Provisioning This option displays the “Provisioning Menu” on page 5-14.
3 Quick Setup This option displays the “Quick Setup Menu” on page 5-38.
4 Status This option displays the “Status Screen” on page 5-40.
5 Test This option displays the “Test Menu” on page 5-42.
6 Performance Monitoring This option displays the “Performance Monitoring Menu” on
page 5-46.
7 System Alarms This option displays the “System Alarms Menu” on page 5-53.
8 Code Download This option displays the “Code Download Method Menu” on
page 5-55.
9 Logoff This option is used to end an MX410/MX412 menus session.
No further menus, screens, or confirmation dialog boxes are
presented.
61189500L1-1B PRELIMINARY 5-11
Page 62

Menu Descriptions MX410/MX412 System Manual
Configuration Screen
The Configuration Screen (see Figure 5-5) displays information about the MX410/MX412.
Information such as Code Version changes as upgrades are performed. The CLEI Code and
Part Number can be used to search for related information on the ADTRAN website or to order
additional parts. Some information from this menu may be required when calling the ADTRAN
Technical Support.
MX410 MM/DD/YY HH:MM
Active Alarms: CRITICAL ID: MX410
Configuration
Unit Name : MX410
CLEI Code : M3M1310BRA
Part Number : 1189500L1
Serial Number : DVTUUTNXXX
Product Revision : B
MAC Address : XX:XX:XX:XX:XX:XX
Code Version : B01
Code Checksum : ADCDEFGH
Boot Version : B03
Boot Checksum : 7C22
'?' - System Help Screen
Figure 5-5. Configuration Screen
The Configuration screen fields are shown in Table 5-3.
5-12 PRELIMINARY 61189500L1-1B
Page 63

MX410/MX412 System Manual Menu Descriptions
Table 5-3. MX410/MX412 Configuration Screen Fields
Field Description
Unit Name This field displays the MX410/MX412 unit name.
CLEI Code This field displays the Common Language Equipment Identifier (CLEI) code of the
MX410/MX412.
Part Number This field displays the MX410/MX412 part number.
Serial Number This field displays the serial number of the MX410/MX412.
Product Revision This field displays the hardware product assembly revision of the MX410/
MX412.
MAC Address This field displays the factory programmed Media Access Control (MAC) or phys-
ical layer address for the MX410/MX412.
Code Version This field displays the current firmware revision level of the MX410/MX412.
Code Checksum This field displays the checksum of the current firmware revision level of the
MX410/MX412.
Boot Version This field displays the Boot ROM software revision code of the MX410/MX412.
Boot Checksum This field displays the checksum of the Boot ROM software revision code of the
MX410/MX412.
61189500L1-1B PRELIMINARY 5-13
Page 64

Menu Descriptions MX410/MX412 System Manual
Provisioning Menu
The Provisioning Menu (see Figure 5-6) is used to make provisioning changes to various
options.
MX410 MM/DD/YY HH:MM
Active Alarms: CRITICAL MAJOR MINOR ID: MX410
Provisioning
1 - DS1 Ports
2 - V.35 Port
3 - Cross-Connect Mapping
4 - Terminal Server Ports
5 - General
6 - Network Management
7 - SNMP
8 - System Configuration Archive (SCA)
9 - Save Provisioning
10 - Auto Save : Enabled
Selection : '?' - System Help Screen
Figure 5-6. Provisioning Menu
The Provisioning menu options are shown in Table 5-4.
5-14 PRELIMINARY 61189500L1-1B
Page 65

MX410/MX412 System Manual Menu Descriptions
Table 5-4. Provisioning Menu Options
Option Description Function
1 DS1 Ports This option displays the “DS1 Ports Menu” on page 5-16.
2 V.35 Port This option displays the “V.35 Port Menu” on page 5-22.
3 Cross-Connect Mapping This option displays the “Cross-Connect Mapping Menu” on
page 5-23.
4 Terminal Server Ports This option displays the “Terminal Server Ports Menu” on
page 5-25.
5 General This option displays the “General Provisioning Menu” on page 5-
27.
6 Network Management This option displays the “Network Management Menu” on
page 5-29.
7 SNMP This option displays the “SNMP Menu” on page 5-35.
8 System Configuration
This option displays the “SCA Update Menu” on page 5-37.
Archive (SCA)
9 Save Provisioning This option is used to save current network settings.
10 Auto Save This option is used to automatically save current network
settings at timed intervals.
61189500L1-1B PRELIMINARY 5-15
Page 66

Menu Descriptions MX410/MX412 System Manual
DS1 Ports Menu
The DS1 Ports Menu (see Figure 5-7) displays line length, line coding, loopback detection,
framing, SNMP line status trap, SNMP link status trap, circuit ID, interface state, and alarm
pass thru information for DS1 ports 1-4 (1-12 on the MX412), as well as timing information.
Selection of an option invokes other menus to set the option variables. The Toggle command
can be used to view more DS1 port information shown in Figure 5-8.
MX410 MM/DD/YY HH:MM
Active Alarms: CRITICAL MAJOR ID: MX410
DS1 Ports
Line Line Loopback SNMP Line SNMP Link
Length Coding Detect Framing Status Trap Status Trap
1 - 0 - 133 ft B8ZS Enabled ESF Disabled Enabled
2 - 0 - 133 ft B8ZS Enabled ESF Disabled Enabled
3 - 0 - 133 ft B8ZS Enabled ESF Disabled Enabled
4 - 0 - 133 ft B8ZS Enabled ESF Disabled Enabled
5 - Primary TX Timing - Internal
6 - Secondary TX Timing - Internal
(T)oggle for more
Selection : '?' - System Help Screen
Figure 5-7. DS1 Ports Menu
MX410 MM/DD/YY HH:MM
Active Alarms: CRITICAL MAJOR ID: MX410
DS1 Ports
Circuit ID Interface State Alarm Pass Thru
1 - Enabled Disabled
2 - Enabled Disabled
3 - Enabled Disabled
4 - Enabled Disabled
5 - Primary TX Timing - Internal
6 - Secondary TX Timing - Internal
(T)oggle for more
Selection : '?' - System Help Screen
Figure 5-8. DS1 Ports Menu - Toggled
5-16 PRELIMINARY 61189500L1-1B
Page 67

MX410/MX412 System Manual Menu Descriptions
The DS1 Ports menu options are shown in Table 5-5.
Table 5-5. DS1 Ports Menu Options
Option Description Function
1 DS1 Port #1 This option displays the “DS1 Provisioning Menu” on page 5-18.
2 DS1 Port #2 This option displays the “DS1 Provisioning Menu” on page 5-18.
3 DS1 Port #3 This option displays the “DS1 Provisioning Menu” on page 5-18.
4 DS1 Port #4 This option displays the “DS1 Provisioning Menu” on page 5-18.
5 Primary TX Timing This option displays the “Primary Timing Mode Menu” on page 5-20.
6 Secondary TX Timing This option displays the “Secondary Timing Mode Menu” on page 5-
21.
61189500L1-1B PRELIMINARY 5-17
Page 68

Menu Descriptions MX410/MX412 System Manual
DS1 Provisioning Menu
The DS1 Provisioning menu (see Figure 5-9) is used to set the line length, line coding,
loopback detection, framing, SNMP line status trap, SNMP link status trap, circuit ID,
interface state, and alarm pass thru information for the selected DS1 port.
MX410 MM/DD/YY HH:MM
Active Alarms: CRITICAL MAJOR ID: MX410
DS1 Provisioning - Port #1
1 - Line Length : 0 - 133 ft
2 - Line Coding : B8ZS
3 - Loopback Detection : Enabled
4 - Framing : ESF
5 - SNMP Line Status Trap : Disabled
6 - SNMP Link Status Trap : Enabled
7 - Circuit ID :
8 - Interface State : Enabled
9 - Alarm Pass Thru : Disabled
Selection : '?' - System Help Screen
Figure 5-9. DS1 Provisioning Menu
The DS1 Provisioning menu options are shown in Table 5-6.
5-18 PRELIMINARY 61189500L1-1B
Page 69

MX410/MX412 System Manual Menu Descriptions
Table 5-6. DS1 Provisioning Menu Options
Option Description Function
1 Line Length This option sets the line length (line build out) for each port inter-
face according to the distance from the MX410/MX412 to the other
device.
Options for line length are as follows:
• 1 - Set line length from 0 to 133 feet
• 2 - Set line length from 133 to 266 feet
• 3 - Set line length from 266 to 399 feet
• 4 - Set line length from 399 to 533 feet
• 5 - Set line length from 533 to 655 feet
• 6 - –22.5 dB
•7 - –15 dB
• 8 - –7.5 dB
•9 - 0 dB
2 Line Coding This option sets the line code for each individual port interface to
match the connected device.
Options for line coding are as follows:
•1 - AMI
•2 - B8ZS
3 Loopback Detection This option enables or disables whether a port responds to CSU
and FDL loopback requests coming from the network.
4 Framing This option sets the framing. Options for framing are as follows:
• 1 - ESF (Extended Super Frame)
• 2 - SF (Super Frame).
5 SNMP Line Status
Trap
6 SNMP Link Status
Trap
7 Circuit ID This option contains a user-configurable text string field to name
8 Interface State This option is viewed using the Toggle command and sets the
9 Alarm Pass Thru This option enables or disables semi-transparency for visibility
This option enables or disables the SNMP line status trap state.
This option enables or disables the SNMP link status trap state.
the selected port. This field accepts up to 32 alphanumeric characters, including spaces and special characters.
interface state to either enabled or disabled.
through the cross connect to remote devices. This option enables
the selected DS1 to transmit RAI when any cross-connected DS1 is
in alarm or receiving RAI.
Alarm Pass Thru
61189500L1-1B PRELIMINARY 5-19
Page 70

Menu Descriptions MX410/MX412 System Manual
Primary Timing Mode Menu
The Primary Timing Mode menu (see Figure 5-10) is used to set the primary timing mode for
the selected DS1 port (1-4 on the MX410 and 1-12 on the MX412).
MX410 MM/DD/YY HH:MM
Active Alarms: CRITICAL MAJOR ID: MX410
Primary Timing Mode : Internal
1 - Internal
2 - DS1 1
3 - DS1 2
4 - DS1 3
5 - DS1 4
Selection : '?' - System Help Screen
Figure 5-10. Primary Timing Mode Menu
The Primary Timing Mode menu options are shown in Table 5-7.
Table 5-7. Primary Timing Mode Menu Options
Option Description Function
1 Internal This option sets the timing mode to internal.
2 DS1 1 This option sets the timing mode to DS1 1.
3 DS1 2 This option sets the timing mode to DS1 2.
4 DS1 3 This option sets the timing mode to DS1 3.
5 DS1 4 This option sets the timing mode to DS1 4.
CAUTION
The entire MX410/MX412 is timed from a single source and all
transmitters are synchronized. Any device attached to the MX410/
MX412 should be placed in loop or line timing mode, unless it is
providing timing. If an attached device is providing timing, the
MX410/MX412 must be configured to use this interface as its primary timing source. If the MX410/MX412 is set for internal timing,
all devices connected to it must be set to loop or line timing.
5-20 PRELIMINARY 61189500L1-1B
Page 71

MX410/MX412 System Manual Menu Descriptions
Secondary Timing Mode Menu
The Secondary Timing Mode menu (see Figure 5-11) is used to set the secondary timing mode
for the selected DS1 port (1-4 on the MX410 and 1-12 on the MX412).
MX410 MM/DD/YY HH:MM
Active Alarms: CRITICAL MAJOR ID: MX410
Primary Timing Mode : Internal
1 - Internal
2 - DS1 1
3 - DS1 2
4 - DS1 3
5 - DS1 4
Selection : '?' - System Help Screen
Figure 5-11. Secondary Timing Mode Menu
The Secondary Timing Mode menu options are shown in Table 5-8.
Table 5-8. Secondary Timing Mode Menu Options
Option Description Function
1 Internal This option sets the timing mode to internal.
2 DS1 1 This option sets the timing mode to DS1 1.
3 DS1 2 This option sets the timing mode to DS1 2.
4 DS1 3 This option sets the timing mode to DS1 3.
5 DS1 4 This option sets the timing mode to DS1 4.
CAUTION
The entire MX410/MX412 is timed from a single source and all
transmitters are synchronized. Any device attached to the MX410/
MX412 should be placed in loop or line timing mode, unless it is
providing timing. If an attached device is providing timing, the
MX410/MX412 must be configured to use this interface as its primary timing source. If the MX410/MX412 is set for internal timing,
all devices connected to it must be set to loop or line timing.
61189500L1-1B PRELIMINARY 5-21
Page 72

Menu Descriptions MX410/MX412 System Manual
V.35 Port Menu
The V.35 Port Menu (see Figure 5-12) is used to provision the V.35 Port.
MX410 MM/DD/YY HH:MM
Active Alarms: CRITICAL ID: MX410
V.35 Port
1 - CTS : Forced On
2 - DCD : Forced On
3 - DSR : Normal
Selection : '?' - System Help Screen
Figure 5-12. V.35 Port Menu
The V.35 Port menu options are shown in Table 5-9.
Table 5-9. V.35 Port Menu Options
Option Description Function
1 CTS This option sets the CTS (Clear To Send) settings. Options are as
follows:
• Normal: The setting matches RTS settings.
• Forced On: This setting forces CTS to be active.
2 DCD This option sets the DCD (Data Carrier Detect) settings. Options
are as follows:
• Normal: The setting matches the status of the connected DS1.
• Forced On: This setting forces DCD to be active.
3 DSR This option sets the DSR (Data Set Ready) settings. Options are as
follows:
• Normal: The setting follows DTR settings.
• Forced On: This setting forces DSR to be active.
5-22 PRELIMINARY 61189500L1-1B
Page 73

MX410/MX412 System Manual Menu Descriptions
Cross-Connect Mapping Menu
The Cross-Connect Mapping menu is used to display DS0 information for the four DS1 ports
(12 ports on the MX412), as well as FXS (MX412 only), PPP, and V.35 settings. The CrossConnect Mapping menu is shown in Figure 5-13 displaying DS0 mapping for the DS1 1 port.
The Toggle command is used to view DS1 2, DS1 3, DS1 4, PPP, and V.35 data. All of the DS1
toggle menus have identical options, and all of the 24 DS0s have identical options for the
selected DS1. The Cross-Connect Mapping - Ports toggle menu is shown in Figure 5-14.
MX410 MM/DD/YY HH:MM
Active Alarms: CRITICAL ID: MX410
Cross-Connect Mapping
DS1 1 - Huntsville T1
1 - DS0 #1 = DS1 1 DS0 #2 13 - DS0 #13 =
2 - DS0 #2 = DS1 1 DS0 #1 14 - DS0 #14 =
3 - DS0 #3 = 15 - DS0 #15 =
4 - DS0 #4 = 16 - DS0 #16 =
5 - DS0 #5 = 17 - DS0 #17 =
6 - DS0 #6 = 18 - DS0 #18 =
7 - DS0 #7 = 19 - DS0 #19 =
8 - DS0 #8 = 20 - DS0 #20 =
9 - DS0 #9 = 21 - DS0 #21 =
10 - DS0 #10 = 22 - DS0 #22 =
11 - DS0 #11 = 23 - DS0 #23 =
12 - DS0 #12 = 24 - DS0 #24 =
(T)oggle View (DS1 2, DS1 3, DS1 4, Ports) 25 - Map Multiple DS0's
Selection : '?' - System Help Screen
Figure 5-13. Cross-Connect Mapping Menu
MX410 MM/DD/YY HH:MM
Active Alarms: CRITICAL ID: MX410
Cross-Connect Mapping
Ports
1 - PPPs
PPP 1 = DS1 4 DS0 #1
2 - V.35 =
3 - FXS =
(T)oggle View (DS1 1, DS1 2, DS1 3, DS1 4)
Selection : '?' - System Help Screen
Figure 5-14. Cross-Connect Mapping - Ports Menu
61189500L1-1B PRELIMINARY 5-23
Page 74

Menu Descriptions MX410/MX412 System Manual
The Cross-Connect Mapping menu options are shown in Table 5-10.
Table 5-10. Cross-Connect Mapping Menu Options
Option Description Function
1-24 DS0 1-24 connections These options invoke the Change Cross-Connect Mapping menu
which is used to provision the cross-connect settings for the
selected DS1 port. Options are as follows:
• 1. Choose TO Group (for DS1 1 through DS1 4/DS1 12)
• 2. Choose TO DS0: (enter a value)
• 3. Robbed Bit Signaling: select Enabled or Disabled
• 4. Apply Cross-Connect: applies the selections made from the
Change Cross-Connect Mapping menu.
25 Map Multiple DS0's This option invokes the Change Cross-Connect Mapping menu
which is used to provision the cross-connect settings for multiple
DS0s at the same time. Options are as follows:
• 1. Choose FROM DS0 Range: enter a range
• 2. Choose TO Group (for DS1 1 through DS1 4/DS1 12)
• 3. Choose TO DS0 Range: enter a range
• 4. Robbed Bit Signaling: select Enabled or Disabled
• 5. Apply Cross-Connect: applies the selections made from the
Change Cross-Connect Mapping menu to all DS0s in the
range entered.
Cross-Connect Mapping - Ports
1 PPPs This option invokes the Change Cross-Connect Mapping menu,
which is used to provision the PPP ports. Options are as follows:
• 1. Choose FROM PPP (for PPP 1 through PPP 4)
• 2. Choose TO Group (for DS1 1 through DS1 4)
• 3. Choose TO DS0 Range: enter a range
• 4. Apply Cross-Connect
2 V.35 This option invokes the Change Cross-Connect Mapping menu,
which is used to provision the V.35 port. Options are as follows:
• 1. Choose TO Group (for DS1 1 through DS1 4/DS1 12)
• 2. Choose TO DS0 Range: enter a range
• 3. Apply Cross-Connect
3 FXS (MX412 only) This option invokes the Change Cross-Connect Mapping menu
which is used to provision the FXS port. Options are as follows:
• 1. Choose TO Group (for DS1 1 through DS1 12)
• 2. Choose TO DS0 Range: enter a range
• 3. Mode: Select Loop Start, PLAR D4, PLAR D3, or FX
Ringdown. Refer to Table 4-6 on page 4-9 for descriptions of
these options.
• 4. Apply Cross-Connect
5-24 PRELIMINARY 61189500L1-1B
Page 75

MX410/MX412 System Manual Menu Descriptions
Terminal Server Ports Menu
The Terminal Server Ports Menu (see Figure 5-15) is used to select Terminal Port 1 through
Port 4 for provisioning.
MX410 MM/DD/YY HH:MM
Active Alarms: CRITICAL ID: MX410
Terminal Server Ports
1 - Port 1
2 - Port 2
3 - Port 3
4 - Port 4
Selection : '?' - System Help Screen
Figure 5-15. Terminal Server Ports Menu
The Terminal Server Ports menu options are shown in Table 5-11.
Table 5-11. Terminal Server Ports Menu Options
Option Description Function
1 Port 1 This option invokes the “Terminal Server Port (1 - 4) Menu” on
page 5-26.
2 Port 2 This option invokes the “Terminal Server Port (1 - 4) Menu” on
page 5-26.
3 Port 3 This option invokes the “Terminal Server Port (1 - 4) Menu” on
page 5-26.
4 Port 4 This option invokes the “Terminal Server Port (1 - 4) Menu” on
page 5-26.
61189500L1-1B PRELIMINARY 5-25
Page 76

Menu Descriptions MX410/MX412 System Manual
Terminal Server Port (1 - 4) Menu
The Terminal Server Port Menu (see Figure 5-16) is used to provision the Terminal Sever Port
selected on the (previous) Terminal Server Ports menu.
MX410 MM/DD/YY HH:MM
Active Alarms: CRITICAL ID: MX410
Terminal Server Port 1
1 - Terminal State : Enabled
2 - Baud Rate : 9600
3 - Telnet Port Number : 2023
4 - Security : Enabled
5 - Username : port 1
6 - Password : password
Selection : '?' - System Help Screen
Figure 5-16. Terminal Server Port 1 Menu
The Terminal Server Port (1-4) menu options are shown in Table 5-12.
Table 5-12. Terminal Server Port Menu Options
Option Description Function
1 Terminal State This option enables or disables the terminal state.
2 Baud Rate This option sets the terminal server baud rate. Options are as
follows:
•9600
• 19200
• 38400
• 57600
• 115200
3 Telnet Port Number This option is used to enter a new Telnet port number.
4 Security This option is used to enable or disable terminal port security.
5 Username This option is used to assign a username to the selected port
number for use when security is enabled.
6 Password This option is used to assign a password to the selected port
number for use when security is enabled.
5-26 PRELIMINARY 61189500L1-1B
Page 77

MX410/MX412 System Manual Menu Descriptions
General Provisioning Menu
The General Provisioning Menu (see Figure 5-17) is used to provision the craft port Baud rate,
the date, time, system ID, auto-logoff inactivity time, to reset the MX410/MX412, and to
handle security administration.
MX410 MM/DD/YY HH:MM
Active Alarms: CRITICAL ID: MX410
General Provisioning
1 - Craft Port Baud Rate : 115200
2 - Date : 04/22/2005
3 - Time : 18:50:47
4 - System ID : MX410
5 - Auto-Logoff Inactivity Time : 15 minutes
6 - Card Reset
7 - Reset To Factory Defaults
8 - Security Administration
Selection: '?' - System Help Screen
Figure 5-17. General Provisioning Menu
The General Provisioning menu options are shown in Table 5-13.
Table 5-13. General Provisioning Menu Options
Option Description Function
1 Craft Port Baud Rate This option sets the craft port baud rate. Options are as follows:
• 9600
• 19200
• 38400
• 57600
• 115200.
2 Date This option is used to enter the date.
3 Time This option is used to enter the time.
4 System ID This option defines the alphanumeric name assigned to the
MX410/MX412.
61189500L1-1B PRELIMINARY 5-27
Page 78

Menu Descriptions MX410/MX412 System Manual
Table 5-13. General Provisioning Menu Options (Continued)
Option Description Function
5 Auto-Logoff Inactivity
Time
This option defines when a menu session automatically terminates due to inactivity. The default setting is 15 Minutes. Options
are as follows:
• 120 Minutes
• 90 Minutes
• 60 Minutes
• 30 Minutes
• 15 Minutes
• 10 Minutes
•5 Minutes
• Disabled
6 Card Reset This option forces the MX410/MX412 to reset.
7 Reset to Factory
Defaults
8 Security
Administration
This option is used to reset factory defaults by logical groups, or
reset all factory defaults at once.
This option invokes the Security Administration menu, which is
used to manage accounts. Options are as follows:
• Users Currently Logged On: This option displays active
usernames, access method and address, and the login time.
• Edit User Accounts: This option is used to edit user accounts.
• Create New User Account: This option is used to create new
user accounts. Options are as follows:
– User ID: This option is used to enter a new username.
– Password: This option is used to enter a new password.
– Access Rights: This option is used to select Read, Test,
Read/Write, or Admin access privileges.
– Apply: This option saves the new user account
information.
• Restore to Default Accounts: This option is used to restore the
accounts default and deletes all previous information by
selecting Yes or No.
• Access Tech Support Account: This option is used to access
the technical support account information by entering a
Response Key.
5-28 PRELIMINARY 61189500L1-1B
Page 79

MX410/MX412 System Manual Menu Descriptions
Network Management Menu
The Network Management menu (see Figure 5-18) is used to provision network information.
MX410 MM/DD/YY HH:MM
Active Alarms: CRITICAL MAJOR ID: MX410
Network Management
1 - Ethernet
2 - PPP BCP/IPCP
3 - DHCP
Selection : '?' - System Help Screen
Figure 5-18. Network Management Menu
The Network Management menu options are shown in Table 5-14.
Table 5-14. Network Management Menu Options
Option Description Function
1 Ethernet This option invokes the “Ethernet Menu” on page 5-30.
2 PPP BCP/IPCP This option invokes the “PPP BCP/IPCP Menu” on page 5-32.
3 DHCP This option invokes the “DHCP Server Menu” on page 5-34.
61189500L1-1B PRELIMINARY 5-29
Page 80

Menu Descriptions MX410/MX412 System Manual
Ethernet Menu
The Ethernet Menu (see Figure 5-19) is used to provision Ethernet information.
MX410 MM/DD/YY HH:MM
Active Alarms: CRITICAL ID: MX410
Ethernet
1 - IP Address : 192.168.100.1
Subnet Mask : 255.255.0.0
2 - Gateway : 192.168.1.1
MAC Address : XX:XX:XX:XX:XX:XX
Eth 1
3 - Link Speed & Duplex : Auto
Functional Link Speed & Duplex : Unknown
Link Status : Down
(T)oggle Between Interfaces
Selection : '?' - System Help Screen
Figure 5-19. Ethernet Menu
The Ethernet menu options are shown in Table 5-15.
Table 5-15. Ethernet Menu Options
Option Description Function
1 IP Address This option invokes another menu which is used to enter the IP
Address and the Subnet Mask for the MX410/MX412. The IP
Address is written in the format XXX.XXX.XXX.XXX, where each 3digit field has a value between 1 and 255.
N/A Subnet Mask This field displays the Subnet Mask. A subnet mask is used to
reduce the traffic on each subnetwork by confining traffic to only
the subnetwork for which it was intended. A subnet mask makes
the entire network more manageable. In effect, each subnet functions as though it were an independent network, keeping local traffic local and forwarding traffic to another subnet only if the address
of the data is external to the subnet. The Subnet Mask is written in
the format XXX.XXX.XXX.XXX, where each 3-digit field has a value
between 1 and 255.
2 Gateway This option invokes another menu which is used to enter the
address of the default gateway/router between the internal
network and the external network. The Gateway address is written
in the format XXX.XXX.XXX.XXX, where each 3-digit field has a
value between 1 and 255.
5-30 PRELIMINARY 61189500L1-1B
Page 81

MX410/MX412 System Manual Menu Descriptions
Table 5-15. Ethernet Menu Options (Continued)
Option Description Function
MAC Address This read-only field displays the Medium Access Control (MAC)
Address. MAC Addresses are location-independent (programmed
into the card at manufacture, they relocate when the card does).
MAC Addresses are contained in the headers of packets and are
used to filter and forward packets.
Eth (1-4)
3 Link Speed & Duplex This option invokes another menu which is used to select the data
rate setting for Ethernet Port (1-4) on the front panel of the
MX410/MX412. Options are as follows:
• 1 - Auto
• 2 - 10 Mbps, Half Duplex
• 3 - 10 Mbps, Full Duplex
• 4 - 100 Mbps, Half Duplex
• 5 - 100 Mbps, Full Duplex
N/A Functional Link
This read-only field displays the actual data rate of the port.
Speed & Duplex
N/A Link Status This read-only field displays the status of the network as being
either Up or Down.
61189500L1-1B PRELIMINARY 5-31
Page 82

Menu Descriptions MX410/MX412 System Manual
PPP BCP/IPCP Menu
Point-to-Point Protocol (PPP) is commonly used for LAN extension and Remote management
connectivity. PPP can use one of two upper layer protocols:
• BCP (Bridge Control Protocol): This protocol routes packets based on MAC addresses and
allows broadcast traffic to be passed over the PPP link(s). This protocol enables true LAN
Extension to be completed. Any device on the LAN can communicate with any other device
with the least amount of configuration by the user.
• IPCP (IP Control Protocol): This protocol is used to for the user to assign an IP address to
each interface of the MX410/MX412. This enables dynamic routing of packets based on
the IP address and prohibits broadcast traffic from being passed over the PPP link(s). This
protocol requires more IP knowledge and configuration of each device on the network to
ensure proper IP routing, Default gateway configuration, as well as avoiding conflicts of
networks and DHCP configurations. When IPCP is enabled, RIP v2 is the routing protocol
used by the MX410/MX412.
If using PPP, the T1/FT1 carrying the PPP link should be configured to ESF and B8ZS.
CAUTION
Only one PPP link can be connected between two devices. If more
than one PPP link is connected between two devices, it creates an
Ethernet LOOP and causes a Packet Storm across the entire
Ethernet network.
The PPP BCP/IPCP menu shown in Figure 5-20 is used to provision the PPP ports.
MX410 MM/DD/YY HH:MM
Active Alarms: CRITICAL MAJOR MINOR ID: MX410
PPP BCP/IPCP
1 - BCP/IPCP : BCP
PPP 1
2 - IP Address : unknown
Subnet Mask : unknown
Far End IP Address : unknown
3 - SNMP Link Status Trap : Enabled
LCP Status : Down
BCP/IPCP Status : Down
(T)oggle Between Interfaces
Selection : '?' - System Help Screen
Figure 5-20. PPP BCP/IPCP Menu
The PPP BCP/IPCP menu options are shown in Table 5-16.
5-32 PRELIMINARY 61189500L1-1B
Page 83

MX410/MX412 System Manual Menu Descriptions
Table 5-16. PPP BCP/IPCP Menu Options
Option Description Function
1 BCP/IPCP This option is used to select either BCP (Bridge Control Protocol) or
IPCP (IP Control Protocol for routing).
PPP (1-4)
2 IP Address This option invokes another menu which is used to enter the IP
Address, the Subnet Mask for the PPP. The IP Address is written in
the format XXX.XXX.XXX.XXX, where each 3-digit field has a value
between 1 and 255.
N/A Subnet Mask This field displays the PPP Subnet Mask. The Subnet Mask is writ-
ten in the format XXX.XXX.XXX.XXX, where each 3-digit field has
a value between 1 and 255.
N/A Far End IP Address This read-only field displays the far-end device IP address.
3 SNMP Link Status
Trap
This option invokes another menu which is used to either enable or
disable the SNMP link status trap.
N/A LCP Status This read-only field displays the Link Control Protocol (LCP) status
as Up or Down.
BCP/IPCP Status This read-only field displays the BCP/IPCP status as Up or Down.
61189500L1-1B PRELIMINARY 5-33
Page 84

Menu Descriptions MX410/MX412 System Manual
DHCP Server Menu
The DHCP (Dynamic Host Configuration Protocol) Server menu shown in Figure 5-21, is used
to provision DHCP server connections.
MX410 MM/DD/YY HH:MM
Active Alarms: CRITICAL MAJOR ID: MX410
DHCP Server
1 - State : Disabled
2 - Network : Not Set/Not Set
3 - Default Router : Not Set
4 - DNS Router : Not Set
5 - Address Range : 0.0.0.0-255.255.255.255
6 - Lease Time (d:h:m) : 0:0:0
Selection : '?' - System Help Screen
Figure 5-21. DHCP Server Menu
The DHCP Server menu options are shown in Table 5-17.
Table 5-17. DHCP Server Menu Options
Option Description Function
1 State This option is used to enable or disable the DHCP server.
2 Network This option invokes another menu which is used to enter a network
address and mask (scope of DHCP server).
3 Default Router This option invokes another menu which is used to enter the new
DHCP default router address.
4 DNS Router This option invokes another menu which is used to enter the new
DHCP DNS router address.
5 Address Range This option invokes another menu which is used to enter the range
of leased addresses.
6 Lease Time (d:h:m) This option invokes another menu which is used to enter the
expiration of the lease assigned to the DHCP server time in days,
hours, and minutes.
5-34 PRELIMINARY 61189500L1-1B
Page 85

MX410/MX412 System Manual Menu Descriptions
SNMP Menu
The SNMP (Simple Network Management Protocol) menu (see Figure 5-22) is used to
provision SNMP information.
MX410 MM/DD/YY HH:MM
Active Alarms: CRITICAL MAJOR MINOR ID: MX410
SNMP
1 - SNMP State : Disabled
2 - Trap Host 1 IP : 0.0.0.0
3 - Trap Host 2 IP : 0.0.0.0
4 - Trap Host 3 IP : 0.0.0.0
5 - Trap Host 4 IP : 0.0.0.0
6 - SNMP Traps : Disabled
7 - System Name : MX410
8 - System Location :
9 - System Contact :
10 - Read Community : public
11 - Write Community : private
Selection : '?' - System Help Screen
Figure 5-22. SNMP Menu
The SNMP menu options are shown in Table 5-18.
Table 5-18. SNMP Menu Options
Option Description Function
1 SNMP State This option sets the SNMP state to enabled or disabled. When
disabled, the MX410/MX412 ignores all incoming SNMP packets,
and does not transmit SNMP packets
2 Trap Host 1 IP This option invokes another menu which is used to enter the Trap
Host 1 IP address of an SNMP manager to which the MX410/
MX412 sends traps, the method (version 1 traps or version 2 notifications), and enable or disable the trap host.
3 Trap Host 2 IP This option invokes another menu which is used to enter the Trap
Host 2 IP address of an SNMP manager to which the MX410/
MX412 sends traps, the method (version 1 traps or version 2 notifications), and enable or disable the trap host.
4 Trap Host 3 IP This option invokes another menu which is used to enter the Trap
Host 3 IP address of an SNMP manager to which the MX410/
MX412 sends traps, the method (version 1 traps or version 2 notifications), and enable or disable the trap host.
61189500L1-1B PRELIMINARY 5-35
Page 86

Menu Descriptions MX410/MX412 System Manual
Table 5-18. SNMP Menu Options (Continued)
Option Description Function
5 Trap Host 4 IP This option invokes another menu which is used to enter the Trap
Host 4 IP address of an SNMP manager to which the MX410/
MX412 sends traps, the method (version 1 traps or version 2 notifications), and enable or disable the trap host.
6 SNMP Traps This option displays the user-defined system name and invokes
another menu which is used to input alphanumeric characters
that identify the name of the MX410/MX412.
7 System Name This option displays the user-defined system name and invokes
another menu which is used to input alphanumeric characters
that identify the name of the MX410/MX412.
8 System Location This option displays the user-defined system location and invokes
another menu which is used to input alphanumeric characters
that identify the physical location of the MX410/MX412.
9 System Contact This option displays the user-defined system contact and invokes
another menu which is used to input the name of personnel to
contact about the MX410/MX412.
10 Read Community This option invokes another menu which is used to enter the
authentication strings used for SNMP management. Input a value
that matches the MX410/MX412 to the SNMP manager for read
privileges.
11 Write Community This option invokes another menu which is used to enter the
authentication strings used for SNMP management. Input a value
that matches the MX410/MX412 to the SNMP manager for write
privileges.
5-36 PRELIMINARY 61189500L1-1B
Page 87

MX410/MX412 System Manual Menu Descriptions
SCA Update Menu
The SCA (System Configuration Archive) Update Menu (see Figure 5-23) is used to update
SCA information.
MX410 MM/DD/YY HH:MM
Active Alarms: CRITICAL MAJOR ID: MX410
SCA Update
1 - SCA TFTP Server : 0.0.0.0
2 - Remote Filename :
3 - All/Data Path Only : All Provisioning
4 - Perform SCA Save
5 - Perform SCA Restore
6 - Auto Save Time : Wed 10:35
7 - Auto Save : Disabled
Awaiting download.
Selection : '?' - System Help Screen
Figure 5-23. SCA Update Menu
The SCA Update menu options are shown in Table 5-19.
Table 5-19. SCA Update Menu Options
Option Description Function
1 SCA TFTP Server This option is used to enter the IP address where the SCA server
resides.
2 Remote Filename This option is used to enter the name of a file to save to or restore
from the SCA server.
3 All/Data Path Only This option is used to enter select amount of data to be save SCA
server.
4 Perform SCA Save This option is used to initiate an upload to save provisioning.
5 Perform SCA Restore This option is used to initiate a download to restore provisioning.
6 Auto Save Time This option is used to enter the date and time to automatically
perform an auto save.
7 Auto Save This option is used to automatically save SCA provisioning data at
a user-specified date and time by selecting enabled or disabled.
61189500L1-1B PRELIMINARY 5-37
Page 88

Menu Descriptions MX410/MX412 System Manual
Quick Setup Menu
To simplify the installation process, all of the basic configuration options necessary to setup
the MX410/MX412 are grouped together on the Quick Setup menu (see Figure 5-24). The
Quick Setup menu allows configuration of such items as DS0 drop assignments, as well as
system date, time, and IP Address information.
MX410 MM/DD/YY HH:MM
Unacknowledged Alarms: CRITICAL ID: MX410
Quick Setup
Ports
1 - PPPs
PPP 1 =
2 - V.35 =
System
3 - System ID
4 - IP Address : 192.168.100.1
Subnet Mask : 255.255.0.0
5 - Default Gateway : 192.168.1.1
6 - Date
7 - Time 8 - Cross-Connect Mapping
Selection : '?' - System Help Screen
Figure 5-24. Quick Setup Menu
The Quick Setup menu options are shown in Table 5-20.
Table 5-20. Quick Setup Menu Options
Option Description Function
Ports
1 PPPs This option is used to provision the PPP ports. Options are as
follows:
• Choose FROM PPP (for PPP 1 through PPP 4)
• Choose TO Group (for DS1 1 through DS1 4)
• Choose TO DS0 Range (enter a range of DS0s)
• Apply Cross-Connect
2 V.35 This option is used to provision the V.35 port. Options are as
follows:
• Choose TO Group (for DS1 1 through DS1 4)
• Choose TO DS0 Range (enter a range of DS0s)
• Apply Cross-Connect
5-38 PRELIMINARY 61189500L1-1B
Page 89

MX410/MX412 System Manual Menu Descriptions
Table 5-20. Quick Setup Menu Options (Continued)
Option Description Function
3 FXS (MX412 only) This option is used to provision the FXS port. Options are as
follows:
• Choose TO Group (for DS1 1 through DS1 4)
• Choose TO DS0 Range: enter a range
• Mode: Select Loop Start, PLAR D4, PLAR D3, or FX Ringdown.
Refer to Table 4-6 on page 4-9 for descriptions of these options.
• Apply Cross-Connect
System
3 System ID This option is used to assign a new system ID.
4 IP Address This option is used to enter the IP Address for the MX410/MX412.
The IP Address is written in the format XXX.XXX.XXX.XXX, where
each 3-digit field has a value between 1 and 255.
N/A Subnet Mask This option is used to enter the subnet mask, written in the format
XXX.XXX.XXX.XXX, where each 3-digit field has a value between 1
and 255.
5 Default Gateway This option is used to enter the default gateway. The Gateway
address is written in the format XXX.XXX.XXX.XXX, where each 3digit field has a value between 1 and 255.
6 Date This option is used to enter the date.
7 Time This option is used to enter the time.
8 Cross-Connect
Mapping
This is another path to the Cross-Connect Mapping Menu shown in
Figure 5-13 on page 5-23 and contains the same options.
61189500L1-1B PRELIMINARY 5-39
Page 90

Menu Descriptions MX410/MX412 System Manual
Status Screen
The Status screen (see Figure 5-25) provides detailed status information about the DS1 Ports,
Ethernet Ports, PPP, Timing, and the Power Feed.
MX410 MM/DD/YY HH:MM
Active Alarms: CRITICAL MAJOR ID: MX410
Status
DS1 Ports PPP Interfaces
State Line Status Test State LCP BCP IPCP
1 - Enabled LOS,TX RAI Data mode 1 - Disabled DOWN DOWN DOWN
2 - Enabled LOS,TX RAI Data mode 2 - Enabled DOWN DOWN DOWN
3 - Enabled LOS,TX RAI Data mode 3 - Disabled DOWN DOWN DOWN
4 - Enabled LOS,TX RAI Data mode 4 - Disabled DOWN DOWN DOWN
Ethernet Ports Auxiliary Alarms
Status Speed Status Severity
1 - Up 100 Mbps, Full Duplex 1 - Cleared N/A
2 - Up 100 Mbps, Full Duplex 2 - Cleared N/A
3 - Down Unknown 3 - Cleared N/A
4 - Down Unknown 4 - Cleared N/A
Power Feed PSU Timing Source
Status State Status Status Source
A - Normal A - Installed Normal Primary - Normal Internal
B - Normal B - Installed Normal Secondary - Normal Internal
'?' - System Help Screen
Figure 5-25. Status Screen
The Status menu options are shown in Table 5-21.
Table 5-21. Status Screen Fields
Option Description Function
DS1 Ports
1-4 State This field displays the current state of the four DS1 Ports as either
Enabled or Disabled.
Line Status This field displays the current line status of the four DS1 ports (12 ports
on the MX412). The possible states are as follows:
• LOS: Loss of Signal
• LOF: Loss of Frame (RX Red Alarm)
• RX AIS: Receiving Alarm Indication Signal (RX Blue Alarm)
• TX AIS: Transmitting Alarm Indication Signal (TX Blue Alarm)
• RX RAI: Receiving Remote Alarm Indicator (RX Yellow Alarm)
• TX RAI: Transmitting Remote Alarm Indicator (TX Yellow Alarm)
• Normal: Indicates no alarms currently active
5-40 PRELIMINARY 61189500L1-1B
Page 91

MX410/MX412 System Manual Menu Descriptions
Table 5-21. Status Screen Fields (Continued)
Option Description Function
Test This field displays one of the following possible states:
• Data Mode: Indicates no tests are active
• Payload Loopback: Indicates that a payload loopback is in progress
• Line Loopback: Indicates that a line loopback is in progress
PPP Interfaces
1-4 State This field displays the current state of the four PPP interfaces as either
Enabled or Disabled.
LCP This field displays the active state of this control protocol as either Up or
Down.
BCP This field Displays the active state of this control protocol as either Up or
Down.
IPCP This field Displays the active state of this control protocol as either Up or
Down.
Ethernet Ports
1-4 Status This field displays the current status as either Up or Down.
Speed This field Displays one of the following speeds as active:
• 10 Mbps, Half Duplex
• 10 Mbps, Full Duplex
• 100 Mbps, Half Duplex
• 100 Mbps, Full Duplex
Auxiliary Alarms
1-4 Status This field displays the current alarm status as either Active or Cleared.
Severity This field displays the current alarm severity. Severities are defined by the
customer and displayed as Critical, Major, Minor, Alert, or Info.
Power Feed
A/B Status This field displays the power feed (which connects to the rear of the
MX410/MX412) as either Normal or Failed.
PSU (MX410 Only)
A/B State This field displays the current status of the A/B PSUs as either Installed
or Removed.
Status This field displays the current status of the A/B PSUs as Normal, Failed
(if the PSU is installed), or N/A (if the PSU is not installed).
Timing Source
Primary/
Status This field displays the status as either Normal or Failed.
Secondary
Source This field Displays internal or DS1 (1-4 on MX410 or 1-12 on MX412).
61189500L1-1B PRELIMINARY 5-41
Page 92

Menu Descriptions MX410/MX412 System Manual
Test Menu
The Test menu (see Figure 5-26) provides options for testing the DS1 Ports.
MX410 MM/DD/YY HH:MM
Active Alarms: CRITICAL MAJOR ID: MX410
Test
DS1 Ports
1 - #1 : Pattern
2 - #2 : Data mode
3 - #3 : Data mode
4 - #4 : Data mode
5 - Reset ALL Tests
6 - Loopback Timeout: 120 Minutes
Selection : '?' - System Help Screen
Figure 5-26. Test Menu
The Test menu options are shown in Table 5-22.
Table 5-22. Test Menu Options
Option Description Function
DS1 Ports (1-4 on MX410 and 1-12 on MX412)
1-4 #1 - #4 This option is used to invokes the “DS1 (Port #) Menu” on page 5-
43.
5 Reset ALL Tests This option is used to stop all DS1 port testing and resets all DS1
ports to Data Mode.
6 Loopback Timeout This option is used to set the loopback timeout value. The default
value is 120 Minutes and the possible values are as follows:
•120 Minutes
• 90 Minutes
• 60 Minutes
• 30 Minutes
• 15 Minutes
• 10 Minutes
• 5 Minutes
• Disabled
5-42 PRELIMINARY 61189500L1-1B
Page 93

MX410/MX412 System Manual Menu Descriptions
DS1 (Port #) Menu
The DS1 (Port #) menu (see Figure 5-27) provides options for testing the DS1 Ports.
MX410 MM/DD/YY HH:MM
Active Alarms: CRITICAL MAJOR ID: MX410
DS1 1
1 - Loopback : Pattern
Pattern : Ones
2 - Insert One Bit Error
3 - Clear Bit Error Count
Patt Sync : NO SYNC
Bit Errors : 14
DS1 1 Status : LOS,TX RAI
Selection: '?' - System Help Screen
Figure 5-27. DS1 (Port #) Menu
The DS1 (Port #) menu options are shown in Table 5-23.
Table 5-23. DS1 (Port #) Menu Options
Option Description Function
1 Loopback This option is used to display the current loopback. Selecting this
option invokes the “Port (#) Test Menu” on page 5-44.
N/A Pattern This option is used to display the current pattern type.
2 Insert One Bit Error This option is present only when a pattern has been selected and
inserts one bit error count.
3 Clear Bit Error Count This option is present only when a pattern has been selected and
clears one bit error count.
Patt Sync This read-only field displays the pattern synchronization status.
Bit Errors This read-only field displays the current number of bit errors.
DS1 (#) Status This read-only field displays the current status of the selected port.
61189500L1-1B PRELIMINARY 5-43
Page 94

Menu Descriptions MX410/MX412 System Manual
Port (#) Test Menu
The Port (#) Test menu (see Figure 5-28) provides options for testing the DS1 Ports.
MX410 MM/DD/YY HH:MM
Active Alarms: CRITICAL MAJOR ID: MX410
Port #1 : Pattern
1 - Data Mode
2 - Payload
3 - Line
4 - Inward
5 - Dual
6 - Remote FDL Line
7 - Remote Inband Line (CSU)
8 - Remote FDL Payload
9 - Pattern Test
Selection: '?' - System Help Screen
Figure 5-28. Port (#) Test Menu
The Port (#1-#4 on MX410, and #1-#12 on MX412) Test menu options are shown in Table 5-
24.
Table 5-24. Port (#) Test Menu Options
Option Description Function
1 Data Mode This option indicates that no tests are active.
2 Payload This option initiates a payload loopback test.
3 Line This option initiates a line loopback test.
4 Inward This option initiates an inward loopback test.
5 Dual This option initiates both line and inward loopback tests.
6 Remote FDL Line This option transmits a request via the FDL (Facility Data Link) for
the remote unit to issue a line loopback (ESF only).
7 Remote Inband Line
(CSU)
This option transmits an inband request for the remote unit to
issue a line loopback.
8 Remote FDL Payload This option transmits a request via the FDL for the remote unit to
issue a payload loopback (ESF only).
9 Pattern Test This option invokes the DS1 Test Pattern menu.
5-44 PRELIMINARY 61189500L1-1B
Page 95

MX410/MX412 System Manual Menu Descriptions
DS1 Test Pattern Menu
The DS1 Test Pattern menu (see Figure 5-29) provides options for testing the DS1 ports using
pattern data.
MX410 MM/DD/YY HH:MM
Active Alarms: CRITICAL MAJOR ID: MX410
DS1 1 Test Pattern
1 - QRSS
2 - All Ones
3 - All Zeros
4 - 511
5 - 2047
6 - 2^15-1
7 - 2^20-1
Selection : '?' - System Help Screen
Figure 5-29. DS1 Test Pattern Menu
The DS1 Test Pattern menu options are all test pattern types. Selecting any of the options
invokes a warning menu that test patterns are service affecting and requests execution
verification.
Pattern type options are as follows:
•QRSS
• All Ones
• All Zeros
•511
•2047
•2^15-1
•2^20-1
61189500L1-1B PRELIMINARY 5-45
Page 96

Menu Descriptions MX410/MX412 System Manual
Performance Monitoring Menu
The Performance Monitoring menu (see Figure 5-30) provides options for viewing performance
data affecting the MX410/MX412 operations. Data is viewed in daily or 15-minute
increments.
MX410 MM/DD/YY HH:MM
Active Alarms: CRITICAL MAJOR ID: MX410
Performance Monitoring
1 - Daily PM Table
2 - Quarter Hour PM Table
3 - Daily PM Thresholds
4 - Quarter Hour PM Thresholds
5 - Clear PM Data
Selection :
'?' - System Help Screen
Figure 5-30. Performance Monitoring Menu
The Performance Monitoring menu options are shown in Table 5-25.
Table 5-25. Port (#) Test Menu Options
Option Description Function
1 Daily PM Table This option invokes the “Daily Performance Monitoring
Screen” on page 5-48.
2 Quarter Hour PM Table This option invokes the “Quarter Hour Performance
Monitoring Screen” on page 5-48.
3 Daily PM Thresholds This option invokes the “Daily PM Thresholds Menu” on
page 5-49.
4 Quarter Hour PM Thresholds This option invokes the “Quarter Hour PM Thresholds
Menu” on page 5-51.
5 Clear PM Data This option invokes the “Clear PM Data Menu” on page 5-52.
Performance Monitoring Definitions are listed in Table 5-26.
5-46 PRELIMINARY 61189500L1-1B
Page 97

MX410/MX412 System Manual Menu Descriptions
Table 5-26. Performance Monitoring Definitions
T1 PM Parameter Definition Description
CV-L Code Violation - Line This parameter indicates the number of Bipolar Viola-
tions (BPVs) and Excessive Zeros (EXZs) that have
occurred during the accumulation period.
ES-L Errored Seconds - Line This parameter indicates the number of seconds for
which one or more Line Coding Violations (CV-Ls), or
one or more Loss of Signal (LOS) defects occurred.
SES-L Severely Errored Seconds - Line This parameter indicates the number of seconds with
1544 or more CV-Ls or one or more LOS defects.
LOSS-L Loss of Signal Second - Line This parameter indicates the number of seconds for
which one or more LOS defects occurred.
CV-P Code Violation - Path SF Mode: This parameter indicates the number of
frame synchronization bit errors that have occurred
during the accumulation period.
ESF Mode: This parameter indicates the number of
CRC-6 errors that have occurred during the accumulation period.
ES-P Errored Seconds - Path SF Mode: This parameter indicates the number of
seconds containing any of the following:
• FE errors
• CS events
• SEF defects
• AIS defects
1
2
3
4
ESF Mode: This parameter indicates the number of
seconds containing any of the following:
• CRC-6 errors
5
• CS events
• SEF defects
• AIS defects
SES-P Severely Errored Seconds - Path SF Mode: This parameter indicates the number of
seconds with 8 or more FE events or one or more SEF
or AIS defects.
ESF Mode: This parameter indicates the number of
seconds with 320 or more CRC-6 errors or one or more
SEF or AIS defects.
SAS-P Severely Errored Frame/AIS
Second - Path
This parameter indicates the number of seconds
containing one or more SEF defects or one or more AIS
defects.
UAS-P Unavailable Second - Path This parameter indicates the number of seconds for
which the DS1 path contains 10 contiguous SESs.
CSS-P Controlled Slip Second - Path This parameter indicates the number of seconds
containing one or more controlled frame slips.
1. FE (Frame bit Error): This parameter indicates the occurrence of a frame bit error in the received frame bit pattern.
2. CS (Controlled Slip): This parameter indicates the replication or deletion of the 192 payload bits of a DS1 frame by
the receiving unit.
3. SEF (Severely Errored Frame): This parameter indicates that two or more frame bit errors are detected in a window.
4. AIS (Alarm Indication Signal): This parameter indicates the detection of an unframed signal with a 1s density of at
least 99.9% for a time.
5. CRC-6 (Cyclic Redundancy Check) error - used in ESF mode only: This parameter indicates the existence of a
CRC-6 code that is not identical to the corresponding locally calculated code.
61189500L1-1B PRELIMINARY 5-47
Page 98

Menu Descriptions MX410/MX412 System Manual
Daily Performance Monitoring Screen
The Daily Performance Monitoring screen (see Figure 5-31) displays DS1 performance
monitoring data in daily increments and in a tabular format.
MX410 MM/DD/YY HH:MM
Active Alarms: CRITICAL MAJOR ID: MX410
DS1 Port 1 Daily Performance Monitoring
Current Total 06/22 06/21 N/A N/A N/A N/A
CV-L 0 0 0 0 0 0 0 0
ES-L 52549 134621 86374 48247 0 0 0 0
SES-L 52549 134621 86374 48247 0 0 0 0
LOSS-L 52549 134621 86374 48247 0 0 0 0
CV-P 0 0 0 0 0 0 0 0
ES-P 0 0 0 0 0 0 0 0
SES-P 0 0 0 0 0 0 0 0
SAS-P 0 0 0 0 0 0 0 0
UAS-P 52549 134621 86374 48247 0 0 0 0
CSS-P 0 0 0 0 0 0 0 0
(N)Next DS1, (P)Prev DS1, (E)Enter DS1, (F)Forward, (B)Back, Selection:
Figure 5-31. Daily Performance Monitoring Screen
Quarter Hour Performance Monitoring Screen
The Quarter Hour Performance Monitoring screen (see Figure 5-32) displays DS1
performance monitoring data in 15-minute increments and in a tabular format.
MX410 MM/DD/YY HH:MM
Active Alarms: CRITICAL MAJOR ID: MX410
DS1 Port 1 Quarter Hour Performance Monitoring
Current Total 15:15 15:00 14:45 14:30 14:15 14:00
CV-L 0 0 0 0 0 0 0 0
ES-L 556 86366 899 900 900 899 900 900
SES-L 556 86366 899 900 900 899 900 900
LOSS-L 556 86366 899 900 900 899 900 900
CV-P 0 0 0 0 0 0 0 0
ES-P 0 0 0 0 0 0 0 0
SES-P 0 0 0 0 0 0 0 0
SAS-P 0 0 0 0 0 0 0 0
UAS-P 556 86366 899 900 900 899 900 900
CSS-P 0 0 0 0 0 0 0 0
(N)Next DS1, (P)Prev DS1, (E)Enter DS1, (F)Forward, (B)Back, Selection:
Figure 5-32. Quarter Hour Performance Monitoring Screen
5-48 PRELIMINARY 61189500L1-1B
Page 99

MX410/MX412 System Manual Menu Descriptions
Daily PM Thresholds Menu
The Daily PM Thresholds menu (see Figure 5-33) displays DS1 performance monitoring
thresholds data in a tabular format. This menu is used to set the performance monitoring
threshold levels and enable or disable an alarms if the threshold is exceeded.
MX410 MM/DD/YY HH:MM
Active Alarms: CRITICAL MAJOR ID: MX410
Daily PM Thresholds
Threshold Alarm
1 - ES-L : 648 Enabled
2 - CV-P (ESF mode) : 132960 Enabled
3 - CV-P (SF mode) : 691 Enabled
4 - ES-P : 648 Enabled
5 - SES-P : 100 Enabled
6 - SAS-P : 17 Enabled
7 - CSS-P : 4 Enabled
8 - UAS-P : 10 Enabled
9 - Restore ALL DS1 Threshold Defaults
10 - Enable ALL DS1 Threshold Alarms
11 - Disable ALL DS1 Threshold Alarms
Selection : '?' - System Help Screen
Figure 5-33. Daily PM Thresholds Menu
The Daily PM Thresholds menu options are shown in Table 5-27.
Table 5-27. Daily PM Thresholds Menu Options
Option Description Function
1 ES-L This option sets the ES-L threshold value. The available
threshold range is (1-65535). The default value is 648.
2 CV-P (ESF mode) This option sets the CV-P ESF threshold value. The available
threshold range is (1-1048575). The default value is
132,960.
3 CV-P (SF mode) This option sets the CV-P SF threshold value. The available
threshold range is (1-1048575). The default value is 691.
4 ES-P This option sets the ES-P threshold value. The available
threshold range is (1-65535). The default value is 648.
5 SES-P This option sets the SES-P threshold value. The available
threshold range is (1-65535). The default value is 100.
6 SAS-P This option sets the SAS-P threshold value. The available
threshold range is (1-65535). The default value is 17.
7 CSS-P This option sets the CSS-P threshold value. The available
threshold range is (1-65535). The default value is 691.
61189500L1-1B PRELIMINARY 5-49
Page 100

Menu Descriptions MX410/MX412 System Manual
Table 5-27. Daily PM Thresholds Menu Options (Continued)
Option Description Function
8 UAS-P This option sets the UAS-P threshold value. The available
threshold range is (1-65535). The default value is 10.
9 Restore ALL DS1 Threshold
Defaults
10 Enable ALL DS1 Threshold
Alarms
11 Disable ALL DS1 Threshold
Alarms
This option restores all threshold values to the defaults
listed above.
This option enables all daily threshold alarms.
This option disables all daily threshold alarms.
5-50 PRELIMINARY 61189500L1-1B
 Loading...