

Page 1

IP 700 Series
Phone User
Manual
Firmware Version 2.x.x
6AOSUG0001-1A
April 2011
Page 2

Trademarks ADTRAN IP 700 Series Phone User Manual
Trademarks
Any brand names and product names included in this manual are trademarks, registered trademarks, or
trade names of their respective holders.
To the Holder of the Manual
The contents of this manual are current as of th e date of publication. ADTRAN reserves the right to change
the contents without prior notice.
In no event will ADTRAN be liable for any special, incidental, or consequential damages or for
commercial losses even if ADTRAN has been advised thereof as a result of issue of this publication.
Software Licensing Agreement
Each ADTRAN product contains a single license for ADTRAN-supplied software. Pursuant to the
Licensing Agreement, you may: (a) use the software on the purchased ADTRAN device only and (b) keep
a copy of the software for backup purposes. This Agreement covers all software installed on the system, as
well as any software available on the ADTRAN website. In addition, certain ADTRAN systems may
contain additional conditions for obtaining software upgrades.
Changes or modifications to this unit not expressly approved by the party responsible for
compliance could void the user’s authority to operate the equipment.
901 Explorer Boulevard
P.O. Box 140000
Huntsville, AL 35814-4000
Phone: (256) 963-8000
Copyright © 2011 ADTRAN, Inc.
All Rights Reserved.
Printed in U.S.A.
2 Copyright © 2011 ADTRAN, Inc. 6AOSUG0001-1A
Page 3

ADTRAN IP 700 Series Phone User Manual Software Licensing Agreement
Conventions
Notes provide additional useful information.
Cautions signify information that could prevent service interruption or damage to
equipment.
Warnings provide information that could prevent injury or endangerment to human
life.
6AOSUG0001-1A Copyright © 2011 ADTRAN, Inc. 3
Page 4

Safety Instructions ADTRAN IP 700 Series Phone User Manual
Safety Instructions
When using your telephone equipment, please follow these basic safety precautions to reduce the risk of
fire, electrical shock, or personal injury:
1. Do not use this product near water, such as a bathtub, wash bowl, kitchen sink, laundry tub, in a
wet basement, or near a swimming pool.
2. Avoid using a telephone (other than a cordless type) during an electrical storm. There is a remote
risk of shock from lightning.
3. Do not use the telephone to report a gas leak in the vicinity of the leak.
4. Use only the power cord, power supply, and batteries indicated in the manual. Do not dispose of
batteries in a fire. They may explode. Check with local codes for special disposal instructions.
5. The socket-outlet shall be installed near the equipment and shall be easily accessible.
Save These Important Safety Instructions
4 Copyright © 2011 ADTRAN, Inc. 6AOSUG0001-1A
Page 5

ADTRAN IP 700 Series Phone User Manual FCC Radio Frequency Interference Statement
FCC Radio Frequency Interference Statement
This equipment has been tested and found to comply with the limits for a Class B digital device, pursuant
to Part 15 of the FCC rules. These limits are designed to provide reasonable protection against harmful
interference when the equipment is operated in a commercial or residential environment. This equipment
generates, uses, and can radiate radio frequency energy and, if not installed and used in accordance with
the instruction manual, may cause harmful interference to radio frequencies.
Product Safety and Electromagnetic Compatibility (EMC) Standards Table
P/N and Name Standards
1200769E1#X
1200770E1#X
IP 706 Series Phone
IP 712 Series Phone
FCC Part 15, Class B
ICES-003
EN 55022 Class B
EN 55024
EN 61000-3-2
EN 61000-3-3
UL/CUL 60950-1
IEC 60950-1
EN 60950-1
Canadian Emissions Requirements
This digital apparatus does not exceed the Class B limits for radio noise emissions from digital apparatus
as set out in the interference-causing equipment standard entitled “Digital Apparatus,” ICES-003 of the
Department of Communications.
Cet appareil numérique respecte les limites de bruits radioelectriques applicables aux appareils numériques
de Class B prescrites dans la norme sur le materiel brouilleur: “Appareils Numériques,” NMB-003 edictee
par le ministre des Communications.
6AOSUG0001-1A Copyright © 2011 ADTRAN, Inc. 5
Page 6

General Information ADTRAN IP 700 Series Phone User Manual
General Information
The IP 706 and IP 712 phones are designed to operate in both Key Systems and PBX Systems. The IP 706
or IP 712 phone will be aware of its operating mode and respond appropriately. Certain features may or
may not be offered in certain modes. This manual notes when certain features are only supported in one
system. Refer to the specific feature for more information.
Service and Warranty
For information on the service and warranty of ADTRAN products, visit the ADTRAN website at
http://www.adtran.com/support
.
Related Documentation
For more specific information regarding the IP 706 and IP 712 model phones, refer to ADTRAN’s website
at www.adtran.com/phones
.
6 Copyright © 2011 ADTRAN, Inc. 6AOSUG0001-1A
Page 7

Table of Contents
1. Introduction . . . . . . . . . . . . . . . . . . . . . . . . . . . . . . . . . . . . . . . . . . . . . . . . . . . . . . . . . . . . . . . . . . . . . 13
Quick Setup. . . . . . . . . . . . . . . . . . . . . . . . . . . . . . . . . . . . . . . . . . . . . . . . . . . . . . . . . . . . . . . . . . . . . 13
Quick Reference and Shortcuts . . . . . . . . . . . . . . . . . . . . . . . . . . . . . . . . . . . . . . . . . . . . . . . . . . . . . 13
2. Assembly and Installation . . . . . . . . . . . . . . . . . . . . . . . . . . . . . . . . . . . . . . . . . . . . . . . . . . . . . . . . . 14
Unpacking the Phone . . . . . . . . . . . . . . . . . . . . . . . . . . . . . . . . . . . . . . . . . . . . . . . . . . . . . . . . . . . . . 14
Assembling the Phone . . . . . . . . . . . . . . . . . . . . . . . . . . . . . . . . . . . . . . . . . . . . . . . . . . . . . . . . . . . . 15
3. Connecting to the Power Source. . . . . . . . . . . . . . . . . . . . . . . . . . . . . . . . . . . . . . . . . . . . . . . . . . . . 17
Local Power Option. . . . . . . . . . . . . . . . . . . . . . . . . . . . . . . . . . . . . . . . . . . . . . . . . . . . . . . . . . . . . . . 17
Inline Power Option. . . . . . . . . . . . . . . . . . . . . . . . . . . . . . . . . . . . . . . . . . . . . . . . . . . . . . . . . . . . . . . 18
4. Phone Overview. . . . . . . . . . . . . . . . . . . . . . . . . . . . . . . . . . . . . . . . . . . . . . . . . . . . . . . . . . . . . . . . . . 19
Phone Diagrams . . . . . . . . . . . . . . . . . . . . . . . . . . . . . . . . . . . . . . . . . . . . . . . . . . . . . . . . . . . . . . . . . 19
Key Descriptions. . . . . . . . . . . . . . . . . . . . . . . . . . . . . . . . . . . . . . . . . . . . . . . . . . . . . . . . . . . . . . . . . 20
LCD Menus. . . . . . . . . . . . . . . . . . . . . . . . . . . . . . . . . . . . . . . . . . . . . . . . . . . . . . . . . . . . . . . . . . . . . 24
Icon Definitions . . . . . . . . . . . . . . . . . . . . . . . . . . . . . . . . . . . . . . . . . . . . . . . . . . . . . . . . . . . . . . . . . . 24
5. Phone Settings . . . . . . . . . . . . . . . . . . . . . . . . . . . . . . . . . . . . . . . . . . . . . . . . . . . . . . . . . . . . . . . . . . 26
Phone Label . . . . . . . . . . . . . . . . . . . . . . . . . . . . . . . . . . . . . . . . . . . . . . . . . . . . . . . . . . . . . . . . . . . . 26
Setting the Time . . . . . . . . . . . . . . . . . . . . . . . . . . . . . . . . . . . . . . . . . . . . . . . . . . . . . . . . . . . . . . . . . 26
Setting Ring Tones . . . . . . . . . . . . . . . . . . . . . . . . . . . . . . . . . . . . . . . . . . . . . . . . . . . . . . . . . . . . . . . 28
Adjusting Volume . . . . . . . . . . . . . . . . . . . . . . . . . . . . . . . . . . . . . . . . . . . . . . . . . . . . . . . . . . . . . . . . 29
Adjusting LCD Contrast. . . . . . . . . . . . . . . . . . . . . . . . . . . . . . . . . . . . . . . . . . . . . . . . . . . . . . . . . . . . 29
Setting Display Language. . . . . . . . . . . . . . . . . . . . . . . . . . . . . . . . . . . . . . . . . . . . . . . . . . . . . . . . . . 29
Configuring Message Waiting Indicator . . . . . . . . . . . . . . . . . . . . . . . . . . . . . . . . . . . . . . . . . . . . . . . 30
Deleting Personal Contacts. . . . . . . . . . . . . . . . . . . . . . . . . . . . . . . . . . . . . . . . . . . . . . . . . . . . . . . . . 30
Programming Speed Dials . . . . . . . . . . . . . . . . . . . . . . . . . . . . . . . . . . . . . . . . . . . . . . . . . . . . . . . . 31
6. Basic Features. . . . . . . . . . . . . . . . . . . . . . . . . . . . . . . . . . . . . . . . . . . . . . . . . . . . . . . . . . . . . . . . . . . 32
Using the Handset, Headset, and Speaker. . . . . . . . . . . . . . . . . . . . . . . . . . . . . . . . . . . . . . . . . . . . . 32
Making Calls . . . . . . . . . . . . . . . . . . . . . . . . . . . . . . . . . . . . . . . . . . . . . . . . . . . . . . . . . . . . . . . . . . . . 32
Answering Calls . . . . . . . . . . . . . . . . . . . . . . . . . . . . . . . . . . . . . . . . . . . . . . . . . . . . . . . . . . . . . . . . . 33
Viewing Caller ID. . . . . . . . . . . . . . . . . . . . . . . . . . . . . . . . . . . . . . . . . . . . . . . . . . . . . . . . . . . . . . . . . 33
Ending Calls . . . . . . . . . . . . . . . . . . . . . . . . . . . . . . . . . . . . . . . . . . . . . . . . . . . . . . . . . . . . . . . . . . . . 33
Muting Calls . . . . . . . . . . . . . . . . . . . . . . . . . . . . . . . . . . . . . . . . . . . . . . . . . . . . . . . . . . . . . . . . . . . . 34
Using the Navigation Bar . . . . . . . . . . . . . . . . . . . . . . . . . . . . . . . . . . . . . . . . . . . . . . . . . . . . . . . . . . 34
Using HFAAI . . . . . . . . . . . . . . . . . . . . . . . . . . . . . . . . . . . . . . . . . . . . . . . . . . . . . . . . . . . . . . . . . . . . 35
Using Hold. . . . . . . . . . . . . . . . . . . . . . . . . . . . . . . . . . . . . . . . . . . . . . . . . . . . . . . . . . . . . . . . . . . . . . 35
Using Park . . . . . . . . . . . . . . . . . . . . . . . . . . . . . . . . . . . . . . . . . . . . . . . . . . . . . . . . . . . . . . . . . . . . . 36
Transferring Calls . . . . . . . . . . . . . . . . . . . . . . . . . . . . . . . . . . . . . . . . . . . . . . . . . . . . . . . . . . . . . . . . 37
Forwarding Calls. . . . . . . . . . . . . . . . . . . . . . . . . . . . . . . . . . . . . . . . . . . . . . . . . . . . . . . . . . . . . . . . . 37
Redialing . . . . . . . . . . . . . . . . . . . . . . . . . . . . . . . . . . . . . . . . . . . . . . . . . . . . . . . . . . . . . . . . . . . . . . 38
Using DND . . . . . . . . . . . . . . . . . . . . . . . . . . . . . . . . . . . . . . . . . . . . . . . . . . . . . . . . . . . . . . . . . . . . . 38
Retrieving Messages. . . . . . . . . . . . . . . . . . . . . . . . . . . . . . . . . . . . . . . . . . . . . . . . . . . . . . . . . . . . . . 39
Conferencing a Call. . . . . . . . . . . . . . . . . . . . . . . . . . . . . . . . . . . . . . . . . . . . . . . . . . . . . . . . . . . . . . . 39
Using Conference Drop . . . . . . . . . . . . . . . . . . . . . . . . . . . . . . . . . . . . . . . . . . . . . . . . . . . . . . . . . . . 40
7. Directories and Call Logs . . . . . . . . . . . . . . . . . . . . . . . . . . . . . . . . . . . . . . . . . . . . . . . . . . . . . . . . . . 41
Using Directories. . . . . . . . . . . . . . . . . . . . . . . . . . . . . . . . . . . . . . . . . . . . . . . . . . . . . . . . . . . . . . . . . 41
6AOSUG0001-1A Copyright © 2011 ADTRAN, Inc. 7
Page 8

Table of Contents ADTRAN IP 700 Series Phone User Manual
Viewing Call Logs . . . . . . . . . . . . . . . . . . . . . . . . . . . . . . . . . . . . . . . . . . . . . . . . . . . . . . . . . . . . . . . . 43
8. WEB GUI. . . . . . . . . . . . . . . . . . . . . . . . . . . . . . . . . . . . . . . . . . . . . . . . . . . . . . . . . . . . . . . . . . . . . . . . 44
Locating the IP Address of the Phone. . . . . . . . . . . . . . . . . . . . . . . . . . . . . . . . . . . . . . . . . . . . . . . . . 44
Accessing the Web Interface . . . . . . . . . . . . . . . . . . . . . . . . . . . . . . . . . . . . . . . . . . . . . . . . . . . . . . . 44
Exiting the GUI . . . . . . . . . . . . . . . . . . . . . . . . . . . . . . . . . . . . . . . . . . . . . . . . . . . . . . . . . . . . . . . . . . 49
Appendix A. Glossary. . . . . . . . . . . . . . . . . . . . . . . . . . . . . . . . . . . . . . . . . . . . . . . . . . . . . . . . . . . . . . . 51
Index. . . . . . . . . . . . . . . . . . . . . . . . . . . . . . . . . . . . . . . . . . . . . . . . . . . . . . . . . . . . . . . . . . . . . . . . . . . . . 53
8 Copyright © 2011 ADTRAN, Inc. 6AOSUG0001-1A
Page 9

List of Figures
Figure 1. Parts Included with Your IP Phone . . . . . . . . . . . . . . . . . . . . . . . . . . . . . . . . . . . . . . . . . . . . 14
Figure 2. Assembling the Desk Stand. . . . . . . . . . . . . . . . . . . . . . . . . . . . . . . . . . . . . . . . . . . . . . . . . . 15
Figure 3. Connecting the Handset and Headset. . . . . . . . . . . . . . . . . . . . . . . . . . . . . . . . . . . . . . . . . . 16
Figure 4. Connecting to the Local Power Source . . . . . . . . . . . . . . . . . . . . . . . . . . . . . . . . . . . . . . . . . 17
Figure 5. Connecting to the Inline Power Source . . . . . . . . . . . . . . . . . . . . . . . . . . . . . . . . . . . . . . . . . 18
Figure 6. IP 712 Phone Diagram . . . . . . . . . . . . . . . . . . . . . . . . . . . . . . . . . . . . . . . . . . . . . . . . . . . . . . 19
Figure 7. IP 706 Phone Diagram . . . . . . . . . . . . . . . . . . . . . . . . . . . . . . . . . . . . . . . . . . . . . . . . . . . . . . 20
Figure 8. Function Key Location . . . . . . . . . . . . . . . . . . . . . . . . . . . . . . . . . . . . . . . . . . . . . . . . . . . . . . 21
Figure 9. Line Keys and Soft Keys for an IP 712 Phone. . . . . . . . . . . . . . . . . . . . . . . . . . . . . . . . . . . . 23
Figure 10. Call Summary Menu. . . . . . . . . . . . . . . . . . . . . . . . . . . . . . . . . . . . . . . . . . . . . . . . . . . . . . . . 45
Figure 11. Missed Calls Menu. . . . . . . . . . . . . . . . . . . . . . . . . . . . . . . . . . . . . . . . . . . . . . . . . . . . . . . . . 46
Figure 12. Phone Status Menu . . . . . . . . . . . . . . . . . . . . . . . . . . . . . . . . . . . . . . . . . . . . . . . . . . . . . . . . 46
Figure 13. Backup Personal PhoneBook Menu . . . . . . . . . . . . . . . . . . . . . . . . . . . . . . . . . . . . . . . . . . . 47
Figure 14. Load Personal PhoneBook Menu . . . . . . . . . . . . . . . . . . . . . . . . . . . . . . . . . . . . . . . . . . . . . 48
Figure 15. Change Password Menu . . . . . . . . . . . . . . . . . . . . . . . . . . . . . . . . . . . . . . . . . . . . . . . . . . . . 48
6AOSUG0001-1A Copyright © 2011 ADTRAN, Inc. 9
Page 10

List of Figures ADTRAN IP 700 Series Phone User Manual
10 Copyright © 2011 ADTRAN, Inc. 6AOSUG0001-1A
Page 11

List of Tables
Table 1. Function Key Description . . . . . . . . . . . . . . . . . . . . . . . . . . . . . . . . . . . . . . . . . . . . . . . . . . 21
Table 2. Icon Definitions . . . . . . . . . . . . . . . . . . . . . . . . . . . . . . . . . . . . . . . . . . . . . . . . . . . . . . . . . 24
Table 3. Line Key Settings for Speed Dial . . . . . . . . . . . . . . . . . . . . . . . . . . . . . . . . . . . . . . . . . . . . 31
Table 4. Menu Navigation Bar . . . . . . . . . . . . . . . . . . . . . . . . . . . . . . . . . . . . . . . . . . . . . . . . . . . . . 34
6AOSUG0001-1A Copyright © 2011 ADTRAN, Inc. 11
Page 12

List of Tables ADTRAN IP 700 Series Phone User Manual
12 Copyright © 2011 ADTRAN, Inc. 6AOSUG0001-1A
Page 13

ADTRAN IP 700 Series Phone User Manual Introduction
1. INTRODUCTION
Congratulations on choosing the IP 706 or IP 712 phone from ADTRAN. ADTRAN IP phones are
full-duplex, handsfree IP telephones that offer business-class features, such as multiple call appearance,
hold, transfer, and conferencing. This user manual provides details about using the many features of the IP
phone, completing basic tasks, as well as troubleshooting tips.
Quick Setup
Use the following topics to quickly set up your IP phone. These are basic steps and are not meant to be all
encompassing. To fully utilize all the features of your phone, it is recommended that you review this
manual in its entirety.
• Assembly and Installation on page 14
• Phone Settings on page 26
-Setting the Time on page 26
-Setting Ring Tones on page 28
-Adjusting LCD Contrast on page 29
-Programming Speed Dials on page 31
• Accessing the Personal Directory on page 41
- Load PhoneBook on page 48
Quick Reference and Shortcuts
• Function Key Description on page 21
• Line Keys and Soft Keys for an IP 712 Phone on page 23
• Icon Definitions on page 24
• Menu Navigation Bar on page 34
• Accessing the Web Interface on page 44
6AOSUG0001-1A Copyright © 2011 ADTRAN, Inc. 13
Page 14
Assembly and Installation ADTRAN IP 700 Series Phone User Manual
2. ASSEMBLY AND INSTALLATION
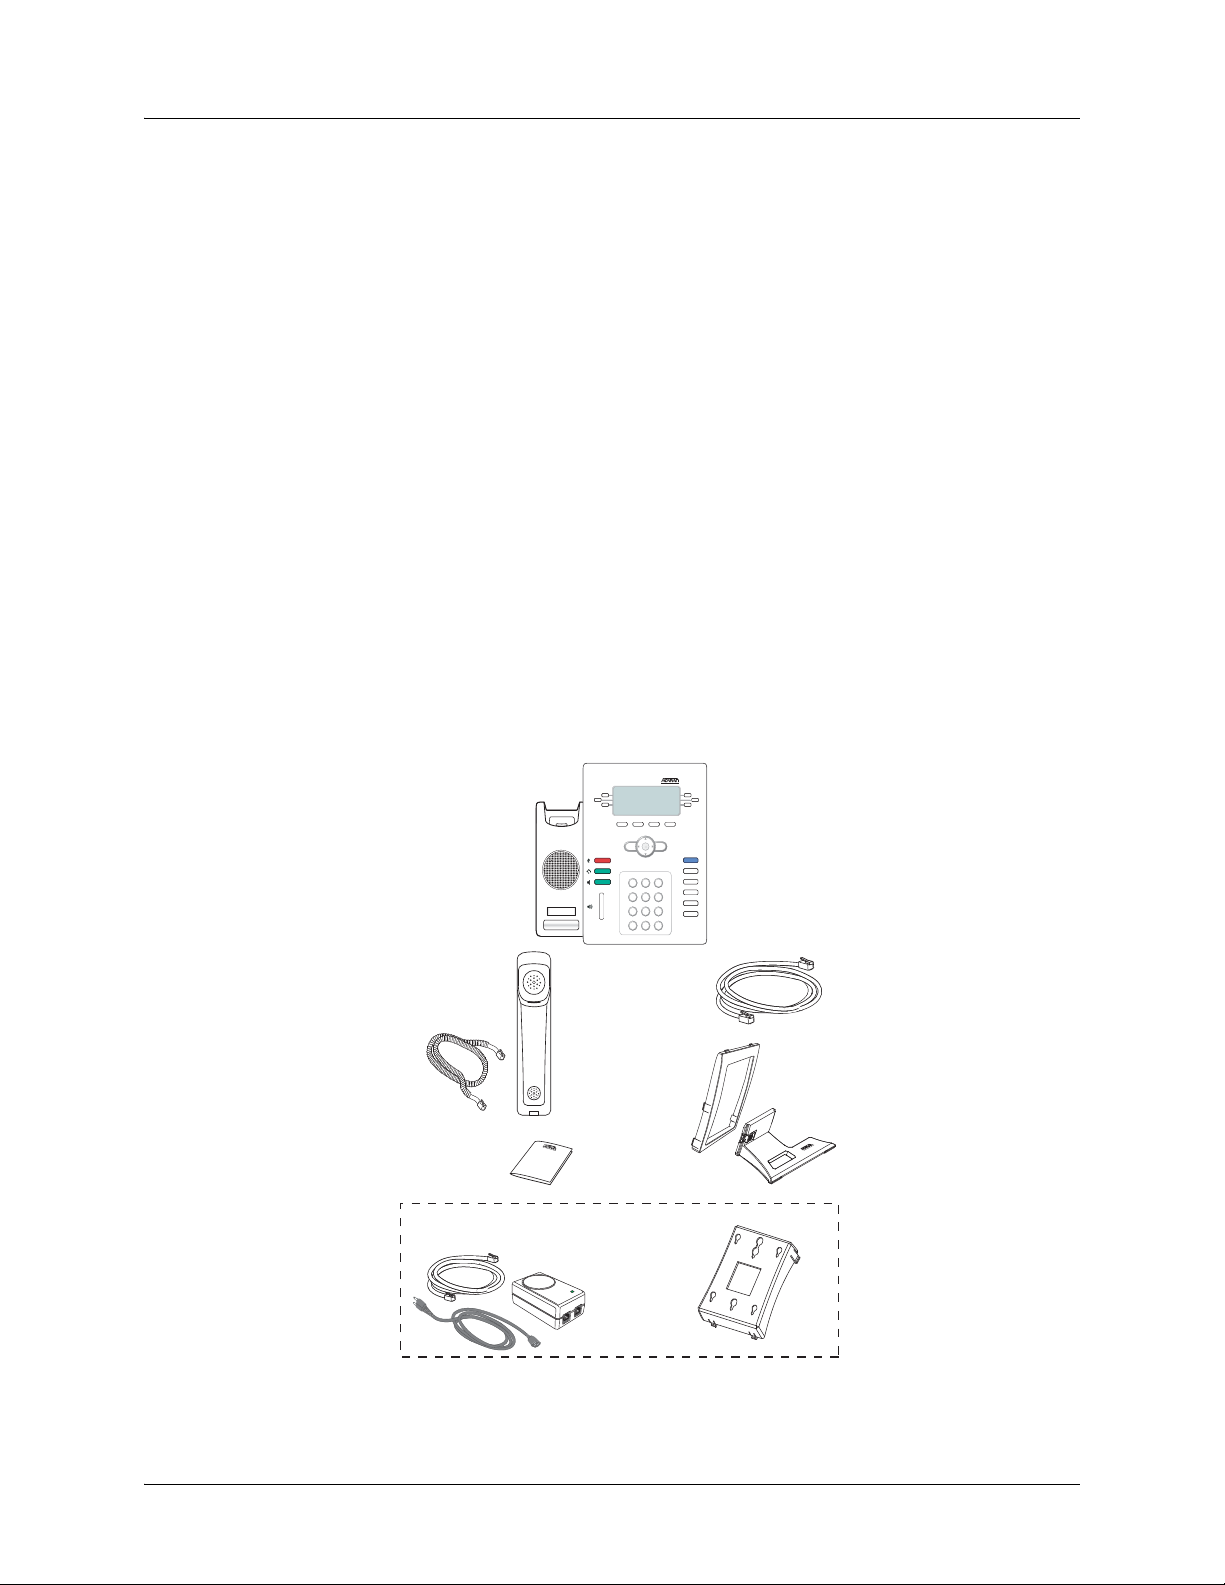
The following sections list the items included in your phone shipment and provide instructions for
assembling the IP 706 and IP 712 phones. For questions dealing with missing parts or difficulty in
assembly, contact your ADTRAN reseller or your system administrator.
Unpacking the Phone
As you carefully unpack your phone, be sure you have received each item in the following list:
• IP 706 or IP 712 phone console
• Audio handset
• 9-foot coiled handset cord
• Ethernet cable
• Adjustable desk stand and bracket
•Quick Start Guide
The following items are available separately:
• Wallmount kit, black (P/N 1200808E1#B)
• Single-port PoE power supply, North America (P/N 1200809E1)
• Single-port PoE power supply, International (P/N 1200809E#IN)
IP 706 Console
OK
Cancel
Menu
Messages
Hold
Transfer
ABC
DEF
12
3
Conference
GHI
JKL6MNO
+
4
5
Directories
PQRS8TUV9WXYZ
Goodbye
7
-
0
#
*
Handset and
Cord
Quick Start
Guide
Optional
PoE Power Supply
Network (LAN)
Cable
Desk Bracket
and Stand
Optional
Wallmount Kit
R
E
W
O
P
J2
DATA
J1
A & PWR
DAT
Figure 1. Parts Included with Your IP Phone
14 Copyright © 2011 ADTRAN, Inc. 6AOSUG0001-1A
Page 15

ADTRAN IP 700 Series Phone User Manual Assembly and Installation
3
2
4
1
5
Bracket
To p
Stand
Desk Stand
Unit
Phone Back
Assembling the Phone
The IP 706 and IP 712 phones require minimal assembly. The parts that must be assembled include the
desk stand and handset.
Attaching the Desk Stand
1. Insert the stand through the bracket (rotating it so it fits through the opening).
2. Once through the bracket opening, rotate the stand back and pull it toward the bracket until seated.
3. Make sure the stand is properly oriented within the bracket as shown in Figure 2 below.
4. With the desk stand assembled, insert the top two tabs into the corresponding slots on the phone
back.
5. Insert the remaining tabs in the order shown in Figure 2 below. The two Tabs 4 and 5 must be
pressed inward at the same time to snap into the slots.
6. Once the desk stand is installed, use the sliding latch on the back to adjust the phone to the
preferred tilt. To remove the desk stand for wall mounting purposes, simply push in the tabs along
the side and lift the desk stand from the back of the phone.
Figure 2. Assembling the Desk Stand
The IP 706 and IP 712 phones may be wall mounted using the optional wallmount kit
(P/N 1200808E1). For wall mounting instructions, refer to the IP 700 Series Wallmount
Kit Quick Start Guide shipped with the kit.
6AOSUG0001-1A Copyright © 2011 ADTRAN, Inc. 15
Page 16
Assembly and Installation ADTRAN IP 700 Series Phone User Manual
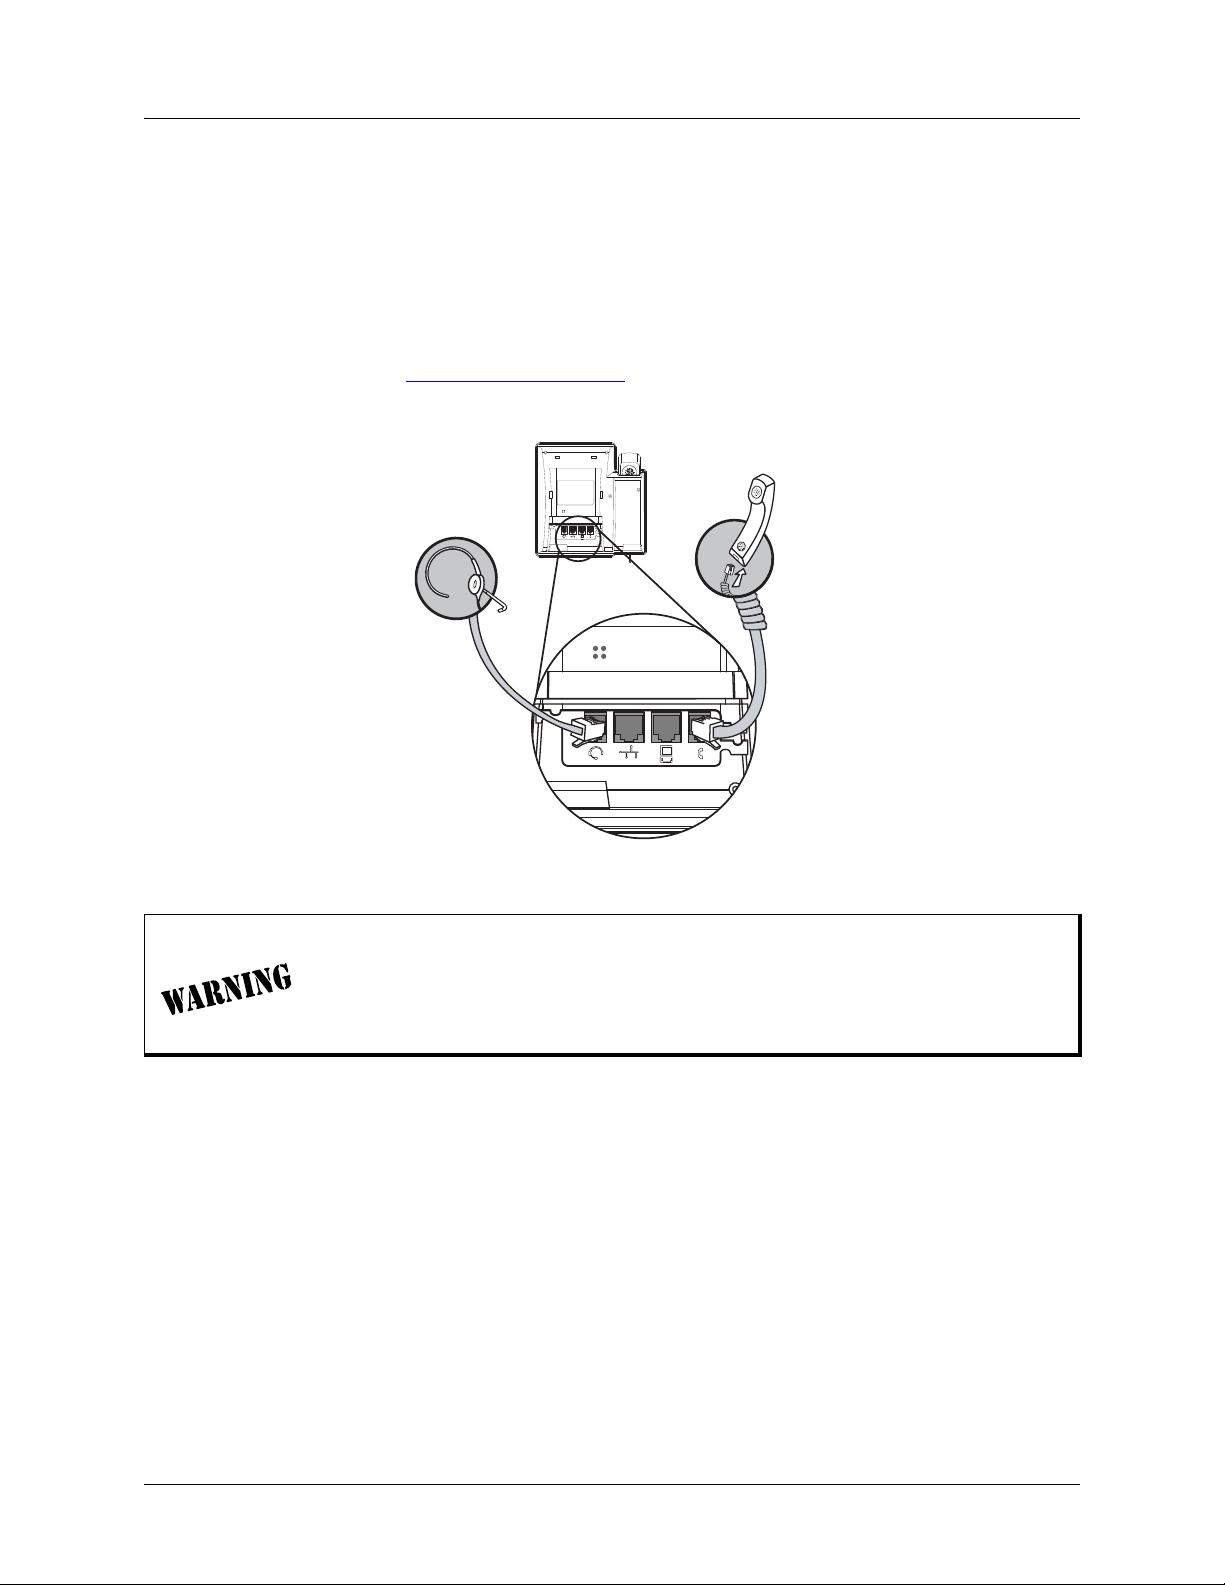
Connecting the Handset and Headset
1. Using the provided 9-foot coiled handset cord, insert one end into the jack in the bottom of the
handset. Insert the other end into the jack on the back of the phone console labeled with the
handset icon as shown in Figure 3 below. Place the handset on the handset cradle once installed.
2. Optional. Connect your headset to the jack in the back of the phone console labeled with the
headset icon as shown in Figure 3 below. There are many types of headsets that can be used with
the IP 706 or IP 712 phone. For a list of compatible headsets for the IP phones, refer to the
ADTRAN website at www.adtran.com/phones
is ready to use.
Optional
Headset
. Once the headset is connected, the headset feature
Handset
Figure 3. Connecting the Handset and Headset
Equipment Installation
Only trained and qualified service personnel should be allowed to install, replace,
or service this equipment. The equipment must be placed indoors and connected to
indoor networks only. Failure to follow the installation guide instructions may void
warranty.
16 Copyright © 2011 ADTRAN, Inc. 6AOSUG0001-1A
Page 17
ADTRAN IP 700 Series Phone User Manual Connecting to the Power Source
3. CONNECTING TO THE POWER SOURCE
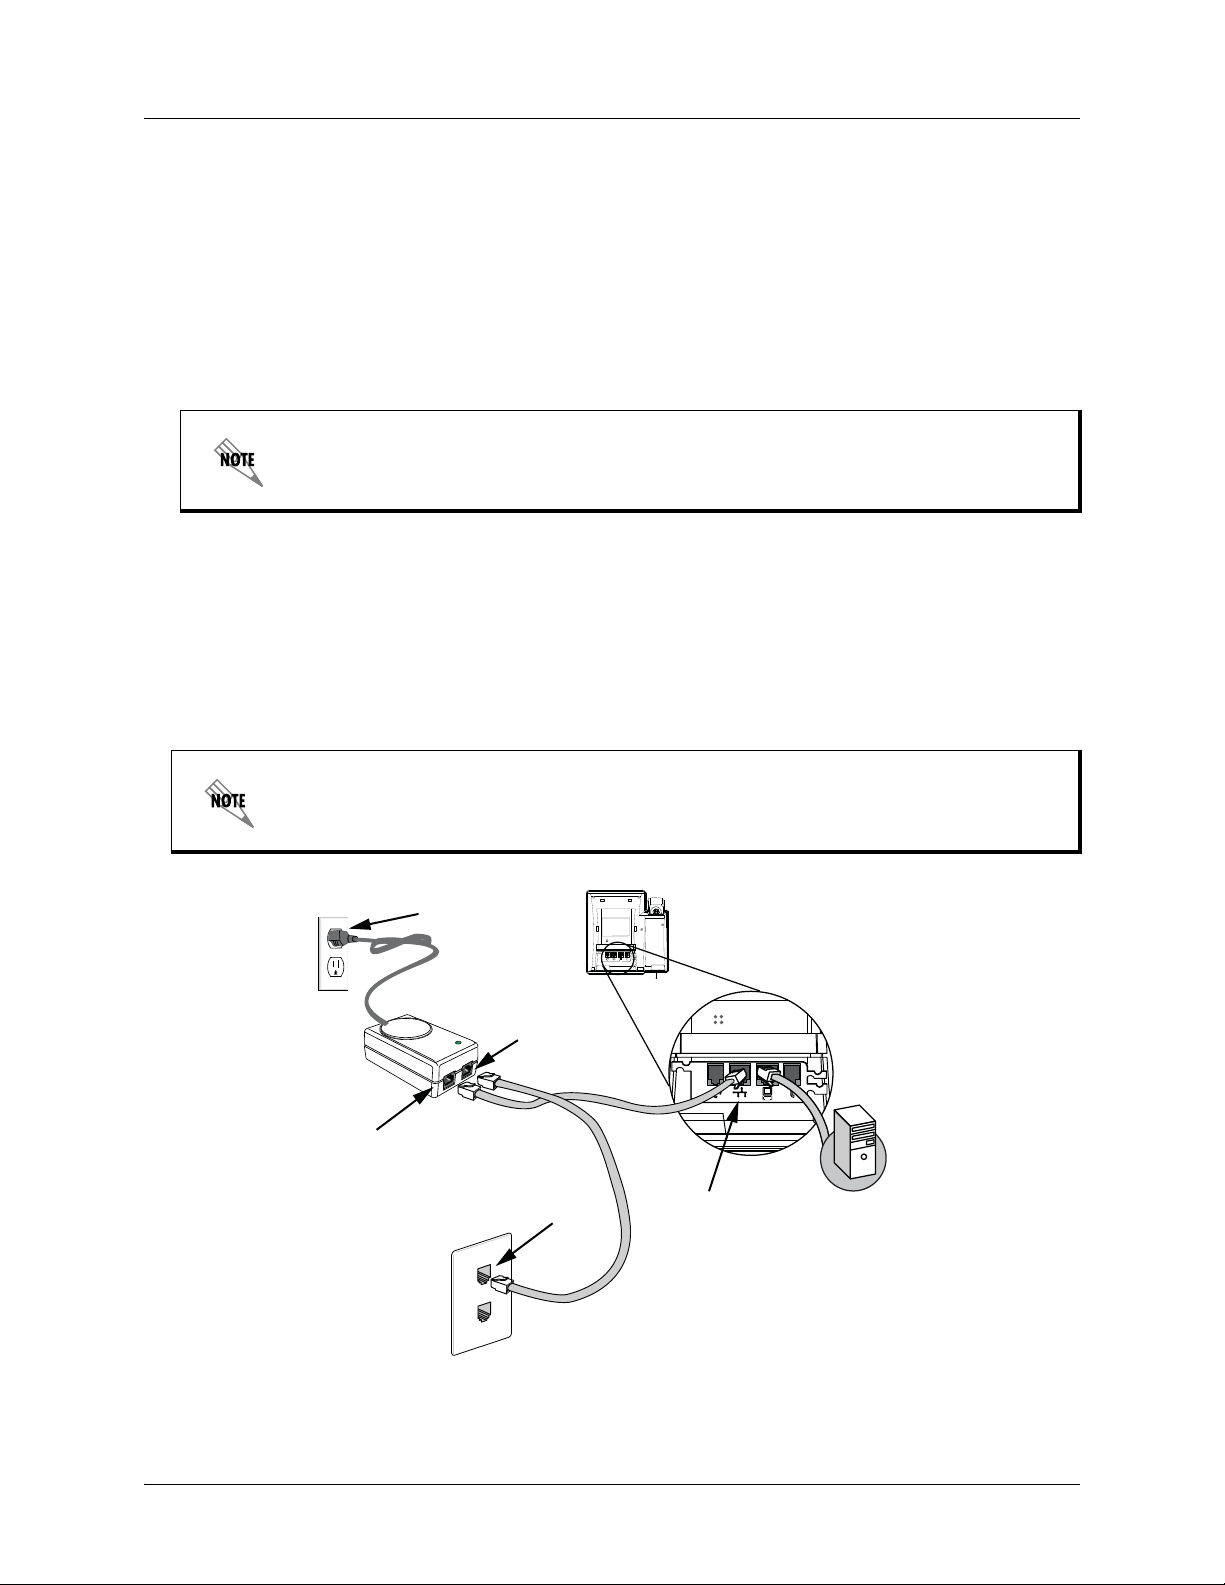
Once the IP 706 and IP 712 phones have been assembled, it is necessary to connect the phones to a power
source and the phone system. There are two options available to supply power to your IP phone. Use the
Local Power Option if your wall jack is not Power over Ethernet (PoE) enabled. This option requires using
the optional PoE power supply (P/N 1200809E1 or P/N 1200809E#IN). If your wall jack is PoE enabled,
use the Inline Power Option which does not require the optional PoE power supply. Use the following
steps to complete these tasks.
Local Power Option
Use the Local Power Option if your jack is NOT PoE enabled. If your jack is PoE
enabled, a PoE power supply is not necessary.
1. Connect one end of the included Ethernet cable to the Ethernet jack on the back of the phone.
2. Connect the remaining end to the
J1 DATA AND POWER port on an appropriate PoE-enabled
device.
3. Connect one end of a second Ethernet cable (not included) to the
J2 DATA port on the PoE device.
4. Connect the remaining end of the second Ethernet cable (not included) to the non-PoE wall jack.
5. Connect the PoE power supply to the wall outlet.
Network connectivity is provided through the wall jack, allowing an optional PC
connection through the IP phone. If the IP phone is disconnected fr om either the network
or power source, network connectivity from the phone to the attached PC will be lost.
5
Optional
PoE Power Supply
3
J2
A
T
A
DATA & PWR
POWER
D
J1
2
Non-PoE Wall
Jack
4
1
Optional PC
Connection
Figure 4. Connecting to the Local Power Source
6AOSUG0001-1A Copyright © 2011 ADTRAN, Inc. 17
Page 18

Connecting to the Power Source ADTRAN IP 700 Series Phone User Manual
Optional PC
Connection
PoE Wall
Jack
1
2
Inline Power Option
1. Connect one end of the included Ethernet cable to the Ethernet jack on the back of the phone.
2. Connect the remaining end of the Ethernet cable to the PoE wall jack.
Network connectivity is provided through the PoE wall jack, allowing an optional
PC connection through the IP phone.
Figure 5. Connecting to the Inline Power Source
18 Copyright © 2011 ADTRAN, Inc. 6AOSUG0001-1A
Page 19

ADTRAN IP 700 Series Phone User Manual Phone Overview
+
-
12
ABC
4
GHI
3
DEF
5
JKL6MNO
7
PQRS8TUV9WXYZ
*
0
#
Menu
OK
Cancel
Directories
Messages
Transfer
Conference
Hold
Goodbye
Context-Sensitive
Soft Keys
LCD Display
Line Keys
7 through 12
Navigation
Bar
Message
Indicator
Line Keys
1 through 6
Mute
Button
Speaker
Hookswitch
Headset
Button
Speaker
Button
Volume Bar
Dial Pad
Function KeysFunction Keys
Hold Call
Transfer Call
Conference Call
Directories
Goodbye
(Disconnect)
4. PHONE OVERVIEW
The following sections provide an overview of the IP 706 and IP 712 phones using phone diagrams,
descriptions of the key types, and liquid crystal display (LCD) menus. Review this information to get the
most from your ADTRAN product.
Phone Diagrams
The following diagrams give an overview of both the IP 706 and IP 712 model phones. The primary
difference between the two models is the number of line keys available. The IP 706 model phone has 6 line
keys, while the IP 712 model phone has 12 line keys.
Figure 6. IP 712 Phone Diagram
6AOSUG0001-1A Copyright © 2011 ADTRAN, Inc. 19
Page 20

Phone Overview ADTRAN IP 700 Series Phone User Manual
12
ABC
4
GHI
3
DEF
5
JKL6MNO
7
PQRS8TUV9WXYZ
*
0
#
Directories
Messages
Transfer
Conference
Hold
Goodbye
+
-
Menu
OK Cancel
Context-Sensitive
Soft Keys
LCD Display
Line Keys
4 through 6
Navigation
Bar
Message
Indicator
Line Keys
1 through 3
Mute
Button
Speaker
Hookswitch
Headset
Button
Speaker
Button
Volume Bar
Dial Pad
Function KeysFunction Keys
Hold Call
Transfer Call
Conference Call
Directories
Goodbye
(Disconnect)
Figure 7. IP 706 Phone Diagram
Key Descriptions
The IP 706 and IP 712 phones use a variety of keys for phone navigation and feature use. The three main
categories are: function keys, line keys, and soft keys. The following sections describe each key type and
how it is used.
Function Keys
The function keys are buttons on the phone that perform predetermined tasks. Function keys include the
designated feature keys
mute, headset, speaker, and volume keys labeled with symbols. The function keys are located on either
side of the number pad as shown in Figure 8 on page 21.
20 Copyright © 2011 ADTRAN, Inc. 6AOSUG0001-1A
Messages, Hold, Transfer, Conference, Directories, and Goodbye, as well as the
Page 21

ADTRAN IP 700 Series Phone User Manual Phone Overview
12
ABC
4
GHI
3
DEF
5
JKL6MNO
7
PQRS8TUV9WXYZ
*
0
#
Directories
Messages
Transfer
Conference
Hold
Goodbye
+
-
Menu
OK Cancel
Function Keys
Function Keys
Figure 8. Function Key Location
Most function keys are used when the phone is either in an idle state or during an active call. Keys that can
be used while in an idle state include Messages and Directories. Keys that can be used during an active
call include Hold, Transfer, Conference, and Goodbye. Keys that can be used in either state include
mute, headset, speaker, and volume.
Table 1 below describes each function key, its appearance, and function.
Table 1. Function Key Description
Function Key Appearance Description
The LED can be configured to
illuminate solid, flash, or blink to
indicate the message count. Can be
set up to directly access voicemail
by pressing the message indicator
key. Contact your system
administrator for more information.
Press to place the current call on
hold.
Messages
Hold
Messages
LED illuminates Blue
when a message is
waiting.
Hold
More
Information
Refer to
Configuring
Message Waiting
Indicator on
page 30.
Refer to Using
Hold on page 35.
Transfer
Transfer
6AOSUG0001-1A Copyright © 2011 ADTRAN, Inc. 21
Press to initiate a call transfer. Refer to
T ransferring Calls
on page 37.
Page 22

Phone Overview ADTRAN IP 700 Series Phone User Manual
Table 1. Function Key Description (Continued)
Function Key Appearance Description
Press to add a third party to an
active call.
Press to access the System and
Personal Contacts directories.
Press to disconnect from the current
call.
Press to silence the speaker,
handset, or headset microphone.
Press the mute key again to
reactivate audio.
Signals that the headset is active.
Y ou must have a hea dset connected
to your phone and have enabled the
Headset Switch Hook to use this
function.
Press to enable the speaker. Refer to Using the
Press +/- to increase or decrease
the volume. Pressing the key causes
the Messages key light to flash and
presents a volume bar on the LCD
screen. A tone plays to indicate the
current volume. This function key is
applied to the call, ringer, and
speaker volume through additional
steps.
Conference
Directories
Goodbye
Mute
Headset
Speaker
Volume
Conference
Directories
Goodbye
LED flashes Red
when active.
LED illuminates
Green when in use.
LED illuminates
Green when active.
+
-
More
Information
Refer to
Conferencing a
Call on page 39.
Refer to Using
Directories on
page 41.
Refer to Ending
Calls on page 33.
Refer to Muting
Calls on page 34.
Refer to Using the
Handset,
Headset, and
Speaker on
page 32.
Handset,
Headset, and
Speaker on
page 32.
Refer to Adjusting
Volume on
page 29.
22 Copyright © 2011 ADTRAN, Inc. 6AOSUG0001-1A
Page 23

ADTRAN IP 700 Series Phone User Manual Phone Overview
Line Keys
1 through 6
Line Keys
7 through 12
Label Area
Soft Key
Menu
Options
4 Soft Keys
Line Keys
The IP 706 phone has 6 line keys, while the IP 712 phone has 12 line keys. These keys are located on either
side of the LCD display. See Figure 6 on page 19 and Figure 7 on page 20 for the line key locations on
each model.
Each line key is identified in the label area on the LCD located adjacent to the key. Each line key label can
contain a maximum of 17 characters.
The line keys can be programmed as a secondary extension, a speed dial entry , or as a shortcut to the do not
disturb (DND) feature. Each of these features require additional configuration and are explained in greater
detail later in this guide.
ADTRAN IP 712 PHONe
5608
5608
5608
StephEn
John
Marc
Lane
Dial
Figure 9. Line Keys and Soft Keys for an IP 712 Phone
Redial
Pickup
03/19/07
1:58 pm
Ann
Chris
Sandra
Home
Dnd
More
Soft Keys
There are four soft keys on both phone models, located at the bottom of the LCD screen. Soft key functions
change according to the LCD menus. As choices are made while navigating the phone’s menu system,
different options become available and are displayed on the LCD screen directly above each soft key.
Figure 9 above depicts the soft keys, their location, and a representation of their dynamic menu.
The soft key menu options are displayed and changed by either pressing the Menu button on the
navigation bar in the middle of the phone face, or one of the default soft key options (Dial, Redial,
Pickup, More). The soft key options change according to the state of the phone. For example, the soft key
menu presented to the user while the phone is in the idle state are different from those displayed while on
an active call.
The soft key labeled More indicates there are more available functions than are currently shown. Press the
More soft key to display further menu options.
6AOSUG0001-1A Copyright © 2011 ADTRAN, Inc. 23
Page 24

Phone Overview ADTRAN IP 700 Series Phone User Manual
LCD Menus
The LCD menus provide another method for controlling and interfacing with the IP phone. All the
programmable features of the phone are accessed using the LCD menu. All keys, whether line, soft, or
function keys, interact with the LCD menus.
The top two lines of the LCD display information pertinent to the user. Items such as name, date, time,
messages, missed calls, and call duration are actively updated and appear on the LCD screen. Other areas
of the LCD provide the user with additional information about specific interactions of the phone. Call
appearance definitions, pop-up menus, and other display items give the user information about calls being
placed and received.
Icon Definitions
Because the IP 706 and IP 712 phones are accessed either through the Web-based graphical user interface
(GUI) or LCD menu, they contain a system of iconic language that every user should recognize and
understand. The following section details the most common icons and their meanings. Take a few moments
to look these over before moving on to the main features of the phone.
Table 2. Icon Definitions
Icon Icon Name Where It Appears Information It Gives
Alarm bell In the line key label area.
Calls forwarded In the line key label area.
Check box In the LCD menus.
Call conferenced In the line key label area.
DND In the line key label area.
The line is receiving an incoming call.
Refer to Answering Calls on page 33.
The line is forwarded to another extension
or number. Refer to Forwarding Calls on
page 37.
Used to show that a specific setting has
been selected.
A three-way conference call is in progress
on the line. Refer to Conferencing a Call
on page 39.
The DND feature is active. Refer to Using
DND on page 38.
Hold In the line key label area.
In use In the line key label area. A call is active on the line.
On-hook/idle In the line key label area.
Speaker with
volume
Speaker with no
volume
24 Copyright © 2011 ADTRAN, Inc. 6AOSUG0001-1A
On volume LCD display.
On volume LCD display.
A call is on hold. Refer to Using Hold on
page 35.
The line has registered with the Session
Initiation Protocol (SIP) server and is
available for use.
The plus (+) end of the volume control bar
has been pressed to increase volume.
Refer to Adjusting Volume on page 29 .
The minus (-) end of the volume control
bar has been pressed to decrease
volume. Refer to Adjusting Volume on
page 29.
Page 25

ADTRAN IP 700 Series Phone User Manual Phone Overview
Table 2. Icon Definitions (Continued)
Icon Icon Name Where It Appears Information It Gives
Voicemail In the line key label area. Indicates the user has voicemail.
Not registered In the line key label area.
Progressing
ringback
In the line key label area. The line is currently making a call.
Speed dial entry In the line key label area.
Busy Lamp Field In the line key label area.
Busy Lamp Field In the line key label area.
Busy Lamp Field In the line key label area.
The line has not registered with the SIP
server and is not available for use.
The line is set to speed dial. Refer to
Programming Speed Dials on page 31.
The line is set to busy lamp field (BLF)
and is monitoring another phone that is
not in use.
The line is set to BLF and is monitoring
another phone that is in use.
Indicates the number the BLF line should
be monitoring cannot be found in its
assigned status group.
6AOSUG0001-1A Copyright © 2011 ADTRAN, Inc. 25
Page 26

Phone Settings ADTRAN IP 700 Series Phone User Manual
5. PHONE SETTINGS
The following sections describe the basic settings of the IP 706 and IP 712 phones. Each section describes
a different setting, its purpose, and the appearance of the LCD screen. T o get the most from the IP phone, it
is recommended that you review this section in its entirety before using your phone.
After pressing the Menu button on the navigation bar, there are two ways to select the
desired menu or feature: 1) use the numeric keypad to select the corresponding number, or
2) use the arrow key to scroll to the feature and pre ss the Ok soft key to select the feature.
All examples given below use the numeric keypad.
Phone Label
The phone label is the phone description located in the upper left corner of the LCD display. To change the
phone label, use the following steps:
1. Press Menu.
2. Press 2 for Phone Settings.
3. Press 1 for Phone Label.
4. Enter the desired phone label using the keypad.
To toggle between uppercase and lowercase letters and numbers, press the Aa1 soft
key on the LCD display. This changes the character entry mode and is indicated by a
symbol in the upper right corner of the LCD display. A signifies uppercase letters, a
signifies lowercase letters, and 1 signifies numbers. Add spaces by using the 0 (zer o)
key, and erase characters by using the soft key.
5. When the desired label is entered, press the Ok soft key or OK on the navigation bar.
6. Press the Exit soft key until the idle screen appears, or press CANCEL on the navigation bar to
return directly to the idle screen.
Setting the Time
The time should already be set by the system administrator and updated as necessary by the system
supporting the IP phone. If it is necessary to change or set the time, this can be done manually. To manually
set the time for the phone, use the following steps:
1. Press Menu.
2. Press 2 for Phone Settings.
3. Press 2 for Clock.
4. Press 1 for Set Time.
5. Using the arrow keys on the navigation bar and keypad, edit the time.
6. Press the Ok soft key or OK on the navigation bar.
7. Press the Exit soft key until the idle screen appears, or press CANCEL on the navigation bar to
return directly to the idle screen.
26 Copyright © 2011 ADTRAN, Inc. 6AOSUG0001-1A
Page 27

ADTRAN IP 700 Series Phone User Manual Phone Settings
Time Format
The IP phones support both 12-hour and 24-hour time formats. To change the time format, use the
following steps:
1. Press Menu.
2. Press 2 for Phone Settings.
3. Press 2 for Clock.
4. Press 2 for Time Format.
5. Using the arrow keys on the navigation bar, scroll to the desired time format.
6. Press the Select soft key to select the highlighted option.
7. Press the Ok soft key or OK on the navigation bar.
8. Press the Exit soft key until the idle screen appears, or press CANCEL on the navigation bar to
return directly to the idle screen.
Date Format
There are a number of ways that dates can be displayed. To change the way the phone displays date
information, follow these steps:
1. Press Menu.
2. Press 2 for Phone Settings.
3. Press 2 for Clock.
4. Press 3 for Date Format.
5. Using the arrow keys on the navigation bar, scroll to the desired display option.
6. Press the Select soft key to select the highlighted option.
7. Press the Ok soft key or OK on the navigation bar.
8. Press the Exit soft key until the idle screen appears, or press CANCEL on the navigation bar to
return directly to the idle screen.
Daylight Savings Time
Daylight savings time (DST) may be enabled or disabled by following these steps:
1. Press Menu.
2. Press 2 for Phone Settings.
3. Press 2 for Clock.
4. Press 4 for Daylight Savings Time.
5. Using the arrow keys on the navigation bar, scroll to the desired option.
6. Press the Select soft key to select the highlighted option.
7. Press the Ok soft key or OK on the navigation bar.
8. Press the Exit soft key until the idle screen appears, or press CANCEL on the navigation bar to
return directly to the idle screen.
6AOSUG0001-1A Copyright © 2011 ADTRAN, Inc. 27
Page 28

Phone Settings ADTRAN IP 700 Series Phone User Manual
Setting Ring Tones
Different ring tones can be set for incoming calls. Ring tones can be set to distinguish between internal
calls, external calls, and specific numbers. Use the following steps to set ring tones:
Internal/External Ring Tones
1. Press Menu.
2. Press 2 for Phone Settings.
3. Press 3 for Set Rings.
4. Press 1 for External or 2 for Internal.
5. Using the arrows on the navigation bar, scroll to the ring option desired.
6. Press the Select soft key to select the highlighted option.
7. Press the Ok soft key or OK on the navigation bar.
8. Press the Exit soft key until the idle screen appears, or press CANCEL on the navigation bar to
return directly to the idle screen.
Distinctive Rings
A distinctive ring can be assigned to any entry in the Personal Contacts directory. Once set, any time a
call is received from that number, the phone will ring using the assigned ring tone. For details
explaining how to add entries to your Personal Contacts, refer to Load PhoneBook on page 48.
To specify a distinctive ring for a number in the Personal Contacts directory, use the following steps:
1. Press Menu.
2. Press 4 for Directories.
3. Press 1 for Personal.
4. Select the desired name/number.
5. Press the Edit soft key .
6. Press 7 for Distinctive Ring.
7. Using the arrows on the navigation bar, scroll to the desired ring.
8. Press the Select soft key to select the highlighted option.
9. Press the Ok soft key or OK on the navigation bar.
10. Press the Exit soft key until the idle screen appears, or press CANCEL on the navigation bar to
return directly to the idle screen.
28 Copyright © 2011 ADTRAN, Inc. 6AOSUG0001-1A
Page 29

ADTRAN IP 700 Series Phone User Manual Phone Settings
Adjusting Volume
Ringer Volume
To adjust the ring volume of the phone, when the phone is idle, use the following steps:
1. Press the + (plus) end of the volume function key to increase the volume.
2. Press the - (minus) end of the volume function key to decrease the volume.
3. Release the volume function key when the desired volume is reached.
Call Volume
To adjust the volume of a call, use the following steps during an active call:
1. Press the + (plus) end of the volume function key to increase the volume.
2. Press the - (minus) end of the volume function key to decrease the volume.
3. Release the volume function key when the desired volume is reached.
Speaker Volume
To adjust the volume of the speaker, when the phone is idle, use the following steps:
1. Press the speaker function key.
2. Press the + (plus) end of the volume function key to increase the volume.
3. Press the - (minus) end of the volume function key to decrease the volume.
4. Release the volume function key when the desired volume is reached.
Adjusting LCD Contrast
To adjust the LCD display contrast, use the following steps:
1. Press Menu.
2. Press 2 for Phone Settings.
3. Press 5 for Contrast.
4. Press the + (plus) or - (minus) soft keys until the desired contrast is reached.
5. Press the Ok soft key or OK on the navigation bar.
6. Press the Exit soft key until the idle screen appears, or press CANCEL on the navigation bar to
return directly to the idle screen.
Setting Display Language
The language displayed on the LCD screen can be changed as needed. To change the display language,
follow these steps:
1. Press Menu.
2. Press 2 for Phone Settings.
6AOSUG0001-1A Copyright © 2011 ADTRAN, Inc. 29
Page 30

Phone Settings ADTRAN IP 700 Series Phone User Manual
3. Press 4 for Language.
4. Using the arrows on the navigation bar, scroll through the available options and highlight the
desired language.
5. Press the Select soft key.
6. Press the Ok soft key or OK on the navigation bar.
7. Press the Exit soft key until the idle screen appears, or press CANCEL on the navigation bar to
return directly to the idle screen.
Configuring Message Waiting Indicator
The Message function key contains a light emitting diode (LED) which illuminates when voicemail
messages are present. The message waiting indicator (MWI) can be configured to one of three settings:
1) to illuminate solid when new voicemail messages are present, 2) flash at one second intervals, or 3) to
indicate the number of voicemail messages by cadenced flashing. To configure the MWI behavior, use the
following steps:
1. Press Menu.
2. Press 2 for Phone Settings.
3. Press 0 for Misc.
4. Press 2 for MWI Cadence.
5. Scroll through the options with the arrow keys.
6. Press the Select soft key when the desired selection is highlighted.
7. Press the Ok soft key or OK on the navigation bar.
8. Press the Exit soft key until the idle screen appears, or press CANCEL on the navigation bar to
return directly to the idle screen.
Deleting Personal Contacts
To delete the entire Personal Contacts directory from the phone, follow these steps:
1. Press Menu.
2. Press 2 for Phone Settings.
3. Press 9 for Reset.
4. Press Del PhBk.
5. Press the Ok soft key or OK on the navigation bar.
6. Press the Exit soft key until the idle screen appears, or press CANCEL on the navigation bar to
return directly to the idle screen.
30 Copyright © 2011 ADTRAN, Inc. 6AOSUG0001-1A
Page 31

ADTRAN IP 700 Series Phone User Manual Phone Settings
Programming Speed Dials
Speed dial members are dynamically placed on line keys not occupied by Line or DND line keys. The
number of line keys available for Speed members also depends on the numb er of BLF members defined in
your phone’s status group (managed by the system administrator). When status groups to which the p hon e
is subscribed are updated by the administrator, a list of BLF members is sent out to the phone, and the BLF
members are dynamically placed on line keys not occupied by Line or DND line keys. Any line keys
remaining after all members from the subscribed BLF groups have been placed are assigned to Speed
members
. Use the following steps to create a speed dial entry:
1. Press Menu.
2. Press 2 for Phone Settings.
3. Press 7 for Set Speed.
4. Use the arrows on the navigation bar to scroll to the desired entry. The entry number designates a
priority for the speed member; lower numbers receive a higher priority when being placed on
unoccupied line keys. For example, speed entry 1 will be placed on an unoccupied line key before
speed entry 2.
5. Press the Edit soft key to set the following parameters:
Table 3. Line Key Settings for Speed Dial
Setting Description Available Options
1. Number Sets the phone number or
extension to dial.
2. Label Creates the label that will
appear on the LCD next to the
line key.
3. Realm Sets the realm in which this
line key exists.
Enter numerals using the keypad. Erase
characters by using the soft key.
Enter alphanumeric characters using the
keypad. To toggle between uppercase letters,
lowercase letters, and numeral character
modes, press the Aa1 soft key. The active
character entry mode is indicated by a symbol in
the upper right corner of the LCD display. A
indicates uppercase letters, a indicates
lowercase letters, and 1 indicates numbers. Add
spaces by pressing 0 (zero).
Select from Internal, External, or Other. This
setting is used in Shared Line Appearance (or
Key System Mode) to select the line type for the
speed dial entry. Internal will use your local
extension, and External will use one of the
external trunk lines when placing the call. Other
is used for post-call setup dialing strings.
6. Use the navigation bar to scroll to the desired parameter, and press the Edit soft key.
7. Set the parameter using the options in Table 3 above.
8. Press the OK soft key or OK on the navigation bar.
9. Press the Exit soft key until the idle screen appears, or press CANCEL on the navigation bar to
return directly to the idle screen.
6AOSUG0001-1A Copyright © 2011 ADTRAN, Inc. 31
Page 32

Basic Features ADTRAN IP 700 Series Phone User Manual
6. BASIC FEATURES
The following sections describe the basic features of the IP 706 and IP 712 phones. Each section describes
a different feature, explains how it is accessed, its purpose, and the appearance of the LCD screen. To get
the most from the IP phone, it is recommended that you review this section in its entirety before using your
phone.
Using the Handset, Headset, and Speaker
When answering or placing a call, three options are available to connect with the other party: the handset,
the headset, or the speaker.
Enabling the Headset
Before using the headset, make sure it is connected to the proper jack in the back of the phone as shown in
Figure 3 on page 16. The IP phone will automatically detect the headset during active calls.
Enabling the Headset Switch Hook
You must enable the Headset Switch Hook option on your IP phone to utilize the on/off button on certain
headsets. See your headset documentation to verify this is necessary. Once the Headset Switch Hook has
been enabled, the IP phone will automatically detect the headset during active calls. T o enable the Headset
Switch Hook, use the following steps:
1. Press Menu.
2. Press 2 for Phone Settings.
3. Press 0 for Misc.
4. Press 1 for Headset Switch Hook.
5. Scroll to On and press the Select soft key.
6. Press the Ok soft key or OK on the navigation bar.
7. Press the Exit soft key until the idle screen appears, or press CANCEL on the navigation bar to
return directly to the idle screen.
Making Calls
Making a call is a simple procedure and can be accomplished using the handset, headset, or speaker. Use
the following steps to make a call:
1. Pick up the handset, or press the speaker key.
If making a call using the headset, begin at Step 3 since the phone will automatically
detect the use of the headset. Enabling the Headset Switch Hook is only necessary to
enable the on/off button functionality on certain headsets (refer to your headset
documentation).
2. Listen for the dial tone.
3. Dial the desired number.
32 Copyright © 2011 ADTRAN, Inc. 6AOSUG0001-1A
Page 33

ADTRAN IP 700 Series Phone User Manual Basic Features
Answering Calls
Similar to making a call, answering calls may be done with the handset, headset, or speaker. Use the
following steps to answer a call:
1. Pick up the handset, press the headset key, or press the speaker key.
2. If you have multiple line labels, select the line key next to the extension receiving the call. A line
receiving an incoming call will display the following icon:
If the phone has the default configuration, the ringing extension will be automatically
selected when the handset is picked up, the headset key is pressed, or the speaker key is
pressed.
Viewing Caller ID
Caller identification (caller ID) displays incoming callers’ names and numbers on the LCD display. Upon
receiving the caller ID information, the phone will search the local phone book and determine if there is a
match. In the event of a match, the name from the local phone book will display in lieu of the name
provided by the calling party.
The caller ID display includes the options to Answer or Ignore the call, send the call directly to voicemail
(Vmail), or close the pop-up display by selecting Exit.
If more than one incoming call occurs simultaneously, the pop-up expands to accommodate the new
information. The initial call is the top number presented, but up to three numbers with caller ID
information can be displayed simultaneously. If the user has more than three incoming calls, only the first
three calls are presented. Any additional calls are queued in the IP phone to be displayed if one of the first
three calls is terminated.
Ending Calls
To disconnect from a call, use one of the following steps:
1. Press the Goodbye function key.
2. Return the handset to the cradle.
3. Press the headset key (if using the headset).
4. Press the speaker key (if using speaker).
5. Press the Endcall soft key.
6AOSUG0001-1A Copyright © 2011 ADTRAN, Inc. 33
Page 34

Basic Features ADTRAN IP 700 Series Phone User Manual
OK
MENU
CANCEL
Personal Contacts
Missed Calls
Placed Calls
Incoming Calls
Muting Calls
To mute a call any time during an active call, use the following steps:
1. Press the Mute function key .
2. The LED flashes red indicating the call has been muted.
3. Press the Mute function key again to cancel.
While mute is enabled, you can still hear the caller’s voice but they cannot hear
any audio from your side of the conversation.
Using the Navigation Bar
The IP 706 and IP 712 phone settings are accessed through the various menus presented on the LCD
display . As previously discussed, there are menus associated with soft keys (displayed across the bottom of
the LCD), as well as a main menu that is displayed when the Menu key in the center of the phone’s face is
pressed.
The navigation bar enables you to scroll through the menus presented on the LCD display, as well as make
selections. See Table 4 below for a description of each button on the navigation bar.
Table 4. Menu Navigation Bar
Function
Button
Scrolls up the list.
Scrolls down the list.
Scrolls to the right.
Scrolls to the left.
OK Selects the highlighted menu item.
MENU Displays the Main menu on the LCD.
CANCEL
Cancels the selection and returns to
idle menu state.
Description Note
In an idle menu state, the up arrow also serves
as a shortcut to the user’s Personal Contacts
directory.
In an idle menu state, the down arrow also
serves as a shortcut to the Missed Calls Log.
In an idle menu state, the right arrow also
serves as a shortcut to the Placed Calls Log.
In an idle menu state, the left arro w also ser ves
as a shortcut to the Incoming Calls Log.
34 Copyright © 2011 ADTRAN, Inc. 6AOSUG0001-1A
Page 35

ADTRAN IP 700 Series Phone User Manual Basic Features
Using HFAAI
Handsfree auto answer intercom (HFAAI) allows the IP phone to automatically answer calls through the
phone speaker without user intervention.
Both parties must have HFAAI enabled to make and receive HFAAI calls. If HFAAI is not
enabled on the receiving phone, the call will ring normally and must be answered
manually.
If the party being called has privacy or DND enabled, the HFAAI feature is overridden.
To make a call using the HFA AI feature, follow these steps:
1. Press the More soft key.
2. Press the HFAAI soft key. The following icon will appear in the upper left corner of the LCD
screen to acknowledge that HFAAI has been activated:
3. Dial the number or extension to initiate the call.
If answering a call to a phone with HFAAI enabled, a short tone will sound to signify someone is on the
speaker.
Using Hold
The Hold feature allows calls to be held temporarily. In Key systems, the call can be resumed from any
other station. In PBX systems, the feature is restricted to only allow the original station to resume the call.
Use the following steps to place a call on hold from either system:
1. Press the Hold function key any time during an active call. The following icon appears next to the
line key:
2. To resume the call, press the line key next to the hold icon.
6AOSUG0001-1A Copyright © 2011 ADTRAN, Inc. 35
Page 36

Basic Features ADTRAN IP 700 Series Phone User Manual
Using Park
Parked calls are created by placing an incoming call on hold in a park orbit where it may be retrieved from
any phone on the system without tying up the external or outgoing phone lines.
Manually Parking a Call
Use the following steps to park a call:
1. Press the Park soft key during an active call.
2. Select a park orbit number to assign to the call. Selection range is from 0 to 9.
3. Press the Ok soft key.
4. The call will be disconnected and placed in park.
Retrieving Manually Parked Calls
Parked calls are retrieved from any phone in the system by using the Pickup and Retrieve features. To
pickup and retrieve parked calls, use the following steps:
1. Press the Pickup soft key.
2. Select the park orbit number of the call you wish to retrieve by pressing the associated number on
the keypad.
3. Press the Ok soft key.
Automatically Parking a Call
Calls can be parked without having to specify a park orbit number if the status group to which the
phone is subscribed has one or more park zones defined. Use the following steps to park a call using a
park zone:
1. Press the Park <number> line key during an active call. The <number> variable is the number of
the park zone and is determined by the status group to which the phone is subscribed.
2. The call will automatically be parked on the park zone, and the Park <number> line key will
change to Retrieve allowing the parked call to be retrieved.
Retrieving Automatically Parked Calls
Automatically parked calls are retrieved from any phone in the system by using the Retrieve feature.
Any phone subscribed to a status group containing the park zone will be able to retrieve the call. To
retrieve an automatically parked call, press the Retrieve line key.
36 Copyright © 2011 ADTRAN, Inc. 6AOSUG0001-1A
Page 37

ADTRAN IP 700 Series Phone User Manual Basic Features
Transferring Calls
Transferring a ca ll move s activ e calls from one ex tens ion to anoth er. Transferring can be done three ways:
Unattended Transfer, Attended Transfer, or Blind Transfer.
Using Unattended Transfer
1. During an active call, press the Transfer function key .
2. Dial the extension to which to transfer the call.
3. Press the Transfer function key again or the Transfer soft key. This will disconnect you from the
call.
Unattended transfer refers to transferring a call without knowing if the intended
party is available to receive the call.
Using Attended Transfer
1. During an active call, press the Transfer function key .
2. Dial the extension to which to transfer the call.
3. Listen for the second call to connect.
4. Press the Transfer function key again or the Transfer soft key to transfer the call.
5. If the party does not answer, press the Cancel soft key to disconnect the new call and return to the
original call.
Using Blind Transfer
1. During an active call, press the Transfer function key.
2. Blind and Cancel soft keys will appear. Press the Blind soft key to enter an extension. Press the
Cancel soft key to return to the original call.
3. Dial the extension to which you want to transfer the call. Once you begin dialing, the Transfer and
soft keys will appear in addition to the Cancel soft key. Use the Transfer soft key to transfer
the call, use the soft key to delete the previously dialed digit (displayed on the LCD screen),
or use the Cancel soft key to return to the original call. The call will be transferred once the
Transfer soft key is pressed or the dialed number matches the dial plan.
Forwarding Calls
Forwarding a call allows for calls intended for one extension to be sent to another . To implement the
Forward feature, use the following steps:
1. Press the More soft key on the idle screen.
2. Press the Forward soft key.
3. Enter the number to which calls will be forwarded.
4. Using the arrows on the navigation bar, highlight ALL and press the Enable soft key. Press Ok.
5. To cancel call forwarding, select the Forward soft key and then select Disable.
6AOSUG0001-1A Copyright © 2011 ADTRAN, Inc. 37
Page 38

Basic Features ADTRAN IP 700 Series Phone User Manual
Redialing
Redial allows the last number called or one number of a list to be dialed again. To use Redial, follow these
steps:
1. Press the Redial soft key on the idle screen.
2. Scroll to the desired number in the Placed Calls list.
3. Press the Dial soft key.
Using DND
The DND feature prevents the phone from ringing or paging over the speaker when incoming calls are
received.
Enabling DND
To enable DND, use the following steps:
1. Press Menu.
2. Press 3 for Features.
3. Press 2 for DND Off.
4. Select the DND On soft key.
5. Press the Exit soft key until the idle screen appears, or press CANCEL on the navigation bar to
return directly to the idle screen.
Enabling DND Shortcut
To set DND as a line key shortcut, use the following steps:
1. Press Menu.
2. Press 2 for Phone Settings.
3. Press 0 for Misc.
4. Press 4 for DND Shortcut.
5. Use the arrow keys to highlight On and press the Select soft key.
6. Press the Ok soft key. The last line key (line key 6 on the IP 706 phone and line key 12 on the
IP 712 phone) will display the following icon to indicate that the DND function has been assigned
to it:
7. Press the Exit soft key until the idle screen appears, or press CANCEL on the navigation bar to
return directly to the idle screen.
38 Copyright © 2011 ADTRAN, Inc. 6AOSUG0001-1A
Page 39

ADTRAN IP 700 Series Phone User Manual Basic Features
8. When you choose to implement DND, press the line key labeled DND. When DND is enabled, the
DND line key icon, as well as the icons for all other available lines, will change to the following
icon:
9. To disable DND, press the line key labeled DND again.
Retrieving Messages
Once your voicemail system has been set up, messages can be retrieved with the touch of a button. To
retrieve messages, use the following steps:
1. Press the Messages function key.
2. Follow the prompts for retrieving messages.
The system administrator is responsible for configuring the voicemail system. If you
cannot retrieve your voicemail messages, contact the system administrator.
Conferencing a Call
Conferencing a call allows a third extension to be added to an active call. To conference a third party into
the call, follow these steps:
1. Press the Conference function key during an active call. The active call will be placed on hold,
and the hold icon (shown below) will appear:
The next available line, used for dialing the third party, will display the ringback icon (shown
below):
2. At the prompt, enter the phone number of the third party to add.
3. When the second call is connected, press the Conference key again to add the call to the
conference. The conference icon (shown below) will display:
Only three parties can be conferenced at one time. If one party disconnects, another
party can be added.
6AOSUG0001-1A Copyright © 2011 ADTRAN, Inc. 39
Page 40

Basic Features ADTRAN IP 700 Series Phone User Manual
Using Conference Drop
Conference Drop removes the last added party from the conference call. To initiate conference drop, use
one of the following methods:
• Press the Cancel soft key during the conferencing process.
• Press the Goodbye function key.
• Press the Conference Drop soft key.
Conference Drop only removes the last added party from the conference call. If the
initiator of the conference hangs up, all parties are disconnected. If either of the
conferenced parties hangs up, the call returns to a normal active call between two
parties.
40 Copyright © 2011 ADTRAN, Inc. 6AOSUG0001-1A
Page 41

ADTRAN IP 700 Series Phone User Manual Directories and Call Logs
7. DIRECTORIES AND CALL LOGS
The IP 706 and IP 712 phones provide many ways for call information to be viewed, stored, and retrieved,
making it very easy for all your contact information to be accessed at any time. The primary method for
managing call information is through the use of directories.
Using Directories
The Directories menu is accessed using one of two methods: by pressing either the Menu key on the
navigation bar, or the Directories function key to the right of the number pad. The Directories menu
provides options for accessing the Personal and System directories, as well as the Missed Calls, Incoming
Calls, and Placed Calls logs. Each of these, with the exception of the System directory, may also be
accessed using the shortcut keys described later in this section.
To access the Directories menu, use the following steps:
1. Press the Directories function key.
2. Scroll to and select one of the following options:
•Personal
•System
• Missed Calls
• Incoming Calls
• Placed Calls
3. Follow the prompts as described in the following sections.
Accessing the Personal Directory
The Personal directory serves as your personal phone book. The information stored in this directory
provides caller ID information, as well as access to contact information for quick dialing and
reference. Your Personal directory can be accessed by pressing the Menu key on the navigation bar,
the Directories function key, or by pressing the
arrow key while the phone is in an idle state.
Adding Personal Contacts from Other Call Logs
You can add entries to your Personal directory from any of the call logs by following these steps:
1. Navigate to a call log (Missed Calls, Placed Calls, or Incoming Calls).
2. Highlight the number you wish to add to your personal directory.
3. Press the More soft key.
4. Press the AddPbook soft key.
5. Press the Edit soft key to edit name information.
To toggle between uppercase and lowercase letters and numbers, press the Aa1 soft
key on the LCD display. This changes the character entry mode and is indicated by a
symbol in the upper right corner of the LCD display. A signifies uppercase letters, a
signifies lowercase letters, and 1 signifies numbers. Add spaces by using the 0 (zero)
key, and erase characters by using the soft key.
6AOSUG0001-1A Copyright © 2011 ADTRAN, Inc. 41
Page 42

Directories and Call Logs ADTRAN IP 700 Series Phone User Manual
6. Press the AddNew soft key.
7. Select a type for the number you are adding. Choose from Business, Mobile, or Home.
8. Press the Exit soft key until the idle screen appears, or press CANCEL on the navigation bar to
return directly to the idle screen.
Editing the Personal Directory
Once entries have been added to the Personal directory, the information they contain can be edited by
following these steps:
1. Press the
2. Scroll to the entry to be edited.
3. Press the Edit soft key.
4. Scroll to the number (1 through 7) that corresponds to the parameter you wish to edit.
5. Press the Edit soft key .
6. Follow the given prompts.
7. Press the Ok soft key or OK on the navigation bar.
8. Press the Exit soft key until the idle screen appears, or press CANCEL on the navigation bar to
return directly to the idle screen.
arrow to access the Personal directory.
Directories/phone books can also be uploaded directly to your phone through the
GUI. For more information on uploading phone books, refer to Load PhoneBook on
page 48.
Accessing the System Directory
The System option under the Directories menu is configured by the system administrator and
typically provides a listing for every phone registered with the system. The System directory may be
accessed by pressing the Menu key on the navigation bar or the Directories function key.
The System directory lists all users registered with the system in alphabetical order. To find a specific
contact, press the first letter of the last name using the keypad and scroll through the list using the
and
arrow keys.
Contacts can be called using the Dial soft key. The View soft key provides information about each
contact, including name, extension, company position, address, cell/mobile phone numbers, email, fax,
and the type of ring associated with their number.
Users cannot add information to the System directory, as this function is reserved for
the system administrator.
42 Copyright © 2011 ADTRAN, Inc. 6AOSUG0001-1A
Page 43

ADTRAN IP 700 Series Phone User Manual Directories and Call Logs
Use the following steps to access the System directory information:
1. Press the Directories function key.
2. Press 2 for System.
3. Using the arrow keys, scroll to highlight the desired contact.
4. Press the View soft key to view contact information.
5. Press the Dial soft key to call a contact.
There is no shortcut key for the System directory. This directory can only be accessed
by pressing the Menu key on the navigation bar or the Directories function key.
Viewing Call Logs
Missed Calls, Incoming Calls, and Placed Calls logs store caller ID information, extension number, and
the time and date for up to 100 calls. From each log, contacts may be Viewed, Dialed, Deleted, or Added
to the Personal directory. Each call log can be accessed by pressing an arrow key on the navigation bar
while the phone is in an idle state. The Missed Calls option (accessed by pressing the
the Directories menu provides a log of all unanswered calls, the Incoming Calls option (accessed by
pressing the
pressing the
arrow key) provides a list of all incoming calls, and the Placed Calls option (accessed by
arrow key) provides a list of all placed calls.
arrow key) under
To access a call log, use one of the following methods:
• Press Menu on the navigation bar and press 4 for Directories.
• Press the Directories function key.
• Press the appropriate arrow key on the navigation bar while the phone is in an idle state.
T o exit a call log, press the Exit soft key until the idle screen appears, or press CANCEL on the navigation
bar to return directly to the idle screen.
6AOSUG0001-1A Copyright © 2011 ADTRAN, Inc. 43
Page 44

WEB GUI ADTRAN IP 700 Series Phone User Manual
8. WEB GUI
There are many features of ADTRAN’s IP phones that can be more easily accessed using the GUI. The
following sections explain how to use the GUI to manage the IP 706/IP 712 phones.
Locating the IP Address of the Phone
Before you can access the GUI, you must locate your phone’s IP address. To identify the IP address, use
these steps:
1. Press Menu.
2. Press 1 for Phone Status.
3. Press 2 for Network.
4. Using the arrow keys, scroll to the IP Address option.
5. Record the IP address for later reference.
6. Press the Exit soft key until the idle screen appears, or press CANCEL on the navigation bar to
return directly to the idle screen.
Accessing the Web Interface
Follow these steps to access the Phone Manager:
1. Enter this command into the address bar of your browser window:
http://<ip address>
where <ip address> is the IP address assigned to the phone.
2. Enter the login name and password.
The default login name is user and the default password is password. For more
information about changing login names and passwords, refer to Change Password on
page 48.
Some networks require browsers to use a proxy server to access the Internet. If you have problems
accessing the We b interface of the phone, it may be because the browser uses a proxy server. To bypass the
proxy server when accessing the phone's Web interface, follow these steps:
1. Open Microsoft
®
Internet Explorer.
2. From the Tools drop-down menu, select Internet Options.
3. Select the Connections tab and select LAN Settings.
4. If Use a proxy server for your LAN is not selected and you are not using a proxy server, you can
quit at this step. If Use a proxy server for your LAN is selected, select Advanced.
5. In the Exceptions box, enter the IP address of your phone.
6. Select OK to close all of the dialog boxes.
44 Copyright © 2011 ADTRAN, Inc. 6AOSUG0001-1A
Page 45

ADTRAN IP 700 Series Phone User Manual WEB GUI
Phone Manager Main Menu
From the main menu, there are several topics available:
• Call Summary
• Missed Calls
• Phone Status
• Backup PhoneBook
• Load PhoneBook
• Change Password
Each of these topics are explained in the following sections.
Call Summary
From the Call Summary option, you can view message alerts for all available mailboxes, and
enable/disable Call Forwarding. The following illustration depicts the Call Summary menu:
Figure 10. Call Summary Menu
To enable Call Forwarding:
1. Select the box next to on by either the specific extension (to forward only calls to that specific
extension) or ALL (to forward all calls).
2. Enter the phone number to which calls will be forwarded in the Calls to field.
3. Select Save Settings.
6AOSUG0001-1A Copyright © 2011 ADTRAN, Inc. 45
Page 46

WEB GUI ADTRAN IP 700 Series Phone User Manual
Missed Calls
The Missed Calls menu will list all unanswered calls. The following illustration depicts the Missed
Calls menu:
Figure 11. Missed Calls Menu
Phone Status
The Phone S tatus menu displays phone information and the current line assignments. The following
illustration depicts the Phone St atus menu:
Figure 12. Phone Status Menu
46 Copyright © 2011 ADTRAN, Inc. 6AOSUG0001-1A
Page 47

ADTRAN IP 700 Series Phone User Manual WEB GUI
Phone settings (such as Line Type) cannot be configured from the GUI. These parameters
must be set from the phone itself.
Backup PhoneBook
The Backup PhoneBook option saves the Personal directory/phone book from your phone as a
comma separated value (CSV) file on your computer. The following illustration depicts the Backup
PhoneBook menu:
Figure 13. Backup Personal PhoneBook Menu
To back up the directory/phone book, follow these steps:
1. Select Backup.
2. In the pop-up window, select Open, Save, or Cancel.
Selecting Open will open the file in Microsoft Excel, and the file will display the same parameters
as the Personal directory information on your phone.
Selecting Save will require specifying the location to save the file and a file name. The file will be
saved as a CSV and must have the .csv extension.
Selecting Cancel will close the pop-up window and return you to the Backup PhoneBook menu.
6AOSUG0001-1A Copyright © 2011 ADTRAN, Inc. 47
Page 48

WEB GUI ADTRAN IP 700 Series Phone User Manual
Load PhoneBook
The Load PhoneBook option adds contact information in CSV files to the Personal directory/phone
book, or replaces the Personal directory/phone book with a new CSV file. The following illustration
depicts the Load PhoneBook menu:
Figure 14. Load Personal PhoneBook Menu
To load a personal directory/phone book, follow these steps:
1. Select Append or Replace.
2. Select Browse.
3. Navigate to your files and select the desired CSV file.
4. Select Open.
5. When the file name appears in the File field, select Load.
Change Password
The Change Password option allows for the GUI login password to be changed. The following
illustration depicts the Change Password menu:
Figure 15. Change Password Menu
48 Copyright © 2011 ADTRAN, Inc. 6AOSUG0001-1A
Page 49

ADTRAN IP 700 Series Phone User Manual WEB GUI
To change the password, follow these steps:
1. Enter the old password in the Old Password field.
2. Enter the new password in the New Password field.
3. Re-enter the new password in the Re-Enter New Password field.
4. Select Submit.
Exiting the GUI
To exit the GUI, close the Web browser.
6AOSUG0001-1A Copyright © 2011 ADTRAN, Inc. 49
Page 50

ADTRAN IP 700 Series Phone User Manual WEB GUI
6AOSUG0001-1A Copyright © 2011 ADTRAN, Inc. 50
Page 51

APPENDIX A. GLOSSARY
Active state/Active call: Refers to when the phone is in use and connected to another phone.
Busy Lamp Field: BLF indicates the status of another phone
Caller ID: Service provided by some local telephone companies that supplies the calling party’ s telephone
number and name.
CSV file: Comma Separated Values file. The CSV file is a plain text file specially formatted to store
spreadsheet or database information. CSV files are used as a method for transferring data between
programs. For example, to load a phone book created in Microsoft Excel into your IP phone, save the
Excel file as a CSV file and upload it to the phone through the Web GUI.
DHCP: Dynamic Host Configuration Protocol. DHCP is a protocol that assigns dynamic IP addresses to
devices on a network. Each time the IP 706/IP 712 phone connects to the ne twork, its IP address may
change. The DHCP keeps track of the address changes.
Distinctive rings: Distinctive Rings are specific ring tones set to specified numbers, allowing the user to
recognize who is calling by the ring assigned to their number. Differing from internal/external rings,
Distinctive Rings apply only to specified numbers in the Personal Contacts list.
Duplex: Refers to the communication ability of two devices in a system. Half-Duplex means conversation
between two devices can only go one direction at a time; Full-Duplex allows for communication in two
directions simultaneously.
Firmware: The software that is embedded in a hardware device.
.
Function keys: The keys on the phone face that have an assigned function that does not change.
Handset: The hand-held part of the telephone that contains the audio transmitter and receiver.
Headset: A handsfree device worn on the head that contains the audio transmitter and receiver.
HFAAI: Handsfree Auto Answer Intercom. The HFAAI feature enables the phone to answer calls
automatically (without ringing) when both parties have HFAAI activated on their phones.
Idle screen: The LCD display when the phone is in an idle state.
Idle state: Refers to the state when the phone is not in use and is not connected to an active call. In this
state, the LCD displays the idle screen.
IP Address: Internet Protocol Address. IP addresses are used by devices on a computer network to
uniquely identify themselves and communicate with other devices via Internet protocol.
Key system: The Key system is the type of phone system most often used by small businesses that do not
require the larger number of phone lines supported by a PBX system. Key systems have a line key assigned
for each outside line and separate buttons for internal calling, unlike the grouping of the PBX systems.
6AOSUG0001-1A Copyright © 2011 ADTRAN, Inc. 51
Page 52

Glossary ADTRAN IP 700 Series Phone User Manual
LCD: Liquid Crystal Display . A display device made up of pixels in fro nt of a light source or reflector. The
main screen on the IP phones is an LCD.
LED: Light Emitting Diode. Semiconductor device that emits narrow-spectrum light.
Line appearance: How the telephone line appears and/or is labeled on the LCD on the IP phones.
Line keys: The keys located down the right and left sides of the LCD, next to each line appearance. Line
keys allow the use of different lines on the IP phones.
Link: The connection between the IP 706/IP 712 phone and the network or oth er devices.
Message Waiting Indicator (MWI): The LED that illuminates the Message function key that alerts the
user there are waiting voicemail messages.
MWI cadence: The rate at which the Message Waiting Indicator light blinks to indicate messages.
Navigation bar: The directional hard keys in the center of the IP phone face. They include the Menu,
Cancel, and Ok keys and the directional arrows.
Negotiation: A method of determining the best process for information transport.
Park orbit: Allows a parked call to be picked up from any phone in the system. The orbit number allows
the tracking of specific calls throughout the system (PBX only).
PBX system: The PBX system is the type of phone system most often used by larger companies because it
supports a larger number of lines than a Key system. The main feature of a PBX system is that is has phone
lines pooled into groups. For example, when dialing an outside line, pressing 9 automatically assigns an
outside line from the outside line group.
Ping: A computer network tool used to test whether various hosts are accessible over IP networks.
PoE power supply: Supplies power and data over standard twisted-pair cables in an Ethernet network.
Proxy: A server in a network that requests information from other servers on behalf of its clients.
SIP server: Session Internet Protocol server. A SIP server functions as registrar and proxy servers
allowing the SIP communication process between devices.
Soft keys: The keys located across the bottom of the LCD screen that are associated with functions
displayed on the screen. As menus and screens change, the functions correlated with each soft key also
change.
Speakerphone: The internal part of the telephone that transmits and receives audio signals through a
speaker, allowing for telephone communication without the use of a handset or headset.
Speed: The rate of information transfer between the IP phone and the network.
Web GUI: A user-friendly method of interacting with the IP phone through a Web interface.
52 Copyright © 2011 ADTRAN, Inc. 6AOSUG0001-1A
Page 53

Index
A
Accessing the Web GUI 44
Active Call
Active State
Answering Calls
Assembling the Phone
51
51
Handset
Headset
Speaker
Desk Stand
Handset
Headset
Power Connection
33
33
33
15
16
16
15
17
C
Call Logs
Access to
Incoming Calls
Missed Calls
Placed Calls
Shortcuts
Call Volume
Caller ID
Viewing
Conference
Drop
Function Key
Icons
Connecting to Power Source
CSV File
41
41
41
41
34
29
51
33
39
40
39, 40
39
47, 48, 51
D
Date Formats 27
Daylight Savings Time
Deleting Personal Contacts
Desk Stand Assembly
DHCP
51
Directories
Access
41
Call Logs
Function Key
Options
Personal Contacts
System Contacts
Using
Distinctive Rings
Duplex
41
41
41
51
27
15
41
41
41, 42
28, 51
17
30
E
EMC Table 5
Enabling the Headset
Ending Calls
Exiting the GUI
External Ring Tones
33
49
F
Features
Conference Drop
Conferencing
Distinctive Rings
Forward
GUI
Icons
24
Messages
Park
36
Redial
Ring Tones
Speed Dial
Transfer
Attended
Unattended
Finding IP Address
Firmware
Forward
Function Key
Function Keys
51
37
GUI
45
Conference
Description
Directories
Goodbye
Headset
Icons
24
Listing of
Menu
34
Messages
Mute
34
Speaker
Transfer
39
37
45
39
38
28
31
37
37
20, 41
39, 40
20, 21
41
33, 40
33
20
39
33
37
51
G
Goodbye 33, 40
H
Handset 16, 51
Connection
Headset
32, 33, 51
16
32
28
40
28
37
44
6AOSUG0001-1A Copyright © 2011 ADTRAN, Inc. 53
Page 54

Index IP 700 Series Phone User Manual
Assembly 16
Connection
HFAAI
Icon
Parameters
Usage
51
16
35
35
35
I
Icon Definitions 24
Idle Screen
Idle State
Incoming Calls
Internal Ring Tones
IP Address
51
51
28
Distinctive Rings
Ring Tones
28
28
51
Viewing
44
28
K
Key Descriptions 20
Function Keys
Line Keys
Soft Keys
Key System
20
23
23
51
L
Labeling the Phone 26
LCD
52
Contrast Adjustment
Display
Display Language
Icons
Menu
LED
Line Key Appearances
GUI
Line Key Functions
Speed Dial
Line Keys
Description
Link
52
23
29
24
24
52
23, 52
46
31
23, 52
23
M
Making Calls 32
Menu Function Key
Menu Navigation Bar
Message Function Key
Message Retrieval
Message Waiting Indicator
Configuration
Missed Call Log
34
34
39
39
30
29
52
GUI
46
MWI
52
N
Navigation Bar 52
Shortcuts
Usage
Negotiation
34
34
52
O
Overview 19
P
Packing List 14
Park
36
Orbit
36
Park Orbit
Parts List
Passwords
PBX System
Personal Contacts
Phone Assembly
Phone Diagrams
Phone Label
Phone Manager
Phone Overview
Phone Settings
Ping
Placing Calls
PoE Power Supply
Power Source Connection
Proxy
52
14
44, 48
52
41
Append
Backup
Deletion
Editing
Load
Replace
48
47
30
42
48
48
14, 15
Desk Stand
Handset
Headset
Power Connection
15
16
16
19
26
Access
44
19
26
Label
26
Language
LCD Contrast
Time/Date
29
Formats
29
26
27
52
32
52
52
17
Q
Quick Setup 13
17
54 Copyright © 2011 ADTRAN, Inc. 6AOSUG0001-1A
Page 55

IP 700 Series Phone User Manual Index
Setting
R
Redial 38
Ring Tones
Distinctive
External
Internal
28
28
28
Transfer
28
Transfer Function Key
26, 27
37
Attended
Unattended
37
37
37
V
S
Setting the Time 26
Shipping Contents
SIP Server
Soft Keys
Software Licensing Agreement
Speaker
Speakerphone
Speed
Speed Dial
System Contacts
24, 25, 52
23, 52
Description
33
52
Access
Using
42
14
23
52
31
42
42
T
Time/Date 26
Formats
27
2
Voicemail 30, 39
Volume
29
W
Web GUI 44, 52
Access
44
Append Personal Contacts
Call Summary
Exit
49
Forwarding
Line Key Appearances
Login
44
Missed Calls
Passwords
Personal Contacts
Phone Status
Replace Personal Contacts
45
45
46
44, 48
46
48
46
47, 48
48
6AOSUG0001-1A Copyright © 2011 ADTRAN, Inc. 55
 Loading...